Раз человек задаёт подобный вопрос, значит ему бесполезно говорить «задайте max-width», он скорее всего просто не знает что это такое и где его задают.
Поэтому давайте так:
1. Откройте страницу вашего сайта.
2. Правой клавишей мыши откройте контекстное меню и выберите «Просмотр кода страницы» (это в Chrome в других браузерах может быть чуть по другому, но главное, чтоб были слова код и страница).
3. В отдельной вкладке откроется код вашей страницы, найдите в нём конструкцию (тег) /head. Делается это так: нажимаете комбинацию клавиш Ctrl+F и в правом верхнем углу появляется окно поиска. Вводите в него нужную конструкцию, в нашем случае /head, и этот тег сразу подсвечивается на странице с кодом.
4. Находите конструкцию (тег), который идёт сразу после тега /head. Это может быть wrapper, body, или что-то другое. В современных темах встречаются разные названия, видимо в целях безопасности или ещё чего. зависит от бзика разработчика, главное чтоб после тега /head
5. Идёте в админку вашего сайта и выбираете в меню слева «Внешний вид», а в нём «Редактор тем». Переходите.
6. Вам сразу откроется файл style.css. Именно он вам нужен.
7. Открываете Поиск (Ctrl+F) и вбиваете тот элемент, который вы нашли на странице с кодом после /head
8. Нюанс: в редакторе WordPress подсветятся только те элементы, которые находятся в видимой части экрана и если в вашей теме в начале файла style.css много комментариев, то поиск нужного элемента не увидит. Придётся найти его чисто визуально, что не будет особо сложно, так как такие элементы находятся обычно вверху файла. На сервере это было-бы делать проще, но учитывая вашу подготовку, я вас туда не посылаю.
9. Нужный вам элемент скорее всего будет в нескольких селекторах, в том числе и в групповых, где нескольким элементам заданы одни и те-же свойства, поэтому я рекомендую прописать в файле отдельный селектор, в любом месте после закрывающей скобки} такого вида
body (или другое название){
max-width: 80%; (число на ваше усмотрение, можно задать в пикселях)
}
Сохраняем файл, смотрим что получилось и подгоняем нужную ширину.
Если нужны инструкции написанные подобным языком, их можно найти Блоге Старого Перца
https://starper55plys.ru
I have a div element with ID=»container». I want to set this element to be the size of the viewable area in the browser window. I am using the following JS to do so.
var container= document.getElementById("container");
container.style.height=(window.innerHeight);
container.style.width=window.innerWidth;
However, the browser window size is larger than the viewable size and horizontal and vertical scroll bars appear. How do I make it so that my HTML page fits into the browser window without a need for scroll bars?
EDIT:
I am basically asking, how can I make the document size the same as the viewport size?
![]()
BoltClock
687k158 gold badges1373 silver badges1349 bronze badges
asked Mar 1, 2012 at 3:48
![]()
This should work.
<!DOCTYPE html>
<html>
    <head>
        <title>Hello World</title>
        <style>
            html, body {
                width: 100%;
                height: 100%;
                margin: 0;
                padding: 0;
                background-color: green;
            }
            #container {
                width: inherit;
                height: inherit;
                margin: 0;
                padding: 0;
                background-color: pink;
            }
            h1 {
                margin: 0;
                padding: 0;
            }
        </style>
    </head>
    <body>
        <div id="container">
            <h1>Hello World</h1>
        </div>
    </body>
</html>
The background colors are there so you can see how this works. Copy this code to a file and open it in your browser. Try playing around with the CSS a bit and see what happens.
The width: inherit; height: inherit; pulls the width and height from the parent element. This should be the default and is not truly necessary.
Try removing the h1 { ... } CSS block and see what happens. You might notice the layout reacts in an odd way. This is because the h1 element is influencing the layout of its container. You could prevent this by declaring overflow: hidden; on the container or the body.
I’d also suggest you do some reading on the CSS Box Model.
answered Mar 1, 2012 at 5:48
![]()
twaddingtontwaddington
11.6k5 gold badges33 silver badges46 bronze badges
1
You could use width: 100%; in your css.
answered Mar 1, 2012 at 3:59
![]()
yvoyeryvoyer
7,4365 gold badges32 silver badges37 bronze badges
1
<html>
<head >
<title>Welcome</title>
<style type="text/css">
#maincontainer
{
top:0px;
padding-top:0;
margin:auto; position:relative;
width:950px;
height:100%;
}
  </style>
  </head>
<body>
 <div id="maincontainer ">
 </div>
</body>
</html>
answered Aug 13, 2013 at 11:12
![]()
Using meta tags:
<!doctype html>
<html>
<head>
<meta content=“width=device-width”>
<title><—-!your title here!—></title>
</head>
<body>
<—-!stuffgoeshere!—->
</body>
</html>
answered Mar 10, 2022 at 12:17
![]()
1
You could try:
<html>
    <head>
        <style>
            #main {
                width: 500; /*Set to whatever*/
                height: 500;/*Set to whatever*/
            }
        </style>
    </head>
    <body id="main">
    </body>
</html>
answered May 6, 2020 at 19:22
![]()

CSS is difficult but also forgiving. And this forgiveness allows us to haphazardly throw styles into our CSS.
Our page still loads. There is no «crash».
When it comes to page width and height, do you know what to set on the HTML element? How about the body element?
Do you just slap the styles into both elements and hope for the best?
If you do, you’re not alone.
The answers to those questions are not intuitive.
I’m 100% guilty of applying styles to both elements in the past without considering exactly which property should be applied to which element. 🤦♂️
It is not uncommon to see CSS properties applied to both the HTML and body elements like this:
html, body {
     min-height: 100%;
}
Does It Matter?
Yes, yes it does.
The above style definition creates a problem:
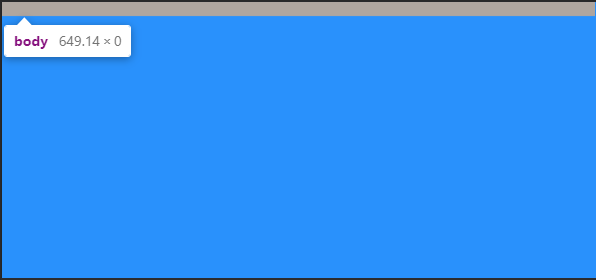
Setting min-height to 100% on both elements does not allow the body element to fill the page like you might expect. If you check the computed style values in dev tools, the body element has a height of zero.
Meanwhile, the HTML element has a height equal to the visible part of the page in the browser.
Look at the following screenshot from Chrome Dev Tools:
Why Does This Happen?
Using a percentage as a size value requires the element to reference a parent to base that percentage on.
The HTML element references the viewport which has a height value equal to the visible viewport height. However, we only set a min-height on the HTML element… NOT a height property value.
Therefore, the body element has no parent height value to reference when deciding what 100% is equal to.
If you started out with enough content to fill the body of the page, you might not have noticed this issue.
And to make it more difficult to notice, if you set a background-color on both elements or even on just one of them, the viewport is full of that color. This gives the impression the body element is as tall as the viewport.
It’s not. It’s still at zero.
The image above is taken from a page with the following CSS:
html, body {
    min-height: 100%;
}
body { background-color: dodgerblue; }
Reverse-inheritance?
In a strange twist, the HTML element assumes the background-color of the body element if you don’t set a separate background-color on the html element.
So What is the Ideal Height Setting for a Full Responsive Page?
For years, the answer was the following:
html {
    height: 100%;
}
body {
    min-height: 100%;
}
This allows the HTML element to reference the parent viewport and have a height value equal to 100% of the viewport value.
With the HTML element receiving a height value, the min-height value assigned to the body element gives it an initial height that matches the HTML element.
This also allows the body to to grow taller if the content outgrows the visible page.
The only drawback is the HTML element does not grow beyond the height of the visible viewport. However, allowing the body element to outgrow the HTML element has been considered acceptable.
The Modern Solution is Simplified
body { min-height: 100vh; }
This example uses vh (viewport height) units to allow the body to set a minimum height value based upon the full height of the viewport.
Like the previously discussed background-color, if we do not set a height value for the HTML element, it will assume the same value for height that is given to the body element.
Therefore, this solution avoids the HTML element overflow present in the previous solution and both elements grow with your content!
The use of vh units did cause some mobile browser issues in the past, but it appears that Chrome and Safari are consistent with viewport units now.
Page Height May Cause a Horizontal Scrollbar
Wait, what?
Shouldn’t this say «Page Width»?
Nope.
In another strange series of events, your page height may activate the horizontal scrollbar in your browser.
When your page content grows taller than the viewport height, the vertical scrollbar on the right is activated. This can cause your page to instantly have a horizontal scrollbar as well.
So What is the Fix?
You may sleep better knowing it starts with a page width setting.
This problem arises when any element — not just the HTML or body element — is set to 100vw (viewport width) units.
The viewport units do not account for the approximate 10 pixels that the vertical scrollbar takes up.
Therefore, when the vertical scrollbar activates you also get a horizontal scrollbar.
Maybe just don’t.
Not setting a width on the HTML and body elements will default to the full size of the screen. If you do set a width value other than auto, consider utilizing a CSS reset first.
Remember, by default the body element has 8px of margin on all sides.
A CSS reset removes this. Otherwise, setting the width to 100% before removing the margins will cause the body element to overflow. Here’s the CSS reset I use:
* {
    margin: 0;
    padding: 0;
    box-sizing: border-box;
}
How to Set Width to Your Preference
While it may not always be necessary to set a width, I usually do.
It may simply be a habit.
If you set the width to 100% on the body element you will have a full page width. This is essentially equivalent to not setting a width value and allowing the default.
If you want to use the body element as a smaller container and let the HTML element fill the page, you could set a max-width value on the body.
Here’s an example:
html { background-color: #000; }
body {
    min-height: 100vh;
    max-width: 400px;
    background-color: papayawhip;
    margin: 0 auto;
}
Conclusion
With no height value provided for the HTML element, setting the height and/or min-height of the body element to 100% results in no height (before you add content).
However, with no width value provided for the HTML element, setting the width of the body element to 100% results in full page width.
This can be counterintuitive and confusing.
For a responsive full page height, set the body element min-height to 100vh.
If you set a page width, choose 100% over 100vw to avoid surprise horizontal scrollbars.
I’ll leave you with a tutorial from my YouTube channel demonstrating the CSS height and width settings for an HTML page that is full screen size and grows with the content it contains:
Do you have a different way of setting the CSS width and height that you prefer?
Let me know your method!
Learn to code for free. freeCodeCamp’s open source curriculum has helped more than 40,000 people get jobs as developers. Get started
CSS is difficult but also forgiving. And this forgiveness allows us to haphazardly throw styles into our CSS.
Our page still loads. There is no «crash».
When it comes to page width and height, do you know what to set on the HTML element? How about the body element?
Do you just slap the styles into both elements and hope for the best?
If you do, you’re not alone.
The answers to those questions are not intuitive.
I’m 100% guilty of applying styles to both elements in the past without considering exactly which property should be applied to which element. 🤦♂️
It is not uncommon to see CSS properties applied to both the HTML and body elements like this:
html, body {
     min-height: 100%;
}
Does It Matter?
Yes, yes it does.
The above style definition creates a problem:
Setting min-height to 100% on both elements does not allow the body element to fill the page like you might expect. If you check the computed style values in dev tools, the body element has a height of zero.
Meanwhile, the HTML element has a height equal to the visible part of the page in the browser.
Look at the following screenshot from Chrome Dev Tools:
Why Does This Happen?
Using a percentage as a size value requires the element to reference a parent to base that percentage on.
The HTML element references the viewport which has a height value equal to the visible viewport height. However, we only set a min-height on the HTML element… NOT a height property value.
Therefore, the body element has no parent height value to reference when deciding what 100% is equal to.
If you started out with enough content to fill the body of the page, you might not have noticed this issue.
And to make it more difficult to notice, if you set a background-color on both elements or even on just one of them, the viewport is full of that color. This gives the impression the body element is as tall as the viewport.
It’s not. It’s still at zero.
The image above is taken from a page with the following CSS:
html, body {
    min-height: 100%;
}
body { background-color: dodgerblue; }
Reverse-inheritance?
In a strange twist, the HTML element assumes the background-color of the body element if you don’t set a separate background-color on the html element.
So What is the Ideal Height Setting for a Full Responsive Page?
For years, the answer was the following:
html {
    height: 100%;
}
body {
    min-height: 100%;
}
This allows the HTML element to reference the parent viewport and have a height value equal to 100% of the viewport value.
With the HTML element receiving a height value, the min-height value assigned to the body element gives it an initial height that matches the HTML element.
This also allows the body to to grow taller if the content outgrows the visible page.
The only drawback is the HTML element does not grow beyond the height of the visible viewport. However, allowing the body element to outgrow the HTML element has been considered acceptable.
The Modern Solution is Simplified
body { min-height: 100vh; }
This example uses vh (viewport height) units to allow the body to set a minimum height value based upon the full height of the viewport.
Like the previously discussed background-color, if we do not set a height value for the HTML element, it will assume the same value for height that is given to the body element.
Therefore, this solution avoids the HTML element overflow present in the previous solution and both elements grow with your content!
The use of vh units did cause some mobile browser issues in the past, but it appears that Chrome and Safari are consistent with viewport units now.
Page Height May Cause a Horizontal Scrollbar
Wait, what?
Shouldn’t this say «Page Width»?
Nope.
In another strange series of events, your page height may activate the horizontal scrollbar in your browser.
When your page content grows taller than the viewport height, the vertical scrollbar on the right is activated. This can cause your page to instantly have a horizontal scrollbar as well.
So What is the Fix?
You may sleep better knowing it starts with a page width setting.
This problem arises when any element — not just the HTML or body element — is set to 100vw (viewport width) units.
The viewport units do not account for the approximate 10 pixels that the vertical scrollbar takes up.
Therefore, when the vertical scrollbar activates you also get a horizontal scrollbar.
Maybe just don’t.
Not setting a width on the HTML and body elements will default to the full size of the screen. If you do set a width value other than auto, consider utilizing a CSS reset first.
Remember, by default the body element has 8px of margin on all sides.
A CSS reset removes this. Otherwise, setting the width to 100% before removing the margins will cause the body element to overflow. Here’s the CSS reset I use:
* {
    margin: 0;
    padding: 0;
    box-sizing: border-box;
}
How to Set Width to Your Preference
While it may not always be necessary to set a width, I usually do.
It may simply be a habit.
If you set the width to 100% on the body element you will have a full page width. This is essentially equivalent to not setting a width value and allowing the default.
If you want to use the body element as a smaller container and let the HTML element fill the page, you could set a max-width value on the body.
Here’s an example:
html { background-color: #000; }
body {
    min-height: 100vh;
    max-width: 400px;
    background-color: papayawhip;
    margin: 0 auto;
}
Conclusion
With no height value provided for the HTML element, setting the height and/or min-height of the body element to 100% results in no height (before you add content).
However, with no width value provided for the HTML element, setting the width of the body element to 100% results in full page width.
This can be counterintuitive and confusing.
For a responsive full page height, set the body element min-height to 100vh.
If you set a page width, choose 100% over 100vw to avoid surprise horizontal scrollbars.
I’ll leave you with a tutorial from my YouTube channel demonstrating the CSS height and width settings for an HTML page that is full screen size and grows with the content it contains:
Do you have a different way of setting the CSS width and height that you prefer?
Let me know your method!
Learn to code for free. freeCodeCamp’s open source curriculum has helped more than 40,000 people get jobs as developers. Get started
В этой статье рассмотрим, как можно задавать ширину и какими свойствами стоит делать это. Для первого примера возьмём блочный элемент div. По умолчанию он имеет высоту равную нулю (если ничего не содержит) и занимает 100% ширины родительского элемента. Попробуем задать ему ширину в 200 пикселей и высоту в 150. Для этого используем CSS свойства width (ширина) и height (высота):
<div style="width: 200px; height:150px;"></div>Получится такой результат:
Можно задавать ширину не только в пикселях, но и в процентах от ширины родительского элемента. Попробуем сделать это:
<div style="width: 40%; height:150px;"></div>Получится такой результат:
К сожалению, задать высоту для блочного элемента в процентах не получится. Если написать «height:50%;», то в разных браузерах будет диаметрально противоположный результат, поэтому лучше считать такую запись ошибкой.
Только у одного элемента можно задать свойство height в процентах, а точнее у псевдоэлементов :before и ::after. Читайте о них в статье Псевдоэлементы (:before, ::after)
Максимальная и минимальная ширина (max-width и min-width)
Жёсткое ограничение ширины — это не лучший способ строить сайт. Потому что в таком случае появятся проблемы с адаптацией под мобильные и планшеты: ширина экрана может быть меньше ширины блока. Тогда часть сайта будет выходить пределы вёрстки сайта и появится горизонтальная прокрутка, чего у версии сайта на мобильном быть не должно. Поэтому вместо жёсткого задания ширины используется ограничение сверху через CSS свойство max-width. Мы знаем, что блочный элемент div пытается занять всю ширину родительского элемента, как будто по умолчанию у него есть свойство width и оно имеет значение 100%.
<div style="max-width: 400px; height:50px;"></div>Результат будет аналогичен предыдущему примеру:
Но теперь, если вы возьмёте окно своего браузера и сузите до 400 пикселей и меньше, то увидите как контейнер div уменьшает свои размеры, чтобы не выпрыгивать за пределы вёрстки. Если же изменить «max-width:400px;» на «width:400px», то блок будет выходить за пределы родительского элемента:
По смыслу свойство min-width является диаметрально противоположным к max-width. Оно ограничивает минимальную ширину элемента, но не ограничивает максимальную.
Максимальная и минимальная высота (max-height и min-height)
Для блока div можно задать максимальную высоту. Это делается в том случае, если контента в блоке будет слишком много и есть вероятность, что он испортит вёрстку сайта. Ведь у контейнера div высота изменяется автоматически в зависимости от того, сколько занимает места его дочерние элементы.
Рассмотрим наглядный пример необходимости использования max-height. Допустим, что нам надо сделать чат, где пользователи сайта смогут обмениваться текстовыми сообщениями. Для этого нужно создать контейнер, который будет расти по мере появления в нём новых сообщений. Но как только div достигает определённой высоты, то перестаёт расти и появится полоса прокрутки. Используем следующий CSS код:
<div style="width: 300px; max-height: 100px;
overflow-y: scroll;"  contenteditable="true">
   Тише, мыши, кот на крыше,
   а котята ещё выше.
   Кот пошёл за молоком,
   а котята кувырком.
   Кот пришёл без молока,
   а котята ха-ха-ха.
</div>
Весь текст не вместится в div. Поэтому из-за свойства «overflow-y: scroll;» появится полоса прокрутки:
Тише, мыши, кот на крыше,
а котята ещё выше.
Кот пошёл за молоком,
а котята кувырком.
Кот пришёл без молока,
а котята ха-ха-ха.
Благодаря атрибуту contenteditable=»true» у тега div в примере, Вы можете изменить текст внутри контейнера. Попробуйте удалить и добавить несколько строк. Размер контейнера будет подстраиваться под количества текста в нём до тех пор, пока не станет быть равен 100px. Затем появится полоса прокрутки.
По смыслу свойство min-height является диаметрально противоположным к max-height. Оно ограничивает минимальную высоту элемента, но не ограничивает максимальную.
#Руководства
- 10 фев 2020
-

18
Как адаптировать сайт под разные разрешения
Рассказываем и показываем, как создавать удобные сайты, которые будут хорошо выглядеть на разных мониторах.
vlada_maestro / shutterstock

Пишет о программировании, в свободное время создаёт игры. Мечтает открыть свою студию и выпускать ламповые RPG.
Многие разработчики слишком ленивы, чтобы хоть как-то адаптировать свой сайт: одни проверяют всё только под свой браузер, а другие игнорируют мобильные устройства.
Но чаще всего можно заметить, что сайты плохо адаптированы под разные мониторы и разрешения. Например, вот как выглядит «ВКонтакте» на FullHD-мониторе:
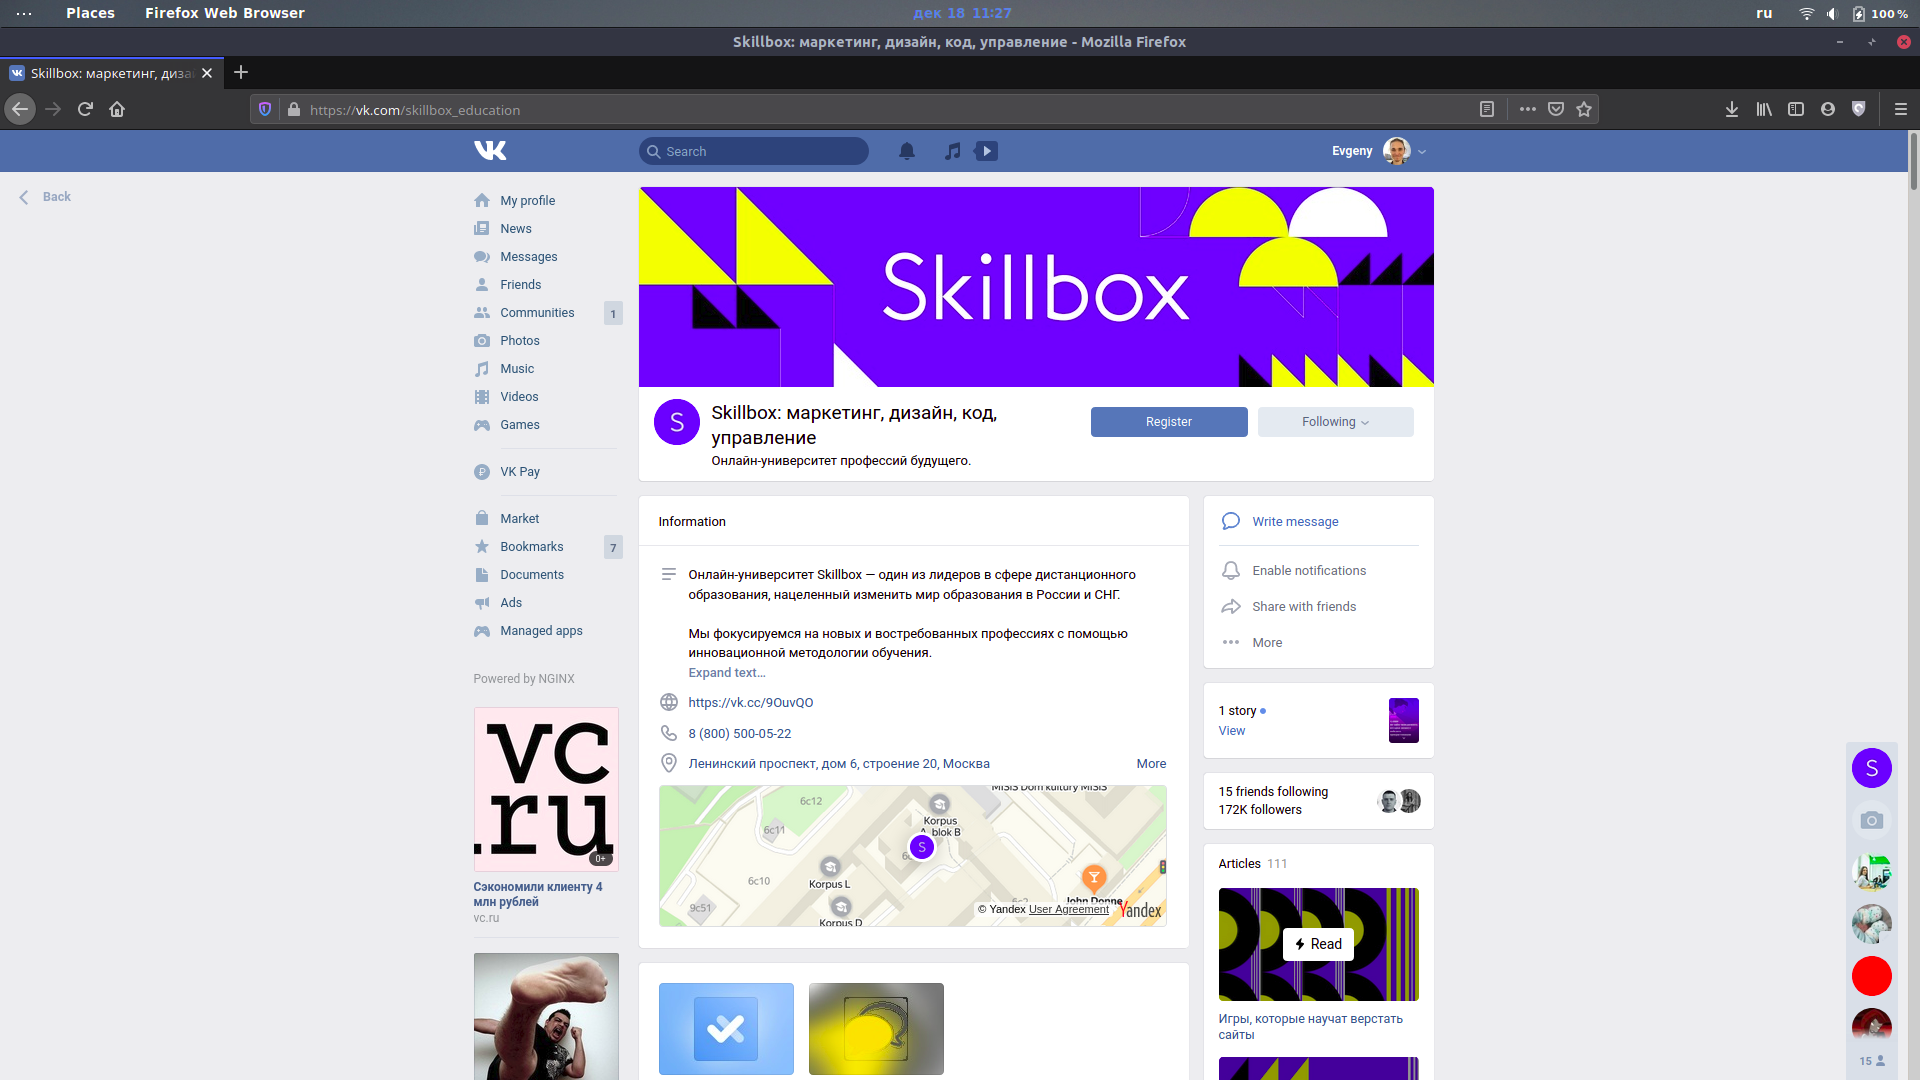
Шрифт очень маленький, а контент размещается только на небольшой части экрана. Чтобы комфортно пользоваться им, нужно менять масштаб страницы:

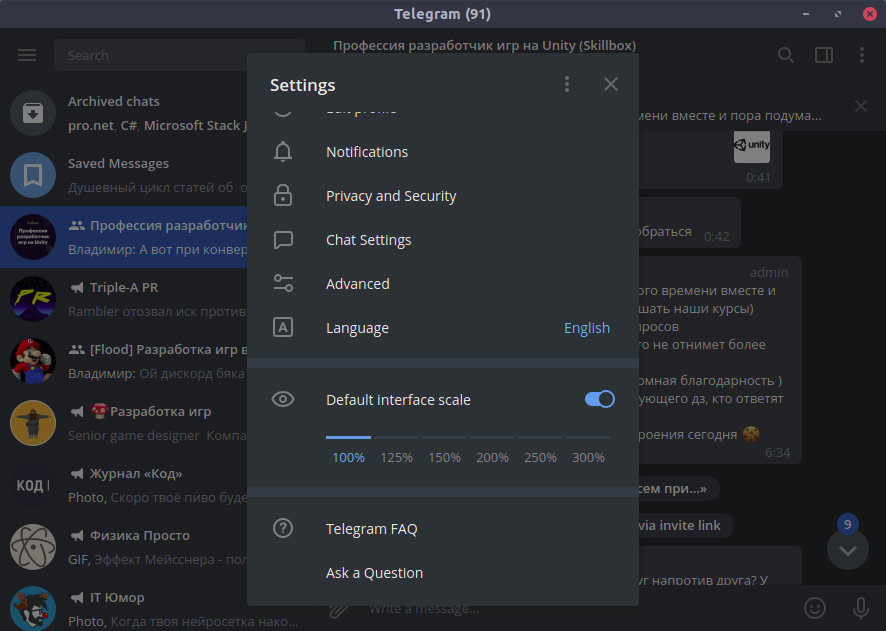
Встроенных настроек для этого нет, в отличие, например, от Telegram:
Такая адаптация — что-то вроде кибертолерантности. Мы должны заботиться об удобстве посетителей наших сайтов, какими бы устройствами, мониторами и браузерами (только не Internet Explorer) они ни пользовались. Поэтому в этой статье мы расскажем, как адаптировать сайт под разные разрешения.
За основу возьмём сайт из статьи про добавление тёмной темы. Читать её не обязательно, но там подробнее объясняется часть с PHP-скриптами. Также вы можете посмотреть исходный код этого сайта на GitHub.
Прежде всего нужно быть уверенным, что ваш сайт не сломается, если пользователь изменит разрешение на 1 пиксель (как это бывает в MS Word). Для этого везде, где только можно, размеры нужно указывать в процентах.
Также при создании сайта полезно помещать его в оболочку (wrapper): она растягивается на весь экран, а сам сайт будет масштабироваться относительно оболочки.
<body>
    <div class="wrapper">
   	 Ваш сайт здесь
    </div>
</body>
Сам контент, не считая хэдера и футера, не стоит растягивать на всю страницу:
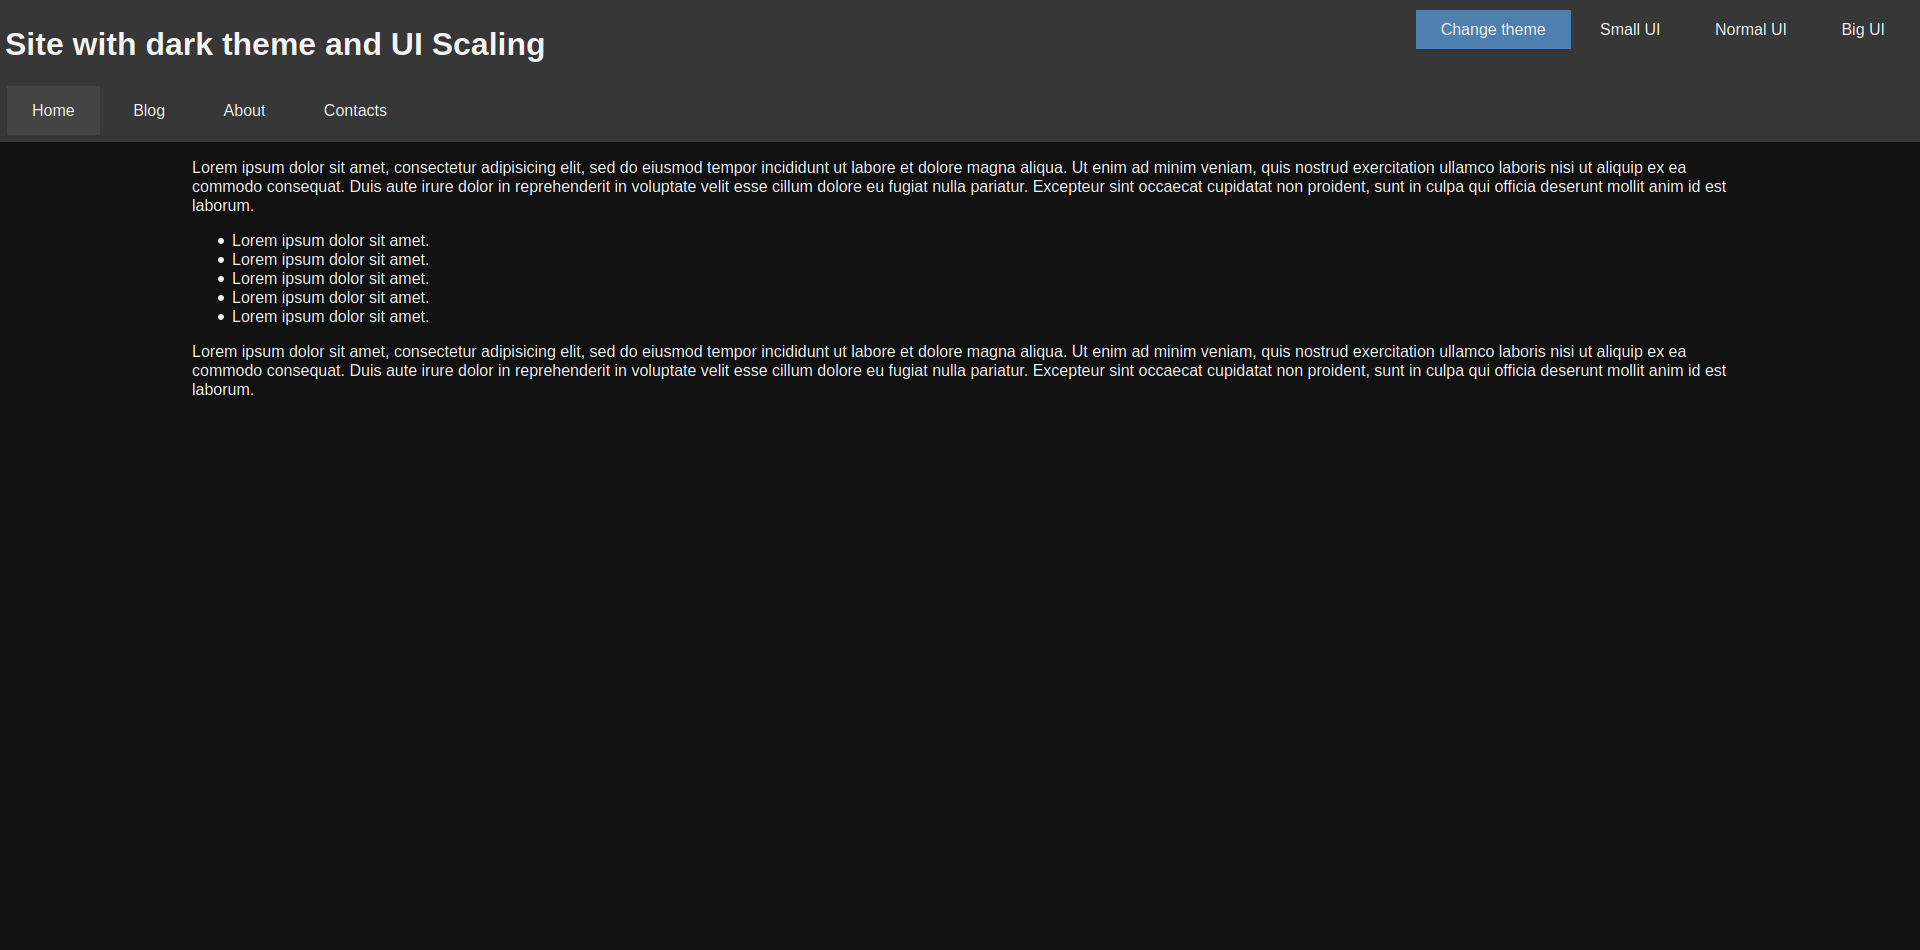
Тут ширина блока с текстом составляет 80% страницы. Если бы не это ограничение, чтение мелкого шрифта с больших мониторов превратилось бы в разминку шеи:

Также вы можете указать максимальную ширину в пикселях:
width: 80%;
max-width: 720px;
Тогда при любом размере монитора читать будет более-менее комфортно.
Как и в случае с тёмной темой, можно подготовить несколько файлов стилей, каждый из которых будет содержать разные размеры для элементов страницы. Начнём со стиля для средних мониторов — normal.css:
body, html
{
	font-size: 16px !important;
}

.nav__item
{
	padding: 15px 25px !important;
	margin: 2px !important;
}

.main__content
{
	width: 80% !important;
	margin: 0 auto !important;
}

.ui-button
{
	padding: 10px 25px !important;
}
Кроме него будут созданы ещё два файла: small.css и big.css. Они добавляются с помощью отдельного элемента link:
<link rel="stylesheet" type="text/css" href="styles/<?php echo $_SESSION["scale"]; ?>.css" id="scale-link">
Теперь нужно сделать так, чтобы пользователь мог выбрать, какой масштаб ему подходит. Для этого добавляем кнопки:
<div class="hover-panel">
<div class="hover-panel__content">
<div class="ui-button theme-button" id="theme-button">Change theme</div>
<div class="ui-button" id="small-button">Small UI</div>
<div class="ui-button" id="normal-button">Normal UI</div>
<div class="ui-button" id="big-button">Big UI</div>
</div>
</div>
И остаётся только подключить скрипт, который будет переключать файл стилей:
var btns =
{
    small: document.getElementById("small-button"),
    normal: document.getElementById("normal-button"),
    big: document.getElementById("big-button")
};
var link = document.getElementById("scale-link");

btns.small.addEventListener("click", function () { ChangeScale("small"); });
btns.normal.addEventListener("click", function () { ChangeScale("normal"); });
btns.big.addEventListener("click", function () { ChangeScale("big"); });

function ChangeScale(size)
{
    link.setAttribute("href", "styles/" + size + ".css");

    SaveScale(size);
}

function SaveScale(size)
{
    var Request = new XMLHttpRequest();
    Request.open("GET", "./scales.php?size=" + size, true);
    Request.send();
}
Кроме переключения стиля, скрипт ещё и сохраняет выбор пользователя в его браузере, чтобы при повторной загрузке страницы подключался именно этот файл. Для этого используется следующий PHP-код:
<?php
session_start();

if(isset($_GET["size"]))
{
    $size = $_GET["size"];

    if($size == "small" || $size == "normal" || $size == "big")
    {
   	 $_SESSION["scale"] = $size;
    }
}

?>
Можно посмотреть, как это будет выглядеть:
Обратите внимание, что блок с текстом для небольших экранов стал шире — это не тот случай, когда пустота красит страницу.
С помощью JavaScript мы можем проверить размер окна браузера пользователя и подключить тот файл стилей, который лучше подойдёт для страницы такого размера. Вот пример такого кода:
window.addEventListener("resize", AutoScale); //Масштабируем страницу при растягивании окна

AutoScale(); //Масштабируем страницу после загрузки

function AutoScale()
{
    let width = window.innerWidth; //Ширина окна
    //Если вы хотите проверять по размеру экрана, то вам нужно свойство window.screen.width

    if(width > 1280)
    {
   	 ChangeScale("big");
    }
    else if(width <= 1280 && width > 720)
    {
   	 ChangeScale("normal");
    }
    else if(width < 720)
    {
   	 ChangeScale("small");
    }
}
В результате страница будет масштабироваться автоматически.
Мы сможем отказаться от адаптации сайтов под разные мониторы только тогда, когда человечество откажется от мониторов. Ну а пока придётся мириться с тем, что существует огромное количество разрешений:
Не говоря уже о том, что на мобильных устройствах эти разрешения тоже воспринимаются по-разному.

Учись бесплатно:
вебинары по программированию, маркетингу и дизайну.
Участвовать

Школа дронов для всех
Учим программировать беспилотники и управлять ими.
Узнать больше
- @Media CSS
- Картинка, видео или фон по размеру экрана на CSS
В 2006 году большинство пользователей имело экран монитора 800*600. Но время неумолимо и в какой-то момент «нормальным» стал 1024*768. У веб-ресурсов, ориентированных на меньшее разрешение, появилось пустое пространство по бокам. Всё большую популярность стали приобретать «резиновые» сайты, которые создаются путём использования
- @Media,
- относительных величин.
Благодаря им теперь не нужно искать оптимальную ширину сайта.
@Media CSS
Для того, чтобы адаптировать дизайн web-проекта под разные устройства (мобильные телефоны, планшетники, принтеры и т.п.) применяется @Media. Из всего многообразия types и Queries, как правило, внедряют print и width. Рассмотрим последний. Он влияет на отображение сайта в окне браузера разной ширины. Поэтому для того, чтобы увидеть его в действии, достаточно уменьшить размеры окна браузера ![]() .
.
Попробуйте это сделать прямо сейчас. И вы увидите как боковая панель данного блога распадается (поиск перемещается вниз, содержание переходит в тело статьи), в меню сокращаются списки, убирается надпись «Дата обновления» и т.д.
Макет с изначальными значениями блоков указан здесь. Добавим правила перед тегом </style>
@media (max-width: 930px) {
  .content-wrapper {padding: 0;}
}

@media (max-width: 930px) and (min-width: 470px) {
  aside {position: static; width: 100%; background: #ccc;}
}

@media (max-width: 469px) {
  body {font: .9em/1em "Helvetica Neue",Arial,Helvetica,sans-serif;}
  aside {display: none;}
}
Вместо px лучше использовать em. Для чего значение px нужно разделить на значение font-size в px. Например, 1600/16=100, а именно media='(min-width: 100em)’.
CSS стили можно как непосредственно добавить в код страницы, так и воспользоваться внешним файлом, например:
<link rel='stylesheet' href='URL_по_умолчанию.css' />
<link rel='stylesheet' media='(min-width: 1600px)' href='URL_большой.css' />
<link rel='stylesheet' media='(max-width: 1599px) and (min-width: 800px)' href='URL_средний.css' />
<link rel='stylesheet' media='(max-width: 799px)' href='URL_маленький_экран.css' />
Размещение экрана как «пейзаж» (ширина больше высоты) и «портрет» (ширина меньше высоты)
@media all and (orientation:landscape) {
 /* стили для пейзажа */
}
@media all and (orientation:portrait) {
 /* стили для портрета */
}
или
<link rel="stylesheet" media="all and (orientation:portrait)" href="portrait.css">
<link rel="stylesheet" media="all and (orientation:landscape)" href="landscape.css">

Так уж сложилось, что мобильные браузеры появились сравнительно недавно, а сайтов в сети к тому времени уже было огромное количество. Естественно, все эти сайты совсем не были оптимизированы под маленькие экраны смартфонов, а смартфоны в свою очередь, вынуждены были полагать, что все сайты в ширину занимают где-то около 1000px (980px в сафари). Нужно было как-то решать сложившуюся ситуацию и в apple придумали метатег <meta name="viewport">, который по традиции потом сперли все остальные производители браузеров.
Давайте рассмотрим типично-эпичную верстку сайта:
html
<!DOCTYPE html>
<html>
  <head>
    <title>Hello world</title>
  </head>
  <body>
   <p> Hello world </p>
  </body>
</html>
Откроем его в мобильном браузере. Вот что мы увидим:

Как вы правильно заметили, текст слишком мелкий и произошло это потому, что сафари попытался вместить наш сайт (который по его предположению сделан для браузеров с шириной экрана около 980pх)
Давайте теперь сообщим браузеру, что наш сайт адаптирован для любой ширины экрана.
html
<meta name="viewport" content="width=device-width">
Что получилось:

Ну вот, теперь все намного лучше. Обозначив width=device-width, мы сказали браузеру, что нам нужна область просмотра контента, равная ширине экрана мобильного устройства.
Можно вручную задать значение для width. Например content="width=320px", но этого не рекомендуется делать, потому-что различные смартфоны могут иметь абсолютно различную ширину экрана.
Очень распространенным вариантом является:
html
<meta name="viewport" content="width=device-width, initial-scale=1.0">
такой вариант задает ширину страницы и начальный масштаб (в данном случае без масштабирования)
Также часто используется следующий вариант:
html
<meta name="viewport" content="width=device-width, initial-scale=1.0, maximum-scale=1.0, user-scalable=no">
Такие значения используют в случае, если сайт будет использоваться и функционировать как мобильное приложение. Т.е
- при загрузке страницы она не будет смасштабирована
- страница займет всю ширину мобильного браузера
- запрещено любое пользовательское масштабирование
- доступен только горизонтальный и вертикальный скролл
Используйте эту конфигурцию, только в том случае, если знаете, что делаете.
Давайте разберем допустимые параметры и их значения, доступные в мета теге viewport
width
Целое число (от 200px — 10,000px) или “device-width”.
Задает ширину viewport. Если нирина viewport не указана, то:
- для мобильного Safari это 980px
- Opera — 850px
- Android WebKit — 800px
- IE — 974px
height
Целое число (от 223px до 10,000px) или “device-height”
задает высоту viewport. 99% случаев, просто не обращайте внимания на этот параметр, но если сильно надо – пробуйте и экспериментируйте. Удачи..
initial-scale
Доступные значения (от 0.1 до 10).
1.0 — не масштабировать. Задает масштаб страницы. Увеличиваем значение – увеличиваем масштаб.
user-scalable
Доступные значения no или yes
Задает возможнось изменения масштаба страницы. По-умолчанию установлено как yes в Safari.
minimum-scale и maximum-scale
Доступные значения (от 0.1 до 10).
1.0 — не масштабировать. Определяет минимальный и максимальный масштаб viewport соответственно.
По-умолчанию в мобильном Safari minimum-scale = "0.25", maximum-scale = “1.6”.
Совет: Не используйте мета-теги (в том числе и этот), пока не разобрались, зачем все это нужно. И тестируйте все в различных мобильных браузерах. Удачи!