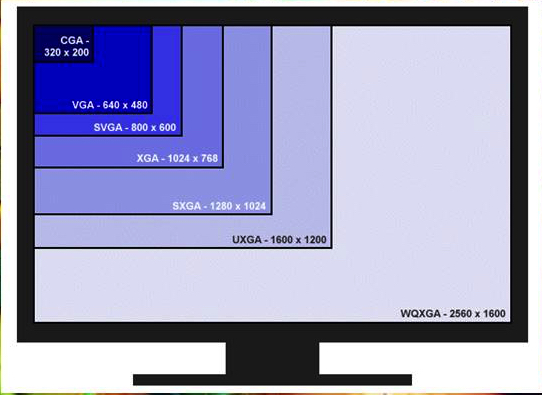
С развитием технологий экраны для компьютеров смогли значительно увеличить разрешение. Если старые экраны показывали 640х800 пикселей, то более новые отображают уже 1920х1080. У последних моделей разрешение ещё выше.
В операционной системе Linux существует несколько способов настройки разрешения экрана. В обычных системах, как правило, это не нужно. Но если вы хотите использовать несколько мониторов или решили запустить Linux на виртуальной машине, то разрешение может определиться неправильно и тогда придётся его настроить. В этой статье мы рассмотрим, как изменить разрешение экрана в Linux через графический интерфейс и терминал.
Настройка разрешения экрана в GUI
Разберём настройку разрешения на примере дистрибутива Ubuntu и окружения рабочего стола Gnome. Откройте утилиту Настройки из главного меню:
Перейдите на вкладку Устройства, а затем выберите пункт Настройка экранов:
Если к компьютеру подключено два монитора Linux или больше, то у вас будет три варианта работы экранов:
- Объединение — все экраны объединяются в одно рабочее пространство;
- Зеркальное отображение — одинаковая картинка на всех экранах;
- Один экран — картинка только на одном экране, другие отключены.
Независимо от того, какой режим вы выбираете, будут доступны настройки Разрешение и Частота обновления, где вы сможете настроить нужные вам параметры:
Так выполняется настройка монитора Linux через графический интерфейс. Если вы хотите объединить экраны, то можно указать разрешение мониторов Linux для каждого из них отдельно:
Но здесь есть один недостаток, вы можете выбрать только то разрешение экрана, которое предлагает система. Если вы захотите установить разрешение выше или ниже тех, что есть, то у вас ничего не выйдет. Для этого надо воспользоваться терминалом.
Как изменить разрешение экрана через терминал
Для управления настройками экрана из терминала можно использовать утилиту xrandr. Синтаксис утилиты очень прост:
xrandr опции параметры
Разберём основные опции утилиты, которые будем использовать:
- —verbose — включить более подробный вывод;
- —version — версия программы;
- —query — когда установлена эта опция или не указанно никаких опций, выводится текущая конфигурация;
- -d, —display — позволяет указать какой X экран использовать по имени;
- -s, —screen — устанавливает дисплей для настройки по ID;
- —output — устанавливает дисплей для настройки по имени или ID;
- —primary — выбрать основной экран;
- —size — позволяет указать размер экрана;
- —rate — устанавливает частоту обновления;
- —dpi — устанавливает DPI, количество точек на дюйм, которое позволяет вычислить правильный размер для окон;
- —newmode — создаёт новый режим отображения по размеру и частоте;
- —rmmode — удаляет режим отображения;
- —addmode — добавляет созданный режим к списку доступных для использования;
- —delmode — удалить режим из списка доступных;
- —mode — активирует указанный режим;
- —off — отключает экран;
- —gamma — позволяет установить коррекцию гаммы, в формате красный:зеленый:синий;
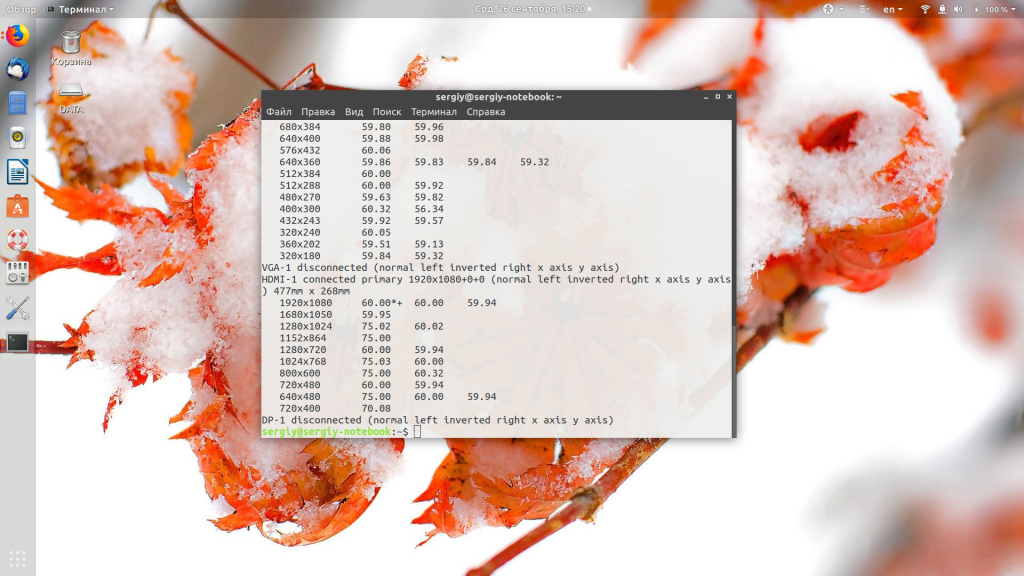
Чтобы посмотреть текущие параметры системы, запустите утилиту без параметров:
xrandr
Как видите, к моей системе подключено два экрана:
- LVDS-1 — встроенный экран ноутбука;
- HDMI-1 — внешний экран;
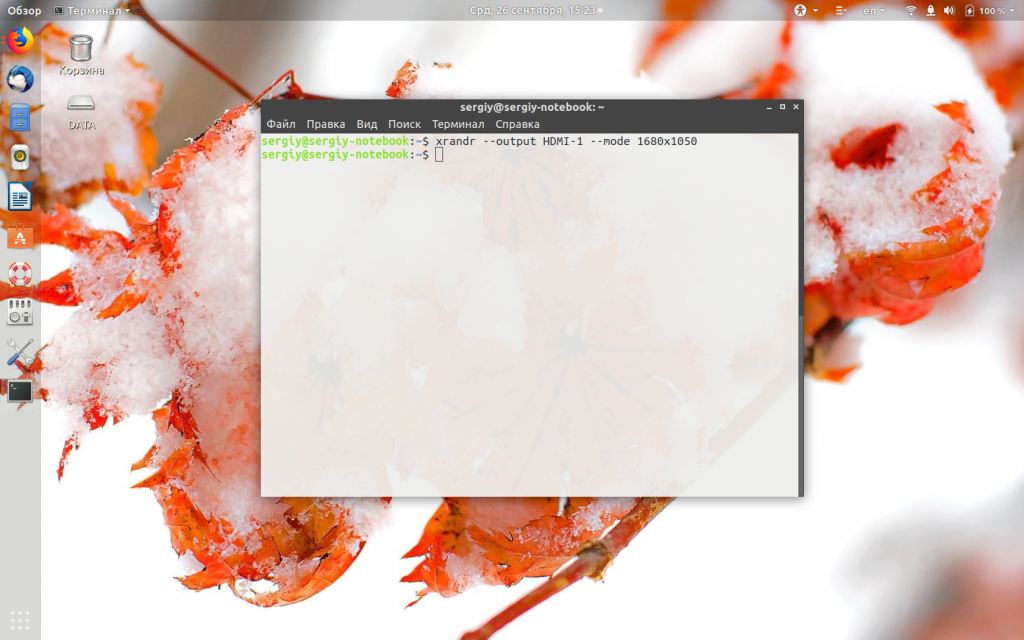
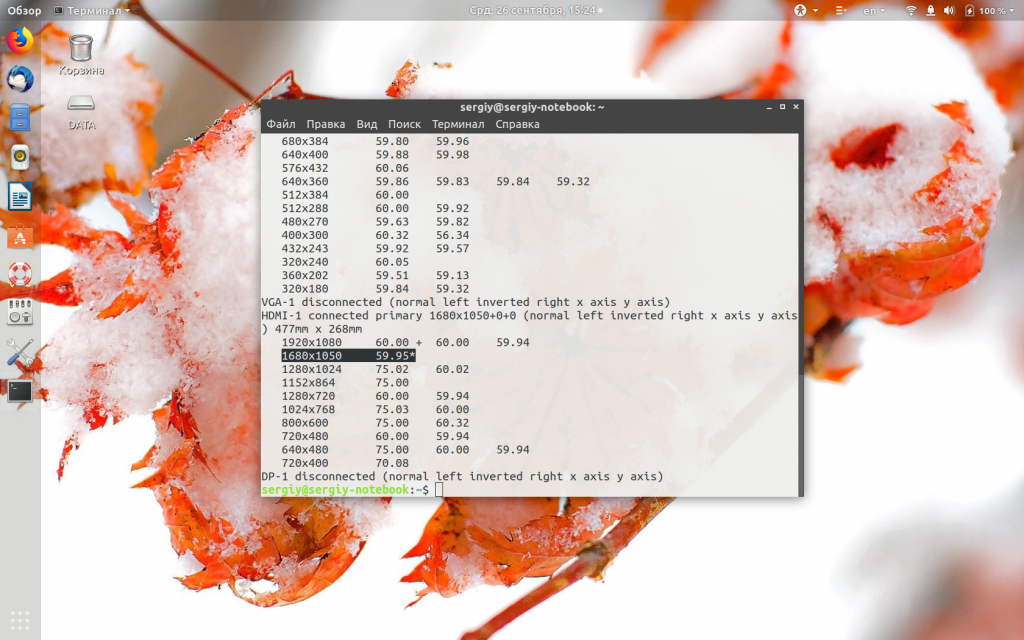
Для каждого экрана доступно несколько разрешений, текущее разрешение отмечено звёздочкой. Чтобы изменить разрешение экрана Linux на одно из доступных, используйте опцию —mode вместе с —output:
xrandr --output HDMI-1 --mode 1680x1050
Теперь звёздочка выводится около разрешения 1680х1050.
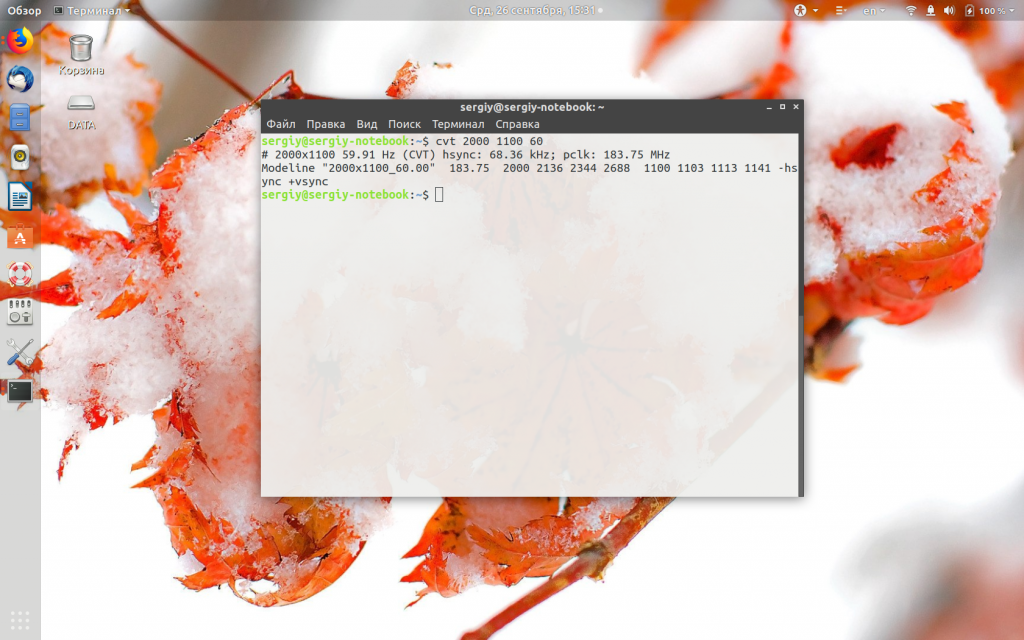
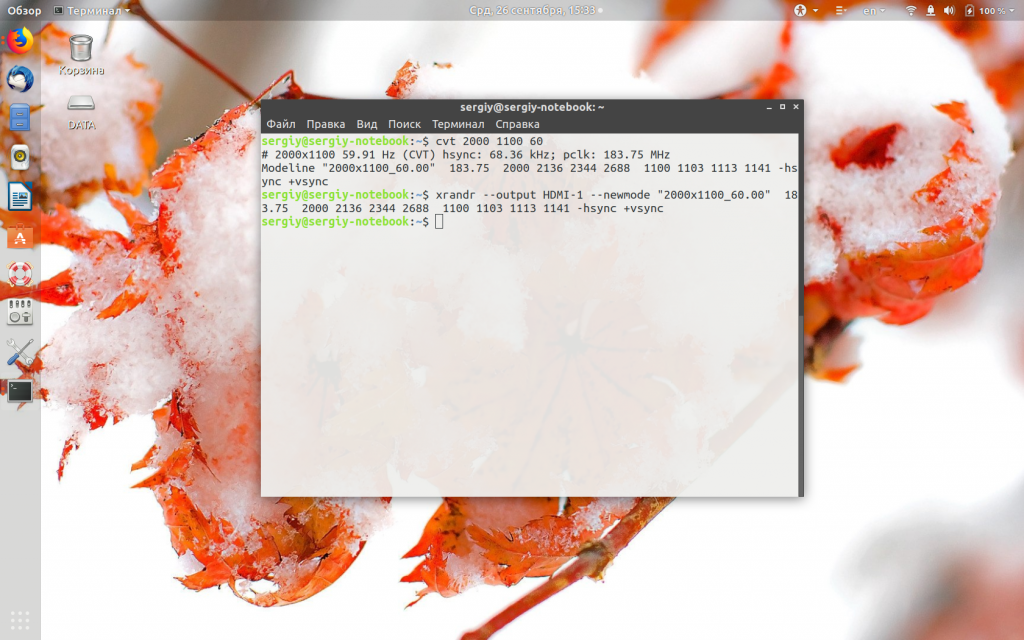
Хорошо, мы разобрались с тем, как добавить одно из существующих разрешений. По сути, то же самое, что и в графическом интерфейсе. Но если нужного разрешения в списке нет, то его можно добавить. Для этого сначала нужно конвертировать обычную запись в формат VESA. Для этого используйте утилиту cvt. Например, создадим режим с разрешением 2000х1100 и частотой обновления 60:
cvt 2000 1100 60
Дальше надо скопировать из вывода утилиты всё, что написано после «Modeline». Осталось использовать скопированный текст в xrandr:
xrandr --newmode "2000x1100_60.00" 183.75 2000 2136 2344 2688 1100 1103 1113 1141 -hsync +vsync
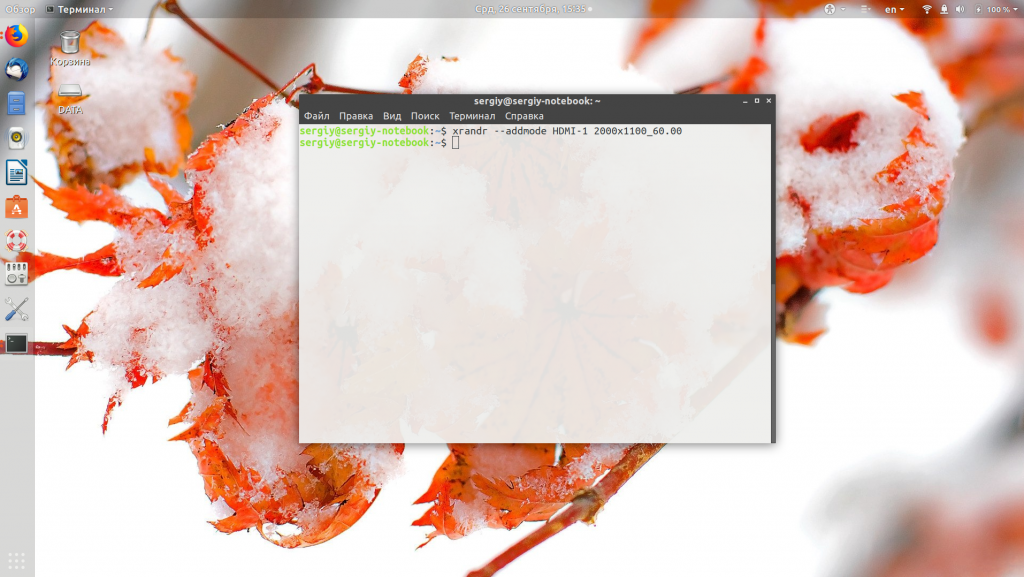
Добавляем только что созданное разрешение к списку доступных для нужного нам экрана:
xrandr --addmode HDMI-1 2000x1100_60.00
А затем активируем, как описывалось выше:
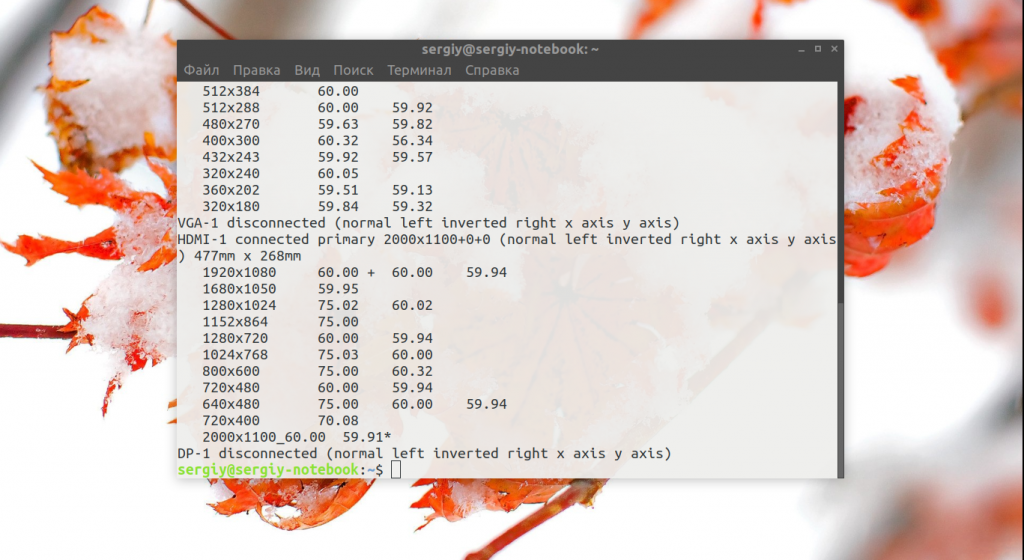
xrandr --output HDMI-1 --mode 2000x1100_60.00
xrandr
Но будьте аккуратны с новыми разрешениями. Если вы устанавливаете разрешение выше, чем поддерживает ваш монитор, то он просто не будет показывать. Но такая штука может быть полезна с VirtualBox, или если компьютер не определяет, что ваш монитор поддерживает более высокое разрешение.
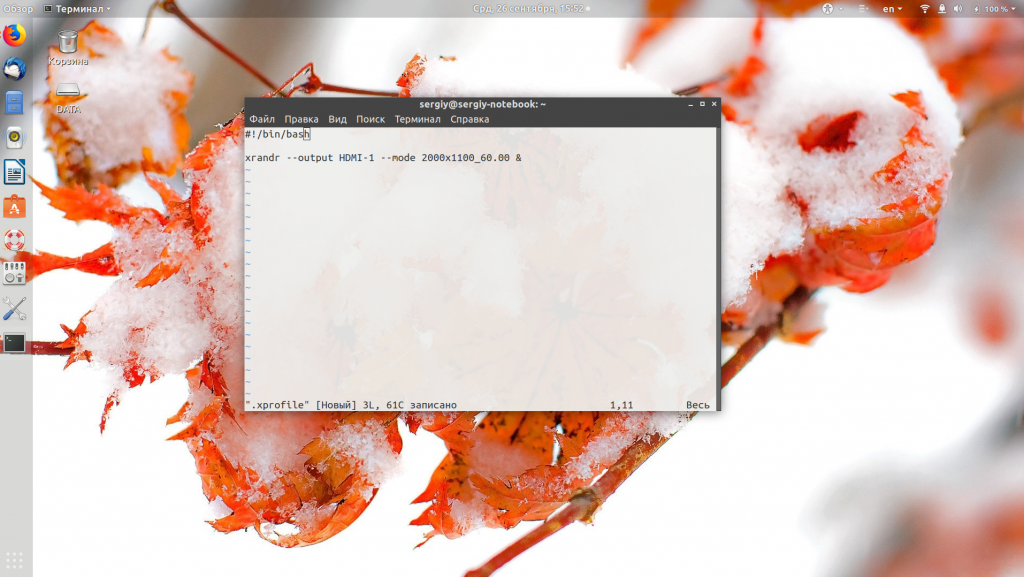
Чтобы сохранить настройки после перезагрузки, добавьте команду активации разрешения в конфигурационный файл ~/.xprofile:
vi ~/.xprofile
Синтаксис файла очень похож на ~/.xinitrc. Все команды из него автоматически выполняются при старте сессии. Или же вы можете использовать любой другой метод автозагрузки, который работает после запуска X.
Выводы
В этой статье мы рассмотрели несколько способов настроить разрешение экрана Linux с помощью графического интерфейса или через терминал. Как видите, это не так сложно, как может показаться на первый взгляд.
Статья распространяется под лицензией Creative Commons ShareAlike 4.0 при копировании материала ссылка на источник обязательна .
Об авторе
Основатель и администратор сайта losst.ru, увлекаюсь открытым программным обеспечением и операционной системой Linux. В качестве основной ОС сейчас использую Ubuntu. Кроме Linux, интересуюсь всем, что связано с информационными технологиями и современной наукой.
Contents
- Resetting an out-of-range resolution
- Dynamically testing different resolutions
- Panning viewport
-
How to setup a dual monitor
-
Introduction
- Output port names
-
Four methods to setup
- By Session with .xprofile
- Dynamic setup with xrandr
- statically setup in xorg.conf
- Xrandr Graphical Front End GUI
- Not recognised video cards
-
Introduction
- Adding undetected resolutions
-
Setting xrandr changes persistently
- Setting xrandr commands in .xprofile
- Setting xrandr commands in kdm/gdm startup scripts
- Setting resolution changes in xorg.conf
-
Setting resolution changes in xorg.conf — resolution lower than expected
- Try this first
- Use cvt/xrandr tool to add the highest mode the LCD can do
- Goto Ubuntu Menu: System -> Preference -> Display
- Obtaining modelines from Windows program PowerStrip
Resetting an out-of-range resolution
If you set a resolution inappropriate for your monitor in the Screen Resolution GUI tool, you can reset it from a terminal by running
-
$ rm ~/.config/monitors.xml
Dynamically testing different resolutions
You can either use the Screen Resolution GUI tool to experiment with different resolutions, or the more powerful xrandr command-line tool. Without parameters, xrandr shows you the names of different outputs available on your system (LVDS, VGA-0, etc.) and resolutions available on each:
-
$ xrandr
Screen 0: minimum 320 x 200, current 1400 x 1050, maximum 1400 x 1400
VGA disconnected (normal left inverted right x axis y axis)
LVDS connected 1400x1050+0+0 (normal left inverted right x axis y axis) 286mm x 214mm
   1400x1050      60.0*+   50.0
[...]
You can direct xrandr to set a different resolution like this:
-
$ xrandr --output LVDS --mode 1024x768
$ xrandr --output VGA1 --mode 1024x768
The refresh rate may also be changed, either at the same time or independently:
-
$ xrandr --output LVDS --mode 1024x768 --rate 75
$ xrandr --output VGA1 --mode 1024x768 --rate 60
Note that changes you make using xrandr only last through the current session. xrandr has a lot more capabilities — see man xrandr for details.
Panning viewport
If you want to have a panning viewport, i.e., a virtual screen that’s bigger than your physical screen that moves when you move the mouse to the edge («zoomed in» view) specify the desired physical resolution with —mode and the virtual screen size with —fb and panning area (typically same as virtual screen size) with —panning.
For example,
-
$ xrandr --output VGA1 --rate 60 --mode 800x600 --fb 1280x1024 --panning 1280x1024
How to setup a dual monitor
Introduction
This article above will give you some important background information. I will summarize the points that I think are important and add a few points. It makes life easier if you pop open a terminal and type to open your gui monitor program:
-
$ gnome-display-properties
Next uncheck same image in all Monitors. If your watch a lot of movies it is important to set your Monitors to your lower resolution. For example, if they are both 1440 x 900 monitors, make sure it is set to that resolution. If the monitors are different resolutions, you will need it to the resolution of the smaller monitor. So, for example, if one monitor is 1440 x 900 and the other is full HD resolution, you will have to set it at 1440×900. The reason for this is your video will be a black screen when trying to watch a movie so this is very important. Click APPLY. Then you will get a warning and you need to keep your new configuration. You will need to restart your session for this to take effect sometimes. There are 2 simple ways to do this. The first is to log out then log back in, and the second is to hit ctrl+alt+backspace. The second method restarts your x session so make you save your work.
This guide is targeted for people who want to use extended desktop mode on two outputs. Clone mode should work out-of-box with a normal configuration.
With RandR 1.2, you can setup dual head and add/remove monitor dynamically (i.e. on-the-fly, without restarting X).
Output port names
Intel driver — UMS
-
VGA — Analog VGA output
-
LVDS — Laptop panel
-
DP1 — DisplayPort output
-
TV — Integrated TV output
-
TMDS-1 — First DVI SDVO output
-
TMDS-2 — Second DVI SDVO output
The SDVO and DVO TV outputs are not supported by the driver at this time.
Intel driver — KMS
-
LVDS1 — Laptop panel
-
VGA1 — Analog VGA output
-
DVI1 — Digital video output
radeon driver
-
VGA-0 — Analog VGA output
-
LVDS — Laptop panel
-
S-video — Integrated TV output
-
DVI-0 — DVI output
http://www.thinkwiki.org/wiki/Xorg_RandR_1.2
Four methods to setup
- By session with .xprofile.
- Dynamically by using xrandr tool
- Statically by setting in xorg.conf.
- Xrandr Graphical Front End GUI.
xrandr tool (an app component in Xorg) is a command line interface to RandR extension, and can be used to set outputs for a screen dynamically, without any specific setting in xorg.conf. You can refer the xrandr manual for details.
By Session with .xprofile
Use your favorite editor to create ~/.xprofile containing something like:
-
xrandr --output VGA1 --mode 1024x768 --rate 60
Now that command will be run every time your start your Xsession. You can force it to run by logging out and logging back in or by executing ~/.xprofile from your terminal.
Here is an example of my ~/.xprofile. The # are for comments just like you do with shell scripts. The purpose of my setup is sometime have laptop on the left and other times I have my laptop on the right. This makes very simple and easy to change which side you want each monitor to be on. I just added the information on how to set your primary monitor.
-
xrandr --output VGA1 --mode 1024x768 --rate 60

#Laptop right extra Monitor Left
#xrandr --output VGA1 --left-of LVDS1

#Laptop left extra Monitor right
xrandr --output LVDS1 --left-of VGA1

#This is to set your primary monitor.

#This sets your laptop monitor as your primary monitor.
xrandr --output LVDS1 --primary

#This sets your VGA monitor as your primary monitor.
#xrandr --output VGA1 --primary
Some people think it is a disadvantage that this only works for one user, other people think this is an advantage. If you want to be able to use this just copy it over to your profile folder.
Important Note: If you just blindly copy some commands from a website, you may see an error message:
-
xrandr: cannot find mode 1024×768
This may be due to some CMS’ way of modifying content: xrandr expects the letter x and not the multiplication cross × between horizontal and vertical resolution.
Incorrect example:
-
$ xrandr --output VGA1 --mode 1024×768 --rate 60
Corrected example
-
$ xrandr --output VGA1 --mode 1024x768 --rate 60
Dynamic setup with xrandr
Xrandr can be used to change outputs’ mode, rotation direction, position, etc. In this guide, we only introduce options related with dual head setting.
You can see the outputs’ status with option ‘-q’. Below is an example:
-
$ xrandr -q
Screen 0: minimum 320 x 200, current 2048 x 768, maximum 4096 x 4096
VGA1 connected 1024x768+1024+0 (normal left inverted right x axis y axis) 338mm x 270mm
 1280x1024      60.0 +   75.0
 1280x960       75.0     70.0     60.0
 1152x864       75.0     70.0     60.0
 1024x768       75.1     70.1     66.0     60.0*
 832x624        74.6
 800x600        72.2     75.0     60.3     56.2
 640x480        72.8     75.0     66.7     60.0
 720x400        70.1
LVDS1 connected 1024x768+0+0 (normal left inverted right x axis y axis) 304mm x 228mm
 1024x768       60.0*+
 800x600        60.3
 640x480        59.9
DVI1 disconnected (normal left inverted right x axis y axis)
TV1 disconnected (normal left inverted right x axis y axis)
In the above example, two outputs (VGA1 and LVDS1) are connected, the resolution of both is 1024×768@60, output VGA’s viewport is at (1024, 0) and output LVDS’s viewport is at (0, 0), i.e. LVDS1 is located at left of VGA. The size of occupied area by both outputs is 2048×768. The virtual screen size (maximum framebuffer) is 4096 x 4096 which is statically set in xorg.conf (see next section). You can decrease the maximum with ‘—fb’ option but can not increase it. You need make sure your screen size fall into the maximum framebuffer, otherwise you should increase the value in xorg.conf.
There are five xrandr options that can be used to set Dual Monitor:
-
$ xrandr --pos <x>x<y>
$ xrandr --left-of <output>
$ xrandr --right-of <output>
$ xrandr --above <output>
$ xrandr --below <output>
The last four will set the output’s relative position to another output, for example:
-
$ xrandr --output VGA1 --left-of LVDS1
Option ‘-pos’ is more flexible which can place output to anywhere, for example:
-
$ xrandr --output VGA1 --pos 200x200
$ xrandr --output LVDS1 --pos 400x500
statically setup in xorg.conf
RandR1.2 configuration in xorg.conf is based on per monitor. So you need write a ‘Monitor’ section for each output and specify these monitors in ‘Device’ section.
Below is a example snippet in xorg.conf.
-
Section "Device"
        Identifier      "Intel 945G "
        Driver         "intel"

        # Using the name of the output defined by the video driver plus the identifier of a
        #     monitor section, one associates a monitor section with an output by adding an
        #     option to the Device section in the following format:
        #     Option "Monitor-outputname" "monitor ID"

        Option          "monitor-VGA" "foo"
        Option          "monitor-LVDS" "bar"
        #Option         "monitor-TMDS-1" "dvi"
EndSection

Section "Monitor"
        Identifier      "foo"

        # specifies a mode to be marked as the preferred initial mode of the monitor
        # Option "PreferredMode"  "800x600"
        # This optional entry specifies the position of the monitor within the X screen.
        #Option        "Position" "1024 0"
        #This optional entry specifies that the monitor should be ignored
        #     entirely, and not reported through RandR.  This is useful if the
        #     hardware reports  the  presence  of  outputs  that do not exist.
        #Option "Ignore"  "true"
EndSection

Section "Monitor"
        Identifier      "bar"

        #Options LeftOf, RightOf, Above, Below specify monitors' relative position

        Option "LeftOf"  "foo"

        # This optional entry specifies  whether  the  monitor  should  be
        #     turned  on  at  startup.  By default, the server will attempt to
        #     enable all connected monitors.
        #Option "Enable"  "true"

        #This optional entry specifies the initial rotation of the given monitor.
        #     Valid values for rotation are "normal", "left", "right", and "inverted".
        # Option "Rotate"  "left"
EndSection

Section "Screen"
        Identifier      "Default Screen"
        Device        "Intel Corporation 945G Integrated Graphics Controller"
        Monitor       "foo"
        DefaultDepth  24
        SubSection "Display"
                Depth          24
                Modes         "1280x1024"  "1024x768"   "640x480"
        EndSubSection
EndSection
Xrandr Graphical Front End GUI
-
ARandR
-
Grandr
-
LXRandR
-
Urandr
-
zarfy
Not recognised video cards
It is possible, that resolutions higher than 1024×768 (or 800×600.. 640×480) are not avalaible by default, because the videocard isn’t recognised propely. If you can add and apply the desired undetected resolution(s) dinamically with cvt and xrandr, but you get an error after applying static changes to xorg.conf, etc/gdm/init/default, or .xprofile etc. & reboot, something like ‘Stored settings can’t be applied to monitors, any of the selected modes are not compatible with avalaible modes.. trying modes to 79.CRTC..’, than You could try forcing X to recognize the video RAM.
Use your favorite text editor as root: (open a terminal)
-
$ sudo nano /usr/share/X11/xorg.conf.d/99-vesahack
or
-
$ gksudo gedit /usr/share/X11/xorg.conf.d/99-vesahack
and put this in the newly created file:
-
Section "Device"
    Identifier "Screen0"
    VideoRam 10000
EndSection
This tells X that there is 10000 kB (~10 MB) of video RAM, enough for 1920×1200 at 4 bytes per pixel. You can replace ‘10000’ above with the amount of avalaible video ram. Save and reboot. (Remove the 99-vesahack file if it doesn’t help.)
Adding undetected resolutions
Due to buggy hardware or drivers, your monitor’s correct resolutions may not always be detected. For example, the EDID data block queried from your monitor may be incorrect.
If the mode already exists, but just isn’t associated for the particular output, you can add it like this:
-
$ xrandr --addmode S-video 800x600
If the mode doesn’t yet exist, you’ll need to create it first by specifying a modeline:
-
$ xrandr --newmode <Mode``Line>
You may create a modeline using the gtf or cvt utility. For example, if you want to add a mode with resolution 800×600 at 60 Hz, you can enter the following command: (The output is shown following.)
-
$ cvt 800 600 60
# 800x600 59.86 Hz (CVT 0.48M3) hsync: 37.35 kHz; pclk: 38.25 MHz
Modeline "800x600_60.00"   38.25  800 832 912 1024  600 603 607 624 -hsync +vsync
Then copy the information after the word «Modeline» into the xrandr command:
-
$ xrandr --newmode "800x600_60.00" 38.25 800 832 912 1024 600 603 607 624 -hsync +vsync
After the mode is entered, it needs to be added to the output using the —addmode command as explained above.
Setting xrandr changes persistently
There are several ways to make xrandr customizations permanent from session to session: a) .xprofile, b) kdm/gdm, c) xorg.conf. Each of these mechanisms will be discussed in turn.
Setting xrandr commands in .xprofile
A user’s ~/.xprofile file is executed on Xorg startup if it exists and is executable. You can copy and paste xrandr command line strings into this file so they’re executed when you log in. For example:
-
$ xrandr --output VGA-0 --mode 800x600
There are two disadvantages to using .xprofile for xrandr settings. First, it occurs fairly late in the startup process, so you’ll see some resolution resizing during the initial screen draw; in some cases panel windows may resize improperly as a result. Second, as this is a per-user setting, it won’t affect the resolutions of other users, nor will it alter the resolution on the login screen.
Setting xrandr commands in kdm/gdm startup scripts
Both KDM and GDM have startup scripts that are executed when X is initiated. For GDM, these are in /etc/gdm/ , while for KDM this is done at /etc/kde4/kdm/Xsetup. In either case, you can paste in an xrandr command line string into one of these scripts. For GDM, try putting them right before
-
initctl -q emit login-session-start DISPLAY_MANAGER=gdm
in /etc/gdm/Init/Default.
This process requires root access and mucking around in system config files, but will take effect earlier in the startup process than using .xprofile, and will apply to all users including the login screen.
Setting resolution changes in xorg.conf
While xorg.conf is largely empty these days, it can still be used for setting up resolutions. For example:
-
Section "Monitor"
    Identifier      "External DVI"
    Modeline        "1280x1024_60.00"  108.88  1280 1360 1496 1712  1024 1025 1028 1060  -HSync +Vsync
    Option          "PreferredMode" "1280x1024_60.00"
EndSection
Section "Device"
    Identifier      "ATI Technologies, Inc. M22 [Radeon Mobility M300]"
    Driver          "ati"
    Option          "Monitor-DVI-0" "External DVI"
EndSection
Section "Screen"
    Identifier      "Primary Screen"
    Device          "ATI Technologies, Inc. M22 [Radeon Mobility M300]"
    DefaultDepth    24
    SubSection "Display"
        Depth           24
        Modes   "1280x1024" "1024x768" "640x480"
    EndSubSection
EndSection

Section "ServerLayout"
        Identifier      "Default Layout"
        Screen          "Primary Screen"
EndSection
See man xorg.conf for full details on how to craft an xorg.conf file.
Setting resolution changes in xorg.conf — resolution lower than expected
Try this first
If you video card is recognized but the resolution is lower than you expect, you may try this.
Background: I use Ubuntu 9.0.4 x86, ATI X1550 based video card and two LCD monitors DELL 2408(up to 1920×1200) and Samsung 206BW(up to 1680×1050). Upon first login after installation, the resolution default to 1152×864. xrandr does not list any resolution higher than 1152×864. You may want to try editing /etc/X11/xorg.conf, add a section about virtual screen, logout, login and see if this helps. If not then read on.
Change the default xorg.conf
-
Section "Device"
        Identifier      "Configured Video Device"
EndSection

Section "Monitor"
        Identifier      "Configured Monitor"
EndSection

Section "Screen"
        Identifier      "Default Screen"
        Monitor         "Configured Monitor"
        Device          "Configured Video Device"
EndSection
To:
Section "Monitor"
        Identifier      "Configured Monitor"
EndSection

Section "Screen"
        Identifier      "Default Screen"
        Monitor         "Configured Monitor"
        Device          "Configured Video Device"
->        SubSection "Display"
->                Virtual 3600 1200
->        EndSubSection
EndSection

Section "Device"
        Identifier      "Configured Video Device"
EndSection
About the numbers: I put DELL on the left and Samsung on the right. So the virtual width is of sum of both LCD width 3600=1920+1680; Height then is figured as the max of them, which is max(1200,1050)=1200. If you put one LCD above the other, use this calculation instead: (max(width1, width2), height1+height2).
If that does not help, here’s what I did:
Use cvt/xrandr tool to add the highest mode the LCD can do
The actual order was different, as I tried to add new mode to one LCD at a time. Below is the combined/all-in-one quote
-
aa@aa-desktop:/$ cvt 1920 1200 60
# 1920x1200 59.88 Hz (CVT 2.30MA) hsync: 74.56 kHz; pclk: 193.25 MHz
Modeline "1920x1200_60.00"  193.25  1920 2056 2256 2592  1200 1203 1209 1245 -hsync +vsync
aa@aa-desktop:/$ cvt 1680 1050 60
# 1680x1050 59.95 Hz (CVT 1.76MA) hsync: 65.29 kHz; pclk: 146.25 MHz
Modeline "1680x1050_60.00"  146.25  1680 1784 1960 2240  1050 1053 1059 1089 -hsync +vsync
aa@aa-desktop:/$ xrandr --newmode "1920x1200_60.00"  193.25  1920 2056 2256 2592  1200 1203 1209 1245 -hsync +vsync
aa@aa-desktop:/$ xrandr --newmode "1680x1050_60.00"  146.25  1680 1784 1960 2240  1050 1053 1059 1089 -hsync +vsync
aa@aa-desktop:/$ xrandr --addmode DVI-1 "1920x1200_60.00"
aa@aa-desktop:/$ xrandr --addmode DVI-0 "1680x1050_60.00"
Change one of the LCD’s resolution to a lower one, e.g. 800×600. Apply change, then (I don’t remember the exact order/wording here:) hopefully the GUI will give you a prompt saying something like «the resolution can be improved but virtual screen has to be enabled, you need to however logout and log back in». I did it and on 2nd login, I am able to find the higher resolution listed for that LCD. After that I follow suite and make similar change to 2nd LCD and am able to get both of them working.
Obtaining modelines from Windows program PowerStrip
X.Org Wiki has an article about this.
Разрешение вашего монитора/экрана означает четкость содержимого (текста и изображений), которое вы можете просматривать на экране. Если экран установлен на более высокое разрешение, например 1366×768, содержимое, отображаемое на экране, будет более четким. Вы также можете заметить, что при высоком разрешении элементы на экране выглядят меньше; это происходит для того, чтобы на экране поместилось больше элементов. С другой стороны, низкое разрешение означает менее четкое изображение, при котором элементы выглядят крупнее и, соответственно, меньше. Если у вас монитор большего размера, он поддерживает более высокое разрешение. Ваша видеокарта также играет большую роль в способности вашей системы поддерживать большое разрешение экрана.
Эта статья поможет вам настроить разрешение экрана в системе Ubuntu. Мы будем использовать командную строку для изменения разрешения. Всегда есть способ сделать почти все наши вещи прямо в Терминале. Так почему же изменение разрешения экрана должно быть иным! Использование Терминала делает некоторые задачи более эффективными и даже быстрыми. Инструменты командной строки не используют слишком много ресурсов и поэтому являются отличной альтернативой широко используемым графическим приложениям, особенно если у вас устаревшее оборудование.
Изменение разрешения экрана через командную строку
Чтобы изменить разрешение экрана в системе Ubuntu, выполните следующие действия:
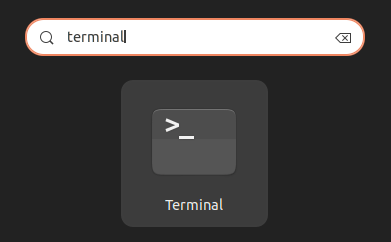
Откройте приложение Терминал либо с помощью сочетания клавиш Ctrl+Alt+T, либо через поиск приложений в пусковой установке следующим образом:
Утилита Xrandr (компонент приложения Xorg) представляет собой интерфейс командной строки для расширения RandR и может быть использована для динамической установки разрешения экрана без каких-либо специальных настроек в xorg.conf.
Мы будем использовать следующий флаг утилиты xrandr для настройки размера экрана:
- -s
- —size [индекс]
- —size [ШиринаXВысота]
Это устанавливает размер экрана, либо подбирая его по размеру, либо используя индекс в списке доступных размеров.
Это одна из двух команд, которые вы можете использовать:
Например:
Использование команды xrandr
xrandr —size [ШиринаXВысота]
Например:
Установка размера экрана с помощью команды xrandr
С помощью этого простого инструмента, который уже установлен в Ubuntu, вы можете настроить разрешение экрана прямо из командной строки. Настроить разрешение экрана через пользовательский интерфейс также возможно. Все, что вам нужно сделать, это использовать вкладку Devices>Displays в утилите Settings, чтобы вручную установить разрешение в соответствии с вашими требованиями.
Главная » Linux » Ubuntu » Два способа изменить разрешение экрана в Ubuntu 22.04 / 20.04
Содержание
- Как изменить разрешение экрана в Ubuntu 22.04 / 20.04
- Способ 1: Использование графического интерфейса пользователя
- Способ 2: Изменение разрешения экрана в Ubuntu с помощью терминала
- Заключение
Общаясь с друзьями, которые только что установили Linux, я заметил, что такая простая вещь, как изменение разрешения экрана, может быть немного сложной. Поэтому в этом посте вы узнаете, как изменить разрешение экрана в Ubuntu из графического интерфейса, так и из терминала.
Многие новички переходят на Linux и в частности в ОС Ubuntu и соответственно теряются. Но со временем они понимают, что Ubuntu проще и интуитивно понятнее, чем другие системы. Но не только это, Ubuntu еще и довольно гибкая. Так как вы можете менять разрешение экрана как через графический интерфейс, так и из терминала.
Как изменить разрешение экрана в Ubuntu 22.04 / 20.04
Способ 1: Использование графического интерфейса пользователя
Обычно новичкам не нравится терминал, поэтому мы начнем с графического интерфейса, которым является GNOME. Эта современная графическая среда имеет все необходимые опции, поэтому вы ничего не пропустите.
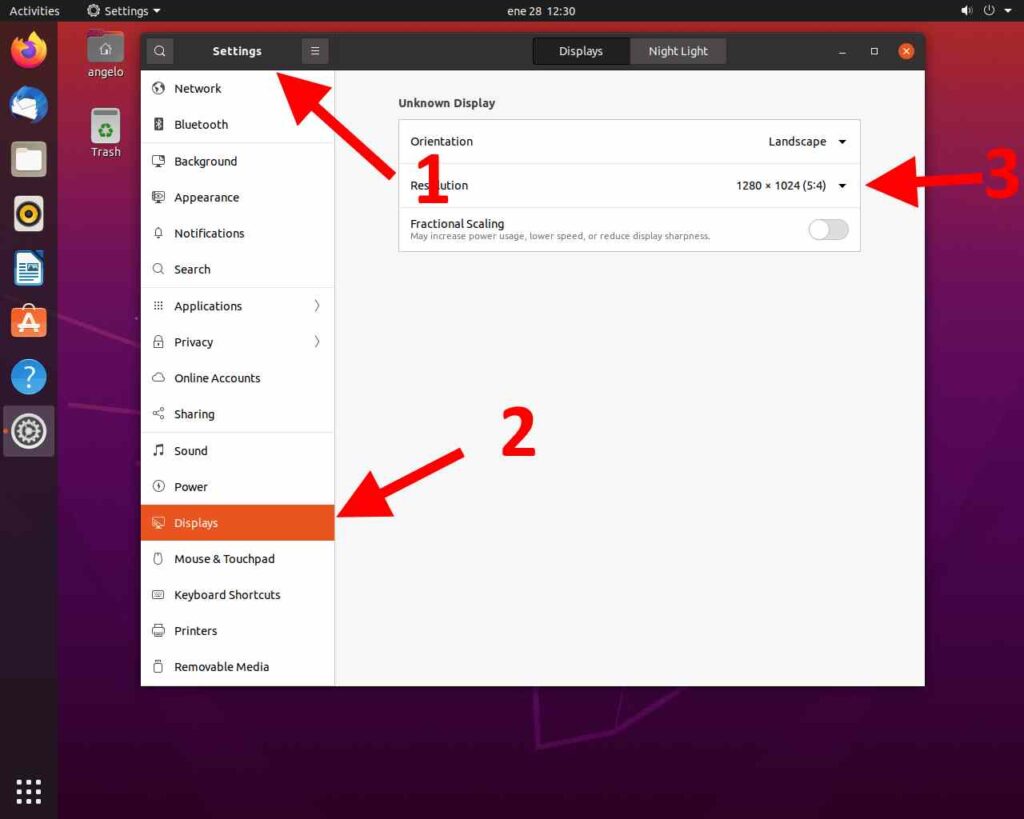
Сначала откройте главное меню и наберите Settings (Настройки). Затем откройте системные опции.
Теперь перейдите в раздел Displays (Дисплеи) и в нем вы увидите настройку Resolution (Разрешение).
В раскрывающемся списке вы увидите разрешения, совместимые с вашим экраном. Это также зависит от установленной видеокарты и драйвера. Поэтому, если соответствующее разрешение экрана не отображается, это связано с проблемой драйвера или его совместимости.
Далее вам нужно выбрать нужное разрешение.
Если вы удовлетворены и вам все нравится, то сохраните изменения и все.
Способ 2: Изменение разрешения экрана в Ubuntu с помощью терминала
Вы можете выполнить этот процесс с помощью терминала. Это просто, благодаря инструменту xrandr. С помощью этого инструмента можно быстро настроить экран.
Для вас это может показаться не очень полезным, но в будущем это может пригодиться в скриптах конфигурации или других ситуациях.
По умолчанию этот пакет установлен в Ubuntu 22.04, поэтому вам не придется много делать.
Откройте терминал из главного меню и выполните следующую команду.
xrandr
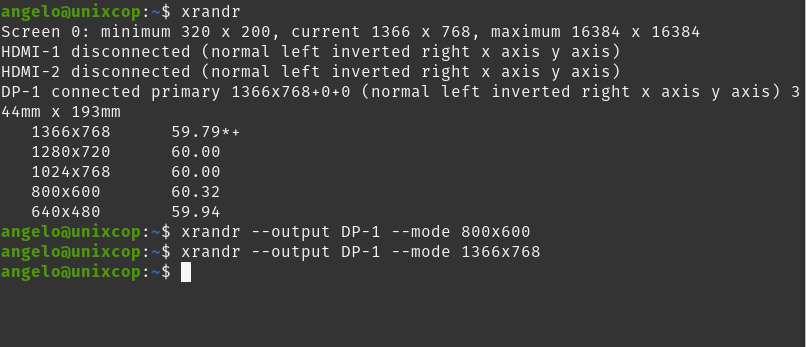
Вы получите на выходе следующее окно.
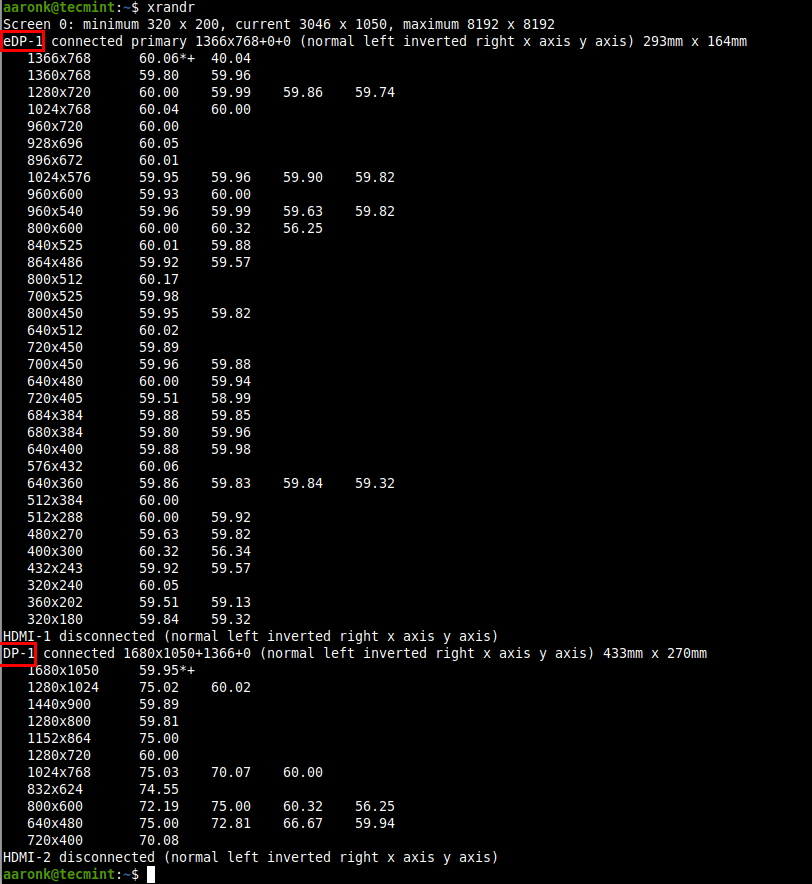
Из этого экрана вы получите важную информацию о конфигурации монитора. В данном случае она показывает минимально допустимое разрешение, текущее разрешение и максимально допустимое разрешение.
Вы также увидите информацию о портах и поддерживаемых разрешениях экрана.
Обратите внимание, что в этом выводе дисплея псевдоним монитора — DP-1. Вы быстро узнаете его, так как на нем написано connected и показано активное разрешение.
Чтобы изменить разрешение на основном мониторе, вам требуется выполнить следующую команду.
xrandr --output [monitor-alias] --mode [resolution]
Например работающей команду.
xrandr --output DP-1 --mode 800x600
Изменения будут происходить автоматически.
Заключение
Это был короткий пост, с его помощью вы узнали, как изменить разрешение экрана в Ubuntu, используя графический интерфейс и терминал. Надеюсь, вам понравилось.
xrandr is an official configuration utility to the RandR (Resize and Rotate) X Window System extension. It can be used to set the size, orientation or reflection of the outputs for a screen. For configuring multiple monitors see the Multihead page.
Installation
Install xorg-xrandr.
Graphical front-ends
- ARandR — Simple visual front end for XRandR. Relative monitor positions are shown graphically and can be changed in a drag-and-drop way.
- https://christian.amsuess.com/tools/arandr/ || arandr
- LXRandR — Screen resolution and monitor position tool for LXDE. Also works in Openbox.
- https://wiki.lxde.org/en/LXRandR[dead link 2022-09-23 ⓘ] || GTK 2: lxrandr, GTK 3: lxrandr-gtk3
CLI front-ends
- autorandr — Automatically select a display configuration based on connected devices.
- https://github.com/phillipberndt/autorandr || autorandr
- xlayoutdisplay — Detects and arranges displays. Handles: laptop lid state, highest available refresh rates, calculating and applying the actual DPI. Best used in .xinitrc, then can be invoked when plugging/unplugging monitors or closing laptop lid.
- https://github.com/alex-courtis/xlayoutdisplay || xlayoutdisplayAUR
Testing configuration
When run without any option, xrandr shows the names of different outputs available on the system (VGA-1, HDMI-1, etc.) and resolutions available on each, with a * after the current one and a + after the preferred one :
xrandr
Screen 0: minimum 320 x 200, current 3200 x 1080, maximum 8192 x 8192
VGA-1 disconnected (normal left inverted right x axis y axis)
HDMI-1 connected primary 1920x1080+0+0 (normal left inverted right x axis y axis) 531mm x 299mm
   1920x1080     59.93 +  60.00*   50.00    59.94
   1920x1080i    60.00    50.00    59.94
   1680x1050     59.88
…
Note: If your resolution is not present in the above list, see #Adding undetected resolutions
You can use xrandr to set different resolution (must be present in the above list) on some output:
$ xrandr --output HDMI-1 --mode 1920x1080
When multiple refresh rates are present in the list, it may be changed by the --rate option, either at the same time or independently. For example:
$ xrandr --output HDMI-1 --mode 1920x1080 --rate 60
The --auto option will turn the specified output on if it is off and set the preferred (maximum) resolution:
$ xrandr --output HDMI-1 --auto
It is possible to specify multiple outputs in one command, e.g. to turn off HDMI-1 and turn on HDMI-2 with preferred resolution:
$ xrandr --output HDMI-1 --off --output HDMI-2 --auto
Note:
- Changes you make using xrandr will only last through the current session.
- xrandr has a lot more capabilities — see xrandr(1) for details.
Configuration
xrandr is just a simple interface to the RandR extension and has no configuration file. However, there are multiple ways of achieving persistent configuration:
- The RandR extension can be configured via X configuration files, see Multihead#RandR for details. This method provides only static configuration.
- If you need dynamic configuration, you need to execute xrandr commands each time X server starts. See Autostarting#On Xorg startup for details. This method has the disadvantage of occurring fairly late in the startup process, thus it will not alter the resolution of the display manager if you use one.
- Custom scripts calling xrandr can be bound to events (for example when external monitor is plugged in), see udev or acpid for details. The #Scripts section provides you with some example scripts that might be useful for this purpose.
Tip: Both GDM and SDDM have startup scripts that are executed when X is initiated. For GDM, these are in /etc/gdm/, while for SDDM this is done at /usr/share/sddm/scripts/Xsetup. This method requires root access and mucking around in system configuration files, but will take effect earlier in the startup process than using xprofile.
Scripts
Toggle external monitor
This script toggles between an external monitor (specified by $extern) and a default monitor (specified by $intern), so that only one monitor is active at a time.
The default monitor should be connected when running the script, which is always true for a laptop.
#!/bin/sh
intern=LVDS1
extern=VGA1

if xrandr | grep "$extern disconnected"; then
    xrandr --output "$extern" --off --output "$intern" --auto
else
    xrandr --output "$intern" --off --output "$extern" --auto
fi
Note: To leave the default monitor enabled when an external monitor is connected, replace the else clause with xrandr --output "$intern" --primary --auto --output "$extern" --right-of "$intern" --auto.
Manage 2-monitors
monsAUR is a POSIX-compliant shell script to quickly manage 2-monitors display.
It provides well-known modes like computer, duplicate, extend and projector mode as well as selecting and positioning one or two monitors among those plugged in (for more details, see mons).
Avoid X crash with xrasengan
Use this workaround to turn on connected outputs that may be in suspend mode and hence shown as disconnected, as is often the case of DisplayPort monitors:
declare -i count=2
declare -i seconds=1

while ((count)); do
    xrandr >/dev/null
    sleep $seconds
    ((count--))
done
xrasenganAUR is an xrandr wrapper with this workaround built in.
$ xrasengan --force -on DisplayPort-0 -off HDMI-0
With the --force option, xrasengan will update status of all outputs before HDMI-0 is turned off, avoiding an X crash if they were the only connected/active outputs.
To force reload current settings, xrasengan provides a --try-reload-active-layout option, which uses --force and unxrandr from the arandr package to assemble the command line:
$ xrasengan --try-reload-active-layout
This can be used in systemd unit or in a keyboard binding to avoid blank screen when resuming DisplayPort monitors from suspend.
Configuration using arandr
arandr can graphically arrange your monitors, change resolutions, and save a script to duplicate your setup. By default, if you «Save As» it will be saved in ~/.screenlayout/. These files can then be autostarted. Sometimes problems arise from running the arandr script too soon after login, add a sleep command if needed.
Troubleshooting
Screen Blinking
For some LCD screens (e.g. Samsung 2343NW, Acer XB280HK and Iiyama ProLite XUB3490WQSU-B1) the command cvt -r can be used to calculate standardized modelines with reduced blanking, allowing for higher frequency signals.
For example: an external monitor ProLite XUB3490WQSU-B1 connected to a Dell laptop through a Thunderbolt-HDMI 2.0 adapter, using 59.97Hz refresh rate with a blinking problem:
Calculating the reduced modelines for the desired resolution cvt -r 3440 1440 gives:
# 3440x1440 59.97 Hz (CVT) hsync: 88.82 kHz; pclk: 319.75 MHz

Modeline "3440x1440R"  319.75  3440 3488 3520 3600  1440 1443 1453 1481 +hsync -vsync
With this information we can use xrandr to create a new mode:
xrandr --newmode "3440x1440R" 319.75 3440 3488 3520 3600 1440 1443 1453 1481 +hsync -vsync
And add it to the set of valid modes for the corresponding output to make it selectable:
xrandr --addmode DP1 3440x1440R
Adding undetected resolutions
Due to buggy hardware or drivers, your monitor’s correct resolutions may not always be detected by xrandr. For example, the EDID data block queried from the monitor may be incorrect. To fix this at a low level, see Kernel mode setting#Forcing modes and EDID. This section will describe how to address this at a higher level by adding the desired resolutions to xrandr. This same procedure can be used to add refresh rates you know are supported, but not enabled by your driver.
First we run gtf or cvt to get the Modeline for the resolution we want:
$ cvt 1280 1024
# 1280x1024 59.89 Hz (CVT 1.31M4) hsync: 63.67 kHz; pclk: 109.00 MHz
Modeline "1280x1024_60.00"  109.00  1280 1368 1496 1712  1024 1027 1034 1063 -hsync +vsync
Tip:
- If you find that the screen goes blank when the modeline is applied, try lower refresh rate (e.g. 30 or 45 instead of 60). The refresh rate should be passed as the third argument:
cvt 2560 1440 45.
Note: If the Intel video driver (xf86-video-intel) is used, it may report the desired resolution along with its properties in /var/log/Xorg.0.log — use that first if it is different from the output of gtf or cvt. For instance, the log and its use with xrandr:
[    45.063] (II) intel(0): clock: 241.5 MHz   Image Size:  597 x 336 mm
[    45.063] (II) intel(0): h_active: 2560  h_sync: 2600  h_sync_end 2632 h_blank_end 2720 h_border: 0
[    45.063] (II) intel(0): v_active: 1440  v_sync: 1443  v_sync_end 1448 v_blanking: 1481 v_border: 0
$ xrandr --newmode "2560x1440" 241.50 2560 2600 2632 2720 1440 1443 1448 1481 -hsync +vsync
An example for the AMDGPU video driver (xf86-video-amdgpu):
[    95.798] (II) AMDGPU(0): Printing DDC gathered Modelines:
[    95.798] (II) AMDGPU(0): Modeline "1920x1080"x0.0  148.50  1920 2008 2052 2200  1080 1084 1089 1125 +hsync +vsync (67.5 kHz eP)
$ xrandr --newmode "1920x1080"x0.0 148.50 1920 2008 2052 2200 1080 1084 1089 1125 +hsync +vsync
Then we create a new xrandr mode. Note that the Modeline keyword needs to be omitted.
$ xrandr --newmode "1280x1024_60.00" 109.00 1280 1368 1496 1712 1024 1027 1034 1063 -hsync +vsync
Tip: Some programs have trouble recognizing modes labeled with «_60.00» see [1]
After creating it we need an extra step to add this new mode to our current output (VGA1). We use just the name of the mode, since the parameters have been set previously.
$ xrandr --addmode VGA1 1280x1024_60.00
Now we change the resolution of the screen to the one we just added:
$ xrandr --output VGA1 --mode 1280x1024_60.00
Note that these settings only take effect during this session.
If you are not sure about the resolution you will test, you may add a sleep 5 and a safe resolution command line following, like this:
$ xrandr --output VGA1 --mode 1280x1024_60.00 && sleep 5 && xrandr --newmode "1024x768-safe" 65.00 1024 1048 1184 1344 768 771 777 806 -HSync -VSync && xrandr --addmode VGA1 1024x768-safe && xrandr --output VGA1 --mode 1024x768-safe
Also, change VGA1 to correct output name.
EDID checksum is invalid
If the previous method results in an *ERROR* EDID checksum is invalid error during boot, see KMS#Forcing modes and EDID and [2].
Or xrandr --addmode might give you the error X Error of failed request: BadMatch. NVIDIA users should read NVIDIA/Troubleshooting#xrandr BadMatch. BadMatch could indicate an invalid EDID checksum. To verify that this is the case, run X in verbose mode (e.g. startx -- -logverbose 6) and check your Xorg log for messages about a bad EDID.
Screen resolution reverts back after a blink
If you use GNOME and your monitor does not have an EDID, above #Adding undetected resolutions might not work, with your screen just blinking once, after xrandr --output.
Poke around with ~/.config/monitors.xml, or delete the file completely, and then reboot.
It is better explained in this article.
Permanently adding undetected resolutions
Once a suitable resolution is found using xrandr, the mode can be permanently added by creating an entry in /etc/X11/xorg.conf.d/:
/etc/X11/xorg.conf.d/10-monitor.conf
Section "Monitor"
    Identifier "VGA1"
    Modeline "1280x1024_60.00"  109.00  1280 1368 1496 1712  1024 1027 1034 1063 -hsync +vsync
    Option "PreferredMode" "1280x1024_60.00"
EndSection

Section "Screen"
    Identifier "Screen0"
    Monitor "VGA1"
    DefaultDepth 24
    SubSection "Display"
        Modes "1280x1024_60.00"
    EndSubSection
EndSection

Section "Device"
    Identifier "Device0"
    Driver "intel"
EndSection
Replace intel with the right driver, e.g. nvidia. When the X server is restarted, you should be able to set the new resolution.
If this does not work for you, try removing the Screen and Device sections and just leaving the Monitor section. [3]
Resolution lower than expected
Tip: Try #Adding undetected resolutions first, if it does not work, you may try this method.
If your video card is recognized but the resolution is lower than you expect, you may try this.
Background: ATI X1550 based video card and two LCD monitors DELL 2408(up to 1920×1200) and Samsung 206BW(up to 1680×1050). Upon first login after installation, the resolution default to 1152×864. xrandr does not list any resolution higher than 1152×864. You may want to try editing /etc/X11/xorg.conf, add a section about virtual screen, logout, login and see if this helps. If not then read on.
Change xorg.conf
/etc/X11/xorg.conf
Section "Screen"
        ...
        SubSection "Display"
                Virtual 3600 1200
        EndSubSection
EndSection
About the numbers: DELL on the left and Samsung on the right. So the virtual width is of sum of both LCD width 3600=1920+1680; Height then is figured as the max of them, which is max(1200,1050)=1200. If you put one LCD above the other, use this calculation instead: (max(width1, width2), height1+height2).
Setting resolution from .xinitrc doesn’t work
DDX drivers other than that of the modesetting(4) driver may take time to properly enumerate the modes of attached devices, to where xrandr may not work right away. This seems to be the case for the xf86-video-intel driver, with which using xrandr early in the startup sets the incorrect resolution. Possible remedies include:
- Waiting for a couple of seconds before invoking xrandr:
~/.xinitrc
...
{ sleep 2; xrandr xrandr_parameters } &
...
This does the waiting in the background, as to not block the rest of the startup. If this not desirable, e.g. your window manager configuration depends on the display being arranged correctly, you can execute the commands in the foreground:
~/.xinitrc
...
sleep 2
xrandr xrandr_parameters
...
- Setting the mode in a later part of the desktop startup. Refer to your window manager documentation for details on startup script functionality.
- Switching to the generic modesetting driver. This is most easily done by uninstalling the device specific DDX driver. In the case of xf86-video-intel, the driver has other deficiencies that may benefit from this; see Intel graphics#Installation for more information.
Correction of overscan tv resolutions via the underscan property
With a flat panel TV, w:overscan looks like the picture is «zoomed in» so the edges are cut off.
Check your TV if there is a parameter to change. If not check if the output has support for the underscan property (xrandr —prop), if so apply an underscan and change border values.
The required underscan vborder and underscan hborder values can be different for you, just check it and change it by more or less.
$ xrandr --output HDMI-0 --set underscan on --set "underscan vborder" 25 --set "underscan hborder" 40
Correction of overscan tv resolutions via —transform
If underscan is not available another solution is using xrandr --transform a,b,c,d,e,f,g,h,i, which applies a transformation matrix on the output. See the xrandr(1) § RandR_version_1.3_options manual page for the explanation of the transformation.
For example, the transformation scaling horizontal coordinates by 0.8, vertical coordinates by 1.04 and moving the screen by 35 pixels right and 19 pixels down, is:
$ xrandr --output HDMI1 --transform 0.80,0,-35,0,1.04,-19,0,0,1
Disabling phantom monitor
In some cases, a non-existent monitor may be detected by the system. To disable it, find the name of the phantom output, e.g. VGA1, and turn it off with
$ xrandr --output VGA1 --off
To make this permanent, add the following to an entry in /etc/X11/xorg.conf.d/:
/etc/X11/xorg.conf.d/10-monitor.conf
Section "Monitor"
    Identifier "VGA1"
    Option "Ignore" "true"
EndSection
Dynamic interlace pattern artifacts with AOC G2590PX
If you are seeing very prominent interlace pattern artifacts (mesh or grid) when you see movement on the screen with this monitor, it might be happening because of a low refresh rate. Switching to a higher refresh rate (from 60 Hz to 119.98 Hz and perhaps even higher) might help reduce the effect.
Sample xrandr output for this monitor over HDMI:
HDMI-1 connected 1920x1080+0+0 (normal left inverted right x axis y axis) 544mm x 303mm
   1920x1080     60.00 + 119.98*   99.93    50.00    59.94
As can be seen in the output above, the preferred refresh rate reported by xrandr is 60.00, but the artifacts are very visible with this refresh rate. Switching to 119.98 should help reduce the effect considerably.
$ xrandr --output HDMI-1 --mode 1920x1080 --rate 119.98
See also
- https://wiki.ubuntu.com/X/Config/Resolution
- Debian Wiki — RandR 1.2 tutorial
- Xorg RandR 1.2 on ThinkWiki
- FAQVideoModes — more information about modelines
Is your screen (or external monitor) resolution is low? thus making the items on your screen look larger and less clear? Or do you want to simply increase the current maximum resolution or add a custom resolution?
In this article, we will show how to add missing or set custom display resolution in Ubuntu and its derivatives such as Linux Mint. By the end of this article, you will be able to set to a higher resolution, making content on your screen appear sharper and clearer.
Changing the Resolution or Orientation of the Screen Using Displays
Normally, to change the resolution or orientation of the screen, you can use the Displays graphical user interface tool (open the Activities overview and type Displays, click to open it or System Menu then type Displays and open it).
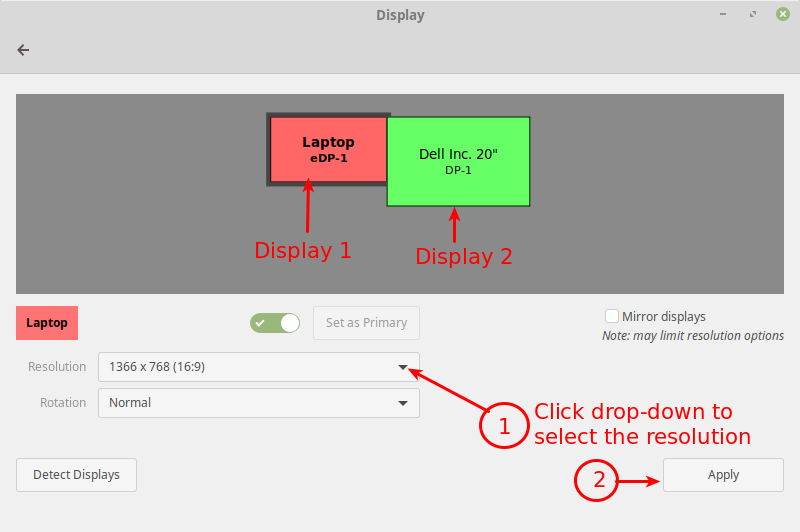
Note: In case you have multiple displays connected to your computer (as shown in the following image), if they are not mirrored, you can have different settings on each display. To change the settings for a display device, select it in the preview area.
Next, select the resolution or scale you want to use, and choose the orientation then click Apply. Then select Keep This Configuration.
Changing the Resolution or Orientation of the Screen Using Xrandr
Alternatively, you can also use the powerful xrandr tool (a command-line interface to RandR (Resize and Rotate) X Window System extension) which is used to set the size, orientation and/or reflection of the outputs for a screen.
You can also use it to set the screen size or list all active monitors as shown.
$ xrandr --listactivemonitors
To show the names of different outputs available on your system and resolutions available on each, run xrandr without any arguments.
$ xrandr
Set Screen Resolution in Ubuntu
To set the resolution for a screen for an external monitor named DP-1 to 1680×1050, use the --mode flag as shown.
$ xrandr --output DP-1 --mode 1680x1050
You can also set the refresh rate using the --rate flag as shown.
$ xrandr --output DP-1 --mode 1680x1050 --rate 75
You can also use the --left-of, --right-of, --above, --below, and --same-as options to arrange your screens either relatively to each other.
For example, I want my external monitor (DP-1) to be positioned left of the Laptop screen (eDP-1) in correspondence to the actual physical positioning:
$ xrandr --output DP-1 --left-of eDP-1
Keep in mind that any changes made using xrandr will only last until you log out or restart the system. To make xrandr changes persistently, use the xorg.conf configuration files for Xorg X server (run man xorg.conf for details on how to create a xorg.conf file) – this is the most effective method.
You can also use the ~/.xprofile file (add xrandr commands in it), however, there are some disadvantages of using this method, one is that this script is read fairly late in the startup process, thus it will not alter the resolution of the display manager (if you use one e.g lightdm).
How to Add Missing or Set Custom Display Resolution Using xrandr
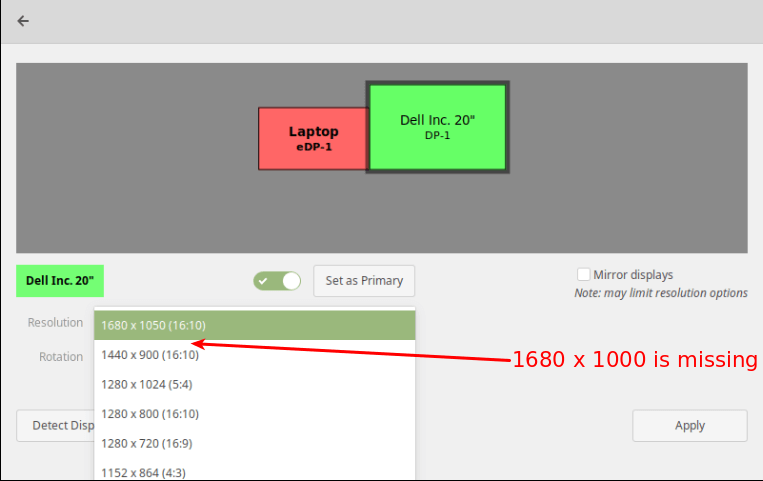
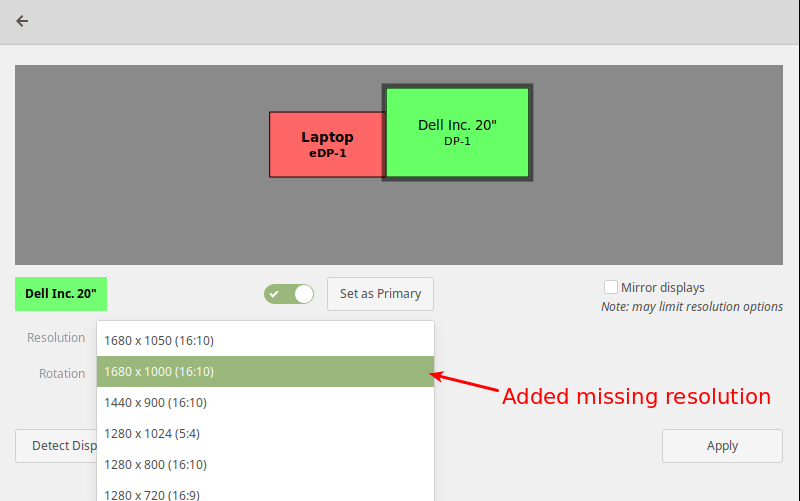
It is possible to add a missing or custom display resolution e.g 1680 x 1000 to Displays panel, for a specific display device (DP-1), as explained below.
To add a missing or custom display resolution, you need to calculate the VESA Coordinated Video Timing (CVT) modes for it. You can do this using the cvt utility as follows.
For example, if you need a horizontal and vertical resolution of 1680 x 1000, run the following command.
$ cvt 1680 1000
Next, copy the Modeline (“1680x1000_60.00″ 139.25 1680 1784 1960 2240 1000 1003 1013 1038 -hsync +vsync) from the output of the cvt command and use it to create a new mode using the xrandr as shown.
$ xrandr --newmode "1680x1000_60.00" 139.25 1680 1784 1960 2240 1000 1003 1013 1038 -hsync +vsync
Then add the new mode to the display.
$ xrandr --addmode DP-1 "1680x1000_60.00"
Now open the Displays and check if the new resolution has been added.
The above changes are only temporary and work for the current session (they last until you log out or restart the system).
To add the resolution permanently, create a script called external_monitor_resolution.sh in the directory /etc/profile.d/.
$ sudo vim /etc/profile.d/external_monitor_resol.sh
Then add the following lines in the file:
xrandr --newmode "1680x1000_60.00"  139.25  1680 1784 1960 2240  1000 1003 1013 1038 -hsync +vsync
xrandr --addmode DP-1 "1680x1000_60.00"
Save the changes and exit the file.
For more information on how xrandr works and how to use it, read its man page:
$ man xrandr
That brings us to the end of this article. If you have any thoughts to share or queries, reach us via the feedback form below.
If You Appreciate What We Do Here On TecMint, You Should Consider:
TecMint is the fastest growing and most trusted community site for any kind of Linux Articles, Guides and Books on the web. Millions of people visit TecMint! to search or browse the thousands of published articles available FREELY to all.
If you like what you are reading, please consider buying us a coffee ( or 2 ) as a token of appreciation.
We are thankful for your never ending support.
Как сменить разрешение дисплея из командной строки Linux
Если разрешение изображения на экране не соответствует паспортному разрешению дисплея, можно изменить разрешение при помощи командной строки.
На работе на ПК с операционной системой Linux Mint 19.3 имею широкоформатный дисплей с разрешением 1366 на 768 пикселей. Однажды загрузил компьютер с отключенным дисплеем и установилось разрешение 1024 на 768. Каким-то образом, это разрешение запомнилось и изображение стало растянутым.
Запуск диагностики основного дисплея выдал:
xrandr -d :0 -qScreen 0: minimum 8 x 8, current 1024 x 768, maximum 32767 x 32767
VGA1 connected primary 1024x768+0+0 (normal left inverted right x axis y axis) 0mm x 0mm
1024x768 60.00*
800x600 60.32 56.25
848x480 60.00
640x480 59.94
Как видно, разрешение 1024×768 выбрано системой, помечено символом звёздочка*.
Решение проблемы
-
Узнать модель дисплея (наклейка на задней крышке) — по модели установить максимально поддерживаемое разрешение.
В данном случае 1366 на 768 px при частоте обновления 60 Гц. -
Выполнить команду cvt с параметрами, соответствующими разрешению и частоте обновления:
cvt 1366 768 60В моём случае было выведено следующее:
# 1368x768 59.88 Hz (CVT) hsync: 47.79 kHz; pclk: 85.25 MHz
Modeline "1368x768_60.00" 85.25 1368 1440 1576 1784 768 771 781 798 -hsync +vsync
-
Надо взять строчку и подать на вход xrandr, чтобы создать новый режим:
xrandr --newmode "1368x768_60.00" 85.25 1368 1440 1576 1784 768 771 781 798 -hsync +vsync -
Узнать название дисплея — выводится командой xrandr:
xrandr -d :0 -q
в моём случае VGA1
- Добавить дисплею новый, ранее созданный режим:
xrandr --addmode VGA1 1368x768_60.00- Наконец, выполнил команду для изменения разрешение изображения (перевода дисплея в новый режим «1368x768_60.00»):
sudo xrandr --output VGA1 --mode 1368x768_60.00Дисплей может мигать и погаснуть. Если все пошло хорошо, изображение станет выбранного разрешения.
Если нужно, выполнить восстановление разрешения на 1024×768:
несколько раз нажимаем Enter и вводим в командную строку следующую команду
sudo xrandr --output VGA1 --mode 1024x768Если нужно, повторяем смену режима дисплея:
xrandr --output VGA1 --mode 1368x768_60.00нажать «Enter»
Ввод пароля sudo каждый раз не требуется.
Дополнение для монитора с разрешением 1280×1024:
cvt 1280 1024 60
xrandr --newmode "1280x1024_60.00"   109.00  1280 1368 1496 1712  1024 1027 1034 1063 -hsync +vsync
xrandr --addmode VGA-1 1280x1024_60.00
sudo xrandr --output VGA-1 --mode 1280x1024_60.00
Постоянная установка разрешения дисплея при входе в Linux
Я прописал следующие три команды в исполнимый файл.
Вначале создал пустой файл в домашней папке
nano resolution.shИ вставил в него 4 строки текста:
#!/bin/bash
xrandr --newmode "1368x768_60" 85.25 1368 1440 1576 1784 768 771 781 798 -hsync +vsync
xrandr --addmode VGA1 1368x768_60
xrandr --output VGA1 --mode 1368x768_60
Сохранил файл.
Такой же файл, но для монитора 1280×1024 прилагаю:
resolution.sh.zip
Дал права — выполнение только от текущего пользователя (владельца).
sudo chmod 700 resolution.shДобавил в автозагрузку (у меня оболочка LXQT):
Пуск — Параметры — Настройки LXQT — Настройки сеанса — Autostart — Add
sh /home/vladimir/resolution.sh.
Подтвердил и закрыл окно.
Другой вариант — добавить команды в файл в домашнем каталоге пользователя .xinitrc:
export GNOME_SHELL_SESSION_MODE=ubuntu
export XDG_CURRENT_DESKTOP=ubuntu:GNOME
export XDG_DATA_DIRS=/usr/share/openbox:/usr/local/share/:/usr/share/
xrandr --newmode "1280x1024_60.00" 109.00 1280 1368 1496 1712 1024 1027 1034 1063 -hsync +vsync
xrandr --addmode VGA-1 1280x1024_60.00
xrandr --output VGA-1 --mode 1280x1024_60.00
Вышел и вошел в систему, чтобы проверить. При входе дисплей мигнул и правильное разрешение дисплея применилось.
Также, командный файл resolution.sh можно запускать из окна Терминала.
Случай HDMI подключения и нескольких мониторов
В отличие от рассмотренного выше подключения через VGA-кабель, при использовании нескольких мониторов, подключенных через интерфейсы HDMI, синтаксис команды другой:
xrandr --newmode DVI-I-1 mode_name1 ...
xrandr --newmode DVI-I-2 mode_name2 ...
xrandr --addmode DVI-I-1 mode_name1
xrandr --addmode DVI-I-2 mode_name2
xrandr --output DVI-I-1 --mode mode_name1
xrandr --output DVI-I-2 --mode mode_name1
Названия интерфейсов мониторов можно получить при помощи той же команды
xrandr -qИсточники:
- https://askubuntu.com/questions/281509/…
- форум linuxmint.com
Похожие публикации
Содержание
- Разрешение монитора в Linux
- Проблема с разрешениеv монитора в Linux (Ubuntu)
- Изменение разрешения монитора в Linux
- Добавление нового разрешения монитора в Linux
- Добавление новой конфигурации монитора в автозагрузку
- Как изменить разрешение экрана в Linux
- 21.10.2018
- Как изменить разрешение экрана в Linux Mint 20.1 MATE
- Как поменять разрешение Linux Mint 20.1
- XRandR: настройка режимов работы с дисплеями (мониторами) в GNU/Linux
- Linux смена разрешения экрана через терминал
- Вывод доступных мониторов и режимов
- Изменение разрешения экрана.
- Добавление нового режима.
- Добавление новой конфигурации в автозагрузку.
Разрешение монитора в Linux
Проблема с разрешениеv монитора в Linux (Ubuntu)
Да, такое бывает часто. Слава Богу, Что эту проблему достаточно просто решить. В данной статье мы рассмотрим
Изменение разрешения монитора в Linux
Для того чтобы посмотреть, на что вообще способны по мнению Linux ваши мониторы (или монитор, если он один), нужно выполнить команду xrandr из консоли (Ctrl+Alt+T):
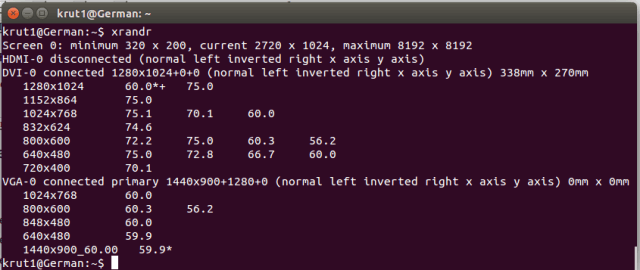
В результате вы получите что-то типа такого (у меня 2 монитора):
Вы можеет увидеть здесь два видеовыхода: DVI-0 и VGA-0, а ниже доступные разрешения для каждого из мониторов на этих видеовыходах. У вас выходы могут называться по разному: LVDS1 — экран ноутбука, VGA1 — экран, подключаемый через VGA, DVI1 — экран, подключаемый через DVI, HDMI — экран, подключенный через HDMI.
Вуаля, на вашем мониторе уже должно смениться разрешение 🙂
Добавление нового разрешения монитора в Linux
А что же делать, если нужного нам разрешения нет в предлагаемых? А вот что: можно просто добавить необходимое разрешение вручную. Для этого найдите характеристики вашего монитора и посмотрите, какое разрешение он поддерживает и на какой частоте. ВНИМАНИЕ! Если вы укажите частоту, на которой монитор работать не может, то потеряете графический интерфейс вашего Linux’а.
Ну к примеру, мы выяснили, что монитор Acer AL1916W отлично работает с разрешением 1440×900 на частоте в 60Гц. Давайте сгенерим для него так называемый конфиг командой cvt:
Вывод команды будет таким:
Отсюда нам нужна вторая строчка, а именно все, что находится после «Modeline»:
Далее мы создаем принципиально новый режим:
Осталось только привязать только что созданный режим к нужному монитору. Помните, в начале статьи мы смотрели, на каком выходе какой из мониторов? Привязка режима к конкретному монитору (выходу) делается так:
Ну вот, ваш монитор погас, включился и вы уже довольны 🙂
Добавление новой конфигурации монитора в автозагрузку
Да да да, вы спросите, и что, делать это каждый раз, когда запускается компьютер?
Нет, каждый раз делать этого не надо: просто не выключайте свой комп 🙂 Шучу. Можно просто добавить эту конфигурацию в автозагрузку, и Linux сам будет все это прекрасно делать при запуске. Как? Давайте по шагам:
Ну на будущее лучше создать в домашнем каталоге папку «.bin», в которой будут храниться все исполняемые скрипты (поверьте, пригодится). Ну и сразу перейдем в эту папку:
В папке создадим файл, назовем его, к примеру, load_screen.sh:
Открываем файл и добавляем в него все наши команды по созданию и добавлению режима монитора. Открыть файл:
Содержимое файла (для монитора, о котором идет речь в этой статье):
Закрываем (Ctrl+X) и сохраняем. Теперь нам надо на файл выставить права, чтоб его можно было выполнять, как команду:
Ну и осталось добавить его в так называемый автозапуск.
И в конец файла дописываем путь к нашему исполняемому скрипту. В итоге, файл 50-unity-greeter.conf у меня выглядит так (не забудьте, что имя пользователя у вас точно другое):
Всё! После перезагрузки разрешение монитора у вас уже должно сразу примениться. Ставьте лайки, друзья, если этот матриал был для вас полезен 😉
Источник
Как изменить разрешение экрана в Linux
21.10.2018
В последнее время часто приходилось сталкиваться с задачей изменения разрешения экрана в Linux. Найти её решение в интернете не сложно. Но чтобы не искать каждый раз решил оставить памятку и у себя на блоге. Дополнительно оказалось, что во многих таких решениях (по всей видимости скопированных друг у друга) демонстрируется непонимание вывода команды xrandr.
Прежде чем менять разрешение экрана нужно выяснить несколько моментов:
На первый и третий вопросы отвечает команда xrandr.
Согласно статье: «xrandr — это расширение X сервера, позволяющее производить настройки режимов работы мониторов».
Теперь главный вопрос, который вызывает непонимание: что выводится в двух колонках? Понятно, что в первой — разрешение экрана, а во второй — его частота в герцах. Но что это за разрешение? Во многих интернет ответах на вопрос «как изменить разрешение экрана в Linux» пишут, что это «доступные разрешения для уcтановки». Это не совсем так. Дальнейшие описываемые действия авторов (создание режима, его добавление непонятно куда и переключение на него) являются абсолютно лишними и только вводят читателей в заблуждение. Так что же выводит xrandr?
Она выводит список доступных режимов работы. То есть, если в нашем примере выводится разрешение 1440×900, то режим для него уже существует. Его не нужно заново создавать и тем более добавлять куда-то. Для переключения на него нужно использовать всего одну команду:
или более короткий вариант:
Команда —newmode нужна для создания нового режима, которого нет в выводе xrandr. А команда —addmode «рассказывает» о нем xrandr.
Допустим, мы хотим задать разрешение 1500×800. Его нет в выводе xrandr, поэтому нужно создать соответствующий ему режим. Но вначале нужно получить всю необходимую информацию. Это делается с помощью команды cvt. В терминале вбиваем:
Аббревиатура cvt расшифровывается как Coordinate Video Timings. Так называется стандарт (VESA-2013-3 v1.2), задающий тайминги компонентов видеосигнала. В качестве параметров утилиты cvt мы указываем желаемое разрешение. Ее вывод направляется в текстовый файл 1.txt (удобнее для последующего копирования текста). Открыв его, мы увидим следующее:
Для создания режима нам понадобится строка после слова Modeline. Обратите внимание: cvt несколько подкорректировала наш запрос. Видимо, так оно лучше соответствует стандартам. Теперь создаем режим и добавляем его в список доступных режимов.
Теперь если мы вновь проверим список доступных режимов, то увидим там наш режим
Осталось только переключиться на него любым описанным ранее способом.
Иногда при добавлении нового режима возникает ошибка.
Источник
Как изменить разрешение экрана в Linux Mint 20.1 MATE
После установки операционной системы она должна сама установить оптимальное разрешение экрана. Но иногда этого не происходит и пользователю приходиться самостоятельно изменять его. Если взять Windows то там все просто а вот с системами Linux могут возникнуть трудности. Изменить разрешения в них можно двумя способами, используя терминал но с этим справятся только опытные пользователи или используя графический интерфейс. Но даже используя графическую оболочку не опытному пользователю все равно будет сложно это сделать. Так как найти данные настройки будет не просто. Сегодня хочу рассказать и показать как это делается в операционной системе Linux Mint 20.1 MATE. Рассмотрим оба варианта.
Прежде чем продолжить дальше хочу вам порекомендовать ранее написанные мною статьи на тему настройки ОС Linux Mint 20.1.
Как поменять разрешение Linux Mint 20.1
Найти настройки экрана можно в «Центре управления» который в свою очередь находиться в пуске.
В открывшемся окне переходим в раздел «Оборудование» и выбираем пункт «Экраны».
Вот тут и можно изменить разрешение экрана, указать частоту обновления Гц и ориентацию.
Теперь рассмотрим второй вариант изменения разрешения экрана через терминал. Первое что нужно сделать это узнать все доступные разрешения введя команду
После этого вы должны увидеть количество подключенных мониторов и доступных для разрешений экрана. Так как у меня Linux Mint 20.1 установлена на виртуальную машину, монитор называется Virtual1 и ниже отображен список, из которого я могу выбрать.
Для того чтобы изменить разрешение нужно ввести команду.
xrandr —output Virtual1 —mode 1280×768
Кстати таким образом можно изменить разрешения экрана практически в любой операционной систем Linux. Так же кода будет вводить команду не ставьте лишних пробелов. Например, если вы напишите так.
xrandr —output Virtual1 — mode 1280×768
Команда не сработает, если кто не заметил то я постав пробел вот тут —_mode.
В общем все достаточно просто, главное нужно быть внимательней.
Источник
XRandR: настройка режимов работы с дисплеями (мониторами) в GNU/Linux
Дата добавления: 31 марта 2012
Изменение разрешения
Лучше всего рассмотреть пример:
Режимы работы с несколькими мониторами
Отключение дисплея
Отключить не нужный в данный момент дисплей можно с помощью опции —off:
После этого у вас будет виртуальное разрешение 1280×720 при 1024×600 физическом.
Сохранение настроек
Для активации необходимых настроек при старте, создайте файл
/ указывает на расположение в домашней директории) и внесите в него необходимые строки команд xrandr.
Статья частично основана по материалам англоязычной документации.
/.xprofile должен быть исполняемым. В англоязычной версии это описано. Я, как новичок, этого не сделал. И, как следствие, при запуске системы разрешение не устанавливается на нужное автоматически. А таких новичков много в сети.
/.xprofile (можно использовать редактор nano).
xrandr вообще отвечает Can’t open display.
А вот как xrandr выглядит в другой системе (зашла со спас.диска):
$ xrandr
Screen 0: minimum 320 x 200, current 1024 x 768, maximum 4096 x 4096
VGA-1 connected 1024×768+0+0 (normal left inverted right x axis y axis) 350mm x 260mm
1600×1200 60.0 60.0
1280×1024 75.0 59.9
1024×768 85.0 75.1 60.0*
800×600 100.0 85.1 75.0 60.3
640×480 85.0 60.0
720×400 70.1
DVI-I-1 disconnected (normal left inverted right x axis y axis)
TV-1 connected 1024×768+0+0 (normal left inverted right x axis y axis) 0mm x 0mm
720×576 50.0 +
1024×768 50.0*
800×600 50.0
720×480 50.0
640×480 50.0
400×300 100.0
320×240 100.0
320×200 100.0
Первый способ:
в начале загрузки выбрать recovery mode,
в recovery mode выбрать resume normal boot,
выйдет предупреждение, что это типа Safe mode и не все графические драйверы могут работать,
кликнула ОК, загрузка продолжилась, пришла куда хотела, всё работает как всегда.
Правда, при перезагрузке та же засада, монитор отключается, т.е. recovery mode теперь пожизненно, если не переписать config файл (но КАКОЙ именно. ).
Ну и ладно, всё равно новую ставить пора, сейчас у меня Минт14 Надя, если кому интересно.
Теперь спокойненько, с кофе и булочкой, бэкапнула закладки и попробую создать файл по вашему совету. 🙂
Спасибо, что поддержали!
$ xrandr
Screen 0: minimum 8 x 8, current 1024 x 768, maximum 32767 x 32767
DP1 disconnected (normal left inverted right x axis y axis)
HDMI1 disconnected (normal left inverted right x axis y axis)
VGA1 disconnected (normal left inverted right x axis y axis)
VIRTUAL1 disconnected (normal left inverted right x axis y axis)
user@ubuntu:
Источник
Linux смена разрешения экрана через терминал
Бывает, что когда вы установили Ubuntu на свой компьютер и подключаете монитор по dvi, но вот максимальное разрешение экрана, на 19-дюймовом мониторе, было 1024х768 вместо 1440х900. Для этого можно воспользоваться программой XRandR.
XRandR — расширение X-сервера, позволяющее производить настройки режимов работы мониторов. Например, можно изменить разрешение, вывести изображение на внешний монитор, повернуть изображение и тому подобное. Утилита часто полезна для настройки корректного разрешения при подключении к внешнему монитору или телевизору.
Вывод доступных мониторов и режимов
Введя в терминале xrandr вы увидите список интерфейсов, по которым могут быть подключены мониторы и доступные режимы работы монитора (разрешение и частота смена кадров в герцах).
Вот пример вывода этой команды:
Возможные названия интерфейсов:
Названия интерфейсов могут отличаться в зависимости от используемой видеокарты. Для последующей работы с конкретным интерфейсом, необходимо запомнить его название (например, VGA1 если мы работам на видео от Intel и подключаем монитор по VGA).
Изменение разрешения экрана.
В предыдущем пункте мы выполнили вывод существующих режимов разрешений экрана:
1366×768 60.0 +
1360×768 59.8 60.0
1024×768 60.0
800×600 60.3* 56.2
640×480 59.9
Чтобы установить любое из этих разрешений, выполняется следующая команда:
Добавление нового режима.
Добавление новой конфигурации в автозагрузку.
Добавленный новый режим разрешения экрана у нас сохранится до тех пор, пока не будет перезагружен компьютер.
Поэтому создадим скрипт sh с нашими командами. И добавим его в конфигурации lightdm.conf.
1. Создаем sh скрипт и проверяем его.
Ничего сложного нет в этом. Советую создать папку «.bin» в домашнем каталоге, куда будете складывать скрипты. Туда удобно складывать скрипты.
Итак создаем теперь новый документ, называем его как захочется, к примеру screen.sh. В текстовым редакторе добавляем туда наши все команды (полученные выше) по порядку:
Сохраняем, закрываем, жмем правой кнопкой мыши по файлу и на вкладке «Права» ставим галочку «Разрешить выполнение как программы».
Естественно меняем путь до вашего скрипта после «=» на свой.
В итоге должно получиться так:
Добавим этот скрипт в Автозагрузку системы.(/etc/xdg/autostart)
Источник
В последнее время часто приходилось сталкиваться с задачей изменения разрешения экрана в Linux. Найти её решение в интернете не сложно. Но чтобы не искать каждый раз решил оставить памятку и у себя на блоге. Дополнительно оказалось, что во многих таких решениях (по всей видимости скопированных друг у друга) демонстрируется непонимание вывода команды xrandr.
Прежде чем менять разрешение экрана нужно выяснить несколько моментов:
- какое разрешение у нас сейчас;
- какое разрешения нам нужно;
- через какой интерфейс (порт) подключен монитор.
На первый и третий вопросы отвечает команда xrandr.
Согласно статье: «xrandr — это расширение X сервера, позволяющее производить настройки режимов работы мониторов».
Вот что мы видим:
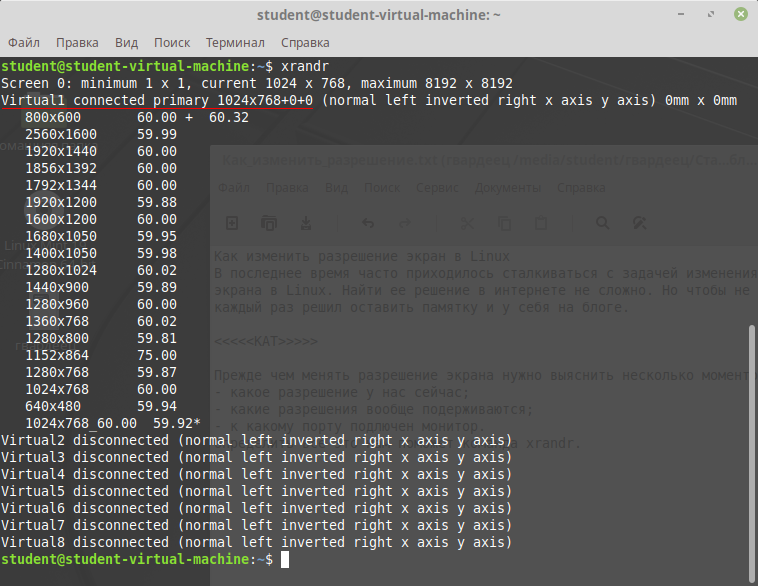
- наш монитор подключен к интерфейсу Virtual1 и работает с разрешением 1024х768 пикселей (соответствующая строка помечена на рисунке, так же соответствующее разрешение помечается звездочкой в списке);
- список доступных интерфейсов (Virtual1, Virtual2, Virtual3 и т.д.). Мы не будем менять интерфейс.
Теперь главный вопрос, который вызывает непонимание: что выводится в двух колонках? Понятно, что в первой — разрешение экрана, а во второй — его частота в герцах. Но что это за разрешение? Во многих интернет ответах на вопрос «как изменить разрешение экрана в Linux» пишут, что это «доступные разрешения для уcтановки». Это не совсем так. Дальнейшие описываемые действия авторов (создание режима, его добавление непонятно куда и переключение на него) являются абсолютно лишними и только вводят читателей в заблуждение. Так что же выводит xrandr?
Она выводит список доступных режимов работы. То есть, если в нашем примере выводится разрешение 1440×900, то режим для него уже существует. Его не нужно заново создавать и тем более добавлять куда-то. Для переключения на него нужно использовать всего одну команду:
xrandr --output Virtual1 --mode 1440x900
или более короткий вариант:
xrandr -s 1440x900
Команда —newmode нужна для создания нового режима, которого нет в выводе xrandr. А команда —addmode «рассказывает» о нем xrandr.
Допустим, мы хотим задать разрешение 1500×800. Его нет в выводе xrandr, поэтому нужно создать соответствующий ему режим. Но вначале нужно получить всю необходимую информацию. Это делается с помощью команды cvt. В терминале вбиваем:
cvt 1500 800 >1.txt
Аббревиатура cvt расшифровывается как Coordinate Video Timings. Так называется стандарт (VESA-2013-3 v1.2), задающий тайминги компонентов видеосигнала. В качестве параметров утилиты cvt мы указываем желаемое разрешение. Ее вывод направляется в текстовый файл 1.txt (удобнее для последующего копирования текста). Открыв его, мы увидим следующее:
# 1504×800 59.92 Hz (CVT) hsync: 49.80 kHz; pclk: 98.00 MHz
Modeline «1504x800_60.00» 98.00 1504 1584 1736 1968 800 803 813 831 -hsync +vsync
Для создания режима нам понадобится строка после слова Modeline. Обратите внимание: cvt несколько подкорректировала наш запрос. Видимо, так оно лучше соответствует стандартам. Теперь создаем режим и добавляем его в список доступных режимов.
xrandr --newmode "1504x800_60.00" 98.00 1504 1584 1736 1968 800 803 813 831 -hsync +vsync
xrandr --addmode Virtual1 1504x800_60.00
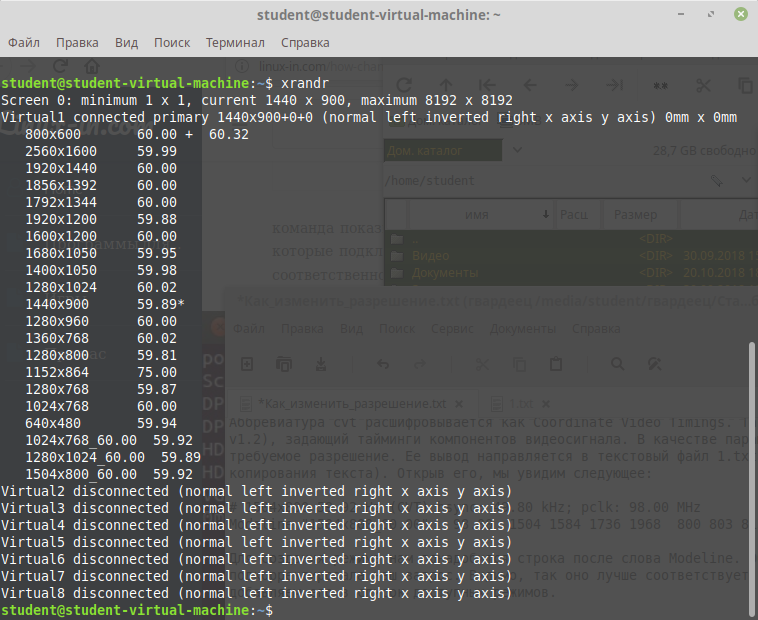
Теперь если мы вновь проверим список доступных режимов, то увидим там наш режим
Осталось только переключиться на него любым описанным ранее способом.
Иногда при добавлении нового режима возникает ошибка.
Как пишут на форумах, данная проблема появляется на закрытых драйверах nvidia. Ее решение, как правило, основывается на ручном редактировании файла настроек xorg.conf. Но об этом может быть в другой раз.
P.S. Имена интерфейсов (Virtual1, Virtual2 и т.д.) выглядят необычно потому, что ве эти эксперименты проводились на виртуальной машине. На реальной аппаратуре они обычно имеют вид: VGA1, DVI1 и др. Например, на моем стационарном компьютере с Linux на борту доступны интерфейсы: VGA-0, DVI-D-0 и HDMI-0.
P.P.S. Согласно википедии: «VESA(Video Electronics Standards Association) — ассоциация стандартизации видеоэлектроники, основанная в 1989 году компанией NEC Home Electronics и восемью другими производителями видеоадаптеров. Первоначально задачей ставилось создание стандарта SVGA(800х600 пикселей) для видеодисплеев. После этого, VESA продолжила создавать стандарты, в основном относящиеся к функционированию видео периферии в IBM-совместимых компьютерах.»


