Suggest a change
Success!
Thank you for helping us improve the quality of Unity Documentation. Although we cannot accept all submissions, we do read each suggested change from our users and will make updates where applicable.
Close
Submission failed
For some reason your suggested change could not be submitted. Please <a>try again</a> in a few minutes. And thank you for taking the time to help us improve the quality of Unity Documentation.
Close
Your name
Your email
Suggestion*
Cancel
Switch to Manual
Description
A Quaternion that stores the rotation of the Transform in world space.
using UnityEngine;// Transform.rotation example.
// Rotate a GameObject using a Quaternion. // Tilt the cube using the arrow keys. When the arrow keys are released // the cube will be rotated back to the center using Slerp.
public class ExampleScript : MonoBehaviour { float smooth = 5.0f; float tiltAngle = 60.0f;
void Update() { // Smoothly tilts a transform towards a target rotation. float tiltAroundZ = Input.GetAxis("Horizontal") * tiltAngle; float tiltAroundX = Input.GetAxis("Vertical") * tiltAngle;
// Rotate the cube by converting the angles into a quaternion. Quaternion target = Quaternion.Euler(tiltAroundX, 0, tiltAroundZ);
// Dampen towards the target rotation transform.rotation = Quaternion.Slerp(transform.rotation, target, Time.deltaTime * smooth); } }
Suggest a change
Success!
Thank you for helping us improve the quality of Unity Documentation. Although we cannot accept all submissions, we do read each suggested change from our users and will make updates where applicable.
Close
Submission failed
For some reason your suggested change could not be submitted. Please <a>try again</a> in a few minutes. And thank you for taking the time to help us improve the quality of Unity Documentation.
Close
Your name
Your email
Suggestion*
Cancel
Switch to Manual
Description
Use Transform.Rotate to rotate GameObjects in a variety of ways. The rotation is often provided as an Euler angle and not a Quaternion.
You can specify a rotation in world axes or local axes.
World axis rotation uses the coordinate system of the Scene, so when you start rotate a GameObject, its x, y, and z axes are aligned with the x, y, and z world axes. So if you rotate a cube in world space, its axes align with the world. When you select a cube in the Unity Editor’s Scene view, rotation Gizmos appear for the left/right, up/down and forward/back rotation axes. Moving these Gizmos rotates the cube around the axes. If you de-select and then re-select the cube, the axes restart in world alignment.
Local rotation uses the coordinate system of the GameObject itself. So, a newly created cube uses its x, y, and z axis set to zero rotation. Rotating the cube updates the rotation axes. If you de-select and the re-select the cube, the axes are shown in the same orientation as before.
![]()
A cube not rotated in Local Gizmo Toggle
![]()
A cube rotated in Local Gizmo Toggle
![]()
A cube not rotated in Global Gizmo Toggle
![]()
A cube rotated in Global Gizmo Toggle
For more information on Rotation in Unity, see Rotation and Orientation in Unity.
Declaration
public void Rotate(Vector3 eulers,
Space relativeTo = Space.Self);
Parameters
| eulers | The rotation to apply in euler angles. |
| relativeTo | Determines whether to rotate the GameObject either locally to the GameObject or relative to the Scene in world space. |
Description
Applies a rotation of eulerAngles.z degrees around the z-axis, eulerAngles.x degrees around the x-axis, and eulerAngles.y degrees around the y-axis (in that order).
Rotate takes a Vector3 argument as an Euler angle. The second argument is the rotation axes, which can be set to local axis (Space.Self) or global axis (Space.World). The rotation is by the Euler amount.
Declaration
public void Rotate(float xAngle,
float yAngle,
float zAngle,
Space relativeTo = Space.Self);
Parameters
| relativeTo | Determines whether to rotate the GameObject either locally to the GameObject or relative to the Scene in world space. |
| xAngle | Degrees to rotate the GameObject around the X axis. |
| yAngle | Degrees to rotate the GameObject around the Y axis. |
| zAngle | Degrees to rotate the GameObject around the Z axis. |
Description
The implementation of this method applies a rotation of zAngle degrees around the z axis, xAngle degrees around the x axis, and yAngle degrees around the y axis (in that order).
Rotate can have the euler angle specified in 3 floats for x, y, and z.
The example shows two cubes: one cube uses Space.Self (the local space and axes of the GameObject) and the other uses Space.World (the space and axes in relation to the /Scene/). They are both first rotated 90 in the X axis so they are not aligned with the world axis by default. Use the xAngle, yAngle and zAngle values exposed in the inspector to see how different rotation values apply to both cubes. You might notice the way the cubes visually rotate is dependant on the current orientation and Space option used. Play around with the values while selecting the cubes in the scene view to try to understand how the values interact.
using UnityEngine;// Transform.Rotate example // // This script creates two different cubes: one red which is rotated using Space.Self; one green which is rotated using Space.World. // Add it onto any GameObject in a scene and hit play to see it run. The rotation is controlled using xAngle, yAngle and zAngle, modifiable on the inspector.
public class ExampleScript : MonoBehaviour { public float xAngle, yAngle, zAngle;
private GameObject cube1, cube2;
void Awake() { cube1 = GameObject.CreatePrimitive(PrimitiveType.Cube); cube1.transform.position = new Vector3(0.75f, 0.0f, 0.0f); cube1.transform.Rotate(90.0f, 0.0f, 0.0f, Space.Self); cube1.GetComponent<Renderer>().material.color = Color.red; cube1.name = "Self";
cube2 = GameObject.CreatePrimitive(PrimitiveType.Cube); cube2.transform.position = new Vector3(-0.75f, 0.0f, 0.0f); cube2.transform.Rotate(90.0f, 0.0f, 0.0f, Space.World); cube2.GetComponent<Renderer>().material.color = Color.green; cube2.name = "World"; }
void Update() { cube1.transform.Rotate(xAngle, yAngle, zAngle, Space.Self); cube2.transform.Rotate(xAngle, yAngle, zAngle, Space.World); } }
Declaration
public void Rotate(Vector3 axis,
float angle,
Space relativeTo = Space.Self);
Parameters
| angle | The degrees of rotation to apply. |
| axis | The axis to apply rotation to. |
| relativeTo | Determines whether to rotate the GameObject either locally to the GameObject or relative to the Scene in world space. |
Description
Rotates the object around the given axis by the number of degrees defined by the given angle.
Rotate has an axis, angle and the local or global parameters. The rotation axis can be in any direction.
Declaration
public void Rotate(Vector3 eulers);
Parameters
| eulers | The rotation to apply in euler angles. |
Description
Applies a rotation of eulerAngles.z degrees around the z-axis, eulerAngles.x degrees around the x-axis, and eulerAngles.y degrees around the y-axis (in that order).
The rotation is relative to the GameObject’s local space (Space.Self).
Declaration
public void Rotate(float xAngle,
float yAngle,
float zAngle);
Parameters
| xAngle | Degrees to rotate the GameObject around the X axis. |
| yAngle | Degrees to rotate the GameObject around the Y axis. |
| zAngle | Degrees to rotate the GameObject around the Z axis. |
Description
The implementation of this method applies a rotation of zAngle degrees around the z axis, xAngle degrees around the x axis, and yAngle degrees around the y axis (in that order).
The rotation is relative to the GameObject’s local space (Space.Self).
Declaration
public void Rotate(Vector3 axis,
float angle);
Parameters
| axis | The axis to apply rotation to. |
| angle | The degrees of rotation to apply. |
Description
Rotates the object around the given axis by the number of degrees defined by the given angle.
Rotate has an axis, angle and the local or global parameters. The rotation axis can be in any direction.
The rotation is relative to the GameObject’s local space (Space.Self).
Rotating an object in Unity can be very straightforward.
However,
Just as there are many different ways to move an object, there are many different ways to rotate one too.
Which means that knowing the right method to use, in order to get the effect that you want, can be a little confusing at first.
But don’t worry, because in this in-depth guide I’ll show you all of the different methods for rotating an object in Unity, and the best time to use each of them, step by step.
Here’s what you’ll find on this page:
- How to rotate an object in Unity
- How to rotate an object around a point in Unity
- How to rotate a vector in Unity
- How to rotate the camera around an object in Unity
- How to rotate an object towards another
- How to rotate an object over time (Lerp & Slerp)
- How to Rotate a Rigidbody with the mouse
- How to Rotate objects in 2D
Rotation in Unity: Overview video
For a general overview of how to rotate in Unity, try my video, or continue to the full article below.
How to rotate an object in Unity
There are a lot of different ways to rotate an object in Unity.
Some methods are simple, some are more complex.
While others work best for certain tasks.
But don’t worry,
While there are a lot of different options available to you, many of them work in similar ways.
Which means that once you’re used to the basics of rotating an object in Unity, you’ll find it easier to use some of the more advanced rotation features that Unity offers.
So what is the basic method?
Rotation in Unity typically works by specifying an amount of rotation in degrees around the X, Y or Z axis of an object.
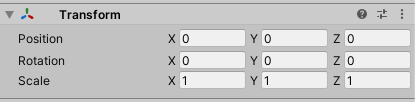
In the Inspector, you’ll see an object’s rotation as a Vector 3 value:
In the same way that a game object’s position in the world can be set using its Transform component…
Like this:
Vector3 newPosition = new Vector3(0, 10, 0);
transform.position = newPosition;
An object’s rotation can also be set directly via its Transform,
Like this:
Vector3 newRotation = new Vector3(0, 10, 0);
transform.eulerAngles = newRotation;
In this example, I’ve set the rotation of the object to 10 degrees around the Y Axis.
Rotational vector 3 values describe a degree of rotation around each of the 3 axes, X Y and Z.
Notice, however, that I didn’t set the rotation property directly like I might do when setting an object’s position, for example.
Instead, I set a different property, Euler Angles.
Why did I do it like that?
Behind the scenes, Unity calculates rotation using Quaternions, meaning that the rotation property of an object is not actually a Vector 3, it’s a Quaternion.
The rotation value you see in the Inspector is the real Quaternion rotation converted to a Vector 3 value, an Euler Angle, which is rotation expressed as an XYZ value for pitch, yaw and roll.
So, when using Transform.eulerAngles, you’re essentially setting and reading a converted value.
This means that if you want to set the rotation property directly, you’ll need to use a Quaternion value instead.
Like this:
// Copies another object's rotation
Quaternion objectRotation = otherObject.transform.rotation;
transform.rotation = objectRotation;
Or, instead of working in Quaternions, you can convert a Vector 3 Euler Angle rotation into a Quaternion.
Like this:
transform.rotation = Quaternion.Euler(new Vector3(0,10,0));The Euler Angles property is a convenient way to set and read an object’s rotation in a format that’s easier to read and work with than Quaternions.
Quaternions vs Euler Angles in Unity
Should you use Quaternions or Euler Angles in Unity?
While Unity uses Quaternions behind the scenes, many of Unity’s rotation functions will allow you to use either type of value, either natively or by converting the value.
But which is better?
Generally speaking, Unity uses Quaternions because they’re efficient and avoid some of the problems of using Euler Angles, such as gimbal lock, which is the loss of a degree of movement when two axes are aligned the same way.
However, Quaternions are complex and aren’t designed to be worked with directly.
Euler Angles, on the other hand, are easier to read and work with.
Because of this, if you want to manually set a rotation, or provide a rotation amount in degrees, then it will be much easier to use an Euler Angle value to do so, and you’ll likely find that there’s an Euler based function available for you to do just that.
However, you may start to run into problems if you directly apply Euler Angle based rotation on a per axis basis or manually over time.
So what’s the answer?
It’s best to think of Euler Angles as a method of describing Quaternions in Unity.
They make reading and manually setting the rotation of an object easier to do.
However…
Trying to work exclusively in Euler Angles can cause unexpected behaviour.
For example, the converted Euler Angle value can vary, since the same Quaternion rotation can be described using different Euler values, or you might reintroduce gimbal lock by trying to work only with Euler Angles in local variables.
In practice, when using Unity’s built-in rotation functions, you shouldn’t need to worry about gimbal lock, even when passing in Euler Angles.
Unity will convert the Euler value and work with Quaternions behind the scenes, avoiding the typical problems associated with Eulers, while keeping their ease of use.
So while it’s generally better to use Quaternions when you can, there’s nothing wrong with using Euler Angles with Unity’s built-in rotation functions.
Setting the rotation of an object directly via its rotation property can be very straightforward.
However…
While this works well for setting an absolute rotation, one time, it’s not as useful for adding rotation to an object.
For example, to rotate an object by a set amount of degrees from its current orientation to a new one.
For that, you’ll need the Rotate function.
How to Rotate an object in Unity using the Rotate function
While setting the Euler Angles property of an object changes its absolute rotation, there will often be times when you want to add an amount of rotation to an object instead.
For example, to turn an object round by 90 degrees:
void RotateByDegrees()
    {
        Vector3 rotationToAdd = new Vector3(0, 90, 0);
        transform.Rotate(rotationToAdd);
    }
Instead of setting the rotation directly, like before, the Rotate function adds 90 degrees to the Y-Axis every time it’s called.
Or you could add rotation every frame to make an object spin smoothly.
Like this:
float degreesPerSecond = 20;
private void Update()
{
    transform.Rotate(new Vector3(0, degreesPerSecond, 0) * Time.deltaTime);
}
In this example, I’m multiplying the rotation amount by Time.deltaTime (the duration of the last frame) to make sure that the rotation is smooth and consistent.
Even if you’re a beginner, you may have already multiplied values by Delta Time before in Unity, as it’s usually required for any kind of function that occurs over time, such as movement, rotation or lerping. This is to make sure that, even if the framerate changes, the amount of movement over time remains the same.
In this case, it changes the amount of rotation from 20 degrees per frame to 20 degrees per second.
Which looks like this:
Rotate vs Rotation in Unity
Typically, Rotation in Unity refers to the rotation property of an object. In other words, the rotation values you see in the inspector, while Rotate is a function for adding an amount of rotation to an object.
So if you want to read the rotation of an object, or set it directly, you’d typically use the rotation property (or the Vector 3 shortcut: transform.eulerAngles). Whereas, if you want to apply an amount of rotation to an object, the Rotate function is designed to do exactly that.
Local rotation vs world rotation
An object’s rotation in Unity can be relative to the world or it can be local, where the rotation amount is relative to the rotation of its parent object.
Both an object’s local rotation and its absolute world rotation can be read as properties of the object’s transform.
Vector3 worldRotation = transform.eulerAngles;
Vector3 localRotation = transform.localEulerAngles;
A lot of the time, the local and world rotation of an object will be the same.
This is because, either the object that’s being rotated doesn’t have a parent object or because that parent object doesn’t have any rotation applied to it, in which case there’s no difference between the two values.
For example, if you rotate a child object by 90 degrees but don’t apply any rotation to the parent object, then the world rotation and the local rotation of the child object will both be the same.
This makes sense, because the child object has an amount of rotation applied to it which, when added to the parent’s rotation of zero, matches the object’s real rotation in the world.
However, if you only apply rotation to an object’s parent then the local rotation value for the child object will be different.
While the world rotation will match the parent, the local rotation will be zero, as no rotation is being applied by the child object’s transform.
Put simply, the world rotation value is the absolute rotation relative to world space. In this example, it’s the rotation of the parent object plus any locally applied rotation, if there is any. While the local rotation value is just the extra rotation added by that object’s Transform component.
So, which one should you use?
When working with rotation directly, for example when setting the rotation of an object via its Euler Angle property, you’ll have the option to set either its world rotation or its local rotation.
By default, when setting rotation directly, you’re setting the object’s world rotation:
// World Rotation
transform.eulerAngles = new Vector3(0,90,0);
Setting the world rotation of a child object will rotate it into that position absolutely.
This means that if the object has a parent with any rotation, the local rotation of the child will not be set to the new rotation value as you might expect. Instead, it will be set to a value that is equal to the difference between the parent’s rotation and the world rotation.
Basically, the local rotation will be set to whatever it needs to be in order to achieve the absolute world rotation you specified.
For example, if you set a child object to a world rotation of 50 degrees around an axis, and the object’s parent is already rotated by 10 degrees, the child object’s rotation will be set to 40 degrees, not the 50 you passed in.
The rotation of the object will technically be correct, you’ll get exactly what you asked for, but you may get some confusing results if you apply world rotation to child objects in this way.
So if you find that, when setting the rotation of an object via scripting, the Inspector values and the rotation don’t match, it might be because you’re setting the world rotation of a child object.
If, however, you only want to apply rotation locally, you can do that by using the local rotation value:
// Local Rotation
transform.localEulerAngles = new Vector3(0,90,0);
A lot of the time, this won’t make any difference.
When the object you rotate doesn’t have a parent, or if the parent isn’t rotated, using either method will produce the same effect.
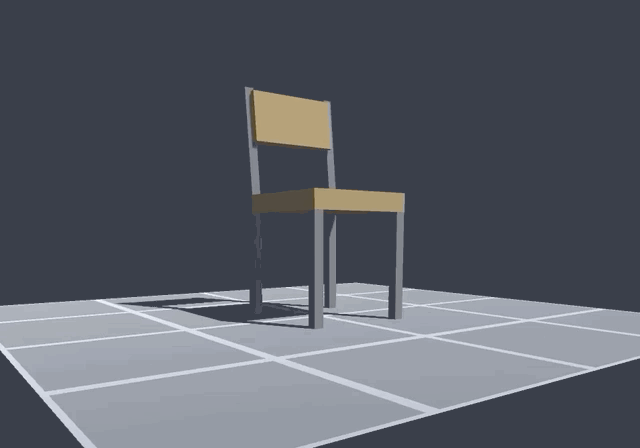
However, there may be times when you’d like to position an object one way and rotate it another.
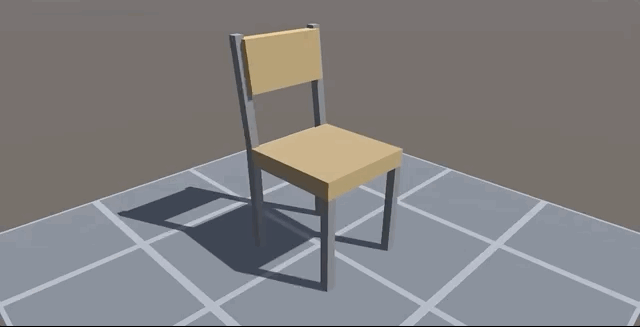
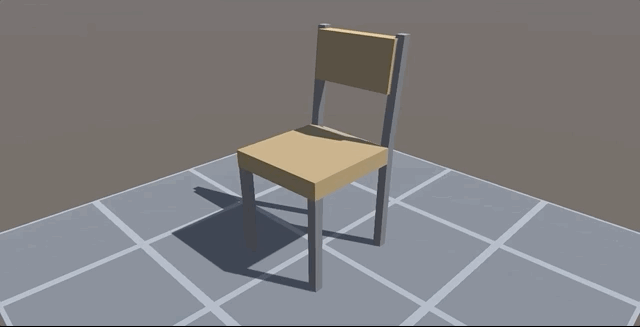
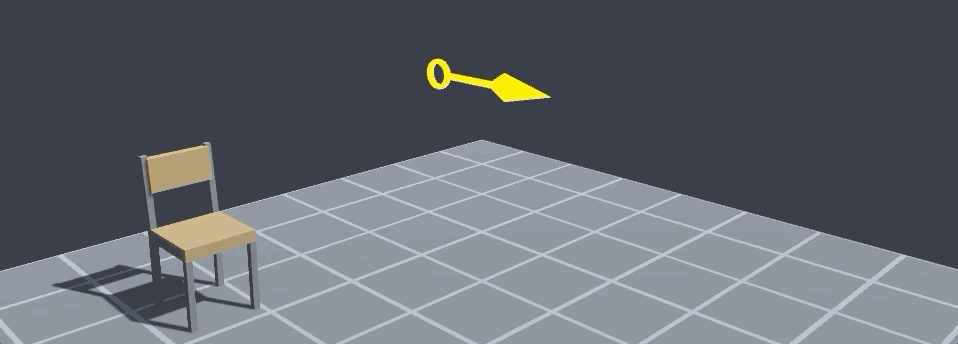
For example, if you want to spin an object that’s already rotated, like this titled chair:
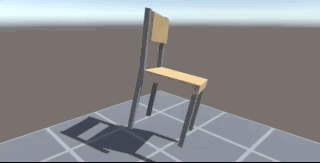
This chair is already rotated but spins on a flat Y-Axis.
One of the easiest ways to achieve this, and other rotation effects like it, is to simply nest the object inside another empty game object.

The child object can then be tilted to any local rotation you like, while the parent container can be automatically rotated on a flat Y-Axis in world space.
Separating the orientation of an object from its rotation like this can be useful for making rotation simpler to manage and easier to control.
Alternatively, if you don’t want to nest objects together, many of Unity’s built-in rotation functions, such as Transform Rotate can be overridden to operate in local or world space, recreating this effect, without the need for additional game objects.
How to rotate an object around a point in Unity
Rotating an object in Unity around one of its axes can be very simple.
For example, spinning a cube or turning an object upside-down can be very straightforward.
However…
As you start to rotate more complex objects, you may begin to notice that the position of the pivot point around which an object rotates is just as important as the rotation itself.
For example, if you build a basic door out of some primitive shapes, and then try to rotate it by 90 degrees to open it, you’ll quickly notice that something is wrong.
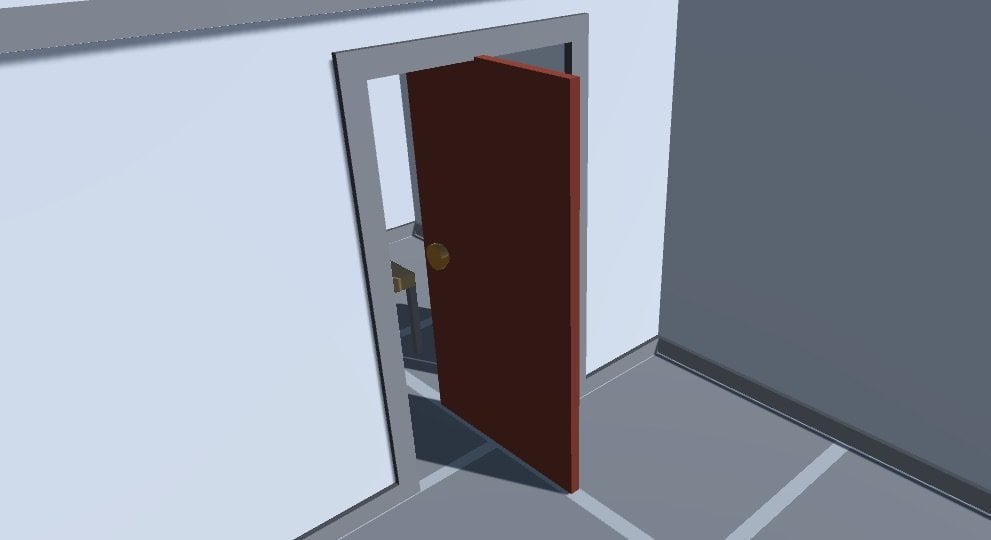
This is not how doors work.
In this example, I’ve built a door out of primitive objects, which means that the pivot point for the parent object, the main part of the door in my case, is in the centre.
This means that, when I rotate the object on its Y-Axis, it rotates around its centre.
Which, as I’m sure you’ve noticed, is not how most doors work.
So what can I do about it?
To fix it, I need to change the pivot point of the 3D object.
How to move the pivot point of a 3d object
Usually, when working with 3D objects that have been created using other tools, the pivot point of the object is set when the object is created.
For example, if I purchase a door model from the Asset Store, chances are that the pivot point will be in the correct place, on the door’s hinge.
I didn’t do that so, instead, I need to move the pivot point to a different position that allows me to rotate the door in the way I want.
Luckily it’s an easy problem to solve, by adding the game object you want to rotate as a child of another object that can act as a pivot point.
Here’s how:
- Place the object you want to rotate in position
- Next, create a new game object, the pivot, and place it at the pivot point of the rotation. Keep it separate while you’re positioning it.
- Finally, in the hierarchy, drag the object you want to rotate on to the pivot object, making it a child of the pivot
Then, instead of rotating the object directly, simply rotate the pivot.
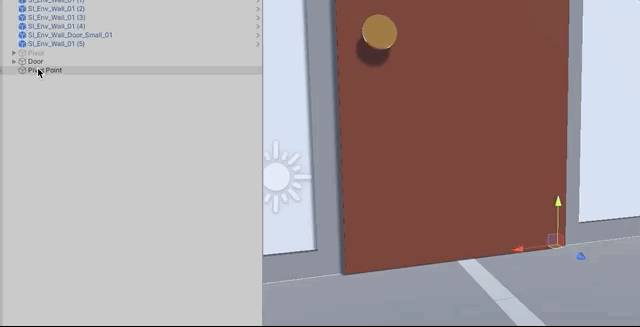
Creating a parent object is an easy way to change the pivot point in Unity
The same technique can be used to centre an object’s pivot point if, for whatever reason, it’s not already in the middle of your object.
You could even nest the root object (now the pivot) in another object that doesn’t rotate, and manage the local rotation of the pivot using a script.
Creating a parent object is an easy way to move the pivot point of an object.
However, it’s also possible to rotate an object around a point, without creating a parent object pivot, using Rotate Around.
How to use Rotate Around in Unity
Rotate Around works in a similar way to the parent object pivot method.
However, instead of creating a pivot point object and rotating it, the Rotate Around function takes a Vector 3 position, in world space, an axis to rotate around, and an angle in degrees.
Transform.RotateAround(Vector3 point, Vector3 axis, float angle);This means that you can use Rotate Around to rotate an object either around a fixed point in world space,
Like this:
Vector3 pivotPoint = new Vector3 (-3.5f,0,0);
void RotateAroundPoint()
{
    // Rotates around the pivot point and the Y-Axis by 90 degrees
    transform.RotateAround(pivotPoint, Vector3.up, 90);
}
Or around another object entirely,
Like this:
public Transform objectToRotateAround;
void RotateAroundObject()
{
    // Rotates around the pivot object's position and the Y-Axis by 90 degrees
    transform.RotateAround(objectToRotateAround.position, Vector3.up, 90);
}
When using Rotate Around, the first argument, the Vector 3 point, is the pivot of the rotation while the 2nd Vector 3, the axis, decides which direction rotation will be applied.
This is important, as it determines which route around the point the object will rotate.
Finally, the float value, the angle, is the amount of rotation that will be applied in degrees.
How to define an axis of rotation in Unity
Several of Unity’s built-in rotation functions, such as Rotate Around, require you to enter an axis parameter in the form of a Vector 3 value, to determine the direction of the rotation that’s applied.
Entering a vector, using XYZ values, creates the definition of direction that’s used to determine the rotational axis.
For example, a vector of (1,0,0) would rotate around the X-Axis, while (0,1,0) rotates around the Y-Axis and (0,0,1) rotates around the Z-Axis.
Entering a mix of values creates a direction vector that’s proportionate to the values entered.
However, most of the time, you’ll probably only need to enter basic Axis values which, helpfully, can be accessed using Vector 3 shorthand, such as Vector3.left for the X-Axis, Vector3.up for the Y-Axis and Vector3.forward for the Z-Axis.
While these shortcuts represent basic directions relative to world space, it’s also possible to define an local directional value by referencing an object’s Transform component.
So, while Vector3.up represents the global up direction, Transform.up represents up in relation to a game object’s Transform.
Just like the Rotate function, Rotate Around is only applied once when it’s called, which means if you want to create continuous rotation, you’ll need to call Rotate Around in Update, multiplying the angle value by Delta Time.
Like this:
public Transform objectToOrbit;
void Update()
{
transform.RotateAround(objectToOrbit.position, Vector3.up, 10 * Time.deltaTime);
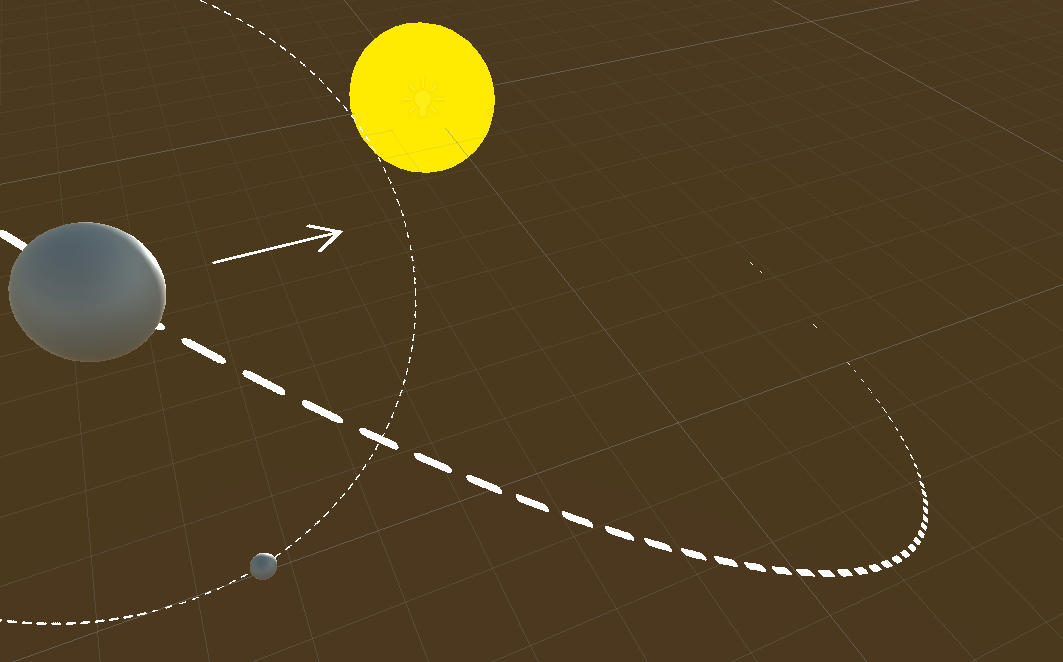
}Rotate Around can be used to create rotation around other objects and points without using the parent object method, which can be useful for rotating an object around another, without needing to rotate both of them.
For example, I could use Rotate Around to create a basic orbit where the planet rotates around the sun and the planet’s moon rotates around the planet.

Rotate Around can be used to create a simple planetary orbit.
In this example, the moon is a child of the planet, which means that the moon’s position is being affected by the rotation of the planet.
While Rotate Around can be very useful and straightforward, there are a couple of drawbacks to using this method.
For example, if you use Rotate Around to move one object around another, and the object that’s being orbited moves, it’s going to affect the path of rotation.
And, while it’s possible to adjust the position of the object to avoid this, there’s another problem.
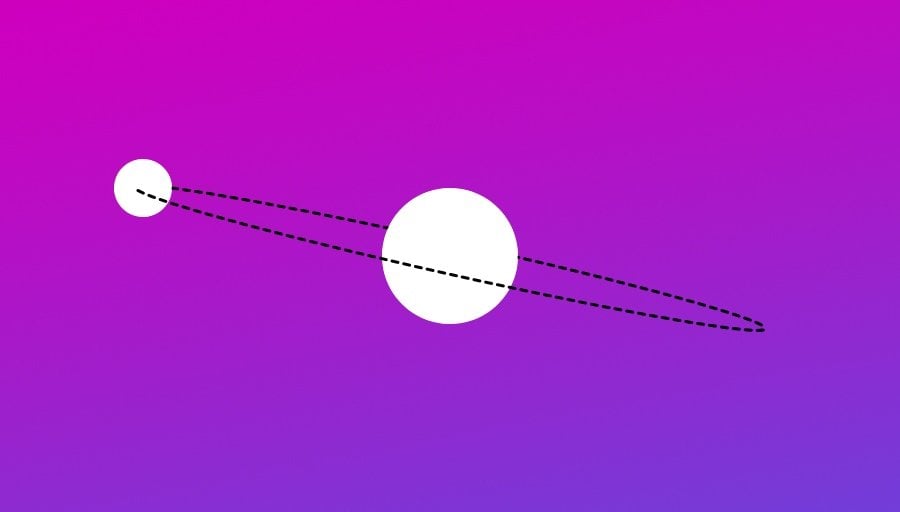
When using the Rotate Around function, the rotating object turns towards the point it’s rotating around.
![]()
Using Rotate Around will also turn the orbiting object to face its point of rotation
This isn’t necessarily a bad thing.
In fact, it can be very useful, such as when rotating a camera around an object.
However, if you’re making an object orbit another, like in this example, it isn’t really how planetary orbits work.
Planets tend to spin around their own axis, while their position orbits around the sun.
So how can you rotate one object around another, without turning the object towards its point of orbit?
How can you rotate an object’s position around a point, without rotating the object itself?
Here’s how…
How to rotate a vector in Unity
A vector is a geometric value that defines a direction and length (which is the magnitude of the vector).
If you’ve worked with any kind of movement from one position to another, or done anything with Raycasts in Unity, then you will have used vectors before. Put simply, they describe direction and distance using Vector 3 values.
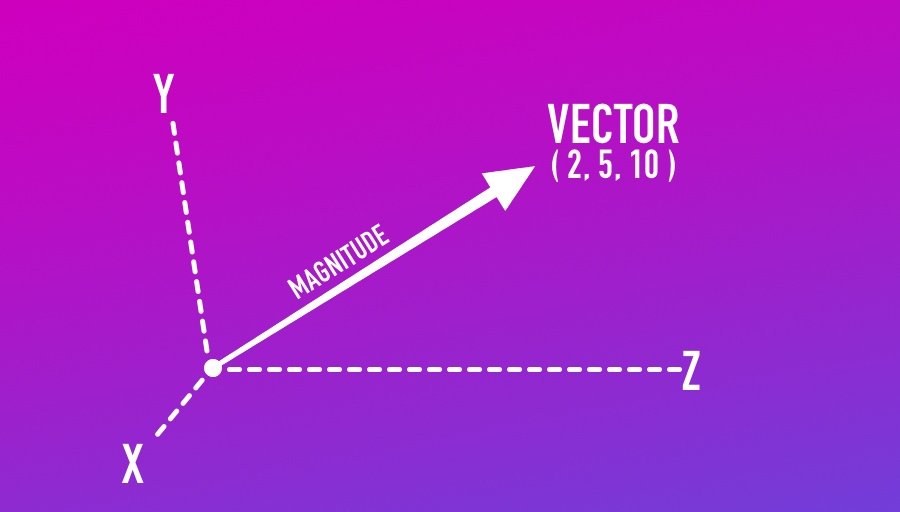
A vector is a definition of direction and distance (the vector’s magnitude).
However… did you know that you can also rotate a vector by multiplying it by a Quaternion?
This works by multiplying the Quaternion rotation by the vector you want to rotate.
Like this:
// Defines a point forward from the origin by 10 units.
Vector3 orbit = Vector3.forward * 10;
// Rotates the orbit vector by degrees around the Y-Axis
orbit = Quaternion.Euler(0, 10, 0) * orbit;
The resulting vector, which has now been rotated, can be used to calculate where the rotated object should be in relation to the object it’s orbiting.
Like this:
transform.position = objectToOrbit.transform.position + orbit;Which means that, using vectors, it’s possible to rotate the position of one object around another in Unity, without actually rotating the object itself.
For example…
Let’s say that I want to orbit one object, a planet, around another, the sun, at a radius of 10 units and at a speed of 30 degrees per second.
First, I need a Vector.
In this case, all I want to do is define a direction and a radius, which will be the distance from the sun that the planet should orbit.
For that, I can multiply Vector3.forward, which is shorthand for (0,0,1) by 10, the radius.
That will give me a vector of (0,0,10).
I can then rotate the vector with an angle value, which I can add to every frame at 30 degrees per second, to create a circular orbit.
Like this:
public GameObject objectToOrbit;
    public float angle;
    public float radius = 10;
    public float degreesPerSecond=30;
    private void Update()
    {
        angle += degreesPerSecond * Time.deltaTime;
        if (angle > 360)
        {
            angle -= 360;
        }
        Vector3 orbit = Vector3.forward * radius;
        orbit = Quaternion.Euler(0, angle, 0) * orbit;
        transform.position = objectToOrbit.transform.position + orbit;
    }
What’s happening here is that I’m taking a basic forward vector and rotating it from its starting point every frame by the angle value.
In this case, I’m rotating around the Y-Axis, but I could also have entered different values to produce different results.
Note, however, that the order of multiplication matters. When Multiplying a vector by a Quaternion the Quaternion must go on the left, otherwise, this won’t work (it won’t even compile).
Finally, because the vector that I’ve created and rotated isn’t attached to anything (it basically describes a vector from the centre of the world), I’ve set it as an offset to the position of the orbited object, the Sun.
The result is a rotation of a vector between two virtual points, not objects, that calculates where one object should be in relation to another, creating a path of rotation. The orbiting object behaves as if it’s nested, however rotating the sun has no effect on the planet and it’s possible to rotate the planet independently of its orbit around the sun.
In this example, I only rotated around the global Y-Axis, which is useful for creating an easy orbit.
However, if I wanted to, I could also set the rotation to match a specific direction-based axis.
For example, imagine that the planet is 10 units away but is also several units higher than the sun and I wanted to create a rotation based on that existing direction.
Getting the direction of the planet from the sun allows me to create an orbit on a tilt.
It’s possible to get a direction vector between two objects in Unity by subtracting their positions.
Like this:
Vector3 direction = transform.position - objectToOrbit.transform.position;I can then calculate a plane of rotation based on the starting direction and distance of the object from its point of orbit.
Like this:
public class Orbit2 : MonoBehaviour
{
    public GameObject objectToOrbit;
    public Vector3 direction;
    public float angle;
    public float radius;
    public float degreesPerSecond = 10;
    private void Start()
    {
        direction = (transform.position - objectToOrbit.transform.position).normalized;
        radius = Vector3.Distance(objectToOrbit.transform.position, transform.position);
    }
    private void Update()
    {
        angle += degreesPerSecond * Time.deltaTime;
        if (angle > 360)
        {
            angle -= 360;
        }
        Vector3 orbit = Vector3.forward * radius;
        orbit = Quaternion.LookRotation(direction) * Quaternion.Euler(0, angle, 0) * orbit;
        transform.position = objectToOrbit.transform.position + orbit;
    }
}
In this example, I’m measuring the direction and the distance of the object in Start, which gives me my orbit direction and radius.
I’m also normalising the vector, which limits its magnitude to 1. This basically limits the vector to directional information only, and while you don’t need to do this, I’m doing it so that I can multiply the direction vector by the radius variable, allowing me to change it later.
Once I have a direction vector, instead of rotating it around the world’s Y-Axis, which would cause the planet to orbit somewhere above the sun, I’m creating a new Quaternion angle using the Quaternion Look Rotation function instead. Look Rotation basically turns a direction vector into a Quaternion angle.
Then, to get the combined angle, I can multiply the Quaternion direction angle (which is the amount of tilt) by the angle of rotation (the angle float variable) to combine the two angles.
I’m still using the basic forward vector as a starting point, however now, instead of only multiplying it by the angle of rotation, I’m also rotating it by the angle of direction as well.
This is useful for creating automatic planet orbits as now, all I need to do is position the object relative to the point or object I want it to orbit, and the script will calculate a trajectory around that object.
Planets can be given a more natural-looking orbit by rotating on an axis that’s based on their direction.
And if I want to change the axis of the orbit, I can do so by simply entering the angle into the X-Axis or the Z-axis instead.
This method is great for creating a path of rotation around a single axis.
However, there will often be times when you don’t want to just rotate one way around an object.
For example, what if you want to freely rotate a camera around the player using the mouse, or the keyboard, or using controller thumbsticks?
How can you pass input axes into a rotation function, to give the player control of the camera?
How to rotate the camera around an object in Unity
Being able to freely rotate the camera around an object with the mouse or other controls is a very common mechanic in many games; For example, to control the position of the camera around a player in 3rd-person.
In the previous example, moving a planet around the sun, I moved one object around another on a single plane of rotation, around the Y-Axis.
Rotating a camera around an object works in a similar way except, instead of a single fixed path, the player is able to freely move the camera around the object using two axes from the combined vertical and horizontal movements of the mouse, a controller thumbstick or keyboard keys.
So how do you do it?
One of the easiest ways to rotate the camera around an object is by using the Rotate Around function.
Using Rotate Around is an easy way to give the player camera control with the mouse.
The Rotate Around function rotates an object around another point, relative to its distance, while turning the object to face the pivot.
This makes it ideal for creating a mouse orbit camera, as it keeps the camera looking at the object.
Like this:
public class CameraRotateAround : MonoBehaviour
{
    public Transform objectToOrbit;
    public float radius;
    void Update()
    {
        transform.position = objectToOrbit.position - (transform.forward * radius);
        transform.RotateAround(objectToOrbit.position, Vector3.up, Input.GetAxis("Mouse X"));
        transform.RotateAround(objectToOrbit.position, transform.right, Input.GetAxis("Mouse Y"));
    }
}
This works, first, by moving the camera so that it faces the target object, but set back by a distance that’s equal to the radius variable.
Notice that I’m using the forward vector of the camera object that this script is attached to, not Vector3.forward, which is the world forward, to keep the camera in position.
Then, using the Rotate Around function, the horizontal input of the mouse (its X-Axis) rotates around the target object around the Y-Axis, which moves the camera left and right around the player.
While the vertical movement of the mouse moves the camera relative to its own X-Axis, moving it up and down.
Using Rotate Around, the object that’s being rotated will turn towards the point that it’s rotating around. For this particular use case, this is ideal, as it means that the camera will look towards the object it’s rotating around automatically, providing a simple method of rotating a camera around an object.
It works well and it’s straightforward.
However, it is also possible to rotate the camera around an object without using the Rotate Around function.
Here’s how to do that…
How to rotate the camera around an object without using Rotate Around
While the Rotate Around function is a straightforward way to rotate the camera around an object, it’s not the only method.
Just as it was possible to orbit an object around a single axis by rotating a direction vector, the same method can be used to create 360 spherical rotation around a player or object.
The benefit of using this method over Rotate Around is that the rotation is entirely position based. Neither the object or the pivot point will be rotated as a result, which can be useful if, for whatever reason, you want to move an object around another with the mouse, but don’t want the object itself to rotate.
Like before it works by defining a basic vector, such as the forward vector, and then rotating it into position using inputs from the mouse.
Like this:
public class Orbit3 : MonoBehaviour
{
    public GameObject player;
    public float angleX;
    public float angleY;
    public float radius = 10;
    private void Update()
    {
        angleX += Input.GetAxis("Mouse X");
        angleY = Mathf.Clamp(angleY -= Input.GetAxis("Mouse Y"), -89, 89);
        radius = Mathf.Clamp(radius -= Input.mouseScrollDelta.y, 1, 10);
        if (angleX > 360)
        {
            angleX -= 360;
        }
        else if (angleX < 0)
        {
            angleX += 360;
        }
        Vector3 orbit = Vector3.forward * radius;
        orbit = Quaternion.Euler(angleY, angleX, 0) * orbit;
        transform.position = player.transform.position + orbit;
        transform.LookAt(player.transform.position);
    }
}
In this example, the X and Y movements of the mouse are added to two angle variables, angle X and angle Y.
To limit vertical movement, the Y angle is clamped at 89 degrees in both directions, to stop the camera from going over the top of the player and round again.
The X angle is also checked to see if it has moved past 360 degrees, or has moved below 0 degrees, in order to keep the value within a normal range.
This check isn’t strictly necessary, as the rotation function will work just fine without it, however keeping the value within a typical rotation range prevents a potential, although highly unlikely, problem of reaching the limit of the value type, as well as making the value easy to understand at a glance.
Finally, a forward vector, multiplied by a distance that’s equal to the radius, is rotated by the two angles, and the position of the camera is then moved to match.
Because this method of moving a camera around an object doesn’t affect the object’s rotation, I’ve used the Transform Look At function, which turns an object to face the direction of a Transform.
In this case, the Look At function is helpful for making sure that the camera is actually facing the player way when it’s rotated.
However, it’s not the only option for turning one object towards another…
How to rotate an object towards another
There are several methods available for rotating one object towards another.
Which one you use depends on how you want the object to rotate towards its target.
How to use Look At
Transform Look At, which instantly snaps an object’s rotation to face the transform of another object, is probably the easiest method of rotating an object towards a specific point.
Like this:
public Transform objectToLookAt;
void Update()
{
    transform.LookAt(objectToLookAt);
}
It takes a single Transform parameter, or a world position as a Vector 3, and will turn the object towards the target as soon as it’s called.
Look At is one of the easiest ways to make one object look at another.
Look At is great as a quick and easy way to snap an object’s rotation towards another object or towards another point in the world.
However, because it’s a function of an object’s Transform, it automatically rotates towards the object when you call it.
And while this can be extremely useful, there may be times when you want to calculate the rotation value required to look at an object, without actually looking at it.
The Quaternion Look Rotation function can help you do that.
How to use Look Rotation
Look Rotation basically turns a direction vector into a rotation value.
This can be useful for calculating the rotation value towards an object or point, but without actually turning the object to point at it.
For example, I could calculate the direction vector of two points by subtracting their positions.
Like this:
Vector3 direction = objectToLookAt.transform.position - transform.position;I could then pass that direction vector into the Look Rotation function to get a matching Quaternion rotation value.
Like this:
Quaternion targetRotation = Quaternion.LookRotation(direction);I now have the rotation required to look at an object as a Quaternion value.
Why would I want to do this?
Why wouldn’t I just use Look At to turn the object to its target?
While Look At can be used to instantly turn an object to face another object or point, depending on what you’re trying to do, you may not want the rotation to happen immediately.
Instead, you might want the object to rotate towards the direction of its target slowly and smoothly.
Following the direction of the target, instead of snapping to it.
And for that, Look Rotation can be used to give you a target value for an object to smoothly rotate towards.
So, now that you have a target, how can you smoothly rotate an object?
How to slowly rotate towards another object
Many examples of smoothly rotating an object towards another tend to use Lerp, which stands for linear interpolation, or Slerp, meaning spherical interpolation, to achieve this kind of eased movement.
However… this isn’t actually what interpolation functions such as Lerp and Slerp are used for.
Lerp and Slerp are typically used to carry out a single movement over a period of time, such as a rotation from one fixed position to another, or a movement between two points.
- More info: The right way to use Lerp in Unity (with examples)
However, continuous movement, such as an arrow following the direction of a target, isn’t really what Lerp or Slerp are designed to do.
If using interpolation functions in this way gets you results that you like, then go ahead!
But… for continuously following the direction of a target, there’s a better function to use, Rotate Towards.
Here’s how…
How to use Rotate Towards
Rotate Towards is a Quaternion function that works in a similar way to Move Towards, which you may have used before to move an object closer to a target.
It looks like this:
Quaternion.RotateTowards(Quaternion startRotation, Quaternion targetRotation, float maxDegreesDelta);In the same way that Move Towards moves an object towards a target position a little bit each frame, Rotate Towards turns an object towards a target rotation each frame, without overshooting when it gets there.
The result is a smoothed movement towards a target rotation.
Rotate Towards turns an object towards a target each frame.
The target rotation is the direction vector of the object you want to rotate towards, which can be worked out by subtracting the target’s position from the object’s position.
The Look Rotation function then turns the direction vector into a Quaternion rotation.
Like this:
Vector3 direction = objectToLookAt.transform.position - transform.position;
Quaternion targetRotation = Quaternion.LookRotation(direction);
How fast Rotate Towards works depends on the Max Degrees Delta of the function, which limits how much the object can rotate in a single step.
Passing a degree value that’s multiplied by Delta Time into the Max Degrees Delta parameter sets the speed of the rotation in degrees per second.
Like this:
public Transform objectToLookAt;
void Update()
{
    float degreesPerSecond = 90 * Time.deltaTime;
    Vector3 direction = objectToLookAt.transform.position - transform.position;
    Quaternion targetRotation = Quaternion.LookRotation(direction);
    transform.rotation = Quaternion.RotateTowards(transform.rotation, targetRotation, degreesPerSecond);
}
The Rotate Toward function is ideal for continuous movement, as it’s always rotating towards a target at a specific speed.
However, if you want to perform a single rotation movement over a fixed amount of time, for example, to rotate an object 90 degrees over two seconds, then Lerp and Slerp can help you to do exactly that.
How to rotate an object over time (Lerp & Slerp)
While Rotate Towards continuously rotates an object towards a target at a set speed, you can use Lerp or Slerp to rotate an object by a fixed amount over a set period of time.
This works by taking a start rotation, such as the object’s own rotation at the start of the movement, a target rotation, which is where you want the object to end up, and a time value.
The time value, when calculated as time elapsed divided by duration, defines where the object should be during the movement. So, for example, at the halfway point (when time elapsed divided by duration equals 0.5) the rotation will be in the middle between the start and target rotations.
Then, once the movement has finished and the time has elapsed, the object is snapped into its final rotation.
So when might you use this?
Quaternion Lerp and Slerp are useful for rotating an object to a new rotation over a fixed amount of time.
For example, rotating an object around 90 degrees taking half a second,
Like this:
public class RotateObject : MonoBehaviour
{
    float lerpDuration = 0.5f;
    bool rotating;
    void Update()
    {
        if (Input.GetMouseButtonDown(0) && !rotating)
        {
            StartCoroutine(Rotate90());
        }
    }
    IEnumerator Rotate90()
    {
        rotating = true;
        float timeElapsed = 0;
        Quaternion startRotation = transform.rotation;
        Quaternion targetRotation = transform.rotation * Quaternion.Euler(0, 90, 0);
        while (timeElapsed < lerpDuration)
        {
            transform.rotation = Quaternion.Slerp(startRotation, targetRotation, timeElapsed / lerpDuration);
            timeElapsed += Time.deltaTime;
            yield return null;
        }
        transform.rotation = targetRotation;
        rotating = false;
    }
}
Because the rotation movement has a start, an end, and is carried out over a number of frames, it works best when placed in a Coroutine.
- More info: Coroutines in Unity, how and when to use them
You may have also noticed that, in this example, I used Quaternion Slerp, not Lerp.
While the two functions are easily interchangeable, as both accept the same parameters, there is a slight difference between the two methods.
The difference between Lerp and Slerp for Rotation
When interpolating rotation, you’ll have the option to interpolate linearly, using Lerp, or spherically using Slerp.
Most of the time you’ll notice very little difference between the two methods. The main difference is that the length of the directional vector remains constant during Slerp while Lerp, which is linear, can be more efficient to perform.

Lerp (green) vs Slerp (red)
So which should you use?
Generally speaking, using Slerp will produce a more accurate path of rotation, particularly when the difference between angles is large.
However… you may want to balance this against performance, as Lerp, which can be more efficient, will produce similar results in most cases and, for small angles, will barely be noticeable at all.
Quaternion Lerp and Slerp are best used for smoothly moving an object from one rotation to another.
However, like all of the previous examples in this guide, they work by setting the rotation of the object directly, basically emulating smooth movement with calculated values.
But what if you don’t want to directly set the orientation of the object?
What if, instead of rotating an object in a measured way, you actually want to spin it round with energy?
While rotation, just like movement, can be calculated and applied exactly, it’s also possible to apply rotation to a Rigidbody as a physical force.
Here’s how it works…
How to Rotate a Rigidbody with the mouse
Physics-based rotation, which is created using angular force and drag, can be a great way to create natural object rotation.
It works by applying an amount of force, which causes an object to rotate, after which angular drag slows the object down bringing it to a stop.
This can be used for all kinds of mechanics; Spinning an inventory object by clicking and dragging the mouse, for example.
So how can you use it?
How to use the Add Torque function
The Add Torque function adds an amount of rotational force to a Rigidbody, taking a Vector 3 value to define the direction of the rotation in world space:
Rigidbody.AddTorque(Vector3 torque);So how can you use it?
Let’s say I want to create a floating object that can be spun around by clicking and dragging the mouse, similar to how you might view and rotate an item in a game.
For this to work, I’ll need to attach a Rigidbody to the object I want to spin.
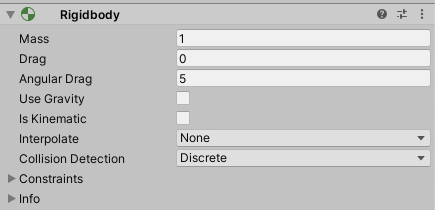
In this example, I’ve disabled gravity and increased the object’s angular drag.
I’ve turned off the Rigidbody’s gravity so that the object doesn’t fall out of the air, and I’ve given the object 5 units of angular drag so that it will stop fairly quickly after being rotated.
Then, to rotate the object using the mouse, all I need to do is pass in the Horizontal and Vertical axes of the mouse input into the Add Torque function whenever the mouse button is down.
Like this:
public class RotateRigidbody : MonoBehaviour
{
    public Rigidbody rb;
    public float strength = 100;
    public float rotX;
    public float rotY;
    bool rotate;
    private void Update()
    {
        if (Input.GetMouseButton(0))
        {
            rotate = true;
            rotX = Input.GetAxis("Mouse X") * strength;
            rotY = Input.GetAxis("Mouse Y") * strength;
        }
        else
        {
            rotate = false;
        }
    }
    void FixedUpdate()
    {
        if (rotate)
        {
            rb.AddTorque(rotY, -rotX, 0);
        }
    }
}
When the mouse button is held down, I’m storing the directional movement values of the mouse in float variables and multiplying them by a strength value.
Then, in the Add Torque function, I’m applying the vertical mouse value to create rotational force around the X-Axis, while the horizontal mouse value creates force around the Y-Axis.
The end result is smooth, natural rotation, that’s applied when clicking and dragging the mouse.
The Add Torque function is great for moving Physics objects around naturally with the mouse.
You’ll notice that I’ve split the functionality of this script across both the Update and Fixed Update calls, connecting the two indirectly using variables.
This is because, while the physics-based Add Torque function should be in Fixed Update, so that the application of force is in sync with the physics steps of the game, the input checks, which are framerate dependent, need to be in Update to work properly.
Splitting the functions like this prevents the different frequencies of Update and Fixed Update from affecting each other.
How to Rotate objects in 2D
A lot of the techniques used for rotating objects in 3D in Unity also apply when rotating in 2D.
This is because, generally speaking, normal game objects in Unity are the same in both 2D and 3D, with the only difference being that the forward vector, Z, usually represents depth in 2D.
Because of this, in order to get the results you want, it helps to be mindful of which axis an object is being rotated around.
Luckily, however, most rotation functions in Unity allow you to specify which way is considered to be up, allowing you to change the orientation of the rotation if you need to.
Such as the Look At function which, in this example is set to face the player in 2D, with the forward axis set as up.
public Transform player;
void Update()
{
    transform.LookAt(player, Vector3.forward);
}
However, in some cases, when working with 2D objects, even changing the orientation of the rotation may not get you the results you want. In which case you may find it easier to simply rotate around the object’s Z-Axis using a single float value.
- How to rotate a 2D object to look at the mouse
Which is, in fact, exactly how rotation works with 2D Rigidbody objects.
How to rotate a Rigidbody in 2D
While many objects rotate in similar ways in both 3D and 2D there are some specific differences when applying physics in 2D.
The 2D and 3D physics engines in Unity are separate. Which means that rotating a physics-based object in 2D can actually be much simpler than it is in 3D.
This is because true 2D rotation only occurs around a single axis. As a result, Rigidbody rotation is stored, and can be applied, using a single float value, which represents the amount of rotation in degrees clockwise or counter-clockwise.
Like this:
public Rigidbody2D rb;
void Update()
{
    // spins a 2D physics object clockwise at 10 degrees per second
    rb.AddTorque(10 * Time.deltaTime);
}
Now it’s your turn
Now I want to hear from you…
How have you dealt with rotation in Unity?
Have you found it easy, or has it given you constant headaches?
And what tips have you learned that you know others will find useful?
Whatever it is, let me know below by leaving a comment.

Get Game Development Tips, Straight to Your inbox
Get helpful tips & tricks and master game development basics the easy way, with deep-dive tutorials and guides.
My favourite time-saving Unity assets
Rewired (the best input management system)
Rewired is an input management asset that extends Unity’s default input system, the Input Manager, adding much needed improvements and support for modern devices. Put simply, it’s much more advanced than the default Input Manager and more reliable than Unity’s new Input System. When I tested both systems, I found Rewired to be surprisingly easy to use and fully featured, so I can understand why everyone loves it.
DOTween Pro (should be built into Unity)
An asset so useful, it should already be built into Unity. Except it’s not. DOTween Pro is an animation and timing tool that allows you to animate anything in Unity. You can move, fade, scale, rotate without writing Coroutines or Lerp functions.
Easy Save (there’s no reason not to use it)
Easy Save makes managing game saves and file serialization extremely easy in Unity. So much so that, for the time it would take to build a save system, vs the cost of buying Easy Save, I don’t recommend making your own save system since Easy Save already exists.
Каждый разработчик игр знает, что без вращения и поворотов игровых объектов невозможно сделать нормальную игру. И перед тем, как начать разбор поворота/вращения объекта, создадим игровой объект, и назовём его Player. Его мы и будем вращать.
Как поворот объекта, так и вращение, осуществляется путём изменения значений компонента Transform, и его свойства Transform.rotation.
И начнём данную статью с вращения, так как он более прост и понятен.
Вращение игрового объекта
Для начала разберём, что означает вращение? Вращение, это плавное изменение значений Transform.rotation, вокруг определённых осей. Вот их нам и нужно менять.
Для изменения этих значений, нам поможет метод Transform.Rotate. Работает он следующим образом:
void Update()
{
    transform.Rotate(0, 0, 1);
}
Этот скрипт будет вращать вашего персонажа по оси Z со скоростью 1. Вы так же можете выбрать другую ось вращения, например X или Y. Или же увеличить скорость вращения на 2.
void Update()
{
    transform.Rotate(2, 0, 0);
}
На этом всё! Как видите, вращать игровые объекты очень просто. Теперь перейдём к повороту, который по своей сути немного тяжелее.
Поворот игрового объекта
Поворот персонажа подразумевает его поворот на 180 градусов по одной из осей. Например, очень часто такое может понадобиться в 2д играх, преимущественно платформерного типа. Поэтому в качестве примера мы будем использовать 2д персонажа, которого нужно развернуть по горизонтали, то-есть по оси X.
Предыдущий код вращения нам не поможет, поскольку там мы вращали с помощью специального метода, который прибавляет к старым значениям — новые. Здесь же нам необходимо устанавливать конкретные значения.
Для того, чтобы это сделать, необходимо прописать следующий код:
Vector3 rotate = transform.eulerAngles;
rotate.y = 180;
transform.rotation = Quaternion.Euler(rotate);
Давайте разберём код:
- В первой строке с помощью метода Transform.eulerAngles мы получаем значения roration в виде углов эйлера.
- Во второй строке установили значение y в 180, тем самым развернули объект на 180 градусов.
- В третьей строке, элеровские значения конвертируем в кватернионы, и сохраняем полученные данные.
Таким же образом мы можем вернуть объект в нормальное положение:
Vector3 rotate = transform.eulerAngles;
rotate.y = 0;
transform.rotation = Quaternion.Euler(rotate);
Аналогичным образом мы можем разворачивать наш объект по любой оси, изменив rotate.y на rotate.x или на rotate.z.
Если остались вопросы, пишите в комментариях. А так же ставьте лайки, если помог 
 изменение Transform.rotation.x
Здравствуйте.
возникла тут небольшая проблема:
при попытке изменить Transform.rotation.x выходит данная ошибка:
Cannot modify a value type return value of `UnityEngine.Transform.rotation’. Consider storing the value in a temporary variable
помогите плиз.
- akkel
- UNIт
- Сообщения: 76
- Зарегистрирован: 23 июн 2009, 07:03
- Откуда: Ростов-На-Дону
Re: изменение Transform.rotation.x
![]() DbIMok 05 май 2011, 21:56
DbIMok 05 май 2011, 21:56
Справка
transform.rotation = Quaternion.Euler(10, 0, 0);
или вы действительно знаете что делаете и хотите поменять x компонент кватерниона?
-

DbIMok - Адепт
- Сообщения: 6321
- Зарегистрирован: 31 июл 2009, 14:05

Re: изменение Transform.rotation.x
![]() akkel 05 май 2011, 22:04
akkel 05 май 2011, 22:04
поменять нужно только значение x
- akkel
- UNIт
- Сообщения: 76
- Зарегистрирован: 23 июн 2009, 07:03
- Откуда: Ростов-На-Дону
Re: изменение Transform.rotation.x
![]() Zaicheg 05 май 2011, 22:36
Zaicheg 05 май 2011, 22:36
В тексте ошибки написано решение — сделать временный кватернион и назначить его на rotation.
Или
rotation = new Quaternion(myValue, rotation.y, rotation.z, rotation.w);
-

Zaicheg - Адепт
- Сообщения: 3024
- Зарегистрирован: 19 июн 2009, 15:12
- Откуда: Череповец

Re: изменение Transform.rotation.x
![]() gnoblin 05 май 2011, 23:51
gnoblin 05 май 2011, 23:51
неееееееее.
Индивидуальные компоненты кватерниона менять ТОЧНО не надо  .
.
-
gnoblin - Адепт
- Сообщения: 4633
- Зарегистрирован: 08 окт 2008, 17:23
- Откуда: Минск, Беларусь
- Skype: madkust
-
- Сайт

Re: изменение Transform.rotation.x
![]() seaman 06 май 2011, 08:01
seaman 06 май 2011, 08:01
Судя по моим представлениям компоненты кватерниона зависят друг от друга. Так что если меняете один нужно менять и остальные — иначе может получиться каша.
Если V — единичный вектор, представляющий ось, вокруг которой вращаем, а a — угол поворота вокруг этой оси, то кватернион, описывающий этот поворот:
q=[V * sin(a/2), cos(a/2)]
Вот и получается, что если изменить, например только X, то поменяется и ось, вокруг которой вращаем, и угол на который повернули.
В данном случае очень хорошо, что для изменения одного компонента кватерниона нужно создавать новый — он и есть совсем другой кватернион…
- seaman
- Адепт
- Сообщения: 8351
- Зарегистрирован: 24 янв 2011, 12:32
- Откуда: Самара
Re: изменение Transform.rotation.x
![]() gnoblin 06 май 2011, 12:36
gnoblin 06 май 2011, 12:36
а зачем вдруг понадобилось менять один из компонентов?
Дымок всё грамотно написал про eulerAngles
-
gnoblin - Адепт
- Сообщения: 4633
- Зарегистрирован: 08 окт 2008, 17:23
- Откуда: Минск, Беларусь
- Skype: madkust
-
- Сайт
Re: изменение Transform.rotation.x
![]() Sef 06 май 2011, 17:46
Sef 06 май 2011, 17:46
А можно и так:
rotation += new Quaternion(myValue, 0f, 0f, 0f);
-

Sef - Старожил
- Сообщения: 595
- Зарегистрирован: 29 окт 2009, 13:24
-
- ICQ

Re: изменение Transform.rotation.x
![]() seaman 06 май 2011, 17:58
seaman 06 май 2011, 17:58
Sef
И что получится? Во всяком случае не то, что написал Дымок…
а зачем вдруг понадобилось менять один из компонентов?
Я тоже не понял — зачем автору топика это понадобилось…
- seaman
- Адепт
- Сообщения: 8351
- Зарегистрирован: 24 янв 2011, 12:32
- Откуда: Самара
Re: изменение Transform.rotation.x
![]() WhiteDevil 06 май 2011, 18:58
WhiteDevil 06 май 2011, 18:58
Ну у меня такой пример. Например мы совершаем ротацию лук-вектора. И хотим ограничить вращение, например чтоб объект повернулся только горизонтально в плоскости ХZ. И ведь руки зачешутся у кватерниона просто что-то взять и обнулить
-
WhiteDevil - UNIверсал
- Сообщения: 455
- Зарегистрирован: 19 дек 2010, 15:55

Re: изменение Transform.rotation.x
![]() gnoblin 06 май 2011, 21:52
gnoblin 06 май 2011, 21:52
если такое захочется, надо обнулять компонент eulerAngles )
-
gnoblin - Адепт
- Сообщения: 4633
- Зарегистрирован: 08 окт 2008, 17:23
- Откуда: Минск, Беларусь
- Skype: madkust
-
- Сайт
Re: изменение Transform.rotation.x
![]() darkPassenger 08 май 2011, 11:22
darkPassenger 08 май 2011, 11:22
А вы уверены что нужно менять именно компоненту кватерниона? Может вам с углами эйлера нужно работать?
Sef писал(а):А можно и так:rotation += new Quaternion(myValue, 0f, 0f, 0f);
Для сложения кватернионов другой оператор:
transform.rotation *= Quaternion.Euler(Vector3.right * myValue);
Еще так можно:
Используется csharp
Vector3 objRot = transform.eulerAngles;
objRot.x = newVal;
transform.eulerAngles = objRot;
Но не знаю насколько целесообразно такой вариант использовать, если вам только одно преобразование нужно сделать
- darkPassenger
- UNец
- Сообщения: 11
- Зарегистрирован: 26 янв 2011, 20:55
Re: изменение Transform.rotation.x
![]() waruiyume 08 май 2011, 13:03
waruiyume 08 май 2011, 13:03
Нафига сей костыль?
Используется javascript
transform.rotation.eulerAngles.x=90;
Хотя наверное лучше локально.
Используется javascript
transform.localRotation.eulerAngles.x=90;
upd
Извиняюсь это только в жабе.
Используется csharp
transform.rotation =
Quaternion.Euler(90,transform.rotation.eulerAngles.y, transform.rotation.eulerAngles.z);
-

waruiyume - Адепт
- Сообщения: 6060
- Зарегистрирован: 30 окт 2010, 05:03
- Откуда: Ростов на Дону

Вернуться в Скрипты
Кто сейчас на конференции
Сейчас этот форум просматривают: нет зарегистрированных пользователей и гости: 3
Aside from movement, rotations are also often required in games. Sometimes you want objects to look at another object, or to face a specific direction when they are moving. Here is a small writeup on the most common ways to move objects, both oriented towards 2D and 3D. In case you haven’t read the post about moving an object, you can find it here.
The most common way to move an object in Unity is to set the rotation of an object by accessing gameObject.rotation. Altough you cannot simply set this to an vector. If you want to use vectors to set a gameObject’s rotation you have to use Quaternion.Euler(x,y,z). So in order to make a object look to the right of your screen you would call “this.transform.rotation = Quaternion.Euler(0,-90f,0);”. In case you want to make a object face another object directly you can call “this.transform.LookAt(location)”. In case you want to ease the rotation to gradually start looking at a position you can use “Quaternion.LookRotation(location, up)” and use “Quaternion.Lerp(rotA,rotB,t)”. The easing of objects can often be a hassle to code, because of this I reccomend using a tweening library like DoTween.
Using Rotate() to rotate an object
The rotate method has a lot of use cases, although be mindful that it always adds a rotation. Methodologies without additive rotations can be found next on this page.
All the methods below also allow you to set a space for the rotation.
Worldspace and Localspace.

// Rotate the object based on added angles
public void Rotate(float xAngle, float yAngle, float zAngle)

// Use a vector to add a rotation
public void Rotate(Vector3 eulers)

// Rotate based on an axis, with an added angle
public void Rotate(Vector3 axis, float angle)
using UnityEngine;
public class RotationExamples : MonoBehaviour
{
[SerializeField] private float degreeStep = 45f;
[SerializeField] private Transform left;
[SerializeField] private Transform middle;
[SerializeField] private Transform right;
private void Update()
{
// Use deltaTime to make the results the same for any
// framerate. As deltatime is the completion time of a frame.
float step = degreeStep * Time.deltaTime;
// Rotating using an angle
left.Rotate(Vector3.up, step);
middle.Rotate(Vector3.forward, step);
right.Rotate(Vector3.right, step);
// Rotating using vectors
left.Rotate(Vector3.up * step);
middle.Rotate(Vector3.forward * step);
right.Rotate(Vector3.right * step);
// Rotating using x,y,z
left.Rotate(0, 1 * step, 0);
middle.Rotate(0, 0, 1 * step);
right.Rotate(1 * step, 0, 0);
}
}Setting the rotation directly
The quickest way of directly modifying a rotation of a object is by setting it directly. You can do this by setting “transform.rotation” to a new Quaternion. The quickest way to create a new Quaternion struct is by calling a static function that has been provided by Unity. Called Quaternion.Euler(x,y,z).
using UnityEngine;

public class RotateHorizontally : MonoBehaviour
{
    // This will make it move 90 degrees per second
    [SerializeField] private float speed = 90;
    float yRotation = 0;

    private void Update()
    {
        // Deltatime is the amount of time it takes for a frame to pass
        // This means it is an accurate way of counting upwards.
        yRotation += Time.deltaTime * speed;

        // This will set the rotation to a new rotation based on an increasing Y axis.
        // Which will make it spin horizontally
        this.transform.rotation = Quaternion.Euler(0, yRotation, 0);
    }
}Another way of setting the rotation directly is by setting any of the following properties to a directional vector:
| transform.right | Setting this aligns the right side of the object to a direction. |
| transform.up | Setting this will make the top “head” of the object align to a direction. |
| transform.forward | Setting this will make the object face to a specific location. |
This makes rotating very easy in general, eliminating the need to tinker with Quaternions. Especially for 2D games. For instance if you want to align a cannon to a target in a game that has Y as up, and X as right. Then you can simply make it aim towards that target by writing “transform.right = targetPosition – cannonPositon;”
using UnityEngine;

public class AimCube : MonoBehaviour
{
    [SerializeField] private Transform target;

    private enum FollowType { Forward, Up, Right }

    // This is seperate for each cube in the inspector, so I can configure them accordingly
    [SerializeField] private FollowType follow;

    private void Update()
    {
        // Get the direction to the target by subtracting the target position by the current position.
        Vector3 directionToTarget = target.transform.position - this.transform.position;

        switch (follow)
        {
            case FollowType.Forward: transform.forward = directionToTarget;
                break;
            case FollowType.Up: transform.up = directionToTarget;
                break;
            case FollowType.Right: transform.right = directionToTarget;
                break;
            default:
                break;
        }
    }
}Gradually moving the rotation to a target
You can easily ease the transform.forward, transform.up and transform.right to a specific location using “Vector3.MoveTowards(a,b,t)” In the example below I also use “transform.RotateAround(point, axis, amount)” to showcase how the easing towards the target works. In case you still want to
Easing using tranform.forward
using UnityEngine;

public class RotationExamples : MonoBehaviour
{
    [SerializeField] private float followSpeed = 2f;

    [SerializeField] private Transform target;

    private void Update()
    {
        // Get the direction to the target by subtracting the target position by the current position.
        Vector3 directionToTarget = (target.transform.position - this.transform.position).normalized;

        // This is how you move using transforms. Last argument is the steps in Units
        transform.forward = Vector3.MoveTowards(transform.forward, directionToTarget, Time.deltaTime * followSpeed);

        // Rotate the target around this object, at a speed of 90 degrees per second.
        target.RotateAround(this.transform.position, transform.up, Time.deltaTime * 90);
    }
}
Easing with Quaternions
using UnityEngine;

public class RotationExamples : MonoBehaviour
{
    [SerializeField] private float degreeStep = 45f;
    [SerializeField] private float followSpeed = 2f;

    [SerializeField] private Transform target;

    private void Update()
    {
        // Get the direction to the target by subtracting the target position by the current position.
        Vector3 directionToTarget = (target.transform.position - this.transform.position).normalized;

            //This is how you do it using quaternions. Last argument is the steps in degrees.
            Quaternion targetRotation = Quaternion.LookRotation(directionToTarget, transform.up);
            transform.rotation = Quaternion.RotateTowards(transform.rotation, targetRotation, Time.deltaTime * degreeStep * followSpeed);

        // Rotate the target around this object, at a speed of 90 degrees per second.
        target.RotateAround(this.transform.position, transform.up, Time.deltaTime * 90);
    }
}
Introduction
In this article we’re going to see how to rotate objects in Unity. There are several ways to achieve this, in this case we will use the Rotate method of the Transform class, this will directly modify the rotation parameters that are observed at the top of the inspector with the GameObject selected.
Go to the project’s main page
Before we start I invite you to watch the video I made to summarize this article. English Subtitles available.
CHECK OUT THIS CRAZY EXPERIMENT
How are rotations expressed mathematically?
In order to describe mathematically we have to know directly or indirectly the following parameters:
-Rotation axis
-Amount of angles to rotate
-Sense of rotation
Let’s imagine that the object we want to rotate is a sphere. We take it in our hands and stick a rod through the exact center of the sphere. Then we take the rod and orient it from north to south parallel to the ground. Finally we make it turn counterclockwise.
Were you able to visualize it in your mind?
My description of the rotation was accurate although perhaps it was not drafted in the best way to be understood. However, let us assume that we could all have imagined exactly the same thing.
In the first place we can say that the axis of rotation is the rod. If we become strict the axis of rotation is an imaginary line that passes through the two ends of the rod.
The number of angles to rotate is half a turn, this mathematically is 180° or π radians.
The direction of rotation is counterclockwise or counterclockwise.
These three parameters can be fully described using a vector, which is what we are going to do in this article.
Workstation
We are going to use the rotation station which consists of three gears that are oriented in the direction of the world’s three x,y,z axes.
The three gears are positioned perpendicular to each other.
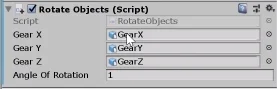
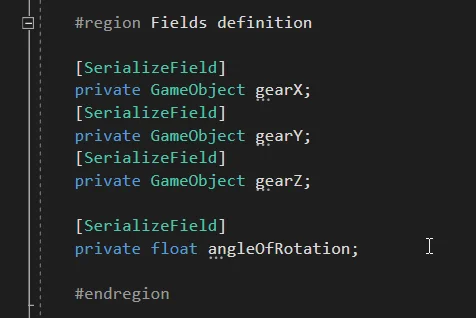
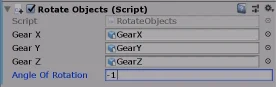
In the hierarchy we can find them inside the GameObject «#9 RotateObjects». They have the names GearX, GearY and GearZ indicating the axis of rotation of each gear.
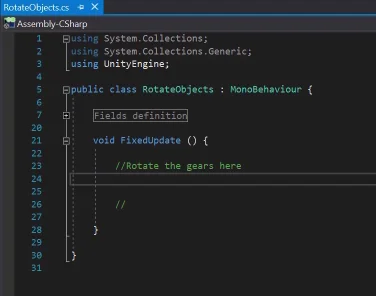
The script to complete is called «RotateObjects» and is assigned to GameObject with the same name in the hierarchy.
In figure 4 we see that the three GameObjects of the hierarchy are already assigned in the fields of the inspector.
When opening the Script we find the FixedUpdate method defined and inside some comments that say that the gears must be rotated there.
If it is not clear what a method is in my channel there is a video in which I talk about methods in programming (english subtitles available) and there is also an article in the programming section of this page.
Why should the rotation code go in the FixedUpdate method?
In the Article 1 about reading keyboard and mouse inputs we discussed why reading instructions were in the Update method.
The FixedUpdate method as its name indicates is an update of the object state but executed at a certain fixed time.
This means that no matter how much the frame rate of the game changes, we will have the same number of executions of this method per second.
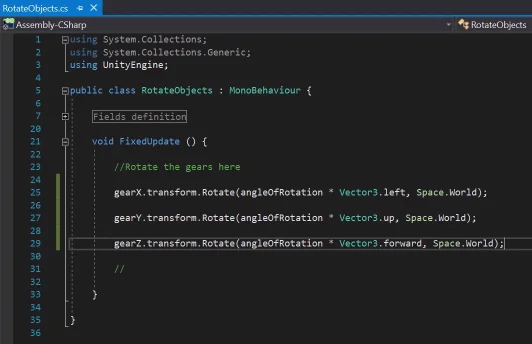
Colocaremos en el método FixedUpdate una instrucción que hará que los engranajes giren una determinada cantidad de ángulos en algún sentido respecto de un eje. Esto significa que en cada llamada de FixedUpdate se aplicará la rotación, lo que generará un movimiento continuo de rotación.
Solution
The Rotate method of the Transform class has different versions, we are going to use one in which the first parameter is the vector that completely expresses the rotation and in the second parameter we indicate the type of coordinates to use, global coordinates that are unique in the whole world of the game or local coordinates that are specific to each particular object, which would be as if each object had its own north.
By mathematical properties of the vectors I rewrote the vector as the product of its module or norm multiplied by a unit vector (norm 1) describing the direction.
This allows us to separate on the one hand the direction of rotation and on the other hand the number of angles to rotate.
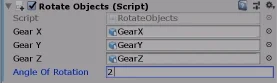
Another advantage of expressing the vector that way is that we can change the direction of rotation simply by using negative values in the inspector.
Conclusion
You can simply rotate objects in Unity using the Rotate method of the Transform class.
If we don’t need mathematical precision, we can play with numbers and get different results.
With this type of rotation we directly affect the rotation vector of the Transform component, this is fine if we seek to show only the animation rotation. If the rotation is needed to produce physical interactions, RigidBody should be used.
Suggest a change
Success!
Thank you for helping us improve the quality of Unity Documentation. Although we cannot accept all submissions, we do read each suggested change from our users and will make updates where applicable.
Close
Submission failed
For some reason your suggested change could not be submitted. Please <a>try again</a> in a few minutes. And thank you for taking the time to help us improve the quality of Unity Documentation.
Close
Your name
Your email
Suggestion*
Cancel
Switch to Manual
public function Rotate(eulerAngles:
Vector3,
relativeTo: Space = Space.Self):
void;
public void Rotate(Vector3 eulerAngles,
Space relativeTo = Space.Self);
Parameters
| eulerAngles | Rotation to apply. |
| relativeTo | Rotation is local to object or World. |
Description
Applies a rotation of eulerAngles.z degrees around the z axis, eulerAngles.x degrees around the x axis, and eulerAngles.y degrees around the y axis (in that order).
If relativeTo is not specified or set to Space.Self the rotation is applied around the transform’s local axes.
If relativeTo is set to Space.World the rotation is applied around the world x, y, z axes.
public function Rotate(xAngle:
float,
yAngle: float,
zAngle: float,
relativeTo: Space = Space.Self):
void;
public void Rotate(float xAngle,
float yAngle,
float zAngle,
Space relativeTo = Space.Self);
Parameters
| xAngle | Degrees to rotate around the X axis. |
| yAngle | Degrees to rotate around the Y axis. |
| zAngle | Degrees to rotate around the Z axis. |
| relativeTo | Rotation is local to object or World. |
Description
Applies a rotation of zAngle degrees around the z axis, xAngle degrees around the x axis, and yAngle degrees around the y axis (in that order).
If relativeTo is not specified or set to Space.Self the rotation is applied around the transform’s local axes.
If relativeTo is set to Space.World the rotation is applied around the world x, y, z axes.
#pragma strict
function Update() {
	// Rotate the object around its local X axis at 1 degree per second
	transform.Rotate(Time.deltaTime, 0, 0);
	// ...also rotate around the World's Y axis
	transform.Rotate(0, Time.deltaTime, 0, Space.World);
}
using UnityEngine;public class ExampleClass : MonoBehaviour
{
    void Update()
    {
        // Rotate the object around its local X axis at 1 degree per second
        transform.Rotate(Time.deltaTime, 0, 0);        // ...also rotate around the World's Y axis
        transform.Rotate(0, Time.deltaTime, 0, Space.World);
    }
}
public function Rotate(axis:
Vector3,
angle: float,
relativeTo: Space = Space.Self):
void;
public void Rotate(Vector3 axis,
float angle,
Space relativeTo = Space.Self);
Parameters
| axis | Axis to apply rotation to. |
| angle | Degrees to rotation to apply. |
| relativeTo | Rotation is local to object or World. |
Description
Rotates the object around axis by angle degrees.
If relativeTo is not specified or set to Space.Self the rotation is applied around the transform’s local axes.
If relativeTo is set to Space.World the rotation is applied around the world x, y, z axes.
Copyright © 2020 Unity Technologies
优美缔软件(上海)有限公司 版权所有
«Unity»、Unity 徽标及其他 Unity 商标是 Unity Technologies 或其附属机构在美国及其他地区的商标或注册商标。其他名称或品牌是其各自所有者的商标。