Смена режима SELinux на вашем Android-устройстве больше не проблема. В этом руководстве мы покажем вам, как легко установить SELinux Permissive на вашем Android-устройстве с root-доступом, используя Переключатель SELinux приложение.
Что такое SELinux? — Linux с повышенной безопасностью, сокращенно «SELinux» — это модуль безопасности в ядре Linux. Он обеспечивает безопасный механизм для регулирования политик безопасности управления доступом.
Проще говоря, это мера безопасности, которая ограничивает объем и тип информации, к которой могут получить доступ пользовательские программы / приложения в случае Android.
SELinux Switch — это служебное приложение для опытных пользователей Android, которое помогает им переключать режим SELinux на своих устройствах.
Поскольку Android изначально поставляется с SELinux Enforcing, вы можете использовать этот простой, но очень эффективный инструмент / приложение для установки SELinux Permissive.
Коммутатор SELinux не вносит никаких постоянных изменений в сценарий загрузки. Итак, когда ваше устройство перезагружается, режим SELinux будет снова изменен на «Принудительный». Однако приложение SELinux Switch автоматически запустится после выполнения последовательности загрузки и снова установит SELinux Permissive, если вы захотите это сделать.
Используя приложение SELinux Switch, переключаться между принудительным и разрешающим режимами SELinux проще, чем когда-либо. Приложение предлагает чистый и функциональный интерфейс, позволяющий выполнять работу всего за несколько нажатий.
Шаг 1. Установите приложение «SELinux Switch»
Чтобы изменить режим SELinux и установить SELinux Permissive, вам сначала нужно будет загрузить и установить приложение SELinux Switch. К сожалению, приложение недоступно в Play Store.
Вы можете установить приложение двумя разными способами — установив APK вручную, что является самым простым. Или, прошив установщик zip через TWRP. Последний доступен в случае, если способ установки APK по каким-либо причинам не работает.
Через APK
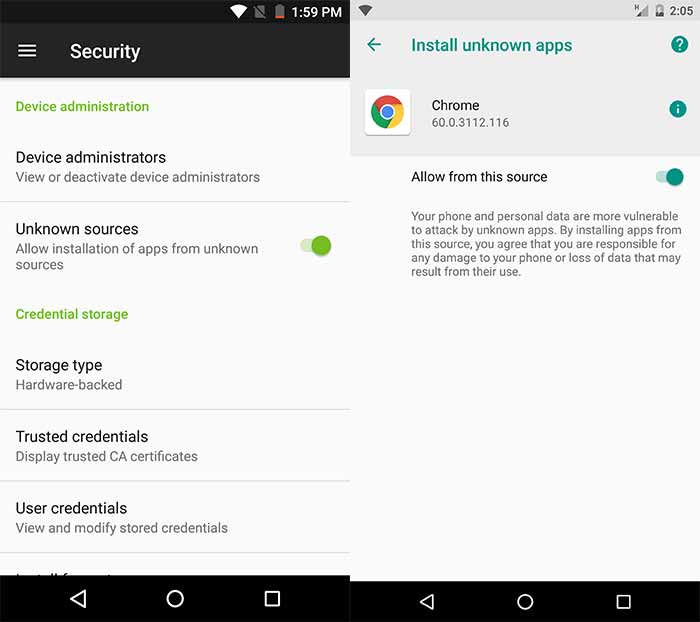
Для начала вы должны сначала включить «Неизвестные источники» (Nougat и ниже) или «Установить неизвестные приложения» (Android Oreo и Android Pie) в настройках. Это необходимо, если вы устанавливаете приложение из источников, отличных от Play Store.
- Android Nougat или более ранняя версия: перейдите на Настройки> Безопасность.
- Android Oreo или Pie: перейдите в Настройки> Приложения и уведомления> Дополнительно> Доступ к специальным приложениям> Установить неизвестные приложения.
После того, как вы включили эту опцию, загрузите последнюю версию APK-файла «SELinux Switch»: Ссылка для скачивания
После того, как вы загрузили APK, используйте свое любимое приложение для управления файлами, чтобы перемещаться по хранилищу и устанавливать его с помощью установщика пакетов.
Через TWRP (прошиваемый установщик ZIP)
Маловероятно, что установка APK завершится неудачно. Но в случае неудачи вы решите установить приложение «SELinux Switch», установив файл * .zip установщика.
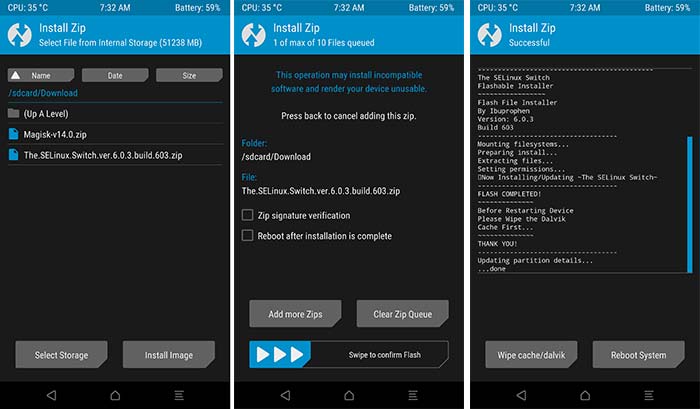
Итак, сначала скачать ZIP-файл установщика (например, The.SELinux.Switch.ver.6.2.7.build.627.zip) и поместите его в хранилище вашего устройства. Затем перезагрузите Android-устройство в режиме восстановления TWRP.
Как только ваше устройство находится в TWRP, нажмите кнопку «Установить». Затем просмотрите внутреннюю память / SD-карту вашего устройства и выберите zip-файл установщика. После выбора файла просто проведите по кнопке «Проведите для подтверждения Flash» внизу.
Установка займет не более нескольких секунд. По завершении нажмите кнопку «Перезагрузить систему».
Шаг 2. Установите разрешение SELinux с помощью приложения
Теперь, когда приложение установлено на вашем Android, вы можете легко использовать его для включить SELinux Permissive Режим.
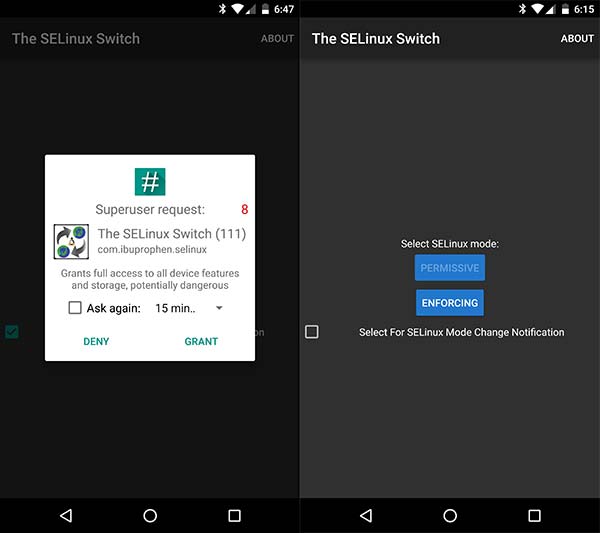
Итак, перейдите в панель приложений и запустите приложение SELinux Switch. Как только интерфейс запустится, вы увидите запрос прав root. Обязательно предоставьте доступ.
Теперь вы увидите экран приложения. Чтобы установить SELinux Permissive, просто нажмите кнопку «PERMISSIVE» один раз.
Чтобы изменить режим обратно, вы можете просто запустить приложение в любое время и нажать кнопку «ПРИНУДИТЬ». Для дополнительного удобства вы также можете выбрать параметр «Выбрать для уведомления об изменении режима SELinux».
Вот и все! Вы легко установили приложение SELinux Switch на свой Android и использовали его для установки SELinux Permissive. Это в конечном итоге избавило вас от многих проблем с установкой модифицированных сценариев загрузки или других обходных путей.
Если у вас возникнут проблемы при установке приложения, вы можете оставить комментарий ниже.
This guide will show you how to Change your Android SELinux mode to permissive on an Android phone, helping you better run various apps to their fullest.
We are not responsible for any damages that occur through following this article. at the time of writing the steps worked fine for the test android phone we were using and we were able to change selinux successfully using a custom kernel.
As we have mentioned throughout this article custom kernels are not available for all versions of every Android phone ever made. however popular phones should be covered. Always take care and backup the device at all stages and correctly choose the kernel for the android model number of the phone you are working with.
Changing SELinux from enforced to permissive will Not Work on Samsung Android Phones with Samsung Knox enabled and it may also not work for other Android phones from other manufacturers depending on the Sndroid os version installed.
What is SELinux?
SELinux or ‘Security Enhanced Linux’ is an Android OS module that is designed to identify and address critical security gaps in the Android operating system. It is used to protect the Android operating software from malicious code or software being installed and causing damage to the phone.
Unfortunately those same ‘security gaps’ associated with malicious software also allow many apps at their root features to function properly. With SELinux in Permissive mode the security gaps in the Android operating system are not fixed and so the programs can use those to run properly.
With SELinux set to Enforced mode the security gaps are fixed, therefor the software cannot run all of its root features properly which results in Limited mode and reduced functionality.
How does SELinux affect applications?
When Samsung released Android OS 4.3 they changed the SELinux option from Permissive, which is what a lot of applications need, to Enforced which means that while most applications will work certain features will not.
For example, when you install FlexiSPY on a rooted phone, as part of the installation process, while it checks for root permissions within SuperSU (after you grant access) it also checks the SELinux status to see if it is set to Enforced – if it is then it will try to force the permission status to permissive.
If it is successful then the software runs in root mode with full access, whereas if it’s unsuccessful, then it will run in root mode with limited access.
How To Check Your SELinux Settings
On the phone, go to Settings > More > About Device and then scroll down to the bottom where you’ll see SE for Android Status
Easily Change Your Android SELinux Mode To Permissive
There is a program on the Play Store (link below) that can change the SELinux mode of non-Samsung Android phones and Samsung Android phones running OS 4.4.2 and below but anything above that and the software will not work – we mention about issues with OS 4.3 and above here
All you need to do is download the application on to the Android phone, run it and tap the Permissive button but, if the Android phone is a Samsung Android phone with OS 4.3 or above installed which also has Knox running then it will no longer work.
- Download and install SELinux Mode Changer from the Play Store onto your phone.
- Run the application and set SELinux to Permissive
- Restart the phone
- Check the SELinux status in the About Device menu to see if it has changed.Note: This process will not only downgrade the OS version but it will also DELETE ALL DATA ON THE PHONE.
Didn’t work? | Install a Custom Kernel
One way to get around SELinux being set to Enforced is change the kernel to one which has been edited so that SELinux has been set to Permissive which should theoretically allow your apps, or FlexiSPY to run in Full mode.
These kernels though may not exist or may be hard to find for every Android phone.
Any Android phone, not just Samsung, whose SELinux status is set to Permissive can run FlexiSPY in FULL MODE.
First of all you need to find out if the Android phone you have has SELinux set to permissive or not which we have explained earlier.
SELinux cannot always be changed so easily depending on the make and mode of the Android phone.
And this is why we have to install a custom kernel if the SELinux Mode Changer application fails to fix the problem.
Please note that custom kernels with selinux set to permissive are not available for all android phones – regardless of whether they are made by samsung or not.
Where can you download a custom kernel?
The Android OS kernel is the most important part of the Android OS. It allows the phone software to interface with the hardware and the application that are installed on the phone, basically telling the phone how to run and what settings and configuration it has and then all this information is used for all installed programs on the Android phone.
The best place to look for custom kernels is the forum on XDA Developers.
How can I install a Custom Kernel which has SELinux set to permissive?
For this example we are using a Samsung Galaxy S4 so we go to XDA forums to get started.
The first thing to do is type in your Android phone model.
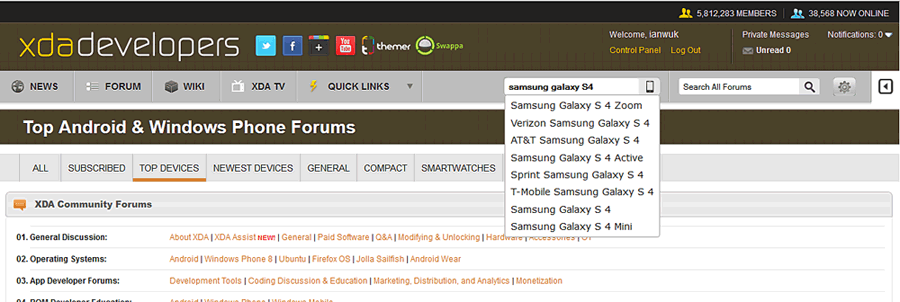
Make sure you choose the correct one from the list as many of the same Android phones have country variants with different model numbers.
You can find the model number to search for on the Android phone by going to the About Device (can also be called About Phone) menu and it will be listed.
For example the model number of our Samsung Galaxy S4 is GT-I9505 so that is what we need for our custom kernel.
Once you have entered the model number to search for you will get the main page for that Android phone.
We need a custom kernel so we click the Kernels tab.
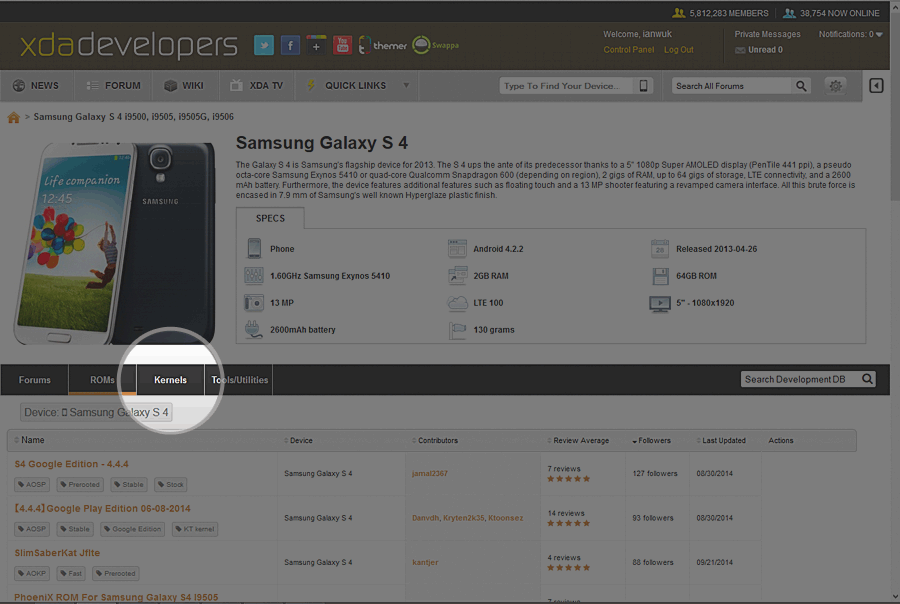
You now need to simply browse through all the custom kernels until you have found one that says it has SELinux set to permissive.
For our version of the Samsung Galaxy S4 we found one pretty easily.
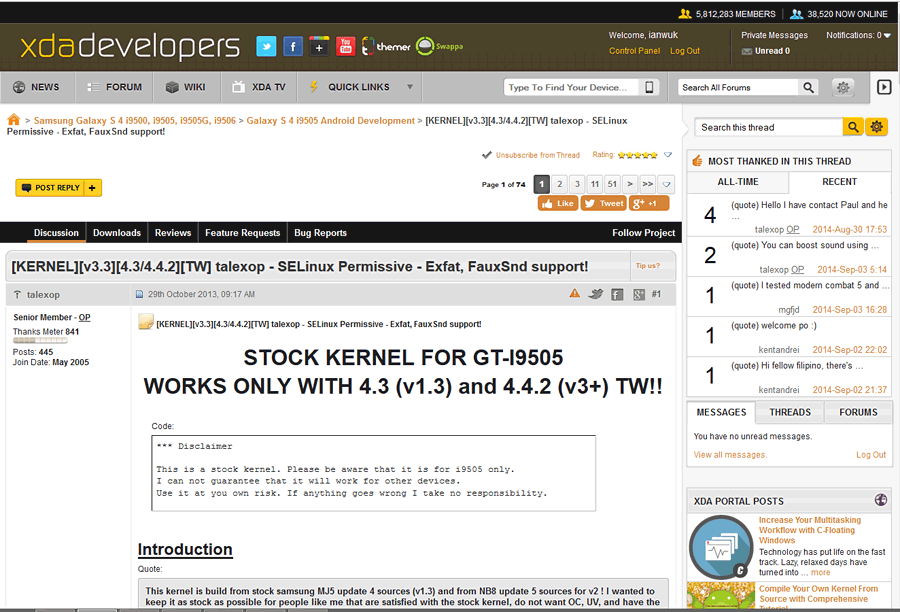
As you can see it matches the model number of our Samsung Galaxy S4 and has SELinux set to permissive and runs on Android OS 4.3.
Note: never install a custom kernel on to a phone whose model number does not match. doing so can make the phone inoperable.
Custom Kernel Installation Guide
The first thing to do is to backup the phone completely. This is vitally important. We explain how to backup an Android phone completely in this article.
Once you have backed up the phone completely download the ROM file from here.
Once you have downloaded the kernel file to your PC you need to install Clockworkmod recovery on to your Android phone. If you have already rooted the Android phone then you already have Clockworkmod installed – you can learn more about rooting and how to root popular Android phones here.
Now that you have backed up the Android phone and rooted it to install Clockworkmod recovery it is time to install the customized kernel.
First you need to connect the Android phone to your PC.
Once it is connected it will appear as a device. Simply copy the kernel zip file to the Downloads folder of the phone, once you have done that we can boot in to ClockworkMod recovery and flash the kernel.
- Make sure the Android phone is turned off completely.
- Hold down the Volume Up, Home button and power together until the model number appears.
- Let go of the key combination and Clockworkmod recovery should load.
- From the list of options choose Install zip from Sdcard
- Browse to the kernel zip file you copied to the phone and select it.
- Install the kernel and wait for it to complete.
- Choose ‘Reboot System Now’ to reboot the phone.
Now that you have flashed the custom kernel and rebooted the phone it is time to check the SELinux status.
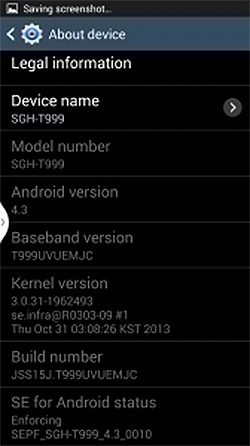
Using the above screenshot as an example you would need to check the SELinux status which is highlighted and the Kernel version should also have been updated to reflect the custom kernel that you just installed.
Providing everything was done correctly and SELinux was successfully changed to Permissive you can now install FlexiSPY (or deactivate and uninstall and reinstall to get full mode) and start taking advantage of the great features that FlexiSPY offers on a rooted phone.
Changing SELinux mode on your Android device is no more pain. In this guide, we will show you how to easily set SELinux Permissive on your rooted Android device using The SELinux Switch app.
What is SELinux? – Security-Enhanced Linux, abbreviated as “SELinux” is a security module in the Linux kernel. It provides a safe mechanism to regulate access-control security policies. In simple language, it is a security measure that limits the amount and type of information that could be accessed by user programs/apps, in case of Android.
SELinux was introduced to the general public with Android 4.3, which could easily be toggled from the Settings back then. Later on, with Android 4.4 KitKat, SELinux status was permanently changed from ‘Permissive’ to ‘Enforcing’. Now, if you do wish to set SELinux Permissive (Change SELinux Mode) on Android devices, you shall read the instructions below.
Table of Contents
- Set SELinux Permissive using The SELinux Switch
- Why would you change SELinux mode to Permissive?
- How to Change SELinux Mode on Android using The SELinux Switch App
- Step 1: Install “The SELinux Switch” App
- Step 2: Set SELinux Permissive Using the App
Set SELinux Permissive using The SELinux Switch
The SELinux Switch is a utility app for Android power-users to help them switch SELinux mode on their devices. Since Android natively comes with SELinux Enforcing, you can use this simple, yet very effective tool/app to set SELinux Permissive. It has been developed by XDA Senior Member – Ibuprophen, who previously brought SELinuxToggler to the public.
So why a new app? SELinuxToggler was self-sufficient and did the job well.
The major reason behind the new app was that SELinuxToggler was using the same package name(com.mrbmic.selinux) as that of SELinuxModeChanger (Developed by MrBIMC). And now since the latter is not under active development anymore, Ibuprophen decided to support the community with his own work from the scratch.
The developer has lately been spending a lot of time in updating the app and making it compatible with the latest Android versions including Android Pie.
The SELinux Switch does not make any permanent alterations to the boot script. So, when your device reboots, the SELinux mode will be changed back to ‘Enforcing’. However, the SELinux Switch app will automatically launch after the boot sequence runs and set SELinux Permissive again, should you wish to do that.
Why would you change SELinux mode to Permissive?
As you read above, SELinux is a security measure implemented in Android to limit the privileges required by apps, so that they wouldn’t be able to attempt any sort of privilege escalation attacks. Such attacks tend to compromise all your personal data on your device. No doubt it was a pretty neat thing to apply and does ensure the safety of our Android devices to a great extent.
But for us, who are more interested in modifying our devices by using root, SELinux often barricades the development with several issues. Of all, the major one being the default Enforcing SELinux mode, which cannot be simply toggled from the device settings. Enforced SELinux creates many problems for root-enabled apps and mods that users operate nowadays, including VIPER4Android, etc.
If one of your favorite root apps is not behaving properly or is not functional, then you might want to set SELinux Permissive.
How to Change SELinux Mode on Android using The SELinux Switch App
Using The SELinux Switch app, it is easier than ever to toggle between Enforcing and Permissive SELinux modes. The app offers a clean and functional UI to get the job done within a few taps.
Step 1: Install “The SELinux Switch” App
In order to change SELinux mode and set SELinux Permissive, you will first have to download and install ‘The SELinux Switch’ app. Unfortunately, the app is not available on the Play Store.
You can install the app through two different methods – by manually installing the APK, which is the easiest. Or, by flashing the installer zip through TWRP. The latter is available in case if the APK installation method fails for some reason.
Via APK
To begin, you must first enable “Unknown sources” (Nougat & below) or “Install unknown apps” (Android Oreo and Android Pie) option in the Settings. This is required if you’re installing an app from sources other than the Play Store.
- Android Nougat or below: Go to Settings > Security.
- Android Oreo or Pie: Go to Settings > Apps & notifications > Advanced > Special app access > Install unknown apps.
After you have enabled this option, download the latest “The SELinux Switch” APK: Download Link
Once you have downloaded the APK, use your favorite file manager application to navigate through the storage and install it via the package installer.
Via TWRP (Flashable Installer ZIP)
It is highly unlikely that the APK installation will fail. But in a scenario where it does fail, you opt to install “The SELinux Switch” app by flashing the installer *.zip file.
So first download the Installer ZIP file (e.g. The.SELinux.Switch.ver.6.2.7.build.627.zip) and place it on your device’s storage. Then reboot your Android device into TWRP recovery mode.
Once your device is in TWRP, tap on the “Install” button. Then, browse the internal storage/SD card of your device and select the installer zip file. Once the file is selected, just swipe the “Swipe to Confirm Flash” button on the bottom.
It shouldn’t take more than a few seconds to install. Once it is complete, tap on the “Reboot System” button.
Step 2: Set SELinux Permissive Using the App
Now that the app is installed on your Android, you can easily use it to enable SELinux Permissive mode. So, go to the app drawer and launch The SELinux Switch app. As soon as the interface initiates, you shall see a prompt for root permissions. Make sure to grant the access.
You shall now see the app screen. To set SELinux Permissive, just tap on the “PERMISSIVE” button once. To change back the mode, you can simply launch the app anytime and press the “ENFORCING” button. For your added convenience, you may also select the “Select For SELinux Mode Change Notification” option.
There you have it! You have easily installed The SELinux Switch app on your Android and used it to set SELinux Permissive. This eventually saved you a lot of trouble of installing modified boot scripts or other workarounds.
- How to Stop Android Wakelocks using WakeBlock (Root)
If you face any problems while installing the app, you can comment below or get direct support from the developer and other users over at the XDA thread.
From Variscite Wiki
Jump to:navigation, search
Android — Customizing SELinux Policy
1 Overview
SELinux is the Security Enhanced Linux concept to enhance the Android Security and have the controlled access to the files.
Please refer to https://source.android.com/security/selinux for more detailed concepts.
2 Bringup Stages and SELinux Permissive
Despite SELinux enforcement from Android 7.1.1 and onwards, you may want to access certain device nodes / have the application to be able to control the hardware.
We recommend building the proper sepolicy by following https://source.android.com/security/selinux/build
This requires SELinux to be set to permissive mode.
Refer to https://source.android.com/security/selinux/validate how to validate and remove the proper filecontext and Sepolicy in place.
You will mostly see below output when avc daemon blocks access to certain files especially applications.
$ adb shell su root dmesg | grep 'avc: '
type=1400 audit: avc:  denied  { read write } for  pid=177
SELinux enforcement can be disabled via ADB on userdebug or eng builds. To do so, first switch ADB to root by running adb root. Then, to disable SELinux enforcement, run:
$ adb shell setenforce 0
Or at the kernel command line (during early device bring-up):
androidboot.selinux=permissive
2.1 Setting the permission in Boot image
2.1.1 Edit U-Boot command line arguments
https://github.com/varigit/uboot-imx/blob/n7.1.1_1.0.0_ga_var01/
Change following macro
#define CONFIG_EXTRA_ENV_SETTINGS
	"bootargs="
	.......
       ...."
And append «androidboot.selinux=permissive» to the kernel
#define CONFIG_EXTRA_ENV_SETTINGS
	"bootargs="
	.......
       androidboot.selinux=permissive"
2.1.2 Compile U-Boot
Compile the new U-Boot
$ cd ~/var_n_711_100/n_711_100_build
$ source build/envsetup.sh
$ lunch -userdebug
$ make -j4 bootloader 2>&1 | tee build1-1.log
There are two methods from which you can update bootloader,
Flash the binaries following Android Recovery SD card and replacing your binaries in /opt/images/Android/
Boot from Yocto, and run install_android.sh.
- Note: This erases everything and installs everything
or
If you wish to just update u-boot, and your platform already has the bootloader and adb running use below commands to flash directly to eMMC.
$ cd ~/var_n_711_100/n_711_100_build
$ adb root;sleep 3;
$ adb push out/target/product//u-boot.img-sd /data/
$ adb shell 'dd if=/data/u-boot.img-sd of=/dev/block/mmcblk0 bs=1k seek='
$ adb shell sync
$ adb reboot