Improve Article
Save Article
Improve Article
Save Article
In this article, we are going to learn how to change the setInterval() time after running one element. The setInterval() method reads the timing once and invokes the function at regular intervals. There are two methods to solve this problem which are discussed below:
Method 1: Using clearInterval() method.
The setInterval() method returns a numeric ID. This ID can be passed to the clearInterval() method to clear/stop the setInterval timer. In this technique, we keep firing clearInterval() after each setInterval() to stop the previous setInterval() and initialize setInterval() with a new counter.
Syntax:
clearTimeout(name_of_setTimeout)
Example: This example shows the use of the above-explained approach.
html
<!DOCTYPE html>
<html>
<head>
<title>
How to Change the Time Interval of
setinterval() Method after Running
one Element using JavaScript ?
</title>
</head>
<body>
<div id="message"></div>
<script>
// Output message
var msg = document.getElementById("message");
var t = 200; // Timer
// Stores the setInterval ID used by
// clearInterval to stop the timer
var interval;
f1();
// Function that changes the timer
function changeTimer(){
t = t * 1.2;
}
// Function that run at irregular intervals
function f1() {
// Clears the previous setInterval timer
clearInterval(interval);
msg.innerHTML += "
<p>Function Fired</p>
";
changeTimer();
interval = setInterval(f1, t);
}
</script>
</body>
</html>
Output:

Method 2: Using the setTimeout() method.
This technique is easier and simpler than the previous one. The setTimout() method fires a function after a certain period. The timer is the time after which we want to run our function. In this technique, after performing the desired task, we change the value of the timer and call setTimeout() again. Now, since the value of the timer changes, each function call is invoked at different intervals.
Syntax:
window.setTimeout(function, milliseconds);
Example: This example shows the use of the above-explained approach.
html
<!DOCTYPE html>
<html>
<head>
<title>
How to Change the Time Interval of
setinterval() Method after Running
one Element using JavaScript ?
</title>
</head>
<body>
<div id="message"></div>
<script>
// To display output
var msg = document.getElementById("message");
// Timer
var t = 200;
f1();
// Function that changes the timer
function changeTimer(){
t = t * 1.2;
}
// Function to run at irregular intervals
function f1() {
msg.innerHTML += "
<p>Function Fired</p>
";
changeTimer();
setTimeout(f1, t);
}
</script>
</body>
</html>
Output:
Improve Article
Save Article
Improve Article
Save Article
In this article, we are going to learn how to change the setInterval() time after running one element. The setInterval() method reads the timing once and invokes the function at regular intervals. There are two methods to solve this problem which are discussed below:
Method 1: Using clearInterval() method.
The setInterval() method returns a numeric ID. This ID can be passed to the clearInterval() method to clear/stop the setInterval timer. In this technique, we keep firing clearInterval() after each setInterval() to stop the previous setInterval() and initialize setInterval() with a new counter.
Syntax:
clearTimeout(name_of_setTimeout)
Example: This example shows the use of the above-explained approach.
html
<!DOCTYPE html>
<html>
<head>
<title>
How to Change the Time Interval of
setinterval() Method after Running
one Element using JavaScript ?
</title>
</head>
<body>
<div id="message"></div>
<script>
// Output message
var msg = document.getElementById("message");
var t = 200; // Timer
// Stores the setInterval ID used by
// clearInterval to stop the timer
var interval;
f1();
// Function that changes the timer
function changeTimer(){
t = t * 1.2;
}
// Function that run at irregular intervals
function f1() {
// Clears the previous setInterval timer
clearInterval(interval);
msg.innerHTML += "
<p>Function Fired</p>
";
changeTimer();
interval = setInterval(f1, t);
}
</script>
</body>
</html>
Output:
Method 2: Using the setTimeout() method.
This technique is easier and simpler than the previous one. The setTimout() method fires a function after a certain period. The timer is the time after which we want to run our function. In this technique, after performing the desired task, we change the value of the timer and call setTimeout() again. Now, since the value of the timer changes, each function call is invoked at different intervals.
Syntax:
window.setTimeout(function, milliseconds);
Example: This example shows the use of the above-explained approach.
html
<!DOCTYPE html>
<html>
<head>
<title>
How to Change the Time Interval of
setinterval() Method after Running
one Element using JavaScript ?
</title>
</head>
<body>
<div id="message"></div>
<script>
// To display output
var msg = document.getElementById("message");
// Timer
var t = 200;
f1();
// Function that changes the timer
function changeTimer(){
t = t * 1.2;
}
// Function to run at irregular intervals
function f1() {
msg.innerHTML += "
<p>Function Fired</p>
";
changeTimer();
setTimeout(f1, t);
}
</script>
</body>
</html>
Output:
I have written a javascript function that uses setInterval to manipulate a string every tenth of a second for a certain number of iterations.
function timer() {
    var section = document.getElementById('txt').value;
    var len = section.length;
    var rands = new Array();

    for (i=0; i<len; i++) {
        rands.push(Math.floor(Math.random()*len));
    };

    var counter = 0
    var interval = setInterval(function() {
        var letters = section.split('');
        for (j=0; j < len; j++) {
            if (counter < rands[j]) {
                letters[j] = Math.floor(Math.random()*9);
            };
        };
        document.getElementById('txt').value = letters.join('');
        counter++

        if (counter > rands.max()) {
            clearInterval(interval);
        }
    }, 100);
};
Instead of having the interval set at a specific number, I would like to update it every time it runs, based on a counter. So instead of:
var interval = setInterval(function() { ... }, 100);
It would be something like:
var interval = setInterval(function() { ... }, 10*counter);
Unfortunately, that did not work. It seemed like «10*counter» equals 0.
So, how can I adjust the interval every time the anonymous function runs?
![]()
asked Aug 14, 2009 at 21:14
![]()
Joe Di StefanoJoe Di Stefano
2,1272 gold badges13 silver badges8 bronze badges
You could use an anonymous function:
var counter = 10;
var myFunction = function(){
    clearInterval(interval);
    counter *= 10;
    interval = setInterval(myFunction, counter);
}
var interval = setInterval(myFunction, counter);
UPDATE: As suggested by A. Wolff, use setTimeout to avoid the need for clearInterval.
var counter = 10;
var myFunction = function() {
    counter *= 10;
    setTimeout(myFunction, counter);
}
setTimeout(myFunction, counter);
answered Sep 16, 2011 at 14:01
![]()
6
Use setTimeout() instead. The callback would then be responsible for firing the next timeout, at which point you can increase or otherwise manipulate the timing.
EDIT
Here’s a generic function you can use to apply a «decelerating» timeout for ANY function call.
function setDeceleratingTimeout(callback, factor, times)
{
    var internalCallback = function(tick, counter) {
        return function() {
            if (--tick >= 0) {
                window.setTimeout(internalCallback, ++counter * factor);
                callback();
            }
        }
    }(times, 0);

    window.setTimeout(internalCallback, factor);
};

// console.log() requires firebug
setDeceleratingTimeout(function(){ console.log('hi'); }, 10, 10);
setDeceleratingTimeout(function(){ console.log('bye'); }, 100, 10);
answered Aug 14, 2009 at 21:18
![]()
Peter BaileyPeter Bailey
105k31 gold badges181 silver badges201 bronze badges
12
I like this question — inspired a little timer object in me:
window.setVariableInterval = function(callbackFunc, timing) {
  var variableInterval = {
    interval: timing,
    callback: callbackFunc,
    stopped: false,
    runLoop: function() {
      if (variableInterval.stopped) return;
      var result = variableInterval.callback.call(variableInterval);
      if (typeof result == 'number')
      {
        if (result === 0) return;
        variableInterval.interval = result;
      }
      variableInterval.loop();
    },
    stop: function() {
      this.stopped = true;
      window.clearTimeout(this.timeout);
    },
    start: function() {
      this.stopped = false;
      return this.loop();
    },
    loop: function() {
      this.timeout = window.setTimeout(this.runLoop, this.interval);
      return this;
    }
  };

  return variableInterval.start();
};
Example use
var vi = setVariableInterval(function() {
  // this is the variableInterval - so we can change/get the interval here:
  var interval = this.interval;

  // print it for the hell of it
  console.log(interval);

  // we can stop ourselves.
  if (interval>4000) this.stop();

  // we could return a new interval after doing something
  return interval + 100;
}, 100);

// we can change the interval down here too
setTimeout(function() {
  vi.interval = 3500;
}, 1000);

// or tell it to start back up in a minute
setTimeout(function() {
  vi.interval = 100;
  vi.start();
}, 60000);
answered Aug 14, 2009 at 22:24
![]()
gnarfgnarf
104k25 gold badges125 silver badges161 bronze badges
2
I had the same question as the original poster, did this as a solution. Not sure how efficient this is ….
let interval = 5000; // initial condition
let run = setInterval(request, interval); // start setInterval as "run"

function request() {

    console.log(interval); // firebug or chrome log
    clearInterval(run); // stop the setInterval()

    // dynamically change the run interval
    if (interval > 200) {
        interval = interval * .8;
    } else {
        interval = interval * 1.2;
    }

    run = setInterval(request, interval); // start the setInterval()
}
![]()
Valor_
3,3579 gold badges57 silver badges107 bronze badges
answered Aug 22, 2013 at 6:26
![]()
user28958user28958
2913 silver badges7 bronze badges
2
This is my way of doing this, i use setTimeout:
var timer = {
    running: false,
    iv: 5000,
    timeout: false,
    cb : function(){},
    start : function(cb,iv){
        var elm = this;
        clearInterval(this.timeout);
        this.running = true;
        if(cb) this.cb = cb;
        if(iv) this.iv = iv;
        this.timeout = setTimeout(function(){elm.execute(elm)}, this.iv);
    },
    execute : function(e){
        if(!e.running) return false;
        e.cb();
        e.start();
    },
    stop : function(){
        this.running = false;
    },
    set_interval : function(iv){
        clearInterval(this.timeout);
        this.start(false, iv);
    }
};
Usage:
timer.start(function(){
    console.debug('go');
}, 2000);

timer.set_interval(500);

timer.stop();
answered Jun 30, 2015 at 14:00
![]()
JaapzeJaapze
7326 silver badges15 bronze badges
4
A much simpler way would be to have an if statement in the refreshed function and a control to execute your command at regular time intervals . In the following example, I run an alert every 2 seconds and the interval (intrv) can be changed dynamically…
var i=1;
var intrv=2; // << control this variable

var refreshId = setInterval(function() {
  if(!(i%intrv)) {
    alert('run!');
  }
  i++;
}, 1000);
![]()
dmonaldo
1891 silver badge13 bronze badges
answered Jun 10, 2011 at 17:11
![]()
3
This can be initiated however you want. timeout is the method i used to keep it on the top of the hour.
I had the need for every hour to begin a code block on the hour. So this would start at server startup and run the interval hourly. Basicaly the initial run is to begin the interval within the same minute. So in a second from init, run immediately then on every 5 seconds.
var interval = 1000;
var timing =function(){
    var timer = setInterval(function(){
        console.log(interval);
        if(interval == 1000){ /*interval you dont want anymore or increment/decrement */
            interval = 3600000; /* Increment you do want for timer */
            clearInterval(timer);
            timing();
        }
    },interval);
}
timing();
Alternately if you wanted to just have something happen at start and then forever at a specific interval you could just call it at the same time as the setInterval. For example:
var this = function(){
 //do
}
setInterval(function(){
  this()
},3600000)
this()
Here we have this run the first time and then every hour.
answered Sep 24, 2015 at 15:45
![]()
I couldn’t synchronize and change the speed my setIntervals too and I was about to post a question. But I think I’ve found a way. It should certainly be improved because I’m a beginner. So, I’d gladly read your comments/remarks about this.
<body onload="foo()">
<div id="count1">0</div>
<div id="count2">2nd counter is stopped</div>
<button onclick="speed0()">pause</button>
<button onclick="speedx(1)">normal speed</button>
<button onclick="speedx(2)">speed x2</button>
<button onclick="speedx(4)">speed x4</button>
<button onclick="startTimer2()">Start second timer</button>
</body>
<script>
var count1 = 0,
    count2 = 0,
    greenlight = new Boolean(0), //blocks 2nd counter
    speed = 1000,   //1second
    countingSpeed;
function foo(){
    countingSpeed = setInterval(function(){
        counter1();
        counter2();
    },speed);
}
function counter1(){
    count1++;
    document.getElementById("count1").innerHTML=count1;
}
function counter2(){
    if (greenlight != false) {
        count2++;
        document.getElementById("count2").innerHTML=count2;
    }
}
function startTimer2(){
    //while the button hasn't been clicked, greenlight boolean is false
    //thus, the 2nd timer is blocked
    greenlight = true;
    counter2();
    //counter2() is greenlighted
}

//these functions modify the speed of the counters
function speed0(){
    clearInterval(countingSpeed);
}
function speedx(a){
    clearInterval(countingSpeed);
    speed=1000/a;
    foo();
}
</script>
If you want the counters to begin to increase once the page is loaded, put counter1() and counter2() in foo() before countingSpeed is called. Otherwise, it takes speed milliseconds before execution.
EDIT : Shorter answer.
answered Mar 6, 2014 at 21:13
![]()
(function variableInterval() {
    //whatever needs to be done
    interval *= 2; //deal with your interval
    setTimeout(variableInterval, interval);
    //whatever needs to be done
})();
can’t get any shorter
answered Jan 9, 2018 at 15:51
![]()
mikakunmikakun
2,1632 gold badges15 silver badges24 bronze badges
Here is yet another way to create a decelerating/accelerating interval timer. The interval gets multiplied by a factor until a total time is exceeded.
function setChangingInterval(callback, startInterval, factor, totalTime) {
    let remainingTime = totalTime;
    let interval = startInterval;

    const internalTimer = () => {
        remainingTime -= interval ;
        interval *= factor;
        if (remainingTime >= 0) {
            setTimeout(internalTimer, interval);
            callback();
        }
    };
    internalTimer();
}
answered Feb 6, 2019 at 17:27
![]()
jo_vajo_va
13.2k3 gold badges24 silver badges46 bronze badges
Make new function:
// set Time interval
$("3000,18000").Multitimeout();

jQuery.fn.extend({
    Multitimeout: function () {
        var res = this.selector.split(",");
        $.each(res, function (index, val) { setTimeout(function () {
            //...Call function
            temp();
        }, val); });
        return true;
    }
});

function temp()
{
    alert();
}
![]()
Eric Aya
69.1k35 gold badges179 silver badges250 bronze badges
answered Jun 18, 2018 at 10:10
![]()
doshi smitdoshi smit
291 silver badge7 bronze badges
0
This piece of code below accelerates (acceleration > 1) or decelerates (acceleration <1) a setInterval function :
function accelerate(yourfunction, timer, refresh, acceleration) {
    var new_timer = timer / acceleration;
    var refresh_init = refresh;//save this user defined value
    if (refresh < new_timer ){//avoid reseting the interval before it has produced anything.
        refresh = new_timer + 1 ;
    };
    var lastInter = setInterval(yourfunction, new_timer);
    console.log("timer:", new_timer);
    function stopLastInter() {
        clearInterval(lastInter);
        accelerate(yourfunction, new_timer, refresh_init, acceleration);
        console.log("refresh:", refresh);
    };
    setTimeout(stopLastInter, refresh);
}
With :
timer: the setInterval initial value in ms (increasing or decreasing)refresh: the time before a new value oftimeris calculated. This is the step lenghtacceleration: the gap between the old and the nexttimervalue. This is the step height
answered Dec 22, 2016 at 14:34
![]()
mquantinmquantin
1,0458 silver badges22 bronze badges
5
Inspired by the internal callback above, i made a function to fire a callback at fractions of minutes. If timeout is set to intervals like 6 000, 15 000, 30 000, 60 000 it will continuously adapt the intervals in sync to the exact transition to the next minute of your system clock.
//Interval timer to trigger on even minute intervals
function setIntervalSynced(callback, intervalMs) {

    //Calculate time to next modulus timer event
    var betterInterval = function () {
        var d = new Date();
        var millis = (d.getMinutes() * 60 + d.getSeconds()) * 1000 + d.getMilliseconds();
        return intervalMs - millis % intervalMs;
    };

    //Internal callback
    var internalCallback = function () {
        return function () {
            setTimeout(internalCallback, betterInterval());
            callback();
        }
    }();

    //Initial call to start internal callback
    setTimeout(internalCallback, betterInterval());
};
answered Mar 3, 2020 at 22:34
![]()
flodisflodis
1,09512 silver badges9 bronze badges
This is my idea for times when you do not want loops like setInterval to overlap.
You also want to be able to set the loop execution delay and start and stop the loop, instansly on the fly.
I am using a loop_flag variable and a setTimeout function.
I set the main function to async so that you can call other functions in the body by calling await. When the main body of your code is running, the main loop waits and does not repeat itself. (which is not the case with setInterval)
An example of a simple code is:
//@NabiKAZ

document.getElementById("btn_start").addEventListener("click", function() {
  console.log("Starting...");
  loop_flag = true;
  loop_func();
});
document.getElementById("btn_stop").addEventListener("click", function() {
  console.log("Stoping...");
  loop_flag = false;
});

var n = 0;

var loop_flag = false;
var loop_func = async function() {
  if (!loop_flag) {
    console.log("STOP.");
    return;
  }

  //body main function inhere
  n++;
  console.log(n);
  ////


  if (loop_flag) {
    setTimeout(loop_func, document.getElementById("inp_delay").value);
  } else {
    console.log("STOP.");
  }
}
<input id="inp_delay" value="1000">
<button id="btn_start">START</button>
<button id="btn_stop">STOP</button>For a more complete code with a fetch request inside the loop, see here:
https://jsfiddle.net/NabiKAZ/a5hdw2bo/
answered Mar 5, 2022 at 3:04
![]()
Nabi K.A.Z.Nabi K.A.Z.
9,2356 gold badges55 silver badges75 bronze badges
You can use a variable and change the variable instead.
setInterval(() => function, variable)
![]()
dsadnick
6041 gold badge10 silver badges25 bronze badges
answered Oct 22, 2020 at 3:24
![]()
You can do this by clearing the interval every iteration, changing the timer value and setting the interval again. Hope it helps 
For exemple:
const DOMCounter = document.querySelector(".counter")

let timer = 1000

const changeCounter = () => {
  clearInterval(interval)
  DOMCounter.innerHTML = timer
  timer += 1000
  timer == 5000 && timer == 1000
  interval = setInterval(changeCounter, timer)
}

let interval = setInterval(changeCounter, timer)
<div class="container">
<p class="counter"></p>
</div>answered Oct 28, 2022 at 14:27
![]()
var counter = 15;
var interval = function() {
    setTimeout(function(){
        // Write your code here and remove console.log, remember that you need declare yourDynamicValue and give it a value
        console.log((new Date()).getTime())

        window.counter = yourDynamicValue;
        window.interval();
    }, counter);
}
// It needs to run just once as init
interval();
answered Apr 25, 2013 at 8:18
![]()
HamidrezaHamidreza
1,8274 gold badges29 silver badges40 bronze badges
1
Метод setInterval() предложен для Window и Worker интерфейсов. Он циклически вызывает функцию или участок кода с фиксированной паузой между каждым вызовом. Уникальный идентификатор intervalID, возвращаемый методом, позволяет впоследствии удалить запущенный setInterval c помощью clearInterval() (en-US). Метод определён с помощью миксина WindowOrWorkerGlobalScope.
Синтаксис
var intervalID = scope.setInterval(func, delay[, param1, param2, ...]);
var intervalID = scope.setInterval(code, delay);
Параметры
func-
function— функция, которая будет вызываться каждыеdelayмиллисекунд. Ожидается, что функция не принимает параметры и ничего не возвращает. code-
Этот необязательный синтаксис позволяет вам включать строку вместо функции, которая компилируется и выполняется каждые
delayмиллисекунд. Однако такая форма не рекомендуется по тем же причинам, которые делаютeval()(en-US) угрозой безопасности. delay-
Время в миллисекундах (одна тысячная секунды), на которое таймер выполнит задержку между вызовом функции. Если задано значение меньше 10, то будет использовано число 10. На самом деле задержка может быть больше чем указано, дополнительное объяснение приведено здесь: Reasons for delays longer than specified в setTimeout().
param1, ..., paramNНеобязательный-
Дополнительные параметры, передаваемые в функцию func.
Примечание: Передача дополнительных аргументов в setInterval() в первом синтаксисе не работает в Internet Explorer 9 и более ранних версиях.Если вы хотите включить эту функцию в этом браузере, вам следует использовать polyfill (смотрите раздел Callback аргументы).
Возвращаемое значение
Возвращаемый intervalID представляет из себя ненулевое числовое значение, которое идентифицирует таймер, созданный вызовом setInterval(); Это значение может быть передано в WindowOrWorkerGlobalScope.clearInterval() (en-US) для отмены таймера.
It may be helpful to be aware that setInterval() and setTimeout() share the same pool of IDs, and that clearInterval() and clearTimeout() can technically be used interchangeably. For clarity, however, you should try to always match them to avoid confusion when maintaining your code.
Примечание: The delay parameter is converted to a signed 32-bit integer. This effectively limits delay to 2147483647 ms, since it’s specified as a signed integer in the IDL.
Примеры
Пример 1: Базовый синтаксис
The following example demonstrates setInterval()‘s basic syntax.
var intervalID = window.setInterval(myCallback, 500);

function myCallback() {
  // Your code here
}
Пример 2: Чередование двух цветов
В следующем примере вызывается функция flashtext() раз в секунду, до того момента, как будет нажата кнопка Stop.
<!DOCTYPE html>
<html>
<head>
  <meta charset="UTF-8" />
  <title>setInterval/clearInterval example</title>

  <script>
    var nIntervId;

    function changeColor() {
      nIntervId = setInterval(flashText, 1000);
    }

    function flashText() {
      var oElem = document.getElementById('my_box');
      oElem.style.color = oElem.style.color == 'red' ? 'blue' : 'red';
      // oElem.style.color == 'red' ? 'blue' : 'red' это тернарный оператор.
    }

    function stopTextColor() {
      clearInterval(nIntervId);
    }
  </script>
</head>

<body onload="changeColor();">
  <div id="my_box">
    <p>Hello World</p>
  </div>

  <button onclick="stopTextColor();">Stop</button>
</body>
</html>
Пример 3: Симуляция пишущей машинки
The following example simulates typewriter by first clearing and then slowly typing content into the NodeList (en-US) that matches a specified group of selectors.
<!DOCTYPE html>
<html>
<head>
<meta charset="UTF-8" />
<title>JavaScript Typewriter - MDN Example</title>
<script>
function Typewriter (sSelector, nRate) {
function clean () {
clearInterval(nIntervId);
bTyping = false;
bStart = true;
oCurrent = null;
aSheets.length = nIdx = 0;
}
function scroll (oSheet, nPos, bEraseAndStop) {
if (!oSheet.hasOwnProperty('parts') || aMap.length < nPos) { return true; }
var oRel, bExit = false;
if (aMap.length === nPos) { aMap.push(0); }
while (aMap[nPos] < oSheet.parts.length) {
oRel = oSheet.parts[aMap[nPos]];
scroll(oRel, nPos + 1, bEraseAndStop) ? aMap[nPos]++ : bExit = true;
if (bEraseAndStop && (oRel.ref.nodeType - 1 | 1) === 3 && oRel.ref.nodeValue) {
bExit = true;
oCurrent = oRel.ref;
sPart = oCurrent.nodeValue;
oCurrent.nodeValue = '';
}
oSheet.ref.appendChild(oRel.ref);
if (bExit) { return false; }
}
aMap.length--;
return true;
}
function typewrite () {
if (sPart.length === 0 && scroll(aSheets[nIdx], 0, true) && nIdx++ === aSheets.length - 1) { clean(); return; }
oCurrent.nodeValue += sPart.charAt(0);
sPart = sPart.slice(1);
}
function Sheet (oNode) {
this.ref = oNode;
if (!oNode.hasChildNodes()) { return; }
this.parts = Array.prototype.slice.call(oNode.childNodes);
for (var nChild = 0; nChild < this.parts.length; nChild++) {
oNode.removeChild(this.parts[nChild]);
this.parts[nChild] = new Sheet(this.parts[nChild]);
}
}
var
nIntervId, oCurrent = null, bTyping = false, bStart = true,
nIdx = 0, sPart = "", aSheets = [], aMap = [];
this.rate = nRate || 100;
this.play = function () {
if (bTyping) { return; }
if (bStart) {
var aItems = document.querySelectorAll(sSelector);
if (aItems.length === 0) { return; }
for (var nItem = 0; nItem < aItems.length; nItem++) {
aSheets.push(new Sheet(aItems[nItem]));
/* Uncomment the following line if you have previously hidden your elements via CSS: */
// aItems[nItem].style.visibility = "visible";
}
bStart = false;
}
nIntervId = setInterval(typewrite, this.rate);
bTyping = true;
};
this.pause = function () {
clearInterval(nIntervId);
bTyping = false;
};
this.terminate = function () {
oCurrent.nodeValue += sPart;
sPart = "";
for (nIdx; nIdx < aSheets.length; scroll(aSheets[nIdx++], 0, false));
clean();
};
}
/* usage: */
var oTWExample1 = new Typewriter(/* elements: */ '#article, h1, #info, #copyleft', /* frame rate (optional): */ 15);
/* default frame rate is 100: */
var oTWExample2 = new Typewriter('#controls');
/* you can also change the frame rate value modifying the "rate" property; for example: */
// oTWExample2.rate = 150;
onload = function () {
oTWExample1.play();
oTWExample2.play();
};
</script>
<style type="text/css">
span.intLink, a, a:visited {
cursor: pointer;
color: #000000;
text-decoration: underline;
}
#info {
width: 180px;
height: 150px;
float: right;
background-color: #eeeeff;
padding: 4px;
overflow: auto;
font-size: 12px;
margin: 4px;
border-radius: 5px;
/* visibility: hidden; */
}
</style>
</head>
<body>
<p id="copyleft" style="font-style: italic; font-size: 12px; text-align: center;">CopyLeft 2012 by <a href="https://developer.mozilla.org/" target="_blank">Mozilla Developer Network</a></p>
<p id="controls" style="text-align: center;">[ <span class="intLink" onclick="oTWExample1.play();">Play</span> | <span class="intLink" onclick="oTWExample1.pause();">Pause</span> | <span class="intLink" onclick="oTWExample1.terminate();">Terminate</span> ]</p>
<div id="info">
Vivamus blandit massa ut metus mattis in fringilla lectus imperdiet. Proin ac ante a felis ornare vehicula. Fusce pellentesque lacus vitae eros convallis ut mollis magna pellentesque. Pellentesque placerat enim at lacus ultricies vitae facilisis nisi fringilla. In tincidunt tincidunt tincidunt.
</div>
<h1>JavaScript Typewriter</h1>
<div id="article">
<p>Lorem ipsum dolor sit amet, consectetur adipiscing elit. Nullam ultrices dolor ac dolor imperdiet ullamcorper. Suspendisse quam libero, luctus auctor mollis sed, malesuada condimentum magna. Quisque in ante tellus, in placerat est. Pellentesque habitant morbi tristique senectus et netus et malesuada fames ac turpis egestas. Donec a mi magna, quis mattis dolor. Etiam sit amet ligula quis urna auctor imperdiet nec faucibus ante. Mauris vel consectetur dolor. Nunc eget elit eget velit pulvinar fringilla consectetur aliquam purus. Curabitur convallis, justo posuere porta egestas, velit erat ornare tortor, non viverra justo diam eget arcu. Phasellus adipiscing fermentum nibh ac commodo. Nam turpis nunc, suscipit a hendrerit vitae, volutpat non ipsum.</p>
<form>
<p>Phasellus ac nisl lorem: <input type="text" /><br />
<textarea style="width: 400px; height: 200px;">Nullam commodo suscipit lacus non aliquet. Phasellus ac nisl lorem, sed facilisis ligula. Nam cursus lobortis placerat. Sed dui nisi, elementum eu sodales ac, placerat sit amet mauris. Pellentesque dapibus tellus ut ipsum aliquam eu auctor dui vehicula. Quisque ultrices laoreet erat, at ultrices tortor sodales non. Sed venenatis luctus magna, ultricies ultricies nunc fringilla eget. Praesent scelerisque urna vitae nibh tristique varius consequat neque luctus. Integer ornare, erat a porta tempus, velit justo fermentum elit, a fermentum metus nisi eu ipsum. Vivamus eget augue vel dui viverra adipiscing congue ut massa. Praesent vitae eros erat, pulvinar laoreet magna. Maecenas vestibulum mollis nunc in posuere. Pellentesque sit amet metus a turpis lobortis tempor eu vel tortor. Cras sodales eleifend interdum.</textarea></p>
<p><input type="submit" value="Send" />
</form>
<p>Duis lobortis sapien quis nisl luctus porttitor. In tempor semper libero, eu tincidunt dolor eleifend sit amet. Ut nec velit in dolor tincidunt rhoncus non non diam. Morbi auctor ornare orci, non euismod felis gravida nec. Curabitur elementum nisi a eros rutrum nec blandit diam placerat. Aenean tincidunt risus ut nisi consectetur cursus. Ut vitae quam elit. Donec dignissim est in quam tempor consequat. Aliquam aliquam diam non felis convallis suscipit. Nulla facilisi. Donec lacus risus, dignissim et fringilla et, egestas vel eros. Duis malesuada accumsan dui, at fringilla mauris bibStartum quis. Cras adipiscing ultricies fermentum. Praesent bibStartum condimentum feugiat.</p>
<p>Nam faucibus, ligula eu fringilla pulvinar, lectus tellus iaculis nunc, vitae scelerisque metus leo non metus. Proin mattis lobortis lobortis. Quisque accumsan faucibus erat, vel varius tortor ultricies ac. Lorem ipsum dolor sit amet, consectetur adipiscing elit. Sed nec libero nunc. Nullam tortor nunc, elementum a consectetur et, ultrices eu orci. Lorem ipsum dolor sit amet, consectetur adipiscing elit. Pellentesque a nisl eu sem vehicula egestas.</p>
</div>
</body>
</html>
View this demo in action. See also: clearInterval() (en-US).
Аргументы колбэк-функции
As previously discussed, Internet Explorer versions 9 and below do not support the passing of arguments to the callback function in either setTimeout() or setInterval(). The following IE-specific code demonstrates a method for overcoming this limitation. To use, simply add the following code to the top of your script.
/*
|*|
|*|  IE-specific polyfill that enables the passage of arbitrary arguments to the
|*|  callback functions of javascript timers (HTML5 standard syntax).
|*|
|*|  https://developer.mozilla.org/en-US/docs/Web/API/window.setInterval
|*|  https://developer.mozilla.org/User:fusionchess
|*|
|*|  Syntax:
|*|  var timeoutID = window.setTimeout(func, delay[, param1, param2, ...]);
|*|  var timeoutID = window.setTimeout(code, delay);
|*|  var intervalID = window.setInterval(func, delay[, param1, param2, ...]);
|*|  var intervalID = window.setInterval(code, delay);
|*|
*/

if (document.all && !window.setTimeout.isPolyfill) {
  var __nativeST__ = window.setTimeout;
  window.setTimeout = function (vCallback, nDelay /*, argumentToPass1, argumentToPass2, etc. */) {
    var aArgs = Array.prototype.slice.call(arguments, 2);
    return __nativeST__(vCallback instanceof Function ? function () {
      vCallback.apply(null, aArgs);
    } : vCallback, nDelay);
  };
  window.setTimeout.isPolyfill = true;
}

if (document.all && !window.setInterval.isPolyfill) {
  var __nativeSI__ = window.setInterval;
  window.setInterval = function (vCallback, nDelay /*, argumentToPass1, argumentToPass2, etc. */) {
    var aArgs = Array.prototype.slice.call(arguments, 2);
    return __nativeSI__(vCallback instanceof Function ? function () {
      vCallback.apply(null, aArgs);
    } : vCallback, nDelay);
  };
  window.setInterval.isPolyfill = true;
}
Another possibility is to use an anonymous function to call your callback, although this solution is a bit more expensive. Example:
var intervalID = setInterval(function() { myFunc('one', 'two', 'three'); }, 1000);
Another possibility is to use function’s bind. Example:
var intervalID = setInterval(function(arg1) {}.bind(undefined, 10), 1000);
Inactive tabs
Starting in Gecko 5.0 (Firefox 5.0 / Thunderbird 5.0 / SeaMonkey 2.2), intervals are clamped to fire no more often than once per second in inactive tabs.
Проблема с «this«
When you pass a method to setInterval() or any other function, it is invoked with the wrong this value. This problem is explained in detail in the JavaScript reference.
Объяснение
Code executed by setInterval() runs in a separate execution context than the function from which it was called. As a consequence, the this keyword for the called function is set to the window (or global) object, it is not the same as the this value for the function that called setTimeout. See the following example (which uses setTimeout() instead of setInterval() – the problem, in fact, is the same for both timers):
myArray = ['zero', 'one', 'two'];

myArray.myMethod = function (sProperty) {
    alert(arguments.length > 0 ? this[sProperty] : this);
};

myArray.myMethod(); // prints "zero,one,two"
myArray.myMethod(1); // prints "one"
setTimeout(myArray.myMethod, 1000); // prints "[object Window]" after 1 second
setTimeout(myArray.myMethod, 1500, "1"); // prints "undefined" after 1,5 seconds
// passing the 'this' object with .call won't work
// because this will change the value of this inside setTimeout itself
// while we want to change the value of this inside myArray.myMethod
// in fact, it will be an error because setTimeout code expects this to be the window object:
setTimeout.call(myArray, myArray.myMethod, 2000); // error: "NS_ERROR_XPC_BAD_OP_ON_WN_PROTO: Illegal operation on WrappedNative prototype object"
setTimeout.call(myArray, myArray.myMethod, 2500, 2); // same error
As you can see there are no ways to pass the this object to the callback function in the legacy JavaScript.
Возможное решение
A possible way to solve the «this» problem is to replace the two native setTimeout() or setInterval() global functions with two non-native ones that enable their invocation through the Function.prototype.call (en-US) method. The following example shows a possible replacement:
// Enable the passage of the 'this' object through the JavaScript timers

var __nativeST__ = window.setTimeout, __nativeSI__ = window.setInterval;

window.setTimeout = function (vCallback, nDelay /*, argumentToPass1, argumentToPass2, etc. */) {
  var oThis = this, aArgs = Array.prototype.slice.call(arguments, 2);
  return __nativeST__(vCallback instanceof Function ? function () {
    vCallback.apply(oThis, aArgs);
  } : vCallback, nDelay);
};

window.setInterval = function (vCallback, nDelay /*, argumentToPass1, argumentToPass2, etc. */) {
  var oThis = this, aArgs = Array.prototype.slice.call(arguments, 2);
  return __nativeSI__(vCallback instanceof Function ? function () {
    vCallback.apply(oThis, aArgs);
  } : vCallback, nDelay);
};
Примечание: These two replacements also enable the HTML5 standard passage of arbitrary arguments to the callback functions of timers in IE. So they can be used as non-standard-compliant polyfills also. See the callback arguments paragraph for a standard-compliant polyfill.
Новое тестируемое свойство:
myArray = ['zero', 'one', 'two'];

myArray.myMethod = function (sProperty) {
    alert(arguments.length > 0 ? this[sProperty] : this);
};

setTimeout(alert, 1500, 'Hello world!'); // the standard use of setTimeout and setInterval is preserved, but...
setTimeout.call(myArray, myArray.myMethod, 2000); // prints "zero,one,two" after 2 seconds
setTimeout.call(myArray, myArray.myMethod, 2500, 2); // prints "two" after 2,5 seconds
Another, more complex, solution for the this problem is the following framework.
Примечание: JavaScript 1.8.5 introduces the Function.prototype.bind() method, which lets you specify the value that should be used as this for all calls to a given function. This lets you easily bypass problems where it’s unclear what this will be, depending on the context from which your function was called. Also, ES2015 supports arrow functions, with lexical this allowing us to write setInterval( () => this.myMethod) if we’re inside myArray method.
MiniDaemon — фреймворк для управления таймерами
In pages requiring many timers, it can often be difficult to keep track of all of the running timer events. One approach to solving this problem is to store information about the state of a timer in an object. Following is a minimal example of such an abstraction. The constructor architecture explicitly avoids the use of closures. It also offers an alternative way to pass the this object to the callback function (see The «this» problem for details). The following code is also available on GitHub.
Примечание: For a more complex but still modular version of it (Daemon) see JavaScript Daemons Management. This more complex version is nothing but a big and scalable collection of methods for the Daemon constructor. However, the Daemon constructor itself is nothing but a clone of MiniDaemon with an added support for init and onstart functions declarable during the instantiation of the daemon. So the MiniDaemon framework remains the recommended way for simple animations, because Daemon without its collection of methods is essentially a clone of it.
minidaemon.js
/*
|*|
|*|  :: MiniDaemon ::
|*|
|*|  Revision #2 - September 26, 2014
|*|
|*|  https://developer.mozilla.org/en-US/docs/Web/API/window.setInterval
|*|  https://developer.mozilla.org/User:fusionchess
|*|  https://github.com/madmurphy/minidaemon.js
|*|
|*|  This framework is released under the GNU Lesser General Public License, version 3 or later.
|*|  http://www.gnu.org/licenses/lgpl-3.0.html
|*|
*/

function MiniDaemon (oOwner, fTask, nRate, nLen) {
  if (!(this && this instanceof MiniDaemon)) { return; }
  if (arguments.length < 2) { throw new TypeError('MiniDaemon - not enough arguments'); }
  if (oOwner) { this.owner = oOwner; }
  this.task = fTask;
  if (isFinite(nRate) && nRate > 0) { this.rate = Math.floor(nRate); }
  if (nLen > 0) { this.length = Math.floor(nLen); }
}

MiniDaemon.prototype.owner = null;
MiniDaemon.prototype.task = null;
MiniDaemon.prototype.rate = 100;
MiniDaemon.prototype.length = Infinity;

  /* These properties should be read-only */

MiniDaemon.prototype.SESSION = -1;
MiniDaemon.prototype.INDEX = 0;
MiniDaemon.prototype.PAUSED = true;
MiniDaemon.prototype.BACKW = true;

  /* Global methods */

MiniDaemon.forceCall = function (oDmn) {
  oDmn.INDEX += oDmn.BACKW ? -1 : 1;
  if (oDmn.task.call(oDmn.owner, oDmn.INDEX, oDmn.length, oDmn.BACKW) === false || oDmn.isAtEnd()) { oDmn.pause(); return false; }
  return true;
};

  /* Instances methods */

MiniDaemon.prototype.isAtEnd = function () {
  return this.BACKW ? isFinite(this.length) && this.INDEX < 1 : this.INDEX + 1 > this.length;
};

MiniDaemon.prototype.synchronize = function () {
  if (this.PAUSED) { return; }
  clearInterval(this.SESSION);
  this.SESSION = setInterval(MiniDaemon.forceCall, this.rate, this);
};

MiniDaemon.prototype.pause = function () {
  clearInterval(this.SESSION);
  this.PAUSED = true;
};

MiniDaemon.prototype.start = function (bReverse) {
  var bBackw = Boolean(bReverse);
  if (this.BACKW === bBackw && (this.isAtEnd() || !this.PAUSED)) { return; }
  this.BACKW = bBackw;
  this.PAUSED = false;
  this.synchronize();
};
Примечание: MiniDaemon passes arguments to the callback function. If you want to work on it with browsers that natively do not support this feature, use one of the methods proposed above.
Синтаксис
var myDaemon = new MiniDaemon(thisObject, callback[, rate[, length]]);
Описание
Returns a JavaScript Object containing all information needed by an animation (like the this object, the callback function, the length, the frame-rate).
Параметры
thisObject-
The
thisobject on which the callback function is called. It can be anobjectornull. callback-
The function that is repeatedly invoked . It is called with three parameters: index (the iterative index of each invocation), length (the number of total invocations assigned to the daemon — finite or
Infinity(en-US)) and backwards (a boolean expressing whether the index is increasing or decreasing). It is something like callback.call(thisObject, index, length, backwards). If the callback function returns afalsevalue the daemon is paused. rate (optional)-
The time lapse (in number of milliseconds) between each invocation. The default value is 100.
length (optional)-
The total number of invocations. It can be a positive integer or
Infinity. The default value isInfinity.
MiniDaemon instances properties
myDaemon.owner-
The
thisobject on which is executed the daemon (read/write). It can be anobjectornull. myDaemon.task-
The function that is repeatedly invoked (read/write). It is called with three arguments: index (the iterative index of each invocation), length (the number of total invocations assigned to the daemon — finite or
Infinity(en-US)) and backwards (a boolean expressing whether the index is decreasing or not) – see above. If themyDaemon.taskfunction returns afalsevalue the daemon is paused. myDaemon.rate-
Промежуток времени (в миллисекундах) между каждым вызовом (чтение / запись).
myDaemon.length-
Итоговое количество вызовов. Это может быть положительное целое число или бесконечность
Infinity(чтение / запись).
MiniDaemon instances methods
myDaemon.isAtEnd()-
Возвращает логическое значение (true или false), в зависимости от того, находится ли daemon в начальной / конечной позиции или нет.
myDaemon.synchronize()-
Synchronize the timer of a started daemon with the time of its invocation.
myDaemon.pause()-
Pauses the daemon.
myDaemon.start([reverse])-
Starts the daemon forward (index of each invocation increasing) or backwards (index decreasing).
MiniDaemon global object methods
MiniDaemon.forceCall(minidaemon)-
Forces a single callback to the
minidaemon.taskfunction regardless of the fact that the end has been reached or not. In any case the internalINDEXproperty is increased/decreased (depending on the actual direction of the process).
Пример использования
Ваша HTML страница:
<!DOCTYPE html>
<html>
<head>
  <meta charset="UTF-8" />
  <title>MiniDaemin Example - MDN</title>
  <script type="text/javascript" src="minidaemon.js"></script>
  <style type="text/css">
    #sample_div {
      visibility: hidden;
    }
  </style>
</head>

<body>
  <p>
    <input type="button" onclick="fadeInOut.start(false );" value="fade in" />
    <input type="button" onclick="fadeInOut.start(true);" value="fade out">
    <input type="button" onclick="fadeInOut.pause();" value="pause" />
  </p>

  <div id="sample_div">Some text here</div>

  <script type="text/javascript">
    function opacity (nIndex, nLength, bBackwards) {
      this.style.opacity = nIndex / nLength;
      if (bBackwards ? nIndex === 0 : nIndex === 1) {
        this.style.visibility = bBackwards ? 'hidden' : 'visible';
      }
    }

    var fadeInOut = new MiniDaemon(document.getElementById('sample_div'), opacity, 300, 8);
  </script>
</body>
</html>
View this example in action
Примечания
The setInterval() function is commonly used to set a delay for functions that are executed again and again, such as animations.
You can cancel the interval using WindowOrWorkerGlobalScope.clearInterval() (en-US).
If you wish to have your function called once after the specified delay, use WindowOrWorkerGlobalScope.setTimeout().
Ensure that execution duration is shorter than interval frequency
If there is a possibility that your logic could take longer to execute than the interval time, it is recommended that you recursively call a named function using WindowOrWorkerGlobalScope.setTimeout. For example, if using setInterval to poll a remote server every 5 seconds, network latency, an unresponsive server, and a host of other issues could prevent the request from completing in its allotted time. As such, you may find yourself with queued up XHR requests that won’t necessarily return in order.
In these cases, a recursive setTimeout() pattern is preferred:
(function loop(){
   setTimeout(function() {
      // Your logic here

      loop();
  }, delay);
})();
In the above snippet, a named function loop() is declared and is immediately executed. loop() is recursively called inside setTimeout() after the logic has completed executing. While this pattern does not guarantee execution on a fixed interval, it does guarantee that the previous interval has completed before recursing.
Throttling of intervals
setInterval() is subject to the same throttling restrictions in Firefox as setTimeout(); see Reasons for delays longer than specified.
Спецификации
| Specification |
|---|
| HTML Standard # dom-setinterval-dev |
Совместимость с браузерами
BCD tables only load in the browser
Смотрите также
На этом уроке мы познакомимся с таймерами, которые предназначены для вызова кода на языке JavaScript через определённые промежутки времени.
В JavaScript имеются методы, которые позволяют вызвать функцию не сразу, а через некоторый промежуток времени (в асинхронном режиме). Называются они setTimeout и setInterval.
Отличаются они друг от друга лишь тем, что setTimeout выполняет вызов функции всего один раз, а setInterval – постоянно через указанный интервал времени.
Синтаксис setTimeout и setInterval:
// setTimeout
window.setTimeout(func [, delay] [, arg1, arg2, ...]);
// setInterval
window.setTimeout(func [, delay] [, arg1, arg2, ...]);
Параметры:
func– функция, которую нужно вызвать спустя указанное вdelayколичество миллисекунд;delay– количество миллисекунд по истечении которых нужно выполнитьfunc;arg1, arg2, ...– дополнительные аргументы, которые нужно передать вfunc.
Например, вызовем функцию myFunc один раз по прошествии 3 секунд:
// функция
function myFunc() {
  console.log('after 3 seconds');
}

// вызовем функцию myFunc после 3 секунд
window.setTimeout(myFunc, 3000);
// выведем сообщение в консоль
console.log('immediately');
При выполнение этого кода программа не остановится на месте, где мы зарегистрировали некоторую асинхронность посредством setTimeout и не будет блокировать её дальнейшее выполнение на 3 секунды, через которые нужно будет вызвать myFunc. Выполнение скрипта продолжится дальше и сначала браузер выведет в консоль сообщение «immediately», а затем через 3 секунды – «after 3 seconds».
Другими словами, когда браузер доходит до исполнения setTimeout, он как бы помещает функцию myFunc в некоторое место, а затем по прошествии определённого количества времени её вызывает. При этом блокировка основного потока выполнения программы не происходит.
Чтобы более подробно разобраться в этом необходимо рассмотреть, как движок JavaScript выполняет синхронный и асинхронный код, а также что такое event loop и как он работает.
Синхронный и асинхронный код
Но перед тем, как переходить к асинхронными операциям, следует сначала в общих чертах разобраться как выполняется синхронный код.
Выполнение такого кода движок JavaScript выполняет последовательно (т.е. строчку за строчкой). При этом перед тем, как выполнить какую-то строчку кода интерпретатор сначала помещает её в стек вызовов (call stack). Именно в нём происходит её разбор и исполнение. После этого происходит её извлечение из стека и переход к следующей строчке.
Но всё меняется, когда интерпретатор доходит до выполнения асинхронных операций, например setTimeout. Они также как и синхронные операции сначала попадают в стек вызовов, где происходит их разбор. Но, при разборе интерпретатор понимает, что это некоторый вызов Web API и помещает эту операцию в него. После этого он удаляет эту строчку из call stack и переходит к выполнению следующей строчки кода.
В это же время Web API регистрирует эту функцию и запускает таймер. Как только он завершается, он помещает эту функцию в очередь (callback queue). Очередь – это структура данных типа FIFO. Она хранит все функции в том порядке, в котором они были туда добавлены.
Очередь обратных вызовов (callback queue) обрабатывает цикл событий (event loop). Он смотрит на эту очередь и на стек вызовов (call stack). Если стек вызовов пуст, а очередь нет – то он берёт первую функцию из очереди и закидывает её в стек вызовов, в котором она уже выполняется. Вот таким образом происходит выполнения асинхронного кода в JavaScript.
Если функцию myFunc необходимо вызывать не один раз, а постоянно через каждые 3 секунды, то тогда вместо setTimeout следует использовать setInterval:
window.setInterval(myFunc, 3000);
Пример, с передачей функции аргументов:
function sayHello(name) {
  alert(`Привет, ${name}!`);
}
setTimeout(sayHello, 3000, 'Василий'); // Привет, Василий!
Пример, с использованием в setTimeout анонимной функции:
setTimeout(function (name) {
  alert(`Привет, ${name}!`);
}, 3000, 'Василий');
В setTimeout и setInterval можно также вместо функции передавать строку с кодом, который нужно выполнить через определённый интервал времени. Но этот вариант использовать не рекомендуется по тем же причинам, что и функцию eval.
Если функция setTimeout по каким-то причинам не работает, то проверьте действительно ли вы передаёте ссылку на функцию, а неё результат:
function sayHello() {
  console.log('Привет!');
}

// передаём в setTimeout не ссылку на функцию sayHello, а результат её вызова
setTimeout(sayHello(), 3000);
Отмена таймаута (clearTimeout)
Метод setTimeout в результате своего вызова возвращает нам некий идентификатор таймера, который затем мы можем использовать для его отмены.
Синтаксис отмены таймаута:
const timeoutId = window.setTimeout(...);
window.clearTimeout(timeoutId);
Данный метод (clearTimeout) содержит один обязательный параметр — это уникальный идентификатор (timeoutId) таймера, который можно получить как результат вызова метода setTimeout.
Например:
// запустим таймер и получим его идентификатор, который будет храниться в timeoutId
const timeoutId = window.setTimeout(() => {
  // он выведет alert с контентом 'Сообщение' через 4 секунды
  alert('Сообщение');
}, 4000);

// остановим таймер с помощью метода clearTimeout (для этого необходимо в качестве параметра данному методу передать идентификатор таймера, хранящийся в timeoutId)
clearTimeout(timeoutId);

Пример
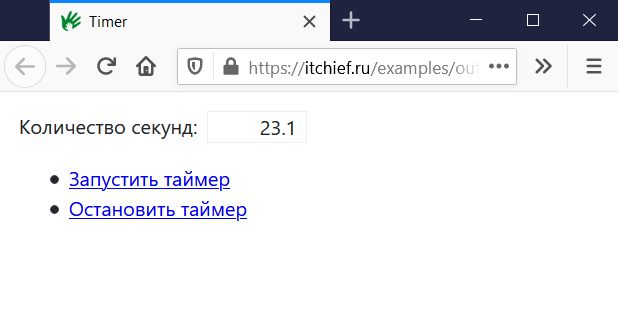
Например, создадим на странице 2 ссылки. При нажатии на первую будет запускать функцию start. Данная функция будет выводить в элемент .seconds количество секунд, прошедших с момента её нажатия. При нажатии на ссылку «Остановить таймер» будем запускать другую функцию stop. Она будет прекращать работу таймера с помощью метода clearTimeout.
<div class="seconds-wrapper">Количество секунд: <span class="seconds"></span></div>
<ul>
  <li><a href="javascript:start()">Запустить таймер</a></li>
  <li><a href="javascript:stop()">Остановить таймер</a></li>
</ul>

<script>
  // переменная, для хранения идентификатора таймера
  let timeoutId = null;

  // функция, которая будет запускать таймер
  function start() {
    // для предотвращения повторного запуска
    if (timeoutId) {
      return;
    }
    // получаем текущее время
    const startTime = new Date().getTime();
    // функция
    const run = () => {
      // определяем время, которое прошло с момента запуска функции start
      const time = new Date().getTime() - startTime;
      // получаем элемент .seconds и выводим в него значение time / 1000
      document.querySelector('.seconds').textContent = (time / 1000).toFixed(1);
      // запускаем вызов функции run через 50 мс
      timeoutId = window.setTimeout(run, 50);
    }
    // запускаем функцию run
    run();
  }

  // функция для остановки таймера по timeoutId
  function stop() {
    if (timeoutId) {
      // прекращаем работу таймера
      clearTimeout(timeoutId);
      // присваиваем переменной timeoutId значение null
      timeoutId = null;
    }
  }
</script>
Задача. Перепишите этот пример с использованием методов setInterval и clearInterval.
Методы setInterval и clearInterval
Метод setInterval предназначен для вызова кода на языке JavaScript через указанные промежутки времени. Он в отличие от метода setTimeOut будет вызвать код до тех пор, пока Вы не остановите этот таймер.
window.setInterval(Параметр_1, Параметр_2);
Метод setInterval имеет два обязательных параметра:
- 1 параметр представляет собой строку, содержащую код на языке JavaScript (например, вызов функции);
- 2 параметр задаёт интервал времени в миллисекундах, через который данный код будет вызываться.
Для прекращения работы данного таймера предназначен метод clearInterval, которому в качестве параметра необходимо передать уникальный идентификатор (id) таймера. Этот идентификатор можно получить при установке таймера, т.е. его возвращает метод setInterval. Также таймер прекращает свою работу при закрытии окна.
//запустим таймер и получим его идентификатор, который будет храниться в переменной timer1
//данный таймер будет выводить сообщение через каждые 5 секунд
var timer1 = window.setInterval("alert('Сообщение');",5000);
//остановим работу таймера с помощью метода clearInterval().
//Для этого в качестве параметра данному методу передадим идентификатор таймера, хранящийся в переменной timer1.
clearInterval(timer1);
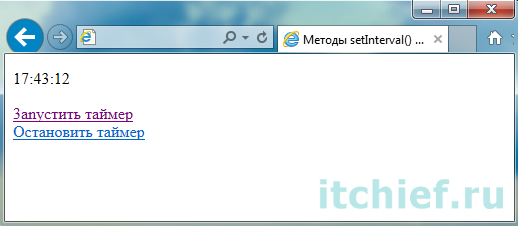
Например, создадим цифровые часы:
<p id="clock"></p>
<a href="javaScript:startClock()">3anycтить таймер</a>
<br />
<a href="javaScript:stopClock()">Остановить таймер</a>

<script>
  // переменная, для хранения идентификатора таймера
  let timeoutId = null;
  // для предотвращения повторного запуска
  let hasStarting = false;

  // функция, которая будет запускать таймер
  function start() {
    // для предотвращения повторного запуска
    if (hasStarting) {
      return;
    }
    hasStarting = true;
    // получаем текущее время
    const startTime = new Date().getTime();
    // функция
    const run = () => {
      // определяем время, которое прошло с момента запуска функции start
      const time = new Date().getTime() - startTime;
      // получаем элемент .seconds и выводим в него значение time / 1000
      document.querySelector('.seconds').textContent = (time / 1000).toFixed(1);
      // запускаем вызов функции run через 50 мс
      timeoutId = window.setTimeout(run, 50);
    }
    // запускаем функцию run
    run();
  }

  // функция для остановки таймера по timeoutId
  function stop() {
    if (timeoutId) {
      // прекращаем работу таймера
      clearTimeout(timeoutId);
      // присваиваем переменной timeoutId значение null
      timeoutId = null;
      // присваиваем hasStarting значение false
      hasStarting = false;
    }
  }
</script>
setTimeout и setInterval
Почти все реализации JavaScript имеют внутренний таймер-планировщик, который позволяет задавать вызов функции через заданный период времени.
В частности, эта возможность поддерживается в браузерах и в сервере Node.JS.
setTimeout
Синтаксис:
var timerId = setTimeout(func / code, delay[, arg1, arg2...])
Параметры:
func/code
: Функция или строка кода для исполнения.
Строка поддерживается для совместимости, использовать её не рекомендуется.
delay
: Задержка в миллисекундах, 1000 миллисекунд равны 1 секунде.
arg1, arg2…
: Аргументы, которые нужно передать функции. Не поддерживаются в IE9-.
Исполнение функции произойдёт спустя время, указанное в параметре delay.
Например, следующий код вызовет func() через одну секунду:
function func() {
  alert( 'Привет' );
}

*!*
setTimeout(func, 1000);
*/!*
С передачей аргументов (не сработает в IE9-):
function func(phrase, who) {
  alert( phrase + ', ' + who );
}

*!*
setTimeout(func, 1000, "Привет", "Вася"); // Привет, Вася
*/!*
Если первый аргумент является строкой, то интерпретатор создаёт анонимную функцию из этой строки.
То есть такая запись тоже сработает:
setTimeout("alert('Привет')", 1000);
Однако, использование строк не рекомендуется, так как они могут вызвать проблемы при минимизации кода, и, вообще, сама возможность использовать строку сохраняется лишь для совместимости.
Вместо них используйте анонимные функции, вот так:
setTimeout(function() { alert('Привет') }, 1000);
Отмена исполнения clearTimeout
Функция setTimeout возвращает числовой идентификатор таймера timerId, который можно использовать для отмены действия.
Синтаксис:
var timerId = setTimeout(...);
clearTimeout(timerId);
В следующем примере мы ставим таймаут, а затем удаляем (передумали). В результате ничего не происходит.
var timerId = setTimeout(function() { alert(1) }, 1000);
alert(timerId); // число - идентификатор таймера

clearTimeout(timerId);
alert(timerId); // всё ещё число, оно не обнуляется после отмены
Как видно из alert, в браузере идентификатор таймера является обычным числом. Другие JavaScript-окружения, например Node.JS, могут возвращать объект таймера, с дополнительными методами.
Такие разночтения вполне соответствуют стандарту просто потому, что в спецификации JavaScript про таймеры нет ни слова.
Таймеры — это надстройка над JavaScript, которая описана в секции Timers стандарта HTML5 для браузеров и в документации к Node.JS — для сервера.
setInterval
Метод setInterval имеет синтаксис, аналогичный setTimeout.
var timerId = setInterval(func / code, delay[, arg1, arg2...])
Смысл аргументов — тот же самый. Но, в отличие от setTimeout, он запускает выполнение функции не один раз, а регулярно повторяет её через указанный интервал времени. Остановить исполнение можно вызовом clearInterval(timerId).
Следующий пример при запуске станет выводить сообщение каждые две секунды, пока не пройдёт 5 секунд:
// начать повторы с интервалом 2 сек
var timerId = setInterval(function() {
  alert( "тик" );
}, 2000);

// через 5 сек остановить повторы
setTimeout(function() {
  clearInterval(timerId);
  alert( 'стоп' );
}, 5000);
Что будет, если долго не жать `OK` на появившемся `alert`? Это зависит от браузера.

В браузерах Chrome, Opera и Safari внутренний таймер "заморожен" во время показа `alert/confirm/prompt`. А вот в IE и Firefox внутренний таймер продолжит идти.

Поэтому, если закрыть `alert` после небольшой паузы, то в Firefox/IE следующий `alert` будет показан сразу же (время подошло), а в Chrome/Opera/Safari -- только через 2 секунды после закрытия.
Рекурсивный setTimeout
Важная альтернатива setInterval — рекурсивный setTimeout:
/** вместо:
var timerId = setInterval(function() {
  alert( "тик" );
}, 2000);
*/

var timerId = setTimeout(function tick() {
  alert( "тик" );
*!*
  timerId = setTimeout(tick, 2000);
*/!*
}, 2000);
В коде выше следующее выполнение планируется сразу после окончания предыдущего.
Рекурсивный setTimeout — более гибкий метод тайминга, чем setInterval, так как время до следующего выполнения можно запланировать по-разному, в зависимости от результатов текущего.
Например, у нас есть сервис, который раз в 5 секунд опрашивает сервер на предмет новых данных. В случае, если сервер перегружен, можно увеличивать интервал опроса до 10, 20, 60 секунд… А потом вернуть обратно, когда всё нормализуется.
Если у нас регулярно проходят грузящие процессор задачи, то мы можем оценивать время, потраченное на их выполнение, и планировать следующий запуск раньше или позже.
Рекурсивный setTimeout гарантирует паузу между вызовами, setInterval — нет.
Давайте сравним два кода. Первый использует setInterval:
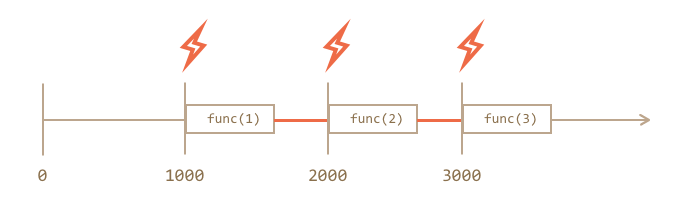
var i = 1;
setInterval(function() {
  func(i);
}, 100);
Второй использует рекурсивный setTimeout:
var i = 1;
setTimeout(function run() {
  func(i);
  setTimeout(run, 100);
}, 100);
При setInterval внутренний таймер будет срабатывать чётко каждые 100 мс и вызывать func(i):

Вы обратили внимание?…
Реальная пауза между вызовами func при setInterval меньше, чем указана в коде!
Это естественно, ведь время работы функции никак не учитывается, оно «съедает» часть интервала.
Возможно и такое что func оказалась сложнее, чем мы рассчитывали и выполнялась дольше, чем 100 мс.
В этом случае интерпретатор будет ждать, пока функция завершится, затем проверит таймер и, если время вызова setInterval уже подошло (или прошло), то следующий вызов произойдёт сразу же.
Если функция и выполняется дольше, чем пауза setInterval, то вызовы будут происходить вообще без перерыва.
Исключением является IE, в котором таймер «застывает» во время выполнения JavaScript.
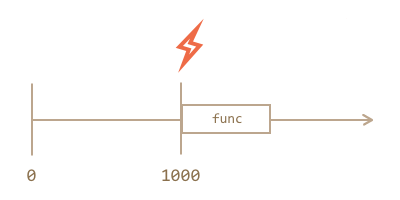
А так будет выглядеть картинка с рекурсивным setTimeout:

При рекурсивном setTimeout задержка всегда фиксирована и равна 100 мс.
Это происходит потому, что каждый новый запуск планируется только после окончания текущего.
Сборщик мусора в JavaScript не чистит функции, назначенные в таймерах, пока таймеры актуальны.

При передаче функции в `setInterval/setTimeout` создаётся внутренняя ссылка на неё, через которую браузер её будет запускать, и которая препятствует удалению из памяти, даже если функция анонимна.

```js
// Функция будет жить в памяти, пока не сработал (или не был очищен) таймер
setTimeout(function() {}, 100);
```

- Для `setTimeout` -- внутренняя ссылка исчезнет после исполнения функции.
- Для `setInterval` -- ссылка исчезнет при очистке таймера.

Так как функция также тянет за собой всё замыкание, то ставшие неактуальными, но не отменённые `setInterval` могут приводить к излишним тратам памяти.
Минимальная задержка таймера
У браузерного таймера есть минимальная возможная задержка. Она меняется от примерно нуля до 4 мс в современных браузерах. В более старых она может быть больше и достигать 15 мс.
По стандарту, минимальная задержка составляет 4 мс. Так что нет разницы между setTimeout(..,1) и setTimeout(..,4).
Посмотреть минимальное разрешение «вживую» можно на следующем примере.
В примере ниже каждая полоска удлиняется вызовом setInterval с указанной на ней задержкой — от 0 мс (сверху) до 20 мс (внизу).
Позапускайте его в различных браузерах. Вы заметите, что несколько первых полосок анимируются с одинаковой скоростью. Это как раз потому, что слишком маленькие задержки таймер не различает.
[iframe border=»1″ src=»setinterval-anim» link edit]
В Internet Explorer, нулевая задержка `setInterval(.., 0)` не сработает. Это касается именно `setInterval`, т.е. `setTimeout(.., 0)` работает нормально.
Почему минимальная задержка -- 4 мс, а не 1 мс? Зачем она вообще существует?

Это -- "привет" от прошлого. Браузер Chrome как-то пытался убрать минимальную задержку в своих ранних версиях, но оказалось, что существуют сайты, которые используют `setTimeout(..,0)` рекурсивно, создавая тем самым "асинхронный цикл". И, если задержку совсем убрать, то будет 100% загрузка процессора, такой сайт "подвесит" браузер.

Поэтому, чтобы не ломать существующие скрипты, решили сделать задержку. По возможности, небольшую. На время создания стандарта оптимальным числом показалось 4 мс.
Реальная частота срабатывания
В ряде ситуаций таймер будет срабатывать реже, чем обычно. Задержка между вызовами setInterval(..., 4) может быть не 4 мс, а 30 мс или даже 1000 мс.
-
Большинство браузеров (десктопных в первую очередь) продолжают выполнять
setTimeout/setInterval, даже если вкладка неактивна.При этом ряд из них (Chrome, FF, IE10) снижают минимальную частоту таймера, до 1 раза в секунду. Получается, что в «фоновой» вкладке будет срабатывать таймер, но редко.
-
При работе от батареи, в ноутбуке — браузеры тоже могут снижать частоту, чтобы реже выполнять код и экономить заряд батареи. Особенно этим известен IE. Снижение может достигать нескольких раз, в зависимости от настроек.
-
При слишком большой загрузке процессора JavaScript может не успевать обрабатывать таймеры вовремя. При этом некоторые запуски
setIntervalбудут пропущены.
Вывод: на частоту 4 мс стоит ориентироваться, но не стоит рассчитывать.
Посмотрим снижение частоты в действии на небольшом примере.

При клике на кнопку ниже запускается `setInterval(..., 90)`, который выводит список интервалов времени между 25 последними срабатываниями таймера. Запустите его. Перейдите на другую вкладку и вернитесь.

<div id="timer-interval-log"></div>

<button onclick="timerIntervalLog()">Запустить повтор с интервалом в 90 мс</button>
<button onclick="clearInterval(timerIntervalLogTimer)">Остановить повтор</button>

<script>
var timerIntervalLogTimer;
function timerIntervalLog() {
  var arr = [];
  var d = new Date;
  timerIntervalLogTimer = setInterval(function() {
    var diff = new Date - d;
    if (diff > 100) diff = '<span style="color:red">'+diff+'</span>';
    arr.push( diff );
    if (arr.length > 25) arr.shift();
    document.getElementById('timer-interval-log').innerHTML = arr;
    d = new Date;
  }, 90);
}
</script>

Если ваш браузер увеличивает таймаут при фоновом выполнении вкладки, то вы увидите увеличенные интервалы, помеченные <span style="color:red">красным</span>.

Кроме того, вы заметите, что таймер не является идеально точным ;)
Разбивка долгих скриптов
Нулевой или небольшой таймаут также используют, чтобы разорвать поток выполнения «тяжелых» скриптов.
Например, скрипт для подсветки синтаксиса должен проанализировать код, создать много цветных элементов для подсветки и добавить их в документ — на большом файле это займёт много времени, браузер может даже подвиснуть, что неприемлемо.
Для того, чтобы этого избежать, сложная задача разбивается на части, выполнение каждой части запускается через мини-интервал после предыдущей, чтобы дать браузеру время.
Например, осуществляется анализ и подсветка первых 100 строк, затем через 20 мс — следующие 100 строк и так далее. При этом можно подстраиваться под CPU посетителя: замерять время на анализ 100 строк и, если процессор хороший, то в следующий раз обработать 200 строк, а если плохой — то 50. В итоге подсветка будет работать с адекватной быстротой и без тормозов на любых текстах и компьютерах.
Итого
- Методы
setInterval(func, delay)иsetTimeout(func, delay)позволяют запускатьfuncрегулярно/один раз черезdelayмиллисекунд. - Оба метода возвращают идентификатор таймера. Его используют для остановки выполнения вызовом
clearInterval/clearTimeout. - В случаях, когда нужно гарантировать задержку между регулярными вызовами или гибко её менять, вместо
setIntervalиспользуют рекурсивныйsetTimeout. - Минимальная задержка по стандарту составляет
4 мс. Браузеры соблюдают этот стандарт, но некоторые другие среды для выполнения JS, например Node.JS, могут предоставить и меньше задержки. - В реальности срабатывания таймера могут быть гораздо реже, чем назначено, например если процессор перегружен, вкладка находится в фоновом режиме, ноутбук работает от батареи или по какой-то иной причине.
Браузерных особенностей почти нет, разве что вызов setInterval(..., 0) с нулевой задержкой в IE недопустим, нужно указывать setInterval(..., 1).
В JS для работы с «планированием вызова» существуют два метода:
1
Метод setInterval
Позволяет вызывать функцию много раз, через определённый интервал времени:
setInterval(func, delay)
Где:
func– функция или строка кода для выполнения,delay– интервал в миллисекундах (1000 = 1 секунда).
Стоит заметить, что вызываемая функция будет работать асинхронно.
Выполнение кода:
setInterval("alert('Прошла одна секунда');"}, 1000);JS
Выполнение анонимной функции:
setInterval(function(){
	alert('Прошла одна секунда');
}, 1000);
JS
Вызов функции:
setInterval('showmessage', 1000);

function showmessage(){
	alert('Прошла одна секунда');
}
JS
Отмены выполнения
Чтобы остановить setInterval применяется метод clearInterval(id).
var interval_id = setInterval(function(){
	alert('Прошла одна секунда');
}, 1000);

...

clearInterval(interval_id);
JS
2
Метод setTimeout
Выполняет заданный код асинхронно только один раз, через заданный интервал времени.
Синтаксис:
setTimeout(func, delay)
Где:
func– функция или строка кода для выполнения,delay– интервал в миллисекундах (1000 = 1 секунда).
Выполнение кода:
setTimeout("alert('1-секундная задержка прошла');", 1000);JS
Выполнение анонимной функции:
setTimeout(function(){
	alert('1-секундная задержка прошла');
}, 1000);
JS
Вызов функции:
setTimeout(showmessage, 1000);

function showmessage(){
	alert('1-секундная задержка прошла');
}
JS
Также, метод setTimeout можно отменить с помощью метода clearTimeout(id).
var timeout_id = setTimeout(function(){
	alert('1-секундная задержка прошла');
}, 1000);

...

clearTimeout(timeout_id);
JS