WooCommerce is a flexible and powerful plugin that you can use to turn your WordPress site into a dynamic ecommerce store. However, if you’re looking to reduce shopping cart abandonment, drive conversions, and boost revenue, it’s important to pay careful attention to your WooCommerce checkout page.
There are so many different ways to style and edit the checkout page in WooCommerce. Whether you’re starting your first online shop and seeking to understand how this page works, or you want to enhance the checkout experience on your existing WooCommerce site, we’ve got you covered.
In this post, we’ll explain what the WooCommerce checkout page is and how it functions. Then we’ll walk you through the many options you have to style, change, and leverage it to optimize conversions using plugins, code, themes, and more.
And remember, your ultimate goal is to increase your store’s revenue. So be sure to download our free ebook, 10 Ways to Boost Your WooCommerce Product Page Conversions.
Let’s jump right in!
An Overview of the WooCommerce Checkout Page
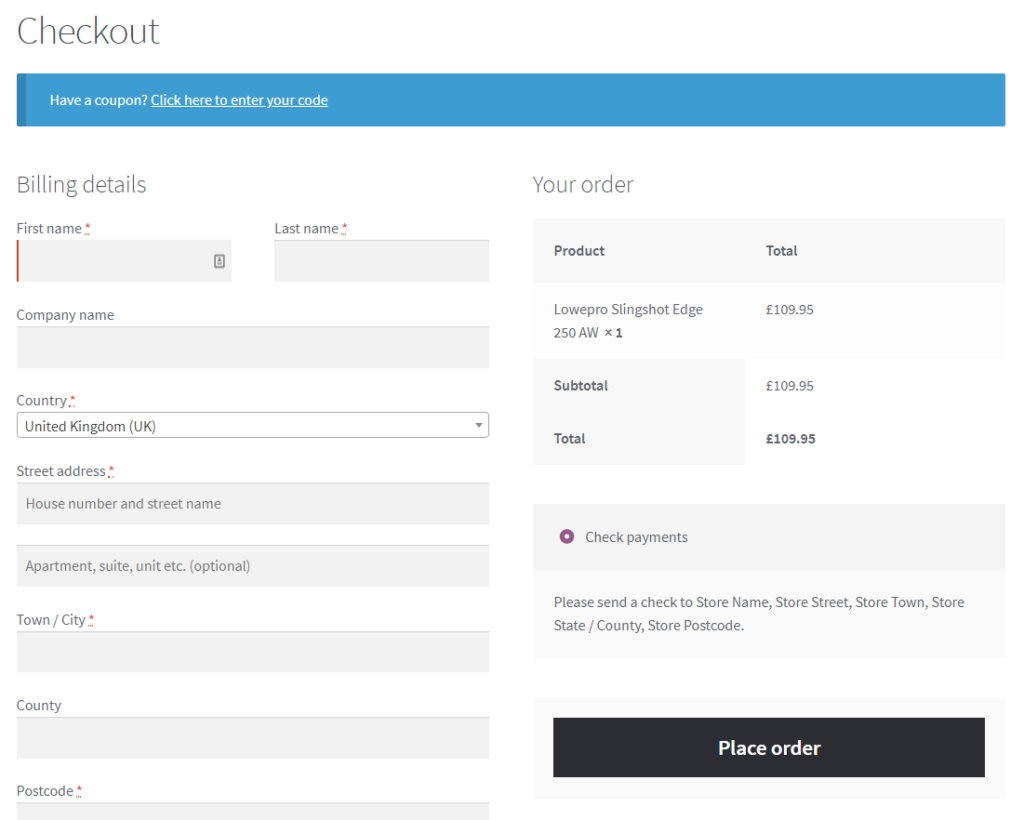
When you first set up your WooCommerce store, the plugin automatically creates and assigns a checkout page. If you preview it on the front end of your site, you’ll notice that it is rather simple:

By default, WooCommerce asks customers for some basic information. This includes:
- Billing details
- First and last name
- Company name
- Address (Town/City, Country, District, and Postcode/ZIP)
- Phone number
- Email address
- Order notes
- Privacy policy statement
This is important information to include on a WooCommerce checkout page. It provides the details necessary for a customer to complete their purchase, and for the website to process their payment information.
However, there’s nothing here that is necessarily helping to increase conversions or reduce checkout abandonment. What’s more, the default page may not offer the most relevant or useful information for your specific business. Therefore, like many WooCommerce site owners, you might be looking to change both the design and content of your checkout page.
Before we get into the different ways you can customize the checkout page in WooCommerce, there are a few things to understand first.
Let’s talk about where to find this page, as well as the various default settings and features available within the WooCommerce plugin.
Where to Find the Default WooCommerce Checkout Page and Settings
WooCommerce automatically creates a checkout page for your store once you activate the plugin. You can locate it by navigating to Pages > Checkout in your admin dashboard:

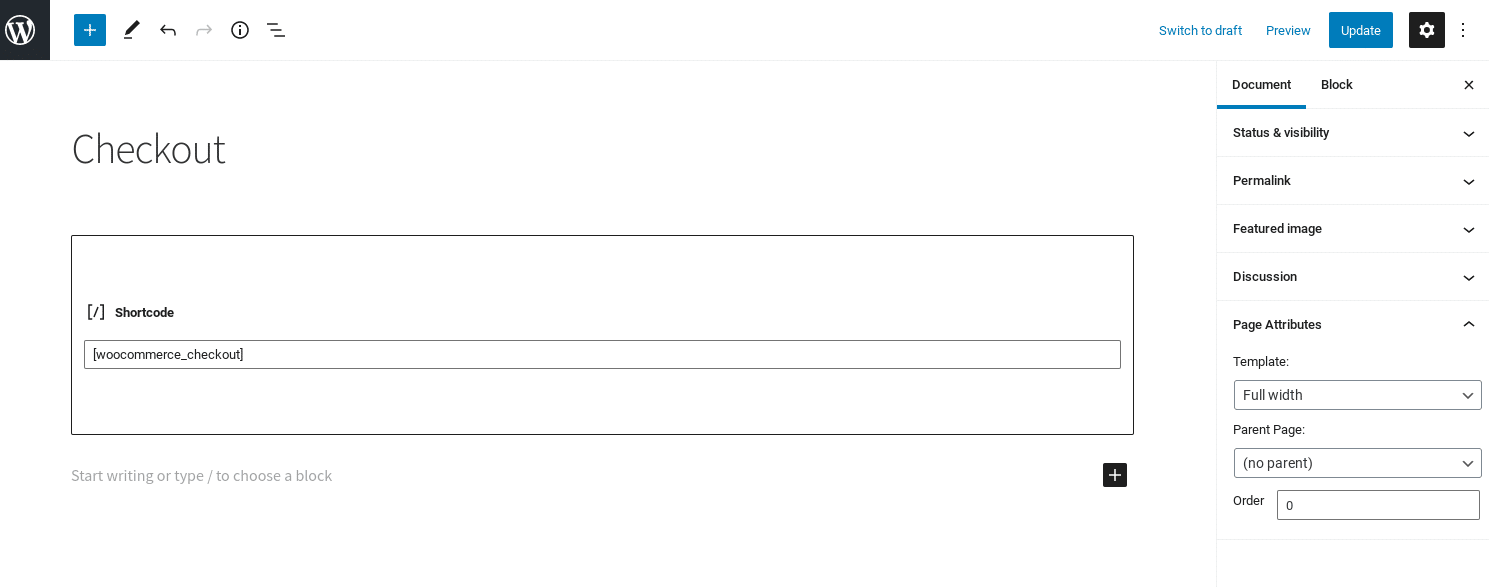
You can edit this page just as you would any WordPress content. For example, you can change the page’s title and permalink, add a featured image, modify the page attributes, etc. It also uses the [woocommerce_checkout] shortcode:
There are a handful of standard options for configuring this page, some of which you can find under WooCommerce > Settings > Advanced:

On this screen, under the Page Setup section, you can select a different page to use as the checkout screen for your store. You also have the option to force a secure HTTPS connection.
On the General settings page, you can enable coupons to be used at checkout, and configure how taxes will be calculated:

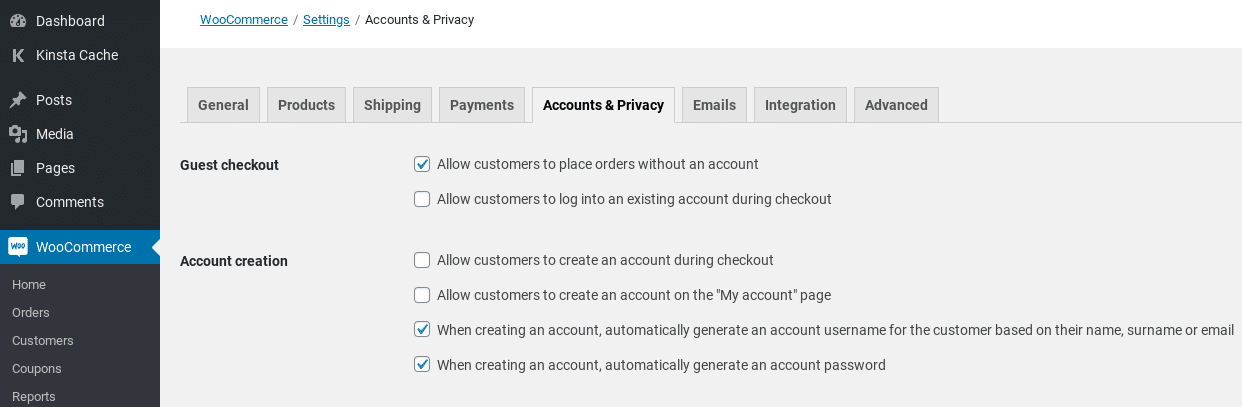
Under the Accounts & Privacy tab, you can also find a few options for account creation and guest checkouts:
Below that, there is a Privacy policy section where you can modify the privacy policy text that displays on the checkout page:

Beyond these built-in settings, you have limited options for customizing your checkout page using the WooCommerce plugin alone. Fortunately, there are other methods you can use to enhance its appearance and extend its functionality.
Why You Might Want to Change Your WooCommerce Checkout Page
The checkout page is the last thing customers see before completing their purchases. It can make the difference between whether they end up converting or abandoning your site altogether.
As such, it’s essential to make sure that your WooCommerce checkout page is designed well and functions in a way that encourages conversions. There are many ways you can provide a better experience, such as by:
- Changing the design and page template
- Creating a one-page checkout
- Adding, removing, or rearranging fields
- Changing input field labels and button text
- Requiring certain fields to be filled out
- Automatically triggering free shipping
- Directly linking products to the checkout page
Whether you want to overhaul the default page completely or make minor modifications, the important thing is that you’re able to do so with ease. Fortunately, you have multiple options.
Want to… ✅ reduce shopping cart abandonment, ✅ drive conversions, and ✅ boost revenue? Then this article is for you.👇 Learn how to build a customized WooCommerce checkout page in minutes ⏱Click to Tweet
Methods You Can Use to Change Your WooCommerce Checkout Page
There are many ways to change your WooCommerce checkout page. The best one to use depends on a handful of factors, such as the specific edit you’re trying to make and your comfort level with coding.
Some of the methods you can use to enhance your WooCommerce checkout page include:
- WooCommerce features, blocks, and shortcodes. WooCommerce does come with a few built-in features and settings that you can use to improve your store. For example, you can automatically trigger free shipping, as well as directly link products to the checkout page. There are also blocks and shortcodes for modifying the page.
- Plugins and extensions. If you’re not tech-savvy or simply want a quick and hassle-free way to enhance your WooCommerce checkout page, there are plenty of plugins you can use. Most are easy to get started with and require little support. Some add-ons are provided by WooCommerce and available from the extension library, while others are developed and offered by third-party platforms.
- Page templates and themes. If you want to change the style of your checkout page, you can use a pre-built template or theme. As with plugins, this is a solid option if you have limited coding experience and want to make changes to the overall appearance of the page, in order to better match your branding. The downside is that it does not offer as much flexibility as custom coding would.
- Custom code. Another method you can leverage to change the WooCommerce checkout page is custom coding. This is a powerful route if you’re comfortable editing your site’s files and want to add a lot of personalization.
In the following sections, we’ll take a look at some of the most effective changes you can make to your WooCommerce page. For each, we’ll explain why you might want to make the edit, and walk you through the different methods you can use to go about it.
How to Customize the WooCommerce Checkout Fields
One of the most common changes you might make to a WooCommerce page is to modify its form fields. These typically take up the most space on the page, so they need to be relevant. Whether you want to remove fields, rearrange their order, or add new custom fields, you have a couple of options for going about it. You can either use a plugin or edit the code directly.
Using a Plugin to Change the WooCommerce Checkout Fields
If you want a quick and simple way to customize the checkout fields in WooCommerce, we recommend using a plugin. There are a handful of options to choose from.
One of the most popular is the Checkout Field Editor plugin:

This is a freemium tool that lets you add or edit the form fields on your WooCommerce checkout page. You can enable or disable certain fields, as well as rearrange their order.
Although the free version lets you handle these basic tasks, WooCommerce Checkout Field Editor Pro comes with additional functionality. This includes 17 field types and custom hooks.
To use this plugin, you can install it on your WooCommerce site by navigating to Plugins > Add New and then searching for it. Once you find it, click on the Install Now button, followed by Activate.
When it’s activated, you can configure the settings by going to WooCommerce > Checkout Form:

There are three different types of fields you can edit:
- Billing
- Shipping
- Additional
You can select whichever field you want to change and then click on the Remove, Enable, or Disable button. To add a new field, select Add field.
If you want to change an existing form field, select the box to the left, and click on the Edit button. A panel will open where you can change the field type (in the premium version only), edit the field’s label, choose whether it will be required, and more:

When you’re done, click on the Save button. Once you’re finished making all the changes you wish to the checkout page’s fields, be sure to hit Save Changes at the bottom of the screen.
For more detailed guidance, you can refer to WooCommerce’s documentation on using the Checkout Field Editor plugin.
Of course, this is just one of many plugins you can use to change your WooCommerce checkout fields. Additional options worth considering include Flexible Checkout Fields and WooCommerce Checkout Manager, which we’ll discuss more later in this post.
Editing the Checkout Fields Using Code
Another option for editing the fields on your WooCommerce checkout page is to use custom coding. Of course, this requires a certain level of technical knowledge and comfort working with your site’s files. The advantage is that you have more flexibility in terms of customization than you would with a third-party plugin.
You can edit your checkout fields using your site’s functions.php file and filters such as:
- woocommerce_checkout_fields
- woocommerce_billing_fields
- Woocommerce_shipping_fields
WooCommerce actions and filters let you manipulate the checkout fields almost any way you wish. For example, you can remove them entirely, add new ones, or change the displayed text. Using the woocommerce_checkout_fields filter will enable you to override any field.
Let’s say you want to change the placeholder text for the order_comments field. By default, it is set as the following:
_x('Notes about your order, e.g. special notes for delivery.', 'placeholder', 'woocommerce')To change it, you can add this snippet of code to your functions.php file:
// Hook in

add_filter( 'woocommerce_checkout_fields' , 'custom_override_checkout_fields' );

// Our hooked in function - $fields is passed via the filter!

function custom_override_checkout_fields( $fields ) {

$fields['order']['order_comments']['placeholder'] = 'My new placeholder';

return $fields;

}
To remove a field, you can use the following:
// Hook in
add_filter( 'woocommerce_checkout_fields' , 'custom_override_checkout_fields' );

// Our hooked in function - $fields is passed via the filter!
function custom_override_checkout_fields( $fields ) {

unset($fields['order']['order_comments']);

return $fields;
There are many changes you can make to the fields on your checkout page, so we won’t explore all of them here. You can find a helpful list of override checkout field codes on GitHub.
How to Change the WooCommerce Checkout Page Template
By default, your WooCommerce checkout page template will be based on your site’s theme. But maybe you want to change the design to better fit your branding or perhaps you just want to make slight changes to the content of the template page.
The two main methods you can use to change this are by using a pre-built template or adding code. Let’s start with the former.
Starting With a Pre-Built Template to Customize Your Checkout Page
The easiest way to change the design of your WooCommerce checkout page is by installing a pre-built theme, such as the ones in the WooCommerce Themes Store. There are a variety of free options available, as well as premium themes.
You can search for one-page checkout themes, for example, or any other kind of specific templates you’re interested in using. You can also find plenty of WooCommerce themes on Envato Market.
Using Code to Customize the WooCommerce Checkout Page Template
If you’re comfortable editing code, you can also manually change the checkout page template. Depending on your hosting provider, you may be able to do this via File Manager in cPanel or a Secure File Transfer Protocol (SFTP) client.
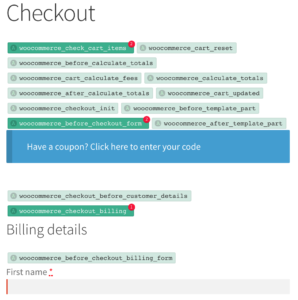
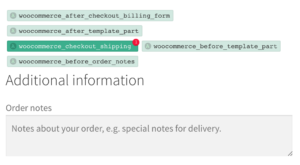
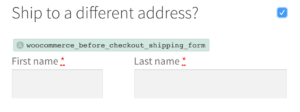
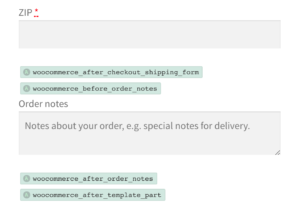
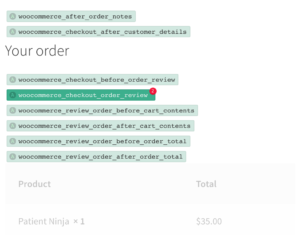
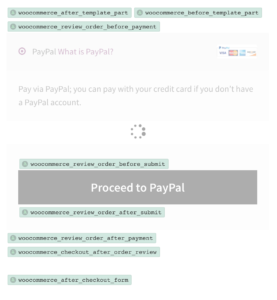
You can use action hooks to add, edit, or remove elements from your checkout page. There are nine main action hooks that WooCommerce uses for the checkout page:
- woocommerce_before_checkout_form
- woocommerce_checkout_before_customer_details
- woocommerce_checkout_billing
- woocommerce_checkout_shipping
- woocommerce_checkout_after_customer_details
- woocommerce_checkout_before_order_review
- woocommerce_checkout_order_review
- woocommerce_checkout_after_order_review
- Woocommerce_after_checkout_form
These action hooks add markup to the page, which you can use to customize both its style and functionality. If you want to use these action hooks to modify your checkout page template, you can do so by editing the checkout form PHP file.
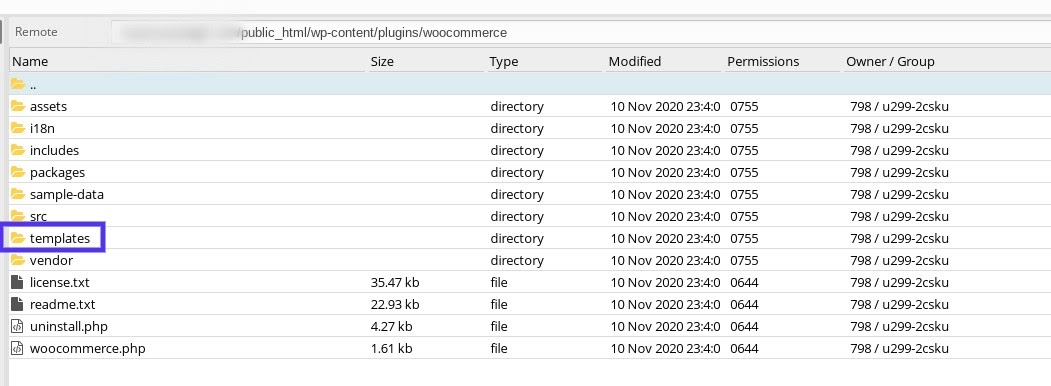
You can locate the WooCommerce template files under /woocommerce/templates. From your site’s root directory, you’ll need to navigate to wp-content/plugins/woocommerce:
Within these files, there are hooks you can use to add and rearrange content on the template page, without actually editing the template files. To create a custom theme template for your checkout page, you’ll first need to create a “woocommerce/checkout” folder within your theme’s folder.
Next, copy the WooCommerce checkout page template, which you can find at woocommerce/templates/checkout/form-checkout.php:

Then, add it to the new folder you just created. After that, you can edit the file to make your desired changes. When you save the file, the WooCommerce plugin will load this template and override the default page template.
How to Create a One Page WooCommerce Checkout
One of the ways to enhance the checkout experience for your customers, and in the process reduce abandonment rates, is to make it as quick and simple as possible. If you want to shorten the checkout process, you can do so by creating a one-page checkout in WooCommerce.
There are multiple ways to do this. As we mentioned earlier, you can look for a one-page theme or template that will provide a single checkout page. However, if you like your current theme, you may not want to change it.
If that’s the case, don’t worry. There are other options, such as the premium WooCommerce One Page Checkout extension:

Since this solution was developed by WooCommerce, you know that it’s safe, reliable, and offers plenty of support. In addition to letting you transform any page into a checkout page, it comes with a plethora of features for optimizing the one-page checkout process.
You can:
- Display both product selection and checkout forms on one page.
- Enable customers to add or remove items from their carts.
- Let customers complete payments without leaving the page.
- Add custom fields to pages.
After you purchase the extension through your WooCommerce account, you can download the plugin, and then install and activate it on your WooCommerce site.
To use it, navigate to Pages > Add New and select the One Page Checkout icon in the editor toolbar:
![]()
In the panel that opens, you can click within the Products field, and begin typing the name of the product(s) that you want to add.
Next, choose the template you want to use (Product List, Product Table, Pricing Table, or Single Product) and click on Create Shortcode.
You can also manually insert the one-page shortcode into any post or page. To learn more about this plugin and how to use it, you can refer to the WooCommerce One Page Checkout documentation.
How to Trigger Free Shipping During the WooCommerce Checkout Process
As an ecommerce business owner, there are many different strategies you can leverage to encourage your customers to spend more. One of those is to offer free shipping.
Of course, you may not want to offer free shipping on every order. However, adding it as an incentive on order totals that reach a certain amount can help you encourage shoppers to spend more than they otherwise would.
Therefore, you may want to configure your WooCommerce checkout page to automatically trigger free shipping on orders above a certain number, such as $100.
The first thing you’ll need to do is to offer the free shipping method to the relevant Shipping Zone(s).
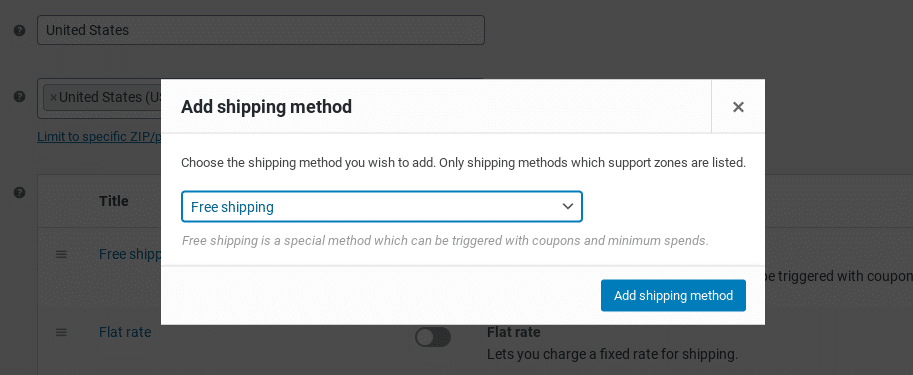
To do so, navigate to WooCommerce > Settings > Shipping:

Hover over the Shipping Zone you want to modify, and then click on the Edit link. If you haven’t added any zones yet, select the Add shipping zone button first and follow the prompts before proceeding.
Next, click on Add Shipping Method. In the modal that opens, select Free Shipping from the dropdown menu, followed by Add shipping method again:
Next, from the Shipping methods list on the settings page, hover over Free Shipping and click on the Edit link.
A Free shipping settings panel will open. From the Free shipping requires…. dropdown menu, select A minimum order amount:

You can then define the minimum order amount. When you’re done, click on the Save Changes button.
How to Directly Link Products to the WooCommerce Checkout Page
Another way you can enhance the checkout experience for your customers is to create direct checkout links. This is helpful for sending customers straight to checkout from product and sales pages.
Creating a Direct Checkout Link Manually
To create and add a direct checkout link in WooCommerce, you can use the following URL: exampledomain.com//checkout/?add-to-cart=ID.
Note: you’ll want to replace “exampledomain” and “ID” with your domain name and the specific product ID that you’re linking to the checkout page.
To find a product ID, navigate to Products > All Products in your admin dashboard. Browse to the product you want to create the direct link for, and then hover over the name of it to reveal the product ID number:

Once you paste the product ID into the aforementioned URL, you can then place the link anywhere on your WooCommerce site. You can repeat this process for each of your products, even variable and grouped items.
Creating a Direct Checkout Link Using a Plugin
We realize that the above strategy may not be the most efficient method for all users. Depending on how many products you have in your WooCommerce store, it can be very time-consuming.
Fortunately, if you’re looking for a faster method you can also use the Direct Checkout for WooCommerce plugin:
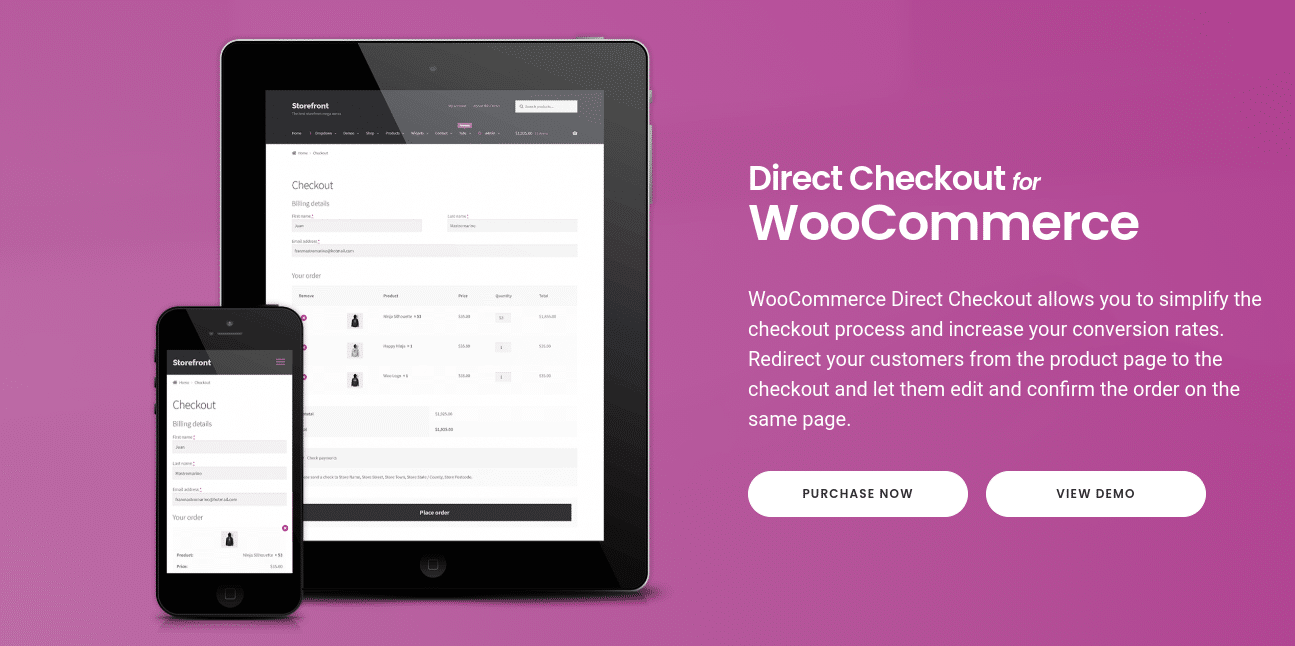
This freemium tool lets you simplify the checkout process in a variety of ways, including by adding a direct link from a product page to the checkout screen. Once you install and activate the plugin on your WooCommerce site, navigate to WooCommerce > Direct Checkout:

Under the General tab, select Yes for the Added to cart redirect option and then choose Checkout from the Added to cart redirect to dropdown menu. Click on Save changes when you’re done.
Next, navigate to the Products tab:

Enable the Redirect to the cart page after successful addition option. Again, click on the Save changes button. That’s it!
How to Test Your WooCommerce Checkout Page
At this point, you’ve hopefully implemented a variety of ways to enhance your WooCommerce checkout page. Now, it’s essential to make sure that your checkout process is working properly, in order to reduce abandonment and confirm that no errors will interrupt the customer journey.
Fortunately, there is an easy way that you can send a test order and payment through your WooCommerce shop, to make sure that everything is working as it should. To do this, you’ll first need to install the WooCommerce Payments plugin on your site (if you haven’t already):
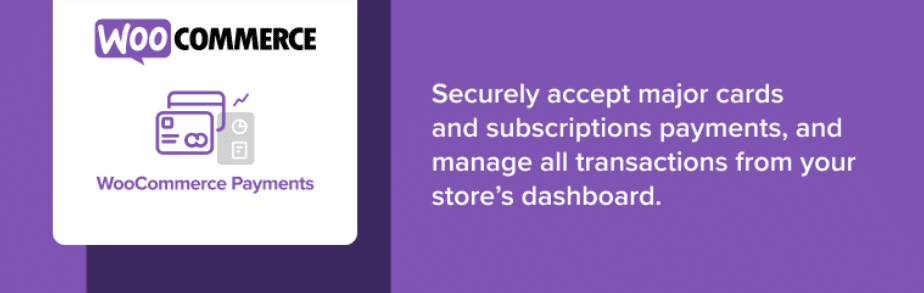
Once you install and activate the plugin, you can enable ‘test mode’. To do this, navigate to WooCommerce > Payments > Settings:

Remember to save your changes.
Once Test Mode is enabled, you can browse your WooCommerce store and select any product. Add it to your shopping cart and then move to the checkout page.
Fill out the checkout page form fields as necessary. For the payment information, you can use any of the dummy credit card numbers provided by WooCommerce. You can also use any three digits for the CVC code, and select any future date.
When you’re done, click on Place Order. Next, navigate to the Payments > Transactions screen:
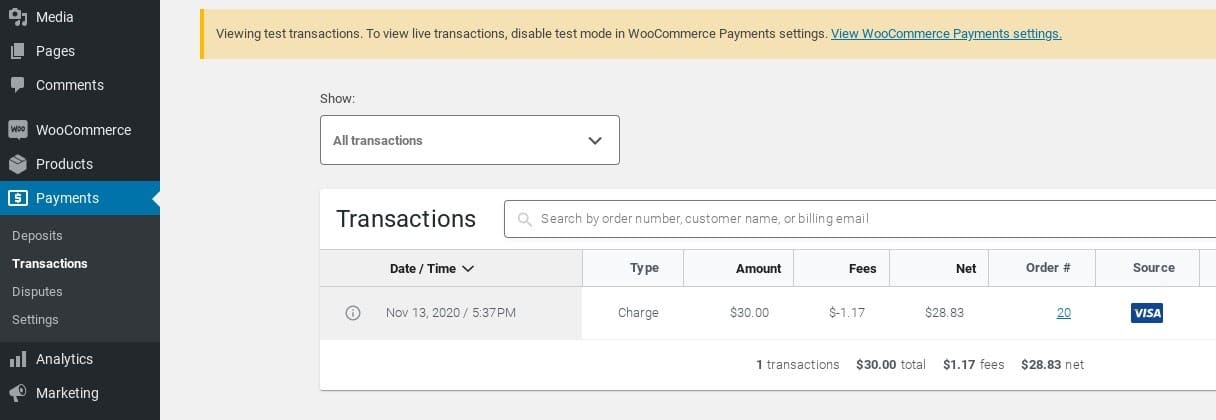
Here, you should see the charge show up. If it’s there, you know that your checkout page is working as it should. Remember to turn Test Mode off when you’re done!
Learn how to style, change, and leverage your WooCommerce checkout page⚡️ to optimize conversions and 💰 boost your revenue here ⬇️Click to Tweet
The Best WooCommerce Checkout Plugins and Extensions
Throughout this post, we’ve covered a wide variety of ways to change your WooCommerce checkout page, including blocks, shortcodes, and custom code. We’ve also mentioned some key plugins that can help you add features and functionalities that wouldn’t otherwise be available.
However, there are some additional add-ons, plugins, and extensions we haven’t mentioned yet, but that provide you with more customization options for your WooCommerce checkout page. Some of the best ones worth considering include:
- WooCommerce Cart Notices Add-On. This WooCommerce add-on lets you display actionable messages and notifications to your customers during the checkout process. For example, you can use it to notify them of relevant sales and promotions.
- WooCommerce Checkout Manager. Made by the same team that developed Direct Checkout for WooCommerce, this plugin is a powerful extension that you can use to optimize your checkout page. You can use it to edit, remove, and add custom fields, as well as to create condition fields.
- WooCommerce Checkout Add-Ons. This premium plugin lets you add free and paid add-ons at the checkout stage. It’s a helpful tool for increasing conversions and driving revenue.
Depending on the type of ecommerce site you have, you may be looking for even more options. If so, we recommend checking out the WooCommerce Extensions Library, which offers a ton of add-ons for extending the WooCommerce plugin’s features and functionality, including both free and paid solutions.
Summary
There are different ways you can implement to improve and optimize your WooCommerce checkout page.
Depending on the change you want to make and your experience level, you can leverage WooCommerce plugins and extensions, page templates and themes, and even custom code.
Do you have any questions about using or editing the WooCommerce checkout page? Let us know in the comments section below!
Get all your applications, databases and WordPress sites online and under one roof. Our feature-packed, high-performance cloud platform includes:
- Easy setup and management in the MyKinsta dashboard
- 24/7 expert support
- The best Google Cloud Platform hardware and network, powered by Kubernetes for maximum scalability
- An enterprise-level Cloudflare integration for speed and security
- Global audience reach with up to 35 data centers and 275 PoPs worldwide
Test it yourself with $20 off your first month of Application Hosting or Database Hosting. Explore our plans or talk to sales to find your best fit.
WooCommerce is a flexible and powerful plugin that you can use to turn your WordPress site into a dynamic ecommerce store. However, if you’re looking to reduce shopping cart abandonment, drive conversions, and boost revenue, it’s important to pay careful attention to your WooCommerce checkout page.
There are so many different ways to style and edit the checkout page in WooCommerce. Whether you’re starting your first online shop and seeking to understand how this page works, or you want to enhance the checkout experience on your existing WooCommerce site, we’ve got you covered.
In this post, we’ll explain what the WooCommerce checkout page is and how it functions. Then we’ll walk you through the many options you have to style, change, and leverage it to optimize conversions using plugins, code, themes, and more.
And remember, your ultimate goal is to increase your store’s revenue. So be sure to download our free ebook, 10 Ways to Boost Your WooCommerce Product Page Conversions.
Let’s jump right in!
An Overview of the WooCommerce Checkout Page
When you first set up your WooCommerce store, the plugin automatically creates and assigns a checkout page. If you preview it on the front end of your site, you’ll notice that it is rather simple:
By default, WooCommerce asks customers for some basic information. This includes:
- Billing details
- First and last name
- Company name
- Address (Town/City, Country, District, and Postcode/ZIP)
- Phone number
- Email address
- Order notes
- Privacy policy statement
This is important information to include on a WooCommerce checkout page. It provides the details necessary for a customer to complete their purchase, and for the website to process their payment information.
However, there’s nothing here that is necessarily helping to increase conversions or reduce checkout abandonment. What’s more, the default page may not offer the most relevant or useful information for your specific business. Therefore, like many WooCommerce site owners, you might be looking to change both the design and content of your checkout page.
Before we get into the different ways you can customize the checkout page in WooCommerce, there are a few things to understand first.
Let’s talk about where to find this page, as well as the various default settings and features available within the WooCommerce plugin.
Where to Find the Default WooCommerce Checkout Page and Settings
WooCommerce automatically creates a checkout page for your store once you activate the plugin. You can locate it by navigating to Pages > Checkout in your admin dashboard:
You can edit this page just as you would any WordPress content. For example, you can change the page’s title and permalink, add a featured image, modify the page attributes, etc. It also uses the [woocommerce_checkout] shortcode:
There are a handful of standard options for configuring this page, some of which you can find under WooCommerce > Settings > Advanced:
On this screen, under the Page Setup section, you can select a different page to use as the checkout screen for your store. You also have the option to force a secure HTTPS connection.
On the General settings page, you can enable coupons to be used at checkout, and configure how taxes will be calculated:
Under the Accounts & Privacy tab, you can also find a few options for account creation and guest checkouts:
Below that, there is a Privacy policy section where you can modify the privacy policy text that displays on the checkout page:
Beyond these built-in settings, you have limited options for customizing your checkout page using the WooCommerce plugin alone. Fortunately, there are other methods you can use to enhance its appearance and extend its functionality.
Why You Might Want to Change Your WooCommerce Checkout Page
The checkout page is the last thing customers see before completing their purchases. It can make the difference between whether they end up converting or abandoning your site altogether.
As such, it’s essential to make sure that your WooCommerce checkout page is designed well and functions in a way that encourages conversions. There are many ways you can provide a better experience, such as by:
- Changing the design and page template
- Creating a one-page checkout
- Adding, removing, or rearranging fields
- Changing input field labels and button text
- Requiring certain fields to be filled out
- Automatically triggering free shipping
- Directly linking products to the checkout page
Whether you want to overhaul the default page completely or make minor modifications, the important thing is that you’re able to do so with ease. Fortunately, you have multiple options.
Want to… ✅ reduce shopping cart abandonment, ✅ drive conversions, and ✅ boost revenue? Then this article is for you.👇 Learn how to build a customized WooCommerce checkout page in minutes ⏱Click to Tweet
Methods You Can Use to Change Your WooCommerce Checkout Page
There are many ways to change your WooCommerce checkout page. The best one to use depends on a handful of factors, such as the specific edit you’re trying to make and your comfort level with coding.
Some of the methods you can use to enhance your WooCommerce checkout page include:
- WooCommerce features, blocks, and shortcodes. WooCommerce does come with a few built-in features and settings that you can use to improve your store. For example, you can automatically trigger free shipping, as well as directly link products to the checkout page. There are also blocks and shortcodes for modifying the page.
- Plugins and extensions. If you’re not tech-savvy or simply want a quick and hassle-free way to enhance your WooCommerce checkout page, there are plenty of plugins you can use. Most are easy to get started with and require little support. Some add-ons are provided by WooCommerce and available from the extension library, while others are developed and offered by third-party platforms.
- Page templates and themes. If you want to change the style of your checkout page, you can use a pre-built template or theme. As with plugins, this is a solid option if you have limited coding experience and want to make changes to the overall appearance of the page, in order to better match your branding. The downside is that it does not offer as much flexibility as custom coding would.
- Custom code. Another method you can leverage to change the WooCommerce checkout page is custom coding. This is a powerful route if you’re comfortable editing your site’s files and want to add a lot of personalization.
In the following sections, we’ll take a look at some of the most effective changes you can make to your WooCommerce page. For each, we’ll explain why you might want to make the edit, and walk you through the different methods you can use to go about it.
How to Customize the WooCommerce Checkout Fields
One of the most common changes you might make to a WooCommerce page is to modify its form fields. These typically take up the most space on the page, so they need to be relevant. Whether you want to remove fields, rearrange their order, or add new custom fields, you have a couple of options for going about it. You can either use a plugin or edit the code directly.
Using a Plugin to Change the WooCommerce Checkout Fields
If you want a quick and simple way to customize the checkout fields in WooCommerce, we recommend using a plugin. There are a handful of options to choose from.
One of the most popular is the Checkout Field Editor plugin:
This is a freemium tool that lets you add or edit the form fields on your WooCommerce checkout page. You can enable or disable certain fields, as well as rearrange their order.
Although the free version lets you handle these basic tasks, WooCommerce Checkout Field Editor Pro comes with additional functionality. This includes 17 field types and custom hooks.
To use this plugin, you can install it on your WooCommerce site by navigating to Plugins > Add New and then searching for it. Once you find it, click on the Install Now button, followed by Activate.
When it’s activated, you can configure the settings by going to WooCommerce > Checkout Form:
There are three different types of fields you can edit:
- Billing
- Shipping
- Additional
You can select whichever field you want to change and then click on the Remove, Enable, or Disable button. To add a new field, select Add field.
If you want to change an existing form field, select the box to the left, and click on the Edit button. A panel will open where you can change the field type (in the premium version only), edit the field’s label, choose whether it will be required, and more:
When you’re done, click on the Save button. Once you’re finished making all the changes you wish to the checkout page’s fields, be sure to hit Save Changes at the bottom of the screen.
For more detailed guidance, you can refer to WooCommerce’s documentation on using the Checkout Field Editor plugin.
Of course, this is just one of many plugins you can use to change your WooCommerce checkout fields. Additional options worth considering include Flexible Checkout Fields and WooCommerce Checkout Manager, which we’ll discuss more later in this post.
Editing the Checkout Fields Using Code
Another option for editing the fields on your WooCommerce checkout page is to use custom coding. Of course, this requires a certain level of technical knowledge and comfort working with your site’s files. The advantage is that you have more flexibility in terms of customization than you would with a third-party plugin.
You can edit your checkout fields using your site’s functions.php file and filters such as:
- woocommerce_checkout_fields
- woocommerce_billing_fields
- Woocommerce_shipping_fields
WooCommerce actions and filters let you manipulate the checkout fields almost any way you wish. For example, you can remove them entirely, add new ones, or change the displayed text. Using the woocommerce_checkout_fields filter will enable you to override any field.
Let’s say you want to change the placeholder text for the order_comments field. By default, it is set as the following:
_x('Notes about your order, e.g. special notes for delivery.', 'placeholder', 'woocommerce')To change it, you can add this snippet of code to your functions.php file:
// Hook in

add_filter( 'woocommerce_checkout_fields' , 'custom_override_checkout_fields' );

// Our hooked in function - $fields is passed via the filter!

function custom_override_checkout_fields( $fields ) {

$fields['order']['order_comments']['placeholder'] = 'My new placeholder';

return $fields;

}
To remove a field, you can use the following:
// Hook in
add_filter( 'woocommerce_checkout_fields' , 'custom_override_checkout_fields' );

// Our hooked in function - $fields is passed via the filter!
function custom_override_checkout_fields( $fields ) {

unset($fields['order']['order_comments']);

return $fields;
There are many changes you can make to the fields on your checkout page, so we won’t explore all of them here. You can find a helpful list of override checkout field codes on GitHub.
How to Change the WooCommerce Checkout Page Template
By default, your WooCommerce checkout page template will be based on your site’s theme. But maybe you want to change the design to better fit your branding or perhaps you just want to make slight changes to the content of the template page.
The two main methods you can use to change this are by using a pre-built template or adding code. Let’s start with the former.
Starting With a Pre-Built Template to Customize Your Checkout Page
The easiest way to change the design of your WooCommerce checkout page is by installing a pre-built theme, such as the ones in the WooCommerce Themes Store. There are a variety of free options available, as well as premium themes.
You can search for one-page checkout themes, for example, or any other kind of specific templates you’re interested in using. You can also find plenty of WooCommerce themes on Envato Market.
Using Code to Customize the WooCommerce Checkout Page Template
If you’re comfortable editing code, you can also manually change the checkout page template. Depending on your hosting provider, you may be able to do this via File Manager in cPanel or a Secure File Transfer Protocol (SFTP) client.
You can use action hooks to add, edit, or remove elements from your checkout page. There are nine main action hooks that WooCommerce uses for the checkout page:
- woocommerce_before_checkout_form
- woocommerce_checkout_before_customer_details
- woocommerce_checkout_billing
- woocommerce_checkout_shipping
- woocommerce_checkout_after_customer_details
- woocommerce_checkout_before_order_review
- woocommerce_checkout_order_review
- woocommerce_checkout_after_order_review
- Woocommerce_after_checkout_form
These action hooks add markup to the page, which you can use to customize both its style and functionality. If you want to use these action hooks to modify your checkout page template, you can do so by editing the checkout form PHP file.
You can locate the WooCommerce template files under /woocommerce/templates. From your site’s root directory, you’ll need to navigate to wp-content/plugins/woocommerce:
Within these files, there are hooks you can use to add and rearrange content on the template page, without actually editing the template files. To create a custom theme template for your checkout page, you’ll first need to create a “woocommerce/checkout” folder within your theme’s folder.
Next, copy the WooCommerce checkout page template, which you can find at woocommerce/templates/checkout/form-checkout.php:
Then, add it to the new folder you just created. After that, you can edit the file to make your desired changes. When you save the file, the WooCommerce plugin will load this template and override the default page template.
How to Create a One Page WooCommerce Checkout
One of the ways to enhance the checkout experience for your customers, and in the process reduce abandonment rates, is to make it as quick and simple as possible. If you want to shorten the checkout process, you can do so by creating a one-page checkout in WooCommerce.
There are multiple ways to do this. As we mentioned earlier, you can look for a one-page theme or template that will provide a single checkout page. However, if you like your current theme, you may not want to change it.
If that’s the case, don’t worry. There are other options, such as the premium WooCommerce One Page Checkout extension:
Since this solution was developed by WooCommerce, you know that it’s safe, reliable, and offers plenty of support. In addition to letting you transform any page into a checkout page, it comes with a plethora of features for optimizing the one-page checkout process.
You can:
- Display both product selection and checkout forms on one page.
- Enable customers to add or remove items from their carts.
- Let customers complete payments without leaving the page.
- Add custom fields to pages.
After you purchase the extension through your WooCommerce account, you can download the plugin, and then install and activate it on your WooCommerce site.
To use it, navigate to Pages > Add New and select the One Page Checkout icon in the editor toolbar:
![]()
In the panel that opens, you can click within the Products field, and begin typing the name of the product(s) that you want to add.
Next, choose the template you want to use (Product List, Product Table, Pricing Table, or Single Product) and click on Create Shortcode.
You can also manually insert the one-page shortcode into any post or page. To learn more about this plugin and how to use it, you can refer to the WooCommerce One Page Checkout documentation.
How to Trigger Free Shipping During the WooCommerce Checkout Process
As an ecommerce business owner, there are many different strategies you can leverage to encourage your customers to spend more. One of those is to offer free shipping.
Of course, you may not want to offer free shipping on every order. However, adding it as an incentive on order totals that reach a certain amount can help you encourage shoppers to spend more than they otherwise would.
Therefore, you may want to configure your WooCommerce checkout page to automatically trigger free shipping on orders above a certain number, such as $100.
The first thing you’ll need to do is to offer the free shipping method to the relevant Shipping Zone(s).
To do so, navigate to WooCommerce > Settings > Shipping:
Hover over the Shipping Zone you want to modify, and then click on the Edit link. If you haven’t added any zones yet, select the Add shipping zone button first and follow the prompts before proceeding.
Next, click on Add Shipping Method. In the modal that opens, select Free Shipping from the dropdown menu, followed by Add shipping method again:
Next, from the Shipping methods list on the settings page, hover over Free Shipping and click on the Edit link.
A Free shipping settings panel will open. From the Free shipping requires…. dropdown menu, select A minimum order amount:
You can then define the minimum order amount. When you’re done, click on the Save Changes button.
How to Directly Link Products to the WooCommerce Checkout Page
Another way you can enhance the checkout experience for your customers is to create direct checkout links. This is helpful for sending customers straight to checkout from product and sales pages.
Creating a Direct Checkout Link Manually
To create and add a direct checkout link in WooCommerce, you can use the following URL: exampledomain.com//checkout/?add-to-cart=ID.
Note: you’ll want to replace “exampledomain” and “ID” with your domain name and the specific product ID that you’re linking to the checkout page.
To find a product ID, navigate to Products > All Products in your admin dashboard. Browse to the product you want to create the direct link for, and then hover over the name of it to reveal the product ID number:
Once you paste the product ID into the aforementioned URL, you can then place the link anywhere on your WooCommerce site. You can repeat this process for each of your products, even variable and grouped items.
Creating a Direct Checkout Link Using a Plugin
We realize that the above strategy may not be the most efficient method for all users. Depending on how many products you have in your WooCommerce store, it can be very time-consuming.
Fortunately, if you’re looking for a faster method you can also use the Direct Checkout for WooCommerce plugin:
This freemium tool lets you simplify the checkout process in a variety of ways, including by adding a direct link from a product page to the checkout screen. Once you install and activate the plugin on your WooCommerce site, navigate to WooCommerce > Direct Checkout:
Under the General tab, select Yes for the Added to cart redirect option and then choose Checkout from the Added to cart redirect to dropdown menu. Click on Save changes when you’re done.
Next, navigate to the Products tab:
Enable the Redirect to the cart page after successful addition option. Again, click on the Save changes button. That’s it!
How to Test Your WooCommerce Checkout Page
At this point, you’ve hopefully implemented a variety of ways to enhance your WooCommerce checkout page. Now, it’s essential to make sure that your checkout process is working properly, in order to reduce abandonment and confirm that no errors will interrupt the customer journey.
Fortunately, there is an easy way that you can send a test order and payment through your WooCommerce shop, to make sure that everything is working as it should. To do this, you’ll first need to install the WooCommerce Payments plugin on your site (if you haven’t already):
Once you install and activate the plugin, you can enable ‘test mode’. To do this, navigate to WooCommerce > Payments > Settings:
Remember to save your changes.
Once Test Mode is enabled, you can browse your WooCommerce store and select any product. Add it to your shopping cart and then move to the checkout page.
Fill out the checkout page form fields as necessary. For the payment information, you can use any of the dummy credit card numbers provided by WooCommerce. You can also use any three digits for the CVC code, and select any future date.
When you’re done, click on Place Order. Next, navigate to the Payments > Transactions screen:
Here, you should see the charge show up. If it’s there, you know that your checkout page is working as it should. Remember to turn Test Mode off when you’re done!
Learn how to style, change, and leverage your WooCommerce checkout page⚡️ to optimize conversions and 💰 boost your revenue here ⬇️Click to Tweet
The Best WooCommerce Checkout Plugins and Extensions
Throughout this post, we’ve covered a wide variety of ways to change your WooCommerce checkout page, including blocks, shortcodes, and custom code. We’ve also mentioned some key plugins that can help you add features and functionalities that wouldn’t otherwise be available.
However, there are some additional add-ons, plugins, and extensions we haven’t mentioned yet, but that provide you with more customization options for your WooCommerce checkout page. Some of the best ones worth considering include:
- WooCommerce Cart Notices Add-On. This WooCommerce add-on lets you display actionable messages and notifications to your customers during the checkout process. For example, you can use it to notify them of relevant sales and promotions.
- WooCommerce Checkout Manager. Made by the same team that developed Direct Checkout for WooCommerce, this plugin is a powerful extension that you can use to optimize your checkout page. You can use it to edit, remove, and add custom fields, as well as to create condition fields.
- WooCommerce Checkout Add-Ons. This premium plugin lets you add free and paid add-ons at the checkout stage. It’s a helpful tool for increasing conversions and driving revenue.
Depending on the type of ecommerce site you have, you may be looking for even more options. If so, we recommend checking out the WooCommerce Extensions Library, which offers a ton of add-ons for extending the WooCommerce plugin’s features and functionality, including both free and paid solutions.
Summary
There are different ways you can implement to improve and optimize your WooCommerce checkout page.
Depending on the change you want to make and your experience level, you can leverage WooCommerce plugins and extensions, page templates and themes, and even custom code.
Do you have any questions about using or editing the WooCommerce checkout page? Let us know in the comments section below!
Get all your applications, databases and WordPress sites online and under one roof. Our feature-packed, high-performance cloud platform includes:
- Easy setup and management in the MyKinsta dashboard
- 24/7 expert support
- The best Google Cloud Platform hardware and network, powered by Kubernetes for maximum scalability
- An enterprise-level Cloudflare integration for speed and security
- Global audience reach with up to 35 data centers and 275 PoPs worldwide
Test it yourself with $20 off your first month of Application Hosting or Database Hosting. Explore our plans or talk to sales to find your best fit.
 Страница Оформления заказа — одна из самых главных страниц в процессе покупки товара.
На этой странице клиенты вводят личные данные и делают оплату.
Учитывая конкуренцию в любой нише и количество брошенных корзин, нужно настроить эту страницу так, чтобы уменьшить отказы и увеличить продажи насколько это возможно.
Хотя стандартная страница Оформления заказа в WooCommerce уже достаточно проработанная, вы можете сделать некоторые изменения, чтобы увеличить конверсию.
В этой статье вы узнаете, как изменить страницу Оформления заказа, чтобы улучшить поведение посетителей и увеличить продажи.
Зачем изменять страницу Оформления заказа
Исследование Baymard, проведенное в 2020 году, показывает, что почти 70% покупателей бросают корзину во время оформления заказа. Одна из главных причин заключается в том, что оформление заказа слишком длинное или сложное.

Так как привлечь посетителей на сайт довольно сложно, нужно приложить максимум усилий, чтобы как можно меньше посетителей бросали корзину и покидали сайт на странице Чекаут.
Устраните отвлекающие и раздражающие факторы, которые замедляют процесс оплаты, добавьте факторы доверия и предоставьте несколько возможностей оплаты.
Содержание:
- Сократите процесс оформления заказа
- Отредактируйте поля
- Автозавершение заказов
- Факторы доверия
- Цены в местной валюте
- Поп-ап при намерении выйти
- Напоминание о брошенной корзине
- Разные варианты оплаты
- Добавьте создание аккаунта
- Условные поля
Сократите процесс оформления заказа
Чтобы уменьшить количество отказов и брошенных корзин, сделайте процесс оформления заказа как можно более коротким, или частично автоматизируйте.
Например, можно сократить время работы с магазином и оформлением заказа, используя прямые ссылки для оформления заказа.
- Как изменить поведение кнопки Добавить в Корзину WooCommerce
- Прямая ссылка на вариативный товар WooCommerce
Вы можете добавить кнопку быстрой покупки (Quick Buy) в магазин или товары, чтобы покупатели могли пропустить добавление товаров в корзину и сразу перейти к оформлению заказа.
- 3 Способа отключить Корзину в WooCommerce
Или можно добавить Корзину на страницу Оформления заказа, чтобы посетители не терялись между шагами.
Отредактируйте поля
Первая вещь, которую вы можете сделать — убрать ненужные поля. Например, если у вас цифровые товары, то вам не нужны поля с адресом доставки. Если у вас мембершип-сайт, то вам нужны только поля с личной информацией посетителей, и так далее.
Кроме этого, вы можете изменить порядок полей, чтобы упростить их заполнение, или добавить собственные поля. Например, чтобы что-то спросить у посетителей, или добавить раздел ЧаВо / FAQ.
Обычно посетителям не нравятся длинные формы, поэтому оптимизируйте поля до необходимого минимума:
- Отображайте только необходимые поля. Вы можете удалить необязательные поля, например, название компании.
- Если вы продаете цифровые товары, уберите все поля доставки: индекс, город, улица, и так далее.
- Отключите проверку почтового индекса, чтобы уменьшить количество действий при оформлении заказа.
- Если вы продаете физические товары, сделайте платежные поля по умолчанию полями доставки, чтобы скрыть ненужные поля.
- По возможности используйте автозаполнение, чтобы сократить время посетителей на заполнение форм.
- Вместо отображения 2 полей (имя и фамилия) вы можете использовать одно поле для полного имени.
Это можно сделать вручную, или с помощью плагина:
Обычно я использую этот бесплатный плагин, с его помощью вы можете убрать лишние поля на странице Чекаут, переименовать их или изменить их порядок.
Лучший платный плагин, который мне удалось найти, — WooCommerce Checkout Manager.

Этот плагин может убирать, добавлять, переименовывать и изменить последовательность полей, добавляет возможность загружать файлы, добавляет информацию из кастомных полей в е-мейлы WooCommerce и работает с условными полями и условной логикой.
- Как удалить ненужные поля вручную или с помощью плагина
- Как редактировать поля на странице Оформления заказа WooCommerce
Автозавершение заказов
Если вы продаете цифровые товары, то вам нужно настроить оплату заказов так, чтобы пользователи получали доступ к своему продукту сразу после оплаты.
В зависимости от вашего плагина приема оплаты или агрегатора платежей, подтверждение об оплате может прийти через несколько минут или часов, или вообще не прийти.
Если ваш плагин или агрегатор платежей не сразу передает или вообще не передает подтверждение об оплате, вы можете настроить автоматическое изменение статуса заказа, чтобы вам не пришлось обновлять статус заказа вручную при каждом новом заказе.
- Как автоматически менять статус заказа в WooCommerce
Или используйте этот плагин:
Факторы доверия
Количество интернет покупок постоянно растет, поэтому безопасность сайта имеет большое значение. Согласно данным исследования, 17% покупателей бросают корзину во время оформления заказа, потому что они не доверяют сайту.
Чтобы зашифровать личные данные пользователей и данные банковских карт во время оформления заказа установите SSL сертификат.
Защита сайта является одним из факторов ранжирования сайтов в поисковой выдаче, поэтому настройте и другие способы защиты.
- 10 Главных факторов ранжирования поисковых систем
- Безопасность Вордпресс. Подробное описание
Еще одна вещь, которая вызывает доверие посетителей — логотипы сервисов платежных шлюзов, чтобы ваши посетители знали, что ваш сайт поддерживает все эти способы оплаты. Обычно это VISA, MasterCard, МИР, PayPal, Stripe и так далее.
Эти значки создают доверие у покупателей, чтобы они не беспокоились о том, что их личная информация или банковские реквизиты будут украдены.
Чтобы добавить картинки способов оплат перед кнопкой Подтвердить заказ, используйте этот снипет:
Замените путь к картинке на ваш в строке 3.

Также вы можете добавить другие элементы или картинки на других местах страницы Оформления заказа (хуки Woocommerce), например, картинки с Гарантией.
- Хуки WooCommerce на странице Оформления заказа
Еще одна вещь, которую вы можете здесь сделать — изменить текст на кнопке Подтвердить заказ.
Вы можете изменить текст для всех товаров на всем сайте, для определенных товаров по ID, в зависимости от категорий товаров или в зависимости от выбранного способа оплаты:
- Как изменить текст на кнопке Оформления заказа в WooCommerce
Цены в местной валюте
Если ваши посетители покупают ваши товары или услуги из разных стран, добавьте им возможность видеть цены в своих валютах.
Тогда вашим посетителям не придется открывать новую вкладку браузера с конвертером цен и переводить одну валюту в другую, и они будут точно знать, сколько именно им нужно заплатить.
Это особенно важно, когда посетители завершают оформление заказа, и им не нужно отвлекаться на посторонние вещи.
Вы можете добавить переключение валют с помощью плагинов:
Если вы хотите использовать платный плагин, попробуйте плагин Currency Converter Widget с официального сайта WooCommerce:

Поп-ап при намерении выйти
Когда посетитель хочет уйти с сайта и ведет мышку к кнопке Х, ему показывается поп-ап с призывом к действию, например, предложение подписаться на рассылку, скидкой, и так далее.
Хотя многие считают, что такие поп-апы раздражают, исследования показывают, что они эффективны и могут увеличить конверсию на 10%.
Существует множество платных и бесплатных плагинов для добавления всплывающих окон, которые открываются при намерении выйти с сайта. Вы можете попробовать Optin Monster, Popup Maker, Elementor или плагин вашей CRM.
Поп-апы с появлением по условию есть во многих премиум-темах, например, Blocksy и Kadence.
Напоминание о брошенной корзине
Согласно статистике, большинство посетителей бросают корзины при посещении сайта. Вы можете отправлять им сообщения на е-мейл с напоминанием о завершении покупки.
Многие магазины их используют, потому что они очень эффективны. Эти электронные письма могут отличаться в зависимости от магазина или сферы деятельности.
Это может быть одно письмо с товарами, которые посетитель оставил в корзине, или серия электронных писем, в которых вы предлагаете скидку. Суть этих сообщений в том, чтобы напомнить покупателю о товарах, которые он оставил в корзине, и убедить его их купить.
Вот несколько популярных плагинов, с помощью которых вы можете напоминать о незавершенных покупках:
С помощью этих плагинов вы можете создать купон со скидкой на следующую покупку:
Разные варианты оплаты
Еще один способ сократить количество отказов от покупок — предоставить покупателям несколько разных способов оплаты.
Добавьте все популярные способы приема оплат, включая банковские карты, электронные кошельки, например, ЮМани и PayPal и сервисы типа Apple Pay, Google Pay и Samsung Pay.
- Плагин приема платежей через Юмани с лайф-тайм лицензией на неограниченное число сайтов
WooCommerce поддерживает все эти платежные шлюзы, и настроить их довольно просто. Чтобы вашим посетителям было удобно оплачивать покупки, добавьте как можно больше вариантов оплат.
Добавьте создание аккаунта
Если вы добавите возможность создавать аккаунт при оформлении заказа, то пользователи смогут сохранять свои настройки, историю покупок, фильтры магазина и так далее.
В следующий раз, когда посетитель будет покупать какой-то товар, ему не придется вводить свои данные еще раз, вся эта информация будет заполняться по умолчанию.
Имея е-мейлы пользователей, вы можете предлагать им другие товары, делать эксклюзивные предложения, например, специальные купоны на скидку, которые они могут получать в своих аккаунтах или по электронной почте.
Условные поля
Условные поля — хороший способ оптимизации страницы Чекаут. Условные поля позволяют отображать или скрывать одно поле в зависимости от значения другого поля.
Например, ваши клиенты могут забрать купленные товары самовывозом, или выбрать доставку на дом. Вместо нескольких дополнительных полей с адресами вы можете создать условное поле, чтобы поля адреса отображались когда посетитель выбирает вариант доставки.
Самый простой способ добавить условные поля — с помощью платного плагина WooCommerce Checkout Manager.
Страница оформления заказа — одна из самых важных в интернет-магазине. Её содержание оказывает большое влияние на конверсию и количество брошенных корзин, поэтому оставьте только то, что нужно, и уберите все, что не нужно.
Читайте также:
- Как отключить уведомления WooCommerce
- Как отключить кнопку В корзину в WooCommerce
- Как вывести цену товара WooCommerce в любом месте сайта
- Как кастомизировать кнопку Оформления заказа WooCommerce
- Как редактировать поля на странице Оформления заказа WooCommerce
Оставляйте комментарии.
The checkout page on your WooCommerce shop is where you get paid, so it’s important to get it just right.
The default configuration is pretty good, but you may need to customize it out of necessity, or to test for a higher conversion rate.
There are 2 ways to customize the page, with a plugin, or with custom code. We’ll go over both of those here.
Custom Checkout Template
Most customizations can be done using hooks and filters, but if you’d like to edit the markup on the checkout page, you can do that in a theme.
A word of warning: moving around the markup on the checkout page can cause problems with other plugins that use hooks and filters. I would not recommend removing any action hooks, or editing the markup aggressively.
According to the WooCommerce documentation, you can copy the checkout template to your theme by in a folder structured like this: woocommerce/checkout/form-checkout.php.
![]()
You can then customize form-checkout.php as desired, and it will load instead of the default template.
Customizing with CSS
CSS classes may change based on your theme or plugins, but the default classes are usually available.
You can customize these classes using custom CSS in a child theme, or the customizer. Here are the main high level tags, with classes and IDs you can use.
<body class="woocommerce-checkout">
<div class="woocommerce">
<form class="woocommerce-checkout"> <div id="customer_details" class="col2-set">
<div class="woocommerce-billing-fields">
<p class="form-row">
<div class="woocommerce-shipping-fields">
<p class="form-row">
<div class="woocommerce-additional-fields">
<div id="order_review" class="woocommerce-checkout-review-order"> <table class="woocommerce-checkout-review-order-table">
<div id="payment"> <ul class="wc_payment_methods payment_methods methods"> <div class="form-row place-order">
Example:
form.woocommerce-checkout input[type="text"] { border-radius: 3px; background-color: #ccc; color: #444; }To see all classes on the checkout page, use a browser inspector.
Checkout Action Hooks
Action hooks can be used to add or remove elements from the checkout page.
There are 9 action hooks on the checkout page:
- woocommerce_before_checkout_form
- woocommerce_checkout_before_customer_details
- woocommerce_checkout_billing
- woocommerce_checkout_shipping
- woocommerce_checkout_after_customer_details
- woocommerce_checkout_before_order_review
- woocommerce_checkout_order_review
- woocommerce_checkout_after_order_review
- woocommerce_after_checkout_form
There are also 7 additional hooks that may be available, depending on your layout:
- woocommerce_checkout_before_terms_and_conditions
- woocommerce_checkout_after_terms_and_conditions
- woocommerce_before_checkout_billing_form
- woocommerce_before_checkout_registration_form
- woocommerce_after_checkout_registration_form
- woocommerce_before_checkout_shipping_form
- woocommerce_after_checkout_shipping_form
Checkout Hooks Visualized
It helps to get a visual idea of where the hooks are located.
Here’s the standard WooCommerce checkout page, using the Storefront theme.
Here are many of the various hooks you can use, visually placed on the checkout page above.
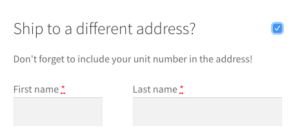
Action hooks are used to add markup to the page. For example, we can add a message to the customer about shipping details using the woocommerce_before_checkout_shipping_form hook.
add_action( 'woocommerce_before_checkout_shipping_form', function() { echo 'Don't forget to include your unit number in the address!'; });That looks like this:
You can find documentation on all of the hooks here.
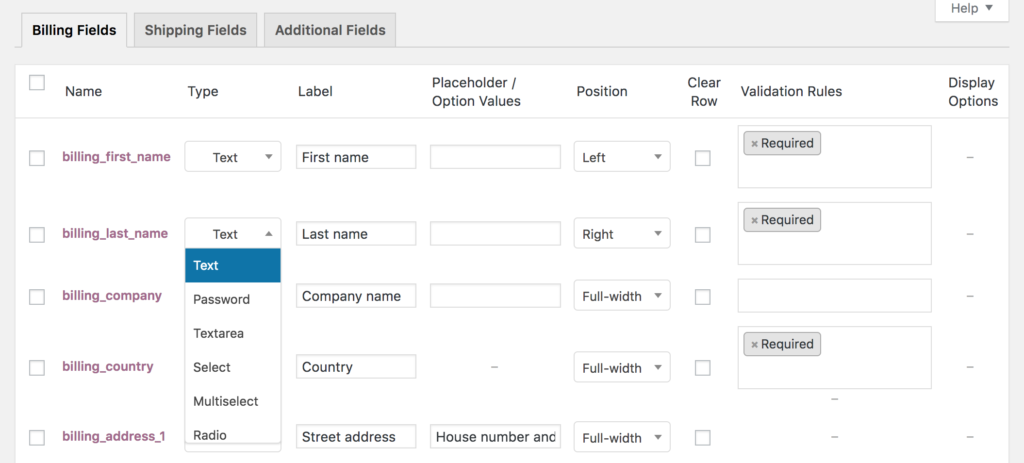
Moving, Adding, or Removing Checkout Fields
The easiest way to customize checkout fields is to use the Checkout Field Editor plugin.
This plugin provides a simple UI to move, edit, add, or remove any checkout fields. You can edit anything about the fields, including type, label, position, and more.
After installing and activating this plugin, you can visit WooCommerce => Checkout Fields to begin editing.
To edit a field, simply change the desired value and save. To add a field, click Add Field, and to remove, check the field and click Disable/Remove.
Custom Code
Custom code is a bit trickier, but if you only want to make a small edit without purchasing a plugin, here’s how you do it.
WooCommerce has several filters available to edit checkout fields, including woocommerce_checkout_fields, woocommerce_billing_fields, and woocommerce_shipping_fields.
You can use the woocommerce_checkout_fields filter to manipulate all the checkout fields.
Remove the billing phone number field
// Hook in add_filter( 'woocommerce_checkout_fields' , 'my_override_checkout_fields' ); // Our hooked in function - $fields is passed via the filter! function my_override_checkout_fields( $fields ) { unset($fields['billing']['billing_phone']); return $fields; }Add Shipping Phone Number Field
// Hook in add_filter( 'woocommerce_checkout_fields' , 'custom_override_checkout_fields' ); // Our hooked in function - $fields is passed via the filter! function custom_override_checkout_fields( $fields ) { $fields['shipping']['shipping_phone'] = array( 'label' => __('Phone', 'woocommerce'), 'placeholder'=> _x('Phone', 'placeholder', 'woocommerce'), 'required' => false, 'class' => array('form-row-wide'), 'clear' => true ); return $fields; } /** * Display field value on the order edit page */ add_action( 'woocommerce_admin_order_data_after_shipping_address', 'my_custom_checkout_field_display_admin_order_meta', 10, 1 ); function my_custom_checkout_field_display_admin_order_meta($order){ global $post_id; $order = new WC_Order( $post_id ); echo '<p><strong>'.__('Field Value').':</strong> ' . get_post_meta($order->get_id(), '_shipping_field_value', true ) . '</p>'; }To edit a field, you can access the field attributes. For example, let’s change the placeholder for Zip to Postal Code.
Change Field Placeholder
add_filter( 'woocommerce_checkout_fields' , 'my_override_checkout_fields' ); // Our hooked in function - $fields is passed via the filter! function my_override_checkout_fields( $fields ) { $fields['billing']['billing_postcode']['placeholder'] = 'Postal Code'; return $fields; }For more examples, view the WooCommerce documentation here.
WooCommerce Checkout Extensions
There are a variety of extensions available to customize the checkout page, here are just a few.
One Page Checkout
This extension allows you to put a checkout form on the same page as your product, making it a one-step payment process.
The normal WooCommerce flow is: go to the single product, click add to cart, go to the cart page, then go to checkout. One page checkout allows you to change that to: go to the product page => checkout.
Checkout Add-Ons
This extension allows you to add paid services or products at checkout. Examples would be, gift wrapping, priority boarding, setup services, and more.
Social Login
This extension allows customers to use their social accounts to login at checkout, so they don’t have to create a new account manually.
It integrates with most major social networks, such as Facebook, Twitter, Google, and more.
FOMO Popups
This is not specific to checkout, but it can help purchase conversions. Show sale notification popups on your WooCommerce site with the Holler Box FOMO plugin.
Conclusion
Editing the WooCommerce checkout page is something you should do with care.
Sometimes your reason is a mandatory client request, other times you may have your own intuition as to what will work better. If you are making changes that aren’t critical to your business, just make sure to keep an eye on your conversions using a Google Analytics conversion funnel, or an A/B testing tool.
The last thing you want to do is make a change that will hurt your conversions instead of help them.
In this post, we’ll show you how to easily change the WooCommerce checkout page template. Plus, we’ll do it with the help of the WooCommerce plugin Flux Checkout for WooCommerce.

But first, let’s see why you might want to change the default WooCommerce checkout page template and upgrade it to a better one.
Flux Checkout for WooCommerce
Prevent abandoned carts with a slick multi-step checkout experience, designed for your customer’s device.
Why change the default WooCommerce checkout page template
The default WooCommerce checkout and the template it uses is fine for beginner stores – but if you’re looking to decrease checkout abandonment and increase sales – upgrading it is a must.
The default checkout is a WooCommerce one-page checkout and looks a little something like this.
Because all of the checkout fields are on one page, it can be pretty overwhelming for the customer. For this reason, it might not be the best choice for WooCommerce stores that want to see a significant increase in revenue.
Let’s explore this a little further. If you were to upgrade your checkout and use a different checkout page template, you’d:
Introduce a better checkout process
The default WooCommerce checkout is a one-page design. This means customers can feel overwhelmed with everything they need to fill out.
If they’re short on time or simply don’t like the idea of giving over that much information, they may abandon their cart completely.
A multi-step checkout process will counteract this feeling. By breaking the checkout flow into short steps, you’ll make the process seem a lot less overwhelming and manageable for customers. Improving your conversion rate significantly.
Improve the checkout experience
The default WooCommerce checkout page template is fine if you’re just starting out. But upgrading to a checkout template designed to save customers time will improve the experience and result in less cart abandonment.
👋 Want to reduce checkout abandonment significantly in your ecommerce store? Read our checkout abandonment guide.
The default WooCommerce checkout form has many additional fields you might not need. By removing and reducing these, you’ll keep things simple and clean.
A streamlined checkout means more options
As we mentioned, the default WooCommerce checkout page template has a lot of unnecessary fields. Because of this, it makes adding extra elements like more input fields/form fields, upsells, widgets, and more virtually impossible because it would overwhelm customers.
By upgrading your checkout to one you can edit, customize, and optimize, you’ll make room for things like:
- Additional payment methods and payment gateways that won’t clutter up the page.
- A way for order notes to look more streamlined and easy to see/use.
- More visible coupon fields, additional drop-downs, shortcodes, and more if you’re using additional checkout add-on plugins.
We now know why upgrading to a new checkout template is beneficial. But to change the WooCommerce checkout page template and customize the WooCommerce checkout page in general. You’ll need the help of a plugin.
How to change the WooCommerce checkout page template
If you want to improve your WooCommerce checkout, reduce abandonment rates, and increase revenue for your WordPress site, you’ll need the help of a plugin. In this case, the WooCommerce plugin Flux Checkout for WooCommerce.
Introducing the plugin Flux Checkout for WooCommerce
Flux Checkout for WooCommerce is a plugin that will transform the default WooCommerce checkout into a streamlined multi-step checkout.
Flux works with any WooCommerce store, template, and page builder (like Elementor), so you can upgrade your checkout no matter what.
Plus, Flux Checkout comes with two checkout themes or templates for you to choose from.
- Classic, which transforms the default WooCommerce checkout page template into an app-like multi-step design. Classic is a bold and speedy checkout for your ecommerce store.
- Flux’s Modern theme replicates the checkout design of some of the biggest online stores. It’s slick, fresh, and optimized to keep your customers on track to complete their order.
So now we know the benefits of Flux Checkout. Let’s get it added to your store with the following step-by-step tutorial.
Step 1: Install Flux Checkout for WooCommerce
To get Flux Checkout for WooCommerce, purchase and download it from the Iconic Store: iconicwp.com/flux-checkout-for-woocommerce
Flux Checkout for WooCommerce
Prevent abandoned carts with a slick multi-step checkout experience, designed for your customer’s device.
Once you have the file on your device, you can proceed to the next step.
To install the plugin, follow these steps:
- Go to Plugins > Add New > Upload Plugin on your WordPress Dashboard.
- Then browse from your device and select the zip file you previously downloaded.
- After the file is uploaded, click Activate.
- After activating Flux, you’ll need to enter the license key.
So now we’ve got Flux installed on our WordPress website. Next, we’ll switch your WooCommerce checkout page template.
Step 2: Pick your checkout page template
As we mentioned earlier, Flux Checkout comes with two themes you can pick from.
- Classic – our app-like theme makes online ordering smooth, especially on mobile.
- Modern – slick, easy to use, and matches any modern checkout design style.

To select which of these themes you’d like to use, take the following steps:
- From your WordPress dashboard, go to WooCommerce > Flux Checkout.
- Then click the Styles tab at the top of the page.
- Here you’ll see Flux’s theme options. Click the radio button next to the theme name to select the theme you want.
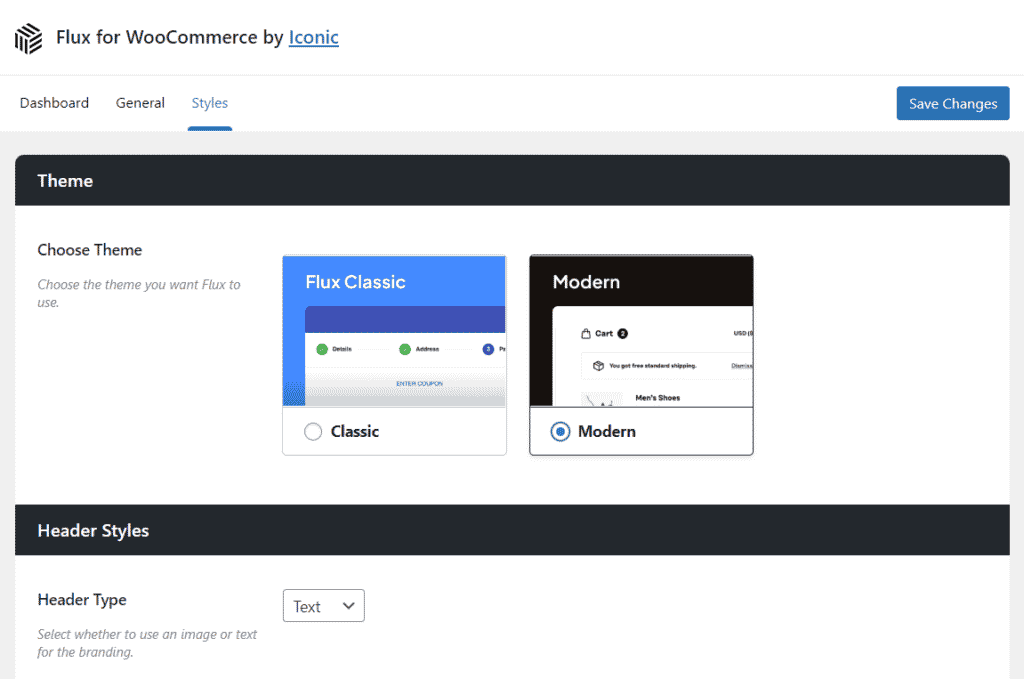
- Depending on which theme you select, the settings below will change.
Step 3: Customize WooCommerce checkout page
Customizing your checkout page will vary depending on which checkout page template or theme you pick.
How to customize the header styles
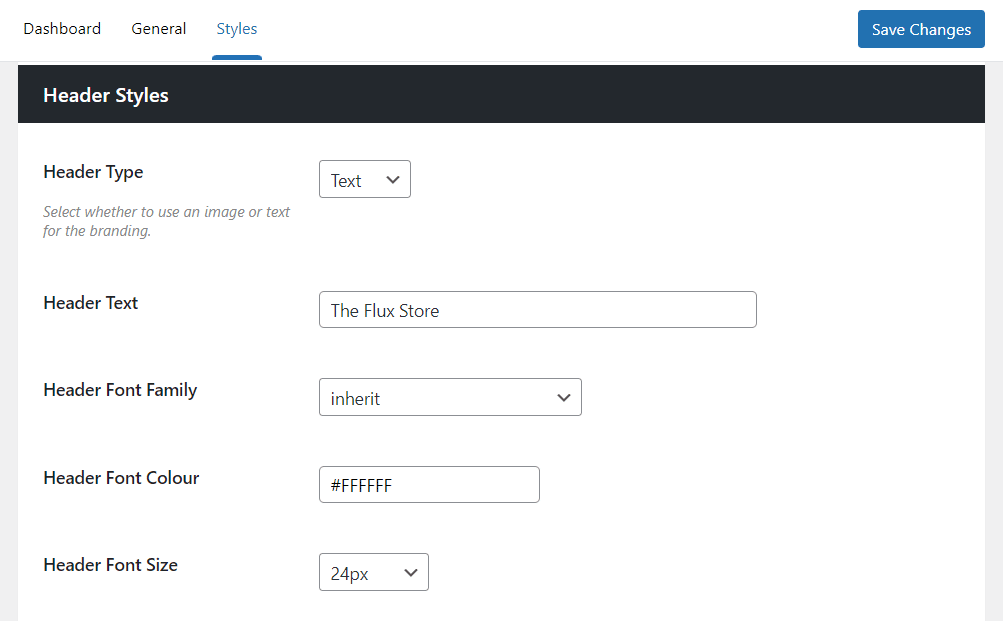
The header of your Flux Checkout will look different depending on your theme. Regardless, you’ll be able to customize it to suit you.
To customize the header styles of your checkout, take the following steps:
- Go to WooCommerce > Flux Checkout from your WordPress dashboard and click the Styles tab at the top of the page.
- Scroll down the page until you get to the Header Styles section.
Customize the Modern theme header styles
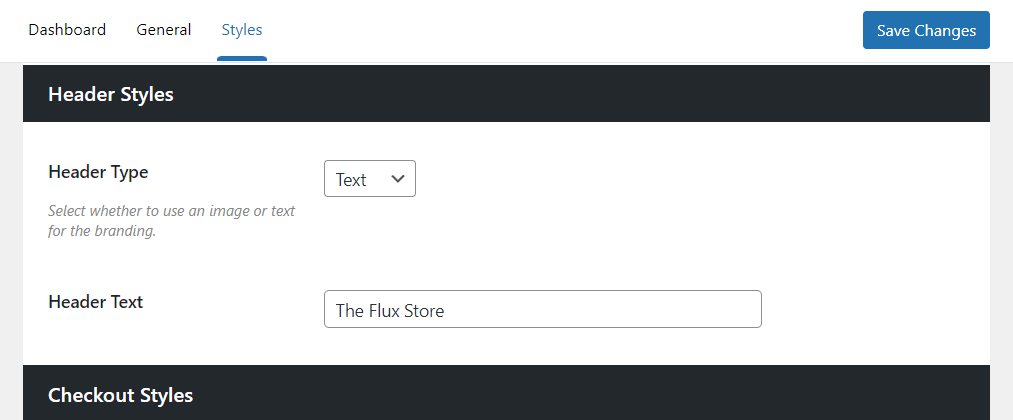
Flux’s Modern checkout theme has a very simple and clean header that draws focus to the checkout fields.
The two options you have here are:
- Header Type – This dropdown allows you to select from Text or Image.
- If you select Text – The field below will allow you to input the text you want to see – usually your store’s name.
- If you select Image – Two fields will appear, allowing you to upload a header image (usually a logo) and set a width for that image if you need to.
Customize the Classic theme header styles
Flux’s Classic checkout theme has a bolder header design which allows for a bright pop, should you want it.
The options you have here are:
- Header Type – This dropdown allows you to select from Text or Image.
- If you select Text – A few fields will appear below. You’ll be able to input the text you want to see – usually your store’s name. You’ll also be able to customize the font family, color, and size.
- If you select Image – Two fields will appear, allowing you to upload a header image (usually a logo) and set a width for that image if you need to.
- Header Background – With this setting, you’ll be able to set the style for your header:
- Use Primary Color – This allows you to use the primary color from the Checkout Styles section further down the page.
- Use Custom Color – This allows you to select a custom color from the field that appears below. You can either add a hex code or use the color picker to select.
- Use Gradient – Select from a vast list of pre-made gradient styles in the Gradient Background dropdown.
- “Back to Cart” Link Color – Next, you’ll be able to change the link color of the ‘Back to Cart’ text within the header. This is particularly useful if you’ve changed your header color and can no longer see the link.
How to customize the checkout styles
The checkout style settings allow you to set colors for specific links, buttons, and placeholders – depending on which theme you use.
Customize the Modern theme checkout styles
Flux’s Modern checkout theme allows you to get a little more specific with the colors in your checkout’s design.
The options you have here are:
- Placeholders – This is the placeholder text color within your form fields and labels.
- Link color – This is the color of any additional links that appear in your checkout. For example, the link to your privacy policy.
- Primary button color – The color of your primary buttons.
- Secondary button color – The color of your secondary buttons.
- Custom CSS – An additional section where you can add some custom CSS to override our theme’s styles should you want to.
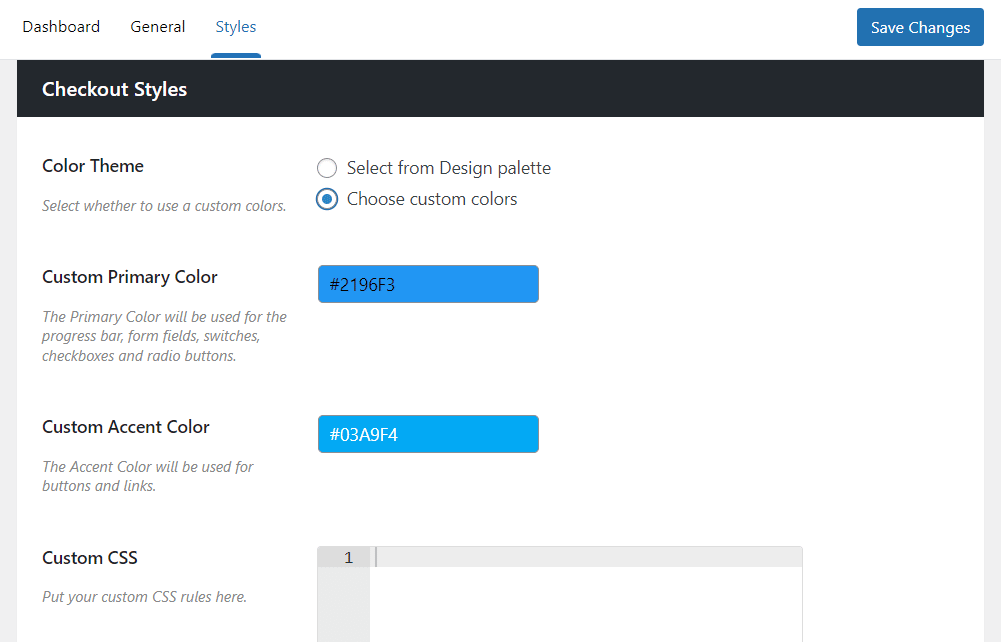
Customize the Classic theme checkout styles
Flux’s Classic checkout theme keeps things simple and takes care of the hard work for you with primary and accent colors.
The options you have here are:
- Color Theme – Pick from either Select from Design palette, or Choose custom colors.
- If you select the design palette – You’ll see a set of pre-made Primary and Accent colors to pick from.
- If you select custom colors – You’ll be able to add your primary and accent colors as hex codes or from color wheels. Then Flux Checkout will take care of the rest.
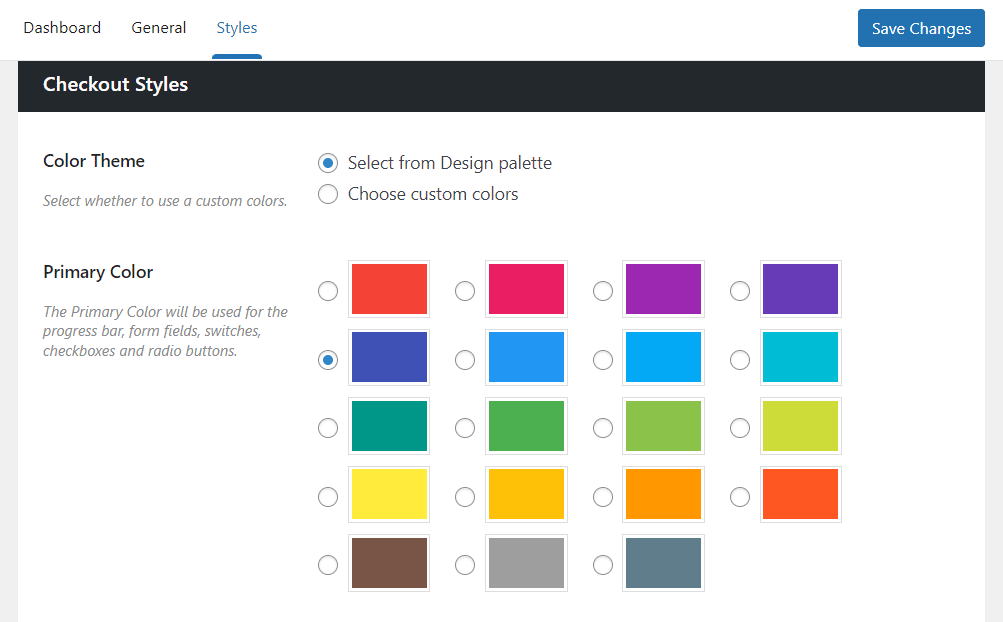
- Once you’re happy with all your design changes, scroll up or down the page and click the blue Save Changes button to make them live.
Change the default checkout page template today
That’s it. You’ve now upgraded the WooCommerce checkout page template. With this change, you’ll have an improved checkout experience and reduced checkout abandonment in just a few clicks.
Take your customer from their WooCommerce cart, to checkout, to complete/place order, with ease.
Flux Checkout for WooCommerce
Prevent abandoned carts with a slick multi-step checkout experience, designed for your customer’s device.

Looking for ways to edit the checkout page in your store? The checkout is one of the most important steps in the purchase process, so it’s key that you optimize it to increase conversion rates. In this guide, we’ll show you different methods to customize the WooCommerce checkout page both with plugins and programmatically.
Why should you edit the checkout page in WooCommerce?
If you have a WooCommerce store, the checkout is one of the most crucial pages. It’s where the customer pays and you close the sale. Considering how many shoppers abandon their carts and how much competition there is nowadays, you should optimize the checkout to close as many sales as possible.
Even though WooCommerce includes a good default configuration, you may need to edit the checkout page to increase conversion rates on your store. Some of the changes you can apply to edit your WooCommerce checkout page are:
- Create a one-page checkout
- Change the checkout style and design with CSS
- Add, remove, or rearrange checkout fields
- Include content
- Make a field required or optional
- Add conditional fields and create conditional logic
- Add extra fees for shipping, packaging, and so on
- And many others
We have previously seen how to customize the shop page and how to remove fields from the checkout, and today we’ll show you 2 different ways to edit the checkout page in WooCommerce.
WooCommerce checkout page customization: 2 Methods
In this guide you will learn how to customize the checkout page in WooCommerce in 2 different ways:
- With a plugin
- Programmatically (coding)
Let’s have a closer look at each option.
1) Customize the checkout page with a plugin
If you don’t have coding skills, you can edit the WooCommerce checkout page with a plugin. There are many options out there but for this tutorial, we’ll use WooCommerce Checkout Manager.
This plugin has been on the market for a couple of years and has more than 90,000 active downloads. It has a free version with basic but powerful functionalities that you can download from here and 3 premium plans with more advanced features that start at 19 USD (one-time payment). Let’s have a look at what this tool can do.
WooCommerce Checkout Manager
Checkout Manager is one of the best plugins to manage your checkout page. It allows you to add, edit, and delete fields on the checkout page to boost your sales. And the best part is that it’s very easy to use. For example, you can add shipping, billing, and additional fields to the checkout page by simply enabling the options from the menu.
The tool allows you to add or hide fields such as the first and last name, company name, country, city, zip code, address, phone number, email, and others. To do this, on your WordPress dashboard go to WooCommerce > Checkout and then the Billing, Shipping, or Additional tab. There, you will see a list of all the fields that you want to display or hide. 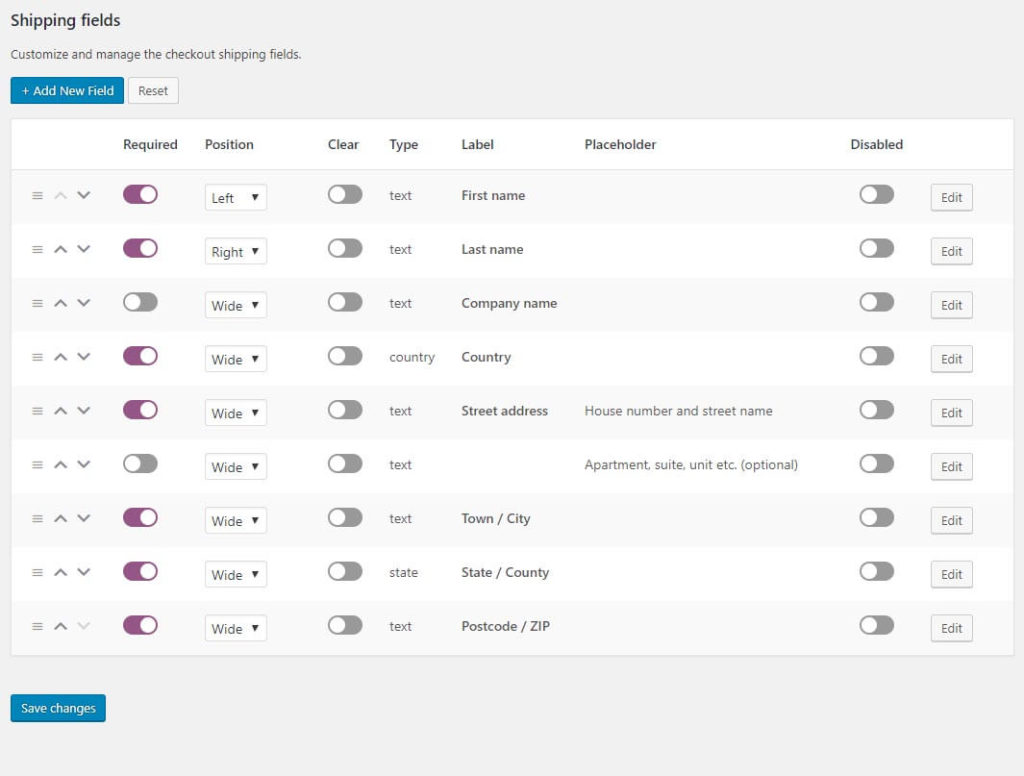
Create a custom upload file field
One of the most interesting features of the WooCommerce Checkout Manager plugin is the possibility to let shoppers upload any type of file during the purchase process. This is very useful when you book a hotel or rent a car online and have to upload your ID or driver’s license. You can also edit those files and let the users manage their files in case they need to provide additional documents. 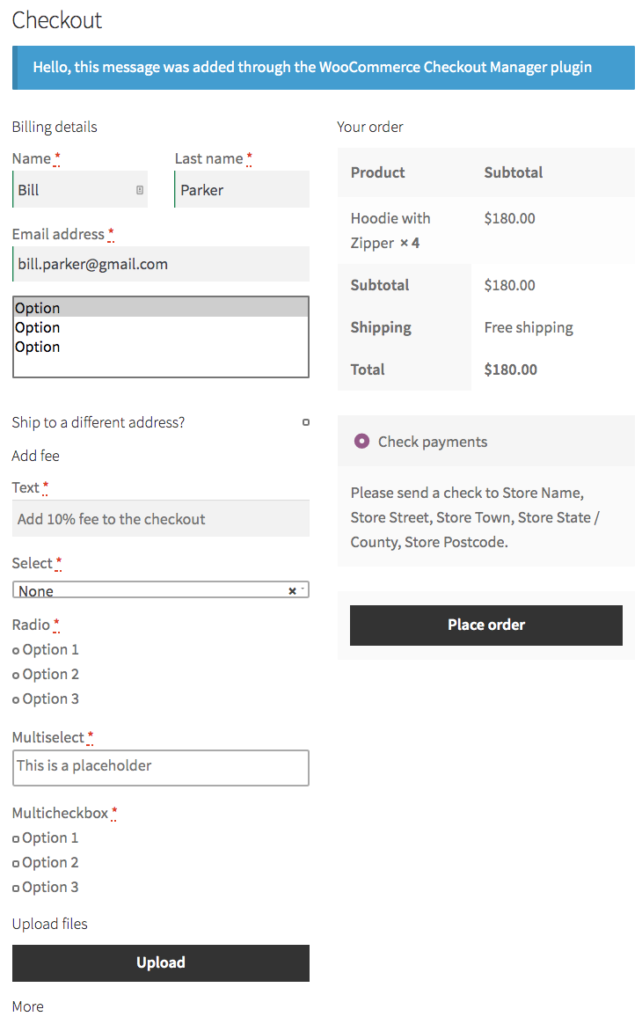 Additionally, you can add fixed or percentage fees to any core or conditional fields.
Add fees to the checkout
Another interesting option to edit the WooCommerce checkout page is to add fees. This can be very useful if you want to include an additional charge for situations like:
- Express delivery
- Special handling
- Extra charge for shipping to certain countries or locations
- Fees related to credit cards or payment gateways
Even though WooCommerce offers some options to add these extra charges, Checkout Manager provides you with more control and flexibility. To add fees with Checkout Manager, and go to WooCommerce > Checkout > Billing.
You’ll see different billing fields that you can enable. For this demonstration, we’ll add a fee for Express Delivery and we’ll need to create a new field, so we press the Add New Field button. We’ll select radio as the button type and give a name to the new field.
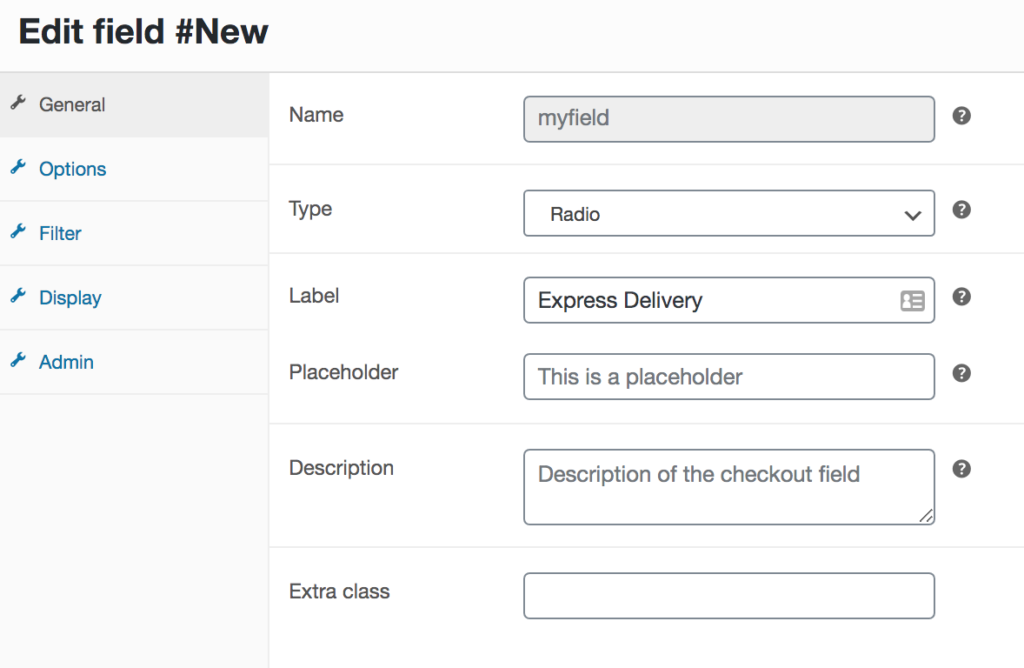
Then, go to the Options tab and we’ll add two labels: Yes and No. When the shopper selects Express Delivery, we’ll add an extra charge of $10.
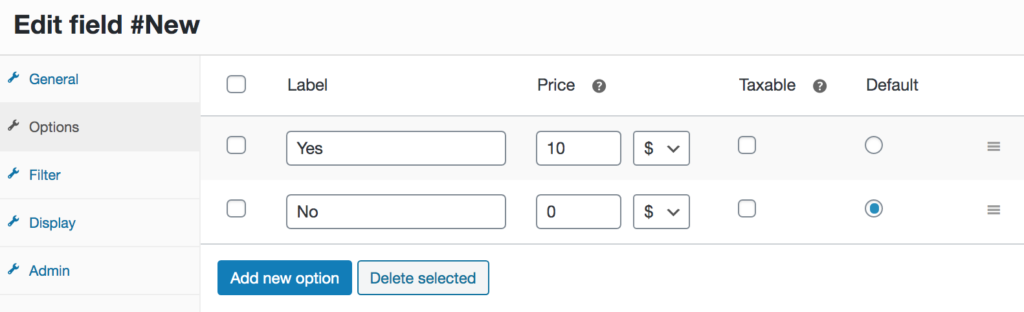 Save the changes and that’s it! Now when the user selects the Express Delivery option at checkout, an extra fee of $10 will be added to their cart.
Create conditional fields
Besides adding fields and fees, you can also customize the WooCommerce checkout page by creating conditional fields to improve the user experience. You simply need to select the conditional parent field and value. Let’s see the step-by-step process:
- In your WordPress dashboard, go to WooCommerce > Checkout > Billing and click Add New Field
- Select the type of field you want to create and fill in the label, placeholder/type, and description. This will depend on the type of conditional you’re creating
- After that, tick the conditional checkbox on the right. Select the parent field and the value the parent field has to take to display the conditional field
- Press Save and you’re done!
The good thing is that Checkout Manager allows you to create unlimited custom fields and apply as many conditions as you want to edit your checkout page and provide users with a unique experience.
For more information on how to create conditional fields in WooCommerce, have a look at this full guide that has several examples of what you can do to customize your checkout.
This is just a simple example but there’s much more you can do. For more information, check out our full guide on how to add fees to the WooCommerce checkout.
All in all, if you want to easily edit the checkout page, WooCommerce Checkout Manager is a great choice. The free version is a great start but if you want more advanced features, we recommend any of the premium plans.
2) Edit the checkout page programmatically (coding)
In this section, we’ll show you how to edit the WooCommerce checkout page via coding. So, by the end of it, you’ll know how to:
- Add custom fields to the WooCommerce checkout page
- Save custom fields to the database
- Make a required field optional
- Add content to the checkout page
- Use shortcodes in the WooCommerce checkout page
- Style the checkout page with custom CSS
To achieve all these customizations, you will use some WooCommerce checkout hooks. If you’re not familiar with hooks, we recommend you check out our starter guide on how to use WooCommerce hooks. As we’ll apply some changes to the functions.php file, we recommend you use a child theme. You can either use one of the many child theme plugins or create one following this guide.
2.1) Add custom fields to the WooCommerce checkout page
The first thing we’ll show you is how to add custom fields to the checkout page. To do this, paste the following script in the functions.php file of the child theme:
// checkbox field
add_action( 'woocommerce_after_order_notes', 'quadlayers_subscribe_checkout' );

function quadlayers_subscribe_checkout( $checkout ) {
woocommerce_form_field( 'subscriber', array(
'type' => 'checkbox',
//'required' => true,
'class' => array('custom-field form-row-wide'),
'label' => ' Subscribe to our newsletter.'
), $checkout->get_value( 'subscriber' ) );
}
This will add a custom checkbox field at the end of the checkout page to give users the option to subscribe to your newsletter. In the same way, you can add any field type. For example, let’s add a radio input field type with the following script:
// Radio input field
add_action('woocommerce_before_order_notes', 'quadlayers_radio_checkout');
function quadlayers_radio_checkout($checkout3){
woocommerce_form_field( 'feed', array(
'type' => 'radio',
//'required' => true,
'class' => array('custom-field form-row-wide'),
'label' => ' How did you find us?.',
'options' => array(
'Google' => 'Google',
'Friend' => 'Friend',
'Facebook' => 'Facebook',
'Youtube' => 'YoutTube',
'Other' => 'Other'
)
));
}
This will add a radio input type so you can ask your customers about where they heard about you. 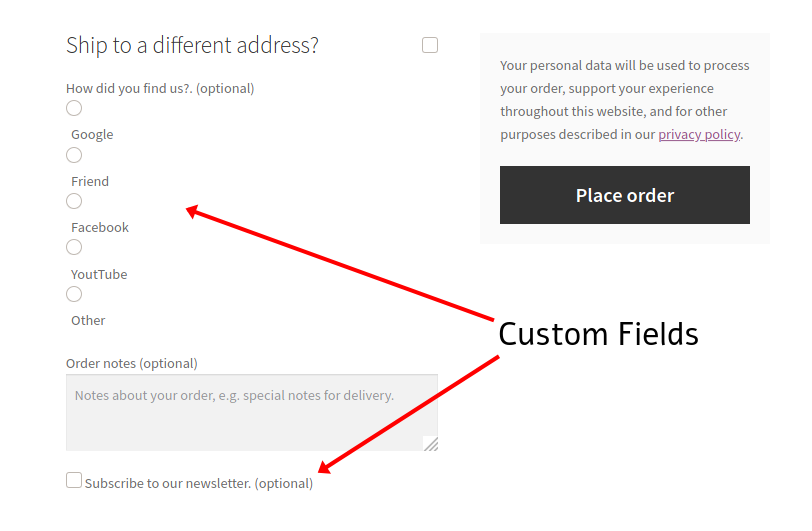 For more information about how to add custom fields to the WooCommerce checkout page, check out this complete guide with several examples.
2.2) Save custom fields values to the database
Now, let’s see how you can use these custom fields to edit the checkout and gather information about WooCommerce orders. To do this, you need to be able to retrieve the values of the custom fields whenever you need to. Additionally, you need to save the values of the custom fields in the database once the customers complete the form and hit the Place order button.
To achieve this, you have to use the 'woocommerce_checkout_update_order_meta'hook. To update the two custom fields you added in step 2.1, copy and paste the following code in the child theme funcitons.php file:
add_action( 'woocommerce_checkout_update_order_meta','quadlayers_save_function' );
function quadlayers_save_function( $order_id ){
if ( ! empty( $_POST['subscriber'] ) ) {
update_post_meta( $order_id, 'subscriber', sanitize_text_field( $_POST['subscriber'] ) );
}
if ( ! empty( $_POST['feed'] ) ) {
update_post_meta( $order_id, 'feed',sanitize_text_field( $_POST['feed'] ) );
}
}
This script checks if the custom field is empty or not with an if()conditional before saving it to the database. After adding this script, you can retrieve the saved data from the database using a global “$post” WP object. In the following script, we get the subscriber metadata of the current order. You can use this in the backend of the WooCommerce orders list.
global $post;
$order = wc_get_order( $post->ID );
$c_meta = $order->get_meta('subscriber');
It’s worth noting that this is a raw script, so you will have to adapt it to fit your specific needs.
2.3) Make a required field optional
Another simple yet effective way to edit the checkout page in WooCommerce is to make mandatory or required fields optional. This way, you let shoppers fill in only the fields that are necessary for the transaction and improve their buying experience.
For example, let’s say you sell downloadable or virtual products so you want to make the Address field in the Billing section optional. Simply add the following code to the functions.php file of your child theme.
add_filter( 'woocommerce_billing_fields', 'wc_address_field_optional');
function wc_address_field_optional( $fields ) {
$fields['billing']['billing_address_1']['required'] = false;
return $fields;
}
Using this snippet as a base, you can make more fields optional in no time.
Conditional fields
If you want to take your WooCommerce checkout page a step further, you can customize it by adding conditional fields. Conditional fields have conditional logic so that there are fields that appear or disappear based on the values of another field. For example, you can create conditional logic so that the credit card fields only appear if the user selects Credit Card as the payment option.
To know more about conditional fields and how to use them to edit your checkout page, have a look at this complete guide.
2.4) Add content to the checkout page
Another way to edit the WooCommerce checkout page is by adding some content. With a solid knowledge of WC checkout hooks, you can easily insert any kind of content such as images, titles, text, and so on wherever you want. For example, you can use this script to add a trust badge image before the Place order button on the checkout page:
add_action('woocommerce_review_order_before_submit','quadlayers_checkout_content');
function quadlayers_checkout_content(){
echo '<img src="https://www.heresylab.com/wp-content/uploads/2019/01/paypal-1.png" />;
}
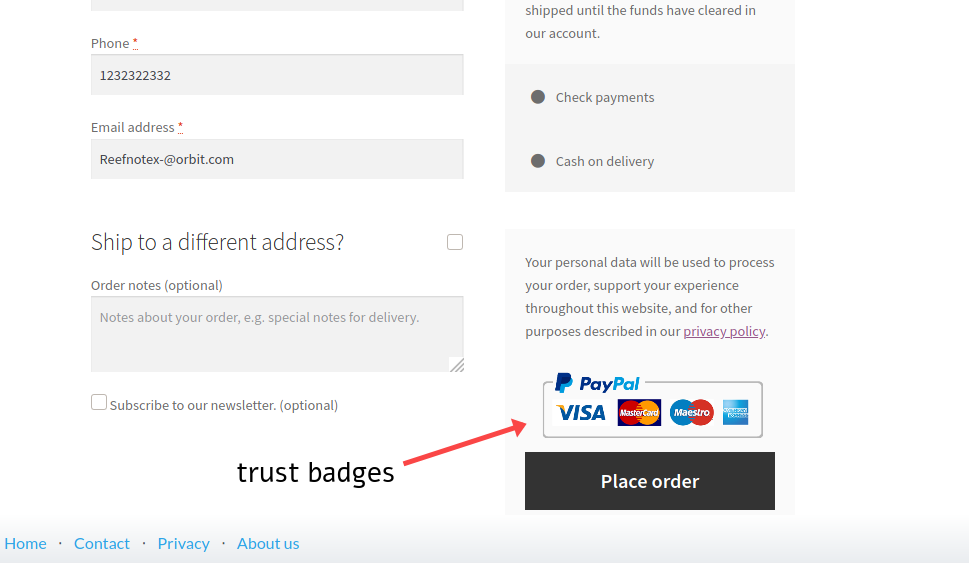 Apart from images, you can also add a simple header text at the top of the checkout:
add_action(woocommerce_checkout_before_customer_details
,'quadlayers_checkout_header');
function quadlayers_checkout_header(){
echo "<h2>This is a custom Header<h2>
";
}
Another interesting alternative is to add a message to your checkout page. Typically, stores mention things related to shipping, delivery, and so on. For example, let’s say you want to remind customers that they might need to wait 5 business days to receive their products. In the functions.php file of your file theme, add:
add_action( 'woocommerce_after_order_notes', 'wc_add_message' );
function wc_add_message () {
echo 'Please remember that delivery may take up to 5 business days.';
}
2.5) Add Fees to the checkout page
Let’s have a look at how to edit the WooCommerce checkout page and add extra fees. Most of the time, there are two types of additional fees:
- Fixed
- Percentage
In this section, we’ll show you how to add both to your checkout.
Add a fixed fee
A typical example of a fixed fee is express delivery. Let’s say you want to include a $10 fixed fee for express delivery.
Simply use the script below and edit the text for the field name. In this example, we’ll call the “Extra Charge” and it will add $10 to the order.
add_action('woocommerce_cart_calculate_fees', function() {
if (is_admin() && !defined('DOING_AJAX')) {
return;
}
WC()->cart->add_fee(__('Extra Charge', 'txtdomain'), 10);
});
Keep in mind that this code will automatically add a $10 fixed fee to the total of the customers’ order during checkout.
Add a percentage-based fee
Another alternative is to charge a percentage-based fee. This can be useful if there are extra taxes or you want to add an extra cost for certain payment gateways charges. Let’s say we want to add a 3% fee to the total price of the order (products + shipping).
add_action('woocommerce_cart_calculate_fees', function() {
if (is_admin() && !defined('DOING_AJAX')) {
return;
}
$percentage = 0.03;
$percentage_fee = (WC()->cart->get_cart_contents_total() + WC()->cart->get_shipping_total()) * $percentage;
 WC()->cart->add_fee(__('Tax', 'txtdomain'), $percentage_fee);
});
This script will add a 3% fee to the shopper’s total order during checkout.
For more information and examples to add fees to your store, check out our guide on how to add fees to the WooCommerce checkout.
2.6) Use shortcodes on the WooCommerce checkout page
WooCommerce shortcodes give you a lot of flexibility and allow you to add any type of content using checkout hooks. However, if you simply print the shortcode, it won’t work. Instead, you should include them as follows:
echo do_shortcode('[woocommerce_cart]');
So, using a hook the same way you did in previous examples, you can end up with something like this:
add_action('woocommerce_after_checkout_form','quadlayers_checkout_shortcode');
function quadlayers_checkout_shortcode(){
echo do_shortcode('[woocommerce_cart]'); }
This script will bring the
[woocommerce_cart]
shortcode into action, displaying the WooCommerce cart at the bottom of the checkout page. 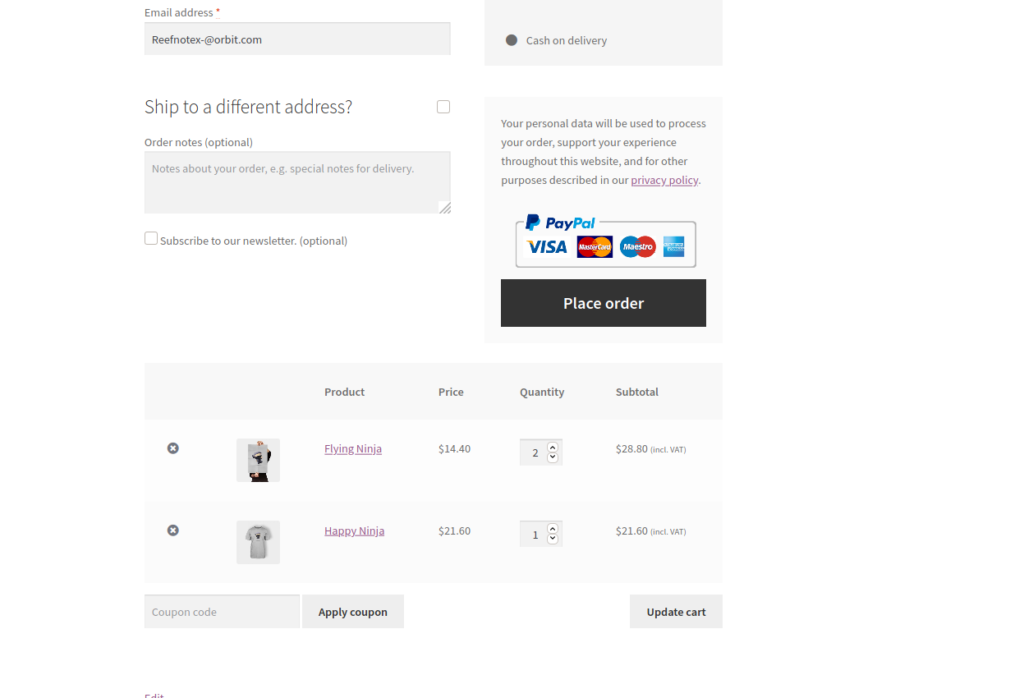 Please note that you can use any WordPress, WooCommerce, or custom shortcode. However, some shortcodes might not be compatible or supported by WooCommerce so check that before using them. To know more about shortcodes, you can check out our complete WooCommerce shortcodes guide.
2.7) Edit the WooCommerce checkout page with custom CSS
Finally, you can also customize the checkout page of your WooCommerce store by editing the CSS style. This doesn’t mean that you need to spend hours rebuilding the whole checkout page. Even a couple of simple changes can help you optimize the checkout. For example, by editing the colors, fonts, margins, or borders, you can see some great improvements in conversion rates.
There’s no magic formula that works for every business here and you’ll need to test different styles but adjusting a few things can help you boost your sales. For example, you can use this simple script to apply a custom CSS style and edit the background color on the checkout page:
add_action('wp_head','quadlayers_checkout_style');

function quadlayers_checkout_style(){
         if(is_checkout()==true){

                 echo '<style> body{background:#dfdfff!important;}<style>';
         }
}
On top of that, you can take this script as a base and add your own CSS rules inside the HTML tag to give it the perfect look and feel for your site. This is a quick hack to apply CSS to the checkout page. It’s very handy to add small pieces of CSS. But if you want more extensive style scripts, you should enqueue the CSS style the WordPress way, using the wp_enqueue_style() native WP hook as follows:
add_action( 'wp_enqueue_scripts', 'quadlayers_enqueue_css' );

function quadlayers_enqueue_css(){
    wp_enqueue_style(  'checkout_style',
        get_stylesheet_directory_uri() . '/checkout-style.css'
    );
}
This way, you can have all your custom CSS in a separate file (checkout-style.css in this example) which will be stored in your child theme folder at the same level as the main style.css file.
These are just a few examples of how you can customize the checkout page in WooCommerce with some simple scripts. We recommend taking them as a base and playing around to add or edit any other aspects of your checkout. Additionally, if you want to edit the shop page via coding, we recommend you have a look at our guide on how to customize the WooCommerce shop page programmatically.
Bonus: Checkout Hooks
There are many checkout hooks that you can use to edit the checkout page in WooCommerce. These are some of the main ones:
- woocommerce_before_checkout_form
- woocommerce_checkout_before_customer_details
- woocommerce_checkout_billing
- woocommerce_before_checkout_billing_form
- woocommerce_checkout_shipping
- woocommerce_before_order_notes
- woocommerce_checkout_after_order_review
- woocommerce_checkout_after_customer_details
- woocommerce_review_order_before_cart_contents
- woocommerce_review_order_before_shipping
- woocommerce_review_order_after_order_total
- woocommerce_checkout_order_review
- woocommerce_review_order_before_submit
- woocommerce_review_order_before_payment
- woocommerce_review_order_after_submit
- woocommerce_after_checkout_form
For more information about hooks and how they work, check out the following guides:
- How to use WooCommerce checkout hooks
- How to use WooCommerce hooks – The Full Guide
Finally, for the full list of hooks that you can use, have a look at this documentation page.
How to increase Checkout Page conversion
One of the main goals of checkout page optimization is increasing conversions. This means, improving the number of users who purchase from your WooCommerce store without having to increase the number of visitors. This is key to making your checkout and your overall business more efficient.
Let’s have a look at some ways to do it:
1) Offer more payment options
One of the mistakes that can cost you a lot of money is not offering enough payment options. This is especially important if you have customers from different countries.
Nowadays, people expect to have different options to pay, so you should let your shoppers decide the most convenient method for them. Accepting credit and debit cards and PayPal payments is a great way to increase your conversions.
2) Clear Pricing details
Have you ever been shopping online and then seen an extra charge that you weren’t aware on the last step? Experiences like this are quite common and deliver a terrible shopping experience. To reduce checkout cart abandonment and boost your conversions, make sure that your pricing and all the extra fees are clear from the start. This means clearly stating shipping costs, taxes, additional charges, and anything extra that the customer will have to pay.
Nobody likes discovering hidden costs and charges when they’re ready to pay, so avoid being that store at all costs.
3) Avoid unnecessary fields
A complicated checkout is one of the main reasons for checkout cart abandonment. That’s why you should make the checkout as simple as possible and remove or hide unnecessary fields that may distract shoppers. For example, if you sell a digital product, do you really need the shopper’s address? Probably not. Simply remove all distractions and only leave the fields that are strictly necessary.
For more ideas on how to optimize your WooCommerce checkout page, have a look at this guide.
Conclusion
All in all, editing the checkout page can make a great difference and help you take your WooCommerce store to the next level. Even with a few changes, you can increase conversion rates and boost your sales. In this guide, we’ve shown you two ways to edit the checkout:
- With a plugin
- Programmatically (via coding)
If you don’t have coding skills but want an easy yet solid solution, WooCommerce Checkout Manager is your best choice. This freemium plugin has powerful functionalities to edit the checkout page, and it’s easy to use.
Also, you can try to tailor your entire payment page to match your brand with help of Fondy. From design, imagery, and color scheme to typefaces and logos. Custom checkout pages help to build customer trust and reduce cart abandonment. You can also change your payment fields and messaging to match promotions and seasonal sales.
On the other hand, if you want to create your own solution via some coding and you don’t want to install any plugins, you can edit the checkout page programmatically. We’ve shown you five different examples to edit different aspects of the checkout but the options are endless. Play around with the scripts and unleash your creativity to optimize your checkout.
If you want to shorten the checkout process to improve conversion rates, we recommend you use a quick buy plugin for WooCommerce or direct checkout links.
Finally, if you want to learn different options to edit the shop page on your store, we recommend you have a look at this step-by-step guide.
Do you have any questions or want to share with us the checkout customizations that you have applied to your site? Let us know in the comments section below! We’ll be happy to hear from you!
 Your WooCommerce checkout page is where all the money comes in, so any little tweak has the chance of increasing your revenue.
Customizing your checkout can be done with custom code or with WooCommerce extensions, we will cover both of those here.
Customizing WooCommerce checkout is something we are intimately familiar with. We recently built a new product called WooCommerce Smart Checkout, which required a lot of customization. We’ll share what we learned, along with lots of other tips in this article.
WooCommerce allows you to move or change existing checkout fields, add new ones, completely change the design, and do anything you want. This can be done with custom code in a plugin or child theme, or with an existing WooCommerce extension.
Let’s take a look at how to customize your checkout form.
Table of Contents
- Manipulating Checkout Fields
- Moving or re-ordering Fields
- Custom Checkout Page Template
- WooCommerce AJAX
- Other Customizations
- Customization advice from the Pros
![]()
Get this guide in PDF form
Enter your info below and we’ll send you the PDF right away.
Manipulating Checkout Fields
WooCommerce has hooks and filters that allow you to do anything you want with the fields, from changing the text to completely removing them. You can also add your own fields to any section of the form you want.
The easiest way to do this is with the Checkout Field Editor extension.
Checkout Field Editor
This extension starts at $49, and allows you to do anything you want to the checkout fields. It is much easier than using custom code, and it works seamlessly out of the box.
For example, let’s say we want to move the email field to be first, before any other fields.
To do that with this extension activated, we just have to drag and drop our email field where we want it.

With this extension, you can edit fields in the billing and shipping sections, and even add new fields. You can change the field attributes, such as input type and placeholder text, change the position, and even add new fields.

This extension does not change the order review or purchase options, that is handled separately. It also does not allow you to use custom input types, such as type=”tel”. I really like the “tel” input type for credit card and phone number inputs, because it displays a number pad on mobile phones.
Custom Code
If you would rather use custom code to edit your checkout fields, there is some great documentation on that.
Your custom code can be placed in a custom plugin or child theme functions.php file. Let’s look at some examples.
Better Input Attributes
When creating WooCommerce Smart Checkout, we wanted to change some of the input types so they were better for mobile. These change the keyboard that is displayed, which makes a big difference.
// Hook in
add_filter( 'woocommerce_checkout_fields' , 'set_input_attrs' );

// Our hooked in function - $fields is passed via the filter!
function set_input_attrs( $fields ) {
       $fields['billing']['billing_email']['type'] = 'email';
       $fields['billing']['billing_phone']['type'] = 'tel';
       $fields['billing']['billing_postcode']['type'] = 'tel';
       $fields['shipping']['shipping_postcode']['type'] = 'tel';

       return $fields;
  }
You can change the type on any other field by adding it to that list. You can also change other input attributes using the same type of code, such as placeholder or class.
In this example, we are changing the placeholder of the email field, and adding a new field for Shipping Phone.
add_filter( 'woocommerce_checkout_fields', 'custom_edit_checkout_fields' );
function custom_edit_checkout_fields( $fields ) {
// Author: apppresser.com
// Change placeholder
$fields['billing']['billing_email']['placeholder'] = '[email protected]';
// Change all attributes on a field
$fields['shipping']['shipping_phone'] = array(
'label' =&amp;amp;gt; __('Shipping Phone', 'woocommerce'),
'placeholder' =&amp;amp;gt; _x('(555) 555 5555', 'placeholder', 'woocommerce'),
'required' =&amp;amp;gt; false,
'class' =&amp;amp;gt; array('my-special-class'),
'clear' =&amp;amp;gt; true
);
return $fields;
}
Make Phone Number Optional
add_filter( 'woocommerce_billing_fields', 'my_optional_fields' );

function my_optional_fields( $address_fields ) {
	$address_fields['billing_phone']['required'] = false;
	return $address_fields;
}
The same code works to make other fields optional, just make sure you use the right filter. For example, here is how to make the address 1 field optional.
// Hook in
add_filter( 'woocommerce_default_address_fields' , 'custom_override_default_address_fields' );

// Our hooked in function - $address_fields is passed via the filter!
function custom_override_default_address_fields( $address_fields ) {
     $address_fields['address_1']['required'] = false;

     return $address_fields;
}
Moving or re-ordering Fields
Moving fields is one of the trickier customizations. Woo does not provide us with example code, so there are a lot of random code samples out there. I found that most of them left out required fields, or did not work 100%.
I would recommend that you use the Checkout Field Editor extension mentioned above to move fields and maintain compatibility with WooCommerce updates. If you really want to do it yourself, the code below uses all required fields in the WooCommerce documentation. It has been tested with WooCommerce 2.5.5.
add_filter( 'woocommerce_checkout_fields', 'yourplugin_move_checkout_fields' );

function yourplugin_move_checkout_fields( $fields ) {
	// Author: apppresser.com

	// Move these around as necessary. You'll see we added email first.
	$billing_order = array(
		"billing_email",
		"billing_first_name",
		"billing_last_name",
		"billing_company",
		"billing_address_1",
		"billing_address_2",
		"billing_postcode",
		"billing_country",
		"billing_state",
		"billing_phone"
	);

	// This sets the billing fields in the order above
	foreach($billing_order as $billing_field) {
	    $billing_fields[$billing_field] = $fields["billing"][$billing_field];
	}

	$fields["billing"] = $billing_fields;

	// Move these around as necessary
	$shipping_order = array(
		"shipping_first_name",
		"shipping_last_name",
		"shipping_company",
		"shipping_address_1",
		"shipping_address_2",
		"shipping_postcode",
		"shipping_country",
		"shipping_city",
		"shipping_state"
	);

	// This sets the shipping fields in the order above
	foreach($shipping_order as $shipping_field) {
	    $shipping_fields[$shipping_field] = $fields["shipping"][$shipping_field];
	}

	$fields["shipping"] = $shipping_fields;

	return $fields;
}
While this does work to move fields around, it does not account for any changes to the default fields, or adding custom fields. If this code runs later than other field customizations, it may override them.
Checkout Page Template Customizations
Besides moving fields around, you can also manipulate the page display.
For example, you could make the shipping fields display before the billing fields, or display a special message on the checkout page. This is done by using action hooks, or a custom checkout page template.
Checkout Hooks
There are 9 hooks on the checkout page:
- woocommerce_before_checkout_form
- woocommerce_checkout_before_customer_details
- woocommerce_checkout_billing
- woocommerce_checkout_shipping
- woocommerce_checkout_after_customer_details
- woocommerce_checkout_before_order_review
- woocommerce_checkout_order_review
- woocommerce_checkout_after_order_review
- woocommerce_after_checkout_form
These hooks are used by WooCommerce core to display checkout page elements, such as the billing and shipping fields. You can use them to add your own custom content. See a visual guide to these checkout action hooks here.
If you wanted to add a message before the checkout form, you could do something like this.
add_action( 'woocommerce_before_checkout_form', 'my_checkout_msg' );
function my_checkout_msg() {
echo '&amp;amp;lt;p&amp;amp;gt;This page is 100% secure. Thank you for your business!&amp;amp;lt;/p&amp;amp;gt;';
}
You could add that same message in other places on the checkout page, by using a different hook, such as woocommerce_checkout_after_order_review.
You should be able to do most of your customizations using the hooks and filters above, and some custom CSS. If you really need to make some big moves, you can use a custom checkout page template.
We did this for WooCommerce Smart Checkout, so we could create a multi-page checkout experience for mobile.
Tip: all of the action hooks and filters for WooCommerce are listed on this page.
Custom Checkout Page Template
WooCommerce allows you to override any of their page templates in your theme.
To add a custom checkout page template to your (child) theme, create a folder structure called woocommerce/checkout inside your theme folder. Next, copy the checkout page template from the WooCommerce plugin located at woocommerce/templates/checkout/form-checkout.php.
![]()
Copy woocommerce/templates/checkout/form-checkout.php to mytheme/woocommerce/checkout/form-checkout.php
You can now make any edits you want to mytheme/woocommerce/checkout/form-checkout.php, and it will not be overwritten when you update WooCommerce. Remember that any changes you make may affect WooCommerce core or extension functionality. I would recommend leaving all of the default actions and markup unless you know what you are doing.
Custom Template in a Plugin
When we created our plugin, we needed to use a custom checkout page template to create a multi-page checkout.
You cannot add a custom checkout page template in a plugin by default, so we had to use a custom filter. If you are creating a plugin, and not adding the checkout page to your theme, do the following.
First, add the custom form-checkout.php template in your plugin inside of a folder named “checkout.” For example, plugin/templates/checkout/form-checkout.php is a good place for it.
Next we need to tell WooCommerce to look in our plugin for our checkout page first using the woocommerce_locate_template filter.
/*
* Use our custom woo checkout form template
* Source: apppresser.com
*/
add_filter( 'woocommerce_locate_template', 'custom_woocommerce_locate_template', 10, 3 );
function custom_woocommerce_locate_template( $template, $template_name, $template_path ) {
global $woocommerce;
$_template = $template;
if ( !$template_path ) $template_path = $woocommerce-&amp;amp;gt;template_url;
$plugin_path = untrailingslashit( plugin_dir_path( __FILE__ ) ) . '/templates/';
// Look within passed path within the theme
$template = locate_template(
array(
$template_path . $template_name,
$template_name
)
);
// Modification: Get the template from this plugin, if it exists
if ( file_exists( $plugin_path . $template_name ) ) {
$template = $plugin_path . $template_name;
}
// Use default template if no other exists
if ( !$template ) {
$template = $_template;
}
// Return what we found
return $template;
}
You may need to edit the $plugin_path variable, depending on your plugin structure. Now you can edit your custom checkout template and it will not be overwritten by WooCommerce updates.
WooCommerce AJAX
We did a lot of javascript customization, and one issue we ran into was running our code at the right times.
WooCommerce updates the cart totals and other information on the fly with AJAX. For example, if you change the shipping options on the checkout page, the cart total and payment options may update. If you are using custom Javascript, you’ll want to make sure your code runs after the checkout page is updated (if necessary).
In our case, we display the cart total at the top of the custom checkout page, and this needs to update when the AJAX runs.
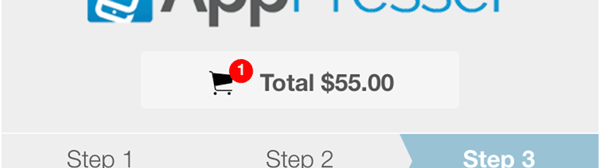
It is very difficult to tap into the WooCommerce AJAX events directly, but there is something better we can do. There is an “ajaxComplete” listener we can use to know when any event takes place. Then we can look at the data, and if it’s a WooCommerce checkout update, we can run our code. Here’s what that looks like:
// Put this in a document ready event
$( document ).ajaxComplete(function( event, xhr, settings ) {
console.log( settings.url );
// settings.url tells us what event this is, so we can choose what code we need to run
if( settings.url.indexOf('update_order_review') &amp;amp;gt; -1 ) {
// update order form
doTotalUpdates();
} else if( settings.url.indexOf('wc-ajax=checkout') &amp;amp;gt; -1 ) {
// Add messages after checkout here
doAfterCheckout();
}
});
In our case, this allowed us to know what event was happening, and we could update our code accordingly. Very handy!
Other Customizations
There are a variety of WooCommerce extensions that allow further customization to the checkout page.
One Page Checkout
This extension allows you to put your sales copy, product selection, and checkout form together on a single page. This works great for some types of businesses.
Checkout Add-ons
This extension allows you to add extra inputs to your checkout page. For example, custom engraving instructions, gift wrapping yes/no, upsell options, and lots more. It’s the no-coding equivalent to adding your own custom checkout fields.
Quick Checkout
Quick Checkout is a popular extension that allows you to display your checkout form in a pop-up modal on any page.
Instead of clicking add to cart => view cart => checkout, you can instantly show the checkout form, saving a few steps.
WooCommerce Smart Checkout
Smart Checkout instantly improves your mobile checkout experience, getting you more sales. It features a sleek mobile checkout page, multi-step checkout, address autofill, and more.
Customization Advice from the Pros
There are lots of ways to customize your checkout form, but don’t make changes just because you can.
Make sure you understand your visitors, and you test your changes to make sure they are actually improving conversions.
We asked some WooCommerce professionals what they recommend when making changes to your checkout page, here’s what they said.

Brent Shepherd, founder of Prospress, and creator of WooCommerce Subscriptions says:
The thing I’d recommend is to run user tests of checkout customisations.
You can always A/B test things, but sitting in the same room as someone talking through their thinking process while progressing through your checkout, of watching a video of a customer talking through the process of checking out will be very revealing.
Those custom buttons, banners or fields might not be perceived or understood the way you think they will. Running user tests always reveals the unexpected to allow you to customise checkout to address that, ultimately helping improve conversions.
If you are interested in how user testing works, we recently did user testing on our own product, and wrote about it here.
Let us know in the comments if you have any advice on customizing WooCommerce checkout.
![]()
Get this guide in PDF form
Enter your info below and we’ll send you the PDF right away.
The checkout page is one of the most important pages on any eCommerce website. All the effort that you put into your website content, design and marketing will amount to nothing if your customers keep abandoning their carts and never complete the checkout process. Some statistics show that cart abandonment rate can range from 64% to around 90% depending on the industry in which you are selling products.
The WooCommerce WordPress plugin automatically creates a checkout page for your website visitors to complete their order by filling out a form. However, it is a general-purpose form meant to cover all bases and is not optimized for your specific use-case. This means that your cart abandonment rates are likely to be high. Reducing the abandonment rate can be the difference between just getting by and making a decent amount of profit to further expand the business.
In this tutorial, I’ll show you how to customize the checkout page in WooCommerce for free using plugins and a little bit of code.
Tips for Improving the Checkout Process
There are a few things that you can change on the checkout page to improve your conversion rate.
You should consider keeping the number of fields required to complete an order as low as possible. This helps for two reasons. First, people are usually unwilling to share extra personal information due to privacy concerns. Second, filling out a form takes time, and not everyone will be willing to spend theirs filling out unnecessary details.
Another thing that you can do to improve your conversion rate is build customer confidence. You can do that by adding a customer testimonial on the checkout page. Also try to convey that the payment process is handled in a secure manner on your website. Making all common payment methods available also helps.
One of the primary reasons for abandoned carts is additional unexpected checkout fees due to high shipping charges or some other reason. Make sure that customers don’t see any extra charges on the checkout page and provide legitimate explanations for charges that you cannot avoid. Any discount coupons should also work as expected on the checkout page.
Customizing the Checkout Page
We will now incorporate some of these tips to customize our own WooCommerce checkout page. The following image shows what the checkout page looks like in its default form for the Storefront theme.


Removing and Rearranging Fields
As you can see, there are a couple of extra fields like Company Name that we don’t want our customers to fill out. We will get rid of them and arrange the remaining fields in a different order, like bringing the phone and email address fields close to the name input.
Begin by installing Checkout Field Editor for WooCommerce from the WordPress plugin directory. Once you have installed and activated the plugin, navigate to WooCommerce > Checkout Form from the dashboard menu.
Drag the fields around to place them in any order that you prefer. After that, select the billing_company field and click on the Remove button as shown below. Finally click on the Save changes button, and you will see the changes reflected on the checkout page on reload.


You might have noticed that there was no option to remove the Order notes field in the settings. You will find it by switching the tabs to Additional Fields at the top of plugin settings. Please note that you probably won’t be able to remove the Order notes field by selecting it and clicking on the Remove button. This is because it is the only field under that tab. Another way to get rid of it is to click on the Disable button and then Save changes.


You can also add extra fields to the checkout form based on your specific business needs. For this example, I am adding a checkbox to let us know that the order is a gift. First, we click on the Add Field button and then select Checkbox from the dropdown menu. Once you have filled out all the other information as shown in the image below, click on the Save & Close button.


Updating Text Content
The Checkout Field Editor provided us with an easy way to add, remove, or rearrange fields in the checkout form. Now, we will use another plugin called StoreCustomizer to make changes to the text on the checkout page. This plugin allows us to make changes to different pages in our WooCommerce store. We used it in the tutorial about customizing the WooCommerce shop page.
Once you have installed the plugin, navigate to Appearance > Customize > StoreCustomizer > Checkout Page. You should now see a bunch of options under different headings.
We will begin by checking the box for Edit Coupon Section Text. Replace the default text with anything that is appropriate for your business. Once you are done, hit the Publish button to apply changes.


Scroll down a bit within the StoreCustomizer checkout page settings, and you will find another subsection titled Design Elements. You can tweak the settings here to customize the Place Order button. Change the text, font size, padding, and color values to something that goes well with your overall website design.


You can also change the headings for different sections by checking the box for Customize checkout details headings. It will also allow you to change the font size and color. I have made the text slightly bigger by setting the font size to 32 pixels. I have also set the color to black.


Updating the Appearance With CSS
We were able to make some changes to the appearance of different elements on the checkout page using the StoreCustomizer plugin. However, the plugin only has limited options for styling changes.
Our best bet is to use custom CSS that we can place inside Appearance > Customize > Additional CSS. In this case, we will modify the look of the coupon section as well as the order summary table. Some other minor changes include the addition of borders under the input fields.


You can find the selectors for different elements using the style inspector in the respective browsers. Here is the CSS that I am going to use for our checkout page.
1 |
input[type="text"], input[type="number"], input[type="email"], input[type="tel"], input[type="url"], input[type="password"], input[type="search"], textarea, .input-text { |
2 |
background-color: #f1f1f1l; |
3 |
box-shadow: none; |
4 |
border-bottom: 1px dashed black; |
5 |
}
|
6 |
|
7 |
.woocommerce-info, .woocommerce-noreviews, p.no-comments { |
8 |
background-color: #ff7800; |
9 |
border-left: 0.5rem solid #00000075; |
10 |
font-size: 1.25rem; |
11 |
padding: 1.25rem 4rem; |
12 |
line-height: 1; |
13 |
margin-bottom: 1rem; |
14 |
}
|
15 |
|
16 |
table.woocommerce-checkout-review-order-table th.product-name, table.woocommerce-checkout-review-order-table th.product-total { |
17 |
background: #222; |
18 |
color: white; |
19 |
font-size: 150%; |
20 |
padding: 0.5rem 1.5rem; |
21 |
}
|
22 |
|
23 |
table:not(.has-background) tbody tr:nth-child(2n) td { |
24 |
background-color: #e3e3e3; |
25 |
}
|
26 |
|
27 |
table:not(.has-background) th, tfoot tr td { |
28 |
background-color: #666; |
29 |
color: white; |
30 |
font-size: 1.2rem; |
31 |
padding: 0.75rem 1rem; |
32 |
}
|
33 |
|
34 |
.button { |
35 |
background-color: #00bc1d; |
36 |
color: #fff; |
37 |
}
|
38 |
|
39 |
.button:hover { |
40 |
background-color: #37960c; |
41 |
color: #fff; |
42 |
}
|
Click on the Publish button now, and you will have a checkout form that looks like the image below.


Adding Content Using Hooks
This last section requires you to have at least a little bit of familiarity with coding. Any wrong steps could potentially make your site inoperable until you fix the errors. Please be careful and make extra changes only if you know what you are doing. We will be updating the functions.php file of your current theme here. Make a copy of the file before proceeding.
A lot of developers integrate hooks within their plugins so that others can customize the plugin functionality according to their own needs. These hooks allow you to make changes within the plugin at specific predefined points. WooCommerce also has lots of hooks of its own that are mentioned on its website. However, you might prefer to see it all laid out visually. Take a look at this visual guide for WooCommerce checkout page hooks.
Let’s say you want to add a customer testimonial before the payment methods. The visual chart shows us that we will have to use the hook woocommerce_review_order_before_payment to add the testimonial there. Add the following code to the functions.php file.
1 |
add_action( 'woocommerce_review_order_before_payment', function() { |
2 |
echo '<figure class="testimonial"> |
3 |
<blockquote>
|
4 |
<p>I trust TutsPlus Demo (Monty) to always sell top-quality products.</p>
|
5 |
</blockquote>
|
6 |
<figcaption>—James</figcaption>
|
7 |
</figure>'; |
8 |
});
|
You can also use some CSS to make the testimonial blend in with the rest of the layout. Place the following CSS inside Appearance > Customize > Additional CSS, as we did in the previous section.
1 |
figure.testimonial { |
2 |
margin: 2rem 0; |
3 |
}
|
4 |
|
5 |
figure.testimonial blockquote { |
6 |
margin: 0; |
7 |
font-size: 1.3rem; |
8 |
font-style: normal; |
9 |
border-left: 5px solid #888; |
10 |
background: #efefef; |
11 |
padding: 2rem 1rem 0.1rem 1rem; |
12 |
}
|
13 |
|
14 |
figure.testimonial figcaption { |
15 |
text-align: right; |
16 |
font-size: 1.5rem; |
17 |
color: black; |
18 |
}
|
Your checkout page should now look like the image below.


Final Thoughts
In this tutorial, we used a combination of techniques to customize a WooCommerce checkout page for free. The easiest and safest way to make content-related changes is with plugins, both free and paid. After that, you can make layout-related or visual changes using custom CSS code. Sometimes, the customization that you are looking for might not be provided with either free or paid plugins. In that case, your best bet is to write your own code.
Hopefully, you will be able to follow the steps in this tutorial to create your own customized WooCommerce checkout page.
Did you find this post useful?

Freelancer, Instructor
I am a full-stack developer who also loves to write tutorials. After trying out a bunch of things till my second year of college, I decided to work on my web development skills. Starting with just HTML and CSS, I kept moving forward and gained experience in PHP, JavaScript, and Python.
I usually spend my free time either working on some side projects or traveling around.
- WordPress
- WooCommerce
- SEO
- Our Services
- Fitness Products
How to Customize WooCommerce Checkout Page Step by Step Guide
-
View Larger Image


How to Customize WooCommerce Checkout Page Step by Step Guide
Customize WooCommerce Checkout Page
Do you want to customize WooCommerce Checkout Page?
In this post, We will discuss how to customize WooCommerce checkout page programmatically and using the WooCommerce checkout plugin.
WooCommerce is a great eCommerce plugin, that you can use to turn your WordPress website into a dynamic online store. This plugin automatically creates a checkout page/ Cart page/ Account page / Order page.
But if you want to add extra features to these pages, you need to use any plugin or you can customize these pages using WooCommerce functions.
The checkout page on your online eCommerce shop is where you get paid, so it’s an important page for your online eCommerce business. WooCommerce the default configuration is so good, but you may need to customize it out of necessity. Like you may add extra user billing fields or your extra a few the important fields.
Obviously, the WooCommerce checkout page is the most important for any eCommerce store. It represents the final step that the customer must take to finally complete his purchase.
Today, In this guide, We will show you how to Customize WooCommerce Checkout Page Step by Step. There are two ways to customize the WooCommerce checkout page. First using the WordPress plugin and another using the Functions.
Most customizations would be done using hooks and filters. Look at the WooCommerce documentation and you can copy the checkout template to your website theme in a folder that looks like this: woocommerce/checkout/form-checkout.php.
Read WooCommerce Action and Filter Hook Reference
WooCommerce Checkout Page By Default

Default WooCommerce Checkout Page Fields
This is WooCommerce the default checkout page outlook:
This method adds the custom field to the checkout page using the code snippet. First, you need to perform an action you activate theme the functions.php file, then we will use this code snippet to start customizing the checkout page:
After adding this code, the checkout page looks like as : 
For the data validation of the custom field using the following code:
Now that we’ve added a replacement field to the checkout page. we would like to confirm whether the details entered into the custom field by the client, are being saved or not. This could be using the snippet below:
After saving the code, we have added custom fields to our WooCommerce Website.
Customizing Shipping Form In WooCommerce Checkout Page
To customize WooCommerce checkout fields, WooCommerce offers several filters and hooks that deal with major groups of fields on the page. Especially, these filters include woocommerce_checkout_fields (checkout fields), woocommerce_billing_fields ( billing fields), and woocommerce_shipping_fields (shipping fields).
Now for this tutorial, we will work with woocommerce_checkout_fields filter. The good news that, we will try to cover both the addition and removal fields.
Remove Fields From The WooCommerce Checkout Page

Just an example, we will try to demonstrate how to remove the First name and the Last name fields. Here is the code:
In the above PHP snippet, you will see the function custom_fields_woocommerce. And in this function takes the argument $fields that take the checkout fields that need to be removed or unset. So, we have unset the first name and the last name.
Here check Please: 
Add Fields To The WooCommerce Checkout Page
Add the following code snippet:
In the above PHP snippet, contains both labels and placeholders for the new fields. Now, there are requirements to set some fields essential. This is taken care of by the required argument that is set to TRUE.
Display Field Value At The WooCommerce Order Page
The following code will display the value of the field on the order page. So, add the following codes:
This code will display the field in the order page Looks like.

In this article, we have discussed, how to add custom fields to the WooCommerce checkout page. At this moment, we are going to customize the WooCommerce default checkout fields and the field modifications.
WooCommerce Default Checkout Field
WooCommerce has provided all the required fields for your website checkout page. such as:
- Billing details
- First name
- Last name
- Company name
- Country
- Address
- Town/City
- District
- Postcode/ZIP
- Phone
- Email address
- Order notes
Customize Checkout Fields Using Code Snippets
Code snippets are adjustable ways for web developers and to customize the WooCommerce checkout page. Here’s a list of principal HTML tags with CSS classes and ID, that very easily you can use to customize the WooCommerce checkout page.
Note: Add the custom CSS in your active theme or you can use a WordPress Custom CSS plugin.
CSS Looks like the following example:
Remove Checkout Field – Default WooCommerce checkout page fields
We are going to remove the default checkout fields using the WooCommerce filter hook woocommerce_checkout_fields. So, do this job very carefully. if possible first, pick up your website full backup. However, add the following code in your active theme fucntions.php file or child theme fucntions.php file.
Make Required Field Not Required
Add the following code in your active theme fucntions.php file or child theme fucntions.php file.
Look $fields[‘billing_phone’][‘required’] = false this code false, So, if you want your fields will be required, then change True.
Change Input Field Labels and Placeholders
Add the following codes in your active theme fucntions.php file or child theme fucntions.php file.
Wrap Up:
Any eCommerce store checkout is a very important page that asks for useful information and then helps the visitor go through the sale.
We hope the above checkout plugins and customize WooCommerce checkout page custom functions help you to optimize your WooCommerce checkout page for more conversions and sales.
Keep in mind, that most of the free plugins come with paid versions that offer you more extra features and if you want to customize WooCommerce checkout page programmatically, you must need enough knowledge of WordPress functions.
However, if you have any questions about customize Woocommerce checkout page? Please comment to us.
Do you want to create a fully functional WooCommerce website? kindly visit the details of our service.
You May Also Like This:
This site uses Akismet to reduce spam. Learn how your comment data is processed.
Ok
Want to customize your WooCommerce checkout page?
ECommerce stores have come a long way. The checkout experience on popular sites is modern and optimized for conversions.
Take a cue from the masters of conversions, Shopify. The Shopify checkout looks incredible, reassures users of their purchases, and drives sales.
The default WoCommerce checkout page, on the other hand, doesn’t cut and looks drab.
And that’s why improving your WooCommerce checkout experience is the key! But without installing many plugins or using complex code snippets.
You wonder if there’s a quick, easy, and out-of-the-box way to do that!
Well, there is!
In this post, you’ll see why the default WooCommerce checkout isn’t optimized for sales.
You’ll also learn how to customize WooCommerce checkout using the no-code and easy way!
Keep reading.
Contents
- 1 What If Your Custom WooCommerce Checkout Looked Modern & Converted 3x More?
- 2 Why You Might Want to Customize the Default WooCommerce Checkout Page?
- 3 Checkout Plugins & Conflicts: Why WooCommerce Checkout Customization Is Hard?
- 4 How to Customize WooCommerce Checkout for Higher Conversions?
- 4.1 Step 1: Add a new funnel and name it
- 4.2 Step 2: Select the funnel template that you like and import it
- 4.3 Step 3: Edit the checkout page template
- 4.4 Step 4: Customize the checkout form fields
- 4.5 Step 5: Enable WooCommerce Checkout optimization tactics
- 5 Add Order Bump & Thank You Page to Complete Your WooCommerce Checkout Flow
- 6 Automate Abandoned Cart Recovery Emails to Get More Sales
- 7 Ready to Customize WooCommerce Checkout Page & Woo Customers?
What If Your Custom WooCommerce Checkout Looked Modern & Converted 3x More?
LittleData did a study of conversion rates on Shopify and WooCommerce checkout pages.
They studied 3000+ Shopify stores and 500+ WooCommerce stores. And found an average Shopify checkout converts at 1.4% while that of WooCommerce at 0.3%!
Shocking, isn’t it?
This means a Shopify checkout converts three times higher than that of WooCommerce.
Here’s the checkout page from the Shopify store, Snow Days:

Here’s what really stands out about this checkout page:
- Trust-winning treatment of the page: The treatment of the checkout page is impeccable. The clickable logo is highlighted well on the left-hand side.
- Express Checkout Options: Apple Pay has 507 million users worldwide and counting. It’s estimated that 12% of the population uses digital wallet apps.
- Multi-step checkout process: The checkout process is a three-step one and looks easier than a single-step checkout. Also, the step change is smooth and AJAX-based.
- Thoughtfully arranged checkout fields: Capturing email before everything else is the key. It means even if the user doesn’t complete checkout, you can reach out via abandoned cart recovery emails.
- Google Address Autocomplete: Address autocomplete is known to increase conversions by 20-30%. It’s all about providing convenience to the users on the checkout page.
- Field Preview on the next step: This feature allows users to preview the fields they filled out on the previous step. The user can hit change if they spot an error and correct it.
- Static Order Summary: The users can view the summary at all times during the checkout process. One can view the items in the cart, the quantity of each, shipping charges, and cart total.
What if your WooCommerce checkout page looked as credible and brilliant as SnowDays’?
Why not!
Why You Might Want to Customize the Default WooCommerce Checkout Page?
Today’s eCommerce customer is discerning, they seek good experiences and want to shop from credible websites. Forbes notes website design, checkout design, payment processing and online support are front and center for today’s customers.
They value consistency in branding, payment convenience, and a smooth shopping experience.
Thanks to top stores like Amazon, Macy’s, and Zappos, you can’t afford to drop the ball at the final step i.e. the checkout page!
You don’t want to disappoint users by leading them to a checkout that doesn’t win confidence.
Here’s the default WooCommerce checkout:

Note the major issues with this checkout page:
- Lacks branding: Branding builds credibility. But the default WooCommerce checkout doesn’t have the logo and tagline of the company. It makes the page look run-of-the-mill.
- Unnecessary fields that are also illogically arranged: Users don’t need those extra fields. Like the one for the street address field, county, company address, and others can be removed. Also note, the email is the very last field in the default checkout.
- No order summary: Notice on the right-hand side, the order summary isn’t clear and the order items aren’t highlighted.
That’s not all!
There are no Express pay options to enable faster checkout. No Google address autocomplete to minimize address-related errors. Also, notice the checkout process is a single-step one, which looks rather overwhelming.
Having said that, WooCommerce is a self-hosted platform and being open source, gives you full control over your website. It’s also a lot cheaper to get started with WooCommerce.
Also, WooCommerce runs on WordPress which powers more than 43% of all websites on the internet.
Thus, it’s important to customize the WooCommerce checkout page and increase conversions.
But here’s the truth: Customising a WooCommerce checkout page to make it convert higher isn’t a walk in the park! Not at all.
Checkout Plugins & Conflicts: Why WooCommerce Checkout Customization Is Hard?
Standing at an average conversion rate of 0.3%, the default WooCommerce checkout page could be turning your best people away.
So make your checkout page look credible and reassure users of their buying decision. This will in turn help you minimize checkout abandonment.
But customizing a WooCommerce checkout page isn’t child’s play. A post by Kinsta notes that your comfort level with coding matters when it comes to customizing the WooCommerce checkout.
It may be hard to achieve the desired output, design-wise if you are an expert at coding.
More specifically, here’s what makes the process hard:
- Use code snippets to rearrange fields:
Using code snippets may be a flexible way for modifying the fields but be careful as it can lead to conflicts with other extensions.
- Download a separate plugin to add a new field type:
To add a checkbox, multi-select or radio button field on the checkout, you need another plugin. You can use WooCommerce Checkout Add-ons or any other extension.
- Get another extension to make your checkout process multi-step:
WooCommerce does not provide out-of-the-box functionality to split the checkout process. If you wish to have a multi-step checkout, there’s another extension for that alone.
- Brush up your coding skills if you want to skip the cart:
To direct users straight to the checkout page and rename the ‘add to cart’ button as ‘buy now’, add code snippets to the functions.php file.
- Want to set up a per-product checkout?
Get yet another plugin! There’s no out-of-the-box way to create a per-product/one-page checkout. You need a plugin that’ll help you achieve that alone.
How to Customize WooCommerce Checkout for Higher Conversions?
In this section, let’s look at how to customize your WooCommerce checkout page. To do that we will be using FunnelKit’s Funnel Builder.
It is a complete solution built to create lead generation and sales funnels using custom templates.
It also allows you to create a dedicated store checkout page in single or multi-step formats. Further, enabling you to activate Google address autocomplete, Express pay options, and more.
So you may use different plugins and play with code snippets or get started with FunnelKit.
It works right out of the box!
So after installing and activating FunnelKit (here’s the guide), follow these steps:
Step 1: Add a new funnel and name it
After activating FunnelKit, add a new funnel and name it. For this post, we will call it the Tripwire Funnel.

Step 2: Select the funnel template that you like and import it
We have a bunch of pre-built checkout templates to choose from. Different templates are built to serve different niches and goals.
So whatever your goal may be, we got a funnel template that’ll help achieve it!

Choose your favorite page builder to customize your checkout, thank you, & one-click upsell pages. At the moment, FunnelKit integrates with Elementor, Divi, Gutenberg, and Oxygen.
We’ll import the Shoppe template here because it’s the one based on Shopify’s checkout page, take a look:

You can view every checkout template in our library in one, two or three-step formats. We’ve chosen the three-step format for our article.
From the top, view the mobile-optimized version of your chosen checkout page template.
Once you click import, you can view the checkout and thank you page templates.

When you’re ready to edit, simply hit the ‘Edit’ button and edit the template you want.
Step 3: Edit the checkout page template
Now that we’ve imported the ‘Shoppe’ template, it’s time to edit the template. It will be your new WooCommerce store checkout page.

The template is fully editable. You can open it up in your chosen page builder and customize the mini cart and checkout form.

Step 4: Customize the checkout form fields
When you’re trying to customize the WooCommerce checkout page, you want to be able to modify the form fields.
Adding, removing, and arranging checkout fields is easy when using FunnelKit. There are sections that contain fields and you can rearrange fields within each section.
The sections too can be re-arranged by using simple drag and drop.

What’s more?
To add a field to your checkout, you don’t need a separate plugin such as the Flexible Checkout Fields plugin.
FunnelKit lets you add a new field type to your checkout page. You can edit a field, remove it or even re-arrange using simple drag & drop.
Adding a new field type is simple, hit the ‘Add new field’ button.
Next, fill out the details about the field type, label, its ID and mark it required or optional. Choose field types from checkbox, radio, HTML, paragraph, and more.
Take a look:
Step 5: Enable WooCommerce Checkout optimization tactics
With FunnelKit, you can activate a bunch of checkout page optimization hacks.
Google address autocomplete completes the address, after a user enters the first few letters.
Hence, minimizing the number of address-related errors committed on the checkout page. And of course, no more expensive wrong shipping!
Another brilliant optimization hack that Shopify deploys is multi-step field review. It lets users view some important fields from the previous step on the current step.
You can choose the fields that you’d like them to preview and edit, in case there has been a typo:

Here’s how the feature looks when activated, on a multi-step checkout page:

That’s not all.
Further, you can enable Express checkout buttons by Apple Pay, Google Pay, Amazon Pay & more.
Minimise checkout page errors through email and phone field validation.
Ease anxiety by auto-applying coupon codes and eliminating the need to look for them!
Add Order Bump & Thank You Page to Complete Your WooCommerce Checkout Flow
Who likes customers completing their purchases without adding anything extra to their cart? We’re sure you don’t.
These missed opportunities can lead to a loss of potential profits. But with order bumps, you can make more dollars per transaction.
FunnelKit offers a complete solution for adding order bumps to the WooCommerce checkout page. You don’t need any extra plugins for this.
Cross-sell products such as extended warranty, faster shipping, extra resources, and more.
It’s effortless to set up! Select the product to cross-sell, enable discount and choose the item quantity.
Once done, customize the bump styling- you have a range of bump skins to choose from!
WooCommerce checkout doesn’t come with an easy way to add an order bump but FunnelKit does!
Here’s how to set it up:

Once you’ve added the order bump component, simply edit it and add a product to cross-sell:

Here’s how your order bump gets displayed on the checkout page:

Finally, do not forget to add a modern thank you page to your store checkout flow.
A good-looking thank you page or an order confirmation page builds a relationship.
After showing a beautiful checkout, never send users to a bland thank-you page!
Take a look at the thank you page built by FunnelKit:

Yes, it’s a breath of fresh air compared to the boxy and old-fashioned WooCommerce thank you page.
Automate Abandoned Cart Recovery Emails to Get More Sales
Why stop at building a conversion-focused checkout when you can also set up abandoned cart follow-ups?
Baymard Institute collated data from 41 different studies and found that the average abandoned cart rate is 69.57%. Mobile users have an even higher abandoned cart rate of 85.65%.
Thus creating an abandoned cart recovery strategy is a very important step!
FunnelKit gives you an end-to-end solution. From building ROI-driven checkout to creating automated cart recovery sequences!
FunnelKit Automations gives you access to a library of pre-built, one-click import workflows.
You’re covered for a wide range of use cases including post-purchase follow-ups and win-back campaigns.
Take a look at the library:

Once you import the abandoned cart recovery workflow, here’s how it would look:
Notice, the entire automation is pre-created including time delays and email messaging:
So all you’d need to do is tweak the messages and the delays as per your requirements and go live!
Ready to Customize WooCommerce Checkout Page & Woo Customers?
There you go! In this post, we looked at the ways to customize WooCommerce checkout page. The best part?
We didn’t use complex code snippets or had to download different plugins!
We did all with pre-built checkout page and thank you page templates.
You saw our library of beautiful and modern checkout pages that we’ve built to woo your customers.
What’s more?
You saw how easy it is to add, remove, edit and re-arrange the checkout fields using drag & drop. Again no need for extra plugins and adding code snippets to your theme files.
Now that you know, how to make your WooCommerce checkout page look and work like that of Shopify’s, why wait?
So go ahead and check out the Funnel Builder by FunnelKit to customize WooCommerce checkout page using the no-code way, today!