Оглавление
- Что такое командная оболочка
- Оболочки Linux
- Как определить текущую командую оболочку
- Способ 1
- Способ 2
- Способ 3
- Как посмотреть список оболочек, доступных в системе
- Как временно переключиться на другую оболочку
- Как изменить оболочку
- Заключение
Что такое командная оболочка
Командная оболочка или командный интерпретатор в Linux — это программа, которая в текстовой среде выступает в качестве интерфейса между пользователем и операционной системой. Она интерпретирует вводимые команды с терминала и вызывает необходимые программы.
Когда вы работаете в терминале, именно командная оболочка обрабатывает вводимые вами команды. Более того, оболочки Linux поддерживают написание программ на языке оболочки.
Оболочки Linux
Одна из самых популярных командных оболочек — это оболочка Bash (Bourne Again Shell). Она используется по умолчанию в большинстве дистрибутивов Linux.
Существуют разные оболочки Linux. Можно отметить:
- bash
- csh
- dash
- fish
- ksh
- pdksh
- rbash
- sh
- tcsh
- zsh
Оболочки могут очень сильно отличаться друг от друга. Они отличаются функциональностью, синтаксисом команд, строкой приветствия, дружелюбностью к пользователю и другими параметрами и возможностями.
Как определить текущую командую оболочку
Есть несколько способов определить оболочку, используемую по умолчанию в вашей системе Linux. Рассмотрим несколько из них, так как в разных системах (и оболочках) какие-то способы могут не сработать.
Также нужно знать, что у разных пользователей системы могут использоваться разные оболочки.
Способ 1
Переменная окружения SHELL хранит путь до исполняемого файла оболочки. Выполним команду:
echo $SHELL
/bin/bash
Из вывода команды, мы видим, что используется оболочка bash.
Способ 2
Также можно воспользоваться командой echo $0. Данная команда выведет на экран имя текущего работающего процесса, внутри которого она выполнена. Так как мы выполняем команду внутри оболочки, то будет выведено имя оболочки.
echo $0
bash
Способ 3
Определим, работающий процесс оболочки командой ps.
ps -p $$
PID TTY TIME CMD
10792 pts/3 00:00:00 bash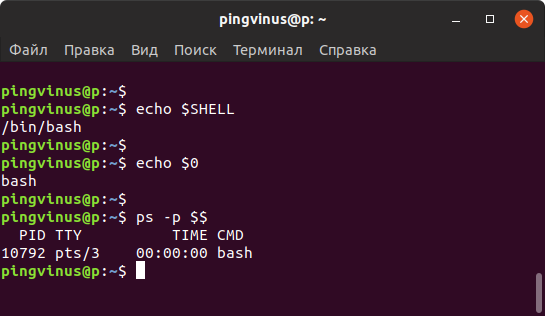
Как посмотреть список оболочек, доступных в системе
Список оболочек, которые в данный момент установлены и доступны в системе Linux, хранится в файле /etc/shells
Выведем содержимое файла /etc/shells, для этого выполняем команду:
cat /etc/shells
# /etc/shells: valid login shells
/bin/sh
/bin/bash
/bin/rbash
/bin/dash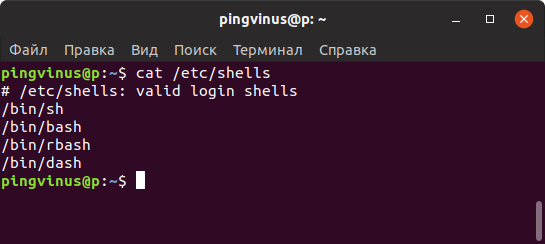
Как временно переключиться на другую оболочку
Чтобы временно переключиться на другую оболочку, достаточно выполнить в терминале команду, соответствующую ее имени. После этого вы переключитесь на новую оболочку.
Например, переключимся на оболочку sh. Выполняем команду:
sh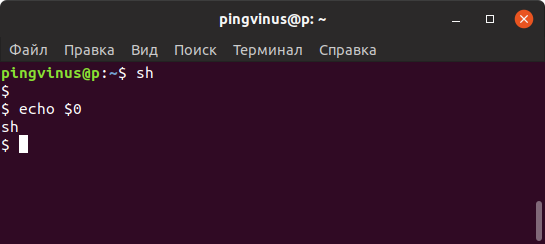
Как изменить оболочку
Для изменения командной оболочки на постоянной основе служит команда chsh (от слов change shell).
Чтобы изменить оболочку текущего пользователя нужно выполнить команду:
chsh -s путь_новой_оболочки
В качестве параметра путь_новой_оболочки необходимо указать путь до исполняемого файла оболочки, который вы можете найти в файле /etc/shells (см. выше).
Например, изменим оболочку на sh. Для этого выполняем команду (при выполнении команды нужно будет ввести пароль):
chsh -s /bin/shПосле этого нужно выйти и снова войти в систему.
Чтобы изменить оболочку, используемую по умолчанию, для другого пользователя, то команде chsh необходимо указать имя этого пользователя:
chsh -s /bin/sh yuriyЗаключение
Мы рассмотрели, как определить текущую оболочку Linux, как просмотреть список доступных оболочек, а также как изменить оболочку, используемую по умолчанию.
Чтобы получить информацию о какой-либо оболочке (доступной в системе) можно воспользоваться Man-страницами. Например:
man rbashДополнительные оболочки можно устанавливать средствами системы (из репозиториев). Например, для установки оболочки fish в Ubuntu Linux, выполните команду
sudo apt install fishIn most Linux systems, the default shell is bash but we can change that to any other shell-like zsh, fish, sh, and any other. In this article, we are going to show how to change that default shell to any other shell in Linux systems. To change the user’s shell, first, let’s find the current shell. There are many ways by which we can change the shell of any user on a Linux system. We are going to see three methods of changing the user’s shell.
Find your current shell name
In Linux systems, there is one file which is /etc/passwd. The /etc/passwd file stores essential information of user accounts, which is required during login. By using this file we can identify the current user login shell.
We are going to see the current user information in the /etc/file using the following command:
grep `whoami` /etc/passwd

In the above image we can see that the user nishant (current user) has home directory /home/nishant and the shell is /bin/sh
List your shells in Linux
Now to change the shell, first, we need to see which shells are installed on the system. We can check installed shells using the following command :
cat /etc/shells
This will show all shells as follows:

Before moving further, first understand who can change the user shell
- Users can change shell to any other shell listed in /etc/shells/.
- The root account can be used to change any other user login shell.
- If an account has a restricted login shell, then only the root can change that user’s shell.
Changing default sh shell to bash
Using usermod command
usermod is a command that modifies the system account files. usemod can change the shell of Users by modifying file /etc/passwd. usermod command provides the -s or –shell option to change the user’s login shell.
In this example, we are going to change the shell of a user named nishant. We are going to change the shell from /bin/sh to /bin/bash of user nishant using usermod command.
sudo usermod --shell /bin/bash nishant
With usermod command mention shell and username after –shell option.
Now you can see the shell use changed. In the above commands, replace nishant with the user name whose shell has to change.

Using chsh Utility
chsh is the utility to change a user’s login shell. chsh provides the -s option to change the user’s shell. This method also modifies the file /etc/passwd. Use the following command to change shells using chsh:
chsh -s /bin/bash nishant

Change User Shell to /etc/passwd File
As we see in the above two methods, the usermod command and chsh utility modify the /etc/passwd file and change the user shell. We can do that manually also by editing the /etc/passwd file. Just change the shell after the username and home directory in the /etc/passwd file and save the file.
nano /etc/passwd

In most Linux systems, the default shell is bash but we can change that to any other shell-like zsh, fish, sh, and any other. In this article, we are going to show how to change that default shell to any other shell in Linux systems. To change the user’s shell, first, let’s find the current shell. There are many ways by which we can change the shell of any user on a Linux system. We are going to see three methods of changing the user’s shell.
Find your current shell name
In Linux systems, there is one file which is /etc/passwd. The /etc/passwd file stores essential information of user accounts, which is required during login. By using this file we can identify the current user login shell.
We are going to see the current user information in the /etc/file using the following command:
grep `whoami` /etc/passwd
In the above image we can see that the user nishant (current user) has home directory /home/nishant and the shell is /bin/sh
List your shells in Linux
Now to change the shell, first, we need to see which shells are installed on the system. We can check installed shells using the following command :
cat /etc/shells
This will show all shells as follows:
Before moving further, first understand who can change the user shell
- Users can change shell to any other shell listed in /etc/shells/.
- The root account can be used to change any other user login shell.
- If an account has a restricted login shell, then only the root can change that user’s shell.
Changing default sh shell to bash
Using usermod command
usermod is a command that modifies the system account files. usemod can change the shell of Users by modifying file /etc/passwd. usermod command provides the -s or –shell option to change the user’s login shell.
In this example, we are going to change the shell of a user named nishant. We are going to change the shell from /bin/sh to /bin/bash of user nishant using usermod command.
sudo usermod --shell /bin/bash nishant
With usermod command mention shell and username after –shell option.
Now you can see the shell use changed. In the above commands, replace nishant with the user name whose shell has to change.
Using chsh Utility
chsh is the utility to change a user’s login shell. chsh provides the -s option to change the user’s shell. This method also modifies the file /etc/passwd. Use the following command to change shells using chsh:
chsh -s /bin/bash nishant
Change User Shell to /etc/passwd File
As we see in the above two methods, the usermod command and chsh utility modify the /etc/passwd file and change the user shell. We can do that manually also by editing the /etc/passwd file. Just change the shell after the username and home directory in the /etc/passwd file and save the file.
nano /etc/passwd
Contents
-
Introduction
- What is a shell?
- Short Description of the main shells
- Why change your shell
- Deciding on a shell
-
How to Change Shells
- Temporarily changing your shell for the session you are in
-
Changing your login shell which is permanent
- interactive method
- non-interactive method
- More information
Introduction
What is a shell?
A shell is a program that provides the traditional, text-only user interface for Unix-like operating systems. Its primary function is to read commands that are typed into a console (i.e., an all-text display mode) or terminal window (an all-text window) in a GUI (graphical user interface) and then execute (i.e., run) them.
Although bash, the default shell on many Debian based Linux distros like Ubuntu and Linux Mint, is highly versatile and can be used for almost anything, each shell has its own characteristics and there might be situations in which it is preferable to use some other shell, such as ash, csh, ksh, sh or zsh. For example, the csh shell has a syntax that resembles that of the highly popular C programming language, and thus it is sometimes preferred by programmers.
Short Description of the main shells
Bourne: the standard default shell for non root users in FreeBSD. You can read about the shell by looking at the «man sh» pages. Uses abbreviation sh.
Korn: a shell developed by AT &T. You can read more about it by looking at the «man ksh93» pages. Uses abbreviation ksh or ksh93.
Bash: The Bourne Again SHell. You can read about it in the «man bash» pages. Uses abbreviation bash.
Z-Shell: The Z shell. You can read about it by looking at the «man zsh» pages. Uses the abbreviation zsh.
C-Shell: The C shell. You can read about it by looking at the «man csh» pages. Uses the abbreviation csh.
TC-Shell: Basically the same thing as above. They are a little bit different, but not very much so they now fall into the same category. You can read about it by looking at the «man tcsh» pages. Uses the abbreviation tcsh.
How to find out what shell you are running:
type at prompt:
$ echo $SHELL
Here is what you may see:
/bin/sh : This is the Bourne shell.
/bin/ksh93 : This is the Korn shell.
/bin/bash : This is the Bash shell.
/bin/zsh : This is the Z shell.
/bin/csh : This is the C Shell.
/bin/tcsh : This is the TC Shell.
Next Check on your Valid login Shells
$ vi /etc/shells
Important Note: You May not have all of these installed on your system right now. The way I checked If a shell was installed my system was by looking to see if I had man pages for a particular shell. I will use csh as an example. Type this into your terminal.
$ man csh
If you don’t have any man pages then there is a high probability you don’t have this shell on your system. There is one other way to test this. Type this into your terminal.
$ csh
$ ps
If you have csh installed on your system you will see something similar to this.
PID TTY          TIME CMD
13964 pts/0    00:00:00 bash
22450 pts/0    00:00:00 csh
22451 pts/0    00:00:00 ps
If you don’t have csh installed on your system then install it will this command.
$ sudo apt-get install csh
Why change your shell
The UNIX shell is most people’s main access to the UNIX operating system and as such any improvement to it can result in considerably more effective use of the system, and may even allow you to do things you couldn’t do before. The primary improvement most of the new generation shells give you is increased speed. They require fewer key strokes to get the same results due to their completion features, they give you more information (e.g. showing your directory in your prompt, showing which files it would complete) and they cover some of the more annoying features of UNIX, such as not going back up symbolic links to directories.
Deciding on a shell
Which of the many shells you choose depends on many different things, here is what I consider to be the most important, you may think differently.
How much time do I have to learn a new shell?
- There is no point in using a shell with a different syntax, or a completly different alias system if you havn’t the time to learn it. If you have the time and are presently using csh or tcsh it is worth considering a switch to a Bourne shell variant.
What do I wish to be able to do with my new shell?
- The main reason for switching shells is to gain extra functionality; its vital you know what you are gaining from the switch.
Do I have to be able to switch back to a different shell?
- If you may have to switch back to a standard shell, it is fairly important you don’t become too dependent on extra features and so can’t use an older shell.
How much extra load can the system cope with?
- The more advanced shells tend to take up extra CPU, since they work in cbreak mode; if you are on an overloaded machine they should probably be avoided; this can also cause problems with an overloaded network. This only really applies to very old systems nowadays.
What support is given for my new shell?
- If your new shell is not supported make sure you have someone you can ask if you encounter problems or that you have the time to sort them out yourself.
What shell am I using already?
- Switching between certain shells of the same syntax is alot easier than switching between shells of a different syntax. So if you havn’t much time a simple upgrade (eg csh to tcsh) may be a good idea.
Can I afford any minor bugs?
- Like most software all shells have some bugs in them (especially csh), can you afford the problems that may occur because of them.
How to Change Shells
There are two different methods of changing shells.
- Temporarily changing your shell for the session you are in.
- Changing your login shell which is permanent.
Temporarily changing your shell for the session you are in
I will use csh as again an example. I will assume you already have csh installed on your system. All you need to do is type the command below into your terminal.
$ csh
There are a few ways to verify this. This first comes from above.
$ ps
If you have csh installed on your system you will see something similar to this.
PID TTY          TIME CMD
13964 pts/0    00:00:00 bash
22450 pts/0    00:00:00 csh
22451 pts/0    00:00:00 ps
The second: Upon changing shells, a different command prompt (i.e., the short text message at the left of each command line) may be shown, depending on the previous and new shells. For example, if the original shell were bash and the new shell is sh, the command prompt would change for a user george from something like [george@localhost george]$ to something like sh-2.05b$.
To return to the original shell, or any other one for that matter, all that is necessary is to just type its name and then press the ENTER key. Thus, for example, to return to the bash shell from the sh shell (or from any other shell), all that is required is to type the word bash or exit.
Changing your login shell which is permanent
You will use a program called chsh. There is a interactive method and non-interactive method. Type this into your terminal.
interactive method
$ chsh
This results in a brief dialog in which the user is prompted first for its password and then for the full path of the desired new shell.
Caution should be exercised when changing one’s default shell because it is possible to make an error that only the root user (i.e., system administrator) can repair (although it should be easy for a skilled user to repair it on a home system). In particular, it is important to first test the shell temporarily in the current session and then to make certain that a valid shell name is being entered when making the permanent change.
non-interactive method
I will use csh as again an example.
$ chsh -s /bin/csh
The -s sets it for you without having to go into the editor to do it.
Okay you did the command and it went ok.but the echo says it is the same. Log out and back it for the change to take effect.Then do echo $SHELL. You should see it show the new shell.
More information
If you would like more information I recommend reading these websites.
http://www.linfo.org/change_shell.html http://www.softlab.ntua.gr/facilities/documentation/unix/shelldiff.html http://www.faqs.org/faqs/unix-faq/shell/shell-differences/ http://physics.nyu.edu/resources/login_shell.html http://www.geekvenue.net/chucktips/jason/chuck/1035144363/index_html
Возможно, вы уже знаете, что в Linux и других Unix-подобных системах доступно несколько оболочек. Bash является оболочкой по умолчанию почти во всех дистрибутивах Linux, но есть и другие популярные оболочки, такие как:
Некоторые из оболочек предоставляют дополнительные функции для удобства пользователе. Возьмем, к примеру, оболочку Fish. Онf частично начинает показывать вам подсказки команд, основанные на вашей предыдущей набранной команде. Это очень удобно, если вы не хотите постоянно помнить ярлыки на терминале Linux.
Давайте посмотрим некоторые моменты оболочки системы Linux.
Чтобы узнать, какая оболочка по умолчанию установлена в конкретной системе, проверим переменную среды SHELL. Обычно оболочкой по умолчанию является bash, и она отображается так:
$ echo $SHELL
/bin/bash
Не существует единого метода, который бы сообщал вам, какая оболочка используется в данный момент со 100%-ой точностью.
Но можно попробовать либо echo $0, который показывает вывод, подобный этому:
$ echo $0
zsh
либо проверить процесс, используя ps -p $$ следующим образом:
$ ps -p $$

  PID TTY          TIME CMD

 9625 pts/0    00:00:00 zsh
Все оболочки, доступные в конкретной системе, перечислены в файле /etc/shells. Можно использовать команды cat или less для просмотра содержимого файла.
$ less /etc/shells
# /etc/shells: valid login shells
/bin/sh
/bin/bash
/bin/rbash
/bin/dash
/usr/bin/tmux
/usr/bin/fish
/bin/zsh
/usr/bin/zsh
Если вы хотите использовать другую оболочку, вы можете просто ввести ее имя и войти в новую оболочку. Например, если вы хотите использовать Z Shell (zsh), вы можете использовать:
$ zsh
Чтобы выйти из новой оболочки и вернуться к предыдущей достаточно выполнить команду exit.
Предположим, нам очень понравилась оболочка Fish, и мы хотим использовать ее в качестве оболочки по умолчанию, вместо оболочки bash которая поставляется по умолчанию.
Linux позволяет изменить оболочку по умолчанию с помощью команды chsh. Лучший способ изменить оболочку по умолчанию для вошедшего в систему пользователя — сменить имя оболочки, указанное в файле /etc/shells, с помощью опции -s.
# chsh -s /usr/bin/fish
Для того, чтобы изменения вступили в силу необходимо выйти из системы, иначе создастся ощущение, что запуск chsh не изменил оболочку.
Необходимо указывать полный путь к файлу /etc/shells? Если использовать chsh -s fish, то получим ошибку типа chsh: fish не является допустимой оболочкой.
Источник
Управление пользователями системы и их основными и дополнительными группами – одна из важных задач при администрировании Linux. С ней отлично справляется встроенная команда usermod.
В этой статье будет рассмотрена команда usermod Linux. Сначала мы разберем её синтаксис и опции, а затем перейдем к конкретным примерам её использования, которые могут оказаться для вас полезными.
Утилита usermod нужна для управления пользователями Linux, их основными и дополнительными группами. При ее выполнении в терминале нужно указать опции и конкретного пользователя, к которому применяются изменения. Синтаксис здесь следующий:
$ usermod опции имя_пользователя
Рассмотрим опции, которые будут использоваться в этой статье:
- —a, —append – добавить пользователя в одну или несколько дополнительных групп. Опция будет работать только вместе с опцией -G.
- —b, —badnames – разрешить использование имен, которые не соответствуют стандартам.
- —d, —home – указать новое местоположение домашнего каталога пользователя. При использовании опции -m содержимое текущего домашнего каталога будет перемещено на новое место.
- —e, —expiredate – указать дату, при наступлении которой учетная запись будет отключена. Дата вводится в формате ГГГГ-ММ-ДД. Если использовать эту опцию без указания даты, то отключение пользователя будет отменено.
- —f, —inactive – установить количество дней для блокировки пользователя, которое должно пройти после устаревания пароля. При значении -1 опция блокировки отключается, а при значении 0 блокировка случится сразу же после устаревания.
- —g, —gid – выбрать новую основную группу для пользователя и для файлов в его домашнем каталоге. Нужно задать имя или номер новой группы.
- —G, —groups – указать список дополнительных групп, в которые должен входить пользователь. Между собой группы разделяются запятой. Если пользователь входит в дополнительную группу, которая не была указана в списке, то он будет из нее удалён. Но при использовании опции -a можно добавлять новые дополнительные группы, не удаляя старые.
- —l, —login – изменить имя пользователя на новое. Данная опция не затрагивает никакие другие данные. А значит, название домашнего каталога и почты придется изменять вручную, чтобы они совпадали с новым именем пользователя.
- —L, —lock – заблокировать пароль пользователя. Эта опция помещает символ ! (восклицательный знак) перед паролем в зашифрованном виде, отключая его. Данную опцию нельзя использовать с -p и -U.
- —m, —move-home – изменить местоположение домашнего каталога пользователя. Опция будет работать только вместе с -d. Утилита попытается обновить права собственности на файлы и скопировать режимы, ACL и расширенные атрибуты.
- —o, —non-unique – разрешить заменить идентификационный номер пользователя на не уникальное значение. Работает в паре с опцией -u.
- —p, —password – изменить пароль в зашифрованном виде.
- —R, —root – выполнить chroot в указанный каталог и использовать его вместо корневого каталога / с хранящимися в нем конфигурационными файлами.
- —s, —shell – указать новую командную оболочку shell для пользователя. При использовании опции -s с пустым значением будет выбрана оболочка по умолчанию.
- —u, —uid – изменить параметр UID (числовой идентификатор пользователя). Данные изменения автоматически применятся к почтовому ящику и содержимому домашнего каталога. Для остальных файлов UID придется изменять вручную.
- —U, —unlock – разблокировать пароль пользователя. Данная опция убирает символ ! (восклицательный знак) перед паролем в зашифрованном виде, разрешая использовать его для входа. Не сработает с -p и -L.
Все доступные опции с исходным описанием для данной утилиты вы можете просмотреть в терминале, выполнив следующую команду:
man usermod
На этом вводная часть статьи завершена. Теперь самое время рассмотреть конкретные примеры использования данной утилиты для администрирования группами в Linux.
Примеры использования usermod
Разберем типовые задачи, которые могут пригодиться вам для управления учетными записями на компьютере или ноутбуке.
1. Изменить основную группу
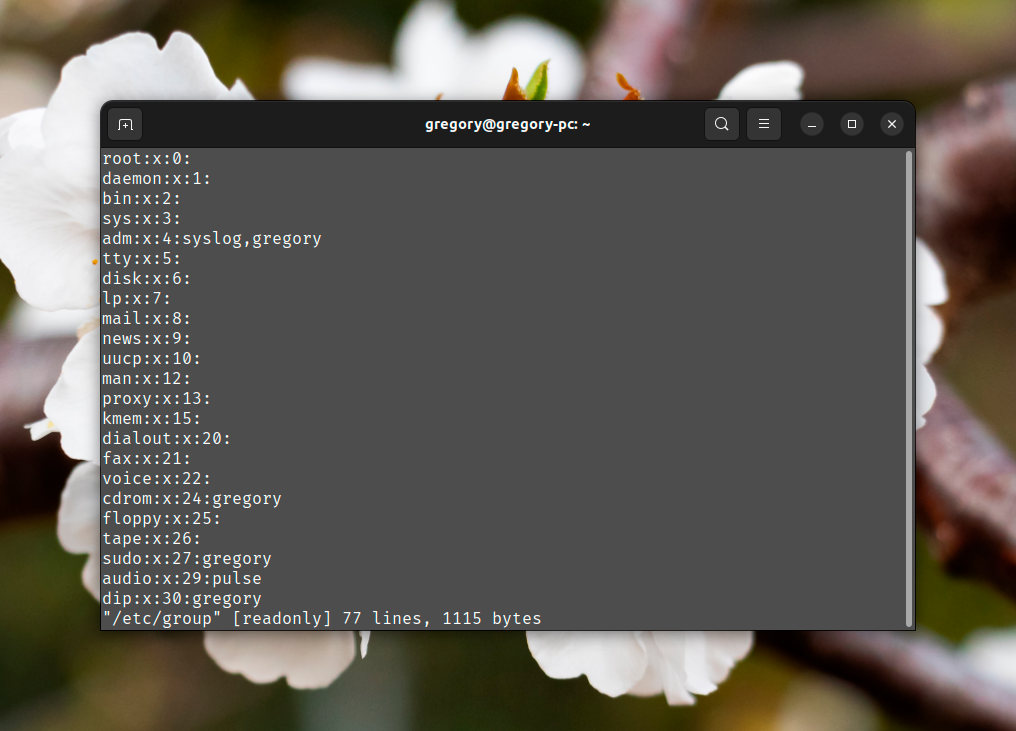
Посмотреть список всех групп, доступных в системе, можно в файле /etc/group, например, с помощью редактора vi в терминале:
vi /etc/group
Для смены основной группы нужна опция -g. Синтаксис здесь следующий:
$ usermod -g имя_основной_группы имя_пользователя
Задача – изменить основную группу для пользователя test_user на test_group (GID – 1001). Так будет выглядеть команда в нашем случае:
sudo usermod -g test_group test_user
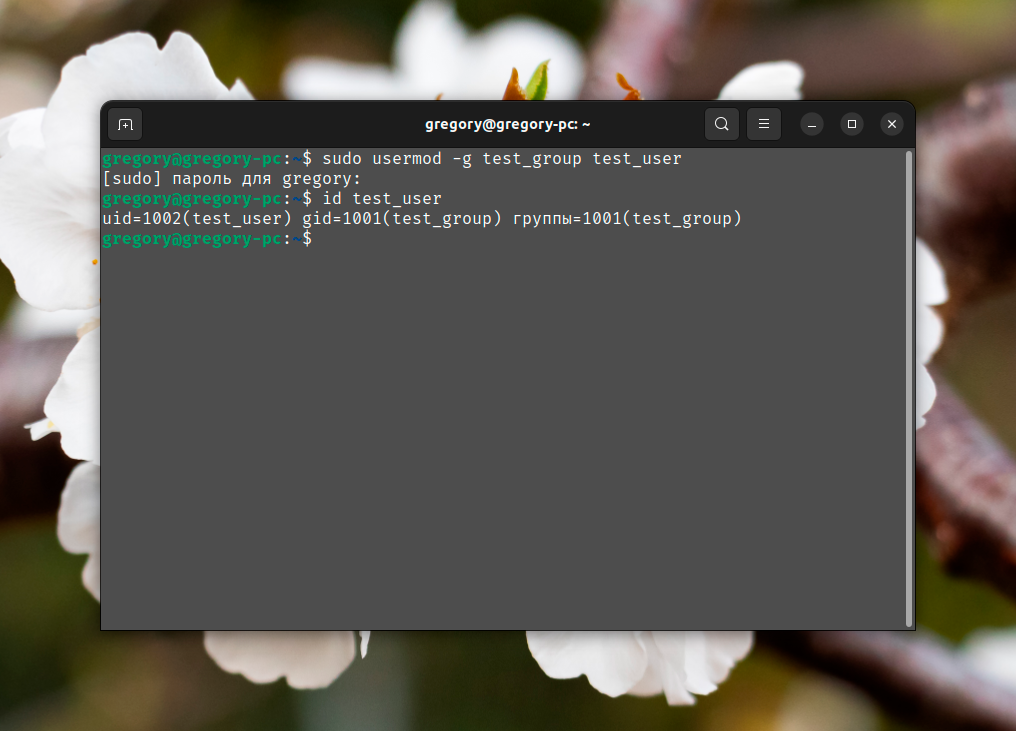
Затем можно проверить что изменения применились с помощью команды id. В результатах вывода команды id нам интересен пункт GID. А еще вместо названия группы можно использовать ее идентификатор GID (1001 в нашем случае):
sudo usermod -g 1001 test_user
2. Добавить в группу
Допустим пользователь gregory2 обладает ограниченными правами, ведь используется в редких случаях для удаленного управления системой. Его нужно включить в группу plugdev, чтобы иметь полный доступ ко внешним устройствам, например, подключенным по USB жестким дискам. Сначала проверим его текущие группы командой:
groups gregory2

С этой задачей поможет параметр —G. Но его обязательно нужно использовать вместе с -a, чтобы добавить новую группу, не удаляя старые:
sudo usermod -a -G plugdev gregory2

Более подробная инструкция по добавлению пользователя в группу с помощью команды usermod описана в отдельной статье. Теперь вы знаете как добавить пользователя в группу usermod.
3. Удалить из группы
Дальше давайте рассмотрим как удалить пользователя из группы usermod. Эта утилита не слишком хорошо справляется с удалением пользователя из групп, ведь нужной опции в ней просто нет. Но с помощью -G можно указать, в каких дополнительных группах пользователь останется, чтобы удалить все остальные.
В качестве примера возьмем уже упомянутую учетную запись gregory2. Задача – оставить ее только в группе disk, убрав cdrom и plugdev. В таком случае нужно для usermod задать опцию -G и ту группу, которая останется:
sudo usermod -G disk gregory2

А если вы хотите удалить все дополнительные группы для конкретного пользователя, передайте опции -G пустое значение:
sudo usermod -G "" gregory2

В подробностях удаление пользователя из группы мы рассказывали в отдельной статье. Помимо утилиты usermod, в ней разобрана работа с gpasswd и deluser.
4. Изменить домашнюю папку
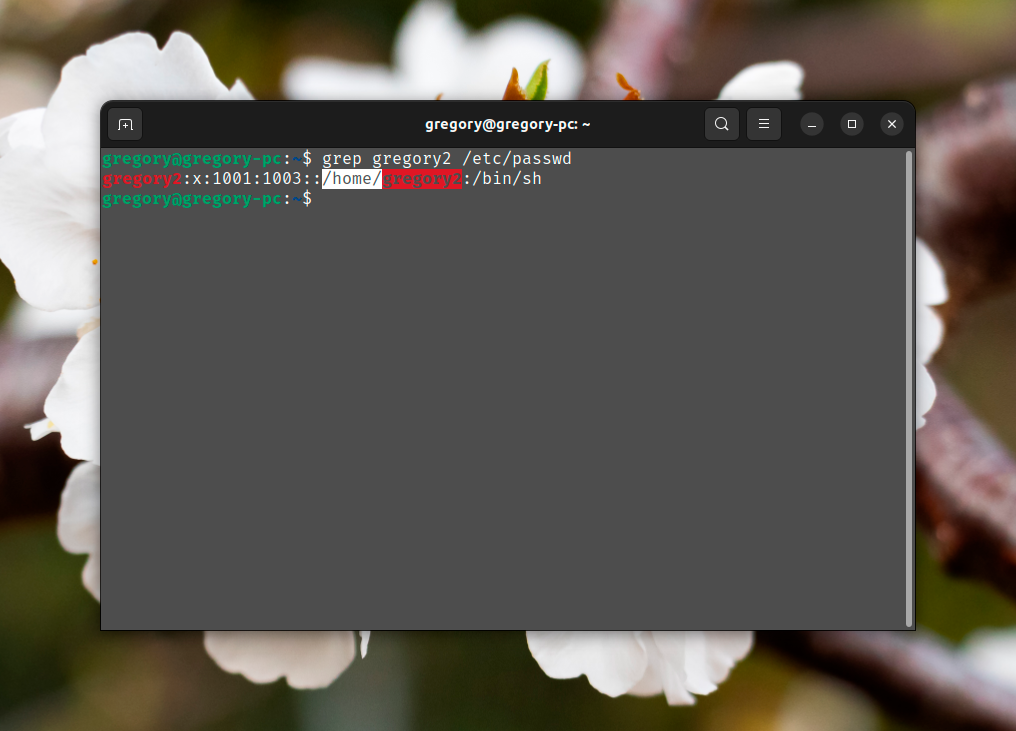
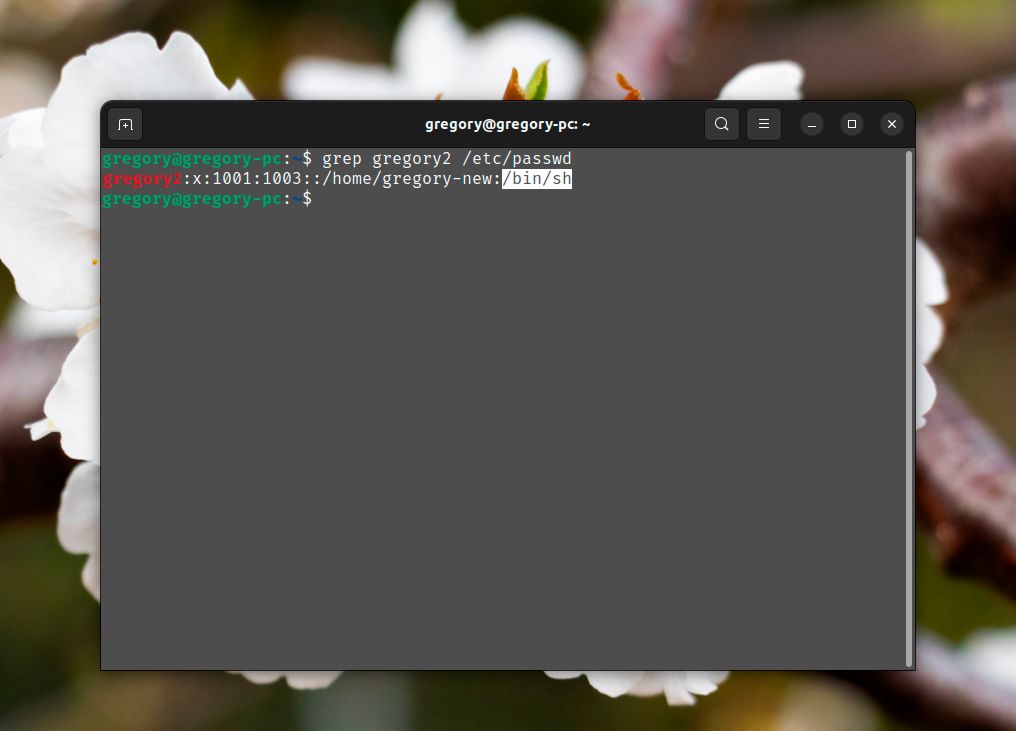
Чтобы увидеть текущий адрес домашней папки конкретно пользователя, посмотрите содержимое файла /etc/passwd, например, с помощью утилиты grep:
grep gregory2 /etc/passwd
Конкретный каталог выводится с первым символом / (косая черта).
Здесь стоит отдельно рассмотреть два сценария: выбор другого местоположения для домашнего каталога и перемещение текущего домашнего каталога со всем его содержимым на новое место.
Если вы хотите просто изменить домашнюю папку, то воспользуйтесь опцией -d, указав новый адрес. Утилита автоматически создаст папку, если ее нет. В качестве примера возьмем путь /home/new-dir:
sudo usermod -d /home/new-dir gregory2

Проверим изменения с помощью уже упомянутой утилиты grep:
grep gregory2 /etc/passwd

А если вы хотите переместить домашнюю папку, сохранив все содержимое, то дополните опцию -d опцией -m, опять же, указав новый путь. В качестве примера возьмем путь /home/gregory-new:
sudo usermod -m -d /home/gregory-new gregory2

Проверить местоположение новой папки можно с помощью grep, а убедиться в копировании содержимого – через файловый менеджер Linux.
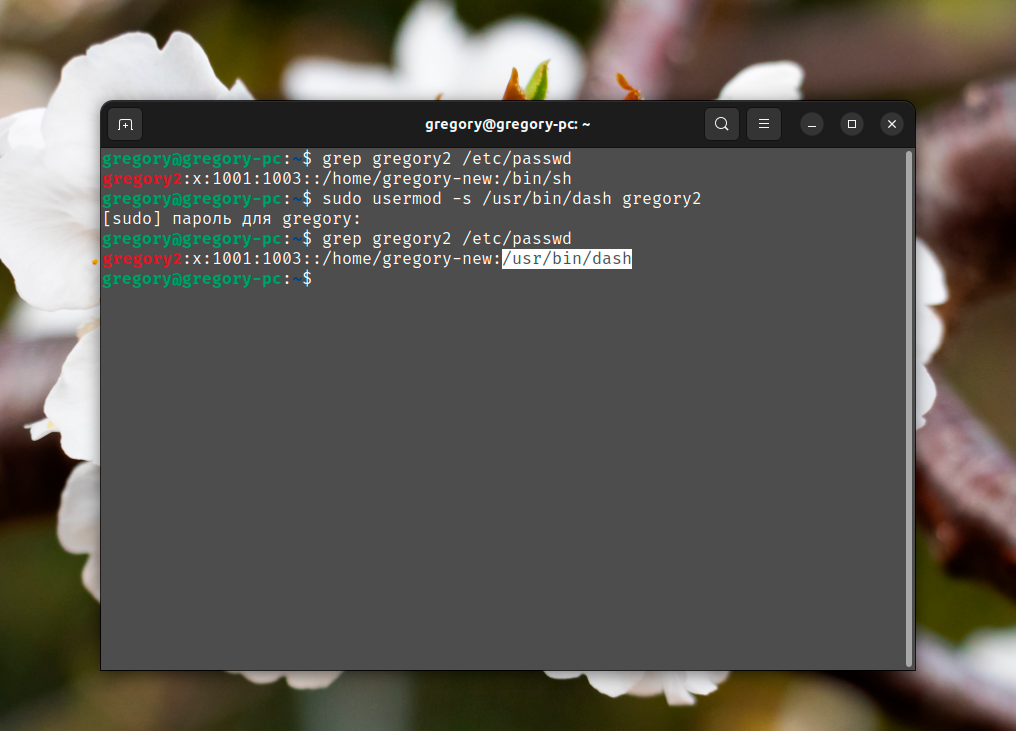
5. Изменить оболочку
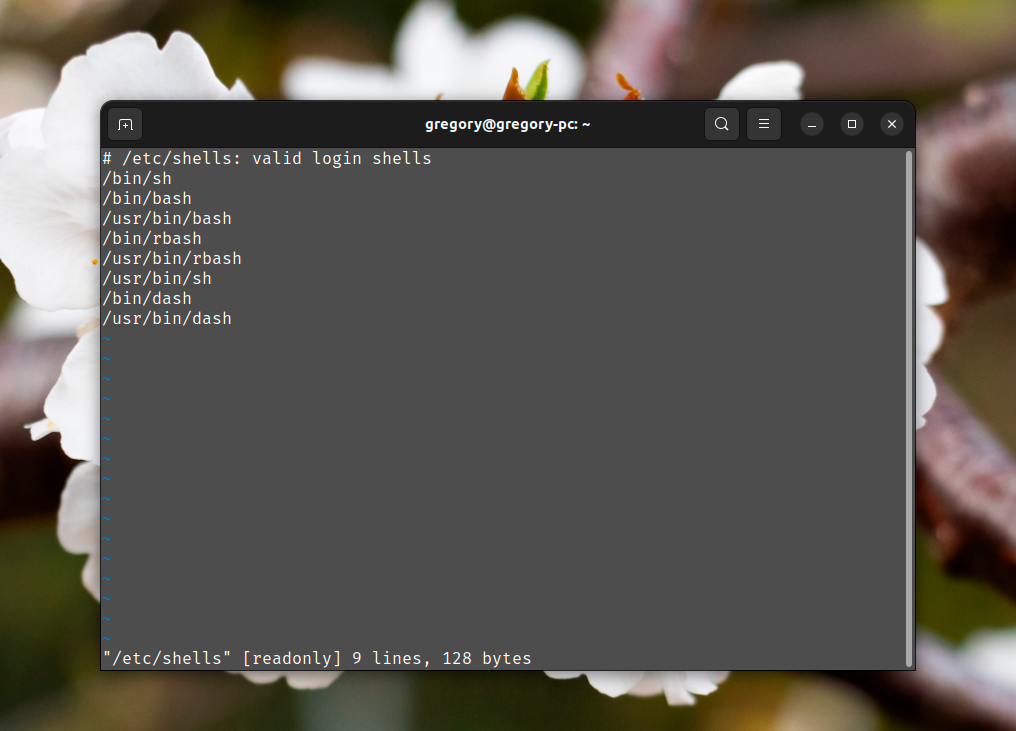
Просмотреть весь список доступных в системе оболочек получится в файле /etc/shells. Откройте его в редакторе vi:
vi /etc/shells
Просмотреть оболочку конкретного пользователя можно в уже упомянутом файле /etc/passwd:
grep gregory2 /etc/passwd
Нужная информация идет после домашнего каталога.
Для того чтобы поменять оболочку shell используйте опцию -s. В качестве примера возьмем оболочку /usr/bin/dash:
sudo usermod -s /usr/bin/dash gregory2
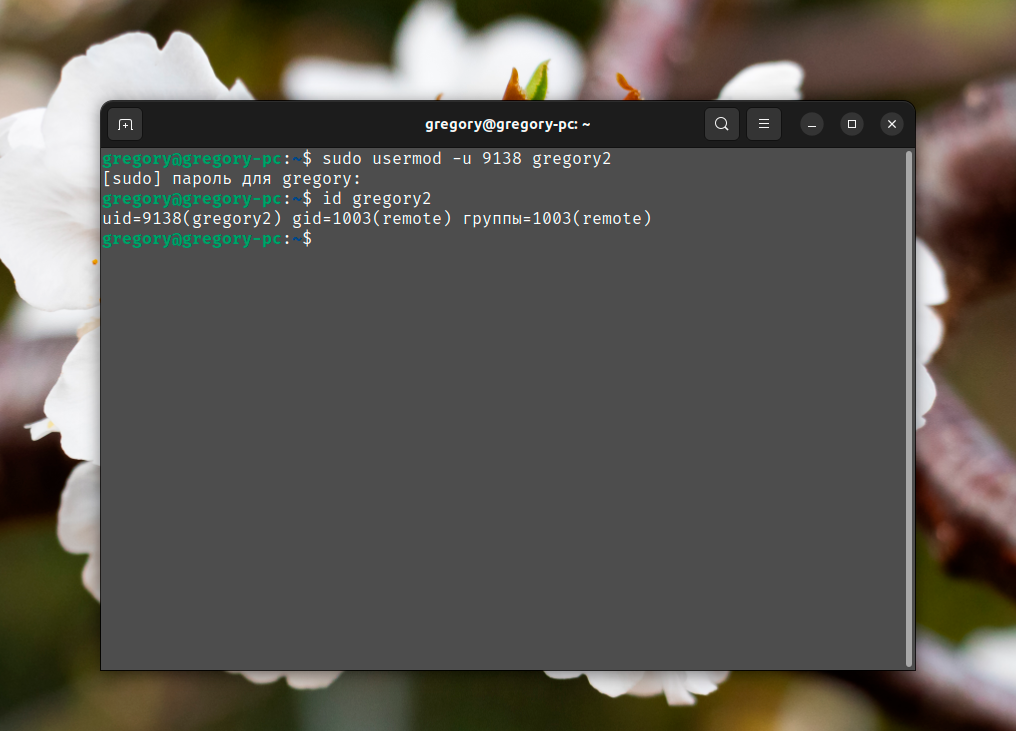
6. Изменить UID
UID – числовой идентификатор пользователя. Для его просмотра воспользуйтесь утилитой id:
id gregory2

Для изменения этого значения нужна опция -u. При этом новый номер должен быть неотрицательным (число 0 допустимо) и уникальным. В качестве примера возьмем 9138:
sudo usermod -u 9138 gregory2
Вы можете задать неуникальный номер UID, добавив к исходной команде опцию —o. В качестве примера возьмем идентификатор 0, который по умолчанию закреплен за группой root:
sudo usermod -o -u 0 gregory2
Не забывайте, что данные изменения автоматически применяются только к домашнему каталогу с его содержимым и к почтовому ящику.
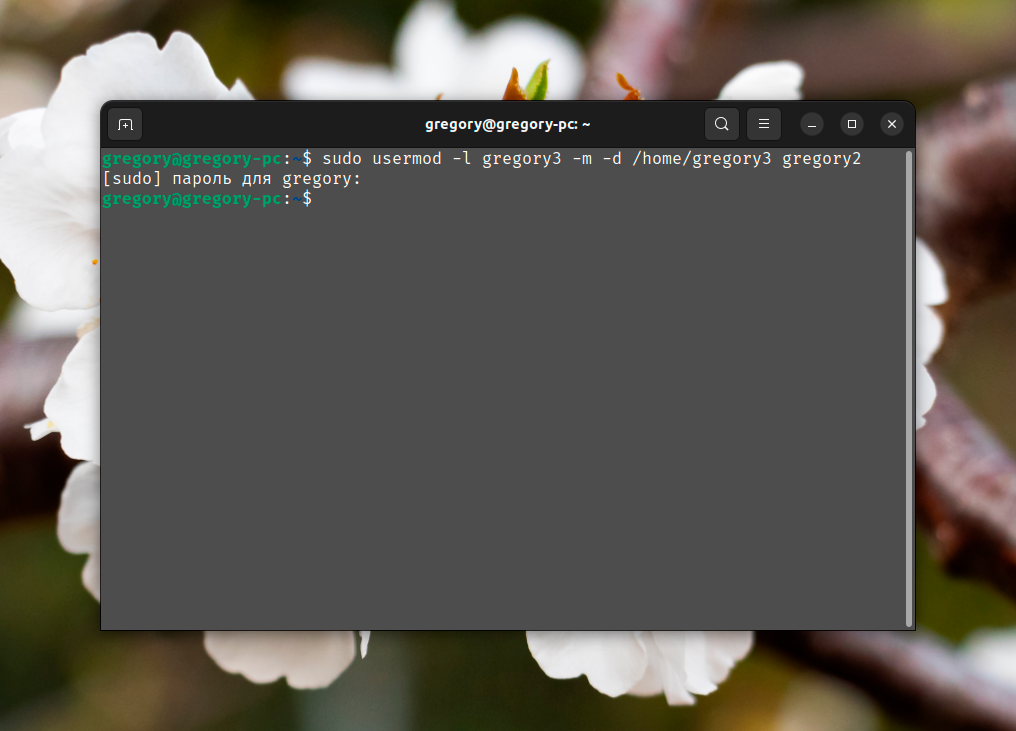
7. Изменить логин
Для изменения логина (имени) пользователя предназначена опция -l. Но при этом она не затрагивает название домашнего каталога. Если вас это устраивает, то можете воспользоваться ей. Синтаксис:
$ sudo usermod -l новое_имя старое_имя
Вот как это выглядит с пользователем gregory2, который нужно переименовать в gregory3:
sudo usermod -l gregory3 gregory2

Ну а еще вы можете использовать эту команду вместе с перенесением домашней папки, например, в /home/gregory3:
sudo usermod -l gregory3 -m -d /home/gregory3 gregory2
8. Изменить пароль
Опция —password предназначена для изменения пароля в зашифрованном виде. А значит, так просто ей воспользоваться не получится. Необходимо добавить к ней команду openssl passwd для шифрования пароля. Для того чтобы изменить пароль на xz3 выполните:
sudo usermod --password $(openssl passwd -6 'xz3') gregory

В результате пароль изменится сразу же после ее выполнения.
9. Заблокировать пользователя
Для блокировки пользователя пригодится опция -L, которая блокирует вход по паролю:
sudo usermod -L gregory2
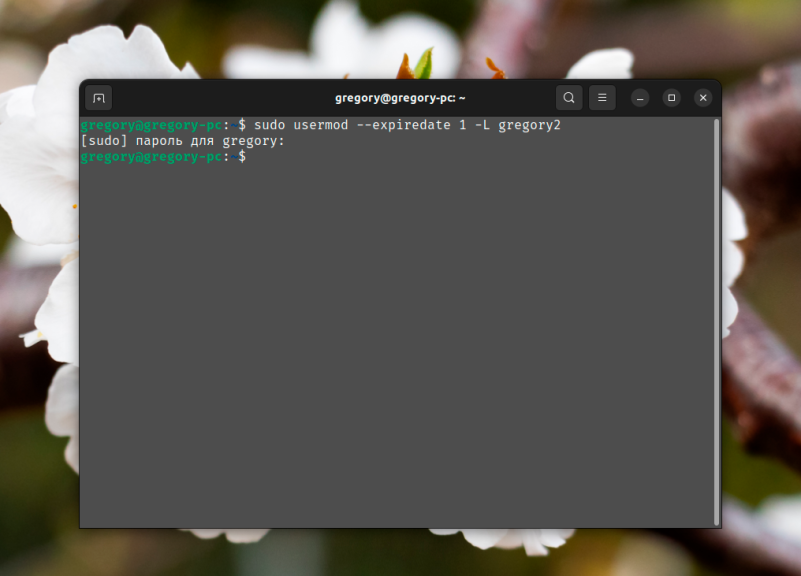
При использовании этой опции перед паролем пользователя в файле /etc/shadow добавляется восклицательный знак и пользователь не сможет больше войти в систему по паролю. Однако, другие способы входа ещё доступны. Для полной блокировки учетной записи к команде нужно добавить опцию —expiredate со значением 1:
sudo usermod --expiredate 1 -L gregory2
Для отмены блокировки в таком случае сработает команда с опциями -U и -e с пустым значением:
sudo usermod --expiredate "" -U gregory2
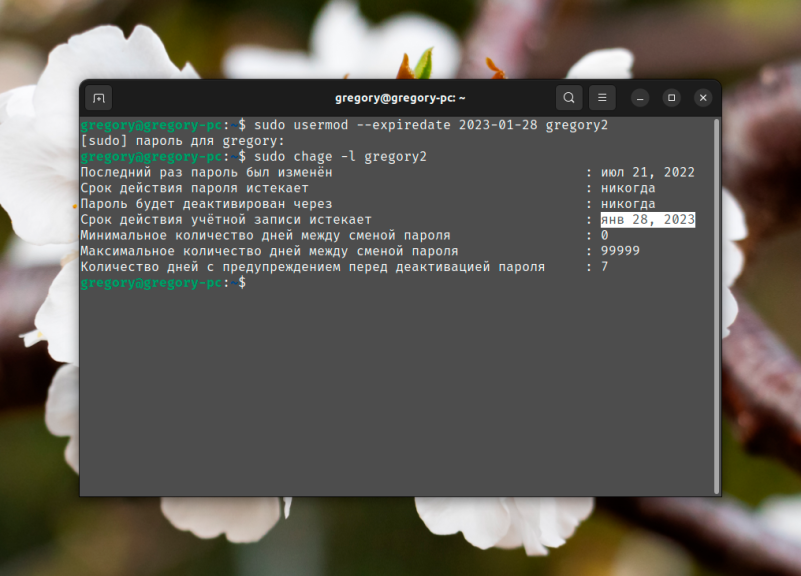
А еще с помощью —expiredate можно указать точную дату для блокировки в формате ГГГГ-ММ-ДД. Вот как будет выглядеть команда для 28 января 2023 года:
sudo usermod --expiredate 2023-01-28 gregory2
Посмотреть срок действия учетной записи получится через утилиту chage с опцией -l:
sudo chage -l gregory2
Выводы
Команда usermod linux позволяет достаточно удобно управлять группами пользователей, а также менять информацию о нём. Ну а если вы хотите более подробно разобраться с самими группами и их устройством в различных дистрибутивах Linux, ознакомьтесь с этим материалом. В нем детально рассмотрена эта тема, место хранения файла с группами и другая полезная информация.

Статья распространяется под лицензией Creative Commons ShareAlike 4.0 при копировании материала ссылка на источник обязательна .
In this article, we will describe how to change a user’s shell in Linux. The shell is a program that accepts and interprets commands; there are several shells such as bash, sh, ksh, zsh, fish and many other lesser known shells available on Linux.
Bash (/bin/bash) is a popular shell on most if not all Linux systems, and it’s normally the default shell for user accounts.
Read Also: 5 Most Frequently Used Open Source Shells for Linux
There are several reasons for changing a user’s shell in Linux including the following:
- To block or disable normal user logins in Linux using a nologin shell.
- Use a shell wrapper script or program to login user commands before they are sent to a shell for execution. Here, you specify the shell wrapper as a user’s login shell.
- To meet a user’s demands (wants to use a specific shell), especially those with administrative rights.
When creating user accounts with the useradd or adduser utilities, the --shell flag can be used to specify the name of a user’s login shell other than that specified in the respective configuration files.
A login shell can be accessed from a text based interface or via a SSH from remote Linux machine. However, if you login via a graphical user interface (GUI), you can access the shell from a terminal emulators like xterm, konsole and many more.
Let’s first list all available shells on your Linux system, type.
# cat /etc/shells

/bin/sh
/bin/bash
/sbin/nologin
/bin/tcsh
/bin/csh
/bin/dash
Before you proceed any further, note that:
- A user can change their own shell to any thing: which, however must be listed in the /etc/shells file.
- Only root can run a shell not listed in /etc/shells file.
- If an account has a restricted login shell, then only root can change that user’s shell.
Now let’s discuss three different ways to change Linux user shell.
1. usermod Utility
usermod is a utility for modifying a user’s account details, stored in the /etc/passwd file and the -s or --shell option is used to change the user’s login shell.
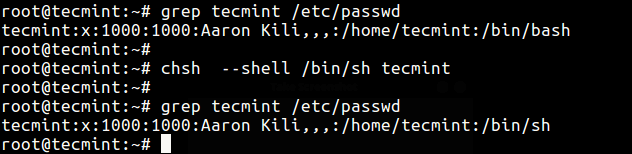
In this example, we’ll first check user tecmint’s account information to view his default login shell and then change its login shell from /bin/sh to /bin/bash as follows.
# grep tecmint /etc/passwd
# usermod --shell /bin/bash tecmint
# grep tecmint /etc/passwd

2. chsh Utility
chsh is a command line utility for changing a login shell with the -s or –shell option like this.
# grep tecmint /etc/passwd
# chsh --shell /bin/sh tecmint
# grep tecmint /etc/passwd
The two methods above all modify the shell specified in /etc/passwd file which you can edit manually as in the third method below.
3. Change User Shell in /etc/passwd File
In this method, simply open the /etc/passwd file using any of your favorite command line text editors and change a specific users shell.
# vi /etc/passwd
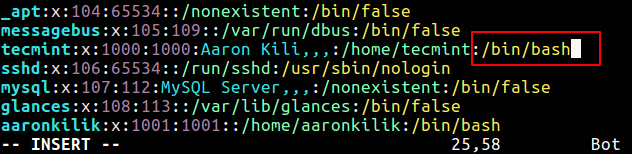
When your done editing, save and close the file.
Do not forget to read these related topics:
- Understanding Shell Initialization Files and User Profiles in Linux
- Understand Linux Shell and Basic Shell Scripting Tips – Part I
- How To Write and Use Custom Shell Functions and Libraries
- Understanding Different Classifications of Shell Commands and Their Usage
In this article, we described various ways of changing a user’s shell in Linux. To share any thoughts with us, use the comment section below.
If You Appreciate What We Do Here On TecMint, You Should Consider:
TecMint is the fastest growing and most trusted community site for any kind of Linux Articles, Guides and Books on the web. Millions of people visit TecMint! to search or browse the thousands of published articles available FREELY to all.
If you like what you are reading, please consider buying us a coffee ( or 2 ) as a token of appreciation.

We are thankful for your never ending support.