- 1. Import the font files
- Supported font formats
- 2. Declare the font in the pubspec
- pubspec.yaml option definitions
- 3. Set a font as the default
- 4. Use the font in a specific widget
- TextStyle
- Complete example
- Fonts
- pubspec.yaml
- main.dart
Although Android and iOS offer high quality system fonts,
one of the most common requests from designers is for custom fonts.
For example, you might have a custom-built font from a designer,
or perhaps you downloaded a font from Google Fonts.
Flutter works with custom fonts and you can apply a custom
font across an entire app or to individual widgets.
This recipe creates an app that uses custom fonts with
the following steps:
- Import the font files.
- Declare the font in the pubspec.
- Set a font as the default.
- Use a font in a specific widget.
1. Import the font files
To work with a font, import the font files into the project.
It’s common practice to put font files in a fonts or assets
folder at the root of a Flutter project.
For example, to import the Raleway and Roboto Mono font
files into a project, the folder structure might look like this:
awesome_app/
  fonts/
    Raleway-Regular.ttf
    Raleway-Italic.ttf
    RobotoMono-Regular.ttf
    RobotoMono-Bold.ttf
Supported font formats
Flutter supports the following font formats:
.ttc.ttf.otf
Flutter does not support .woff and .woff2 fonts for all platforms.
2. Declare the font in the pubspec
Once you’ve identified a font, tell Flutter where to find it.
You can do this by including a font definition in the pubspec.yaml file.
flutter:
  fonts:
    - family: Raleway
      fonts:
        - asset: fonts/Raleway-Regular.ttf
        - asset: fonts/Raleway-Italic.ttf
          style: italic
    - family: RobotoMono
      fonts:
        - asset: fonts/RobotoMono-Regular.ttf
        - asset: fonts/RobotoMono-Bold.ttf
          weight: 700
pubspec.yaml option definitions
The family determines the name of the font, which you use in the
fontFamily property of a TextStyle object.
The asset is a path to the font file,
relative to the pubspec.yaml file.
These files contain the outlines for the glyphs in the font.
When building the app,
these files are included in the app’s asset bundle.
A single font can reference many different files with different
outline weights and styles:
-
The
weightproperty specifies the weight of the outlines in
the file as an integer multiple of 100, between 100 and 900.
These values correspond to theFontWeightand can be used in the
fontWeightproperty of aTextStyleobject.
For example, if you want to use theRobotoMono-Boldfont defined above,
you would setfontWeighttoFontWeight.w700in yourTextStyle.Note that defining the
weightproperty does not
override the actual weight of the font. You would not be able to
accessRobotoMono-BoldwithFontWeight.w100, even if itsweight
was set to 100. -
The
styleproperty specifies whether the outlines in the file are
italicornormal.
These values correspond to theFontStyleand can be used in the
fontStyleproperty of aTextStyleobject.
For example, if you want to use theRaleway-Italicfont defined above,
you would setfontStyletoFontStyle.italicin yourTextStyle.Note that defining the
styleproperty does not
override the actual style of the font; You would not be able to
accessRaleway-ItalicwithFontStyle.normal, even if itsstyle
was set to normal.
3. Set a font as the default
You have two options for how to apply fonts to text: as the default font
or only within specific widgets.
To use a font as the default, set the fontFamily property
as part of the app’s theme. The value provided to
fontFamily must match the family
name declared in the pubspec.yaml.
return MaterialApp(
  title: 'Custom Fonts',
  // Set Raleway as the default app font.
  theme: ThemeData(fontFamily: 'Raleway'),
  home: const MyHomePage(),
);
For more information on themes,
see the Using Themes to share colors and font styles recipe.
If you want to apply the font to a specific widget,
such as a Text widget,
provide a TextStyle to the widget.
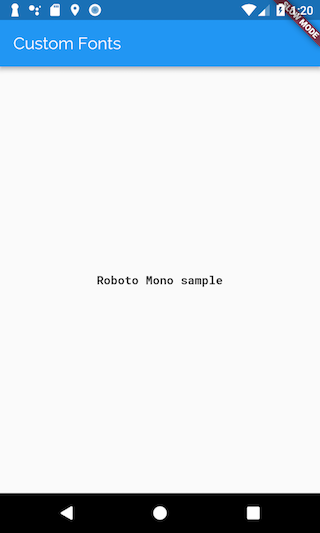
In this example, apply the RobotoMono font to a single Text widget.
Once again, the fontFamily must match the family name declared in the
pubspec.yaml.
child: Text(
  'Roboto Mono sample',
  style: TextStyle(fontFamily: 'RobotoMono'),
),
TextStyle
If a TextStyle object specifies a weight
or style for which there is no exact font file,
the engine uses one of the more generic files
for the font and attempts to extrapolate outlines
for the requested weight and style.
Complete example
Fonts
The Raleway and RobotoMono fonts were downloaded from
Google Fonts.
pubspec.yaml
name: custom_fonts
description: An example of how to use custom fonts with Flutter

dependencies:
  flutter:
    sdk: flutter

dev_dependencies:
  flutter_test:
    sdk: flutter

flutter:
  fonts:
    - family: Raleway
      fonts:
        - asset: fonts/Raleway-Regular.ttf
        - asset: fonts/Raleway-Italic.ttf
          style: italic
    - family: RobotoMono
      fonts:
        - asset: fonts/RobotoMono-Regular.ttf
        - asset: fonts/RobotoMono-Bold.ttf
          weight: 700
  uses-material-design: true
main.dart
import 'package:flutter/material.dart';

void main() => runApp(const MyApp());

class MyApp extends StatelessWidget {
  const MyApp({super.key});

  @override
  Widget build(BuildContext context) {
    return MaterialApp(
      title: 'Custom Fonts',
      // Set Raleway as the default app font.
      theme: ThemeData(fontFamily: 'Raleway'),
      home: const MyHomePage(),
    );
  }
}

class MyHomePage extends StatelessWidget {
  const MyHomePage({super.key});

  @override
  Widget build(BuildContext context) {
    return Scaffold(
      // The AppBar uses the app-default Raleway font.
      appBar: AppBar(title: const Text('Custom Fonts')),
      body: const Center(
        // This Text widget uses the RobotoMono font.
        child: Text(
          'Roboto Mono sample',
          style: TextStyle(fontFamily: 'RobotoMono'),
        ),
      ),
    );
  }
}
Customization is everywhere, from documents to apps, we can customize everything as we want to. The power of customization is humongous, and it has revolutionized the way we look at technology in this world. Just like how printing “Hello World”, is the basic step towards learning a new programming language, customizing the style of a text is the basic step toward customizing an app. So, let’s see how to customize text in Flutter.
Basic Flutter App:
In Flutter, everything is a widget. So, “Text” is a widget too. The text widget has its own properties like font style, font size, font-weight, etc. The Flutter team has set a few default properties before making things easier for the user to create apps. So, customizing text is all about editing these properties as we want, to get the desired output.
Now, let’s create a basic Flutter app with various default Text widget properties available.
Dart
import 'package:flutter/material.dart';
void main() => runApp(const MyApp());
class MyApp extends StatelessWidget {
const MyApp({Key? key}) : super(key: key);
@override
Widget build(BuildContext context) {
return MaterialApp(
home: Scaffold(
appBar: AppBar(
title: const Text('GeeksforGeeks'),
backgroundColor: Colors.green,
),
body: const SafeArea(
child: Center(
child: Text(
'Welcome to GFG!',
style: TextStyle(
fontSize: 40.0,
color: Colors.green,
fontWeight: FontWeight.bold),
),
),
),
),
);
}
}
Output:

Custom Fonts in Flutter:
Download Font File: A Font file has all the required details regarding a font family, so once imported the font style can be used throughout the app. Google Fonts website has a wide variety of font families that can be downloaded and used in an app. The steps for downloading the file are as follows:
- Step 1: Open Google Fonts and search for a font family in the search bar (here “Pacifico”).
- Step 2: Select the “Pacifico” font file.
- Step 3: To download, click the “Download Family” button.

Import Font Files: To use the downloaded font family, we need to import the font file into the root of the Flutter app. The steps for importing the font file in Android Studio are as follows:
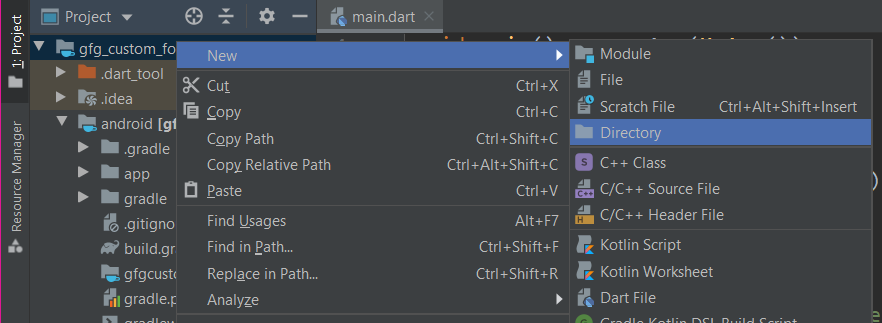
- Step 1: Click the “Project” button in the top left corner of Android Studio.
- Step 2: Right-click on the project name, here “gfg_custom_fonts” and select New + Directory.
- Step 3: Name the directory as “fonts“.
- Step 4: Open file manager and go to downloads. Extract and open the “Pacifico” zip file.
- Step 5: Move the “Pacifico Regular” file into this directory. After moving, the font directory contains a file named “Pacifico-Regular.ttf”.
Declare Font: Now after importing the font file, it’s a necessity to tell Flutter where to fetch the font file from. So, it’s a need to declare the font in a specific file named “pubspec.yaml” file. Indentation plays a major role in this file, where double-space is used to indent the code. The steps to declare the font file is as follows:
- Step 1: Click the “Project” button and click on the project name, here “gfg_custom_fonts”.
- Step 2: In the list, there is a file called “pubspec.yaml” file. Click this file.
- Step 3: Paste the below code in the pubspec.yaml file. Be aware of the indentations.
- Step 4: Press the “Pub get” button in the top right corner of the file.
Dart
name: gfgcustomfonts
description: A new Flutter application.
publish_to: 'none'
version: 1.0.0+1
environment:
sdk: ">=2.7.0 <3.0.1"
dependencies:
flutter:
sdk: flutter
cupertino_icons: ^0.1.3
dev_dependencies:
flutter_test:
sdk: flutter
flutter:
uses-material-design: true
fonts:
- family: Pacifico
fonts:
- asset: fonts/Pacifico-Regular.ttf
Add Font Family: Now this font family can be used in styling the text widget in the app wherever needed. Not only one, but multiple families can be downloaded in the above-mentioned steps.
Note: The name mentioned in the “family:” of the “pubspec.yaml” file should be unique for different font families. In order to use this font, the font family property of the text widget is used in the .dart file.
The syntax for it is as follows:
Text('text',
             style: TextStyle(
               fontFamily: 'family_name',
             ),
           ),
Complete Source Code: The final code after customizing the text style is as follows:
Dart
import 'package:flutter/material.dart';
void main() => runApp(const MyApp());
class MyApp extends StatelessWidget {
const MyApp({Key? key}) : super(key: key);
@override
Widget build(BuildContext context) {
return MaterialApp(
home: Scaffold(
appBar: AppBar(
title: const Text('Geeks for Geeks'),
backgroundColor: Colors.green,
),
body: const SafeArea(
child: Center(
child: Text(
'Welcome to GFG!',
style: TextStyle(
fontFamily: 'Pacifico',
fontSize: 40.0,
color: Colors.green,
fontWeight: FontWeight.bold,
),
),
),
),
),
);
}
}
Output:

Customization is everywhere, from documents to apps, we can customize everything as we want to. The power of customization is humongous, and it has revolutionized the way we look at technology in this world. Just like how printing “Hello World”, is the basic step towards learning a new programming language, customizing the style of a text is the basic step toward customizing an app. So, let’s see how to customize text in Flutter.
Basic Flutter App:
In Flutter, everything is a widget. So, “Text” is a widget too. The text widget has its own properties like font style, font size, font-weight, etc. The Flutter team has set a few default properties before making things easier for the user to create apps. So, customizing text is all about editing these properties as we want, to get the desired output.
Now, let’s create a basic Flutter app with various default Text widget properties available.
Dart
import 'package:flutter/material.dart';
void main() => runApp(const MyApp());
class MyApp extends StatelessWidget {
const MyApp({Key? key}) : super(key: key);
@override
Widget build(BuildContext context) {
return MaterialApp(
home: Scaffold(
appBar: AppBar(
title: const Text('GeeksforGeeks'),
backgroundColor: Colors.green,
),
body: const SafeArea(
child: Center(
child: Text(
'Welcome to GFG!',
style: TextStyle(
fontSize: 40.0,
color: Colors.green,
fontWeight: FontWeight.bold),
),
),
),
),
);
}
}
Output:
Custom Fonts in Flutter:
Download Font File: A Font file has all the required details regarding a font family, so once imported the font style can be used throughout the app. Google Fonts website has a wide variety of font families that can be downloaded and used in an app. The steps for downloading the file are as follows:
- Step 1: Open Google Fonts and search for a font family in the search bar (here “Pacifico”).
- Step 2: Select the “Pacifico” font file.
- Step 3: To download, click the “Download Family” button.
Import Font Files: To use the downloaded font family, we need to import the font file into the root of the Flutter app. The steps for importing the font file in Android Studio are as follows:
- Step 1: Click the “Project” button in the top left corner of Android Studio.
- Step 2: Right-click on the project name, here “gfg_custom_fonts” and select New + Directory.
- Step 3: Name the directory as “fonts“.
- Step 4: Open file manager and go to downloads. Extract and open the “Pacifico” zip file.
- Step 5: Move the “Pacifico Regular” file into this directory. After moving, the font directory contains a file named “Pacifico-Regular.ttf”.
Declare Font: Now after importing the font file, it’s a necessity to tell Flutter where to fetch the font file from. So, it’s a need to declare the font in a specific file named “pubspec.yaml” file. Indentation plays a major role in this file, where double-space is used to indent the code. The steps to declare the font file is as follows:
- Step 1: Click the “Project” button and click on the project name, here “gfg_custom_fonts”.
- Step 2: In the list, there is a file called “pubspec.yaml” file. Click this file.
- Step 3: Paste the below code in the pubspec.yaml file. Be aware of the indentations.
- Step 4: Press the “Pub get” button in the top right corner of the file.
Dart
name: gfgcustomfonts
description: A new Flutter application.
publish_to: 'none'
version: 1.0.0+1
environment:
sdk: ">=2.7.0 <3.0.1"
dependencies:
flutter:
sdk: flutter
cupertino_icons: ^0.1.3
dev_dependencies:
flutter_test:
sdk: flutter
flutter:
uses-material-design: true
fonts:
- family: Pacifico
fonts:
- asset: fonts/Pacifico-Regular.ttf
Add Font Family: Now this font family can be used in styling the text widget in the app wherever needed. Not only one, but multiple families can be downloaded in the above-mentioned steps.
Note: The name mentioned in the “family:” of the “pubspec.yaml” file should be unique for different font families. In order to use this font, the font family property of the text widget is used in the .dart file.
The syntax for it is as follows:
Text('text',
             style: TextStyle(
               fontFamily: 'family_name',
             ),
           ),
Complete Source Code: The final code after customizing the text style is as follows:
Dart
import 'package:flutter/material.dart';
void main() => runApp(const MyApp());
class MyApp extends StatelessWidget {
const MyApp({Key? key}) : super(key: key);
@override
Widget build(BuildContext context) {
return MaterialApp(
home: Scaffold(
appBar: AppBar(
title: const Text('Geeks for Geeks'),
backgroundColor: Colors.green,
),
body: const SafeArea(
child: Center(
child: Text(
'Welcome to GFG!',
style: TextStyle(
fontFamily: 'Pacifico',
fontSize: 40.0,
color: Colors.green,
fontWeight: FontWeight.bold,
),
),
),
),
),
);
}
}
Output:
Introduction
You can use different fonts in your Flutter application.
For example, you may have a custom font that your designer created,
or you may have a font from Google Fonts.
This page describes how to configure fonts for your Flutter app,
and use them when rendering text.
Using fonts in your Flutter application is done in two steps.
First declare them in your pubspec.yaml, to ensure that they are included in the app. Second use the font with a TextStyle property.
Declaring in the font asset
To include your font in the app, declare it like in the pubspec.yaml example below.
Then copy the font file to the location specified in your pubspec.yaml.
flutter:
  fonts:
    - family: Raleway
      fonts:
        - asset: assets/fonts/Raleway-Regular.ttf
        - asset: assets/fonts/Raleway-Medium.ttf
          weight: 500
        - asset: assets/fonts/Raleway-SemiBold.ttf
          weight: 600
    - family: AbrilFatface
      fonts:
        - asset: assets/fonts/abrilfatface/AbrilFatface-Regular.ttf
Using the font
Second use the font by creating a TextStyle.
Then set the TextStyle fontFamily property
and use the font family specified in the pubsec.yaml declarations.
// declare the text style
const textStyle = const TextStyle(
  fontFamily: 'Raleway',
);

// use the text style
var buttonText = const Text(
  "Use the font for this text",
  style: textStyle,
);
Fonts in package dependencies
To use a font family defined in a package, the package argument must be provided. For instance, suppose the font
declaration above is in the pubspec.yaml of a package named my_package which the app depends on. Then creating the
TextStyle is done as follows:
const textStyle = const TextStyle(
  fontFamily: 'Raleway',
  package: 'my_package',
);
If the package internally uses the font it defines, it should still specify
the package argument when creating the text style as in the example above.
A package can also provide font files without declaring a font in its pubspec.yaml. These files
should then be in the lib/ folder of the package. The font files will not
automatically be bundled in the app, instead the app can use these
selectively when declaring a font. Suppose a package named my_package has:
lib/fonts/Raleway-Medium.ttf
Then the app can declare a font like in the example below:
 flutter:
   fonts:
     - family: Raleway
       fonts:
         - asset: assets/fonts/Raleway-Regular.ttf
         - asset: packages/my_package/fonts/Raleway-Medium.ttf
           weight: 500
The lib/ is implied, so it should not be included in the asset path.
In this case, since the app locally defines the font, the TextStyle is created
without the package argument:
const textStyle = const TextStyle(
  fontFamily: 'Raleway',
);
Using the Material Design icon font
When you want to use the Material Design icon font,
it can be simply included by adding a property uses-material-design: true to the pubspec.yaml file.
flutter:
  # The following line ensures that the Material Icons font is
  # included with your application, so that you can use the icons in
  # the Icons class.
  uses-material-design: true
pubspec.yaml option definitions
The family determines the name of the font, which you can use in the
fontFamily
property of a TextStyle
object to use the font with a Text
or a RichText
widget.
The asset is a path to the font file, relative to the pubspec.yaml file.
These files contain the outlines for the glyphs in the font. When building your app,
these files are included in your app’s asset bundle.
A single font can reference many different files with different outline weights
and styles:
-
The
weightproperty specifies the weight of the outlines in the file as an
integer multiple of 100 between 100 and 900. These values correspond to the
FontWeight
and can be used in thefontWeight
property of aTextStyle
object. -
The
styleproperty specfies whether the outlines in the file are
italicornormal. These values correspond to the
FontStyle
and can be used in the fontStyle
property of aTextStyle
object.
TextStyle
If a TextStyle
object specifies a weight or style for which is there is no exact font file, the
engine uses one of the more generic files for the font and attempts to
extrapolate outlines for the requested weight and style.
Example
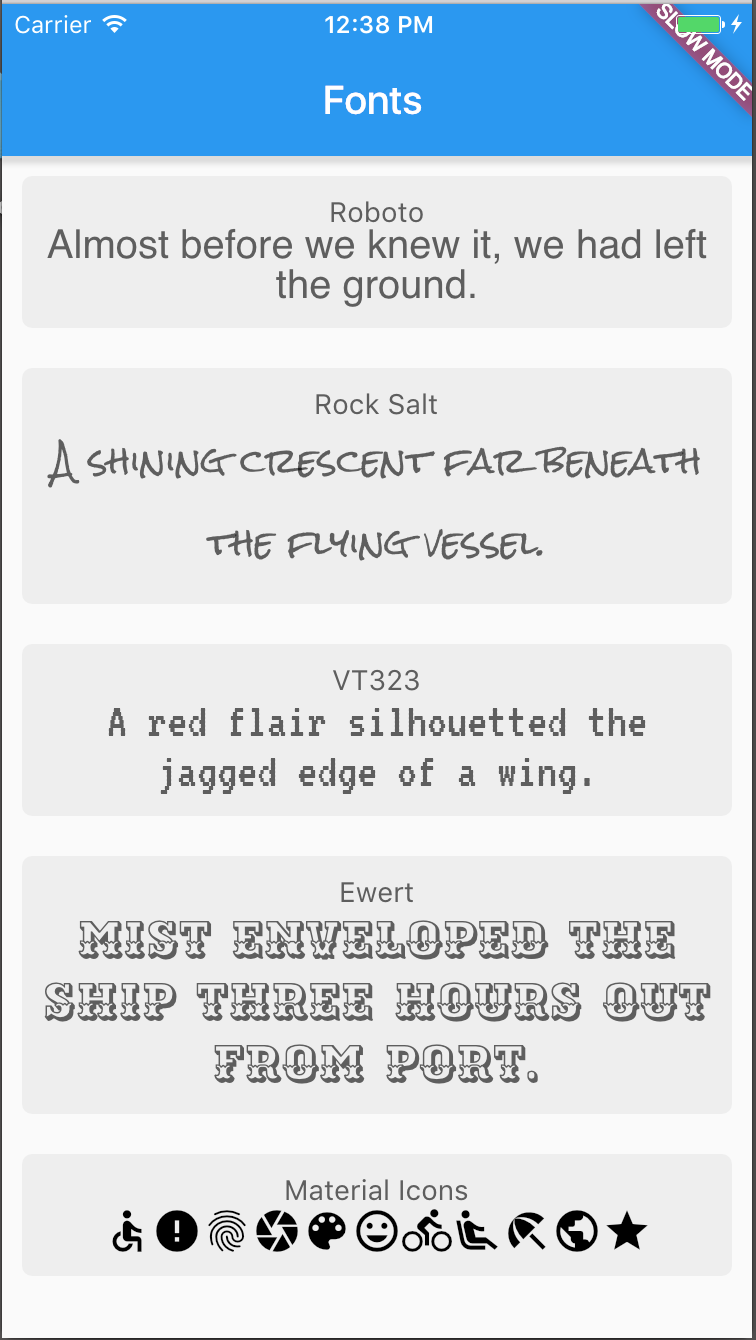
Here is an example delcaring and using the fonts in a simple application.
| iOS | Android |
|---|---|
 |
 |
Declaring the fonts in the pubsec.yaml.
name: my_application
description: A new Flutter project.

dependencies:
  flutter:
    sdk: flutter

flutter:
  # Include the Material Design fonts.
  uses-material-design: true

  fonts:
    - family: Rock Salt
      fonts:
        # https://fonts.google.com/specimen/Rock+Salt
        - asset: fonts/RockSalt-Regular.ttf
    - family: VT323
      fonts:
        # https://fonts.google.com/specimen/VT323
        - asset: fonts/VT323-Regular.ttf
    - family: Ewert
      fonts:
        # https://fonts.google.com/specimen/Ewert
        - asset: fonts/Ewert-Regular.ttf
Implementing the fonts in the application source code.
import 'package:flutter/material.dart';
const String words1 = "Almost before we knew it, we had left the ground.";
const String words2 = "A shining crescent far beneath the flying vessel.";
const String words3 = "A red flair silhouetted the jagged edge of a wing.";
const String words4 = "Mist enveloped the ship three hours out from port.";
void main() {
runApp(new MyApp());
}
class MyApp extends StatelessWidget {
@override
Widget build(BuildContext context) {
return new MaterialApp(
title: 'Flutter Fonts',
theme: new ThemeData(
primarySwatch: Colors.blue,
),
home: new FontsPage(),
);
}
}
class FontsPage extends StatefulWidget {
@override
_FontsPageState createState() => new _FontsPageState();
}
class _FontsPageState extends State<FontsPage> {
@override
Widget build(BuildContext context) {
// Rock Salt - https://fonts.google.com/specimen/Rock+Salt
var rockSaltContainer = new Container(
child: new Column(
children: <Widget>[
new Text(
"Rock Salt",
),
new Text(
words2,
textAlign: TextAlign.center,
style: new TextStyle(
fontFamily: "Rock Salt",
fontSize: 17.0,
),
),
],
),
margin: const EdgeInsets.all(10.0),
padding: const EdgeInsets.all(10.0),
decoration: new BoxDecoration(
color: Colors.grey.shade200,
borderRadius: new BorderRadius.all(new Radius.circular(5.0)),
),
);
// VT323 - https://fonts.google.com/specimen/VT323
var v2t323Container = new Container(
child: new Column(
children: <Widget>[
new Text(
"VT323",
),
new Text(
words3,
textAlign: TextAlign.center,
style: new TextStyle(
fontFamily: "VT323",
fontSize: 25.0,
),
),
],
),
margin: const EdgeInsets.all(10.0),
padding: const EdgeInsets.all(10.0),
decoration: new BoxDecoration(
color: Colors.grey.shade200,
borderRadius: new BorderRadius.all(new Radius.circular(5.0)),
),
);
// https://fonts.google.com/specimen/Ewert
var ewertContainer = new Container(
child: new Column(
children: <Widget>[
new Text(
"Ewert",
),
new Text(
words4,
textAlign: TextAlign.center,
style: new TextStyle(
fontFamily: "Ewert",
fontSize: 25.0,
),
),
],
),
margin: const EdgeInsets.all(10.0),
padding: const EdgeInsets.all(10.0),
decoration: new BoxDecoration(
color: Colors.grey.shade200,
borderRadius: new BorderRadius.all(new Radius.circular(5.0)),
),
);
// Material Icons font - included with Material Design
String icons = "";
// https://material.io/icons/#ic_accessible
// accessible: or 0xE914 or E914
icons += "u{E914}";
// https://material.io/icons/#ic_error
// error: or 0xE000 or E000
icons += "u{E000}";
// https://material.io/icons/#ic_fingerprint
// fingerprint: or 0xE90D or E90D
icons += "u{E90D}";
// https://material.io/icons/#ic_camera
// camera: or 0xE3AF or E3AF
icons += "u{E3AF}";
// https://material.io/icons/#ic_palette
// palette: or 0xE40A or E40A
icons += "u{E40A}";
// https://material.io/icons/#ic_tag_faces
// tag faces: or 0xE420 or E420
icons += "u{E420}";
// https://material.io/icons/#ic_directions_bike
// directions bike: or 0xE52F or E52F
icons += "u{E52F}";
// https://material.io/icons/#ic_airline_seat_recline_extra
// airline seat recline extra: or 0xE636 or E636
icons += "u{E636}";
// https://material.io/icons/#ic_beach_access
// beach access: or 0xEB3E or EB3E
icons += "u{EB3E}";
// https://material.io/icons/#ic_public
// public: or 0xE80B or E80B
icons += "u{E80B}";
// https://material.io/icons/#ic_star
// star: or 0xE838 or E838
icons += "u{E838}";
var materialIconsContainer = new Container(
child: new Column(
children: <Widget>[
new Text(
"Material Icons",
),
new Text(
icons,
textAlign: TextAlign.center,
style: new TextStyle(
inherit: false,
fontFamily: "MaterialIcons",
color: Colors.black,
fontStyle: FontStyle.normal,
fontSize: 25.0,
),
),
],
),
margin: const EdgeInsets.all(10.0),
padding: const EdgeInsets.all(10.0),
decoration: new BoxDecoration(
color: Colors.grey.shade200,
borderRadius: new BorderRadius.all(new Radius.circular(5.0)),
),
);
return new Scaffold(
appBar: new AppBar(
title: new Text("Fonts"),
),
body: new ListView(
children: <Widget>[
rockSaltContainer,
v2t323Container,
ewertContainer,
materialIconsContainer,
],
),
);
}
}
Flutter helps us create beautiful mobile applications for multiple platforms with a single codebase. Isn’t that awesome? Yes, it is.
Designers and developers favor using a custom font to give their app a distinct appearance that helps in building brand awareness and a better product altogether.
Roboto and San Fransisco are the default font family for Android and iOS, respectively. You might have a custom-created font from a designer, or you might have downloaded a font from any other resource like Google Fonts. Either way, you will have to download the font file (.ttf ) and import it to your Flutter project.
In this article, you’ll learn how to add custom a font to your project by creating a basic Flutter app that displays texts with different font styles.
Getting started with custom fonts 🎬
Follow these steps to begin with fonts in Flutter:
- Downloading the font file
- Importing the font files in a project
- Adding the font in the
pubspec.yaml - Using the font in an app
1. Downloading the font file 📦
Let’s get started by downloading a custom font from Google Fonts. In this example, we’ll use the Montserrat font. You might have gotten a custom font file from a designer or somewhere else. But in this tutorial, we will be downloading the .ttf font file from Google Fonts. Google Fonts is a catalog containing fonts published under licenses that allow you to use them on any website or an app for commercial or personal use.
Follow these steps to download the font file:
- Step 1: Visit Google Fonts and search for Monserrat in the search bar
- Step 2: Click on the Monserrat font
- Step 3: Now click on the Download family to download the font
- Step 4: Unzip the downloaded file
2. Importing font files in a project 📂
After downloading, we need to add the font files to our Flutter project. Create a folder named fonts in the root of the Flutter project.
You need to structure the folder like this:
my_app/
  lib
  fonts/
    Montserrat-Regular.ttf
Next, move the Montserrat font files or .ttf files into the fonts folder that you just created.
N.B., you will see many fonts files after unzipping but only copy Monserrat-Regular.ttf, Monserrat-Italic.ttf, Monserrat-Bold.ttf for this tutorial. Later you can experiment with as many variants as you want.
3. Adding font files in pubspec 📝
So now after importing the font files into our Flutter project, we need to add them to our pubspec.yaml. By declaring the font in the pubspec.yaml, you tell Flutter to register this font and remember it so that you can use it all over the project.
You need to follow a specific structure while declaring the font in the pubspec.yaml:
Follow the below structure to declare the font:
flutter:
  fonts:
    - family: Montserrat
      fonts:
        - asset: fonts/Montserrat-Regular.ttf
        - asset: fonts/Montserrat-Italic.ttf
          style: italic
        - asset: fonts/Montserrat-Bold.ttf
          weight: 700
Keep these things in mind while declaring fonts in the pubspec 🤓:
- Indentation is crucial, and always make sure to have proper spaces as required
- You can add multiple font families in the same manner (you will see that later)
- The
familydetermines the name of the font and it should be unique for different font families - The
assetis the path of the font from the root of the project - The
weightproperty represents the weight of the font, an integer value from 100 to 900 - The
styleproperty specifies whether the font is normal or italic
Hint: After adding a font in the pubspec.yaml, always restart the app from the cold. 🔥
Up until now you have successfully imported and added the font. In the next step, you will see how to use the font in the project.
4. Using font in an app 🕹️
Now it’s time for the real action. After all those steps, you’re set up to start using the custom font and make a custom-tailored app.
Let’s see how to use the custom font in a Text widget:
import 'package:flutter/material.dart';
import 'package:flutter/cupertino.dart';

void main() => runApp(MyApp());

class MyApp extends StatelessWidget {
  @override
  Widget build(BuildContext context) {
    return const MaterialApp(
      home: Scaffold(
        body: SafeArea(
          child: Center(
            child: Text(
              'Almost before we knew it, we had left the ground.',
              style: TextStyle(
                fontFamily: 'Montserrat',
                fontSize: 36.0,
                color: Colors.teal,
                fontWeight: FontWeight.bold,
              ),
            ),
          ),
        ),
      ),
    );
  }
}
Result:
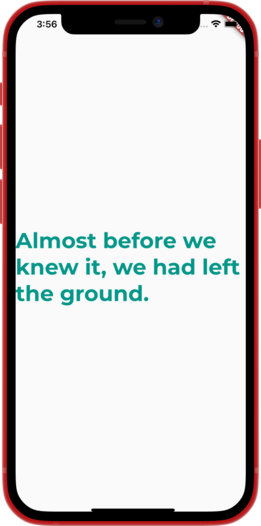
You need to use TextStyle to add style to a Text widget. TextStyle takes a fontFamily parameter that is the name of the font that you earlier added in the pubspes.yaml (here Montserrat). Other parameters like fontSize, color, and fontWeight declare the size of the font, color of the font, and weight of the font, respectively.
Instead of declaring the font separately in each Text widget, you can also make a font app-level that will be implemented throughout the app.
By declaring the font in the MaterialApp‘s theme property, you can apply the custom font to the entire app.
Here’s how you add do it 😎:
class MyApp extends StatelessWidget {
  const MyApp({Key? key}) : super(key: key);
  @override
  Widget build(BuildContext context) {
    return MaterialApp(
      title: 'Flutter Demo',
      theme: ThemeData(
        primarySwatch: Colors.blue,
        fontFamily: 'Montserrat',
      ),
      home: const HomePage(),
    );
  }
}
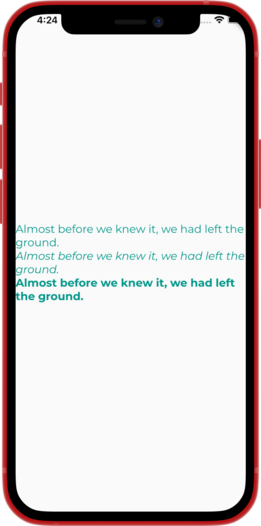
In the above example, we added Montserrat as the default font family for our app. Every Text widget that you’ll add will now be using Montserrat as their font. Configuring fontWeight and fontStyle to bold and italic will use the Montserrat font that you added for italic and bold in pubspec.yaml.
Here’s a complete example of using different variations of the Montserrat font:
import 'package:flutter/material.dart';
import 'package:flutter/widgets.dart';

void main() {
  runApp(const MyApp());
}

class MyApp extends StatelessWidget {
  const MyApp({Key? key}) : super(key: key);

  @override
  Widget build(BuildContext context) {
    return MaterialApp(
      title: 'Flutter Demo',
      theme: ThemeData(
        primarySwatch: Colors.blue,
        fontFamily: 'Montserrat',
      ),
      home: const HomePage(),
    );
  }
}

class HomePage extends StatelessWidget {
  const HomePage({Key? key}) : super(key: key);

  @override
  Widget build(BuildContext context) {
    return Scaffold(
      body: Center(
        child: Column(
          mainAxisAlignment: MainAxisAlignment.center,
          children: const [
            Text(
              "Almost before we knew it, we had left the ground.",
              style: TextStyle(
                fontSize: 18.0,
                color: Colors.teal,
              ),
            ),
            Text(
              "Almost before we knew it, we had left the ground.",
              style: TextStyle(
                fontStyle: FontStyle.italic,
                fontSize: 18.0,
                color: Colors.teal,
              ),
            ),
            Text(
              "Almost before we knew it, we had left the ground.",
              style: TextStyle(
                fontWeight: FontWeight.bold,
                fontSize: 18.0,
                color: Colors.teal,
              ),
            ),
          ],
        ),
      ),
    );
  }
}
Result:
At times either your designer or you may want to add multiple fonts in your app to make it more vibrant, expressive, and better looking.
To add another font in the pubspec.yaml, just do the following :
-
- Download Dancing Script from Google Fonts
- Unzip and add it to the fonts folder
- Add the font to the
pubspec.yaml:- family: DancingScript
fonts:- asset: fonts/DancingScript-Bold.ttf
weight: 700
- asset: fonts/DancingScript-Bold.ttf
- family: DancingScript
- Use the DancingScript font by adding a new
Textwidget in theColumn
After adding a Text widget that uses DancingScript, here’s how the HomePage widget will look:
class HomePage extends StatelessWidget {
const HomePage({Key? key}) : super(key: key);
@override
Widget build(BuildContext context) {
return Scaffold(
body: Center(
child: Column(
mainAxisAlignment: MainAxisAlignment.center,
children: const [
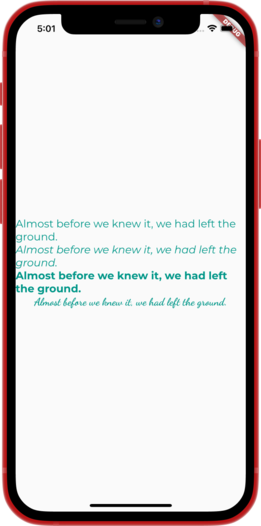
Text(
"Almost before we knew it, we had left the ground.",
style: TextStyle(
fontSize: 18.0,
color: Colors.teal,
),
),
Text(
"Almost before we knew it, we had left the ground.",
style: TextStyle(
fontStyle: FontStyle.italic,
fontSize: 18.0,
color: Colors.teal,
),
),
Text(
"Almost before we knew it, we had left the ground.",
style: TextStyle(
fontWeight: FontWeight.bold,
fontSize: 18.0,
color: Colors.teal,
),
),
Text(
"Almost before we knew it, we had left the ground.",
style: TextStyle(
fontFamily: 'DancingScript',
fontWeight: FontWeight.bold,
fontSize: 18.0,
color: Colors.teal,
),
),
],
),
),
);
}
}
Result:
Conclusion 🌠
In this tutorial, you learned how you can use custom fonts in a Flutter project.
Another way to use fonts from Google Fonts is by using the google_fonts package. The google_font package can fetch the .ttf or font files once via http at runtime, and cache it in the app’s file system instead of storing it in the fonts folder and declaring the font in the pubspec.yaml. I’m excited to see what you all come up with all this learning.
Good luck! Happy Fluttering! 👨💻
If you have any questions, feel free to post them 👇.
Any feedback is welcome 😃.
If you enjoyed this article, you can support us by sharing it with your friends.
Cut through the noise of traditional error reporting with LogRocket

LogRocket is a digital experience analytics solution that shields you from the hundreds of false-positive errors alerts to just a few truly important items. LogRocket tells you the most impactful bugs and UX issues actually impacting users in your applications.
Then, use session replay with deep technical telemetry to see exactly what the user saw and what caused the problem, as if you were looking over their shoulder.
LogRocket automatically aggregates client side errors, JS exceptions, frontend performance metrics, and user interactions. Then LogRocket uses machine learning to tell you which problems are affecting the most users and provides the context you need to fix it.
Focus on the bugs that matter — try LogRocket today.

32,495 January 11, 2021 Follow
How to Add Custom Fonts in Flutter
Flutter is no doubt one of the best cross-platform mobile application development frameworks available in the present context. The ability to create pixel-perfect UI designs using a simple combination of widget structure has made Flutter a popular choice among mobile app developers. The widget integration along with logical coding through dart programming language can make the app user interface as well as user experience sublime. When it comes to the user interface, most of the area on the screen is covered with text. Text elements are used as a means of communication between the app and its end users. Hence, textual elements in an app display are the core element that impacts the overall UI/UX. Typographical elements influence the overall perspective of the user towards the app. Therefore, the typographical elements must be properly placed with correct parameters to make the UI look appealing and readable for the end-users. The font design, size, and weight, each parameter must be considered to amplify the overall user experience in any mobile application.
In this tutorial, we are going to learn how to add the custom font to our Flutter app. The integration will work for both Android as well as iOS platforms. The steps are simple and easy to understand. We are going to make use of Google Fonts to download the required fonts which we are going to integrate into our project. Google Fonts repository provides a wide variety of uniquely designed font packages. The idea is to download some of the most uniquely designed fonts and add them to the Flutter project. Then, we are going to register the downloaded custom fonts to the Flutter app ecosystem and then use them in our template.
Let’s get started!
Step 1: Create a new Flutter project
First, we need to create a new Flutter project. For that, make sure that the Flutter SDK and other flutter app development related requirements are properly installed. If everything is properly set up, then in order to create a project, we can simply run the following command in the desired local directory:
|
flutter create customFontExample |
After the project has been set up, we can navigate inside the project directory and execute the following command in the terminal to run the project in either an available emulator or an actual device:
After a successful build, we will get the following result on the emulator screen:

New flutter application
Step 2: Download the Custom Fonts
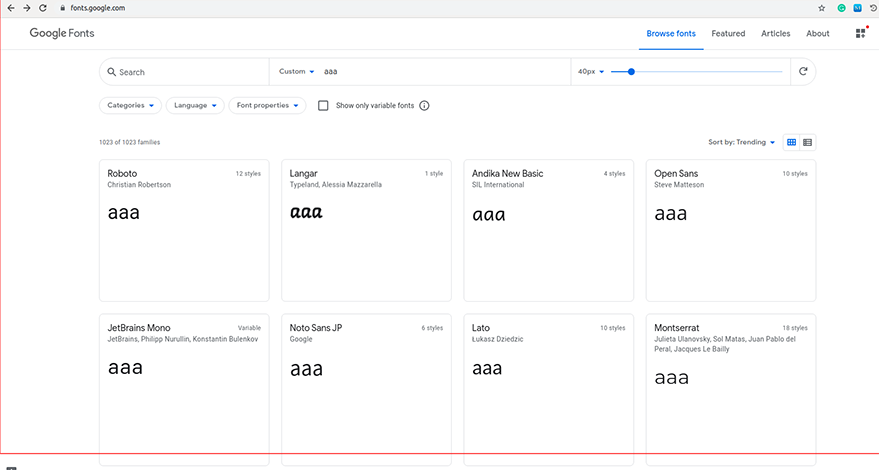
Since we are going to install custom fonts to our Flutter project, we need to get those fonts first. We can simply download the different font design files from Google Fonts. Google Fonts provides a wide selection of font design as shown in the screenshot below:
Google fonts
To download the font files, we simply need to click on the font we want. Once, we select the font, the font detail window opens up where different styles, weights, sizes, and configuration information are provided. Then, we can simply click on the “+ Download family” button to download the required font files. The downloaded file will contain a full package of the font files with different font-weight specifications. Usually, the font files will be of extension (.tff). Now, we can use these font files in our Flutter project and use them.
For this project, we are going to download two distinct Font Families:
- Langer
- Dancing Script
We chose these font designs because they have a unique font design that we can easily identify and differentiate from other fonts. This will help us to easily distinguish between the default Flutter font and custom fonts.
The font file package will be downloaded in a compressed (zip) form. We need to unzip the folder to get the required font files.
Now, in our Flutter project, we need to create a ./assets folder in the root project folder. Inside the ./assets folders, we need to create another folder called ./fonts folder.
Next, we need to copy the required font files and paste them inside the ./assets/fonts folder of our Flutter project.
The folder structure is shown in the screenshot below:

Font structure folder
Step 3: Register the Font
Now, we need to register the custom fonts to the Flutter ecosystem. For that, we need to mention them in the pubspec.yaml file with proper parameters. In the pubspec.yaml file, we have a flutter section. Inside the flutter section, there will the fonts section which has been commented out. With proper indentations, we have to register the fonts as shown in the code snippet below:
|
fonts: — family: DancingScript fonts: — asset: assets/fonts/DancingScript-Regular.ttf — family: Langer fonts: — asset: assets/fonts/Langar-Regular.ttf |
Here, we have a family parameter. The font family name mentioned in it can be used in the Flutter widgets. Then, we can point towards the designated custom font file using the assets parameter inside the fonts option.
Now, the fonts are ready to be used inside the Flutter project.
Step 4: Use the Font in Flutter template
In main.js, we have the default MyHomePage stateful widget. In the widget class, we can filter out the unnecessary default template widgets and add our own widgets with text style specifications. The overall code is provided in the code snippet below:
|
1 2 3 4 5 6 7 8 9 10 11 12 13 14 15 16 17 18 19 20 21 22 23 24 25 26 27 28 29 30 31 32 33 34 35 36 37 38 39 40 41 42 43 44 45 46 47 48 49 50 51 52 53 54 |
class MyApp extends StatelessWidget { // This widget is the root of your application. @override Widget build(BuildContext context) { return MaterialApp( title: ‘Flutter Custom Font’, theme: ThemeData( primarySwatch: Colors.blue, visualDensity: VisualDensity.adaptivePlatformDensity, ), home: MyHomePage(), ); } } class MyHomePage extends StatefulWidget { MyHomePage({Key key}) : super(key: key); @override _MyHomePageState createState() => _MyHomePageState(); } class _MyHomePageState extends State<MyHomePage> { @override Widget build(BuildContext context) { return Scaffold( appBar: AppBar( title: Text(«Custom Fonts»), ), body: Center( child: Column( mainAxisAlignment: MainAxisAlignment.center, children: <Widget>[ Text( ‘This is Normal Font’, style: TextStyle(fontSize: 24), ), SizedBox(height: 10), Text( ‘This is Dancing Script Font’, style: TextStyle(fontFamily: ‘DancingScript’, fontSize: 24), ), SizedBox(height: 10), Text( ‘This is Langer Font’, style: TextStyle(fontFamily: ‘Langer’, fontSize: 24), ), ], ), ), ); } } |
Here, we have used the Text widget inside the Column widget to display the text with different custom font families. Three Text widgets are added to show the normal font text, Dancing Script text, and Langer font text so that they can be easily distinguished.
Now, we can rebuild the app by executing the following command:
Hence, we will get the following result on the app screen:

Set the custom font in Flutter
We can notice the different font family styles on the screen above. Hence, this proves that the custom fonts are properly registered to the Flutter ecosystem and we can use them anywhere inside the project.
Step 5: Adding Weight Parameters to Registered Fonts
Now, let’s move to a few advanced configurations for custom fonts. Some unique fonts do not really accommodate themselves with the font style properties. They possess their own unique styling and have a separate font file for them. Here, we are going to take an example of the Bold font-weight of the Dancing Script font we used before. We are going to integrate the custom bold font of the Dancing Script in the Flutter ecosystem as well.
For that, we need to first copy the bold font-weight file from downloaded Dancing Script font files and paste it in ./assets/fonts as shown in the screenshot below:
Now, we need to register the bold font file under the same DancingScript font family as shown in the code snippet below:

Font location
You can also learn about the use of fabulous custom font design that suits the theme of the app by looking into some state of the art Flutter template available in the market.
|
fonts: — family: DancingScript fonts: — asset: assets/fonts/DancingScript-Regular.ttf — asset: assets/fonts/DancingScript-Bold.ttf weight: 700 |
Here, we have assigned the weight parameter to the second asset option. This weight parameter will help us specify the bold Dancing Script font file. Now, using the fontWeight property in the font with the value of 700 will directly point to this custom file. This will let us render out the actual bold style Dancing Script on the app screen.
Now, we can test it out by defining the fontWeight property for the Text widget containing DancingScript font-family as shown in the code snippet below:
|
Text( ‘This is Dancing Script Font — Regular’, style: TextStyle(fontFamily: ‘DancingScript’, fontSize: 24), ), SizedBox(height: 10), Text( ‘This is Dancing Script Font — Bold’, style: TextStyle(fontFamily: ‘DancingScript’, fontSize: 24, fontWeight: FontWeight.w700), ), |
Hence, we will get the result as shown in the code snippet below:

Adding weight parameters to registered fonts
Here, we can notice the regular style and bold style of the Dancing Script font.
Likewise, we can also assign other parameters such as the style with specific file types of custom fonts. The ability to assign multiple font styles of a single font family using different parameters such as weight and style will enable us to display the true nature of uniquely customized Fonts. It provides us extra power over the overall usage of custom fonts in the Flutter ecosystem.
Conclusion
Hope that the steps were easy to understand. Actually, the overall integration process was simple and quick. While adding a custom font to the Flutter app, we should make sure that the font design matches the theme of the overall app. We should consider the size and weight of the font as well. We can even register the extra parameters such as font-weight to the project while registering the font in pubspec.yaml file. Choosing the right font design will definitely have a huge impact on any mobile application. The steps we learned from this tutorial will definitely help you boost the beauty of the app interface by means of different custom fonts.
About the author
Registered 09-12-2019 | Last seen 2 years ago 80

React Native vs. Flutter: Which One Would Suit You Better?
Unveiling pros and cons of such cross-platform development frameworks as Flutter and React Native. Discover what suits you …

Understanding Flutter Bloc Pattern
In this article, we’ll cover a bit of Reactive Programming, BLOC patterns in Flutter, when and how to use them, as well as look at some alternatives …

Monitoring your NestJS application with Sentry
When developing applications, logically we do throw errors or raise exceptions from time to time when things do work as expected. For instance, …
In this example, we are going to show the way to change style of font inside text widget such as font-weight, font size, color, bold, italic, underline properties of font inside Text Widget in Flutter. See the example below for more details:
Text(
  "Lorem Ipsum is simply dummy text.",
  style: TextStyle(
      fontSize: 18,
      height: 2, //line height 200%, 1= 100%, were 0.9 = 90% of actual line height
      color: Colors.redAccent, //font color
      backgroundColor: Colors.black12, //background color
      letterSpacing: 5, //letter spacing
      decoration: TextDecoration.underline, //make underline
      decorationStyle: TextDecorationStyle.double, //double underline
      decorationColor: Colors.brown, //text decoration 'underline' color
      decorationThickness: 1.5, //decoration 'underline' thickness
      fontStyle: FontStyle.italic
  ),
)
Text(
"hello world",
style: Theme.of(context).textTheme.headline1, // like <h1> in HTML
)import 'package:flutter/material.dart';
void main(){
runApp(MyApp());
}
class MyApp extends StatelessWidget{
@override
Widget build(BuildContext context) {
return MaterialApp(
home: Home(),
);
}
}
class Home extends StatelessWidget{
@override
Widget build(BuildContext context) {
return Scaffold(
appBar: AppBar(
title: Text("Text Style"),
backgroundColor: Colors.deepOrangeAccent,
),
body: Container(
padding: EdgeInsets.all(20),
child: Column(
crossAxisAlignment: CrossAxisAlignment.center,
children: [
Text(
"Lorem Ipsum is simply dummy text.",
style: TextStyle(
fontSize: 18,
height: 2, //line height 200%, 1= 100%, were 0.9 = 90% of actual line height
color: Colors.redAccent, //font color
backgroundColor: Colors.black12, //background color
letterSpacing: 5, //letter spacing
decoration: TextDecoration.underline, //make underline
decorationStyle: TextDecorationStyle.double, //double underline
decorationColor: Colors.brown, //text decoration 'underline' color
decorationThickness: 1.5, //decoration 'underline' thickness
fontStyle: FontStyle.italic
),
),
Text(
"Lorem Ipsum is simply dummy text of the printing and typesetting industry.",
style: TextStyle(
fontSize: 38,
height: 0.9, //line height 90% of actual height
color: Colors.orangeAccent,
decoration: TextDecoration.lineThrough,
),
),
Text(
  "hello world",
  style: Theme.of(context).textTheme.headline1, // like <h1> in HTML
)
],
),
)
);
}
}
In this way, you can make the font big, small, bold, italic, underline, double underline using TextStyle() on Text() widget in Flutter.