|
SHEPARD73 0 / 0 / 0 Регистрация: 22.12.2013 Сообщений: 48 |
||||
|
1 |
||||
|
08.01.2014, 13:15. Показов 105237. Ответов 20 Метки нет (Все метки)
Народ каким образом мне сделать прорисовку или что то другое, похожее на
чтобы мне можно было сделать конструктор для изменения цвета и шрифта label’а?
__________________
0 |

|
zna926 546 / 477 / 315 Регистрация: 24.09.2013 Сообщений: 3,345 Записей в блоге: 1 |
||||
|
08.01.2014, 19:32 |
2 |
|||
0 |
|
SHEPARD73 0 / 0 / 0 Регистрация: 22.12.2013 Сообщений: 48 |
||||
|
08.01.2014, 23:59 [ТС] |
3 |
|||
|
Я с этим разобрался, а теперь мне нужно как-то задать размер шрифта, задаю так
но почему то ошибка «доступно только для чтения», как исправить?
0 |
|
546 / 477 / 315 Регистрация: 24.09.2013 Сообщений: 3,345 Записей в блоге: 1 |
|
|
09.01.2014, 02:30 |
4 |
|
Так задуман код, что можно только получить , а не установливать значение. Установка значения в свойствах и там еще выбор шрифта жирный, наклонный и т.д.
0 |
|
lpvoid 324 / 307 / 59 Регистрация: 06.03.2013 Сообщений: 869 |
||||
|
09.01.2014, 07:53 |
5 |
|||
|
SHEPARD73,
System.Drawing.Font
0 |
|
SHEPARD73 0 / 0 / 0 Регистрация: 22.12.2013 Сообщений: 48 |
||||
|
09.01.2014, 19:34 [ТС] |
6 |
|||
|
А как потом изменять размер, т.е. задавать что-вроде
не получается ?
0 |
|
Заблокирован |
||||
|
09.01.2014, 19:39 |
7 |
|||
|
SHEPARD73, вам же написали
label1.Font = new Font(название, размер, стиль);
w — размер шрифта.
1 |

|
0 / 0 / 0 Регистрация: 22.12.2013 Сообщений: 48 |
|
|
10.01.2014, 16:06 [ТС] |
8 |
|
Я имел ввиду как мне добавить свойство для изменения размера, я же не могу ковертировать все это в числовой тип?
0 |
|
Заблокирован |
|
|
11.01.2014, 22:20 |
9 |
|
я же не могу ковертировать все это в числовой тип? Он изначально предполагался, что будет числовой или это не так?
0 |
|
0 / 0 / 0 Регистрация: 22.12.2013 Сообщений: 48 |
|
|
12.01.2014, 15:15 [ТС] |
10 |
|
Он изначально предполагался, что будет числовой или это не так? При конвертации в числовой тип появляется ошибка: неявное преобразование типа int в string
0 |
|
Заблокирован |
||||
|
12.01.2014, 15:24 |
11 |
|||
|
SHEPARD73, я вас понять не могу. на форму я кинул TB, туда пишу размер шрифта и на кнопку, такой код
0 |
|
SHEPARD73 0 / 0 / 0 Регистрация: 22.12.2013 Сообщений: 48 |
||||
|
12.01.2014, 16:42 [ТС] |
12 |
|||
|
Release, Я хочу чтобы через панель свойства можно было задавать ширину текста в label, должно быть что то вроде
но данное свойство изменяет ширину самого label, а не текста
0 |
|
Заблокирован |
|
|
12.01.2014, 17:16 |
13 |
|
lab1.Width = value; ну так? нужно к Font обращаться. По этому вопросу не могу подсказать.
0 |
|
Администратор
9357 / 4639 / 755 Регистрация: 17.04.2012 Сообщений: 9,490 Записей в блоге: 14 |
|
|
12.01.2014, 17:20 |
14 |
|
SHEPARD73, объясните, что вы имеете в виду под «шириной текста»?
0 |
|
0 / 0 / 0 Регистрация: 22.12.2013 Сообщений: 48 |
|
|
12.01.2014, 20:22 [ТС] |
15 |
|
SHEPARD73, объясните, что вы имеете в виду под «шириной текста»? пространство между буквами, а также высоту букв
0 |
|
zna926 546 / 477 / 315 Регистрация: 24.09.2013 Сообщений: 3,345 Записей в блоге: 1 |
||||
|
12.01.2014, 21:37 |
16 |
|||
1 |
|
0 / 0 / 0 Регистрация: 22.12.2013 Сообщений: 48 |
|
|
13.01.2014, 22:44 [ТС] |
17 |
|
zna926,
0 |
|
zna926 546 / 477 / 315 Регистрация: 24.09.2013 Сообщений: 3,345 Записей в блоге: 1 |
||||
|
14.01.2014, 00:17 |
18 |
|||
|
label1.Font = new Font(«Tobota», 14, FontStyle.Italic);
0 |
|
SHEPARD73 0 / 0 / 0 Регистрация: 22.12.2013 Сообщений: 48 |
||||
|
14.01.2014, 00:31 [ТС] |
19 |
|||
|
zna926,
0 |
|
546 / 477 / 315 Регистрация: 24.09.2013 Сообщений: 3,345 Записей в блоге: 1 |
|
|
14.01.2014, 01:02 |
20 |
|
Как я понял нужно, чтобы ширина шрифта менялась независимо от его размера.
0 |
Последнее обновление: 12.07.2022
Label представляет обычную текстовую метку, которая выводит информацию с помощью свойства Text. Label удобен для создания заголоков и меток к элементам ввода. Основные свойства Label:
-
CharacterSpacing: расстояние между символами в тексте в виде значения типа double
-
FontAttributes: определяет стиль текста
-
FontAutoScalingEnabled: значение типа bool, устанавливает, будет ли к тексту применяться системное масштабирование
-
FontFamily: семейство шрифтов в виде строки
-
FontSize: размер шрифта (значение типа double)
-
FormattedText: представляет отформатированный текст в виде объекта FormattedString
-
LineBreakMode: значение типа LineBreakMode, которое определяет, как будет производиться перенос строки, если текст не вмещается
-
LineHeight: высота строки (значение типа double)
-
MaxLines: максимальное допустимое количество строк
-
Padding: внутренний отступ
-
Text: текст метки
-
TextColor: цвет текста
-
TextDecorations: декорации текста (его подчеркивание или вчеркивание) (значение типа TextDecorations)
-
TextTransform: объект типа TextTransform, который определяет преобразование текста
-
TextType: значение типа TextType, которое определяет тип текста — обычный текст или html
-
HorizontalTextAlignment: значение TextAlignment, которое определяет выравнивание текста по горизонтали
-
VerticalTextAlignment: значение типа TextAlignment, которое определяет выравнивание текста по вертикали
Пример простейшей метки
namespace HelloApp
{
    class StartPage : ContentPage
    {
        public StartPage()
        {
            Grid grid = new Grid();

            Label label = new Label
            {
                Text = "Hello METANIT.COM!",
                TextDecorations = TextDecorations.Underline,
                CharacterSpacing = 2,
                FontAttributes = FontAttributes.Bold,
                FontFamily = "Helvetica",
                FontSize = 22,
                VerticalOptions = LayoutOptions.Center,
                HorizontalOptions = LayoutOptions.Center
            };

            grid.Children.Add(label);
            Content = grid;
        }
    }
}
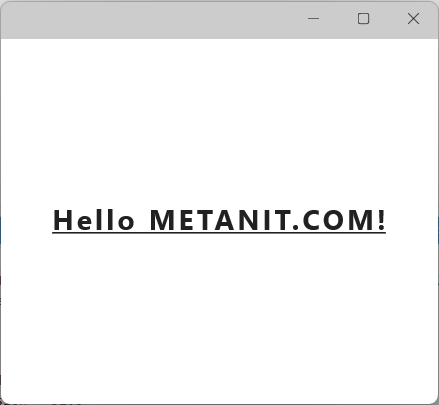
Аналогичный пример в XAML:
<?xml version="1.0" encoding="utf-8" ?>
<ContentPage xmlns="http://schemas.microsoft.com/dotnet/2021/maui"
             xmlns:x="http://schemas.microsoft.com/winfx/2009/xaml"
             x:Class="HelloApp.MainPage">
    <Grid>
        <Label FontSize="22" Text = "Hello METANIT.COM!"
             TextDecorations = "Underline" CharacterSpacing = "2"
             FontAttributes = "Bold" FontFamily = "Helvetica"
            HorizontalOptions="Center" VerticalOptions="Center"
         />
    </Grid>
</ContentPage>
Форматирование текста
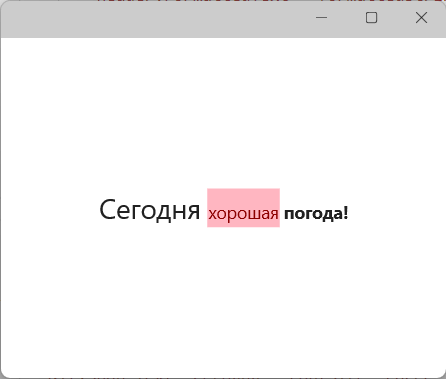
Свойство Text элемента Label позволяет устанавливать простой текст, который мы можем стилизовать с помощью ранее рассмотренных свойств.
Однако текст с каким-то более сложным форматированием так не задать. И для этого в элементе Label определено вспомогательное свойство FormattedText,
которое допускает сложное форматирование.
Свойство FormattedText хранит не просто строку текста, а объект типа FormattedString,
который инкапсулирует объекты типа Span. Каждый объект Span как раз и представляет кусок некоторым образом стилизованного текста. Для стилизации
объекта Span применются все те же свойства:
-
Text -
FontFamily -
FontSize -
FontAttributes -
TextColor -
BackgroundColor
Например,создадим текст со сложным форматированием в коде:
namespace HelloApp
{
    class StartPage : ContentPage
    {
        public StartPage()
        {
            Grid grid = new Grid();

            Label header = new Label();

            FormattedString formattedString = new FormattedString();
            formattedString.Spans.Add(new Span
            {
                Text = "Сегодня ",
                FontSize = 22
            });
            formattedString.Spans.Add(new Span
            {
                Text = "хорошая",
                TextColor = Colors.DarkRed,
                BackgroundColor = Colors.LightPink,
            });
            formattedString.Spans.Add(new Span
            {
                Text = " погода!",
                FontAttributes = FontAttributes.Bold
            });
            header.FormattedText = formattedString;

            header.VerticalOptions = LayoutOptions.Center;
            header.HorizontalOptions = LayoutOptions.Center;

            grid.Children.Add(header);
            Content = grid;
        }
    }
}
Аналогичный код в XAML:
<?xml version="1.0" encoding="utf-8" ?>
<ContentPage xmlns="http://schemas.microsoft.com/dotnet/2021/maui"
             xmlns:x="http://schemas.microsoft.com/winfx/2009/xaml"
             x:Class="HelloApp.MainPage">
    <Grid>
        <Label HorizontalOptions="Center" VerticalOptions="Center">
            <Label.FormattedText>
                <FormattedString>
                    <Span Text="Сегодня " FontSize="22" />
                    <Span Text="хорошая " BackgroundColor="LightPink" TextColor="DarkRed" />
                    <Span Text="погода!" FontAttributes="Bold" />
                </FormattedString>
            </Label.FormattedText>
        </Label>
    </Grid>
</ContentPage>
Перевод строки
Для переноса текста на новую строку используется значение «n». Например:
header.Text= "Его пример другим наука;n"+
             "Но, боже мой, какая скукаn" +
             "С больным сидеть и день и ночь,n" +
             "Не отходя ни шагу прочь!n";
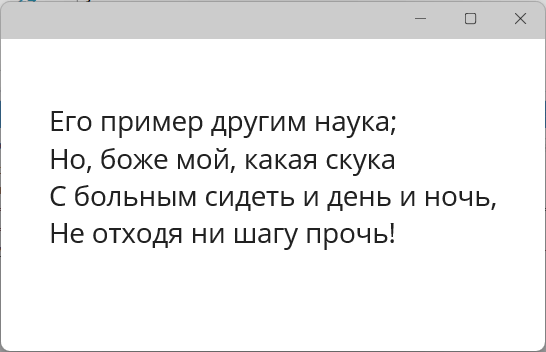
В XAML тоже не сложно задать многострочный текст:
<?xml version="1.0" encoding="utf-8" ?>
<ContentPage xmlns="http://schemas.microsoft.com/dotnet/2021/maui"
             xmlns:x="http://schemas.microsoft.com/winfx/2009/xaml"
             x:Class="HelloApp.MainPage">
    <Grid>
        <Label HorizontalOptions="Center" VerticalOptions="Center" FontSize="22">
            <Label.Text>
                <x:String>
Его пример другим наука;
Но, боже мой, какая скука
С больным сидеть и день и ночь,
Не отходя ни шагу прочь!
                </x:String>
            </Label.Text>
        </Label>
    </Grid>
</ContentPage>
В данном случае применяется сложное свойство Label.Text, которое в качестве значения принимает объект String. Причем для элемента String применяется префикс x — x:String,
то есть определение данного типа берется из пространства имен «http://schemas.microsoft.com/winfx/2009/xaml»
Обработка нажатия
Кнопки определяют событие нажатия, которое мы можем обработать. Однако у Label подобного события нет. Но что делать, если мы вдруг хотим обрабатывать нажатие на заголовок? В этом случае мы можем воспользоваться
специальным классом TapGestureRecognizer, который позволяет обрабатывать нажатия:
namespace HelloApp
{
    class StartPage : ContentPage
    {
        public StartPage()
        {
            Grid grid = new Grid();

            Label label = new Label
            {
                Text = "Hello METANIT.COM",
                VerticalOptions = LayoutOptions.Center,
                HorizontalOptions = LayoutOptions.Center,
                FontSize = 22
            };

            TapGestureRecognizer tapGesture = new TapGestureRecognizer
            {
                NumberOfTapsRequired = 2
            };

            int count = 0;  // счетчик нажатий
            tapGesture.Tapped += (s, e) =>
            {
                count++;
                label.Text = $"Вы нажали {count} раз";
            };
            label.GestureRecognizers.Add(tapGesture);

            grid.Children.Add(label);
            Content = grid;
        }
    }
}
TapGestureRecognizer представляет специальный класс, который позволяет распознать нажатия. С помощью свойства NumberOfTapsRequired
мы можем установить, сколько нажатий необходимо. В данном случае мы устанавливаем двойное нажатие. И именно по двойному нажатию будет генерироваться событие
Tapped, в обработчике которого изменяется значение переменной count и текст метки.
И чтобы связать объект TapGestureRecognizer с меткой, необходимо добавить этот объект в коллекцию GestureRecognizers:
label.GestureRecognizers.Add(tapGesture);
Tkinter Label is used to display one or more lines, it can also be used to display bitmap or images. In this article, we are going to change the font-size of the Label Widget. To create Label use following:
Syntax: label = Label(parent, option, …)
Parameters:
parent: Object of the widget that will display this label, generally a root object
text: To display one or more lines of text.
image: To display a static image
compound: To display both Text and Image. It accepts TOP, BOTTOM, LEFT, RIGHT, CENTER. For example, if you write compound=TOPimage will displayed to the top of Text.
We can do this using different methods:
Method 1: By using Label’s font property.
Python3
from tkinter import Tk
from tkinter.ttk import Label
class App:
def __init__(self, master) -> None:
self.master = master
Label(self.master, text="I have default font-size").pack(pady=20)
Label(self.master,
text="I have a font-size of 25",
font=("Arial", 25)
).pack()
if __name__ == "__main__":
root = Tk()
root.title("Change font-size of Label")
root.geometry("400x250")
app = App(root)
root.mainloop()
Output:

Method 2: By using Style class. In this method, we will use our custom style otherwise all the Label widgets will get the same style.
Python3
from tkinter import Tk
from tkinter.ttk import Label, Style
class App:
def __init__(self, master) -> None:
self.master = master
Label(self.master, text="I have default font-size").pack(pady=20)
self.style = Style(self.master)
self.style.configure("My.TLabel", font=('Arial', 25))
Label(
self.master,
text="I have a font-size of 25",
style="My.TLabel").pack()
if __name__ == "__main__":
root = Tk()
root.title("Change font-size of Label")
root.geometry("400x250")
app = App(root)
root.mainloop()
Output:
Note: In the above method, TLabel is the name of the default style. So if you want to create your own style name then always use below syntax
my_style_name.default_style_name
Example:
New.TButton # To override Button Widget’s styles
My.TLabel # To override Label Widget’s Styles
Abc.TEntry # To override Entry Widget’s Styles
If you use only the default style name then it will apply to all the corresponding widgets i.e if I use TLabel instead of My.TLabel then both the label will have font-size of 25. And importantly, if you use the default style name then you don’t need to provide style property.
Extra: Changing font size using the Default Style Name.
Python3
from tkinter import Tk
from tkinter.ttk import Label, Style
class App:
def __init__(self, master) -> None:
self.master = master
Label(self.master, text="I have default font-size").pack(pady=20)
self.style = Style(self.master)
self.style.configure("TLabel", font=('Arial', 25))
Label(self.master, text="I have a font-size of 25").pack()
if __name__ == "__main__":
root = Tk()
root.title("Change font-size of Label")
root.geometry("400x250")
app = App(root)
root.mainloop()
Notice in the above program that we have not provided style or font property to any of the Label still both of them got the same font-size and same font-family.
Output:

Method 3: By using the Font class. In this method, we will create a Font object and then use this to change Font style of any widget. Benefit of this
Font class consist of following property:
root: Object of toplevel widget.
family: The font family name as a string.
size: The font height as an integer in points.
weight: ‘bold’/BOLD for boldface, ‘normal’/NORMAL for regular weight.
slant: ‘italic’/ITALIC for italic, ‘roman’/ROMAN for unslanted.
underline: 1/True/TRUE for underlined text, 0/False/FALSE for normal.
overstrike: 1/True/TRUE for overstruck text, 0/False/FALSE for normal.
Python3
from tkinter import Tk
from tkinter.font import BOLD, Font
from tkinter.ttk import Label
class App:
def __init__(self, master) -> None:
self.master = master
Label(self.master, text="I have default font-size").pack(pady=20)
self.bold25 = Font(self.master, size=25, weight=BOLD)
Label(self.master, text="I have a font-size of 25",
font=self.bold25).pack()
if __name__ == "__main__":
root = Tk()
root.title("Change font-size of Label")
root.geometry("400x250")
app = App(root)
root.mainloop()
Output:

Tkinter Label is used to display one or more lines, it can also be used to display bitmap or images. In this article, we are going to change the font-size of the Label Widget. To create Label use following:
Syntax: label = Label(parent, option, …)
Parameters:
parent: Object of the widget that will display this label, generally a root object
text: To display one or more lines of text.
image: To display a static image
compound: To display both Text and Image. It accepts TOP, BOTTOM, LEFT, RIGHT, CENTER. For example, if you write compound=TOPimage will displayed to the top of Text.
We can do this using different methods:
Method 1: By using Label’s font property.
Python3
from tkinter import Tk
from tkinter.ttk import Label
class App:
def __init__(self, master) -> None:
self.master = master
Label(self.master, text="I have default font-size").pack(pady=20)
Label(self.master,
text="I have a font-size of 25",
font=("Arial", 25)
).pack()
if __name__ == "__main__":
root = Tk()
root.title("Change font-size of Label")
root.geometry("400x250")
app = App(root)
root.mainloop()
Output:
Method 2: By using Style class. In this method, we will use our custom style otherwise all the Label widgets will get the same style.
Python3
from tkinter import Tk
from tkinter.ttk import Label, Style
class App:
def __init__(self, master) -> None:
self.master = master
Label(self.master, text="I have default font-size").pack(pady=20)
self.style = Style(self.master)
self.style.configure("My.TLabel", font=('Arial', 25))
Label(
self.master,
text="I have a font-size of 25",
style="My.TLabel").pack()
if __name__ == "__main__":
root = Tk()
root.title("Change font-size of Label")
root.geometry("400x250")
app = App(root)
root.mainloop()
Output:
Note: In the above method, TLabel is the name of the default style. So if you want to create your own style name then always use below syntax
my_style_name.default_style_name
Example:
New.TButton # To override Button Widget’s styles
My.TLabel # To override Label Widget’s Styles
Abc.TEntry # To override Entry Widget’s Styles
If you use only the default style name then it will apply to all the corresponding widgets i.e if I use TLabel instead of My.TLabel then both the label will have font-size of 25. And importantly, if you use the default style name then you don’t need to provide style property.
Extra: Changing font size using the Default Style Name.
Python3
from tkinter import Tk
from tkinter.ttk import Label, Style
class App:
def __init__(self, master) -> None:
self.master = master
Label(self.master, text="I have default font-size").pack(pady=20)
self.style = Style(self.master)
self.style.configure("TLabel", font=('Arial', 25))
Label(self.master, text="I have a font-size of 25").pack()
if __name__ == "__main__":
root = Tk()
root.title("Change font-size of Label")
root.geometry("400x250")
app = App(root)
root.mainloop()
Notice in the above program that we have not provided style or font property to any of the Label still both of them got the same font-size and same font-family.
Output:
Method 3: By using the Font class. In this method, we will create a Font object and then use this to change Font style of any widget. Benefit of this
Font class consist of following property:
root: Object of toplevel widget.
family: The font family name as a string.
size: The font height as an integer in points.
weight: ‘bold’/BOLD for boldface, ‘normal’/NORMAL for regular weight.
slant: ‘italic’/ITALIC for italic, ‘roman’/ROMAN for unslanted.
underline: 1/True/TRUE for underlined text, 0/False/FALSE for normal.
overstrike: 1/True/TRUE for overstruck text, 0/False/FALSE for normal.
Python3
from tkinter import Tk
from tkinter.font import BOLD, Font
from tkinter.ttk import Label
class App:
def __init__(self, master) -> None:
self.master = master
Label(self.master, text="I have default font-size").pack(pady=20)
self.bold25 = Font(self.master, size=25, weight=BOLD)
Label(self.master, text="I have a font-size of 25",
font=self.bold25).pack()
if __name__ == "__main__":
root = Tk()
root.title("Change font-size of Label")
root.geometry("400x250")
app = App(root)
root.mainloop()
Output:
Тег <label> определяет текстовую метку для тега <input>. Метка представляет собой обычный текст, кликнув по которому, пользователь может выбрать элемент формы. Она облегчает использование формы, так как в элементы формы не всегда удобно попасть курсором.
Тег <label> парный, текст размещается между открывающим (<label>) и закрывающим (</label>) тегами.
Тег <label> также используется для определения горячих клавиш на клавиатуре и перехода на активный элемент подобно ссылкам.
Связать текстовую метку и форму, к которой она относится, можно двумя способами:
- установить идентификатор id внутри элемента <input> и указать его имя в качестве атрибута for тега <label>.
Пример
<!DOCTYPE html>
<html>
   <head>
      <title> Заголовок документа</title>
   </head>
   <body>
          <form>
              <label for="lfname">Имя пользователя:</label>
              <input id="lfname" name="fname" type="text" />
          </form>
   </body>
</html>
Результат

- Поместить <input> в элемент <label>.
Пример
<!DOCTYPE html>
<html>
   <head>
      <title>Заголовок документа</title>
   </head>
  <body>
    <form>
      <label>Имя
      <input id="User" name="Имя" type="text" />
      </label>
    </form>
  </body>
</html>
Результат

Пример (форма с флажками)
<!DOCTYPE html>
<html>
   <head>
      <title>Заголовок документа</title>
   </head>
   <body>
          <form>
              <label for="barca">Барселона</label>
              <input type="radio" name="team" id="barca" value="Барселона"><br />
              <label for="real">Реал Мадрид</label>
              <input type="radio" name="team" id="real" value="Реал Мадрид"><br />
          </form>
   </body>
</html>
Результат

Используйте CSS свойства font для стилизации тега <label>.
Пример
<!DOCTYPE html>
<html>
  <head>
    <title>Заголовок документа</title>
    <style>
      body {
       padding: 20px;
      }
      label {
        font-size: 20px;
        font-weight: 700;
        color: #1c87c9;
      }
      input {
        width: 50%;
        height: 28px;
        padding: 4px 10px;
        border: 1px solid #666;
        background: #cce6ff;
        color: #1c87c9;
        font-size: 16px;
      }
    </style>
  </head>
  <body>
    <form>
      <label>Ваше имя:</label>
      <input id="User" name="Name" type="text"/>
    </form>
  </body>
</html>
Результат

Тег <label> поддерживает глобальные атрибуты и атрибуты событий.