Шрифт помогает создать уникальный внешний вид сайта. Каждая тема содержит предварительно сформированный список шрифтов, которые можно выбирать, включая шрифты Google.
Доступные опции для смены шрифта зависят от используемой вами темы:
- Если используемая тема поддерживает редактор веб-сайта (на консоли отображается Внешний вид → Редактор), вы можете изменить шрифты на своём сайте в разделе Стили редактора.
- В случае использования одной из этих тем выберите опцию Глобальные стили в редакторе WordPress.
- Для других тем изменить шрифты можно, нажав Внешний вид → Настроить → Шрифты.
Содержание
Замена шрифтов с помощью редактора сайта

Замена шрифтов с помощью глобальных стилей
Для смены шрифта своего сайта в любой из этих тем воспользуйтесь глобальными стилями.
- На консоли нажмите Страницы.
- Нажмите кнопку Добавить новый или заголовок существующей страницы, чтобы открыть ее в Редакторе WordPress.
- При добавлении новой страницы выберите предпочтительный макет или пустой макет по умолчанию.
- В редакторе нажмите кнопку «Глобальные стили». Кнопка «Aa» находится между значком «Настройки» и зеленой кнопкой Jetpack.
- Нажмите выпадающее меню в разделе «Заголовки» или «Базовый шрифт», чтобы увидеть доступные опции шрифтов.
Шрифты отображаются парами: один для заголовков, второй для основного текста.
- Шрифт заголовков: выберите шрифт для всех заголовков в блоге. К ним относятся заголовки страниц и записей, виджетов и комментариев, а также заголовки в тексте записей и страниц.
- Шрифт основного текста: выберите шрифт для основного текста и меню блога.
Нажмите Опубликовать для сохранения новых пар шрифтов в меню «Глобальные стили» или Сброс для сброса изменений.
При публикации изменений в меню «Глобальные стили» страница, с которой вы работаете, опубликована не будет.
Изменение размера шрифта
Редактор блоков предоставляет опции для изменения размера шрифта внутри отдельных блоков.
Чтобы изменить размер шрифта заголовков, выберите другой тип заголовка (H1, H2 и т. д.) в блоке «Заголовок».

Абзацы, кнопки и другие текстовые блоки имеют опцию «Оформление» в разделе «Настройки блока», где можно изменить размер текста до предустановленного или задать пользовательский размер шрифта.
Если боковая панель не отображается, чтобы открыть настройки, нужно нажать значок Настройки в правом верхнем углу экрана. Этот значок похож на квадрат с двумя неравными столбцами.

Замена шрифтов в конфигураторе
Во многих темах можно изменить шрифт, выбрав Внешний вид → Настроить. Если в конфигураторе не отображаются опции шрифтов, проверьте, поддерживает ли ваша тема метод «Глобальные стили» для изменения шрифтов.
- В консоли выберите Внешний вид → Настроить.
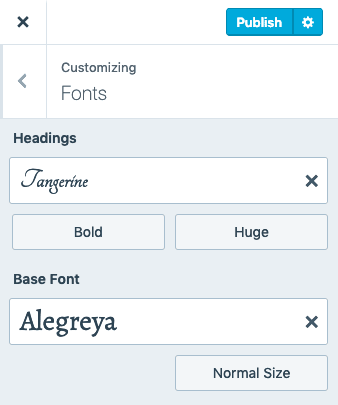
- Выберите опцию Шрифты в конфигураторе.
- Нажмите выпадающее меню в разделе «Заголовки» или «Базовый шрифт», чтобы увидеть доступные опции шрифтов.

Шрифты отображаются парами: один для заголовков, второй для основного текста.
- Заголовки: выберите шрифт для всех заголовков в блоге. К ним относятся заголовки страниц и записей, виджетов и комментариев, а также заголовки в тексте записей и страниц.
- Шрифт основного текста: выберите шрифт для основного текста и меню блога.
Предварительный просмотр при выборе шрифта позволяет увидеть, как он будет выглядеть в блоге.
Изменение размера шрифта и стиля
Стиль шрифта: чтобы изменить стиль шрифта заголовка, выберите опцию ниже и слева от шрифта. Доступные стили зависят от выбранного шрифта.
Размер шрифта: для изменения размера заголовка или базовых шрифтов выберите опцию размера ниже и справа для каждого выбранного шрифта, а затем размер в выпадающем меню.
Сохранение шрифтов
После выбора и настройки всех шрифтов опубликуйте свой сайт или сохраните черновик, чтобы продолжить настройку сайта перед его публикацией.
Изменение шрифтов
После выбора пользовательских шрифтов вы можете менять их любое количество раз.
Чтобы сменить пользовательские шрифты, перейдите в раздел Внешний вид→ Настроить → Шрифты и выберите другой шрифт для заголовка или базового шрифта. Нажмите значок «X» справа от имени пользовательского шрифта, чтобы вернуться к шрифту по умолчанию для темы.
Завершив процедуру настройки шрифтов, нажмите Опубликовать или Сохранить черновик, чтобы продолжить настройку сайта.

📌
После сохранения шрифтов они могут отобразиться в блоге или на сайте через несколько минут. Вам также может понадобиться очистить кэш браузера, чтобы гарантировать, что вы просматриваете последнюю версию сайта.
Сброс шрифтов
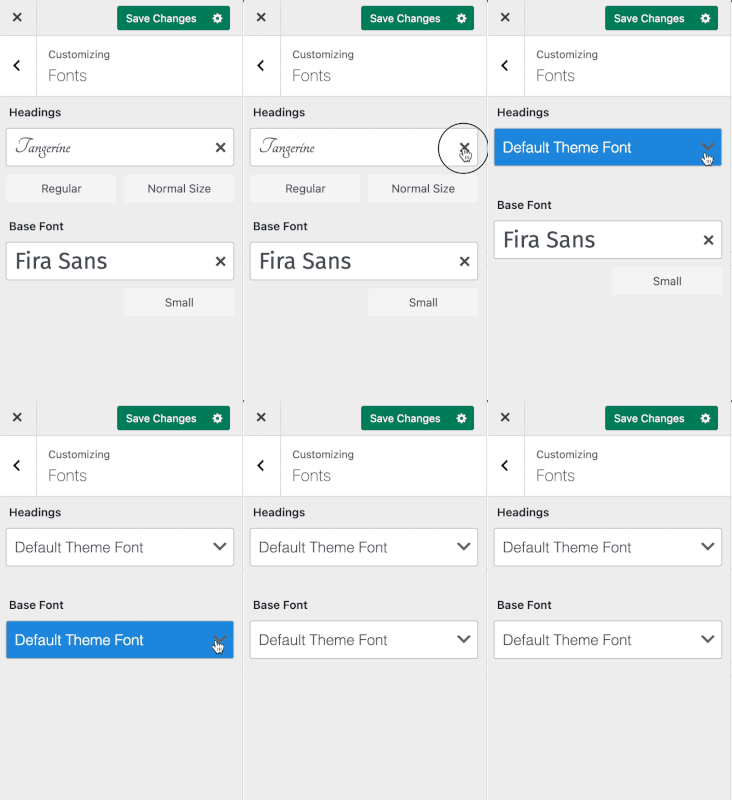
Чтобы вернуться к шрифтам по умолчанию для темы, нажмите «X» рядом с текущим шрифтом.
- Перейдите в раздел Внешний вид → Настроить.
- Нажмите Шрифты.
- Нажмите X рядом с пользовательским шрифтом, чтобы вернуться к шрифту по умолчанию для темы.
- Нажмите Сохранить изменения.
Применение шрифта к конкретному тексту
При выборе шрифтов есть возможность применить шрифт ко всему сайту, а не к отдельным страницам или строкам текста. Данный подход положительно влияет на внешний вид сайта в целом. Веб-сайт выглядит лучше благодаря единому шрифту. При использовании нескольких разных шрифтов сайт становится более трудным для восприятия.
Чтобы выделить отрывок текста, рассмотрите другие способы привлечения внимания. Например, примените другой цвет, используйте блок «Цитата» или вставьте изображение.
Использование пользовательских шрифтов
Чтобы расширить выбор шрифтов на сайте, можно установить специальный плагин. Существует много плагинов, которые позволяют добавлять на сайт ваши собственные шрифты. Поэтому при выборе плагинов проверьте рейтинг, количество положительных комментариев и тип поддержки, которую может предоставить разработчик плагина. Если после тестирования плагина вы решите его не использовать, убедитесь, что деактивировали его или удалили, чтобы в списке плагинов не было ненужных плагинов.
Часто задаваемые вопросы
Могу ли я привязать свой аккаунт Typekit.com к моему сайту WordPress.com?
Вы не можете привязать аккаунт Typekit.com к сайту или блогу WordPress.com.
Будут ли шрифты работать с моим языком?
Если вы выбрали язык c нелатинскими символами для блога в разделе «Настройки → Общие», будут загружены все символы пользовательского шрифта. При выборе языка с латинскими символами, например английского, итальянского, португальского или испанского, будет загружен только небольшой дополнительный набор символов шрифта. Если какие-то символы некорректно отображаются в блоге, в настройках языка убедитесь, что выбран язык, на котором вы вводите текст. Затем перейдите в Конфигуратор → Шрифты и заново сохраните шрифт, чтобы обновить его в соответствии с новым языком.
Как узнать, поддерживается ли для моего языка шрифт, который я хочу использовать?
Чтобы проверить, будет ли корректно отображаться шрифт на каком-либо языке, лучше всего попробовать этот шрифт в конфигураторе и посмотреть, меняется ли шрифт при переключении с темы по умолчанию. В настоящее время языки стран Азии не поддерживаются, а кириллица поддерживается во многих, но не во всех семействах шрифтов. Мы постоянно расширяем и улучшаем поддержку языков.
Почему перед появлением выбранного шрифта на короткое время появляется другой шрифт?
Этот эффект называется «кратковременное появление неоформленного текста» (Flash of Unstyled Text; FOUT). Если сайт загружается медленно из-за низкой пропускной способности сети, то сначала отображается шрифт по умолчанию для выбранной темы. Так пользователи смогут начать чтение до окончания загрузки пользовательского шрифта, а не смотреть на пустую страницу. У кого-то другой шрифт будет появляться лишь на секунду, но пользователям с медленным соединением это может оказаться удобным. Чтобы избежать подобной ситуации, вы можете добавить на сайт следующий код CSS с помощью редактора CSS в разделе Внешний вид → Настроить → Дополнительный CSS (только для тарифных планов Premium, Business, eCommerce и Pro):
.wf-loading body { visibility: hidden; }
или
html:not(.wf-active) body { display: none; }
Шрифты Google и GDPR
Все запросы на обслуживание шрифтов Google, используемые в темах WordPress.com, обслуживаются через серверы WordPress.com и больше не используют сеть CDN или FDN Google. Это изменение произошло в декабре 2022 г.
Если на вашем сайте применены пользовательский плагин или сторонняя тема, вам будет нужно вместе с разработчиками плагина и (или) темы убедиться, что они не работают со шрифтами Google через сеть CDN или FDN Google.
Дополнительную информацию о GDPR см. здесь.
Приветствую друзья. Данный пост будет полезен новичкам, которые совсем недавно начали знакомиться с таким нелегким делом как сайтостроение и не знают, как на сайте в Вордпресс поменять шрифт на свой собственный, или изменить текущему цвет и размер.
Для начала стоит определиться с целью — вы хотите полностью изменить шрифт на новый, или отредактировать старый. Начнем с 1-го варианта
В большинстве современных шаблонов (тем оформления) изменения шрифтов делается довольно просто — из настроек самого шаблона в админке Вордпресса.
В каждой теме эти настройки могут быть расположены по своему, но основных путей несколько:
1. Админка — Внешний вид — Настроить. Тут откроется менюшка, в которой можно произвести кастомизацию шаблона, исходя из его возможностей.


Она может называться по разному — Fonts, Typography или как-то на русском. Внутри вы найдете доступные для данного шаблона настройки шрифтов.
Как правило это выбор из списка семейства шрифтов, установка размера и цвета шрифтов для разных элементов шаблона, типа заголовков, параграфов.
2. Однако не всегда полноценные настройки шаблона находятся по этому пути, иногда в шаблонах бывает отдельно созданная среда для его управления.
Как правило находятся настройки почти там же, Админка — Внешний вид- Theme options (или название шаблона). Либо может быть нужная опция просто в админке добавится с названием шаблона.

Внутри также ищите необходимые настройки шрифтов.

Это были относительно простые способы. Далее мы рассмотрим варианты, когда в самой теме оформления ВП нет необходимых настроек для шрифтов.
Как поменять цвет шрифта в Вордпресс через CSS
Если ваш шаблон не хочет помогать вам в кастомизации, то придется прибегнуть к ручной правке стилей через CSS правила. Если разобрать, то это не сложнее, чем разобраться как убрать защиту от записи с флешки. Однако придется потратить какое-то время на изучение, либо обращаться к специалистам, если времени или желания нет самостоятельно разбираться.
Для того что бы поменять цвет шрифта существует CSS правило color. Выглядит это примерно так в коде:
p {
    color: #af7070;
}- В данном примере p это селектор параграфов, т.е. мы меняем цвет для всего текста заключенного в тэг параграфа p.
- color соответственно это атрибут, который мы хотим поменять у параграфа, который означает цвет
- #af7070 это всего лишь шестнадцатеричный код цвета в RGB, соответствующий коричневому оттенку.
Хорошая новость — вам вовсе не обязательно учить все правила и коды цветов, достаточно иметь современный браузер и воспользоваться инструментом просмотра кода (CTRL+Shift+I для хрома)
Выбираем стрелочкой нужный нам элемент на странице, который хотим изменить, и слева можем увидеть текущие стили данного элемента.
В моем примере у тэга p уже задан цвет и достаточно просто нажать по квадратику с цветом, что бы выбрать нужный нам. Но не торопитесь, изменения в этом инструменте сами по себе не сохранятся на сайте. Их нужно скопировать и сохранить в шаблоне.
Например вы поменяли цвет шрифта параграфов на черный, выглядеть это будет теперь так
p {
    color: #000000;
}
Копируем данный код и сохраняем по следующему адресу: Админка — Внешний вид — Настроить — Дополнительные стили
Там откроется окошко, в котором вы можете сохранять все ваши собственные стили, без риска потери изменений при обновлении шаблона.

Иногда возникает необходимость лезть в файлы шаблона и вручную редактировать стили шаблона, как правило это файл style.css, подробнее о редактировании стилей можете почитать в другой моей статье.
Как изменить размер шрифта
По аналогии с изменением цвета, все тоже самое, только вместо атрибута color для указания размера текста используется атрибут
font-size. Несколько правил записываются вместе, с новой строки через; Выглядит это будет так вместе с цветом и размером:
p {
    color: #000000;
    font-size: 17px;
}
Где 17px это указание размера шрифта в пикселях. Можете подобрать оптимальные для себя значения изменяя эту цифру.
Как изменить семейство шрифта на ВП
Но что делать если изначально шрифт на сайте вам не нравится и вы хотите другой? Тут все сложнее.
Браузеры по умолчанию поддерживают не так много шрифтов, их вы можете увидеть в таблице ниже:

За семейство шрифтов отвечает CSS правило font-family и выглядит полностью оно так в нашем примере:
p {
    color: #000000;
    font-size: 17px;
    font-family: Arial, Helvetica, Sans-Serif;
}
Где font-family это атрибут семейства, а перечисления Arial, Helvetica, Sans-Serif через запятую это указания шрифтов и типа шрифтов.
В первую очередь браузером будет браться тот шрифт, который указан первым, т.е. Arial в нашем случае. Остальные в списке это запасные, они будут использоваться браузером только в том случае, если у пользователя не найдется на компьютере шрифта Arial (что вряд ли возможно ибо он стандартный для браузеров). Но как правило, не используются.
Если же вы хотите установить нестандартный шрифт на сайт, то придется поколдовать немножко) Проще всего будет использовать плагины, типа WP Google Fonts.
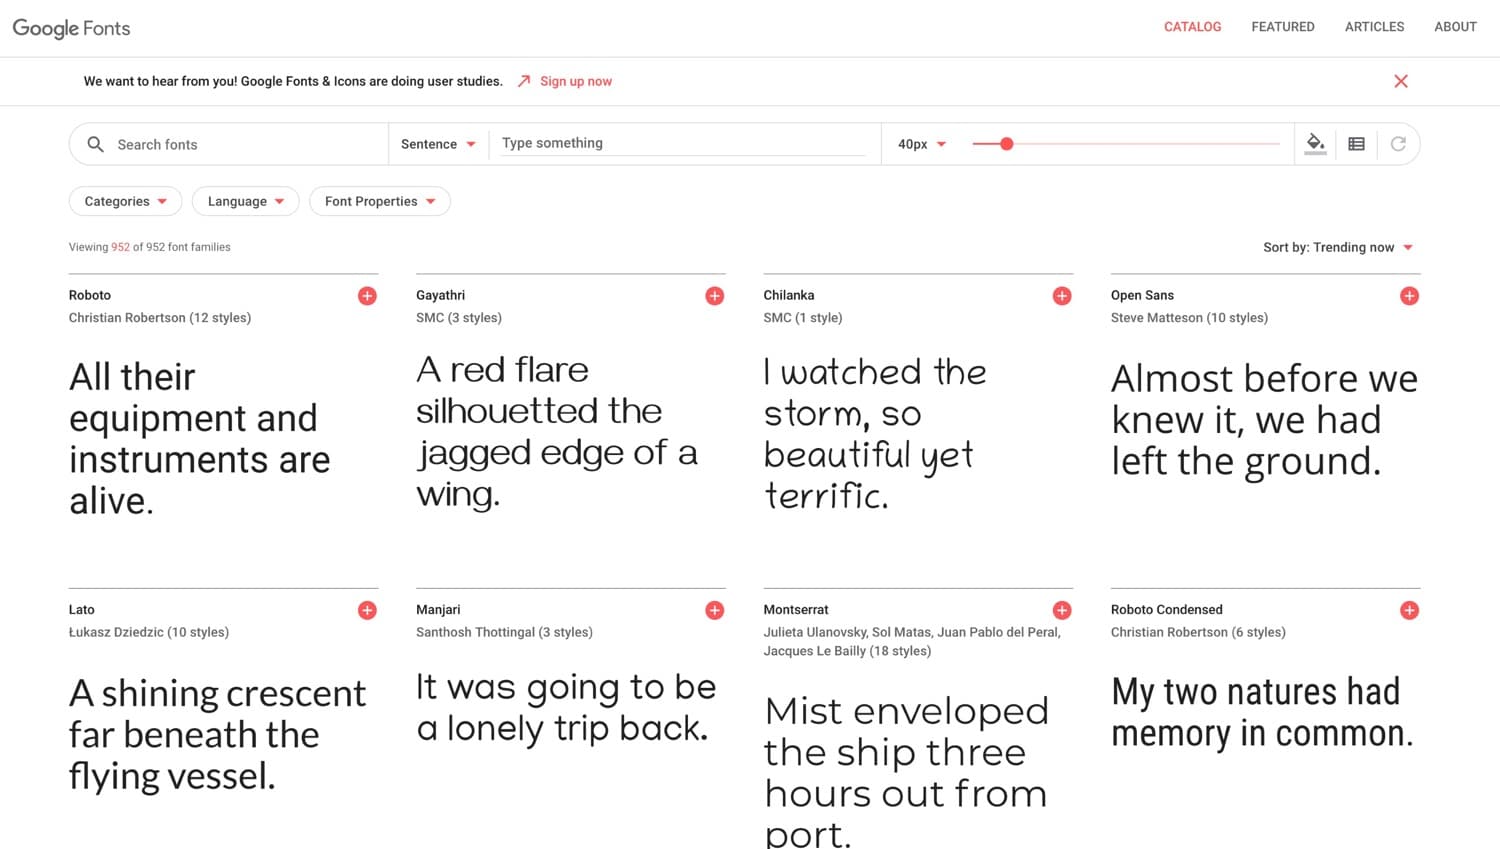
Либо можно зайти на сайт того же гугла https://fonts.google.com/ и подобрать там что-то интересное, а затем следуя несложной инструкции подключить данный шрифт на свой сайт.

Однако имейте ввиду, что далеко не все шрифты там поддерживают кириллицу, используйте в настройках именно кириллические шрифты при поиске подходящего, если ваш сайт на русском языке.
А какой у вас любимый шрифт для сайта? Мои например это PT Sans, Tahoma и Verdana
Существуют миллионы сайтов WordPress, использующих несколько популярных тем, похожих во всех аспектах. Использование разных шрифтов — один из простых способов сделать свой сайт уникальным. Хотя это может показаться легкой задачей, иногда это немного сложно. В этой статье мы расскажем о нескольких методах изменения шрифта на сайте WordPress. В зависимости от ваших навыков и знаний WordPress вы можете выбрать, какой из этих методов лучше всего подходит для вас.
Меры предосторожности перед изменением шрифта
Прежде чем приступить к изменению шрифта, вы можете предпринять некоторые меры предосторожности. Несмотря на то, что это несущественное изменение, которое вы внесете на свой веб-сайт, лучше перестраховаться.
- Одно из самых важных измерений, которое вам понадобится, — это сделать резервную копию вашего сайта. Поступая так, вы предотвратите любые проблемы, с которыми вы можете столкнуться в будущем. Это особенно полезно, особенно если вы играете с CSS темы.
- Решите, какое семейство шрифтов вы хотите использовать на своем сайте. Помимо стандартных семейств шрифтов, таких как Arial (без засечек), Times New Roman (с засечками) и т. Д. Google предлагает более 700 пользовательских шрифтов. Поэтому выберите семейство, которое хотите использовать на своем сайте.
- Изменение шрифта может повлиять на макет сайта. Следовательно, убедитесь, что вы выбрали правильный шрифт, который подходит для вашего контента и макета.
- Еще один шаг, который вы можете сделать, — это изменить шрифт на тестовом веб-сайте. Сделав это, вы узнаете, как выполнить эту задачу, ничего не пропуская на своем действующем сайте. Мы настоятельно рекомендуем сделать это, чтобы не вносить изменения в ваш действующий сайт, который долгое время работал с разными шрифтами.
1. Изменение шрифтов в настройках темы
Первый и простой способ изменить шрифт на вашем веб-сайте — использовать встроенный сменщик шрифтов. Большинство коммерческих тем предлагают варианты типографики в разделе настройщика для настройки шрифтов и интервалов. Просто будьте начеку, поскольку некоторые темы могут не включать эту функцию, или, если вы используете ее бесплатную версию, эта функция может быть доступна в версии Pro.
Чтобы показать это, мы воспользуемся популярной темой «Астра».
- Прежде всего, перейдите в раздел «Внешний вид> Настроить» на панели администратора WordPress.
- Затем перейдите в раздел «Общие> Типография» внутри настройщика.
- Там вы найдете два варианта: «Базовая типографика» и «Заголовки».
- Базовая типография позволяет вам вносить изменения в тело и контент вашего сайта. Здесь вы можете изменить семейство шрифтов, размер, толщину, высоту строки и нижнее поле абзацев.
- В разделе «Заголовки» вы можете изменить семейство шрифтов, размер и высоту строки для всех заголовков, которые могут быть на вашем веб-сайте, с H1 на H6.
Использование опций типографики вашей темы — лучший вариант, так как разработчик мог проверить все доступные шрифты и варианты. Это уменьшит ваши усилия по тестированию и, скорее всего, вы сможете внести изменения на действующем сайте за несколько минут.
Обратите внимание, что такие темы, как Astra и GeneratePress, позволяют вам выбрать системный шрифт для вашего сайта. Это означает, что сайт будет использовать шрифт с устройства, на котором он просматривается. Поскольку это удалит время загрузки файлов шрифтов из вашего домена, скорость загрузки вашей страницы значительно улучшится.
2. Изменение шрифта с помощью плагина
Плагины — одни из самых полезных функций WordPress; с ними можно делать практически все что угодно. Смена шрифта ничем не отличается, особенно если ваша тема не предлагает вариантов типографики. Есть множество плагинов, которые могут сделать это за вас.
- Перейдите в раздел «Плагины> Добавить новый» на панели инструментов WordPress.
- Выполните поиск по похожему запросу, например «шрифт».
- Вы увидите множество различных плагинов, таких как Easy Google Fonts, Fonts Plugin, Google Fonts Typography и Use Any Font и Custom Font Uploader. Выбирать лучший плагин с лучшим рейтингом и наибольшим количеством загрузок — это простой способ.
- В этом примере мы будем использовать «Плагин шрифтов» для настройки шрифтов на вашем сайте. После того, как вы установили плагин, активируйте его, как любой другой плагин, который вы используете.
- Плагин предлагает бесплатное руководство по быстрому запуску. Вы можете либо получить их руководство по электронной почте, либо проигнорировать руководство по настройке шрифтов самостоятельно, перейдя в раздел «Плагин шрифтов> Настройка шрифтов».
- Это приведет вас к настройщику, где вы сможете изменить шрифт.
- Вы можете войти в базовые настройки, чтобы изменить шрифт, или в расширенные настройки, если вы хотите изменить шрифт для разных частей вашего сайта.
- Вы можете изменить шрифт для вашего контента, заголовков и кнопок в разделе «Основные настройки».
- Находясь в «Расширенных настройках», вы можете более подробно изучить и изменить шрифт для брендинга, навигации, контента (здесь вы можете изменить шрифт для заголовков, заголовков и других частей вашего контента), боковой панели, нижнего колонтитула и загружать только шрифты.
- После выбора шрифтов вы можете мгновенно просмотреть свой контент и посмотреть, как он выглядит. Если все в порядке, нажмите кнопку «Опубликовать», чтобы изменения вступили в силу на вашем действующем сайте.
- Помимо изменения шрифта, в этом плагине есть еще несколько полезных инструментов, которые помогут вам в этом процессе. Загрузка шрифтов — одна из них; это помогает оптимизировать производительность вашего сайта, снимая отметки с любых шрифтов, которые не используются. Отладка помогает устранить любые ошибки, которые могут быть на вашем сайте в отношении шрифтов.
3. Изменение шрифта с помощью CSS
Это не рекомендуемый метод, особенно для новичков, не имеющих соответствующих знаний об использовании шрифтов в CSS. Кроме того, вам следует быть осторожным, поскольку вы входите в код веб-сайта. Так что будьте осторожны с тем, что вы редактируете, удаляете и добавляете.
- Перейдите в раздел «Внешний вид> Редактор тем» в панели администратора WordPress.
- Вы можете игнорировать предупреждение, которое показывает WordPress, чтобы избежать редактирования файлов темы.
- Выберите вашу активную тему; в этом примере мы будем использовать стандартную тему «двадцать двадцать».
- Когда вы там окажетесь, WordPress по умолчанию откроет таблицу стилей с именем style.css. Обычно он доступен как первый файл; вам нужно для смены шрифтов на вашем сайте.
- Добавьте приведенный ниже код, чтобы изменить шрифт для всего вашего сайта.
*{font-family:" Name of your font"}- Вам также нужно будет определить семейство шрифтов в верхней части style.css; вы можете сделать это, добавив эти строки. Подробнее об использовании свойства font-face Вот.
@font-face {
font-family: "Name of your font";
font-weight: 100 900; /*These will decide how thick or thin your characters will be */
font-style: normal; /*Here you can put your style as normal, italic, or oblique*/
src: url (URL from which you got the font) format("format of font");
}- Для изменений на уровне сайта вы также можете вставить код CSS в разделе «Внешний вид> Настройка> Дополнительные CSS».
- Если вы хотите изменить шрифт только для раздела вашего веб-сайта, вам нужно сначала найти этот раздел. Как только вы найдете его в своем коде, вы можете добавить ту же строку или изменить существующую. Например, на изображении ниже вы увидите раздел основного текста вашего веб-сайта и какой шрифт он использует. Вы также можете изменить размер шрифта, если хотите сделать его больше или меньше.
- После добавления или изменения кода вам нужно будет прокрутить страницу вниз и нажать кнопку «Обновить файл». Таким образом, ваш сайт должен автоматически менять шрифт.
Когда вы играете с CSS, вам нужно загружать только необходимые шрифты и удалять неиспользуемые шрифты со своего сайта. Однако это будет очень сложной задачей для новичков, поскольку в некоторых темах используется несколько шрифтов в CSS, что усложняет чтение кода.
Повлияет ли изменение шрифта на мое SEO?
Ответ — да, изменение шрифта повлияет на ваш рейтинг в поисковых системах, если вы не планируете и не делаете это правильно.
- Загрузка файлов шрифтов повлияет на скорость загрузки страницы. Google PageSpeed Insights и другие инструменты измерения скорости будут отображать предупреждения, когда шрифты препятствуют загрузке содержимого страницы. Чтобы этого избежать, выбирайте только необходимый вес шрифта, чтобы не загружать кучу файлов шрифтов на ваш сайт. как упоминалось выше, «Плагин шрифтов» может помочь в этом, чтобы загрузить только требуемые веса шрифта. Когда вы используете настройки темы или собственный CSS, обязательно позаботьтесь об этом.
- Вы должны предварительно загрузить файлы шрифтов, используемые на вашем сайте, чтобы удалить ошибки запросов на предварительную загрузку в Google PageSpeed Insights. Узнайте больше о том, как предварительно загрузить файлы шрифтов в WordPress.
- Убедитесь, что у вашего сайта правильный размер и интервал. В противном случае вы увидите ошибки в Google PageSpeed, например, слишком близкие элементы и меньший размер шрифта.
- Использование внешнего шрифта, такого как Google Fonts, увеличит время загрузки и, следовательно, замедлит ваш сайт. Вы можете использовать плагины кеширования, такие как WP Rocket, для оптимизации и объединения всех используемых вами внешних шрифтов Google.
- Когда вы меняете шрифт, Google и другие поисковые системы будут пытаться найти предыдущие файлы шрифтов на вашем сайте. это вызовет ошибку 404, как если бы вы удалили старые шрифты. Как правило, вам не нужно устанавливать 301 редирект для отсутствующих файлов шрифтов и игнорировать их, поскольку эти ошибки не влияют на пользователей.
С другой стороны, если у вас медленно загружается веб-сайт, проверьте вышеупомянутые проблемы со шрифтами. Вероятно, переход на новый шрифт поможет повысить скорость.
Как изменить шрифт (цвет, размер) текста, меню, заголовков в wordpress + видео
Как изменить шрифт (цвет, размер) текста, меню, заголовков в wordpress, чтобы улучшить вид страниц сайта. Внести кардинальные правки с минимальными знаниями кода. Предлагаю два способа. Первый — без использования плагинов, потому что для новичков настройки выглядят сложными. Второй — видео, если предпочитаете установить расширение.

Шаг №1
Сделайте бэкап файла style.css
Прежде всего обезопасьте ресурс от некорректного вмешательства. Сделав что-то не так, вернете прежний вид. В зависимости от того, где вносите правки, локальный это ресурс или находящийся в интернете, используйте удобный для вас метод:
- скопируйте содержание файла, с которым будете работать;
- создайте бэкап файла (сайта) с помощью плагина;
- сделайте скриншот файла стилей до внесения изменений;
- проверьте на локалке, как выглядит страница по-новому.

В первом случае, перейдите: Консоль управления WP → Внешний вид → Редактор тем. Откройте файл стилей, скопируйте весь код. Сохраните в каком-либо редакторе на компьютере. При необходимости, заменив содержание файла, вернете первоначальные настройки.
- Если работаете на локалке, используя «Денвер», проще скопировать файл style.css, перейдя в директорию: Z: (или папка Сервер) → home → localhost → www → web → wp-content → themes → название установленной темы. Найдите файл стилей, скопируйте, сохраните в удобном месте.
- В случае использования OpenServer, путь будет таким: Диск, на который установили платформу (у меня это D:/) — OSPanel — domains — домен сайта — wp-content — themes — название Темы — style.css.
Если не понравится новый вид страниц (не заметили, что изменились блоки связанные одним кодом настроек), замените содержание или файл стилей на копию. Неважно, какой вариант используете, главное — возможность вернуть прежние настройки.
Обратите внимание: Если изменяемый параметр, например, цвет, есть в кастомных настройках Темы, правка кода не нужна. Меняйте цвет в окне, которое открывается слева. Этот функционал имеет приоритет.
Шаг №2:
Как просто выбрать шрифт для замены
Выбрать шрифт можно, используя сервис Google fonts. Там же предлагается код для вставки в файлы header и style.css. Но проще и нагляднее вносить правки вручную. Если хотите внедрить не слишком вычурный тип шрифта, найдите его в редакторе, имеющем подобный список.
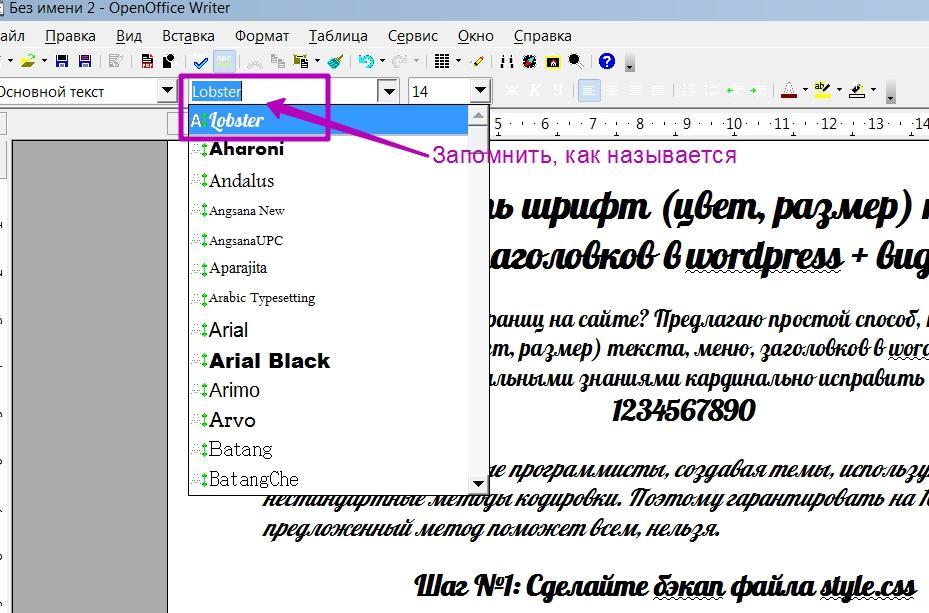
Например, для создания текстов использую OpenOffice. Выбираю шрифт, смотрю, как он выглядит (обычный, курсив, жирность, цифры), запоминаю название.
Подбирайте вариант, чтобы текст легко читался. Учитывайте, выбранный шрифт будет отражаться у пользователя, только в том случае, если имеется в его системе (браузере).
Например, шрифты, входящие в Windows могут отсутствовать в Linux и на телефонах. Поэтому лучше использовать популярные, более распространенные, имеющиеся в каждом браузере. В кодировке приведено несколько вариантов. Если первого по списку у читателя нет, отображаться будет следующий и т. д.
Нежелательно применять много разных стилей: особый для заголовка, подзаголовка, виджетов, текстов и пр. Многообразие влияет на скорость загрузки сайта. Поэтому увлекаться шрифтами не следует. Подобрав нужный, скопируйте название и переходите на сайт.

Шаг №3
Предварительный визуальный обзор
измененных параметров шрифта
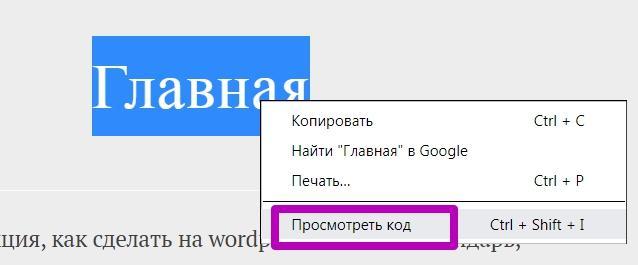
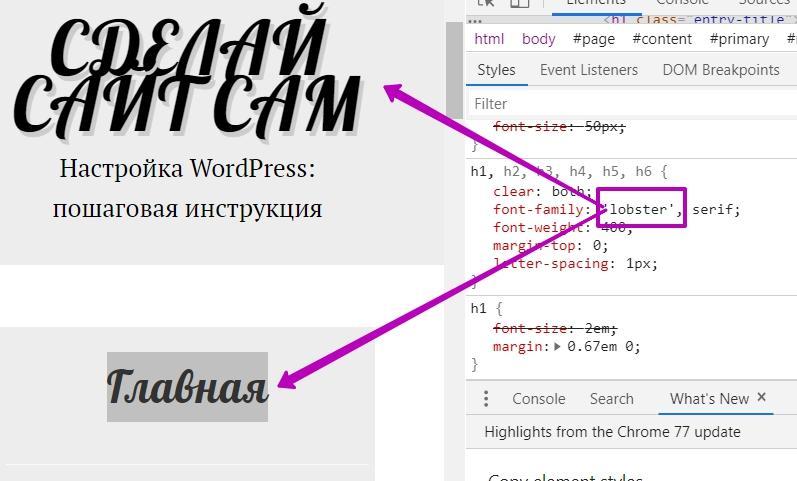
Перейдите на сайт, выделите область, которую хотите изменить. Это может быть любой блок: заголовок, контекст, записи, виджеты, меню и т. д. Правой кнопкой мыши вызовите контекстное меню, нажмите «Просмотреть код». Попадете на страницу, где меняют визуальные настройки. При этом содержание файлов останется нетронутым.
В wordpress предусмотрена функция демонстрации вносимых изменений. Это прекрасная возможность, ничего не ломая, предварительно увидеть правки. Скорректировав шрифт, как только переключитесь на другую страницу, все вернется к прежнему виду. Поэтому не бойтесь, на этой стадии ничего не испортите.
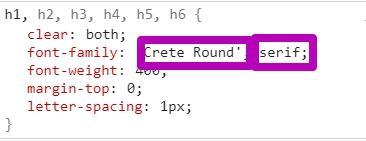
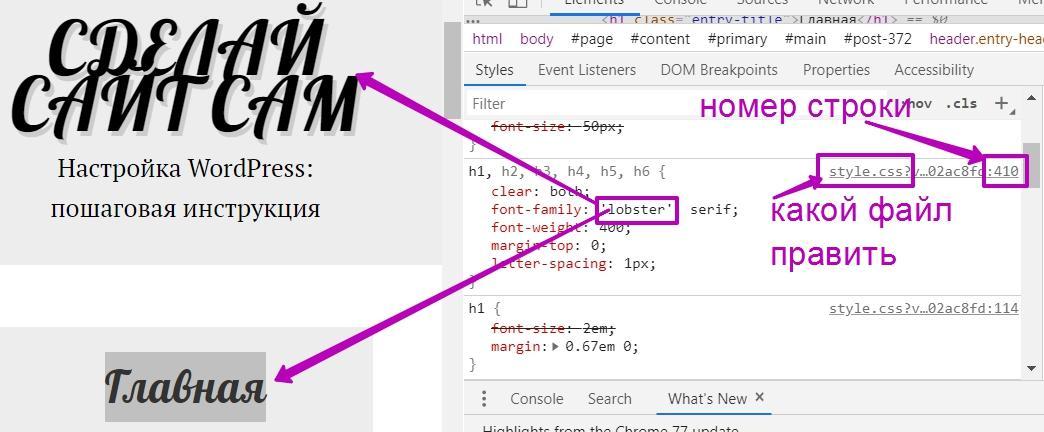
Поле с кодом может располагаться как внизу, так и справа. Это зависит от браузера. В Google работать удобнее, лучше виден блок для внесения правок. Открывается мобильная версия сайта. Прокрутите экран, чтобы выделенный фрагмент был в поле зрения. Справа ищите параметры, соответствующие шрифтам. Это все связанное с наименованием «font». Окна, если они закрыты, раздвигайте направляющими стрелочками.
Параметры шрифтов для изменения
Примечание: Сохраняйте все знаки препинания, обозначения. Меняйте только числа. Список шрифтов не удаляйте, просто первым пропишите свое название. Подобрав нужный цвет, скопируйте код (типа # e34a83d). В файле стилей нет цветных квадратиков, только эти значения.
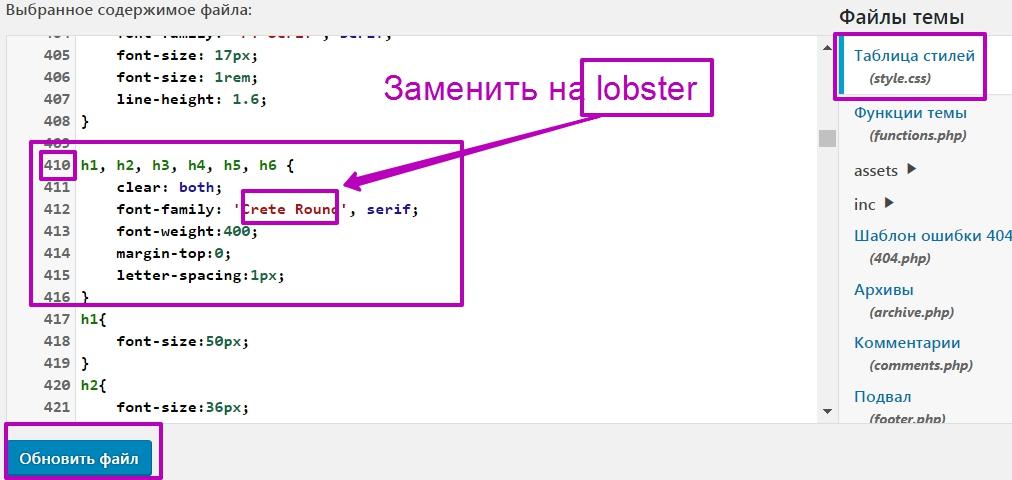
Запишите номер строки файла style.css и данные, которые меняли. Аналогично меняют цвет и размер шрифтов. Подобрав параметры, закройте панель с блоком кодировки, не страницу. Иначе настройки пропадут. Посмотрите внимательно, возможно изменения коснулись других блоков.
Шаг №4
Как изменить шрифт в файле Стилей
Если все устраивает, переходите в консоль управления: Внешний вид → Редактор тем. Ищите в открытом файле style номера строк, в которые внесете правки. Не нарушая обозначений (артиклей, запятых, кавычек), пропишите вместо имеющихся параметров свои настройки шрифта. Сохраните новые значения, нажав кнопку внизу (можно несколько раз, чтобы ускорить обновление).

Заключение
Описывать процесс пошагово — долго, но проделав это пару раз, будете корректировать шаблон, ничего не опасаясь, очень быстро (так же меняют вид кнопок). Единственное препятствие — особо сгруппированный код. Когда для разных блоков прописывают параметры в общем разделе. Изменяя шрифт в одном месте, то же самое происходит в другом.
На какие-то элементы могут налагаться ограничения. Как не меняй, они останутся прежними, где-то есть более приоритетное указание. Поэтому адаптируя шрифты Темы, проверяйте все сначала на локальном сайте.
Важно: При обновлении темы, настройки, сделанные таким способом, пропадут. Чтобы этого не случилось, скопируйте и сохраните файл стилей перед этим процессом. После замените обновленный (дефолтный style.css). Либо восстановите данные из бэкапа, либо не обновляйте шаблон, пока не найдете оптимального решения. Например, создав дочернюю Тему. При нестандартном коде поможет установка шрифтов через плагин.
Изменение шрифтов с помощью плагина
Опытом делится известный в сети вебмастер А. Абрамович. Автор чудо- скрипта Art Decoration Shortcode для красивого оформления статей. Сама часто пользуюсь советами Артема при работе с wordpress, поэтому рекомендую посмотреть ролик.
На чтение 2 мин Опубликовано 23.12.2015
Привет, сегодня я расскажу вам и покажу, как можно очень просто поменять шрифты на сайте wordpress. Раньше я помню у меня бывало такое, найдёшь тему классную, а шрифты на ней ужасные, устаревшие, всю картину портят и не понятно было как изменить эти шрифты. Лезть в код и наугад там, что-то менять, дело муторное и не безопасное. Но, на днях я наконец-то узнал, как можно очень просто и быстро поменять шрифты на wordpress сайте. Оказывается всё просто, когда под рукой есть отличный плагин — Easy Google Fonts.
С помощью данного плагина вы не только сможете изменить шрифты для всех основных заголовков сайта — Heading 1,2,3,4,5,6, но и поменять шрифт для текста в записях и на страницах. Менять шрифт вы сможете прямо из настройщика wordpress, Внешний вид — Настроить. Установить плагин вы сможете прямо из админ-панели wordpress. Перейдите по вкладке: Плагины — Добавить новый, введите название плагина в форму поиска, нажмите Enter, установите и активируйте плагин.
После установки и активации плагина, перейдите по вкладке: Внешний вид — Настроить, нажмите на вкладку: Typography — Default Typography. Здесь вы сможете менять стиль шрифта и сразу же наблюдать за сделанными изменениями.
— Paragraphs, в данном поле вы сможете изменить шрифт для текста в записях и на страницах.
— Heading 1, здесь можно изменить шрифт для самых больших заголовков на вашем сайте.
— Heading 6, самые маленькие заголовки на вашем сайте.
Если вы хотите поменять только шрифт, то используйте значение — Font Family, остальные параметры не трогайте.
— Script/Subset, набор шрифтов, рекомендую выбрать — All Subsets.
— Font Weight/Style, можно изменить насыщенность и стиль шрифта.
— Text Decoration, можно сделать текст подчёркнутым, перечёркнутым и черта сверху текста.
— Text Transform, можно сделать текст только из больших букв или только из маленьких.
На этом всё, остальные параметры я не стал разбирать, так как это просто ни к чему, да и на некоторых темах они просто не работают. Да и ещё если вы поменяли шрифт для заголовков h1 то и для других заголовков устанавливайте такой же шрифт, чтобы не было потом разногласий, а то вдруг захотите в текст добавить заголовок h2. Жду ваших комментариев, до новых встреч !
Fonts can make the difference between a dull website and a beautiful one. By learning how to change font in WordPress, you can make your site look modern, professional, and branded.
But what’s the best way to use fonts in your WordPress site, and how do you choose the right fonts for your design?
In this guide, I’ll walk you through you everything you need to know about fonts in WordPress. You’ll learn about:
Fonts: The Terminology
Let’s start by looking at the terminology around fonts on the web.
- Web fonts (aka HTML fonts) are fonts hosted on a third-party website and linked to in your site.
- Locally hosted fonts are just that (hosted on your website’s servers.)
- Web-safe fonts are a limited range of fonts that are pre-installed on (almost) all computers and that you can be fairly confident all your visitors will have access to.
Let’s have a look at the options for adding fonts to your website.
How to Add Fonts to Your WordPress Site (the Options)
Before leaping into adding fonts to your site, it helps if you understand the options available to you.
Fonts are part of your site’s design, so in most cases, they will be coded via your theme – but not always. In some cases, you might decide to use a plugin to enable a wider range of fonts in your site.
Here are some of the options available to you:
- Using web fonts such as Google Fonts by installing a plugin that gives you access.
- Using web fonts by coding them into your theme and enqueuing them (not as tricky as it sounds).
- Hosting your fonts on your own website and adding those to your theme.
There are two main distinctions – whether you use web fonts, which are hosted outside your site, or whether you choose to host your font files yourself. In this guide, we’ll look at the pros and cons of each.
Let’s start by looking at web fonts: why you might choose to use them and the ways of adding them to your site.
Using Web Fonts in WordPress
Web fonts are the most popular way of adding fonts to your website because they make it easy to add a vast range of fonts.
What Are Web Fonts?
Web fonts are fonts that are hosted on a third-party provider’s website. Instead of copying the files to your own site, you link to the provider’s website and they are pulled in from there.
This means that you have access to a large range of fonts without having to use server space on your own hosting. It also means that if the font files should change over time, you don’t have to update your files and you’ll automatically have access to the new versions of the files from the provider.
Web fonts can be free or you can pay for them, usually via a subscription. Some popular providers are:
- Google Fonts. The biggest provider of free web fonts. You can also download all of their fonts to your computer, meaning if you want to create offline materials using the same fonts as your website, you can. And it’s all free.
- Adobe Edge Web Fonts. These are also free. While they’re designed to be used with Adobe products, they work well on any website.
- Fonts.com is a premium provider of fonts, which you may need to use if you have to match your web font to a font from your printed material and the font isn’t available via a free provider.
- fontfabric is a font designer providing premium fonts for use as web fonts and online. You’ll need to pay for these but will get something more individual than if you used Google fonts.
All of these providers let you serve the fonts direct from their servers by adding some code to your WordPress site or sometimes by using a plugin that means you don’t have to add any code.
Web fonts are different from web-safe fonts. You can use these as a fallback for web fonts just in case your website visitor can’t connect to the web font for some reason. I’ll show you how to do that later in this post.
Why Use Web Fonts?
So now you know what web fonts are, why would you choose to use them instead of hosting your own fonts?
Here are some of the benefits:
- Ease: adding a few lines of code or installing a plugin is quicker than downloading and uploading the font files and makes it easier to change the fonts if you decide to in the future.
- Range of fonts: there are thousands of fonts available as web fonts and the list is growing all the time.
- Updates: If the font file needs to be updated, maybe to add variable fonts (more of which shortly) or to add extra characters, your site will have access to the new version without you having to do anything.
Most websites use web fonts, with a web-safe font as a backup. And with WordPress, it’s very easy to do.
Finding the Best Web Fonts For Your Site
Having decided you’re going to use web fonts, you now have a tough decision: which fonts to use?
In the good old days when all web developers had access to were those pre-installed web-safe fonts, this was a very easy decision. Did you want to use a serif font or sans-serif? (Serif fonts have a little line or stroke at the end of a larger stroke in each character, sans-serif fonts don’t.) Having made that decision, your choices were very limited.
But now, the world is your oyster.
Here are some tips to help you choose the best font for your site:
- Look at your printed materials. Are there fonts already being used that you can find as web fonts? If not, can you find something similar?
- Look at your competitors’ websites. What kinds of fonts are they using? I don’t recommend you copy them, but there may be certain styles that convey the right sort of image to your website users.
- Think about what kind of mood you want to convey with your fonts. Some fonts look more modern, others more traditional. Some are fun, others more serious.
- Stick to fonts that are easy to read for body text, and use more interesting fonts for headlines if you want.
- Pick from the most popular Google fonts – these will be familiar to website visitors and are easy to read.
Once you’ve chosen your fonts, spend some time experimenting with them. Font providers like Google Fonts let you type in custom text to see what it looks like in your chosen font. Once you see your own text in the font, it might help you decide if that’s the right font for you.
And remember, using web fonts makes it very easy to change your fonts so you can always switch to another option while you’re developing your theme or setting your site up.
How to Add Web Fonts with a WordPress Plugin
So you’ve picked your chosen font, now it’s time to add it to your site.
If you don’t feel comfortable adding code to your theme files, you can install a plugin that will let you access Google Fonts and use whichever font you want on your site.
The Google Fonts Typography plugin gives you access to the entire library of Google fonts and lets you review them via the WordPress Customizer.
Install the plugin on your site just as you would any other plugin, and then activate it.
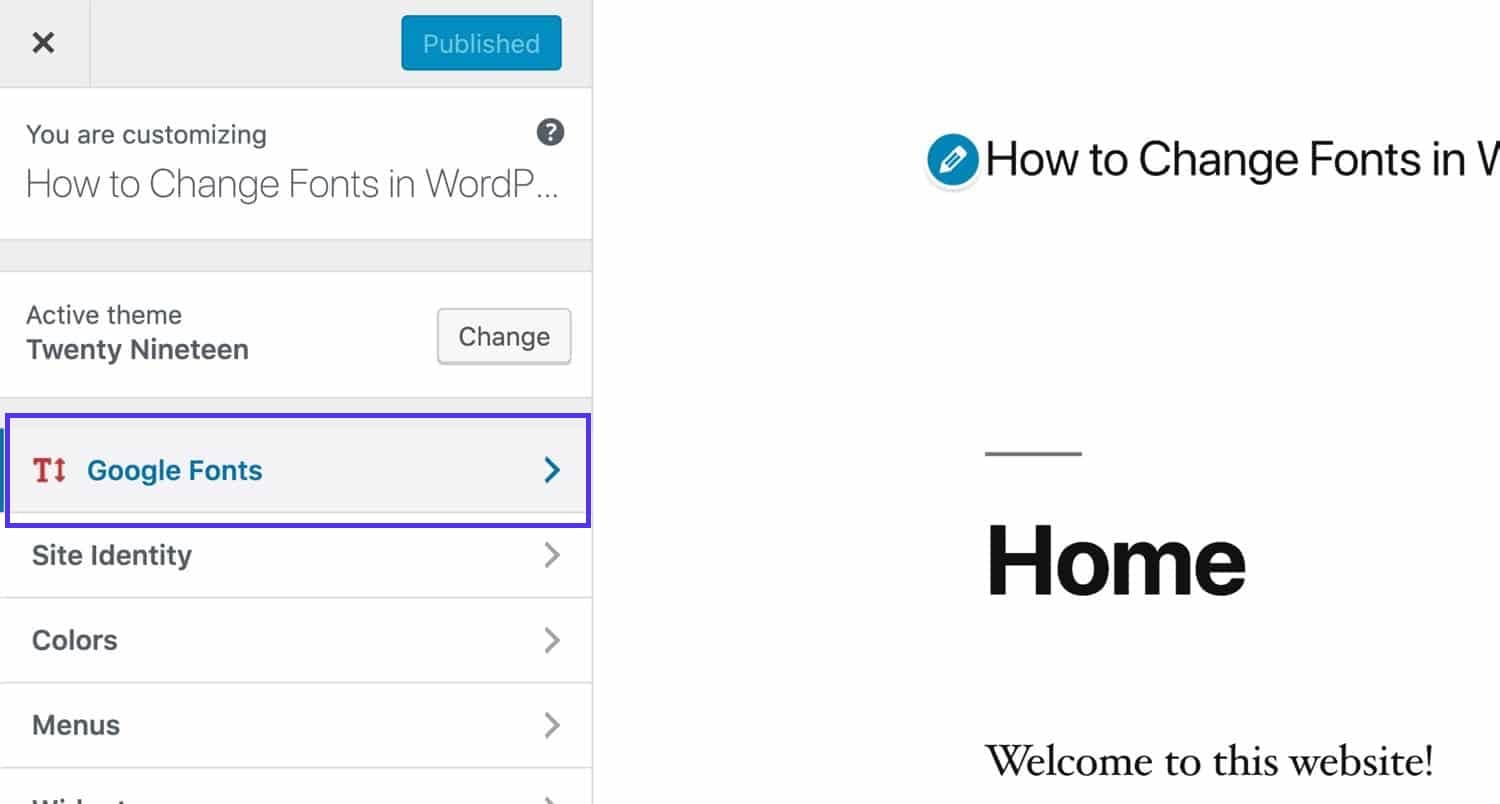
Go to Appearance > Customize to access the Customizer. You’ll see a section for Google Fonts.
Click on that link to access the settings for your fonts. Configure them as follows:
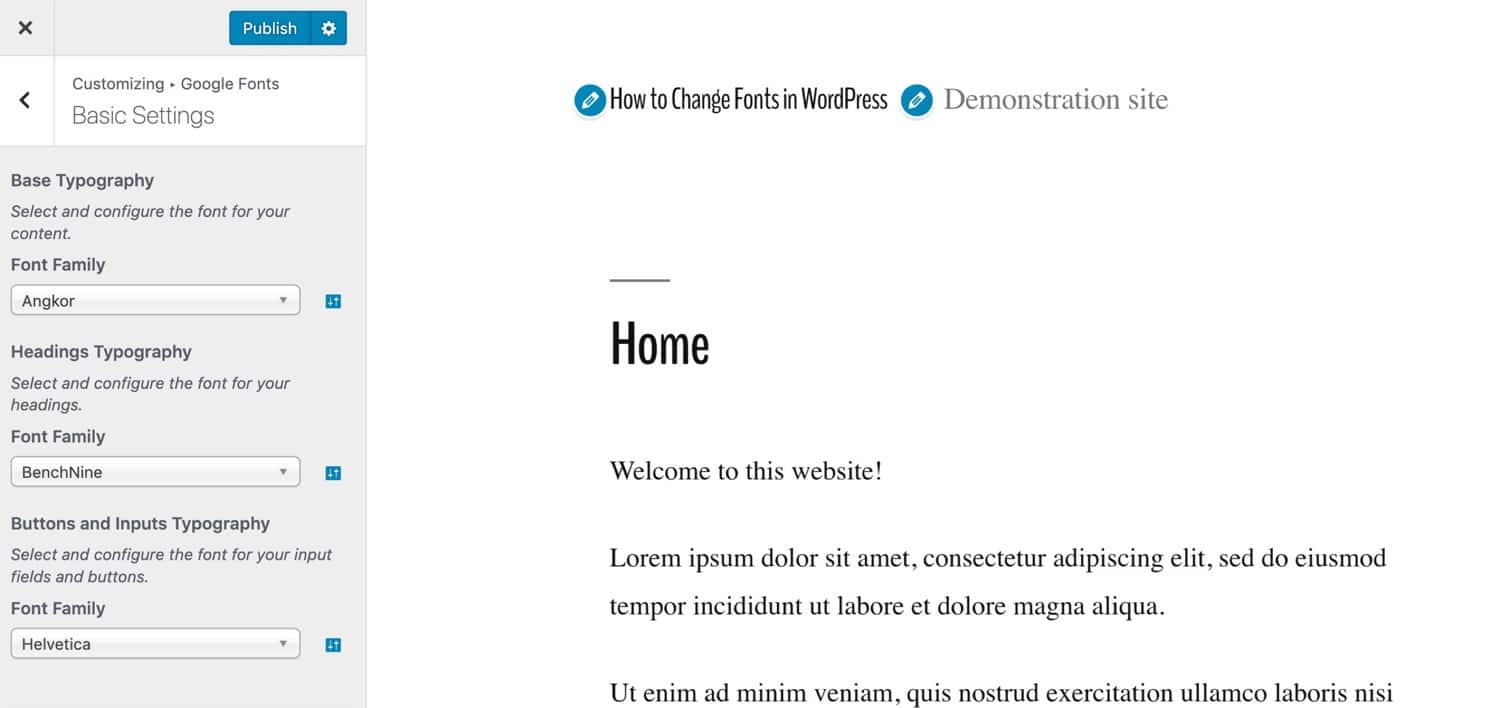
Basic Settings: configure the default font for your body text and your headings, as well as any buttons. In the screenshot below you can see that I’ve added an easy-to-read serif font for the body and a more distinctive font for headings.
Advanced Settings: Here you can configure branding (site title and description), navigation (your menu), content and headings in more detail, your sidebar and footer. You can also load fonts without assigning them to anything, which means you can add them to any custom CSS in the Customizer.
Font Loading: If there are any font weights you don’t need (i.e. bold, italics, that kind of thing), you can uncheck them here so they don’t slow your site down needlessly.
Debugging: Use this to force any fonts to display if they’re not working as they should.
Spend some time working with these settings and testing them in the Customizer to ensure they work the way you want. Then when you’re happy with your settings, click the Publish button. Don’t leave the Customizer without clicking Publish or you will lose your changes.
Editing Font Colors
The free version of the plugin doesn’t let you edit the colors of your fonts. To do that, you’ll have to either buy the premium version or use the Additional CSS option in the Customizer.
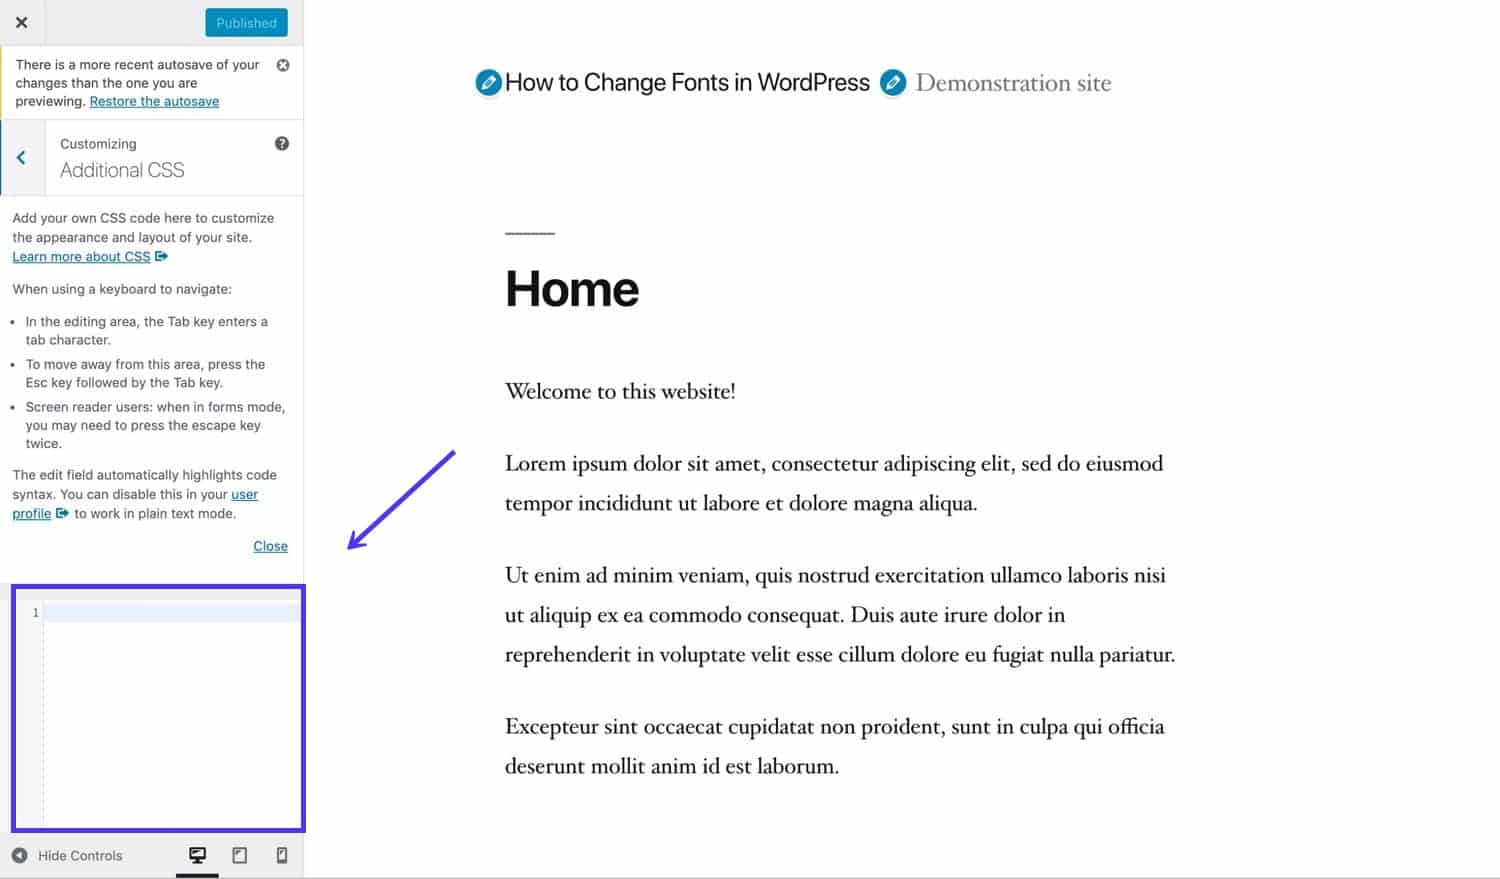
Go back to the home screen of the Customizer and click the Additional CSS tab. You’ll be presented with an empty text area where you can add your own CSS.
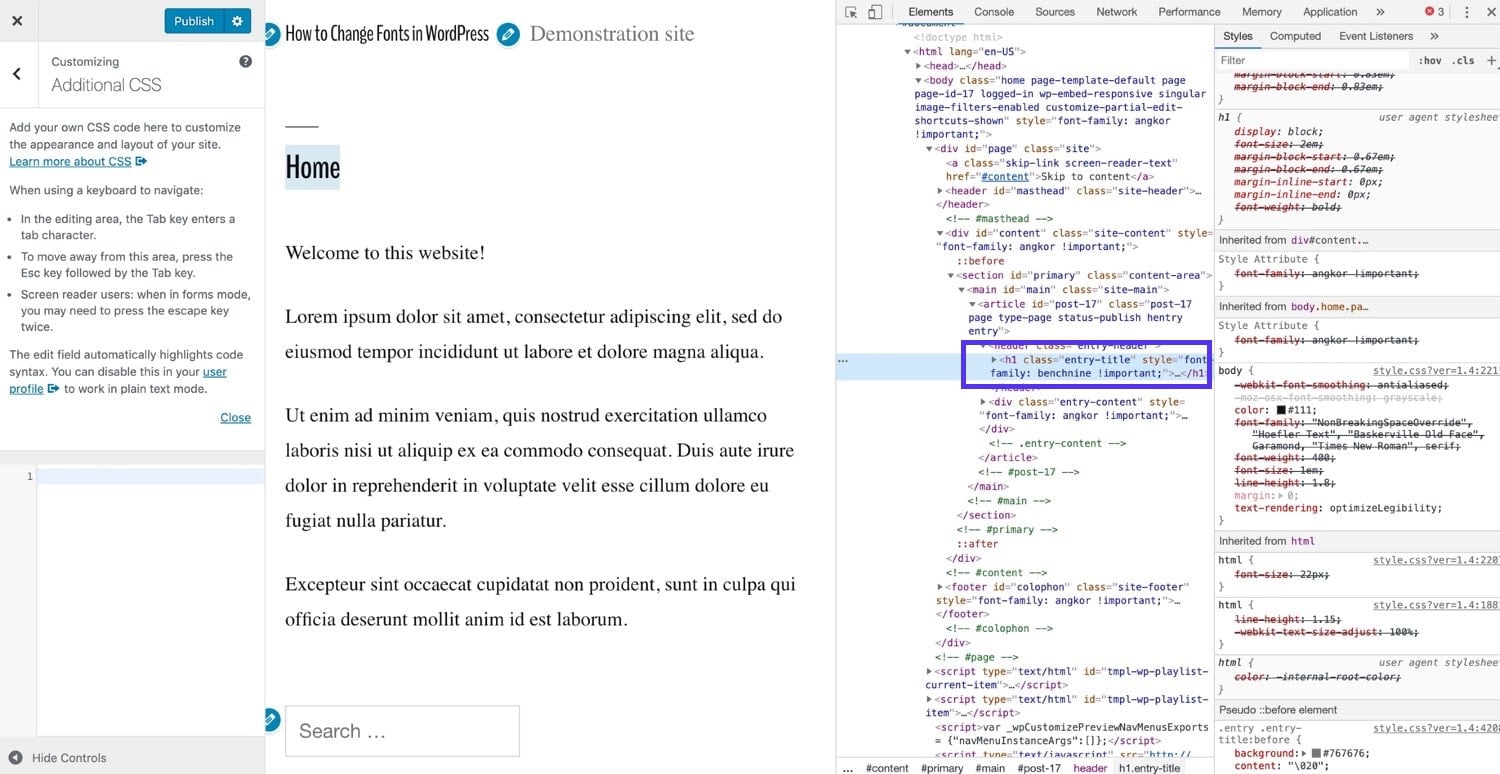
To find the element you need to style, select it and use the code inspector in your browser to find out what color styling it already has.
Below I’m using Google Chrome and I’ve targeted an h1 element.
In my WordPress theme, it’s inherited its color from the body element. I want to add something more specific. In the text area for your CSS, type in the CSS for your element and the color you want to use. Mine looks like this:
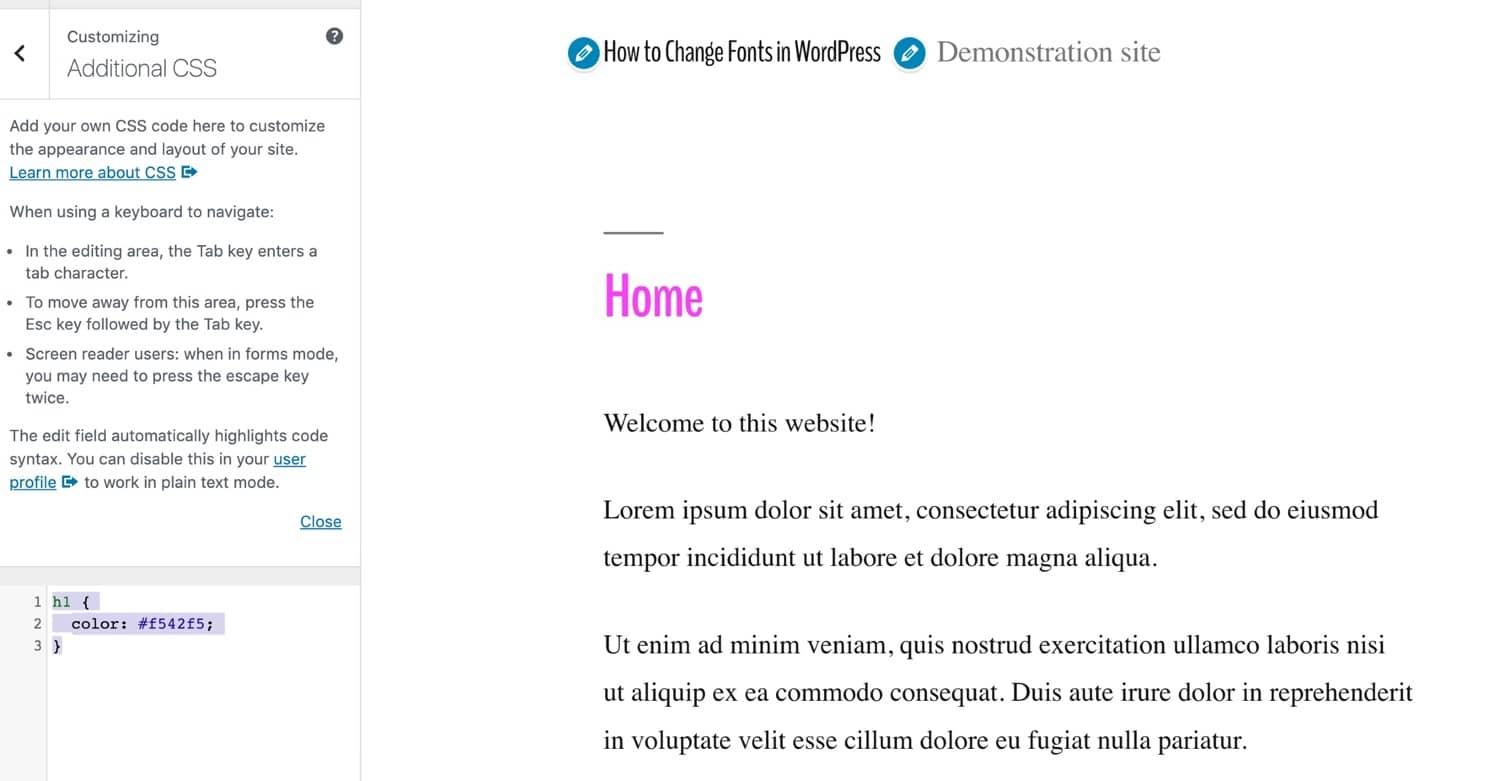
h1 {
 color: #f542f5;
}
That gives me a bright pink h1 element:
You can repeat this with any text elements you want to add color to, and also to any you want to add custom fonts too that weren’t included in the options in the other screens. If you want to know what CSS to use for fonts, read on to the section of this post on amending your fonts via CSS.
How to Add Web Fonts Manually
If you don’t want to add an extra plugin to your site and have access to the code for your theme, you can install and use web fonts by adding some code to your functions file and your stylesheet.
If your site is using a bespoke theme that you can edit, then you can edit the functions file and stylesheet from your theme. But if you’re using a third party theme that you bought or got from the WordPress theme directory, then you’ll need to create a child theme. You’ll then need to give it two files: functions.php and style.css.
Let’s work through the process of manually adding web fonts to your theme. I’m going to work with Google Fonts for this example, as that’s the most commonly used and it’s free.
Picking a Font and Grabbing the Link
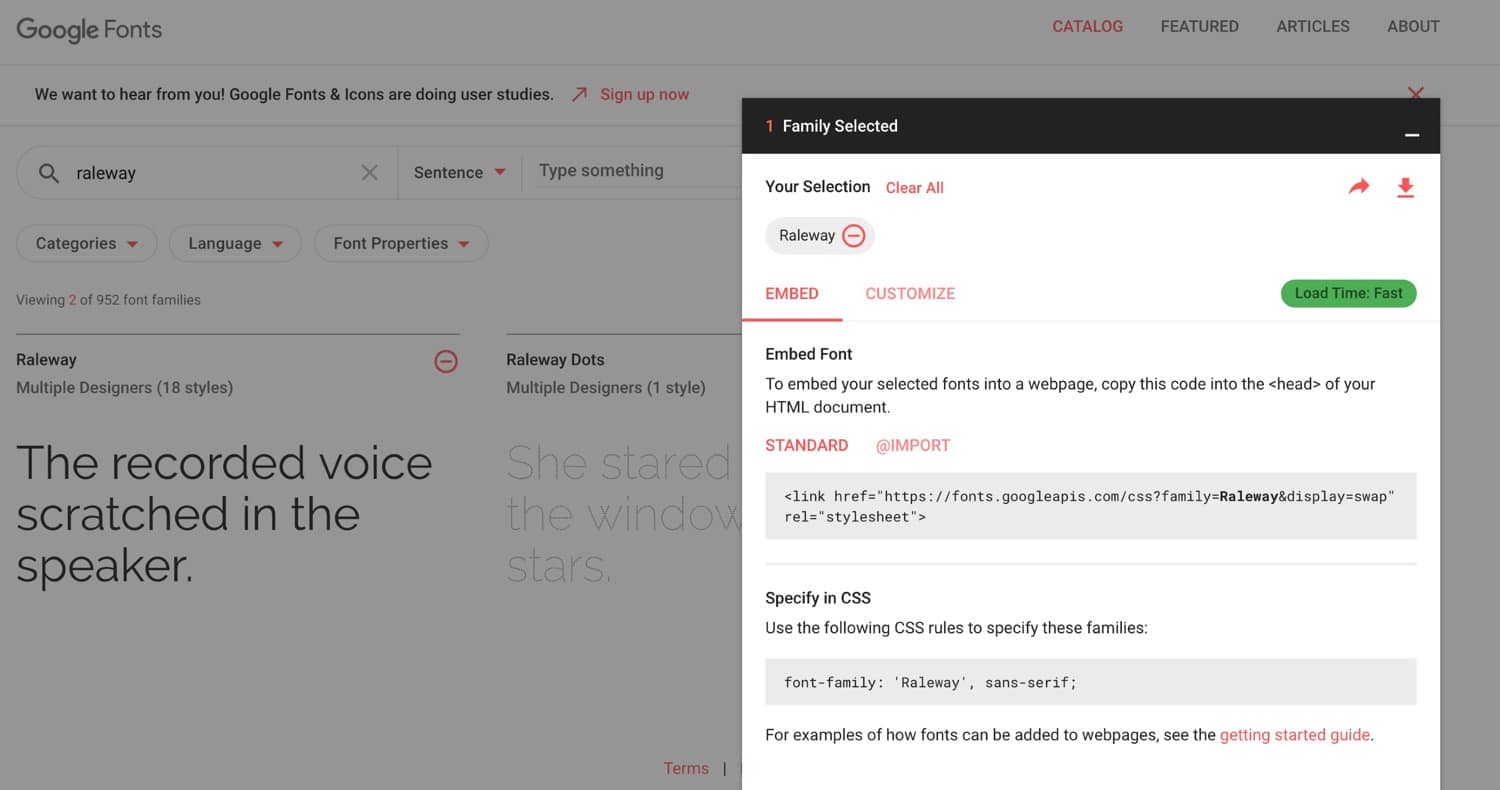
Start by choosing your font from Google Fonts. Add it to your library by clicking the plus icon next to it.
Click on the tab at the bottom of the screen for your library and you’ll see some code for you to add to your site. If you want to add extra font weights and styles, click the Customize tab and select the ones you want. Then go back to the Embed tab.
Don’t copy the code exactly: you’ll be using it, but instead of calling the font in the <head> section of your site’s header, you’ll be enqueuing the fonts. This is the correct way to do it in WordPress.
Instead, from the Embed font section, copy just the link to the font.
So, in my case, Google Fonts is giving me this code:
<link href="https://fonts.googleapis.com/css?family=Raleway" rel="stylesheet">I just need to copy this bit:
https://fonts.googleapis.com/css?family=RalewayEnqueuing the Font(s)
Open your theme’s functions file and add the following, replacing the link for my font with the link Google has given you for yours:
function kinsta_add_google_fonts() {
 wp_register_style( 'googleFonts', 'https://fonts.googleapis.com/css?family=Raleway');
 wp_enqueue_style( 'googleFonts');
}
add_action( 'wp_enqueue_scripts', 'kinsta_add_google_fonts' );
This enqueues the style from the Google Fonts servers. If you need to add more fonts to it in future, you can either add a new line to your function or add it into the same line, like so:
function kinsta_add_google_fonts() {
 wp_register_style( 'googleFonts', 'https://fonts.googleapis.com/css?family=Merriweather|Raleway');
 wp_enqueue_style( 'googleFonts');
}
add_action( 'wp_enqueue_scripts', 'kinsta_add_google_fonts' );
This will enqueue both the Merriweather and Raleway fonts.
Adding the Font(s) to Your Stylesheet
This won’t make the font work in your site yet: you still need to add it to your theme’s stylesheet.
Open the style.css file in your theme and add the code to style individual elements with your web fonts. Make sure you add it after any existing CSS for fonts, or it may get overridden by that.
Which elements you style will be up to you, but it’s common to use a legible font for the body element and something more fancy for the headings.
body {
 font-family: 'Raleway', sans-serif;
}

h1, h2, h3 {
 font-family: 'Merriweather', serif;
}
In the case above, everything on the page will use the Raleway font, except the h1, h2 and h3 elements, which will use Merriweather.
Now, save your stylesheet and check your site to make sure it all works as you expect. If the new fonts aren’t showing, try clearing your browser cache and checking that the fonts aren’t being overridden by any styling for fonts lower down in the stylesheet. This is why it’s a good idea to either add your new styling at the bottom of the stylesheet or to replace the existing font styling with your new styling (even better).
Adding a Backup Font
There may be occasions when someone visits your site and can’t access the web font files for some reason. Maybe they’re on a poor connection or using an old device that won’t render web fonts. Or maybe your web font provider is having technical issues.
For this reason, it’s a good idea to have a backup in place.
The code you’re given by Google fonts already has a backup of simply specifying serifor sans-serif, but we can go a step further than that.
Use one of the web-ready fonts that’ll already be installed on your visitor’s machine, and then include the second fallback of just serifor sans-serif, in case they’re using a mobile device that doesn’t even have the web-ready fonts.
Go back to your stylesheet and edit your CSS so it reads something like this:
body {
 font-family: 'Raleway', Helvetica, sans-serif;
}

h1, h2, h3 {
 font-family: 'Merriweather', Georgia, serif;
}
This means that people visiting your site will see your web fonts if all is well; but if it isn’t, they’ll see Helvetica or Georgia, or failing that, they’ll see whatever serif and sans-serif fonts their browser is able to load.
Hosting Your Own Fonts in WordPress
Some developers prefer not to use web fonts but instead to host fonts on their own servers and you might be one of them.
This could be for one or more of a number of reasons, including security, performance or budget.
If you’re concerned about performance, you can optimize the performance of your web fonts in a number of ways, which are covered later in this post. But if you’ve decided to go down the local route, you’ll need to know how to do it.
Why Host Your Own Fonts?
Using web fonts is often easier and can give you more flexibility as well as taking up less space on your server. But that doesn’t mean there aren’t occasions when locally hosting fonts might not be more appropriate.
Reasons you might want to host fonts locally include:
You might find that you can get around some of these issues
- You might prefer not to pull in resources from third-party providers for security reasons, knowing that your own site’s security is controlled by you.
- You might find that using a third-party service impacts on your site’s performance.
- You might have bought a font file and want to use that. Make sure your license includes website use as well as use in printed materials.
- Your site might be hosted locally, for example on an intranet, and users won’t have access to web fonts when they’re using it.
Where to Find Fonts You Can Host Locally
Many web fonts can also be downloaded for use as locally hosted fonts, but you’ll have to check that this is permitted by the license. In the case of Google Fonts, it is allowed.
You’ll also find that there are fonts not available as web fonts that you can download and host yourself. Any font file that you can download to your computer can also be uploaded to your website and stored there. If you need to use a font that isn’t available as a web font to tie in with your branding, this will be the solution but make sure your license allows it.
How to Add Locally Hosted Fonts to Your WordPress Site
So you know you want to host your fonts locally, how do you go about setting it up?
The process is different from using web fonts. You have to upload the file(s) to your site and you link to them in your stylesheet without having to enqueue them in your functions file.
Download and Convert the Fonts
Start by downloading the fonts you want to use. In Google Fonts, you can do this by clicking on the download icon when viewing the font in your library.
Unzip the font file on your computer and delete any font weights you don’t need to use on your site: there’s no point uploading files you won’t be using.
To use on your website, the files will need to be in the .woff format. If they aren’t (they won’t be if you got them from Google fonts), you can use a service like Convertio to convert them.
Upload the Fonts to Your Theme
Now upload the font file(s) to your theme, in wp-content/themes/themename, where themename is the folder for your theme. It’s a good idea to put any font files in their own folder in the theme, for example, a fonts folder.
If you’re working with a third-party theme, create a child theme for your font files and your stylesheet.
Once you’ve done that, you’ll need to add the font to your stylesheet.
Add the Fonts(s) in CSS
Open your theme’s stylesheet.
Add code like this, replacing the fonts I’ve used with your own:
@font-face {
 font-family: ‘Raleway';
 src: url( “fonts/Raleway-Medium.ttf”) format(‘woff’); /* medium */
 font-weight: normal;
 font-style: normal;
}

@font-face {
 font-family: ‘Raleway';
 src: url( “fonts/Raleway-Bold.ttf”) format(‘woff’); /* medium */
 font-weight: bold;
 font-style: normal;
}

@font-face {
 font-family: ‘Merriweather';
 src: url( “fonts/Merriweather.ttf”) format(‘woff’); /* medium */
 font-weight: normal;
 font-style: normal;
}
Add any more that you need to. Note that if you want to use the bold, italics, etc. variations of your font, you need to declare each one using @fontface and then specify the weight or style for each, as I’ve done above with Raleway for bold and normal weights.
Now add the styling for your elements, as you would when using web fonts:
body {
 font-family: 'Raleway', Helvetica, sans-serif;
 src: url( “/fonts/Raleway-Medium.ttf” );
}

h1, h2, h3 {
 font-family: 'Merriweather', Georgia, serif;
}
Your locally hosted fonts will now work with your theme.
How to Change Fonts in WordPress
Now you know how to install fonts in your WordPress site in one of two ways. How about editing them? What about changing them?
You can edit your fonts in one of three ways: via the Customizer, in the post or page editing screen, or using CSS.
Let’s look at each of those options for changing the font style, color, and size.
How to Change Font Styles in WordPress
Let’s see how we can do that both if you’re using the Block Editor or the Classic Editor.
Changing Font Styles in Block Editor (Gutenberg)
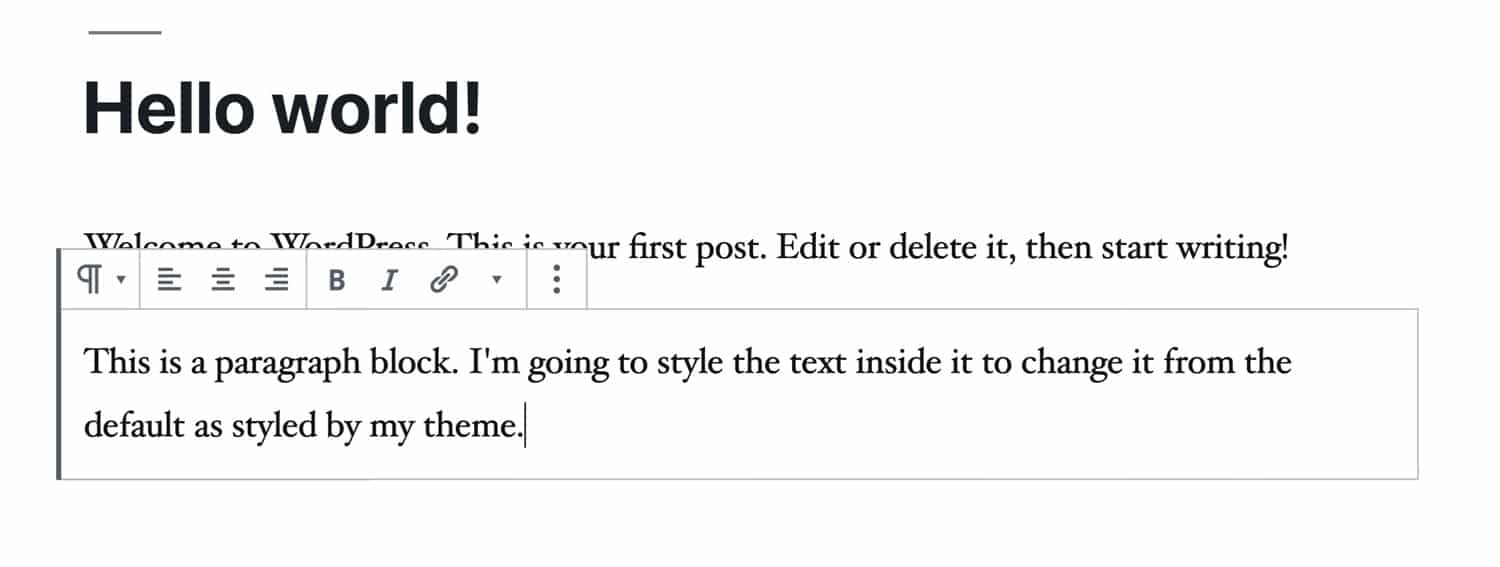
If you’re using a recent version of WordPress with the Gutenberg editor, you can change the style of your text when editing it in your post or page.
Select the block you want to edit and a styling menu will appear above it.
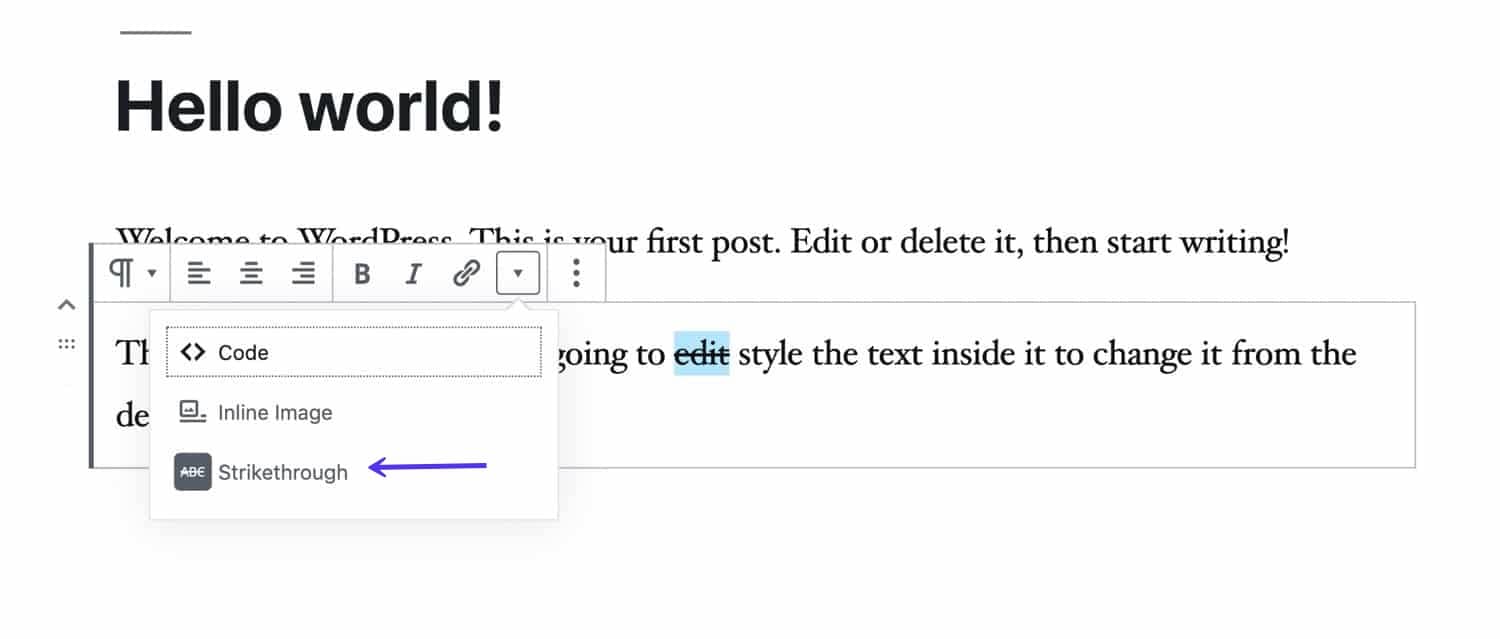
Select the text you want to edit and then click on the icons to make it bold or italicized. If you click the arrow next to those, you’ll see that you can also select strikethrough.
Changing Font Styles in the Classic Editor
If you’re running an older version of WordPress or you have the Classic Editor plugin installed, you can also edit font styles. (If you don’t want the Gutenberg editor, it’s better to update WordPress and disable Gutenberg.)
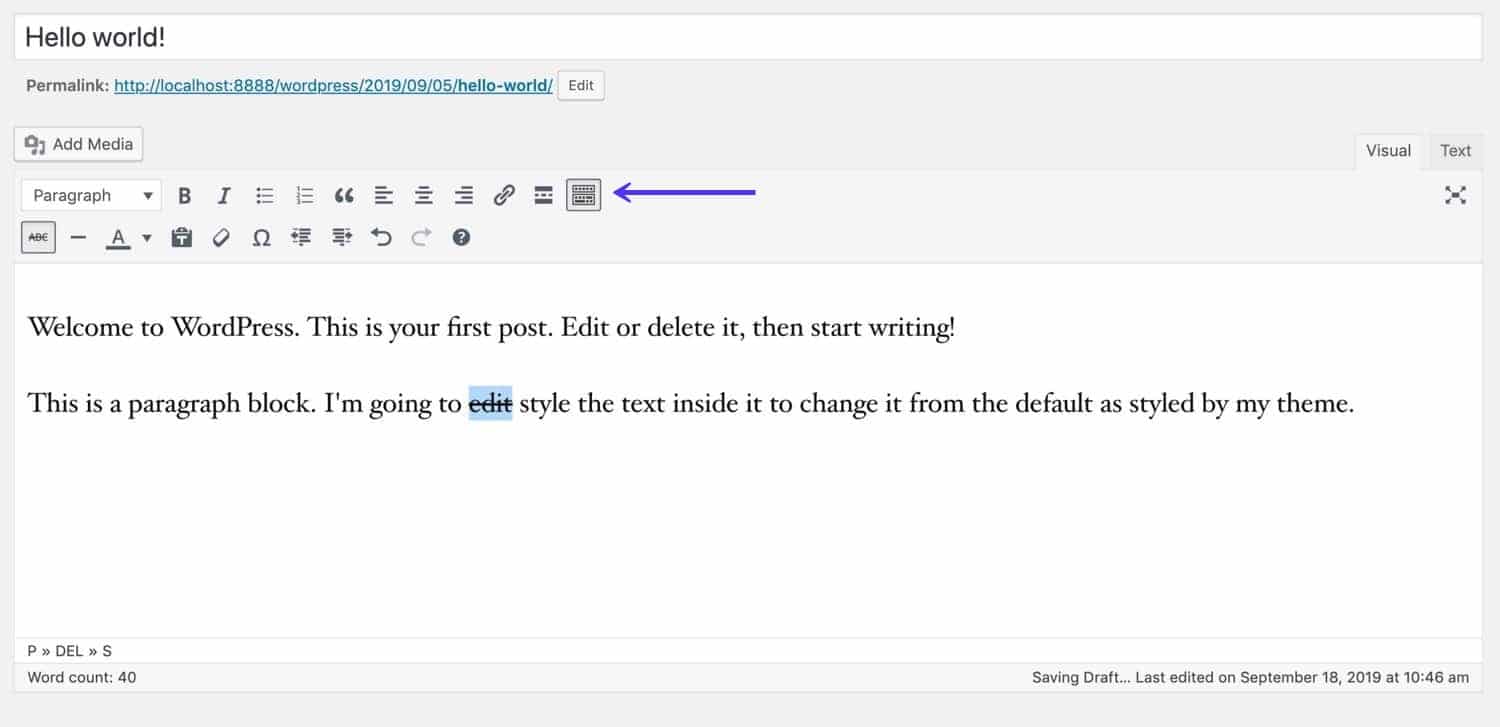
The Classic Editor includes a toolbar above the main editing pane where you can change the styles of your text. If you click on the Toolbar Toggle icon to its right, you can access more options, including strikethrough.
Changing Font Styles in the Customizer
If you want to change the font style for a specific element, you can do this by adding manual CSS to the Customizer.
Open the Customizer and click on Additional CSS. This will open a screen where you can type in CSS.
Now you can type in the CSS for your fonts in the box. So if you wanted to change all h1 and h2 elements to italics, you would add this CSS:
h1, h2 {
 font-style: italics;
}
Changing Font Styles in Your Stylesheet
If you’re comfortable adding code to your stylesheet, this is a better way to do it.
If you’re using a third-party theme, create a child theme for your own styling otherwise any changes you make will be lost when you update the theme. You’ll have to create a stylesheet in the child theme to tell WordPress that it’s a child theme: that’s where you put your new font styling.
If you’re using your own theme, you can edit and amend the CSS in your own stylesheet. The file is style.css and you’ll find it in your theme folder in wp-content/themes.
Add any font styling at the end of your stylesheet so it isn’t canceled out by anything already there. Or even better, remove and overwrite any existing font styling, unless you want to retain it.
Change the weight of an element with font-weight:
span.featured {
 font-weight = bold;
}
Change the style of an element with font-style:
span.featured {
 font-style = italic;
}
Change the alignment with text-alignment:
span.featured {
 text-alignment: center;
}
How to Change Font Colors in WordPress
Another change you might want to make is to change the color of certain text in your site. Beware of going overboard with this: your theme has been designed with colors that work well together and if you add too many colors, it could look garish and unprofessional.
Changing Font Colors in Gutenberg
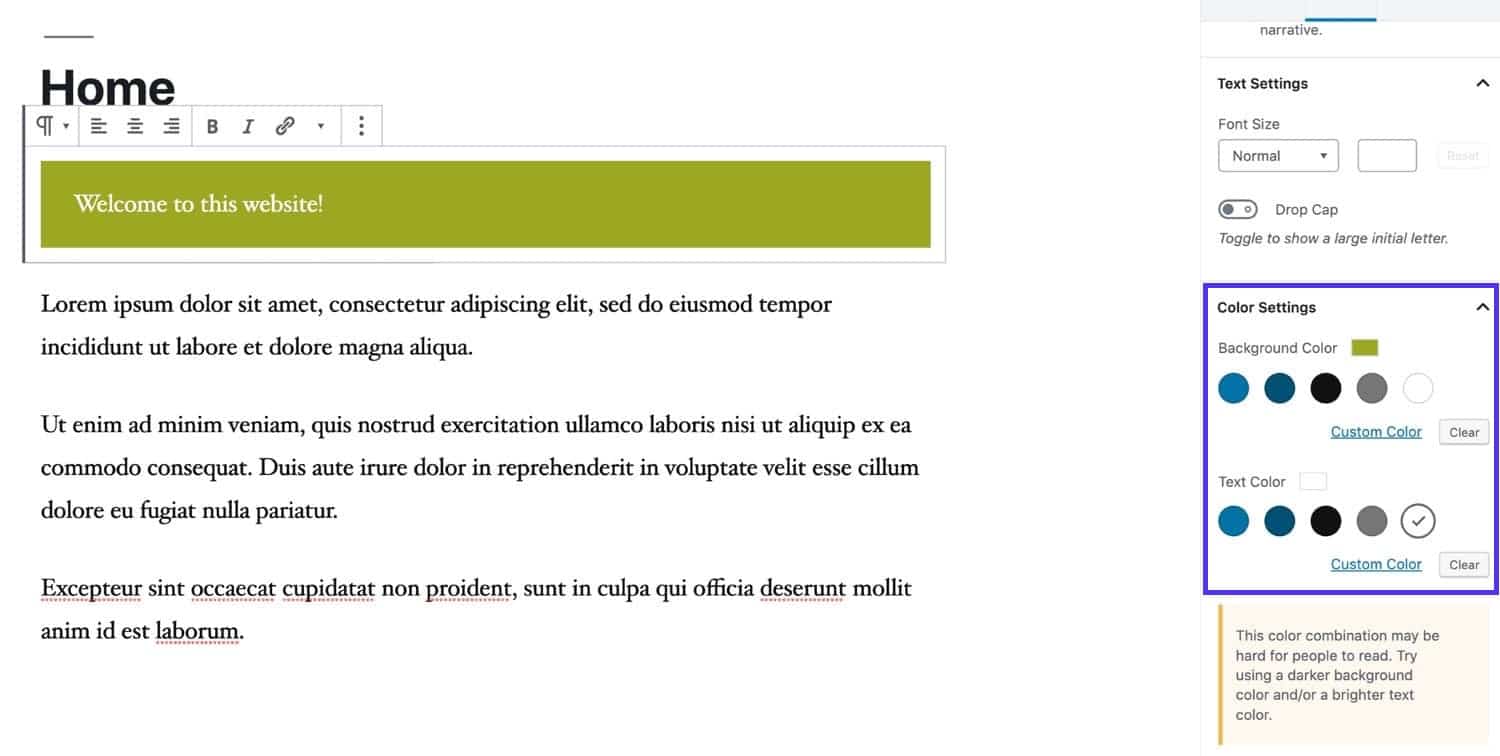
Gutenberg text blocks let you edit text color and background. To do this, open the block you want to amend and click on the Color Settings tab in the Block section on the right of the screen.
From here you can edit the background color and the text color for text blocks.
Note that WordPress will warn you if the combination of colors you use will be bad for accessibility, such as in the example I’ve used above. Avoid the temptation to go overboard with your colors – after all you chose your theme because its color design was appropriate for your site, and adding lots more colors could make it look garish.
If you click the Advanced tab below the Color Settings tab, you can also add a class to that block, which you can then style in the Customizer or your stylesheet. So for example if you added a class of .featuredto your block, you could then style it using that class.
Changing Font Colors in the Classic Editor
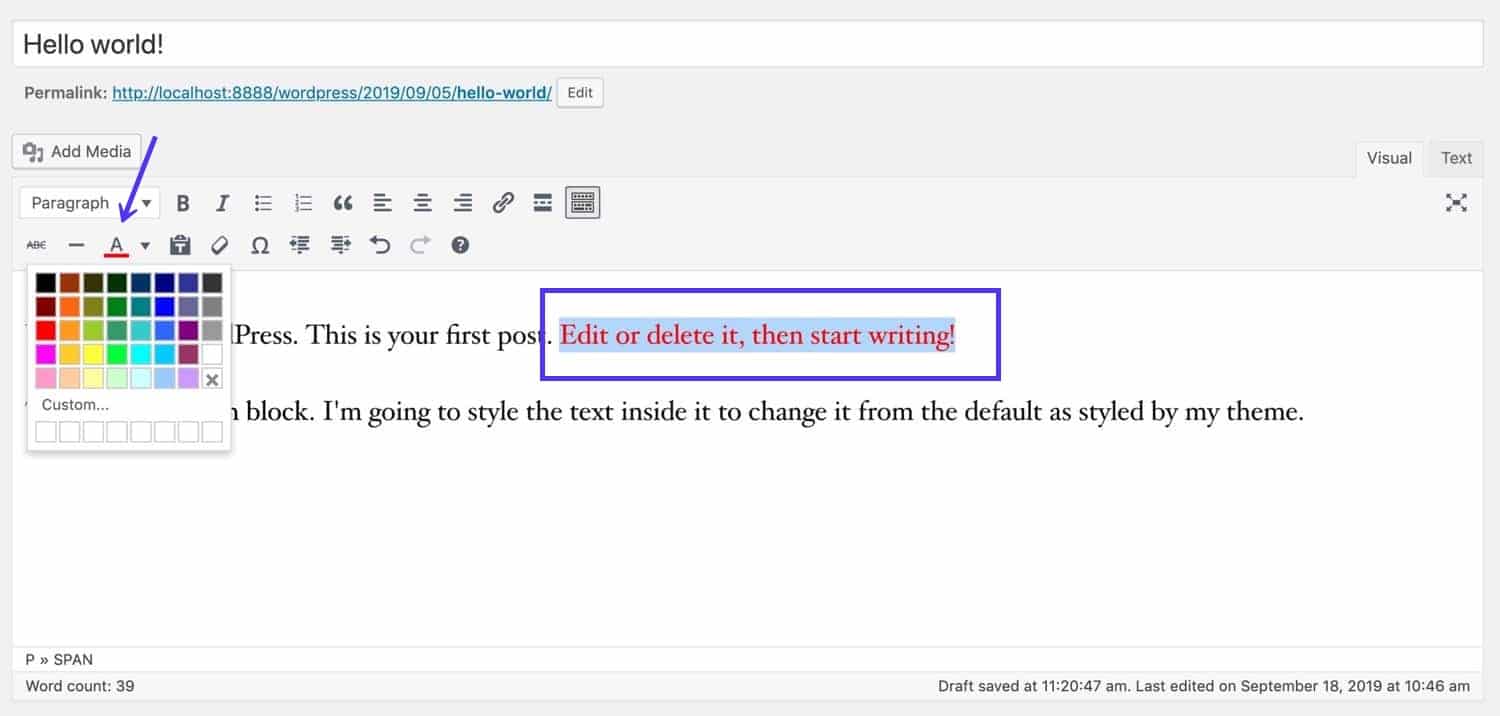
The classic editor’s toolbar lets you change the color of whatever text you select. So you can select an individual word and change its color. Below I’ve made a sentence red.
While this does, in theory, give you plenty of flexibility, beware overusing it. If you start adding lots more colors to your text it could result in a site that’s difficult to read and bad for accessibility.
Changing Font Colors in the Customizer
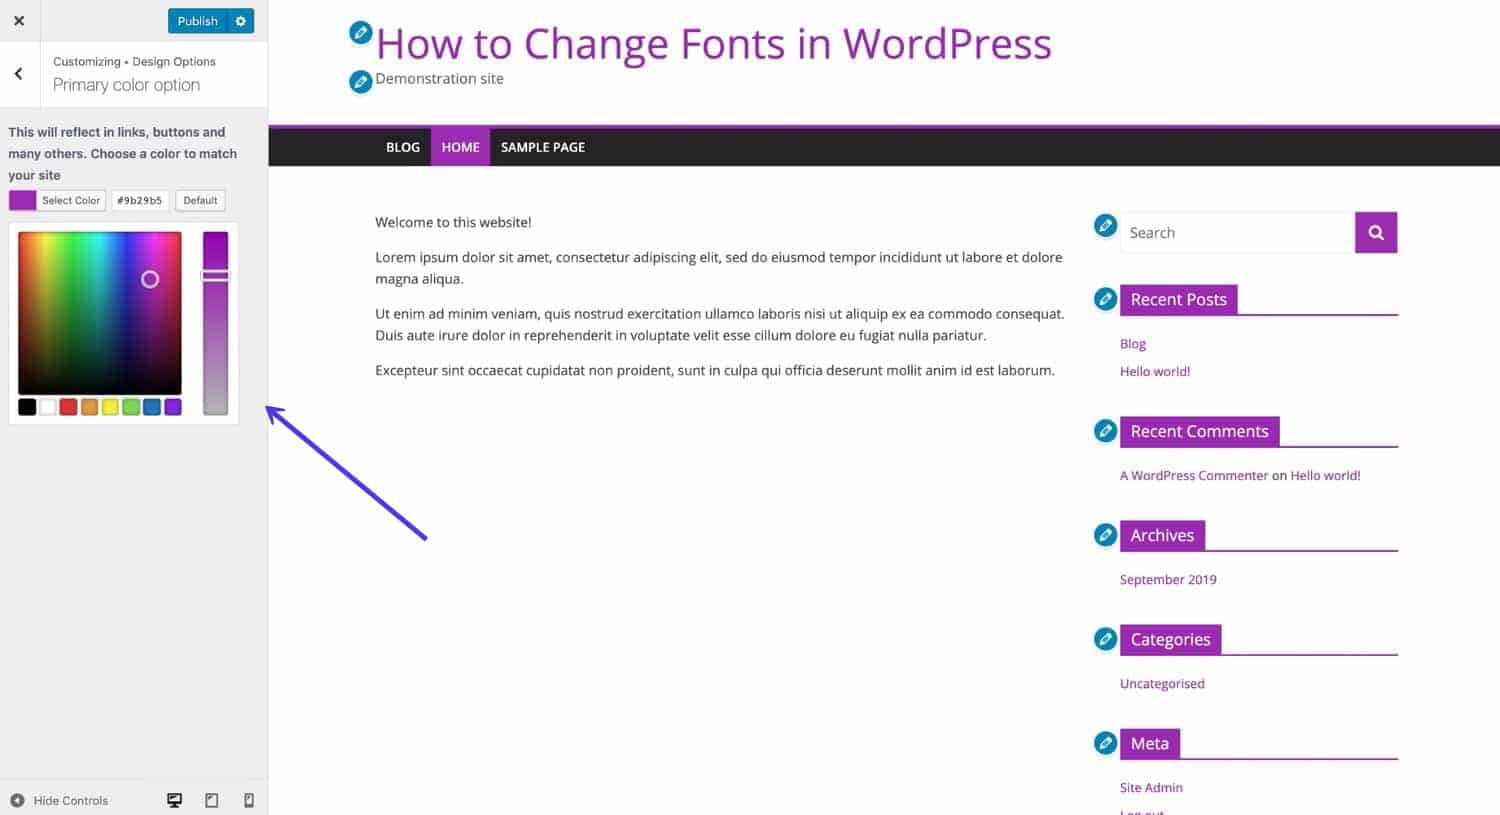
If your theme includes options to change the website color scheme, this is the best place to do it.
For example, in the site below I’m using a theme that lets me choose a new color scheme for the entire theme. This helps ensure the new colors work together well and are coherent.
The options for this will vary according to your theme – some themes let you target headings, links and other elements and change their color.
If you want to target specific elements to change their color but this isn’t an option with your theme, you can add CSS in the Customizer to do this.
Select Customize > Additional CSS, and type your CSS in the text box.
For example, if you want to change the color of your h1headings, you type this:
h1 {
 color: #564534;
}
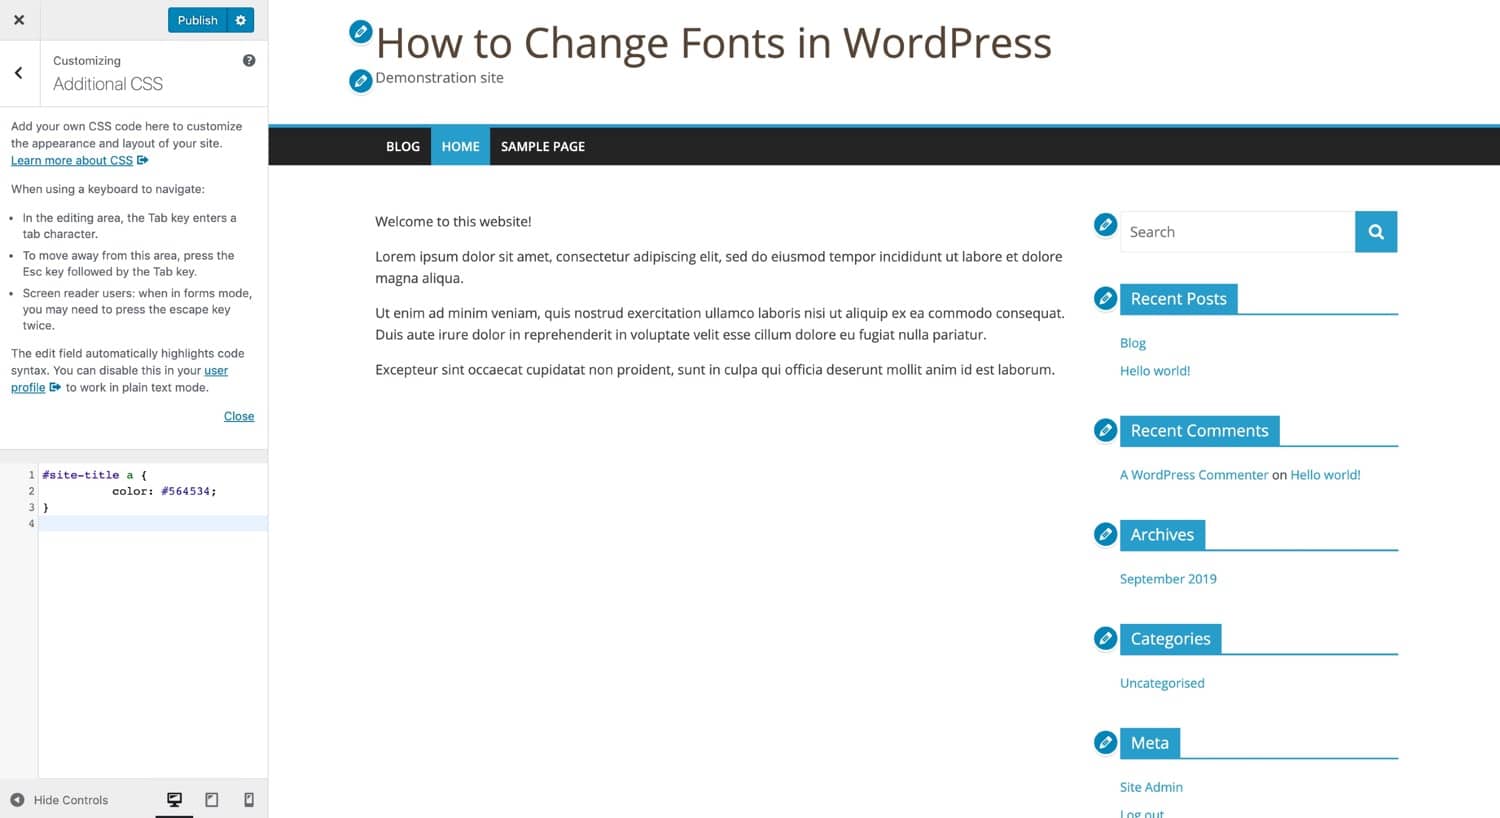
If that doesn’t work, you may need to add more specific CSS. In my theme, the color for the site heading link is coded using the #site-titleID, so I need to add this CSS:
#site-title a {
 color: #564534;
}Replace the color I’ve used above with your own color.
When you’re happy with your changes, click the Publish button.
Changing Font Colors in Your Stylesheet
As with font styles, you can also edit your theme’s stylesheet (or create a child theme) to change the font colors.
Change the color with color. Below I’m changing the main color for my site’s text, using the bodyelement:
body {
 color = #222222;
}
Make sure you override any existing styling for the same elements and that you also style any elements that inherit that styling if you want them to have a different color. All text will inherit the color of the body element unless it has its own styling.
Changing Font Sizes in WordPress
For accessibility reasons, you might decide you want your fonts to be bigger than they are by default in your theme. Or you might decide the headings in your widget areas are too small, for example.
Changing Font Size in Gutenberg
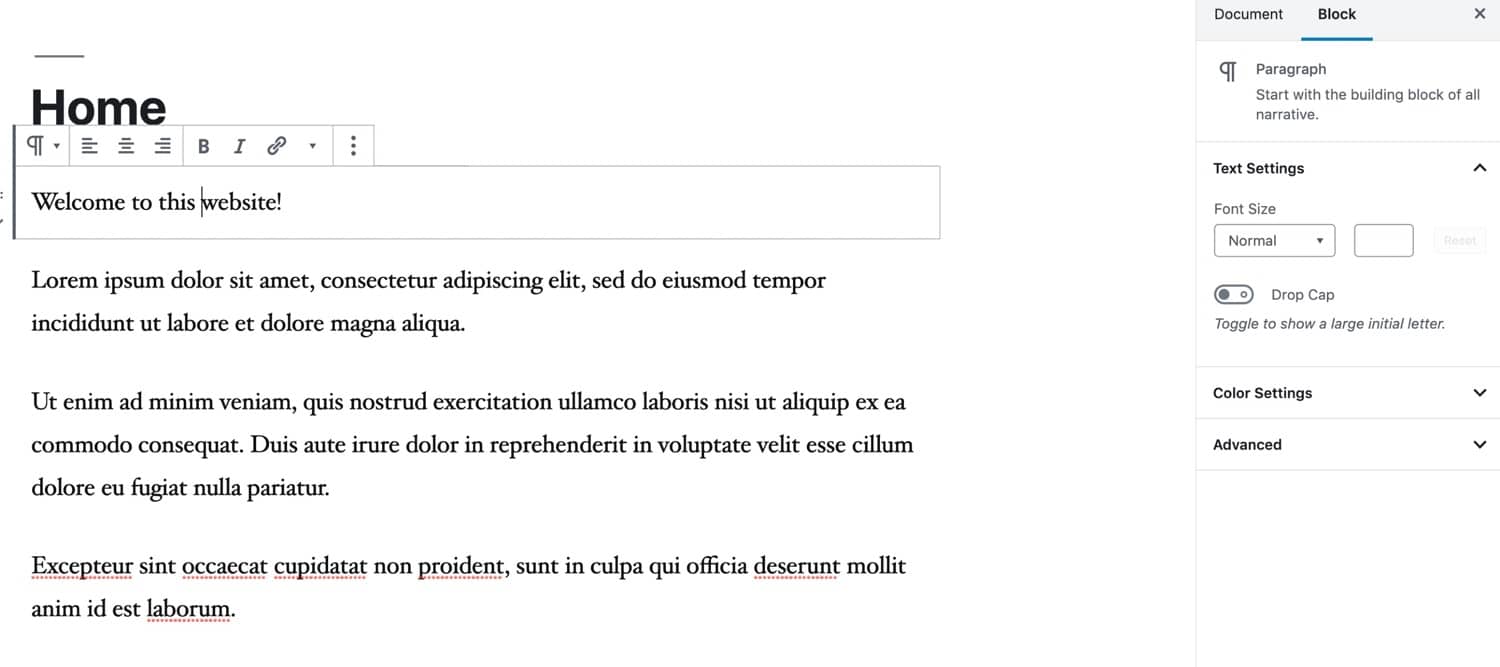
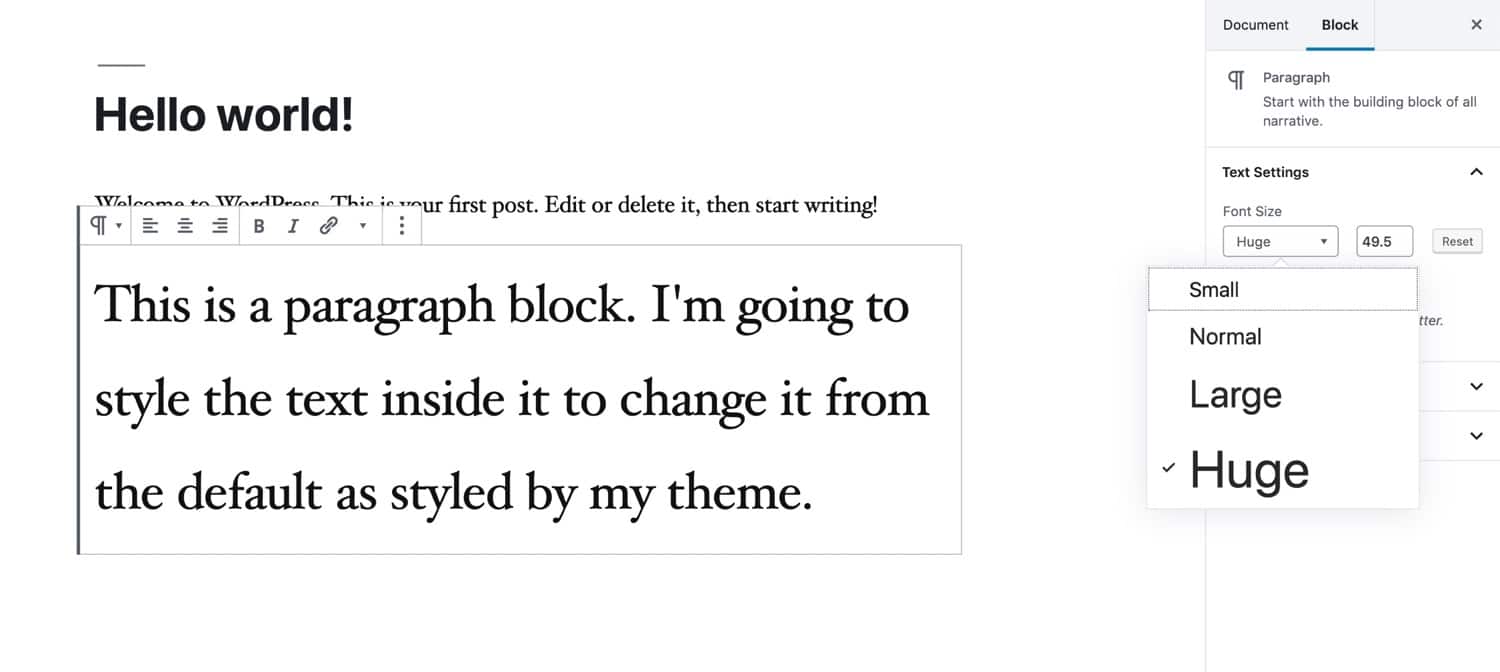
With the Gutenberg editor, you can change the size of the text within each block.
Select the block and then click on the Text Settings tab in the Blocks menu on the right of the screen. You can make the text in the block smaller or larger, as shown below.
Beware doing this too much: if all the paragraphs on your page are different sizes, it will look disjointed and be difficult to read.
Changing Font Size in the Classic Editor
The classic editor doesn’t give you the option to select specific text and change its size: so if you do need this feature, you’ll need to upgrade to Gutenberg. Sorry!
Changing Font Size in the Customizer
Depending on your theme, you may have an option to change the font sizes in the Customizer, either changing the font size for the whole site or targeting headers and body text.
If your theme doesn’t include a Customizer option to change font sizes, but you can use the Additional CSS option. Go to Customize > Additional CSS and type the CSS in the box.
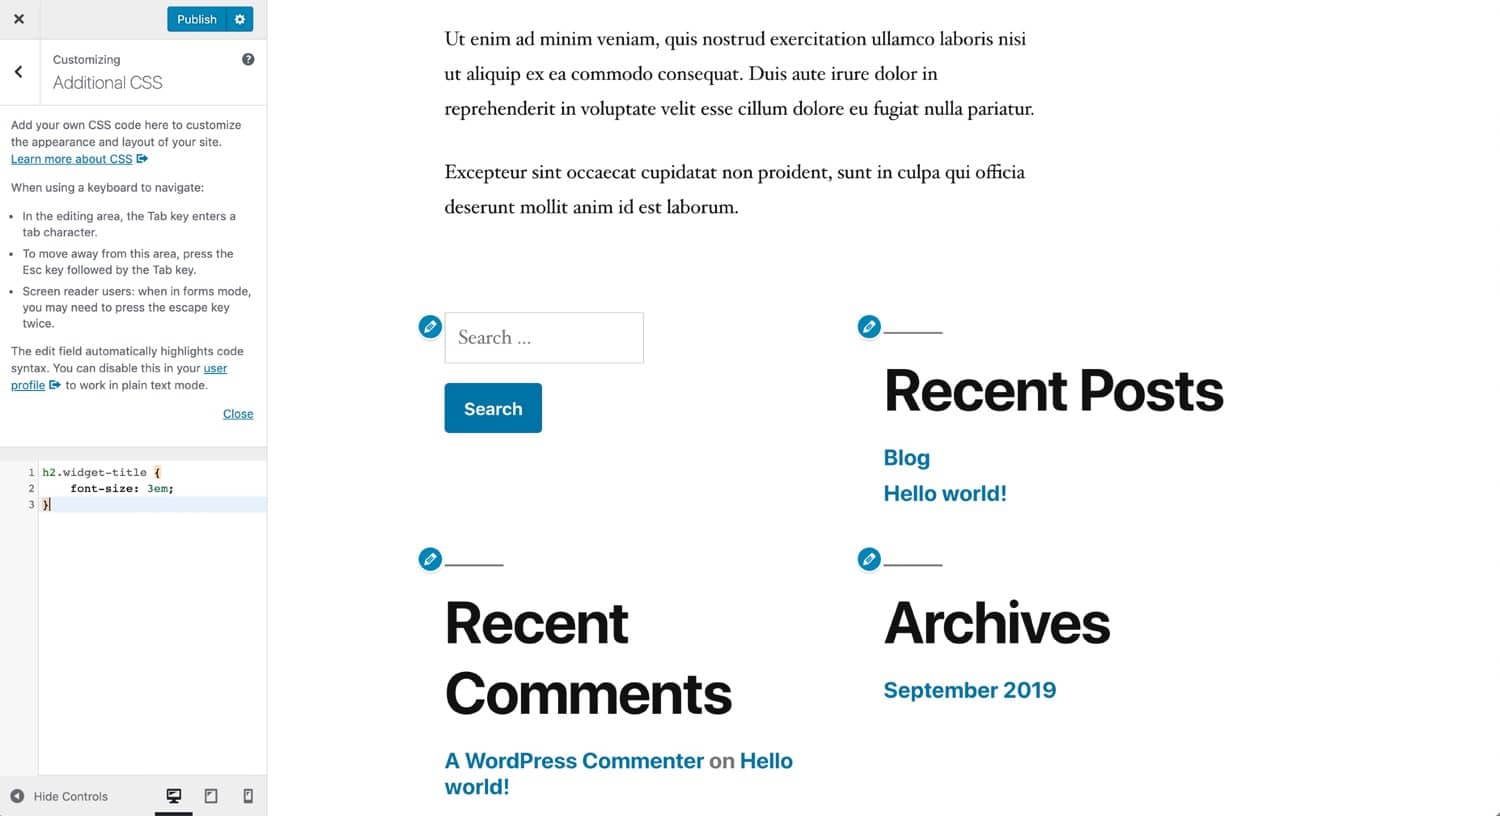
Below I’m making the headings in the widget areas bigger, with this CSS:
h2.widget-title {
 font-size: 3em;
}Maybe that’s a bit too big, but it gives you the general idea.
Changing Font Size in Your Stylesheet
Changing the size of fonts in your stylesheet works in a similar way to changing any other styling for your fonts.
If you want to change the size of all the text in your site, you would use the bodyelement:
body {
 font-size: 14px;
}
For the bodyelement you use pixels, but for other elements you use emso the size is relative to the size of the bodyelement.
h1,
#site-title {
 font-size: 2em;
}
Remember if you’re going to make changes to the fonts in your theme stylesheet, test it on a development or staging site first so you don’t run the risk of ruining your live site.
How to Optimize Fonts in WordPress
Whether you’re using web fonts or locally hosted fonts, it makes sense to do everything you can to optimize your fonts.
Here I’ll give you some tips on optimizing your fonts, both for speed and for design.
Optimizing Fonts for Performance
If you’re using web fonts on your site, you’ll want to do everything they can to ensure that they’re delivered to your pages as fast as possible and that the fact they’re hosted elsewhere doesn’t slow things down.
- Use caching to ensure pages don’t need to be rebuilt every time they’re loaded. Kinsta hosting plans come with caching built-in.
- Use a web fonts provider that delivers fonts using a Content Delivery Network or CDN. Google Fonts does this and it speeds up delivery of the fonts.
- Only use those fonts you need. Don’t enqueue variations of fonts (weights, styles) you won’t be using in your stylesheet. If you find you need them at a later date, you can always add them then.
- If using web fonts, make sure you enqueue them properly. Don’t use an @import line in your stylesheet, even if this is what your web font provider tells you to do.
- When adding CSS manually, add it to your theme’s stylesheet and not to the <head> section of your header.php file. This is one reason why it’s better practice to code the CSS manually into your theme rather than using the Customizer or a block, as both of those will add inline CSS to the page instead of adding it to the stylesheet.
- Consider using CSS inlining to shave a few extra milliseconds off page load times. This is a process that uses base64 encoding to add CSS from your stylesheet into the page before loading it, saving the browser having to load extra files. It may seem counterintuitive given the advice above about not writing inline CSS, but it still works from a separate CSS file and doesn’t mean manually coding inline CSS. If you’re loading multiple fonts, inlining can speed up your site a little.
- Use minification to reduce the size of your stylesheet. This can easily be done if you are a Kinsta customer by taking advantage of the code minification feature located right in the MyKinsta dashboard. This allows customers to enable automatic CSS and JavaScript minification with a simple click, speeding up their sites with zero manual effort.
- If you’re hosting fonts locally, only upload the files for the fonts and the font weights and styles you need. Only add those variations that you need using the @font-face declaration.
- Consider using a CDN to host your own fonts instead of hosting them on your own server.
- When hosting your own fonts, include additional formats: woff2, woff, ttf, and eot. Browsers can then select the version that’s going to load fastest.
- If you’re using a different font for your site title, enqueue just the characters you need instead of the whole font library.
So if your site title is Kinsta, you could make a small performance improvement by ensuing the stylesheet like this:
function kinsta_add_title_font() {
 wp_register_style( 'googleFonts', ‘https://fonts.googleapis.com/css?family=Raleway&text=“kinsta');
 wp_enqueue_style( 'googleFonts');
}
add_action( 'wp_enqueue_scripts', 'kinsta_add_title_font' );
Optimizing Fonts for Design
As well as optimizing the performance of your fonts, it also makes sense to make sure they’re visually optimized: that they fit well with the design of your site and with your offline materials.
This is particularly the case if you use a plugin or a child theme to add extra fonts on top of the ones already bundled with your theme. There is a risk of your theme looking messy if there are too many fonts in too many colors and styles.
Before you add extra fonts to your site, consider the following:
- Are the new fonts consistent with your existing fonts? Do they convey a similar style or mood?
- If you need to match a font that’s been used for print materials but can’t use the same font as a web font, try finding as close a match as possible on Google Fonts.
- Are the fonts you’ve chosen consistent with your brand? If you’re running a serious business, you don’t want to use Comic Sans (in fact, whatever kind of website you’re running, you don’t want to use Comic Sans).
- If you’re changing the colors of your fonts, try to use colors that are already in the design of your theme or that coordinate with them. Adding too many colors will make your site look garish and unprofessional.
- If you’re trying to pick out a pair of fonts on Google Fonts, try using a service like fontpair to find two that work well together.
The fonts you use in your design will have an impact on the impression visitors get when they reach your site. Make sure you’ve considered this and chosen fonts that will reinforce your brand.
Working with Variable Fonts
Variable fonts are a new kind of fonts that make adding more fonts to your site more efficient.
They allow more information to be stored in one font file, so that if you want variations on your font (bold, italics, etc.), you don’t have to load multiple font files, but can just load the one.
For a font with multiple font weights, styles and slants, this could save a lot of file space and make the process of enqueuing the font or adding it via @fontface easier too.
Variable fonts are supported in the latest versions of Chrome, Edge, Firefox, and Safari, but not by older browsers; so if you do use them, you’ll need a fallback. And there aren’t many variable fonts available just yet. Google Fonts doesn’t include any, but Google does support the specification, so it’s likely they will be added over time.
Font developers are working on creating more variable fonts and improving their reliability, so it’s worth watching progress so that you can use variable fonts to optimize your fonts once they become more stable.
Fonts are taken for granted but they’re crucial for ANY website (no exceptions). Learn how to change font, font size, and font color in WordPress! 🎨👨👦Click to Tweet
Summary
Changing fonts on your WordPress site isn’t a straightforward task. You have different possibilities to choose from:
- Using web fonts by installing a plugin.
- Using web fonts by coding them into your theme and enqueuing them.
- Hosting your fonts.
Then, you should focus on how to optimize your fonts for better performance. If you follow the tips in this guide, you should be able not only to change fonts in WordPress but also have more control over them in your theme.
Want to declutter your page or blog layout to make your readers focus on your content? Then, check out this: How to Remove the Sidebar in WordPress (4 Methods).
Get all your applications, databases and WordPress sites online and under one roof. Our feature-packed, high-performance cloud platform includes:
- Easy setup and management in the MyKinsta dashboard
- 24/7 expert support
- The best Google Cloud Platform hardware and network, powered by Kubernetes for maximum scalability
- An enterprise-level Cloudflare integration for speed and security
- Global audience reach with up to 35 data centers and 275 PoPs worldwide
Test it yourself with $20 off your first month of Application Hosting or Database Hosting. Explore our plans or talk to sales to find your best fit.
Эта статья поможет разобраться каким образом можно изменить шрифт различных элементов на сайте работающим под управлением WordPress. Мы разберем несколько способов.
Стандартный набор тем имеющихся в WordPress по умолчанию, после установки движка, достаточно скуп по функционалу. В том числе в них нет и настроек связанных с изменением шрифтов. Для нас это хорошо, так как поняв как изменить шрифт заголовков статей в стандартных темах WordPress, мы без труда это сделаем и на других темах. Именно заголовков, потому что это наиболее информативный элемент нашего сайта на WordPress, и владельцы сайтов зачастую хотят изменить шрифт именного этого элемента на сайте.
Хочется отметить, что перегружать сайт различными шрифтами не стоит. Достаточно использовать пару, максимум тройку, шрифтов на вашем сайте. В тексте желательно использовать только различное форматирование одного и того же шрифта: курсив, жирность, подчеркивание, размер. Мнение, что загрузив сайт различными шрифтами мы сделаем его более красивым и стильным, ошибочно. Если только у вас не стоят иные задачи и вы это делаете намеренно, и это, допустим, входит в вашу концепцию.
Итак перейдем к способам изменения шрифта на сайте WordPress.
Перед любыми изменениями вносимыми вами на сайт желательно создать полную резервную копию вашего сайта. Эта привычка убережет вас от множества проблем при работе с ваши сайтом.
В настройках темы WordPress
Как уже было сказано выше в стандартных темах WordPress нет встроенных настроек шрифтов. Поэтому пользователям стандартных тем этот способ не подойдет. Это вариант для тех у кого установлена другая тема WordPress. Все зависит, конечно от конкретной темы, говорить однозначно, что настройка шрифтов есть во всех темах будет не верно, но вероятность того, что вы найдете эту настройку в своей теме очень высока.
Итак как изменить шрифт заголовка статьи в настройках темы? Почему именно заголовка статьи, сказано было уже выше. В конце, концов этот пример наиболее нагляден и информативен.
В административной части, сайта на WordPress, идем в настройки темы по пути — Внешний вид — Настроить и оказываемся на странице настроек нашей темы. Скорее всего вы увидите раздел Типографика, Типография, Typography, Шрифты или что либо подобное, в зависимости от вашей темы WordPress. Переходим в этот раздел и настраиваем шрифт заголовка H1 или H2, именно он применяется в WordPress для заголовков статей.
Как правило, на предложат список системных шрифтов, поддерживаемых большинством браузеров по умолчанию, и большой список Google шрифтов. Остановимся подробнее на Google шрифтах.
Google fonts это библиотека свободных шрифтов для сайтов. Шрифт Google нужного семейства и начертания подгружается браузером с серверов Google вместе с вашим сайтом. Библиотека Google предлагает, на момент написания статьи, более 959 различных шрифтов. Отметим сразу, что большинство шрифтов не поддерживает кириллицу и использовать их на русскоязычном сайте смысла нет. На момент написания статьи, кириллических шрифтов в библиотеке нашлось 106.
Открыв длинный список Google шрифтов в настройках темы, мы столкнемся с ситуацией подбора шрифтов методом тыка. Большинство изменений не приведет к результату, так как только каждый десятый шрифт поддерживает кириллицу. Простой выход заключается подборе нужного нам шрифта на сайте Goole Fonts, переключив настройку Language на Cyrillic. Выбрав понравившийся нам шрифт, мы легко найдем его в длинном списке в настройках темы WordPress. На картинке выше приведен пример изменения шрифта заголовка статьи WordPress, с использованием темы GeneratePress, на компактный Open Sans Condensed. В некоторых темах есть возможность прямо в настройках выбора шрифта указать, что нам необходимы только кириллические шрифты, но это есть далеко не во всех темах.
Мы разобрали как изменить шрифт заголовка статьи WordPress используя возможности настройки темы.
Подключение Google шрифтов к сайту WordPress методом непосредственного редактирования файлов темы
Этот способ подойдет тем кто использует любые темы WordPress, так как мы будем вносить изменения непосредственно в код файлов темы.
Сразу предупрежу, что способ подойдет тем, кто хоть не много знаком с разметкой html и файлами CSS стилей и не пугается их редактировать. Так же не забывайте о предварительном резервном копировании сайта.
Начнем с предварительного выбора понравившегося вам шрифта на сайте Google Fonts. Находим нужный шрифт и нажимаем на знак + в правом верхнем углу контейнера со шрифтом. Можно выбрать несколько шрифтов если нужно подключить к сайту WordPress несколько шрифтов.
Затем открываем всплывающее наверх окно в правом нижнем углу — Family Selected. Переходим во вкладку CUSTOMIZE и отмечаем, что нам нужны кириллические шрифты.
Во вкладке EMBED выбираем @IMPORTи копируем код, в нашем случае это:
@import url('https://fonts.googleapis.com/css?family=Poiret+One&display=swap&subset=cyrillic');Теги <stile> и </style> копировать не нужно.
Мы отказываемся от варианта редактирования html-заголовка нашего сайта по причине того, что прямое редактирование кода темы не совсем корректно. Мы используем мощную систему CMS WordPress и при очередном обновлении нашей темы можем потерять сделанные нами вручную изменения.
Корректный способ добавления этого кода к нам в тему через её настройки в Административной панели WordPress вашего сайта. Внешний вид — Настроить — Дополнительные стили.
После добавления этого кода в Дополнительные стили при каждой новой загрузке сайта клиентским браузером будут загружаться выбранные вами шрифты с серверов Google.
Настало время указать браузеру какие именно элементы вашего сайта должны использовать этот шрифт, добавив код дополнительного стиля в настройки вашей темы WordPress. Само правило необходимо взять из того же окна Family Selected на сайте Goggle Fonts на вкладке EMBED чуть ниже.
В нашем случае это:
font-family: 'Poiret One', cursive;Теперь найдем какому конкретно элементу нашего сайта присвоить это правило. Сделать это можно с помощью инструментов для вебмастеров браузеров Chrome или Firefox. Перейдем на страницу с любой записью на вашем сайте и выделим текст заголовка. В меню правой кнопки мыши выберем — Посмотреть код или Исследовать элемент, в зависимости от используемого вами браузера.
Из приведенного примера видно, что заголовку статьи в используемой нами теме GeneratePress был присвоен класс .entry-title. В разных темах заголовку статьи может быть присвоен разный класс. Тут нужно повнимательней изучить код сайта в браузере и найти нужный нам класс. Попробуем использовать использовать класс .entry-title, полученный нами при изучении кода темы GeneratePress, в настройках Дополнительных стилей. Необходимо добавить следующий код:
.entry-title {

	font-family: 'Poiret One', cursive;

}
При изучении кода стандартной темы WordPress Twenty Nineteen, можно увидеть что для заголовков статей используется класс .entry .entry-title:
Вставляемый в этом случае код:
.entry .entry-title {
	font-family: 'Poiret One', cursive;
}
Добавить CSS стиль в тему сайта на WordPress можно несколькими способами, включая описанный нами :
- Добавить код в файл стилей на прямую из файлового менеджера на хостинге или отредактировать его локально скачав по FTP;
- Добавить код в файл стилей из административной панели WordPress в Редакторе стилей темы;
- Добавить код стиля в настройках Дополнительных стилей используемой темы WordPress.
У первых двух способов, как уже говорилось в этой статье, есть свои недостатки. При обновлении темы скорее всего будут обновлены и файлы с css стилями и вы потеряете свои настройки шрифтов. Так же нужно отметить, что некоторыми темами используются, так называемые mini файлы со стилями, сжатые или минимизированные файлы, трудно понятные человеком, но быстро читаемые браузером. В административной части WordPress, в редакторе некоторых тем, сжатые css файлы не отображаются .
Внедрение стороннего шрифта на сайт.
Это пожалуй самый продвинутый добавить сторонний шрифт на сайт. Файлы со шрифтами хранятся на вашем сервере, вместе с файлами сайта. В этом случае вы не зависите от сторонних сервисов. Загрузка шрифта происходит быстрее. Выбор шрифтов практически не ограничен.
Более того есть случаи когда это единственный выход внедрения шрифта на сайт. Допустим нужен конкретный шрифт, а он на сервисе Google Fonts не имеет кириллического начертания. Например шрифт Raleway на Google Fonts не поддерживает кириллицу. Этот же шрифт можно найти в интернете с поддержкой русских букв. Например на сайте WebFonts.pro. На этом же сайте можно найти множество других шрифтов, очень красивых и оригинальных.
Рассмотрим процесс внедрения шрифта в стандартную тему Twenty Nineteen сайта WordPress, на примере шрифта Raleway скаченного с сайта WebFonts.pro
Скачиваем архив с файлами шрифта по ссылке данной выше.
Нужно разархивировать содержимое архива в отдельную директорию у себя локально на компьютере. Открыв файл demo.html в браузере выберем нужное нам начертание шрифта. Чтобы получить начертания скаченных нами шрифтов, нужно открывать именно из разархивированной директории, а не из архива.
На мой взгляд, очень элегантно для заголовка смотрится начертание Raleway Thin:
Сохраним css правило из примера на демо странице для его внедрения на сайт:
.your-style {
    font-family: 'Raleway';
    font-weight: 100;
    font-style: normal;
}
Как мы уже выяснили ранее в этой статье в теме Twenty Nineteen для заголовков статей используется класс .entry .entry-title .
Отредактируем полученный нами код и получим:
.entry .entry-title {
    font-family: 'Raleway';
    font-weight: 100;
    font-style: normal;
}
Далее нужно в любом файловом менеджере используемом вами для доступа к файлам сайта открыть директорию /wp-content/themes/twentynineteen/fonts/ и закачать туда все файлы со шрифтами полученными нам в архиве. Файлы demo.html и stylesheet.css закачивать на сайт не нужно. Они очень наглядно показывают пример внедрения скаченного шрифта на сайт.
У себя локально на компьютере открываем файл с примерами стилей stylesheet.css
Находим фрагмент кода, понравившегося нам начертания:
@font-face {
	font-family: 'Raleway';
	src: url('Raleway-Thin.eot');
	src: local('Raleway Thin'), local('Raleway-Thin'),
		url('Raleway-Thin.eot?#iefix') format('embedded-opentype'),
		url('Raleway-Thin.woff') format('woff'),
		url('Raleway-Thin.ttf') format('truetype');
	font-weight: 100;
	font-style: normal;
}
Необходимо отредактировать в этом коде путь до файла со шрифтом на нашем сайте. В нашем случае это: /wp-content/themes/twentynineteen/fonts/ .
Получим следующий код:
@font-face {
	font-family: 'Raleway';
	src: url('/wp-content/themes/twentynineteen/fonts/Raleway-Thin.eot');
	src: local('/wp-content/themes/twentynineteen/fonts/Raleway Thin'), local('Raleway-Thin'),
		url('/wp-content/themes/twentynineteen/fonts/Raleway-Thin.eot?#iefix') format('embedded-opentype'),
		url('/wp-content/themes/twentynineteen/fonts/Raleway-Thin.woff') format('woff'),
		url('/wp-content/themes/twentynineteen/fonts/Raleway-Thin.ttf') format('truetype');
	font-weight: 100;
	font-style: normal;
}
Далее будем использовать уже описанный нами в этой статье способ внедрения css стиля на сайт через настройки Дополнительных стилей темы. Внешний вид — Настроить — Дополнительный стили.
Приведу еще раз весь код который необходимо добавить:
@font-face {
	font-family: 'Raleway';
	src: url('/wp-content/themes/twentynineteen/fonts/Raleway-Thin.eot');
	src: local('/wp-content/themes/twentynineteen/fonts/Raleway Thin'), local('Raleway-Thin'),
		url('/wp-content/themes/twentynineteen/fonts/Raleway-Thin.eot?#iefix') format('embedded-opentype'),
		url('/wp-content/themes/twentynineteen/fonts/Raleway-Thin.woff') format('woff'),
		url('/wp-content/themes/twentynineteen/fonts/Raleway-Thin.ttf') format('truetype');
	font-weight: 100;
	font-style: normal;
}
.entry .entry-title {
    font-family: 'Raleway';
    font-weight: 100;
    font-style: normal;
}
Вы этой статье мы подробно разобрали как внедрить шрифт на сайт под управлением CMS WordPress несколькими способами.
-
1.
Использование заголовков абзаца-
1.1.
Как добавить заголовок в блочном редакторе Gutenberg -
1.2.
Как добавить заголовок в старом классическом редакторе
-
1.1.
-
2.
Изменение размера текста в блочном редакторе Gutenberg -
3.
Как изменить размер шрифта в WordPress с помощью плагина TinyMCE Advanced -
4.
Как изменить размер шрифта всего сайта WordPress через CSS
Вам потребовалось изменить размер шрифта в посте или странице WordPress? Требуется увеличить размер шрифта у строки, абзаца или всего содержимого страницы? В этой статье мы расскажем, как легко изменить размер шрифта в WordPress.
Использование заголовков абзаца
Заходя на сайт, посетите в течение пары секунд определяет, подходит ли ему эта статья или нет. Он не вчитывается в абзацы, а бегло просматривает заголовки и всё, что выделяется из общей массы текста. Заголовки являются визуальными крючками, за которые цепляется взгляд пользователя. Если их не будет, посетитель просто уйдет с сайта.
Текст разделяется на абзацы, разные смысловые части текста разделяются заголовками/подзаголовками. Это также полезно и для SEO, ведь поисковые системы уделяют больше внимания заголовкам, чем абзацам.
Как добавить заголовок в блочном редакторе Gutenberg
Вы можете добавить заголовок, как новый блок или изменить тип блока на заголовок. Более подробно вы можете узнать о Gutenberg в нашей обучающей статье.
По умолчанию, при создании блок имеет заголовок 2 уровня. Мы рекомендуем использовать именно его, но если вы пишите большую статью, то можно использовать заголовки 3 и 4 уровня. Для этого нажмите на H2 и выберите нужный.
В правой части экрана экрана, в настройках блока, вы также можете изменить размер заголовка, выбрать его цвет.
Как добавить заголовок в старом классическом редакторе
Если вы воспользовались нашей статьей о том, как отключить Gutenberg и вернуть классический редактор, то добавить заголовок можно нажатием на раскрывающийся список “Абзац”.
Выделите текст, который вы хотите сделать заголовком и нажмите на нужный размер заголовка.
Размер и цвет разных стилей заголовка указывается в таблице стилей вашей темы (файл style.css). Если вы используете премиум темы, то изменить оформление текста можно в настройках темы Внешний вид -> Настройки, либо в уникальной вкладке темы (зависит от темы).
Изменение размера текста в блочном редакторе Gutenberg
Если вы хотите иметь абзац или весь текст более крупным шрифтом, то вы без проблем это сделаете в новой версии редактора.
Нажмите на нужный абзац, далее в правой части экрана в разделе “Настройки текста” выберите нужный размер. Вы также можете ввести определенный размер шрифта в поле “произвольно” в пикселях. Для отмены изменений всегда можно нажать “Сброс”.
Таких возможностей нет в старом классическом редакторе WordPress. Если вы хотите использовать новые возможности редактора, то рекомендуем вам ознакомиться с нашей обучающей статьей по Гутенберг.
Если переходить на новый редактор вы категорически отказываетесь, то следующий вариант для вас.
Как изменить размер шрифта в WordPress с помощью плагина TinyMCE Advanced
TinyMCE Advanced – это плагин WordPress, расширяющий возможности оформления текста, а также ряд других полезных функций. Плагин особенно полезен для пользователей старого классического редактора, но также работает и с новым блочным редактором. В Gutenberg он добавляет новый блок “Классический параграф”, который повторяет весь функционал классического редактора.
Для использования, установите и активируйте плагин TinyMCE Advanced. Если вы не знаете, как это сделать, то прочтите наше руководство по установке плагинов WordPress.
Перейдите в Настройки -> TinyMCE Advanced, для настройки редактора. Если вы используете классический редактор, то перейдите во вкладку “Классический редактор (Tiny MCE)”.
Здесь вы можете видеть внешний вид панели инструментом. В третей строчке находится инструмент раскрывающийся список “Размеры шрифта”. Именно она нам нужна. Вы можете переместить её в первый ряд, добавить или убрать не нужные инструменты, перетаскивая их на нужные места.
Если вы используете блочный редактор, то перейдите во вкладку “Редактор блоков (Gutenberg)” и переместите раскрывающийся список “Размеры шрифтов” в панель инструментов.
После настройки не забудьте сохранить изменения.
Теперь чтобы редактировать размер шрифта в блочном редакторе, добавьте блок “Классический параграф” и у вас появится возможность изменять размер шрифта у текста, а также все остальные стандартные инструменты.
Используя классический редактор у вас появятся новые инструмента, один из них – Размер шрифта, который вы можете изменить. Выделите нужный кусок текста и в выпадающем списке выберите размер шрифта.

Примечание
К сожалению, вы не сможете вписать произвольный размер шрифта так, как это сделано в блочном редакторе.
Если размер шрифта абзацев вас не устраивает и вы всегда изменяете его, то лучшим решением будет воспользоваться CSS.
Многие темы, особенно премиум, имеют настройки оформления, где зачастую можно изменить размер шрифта. Для этого зайдите во вкладку Внешний вид -> Настроить. Если вы нашли там такую опцию, то это отлично. Вам не нужно будет вносить изменения в код CSS.
Но есть такие темы, которые не имеют таких возможностей, поэтому нам придется прописать собственные правила для размера шрифта у абзацев. Для этого зайдите в Внешний вид -> Настроить -> Дополнительные стили. Здесь вы можете размещать все свои пользовательские стили (код CSS).

В данном текстовом поле добавьте свой CSS код.
Чтобы сделать размер шрифта абзацев 16px добавьте следущий код:
Вы сразу увидите изменения в предварительном просмотре в правой части экрана. Если никаких изменений не произошло, то добавьте !important, как показано на скриншоте выше. Это даст вашему коду приоритет. После того, как размер шрифта вас устроит, нажмите кнопку “Опубликовать” в верхней части экрана, чтобы сохранить все внесенные изменения.
Данный код относится только в абзацам, а что, если вы захотите увеличить размер шрифта заголовка 2 уровня (h2)? С помощью данного кода мы увеличим размер шрифта заголовков 2 уровня до 32px:
Вы можете проделать данные действия с любым размером заголовков или элементом страницы.
Хотим заметить, что все эти изменения относятся только к активной теме. Если вы смените тему, то данный код нужно будет скопировать в новую тему.
Если вы нашли ошибку, пожалуйста, выделите фрагмент текста и нажмите Ctrl+Enter.
Часто, чтобы текст на сайте читался лучше, нужно изменить размер шрифта в WordPress. Сделать это можно с помощью плагина или добавив несколько строк кода в файл CSS. Есть и третий способ — изменить размер шрифта с помощью редактора Gutenberg.
Следуйте инструкции, чтобы сделать все просто и быстро.
Способ 1. Меняем размер шрифта с помощью плагина Advanced Editor Tools
Advanced Editor Tools — полностью бесплатный компонент, который позволяет вернуть в редакторе классическую панель инструментов.
Найти плагин можно в официальном репозитории WordPress. После стандартной установки и активации перейдите в настройки плагина.
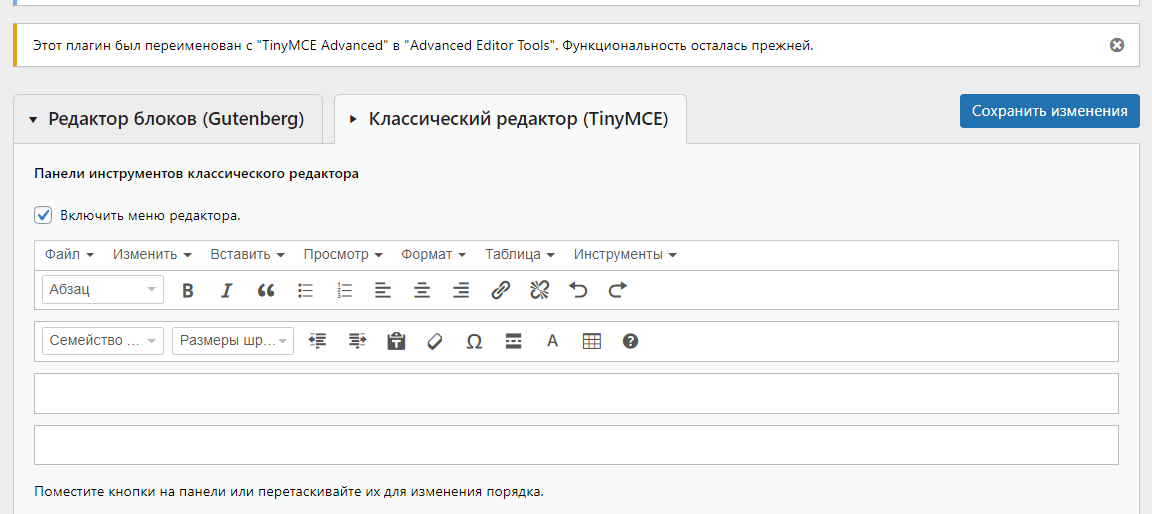
Плагин предложит вам переключиться между редактором блоков Gutenberg и классическим редактором TinyMCE. Выберите второй вариант и сохраните изменения.
Убедитесь, что вы поставили отметку в чек-боксе

Дальнейшие действия. Если вы выбрали классический редактор как единственный вариант.
Перейдите в раздел Записи — Добавить новую или перейдите к редактированию одной из существующих записей. Если вы выбрали только классический вариант, то увидите примерно следующее.

Дальше все предельно просто. Добавьте текст, выберите фрагмент, размер которого нужно изменить, и укажите на какой размер его поменять.
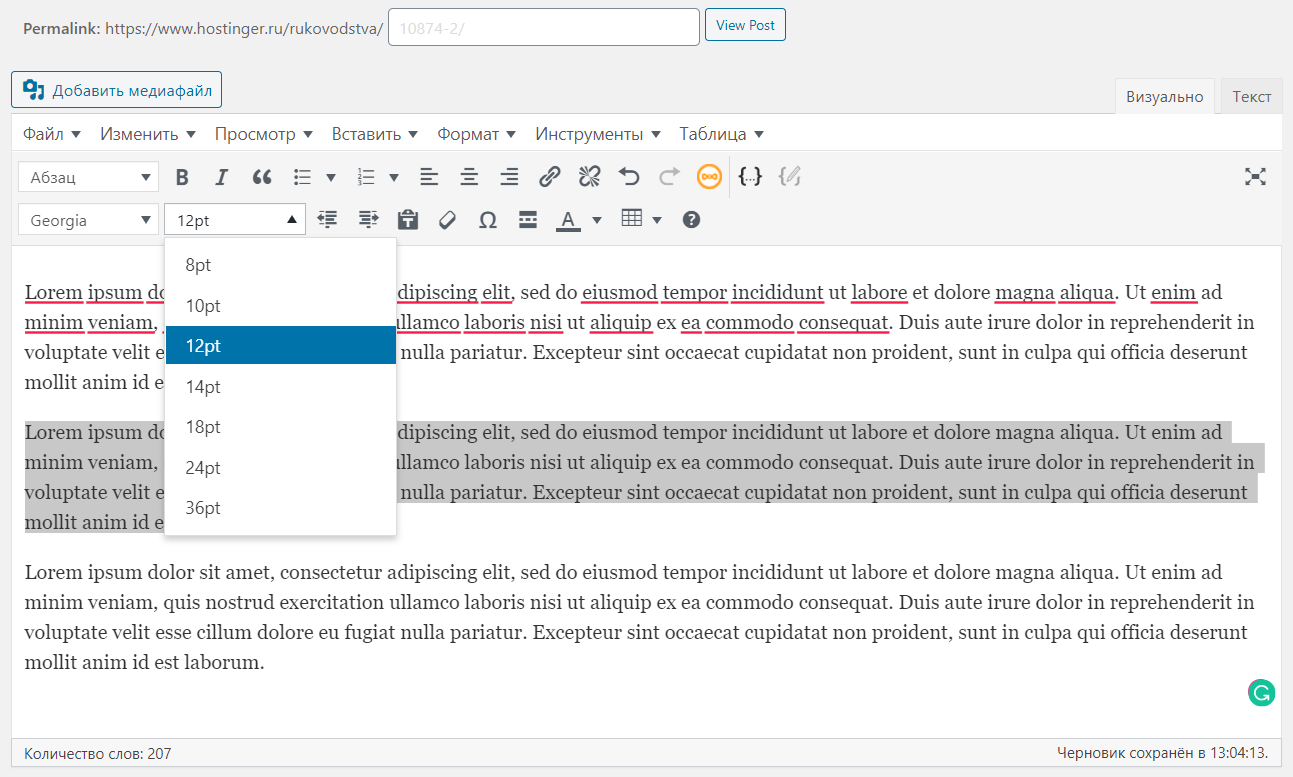
Результат будет выглядеть вот так.

Способ 2. Изменение размеров с помощью CSS
Первый способ более простой. Но он не подойдет, если вы используете Elementor или другой аналогичный конструктор страниц. Изменить размер шрифта с помощью CSS немного более сложное, но универсальное решение, которое считается классическим.
Этот вариант сложнее, но только если вы никогда не работали с CSS. Инструкция от Host4Biz поможет сделать всё быстро и правильно.
Добавить код в CSS можно через редактор или настройщик (customizer). Как это делается. Преимущество работы с css в том, что можно менять размер шрифта в любом элементе сайта без плагинов и независимо от других частей страницы.
Разберем, как это делается:
В консоли выбираем пункт меню Внешний вид — Настроить.
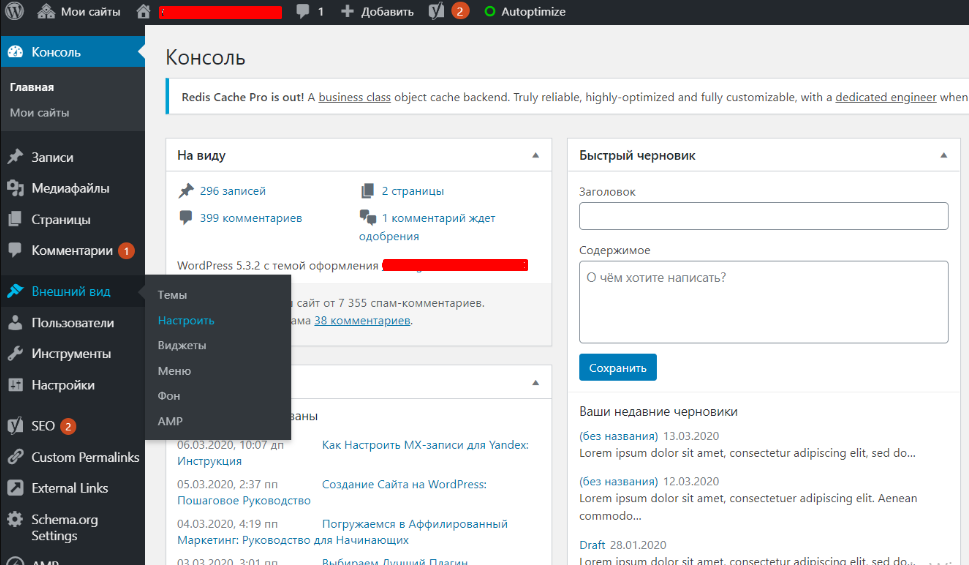
Затем в открывшемся меню выбираем Дополнительные стили.

Следующим шагом добавляем нужный код в поле справа.

Теперь разберемся, какой именно код добавлять.
- Чтобы поменять весь шрифт, вставляйте:
body {

font-size: 1.25rem;

}
Значение 1,25 можно заменить другой цифрой.
2. Чтобы изменить шрифт в абзацах.
p {

font-size: 25px;

}
3. Для изменения шрифта в части заголовков
h2 {

font-size: 2.5em;

}
Команда будет применяться только к заголовкам, отмеченным h2.
4. Изменить размер шрифта в боковом меню
.sidebar li {

font-size: 12px;

}
5. Чтобы увеличить или уменьшить размер текста в футере
.footer {

font-size: 150%;

}
6. Изменение размеров шрифта для определенных размеров экрана
html {

font-size: 18px;

}

@media (min-width: 900px) {

html {

font-size: 20px;

}

}
В CSS-стилях можно использовать несколько единиц измерения:
- Эм (em) — 1em соответствует размеру шрифта на странице, то есть если размер шрифта 12pt, 1em=12pt.
- Пиксели — пиксель это одна точка на экране компьютера или мобильного устройства.
- Пункты — эту единицу заимствовали из бумажных изданий. Один пункт соответствует 1/72 дюйма.
- Проценты — эта величина по умолчанию равна 100%, при увеличении или уменьшении будет меняться.
Способ 3. Изменение размеров шрифта с помощью редактора Gutenberg
Gutenberg — стал стандартным редактором WordPress. Он предлагает возможности для изменения шрифта еще начиная с версии 5.3, где Gutenberg был одним из плагинов.
В Gutenberg текст добавляется с помощью одного из блоков редактора. Чтобы изменить размер шрифта, просто выделите текст и выберите нужный размер в правом меню.

Как видите, все очень просто и быстро.
Итоги
Легко читаемый шрифт может серьезно повлиять на поведенческие факторы и показатель конверсии сайта. WordPress дает много возможностей для переформатирования текста, в том числе, и изменения шрифта.
Увеличить или уменьшить шрифт можно с помощью плагинов, редактора Gutenberg или редактирования CSS-файлов.
Развивайте свой бизнес онлайн вместе с Host4Biz и читайте наш блог.


