In this article, we are going to learn how to change the font size of the text in Tkinter. Font size refers to how large the characters displayed on the screen are. It is crucial to use proper font size in order to gain the reader’s attention wherever needed. So let’s see the different ways using which we can change the font size of text using Tkinter.
Method 1: Changing Tkinter font size using the font as a tuple
import tkinter as tk
from tkinter import *

#main window
root = Tk()
#title of the window
root.title("Tkinter Font Size")

#adding a label
l = Label(root, text="This is a sample line with font size 15.", width=40,
            height=5, font=('Times New Roman', 15, 'bold'))
l.pack()

root.mainloop()
Output:
In the above code, we have created a very basic GUI and added a label to it. Label widgets have an inbuilt property of font(‘font family’, size, ‘font style’). Font acts as a parameter in the code above. If not mentioned explicitly, the parameters will have their default values. In the above code, we have only used the size property and set the size to 15.
Method 2: Changing tkinter font size using the font as an object
Recommended Read: Tkinter Font Class Tutorial
import tkinter as tk
from tkinter import *
import tkinter.font as tkFont

#main window
root = tk.Tk()
#title of the window
root.title("Tkinter Font Size")

#creating a font object
fontObj = tkFont.Font(size=28)

#adding a label
l = Label(root, text="This is a sample line with font size 28.",
            width=40, height=5, font=fontObj)
l.pack()

root.mainloop()
Output:
Here, we have created an object of the Font class named fontObj and set the font size to 28. Later, in the label, we assigned the value of parameters for the font to be equal to the font object (fontObj) and hence, in the output, the font size is 28. In addition to size, we can also mention the font family and style as required.
Method 3: Using changing fonts using a custom class
import tkinter as tk
from tkinter import *
from tkinter.font import Font

#creating a custom class
class cl:
    def __init__(self, master) -> None:
        self.master = master
        #setting the font size to be 40
        self.customFont = Font(size=40)
        Label(self.master, text="Font size in the custom class is 40.",
                font=self.customFont).pack()
#end of custom class

if __name__ == "__main__":
    #main window
    root = tk.Tk()
    #title of the window
    root.title("Tkinter Font Size")
    #adding a label
    l = Label(root, text="This is a sample line with default font size.",
                width=40, height=5)
    l.pack()
    #calling our class object
    customSize = cl(root)

    root.mainloop()
Output:
In the above example, we have defined a custom class (cl), inside which we have a constructor where we assign the font size to 40. A label is also created with the font parameter being equal to the customFont.
In the main function, we first created a label with no explicit mention of the size of the text. Hence, it has the default size. After this, we call the cl class by creating its object customSize. On creating a new instance or object, the label with font size 40 is also displayed in the output along with the default size label.
Every time a new instance of the class is created, the label with font size 40 will be displayed as it is a part of the constructor of the class here. We can also set the font family and style inside the class itself.
Summary
In this way, we have understood how to change the font size in Tkinter in multiple ways. It is an easy topic to understand and implement. Please check out our other Tkinter tutorials here.
Improve Article
Save Article
Improve Article
Save Article
Prerequisite: Python GUI – tkinter
Python provides a Tkinter module for GUI (Graphical User Interface). In this article, we are going to see how to set text font in Tkinter.
Text Widget is used where a user wants to insert multi-line text fields. In this article, we are going to learn the approaches to set the font inserted in the text fields of the text widget. It can be done with different methods.
Method 1: Using a tuple and .configure( ) method.
Approach :
- Import the tkinter module.
- Create a GUI window.
- Create our text widget.
- Create a tuple containing the specifications of the font. But while creating this tuple, the order should be maintained like this, (font_family, font_size_in_pixel, font_weight). Font_family and font_weight should be passed as a string and the font size as an integer.
- Parse the specifications to the Text widget using .configure( ) method.
Below is the implementation of the above approach
Python3
import tkinter
root = tkinter.Tk()
root.title("Welcome to GeekForGeeks")
root.geometry("400x240")
sample_text = tkinter.Text( root, height = 10)
sample_text.pack()
Font_tuple = ("Comic Sans MS", 20, "bold")
sample_text.configure(font = Font_tuple)
root.mainloop()
Output :

Method 2: Setting the font using the Font object of tkinter.font
Approach:
- Import the Tkinter module.
- Import Tkinter font.
- Create the GUI window
- Create our text widget.
- Create an object of type Font from tkinter.font module. It takes in the desired font specifications(font_family, font_size_in_pixel , font_weight) as a constructor of this object. This is that specified object that the text widget requires while determining its font.
- Parse the Font object to the Text widget using .configure( ) method.
Below is the implementation of the above approach:
Python3
import tkinter
import tkinter.font
root = tkinter.Tk()
root.title("Welcome to GeekForGeeks")
root.geometry("918x450")
sample_text=tkinter.Text( root, height = 10)
sample_text.pack()
Desired_font = tkinter.font.Font( family = "Comic Sans MS",
size = 20,
weight = "bold")
sample_text.configure(font = Desired_font)
root.mainloop()
Output:

Improve Article
Save Article
Improve Article
Save Article
Prerequisite: Python GUI – tkinter
Python provides a Tkinter module for GUI (Graphical User Interface). In this article, we are going to see how to set text font in Tkinter.
Text Widget is used where a user wants to insert multi-line text fields. In this article, we are going to learn the approaches to set the font inserted in the text fields of the text widget. It can be done with different methods.
Method 1: Using a tuple and .configure( ) method.
Approach :
- Import the tkinter module.
- Create a GUI window.
- Create our text widget.
- Create a tuple containing the specifications of the font. But while creating this tuple, the order should be maintained like this, (font_family, font_size_in_pixel, font_weight). Font_family and font_weight should be passed as a string and the font size as an integer.
- Parse the specifications to the Text widget using .configure( ) method.
Below is the implementation of the above approach
Python3
import tkinter
root = tkinter.Tk()
root.title("Welcome to GeekForGeeks")
root.geometry("400x240")
sample_text = tkinter.Text( root, height = 10)
sample_text.pack()
Font_tuple = ("Comic Sans MS", 20, "bold")
sample_text.configure(font = Font_tuple)
root.mainloop()
Output :
Method 2: Setting the font using the Font object of tkinter.font
Approach:
- Import the Tkinter module.
- Import Tkinter font.
- Create the GUI window
- Create our text widget.
- Create an object of type Font from tkinter.font module. It takes in the desired font specifications(font_family, font_size_in_pixel , font_weight) as a constructor of this object. This is that specified object that the text widget requires while determining its font.
- Parse the Font object to the Text widget using .configure( ) method.
Below is the implementation of the above approach:
Python3
import tkinter
import tkinter.font
root = tkinter.Tk()
root.title("Welcome to GeekForGeeks")
root.geometry("918x450")
sample_text=tkinter.Text( root, height = 10)
sample_text.pack()
Desired_font = tkinter.font.Font( family = "Comic Sans MS",
size = 20,
weight = "bold")
sample_text.configure(font = Desired_font)
root.mainloop()
Output:
Стилизация
Шрифты
Последнее обновление: 24.09.2022
Имена шрифтов
Ряд виджетов, например, Label или Text, поддерживают установку шрифта через параметр font.
Каждая платформа может определять свои специфические шрифты. Но также библиотека Tk по умолчанию включает ряд именнованных шрифтов, которые могут использоваться на
различных компонентах графического интерфейса и которые доступны на всех платформах:
-
TkDefaultFont: шрифт по умолчанию, который применяется, если для виджета явным образом не определен шрифт
-
TkTextFont: шрифт по умолчанию, который применяется для виджетов Entry, Listbox и ряда других
-
TkFixedFont: шрифт с фиксированной шириной
-
TkMenuFont: шрифт для пунктов меню
-
TkHeadingFont: шрифт для заголовков в Listbox и в таблицах
-
TkCaptionFont: шрифт для строки статуса в окнах
-
TkSmallCaptionFont: шрифт малого размера для диалоговых окон
-
TkIconFont: шрифт для подписей к иконкам
-
TkTooltipFont: шрифт для высплывающих окон
В принципе мы можем использовать эти шрифты не только в любых виджетах:
ttk.Label(text="Hello World", font="TkTextFont")
Tk также предоставляет дополнительный набор именнованных шрифтов, которые определены только на определенных платформах. Для их получения можно использовать
функцию names() из пакета tkinter.font:
from tkinter import font

for font_name in font.names():
    print(font_name)
Например, на Windows мы получим следующий набор:
fixed
oemfixed
TkDefaultFont
TkMenuFont
ansifixed
systemfixed
TkHeadingFont
device
TkTooltipFont
defaultgui
TkTextFont
ansi
TkCaptionFont
system
TkSmallCaptionFont
TkFixedFont
TkIconFont
В данном случае выводятся и платформа-независимые, и платформо-специфичные шрифты, например, «system».
ttk.Label(text="Hello World", font="system")
Определение шрифта
За определение шрифта в Tkinter отвечает класс Font из модуля tkinter.font. Он принимет следующие параметры:
-
name: имя шрифта -
family: семейство шрифтов -
size: высота шрифта (в точках при положительном значении или в пикселях при негативном значении) -
weight: вес шрифта. Принимает значенияnormal(обычный) илиbold(жирный) -
slant: наклон. Принимает значенияroman(обычный) илиitalic(наклонный) -
underline: подчеркивание. Принимает значенияTrue(с подчеркиванием) илиFalse(без подчеркивания) -
overstrike: зачеркивание. Принимает значенияTrue(с зачеркиванием) илиFalse(без зачеркивания)
Для получения всех доступных семейств шрифтов на текущей платформе можно использовать функцию families() из модуля tkinter.font
from tkinter import font

for family in font.families():
    print(family)
Пример применения шрифтов:
from tkinter import *
from tkinter import ttk
from tkinter import font
root = Tk()
root.title("METANIT.COM")
root.geometry("250x200")
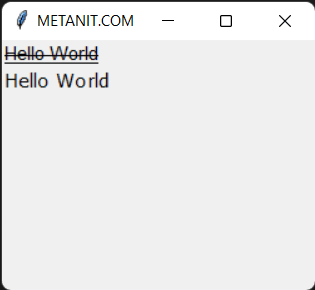
font1 = font.Font(family= "Arial", size=11, weight="normal", slant="roman", underline=True, overstrike=True)
label1 = ttk.Label(text="Hello World", font=font1)
label1.pack(anchor=NW)
font2 = font.Font(family= "Verdana", size=11, weight="normal", slant="roman")
label2 = ttk.Label(text="Hello World", font=font2)
label2.pack(anchor=NW)
root.mainloop()
Также можно использовать определение шрифта в виде строки:
from tkinter import *
from tkinter import ttk

root = Tk()
root.title("METANIT.COM")
root.geometry("250x200")

label1 = ttk.Label(text="Hello World", font="Arial 11 normal roman")
label1.pack(anchor=NW)

label2 = ttk.Label(text="Hello World", font="Verdana 11 normal roman")
label2.pack(anchor=NW)

root.mainloop()
Например, в определении "Arial 11 normal roman", применяется семейство шрифта Arial, высота 11 единиц, нежирный шрифт без наклона.
Скачайте код уроков с GitLab: https://gitlab.com/PythonRu/tkinter-uroki
Работа с цветами
В примерах из прошлых материалов цвета задавались с помощью их названий: например, white, blue или yellow. Эти значения передаются в виде строк параметрам foreground и background, которые изменяют цвет текста и фона виджета соответственно.
Названия цветов дальше уже привязываются к RGB-значениям (аддитивной модели, которая представляет цвета за счет комбинации интенсивности красного, зеленого и синего цветов). Этот перевод делается на основе таблицы, которая отличается от платформы к платформе. Если же нужно отображать один и тот же цвет на разных платформах, то можно передавать RGB-значение в параметры виджета.
Следующее приложение показывает, как можно динамически менять параметры foreground и background у метки, которая демонстрирует зафиксированный текст:
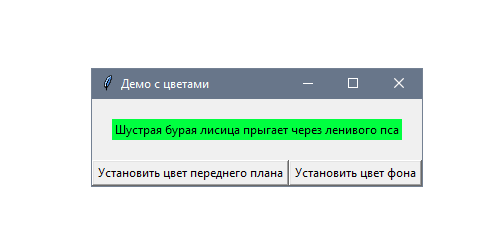
Цвета определены в формате RGB и выбираются с помощью нативного модального окна. На следующем скриншоте представлено диалоговое окно из Windows 10:
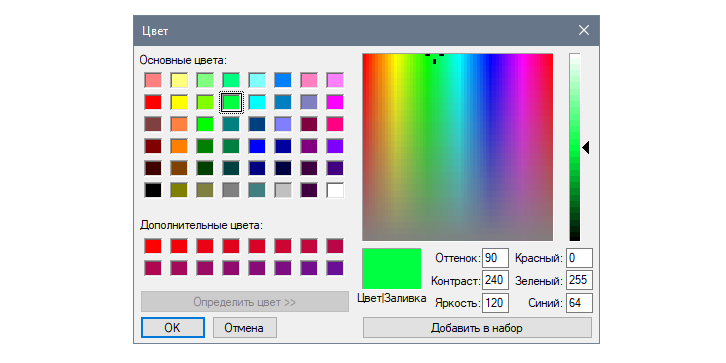
Традиционно будем работать с настройками виджета с помощью кнопок — по одной для каждого параметра. Основное отличие по сравнению с предыдущими примерами в том, что значения могут быть прямо выбраны с помощью диалогового окна askcolor из модуля tkinter.colorchooser:
from functools import partial
import tkinter as tk
from tkinter.colorchooser import askcolor
class App(tk.Tk):
def __init__(self):
super().__init__()
self.title("Демо с цветами")
text = "Шустрая бурая лисица прыгает через ленивого пса"
self.label = tk.Label(self, text=text)
self.fg_btn = tk.Button(self, text="Установить цвет текста",
command=partial(self.set_color, "fg"))
self.bg_btn = tk.Button(self, text="Установить цвет фона",
command=partial(self.set_color, "bg"))
self.label.pack(padx=20, pady=20)
self.fg_btn.pack(side=tk.LEFT, fill=tk.BOTH, expand=True)
self.bg_btn.pack(side=tk.LEFT, fill=tk.BOTH, expand=True)
def set_color(self, option):
color = askcolor()[1]
print("Выбрать цвет:", color)
self.label.config(**{option: color})
if __name__ == "__main__":
app = App()
app.mainloop()
Если нужно проверить RGB-значение выбранного цвета, то его можно вывести в консоль при подтверждении выбора. Если же ничего не было выбрано, то и консоль останется пустой.
Как работает настройка цвета
Обе кнопки используют функцию partial в качестве обратного вызова. Это инструмент из модуля functools, который создает новый вызываемый объект. Он ведет себя как оригинальная функция, но с некоторыми зафиксированными аргументами. Возьмем в качестве примера такую инструкцию:
tk.Button(self, command=partial(self.set_color, "fg"), ...)
Предыдущая инструкция выполняет то же действие, что и следующая:
tk.Button(self, command=lambda: self.set_color("fg"), ...)
Так делается для того, чтобы переиспользовать метод set_color() из модуля functools. Это особенно полезно в более сложных сценариях, например, когда нужно создать несколько функций, и очевидно, что некоторые аргументы заданы заранее.
Нужно лишь помнить тот нюанс, что foreground и background кратко записаны как fg и bg. Эти строки распаковываются с помощью ** при настройке виджета в инструкции:
def set_color(self, option):

        color = askcolor()[1]

        print("Выбрать цвет:", color)

        self.label.config(**{option: color}) # same as (fg=color)

                                or (bg=color)
askcolor возвращает кортеж с двумя элементами, которые представляют собой выбранный цвет. Первый — кортеж цветов из RGB-значений, а второй — шестнадцатеричное представление в виде строки. Поскольку первый вариант не может быть прямо передан в параметры виджета, используется второй.
Если нужно преобразовать название цвета в RGB-формат, можно использовать метод winfo_rgb() из предыдущего виджета. Поскольку он возвращает кортеж целых чисел от 0 до 65535, которые представляют 16-битные RGB-значения, их можно конвертировать в более привычное представление #RRGGBB, сдвинув вправо 8 битов:
rgb = widget.winfo_rgb("lightblue")

red, green, blue = [x>>8 for x in rgb]

print("#{:02x}{:02x}{:02x}".format(red, green, blue))
В предыдущем коде использовался {:02x} для форматирования каждого целого числа в два шестнадцатеричных.
Задание шрифтов виджета
В Tkinter можно менять шрифт виджета на кнопках, метках и записях. По умолчанию он соответствует системному, но его можно поменять с помощью параметра font.
Следующее приложение позволяет пользователю динамически менять тип шрифта и его размер для статического текста. Попробуйте разные значения, чтобы увидеть результаты настройки:
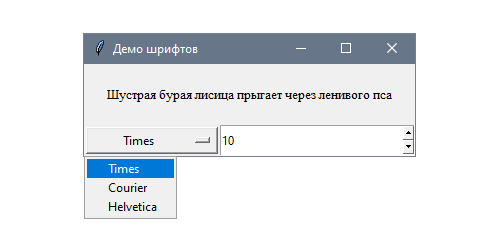
В данном случае для настройки используются два вида виджетов: выпадающее меню со списком шрифтов и поле ввода с предустановленными вариантами Spinbox для выбора размера:
import tkinter as tk

class App(tk.Tk):

    def __init__(self):

        super().__init__()

        self.title("Демо шрифтов")

        text = "Шустрая бурая лисица прыгает через ленивого пса"

        self.label = tk.Label(self, text=text)

        self.family = tk.StringVar()

        self.family.trace("w", self.set_font)

        families = ("Times", "Courier", "Helvetica")

        self.option = tk.OptionMenu(self, self.family, *families)

        self.size = tk.StringVar()

        self.size.trace("w", self.set_font)

        self.spinbox = tk.Spinbox(self, from_=8, to=18,

                                  textvariable=self.size)

        self.family.set(families[0])

        self.size.set("10")

        self.label.pack(padx=20, pady=20)

        self.option.pack(side=tk.LEFT, fill=tk.BOTH, expand=True)

        self.spinbox.pack(side=tk.LEFT, fill=tk.BOTH, expand=True)

    def set_font(self, *args):

        family = self.family.get()

        size = self.size.get()

        self.label.config(font=(family, size))

if __name__ == "__main__":

    app = App()

    app.mainloop()
Стоит обратить внимание, что у переменных Tkinter есть некоторые значения по умолчанию, которые привязаны к каждому полю.
Как работает настройка шрифтов?
Кортеж FAMILIES включает три типа шрифтов, которые Tk гарантированно поддерживает на всех платформах: Times (Times New Roman), Courier и Helvetica. Между ними можно переключаться с помощью виджета OptionMenu, который привязан к переменной self.family.
Подобный подход используется также для того, чтобы задать размер шрифта в Spinbox. Обе переменных вызывают метод, который меняет шрифт метки:
def set_font(self, *args):

    family = self.family.get()

    size = self.size.get()

    self.label.config(font=(family, size))
Кортеж, который передается в font, также может определять один или несколько следующих параметров шрифта: полужирный, стандартный, курсивный, подчеркнутый или перечеркнутый:
widget1.config(font=("Times", "20", "bold"))

widget2.config(font=("Helvetica", "16", "italic underline"))
Полный список всех доступных шрифтов, которые доступны для платформы, можно получить с помощью метода families() из модуля tkinter.font. Поскольку сперва нужно создать экземпляр окна root, можно использовать следующий скрипт:
import tkinter as tk

from tkinter import font

root = tk.Tk()

print(font.families())
Tkinter не вернет ошибку при попытке использовать шрифт не из списка, но попробует подобрать похожий.
Модуль tkinter.font включает класс Font, который можно переиспользовать в нескольких виджетах. Основное преимущество изменения экземпляра font в том, что в таком случае он затрагивает все виджеты, в которых был использован.
Работа с классом Font напоминает работу с дескрипторами шрифтов. Например, этот скрипт создает полужирный шрифт Courier размером 18 пикселей:
from tkinter import font

courier_18 = font.Font(family="Courier", size=18, weight=font.BOLD)
Чтобы получить или изменить значение, можно использовать методы cget и configure:
family = courier_18.cget("family")

courier_18.configure(underline=1)
Использование параметров базы данных
В Tkinter есть понятие базы данных параметров. Этот механизм используется для настройки внешнего вида приложения без определения параметров для каждого виджета. Это позволяет отделить некоторые параметры виджета от индивидуальной настройки, предоставив стандартизированные значения по умолчанию на основе иерархии виджетов.
В этом примере построим приложение, включающее несколько виджетов с разными стилями, которые будут определены в базе данных параметров:
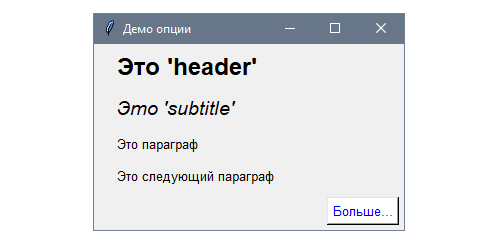
Добавим кое-какие параметры с помощью метода option_add(), который доступен из всех классов виджетов:
import tkinter as tk
class App(tk.Tk):
def __init__(self):
super().__init__()
self.title("Демо опции")
self.option_add("*font", "helvetica 10")
self.option_add("*header.font", "helvetica 18 bold")
self.option_add("*subtitle.font", "helvetica 14 italic")
self.option_add("*Button.foreground", "blue")

self.option_add("*Button.background", "white")

self.option_add("*Button.activeBackground", "gray")

self.option_add("*Button.activeForeground", "black")
self.create_label(name="header", text="Это 'header'")
self.create_label(name="subtitle", text="Это 'subtitle'")
self.create_label(text="Это параграф")
self.create_label(text="Это следующий параграф")
self.create_button(text="Больше...")
def create_label(self, **options):
tk.Label(self, **options).pack(padx=20, pady=5, anchor=tk.W)
def create_button(self, **options):
tk.Button(self, **options).pack(padx=5, pady=5, anchor=tk.E)
if __name__ == "__main__":
app = App()
app.mainloop()
Вместо настройки шрифтов, foreground и background и других параметров Tkinter будет использовать значения по умолчанию из базы.
Как работают стили для виджетов
Начнем с объяснения каждого вызова option_add. Первый из них добавляет параметр, который задает атрибут font для всех виджетов — звездочка представляет любое название приложения:
self.option_add("*font", "helvetica 10")
Следующий вызов ограничивает вызов для элементов с именем header. Чем он конкретнее, тем выше приоритет. Это же имя позже используется при создании экземпляра с меткой name="header":
self.option_add("*header.font", "helvetica 18 bold")
То же применимо и к self.option_add("*subtitle.font", "helvetica 14 italic"), где каждый параметр соответствует своему экземпляру виджета.
Следующие параметры используют имя класса Button вместе имени экземпляра. Таким образом можно ссылаться на все виджеты конкретного класса, чтобы задать для них значения по умолчанию:
self.option_add("*Button.foreground", "blue")
self.option_add("*Button.background", "white")
self.option_add("*Button.activeBackground", "gray")
self.option_add("*Button.activeForeground", "black")
База параметров использует иерархию виджетов для определения параметров, которые будут применяться к каждому экземпляру, поэтому в случае вложенных контейнеров они также могут быть использованы для ограничения параметров, у которых выше приоритет.
Эти параметры не применяются к существующим виджетам, а лишь к тем, которые были созданы после изменения базы данных. Таким образом всегда рекомендуется вызывать option_add() в начале приложения.
Есть несколько примеров, где один приоритетнее предыдущего:
*Frame*background: работает для фона всех виджетов во фрейме.*Frame.background: фон всех фреймов.*Frame.myButton.background: фон виджетаmyButton.*myFrame.myButton.background: фон виджетаmyButtonвнутри контейнераmyFrame.
Чтобы не добавлять параметры в коде, их можно определить в отдельном текстовом файле в таком формате:
*font: helvetica 10

*header.font: helvetica 18 bold

*subtitle.font: helvetica 14 italic

*Button.foreground: blue

*Button.background: white

*Button.activeBackground: gray

*Button.activeForeground: black
Этот файл затем загружается в приложение с помощью метода option_readfile() и заменяет все вызовы к option_add(). В этом примере предположим, что файл называется my_options_file и что находится он в одной папке с кодом:
def __init__(self):

    super().__init__()

    self.title("Options demo")

    self.option_readfile("my_options_file")

    # ...
Если такого файла не существует или его формат неверный, Tkinter вернет ошибку TclError.
Метод configure виджета Tkinter Text задаёт свойства Text, подобно шрифту текста. Шрифт font может быть как tuple типом, так и объектом Tkinter Font.
import tkinter as tk
root = tk.Tk()
root.geometry("400x240")

textExample=tk.Text(root, height=10)
textExample.pack()

textExample.configure(font=("Courier", 16, "italic"))

root.mainloop()
textExample.configure(font=("Courier", 16, "italic"))
Он устанавливает шрифт Courier, курсив с размером 16.
Также мы могли бы установить шрифт с помощью объекта font модуля tkFont.
import tkinter as tk
import tkinter.font as tkFont

root = tk.Tk()
root.geometry("400x240")

textExample=tk.Text(root, height=10)
textExample.pack()

fontExample = tkFont.Font(family="Arial", size=16, weight="bold", slant="italic")

textExample.configure(font=fontExample)

root.mainloop()
fontExample = tkFont.Font(family="Arial", size=16, weight="bold", slant="italic")
Преимущество использования объекта Font вместо шрифта tuple заключается в том, что один и тот же объект Font может быть присвоен различным виджетам и программно обновлен методом Font.configure. Все виджеты, имеющие один и тот же объект Font, будут обновлены в новом стиле font.
fontExample.configure(weight='normal')
Он обновляет вес fontExample, чтобы быть normal.
Для вашего удобства мы перечислили все доступные семейства шрифтов в Tkinter (Tkinter 3, Windows OS). Вы также можете перечислить семейства шрифтов в вашей рабочей среде со следующими кодами,
import tkinter as tk
import tkinter.font as tkFont

print(list(tkFont.families()))
[
'System',
'Terminal',
'Fixedsys',
'Modern',
'Roman',
'Script',
'Courier',
'MS Serif',
'MS Sans Serif',
'Small Fonts',
'Marlett',
'Arial',
'Arabic Transparent',
'Arial Baltic',
'Arial CE',
'Arial CYR',
'Arial Greek',
'Arial TUR',
'Arial Black',
'Bahnschrift Light',
'Bahnschrift SemiLight',
'Bahnschrift',
'Bahnschrift SemiBold',
'Bahnschrift Light SemiCondensed',
'Bahnschrift SemiLight SemiConde',
'Bahnschrift SemiCondensed',
'Bahnschrift SemiBold SemiConden',
'Bahnschrift Light Condensed',
'Bahnschrift SemiLight Condensed',
'Bahnschrift Condensed',
'Bahnschrift SemiBold Condensed',
'Calibri',
'Calibri Light',
'Cambria',
'Cambria Math',
'Candara',
'Candara Light',
'Comic Sans MS',
'Consolas',
'Constantia',
'Corbel',
'Corbel Light',
'Courier New',
'Courier New Baltic',
'Courier New CE',
'Courier New CYR',
'Courier New Greek',
'Courier New TUR',
'Ebrima',
'Franklin Gothic Medium',
'Gabriola',
'Gadugi',
'Georgia',
'Impact',
'Ink Free',
'Javanese Text',
'Leelawadee UI',
'Leelawadee UI Semilight',
'Lucida Console',
'Lucida Sans Unicode',
'Malgun Gothic',
'@Malgun Gothic',
'Malgun Gothic Semilight',
'@Malgun Gothic Semilight',
'Microsoft Himalaya',
'Microsoft JhengHei',
'@Microsoft JhengHei',
'Microsoft JhengHei UI',
'@Microsoft JhengHei UI',
'Microsoft JhengHei Light',
'@Microsoft JhengHei Light',
'Microsoft JhengHei UI Light',
'@Microsoft JhengHei UI Light',
'Microsoft New Tai Lue',
'Microsoft PhagsPa',
'Microsoft Sans Serif',
'Microsoft Tai Le',
'Microsoft YaHei',
'@Microsoft YaHei',
'Microsoft YaHei UI',
'@Microsoft YaHei UI',
'Microsoft YaHei Light',
'@Microsoft YaHei Light',
'Microsoft YaHei UI Light',
'@Microsoft YaHei UI Light',
'Microsoft Yi Baiti',
'MingLiU-ExtB',
'@MingLiU-ExtB',
'PMingLiU-ExtB',
'@PMingLiU-ExtB',
'MingLiU_HKSCS-ExtB',
'@MingLiU_HKSCS-ExtB',
'Mongolian Baiti',
'MS Gothic',
'@MS Gothic',
'MS UI Gothic',
'@MS UI Gothic',
'MS PGothic',
'@MS PGothic',
'MV Boli',
'Myanmar Text',
'Nirmala UI',
'Nirmala UI Semilight',
'Palatino Linotype',
'Segoe MDL2 Assets',
'Segoe Print',
'Segoe Script',
'Segoe UI',
'Segoe UI Black',
'Segoe UI Emoji',
'Segoe UI Historic',
'Segoe UI Light',
'Segoe UI Semibold',
'Segoe UI Semilight',
'Segoe UI Symbol',
'SimSun',
'@SimSun',
'NSimSun',
'@NSimSun',
'SimSun-ExtB',
'@SimSun-ExtB',
'Sitka Small',
'Sitka Text',
'Sitka Subheading',
'Sitka Heading',
'Sitka Display',
'Sitka Banner',
'Sylfaen',
'Symbol',
'Tahoma',
'Times New Roman',
'Times New Roman Baltic',
'Times New Roman CE',
'Times New Roman CYR',
'Times New Roman Greek',
'Times New Roman TUR',
'Trebuchet MS',
'Verdana',
'Webdings',
'Wingdings',
'Yu Gothic',
'@Yu Gothic',
'Yu Gothic UI',
'@Yu Gothic UI',
'Yu Gothic UI Semibold',
'@Yu Gothic UI Semibold',
'Yu Gothic Light',
'@Yu Gothic Light',
'Yu Gothic UI Light',
'@Yu Gothic UI Light',
'Yu Gothic Medium',
'@Yu Gothic Medium',
'Yu Gothic UI Semilight',
'@Yu Gothic UI Semilight',
'HoloLens MDL2 Assets',
'BIZ UDGothic',
'@BIZ UDGothic',
'BIZ UDPGothic',
'@BIZ UDPGothic',
'BIZ UDMincho Medium',
'@BIZ UDMincho Medium',
'BIZ UDPMincho Medium',
'@BIZ UDPMincho Medium',
'Meiryo',
'@Meiryo',
'Meiryo UI',
'@Meiryo UI',
'MS Mincho',
'@MS Mincho',
'MS PMincho',
'@MS PMincho',
'UD Digi Kyokasho N-B',
'@UD Digi Kyokasho N-B',
'UD Digi Kyokasho NP-B',
'@UD Digi Kyokasho NP-B',
'UD Digi Kyokasho NK-B',
'@UD Digi Kyokasho NK-B',
'UD Digi Kyokasho N-R',
'@UD Digi Kyokasho N-R',
'UD Digi Kyokasho NP-R',
'@UD Digi Kyokasho NP-R',
'UD Digi Kyokasho NK-R',
'@UD Digi Kyokasho NK-R',
'Yu Mincho',
'@Yu Mincho',
'Yu Mincho Demibold',
'@Yu Mincho Demibold',
'Yu Mincho Light',
'@Yu Mincho Light',
'DengXian',
'@DengXian',
'DengXian Light',
'@DengXian Light',
'FangSong',
'@FangSong',
'KaiTi',
'@KaiTi',
'SimHei',
'@SimHei',
'Ubuntu',
'Raleway',
'Ubuntu Condensed',
'Ubuntu Light'
]
Tkinter Label is used to display one or more lines, it can also be used to display bitmap or images. In this article, we are going to change the font-size of the Label Widget. To create Label use following:
Syntax: label = Label(parent, option, …)
Parameters:
parent: Object of the widget that will display this label, generally a root object
text: To display one or more lines of text.
image: To display a static image
compound: To display both Text and Image. It accepts TOP, BOTTOM, LEFT, RIGHT, CENTER. For example, if you write compound=TOPimage will displayed to the top of Text.
We can do this using different methods:
Method 1: By using Label’s font property.
Python3
from tkinter import Tk
from tkinter.ttk import Label
class App:
def __init__(self, master) -> None:
self.master = master
Label(self.master, text="I have default font-size").pack(pady=20)
Label(self.master,
text="I have a font-size of 25",
font=("Arial", 25)
).pack()
if __name__ == "__main__":
root = Tk()
root.title("Change font-size of Label")
root.geometry("400x250")
app = App(root)
root.mainloop()
Output:

Method 2: By using Style class. In this method, we will use our custom style otherwise all the Label widgets will get the same style.
Python3
from tkinter import Tk
from tkinter.ttk import Label, Style
class App:
def __init__(self, master) -> None:
self.master = master
Label(self.master, text="I have default font-size").pack(pady=20)
self.style = Style(self.master)
self.style.configure("My.TLabel", font=('Arial', 25))
Label(
self.master,
text="I have a font-size of 25",
style="My.TLabel").pack()
if __name__ == "__main__":
root = Tk()
root.title("Change font-size of Label")
root.geometry("400x250")
app = App(root)
root.mainloop()
Output:
Note: In the above method, TLabel is the name of the default style. So if you want to create your own style name then always use below syntax
my_style_name.default_style_name
Example:
New.TButton # To override Button Widget’s styles
My.TLabel # To override Label Widget’s Styles
Abc.TEntry # To override Entry Widget’s Styles
If you use only the default style name then it will apply to all the corresponding widgets i.e if I use TLabel instead of My.TLabel then both the label will have font-size of 25. And importantly, if you use the default style name then you don’t need to provide style property.
Extra: Changing font size using the Default Style Name.
Python3
from tkinter import Tk
from tkinter.ttk import Label, Style
class App:
def __init__(self, master) -> None:
self.master = master
Label(self.master, text="I have default font-size").pack(pady=20)
self.style = Style(self.master)
self.style.configure("TLabel", font=('Arial', 25))
Label(self.master, text="I have a font-size of 25").pack()
if __name__ == "__main__":
root = Tk()
root.title("Change font-size of Label")
root.geometry("400x250")
app = App(root)
root.mainloop()
Notice in the above program that we have not provided style or font property to any of the Label still both of them got the same font-size and same font-family.
Output:

Method 3: By using the Font class. In this method, we will create a Font object and then use this to change Font style of any widget. Benefit of this
Font class consist of following property:
root: Object of toplevel widget.
family: The font family name as a string.
size: The font height as an integer in points.
weight: ‘bold’/BOLD for boldface, ‘normal’/NORMAL for regular weight.
slant: ‘italic’/ITALIC for italic, ‘roman’/ROMAN for unslanted.
underline: 1/True/TRUE for underlined text, 0/False/FALSE for normal.
overstrike: 1/True/TRUE for overstruck text, 0/False/FALSE for normal.
Python3
from tkinter import Tk
from tkinter.font import BOLD, Font
from tkinter.ttk import Label
class App:
def __init__(self, master) -> None:
self.master = master
Label(self.master, text="I have default font-size").pack(pady=20)
self.bold25 = Font(self.master, size=25, weight=BOLD)
Label(self.master, text="I have a font-size of 25",
font=self.bold25).pack()
if __name__ == "__main__":
root = Tk()
root.title("Change font-size of Label")
root.geometry("400x250")
app = App(root)
root.mainloop()
Output:

Tkinter actually has a variety of ways in which we may change the font type and size. Tkinter has several built in fonts, which can complicate things, especially when you realize that Each widget only uses one of these fonts. However, this also gives us the option to individually change the font type and size for different types of widgets.
We’ll start off with a general way of changing the font size and type that effects everything in the tkinter window.
Technique 1
The following code will only change the Font.
import tkinter as tk

root = tk.Tk()
root.option_add('*Font', '19')
root.geometry("200x150")

label = tk.Label(root, text = "Hello World")
label.pack(padx = 5, pady = 5)

root.mainloop()
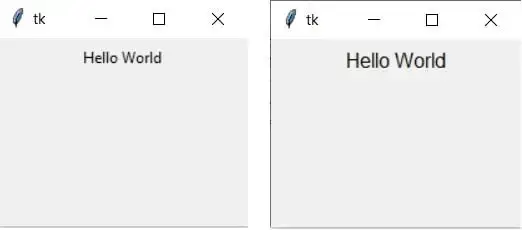
The following code changes only the font type. Tip:
import tkinter as tk

root = tk.Tk()
root.option_add('*Font', 'Times')
root.geometry("200x150")

label = tk.Label(root, text = "Hello World")
label.pack(padx = 5, pady = 5)

root.mainloop()
Tip: If you want a list of font families, you can use the following code. It will return a list of different font types.
from tkinter import Tk, font
root = Tk()
print(font.families())
Finally, you can change both simultaneously by writing both at the same time.
import tkinter as tk

root = tk.Tk()
root.option_add('*Font', 'Times 19')
root.geometry("200x150")

label = tk.Label(root, text = "Hello World")
label.pack(padx = 5, pady = 5)

root.mainloop()
Note, however, that option_add only affects widgets created after you’ve called option_add, so you need to do it before creating any other widgets.
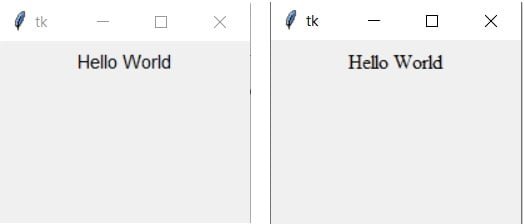
Technique 2
Here narrow down our area of effect from the whole tkinter program to certain segments of it. As mentioned earlier, tkinter has several built in fonts which different widgets use. We can change each one of these individually.
import tkinter as tk
import tkinter.font as tkFont

root = tk.Tk()
print(tkFont.names())
('fixed', 'oemfixed', 'TkDefaultFont', 'TkMenuFont', 'ansifixed', 'systemfixed', 'TkHeadingFont', 'device', 'TkTooltipFont', 'defaultgui', 'TkTextFont', 'ansi', 'TkCaptionFont', 'system', 'TkSmallCaptionFont', 'TkFixedFont', 'TkIconFont')Above we can notice several font types like TkHeadingFont and TkMenuFont. These appear to be the fonts that determine the font type and size for headings and Menu’s respectively. Let’s try to change the TkDefaultFont. Any widget that uses the TkDefaultFont type will automatically change to the new settings.
import tkinter as tk
import tkinter.font as tkFont

root = tk.Tk()
root.geometry("200x150")

def_font = tk.font.nametofont("TkDefaultFont")
def_font.config(size=24)

label = tk.Label(root, text = "Hello World")
label.pack(padx = 5, pady = 5)

root.mainloop()
The tricky part however is figuring out which widgets are affected by which Font types. Due to a lack of material, this information is currently unavailable. Though you are free to search for it on your own.
This marks the end of the change font type and size in Tkinter article. Any suggestions or contributions for CodersLegacy are more than welcome. Any questions can be asked in the comments section below.
See more Tkinter related tit bits below.
How to improve Tkinter screen resolution?
How to prevent resizing in Tkinter Windows?
Using Lambda with Tkinter “command” option