|
darfulechka |
|
|
1 |
|
Смена статусов разделов жесткого диска01.07.2012, 20:27. Показов 14641. Ответов 1
Подскажите как сменить назначение системного диска С:. То есть перенести статус системного на другой. Ради возможности его форматирования. Для наглядности добавляю скрин из Acronis Disk Director Миниатюры
__________________ |


|
8449 / 2971 / 494 Регистрация: 14.04.2011 Сообщений: 7,367 |
|
|
02.07.2012, 13:49 |
2 |
|
Подскажите как сменить назначение системного диска С:. То есть перенести статус системного на другой Насколько я понимаю никак. Системный, значит на нём находится система. Он перестанет быть системным, если удалить систему с этого раздела (этого естественно делать не надо). Из рабочей Win 7 покажите скрин из Управления дисками. Пуск -> в строке поиска введите diskmgmt.msc -> OK.
0 |

|
IT_Exp Эксперт 87844 / 49110 / 22898 Регистрация: 17.06.2006 Сообщений: 92,604 |
02.07.2012, 13:49 |
|
2 |
В командной строке введите fdisk и нажмите клавишу ВВОД. Когда вам будет предложено включить поддержку больших дисков, нажмите Да. Щелкните Установить активный раздел, введите номер раздела, который вы хотите сделать активным, а затем нажмите клавишу ВВОД. Нажмите ESC.
Как исправить неправильный активный раздел?
Вы можете использовать следующие шаги, чтобы отключить активный раздел:
- Откройте командную строку.
- Тип: diskpart.
- В командной строке DISKPART введите: list disk (эта команда выведет список всех дисков, которые у вас есть)
- В следующем запросе введите: select disk # (# означает номер диска, на котором находится неправильный активный раздел)
Как изменить активный основной раздел?
Метод # 2: установить активный раздел с помощью управления дисками
- Нажмите сочетание клавиш WIN + R, чтобы открыть окно RUN, введите diskmgmt. msc, или вы можете просто щелкнуть правой кнопкой мыши внизу Пуск и выбрать Управление дисками в Windows 10 и Windows Server 2008.
- Щелкните правой кнопкой мыши раздел, который вы хотите сделать активным, выберите «Отметить раздел как активный».
Преобразование MBR в стиль раздела GPT (рекомендуется)
- Открыть настройки.
- Щелкните Обновление и безопасность.
- Щелкните Восстановление.
- В разделе «Расширенный запуск» нажмите кнопку «Перезагрузить сейчас».
- Нажмите вариант устранения неполадок.
- Нажмите на Дополнительные параметры.
- Щелкните параметр Командная строка.
Как сделать загрузочный раздел активным?
Чтобы сделать раздел активным:
- Запустите командную строку от имени администратора.
- часть диска.
- список диска. Запомните желаемый номер диска.
- выберите диск #, где # — желаемый номер диска.
- раздел списка. Запомните желаемый номер раздела.
- выберите раздел №, где № — желаемый номер раздела.
- активный.
Следует ли помечать диск C как активный?
Нет, активный раздел является загрузочным, не диск C. Это то, что содержит файлы, которые BIOS ищет для загрузки Win 10, даже с 1 диском на ПК, C не будет активным разделом.
Должен ли диск C быть активным?
ini называется системным разделом, а не только диском C.… И вообще, system раздел должен быть активным для успешной загрузки Windows. Если на одном диске несколько системных разделов, что означает, что операционные системы Windows равны, нам нужно сделать активным необходимый.
Как снять отметку с активного раздела?
Введите следующее, чтобы удалить активный флаг на разделе:
- Введите ‘список дисков’
- Введите ‘выберите диск 1’
- Введите ‘выберите раздел 1’
- Введите «неактивный»
Что такое активный основной раздел?
Активный раздел — это Основной раздел, содержащий операционную систему (Windows), которая запускается при включении компьютера.. … Первичные разделы обычно содержат операционные системы. Несколько основных разделов используются, когда на одном компьютере установлено несколько операционных систем.
Что означает Отметить раздел как активный?
Команда «Отметить раздел как активный» позволяет назначить основной основной раздел активным. Активный раздел — это раздел, с которого запускается компьютер. … Имена, обычно используемые для разделов или томов, содержащих файлы запуска и операционной системы, — это системный том и загрузочный том соответственно.
Можно ли установить Windows 10 на раздел MBR?
Итак, почему теперь с этой последней версией выпуска Windows 10 есть возможности установка Windows 10 не позволяет устанавливать окна с MBR-диском .
UEFI лучше устаревшего?
UEFI, преемник Legacy, в настоящее время является основным режимом загрузки. По сравнению с Legacy, UEFI имеет лучшую программируемость, большую масштабируемость, более высокая производительность и более высокий уровень безопасности. Система Windows поддерживает UEFI из Windows 7, а Windows 8 начинает использовать UEFI по умолчанию.
Как узнать, активен ли раздел?
Сначала войдите в командную строку с помощью загрузочного диска и введите DiskPart по запросу. В командной строке DiskPart введите список дисков. Вы увидите список дисков, которые в настоящее время подключены к вашему компьютеру. Теперь введите select disk n, где n — номер диска.
Как мне загрузиться с определенного раздела?
Как загрузиться с другого раздела
- Нажмите «Пуск».
- Щелкните «Панель управления».
- Щелкните «Администрирование». В этой папке откройте значок «Конфигурация системы». На экране откроется служебная программа настройки системы Microsoft (сокращенно MSCONFIG).
- Щелкните вкладку «Загрузка». …
- Перезагрузите компьютер.
Как создать раздел диспетчера загрузки Windows?
Шаги по созданию нового загрузочного раздела в Windows 8:
- Загрузите в Windows 8.
- Нажмите клавишу Windows и R, чтобы открыть Выполнить.
- Введите diskmgmt.msc, чтобы открыть Управление дисками.
- Нажмите «ОК» или нажмите «Ввод».
- Проверьте, есть ли на жестком диске незанятое пространство. …
- Продолжайте следовать инструкциям, чтобы завершить процесс.
How Do I Change My Boot Drive?
«Hi, do you know how can I change my system disk? I mean to set up SSD as the OS drive and change the old HDD as the storage disk for my computer. Can I do it on my own? How?»
«I recently bought a new SSD drive, and I want to install my present Windows 10 into the new SSD and leave the present HDD as a data drive. How to make the change? I mean how to change system disk and set SSD as the system drive? Can you help me?»
If you are looking for a way to set new SSD/HDD as the system drive disk for your computer, you are at the right place. Here below, we have two practical methods for you to solve this problem:
Method 1. Change System Disk By Migrating OS to HDD/SSD
Method 2. Clean Install OS to New SSD or HDD and Change OS Drive
Follow the tutorial guide here to start switching your system drive, making Windows bootable on another disk now.
Preparations — Backup System, Data and Set Up SSD/HDD
Before you start, here are some tips that you should follow to prepare your new SSD or HDD ready before chaging the system boot drive on your computer
Tip 1: Back up Windows system and data first
To avoid unexpected system failure or data loss trouble while you are changing the system disk between SSD and HDD, it’s highly recommended for you to back up your present Windows system and important data in your PC first. See also: Back Up Windows 10 to USB drive.
Tip 2: Set up new disk — SSD/HDD
For a new disk — new SSD/HDD: Install the new drive to your computer properly via the SATA and Power cables. For more details, read: How to Install a new hard drive/SSD.
For a used or a data disk: Back up data there to another device first. Backing up to an external hard drive shall be the best option.
Method 1. Change System Disk By Migrating OS to HDD/SSD
Work to: change system disk, move OS to new SSD/HDD, swap Windows system to a new disk.
This straightforward method enables users to directly change their OS disk without reinstalling system on Windows 11/10/8/7 etc. All you need is a professional partition manager software which supports to freely migrate system to HDD or SSD.
- Required Tools — EaseUS Partition Master with its «Migrate OS to HDD/SSD» feature
EaseUS Partition Master supports you to transfer system between HDD and SSD so to change the system disk and storage disk with ease. And only a few simple clicks will do.
- Tutorial — Download this software for free and follow the steps to do it now:
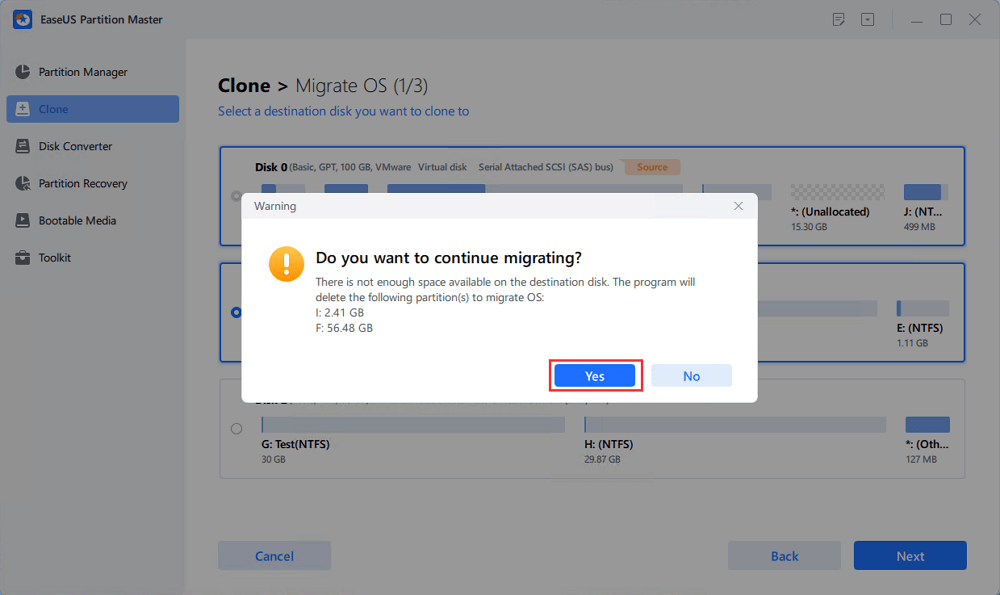
Note: The operation of migrating OS to SSD or HDD will delete and remove existing partitions and data on your target disk when there is not enough unallocated space on the target disk. If you saved important data there, back up them to an external hard drive in advance.
Step 1. Select «Clone» from the left menu. Select the «Migrate OS» and click «Next» to continue..
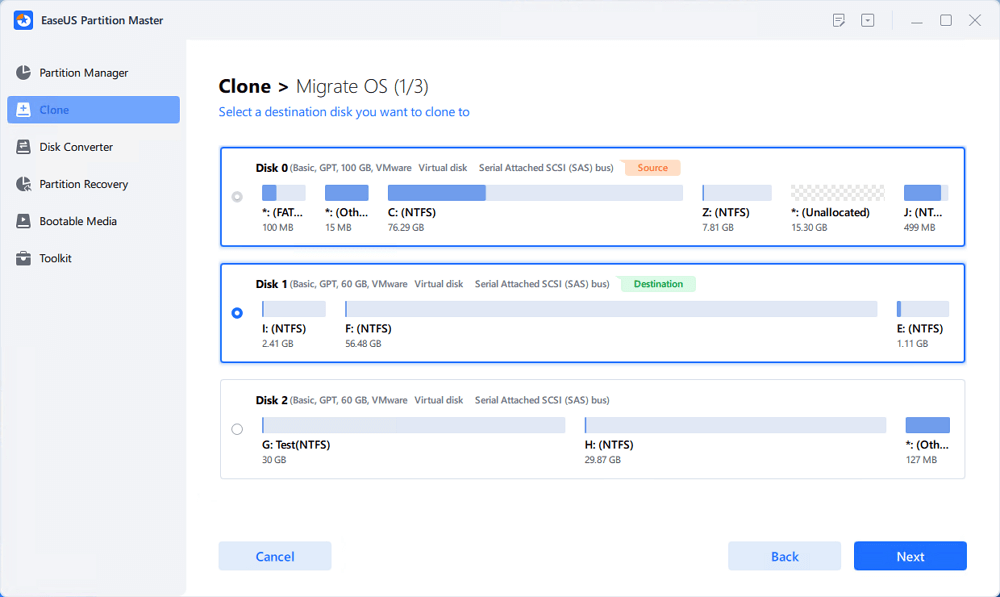
Step 2. Select the target disk you want to clone. Click «Next».
Step 3. Click «Yes» after checking the warning message. The data and partitions on the target disk will be deleted. Make sure that you’ve backed up important data in advance. If not, do it now.
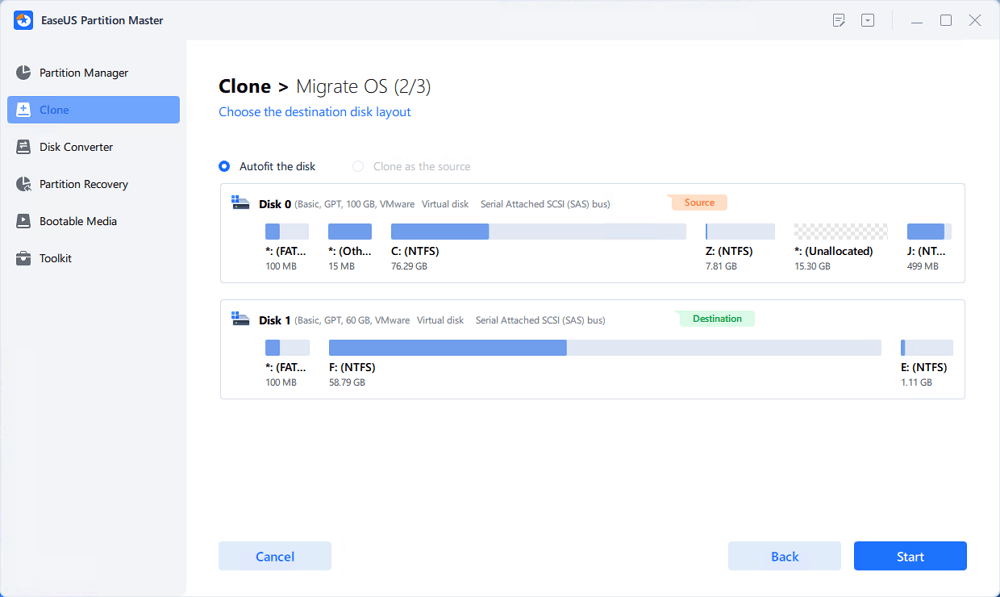
Step 4. Preview the layout of your target disk. You can also click the disk layout options to customize the layout of your target disk as you want. Then click «Start» to start migrating your OS to a new disk
- Set Up PC — Make OS Bootable on New HDD/SSD
When you finish the operation, all you need is to set the computer to boot from your new HDD or SSD by changing the boot order in BIOS.
Here are the steps to set up your new disk as boot drive, making Windows OS bootable:
Step 1. Restart PC and press F2/F8/Del keys to enter BIOS.
Step 2. Go to the Boot menu, under Boot Priority or Boot Order section, set the new HDD/SSD with migrated OS as the boot drive.
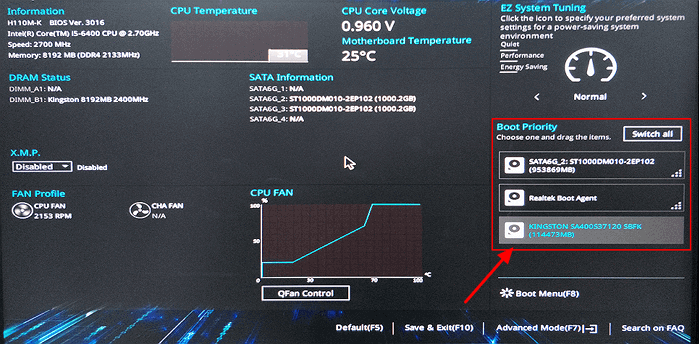
Step 3. Save the changes and exit BIOS. Then restart your PC.
After this, your Windows will automatically boot from the new disk. Everything on the system drive has been moved to the new disk with no data loss nor boot error. You can now delete the old system partition on your old drive and create a new partition to save data.
- Tip
- By following the above tutorial, Windows will work as normal and you don’t need to reactivate it.
- If Microsoft Windows pops up a notification and requests reactivation, reactivate it with your key or you can contact the Microsoft support team for further help.
Method 2. Clean Install OS to New SSD or HDD and Change OS Drive
Work to: Change boot drive by fresh or clean install Windows OS on new SSD/HDD, or install Windows on a second drive.
Those people who don’t like the present operating system can try this method to fresh install a new Windows OS on the new SSD or HDD. This method also works to set up SSD/HDD as a new OS disk in Windows systems and it might be more complex.
Follow to clean install the OS on new SSD and set it as your boot drive now.
- Preparations — Empty USB (8GB min), Download Windows Media Creation Tool, Windows product key (activate after installation).
- Tutorial — Fresh install Windows 10 on SSD/HDD and set it up as boot drive:
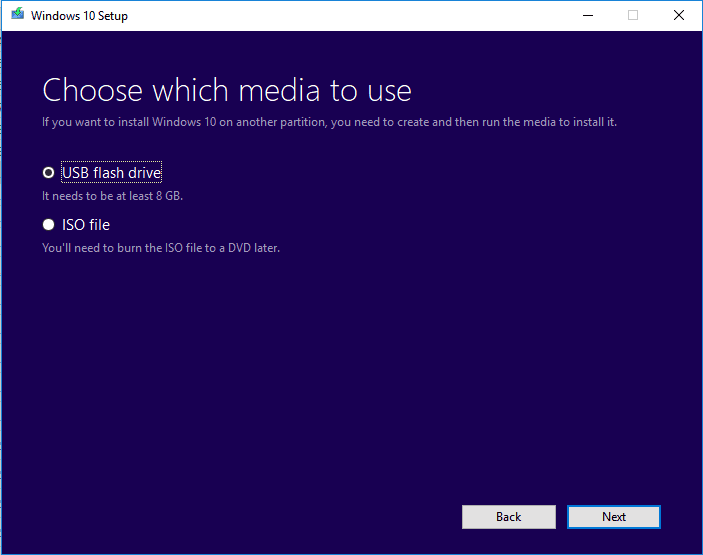
Step 1. Create Windows Installation Media on USB.
Double-click to run the Windows Media Creation Tool and select USB as the target to create Windows Installation Media.
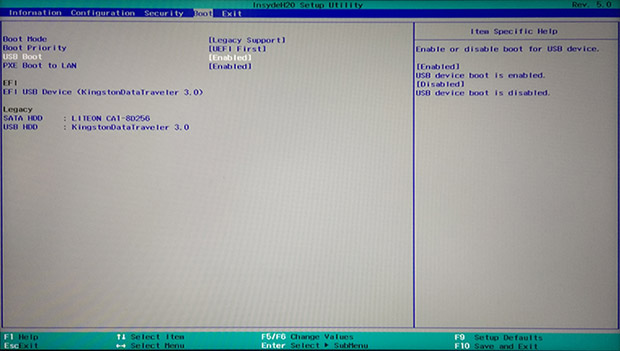
Step 2. Boot PC from USB Installation Media.
Remove the old system disk. Insert the new SSD and bootable USB to your PC, reboot PC, enter BIOS and set PC boot from the Installation Media.
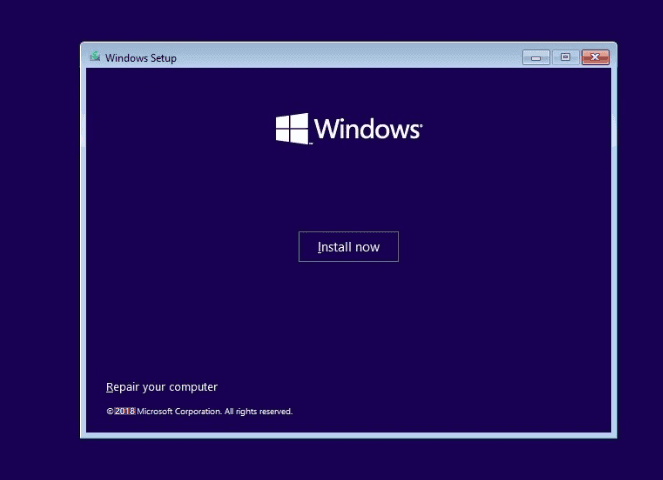
Step 3. Sut up perferences before installing Windows on the new drive.
Set language, other preference before clicking «Install now».
Step 4. Install Windows on new SSD.
Skep entring a product key, select «Install Windows only», and select to install Windows on the new SSD.
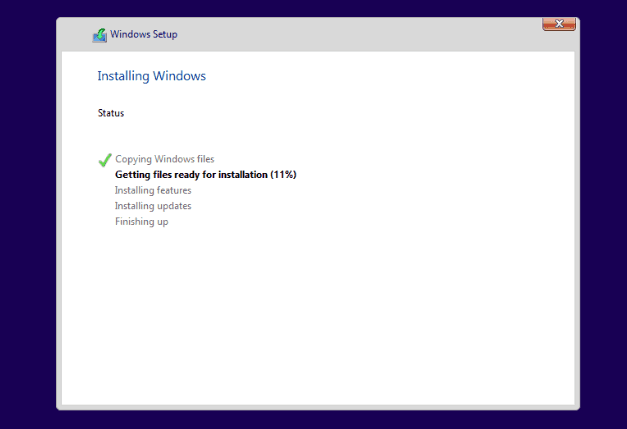
Wait for the process to complete.
Step 5. Set up SSD/HDD as boot drive.
After the installation, restart your PC, enter BIOS to change the boot drive by setting SSD as the OS drive.
Step 6. Reinsert old OS disk and set it as data drive.
Shut down PC, remove the installation USB drive, reinsert old HDD to computer and restart PC.
Step 7. Activate Windows with the product key.
If you want a dual boot OS computer, you can stop here and repartition the drive to create new partition to save your backup data.
If you want to use the whole drive as data disk, back up useful files on the old system drive and delete it. Then you can create a new partition so to copy the back up data back to your data disk.
Note: Any false operation may cause system boot failure or unexpected system problem on your computer. And please do it very carefully. For a more stable and proper way, please try Method 1 with EaseUS Partition Master to protect the system and data security.
Conclusion
This page covers two practical and efficient ways to help you change system disk by migrating OS or clean install Windows to SSD/HDD. As if you don’t know which way suits you better, take the tips here:
- If you only want to switch system drive, change the system disk to a new SSD or a bigger HDD but keep the operating system, Method 1 with EaseUS Partition Master can help.
It will help you migrate OS to SSD/HDD without reinstallation of Windows. You don’t need to reset the new SSD as the boot drive in BIOS. It will all be done during the migration process.
- If you want to create a dual-boot OS, installing two versions of Windows OS on your computer, or clean install Windows on the new SSD/HDD, Method 2 with Clean Install Windows tutorial is workable.
You should be careful during the installation, and remember to set up SSD or HDD as the boot disk after the installation. Otherwise, Windows won’t boot from the new disk.
People Also Ask
This page mainly answers the question of «How do I change system disk and set up new SSD/HDD as the boot drive». However, some people also searched related questions on Google.
Here we will lift 3 top concerned questions and leave an answer to each question. If you are having the same doubts in your mind, check the answers here now.
1. How do I change my boot drive or boot disk?
To change the boot drive requires your other disk has Windows OS installed on it. To do so, you have two choices: 1). Migrate OS to the new disk by using EaseUS Partition Master with its Migrate OS feature; 2). Fresh or clean install Windows on the new drive.
- If you use the first method to migrate OS, you just need to restart the PC and Windows will automatically boot from the new drive. No further operation is needed.
- If you have used the second method to fresh install Windows OS on the new drive, take the steps here to change your boot drive:
- Step 1. Shut down PC and remove the old drive.
- Step 2. Restart PC, press F2, F10, or Del key to enter BIOS.
- Step 3. Go to the Boot order section, set the new disk as the boot drive, and save the changes.
- Step 4. Restart PC.
If everything goes right, shut down the computer and insert the old drive back into your computer. Restart it again.
2. How do I move Windows 10 to a new SSD?
The way to move Windows 10 to a new SSD is similar to the provided Method 1 on this page. You can safely install the SSD on your computer and run EaseUS Partition Master to execute the OS migration job.
When the process finishes, just restart PC and everything is done. You may also refer to transfer Windows 10 to SSD for a detailed guide.
3. How do I transfer my operating system to a new hard drive?
There are two ways that you can apply to transfer OS to a new hard drive:
- 1). Directly migrate OS to new Hard drive;
- 2). Clone system to the new hard drive and set the new drive as a boot drive.
If you prefer the first way, you can directly revert to Method 1 on this page for a detailed guide. If you choose to clone the system to the new drive, refer to Transfer OS to New Hard Drive without Reinstalling Windows as a guide.
How Do I Change My Boot Drive?
«Hi, do you know how can I change my system disk? I mean to set up SSD as the OS drive and change the old HDD as the storage disk for my computer. Can I do it on my own? How?»
«I recently bought a new SSD drive, and I want to install my present Windows 10 into the new SSD and leave the present HDD as a data drive. How to make the change? I mean how to change system disk and set SSD as the system drive? Can you help me?»
If you are looking for a way to set new SSD/HDD as the system drive disk for your computer, you are at the right place. Here below, we have two practical methods for you to solve this problem:
Method 1. Change System Disk By Migrating OS to HDD/SSD
Method 2. Clean Install OS to New SSD or HDD and Change OS Drive
Follow the tutorial guide here to start switching your system drive, making Windows bootable on another disk now.
Preparations — Backup System, Data and Set Up SSD/HDD
Before you start, here are some tips that you should follow to prepare your new SSD or HDD ready before chaging the system boot drive on your computer
Tip 1: Back up Windows system and data first
To avoid unexpected system failure or data loss trouble while you are changing the system disk between SSD and HDD, it’s highly recommended for you to back up your present Windows system and important data in your PC first. See also: Back Up Windows 10 to USB drive.
Tip 2: Set up new disk — SSD/HDD
For a new disk — new SSD/HDD: Install the new drive to your computer properly via the SATA and Power cables. For more details, read: How to Install a new hard drive/SSD.
For a used or a data disk: Back up data there to another device first. Backing up to an external hard drive shall be the best option.
Method 1. Change System Disk By Migrating OS to HDD/SSD
Work to: change system disk, move OS to new SSD/HDD, swap Windows system to a new disk.
This straightforward method enables users to directly change their OS disk without reinstalling system on Windows 11/10/8/7 etc. All you need is a professional partition manager software which supports to freely migrate system to HDD or SSD.
- Required Tools — EaseUS Partition Master with its «Migrate OS to HDD/SSD» feature
EaseUS Partition Master supports you to transfer system between HDD and SSD so to change the system disk and storage disk with ease. And only a few simple clicks will do.
- Tutorial — Download this software for free and follow the steps to do it now:
Note: The operation of migrating OS to SSD or HDD will delete and remove existing partitions and data on your target disk when there is not enough unallocated space on the target disk. If you saved important data there, back up them to an external hard drive in advance.
Step 1. Select «Clone» from the left menu. Select the «Migrate OS» and click «Next» to continue..
Step 2. Select the target disk you want to clone. Click «Next».
Step 3. Click «Yes» after checking the warning message. The data and partitions on the target disk will be deleted. Make sure that you’ve backed up important data in advance. If not, do it now.
Step 4. Preview the layout of your target disk. You can also click the disk layout options to customize the layout of your target disk as you want. Then click «Start» to start migrating your OS to a new disk
- Set Up PC — Make OS Bootable on New HDD/SSD
When you finish the operation, all you need is to set the computer to boot from your new HDD or SSD by changing the boot order in BIOS.
Here are the steps to set up your new disk as boot drive, making Windows OS bootable:
Step 1. Restart PC and press F2/F8/Del keys to enter BIOS.
Step 2. Go to the Boot menu, under Boot Priority or Boot Order section, set the new HDD/SSD with migrated OS as the boot drive.
Step 3. Save the changes and exit BIOS. Then restart your PC.
After this, your Windows will automatically boot from the new disk. Everything on the system drive has been moved to the new disk with no data loss nor boot error. You can now delete the old system partition on your old drive and create a new partition to save data.
- Tip
- By following the above tutorial, Windows will work as normal and you don’t need to reactivate it.
- If Microsoft Windows pops up a notification and requests reactivation, reactivate it with your key or you can contact the Microsoft support team for further help.
Method 2. Clean Install OS to New SSD or HDD and Change OS Drive
Work to: Change boot drive by fresh or clean install Windows OS on new SSD/HDD, or install Windows on a second drive.
Those people who don’t like the present operating system can try this method to fresh install a new Windows OS on the new SSD or HDD. This method also works to set up SSD/HDD as a new OS disk in Windows systems and it might be more complex.
Follow to clean install the OS on new SSD and set it as your boot drive now.
- Preparations — Empty USB (8GB min), Download Windows Media Creation Tool, Windows product key (activate after installation).
- Tutorial — Fresh install Windows 10 on SSD/HDD and set it up as boot drive:
Step 1. Create Windows Installation Media on USB.
Double-click to run the Windows Media Creation Tool and select USB as the target to create Windows Installation Media.
Step 2. Boot PC from USB Installation Media.
Remove the old system disk. Insert the new SSD and bootable USB to your PC, reboot PC, enter BIOS and set PC boot from the Installation Media.
Step 3. Sut up perferences before installing Windows on the new drive.
Set language, other preference before clicking «Install now».
Step 4. Install Windows on new SSD.
Skep entring a product key, select «Install Windows only», and select to install Windows on the new SSD.
Wait for the process to complete.
Step 5. Set up SSD/HDD as boot drive.
After the installation, restart your PC, enter BIOS to change the boot drive by setting SSD as the OS drive.
Step 6. Reinsert old OS disk and set it as data drive.
Shut down PC, remove the installation USB drive, reinsert old HDD to computer and restart PC.
Step 7. Activate Windows with the product key.
If you want a dual boot OS computer, you can stop here and repartition the drive to create new partition to save your backup data.
If you want to use the whole drive as data disk, back up useful files on the old system drive and delete it. Then you can create a new partition so to copy the back up data back to your data disk.
Note: Any false operation may cause system boot failure or unexpected system problem on your computer. And please do it very carefully. For a more stable and proper way, please try Method 1 with EaseUS Partition Master to protect the system and data security.
Conclusion
This page covers two practical and efficient ways to help you change system disk by migrating OS or clean install Windows to SSD/HDD. As if you don’t know which way suits you better, take the tips here:
- If you only want to switch system drive, change the system disk to a new SSD or a bigger HDD but keep the operating system, Method 1 with EaseUS Partition Master can help.
It will help you migrate OS to SSD/HDD without reinstallation of Windows. You don’t need to reset the new SSD as the boot drive in BIOS. It will all be done during the migration process.
- If you want to create a dual-boot OS, installing two versions of Windows OS on your computer, or clean install Windows on the new SSD/HDD, Method 2 with Clean Install Windows tutorial is workable.
You should be careful during the installation, and remember to set up SSD or HDD as the boot disk after the installation. Otherwise, Windows won’t boot from the new disk.
People Also Ask
This page mainly answers the question of «How do I change system disk and set up new SSD/HDD as the boot drive». However, some people also searched related questions on Google.
Here we will lift 3 top concerned questions and leave an answer to each question. If you are having the same doubts in your mind, check the answers here now.
1. How do I change my boot drive or boot disk?
To change the boot drive requires your other disk has Windows OS installed on it. To do so, you have two choices: 1). Migrate OS to the new disk by using EaseUS Partition Master with its Migrate OS feature; 2). Fresh or clean install Windows on the new drive.
- If you use the first method to migrate OS, you just need to restart the PC and Windows will automatically boot from the new drive. No further operation is needed.
- If you have used the second method to fresh install Windows OS on the new drive, take the steps here to change your boot drive:
- Step 1. Shut down PC and remove the old drive.
- Step 2. Restart PC, press F2, F10, or Del key to enter BIOS.
- Step 3. Go to the Boot order section, set the new disk as the boot drive, and save the changes.
- Step 4. Restart PC.
If everything goes right, shut down the computer and insert the old drive back into your computer. Restart it again.
2. How do I move Windows 10 to a new SSD?
The way to move Windows 10 to a new SSD is similar to the provided Method 1 on this page. You can safely install the SSD on your computer and run EaseUS Partition Master to execute the OS migration job.
When the process finishes, just restart PC and everything is done. You may also refer to transfer Windows 10 to SSD for a detailed guide.
3. How do I transfer my operating system to a new hard drive?
There are two ways that you can apply to transfer OS to a new hard drive:
- 1). Directly migrate OS to new Hard drive;
- 2). Clone system to the new hard drive and set the new drive as a boot drive.
If you prefer the first way, you can directly revert to Method 1 on this page for a detailed guide. If you choose to clone the system to the new drive, refer to Transfer OS to New Hard Drive without Reinstalling Windows as a guide.
Ошибка в загрузке операционной системы Winodows 7 не самое лучшее с чем можно столкнуться в работе с операционной системой Microsoft. Но иногда подобные вещи случаются (нужно признать, что в Windows 7 гораздо реже чем, например в Windows XP). Переустановка операционной системы зачастую является крайним методом устранения проблемы. В этой статье я пошагово опишу, как исправить ошибку BOOTMGR is missing Press Ctrl+Alt+Del to restart при загрузки Windows 7.
Итак, после включения компьютера/ ноутбука имеем зловещую надпись «BOOTMGR is missing Press Ctrl+Alt+Del to restart«. Зачастую такая ошибка возникает после неудачных экспериментов с разделами жесткого диска.

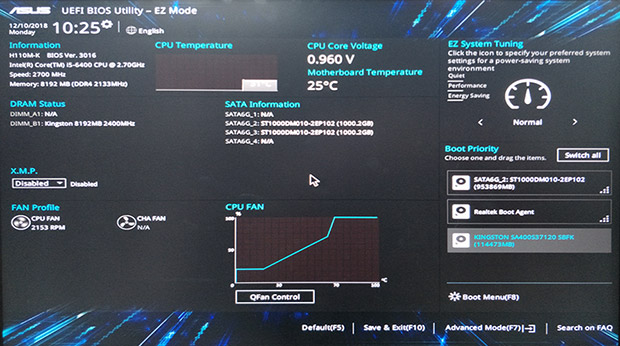
Для устранения этой ошибки необходимо вставить диск с вашей операционной системой и загрузиться с него. Как это сделать описано в статье- как загрузиться с диска.
После этого выбираем язык и другие параметры, нажимаем «Далее».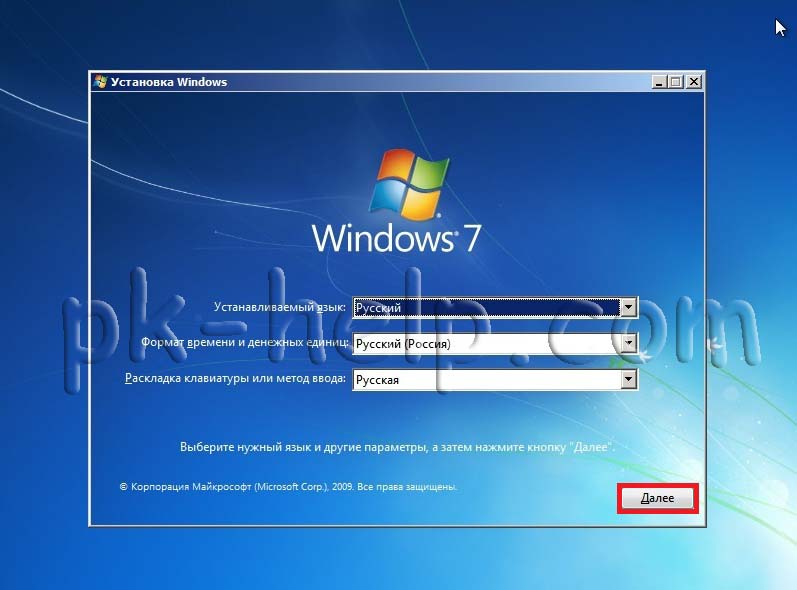
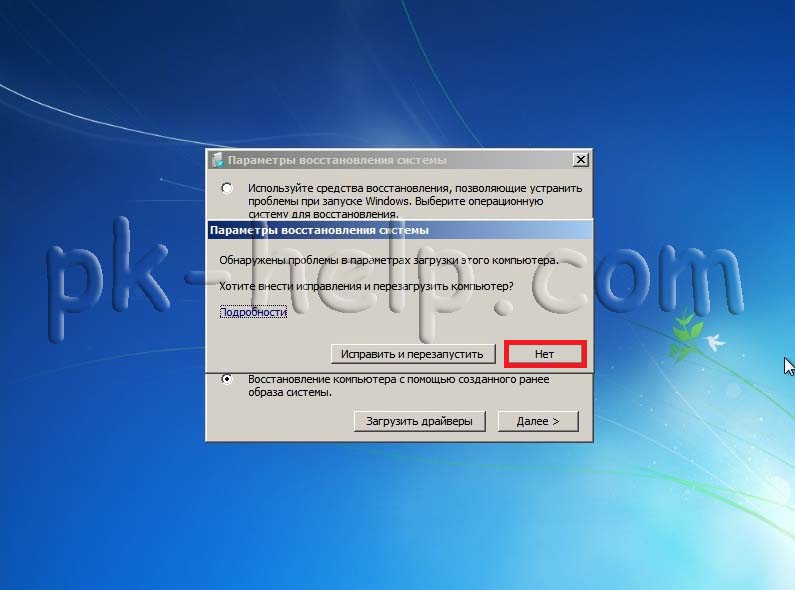
Затем нажимаем «Восстановление системы».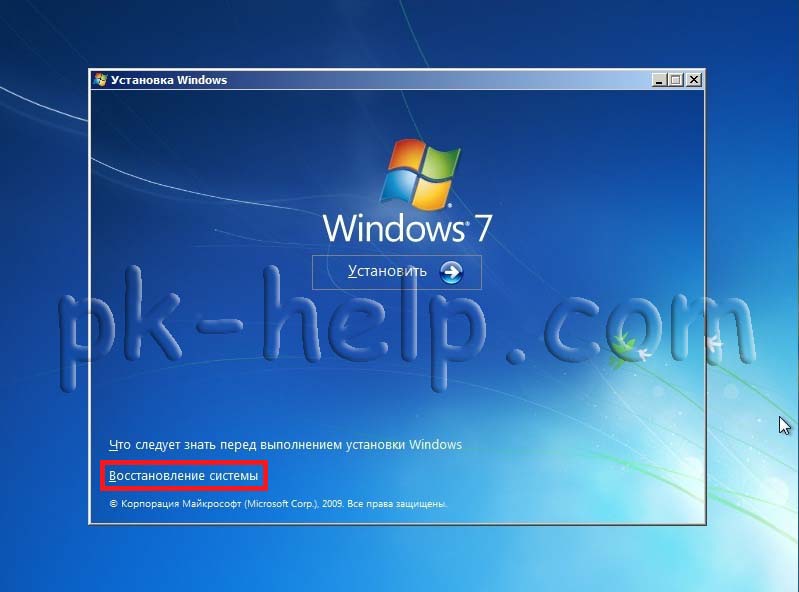
После этого автоматически запуститься восстановление компьютера с помощью созданного ранее образа. В параметрах восстановления системы нажимаем «Нет».
Если у вас нету бекапа системы, то в следующих окнах нажимаем «Отмена».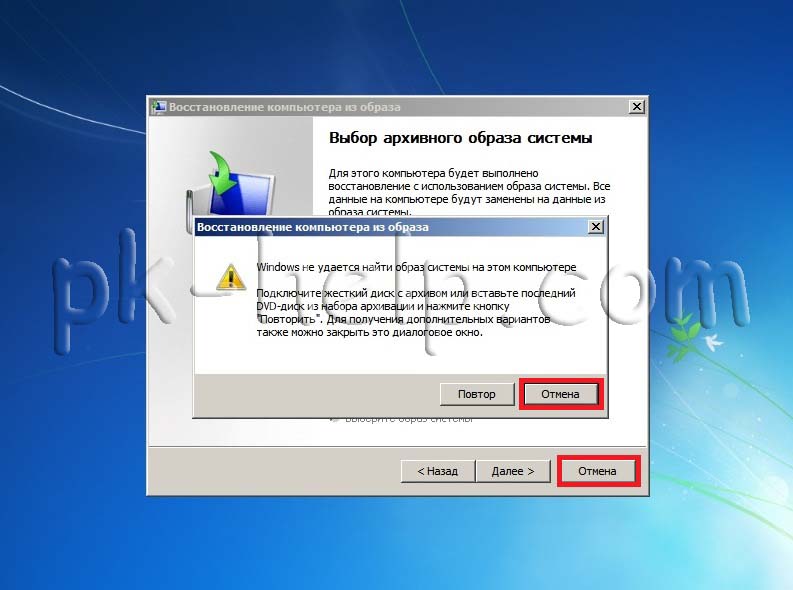
В окне Параметры восстановления системы запускаем командную строку.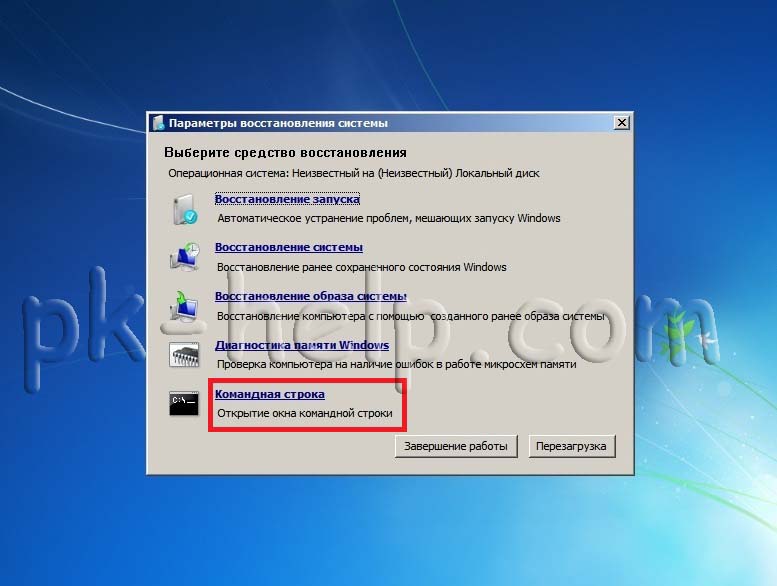
Теперь необходимо с помощью утилиты diskpart изменить активный раздел.
Активный раздел – это основной раздел, с которого происходит загрузка компьютера. На компьютере может содержаться несколько основных разделов с собственной операционной системой. При этом, загрузка происходит именно с того основного раздела, который в данный момент является активным.
Например, если вы нажмете правой кнопкой мыши на ярлыке Компьютер выберите «Управление – Управления дисками» вы увидите все жесткие диски и их разделы. Для Windows 7 Активный раздел должен быть раздел размером 100 Мб (в Windows 8 – 350 Мб. ). Атрибут «Активен» нужен BIOS, чтобы кратчайшим способом определить, на каком из основных разделов находятся файлы загрузки, а то что этот раздел не отображается в проводнике Windows и помечен как «Зарезервировано системой», указывая на его чрезвычайную важность и не стоить с ним ничего делать.
Последовательно запускаем команды:
1 Diskpart — утилита работы с разделами жёсткого диска для командной строки, включённая в версии линеек ОС Windows NT начиная с Windows 2000, которая заменила fdisk что была под MS-DOS.
2 List disk — команда выведет список всех подключенных к вашему компьютеру дисков и назначит им номера.
3 Select Disk x – где x- номер диска, содержащего раздел, который вы хотите сделать активным.
4 List partition –команда просмотра всех разделов на выбранном ранее диске.
5 Select Partition x — где x- номер раздела, который необходимо сделать активным
6 Active — сделает выбранный вами раздел активным.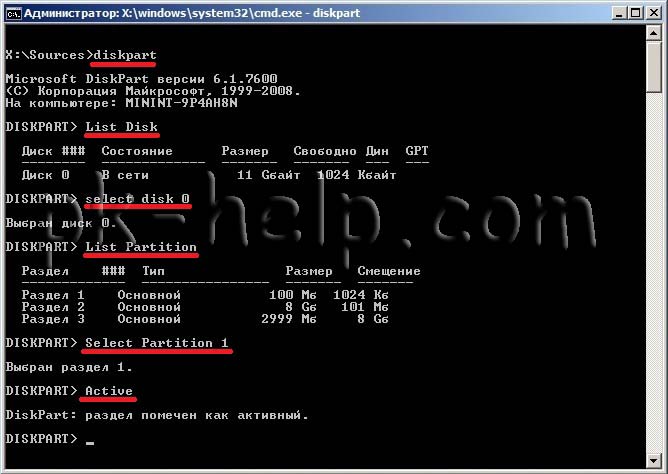
После этого перезагружаем Windows 7. Если все сделано правильно ошибки BOOTMGR is missing Press Ctrl+Alt+Del to restart не должно быть, операционная система должна загрузиться в нормальном режиме.