Contents
- What are Repositories?
-
Ubuntu Software Tab
- The Four Main Repositories
- Download Server
- CD-ROM/DVD
-
Other Software Tab
- Enabling Canonical Partner Repositories
- CD-ROM/DVD
-
Adding Personal Package Archives (PPAs)
- Adding a PPA using the command-line
- Adding Extra Repositories
- Editing Repository Details
- Removing & Disabling Repositories
-
Updates Tab
- Install updates from:
- Automatic Updates
- Notify me of a new Ubuntu version:
- Authentication Tab
- Integration with Ubuntu Software Center
-
Exploring the Repositories
- Finding a Package’s Repository
- Other Links
What are Repositories?
There are literally thousands of Ubuntu programs available to meet the needs of Ubuntu users. Many of these programs are stored in software archives commonly referred to as repositories. Repositories make it easy to install new software, while also providing a high level of security, since the software is thoroughly tested and built specifically for each version of Ubuntu.
Ubuntu distinguishes between software that is «free» and software that is not free. For details of Ubuntu’s Free Software Philosophy please see here.
The four main repositories are:
-
Main — Canonical-supported free and open-source software.
-
Universe — Community-maintained free and open-source software.
-
Restricted — Proprietary drivers for devices.
-
Multiverse — Software restricted by copyright or legal issues.
The Ubuntu Install CDs contain software from the «Main» and «Restricted» repositories, so if you have no internet connection you can still install software from the CDs. If you have an internet connection you can install software from any Ubuntu repository.
This page describes how to manage software repositories in Ubuntu. For Kubuntu please see Kubuntu repository management.
GUI-based repository management is normally accomplished via «Software Sources». This interface can be accessed via several methods. One method is to go through the «Ubuntu Software Center». Open the software center, then from the Edit menu select «Software Sources». Note: You will have to enter your password to change settings in this window.
You can download a copy of a Canonical repository for your machine architecture (for example, i386) and use it offline (see AptGet/Offline/Repository).
 The operations described on this page modify the software repositories configuration file /etc/apt/sources.list. If you wish to, you can modify this file directly. For further details please see Managing Repositories from the Command Line.
Ubuntu Software Tab

The Four Main Repositories
The «Ubuntu Software» tab displays a list of repositories or «Channels». The four main repositories are:
-
Main — Canonical-supported free and open-source software.
-
Universe — Community-maintained free and open-source software.
-
Restricted — Proprietary drivers for devices.
-
Multiverse — Software restricted by copyright or legal issues.
For a detailed description of these repositories, see Repositories.
To disable a repository temporarily, untick the checkbox next to its name.
Select «Close» to save your changes. A dialog box should appear, asking whether you’d like to update the list of repositories. Select «Reload» to update the list.

The Close, Reload, and Revert buttons each perform special functions with regard to the repository pages.
-
Close. The ‘Close’ button must be selected to execute any change(s). If the action would change system files, they are written at this time.
-
Reload. Any time a setting is changed which alters a repository setting the ‘Reload’ button should be selected to allow the applicable repository database to be updated. Repository information will not normally be updated until the ‘Reload’ button is selected. If you do not wish to use ‘Reload’, select ‘Close’ to exit without updating the database.
-
Revert. The ‘Revert’ button erases changes made since the last save. It merely cancels pending changes which have not been executed, returning the selections to their prior state. The button does not return system files to the original installation settings.
Download Server
Copies of the main repositories are available on different servers round the world. The fastest server for you will often be a server close geographically to you.
If you have problems with your current server (for example, the server is slow or you cannot find a package you expect) then select another server by clicking the «Download from:» list.
If you click «Select Best Server», Ubuntu will attempt (on this occasion only) to find the fastest server. Once you select a server it remains the selected server until you change it. Note: The fastest server now may not be the fastest server at another time.
CD-ROM/DVD
The option to install from CD-ROM may be selected or deselected from this window (in the section «Installable from CD-ROM/DVD»).
If the option is selected, the system will attempt to search the CD-ROM during package installs. If the CD-ROM is not present, the system will request its insertion.
Deselect this option if you do not plan to install packages from CD-ROM. Once the option is deselected the system will no longer check if a CD-ROM is present.
Other Software Tab
Enabling Canonical Partner Repositories
The «Other Software» tab is where you can enable Canonical Partner Repositories. The partner repositories offer access to proprietary and closed-source software and are disabled by default. If you wish to enable a partner repository, tick it, enter your password, click «Close», and then click «Reload».
In the screenshot below two partner repositories are listed — one for applications (enabled) and one for source code (disabled).

CD-ROM/DVD
You can add software sources on CD-ROM/DVD using this tab. To add such a source, insert the CD-ROM/DVD and click the «Add Volume» button. Once you have added the CD-ROM/DVD, it will be searched for packages during installation requests.
Adding Personal Package Archives (PPAs)
Personal Package Archives (PPAs) are a kind of repository. Developers create them in order to distribute their software. In order to add a PPA you need its «location», which is in the format ppa:[username]/[ppaname]. You can find this information on the PPA’s Launchpad page.
 Packages in PPAs do not undergo the same process of validation as packages in the main repositories. PPAs are a low-security alternative to the main repositories, so the user will be installing software at their own risk.
To add a PPA to your system’s software sources:
-
Navigate to Ubuntu Software Centre > Edit > Software Sources > Other Software.

-
Click Add.

- Enter the PPA’s location (as described above).
-
Click Add Source.
- Enter your password.
-
Click Authenticate.
-
Click Close.
-
If you are asked if you want to reload the information about available software, click Reload.


You have now added the PPA and can install packages from it.
Adding a PPA using the command-line
Make sure you have the package python-software-properties installed.
Step 1: On the PPA’s Launchpad page, look for the heading that reads «Adding this PPA to your system». Make a note of the PPA’s location, which has the format ppa:user/ppa-name.
Step 2: Open a terminal and enter:
sudo add-apt-repository ppa:user/ppa-name
Replace ‘ppa:user/ppa-name‘ with the PPA’s location that you noted above.
Your system will now fetch the PPA’s key. This enables your system to verify that the packages in the PPA have not been interfered with since they were built.
Step 3: Now, as a one-off, tell your system to pull down the latest list of software from each archive it knows about, including the PPA you just added:
sudo apt-get update
Now you’re ready to start installing software from the PPA!
There are times when you might want to add extra repositories to your system’s software sources (that is, in addition to the repositories provided by Canonical). For example, there is at least one repository that «caters to the Ubuntu gamer».
Make sure that any repositories that you add have been tested and are known to work on Ubuntu systems. Repositories that are not designed to work with your version of Ubuntu can introduce inconsistencies in your system and might force you to re-install.
In order to add a repository you need its «location» and the «key command» (the command that will add the repository’s key to your system). For an explanation of the format of the «location», see the Editing Repository Details section below.
To add a repository to your system’s software sources:
-
Navigate to Ubuntu Software Centre > Edit > Software Sources > Other Software.
-
Click Add.
- Enter the repository’s location.
-
Click Add Source.
- Enter your password.
-
Click Authenticate.
-
Click Close.
-
If you are asked if you want to reload the information about available software, click Reload.
- In a terminal enter the «key command».
You have now added the repository and can install packages from it.
Editing Repository Details
To edit a repository’s details, select the repository in the list and click the Edit button. A dialog box displays the apt line, broken up into its components.

The fields are as follows:
-
Type designated as «binary» (deb) for software in binary format or «Source» (src) for source code format. Select the option that corresponds to the repository.
-
URI Enter a valid Uniform Resource Indicator or URI for the software repository. Here’s a list of examples:
-
cdrom
cdrom:[description_of_cd]/
-
ftp
ftp://ftp.domain.ext/path/to/repository
-
http
http://www.domain.ext/path/to/repository
-
smb (works only when the computer is connected to a Samba share)
smb://path/to/repository
-
nfs (works only if the computer is connected to a NFS share)
file://path/to/local/directory
-
-
Distribution
Select the name of the distribution or the name of the distribution version. -
Components
Select the repository section to access. Add more sections separated by spaces. -
Comment
Add a comment to describe the repository for easier reference.
Removing & Disabling Repositories
The «Other Software» tab lists your repositories and PPAs (except for Main, Universe, Restricted, and Multiverse).
To disable a repository temporarily, untick the checkbox next to the source. You can enable the repository again by re-ticking the checkbox.
To remove a repository permanently from the list, highlight the repository and click «Remove».
Updates Tab

The Updates tab is where you set when and how Ubuntu receives system updates. If you make any changes don’t forget to «Close» and «Reload» so that your system’s software sources will be updated.
Install updates from:
- «Important security updates (…)». Updates that fix security vulnerabilities. They are managed by the Ubuntu Security Team and are designed to change the behavior of the package as little as possible — in fact, the minimum required to resolve the security problem. As a result, they tend to be very low-risk to apply and all users are urged to apply security updates.
- «Recommended updates (…)». Updates for serious bugs other than security vulnerabilities.
-
«Unsupported updates (…)». New versions of packages which have been backported to an older release. Packages may contain new features, may introduce new interfaces, and bugs. Such updates are not supported by Canonical on the release they have been backported to but they have been tested by members of the Ubuntu community. For more information on backports, visit UbuntuBackports
Automatic Updates
This section allows the user to set the frequency and manner of updates.
Notify me of a new Ubuntu version:
Allows users to upgrade to new versions of Ubuntu.
- «Normal Releases» — Notifies the user of an upgrade from one regular release to another, such as from Ubuntu 12.10 (Quantal Quetzal) to Ubuntu 13.04 (Raring Ringtail).
- «Long Term Support Releases Only» — Notifies the user of an upgrade between Long Term Support releases, such as from Ubuntu 10.04 (Lucid Lynx) LTS to Ubuntu 12.04 (Precise Pangolin) LTS but not to other distributions which were not designated Long Term Support releases.
Authentication Tab

The Authentication tab lists the keys for your repositories (but not your PPAs). Note: PPAs do have keys but the system handles them automatically and they are not listed here.
When you add a repository to your system’s software sources the maintainer of the repository will normally tell you how to add the key.
If the maintainer does not tell you how to add the key then you need to find the «key hash» of the repository in order to look up the key on a public key server. Once you know the key hash, the key can be retrieved using the command:
gpg --keyserver [name of keyserver] --recv-keys [keyhash]
For example, if the key hash is CE49EC21, you retrieve the key using the command:
gpg --keyserver subkeys.pgp.net --recv-keys CE49EC21
Then, add the key to Ubuntu’s apt trusted keys database using the command:
gpg --export --armor CE49EC21 | sudo apt-key add -
Note: There’s a dash at the end of the line above.
For more on apt and authentication keys, see SecureApt.
Integration with Ubuntu Software Center

Ubuntu Software Center is the GUI-based method to add or remove applications. It allows the user to selectively choose the repositories to be searched and then presents a list of applications with a brief description of each application.
By default Ubuntu Software Center searches all (enabled) repositories. If you wish to search one repository only then click the down arrow to the right of All Software and select the repository that you wish to search.
Software Sources is accessible from the Ubuntu Software Center via the Edit, Software Sources menu. The contents of Ubuntu Software Center are updated whenever a repository is added, deleted or changed via Software Sources. While the repository list is updating the Progress icon is displayed in the top bar of Ubuntu Software Center.
Exploring the Repositories
There are several GUI-based methods you can use to explore the repositories. One is to open Synaptic Package Manager and click on the Origin button. This will display a repository list in the window above the button. The list will contain all the repositories enabled in your system’s software sources. To the right will be the packages available via download (white boxes) and currently installed packages (green boxes).
There are two cropped images of the main Synaptic window below:
-
The image on the left shows the results of selecting Local/main (packages from the Main repository stored locally). Local packages are packages stored on the user’s computer.
-
The image on the right displays the results of selecting archive.ubuntu.com/main (the Main repository).

Finding a Package’s Repository
It is sometimes useful to find a package’s repository (the repository that the package was installed from). If you highlight the package and click the Properties button you may be able to determine the repository in the Section: area. The name in parentheses (if any) is the repository. For example, from the screenshot below we can see that the rar package’s repository is Multiverse.

Another method to find a package’s repository is to visit http://packages.ubuntu.com/. The search box is an easy method to quickly locate a package maintained by the Ubuntu team. Several input selections are available to help the user refine the search.
(Note: Some packages are not available from a repository or PPA, instead they are available as Debian packages.)
Other Links
-
To selectively enable packages from the Proposed repository please see https://wiki.ubuntu.com/Testing/EnableProposed.
-
Managing Software Repositories from the Command Line
-
Managing Software Repositories in Kubuntu
-
AptGet/Offline/Repository
-
Personal repositories
-
Launchpad — Installing Software from a PPA
-
Article about repository management
CategoryPackageManagement
I am updating my Tor on Ubuntu and it states:
Do not use the packages in Ubuntu’s universe. You’ll need to set up our package repository before you can fetch Tor.
It then states that I have to add this line to your /etc/apt/sources.list file:
deb http://deb.torproject.org/torproject.org <precise> main
I am uncertain how to add a line to /etc/apt/sources.list.
![]()
Braiam
66.2k30 gold badges174 silver badges262 bronze badges
asked Oct 7, 2012 at 21:16
![]()
Make a backup copy of your current sources.list file
sudo cp /etc/apt/sources.list /etc/apt/sources.list.bak
Append new line of text to current sources.list file
-
CLI
echo "new line of text" | sudo tee -a /etc/apt/sources.list -
GUI (Text Editor)
sudo gedit /etc/apt/sources.list -
Paste
new line of texton new line at end of currentsources.listtext file in Text Editor. - Save and close
sources.list
Don’t forget to update in order to use the new repository
sudo apt-get update
![]()
jtd
2,3552 gold badges22 silver badges30 bronze badges
answered Oct 8, 2012 at 8:39
0
In order to add a third-party repository, you first need the public keys for this repository which in this case you can grab from the Ubuntu key server:
sudo apt-key adv --recv-keys --keyserver keyserver.ubuntu.com 886DDD89
Now you can add the repository in /etc/apt/sources.list.d/ with add-apt-repository:
sudo add-apt-repository "deb http://deb.torproject.org/torproject.org $(lsb_release -s -c) main"
After adding any repository it is always needed to execute
sudo apt-get update
Now you can install the package for Tor itself. For complete instructions on how to install Tor correctly, see How to install Tor?
This procedure can also be reversed.
![]()
answered Oct 7, 2012 at 23:28
![]()
zerwaszerwas
3,8731 gold badge23 silver badges19 bronze badges
3
Easiest way on Ubuntu:
Go to Ubuntu Software Centre > Edit > Software Sources > Add
Paste the line from the Tor website into the APT line box.
You could also manually edit /etc/apt/sources.list, but probably simplest to go through the Software Centre.
Make sure to input the line correctly as well, e.g.
deb http://deb.torproject.org/torproject.org precise main
if you’re using 12.04. If something goes wrong edit /etc/apt/sources.list to fix it.
![]()
penreturns
5,9404 gold badges32 silver badges44 bronze badges
answered Oct 7, 2012 at 21:36
![]()
First, make a backup. You can do so with:
sudo cp /etc/apt/sources.list /etc/apt/sources.list.bak
in the Terminal. Give your password and press Enter. It will not be shown, not even asterisks. Then run:
gksudo gedit /etc/apt/sources.list
and give your password.
Add the line:
deb http://deb.torproject.org/torproject.org main
to the bottom of the file and use File->Save to save it.
Then, go back to the terminal and run:
sudo apt-get update
and then continue following the instructions. This command and the one starting in sudo apt-get install may take a while. Additionally, the install command may give a:
Do you want to continue[y/n]?
prompt, where you must type y and press Enter to continue.
answered Oct 7, 2012 at 21:33
![]()
nanofaradnanofarad
20.5k12 gold badges63 silver badges90 bronze badges
You need not to edit default /etc/apt/sources.list, you better upgrade your Ubuntu to Saucy. Here Tor is in the official repository.
See, my /etc/apt/sources.list:
deb http://us-west-2.ec2.archive.ubuntu.com/ubuntu/ saucy main restricted universe multiverse
deb http://us-west-2.ec2.archive.ubuntu.com/ubuntu/ saucy-updates main restricted universe multiverse
deb http://us-west-2.ec2.archive.ubuntu.com/ubuntu/ saucy-backports main restricted universe multiverse
deb http://us-west-2.ec2.archive.ubuntu.com/ubuntu/ saucy-security main restricted universe multiverse
Only 4 lines.
I’m able to download and install the Tor package:
# aptitude download tor
Get: 1 http://us-west-2.ec2.archive.ubuntu.com/ubuntu/ saucy/universe tor amd64 0.2.3.25-1 [953 kB]
84% [1 tor 799 kB/953 kB 84%]201 URI Done: http://us-west-2.ec2.archive.ubuntu.com/ubuntu/pool/universe/t/tor/tor_0.2.3.25-1_amd64.deb
RecivedHash: MD5Sum:1cb3ed029c169c3a5e528dd7d28cc60f
ExpectedHash: MD5Sum:1cb3ed029c169c3a5e528dd7d28cc60f

Fetched 953 kB in 4s (198 kB/s)
According to http://torstatus.blutmagie.de Tor 0.2.3.25 on Linux, one of the common installations.
answered Feb 16, 2014 at 16:47
![]()
Basically sources.list is a text file you want to edit. Linux is all about file you can customize your ubuntu by changing files. so the basic way to edit files(adding or deleting text) is by using some of the text editor like:
- emacs,gedit(gui based)
- nano,vi,vim(cli based)
You can install them by typing sudo apt-get install text_editor_name.
type man text_editor_name for reading their mannual pages.
-
If the status is you don’t hav permissions, use:
chmod 777 filename
answered Feb 14, 2014 at 12:23
![]()
kashminderkashminder
1,35010 silver badges16 bronze badges
1
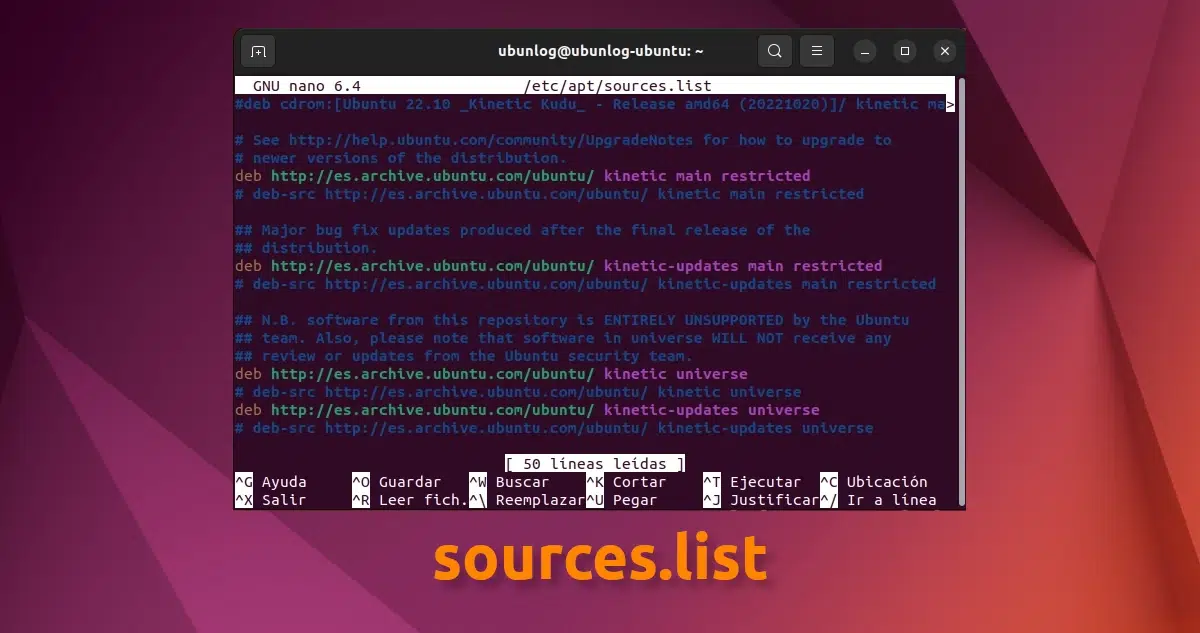
Этот пост посвящен самым новичкам в дистрибутиве и особенно в мире GNU/Linux. Сегодня мы поговорим об одном из самых важных файлов в Linux, а точнее о файле sources.list. Название этого файла уже довольно вдохновляет и указывает на то, каким он может быть, хотя мы мало знаем по-английски.
Работа с дистрибутивом Gnu / Linux проста: с одной стороны, у нас есть компоненты операционной системы, а с другой — безопасное соединение с сервером, на котором операционная система предоставляется с программами, пакетами и обновлениями. Это качество, которое многим параноикам по поводу безопасности может показаться большой дырой, является одним из лучших качеств, которыми он обладает, и позволяет дистрибутивам улучшаться день ото дня.
Ubuntu Он имеет ряд серверов и ряд приложений, которые позволяют нам обновлять и защищать нашу операционную систему, а также улучшать наше взаимодействие и опыт обновления. Но даже в этом случае лучше всего или всегда будет работать независимо от версии используемой системы ручное редактирование файла sources.list.
Индекс
- 1 Как отредактировать и улучшить файл sources.list?
- 2 И как мне добавить репозиторий, который мне сказал друг?
- 3 И как я узнаю, что это действующий репозиторий?
Редактировать такой файл очень просто, но при этом делать это необходимо с правами администратора.
[ОСТОРОЖНО] Неправильное редактирование или удаление информации может сделать операционную систему нестабильной и даже вывести ее из строя. Хорошим средством безопасности является открытие файла с текстовый редактор, скопируйте информацию и вставьте ее в другой файл. Так много Убунлог как и я, мы не несем ответственности за то, что может произойти, хотя существует множество копий Ubuntu sources.list.
Открываем терминал и пишем:
sudo nano /etc/apt/sources.list
У нас спросят пароль и после его подтверждения откроется наноэкран с текстом файла. Можно выбрать и другие текстовые редакторы, но nano широко используется и работает прямо из терминала. Возможно, мы ввели указанный выше адрес неправильно, и в этом случае он покажет пустую страницу, поэтому мы закроем без сохранения и введем его снова, но на этот раз он правильный.
Файл будет выглядеть следующим образом:
Первые строки, содержащие слово cd-rom, являются ссылками на установочный компакт-диск, они всегда идут со словами «деб cdrom:” даже если он был установлен через сеть или usb. Отсюда начинают появляться несколько строк, которые начинаются с «deb http://» или «deb-src». Незакомментированные строки включенные репозитории, в случае с образом, основной, софт, поддерживаемый сообществом (юниверс).
Строки, начинающиеся с ## (хотя должно быть достаточно хэша), закомментированные строки которые либо имеют текст, объясняющий репозиторий, следующий за ним, либо являются репозиториями, к которым мы не хотим, чтобы наша операционная система имела доступ. В любом случае, увидев эти символы в начале строки, система понимает, что дальше следует не нужно, и переходит на следующую строку, которая не начинается с этого знака.
Бывают случаи, когда репозиторий временно поврежден или мы не хотим, чтобы версия программы из этого репозитория была установлена, тогда лучший вариант — поставить этот знак в начале строки репозитория, и у нас больше не будет проблем. Будьте осторожны, если вы комментируете репозиторий, то есть ставите # в начале адреса сервера, вы также должны прокомментировать адрес источников, иначе выдаст ошибку.
И как мне добавить репозиторий, который мне сказал друг?
Что ж, чтобы добавить репозиторий, нам просто нужно перейти в конец документа и указать адрес репозитория и адрес источников, то есть deb и deb-src
И как я узнаю, что это действующий репозиторий?
Все действующие адреса репозитория имеют следующий формат:
deb http://адрес_сервера/имя_папки имя_версии (основная или юниверс, или мультивселенная, или основная ограниченная и т. д.)
Эта последняя часть строки указывает разделы репозитория: основной главный, в то время как основной ограниченный указывает на раздел ограниченного программного обеспечения.
Единственная предосторожность, которую необходимо соблюдать в этом файле в целом, заключается в том, что вы должны стараться ставить репозитории одной и той же версии, то есть прилагательного животного, которое является талисманом нашей текущей версии Ubuntu. В противном случае мы рискуем, что при обновлении наша система перепутает пакеты и версии и сойдет с ума, достигнув состояния «нарушение распределения», когда система использования репозиториев не работает должным образом.
Как только репозитории настроены по нашему вкусу, нам просто нужно сохранить, закрыть, перейти в консоль и написать:
sudo apt update && sudo apt upgrade
И так начнется обновление списка пакетов, которые распознает операционная система.
Если вы прочитали весь учебник, вы увидите, что это просто, по крайней мере, попробуйте просмотреть файл. Стоит. Привет.
Больше информации — Как добавить репозитории PPA в Debian и дистрибутивы на его основе,
Содержание статьи соответствует нашим принципам редакционная этика. Чтобы сообщить об ошибке, нажмите здесь.
Вы можете быть заинтересованы
Translation(s): English — Français — Italiano — Portugês Brasileiro — Русский
Apt > sources.list
Contents
-
/etc/apt/sources.list
- Тип архива
- URL Репозитория
- Дистрибутив
- Компонент
- Пример sources.list
- Используем Tor вместе с Apt
- CD-ROM
- Проблемы с разрешением доменных имен
- Debug Symbol Packages
- Подробнее
/etc/apt/sources.list
Как часть своей работы, Apt использует файл содержащий список ‘источников’ из которых могут быть скачаны пакеты. Этот файл /etc/apt/sources.list.
Содержимое этого файла обычно имеет следующий формат (приведенные ниже данные являются вымышленными и не должны использоваться):
deb http://site.example.com/debian distribution component1 component2 component3
deb-src http://site.example.com/debian distribution component1 component2 component3
Тип архива
Первое слово в каждой строке, deb или deb-src, указывает тип архива. Deb указывает что архив содержит бинарные пакеты (deb), пре-компилированные пакеты для нормального использования. Deb-src указывает что это архив пакетов с иходным кодом, который содержит оригинальные исходные коды программ плюс контрольный файл Debian (.dsc) и diff.gz содержащий изменения и необходимый для пакетирования программы.
URL Репозитория
Следующая запись в строке это адрес (URL) репозитория с которого вы хотите скачивать пакеты. Основной список зеркал репозитория Debian находитсяздесь.
Дистрибутив
‘distribution’ может быть либо кодовое имя / псевдоним релиза (jessie, stretch, buster, sid), либо класс релиза (stable, oldstable, testing, unstable). Если вы имеете в виду отслеживание класса релиза, а затем хотите использовать название релиза, или же если вы просто хотите отслеживать цикл релизов Debian, то используйте кодовое имя.
Например, если у вас есть система работающая на Debian 11.6 «bullseye» и вы не хотите обновляться когда выйдет Debian «bookworm», в таком случае нужно использовать «bullseye» вместо «bookworm». Если вы всегда хотите помогать с тестированием дистрибутива, то используйте «testing». Если вы отслеживаете цикл «bookworm» и хотите оставаться на нём от тестирования и до конца его жизни, используйте «bookworm».
Компонент
main состоит из DFSG-compliant пакетов, которым не требуется другое ПО из других зон. Эти пакеты считаются частью дистрибуции Debian
contrib пакеты содержат DFSG-compliant ПО, но у них зависимостей из зоны main (возможно упакованы в non-free).
non-free содержит ПО, которое не соответствует DFSG.
Пример sources.list
Ниже приведен пример файла sources.list для Debian 9/Stretch.
deb http://deb.debian.org/debian/ stretch main
deb-src  http://deb.debian.org/debian/ stretch main

deb http://deb.debian.org/debian/ stretch-updates main
deb-src  http://deb.debian.org/debian/ stretch-updates main

deb http://security.debian.org/debian-security/ stretch/updates main
deb-src http://security.debian.org/debian-security/ stretch/updates main
Если вы хотите подключить репозиторий с несвободными компонентами системы, то добавьте contrib non-free после main:
deb http://deb.debian.org/debian/ stretch main contrib non-free
deb-src http://deb.debian.org/debian/ stretch main contrib non-free

deb http://deb.debian.org/debian/ stretch-updates main contrib non-free
deb-src http://deb.debian.org/debian/ stretch-updates main contrib non-free

deb http://security.debian.org/debian-security/ stretch/updates main contrib non-free
deb-src http://security.debian.org/debian-security/ stretch/updates main contrib non-free
Для редактирования вашего файла sources.list, вы можете воспользоваться утилитой software-properties-gtk. Расположенной в Menu → System → Administration → Software Sources.
gksu --desktop /usr/share/applications/software-properties.desktop /usr/bin/software-properties-gtk
Используем Tor вместе с Apt
Apt может получать и загружать обновления через Tor. Для этого вам нужно установить пакеты tor и apt-transport-tor. Затем вы можете использовать официальные onion-ресурсы в Debian.
Ниже приведен пример файла sources.list использующий onion-ресурсы в Debian 9/Stretch:
deb tor+http://vwakviie2ienjx6t.onion/debian stretch main
deb-src tor+http://vwakviie2ienjx6t.onion/debian stretch main

deb tor+http://vwakviie2ienjx6t.onion/debian stretch-updates main
deb-src tor+http://vwakviie2ienjx6t.onion/debian stretch-updates main

deb tor+http://sgvtcaew4bxjd7ln.onion/debian-security stretch/updates main
deb-src tor+http://sgvtcaew4bxjd7ln.onion/debian-security stretch/updates main
CD-ROM
Если вы хотите использовать CD-ROM для установки пакетов или автоматического обновления системы через APT, то можно записать его в /etc/apt/sources.list. Для этого можно использовать программу apt-cdrom, например:
# apt-cdrom add
Можно использовать -d для каталога точки монтирования CD-ROM или добавить точку монтирования не-CD (т.е. USB накопитель).
Проблемы с разрешением доменных имен
Если у вас сломалось/не работает разрешение имён. Например, ниже запущен порт S/390x в QEMU Chroot:
# apt-get update
0% [Working]Unsupported socketcall: 20
Unsupported socketcall: 20
Unsupported socketcall: 20
Unsupported socketcall: 20
Unsupported socketcall: 20
Unsupported socketcall: 20
Unsupported socketcall: 20
Unsupported socketcall: 20
Err:1 http://ftp.us.debian.org/debian testing InRelease
  Temporary failure resolving 'ftp.us.debian.org'
Reading package lists... Done
W: Failed to fetch http://ftp.us.debian.org/debian/dists/testing/InRelease  Temporary failure resolving 'ftp.us.debian.org'
W: Some index files failed to download. They have been ignored, or old ones used instead.
Вы можете временно обойти эту проблему, указав IP адрес репозитория (получив его с другой машны):
echo "deb http://128.30.2.26/debian testing main contrib" > /etc/apt/sources.list

apt-get update
Get:1 http://128.30.2.26/debian testing InRelease [232 kB]
Get:2 http://128.30.2.26/debian testing/main s390x Packages [7583 kB]
Get:3 http://128.30.2.26/debian testing/main Translation-en [5134 kB]
Get:4 http://128.30.2.26/debian testing/contrib s390x Packages [42.7 kB]
Get:5 http://128.30.2.26/debian testing/contrib Translation-en [44.7 kB]
Fetched 13.0 MB in 32s (403 kB/s)
Reading package lists... Done
Debug Symbol Packages
Для отладки аварийных остановок работы программ часто требуются соответствующие файлы символов отладки. Для большинства пакетов Debian они находятся в пакетах dbgsym. Они доступны из отдельного архива.
Ниже приведен пример файла sources.list для dbgsym-пакетов Debian 9/Stretch:
deb http://deb.debian.org/debian-debug/ stretch-debug main
Подробнее
-
sources.list(5) man page
-
Список неофициальных репозиториев, что-бы получить дополнительные программы ( Skype, Opera, Google )
-
AptCLI
-
AptPreferences
-
APT HOWTO
-
поиск по неофициальным репозиториям (восновном очень старые пакеты)
-
Debian на CD/DVD
-
Добавление списка источников, в том числе cd, используя apt-setup
-
deb.debian.org
ru/PackageManagement
Из этой статьи вы узнаете что такое репозитории в Linux. Мы научимся их настраивать на примере Debian 11 и Ubuntu 22.04.
Что такое репозиторий
Репозиторий – это своеобразное хранилище приложений. У многих GNU/Linux дистрибутивов есть свои репозитории. А также разработчики какого-нибудь отдельного программного обеспечения могут создать свой репозиторий. Но в этом случае такой репозиторий нужно разделить на ветки, одна ветка будет подходить для одной Linux системы, а другая для другой.
В репозиториях, которые подходят для Debian и Ubuntu приложения хранятся в виде архивов. Такие архивы называются пакетами. Эти пакеты имеют особый формат – deb. Есть ещё другой, популярный, формат пакетов – rpm, но системы полагающиеся на такие пакеты я не рассматриваю.
Репозитории могут быть доступны с использованием различных протоколов, но самым распространённым является http. Такие репозитории могут быть открыты с помощью обычного браузера. И от туда можно скачать необходимый пакет для установки. Но правильнее устанавливать пакеты в систему из репозиториев с помощью специальных утилит – пакетных менеджеров.
На этом уроке мы познакомимся с подключением системных и сторонних репозиториев. А пакетные менеджеры рассмотрим позже.
Конфиги со списком репозиториев
Пакетные менеджеры, которые умеют устанавливать пакеты из репозиториев, должны знать адреса репозиториев. И эти адреса записываются в конфиг – /etc/apt/sources.list. А также можно создавать дополнительные конфиги с расширением .list в каталоге /etc/apt/sources.list.d/. Всё это справедливо и для Debian и для Ubuntu.
Если помните, в процессе установки систем мы выбирали репозиторий:
- для Debian – deb.debian.org;
- для Ubuntu – ru.archive.ubuntu.com.
Давайте теперь посмотрим какие репозитории прописались на наших Linux системах (с помощью egrep -v '^#|^$' я убрал комментарии, а с помощью cat -n добавил нумерацию строк):
alex@ubu:~$ egrep -v '^#|^$' /etc/apt/sources.list | cat -n
    1 deb http://ru.archive.ubuntu.com/ubuntu jammy main restricted
    2 deb http://ru.archive.ubuntu.com/ubuntu jammy-updates main restricted
    3 deb http://ru.archive.ubuntu.com/ubuntu jammy universe
    4 deb http://ru.archive.ubuntu.com/ubuntu jammy-updates universe
    5 deb http://ru.archive.ubuntu.com/ubuntu jammy multiverse
    6 deb http://ru.archive.ubuntu.com/ubuntu jammy-updates multiverse
    7 deb http://ru.archive.ubuntu.com/ubuntu jammy-backports main restricted universe multiverse
    8 deb http://ru.archive.ubuntu.com/ubuntu jammy-security main restricted
    9 deb http://ru.archive.ubuntu.com/ubuntu jammy-security universe
    10 deb http://ru.archive.ubuntu.com/ubuntu jammy-security multiverse

alex@deb:~$ egrep -v '^#|^$' /etc/apt/sources.list | cat -n
     1  deb http://deb.debian.org/debian/ bullseye main
     2  deb-src http://deb.debian.org/debian/ bullseye main
     3  deb http://security.debian.org/debian-security bullseye-security main
     4  deb-src http://security.debian.org/debian-security bullseye-security main
     5  deb http://deb.debian.org/debian/ bullseye-updates main
     6  deb-src http://deb.debian.org/debian/ bullseye-updates main
Разбираем конфиг
Этот файл состоит из строк, а строки состоят из следующих столбцов:
- Тип пакетов:
- deb — архив с уже откомпилированной и готовой к установке программой;
- deb-src — архив с исходным кодом программы, который перед установкой нужно будет откомпилировать.
- Адрес репозитория:
- http://ru.archive.ubuntu.com/ubuntu – для Ubuntu;
- http://deb.debian.org/debian/ – для Debian;
- http://security.debian.org/debian-security – обновления безопасности для Debian.
- Ветки репозитория:
- для Ubuntu:
- jammy – приложения для этой версии Ubuntu;
- jammy-updates – рекомендуемые обновления;
- jammy-backports – обновления из более новой системы. Допустим для Ubuntu 20.04 определённый пакет уже не обновляется, но из этой ветки можно попробовать его обновить (конечно есть вероятность повредить систему);
- jammy-security – важные обновления безопасности, без которых ваш сервер легче будет взломать.
- для Debian:
- bullseye – приложения для этой версии Debian;
- bullseye-updates – рекомендуемые обновления;
- bullseye-security – важные обновления безопасности, без которых ваш сервер легче будет взломать.
- для Ubuntu:
- И в самом конце компоненты, их можно записывать через пробел в одной строке:
- Для Ubuntu:
- main – здесь находятся пакеты, которые официально поддерживаются компанией Canonical;
- restricted – содержит поддерживаемое ПО с закрытым исходным кодом, например MP3 или Flash;
- universe – содержит ПО, которое поддерживается сообществом пользователей и разработчиков Ubuntu;
- multiverse – содержит ПО, которое каким-либо образом ограничено либо условиями лицензии, либо юрисдикцией.
- Для Debian компоненты делятся по критериям свободного ПО (DFSG)
- main – пакеты полностью соответствуют критериям DFSG. Эти пакеты считаются частью дистрибуции Debian;
- contrib – пакеты тоже соответствуют критериям DFSG, но зависят от других пакетов, которые не соответствуют этим критериям;
- non-free – содержит всё остальное ПО, которое не соответствует DFSG.
- Для Ubuntu:
Классы релизов в Debian
Рассматривая выше ветки репозиториев Debian мы увидели следующее:
- bullseye;
- bullseye-updates;
- bullseye-security.
Но, помимо кодовых имён версий системы, в названиях веток, можно использовать специальные классы релизов:
- stable – ссылается на текущей стабильный репозиторий Debian, сейчас это bullseye. Как только выйдет новая версия Debian, то stable будет ссылаться на более новую версию;
- oldstable – ссылается на предыдущий стабильный репозиторий;
- testing – ссылается на специальную ветку репозитория для разработки нового стабильного релиза;
- unstable – ссылается на самые свежие, но не протестированные пакеты;
- experimental – здесь хранятся пакеты, которые только начали разрабатывать;
- backports – ссылается на testing и unstable, но только для обновлений безопасности.
То есть вы можете изменить свои репозитории на testing, и быть на острие прогресса:
### Это только пример, существует большая вероятность что система очень скоро повредится из за непроверенных обновлений ###
deb http://deb.debian.org/debian/ testing main
deb-src http://deb.debian.org/debian/ testing main
deb http://security.debian.org/debian-security testing-security main
deb-src http://security.debian.org/debian-security testing-security main
deb http://deb.debian.org/debian/ testing-updates main
deb-src http://deb.debian.org/debian/ testing-updates main
Файл Release
Каждый репозиторий, для каждой ветки содержит текстовый файл Release. Например, откройте в браузере репозиторий для Ubuntu: http://ru.archive.ubuntu.com/ubuntu/. Дальше откройте ветку (dists) для jammy. И здесь вы можете скачать и посмотреть файл Release.
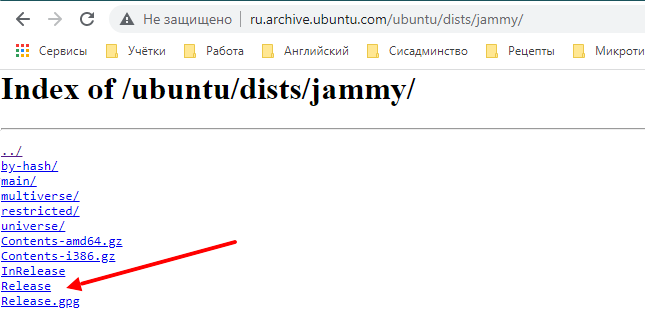
Он содержит информацию о данной ветке репозитория, например для Ubuntu Jammy файл содержит следующее:
Origin: Ubuntu
Label: Ubuntu
Suite: jammy
Version: 22.04
Codename: jammy
Date: Thu, 21 Apr 2022 17:16:08 UTC
Architectures: amd64 arm64 armhf i386 ppc64el riscv64 s390x
Components: main restricted universe multiverse
Description: Ubuntu Jammy 22.04
MD5Sum:
 *** а здесь контрольные суммы для каждого пакета из репозитория ***
Файл Release – один из самых важных файлов для работы репозитория. Когда пакетный менеджер обновляет список пакетов, то он открывает адрес репозитория и читает этот файл. Если этого файла нет, то репозиторий будет помечен как неисправный и не будет использоваться.
Архитектура пакетов
Если вы ещё раз посмотрите на файл Release в репозитории, то можете заметить там строчку:
Architectures: amd64 arm64 armhf i386 ppc64el riscv64 s390x
Здесь прописаны архитектуры пакетов, которые хранятся в репозитории. Прописывая источник репозитория, например в конфиге /etc/apt/sources.list вы можете указать определённую архитектуру, чтобы предотвратить скачивание и установку пакетов для других архитектур.
Это делается таким способом:
### Пример для Debian ###
deb [arch=amd64] http://deb.debian.org/debian/ bullseye main
Вариант использования официальных репозиториев
Для того чтобы уменьшить вероятность поломки вашей системы из-за непроверенных обновлений, можно немного сократить количество репозиториев в системах Debian и в Ubuntu.
Вообще в Debian дан список самых безопасных репозиториев по умолчанию. Можем лишь закомментировать репозитории с исходниками, так как скорее всего вам они пока не понадобятся. Напомню, что такие строки начинаются со слова deb-src. А если понадобятся вы их просто раскомментируете. После правки у нас осталось 3 источника пакетов:
alex@deb:~$ egrep -v '^#|^$' /etc/apt/sources.list | cat -n
     1  deb http://deb.debian.org/debian/ bullseye main
     2  deb http://security.debian.org/debian-security bullseye-security main
     3  deb http://deb.debian.org/debian/ bullseye-updates main
Ubuntu при установке прописала намного больше своих репозиториев. Но их тоже можно свести к трем. Например, я считаю нужным отключить universe, multiverse и jammy-backports репозитории на сервере. После правки список репозиториев также состоит из 3-ёх строк:
alex@ubu:~$ egrep -v '^#|^$' /etc/apt/sources.list | cat -n
     1  deb http://ru.archive.ubuntu.com/ubuntu jammy main restricted
     2  deb http://ru.archive.ubuntu.com/ubuntu jammy-updates main restricted
     3  deb http://ru.archive.ubuntu.com/ubuntu jammy-security main restricted
Чтобы применить изменения, выполните на обоих системах команду:
$ sudo apt update
Эта команда подключится к каждому репозиторию, посмотрит какие пакеты можно обновить и из каких источников. И сохранит локальных кэш. После выполнения этой команды система будет знать какие пакеты из каких репозиториев можно получить, а также версии этих пакетов. Но если в репозиторий добавят более новую версию какого-нибудь пакета, то система об этом узнает лишь после следующего выполнения этой команды.
А если хотите обновить систему, то выполните команду:
$ sudo apt upgrade
Эта команда уже скачивает все обновления и устанавливает их.
Кстати утилита apt – это и есть менеджер пакетов. Рассмотрим её и другие менеджеры пакетов в следующих статьях.
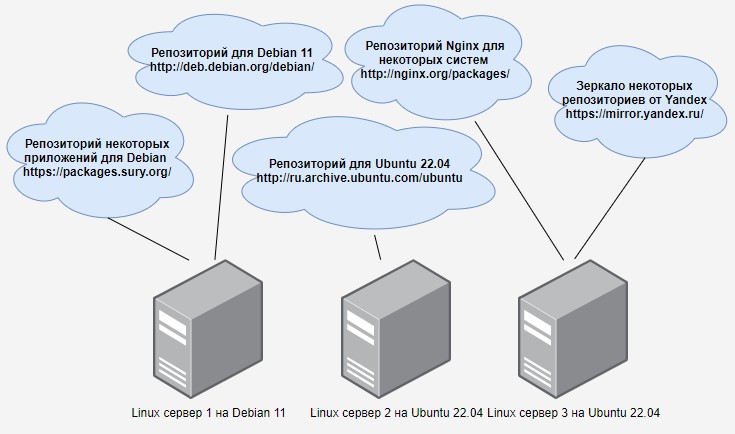
Добавление сторонних репозиториев
Источник репозитория
Некоторые разработчики создают свои собственные репозитории. Например у веб сервера Nginx есть свой репозиторий для разных систем, в том числе для Debian и Ubuntu. Вот его адрес: https://nginx.org/packages/mainline/.
Добавлять репозитории можно в основной конфиг: /etc/apt/sources.list или создавать отдельные конфиги в каталоге /etc/apt/sources.list.d/. Сам я считаю что правильнее для каждого стороннего репозитория создавать отдельные конфиги.
Например, чтобы подключить репозиторий nginx создайте следующий конфиг. Для Debian:
alex@deb:~$ sudo nano /etc/apt/sources.list.d/nginx.list
deb http://nginx.org/packages/debian bullseye nginx
Или для Ubutnu:
alex@ubu:~$ sudo nano /etc/apt/sources.list.d/nginx.list
deb http://nginx.org/packages/ubuntu jammy nginx
Приоритет репозитория
Допустим, мы прописали дополнительный репозиторий для nginx, но как системе понять из какого репозитория брать пакет для установки? Ведь пакеты для nginx есть и в системном репозитории и в репозитории от самого nginx. Чтобы ответить на этот вопрос придумали приоритеты репозиториев.
Чтобы задать приоритет репозитория нужно создать файл /etc/apt/preferences.d/XX<имя_репозитория>, где XX это номер файла, чем он выше, тем обработается позднее, то есть будет иметь приоритет над другими настройками.
По нашему примеру для nginx нужно создать следующий файл:
$ sudo nano /etc/apt/preferences.d/99nginx
Package: *
Pin: origin nginx.org
Pin: release o=nginx
Pin-Priority: 900
Разберём написанное:
- Package: имя пакета. Можно поставить знак * чтобы применить приоритет для всех пакетов из этого репозитория. Также можно указать несколько имён через пробел;
- Pin: опции прикрепления. Существует много опций, я разберу лишь некоторые:
- origin “имя автора или поставщика”;
- release o=nginx – означает что в файле Release репозитория есть поставщик (Origin = o) с именем nginx;
- release l=Debian – означает что в файле Release репозитория есть Label (l) с именем Debian;
- Pin-Priority: приоритет.
То-есть Package и Pin это условия для назначения приоритета, а Pin-Priority это действие (назначение приоритета). В нашем примере получается следующее: если имя пакета любое, но владелец репозитория nginx.org и в файле Release прописано “Origin: nginx“, то для таких пакетов ставим приоритет 900.
Приоритет может быть в следующих диапазонах:
- P >= 1000 – пакет будет установлен из этого репозитория, даже если это приведет к понижению версии уже установленного пакета;
- 990 <= P < 1000 – пакет будет установлен из этого репозитория, если не установлена более новая версия;
- 500 <= P < 990 – пакет будет установлен, если нет пакета принадлежащего к целевому выпуску или не установлена более новая версия;
- 100 <= P < 500 – пакет будет установлен, если нет кандидатов из других репозиториев или установленного пакета более новой версии;
- 0 < P < 100 – пакет будет установлен, только если он ещё не установлен (любой версии) и если нет кандидатов из других репозиториев;
- P < 0 – пакет не будет установлен ни при каких условиях;
- P = 0 – не используется.
Целевой выпуск
Приоритеты с 500 по 990 и с 990 по 1000 очень похожи. Чтобы их отличить нужно понять что такое целевой выпуск. Для Ubuntu или Debian это название версии дистрибутива. Например для Ubuntu – jammy, а для Debian – bullseye. Но это имя ещё нужно задать таким способом:
alex@deb:~$ sudo nano /etc/apt/apt.conf.d/default
APT::Default-Release "bullseye";

alex@ubu:~$ sudo nano /etc/apt/apt.conf.d/default
APT::Default-Release "jammy";
Открытый ключ репозитория
И так, репозиторий мы добавили, приоритет настроили. Давайте попробуем применить изменения:
alex@deb:~$ sudo apt update
Пол:1 http://nginx.org/packages/debian bullseye InRelease [2 860 B]
Ошб:1 http://nginx.org/packages/debian bullseye InRelease
  Следующие подписи не могут быть проверены, так как недоступен открытый ключ: NO_PUBKEY ABF5BD827BD9BF62
Пол:2 http://security.debian.org/debian-security bullseye-security InRelease [44,1 kB]
Сущ:3 http://deb.debian.org/debian bullseye InRelease
Пол:4 http://deb.debian.org/debian bullseye-updates InRelease [39,4 kB]
Чтение списков пакетов… Готово
W: Ошибка GPG: http://nginx.org/packages/debian bullseye InRelease: Следующие подписи не могут быть проверены, так как недоступен открытый ключ: NO_PUBKEY ABF5BD827BD9BF62
E: Репозиторий «http://nginx.org/packages/debian bullseye InRelease» не подписан.
N: Обновление из этого репозитория нельзя выполнить безопасным способом, поэтому по умолчанию он отключён.
N: Информацию о создании репозитория и настройках пользователя смотрите в справочной странице apt-secure(8).
И тут мы видим ошибку, что нам не хватает открытого ключа. Я привёл пример для Debian, но в Ubuntu будет подобная ситуация. Дело в том что современные репозитории шифруются с помощью закрытого ключа и чтобы его использовать, нам нужно установить в систему открытый ключ.
Чтобы это сделать, вначале установим необходимые инструменты:
### Для Debian ###
alex@deb:~$ sudo apt install curl gnupg2 ca-certificates lsb-release debian-archive-keyring

### Для Ubuntu ###
alex@ubu:~$ sudo apt install curl gnupg2 ca-certificates lsb-release ubuntu-keyring
Внимание! Утилита gnupg2 для Ubuntu доступна только в репозитории universe, если вы закомментировали эти источники, то разкомментируете их. Это строчки:
deb http://ru.archive.ubuntu.com/ubuntu jammy universe
deb http://ru.archive.ubuntu.com/ubuntu jammy-updates universe
И не забудьте применить изменения, выполнив:
$ sudo apt update
А дальше скачаем открытый ключ (с помощью wget):
$ wget https://nginx.org/keys/nginx_signing.key
Дальше выполняется конвейер команд, это когда вывод одной команды идет на вход другой команде. Такие конвейеры мы будем проходить позже. Но всё равно постараюсь объяснить следующую команду. С помощью cat мы читаем файл ключа, и прочитанное передаём утилите gpg. Утилита gpg переводит прочитанное в необходимый формат и передаёт вывод уже следующей команде tee. Утилита tee (под sudo) сохраняет полученный текст в файл. В конце добавляем >/dev/null, чтобы не было никакого вывода на терминал. Вот сама команда:
$ cat nginx_signing.key | gpg --dearmor | sudo tee /usr/share/keyrings/nginx-archive-keyring.gpg >/dev/null
Вот так мы получили открытый ключ, который теперь хранится в файле /usr/share/keyrings/nginx-archive-keyring.gpg.
Или можно сразу в одной команде скачать файл (с помощью wget или curl) и сохранить ключ в формате gpg:
### Пример для wget ###
$ wget -O- https://nginx.org/keys/nginx_signing.key | gpg --dearmor | sudo tee /usr/share/keyrings/nginx-archive-keyring.gpg >/dev/null

### Пример для curl ###
$ curl https://nginx.org/keys/nginx_signing.key | gpg --dearmor | sudo tee /usr/share/keyrings/nginx-archive-keyring.gpg >/dev/null
После этого необходимо указать в конфиге репозитория, что нужно использовать этот ключ. Для этого в конфиге репозитория между deb и адресом репозитория вставляем [signed-by=/путь/к/ключу]:
alex@deb:~$ sudo nano /etc/apt/sources.list.d/nginx.list
deb [signed-by=/usr/share/keyrings/nginx-archive-keyring.gpg] http://nginx.org/packages/debian bullseye nginx
И пробуем ещё раз применить изменения:
alex@deb:~$ sudo apt update
Сущ:1 http://security.debian.org/debian-security bullseye-security InRelease
Сущ:2 http://deb.debian.org/debian bullseye InRelease
Сущ:3 http://deb.debian.org/debian bullseye-updates InRelease
Пол:4 http://nginx.org/packages/debian bullseye InRelease [2 860 B]
Пол:5 http://nginx.org/packages/debian bullseye/nginx amd64 Packages [7 633 B]
Получено 7 633 B за 1с (9 420 B/s)
Чтение списков пакетов… Готово
Построение дерева зависимостей… Готово
Чтение информации о состоянии… Готово
Все пакеты имеют последние версии.
На этот раз всё прошло успешно.
Кстати, если вы хотите в источнике пакетов прописать архитектуру и открытый ключ, то это делается через пробел:
### Пример ###
deb [arch=amd64 signed-by=/usr/share/keyrings/nginx-archive-keyring.gpg] http://nginx.org/packages/debian bullseye nginx
Проверка добавленного репозитория
Ну и чтобы понять из какого репозитория будет установлен пакет, выполните команду:
alex@deb:~$ apt-cache policy nginx
nginx:
  Установлен: (отсутствует)
  Кандидат:   1.20.2-1~bullseye
  Таблица версий:
     1.20.2-1~bullseye 990
        990 http://nginx.org/packages/debian bullseye/nginx amd64 Packages
     1.20.1-1~bullseye 990
        990 http://nginx.org/packages/debian bullseye/nginx amd64 Packages
     1.18.0-6.1 990
        990 http://deb.debian.org/debian bullseye/main amd64 Packages
Из вывода становится ясно что пакет nginx ещё не установлен в систему, а кандидатом на установку является пакет с версией 1.20.2 из репозитория http://nginx.org/packages/debian. Приоритет у всех пакетов, кстати стал равным = 990. Это произошло после того, как мы установили целевой выпуск = bullseye. Так как все репозитории относятся к этому выпуску, то на назначенный мною приоритет система перестала смотреть, а назначила репозиториям для bullseye такой приоритет.
Итог
Мы узнали что такое репозитории. Узнали что есть официальные репозитории для системы и они прописываются в конфиг /etc/apt/sources.list. А также есть сторонние репозитории и для них лучше создавать свои конфиги в каталоге /etc/apt/sources.list.d/.
Научились добавлять сторонний репозиторий на примере nginx. Узнали про приоритеты репозиториев и открытые ключи. А также узнали что такое целевой выпуск.
Полезные источники:
- Очень хорошо про приоритеты и повышение или понижение версий пакетов написано здесь.
- Инструкция для подключения nginx репозитория в различные системы.
- Существует Репозиторий от Yandex – он хранит ветки для большинства систем Linux.
- Репозиторий Ubuntu
- Репозиторий Debian
Сводка

Имя статьи
Репозитории Linux
Описание
Из этой статьи вы узнаете что такое репозитории в Linux. Мы научимся их настраивать на примере Debian 11 и Ubuntu 22.04
I am new to linux, and just beginning to learn bash. I am using Ubuntu 9.04, and would like to add repositories to /etc/apt/sources.list from the command line. Basically, I would like to do this:
sudo echo "[some repository]" >> /etc/apt/sources.list
However, even when I use sudo, I get this error:
bash: /etc/apt/sources.list: Permission denied
How do I avoid this error?
asked May 12, 2009 at 1:13
![]()
2
echo "[some repository]" | sudo tee -a /etc/apt/sources.list
The tee command is called as the superuser via sudo and the -a argument tells tee to append to the file instead of overwriting it.
Your original command failed, as the IO redirection with >> will be done as the regular user, only your echo was executed with sudo.
Calling a sudo subshell like
sudo sh -c 'echo "[some repository]" >> /etc/apt/sources.list'
works, too as pointed out by others.
![]()
ghickman
5,8539 gold badges40 silver badges51 bronze badges
answered May 12, 2009 at 1:17
![]()
lotharlothar
19.5k5 gold badges45 silver badges59 bronze badges
6
The shell processes «>», «<«, «>>» etc itself before launching commands. So the problem is that «sudo >> /etc/foo» tries to open /etc/foo for append before gaining privileges.
One way round this is to use sudo to launch another shell to do what you want, e.g.:
sudo sh -c 'echo "[some repository]" >> /etc/apt/sources.list'
Or alternatively:
echo "[some repository]" | sudo sh -c 'cat >> /etc/apt/sources.list'
A simpler approach may simply be to use sudo to launch an editor on the /etc/file 
answered May 12, 2009 at 1:32
![]()
araqnidaraqnid
123k23 gold badges153 silver badges133 bronze badges
It’s better to use a separate file in /etc/apt/sources.list.d rather than modifying /etc/apt/sources.list, as explained in this other answer. (Note that the file name MUST end in .list or it will be ignored.)
However, if you want to create it using echo the issue with permissions remains. You can use tee to create it like this:
echo '[some repository]' | sudo tee /etc/apt/sources.list.d/some-repository.list >/dev/null
or like this:
sudo tee /etc/apt/sources.list.d/some-repository.list >/dev/null <<EOF
[some repository]
EOF
Note that you don’t need -a on the tee command (because you’re not appending).
You can also create the file somewhere else and then copy it into place with:
sudo cp path/to/some-repository.list /etc/apt/sources.list.d/
answered Jul 2, 2010 at 20:29
![]()
Neil MayhewNeil Mayhew
13.9k3 gold badges32 silver badges24 bronze badges
1
One way to solve this is to do the redirection in a subshell:
sudo sh -c 'echo "[some repository]" >> /etc/apt/sources.list'
That way, the sh process is executed under sudo and therefore has the necessary privileges to open the redirected output to /etc/apt/sources.list.
answered May 12, 2009 at 1:31
![]()
Greg HewgillGreg Hewgill
928k180 gold badges1137 silver badges1275 bronze badges
Following works for me
sudo echo "deb http://downloads-distro.mongodb.org/repo/ubuntu-upstart dist 10gen" | sudo tee -a /etc/apt/sources.list.d/10gen.list
answered Jan 10, 2013 at 15:53
![]()
SalilSalil
46k21 gold badges123 silver badges155 bronze badges
0
In Karmic, you can just use the add-apt-repository command, at least for PPAs.
For example:
sudo add-apt-repository ppa:docky
answered Nov 12, 2009 at 21:56
![]()
MatthewMatthew
27.7k26 gold badges102 silver badges165 bronze badges
2
Here is solution without using piping, just simple in-place editing:
sudo ex +'$put = "[some repository]"' -cwq /etc/apt/sources.list
The ex is equivalent to vi -e.
answered May 25, 2015 at 10:41
![]()
kenorbkenorb
149k80 gold badges668 silver badges723 bronze badges
If you were to switch to the root user the same command will work just fine. This is because sudo elevates the priveleges only for the [echo] command and does not elevate the right side of the output redirection.
sudo su
echo "[some repository]" >> /etc/apt/sources.list
If you do it this way be sure to exit from su so that you are not running unnecessary programs as root (superuser)
answered May 24, 2011 at 23:15
![]()
4
first open or create the file you want to edit it by the following command
1- sudo nano file_name
2- edit the file after it opens
3- ctrl+x
4- press ‘Y’ to say yes
and you are done.
answered Aug 7, 2016 at 9:00
![]()
interesting, 1- remove the file with rm , 2 create the file again with touch, 3 use printf to print formatted, 4 pipe with tee to the file(THIS IS FOR DEBIAN) replace to your tastes and likes
sudo rm /etc/apt/sources.list && sudo touch /etc/apt/sources.list && sudo chmod +rwx /etc/apt/sources.list && sudo printf "deb http://deb.debian.org/debian buster main contrib non-free
deb-src http://deb.debian.org/debian buster main contrib non-free
deb http://deb.debian.org/debian-security/ buster/updates main contrib non-free
deb-src http://deb.debian.org/debian-security/ buster/updates main contrib non-free
deb http://deb.debian.org/debian buster-updates main contrib non-free
deb-src http://deb.debian.org/debian buster-updates main contrib non-free" | sudo tee -a /etc/apt/sources.list
answered Jul 19, 2021 at 18:21
![]()