How do I style contact form? This is a common question on the support forum. Contact Form 7 doesn’t provide any customization for styling. Editing CSS style sheets is the best method to style contact forms. In this article, I’ll show you some important steps for styling your contact forms. If you know about CSS, my explanation is simple. If you are not familiar with CSS, please learn CSS first with these informative websites:
- Learning CSS – W3C
- CSS Tutorial – W3Schools
- Learn CSS | MDN – Mozilla Developer Network
- CSS Basics
Which style sheet should I edit?
Any style sheet is okay, but I recommend editing your theme’s main style sheet. It’s better not to edit style sheets in the plugin because your changes will be overwritten when the plugin is updated. Themes can be updated, but they are generally updated less frequently than plugins. If your theme is updated often, you might make a child theme and manage the style sheet in the child theme.
You can also use Additional CSS, and it has several advantages over modifying theme’s stylesheets directly.
Styling contact form fields
Let’s see how we can style individual fields in a contact form. There are several types of input fields. The most common field is a single-line text input field so let’s add a style rule for it:
input[type="text"]
{
    background-color: #fff;
    color: #000;
    width: 50%;
}
This selector matches all input elements whose type attribute has exactly the value text (i.e. single-line text input fields). Also, this style rule has three properties specifying white as background color, black as foreground (text) color, and 50% as width of field.
You may want to apply this style rule to other types of fields. Let’s add selectors for an email address input field and a multi-line text input area:
input[type="text"],
input[type="email"],
textarea
{
    background-color: #fff;
    color: #000;
    width: 50%;
}
Now this style is applied to every part of your site. You may want to limit it to contact forms. Contact Form 7’s form has a wrapper element that has the wpcf7 class. You can limit the scope of target by adding ancestor selectors:
.wpcf7 input[type="text"],
.wpcf7 input[type="email"],
.wpcf7 textarea
{
    background-color: #fff;
    color: #000;
    width: 50%;
}
See also:
- Why does my email address input field look different than other text input fields?
- Custom layout for checkboxes and radio buttons
Styling specific fields
You might want to style only specific fields. First, add an id or class option to the form-tags of the fields that you want to style:
[text text-123 id:very-special-field]
Then add style rules using the id or class:
#very-special-field
{
    color: #f00;
    border: 1px solid #f00;
}
Styling whole of contact form
As I mentioned earlier, the top-level element of contact form has the wpcf7 class. To style the whole contact form, add style rules for the class selector:
.wpcf7
{
    background-color: #f7f7f7;
    border: 2px solid #0f0;
}
This style rule gives your contact forms a light gray background and green border.
See also: Can I add id and class attributes to a form element?
Styling response messages
The response message at the bottom of a contact form by default has the wpcf7-response-output class, so you can apply a style rule to this class to style the response message.
To decide on the style based on the status of the contact form, refer to the form element’s class attribute. It should have a class that reflects the current status. Possible values are: init, sent, failed, aborted, spam, invalid, or unaccepted.
For an example of styling, see the following default style rules that Contact Form 7 5.2.2 applies to a response message:
.wpcf7 form .wpcf7-response-output {
    margin: 2em 0.5em 1em;
    padding: 0.2em 1em;
    border: 2px solid #00a0d2; /* Blue */
}

.wpcf7 form.init .wpcf7-response-output {
    display: none;
}

.wpcf7 form.sent .wpcf7-response-output {
    border-color: #46b450; /* Green */
}

.wpcf7 form.failed .wpcf7-response-output,
.wpcf7 form.aborted .wpcf7-response-output {
    border-color: #dc3232; /* Red */
}

.wpcf7 form.spam .wpcf7-response-output {
    border-color: #f56e28; /* Orange */
}

.wpcf7 form.invalid .wpcf7-response-output,
.wpcf7 form.unaccepted .wpcf7-response-output {
    border-color: #ffb900; /* Yellow */
}
See also: Locating response message box anywhere
Styling validation error messages
When a field has an invalid value, a validation error message appears under the field. As the element of a validation error message has the wpcf7-not-valid-tip class, you can use the class to style validation error messages.
Contact Form 7 5.2.2 applies the following style rule by default:
.wpcf7-not-valid-tip {
    color: #dc3232;
    font-size: 1em;
    font-weight: normal;
    display: block;
}
See also: Customizing validation error messages
Just another contact form plugin for WordPress. Simple but flexible.
Приветствую вас дорогой читатель моего блога!
Сегодня я хочу поделиться с вами некоторыми своими наработками и заготовками для придания более приятного вида форме обратной связи, созданной при помощи плагина Contact Form 7.
К сожалению, по умолчанию оформление этой формы выглядит довольно невзрачно.
Смотрите сами:
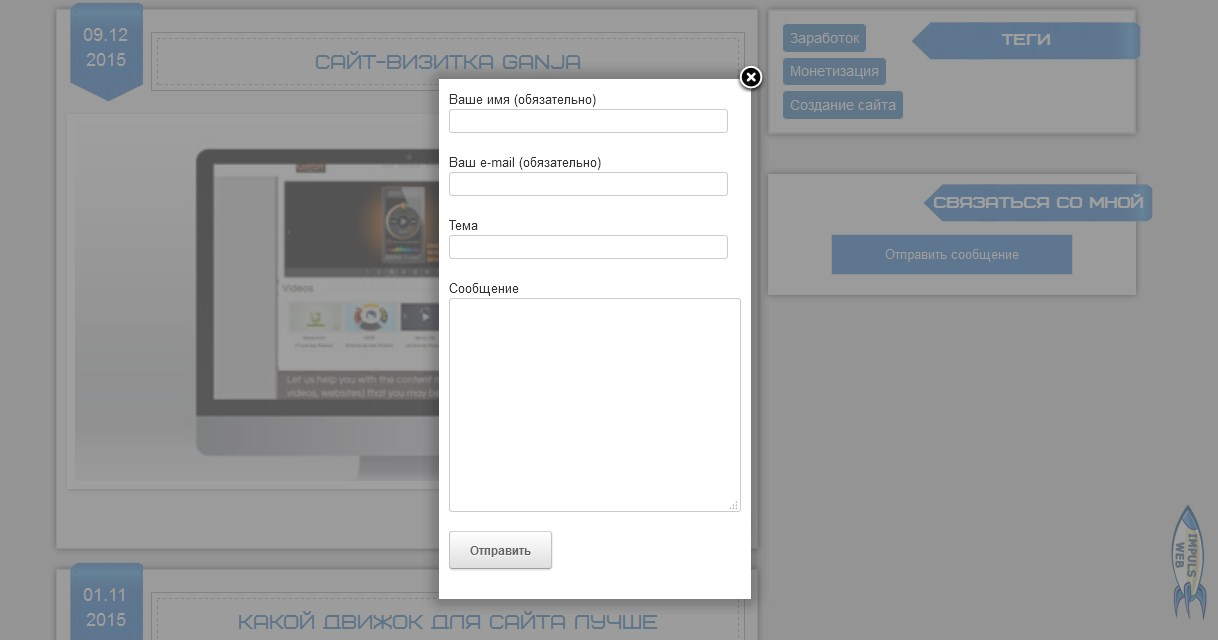
Выглядит не очень. Не правда ли?
К счастью всё это можно легко исправить и подогнать под дизайн Вашего сайта
Я предлагаю вам 3 варианта готовых стилей для Contact Form 7
Куда вносить изменения?
Перед тем как править стили нужно определиться куда вносить изменения.
Мы можем прописать новые стили прямо в файл стилей плагина, но после обновления этот файл заменится и Ваша работа пойдёт коту … ну вы сами знаете куда.
Более надёжным вариантом будет внесение изменений прямо в файл стилей вашей темы. Однако если вы и тему регулярно обновляете и не используете дочернюю тему то и в этом случае файл стилей заменится. Помните об этом и как минимум делайте себе резервные копии вашей темы и сайта в целом.

Для этого варианта нам не нужно будет ничего менять в самой форме, достаточно будет просто приписать стили в файл style.css вашей темы.
Для тех кто не помнит в какой папке он лежит вот путь:
Ваш_домен.ru/wp-content/themes/НАЗВАНИЕ ВАШЕЙ ТЕМЫ/style.css
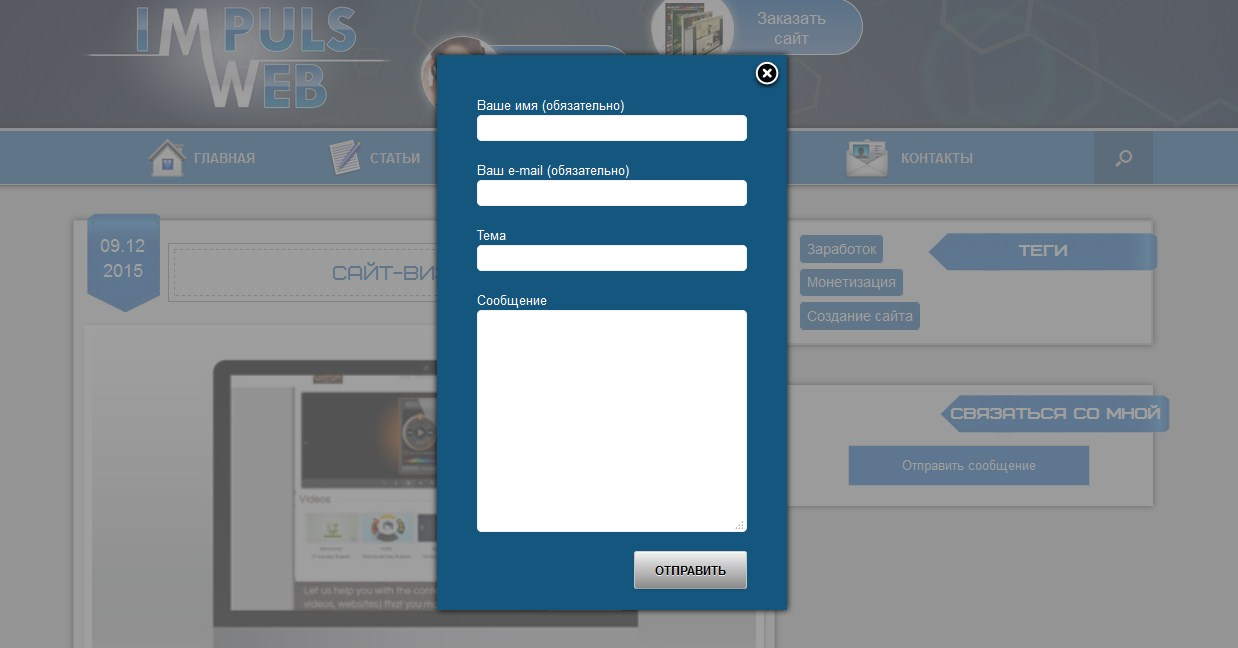
Для того чтобы получить такой результат как на картинке выше приписываем в самом конце файла style.css следующие стили:
|
1 2 3 4 5 6 7 8 9 10 11 12 13 14 15 16 17 18 19 20 21 22 23 24 25 26 27 28 29 30 31 32 33 34 35 36 37 38 39 40 41 42 43 44 45 46 47 48 49 50 51 52 53 54 55 56 57 58 59 60 61 |
/*******Стили для Contact form 7 вариант1********/ #fancybox-wrap{ background:#15567E!important; -moz-box-shadow: 0 0 6px #000; -webkit-box-shadow: 0 0 6px #000; box-shadow:0 0 6px #000; } #fancybox-outer{ background:none!important; } #fancybox-outer>div, #fancybox-content, #contact_form_pop_up{ background:none!important; border:none!important; } #contact_form_pop_up{ padding: 20px 0px 0px 20px!important; } .wpcf7 { color:#fff!important; background:#15567E!important; width:280px; /*ширину задаём такую, как нам нужно в случае с всплывающей формой можно вообще не задавать*/ padding:0px!important;/*нулевой отступ для всплывающей формы, а если форма на странице, то нужно задать 20px*/ overflow:hidden; } .wpcf7 input[type=»text»], .wpcf7 input[type=»email»], .wpcf7 textarea{ border:1px solid red; padding:4px!important; border-radius:5px; border:1px solid #f1f1f1; } .wpcf7 input[type=»text»]:focus, .wpcf7 input[type=»email»]:focus, .wpcf7 textarea:focus{ border:1px solid #fff; -moz-box-shadow: 0 0 6px #fff; -webkit-box-shadow: 0 0 6px #fff; box-shadow:0 0 6px #fff; } .wpcf7 input[type=»text»], .wpcf7 input[type=»email»], .wpcf7 textarea{ width:270px!important; } .wpcf7-submit{ background: linear-gradient(#f1f1f1, #8b8b8b), #f1f1f1!important; color:#000!important; text-transform:uppercase; float:right; margin-top:20px; } .wpcf7-submit:hover{ -moz-box-shadow: 0 0 6px #000; -webkit-box-shadow: 0 0 6px #000; box-shadow:0 0 6px #000; background-image: linear-gradient( #8b8b8b, #f1f1f1), #8b8b8b!important; } |
Обратите внимание! Что данные стили задаются для всплывающей формы, а если ваша форма просто размещена на странице, то некоторые свойства нужно подправить.
Необходимо увеличить внутренний отступ для .wpcf7. Вместо «padding:0px!important;» задать своё значение, например «padding:20px!important;»
Ширина формы также меняется на ваше усмотрение.
Вы можете изменить цвет фона на свой.
Делается этот вот здесь

Обратите внимание на правило !important — оно должно быть здесь обязательно иначе ваш цвет перебьют стили, которые прописаны в самом плагине. При помощи этого правила мы повышаем приоритет указанного стиля.
Вы также можете поставить на фон формы изображение или градиент.
Для того чтобы поставить изображение замените эту строку на следующую:
background: url(images/form.jpg)!important;
При этом не забудьте загрузить изображение фона в папку images вашей темы.
Ваш_домен.ru/wp-content/themes/НАЗВАНИЕ ВАШЕЙ ТЕМЫ/images/form.jpg
Вот пример с фоном.
Для градиента замените эту строку на следующую:
background: linear-gradient(#1B698B, #B8EAE4), #1B698B!important;
Здесь первое значение цвета это верхний цвет, второе это нижний и в конце задаётся однотонный фон на случай если браузер не поддерживает свойство linear-gradient.
Вот как выглядит этот градиент:

Для того чтобы при активации полей они подсвечивались мы приписали следующие стили:
|
.wpcf7 input[type=»text»]:focus, .wpcf7 input[type=»email»]:focus, .wpcf7 textarea:focus{ border:1px solid #fff; -moz-box-shadow: 0 0 6px #fff; -webkit-box-shadow: 0 0 6px #fff; box-shadow:0 0 6px #fff; } |
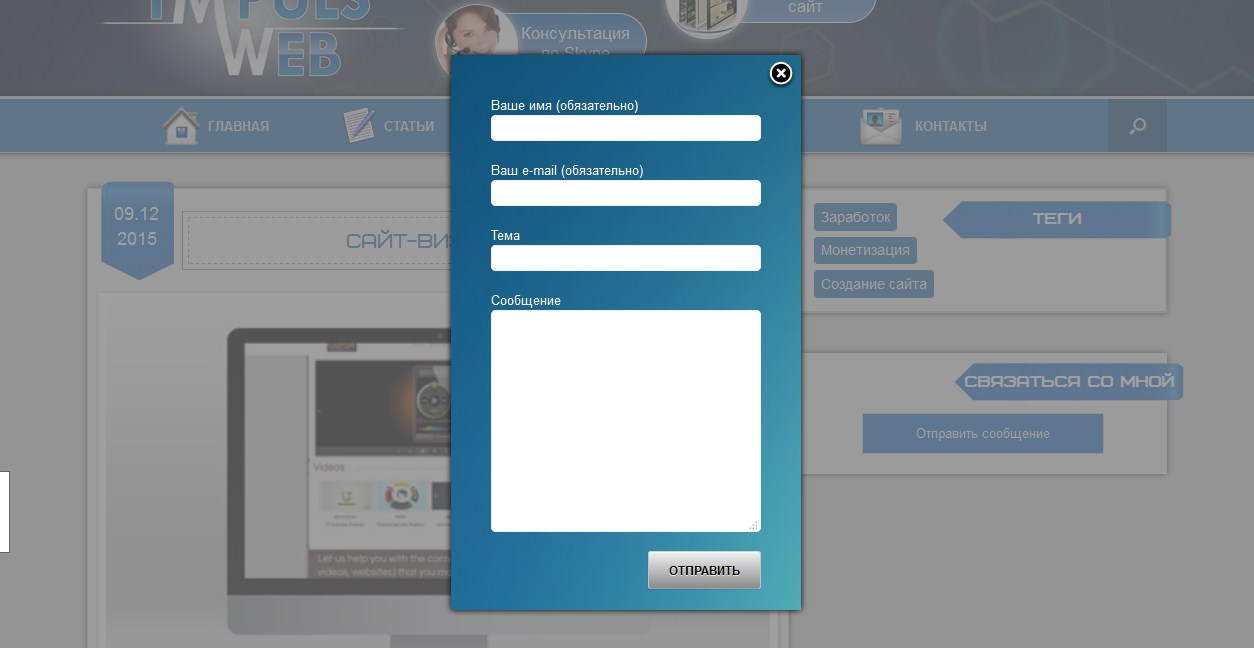
Второй вариант стилизации Contact Form7
Для того чтобы реализовать этот вариант помимо стилей нам ещё нужно будет немного доработать код, в котором задаются поля формы.
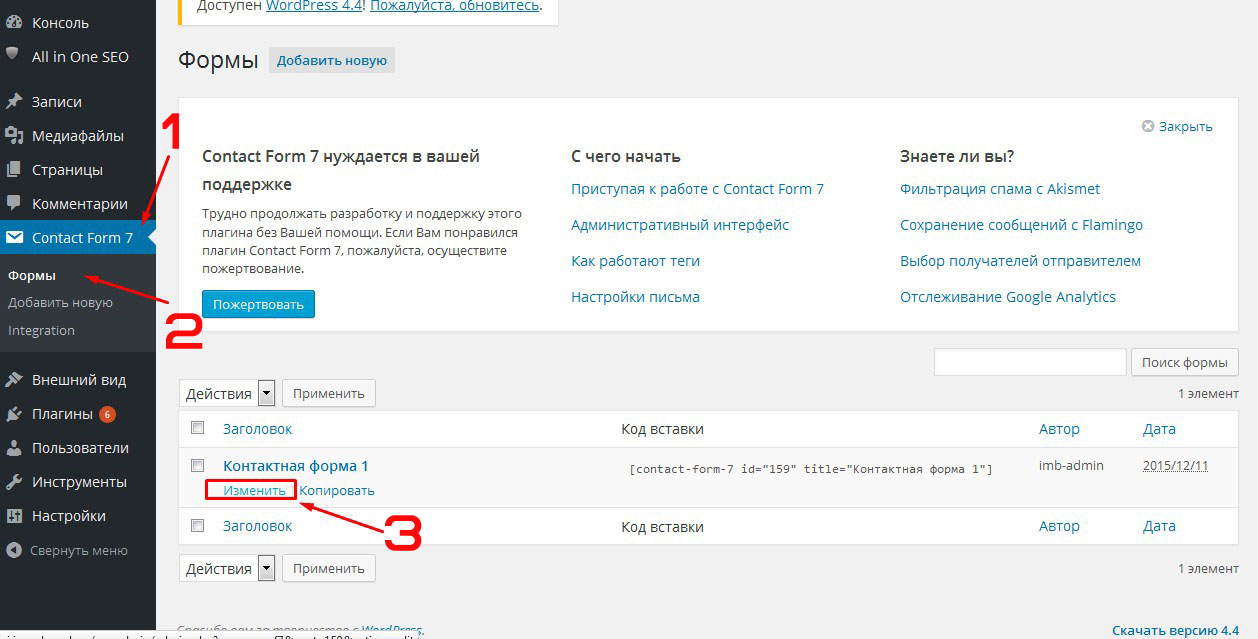
Для этого переходим в административную часть сайта и открываем меню «Contact form 7» — «Формы» — находим нашу форму и нажимаем «Изменить»
Далее удаляем тот код что там есть и вставляем следующий:
|
<div class=«cf-left»>Вашеимя*:</div> <div class=«cf-right»> [text* your-name] </div> <div class=«clear»></div> <div class=«cf-left»>Ваш e-mail*:</div> <div class=«cf-right»> [email* your-email]</div> <div class=«clear»></div> <div class=«cf-left»>Тема:</div> <div class=«cf-right»>[text your-subject] </div> <div class=«clear»></div> <div class=«cf-left»>Сообщение:</div> <div class=«cf-right»>[textarea your-message] </div> <div class=«clear»></div> <p>[submit «Отправить»]</p> |
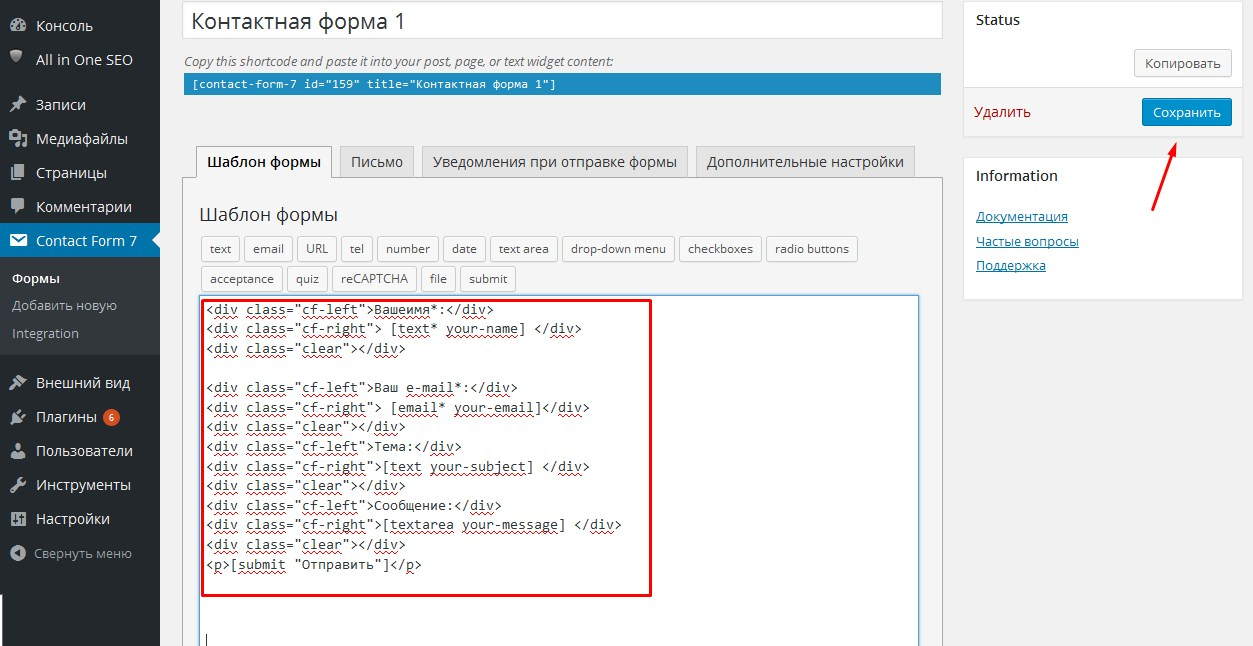
Обратите внимание что здесь используются стандартные шоткоды Contact Form7, то есть если вы добавляли свои поля, то вам нужно будет заменить соответствующие шоткоды.
После добавления кода не забываем сохранить изменения. Теперь в файл стилей дописываем:
|
1 2 3 4 5 6 7 8 9 10 11 12 13 14 15 16 17 18 19 20 21 22 23 24 25 26 27 28 29 30 31 32 33 34 35 36 37 38 39 40 41 42 43 44 45 46 47 48 49 50 51 52 53 |
/***Стили для CF7 вариант2***/ .wpcf7 { border:1px dashed #225384; /*цвет границы*/ padding:20px 20px 20px 0px!important; text-transform:uppercase; } .cf-left, .cf-right{ float:left; margin-bottom:15px; } .clear{ clear:both; } /*Стилти для блока с заголовками полей*/ .cf-left{ width:50%; padding-left:20px; max-width:120px; font-size:1.1em; } /*Стилти для блока полей формы*/ .cf-right{ width:60%; } .cf-right input, .cf-right textarea{ width: 100%; max-width:300px; padding:4px; background:#d4d4d4; /*фон полей формы*/ border:1px solid #8a8a8a; } .wpcf7-submit{ background: linear-gradient(#2F73B6, #399ADF), #2F73B6!important; /*фон кнопки*/ color:#fff!important; /*цвет шрифта кнопки*/ text-transform:uppercase; float:right; margin-left: 20px!important; border-radius:5px!important; text-shadow:none!important; } .wpcf7-submit:hover{ -moz-box-shadow: 0 0 6px #000; -webkit-box-shadow: 0 0 6px #000; box-shadow:0 0 6px #000; background-image: linear-gradient( #399ADF, #2F73B6), #399ADF!important; /*фон кнопки при наведении*/ } |
Я внесла код комментарии где можно поменять фон и т.д.
Если возникает необходимость поменять ширину формы, то это делается так:
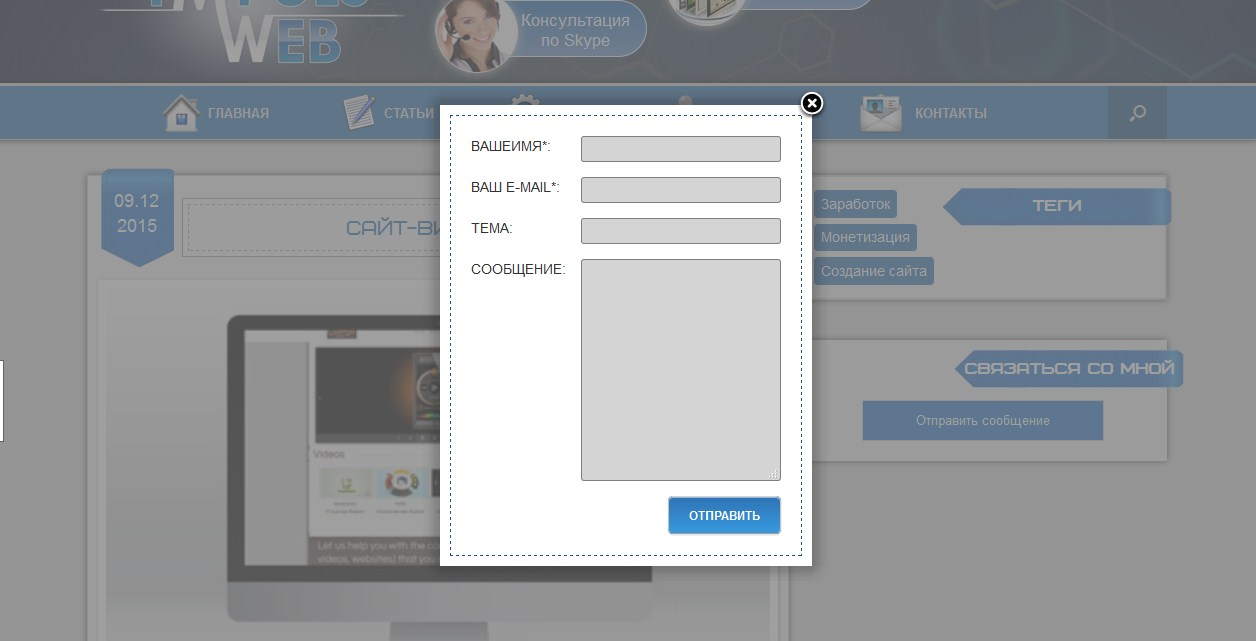
Третий вариант стилей для Contact Form7

Теперь давайте рассмотрим ещё один вариант оформления стилей для Contact Form7 c использованием подписи полей внутри самого поля (placeholder)
Для этого открываем нашу форму для редактирования и удаляем все поля кроме кнопки отправки сообщения.
Далее добавляем 2 поля типа «text» при этом в поле «Значение по умолчанию» введём Значение нашего поля, например, «Ваше имя»
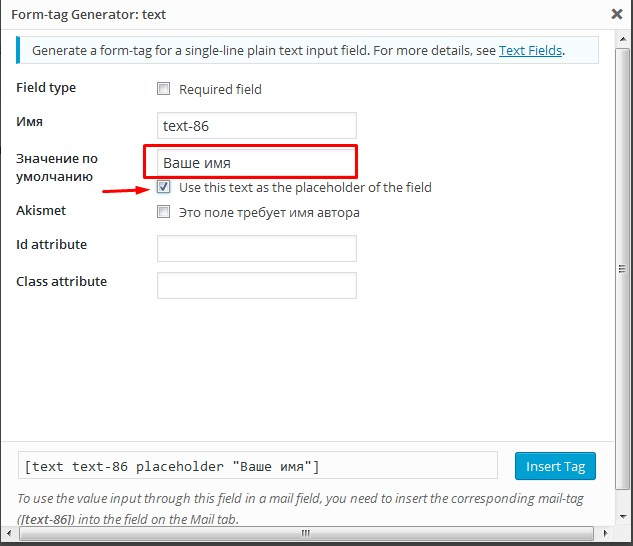
И сразу под этим полем нужно поставить галочку «Use this text as the placeholder of the field»
Если нужно чтобы поле было обязательным для заполнения то ставим галочку возле «Required field»
После этого нужно не забыть перейти на вкладку «Письмо» и подставить значения новых полей в письмо, которое будет приходить администратору.
В моём случае это выглядит так:
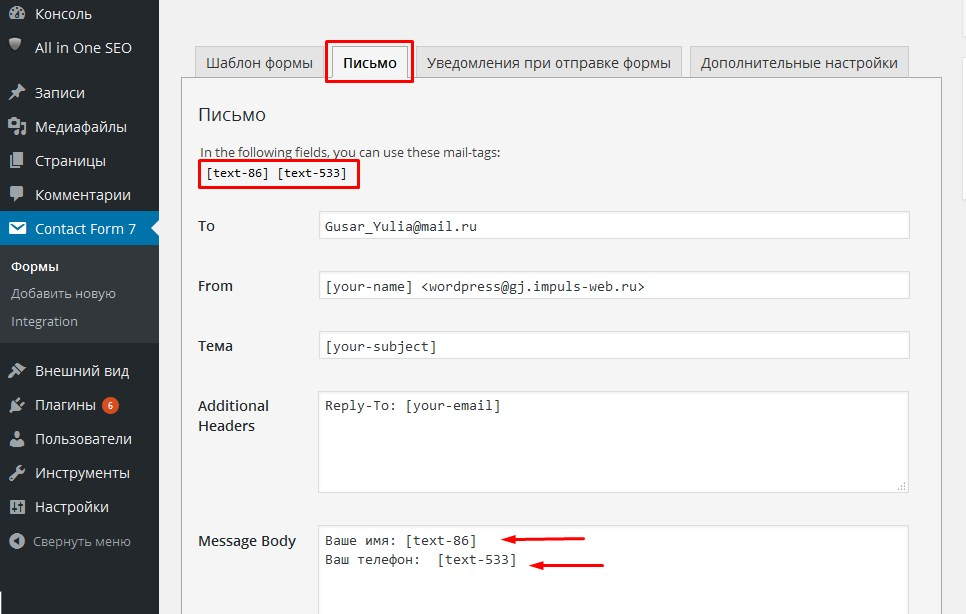
У вас будут другие значения шоткодов.
Для того чтобы придать этой форме более аккуратный вид допишем следующие стили:
|
1 2 3 4 5 6 7 8 9 10 11 12 13 14 15 16 17 18 19 20 21 22 23 24 25 26 27 28 29 30 31 32 33 34 35 36 37 38 39 40 |
/***Стили для CF7 вариант3***/ .wpcf7 { background:#f1f1f1; /*цвет границы*/ padding:20px 20px 20px 20px!important; text-align:center; border:1px solid #ccc; font-size:17px; } .wpcf7 h2{ text-transform:uppercase; font-size:20px; color:#750000; margin-bottom:15px; } .wpcf7-text{ margin-bottom:10px; padding:5px; border:1px solid #6e6e6e; } .wpcf7-text:focus{ -moz-box-shadow: 0 0 6px #004080!important; -webkit-box-shadow: 0 0 6px #004080!important; box-shadow:0 0 6px #004080!important; } .wpcf7-submit{ background: linear-gradient(#f20000, #750000)!important; color:#fff!important; text-shadow:none!important; text-transform:uppercase; border-radius:10px!important; -moz-box-shadow: 0 0 6px #000!important; -webkit-box-shadow: 0 0 6px #000!important; box-shadow:0 0 6px #000!important; margin-top:20px; } |

Стили для вывода сообщений
Ещё один момент это вывод сообщений об ошибках и отправке сообщения.
Для того чтобы стилизовать их нам понадобятся классы «wpcf7-not-valid» для задания стилей тексту, который выводится под полем формы и «wpcf7-response-output» — отвечает за стиль сообщений внизу формы.
Я добавила красную рамку для неправильно заполненных или пустых полей а так же тень и закруглённые углы для выводящихся сообщений. Вы можете дописать в эти классы всё на что хватит вашей фантазии.
|
.wpcf7-not-valid{ border:1px solid red!important; } .wpcf7-response-output{ background:#fff; border-radius:10px!important; -moz-box-shadow: 0 0 6px #000; -webkit-box-shadow: 0 0 6px #000; box-shadow:0 0 6px #000; } |
Вот результат:
Помните что если стили заданы в плагине по умолчанию, то они применятся только после того как вы повысите приоритет свойства приписав к нему правило «!important»
Видеоинструкция
На этом у меня всё. Надеюсь что смысл дописания своих стилей Вам понятен. Желаю вам удачи в подгонке стилей под дизайн вашего сайта и терпения. Уверена что у вас всё получится.
Если что пишите в комментарии. Всегда рада на них ответить.
С уважением Юлия Гусарь

Популярный плагин Contact form 7 не отличается особой красотой своей стандартной формы, по этому для многих пользователей встает вопрос, как изменить внешний вид. Именно этим мы сейчас и займемся, я попытаюсь дать вам универсальный вариант, который подойдет для любого сайта.
Ранее я уже рассказывал о том как установить и настроить Contact Form 7, сейчас не будем об этом говорить, а сразу перейдем к необходимым изменениям дизайна.
Для начала нам нужен доступ к админке и файлу style.css, его можно найти во вкладке «Внешний вид»/»Редактор». По умолчанию, именно нужный файл вам и откроется. Рекомендую открыть несколько вкладок в браузере:
- Вкладка Contact Form 7 для правки формы.
- Страницу на сайте с формой обратной связи.
- Редактор с открытым файлом CSS.
Вкладки открыты приступим к внесению изменений, для начала немного подправим нашу форму.
- Добавляем классы к форме Contact Form 7.
- Стилизация формы Contact Form 7, работа с файлом style.css
Добавляем классы к форме Contact Form 7.
Когда мы откроем форму для правки мы увидим примерно следующую картину:


Такая форма обратной связи будет выглядеть примерно так:

Скучно, не пропорционально, скажем прямо не красиво.
Для изменения внешнего вида формы нужно немного поработать со стилями, но для начала добавим несколько классов в шаблон формы. Для этого открываем форму для правки (как на картинке выше) и дописываем следующие классы:

Писать мало, поэтому ошибок наделать трудно. В сети вы наверное находили советы без применения и добавления классов. Все дело в том что без добавления классов может возникнуть несколько проблем. К примеру вы захотите добавить сразу несколько форм на сайт, все они примут идентичный вид, а это не всегда удобно, по этому стоит использовать именно предложенный мной вариант.
Классы добавлены, пока ничего не изменилось, следующим шагом будет определение id формы.
Определяем ID формы на странице.
Для начала нужно понять что одна и та же форма будет иметь разные id на разных страницах сайта, так устроен плагин, он добавляет дополнительный параметр при каждом вызове формы. Сейчас разберем поподробнее.
Для правки формы нужно ее добавить на страницу или в запись, в необходимом месте, то-есть вставить шорткод. После этого переходим на эту страницу и кликаем по форме правой кнопкой мыши и выбираем пункт «Просмотреть код» это для браузера Chrome, если у вас другой, то там примерно такой же текст.

В открывшемся коде ищем начало нашей формы, выглядит это так:

Именно это и будет id формы. Возвращаясь назад, покажу какой id имеет эта же форма на другой странице.

Как видим, идентификатор отличается всего несколькими цифрами. По этому для начала нужно определиться на какой странице будет расположена форма, а уж затем приступать к правке стилей.
Ну что, очередной шаг сделан, мы определили id, прописали наши классы, теперь приступим непосредственно к изменению внешнего вида.
Стилизация формы Contact Form 7, работа с файлом style.css
Забегая вперед скажу что предложенный мной вариант навряд покажется вам идеальным. Дело в том что каждый кто читает эти строки хочет видеть свою форму именно такой какой он ее представляет. Я не телепат, и не смогу угодить всем, но постараюсь дать вам наводку где и в каком месте искать информацию и что изменять. Так что простите сразу за возможное разочарование, панацеи нет, придется и вам немного поработать.
Изменяем цвет фона, отступы, шрифт формы.
После проделанной работы переходим к стилям. Сперва изменим (если это нужно) фоновый цвет формы, подгоним наши отступы, подберем необходимый шрифт и цвет текста. Все эти настройки будем проводить заранее зная ID. Как его узнать, мы рассматривали выше.
Сперва обратимся к файлу style.css, добавим первые правила для ID формы (добавлять нужно в самом низу файла), в моем случае это wpcf7-f172-p34-o1, вам же нужно подставить ваш идентификатор:
#wpcf7-f172-p34-o1 { margin: 5px; padding: 10px; background: #B3AFAF; font-family: Georgia, "Times New Roman", Times, serif; color: #000; }
Теперь разберем все подробнее:
- Вначале займемся отступами. Внешние отступы (от края до начала формы) — margin: 5px, внутренние отступы (от начала формы до внутренних элементов) —padding: 10px.
- Заливка формы или ее фон определяется свойством background: #B3AFAF, цвет можете подбирать какой угодно, просто заменив значение.
- Определяемся с семейством шрифта, если менять не хотите можно не прописывать это правило (font-family: Georgia, «Times New Roman», Times, serif).
- Цвет текста определяет свойство color, которое сейчас стоит в черном цвете (color: #000).
С данными параметрами можете экспериментировать сами, подбирать отступы, цвета и шрифты. Для этого нужно лишь изменить значение, сохранить новый вариант, обновить страницу и посмотреть изменения. Не бойтесь экспериментов, тут вы не сможете поломать ничего, в крайнем случае стили просто не сработают и вы легко все исправите как было.
Определяем отступы между полями, изменяем рамку.
Переходим к нашим полям, добавим отступов:
#wpcf7-f172-p34-o1 p{ margin:5px; }
Это отступы по краям полей, что бы текст и блоки не сливались в одно целое.
Следующим этапом будут рамки, я дам свой вариант, а вы сможете найти в сети множество вариантов которые вам понравятся и заменить их.
#wpcf7-f172-p34-o1 input,textarea { border: 3px double #000; }
О рамках немного подробнее. Значение в 3px это ширина рамки, double двойное использование (если не нужно, можно удалить это слово), #000 цвет рамки так же можете подобрать свой.
Можете сохранить изменения и посмотреть на то что у вас получилось. Далее перейдем непосредственно к полям и изменению их размеров и расположения.
Меняем ширину полей и их расположение.
Ранее мы немного изменили нашу форму и добавили классы, именно сейчас это и пригодится. По умолчанию ширина всех полей одинакова и это не очень красиво и удобно. Сейчас мы это исправим. Добавляем к нашему файлу стилей следующие правила:
.name-cf { float:left; padding: 2px; } .name-cf input { width: 270px; } .thems-cf input { width: 100%; } .clear-cf { clear: both; } .text-cf textarea { width: 100%; }
Теперь разберем все поподробнее:
- Первый класс к которому мы обратимся name-cf он принадлежит полям с именем и емейлом. Для них задаем отступ в 2px (padding: 2px) и обтекание (float:left), что бы выровнять два поля в один ряд.
- Далее подправим ширину полей задав им оптимальный (для моего шаблона) размер в 270px (.name-cf input { width: 270px; }). Если у вас поля все еще в одну строчку или же слишком маленький размер, подберите свой вариант.
- Поле с названием темы сделаем на всю ширину формы, так как текста там может быть больше (.thems-cf input { width: 100%;}). Если вы хотите свое, точное значение укажите его в пикселях.
- Следующий блок который мы добавили к форме предназначен для отмены обтекания (.thems-cf input {width: 100%; }).
- Так же как и в предыдущем случае, поле с текстом сообщения делаем на всю ширину (text-cf textarea {width: 100%;}).
Можно обновить файл стилей и посмотреть на изменения, если нужно, подогнать размеры под ваши нужды.
Выравниваем кнопку «Отправить» по центру, изменяем фон и ширину.
Переходим к нашей кнопке, выровняем по центру и добавим фон:
.submit-cf { width: 200px; /*ширина блока*/ height: 25px; /*высота*/ margin: 0 auto; /* Отступ слева и справа */ } .submit-cf input { width: 200px; background:#96B195; }
Традиционно объясняю что к чему:
- Первым правилом мы определяем ширину и высоту блока в котором будет размещена кнопка и ставим ее по центру формы.
- Вторым правилом задаем цвет фона кнопки (background:#96B195, если не указать будет такого же цвета как и все остальные поля), устанавливаем ширину кнопки (width: 200px, желательно что бы была такого же размера, как ширина блока, что бы кнопка не двигалась в стороны).
Сохраняем наши настройки и смотрим что у нас получилось:

Соглашусь далеко не шик, но зато адекватно смотрится в целом, ниже форма по умолчанию, думаю эффект очевиден. В любом случае мы научились изменять внешний вид формы Contact Form 7.
Надеюсь для вас статья была полезной, если же что-то не так или возникли проблемы оставьте свой комментарий и я постараюсь ответить (подправить).
Привет всем читателям моего блога. Сегодня я хочу поделиться о том, как происходит настройка внешнего вида contact form 7 на wordpress. Те, кто знаком с движком wordpress знают, что этот плагин надежный рабочий инструмент, с помощью которого можно внедрить на сайт форму обратной связи.
Плагин легко устанавливается и настраивается, но у него есть один небольшой недостаток – это его внешний вид. Он не уродлив, но его дизайн несколько простоват. Поэтому нам понадобится еще и настройка внешнего вида contact form 7, чтобы контактная форма выглядела привлекательней и современней.
Изменить внешний вид contact form 7 можно двумя способами. Первый – это поставить плагин contact form 7 skins. Это конструктор контактной формы, предлагающий 7 способов оформления внешнего вида плагина. Второй способ – это внедрить в contact form 7 готовые стили css.
Я решил идти вторым путем, поскольку не хочется устанавливать дополнительный плагин ради изменения внешнего вида формы обратной связи. Даже если вы не знаете html и css – не проблема, я предлагаю использовать уже готовые стили и код написанный другими.
Вот шаги, которые нам необходимо предпринять:
- создать шаблон страницы контактов
- скачать готовые стили css и html код
- установить плагин contact form 7
- создание кастомных полей с помощью плагина ACF
- убираем через фильтр лишние теги <p>, <br>, <span>
- настраиваем уведомление при отправке формы
Создаем шаблон страницы «Контакты»
Итак, идем в админку wordpress и создаем страницу Контакты. После смотрим на образовавшийся url и видим, что у него есть слаг contact. У меня стоит плагин cyr to lat для транслитерации кириллических символов в транслит и он сгенерировал именно такой слаг. Однако если вам он не нравится, можете сделать себе любой другой.
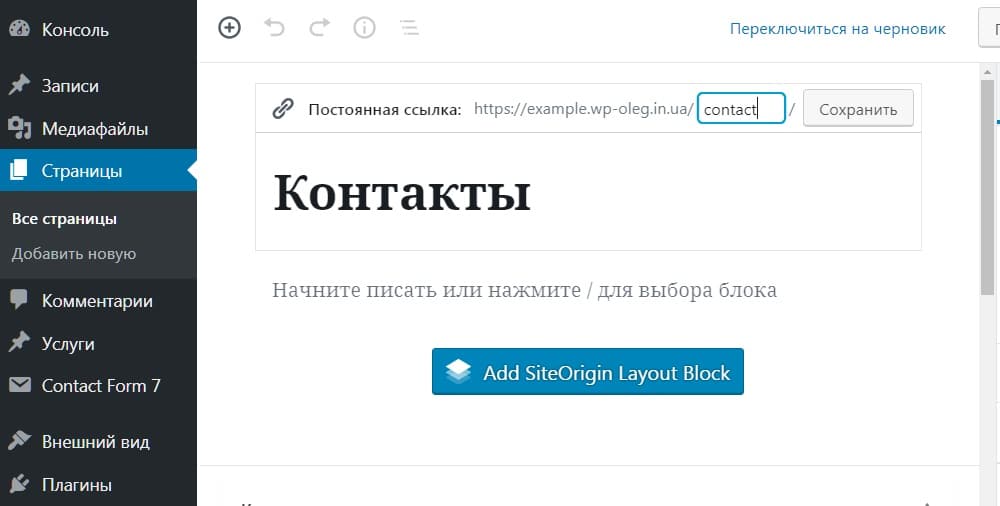
Далее идем в папку с вашей темой по пути wp-content > themes > vasha-tema и переименовываем файл шаблона page.php в page-contact.php. После того, как вы его переименовали, откройте этот файл в любом редакторе кода и удалите код, отвечающий за вывод содержимого страницы. Он находится между хуками, которые подключают область хедера и футера <?php get_header(); ?> и <?php get_footer(); ?>. Также удалите функцию <?php get_sidebar(); ?> поскольку эта страница будет на всю ширину экрана без боковой колонки. В итоге у вас должен остаться только такой код.
<?php
/**
 * The template for displaying all pages.
 *
 */
get_header(); ?>

<! - - Сюда вставим html код формы, шорткод contact form 7 и готовые стили css - - >

<?php get_footer(); ?>
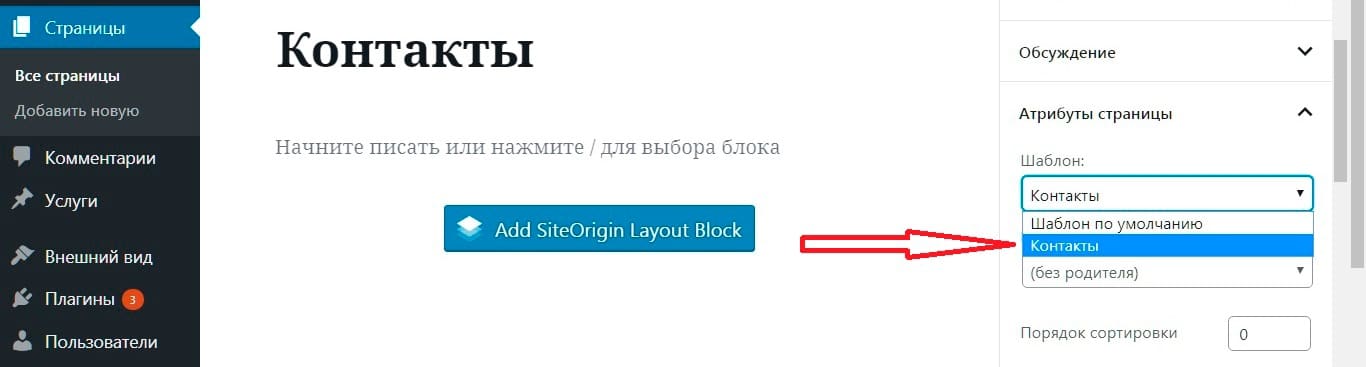
Теперь вордпрес видит, что данный шаблон страницы относится только к странице контакты, и ни с какой другой страницей он работать не будет. Но если вам понадобиться подключить этот шаблон страницы также к другим страницам вордпресс, то вместо текста The template for displaying all pages, напишите Template name: Контакты. В админке выберите этот шаблон и сохраните. Тогда он будет работать и с другими страницами темы.
Contact form 7 готовые стили css
После того как мы создали шаблон страницы контакты, нам нужно самим написать или где-то скачать для плагина contact form 7 готовые стили css и html код формы. Я предлагаю взять код с бесплатного шаблона одностраничного сайта под названием Agenсy. Вот ссылка для скачивания https://startbootstrap.com/themes/agency/

Важно: чтобы данный код сработал, к вашей теме сайта должна быть подключена библиотека bootstrap. Большинство тем wordpress сделано с помощью сетки бутстрап, поэтому, вполне вероятно, что она у вас уже установлена. Если же ее нет, то возьмите минифицированный файл со стилями bootstrap.min.css в папке vendor шаблона agensy. Или скачайте его на официальном сайте. Загрузите его в папку со стилями вашей темы и подключите в файле functions.php. Заодно подключите файл с собственными стилями формы обратной связи custom.css с помощью этого кода.
/**
 * Enqueue bootstrap and custom styles in your theme.
 */

function your_theme_enqueue_bootstrap()  {

wp_register_style( 'bootstrap', get_template_directory_uri() . '/css/bootstrap.min.css', array(), '1', 'all' );
wp_register_style( 'custom-theme', get_template_directory_uri() . '/css/custom.css', array(), '1', 'all' );
   wp_enqueue_style( 'bootstrap' );
   wp_enqueue_style( 'custom-theme' );
}

add_action( 'wp_enqueue_scripts', 'your_theme_enqueue_bootstrap' );
Проследите за тем, чтобы путь к файлу bootstrap.min.css был указан верно, в противном случае в contact form 7 готовые стили css работать не будут. Так же после подключения файла со стилями убедитесь, что стили с файла бутстрап не переопределили стили вашей темы.
Посмотрите на внешний вид темы, если все выглядит как и было до подключения файла с бутстрап, значит все оk. Иначе нужно файл со стилями подключить выше в коде, над подключением собственных стилей вашей темы. Приоритет отдается файлам со стилями css, которые подключены ниже в файле functions.php/. Те, которые подключены ниже перебивают все другие.
Также если вы захотите чтобы у вас был такой же шрифт как в шаблоне формы, то подключите его в файле functions.php с помощью этой функции:
/**
 * Enqueue own fonts.
 */

wp_enqueue_style('google-fonts', 'https://fonts.googleapis.com/css?family=Montserrat:400,700|Kaushan+Script|Droid+Serif:400,700,400italic,700italic|Roboto+Slab:400,100,300,700&subset=cyrillic');
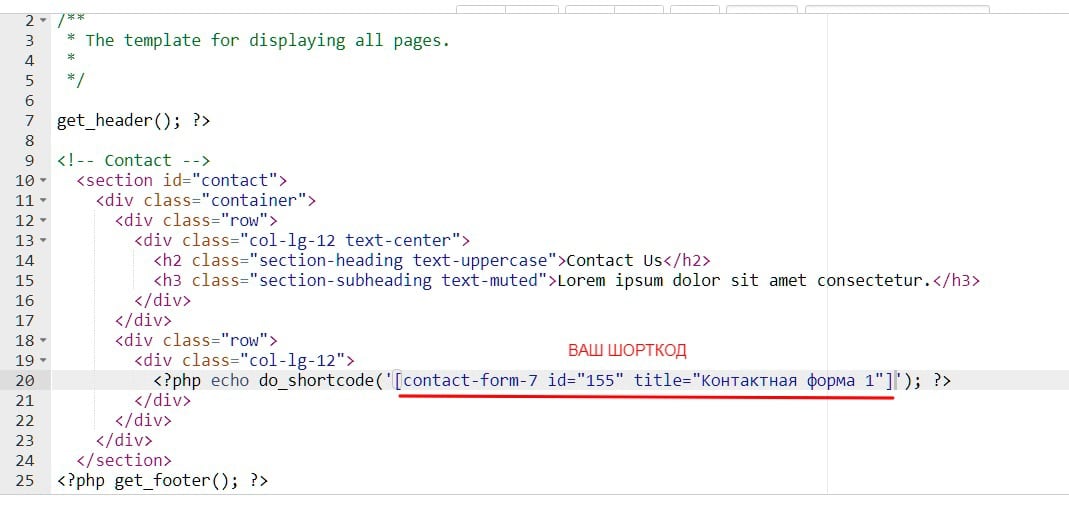
Далее скачайте шаблон и скопируйте код со строки 407 по 450. Код на странице index.html хорошо прокомментирован, и нужную секцию можно увидеть без труда. Начинается она с комментария <! — Contact — >. Вставьте этот html код верстки в файл шаблона page-contact.php. Здесь мы видим заголовок с подзаголовком:
<h2 class="section-heading text-uppercase">Contact Us</h2>

<h3 class="section-subheading text-muted">Lorem ipsum dolor sit amet consectetur.</h3>
Далее идет код самой формы. Обертка контактной формы это теги <div class=”row”></div><div class=”col-lg-12”></div>. Эти теги с классами, растягивающими контактную форму на всю ширину страницы. Оставшийся код, начиная с тега <form id=»contactForm» name=»sentMessage» novalidate=»novalidate»> и заканчивая закрывающим тегом </form>, нужно вырезать. Вставьте его пока в блокнот, чтобы он не потерялся. На данный момент у нас остается такой код в файле шаблона.
<?php
/**
 * The template for displaying all pages.
 *
 */

get_header(); ?>

<!-- Contact -->
  <section id="contact">
    <div class="container">
      <div class="row">
        <div class="col-lg-12 text-center">
          <h2 class="section-heading text-uppercase">Contact Us</h2>
          <h3 class="section-subheading text-muted">Lorem ipsum dolor sit amet consectetur.</h3>
        </div>
      </div>
      <div class="row">
        <div class="col-lg-12">
          <! - - Сюда вставим шорткод contact form 7 и готовые стили css - - >
        </div>
      </div>
    </div>
  </section>
<?php get_footer(); ?>
Установка плагина contact form 7 и создание своих полей
Далее нас ждет установка плагина contact form7 с репозитория вордпресс. Устанавливаем, активируем его и видим, что он сразу же сгенерировал нам контактную форму, сделанную им же по умолчанию. Нам нужно изменить ее или создать новую, здесь нет разницы.
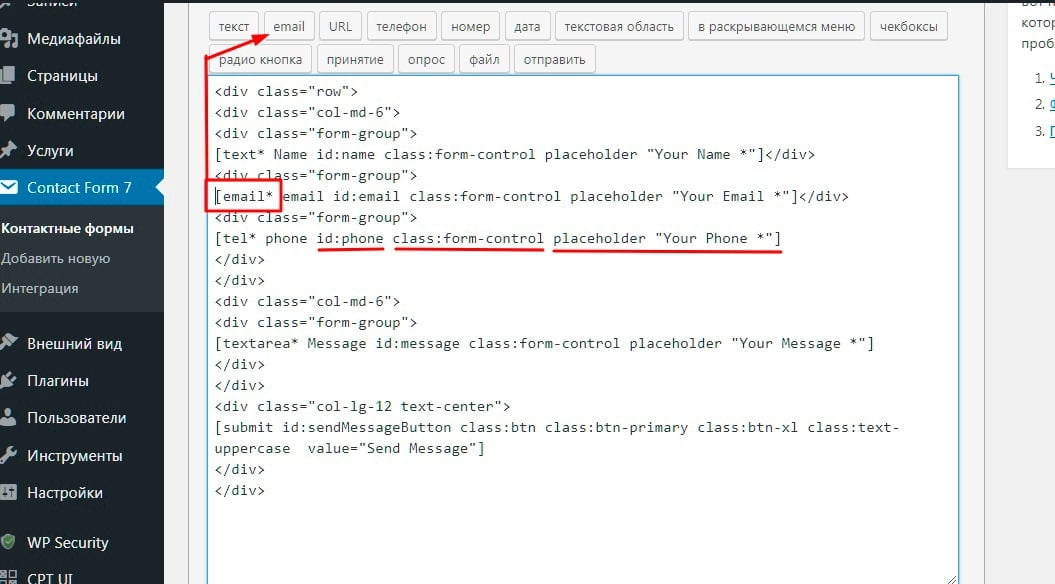
Из верстки контактной формы видно, что в ней есть три поля input для ввода имени пользователя, телефона, email, поле textarea для текста и кнопка «Отправить». Следовательно, нам нужно создать такие же поля, только в настройке формы contact form 7. В верстке есть тег <p class=»help-block text-danger»></p> под каждым полем и тег <div id=»success»></div>. Они не нужны, их необходимо удалить.
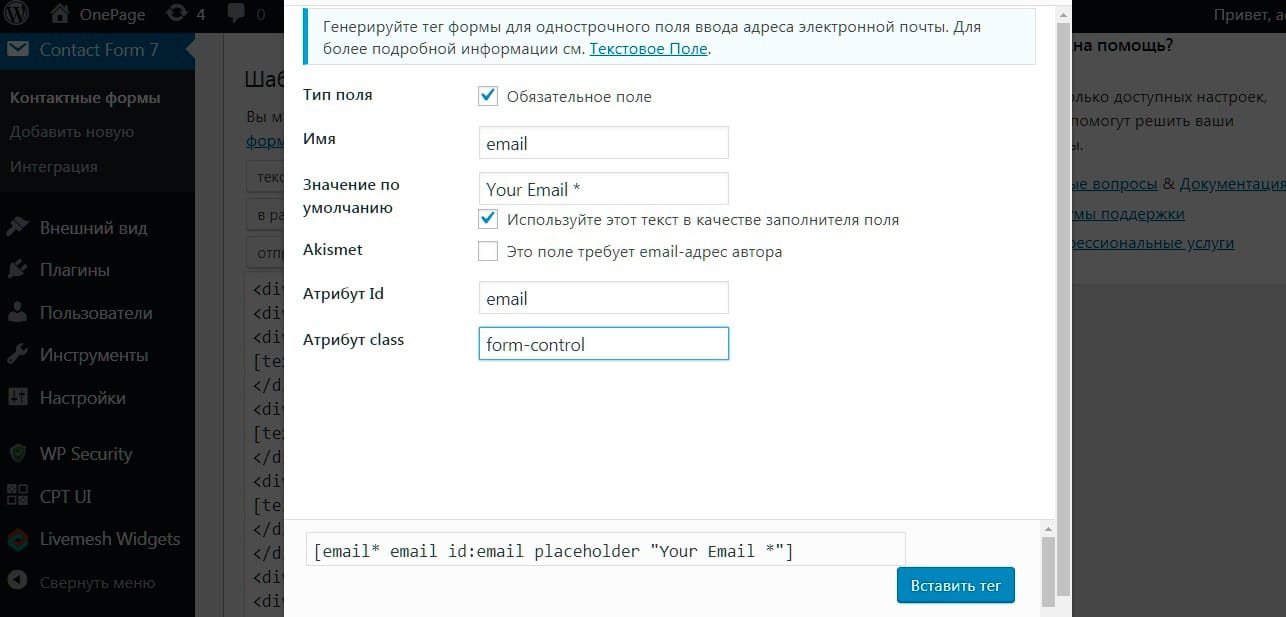
Важно. При создании полей в contact form 7 обратите внимание на css классы в тегах input, идентификаторы id и атрибуты полей которые есть в верстке шаблона. Вы должны их перенести и прописать в соответствующих полях при настройке формы:
- класс css = “form-control” во всех тегах input
- идентификатор id= “ ” в каждом поле свой – name, phone, email, message
- type =”” тип поля у каждого тега input свой (типы полей задаются кликом по соответствующей кнопке при выборе поля. Если вам нужно поле ввода для email адреса выбирайте кнопку email. Если вы зададите для всех инпутов поле text, то форма работать будет, но не будет происходить валидация полей. Так если пользователь введет текст вместо цифр в поле phone, то это не будет считаться ошибкой. В противном случае появится уведомление, о том что введен некорректный телефонный номер). В общем, выбирайте правильные поля для каждого поля ввода.
- placeholder – скопируйте содержимое placeholder в верстке и вставьте это содержимое в соответствующее поле. Образец заполнения на рисунке ниже.
Удаляйте все теги <label> для полей, которые генерирует форма по умолчанию. Делаем три поля с инпутами, одно поле для ввода сообщения и кнопку. Обертку для кнопки тег <button> я удалил и переопределил классы дефолтного тега формы <инпут type= submit>, назначив ему css классы кнопки <button>. Кнопка будет иметь такой же вид, но тег будет не <button>, а <input type= “submit”>. Вот классы кнопки:
#sendMessageButton {
    font-weight: 700;
    display: inline-block;
    font-size:18px;
	padding: 20px 40px;
    color: #fff;
    text-align: center;
    background-color: #fed136;
    border: 1px solid #fed136;
    line-height: 1.5;
    border-radius: .25rem;
Вставьте их в кастомайзер, во вкладку «Дополнительные стили css» или в файл со стилями вашей темы.
На рисунке ниже показаны отредактированные теги верстки с готовыми полями. Ниже я приложу архив с весткой формы и вы можете скопировать эти теги и вставить во вкладку «Шаблон формы» во время настройки контактной формы.
Из этого скриншота видно, что все поля формы контактной формы находятся в теге div с классом row <div class=”row”>. Он разделен на две части дивами с колонками по шесть штук в каждом. Кто знает бутстрап, тот поймет, что такая верстка содержит в себе главный ряд (12 колонок), который разделен на две части, в каждой из которых по 6 колонок <div class=”col-md-6”> Tакая разметка делит поля контактной формы на две части. В левой части находятся три поля с инпутами, а в правой textarea. Кнопка это тег input тип submit. Она находится в отдельном ряду и выровнена по центру. Ну и у каждого поля естественно свои классы. Вот и вся хитрость.
Вставляем шорткод контактной формы
Далее нам нужно вставить шорткод уже готовой контактной формы в файл шаблона для ее вывода во фронтэнде. Для этого используется специальная функция <?php echo do_shortcode(); ?> для вставки любых зарегистрированных шорткодов.
После того как я вставил код с шорткодом в шаблон контактной страницы, у меня появилась вполне рабочая контактная форма, но ее внешний вид еще не соответствовал образцу, потому, что не было фоновой фотографии и стили нужно профиксить.
На фоне формы есть фоновое изображение и цвет. Оно прикрепляется через свойство background-image к тегу section. Хотелось бы изменять фон прямо в консоли водпресс, а не в файле со стилями. Так же я хочу, чтобы заголовки h2 и h3 можно было изменять в настройках страницы, а не в файле шаблона. В общем, не должно быть никакого хардкода.
Заключительные настроки нужно сделать с помощью custom fields, то есть произвольных полей записи. Плагин ACF (advanced custom fields) подойдет для этого лучше всего. С его помощью я сделаю кастомные поля для вывода заголовков и фоновой картинки.
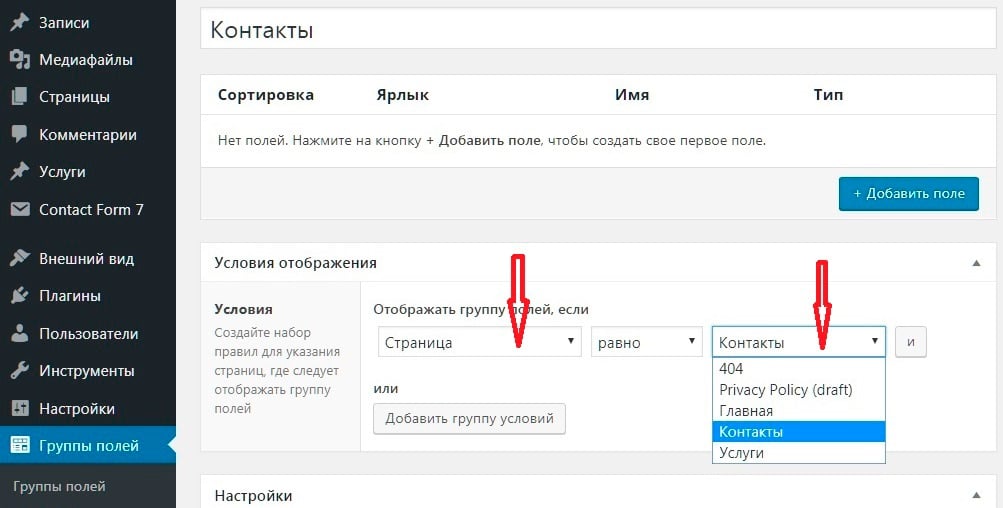
Создание кастомных полей с помощью плагина Acf
Устанавливаем и активируем плагин ACF. Находим вкладку «Группы полей» и создаем группу для страницы «Контакты». Даем ей какое-нибудь название, например «Контакты». В настройках для отображения данной группы полей я указал, что ее необходимо показывать на странице шаблона «Контакты».
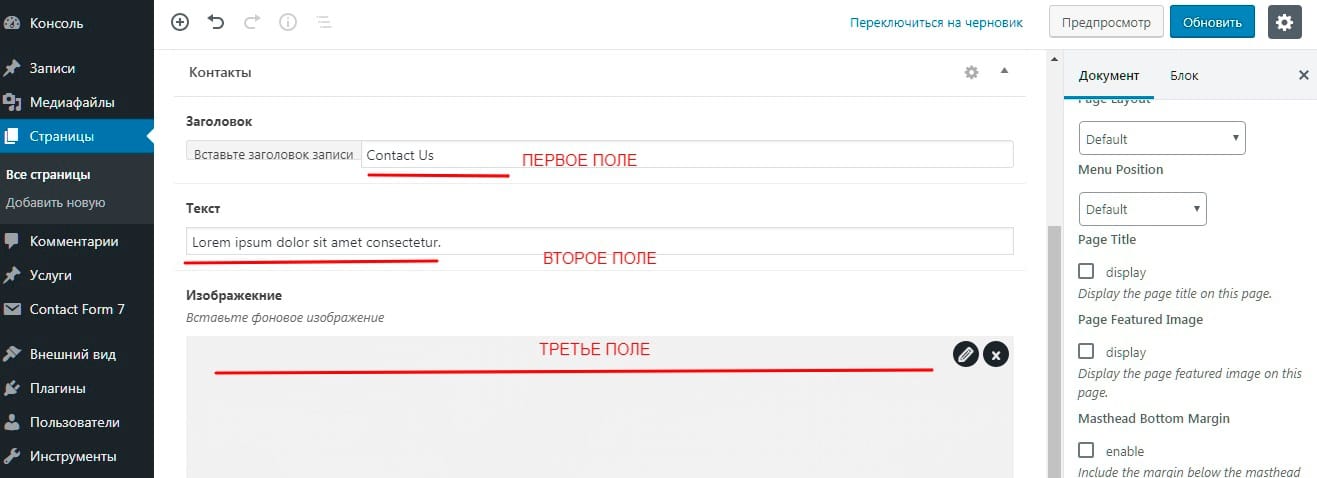
Здесь я сделал три поля:
- Ярлык 1-го поля Заголовок, имя поля – (его slug) header, тип поля – текст
- Ярлык 2-го Текст, имя поля – text, тип поля – текст
- Ярлык 3-го Изображение, имя поля – image, тип поля – изображение.
Теперь переходим на страницу Контакты и заполняем созданные поля. В заголовок h2 вставляем текст «Contact Us». В подзаголовок h3 вставляем «рыбный» текст Lorem ipsum dolor sit amet consectetur. И фоновое изображение map-image.png находится в папке шаблона Agency. Загружаем его в медиа библиотеку и вставляем в третье поле.
Теперь содержание этих полей нужно вывести на экран. Сделаем это с помощью специальной php функции для вывода кастомных полей <?php get_post_meta(); ?>.
На примере для заголовка h2 вы можете увидеть, что я вставил функцию get_post_meta(); в переменную $fields и обратился к ее параметрам id и key. ID поста – 149 (номер id можно увидеть в строке браузера в админке), key – это название поля, которое нужно получить. Его слаг в данном случае это header и параметр true возвращает значение метаполя.
<h2 class="section-heading text-uppercase">

<?php $fields = get_post_meta( '149', 'header', true ); echo $fields; ?>

</h2>

<h3 class="section-subheading text-muted">

<?php $field = get_post_meta( '149', 'text', true ); echo $field; ?>

</h3>
Настраиваем динамический фон
Фоновое изображение я вставил благодаря функции <?php get_field(); ?> Сначала я присвоил переменной $image значение функции get_field(‘bg_img’); со слагом поля bg_img и с помощью css класса background-image вывел ее, обратившись к значению массива [url] таким образом:
<?php $image = get_field('bg_img'); ?>

<section id="contact" style="background-image: url(<?php echo $image['url']; ?>);">
</section>
Вот что у меня вышло.

Перейдите по этой ссылке и посмотрите реальный пример https://example.wp-oleg.in.ua/contact/ Согласитесь, что примененные к contact form 7 готовые стили css придают ей гораздо лучший вид, чем у дефолтной формы. Также здесь вы можете скачать файл шаблона page-contact.php контактной формы с css стилями и готовым кодом.
Убираем лишние генерируемые теги <p>,<br>, <span> в contact form 7
Плагин контакт форм 7 генерирует свои теги <span>, <p>, <br>. Если ваша форма не соответствует образцу показанному в шаблоне сайта, то выясните это просмотрев код формы в браузере с помощью инструментов для разработчика dev tools. Возможно, вы увидите эти лишние теги. Их можно убрать с помощью фильтра. В сети есть много решений этого вопроса стоит только загуглить «как убрать лишние генерируемые теги <p> и <br> в contact form 7» или «how to remove tag span contact form 7». Один из вариантов убрать лишние теги с contact form это, вставить этот код в файл functions.php. Он убирает теги <p>, <br> и <span>
/**
 * Remove tag <p> и <br>.
 */

define('WPCF7_AUTOP', false );

/**
 * Remove tag <span>.
 */

add_filter('wpcf7_form_elements', function($content) {

$content = preg_replace('/<(span).*?class="s*(?:.*s)?wpcf7-form-control-wrap(?:s[^"]+)?s*"[^>]*>(.*)</1>/i', '2', $content);

return $content;

});
Настройки уведомления при отправке формы
Так же в настройках уведомления при отправке формы, рекомендую использовать почтовый тег [Name]. Он будет выводить значение текстового поля Name вместе с уведомлением. Вставьте его в начало каждого поля. Например, так:
[Name], спасибо за Ваше сообщение. Оно успешно отправлено.
При удачной отправке письма, пользователь увидит свое имя и обращение к нему, например: «Вася, спасибо за Ваше сообщение. Оно успешно отправлено». Безусловно Васе будет приятно :-). Таким же образом вы можете отредактировать другие поля в настройках отправки формы, использовав другие почтовые теги, которые сгенерировала вам форма. Это теги [Email], [Phone], [Messege] и т.д.
Заключение
Надеюсь что у меня получилось помочь вам понять, как в contact form7 происходит настройка внешнего вида формы обратной связи. Буду рад если оставите свой комментарий или сделайте репост этой статьи. Пока.
В предыдущих статьях мы научились создавать контактную форму и настраивать её. Но как и в любом деле, тут тоже есть свои нюансы. Их знание поможет вам создавать более гибкие и сложные формы.
События DOM
Отслеживая события DOM, вы можете сделать что-либо в нужный момент при работе с формой. К примеру, после успешной отправки формы сказать «Спасибо» в всплывающем окне или перенаправить пользователя на другую страницу.
Этот способ пришёл на смену коду on_sent_ok и on_submit, который мы писали во вкладке формы «Дополнительные настройки».
Список событий формы
- wpcf7invalid
- Срабатывает, когда форма успешно была отправлена на сервер, но почта не была отправлена, потому что были поля с недопустимым вводом.
- wpcf7spam
- Срабатывает, когда форма успешно была отправлена на сервер, но почта не была отправлена, поскольку обнаружена возможная активность спама.
- wpcf7mailsent
- Срабатывает, когда форма успешно была отправлена на сервер и почта отправлена адресату.
- wpcf7mailfailed
- Срабатывает, когда форма успешно была отправлена на сервер, но отправить почту не удалось. Это может быть в следствии того, что на хостинге не работает почтовый сервер.
- wpcf7submit
- Срабатывает, когда форма успешно была отправлена на сервер, независимо от других инцидентов. Нажали кнопку «Отправить» — сработало этой действие.
- wpcf7beforesubmit
- Срабатывает раньше события
wpcf7submit, что позволяет провести любые манипуляции с formData — данными формы, которые будут отправлены на сервер. Событие добавлено в CF7 v4.9.
Код из примеров ниже нужно использовать там, где выводится форма. Если форма у вас выводится на всех страницах сайта, то хорошим решением будет разместить код в файле footer.php, так как этот шаблон используется на всех страницах сайта.
Примеры для события wpcf7submit
Код ниже — простой пример регистрации обработчика события. В этом примере функция прослушивает событие wpcf7submit у контейнера с классом wpcf7 и просто выдает предупреждение при его возникновении, то есть при клике по кнопке «Отправить» сразу вызывает сообщение «Опачки, меня пытаются отправить… в Магадан!». Заметьте, что элемент с классом wpcf7 — это DIV с формой внутри, всё это плагин генерирует самостоятельно. Если у вас на странице несколько форм, код отработает только для первой найденной формы. Конечно, вы замените ненужный alert() на более полезное действие, к примеру, красивой анимацией отправки формы.
// Ищем блок с формой, имеющий класс wpcf7 (его имеют все div с формой)
var wpcf7Elm = document.querySelector( '.wpcf7' );

// Мониторим событие wpcf7submit у выбранного блока
wpcf7Elm.addEventListener( 'wpcf7submit', function( event ) {
	alert( "Опачки, меня пытаются отправить... в Магадан!" );
	// Либо что-то более полезное
}, false );
Если вам захочется мониторить какую-то определенную форму (ниже по статье будут альтернативные решения, более рациональные), то укажите ID контейнера:
// Ищем уникальный блок с формой по его ID
var wpcf7Elm = document.querySelector( '#wpcf7-f92-p95-o1' );

// Тут мониторинг события wpcf7submit , как в предыдущем примере.
Примеры выше рассчитаны на работу с одной формой. Если на странице несколько форм и надо мониторить событие wpcf7submit (или другие) у всех, то вешаем событие не на отдельный блок, а на весь document:
document.addEventListener( 'wpcf7submit', function( event ) {
	alert( "Кто-то отправил форму! Какую именно? Пока не знаю." );
}, false );
Как отследить введенные данные в поля
Пользовательские данные передаются обработчику события как свойство detail.inputs объекта события. Структура данных detail.inputs представляет собой массив объектов, и каждый объект имеет свойства имени и значения. Допустим у формы 4 поля. Используем код:
document.addEventListener( 'wpcf7submit', function( event ) {
	var inputs = event.detail.inputs;
	console.log(inputs);
}, false );
При нажатии кнопки «Отправить» в консоле браузера отобразится структура данных:
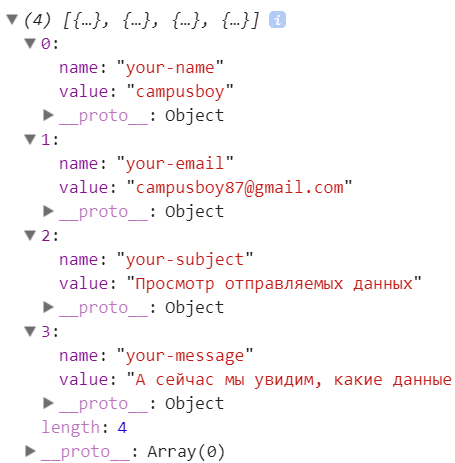
Нам доступны имя каждого поля формы (имя поля указывается в админке в теге поля и является обязательным атрибутом) и его значение.
Перебрать каждое поле и отреагировать на определенное можно так:
document.addEventListener( 'wpcf7submit', function( event ) {
	var inputs = event.detail.inputs;

	// Ищем поле с именем your-name и злоупотребляем alert'ом при нахождении поля
	for ( var i = 0; i < inputs.length; i++ ) {
		if ( 'your-name' == inputs[i].name ) {
			alert( inputs[i].value );
			break;
		}
	}
}, false );
Существуют и другие свойства объекта события, которые вы можете использовать в обработчике.
- detail.contactFormId
- ID контактной формы. Данный ID можно увидеть в админке в адресной строке при редактировании формы или в самом шоткоде формы.
- detail.pluginVersion
- Версия плагина Contact Form 7.
- detail.contactFormLocale
- Языковой код формы. К примеру,
ru_RU. - detail.unitTag
- Юнит-тег контактной формы. У каждой формы свой, к примеру
wpcf7-f92-p95-o1. - detail.containerPostId
- ID поста, в контенте которого размещена форма.
Просмотреть все данные можно так:
document.addEventListener( 'wpcf7submit', function( event ) {
	console.log(event.detail);
}, false );

Как обработать определенную форму
Например, если вы хотите что-то сделать только с определенной формой контакта (ID = 123), используйте свойство detail.contactFormId, как показано ниже:
document.addEventListener( 'wpcf7submit', function( event ) {
	if ( '123' == event.detail.contactFormId ) {
		alert( "Контактная форма с ID = 123." );
		// Делаем ещё что-нибудь
	}
}, false );
Борьба со спамом с помощью Akismet
Как бороться со спамом в плагине Contact Form 7? Предусмотрено несколько механизмов, но лишь пара являются популярными: reCAPTCHA и Akismet.
Как установить и настроить Akismet? При установке WordPress плагин Akismet устанавливается автоматически, остаётся его лишь активировать. Если по каким-то причинам его нет, то эти ссылки Вам помогут:
- Официальный сайт Akismet
- Akismet в репозитории WordPress
После активации плагина появится сообщение с предложением активировать вашу учётную запись:
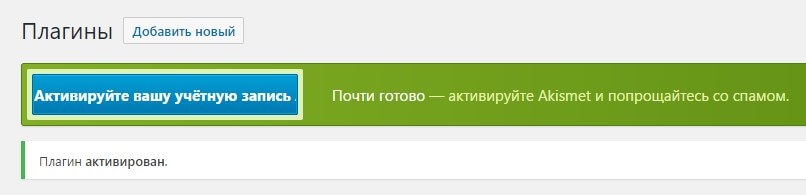
При нажатии по кнопке вас перекинет на страницу настроек плагина:

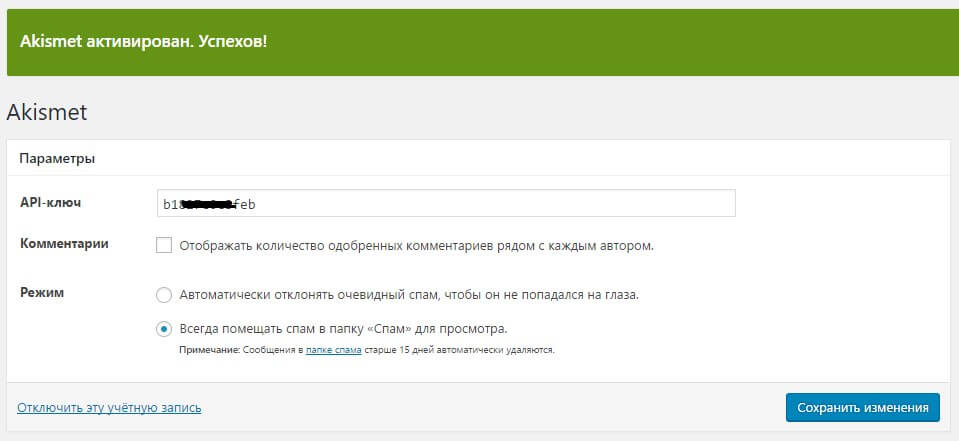
Чтобы Akismet заработал, надо в настройках плагина указать API-ключ. Если его нет, то нажимайте кнопку «Получить API-ключ» и следуйте инструкциям:
- Регистрация на офф. сайте плагина с использованием аккаунта wordpress.com
- Выбор тарифного плана (есть бесплатный)
- Добавление сайта в админ-панель сервиса по нажатию кнопки «Activate this site»
Это простой и быстрый процесс. После активации сайта произойдёт редирект обратно в админку вашего сайта с уже готовыми настройками, их нужно сохранить:
Чтобы Akismet начал проверять поле, нужно при его генерации указать по какому правилу делать проверку, например:
- akismet:author
- Добавьте такой параметр в поле для ввода имени пользователя.
Пример: [text* your-name akismet:author] - akismet:author_email
- Добавьте такой параметр в поле для ввода email пользователя.
Пример: [email* your-email akismet:author_email] - akismet:author_url
- Добавьте такой параметр в поле для ввода ссылки от пользователя.
Пример: [text your-url akismet:author_url]
Рекомендуется использовать параметр akismet:значение ко всем полям, которые предусматривают такую проверку. По собранным данным Akismet примет решение, спам это или нет, поэтому их полнота играет важное значение.
В Contact Form 7 есть несколько видов оформления извещений:
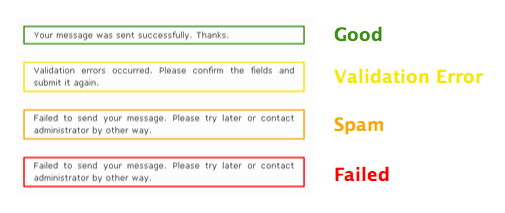
- Зеленая рамка у извещения
- Сообщение отправлено успешно
- Жёлтая рамка у извещения
- Некоторые поля заполнены с ошибкой, валидацию поле не прошло
- Оранжевая рамка у извещения
- Сообщение отмечено как спам
- Красная рамка у извещения
- Отправка сообщения провалена
Теперь можно протестировать работу формы с Akismet защитой, вписав вместо:
- имени пользователя
viagra-test-123(параметр akismet:author); - и/или почты пользователя
akismet-guaranteed-spam@example.com(параметр akismet:author_email).
Сообщение с такими данными будет помечено как спам и отослано на почту не будет.
Ограничение доступа к панели администрирования
Изначально, вкладка с формами Contact Form 7 доступна всем пользователям с ролью участника (contributor) и выше. Редактировать формы могут только редакторы и администраторы. Как изменить права доступа к формам?
Параметры доступа изменяются с помощью констант, которые прописываются в корне движка в файле wp-config.php, например:
define( 'WPCF7_ADMIN_READ_CAPABILITY', 'manage_options' );
define( 'WPCF7_ADMIN_READ_WRITE_CAPABILITY', 'manage_options' );
Право manage_options по умолчанию имеют администраторы и супер администраторы сайта. Поэтому данный пример даст доступ к списку форм и возможность их редактировать только пользователям с этими ролями. Другие роли не увидят вкладку плагина.
- WPCF7_ADMIN_READ_CAPABILITY
- Минимальная роль или возможность для доступа к админке, то есть отображения меню и списка форм.
По умолчанию: edit_posts - WPCF7_ADMIN_READ_WRITE_CAPABILITY
- Минимальная роль или возможность для редактирования форм. Этот параметр должен быть строже или такой же, как WPCF7_ADMIN_READ_CAPABILITY. Объясняется это тем, что нельзя редактировать формы, не имея доступа к админ-панели.
По умолчанию: publish_pages
Чтобы лучше понимать, как это работает, взгляните на код (CF7 v4.9.1, файл capabilities.php) с использованием этих констант:
add_filter( 'map_meta_cap', 'wpcf7_map_meta_cap', 10, 4 );

function wpcf7_map_meta_cap( $caps, $cap, $user_id, $args ) {
	$meta_caps = array(
		'wpcf7_edit_contact_form' => WPCF7_ADMIN_READ_WRITE_CAPABILITY,
		'wpcf7_edit_contact_forms' => WPCF7_ADMIN_READ_WRITE_CAPABILITY,
		'wpcf7_read_contact_forms' => WPCF7_ADMIN_READ_CAPABILITY,
		'wpcf7_delete_contact_form' => WPCF7_ADMIN_READ_WRITE_CAPABILITY,
		'wpcf7_manage_integration' => 'manage_options',
		'wpcf7_submit' => 'read',
	);

	$meta_caps = apply_filters( 'wpcf7_map_meta_cap', $meta_caps );

	$caps = array_diff( $caps, array_keys( $meta_caps ) );

	if ( isset( $meta_caps[$cap] ) ) {
		$caps[] = $meta_caps[$cap];
	}

	return $caps;
}
Из кода видно, что массив возможностей проходит через фильтр wpcf7_map_meta_cap, и содержит следующие данные:
По умолчанию

Array
(
	[wpcf7_edit_contact_form]   => publish_pages
	[wpcf7_edit_contact_forms]  => publish_pages
	[wpcf7_read_contact_forms]  => edit_posts
	[wpcf7_delete_contact_form] => publish_pages
	[wpcf7_manage_integration]  => manage_options
	[wpcf7_submit]              => read
)

После изменения, к примеру, с помощью констант

Array
(
	[wpcf7_edit_contact_form]   => manage_options
	[wpcf7_edit_contact_forms]  => manage_options
	[wpcf7_read_contact_forms]  => manage_options
	[wpcf7_delete_contact_form] => manage_options
	[wpcf7_manage_integration]  => manage_options
	[wpcf7_submit]              => read
)
Благодаря фильтру wpcf7_map_meta_cap, мы может изменить данный массив. Этот способ избавляет нас от редактирования файла wp-config.php, но придется писать код, к примеру, в файле functions.php:
add_filter( 'wpcf7_map_meta_cap', 'change_wpcf7_map_meta_cap' );

function change_wpcf7_map_meta_cap( $meta_caps ) {

	// Новые значение возможностей
	$replace_caps = array(
		'wpcf7_edit_contact_form'   => 'manage_options',
		'wpcf7_edit_contact_forms'  => 'manage_options',
		'wpcf7_read_contact_forms'  => 'manage_options',
		'wpcf7_delete_contact_form' => 'manage_options',
	);

	return array_replace( $meta_caps, $replace_caps );
}
Оформление чекбоксов и радиокнопок
Contact Form 7 по умолчанию оформляет чекбоксы и радиокнопки в линию. Но это можно изменить с помощью настроек тега этих полей и простых CSS правил.
Так выглядят чекбоксы по умолчанию:

Но если передать в тег чекбокса параметр label_first, отображение лейбла относительно флажка измениться на обратное:
[checkbox your-cb label_first "Option 1" "Option 2" "Option 3"]

Чтобы выстроить чекбоксы в столбик, добавьте строку стилей в CSS файл темы:
span.wpcf7-list-item {
	display: block;
}
Чтобы выстроить чекбоксы как таблицу, добавьте строку стилей в CSS файл темы (дополнительно использовался параметр label_first):
span.wpcf7-list-item {
	display: table-row;
}

span.wpcf7-list-item * {
	display: table-cell;
}

Загрузка JavaScript и CSS по необходимости
По умолчанию Contact Form 7 загружает JavaScript и CSS на всех страницах сайта, независимо где используется форма. Технически плагин не может работать иначе, но ему можно «подсказать».
Пример 1 — полное отключение JavaScript и CSS и включение где нужно
Шаг 1 — отключение JavaScript и CSS на всех страницах сайта
Существует константа WPCF7_LOAD_JS со значением по умолчанию true, которая определена в коде плагина и отвечает за загрузку JavaScript на всех страницах сайта. Её можно переопределить, вставив в файл wp-config.php код:
define('WPCF7_LOAD_JS', false);
Этот код отменит загрузку скриптов плагина.
И такая же константа есть для стилей WPCF7_LOAD_CSS, которая работает по тому же принципу — отменяет загрузку стилей плагина:
define('WPCF7_LOAD_CSS', false);
С версии плагина 3.9 и выше, можно отменить загрузку JavaScript и CSS через хуки в functions.php:
add_filter( 'wpcf7_load_js', '__return_false' );
add_filter( 'wpcf7_load_css', '__return_false' );
Но теперь у нас появилась другая проблема — на странице с формой стили и скрипты плагина не подгружаются, а функциональность и внешний вид испорчены. Нужен механизм, который бы решал проблему.
Шаг 2 — загрузка файлов на страницах с формами
Например, у нас есть страница «Контакты» с формой. За вывод страницы отвечает файл contact.php. Тогда, воспользуемся кодом:
if ( function_exists( 'wpcf7_enqueue_scripts' ) ) {
	wpcf7_enqueue_scripts();
}

if ( function_exists( 'wpcf7_enqueue_styles' ) ) {
	wpcf7_enqueue_styles();
}
Эта конструкция должна быть размещена в файле contact.php до вызовы функции wp_head(). Это рекомендация разработчика плагина.
Пример 2 — отключение скриптов и стилей везде где НЕ нужно
Есть более гибкий метод, позволяющий указать, на каких страницах подключать скрипты. Данный код нужно вставить в functions.php:
1 вариант:
## Отключаем стили, скрипты плагина везде кроме страницы contacts
add_filter('wp', 'cf7_disable_css_js');
function cf7_disable_css_js(){
	if( ! is_page('contacts') ){
		add_filter( 'wpcf7_load_js', '__return_false' );
		add_filter( 'wpcf7_load_css', '__return_false' );
	}
}
2 вариант:
## Отключаем стили, скрипты плагина везде кроме страницы contacts
add_action('wp_print_styles', 'my_deregister_javascript', 100 );
function my_deregister_javascript(){
	if( ! is_page ('contacts') ){
		wp_deregister_script( 'contact-form-7' ); // отключаем скрипты плагина
		wp_deregister_style( 'contact-form-7' ); // отключаем стили плагина
	}
}
Пример 3 — включение скриптов только при использовании шорткода формы
Сначала отменяем подключение JS и CSS, а затем подключаем обратно только тогда, когда срабатывает шорткод формы. Тем самым файлы подключатся только на тех страницах, где есть шорткод формы.
function wpcf7_remove_assets() {
	add_filter( 'wpcf7_load_js', '__return_false' );
	add_filter( 'wpcf7_load_css', '__return_false' );
}

add_action( 'wpcf7_init', 'wpcf7_remove_assets' );

function wpcf7_add_assets( $atts ) {
	wpcf7_enqueue_styles();
	wpcf7_enqueue_scripts();

	return $atts;
}

add_filter( 'shortcode_atts_wpcf7', 'wpcf7_add_assets' );
Код можно оформить как плагин или вставить в functions.php темы.
Отслеживание форм с помощью Google Analytics
Есть простой способ отслеживать события формы через Google Analytics.
Во-первых, убедитесь в наличии кода от Google Analytic, выглядит он примерно так:
<!-- Google Analytics -->
<script>
(function(i,s,o,g,r,a,m){i['GoogleAnalyticsObject']=r;i[r]=i[r]||function(){
(i[r].q=i[r].q||[]).push(arguments)},i[r].l=1*new Date();a=s.createElement(o),
m=s.getElementsByTagName(o)[0];a.async=1;a.src=g;m.parentNode.insertBefore(a,m)
})(window,document,'script','//www.google-analytics.com/analytics.js','ga');

ga('create', 'UA-XXXXX-Y', 'auto');
ga('send', 'pageview');
</script>
<!-- End Google Analytics -->
Если код Аналитики есть или после его установки, в систему можно отправлять данные, за которыми затем можно следить в админке Google Analytics. Подробнее об этом читайте в официальной документации об отслеживании событий.
К примеру, нужно отследить отправку форму, для этого нужно выполнить такой код:
ga('send', 'event', 'Contact Form', 'submit');
Последним шагом является вставка этого фрагмента в код JavaScript в заголовок HTML (<head> </ head>) каждой страницы. Вы можете для этого отредактировать шаблон header.php вашей темы, или вы можете использовать на хуке wp_head functions.php.
<script>
document.addEventListener( 'wpcf7mailsent', function( event ) {
	ga('send', 'event', 'Contact Form', 'submit');
}, false );
</script>
А так можно отслеживать успешную отправку каждой отдельной формы:
document.addEventListener( 'wpcf7mailsent', function( event ) {
	if ( '123' == event.detail.contactFormId ) {
		ga('send', 'event', 'Contact Form 123', 'submit');
	}
	if ( '253' == event.detail.contactFormId ) {
		ga('send', 'event', 'Contact Form 253', 'submit');
	}
}, false );
Теперь, при успешной отправке формы вы будите видеть это событие в админке Google Analytics (Поведение -> События -> Обзор). Возможно, данные появятся там не сразу после совершения события, а после 24-48 часов.
Выбор адресата в форме
Представим, что у вас небольшая веб-студия с персоналом: сеошник, продажник и техподдержка. Как с помощью одной формы отправить информацию кому-то из них лично? На помощь придёт поле select (выпадающий список)! Задача решается в два этапа.
1 этап — добавление тега в шаблон формы:
[select your-recipient "ceo@example.com"
					"sales@example.com"
					"support@example.com"]
2 этап этап — вставка в поле «Кому» тег [your-recipient], который при отправке письма будет брать из нашего выпадающего списка выбранную пользователем почту и подставлять в поле.

У этого способа есть серьезный недостаток. Взгляните на код, получаемый после преобразование нашего тега выпадающего списка:
<span class="wpcf7-form-control-wrap your-recipient">
	<select name="your-recipient" class="wpcf7-form-control wpcf7-select" aria-invalid="false">
		<option value="ceo@example.com">ceo@example.com   </option>
		<option value="sales@example.com">sales@example.com</option>
		<option value="support@example.com">support@example.com</option>
	</select>
</span>
Как видно, адреса электронной почты «хранятся» в открытом виде. Этим могут воспользоваться вездесущие спамеры. Но не после маленькой хитрости… Модернизируем наш тег так:
[select your-recipient "Сеошник|ceo@example.com"
					"Продажник|sales@example.com"
					"ТехПоддержка|support@example.com"]
Здесь мы передавали параметр через так называемую трубу (прямой слеш) по правилу имя|значение. В итоге получили следующую html структуру на выходе:
<span class="wpcf7-form-control-wrap your-recipient">
	<select name="your-recipient" class="wpcf7-form-control wpcf7-select" aria-invalid="false">
		<option value="Сеошник">Сеошник</option>
		<option value="Продажник">Продажник</option>
		<option value="ТехПоддержка">ТехПоддержка</option>
	</select>
</span>
Как видим, в форме пользователь выбирает один из пунктов, а плагин при отправке письма сам берет значение на основе названия выбранного пункта.
Усложним задачу еще…
Представим ситуацию, когда надо отправить письмо выбранному адресату, к примеру сеошнику, и еще копию письма менеджеру сайта для контроля.
В предыдущих статьях мы рассмотрели, что Contact Form 7 может отправлять два письма, причем для каждого адресата можно задать отдельный шаблон.
Итак, первая копия приходит сеошнику и тот понимает о чем речь в сообщении. А вот менеджер не понимает, какому специалисту было адресовано письмо, ведь он может не до конца разбираться в теме или не помнить все почтовые адреса специалистов. Возникает потребность в шаблоне письма использовать не только значение поля (в нашем случае адреса электронной почты), но и заголовок пункта (название специалиста)? Для этого плагин предоставляет нам тег [_raw_{field name}], где {field name}— название нашего поля. Подытожим употребление тегов:
- [your-recipient]
- значение поля, которое в шаблоне письма преобразуется в значение выбранного пункта (адрес электронной почты в нашем примере, то есть ceo@example.com)
- [_raw_your-recipient]
- имя поля, которое в шаблоне письма преобразуется в имя (заголовок) выбранного пункта (название специалиста в нашем примере, то есть Сеошник)
Если данный функционал не нужен, то его можно отключить, вписав следующий код в файл wp-config.php:
define( 'WPCF7_USE_PIPE', false );
Добавление Cc, Bcc и других заголовков письма
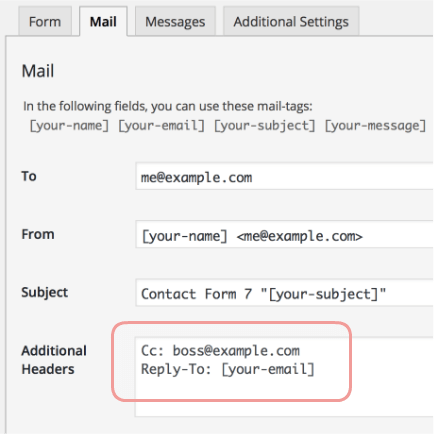
Contact Form 7 во вкладке с настройкой шаблона письма имеет поле для отправки дополнительных заголовков (Additional Headers) по правилу название-заголовка: значение. Каждый заголовок должен идти с новой строки.
Рассмотрим самые популярные — Reply-To, Cc и Bcc, об остальных читайте на Википедии.
- Reply-To
- Имя и адрес, куда следует адресовать ответы на это письмо. К примеру, вы в форме попросили пользователя указать его email. Используйте его, чтобы почтовый клиент сразу знал, на какой email надо отправить ответ.
- Cc
- (от англ. carbon copy) содержит имена и адреса вторичных получателей письма, к которым направляется копия.
- Bcc
- (от англ. blind carbon copy) содержит имена и адреса получателей письма, чьи адреса не следует показывать другим получателям.
Contact Form 7 автоматически использует перевод того языка, который вы используете в админке. Меняется язык в Настройки -> Общие -> Язык сайта (выпадающий список). Но так изменится язык для всего сайта. А что делать, когда у вас авторы говорят на разных языках?
Для этого разработчики предлагают использовать плагин Bogo, который для каждого пользователя даёт возможность переключать язык админки. После активации в тулбоксе рядом с вашим ником появится переключение языков.
Специальные теги письма
Contact Form 7 поддерживает несколько специфических тегов, которые могут понадобиться при работе с формой. Например, в письме указать IP отправителя и ссылку страницы, где была форма заполнена. Специальные теги можно использовать в шаблоне письма или других полях формы.
Теги отправки
- [_remote_ip]
- Этот тег будет заменен на IP пользователя.
- [_user_agent]
- Этот тег будет заменен на User Agent браузера пользователя. User Agent — это строка, которую используют веб-браузеры в качестве своего имени, она содержит не только имя браузера, но и версию операционной системы и другие параметры.
- [_url]
- Этот тег будет заменен на адрес страницы, с которой была отправлена форма.
- [_date]
- Будет заменен на дату отправки формы.
- [_time]
- Будет заменен на время отправки формы.
- [_invalid_fields]
- Этот тег заменяется количеством полей формы с недопустимым вводом. Используйте в шаблонах уведомлений.
- [_serial_number]
- Будет заменен на порядковое число сохраненного сообщения. Должен быть установлен плагин Flamingo 1.5+, о нем рассказано ниже.
Теги поста
Данные теги будут работать только если форма находится в контенте поста. Если форма в модальном окне, в сайдбаре, футере или хедере, встроена в шаблон темы, то есть вне контента поста — они не сработают.
- [_post_id]
- Будет заменен на ID поста, в контенте которого отображена форма.
- [_post_name]
- Будет заменен на имя (slug) поста, с которого была отправлена форма.
- [_post_title]
- Будет заменен на название (заголовок) поста, с которого была отправлена форма.
- [_post_url]
- Будет заменен на ссылку (url) поста, с которого была отправлена форма.
- [_post_author]
- Будет заменен на имя автора поста, с которого была отправлена форма.
- [_post_author_email]
- Будет заменен на email автора поста, с которого была отправлена форма.
Теги сайта
Эти теги содержат информацию о вашем сайте, на которой размещена контактная форма. Удобно, когда вы копируете шаблоны форм от сайта к сайту. Благодаря этим тегам, не придётся менять информацию вручную.
- [_site_title]
- Будет заменен названием сайта (указывается в Общих настройках).
- [_site_description]
- Будет заменен описанием сайта (указывается в Общих настройках).
- [_site_url]
- Будет заменен адресом сайта (указывается в Общих настройках).
- [_site_admin_email]
- Будет заменен на адрес e-mail сайта (указывается в Общих настройках).
Теги пользователя
Эти теги предоставляют информацию о текущем зарегистрированном пользователе.
Теги [_user_*] работают только тогда, когда Отправитель имеет учетную запись и авторизовался. Если форму отправит неавторизованный пользователь, то эти теги вернут пустой результат и смысла от них не будет. Рекомендуется включить режим «Только для подписчиков», чтобы форма отображалась только для зарегистрированных пользователей.
Если нужно использовать эти теги, и при этом не нужно использовать опцию «только для подписчиков» (subscribers_only: true), вам нужно включить nonce опцию. Если всего этого не сделать, данные авторизованных юзеров будут сброшены через WP REST API и указанный тег будет пропущен (заменен на пустую строку).
- [_user_login]
- Будет заменен на логин пользователя.
- [_user_email]
- Будет заменен на email пользователя.
- [_user_url]
- Будет заменен на URL сайта пользователя.
- [_user_first_name]
- Будет заменен на имя пользователя.
- [_user_last_name]
- Будет заменен на фамилию пользователя.
- [_user_nickname]
- Будет заменен на ник пользователя.
- [_user_display_name]
- Будет заменен на отображаемое имя пользователя.
Сохранение отправленных сообщений с помощью Flamingo
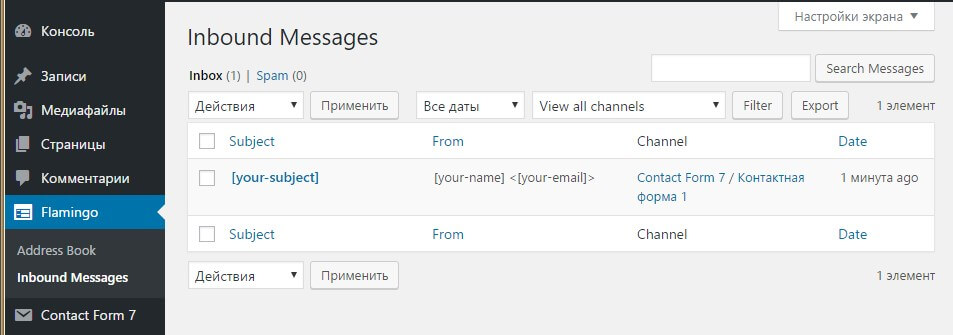
Бесплатный плагин Flamingo позволяет сохранять отправленные формы Contact Form 7 в базе данных. А затем их можно читать и экспортировать в файл с расширением CSV.
Плагин работает сразу после установки. Создадим форму.
Шаблон формы
Ваше имя
[text name-client]

Ваш email
[email email-client]

Ваше сообщение
[textarea your-message]

[submit "Отправить"]
Шаблон письма
Имя: [name]

Сообщение:
[your-message]

Сообщение №[_serial_number]
Здесь вставлен тег [_serial_number], который преобразуется в номер (ID) сообщения.
В админке список сохраненных сообщений напоминает список постов (тип поста flamingo_inbound):
При редактировании такого сообщения отобразиться следующая информация:
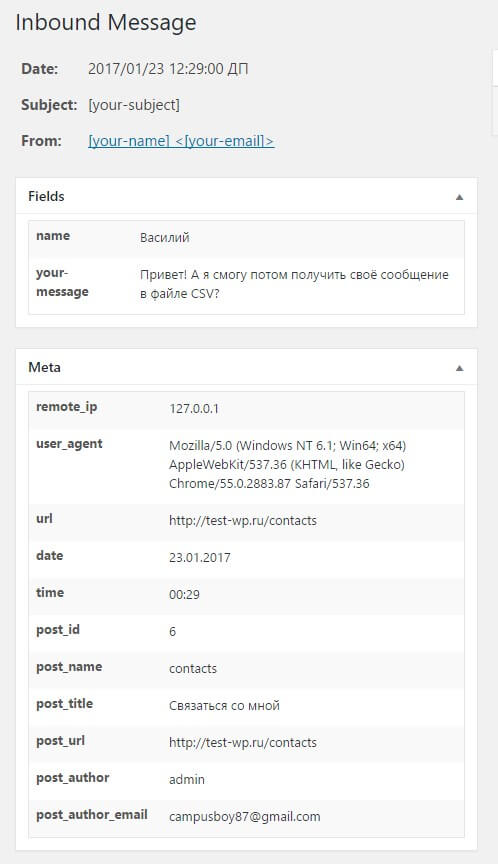
Вы наверное заметили, что некоторые поля, такие как Subject (тема) и From (от кого) заполнены некорректно. Дело в том, что плагин ориентируется на дефолтную форму, которую создал Contact Form 7, в который есть такие поля, как your-subject, your-name и your-email. Если Flamingo полей с такими именами не находит, то получается такой казус.
Чтобы сообщить плагину, что мы используем поля с другими именами, нужно при редактировании формы во вкладку «Дополнительные настройки» добавить:
flamingo_name: "[name-client]"
flamingo_email: "[email-client]"
flamingo_subject: "Сообщение от клиента"
Этот код применим к нашей форме, вам же предстоит подставить имена своих полей. В итоге видим следующий результат:
Список сохраненных сообщений
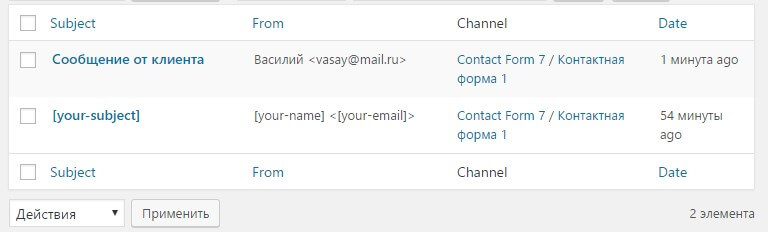
Сохраненное сообщение с правильно прописанными тегами
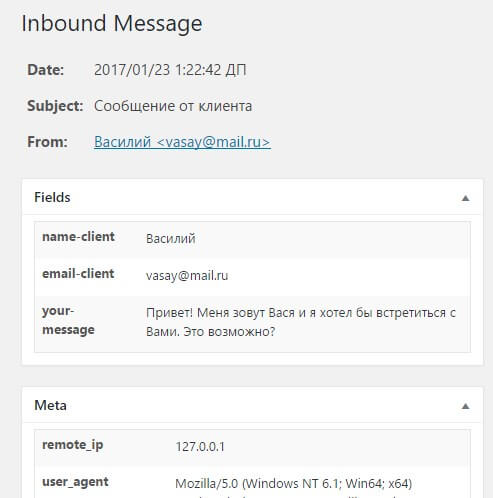
Заметьте, в моем шаблоне формы не было поля flamingo_subject, но чтобы в админке колонка subject была осмысленно подписана, а не так как на скриншоте, я задал тему письма «жёстко» в виде строки.
Также можно передавать несколько тегов, например:
flamingo_name: "[first-name-field] [last-name-field]"
Константы контроля плагина
Частично поведение Contact Form 7 можно переопределить с помощью констант, прописанных в файле wp-config.php, например:
define ('WPCF7_LOAD_JS', false); // Отключить JS плагина
define ('WPCF7_LOAD_CSS', false); // Отключить CSS плагина
Список всех констант для управления Contact Form 7:
- WPCF7_LOAD_JS
-
Когда значение константы
false(по умолчаниюtrue), Contact Form 7 не загружает JavaScript во фронэнде. Когда значение константы определено какheader, Contact Form 7 загрузит JavaScript в секции head (по умолчанию грузится в футере).// Можно тоже самое сделать с помощью фильтра add_action( 'wpcf7_load_js', '__return_false' );
- WPCF7_LOAD_CSS
-
Когда значение константы
false(по умолчаниюtrue), Contact Form 7 не загружает CSS во фронэнде.// Можно тоже самое сделать с помощью фильтра add_action( 'wpcf7_load_css', '__return_false' );
- WPCF7_AUTOP
-
Когда значение константы
false(по умолчаниюtrue), Contact Form 7 не будет пропускать контент формы через фильтрautop. Данный фильтр заменяет двойной перенос строки на HTML конструкцию<p>...</p>, а одинарный на<br>. Подобным образом работает функция wpautop.// Можно тоже самое сделать с помощью фильтра add_action( 'wpcf7_autop_or_not', '__return_false' );
- WPCF7_USE_PIPE
- Когда значение константы
false(по умолчаниюtrue), Contact Form 7 начинает воспринимать | как обычный символ. - WPCF7_ADMIN_READ_CAPABILITY
- Минимальная роль или возможность для доступа к админке.
По умолчанию: edit_posts. - WPCF7_ADMIN_READ_WRITE_CAPABILITY
- Минимальная роль или возможность для редактирования форм. По умолчанию
publish_pages. Этот параметр должен быть строже или такой же, как WPCF7_ADMIN_READ_CAPABILITY. Это объясняется тем, что Нельзя редактировать формы, не имея доступа к панели администрирования. - WPCF7_CAPTCHA_TMP_DIR
- Определение этой константы переопределит путь к папке для временных файлов CAPTCHA.
- WPCF7_CAPTCHA_TMP_URL
- Определение этой константы переопределит ссылку к папке для временных файлов CAPTCHA.
- WPCF7_UPLOADS_TMP_DIR
- Определение этой константы переопределит путь к временной папке для загруженных файлов.
- WPCF7_VERIFY_NONCE
-
Указывает плагину, проверять nonce (защитный код) или нет. С версии плагина 4.9 эта константа стала иметь значение
false, то есть «не проверять». Вернуть проверку можно установив значение константы вtrueили с помощью хукаadd_filter( 'wpcf7_verify_nonce', '__return_true' );
Перенаправление на другой адрес после отправки формы
Когда нужно после успешной отправки формы переадресовать пользователя на какую-то страницу, к примеру, с благодарностью или подарком, воспользуйтесь JavaScript хуком:
<script>
document.addEventListener( 'wpcf7mailsent', function( event ) {
	location = 'http://example.com/';
}, false );
</script>
Смотрите пункт «События DOM», чтобы разобраться, как это работает.
Черный список спама от WordPress для фильтрации форм
Если вы страдаете от наплыва спама или нежелательных сообщений, а CAPTCHA или Akismet не справляются, то выручить может встроенный в движок функционал «Черный список».
Черный список находится в админке по пути Настройки -> Обсуждение.
Если сообщение, отправляемое через Contact Form 7, содержит какие-либо из этих слов в своём тексте, имени автора, URL, адресе e-mail или IP — оно будет помечено, как спам, и отправлено не будет. Каждое слово или IP с новой строки. Используется поиск по подстроке, то есть по слову «купи» будет найдено «купить».
Как узнать IP-адрес, с которого приходит спам через форму Contact Form 7? Самый простой способ заключается в использовании специального тега [_remote_ip]. Данный тег вставляется в шаблон письма и будет заменен на IP-адрес отправителя при отправке письма.
Я часто привожу html код того или иного поля в Contact Form 7. Вы можете наблюдать, какие классы по умолчанию добавляет плагин полям. А сейчас мы вкратце пробежимся, как задать свои классы полям формы.
Какой CSS редактировать чтобы изменить внешний вид формы?
Все стили, которые отвечают за внешний фид форм, хранятся в файле плагина contact-form-7/includes/css/styles.css. Изменять этот файл — плохая идея, так как при обновлении плагина файл заменится и вы потеряете все изменения. Тоже самое относится и к публичным темам, которые также обновляются, как и плагины.
Поэтому чтобы изменить стили, нужно выбрать файл стилей, который не будет обновляться. Это может быть файл стилей дочерней темой. Или можно воспользоваться настройками темы, которые позволяют вставлять CSS код в специальное поле.
Если у вас своя тема, то можно изменить (перебить) стили Contact Form 7 в стилях темы.
Стили полей в Contact Form 7
Плагин поддерживает множество типов полей, но самый распространенный тип поля — текстовый. Чтобы задать такому полю стиль, нужно обратиться к нему по типу:
.wpcf7 input[type="text"]{
	background-color: #fff;
	color: #000;
	width: 50%;
}
В форме мы часто используем не одно поле, потому давайте пропишем свойства сразу нескольким:
.wpcf7 input[type="text"],
.wpcf7 input[type="email"],
.wpcf7 textarea{
	background-color: #fff;
	color: #000;
	width: 50%;
}
Вышеперечисленные стили будут применены ко всем полям и формам плагина Contact Form 7 на это указывает селектор .wpcf7. Подробнее о селекторах читайте здесь.
Стиль для определенного поля
При создании любого поля можно задать ему идентификатор или класс:
[text text-123 id:very-special-field]
Теперь в CSS, благодаря идентификатору, мы можем обратиться только к этому полю:
#very-special-field{
	color: #f00;
	border: 1px solid #f00;
}
Стиль формы
Про стили полей поговорили, а как добавить оформление самой форме? Воспользуемся уже известным нам классом wpcf7, который добавляется ко всем формам плагина:
.wpcf7{
	background-color: #f7f7f7;
	border: 2px solid #0f0;
}
Настройка сообщений об ошибках
При отправке формы, если обязательное поле не заполнено или не прошло првоерку, Contact Form 7 отобразит сообщение об ошибке. Эти сообщения можно настроить.
Изменение текста
Текст той или иной ошибки, уведомления можно изменить. Например, при отправке формы с незаполненным обязательным полем появляется сообщение «Поле обязательно.» Чтобы изменить текст этого сообщения, откройте редактирование формы, вкладку «Уведомления при отправке формы». Если нужно изменить текст ошибки для каждого поля в отдельности, то стоит обратить внимание на плагин Contact form 7 Custom validation.
Статическое или плавающее сообщение?
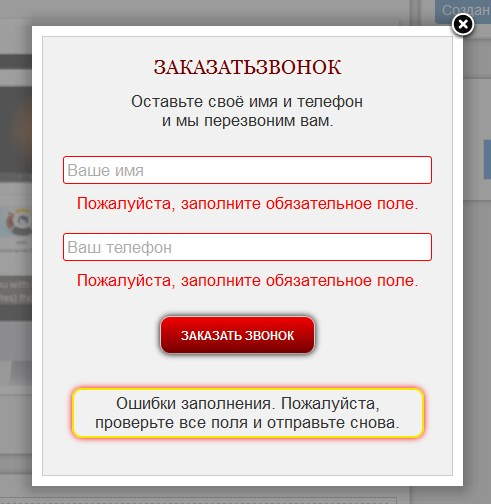
Как говорят, лучше один раз увидеть, чем сто раз услышать, потому смотрите:
Статический стиль сообщений
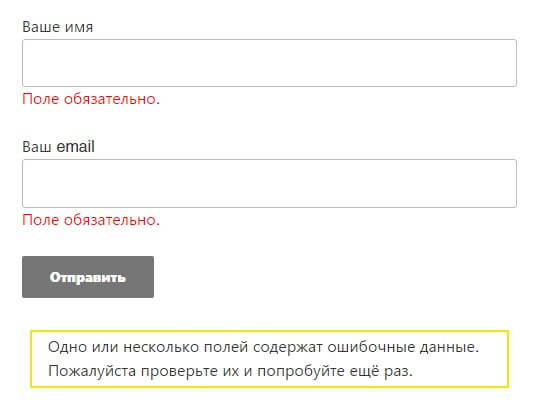
Сообщения об ошибках отображаются ниже поля и не исчезают, пока форма не будет успешно отправлена.
Плавающий стиль сообщений
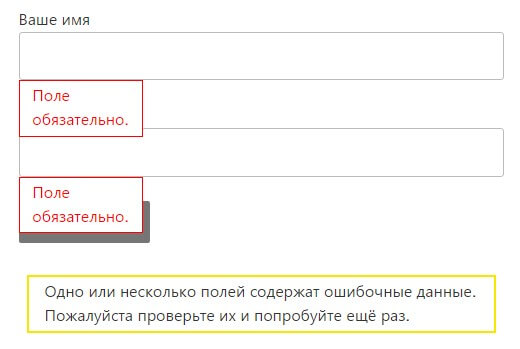
Сообщения об ошибках отображаются ниже поля в стиле подсказки. Подсказка исчезает при наведении на неё или при фокусе в поле, к которому эта подсказка относится.
Плавающий стиль для нужного поля
Чтобы задать плавающий стиль определенному полю, нужно обернуть его в блок с классом use-floating-validation-tip:
<span class="use-floating-validation-tip">[text* your-name]</span>
Плавающий стиль для всех полей
Чтобы не оборачивать каждое поле в блок с классом use-floating-validation-tip, можно «попросить» плагин сделать это за нас, указав в шорткоде формы атрибут html_class со значением use-floating-validation-tip:
Ошибка: Контактная форма не найдена.
Если используется не Ajax отправка (с перезагрузкой страницы), то независимо от настроек, будет использоваться статический стиль отображения ошибок.
Менеджер длинных листов с Listo
Допустим, нам нужно сделать контактную форму, где пользователю предлагают с помощью выпадающего списка выбрать его местоположение. Есть около 200 стран мира и создание такого списка выльется в мучение.
Например:
[select your-country "Aruba" "Afghanistan" "Angola" "Albania" "Andorra" "United Arab Emirates" "Argentina" "Armenia" "American Samoa" "Antigua and Barbuda" "Australia" "Austria" "Azerbaijan" "Burundi" "Belgium" "Benin" "Burkina Faso" "Bangladesh" "Bulgaria" "Bahrain" "Bahamas" "Bosnia and Herzegovina" "Belarus" "Belize" "Bermuda" "Bolivia, Plurinational State of" "Brazil" "Barbados" "Brunei Darussalam" "Bhutan" "Botswana" "Central African Republic" "Canada" "Switzerland" "Chile" "China" "Cote d’Ivoire" "Cameroon" "Congo, the Democratic Republic of the" "Congo" "Cook Islands" "Colombia" "Comoros" "Cape Verde" "Costa Rica" "Cuba" "Cayman Islands" "Cyprus" "Czech Republic" "Germany" "Djibouti" "Dominica" "Denmark" "Dominican Republic" "Algeria" "Ecuador" "Egypt" "Eritrea" "Spain" "Estonia" "Ethiopia" "Finland" "Fiji" "France" "Micronesia, Federated States of" "Gabon" "United Kingdom" "Georgia" "Ghana" "Guinea" "Gambia" "Guinea-Bissau" "Equatorial Guinea" "Greece" "Grenada" "Guatemala" "Guam" "Guyana" "Hong Kong" "Honduras" "Croatia" "Haiti" "Hungary" "Indonesia" "India" "Ireland" "Iran, Islamic Republic of" "Iraq" "Iceland" "Israel" "Italy" "Jamaica" "Jordan" "Japan" "Kazakhstan" "Kenya" "Kyrgyzstan" "Cambodia" "Kiribati" "Saint Kitts and Nevis" "Korea, Republic of" "Kuwait" "Lao People’s Democratic Republic" "Lebanon" "Liberia" "Libya" "Saint Lucia" "Liechtenstein" "Sri Lanka" "Lesotho" "Lithuania" "Luxembourg" "Latvia" "Morocco" "Monaco" "Moldova, Republic of" "Madagascar" "Maldives" "Mexico" "Marshall Islands" "Macedonia, the former Yugoslav Republic of" "Mali" "Malta" "Myanmar" "Montenegro" "Mongolia" "Mozambique" "Mauritania" "Mauritius" "Malawi" "Malaysia" "Namibia" "Niger" "Nigeria" "Nicaragua" "Netherlands" "Norway" "Nepal" "Nauru" "New Zealand" "Oman" "Pakistan" "Panama" "Peru" "Philippines" "Palau" "Papua New Guinea" "Poland" "Puerto Rico" "Korea, Democratic People’s Republic of" "Portugal" "Paraguay" "Palestine, State of" "Qatar" "Romania" "Russian Federation" "Rwanda" "Saudi Arabia" "Sudan" "Senegal" "Singapore" "Solomon Islands" "Sierra Leone" "El Salvador" "San Marino" "Somalia" "Serbia" "Sao Tome and Principe" "Suriname" "Slovakia" "Slovenia" "Sweden" "Swaziland" "Seychelles" "Syrian Arab Republic" "Chad" "Togo" "Thailand" "Tajikistan" "Turkmenistan" "Timor-Leste" "Tonga" "Trinidad and Tobago" "Tunisia" "Turkey" "Tuvalu" "Taiwan, Province of China" "Tanzania, United Republic of" "Uganda" "Ukraine" "Uruguay" "United States" "Uzbekistan" "Saint Vincent and the Grenadines" "Venezuela, Bolivarian Republic of" "Virgin Islands, U.S." "Viet Nam" "Vanuatu" "Samoa" "Yemen" "South Africa" "Zambia" "Zimbabwe"]
Управлять такой «колбасой» сложно и вероятность допустить ошибку высока.
Для решения такой нелепицы есть плагин Listo, который предоставляет следующие списки:
- Страны —
data:countries,data:countries.olympic - Структурные подразделения США —
data:us_subdivisions.states,data:us_subdivisions.districts - Валюты —
data:currencies - Временные зоны
Contact Form 7 умеет работать с Listo (или наоборот этого никто не знает), который в свою очередь работает с полями: выпадающий список, чекбоксы и радио-кнопки. Благодаря такой связке не придётся болезненно редактировать длинные списки, а можно будет использовать короткие предопределенные параметры.
Как управлять параметрами длинного списка
К примеру, мы решили вывести список стран, для этого понадобится тег выпадающего списка [select]:
[select your-country]
Список пока пустой, мы не передали никаких параметров. Добавим их:
[select your-country data:countries]
Всего один параметр и мы стали веганами — никакой «колбасы» с перечислением стран — за нас это сделал Listo.
Про Listo и его параметры читайте в его документации.
Дополнительные настройки
Каждой форме можно указать доп. параметры во вкладке «Дополнительные настройки». Рассмотрим все такие настройки:
Режим «Только для подписчиков»
subscribers_only: true
Данный режим (доступен с CF7 v7 4.9) позволяет отобразить форму только для зарегистрированных пользователей. Незарегистрированные пользователи увидят сообщение «Эта форма доступна только для зарегистрированных пользователей.» и, соответственно, не смогут заполнить и отправить форму. Отличный способ избавиться от спама, если вам нужно принимать письма только от авторизованных пользователей.
Демо режим
demo_mode: on
При использовании этого кода форма перейдёт в демонстрационной режим. В этом режиме контактная форма пропустит процесс отправки почты и просто отобразит «завершено успешно» в качестве ответного сообщения.
Пропустить письмо
skip_mail: on
Параметр skip_mail работает почти так же, как demo_mode, но skip_mail пропускает только отправку сообщений. В отличие от demo_mode, skip_mail не влияет на другие действия, такие как сохранение сообщений с помощью Flamingo.
Принудительная проверка полей
acceptance_as_validation: on
По умолчанию, такие поля, как чекбоксы не выдают ошибок. Данный параметр позволяет применять к чекбоксам правила валидации, такие же как для других полей. К примеру, если вы создали чекбокс, в котором пользователь должен поставить флажок, какого он пола, а пользователь ничего не выбрал — плагин выдаст общую ошибку «Не все поля заполнены». Если же применить этот параметр, то в дополнение к общему сообщению, пользователь увидит сообщение индивидуально для данного чекбокса.
Запрет сохранения сообщений
do_not_store: true
Этот параметр сообщает модулям хранения сообщений, таким как Flamingo, чтобы те не сохраняли сообщения через эту форму контакта.
Выполнение JavaScript кода
Этот функционал пригодится, когда нужно отслеживать поведение пользователей. К этим хукам можно прикрепить отслеживание через Google Analytics или другие системы статистики (об этом говорится выше).
Этот метод устарел и скоро перестанет работать в новых версиях плагина или уже не работает! Смотрите современную альтернативу в пункте «События DOM» этой статьи.
on_sent_ok: "alert('sent ok');"
on_submit: "alert('submit');"
- on_sent_ok
- переданный JavaScript будет выполнен после успешной отправки формы.
- on_submit
- переданный JavaScript будет выполнен при нажатии на кнопку «Отправить».
У нас есть настроенная и рабочая форма. И нужно, чтобы когда пользователь нажимает на кнопку «Отправить» и нам уходит письмо, форма пропадала, а на её месте появлялся текст «Отправлено!».
Делается это просто: для этого в дополнительных настройках плагина добавьте такую строку:
document.addEventListener( 'wpcf7mailsent', function( event ) {
	jQuery('#contactform').hide();
}, false );
где contactform — это ID формы которую нужно скрыть. Вместо #contactform можно указать другой селектор HTML элемента (формы), который нужно скрыть.
Как в теге select объединить похожие option в отдельные группы? Данный функционал может обеспечить html тег optgroup, но по умолчанию плагин Contact Form 7 это не умеет. Рассмотрим способы решения этой нестандартной для плагина задачи.
Способ 1 с использованием JavaScript
Данный способ подсмотрен на codepen.io и немного переработан. Суть способа в том, что JavaScript «считывает структуру тега select и преобразовывает в нужный формат. В примере будет рассмотрено поле для выбора движка:
Шаблон формы:
[select engines "optgroup-Бесплатные движки" "Wordpress" "Joomla!"
				"Drupal" "Grav" "endoptgroup" "optgroup-Платные движки"
				"1С-Битрикс" "DLE (DataLife Engine)" "UMI.CMS" "NetCat"
				"ImageCMS Shop" "endoptgroup"]
Имя поля выбрано engines, потому в шаблоне письма используем тег [engines], чтобы на почту пришло выбранное пользователем значение.
Добавляем JavaScript
jQuery(document).ready(function($){

	var selectEngines = $('select[name=engines]');
	var foundin = $('option:contains("optgroup-")', selectEngines);

  $.each(foundin, function(value){
	var updated = $(this).val().replace('optgroup-','');
	$(this).nextUntil('option:contains("endoptgroup")').wrapAll('<optgroup label="'+updated+'"></optgroup>');
  });

  $('option:contains("optgroup-"), option:contains("endoptgroup")', selectEngines).remove();

});
Данный код реализован на jQuery. Вставлять его следует в js файл темы или создать новый js и подключить. Так как имя тега было engines, то в этом коде указываем именно его, то есть select[name=engines].
Оригинальный html код поля select
<span class="wpcf7-form-control-wrap engines">
	<select name="engines" class="wpcf7-form-control wpcf7-select" aria-invalid="false">
		<option value="optgroup-Бесплатные движки">optgroup-Бесплатные движки</option>
		<option value="Wordpress">Wordpress</option>
		<option value="Joomla!">Joomla!</option>
		<option value="Drupal">Drupal</option>
		<option value="Grav">Grav</option>
		<option value="endoptgroup">endoptgroup</option>
		<option value="optgroup-Платные движки">optgroup-Платные движки</option>
		<option value="1С-Битрикс">1С-Битрикс</option>
		<option value="DLE (DataLife Engine)">DLE (DataLife Engine)</option>
		<option value="UMI.CMS">UMI.CMS</option>
		<option value="NetCat">NetCat</option>
		<option value="ImageCMS Shop">ImageCMS Shop</option>
		<option value="endoptgroup">endoptgroup</option>
	</select>
</span>
Обработанный html код поля select
<span class="wpcf7-form-control-wrap engines">
	<select name="engines" class="wpcf7-form-control wpcf7-select" aria-invalid="false">
		<optgroup label="Бесплатные движки">
			<option value="Wordpress">Wordpress</option>
			<option value="Joomla!">Joomla!</option>
			<option value="Drupal">Drupal</option>
			<option value="Grav">Grav</option>
		</optgroup>
		<optgroup label="Платные движки">
			<option value="1С-Битрикс">1С-Битрикс</option>
			<option value="DLE (DataLife Engine)">DLE (DataLife Engine)</option>
			<option value="UMI.CMS">UMI.CMS</option>
			<option value="NetCat">NetCat</option>
			<option value="ImageCMS Shop">ImageCMS Shop</option>
		</optgroup>
	</select>
</span>
Если у пользователя отключен JavaScript, то поле будет отображать все option. То есть даже те option, что должны были быть преобразованы в тег optgroup, станут видны как обычные option.
Способ 2 с использованием PHP
Этот способ не имеет недостатков по сравнению с предыдущим. Полное решение данной задачи вынесено в другую статью, так как относится к созданию нового шорткода в Contact Form 7.
Хранение шаблона формы в файле (шаблоне)
add_filter( 'wpcf7_contact_form_properties', function ( $properties, WPCF7_ContactForm $contactForm ) {
	if ( $contactForm->id() == 458 ) {
		$properties['form'] = '[email your-email]';
	}

	return $properties;
}, 10, 2 );
Even though contact forms are an essential method for engaging with visitors, most WordPress webmasters struggle to properly style them. In most cases, forms have a default styling, which is provided by the browser. Those forms tend to be sparsely stylized and can differ a lot from your site design. On the other hand, the WordPress theme you’re using could contain CSS code that stylizes the forms, which can help with your stylization problem. But, even a theme-specific style might clash with your website’s brand.
Therefore, it is up to you to properly style Contact Form 7 and make yours stand out from the crowd. And this article is here to help you do that. Within it, we will cover various aspects of creating the code necessary for form stylization. We focused on using a contact form created by the Contact Form 7 plugin as the showcase, but most of what we discuss can be applied to any form. Also, depending on your existing knowledge of CSS, you might need to do some additional reading to understand the code fully.
However, before we show you the CSS way of doing it, we would like to talk about two newbie-friendlier ways of styling a Contact Form 7 form using a plugin: our own Qi Addons for Elementor, and Qi Blocks for Gutenberg plugins.
How to Style Contact Form 7 Forms Using Qi Addons for Elementor
Our very own Qi Addons for Elementor plugin contains a wealth of beautiful, professionally designed widgets, and a Contact Form 7 widget is just one of them, available even in the free version of the plugin. To use them, you need to install the latest version of Elementor and the Qi Addons plugin, and you’re good to go. Elementor is a must; Qi Addons will not work with any other page editor. It will work with the free version of Elementor, though, so the whole package doesn’t need to cost you a penny.
You can see all the widget’s options in action in the video below. If you prefer your tutorials in text form, we will give you a brief overview below.
Qi Addons Contact Form 7 Placement
To create a form, simply drag the Qi Addons widget from the left hand side menu to where you want the form on the page.
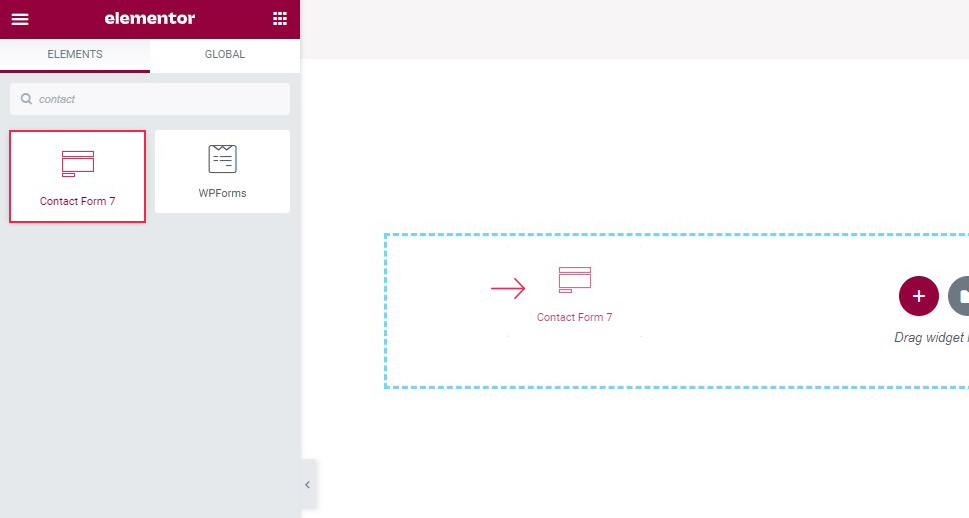
The content field, which should be open by default, lets you choose which of the forms you have saved will feature in the widget.
Qi Addons Contact Form 7 Label and Text Styling
As far as styling goes, you need to switch to the Style tab of the widget. Once there, you will find styling controls organized into several sections. In the Label Style section, you can change the label typography, if you want to use a different style, as well as the label color.
The Input Style sections has controls for input topography, text color, background color, and borders, and a Normal/Active tab which you can use to create different settings for the active and inactive fields, in case you wish to, say, choose a different background color for an active field in the name of accessibility and make it easier for your visitors to see which field they are entering text into.
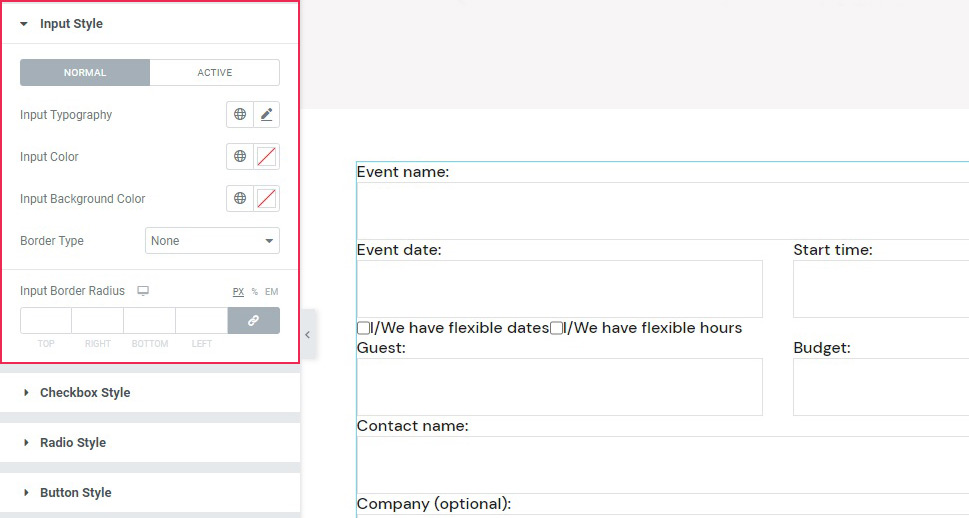
Qi Addons Contact Form 7 Checkbox, Buttons, and Spacing Styling
If you are using checkboxes or radio buttons in your form, you will find the controls to style them in the Checkbox Style and Radio Style sections of the Style tab. There, you can tweak their size and margins.
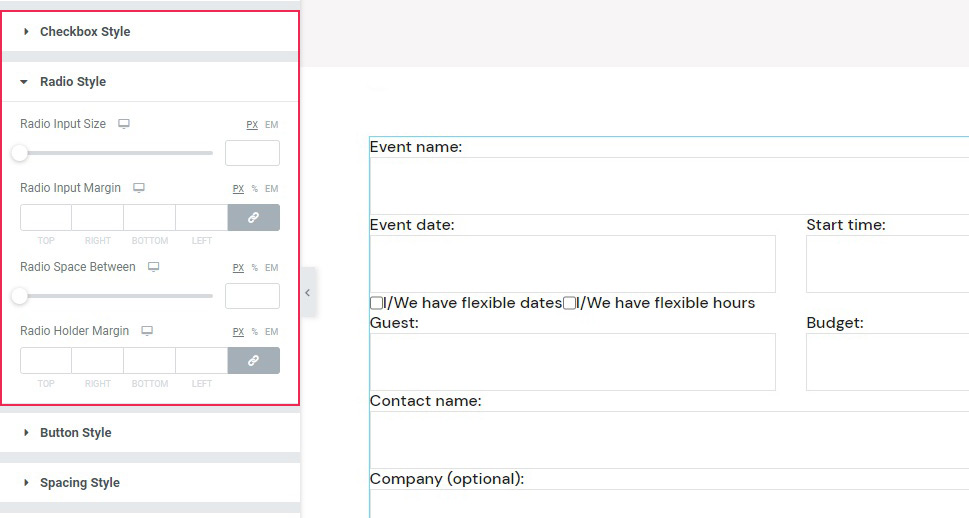
As for the buttons, you can find their styling options in the Button Style section. The buttons can be styled in the same Normal/Active modes, but also in terms of color, background color, size, and style.
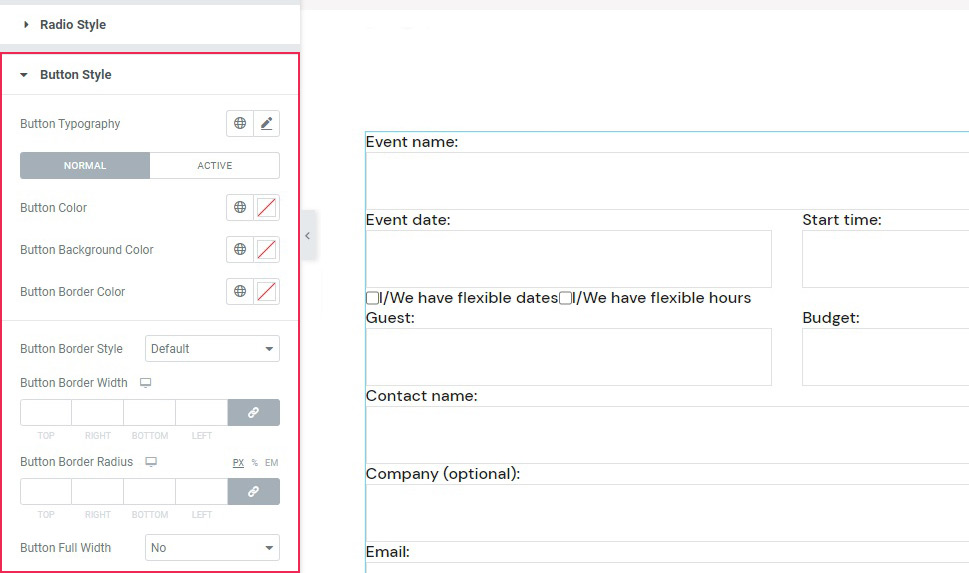
As for the Spacing Style, this section holds the controls for the margins of the widget as well as some parts of it.
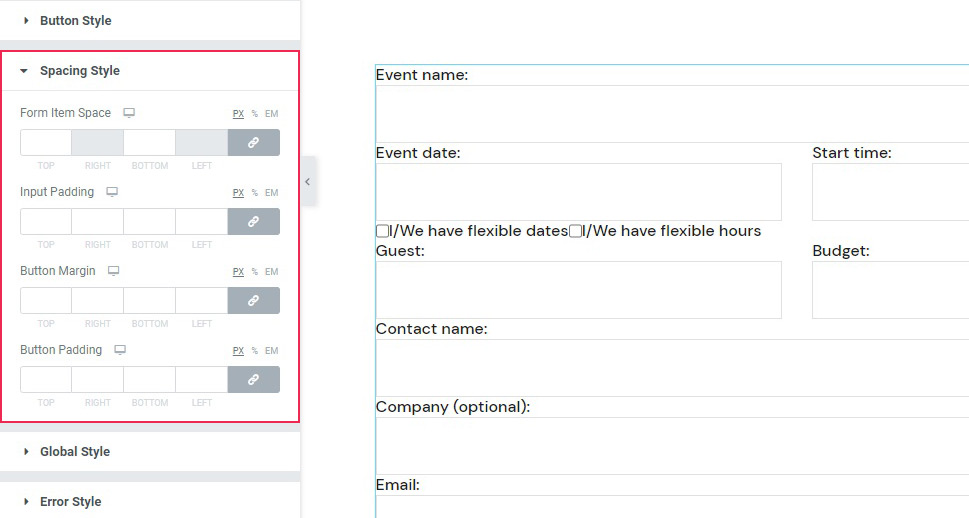
Qi Addons Contact Form 7 General Styling
The Global Style section of the Style tab merely sets the alignment of the widget, between left, center and right. The Error Style section governs your settings of the error messages in case a visitor gets something wrong when filling out the form. Finally, the Response Style section is used to style the okay message that your visitor should get after filling out and submitting the form.
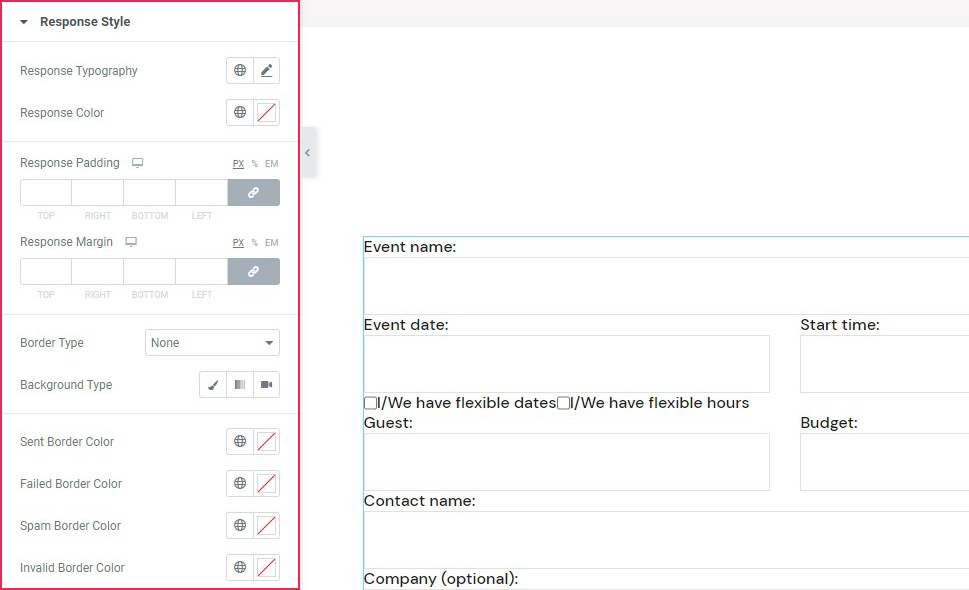
Now let’s see how you can style your Contact Form 7 forms using another one of our plugins, Qi Blocks for Gutenberg.
How to Style Contact Form 7 Forms Using Qi Blocks for Gutenberg
One of the things that make contact forms such a great tool is their versatility. Whether you’re adding them as popups or using them to express some innovative design ideas, they can easily find their place on any type of website and do their job well. And if you like to edit your website using the Gutenberg block editor, then Qi Blocks for Gutenberg should be your go-to choice for styling CF7 forms. The plugin features 81 different blocks, over half of which are available in the free version – including the Contact Form 7 Gutenberg block.
Before getting started, keep in mind that you’ll need to install the Contact Form 7 plugin, as well as Qi Blocks for Gutenberg. The Contact Form 7 Gutenberg block lets you add different forms you’ve created in the Contact Form 7 plugin – we’ve created the one we’re using in this example. We’ve also set up the page using the Advanced Columns and Section Title blocks, both of which are available with the free version of the plugin.
Adding the Contact Form 7 Block
We started by creating a new paragraph below the section title we’ll be using as a title for the contact form. The simplest way to add a new block would be to click on the “+” button on the right edge of the paragraph block and search for the Contact Form 7 block. Once you add the widget, the right-hand side block options menu will automatically open on Content options, where you choose the contact form you want to load with the block.
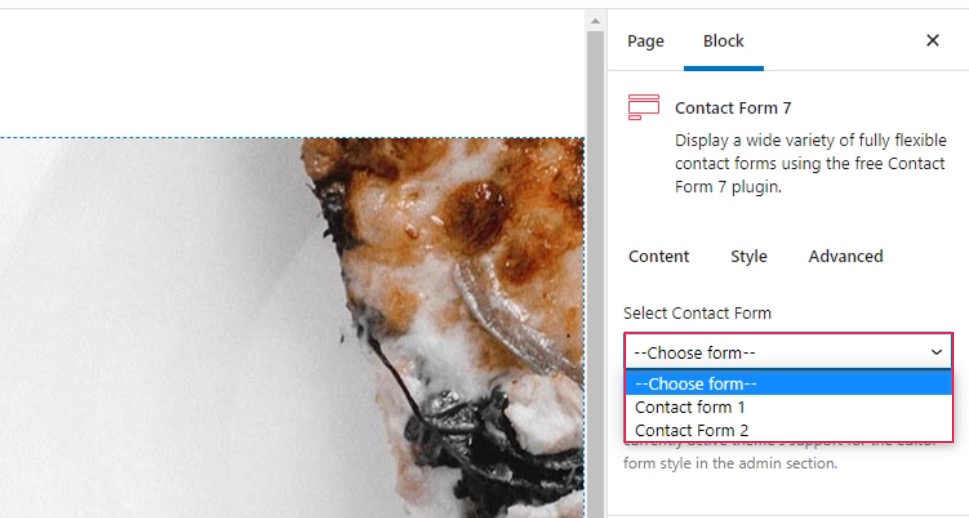
Contact Form 2 is the one we’ve made in the CF7 plugin, and choosing it loaded it in the block without any settings. To style the form, we went to the Style tab in the block options menu.
Styling the Form
The first two styling options are the Global Style and Label Style options. The first one lets you choose the alignment of the label text, while the second gives you all the typography and color options you need to style the label as you see fit. For our contact form, we only changed the alignment to center in the Global Style options.
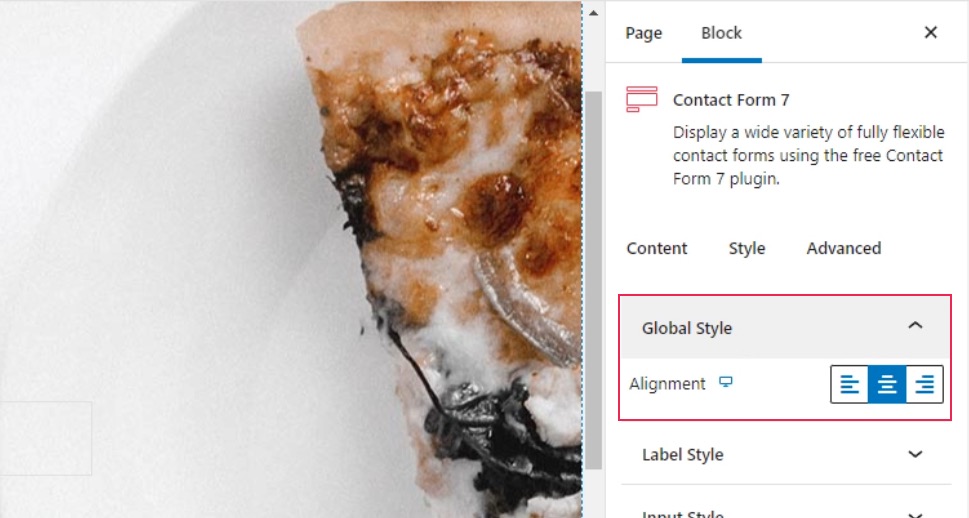
The next set of options, Input Style, lets you set up the border, as well as the style of the input fields and the text. You’ll get to choose typography, colors, and background colors, and you’ll be able to do it for both the initial state of a field and the one when the field is selected.
Our first step was to remove the border by choosing None under Border Type. For the Initial text color, we chose #c4c4c4, and we chose #ffffff as the background color. Under the Focus options, we again changed the text color to #1e1e1e.
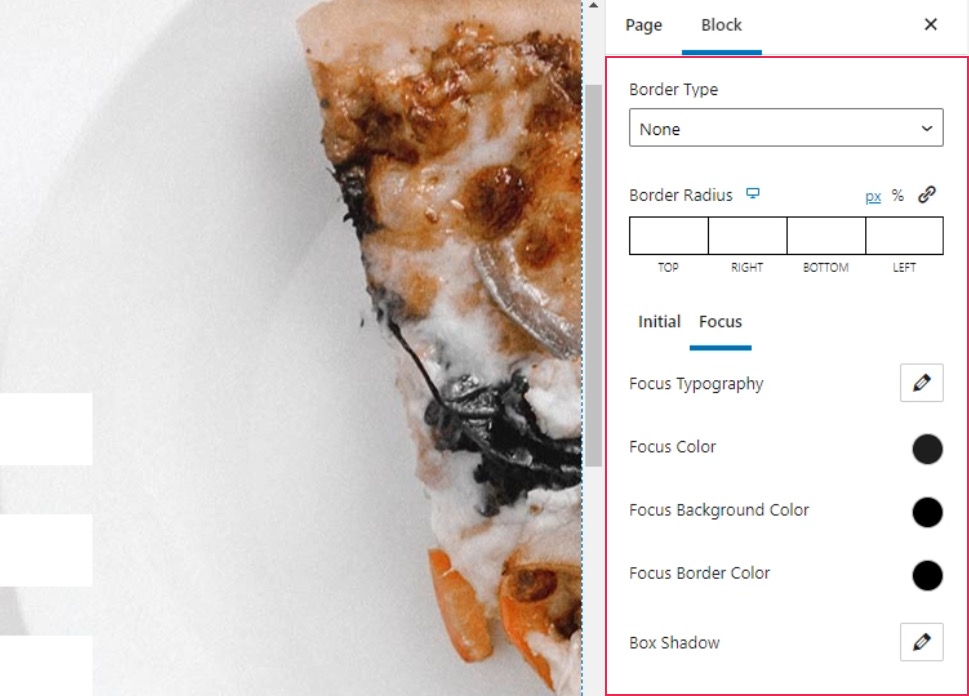
Styling the Checkboxes and Radio Buttons
The Checkbox Style and Radio Style options let you style the checkboxes and radio buttons in your form. You can choose their sizes, margins, and spacing, and you can also set up custom typography options for the checkbox.
The one thing you should keep in mind is that the changes when styling the checkboxes and the radio buttons are only properly visible when you preview the page. In our case, the checkboxes and radio buttons were stacked vertically, while in the preview they appeared horizontally. Here’s what you’ll see in the editor.

And here’s the preview that shows you what your website visitors will see.
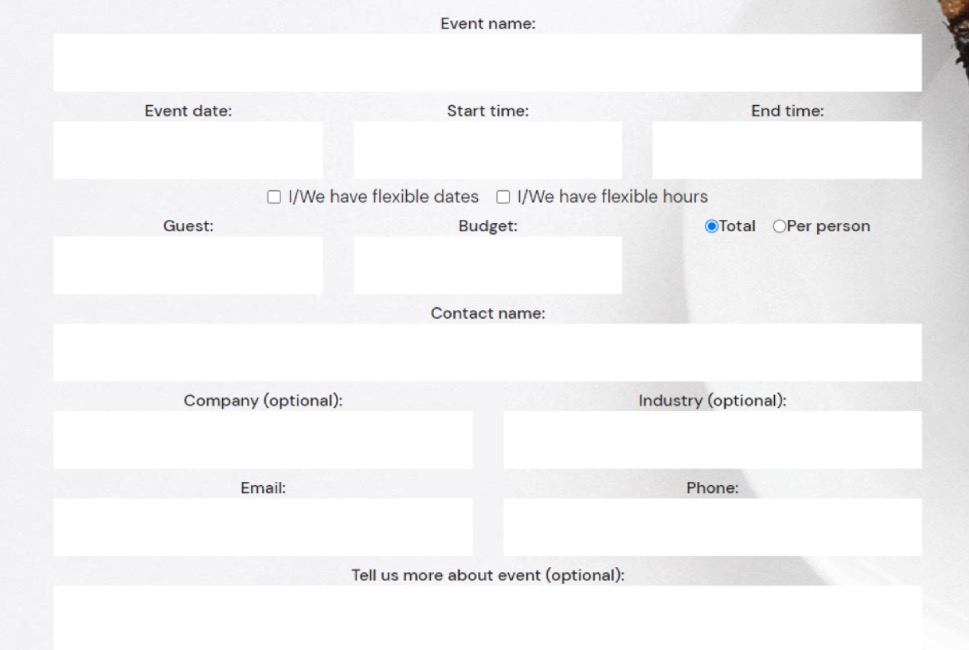
The settings we used for the checkboxes were 7px for the right checkbox input margin, 50px for the checkbox space between, -4px for the top checkbox holder margin and 5px for the top checkbox holder margin. For the Radio Style options, we used 7px for the right radio input margin, 24px for the radio space between, and 28px for the top radio holder margin.
Styling the Buttons and Spacing
Among the Button Style options, you’ll find the options to set the button typography, color, border, and shadows. You’ll also get to style the initial and the hover versions of the button separately.
We set the Initial color for the text to #ffffff, while we used #333333 for the background color. We also set the background color to #000000 on hover.
The Spacing Style lets you set all the various spacing, padding, and margins within the elements in the form. To make our form just right, we set 14px for the top and 33px for the bottom under the Form Item space. Under Input Padding, we set 5px everywhere except the final, left, value, which we set to 20px. We set the top Button Margin to 8px, and for the Button Padding, we used the following values: 14px, 40px, 13px, and 40px.
Styling the Error and Response Messages
For the Error Style, you’ll get to choose the alignments of the messages, their typography options, color, and margins. Under the Typography options, we set the font size to 17px and the line height to 26px. We set the Color option to #e54848, and the top Error Margin to 9px.
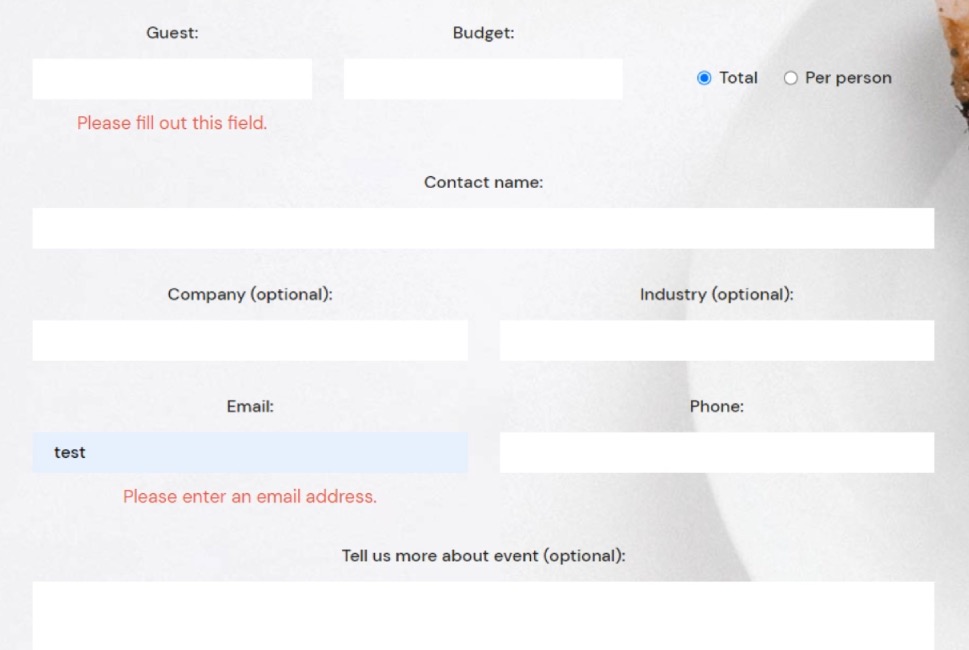
With the Response Style options, you get to style the message that appears after submitting the form. The options you have at your disposal include typography, color, padding and margins, border, and background options.
Under the typography options, we set the font size to 17px and the line height to 26px. We entered the following values under Response Padding: 16px, 25px, 19px, 25px. For the top Response Margin, we set the value at 40px. We choose the Solid border type and set the Border Width at 1px.
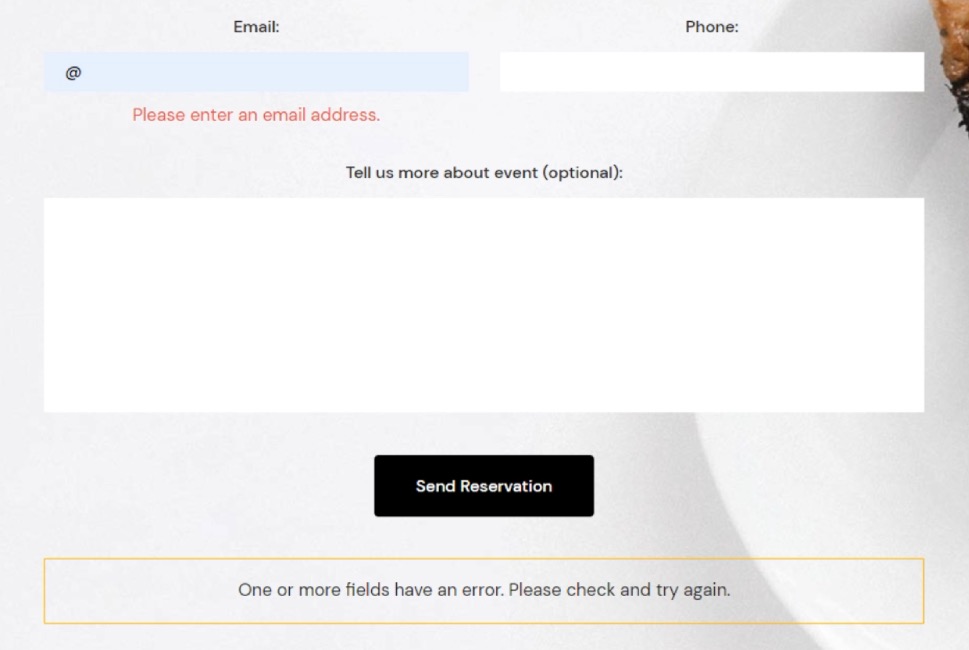
The block also lets you choose different border colors for different messages. We picked #61a73a for the sent border color, #f58e32 for the spam sent border, and #f1ce41 for invalid border color. And with that, we’ve finished styling our form.
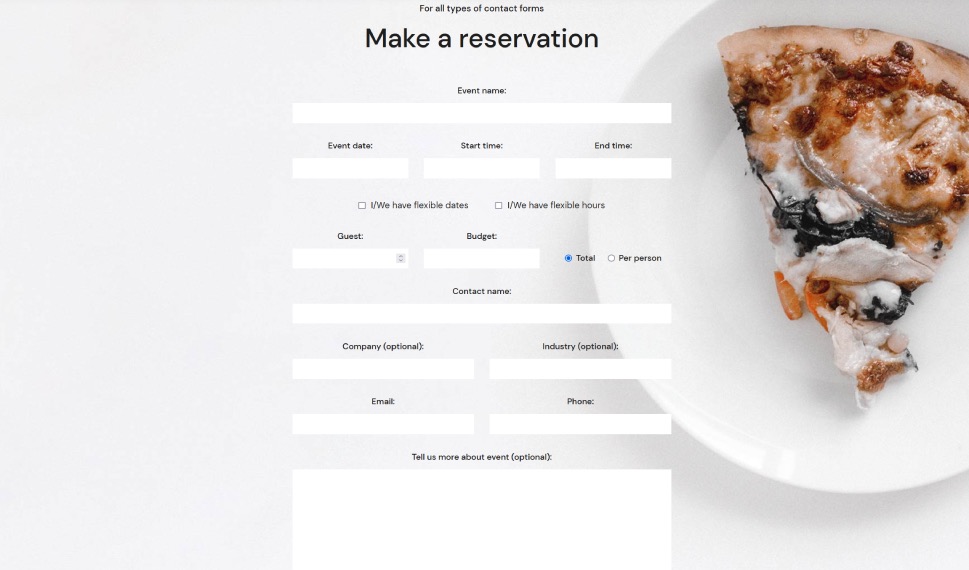
Of course, there is a way to style your Contact Form 7 forms using CSS, and, to learn that, all you need to do is scroll down to the next section.
Styling Contact Form 7 Forms Using CSS
If, for whatever reason, you don’t use Elementor or don’t want to use our plugin (and we can’t think of a way why you wouldn’t want to), don’t fret. We got you covered. We will also cover how to create styles applicable to all your CF7 forms, as well as how to stylize a specific form using CSS. To follow along with this article, you will need to have the Contact Form 7 plugin installed and have at least one form on your website created with this plugin. Then, you will be able to use that form to apply the methods we discuss below.
Before we begin
In this article, we will cover how to create styles applicable to all your CF7 forms, as well as how to stylize a specific form. To follow along with this article, you will need to have the Contact Form 7 plugin installed and have at least one form on your website created with this plugin. Then, you will be able to use that form to apply the methods we discuss below.
Please note, the CSS you create during this process should be added inside Appearance > Customize > Additional CSS. If you aren’t comfortable with your current CSS skills, you should brush up on them beforehand as some CSS knowledge is necessary for grasping the topics in this article. Once you’ve done that, you can proceed to the main part of the article below.
Creating site-wide form styles
For this article, we created the following CSS, which would apply a specific style to all Contact Form 7 forms on your website.
.wpcf7 {
background-color: #6ec1e4;
padding: 30px;
}
.wpcf7 input[type="text"], .wpcf7 input[type="email"], .wpcf7 textarea {
font-size: 16px;
color: #000000e8;
background-color: #E9ECF5;
border: 1px solid #E9ECF5;
border-radius: 10px;
}
.wpcf7 .wpcf7-submit {
background-color: #E9ECF5;
border: 1px solid #E9ECF5;
color: #1f1f1f;
width: 100%;
}
That code would produce the following output.
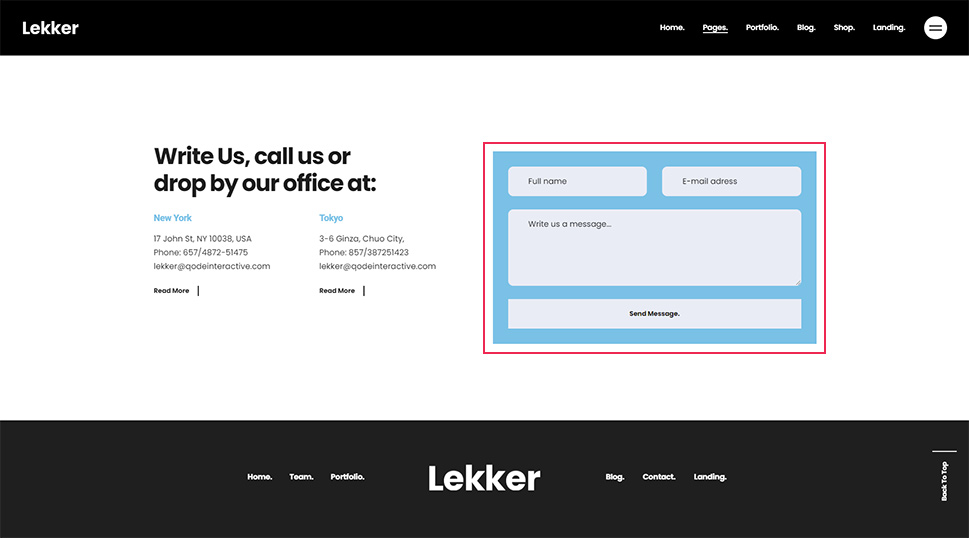
However, this is merely an example of CSS you can use. So, you shouldn’t rush to copy and paste it to your website without understanding how it was made. Since the CSS for styling forms should be made on a case-by-case basis, you will most likely need to adapt this or create one from scratch to use on your CF7 forms. To help you do that, we will explain why and how we created the code above, going one part at a time.
One of the most important requirements for creating CSS code, in general, is knowing how to inspect an element using your browser’s developer tools. As such, we will cover that step first. There are several ways you can access the developer tools (e.g. using keyboard shortcuts) but the most universally applicable way would be using mouse clicks.
To inspect a certain element, right-click on it and select the Inspect option from the menu that appears. In the case of a Contact Form 7 form, clicking anywhere within the form will work.
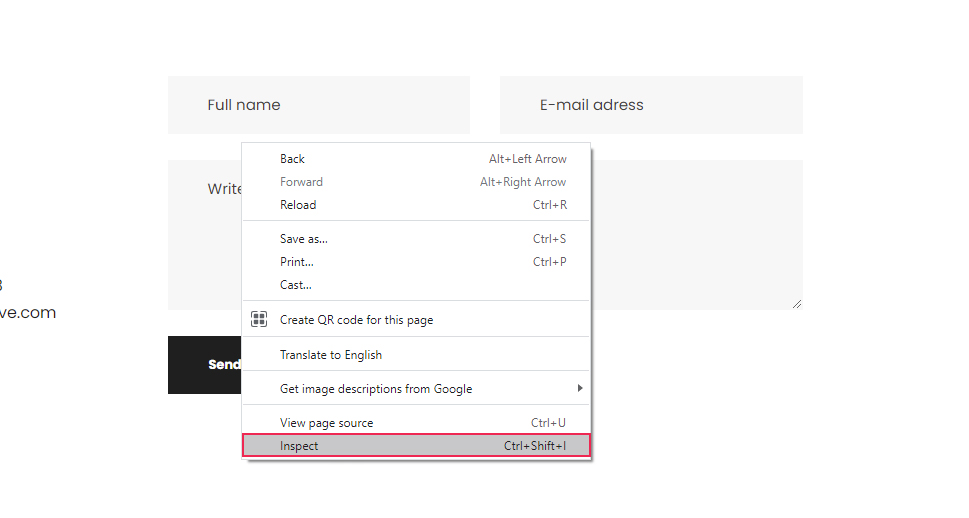
This will open your browser’s developer tools and place you within the Elements tab, where the HTML code of the element you clicked on will be highlighted. We will reference this process many times during the article, so you should get comfortable with inspecting page elements.
Once you’ve opened the developer tools, the first thing you should do is to look for the HTML element that corresponds to the whole form. Since Contact Form 7 forms have a well-known structure, you will be looking for an element that has the following starting HTML code:
<div role="form" class="wpcf7"
Also, when you hover over the HTML, the entire form should be highlighted.
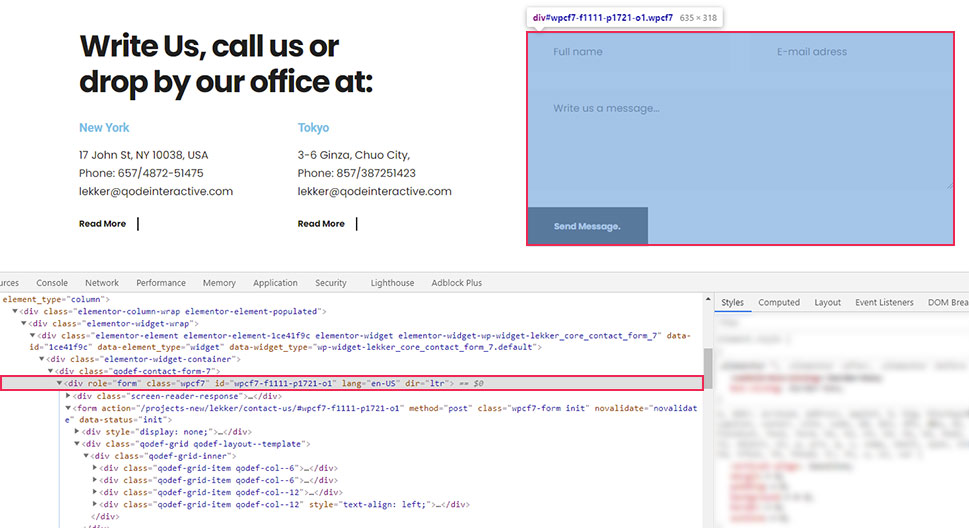
Furthermore, as you can see on the screenshot, the contact form element has a custom class and a unique ID. We will only use the class in this section and will touch on the ID later in the article. For now, we’re using the class because all Contact Form 7 forms share the wpcf7 class and, with it, we can create CSS code that will affect all your site forms in the same way.
.wpcf7 {
// CSS code goes here
}
You might recall that this is how the CSS we created for this article starts. The period used before the class name signifies that this is a CSS class selector. This means that the code that follows it will affect all of the CF7 forms on the website since they all share the same class.
In the code we created, the wpcf7 class is followed by CSS that will give your forms a background color and a padding of 30px on all sides.
.wpcf7 {
background-color: #6ec1e4;
padding: 30px;
}
Now let’s take a look at how corresponding CSS selectors for all the form fields were created.
To create the CSS selector for the text field, inspect a text field as described above. In the screenshot below, you can see it is a simple textual input field.
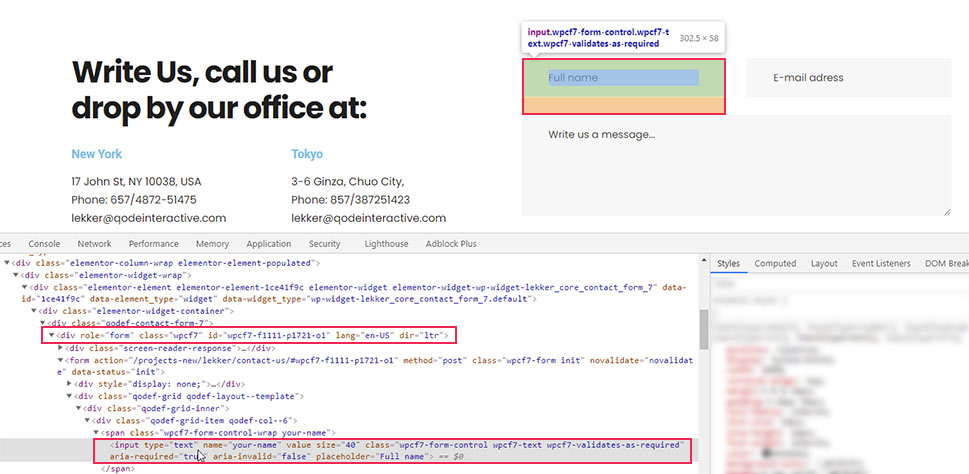
To reference it, you can use the following CSS selector – input[type=”text”]. However, this will select all textual inputs, including the ones that don’t belong to the form. To avoid that, you need to put the class selector for Contact Form 7 forms we previously mentioned before this. Meaning, you can create CSS code for textual form inputs in the following format:
.wpcf7 input[type="text"]{
// CSS rules go here
}
Similarly, you can find the equivalent pseudocode for email fields.
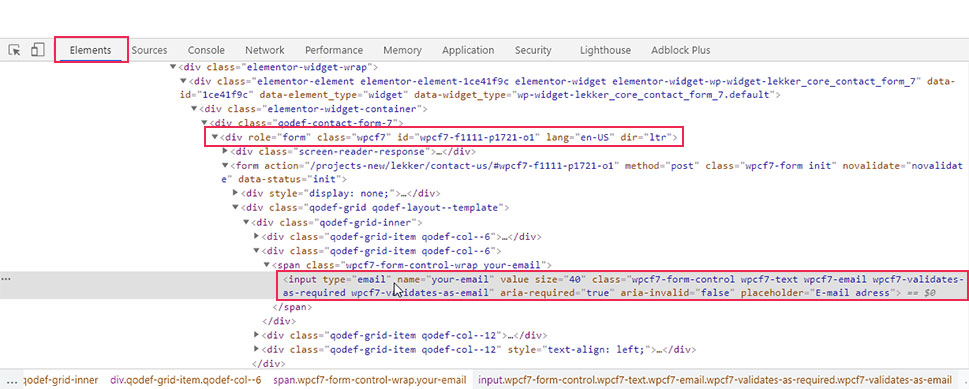
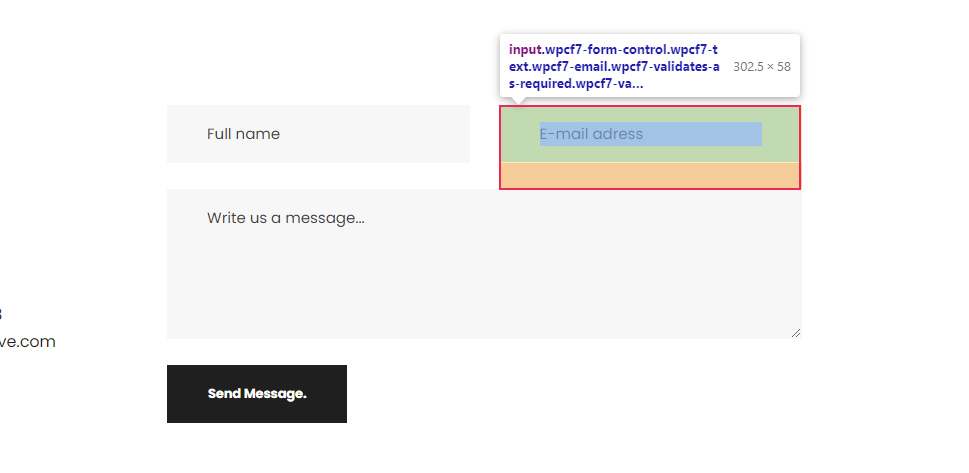
.wpcf7 input[type="email"]{
// CSS rules go here
}
As for the textual areas, they are simply referenced by their HTML element—textarea, preceded by the form class name.
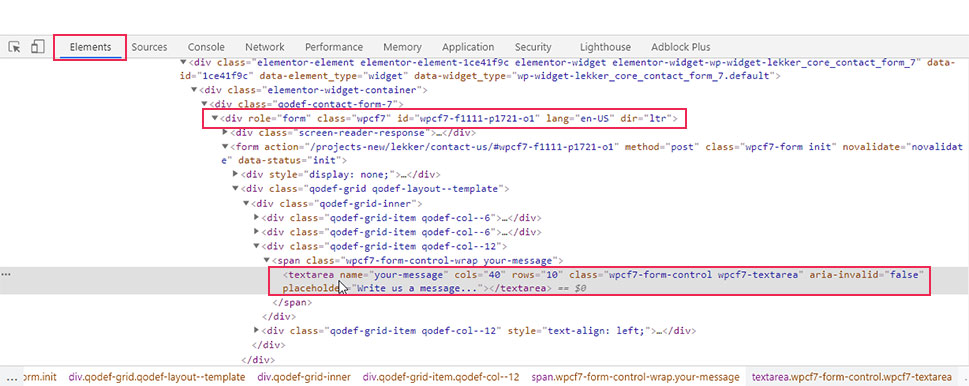

Meaning, if you want to target all CF7 form text areas, you can use the pseudocode given below.
.wpcf7 textarea{
// CSS rules go here
}
In our case, since we wanted to apply the same styles to the text and email fields, as well as the textual area, we used a compound CSS selector. This is done by using all three selectors separated by commas (.wpcf7 input[type=”text”], .wpcf7 input[type=”email”], .wpcf7 textarea). The styles that we added include setting a font size, and color for the text within the fields, as well as background color, border, and border-radius to the fields themselves making them slightly rounded on the edges.
.wpcf7 input[type="text"], .wpcf7 input[type="email"], .wpcf7 textarea {
font-size: 16px;
color: #000000e8;
background-color: #E9ECF5;
border: 1px solid #E9ECF5;
border-radius: 10px;
}
Finally, to figure out the appropriate CSS selector for the Send Message button, you need to inspect it.
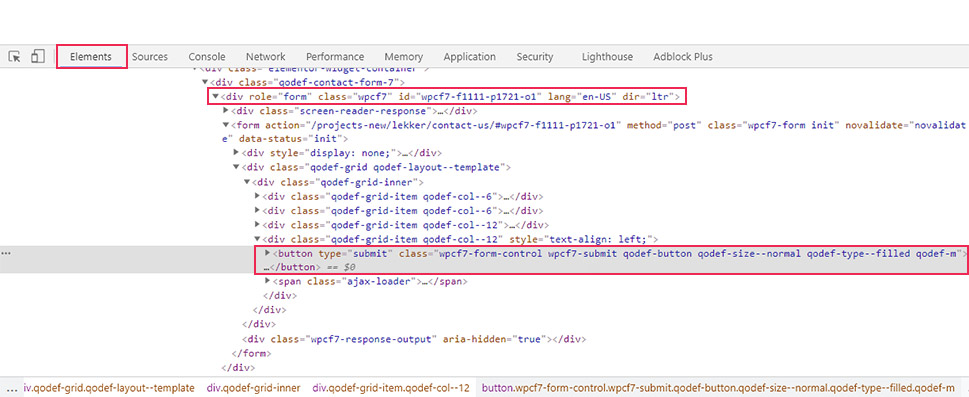
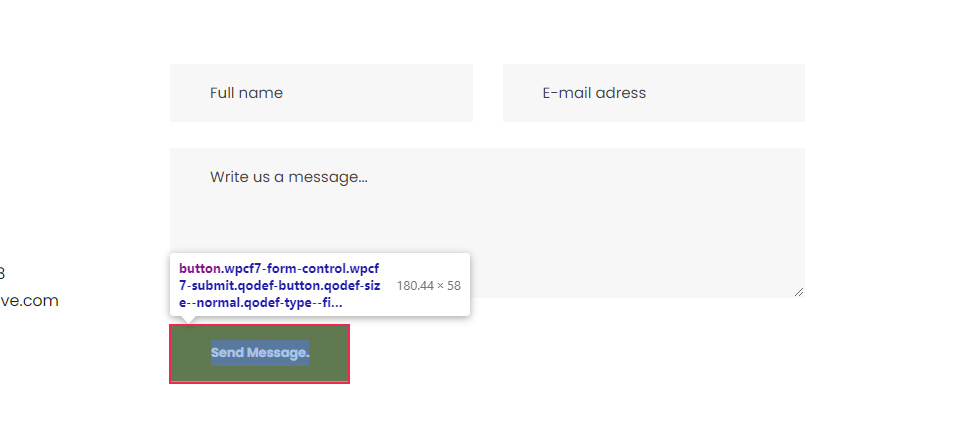
As you can see in the screenshot, this button has a custom class called wpcf7-submit, which is a Contact Form 7 specific class that you can use to reference the button. To make sure your CSS is highly specific, we advise using the form custom class—wpcf7 beforehand, as well. In that case, the pseudocode for targeting all CF7 form submit buttons could look like the following:
.wpcf7 .wpcf7-submit {
// CSS rules go here
}
In terms of the CSS we created for this article, we stylized the button to have a background and border, set the color of its text, and made it stretch across the full width of the form.
.wpcf7 .wpcf7-submit {
background-color: #E9ECF5;
border: 1px solid #E9ECF5;
color: #1f1f1f;
width: 100%;
}
With that being said, there are several other elements that can be used inside a contact form, which we chose to omit from our example. But if you decide to use them, you can create the appropriate CSS selector for all of them the same way we’ve described above.
Creating form-specific styles
In most cases, creating one type of CSS code to stylize your CF7 forms won’t be enough. Forms with different purposes will require different styles to stand out on your pages. As such, you will need to create additional CSS code for specific forms.
In this section, we will explain several tips on how to create form-specific styles. Since the hardest part in creating these styles lies in finding the appropriate CSS selectors that target specific forms or form fields, we will focus on that aspect the most.
The easiest way to create form-specific styles is to use the specific ID every form has instead of the custom class that is shared by all CF7 forms.
To find out the specific ID of a CF7 form, inspect it and navigate to the HTML element that wraps the form. The element will have the following HTML part:
<div role="form" class="wpcf7" id="form-ID-is-here"
You will find the ID within the quotation marks of the id attribute.
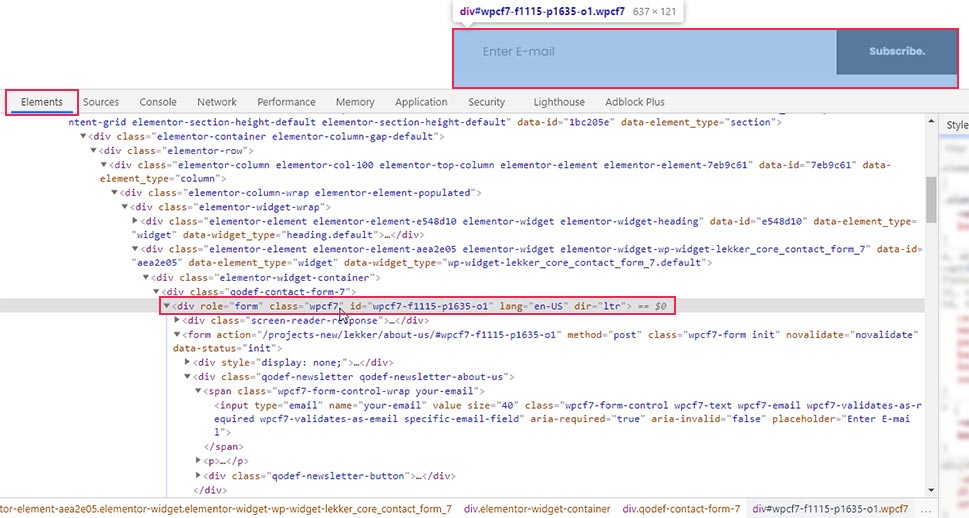
Then, to stylize a specific form with that ID, you will need to use the CSS code in the following format:
#form-id {
// CSS rules go here
}
For example, if we wanted to stylize the form shown on the screenshot above, we would use the following pseudocode:
#wpcf7-f1115-p1635-o1 {
// CSS rules go here
}
Furthermore, to reference the fields within that specific form, we would have to change the wpcf7 class with the wpcf7-f1115-p1635-o1 ID, as well. Meaning, if we wanted to apply the previously created CSS to this form only, then the code would look the like this:
#wpcf7-f1115-p1635-o1 {
background-color: #6ec1e4;
padding: 30px;
}
#wpcf7-f1115-p1635-o1 input[type="text"], #wpcf7-f1115-p1635-o1 input[type="email"], #wpcf7-f1115-p1635-o1 textarea {
font-size: 16px;
color: #000000e8;
background-color: #E9ECF5;
border: 1px solid #E9ECF5;
border-radius: 10px;
}
#wpcf7-f1115-p1635-o1 .wpcf7-submit {
background-color: #E9ECF5;
border: 1px solid #E9ECF5;
color: #1f1f1f;
width: 100%;
}
As we’ve mentioned before, the CSS in this article isn’t meant to be simply copy-pasted. CSS for form stylization should be created on a case-by-case basis. Also, when creating CSS for a specific form, you wouldn’t use the same CSS that is used for all other forms because that will make them identical. Generally speaking, you might use a part of the CSS from one form and edit it to fit another form. The point you need to remember is to use a form-specific ID to narrow down the scope of your CSS. Now that we clarified that, we can move on.
There are two other tricks you can use for creating form-specific styles. The first is to edit the HTML structure of the CF7 form by inserting the appropriate wrapping HTML elements. By adding specific classes or IDs to these HTML elements, you should find creating form-specific styles much easier.
For example, we wrapped fields of a newsletter subscription form with a div element and assigned two custom classes to it: qodef-newsletter and qodef-newsletter-about-us. You can use either of those classes (or even both) to reference that specific contact form.
To add a new custom class, you need to edit the structure of the contact form. To do so, navigate to Contact > Contact Forms, select the form you wish to edit, and wrap it with appropriate HTML elements.
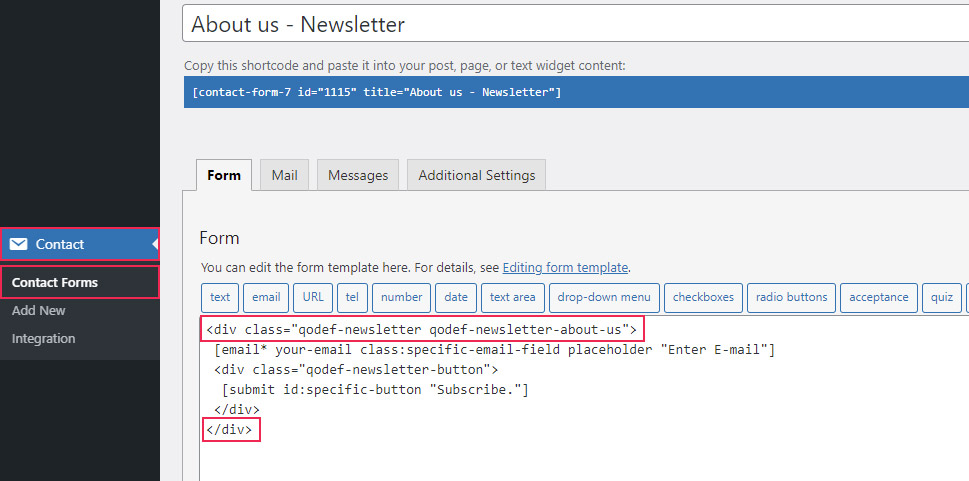
You can then use the assigned classes or IDs to reference that specific form. In the example shown above, we used two custom classes, so you can choose between the following CSS selectors:
-
.qodef-newsletter
-
.qodef-newsletter-about-us
-
.qodef-newsletter.qodef-newsletter-about-us
Additionally, you can even use them in conjunction with the CF7 form class selector we previously discussed—wpcf7 or the form ID, to make them more precise. Doing this can prove useful if you have conflicting CSS that comes from your theme or plugins.
With that being said, the second trick we wanted to mention ties directly into the first one. If you look closely at the screenshot above, you can see that we wrapped the submit button with a div element and assigned a custom class to it—qodef-newsletter-button.
This goes to show that the approach mentioned above isn’t limited to forms only. You can reference specific fields within a specific form by wrapping them with appropriate HTML elements and using the assigned classes or IDs as CSS selectors. For example, to reference the submit button, you could use the following CSS selector .qodef-newsletter-button .wpcf7-submit.
The final thing we want to mention is that you can also add classes and IDs to the form fields directly instead of adding them to the wrapping HTML element. This is done by adding the class:class-name-here or id:id-name-here attributes to the form fields, with the appropriate class and ID names inserted. An example of both can be seen in the screenshot below.
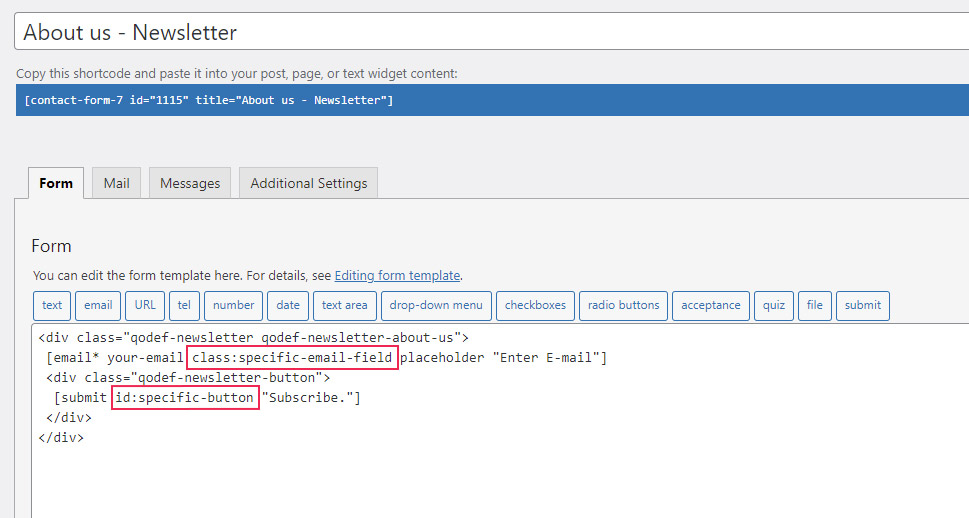
To reference those fields in your form-specific CSS, you would simply use those classes or IDs. For example, to reference the email field from the screenshot, you can use .specific-email-field as the CSS selector. To reference the submit button, you can use #specific-button as the selector.
This concludes the section on tips you can use to create a form-specific CSS selector. Now that you have a better grasp of this topic, you can style Contact Form 7 forms by applying common CSS rules to those specific selectors.
form-specific-selector {
// CSS rules go here
}
Final Thoughts
Having contact forms on your WordPress website is a crucial step in properly interacting with your visitors. However, styling those forms to seamlessly blend with your current brand is a challenge for any webmaster. This is where our article comes in—to provide you with the ideas needed to style any form. Within it, we explore how to use specific classes and IDs to target specific forms or form parts. As a practical example, we created CSS to style a Contact Form 7 form. Whether you’re using that plugin or any other contact form plugins, you will be able to use all the approaches we described to create a custom style for your form in a matter of minutes.
With over a million active installs, Contact Form 7 is by far one of the most popular WordPress plugins ever. It’s popularity probably has a lot to do with the truth behind its description: “Simple but flexible.”
Contact Form 7 allows you to create multiple contact forms using nothing but simple HTML markup (which it generates for you). Once created, each form can be quickly deployed by placing its corresponding shortcode where you’d like the form to appear; in page, post, or widget area. Messages submitted via the forms are sent to the email address provided in the plugin settings and spam is combatted via support for CAPTCHA and Akismet.
Contact Form 7 is so simple that it seems literally anyone can use it effectively. Styling too, is intended to be simple. But perhaps too simple for some. By default the Contact Form 7 plugin does not style its forms. Any styling they do have is a result of default stylings present in a WordPress theme’s style sheet.
Usually resulting in something quite basic, like this:
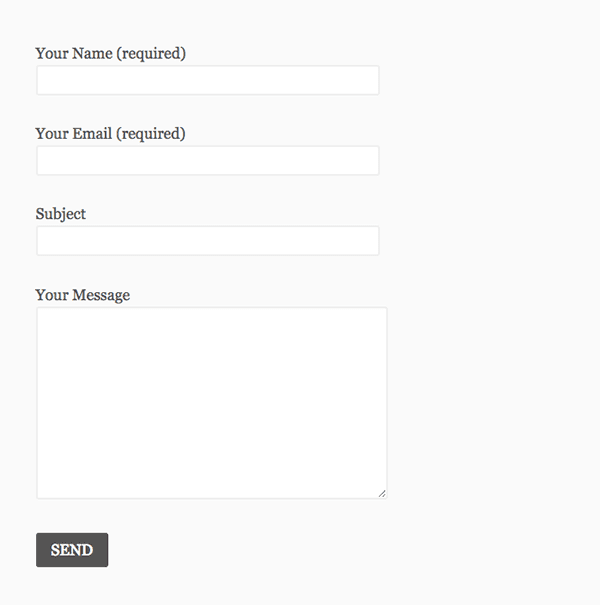
Unfortunately this kind of form, while indeed simple and flexible, may not be as beautifully designed as the other elements on one’s website. Leaving many otherwise happy users looking for alternatives to Contact Form 7 with more styling options. Thankfully though, with just a bit of CSS, no plugin alternative is necessary.
In today’s post I’m going to share a series of tips that will open up a wide variety of Contact Form 7 styling possibilities for anyone, using any theme.
-
1
How To Customize The Style Of Contact Form 7 To Match Your Website -
2
Where to Edit Your Contact Form 7 CSS (and Why) -
3
How to Create Site Wide Form Styles -
4
How to Create Site Wide Form Field Styles -
5
How to Style a Specific Form -
6
How to Style Specific Fields -
7
How to Create Custom Form Layouts for Checkboxes and Radial Buttons -
8
Bonus Tip: How to Remove Field Titles & Use Placeholder Text Instead -
9
In Conclusion
How To Customize The Style Of Contact Form 7 To Match Your Website
Subscribe To Our Youtube Channel
Where to Edit Your Contact Form 7 CSS (and Why)
It’s important that when adding custom CSS you do not add it to the style sheet of either Contact Form 7 or your parent theme. Any changes or additions you make there will be overwritten as soon as the theme and/or plugin are updated.
Instead, you will want to add the CSS below to your child theme‘s CSS. You can also use the custom CSS feature on Jetpack, or if your theme provides a section in its admin panel for custom CSS you can use that too.
Ok, now that we know where to place the styles we’ll be going over below, let’s get started!
How to Create Site Wide Form Styles
Let’s start by making some general edits that will apply themselves to the whole form. We can do this by using the class selector .wpcf7 and then adding styles beneath it.
(I’d also like to highly suggest that you place the commented out heading I’ve written below within your style sheet to denote where your Contact Form 7 styles begin.)
/* Contact Form 7 Styles
---------------------------------*/

.wpcf7 {

background-color: #F0F0F0;

border: 5px solid #666666;

}
After adding the above code to your style sheet, every form you create with Contact Form 7 will have the background and border styles you’ve just defined. Below is an example.
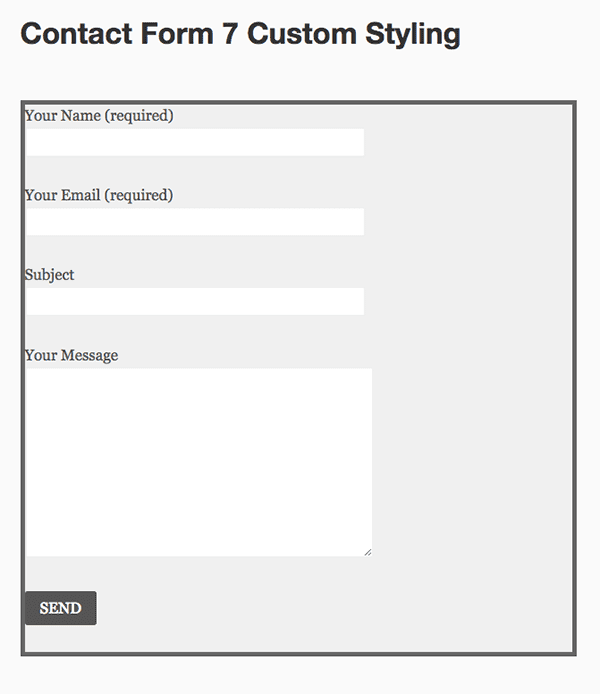
As you can see, there are some spacing issues. To fix this you’ll want to adjust the margins between the border and the inner form elements. You can do this with the code below.
.wpcf7-form {

margin-left: 25px;

margin-right: 25px;

margin-top: 25px;
On my test site, this resulted in the following:
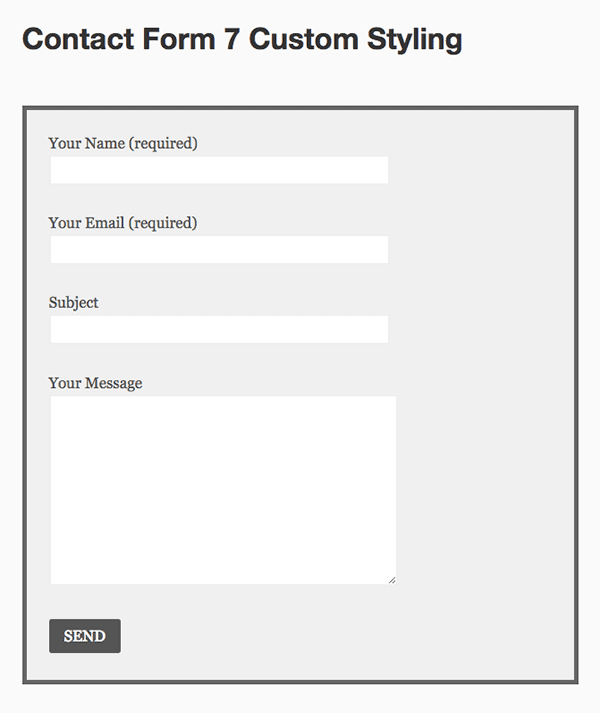
Note: these styles may affect your forms in slightly different ways due to the fact that we’re most likely working with different themes. That doesn’t mean that this code won’t work for you, only that you may have to tweak the numbers a bit to get things just right for your site.
How to Create Site Wide Form Field Styles
One of the more common requests people have when it comes to styling Contact Form 7 is how they can adjust the width of the fields. Particularly the message area which does not extend very far.
The code below will extend the message area to your desired width (when adjusted). I have set mine in the example for 95% as that is what looked best in my imagined use case. You can set it to suit your needs as well–using a percentage or a fixed pixel count.
.wpcf7-textarea {

width: 85%;

}
You can adjust the width of the other fields as well by adjusting the input class selector.
.wpcf7 input {

width: 50%;

}
If you do not want to adjust all of your input fields with the same criteria you can drill down a bit by selecting just those you are interested in. In the example below I’ve opted to just change my text fields so that my submit button is not also affected.
.wpcf7-text {
width: 50%;
}
After all of the above changes, I was able to style the form you see below.
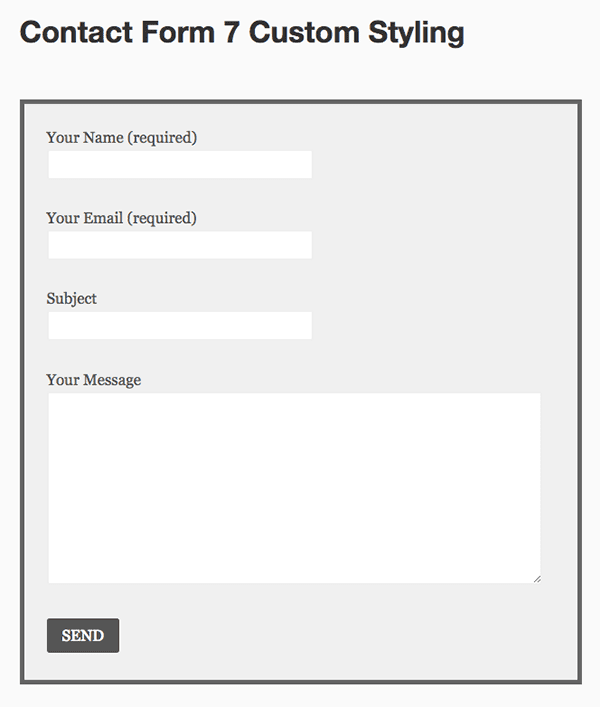
I personally didn’t want to change my button color, but I think that is most likely another common desire. So if you’d like to alter your button color you can use the CSS below to experiment.
.wpcf7-submit {

background: #555555;

color: #ffffff;

}
With these bits of CSS in place, every form created with Contact Form 7 will look like the final image above. But what happens when you want one form in particular to look different from all of the others?
How to Style a Specific Form
Getting the specific CSS ID required to make style edits to a specific form can be a bit of a bother, but it is possible with a little tinkering.
The first thing you’ll want to do is actually add the form shortcode into your site and preview it. (You’ll notice that within that shortcode there is a number for the ID–but that is not actually the full ID you will need.)
Then, using either Google Chrome’s inspect element feature or something similar in another browser, take a look at the code for the form. Using this you will find the full form ID.
In my case, the ID number in my shortcode was 4407. The full ID turned out to be wpcf7-f4407-p4405-o1. Which meant that I could make further edits, just to that specific form, by using the code below with various criteria that differed from my site-wide settings.
#wpcf7-f4407-p4405-o1 {
background-color: #333333;
border: 5px solid #0074A2;
}
How to Style Specific Fields
You can do the same thing with specific fields. Instead of tracking down a specific CSS class or ID in your browser all you have to do is add it in the form builder.
When you are generating a tag to place in the form builder you will notice that there are two options for creating an ID, a Class, or both.
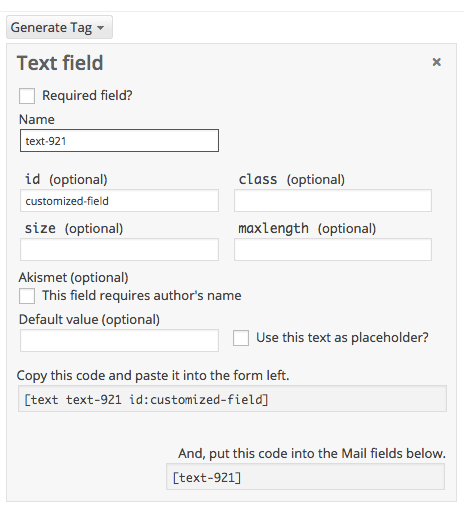
In this example I chose to create a class called customized-field. If you do the same (or something similar) you will then be able to style just that field using your new id (or class) as I have below.
#customized-field {

color: #ffffff;

border: 2px solid #333333;

}
How to Create Custom Form Layouts for Checkboxes and Radial Buttons
By default, checkboxes and radiuses display from left to right.
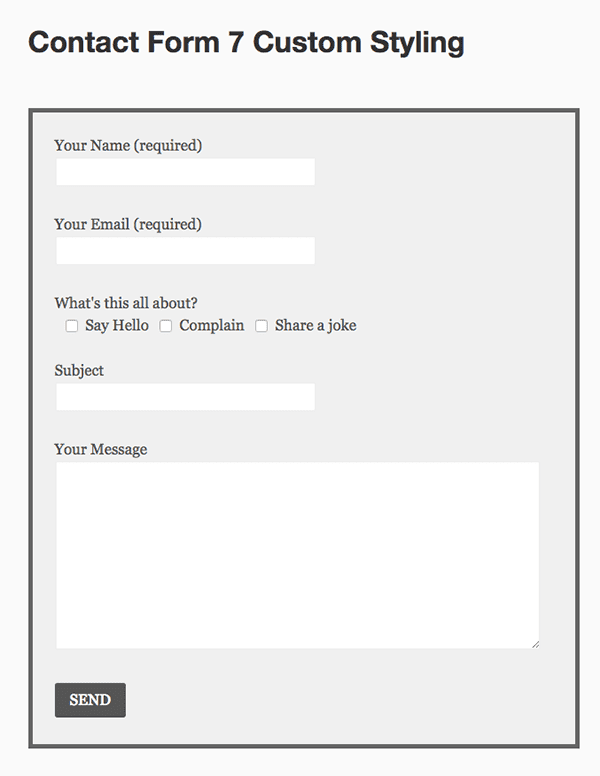
But because of personal preference or a specific use case in which displaying them top to bottom might be preferable, you can use one of the two options below.
To display your checkboxes or radial buttons top to bottom and on the left, use this.
.wpcf7-list-item {
display: block;
}

To display your checkboxes and radial buttons top to bottom and on the right, use this. Also be sure that when you generate the tag for this option that you choose the “label first” checkbox.
.wpcf7-list-item {
display: table-row;
}

.wpcf7-list-item * {
display: table-cell;
}
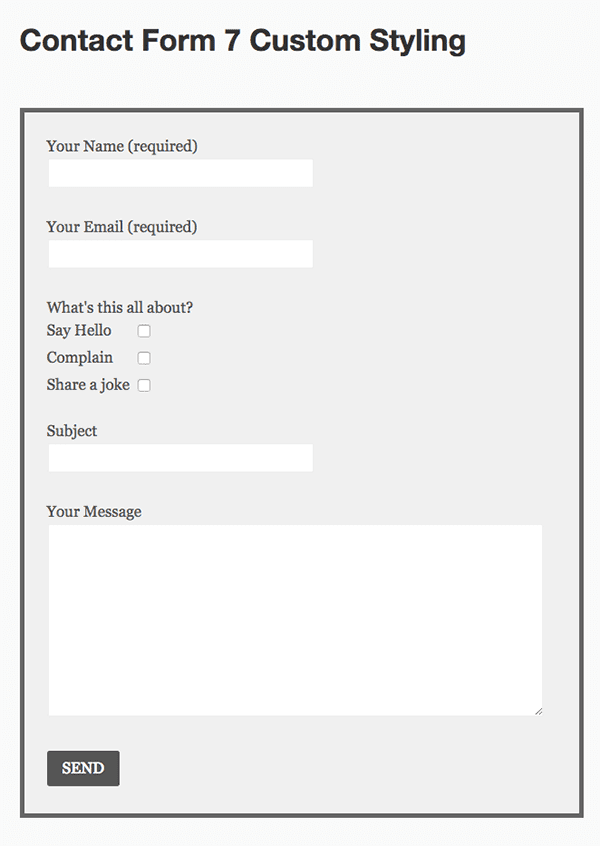
Bonus Tip: How to Remove Field Titles & Use Placeholder Text Instead
This tip does not require use of CSS like the others above, but rather a simple tweak to the markup used in the Contact Form 7 form builder.
Sometimes it isn’t necessary to have field titles, especially when you can put placeholder text within the fields themselves that explain what information belongs there.
If that’s the case on your site, then all you have to do is delete the titles in the form builder and add placeholding text like I have done in the example below.
<p></p>

<p>[email* your-email placeholder "Email Address"]</p>

<p></p>

<p>[textarea your-message placeholder "Talk to me"]</p>
The result is a cleaner form with less clutter.
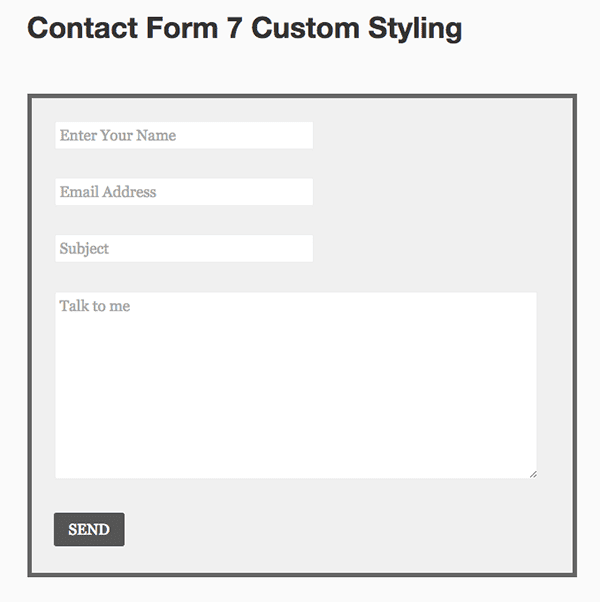
In Conclusion
I hope I’ve shown in the examples above that the Contact Form 7 plugin is highly customizable. True, it does require a bit of tinkering but for a free plugin that might be expected.
I think the lack of styling options by default is a big part of why the plugin works so well for so many. So it’s only fair that anyone getting a lot of value from it who wants more style to commit a few minutes to dropping in a version of one of the code example above.
Do you have any Contact Form 7 style tips of your own? Any favorites you’ve used that you’d like to share? Drop us a line in the comments below!
Article Thumbnail via Dmitry Lemon5ky // shutterstock.com
Do you want to customize your Contact Form 7 forms and change their style?
Contact Form 7 is one of the most popular contact form plugins for WordPress. However, the biggest downside is that the out-of-the-box forms you add are very plain-looking.
In this article, we will show you how to style contact form 7 forms in WordPress.

Why Style Your Contact Form 7 Forms?
Contact Form 7 is one of the most popular contact form plugins for WordPress. It’s free to use and lets you add a WordPress form using shortcode.
However, Contact Form 7 is very limited in features. One of the problems with Contact Form 7 is that the forms are styled plainly. Plus, the plugin doesn’t offer any built-in options to change the style of your forms.
This makes it difficult to match the contact form’s design with your website theme or if you want to edit the font and background color to make your form stand out.
If you want more customizable forms with advanced features, then we recommend WPForms, which is the most beginner-friendly contact form plugin. It comes with a drag and drop form builder, pre-built templates, and numerous customization options.
That said, let’s take a look at how to style a Contact Form 7 form in WordPress.
Getting Started with Contact Form 7
First, you’ll need to install and activate the Contact Form 7 plugin on your website. If you need help, then please see our guide on how to install a WordPress plugin.
Upon activation, you can head over to Contact » Add New from your WordPress dashboard.

You can now edit the form for your website and start by entering a title for your form.
The plugin will automatically add the form’s default name, email, subject, and message fields. However, you can also add more fields by simply dragging and dropping them where you want.
When you’re done, don’t forget to click the ‘Save’ button and copy the shortcode.

The next thing to do is add it to your blog post or page.
To do that, simply edit a post or add a new one. Once you’re in the WordPress editor, go ahead and click the ‘+’ sign at the top and then add a Shortcode block.

After that, simply enter the shortcode for your Contact Form 7 form in the shortcode block. It will look something like this:
Ошибка: Контактная форма не найдена.
Now, go ahead and publish your WordPress blog post to see the contact form in action. For the sake of this article, we have used the default contact form and added it to a WordPress page. This is how the contact form looked on our test site.

Now, are you ready to customize your Contact Form 7 form in WordPress?
Styling Contact Form 7 Forms in WordPress Using Custom CSS
Since Contact Form 7 doesn’t have built-in style options, you’ll need to use CSS to style your forms.
Contact Form 7 generates standard-compliant code for forms. Each element in the form has a proper ID and CSS class associated with it, making it easy to customize if you know CSS.
Each Contact Form 7 form uses the CSS class .wpcf7 that you can use to style your form.
In this example, we will use the custom font called Lora in our input fields and change the background color of the form.
div.wpcf7 {
background-color: #fbefde;
border: 1px solid #f28f27;
padding:20px;
}
.wpcf7 input[type="text"],
.wpcf7 input[type="email"],
.wpcf7 textarea {
background:#725f4c;
color:#FFF;
font-family:lora, sans-serif;
font-style:italic;
}
.wpcf7 input[type="submit"],
.wpcf7 input[type="button"] {
background-color:#725f4c;
width:100%;
text-align:center;
text-transform:uppercase;
}
If you need help adding the custom CSS, then please refer to our guide on how to easily add custom CSS to a WordPress site.
This is how our contact form looked after applying this CSS.

Styling Multiple Contact Form 7 Forms
If you are using multiple contact forms and want to style them differently, then you will need to use the ID generated by contact form 7 for each form. The problem with the CSS we used above is that it will be applied to all Contact Form 7 forms on your website.
To start, simply open a page containing the form you want to modify. Next, take your mouse to the first field in the form, right-click and select Inspect.
The browser screen will split, and you will see the page’s source code. In the source code, you need to locate the starting line of the form code.

As you can see in the screenshot above, our contact form code starts with the line:
<div role="form" class="wpcf7" id="wpcf7-f113-p114-o1" lang="en-US" dir="ltr">
The id attribute is a unique identifier generated by Contact Form 7 for this particular form. It is a combination of the form id and the post id where this form is added.
We will use this ID in our CSS to style our contact form and replace .wpcf7 in our first CSS snippet with #wpcf7-f113-p114-o1.
div#wpcf7-f113-p114-o1{
background-color: #fbefde;
border: 1px solid #f28f27;
padding:20px;
}
#wpcf7-f113-p114-o1 input[type="text"],
#wpcf7-f113-p114-o1 input[type="email"],
#wpcf7-f113-p114-o1 textarea {
background:#725f4c;
color:#FFF;
font-family:lora, "Open Sans", sans-serif;
font-style:italic;
}
#wpcf7-f113-p114-o1 input[type="submit"],
#wpcf7-f113-p114-o1 input[type="button"] {
background-color:#725f4c;
width:100%;
text-align:center;
text-transform:uppercase;
}
You can now repeat the step for all your forms and replace the form ID for each Contact Form 7 form you want to customize.
Styling Contact Form 7 Forms with CSS Hero
An easier way you can change the style of Contact Form 7 forms is by using CSS Hero. It lets you edit your forms without the need to write CSS.
Simply install and activate the CSS Hero plugin on your website. You can follow our guide on how to install a WordPress plugin.
Next, go to the page containing your form and click on the ‘Customize with CSS Hero’ option in the toolbar at the top.

CSS Hero will provide you with an easy user interface to edit the CSS without writing any code.
Using the plugin, you can click on any field, heading, and other elements on your form and edit the background color, font, borders, spacing, and much more.

After you’ve customized your form, simply click the ‘Save & Publish’ button at the bottom.
We hope this article helped you learn how to style Contact Form 7 forms in WordPress. You may also want to see our guide on how to create an email newsletter and the best live chat software for small businesses.
If you liked this article, then please subscribe to our YouTube Channel for WordPress video tutorials. You can also find us on Twitter and Facebook.
Disclosure: Our content is reader-supported. This means if you click on some of our links, then we may earn a commission. See how WPBeginner is funded, why it matters, and how you can support us.
Editorial Staff at WPBeginner is a team of WordPress experts led by Syed Balkhi. We have been creating WordPress tutorials since 2009, and WPBeginner has become the largest free WordPress resource site in the industry.
Contact Form 7 (CF7) is one of the most popular plugins available for WordPress. It allows users to quickly create customised forms, anywhere on a WordPress website.
While the forms are easy to create and implement, the fields within them are styled minimally – allowing them to blend in with most websites. The appearance of each CF7 form depends on the CSS styling applied to standard HTML form elements used in your current WordPress theme.
This article shows users, skilled at using HTML and CSS, how to style When you select a CF7 Skins Style the aesthetic design (CSS code) is automatically created and applied to your form. Contact Form 7 forms to their particular requirements.
Style Contact Form 7
Tl:dr (too long; didn’t read) version
- The Form Process
- Use Dev Tools to examine your CF7 form
- Examine CSS in your current WordPress theme
- Target CSS changes to CF7 forms only
- Use CSS to change the appearance of your CF7 form
You will need to be skilled at using HTML and CSS to follow along in this article. If that description does not fit you, you can learn all you need to know about both HTML and CSS at http://www.w3schools.com/ and come back to this article when you’ve done that.
You will also need to be skilled at using Firebug or Chrome Dev Tools to examine the HTML and CSS of your CF7 form in detail to follow along in this article. If that description does not fit you, you can learn about Firebug or Chrome Dev Tools and come back to this article when you’ve done that.
Table of Contents
- Default Contact Form 7 Form
- The Form Process
- HTML
- Standard HTML Form Elements
- HTML code + CF7 Tags in CF7 Form area
- Completed HTML code in CF7 Form
- CSS classes & ids generated by CF7
- Target CF7 classes & ids
- Add CF7 classes & ids
- Use Dev Tools to examine your CF7 form
- CF7 Form Structure
- CSS
- Default CF7 CSS style
- Examine CSS in your current WordPress theme
- Use a Child Theme to make changes to your CF7 forms CSS
- Target CSS changes to CF7 forms only
- You made need higher CSS Specificity
- Add CSS changes on individual CF7 form elements
- Copy current CSS with your Dev Tool
- Add CF7 classes & ids within your CF7 forms
- Use CSS to change the appearance of your CF7 form
- Targeting Specific CF7 Forms

Default Contact Form 7 Form
We use the default CF7 form (normally named “Contact form 1” & installed automatically on every install of the CF7 plugin) as the basis of this article.
The actual look of this default form on your WordPress website will depend on the current WordPress theme used on your website and the CSS styling that theme applies to standard HTML form elements.
In this case our website uses the The7 theme by Dream-Theme and the default Contact Form 7 form appears as follows:
Tip: The appearance of the default CF7 form on your WordPress website will depend on the current WordPress theme used and the CSS styling that theme applies to standard HTML form elements.
You may notice this form has a couple of styling issues:
- The labels don’t really stand out
- The Send button text is a little small.
In this article we’ll be demonstrating how to change the style of this form, using HTML and CSS, to meet particular requirements.

The Form Process
Forms are a common part of many websites and are a very powerful tool for interacting with users. They provide an easy way for visitors to your website to start a conversation with you about their particular requirements.
CF7 forms are based firmly on the more general HTML form process
While the CF7 plugin makes it quick and easy to create forms with little or no knowledge of HTML, Contact Form 7 forms are based firmly on the general HTML form process.
HTML includes a number of elements which are specifically designed for use in forms. The CF7 plugin provides support for most of the commonly used HTML form elements, including some recently added HTML5 elements.
Form appearance depends on the HTML form elements used and the CSS styling applied
The appearance of each CF7 form depends on the HTML form elements used

HTML for CF7 Form
and the CSS styling applied to these elements in your current WordPress theme.

CSS for CF7 Form
In any web form, the HTML provides the form content and layout (structure) of the form while the CSS controls the forms appearance and presentation (style).
HTML + CSS = FORM
HTML – form content and layout (structure)
CSS – form appearance and presentation (style).

HTML
The HTML in each CF7 form is created by the CF7 plugin based on information supplied by you in the Form section on the CF7 interface.

Form section of the CF7 interface
Any HTML elements added by you in the Form section on the CF7 interface are combined with HTML generated by the CF7 plugin.
HTML (supplied by you) + HTML (added by the CF7 plugin) = FORM Content & Layout (structure)
Standard HTML Form Elements
The default Contact Form 7 form uses label elements Label Content as the basis for the form.
While this is probably the simpliest way to create a form, it has a number of shortcomings, which we discuss in further articles – ( see Why we use Fieldset, Legend & Lists in CF7 Skins and Making your form easy to read by using Fieldsets ).
You can in fact use any HTML elements you want in the Form section on the CF7 interface and this is a key part of building CF7 forms that match your functional and appearance requirements.
With practice you can learn how to create increasingly complex CF7 forms by combining your HTML elements with those added automatically by the CF7 plugin.

HTML code + CF7 Tags in CF7 Form area
The box below shows the content of the Form section of the CF7 interface for the default CF7 form.
<label> Your Name (required)
     </label>

<label> Your Email (required)
    [email* your-email] </label>

<label> Subject
     </label>

<label> Your Message
    [textarea your-message] </label>

[submit "Send"]
As you examine this code you should notice that it includes:
- Standard HTML Elements –
Your Name (required) - CF7 Tags –
[email* your-email]
The standard HTML Elements you add in this section are output largely unchanged by the CF7 plugin. CF7 then uses the CF7 Tags to create fully functioning standard HTML form elements which can include a number of additional HTML attributes.
If you are not sure how Contact Form 7 uses CF7 Tags you can read all about them at Contact For 7 Tag Syntax.
Completed HTML code in CF7 Form
The box below shows the complete HTML code generated on the actual website, based on information supplied by you in the Form section on the CF7 interface and the additional HTML code added by the CF7 plugin.
<div id="wpcf7-f235-p1192-o1" class="wpcf7"><form novalidate="novalidate"
  class="wpcf7-form" method="post" action="/example.com/styling-contact-form-7-forms/
  #wpcf7-f235-p1192-o1">
<div style="display: none;">
<input type="hidden" value="8" name="_wpcf7">
<input type="hidden" value="3.4.1" name="_wpcf7_version">
<input type="hidden" value="wpcf7-f235-p1192-o1" name="_wpcf7_unit_tag">
<input type="hidden" value="1cc9dc2c57" name="_wpnonce">
</div>
<p>Your Name (required)<br>
  <span class="wpcf7-form-control-wrap your-name">
  <input type="text" aria-required="true" class="wpcf7-form-control
  wpcf7-text wpcf7-validates-as-required" size="40" value="" name="your-name"></span> </p>
<p>Your Email (required)<br>
  <span class="wpcf7-form-control-wrap your-email">
  <input type="email" aria-required="true" class="wpcf7-form-control
  wpcf7-text wpcf7-email wpcf7-validates-as-required wpcf7-validates-as-email"
  size="40" value="" name="your-email"></span> </p>
<p>Subject<br>
  <span class="wpcf7-form-control-wrap your-subject">
  <input type="text" class="wpcf7-form-control wpcf7-text"
   size="40" value="" name="your-subject"></span> </p>
<p>Your Message<br>
  <span class="wpcf7-form-control-wrap your-message">
  <textarea class="wpcf7-form-control wpcf7-textarea"
   rows="10" cols="40" name="your-message"></textarea></span> </p>
<p><input type="submit" class="wpcf7-form-control wpcf7-submit"
  value="Send"><img class="ajax-loader" src="http://buzztone.com.au/wp-content/plugins
 /contact-form-7/images/ajax-loader.gif" alt="Ajax loader sending..." style="visibility: hidden;"></p>
<div class="wpcf7-response-output wpcf7-display-none"></div>
</form>
</div>
Take a moment to compare these two bits of code and notice where the information from the form section of the CF7 interface has made it into the HTML on the actual website.
Tip: If you unable to understand easily what is going on in the code included in these two boxes, you probably don’t have adequate skills to change the style of CF7 forms, without at least some external support or advice.
In that case you should continue to learn what you need to know about both HTML and CSS at http://www.w3schools.com/ and come back to this article when you’ve done that.

CSS classes & ids generated by CF7
You may notice that Contact Form 7 adds a number of CSS classes & ids to the individual HTML form elements – for example:
- <div> id=”wpcf7-f8-p275-o1″ class=”wpcf7″ > … <div> – for the complete form which is given a unique id
- <span> class=”wpcf7-form-control-wrap your-name”> … </span> – inline element which wraps each text field
These are added, by the plugin author, to allow users skilled at using HTML and CSS, to style their CF7 forms to their particular requirements.
Target CF7 classes & ids
The list of available classes that can be targeted within CF7 forms include:
- .wpcf7
- .wpcf7-form
- .wpcf7-form-control
- .wpcf7 input
- .wpcf7 input[type=”text”]
- .wpcf7 input[type=”email”]
- .wpcf7 input[type=”checkbox”]
- .wpcf7 textarea
- .wpcf7 select
- .wpcf7 select option
- .wpcf7 select option:hover
- .wpcf7 p
It makes sense to target these individual CSS classes available within your CF7 forms.
WordPress theme developers also can use these CSS classes & ids to build support for the CF7 plugin within their theme. As CF7 is one of the most popular plugins in WordPress, it makes sense for theme developers to do this.
Add CF7 classes & ids
You can also give your HTML form elements individual classes & ids within the CF7 tags in the Form section of the CF7 interface. This can be very useful when you have number of elements you want to style the same way.

CF7 tag with ID & Class
At this point you should use Firebug or Chrome Dev Tools to examine the HTML and CSS of your CF7 form in detail.
Use one of these tools to explore all the HTML form elements in your CF7 form and see how each element is being styled in detail by the CSS in your current WordPress theme.
In particular take note of the various style sheets that are contributing to the final style used and how individual style elements are being overwritten (or not) by the CSS hierarchy.
Once you understand how the HTML and CSS is configured in your CF7 form, you can begin to plan the CSS changes you need to change the appearance of the form to suit your requirements.
You will need to be skilled at using Firebug or Chrome Dev Tools to examine the HTML and CSS of your CF7 form in detail to follow along in this article.
If that description does not fit you, you can learn about Firebug or Chrome Dev Tools and come back to this article when you’ve done that..
CF7 Form Structure
We used Firebug to produce the following diagram which shows the overall structure if the default CF7 form we are using in this article.
The diagram shows how each element of the form is created using standard HTML form elements and how those elements are arranged in relation to each other.
With experience, using Firebug or Chrome Dev Tools should give you all the information you need to change the style of your CF7 forms quickly and easily, but it may definitely help you initially to produce a hand drawn paper sketch similar to this diagram.
CSS
Default CF7 CSS style
There is a common misconception that the CF7 plugin controls the appearance of CF7 forms though the plugins CSS style sheets.
In truth the Contact Form 7 plugin uses only very minimal CSS styling to allow CF7 forms to blend in with most websites. For a listing of complete style sheet used by the CF7 plugin see Default CF7 CSS style.
The appearance of CF7 forms on your website will depend largely on the current WordPress theme used and the CSS styling that theme applies to standard HTML form elements.
Examine CSS in your current WordPress theme
The actual look of CF7 forms on your website will depend largely on the current WordPress theme used and the CSS styling that theme applies to standard HTML form elements.
To change the appearance of your CF7 forms to suit your requirements, you will need to:
- Understand what CSS styling is being applied to standard HTML form elements in your CF7 form
- Adjust the CSS used by your current theme for these HTML form elements.
Your current theme may not do a good job of styling forms
For some reason many WordPress themes do not provide CSS styling for standard HTML form elements. We regard this as poor practice and always look closely at how a theme styles standard HTML form elements when selecting themes.
Importantly if your theme neglects to provide appropriate CSS for these standard HTML form elements then the appearance of your form will fall back to that provided by default by the browser – which can be different in different browsers.
Use a Child Theme to make changes to your CF7 forms CSS
The most common and preferred method to makes changes to CF7 form styling is to create a Child Theme.
Make any necessary additions to the CSS in the child themes style.css only, rather than directly in the themes styles.css. That way you don’t lose your changes when you update the theme.
The style.css file of the child theme usually imports all styling from the parent theme by including the following CSS code at the top of the child theme’s style.css file.
/* Import Parent Theme */
@import url('../twentyeleven/style.css');
Any CSS changes that alter the appearance of our CF7 forms are added below this. Due to the CSS loading heirachy, any CSS changes made here will overwrite styles previously set in the parent theme.
Alternatively you could use a custom CSS plugin to make your CSS changes.
Target CSS changes to CF7 forms only
When making CSS changes you want to make sure that your CSS changes don’t inadvertantly effect other elements on your website.
The preferred way to do this is to use CSS inheritance to target the relevant HTML elements within your CF7 forms only.
For CF7 forms we have several ids & classes which can be used to give the necessary targeted inheritance including:
- .wpcf7
- .wpcf7-form
- .wpcf7-form-control
For example we can use the class .wpcf7-form to change the appearance of all HTML input text elements within CF7 forms only:
.wpcf7-form input[type="text"] {
	background: #fff;
	border: 1px solid #bbb;
	color: #4F4F4F;
}
Use CSS inheritance to ensure that your CSS changes don’t inadvertently affect other elements on your website.
You made need higher CSS Specificity
Depending on how your theme styles standard HTML form elements in general, and CF7 form elements in particular, you may need to add extra CSS specificity to get your CSS changes showing.
For example we can use an extra the CF7 class to give higher CSS Specificity:
.wpcf7 .wpcf7-form input[type="text"] {
	background: #fff;
	border: 1px solid #bbb;
	color: #4F4F4F;
}
For WordPress themes with high levels of unnecessary CSS specificity, you may need to target the #id of specfic CF7 forms as explained in Styling a Specific Contact Form 7 Form.
Add CSS changes on individual CF7 form elements
You can add additional CSS styling to any CF7 form elements you want to modify.
The list of common elements that can be targeted within CF7 forms include:
- .wpcf7 input
- .wpcf7 input[type=”text”]
- .wpcf7 input[type=”email”]
- .wpcf7 input[type=”checkbox”]
- .wpcf7 textarea
- .wpcf7 select
- .wpcf7 select option
- .wpcf7 select option:hover
- .wpcf7 p
You can use Firebug or Chrome Dev Tools to explore the full range of ids & classes used by Contact Form 7.
For example to change the background colour of the Send button when the mouse pointer hovers over the button:
.wpcf7 input[type="submit"]:hover {
	background:#4f2a0f;
	cursor:pointer;
	color:#fff;
}
There are some CF7 classes available which you might want to use to target a specific CF7 Tag on all CF7 forms on your site.
- .wpcf7-text
- .wpcf7-email
- .wpcf7-textarea
- .wpcf7-submit
Copy current CSS with your Dev Tool
Often you can copy the CSS currently used on the element from within your Dev Tool

and then add alternative values for the properties you want to change.
Add CF7 classes & ids within your CF7 forms
You can also add id and class attributes to a CF7 form by adding html_id and html_class attributes into a CF7 shortcode. This can be used to target individual forms via the html_id attribute or a number of forms using the html_class attribute.
HTML:
[ contact-form-7 id=”1511″ html_class=”cf7-psForm” title=”Personal Service Form” ]
CSS:
.wpcf7 .cf7-psForm {
    background: none repeat scroll 0 0 #fff;
    border: 1px solid #9ffffe;
    padding: 20px;
}
Use CSS to change the appearance of your CF7 form
Using the techniques described in this article, we can use the following CSS to change the appearance of the default CF7 form.
.wpcf7-form {
	background: #dcc8a5;
	padding: 10px 20px;
	border: 2px solid #f6efdf;
	border-radius: 7px;
	width: 300px;
}

.wpcf7-form p {
	color: #4f2a0f;
	margin-bottom: 5px;
}

.wpcf7-form input,
.wpcf7-form textarea {
	background: #f6efdf;
	padding: 5px 7px;
	margin: 4px 0 8px 0;
	border: 3px solid #ccb58c;
	color: #4f4f4f;
	border-radius: 7px;
}

.wpcf7-form .wpcf7-submit {
	background: #4f2a0f;
	padding: 5px 15px;
	color: #fff;
	min-width: 100px;
}

.wpcf7-form input[type="submit"]:hover {
 	background: #000;
}
Using the changed CSS given above, the default CF7 form now looks as shown below.
As practice you can use Firebug or Chrome Dev Tools to see how we’ve styled this form.
Targeting Specific CF7 Forms
Each CF7 form has a unique id which can be targeted in your CSS changes – see Styling a Specific Contact Form 7 Form for detailed instructions on how to do this.
Contact Form 7 Styling Troubleshooter
If you would like some help from our support staff & are willing to help us by providing information on your use of Contact Form 7 & CF7 Skins, you should complete the following form:
This form is made with CF7 Skins + CF7 Skins Pro + CF7 Skins Ready + CF7 Skins Multi + CF7 Skins Logic
Still have questions?
If you still have questions, after reading and working through the information provided in this article, you should ask your question in the CF7 support forum.
Please include:
- a link to your Contact Form 7 form plus
- all your input in the Form & Mail sections of the CF7 interface.
This helps others to understand your actual problem and offer a possible solution.
Tip: Make sure you create a separate post for your question as per the WordPress Forum Guidelines.
This page is still a Work in Progress
This article was created from questions asked in the CF7 support forum related to this issue. We add more information as we become aware of other issues and solutions.
If you have something you think might help others on this issue, you can use the CF7 form below to contact us.
Please note that anything that looks like a request for support or help will probably be ignored.
This form is made using CF7 Skins – you can use Firebug or Chrome Dev Tools to see how we’ve built it.
Reading Time: 6 minutes
Last updated on June 22nd, 2022
Contact Form 7 is almost iconic. It is one of WordPress’ oldest and most widely used contact form plugins. With 5 million downloads it is the most downloaded contact form plugin on WordPress. Its popularity is due to its flexibility and free features.
The problem is that Contact Form 7 doesn’t look good unless you add some CSS to style it. Fortunately, due to its popularity, a lot of themes come with prewritten styles for the form. However, if your theme doesn’t or you’re using a starter theme like Underscores or Sage you’ll want to add some CSS to make the form look nice. I’m going to show you how to style Contact Form 7 and give you some CSS that you can simply copy and paste into your own website.
A minimal starting point
My starting point for styling the form is I’ve installed the Underscores theme on WordPress and I’ve installed Contact Form 7 and added the basic contact form it comes with to a contact page. I’ve made a container for the form that has a max-width of 960px.
As you can see, the unstyled form does the job but aesthetically it is very lacking so let’s get writing some CSS to make it look good.
Add the CSS in whatever way you prefer. For this tutorial, I’m using the CSS plugin Simple CSS because it’s a little easier to see what I’m doing other adding it to the style.css file.
Adding placeholder text
The first thing I’m going to do is remove the labels and replace them with placeholders inside the input boxes. This will make the form more minimal. I wouldn’t recommend doing this for long contact forms with lots of inputs because this would be bad for user experience but when there are so few entries it’s okay. To do this we’ll need to change the form in the WordPress backend.
The image below shows the default contact form that comes with the plugins.
<label> Your Name (required)
    [text* your-name] </label>

<label> Your Email (required)
    [email* your-email] </label>

<label> Subject
    [text your-subject] </label>

<label> Your Message
    [textarea your-message] </label>

[submit "Send"]
Removing the labels is a simple matter of deleting them. For example, delete “Your Name (required)”. To replace with a placeholder we need to add this option in along with the placeholder text we want to show. So for the ‘Name’ field we’ll add:
<label> [text* your-name placeholder "Name"] </label>
Doing this for the rest of the fields means we now have this in the backend.
<label>[text* your-name placeholder "Name"] </label>

<label> [email* your-email placeholder "Email"] </label>

<label> [text your-subject placeholder "Subject"] </label>

<label> [textarea your-message placeholder "Message"] </label>

[submit class:button "Send"]
I’ve also placed the label text all on the same line whereas before it was on two. This removes a <br> tag that gets added to the frontend of the form. The <br> tag adds extra space between the form inputs and this can get in the way of styling the form later on so it’s my preference to remove it so we have complete control over the space we add later.
Now the form is a bit neater and already looking more modern so let’s save this and get on with writing some CSS to style the form.
CSS styles for Contact Form 7
A couple of quick fixes to make the contact form look better is to add some padding inside the input box and to make all the inputs full width. Space is so important for modern design and user experience so this alone is a big improvement to the previously small and nineties-esque form.
One handy thing to know is that all Contact Form 7 forms have the class “wpcf7-form”, this can be useful for dealing with CSS specificity. It’s good to use this selector to avoid accidentally changing the styles of another form on your website, such as an email sign up form.
.wpcf7-form input[type="text"],
.wpcf7-form input[type="email"],
.wpcf7-form input[type="url"],
.wpcf7-form input[type="password"],
.wpcf7-form input[type="search"],
.wpcf7-form input[type="number"],
.wpcf7-form input[type="tel"],
.wpcf7-form textarea {
    color: #1f252b;
    width: 100%;
    padding: 12px 16px;
    border-radius: 0;
    border: 0;
}

.wpcf7-form p {
    margin: 0 0 28px;
}

.wpcf7-text:focus,
.wpcf7-textarea:focus {
    outline: 1px solid rgba(84, 222, 197, 0.9);
    outline-offset: 0;
}
With the CSS above I’ve removed the border, added new spacing, tweaked the colours and put the form on a coloured background. This is what the form looks lie now. It’s looking a lot nicer but that button needs some serious work!
Contact Form 7 Button Class Styles
If you’re developing a theme you’ll probably be creating button styles to be consistent across your website. You can reuse the CSS you’ve written for your buttons by adding a class to the contact form submit button. So if you have written button styles for the class ‘button‘ you can add this class to the submit button.
Adding a class in Contact Form 7 is very simple. Here I’ve added the class of ‘button‘ to the submit button.
[submit class:button "Send"]
Adding the class alone won’t override all of the default Contact Form 7 styles so to do this you can either add !important to the end of all your CSS or add the ‘.wpcf7-form’ before ‘.button‘ because this makes it more specific.
.wpcf7-form .button {
    background-color: #14e2ae;
    border: 0;
    color: #fff;
    border-radius: 1px;
    font-weight: 700;
    text-align: center;
    text-transform: uppercase;
    margin-bottom: 15px;
    width: auto;
    padding: 20px 42px;
    letter-spacing: 2px;
    font-size: 14px;
}

.wpcf7-form .button:hover {
    cursor: pointer;
    box-shadow: 0px 7px 16px -7px rgba(0, 0, 0, 0.4);
    border: 0;
}
We now have a great looking contact form!
But there’s a couple of final things to do because while it looks good at the moment when a user sends a message a success or failure message is going to show up under the form. As with the original form, the default styles for this are not pretty so let’s fix these up too.
Styling the response message box
Adding more space to the response boxes and giving them a background colour will help modernise the design and make it in keeping with the rest of the form. The CSS below will make the success message use the brand colour for the background colour and the error message a nice red. I’ve also made the error tip the same red.
div.wpcf7-mail-sent-ok {
    border: 0;
    background: #5471de;
    color: #fff;
    padding: 18px;
}

div.wpcf7-acceptance-missing,
div.wpcf7-validation-errors {
    border: 0;
    background: #f9443b;
    color: #fff;
    padding: 18px;
}

span.wpcf7-not-valid-tip {
    color: #f9443b;
}
Having added these final styles the contact form has much better continuity and it’s all now ready for the world.
The entire code for how to achieve this Contact Form 7 style is below. Feel free to copy and paste this Contact Form 7 CSS example into your own project and tweak as needed.
/*
** Contact Form 7 Styles
*/

.wpcf7-form input[type="text"],
.wpcf7-form input[type="email"],
.wpcf7-form input[type="url"],
.wpcf7-form input[type="password"],
.wpcf7-form input[type="search"],
.wpcf7-form input[type="number"],
.wpcf7-form input[type="tel"],
.wpcf7-form textarea {
    color: #1f252b;
    width: 100%;
    padding: 12px 16px;
    border-radius: 0;
    border: 0;
}

.wpcf7-form p {
    margin: 0 0 28px;
}

.wpcf7-text:focus,
.wpcf7-textarea:focus {
    outline: 1px solid rgba(84, 222, 197, 0.9);
    outline-offset: 0;
}

div.wpcf7-mail-sent-ok {
    border: 0;
    background: #5471de;
    color: #fff;
    padding: 18px;
}

div.wpcf7-acceptance-missing,
div.wpcf7-validation-errors {
    border: 0;
    background: #f9443b;
    color: #fff;
    padding: 18px;
}

span.wpcf7-not-valid-tip {
    color: #f9443b;
}

/*
** Button Styles
*/

.wpcf7-form .button {
    background-color: #14e2ae;
    border: 0;
    color: #fff;
    border-radius: 1px;
    font-weight: 700;
    text-align: center;
    text-transform: uppercase;
    margin-bottom: 15px;
    width: auto;
    padding: 20px 42px;
    letter-spacing: 2px;
    font-size: 14px;
}

.wpcf7-form .button:hover {
    cursor: pointer;
    box-shadow: 0px 7px 16px -7px rgba(0, 0, 0, 0.4);
    border: 0;
}
This only takes into account the styles of course. There are still things to be done before adding the form to your website like connecting it with your email address and editing responses. For all of this stuff, there are plenty of other good tutorials out there or you can refer to the CF7 docs.
Contact Form 7 needs a bit of extra CSS to make it look good but once this is added it is one of the most capable contact form plugins on WordPress. If you’re using the plugin on your website you’ll want to check out this post I’ve written on how to only load Contact Form 7’s files when needed, this will speed up the other pages on your website that don’t use the form so it’s well worth doing.