Решил написать код изменения стоп-лосса (трейлинг) в своем советнике. Поискал примеры на форуме и нашел два способа изменения стопа:
1. В статье «Как создать свой Trailing Stop»https://www.mql5.com/ru/articles/134 сначала подготавливаеться структура торгового запроса:
//--- заполнение структуры торгового запроса
   m_request.symbol=m_symbol;                    // подготовка структуры торгового запроса, установка символа
   m_request.action=TRADE_ACTION_SLTP;           // подготовка структуры торгового запроса, установка типа торгового действия
Дальше перед выполнением модификации заполняем поля sl и tp структуры MqlTradeRequest. Переменной m_request.sl присваивается требуемое значение Стоп Лосс, переменной m_request.tp — существующее значение Тейк Профит (его оставляем без изменений); остальные поля уже заполнены при выполнении метода Init(). После заполнения структуры вызывается функция OrderSend().
if(sl>possl)
        {//--- если новое значение стоплосс выше, чем текущее значение стоплосс,
         //    будет выполнена попытка переместить стоплосс на новый уровень
         //--- заполнение структуры запроса
         m_request.sl=sl;
         //--- заполнение структуры запроса
         m_request.tp=PositionGetDouble(POSITION_TP);
         //--- запрос
         OrderSend(m_request,m_result);
2. В статье «Рецепты MQL5 — Как не получить ошибку при установке/изменении торговых уровней?» https://www.mql5.com/ru/articles/643 для модификации позиции используется метод PositionModify из торгового класса CTrade стандартной библиотеки.
 if(pos_sl>0)
           {
            //--- Если выполняется условие на модификацию ордера, т.е. новое значение ниже/выше,
            //    чем текущее, модифицируем защитный уровень позиции
            if(condition)
              {
               if(!trade.PositionModify(_Symbol,new_sl,pos_tp))
                  Print("Ошибка при модификации позиции: ",GetLastError()," - ",ErrorDescription(GetLastError()));
              }
           }
Обьясните какая разница между ними? И какой способ лучше использовать в своем советнике?
Введение
Перед тем как приступить к разговору на тему статьи, предлагаю расставить точки над i. Лишний раз не помешает определиться с понятиями «позиция» и «ордер»:
- Позиция — это рыночное обязательство, количество купленных или проданных контрактов по
финансовому инструменту. Позиция по одному инструменту может быть только одна. - Ордер — это распоряжение брокерской компании купить или продать финансовый инструмент. Различают несколько типов ордеров: рыночные и отложенные, а также стоп ордера (Стоп Лосс и Тейк Профит).

Рис. 1. Позиции и ордера.
В данной статье речь пойдет о трейлинге уровня Стоп Лосс для позиций. Для отложенных ордеров данная операция не имеет смысла, так как двигать можно непосредственно цену ордера. А уж когда он превратится в позицию (или ее часть), тогда вам и пригодится нижеизложенный материал.
Торговую позицию можно закрыть не только при помощи кнопки «Закрыть» окна управления позицией (рис. 2).
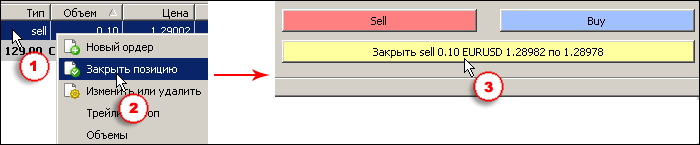
Рис. 2. Закрытие позиции кнопкой «Закрыть» окна управления позицией. 1 — открыть контекстное меню позиции, 2 — выбрать команду «Закрыть позицию»,
3 — нажать кнопку «Закрыть».
Кроме этого, позиция может быть закрыта автоматически при достижении ценой заранее установленного уровня прибыли (Тейк Профит) или уровня убытка (Стоп Лосс). В отличие от закрытия позиции кнопкой «Закрыть», закрытие по Стоп Лосс и Тейк Профит выполняется не из терминала (трейдером или экспертом), а брокером. Таким образом, обеспечивается абсолютно гарантированное закрытие позиции, независимо от наличия связи и электропитания. Это делает применение Стоп Лосс практически обязательным элементом в работе трейдера.
Единственное действие, которое должен сделать трейдер, — отдать брокеру приказ на установку уровня защитной остановки. Другими словами, необходимо установить Стоп Лосс на позицию (или сразу открыть позиции с установленным уровнем). Установка Стоп Лосс выполняется при помощи команды «Изменить» контекстного меню терминала. В списке позиций терминала необходимо навести указатель мыши на позицию, нажать правую кнопку и выбрать команду «Изменить или удалить». После этого в открывшемся окне управления позицией нужно ввести необходимый уровень Стоп Лосс и нажать кнопку «Изменить» (рис. 3).
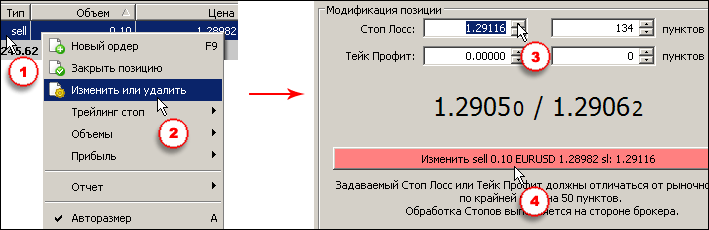
Рис. 3. Установка уровня Стоп Лосс позиции. 1 — открыть контекстное меню позиции, 2 — выбрать команду «Изменить или удалить», 3 — установить значение, 4 — нажать кнопку «Изменить».
Уровень Стоп Лосс позиции отображается на ценовом графике вместе с уровнем ее открытия (рис.4).
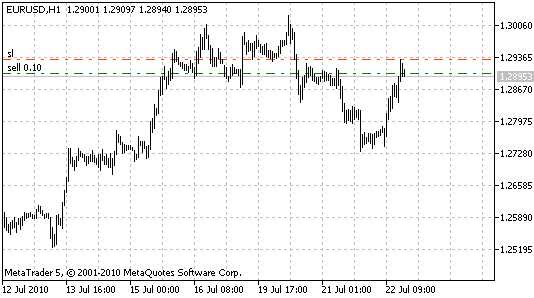
Рис. 4. Позиция со Стоп Лосс. Уровень обозначен красной пунктирной линией с надписью sl с левого края линии.
Стоп Лосс для позиции можно не только устанавливать, но и периодически менять его значение. Например, его можно подтягивать вслед за изменениями цены в сторону прибыльности позиции, тем самым сокращая возможный убыток. Такое подтягивание защитного стоп-уровня собственно и называется скользящим стопом или трейлинг стопом.
Существует огромное количество вариантов трейлинг стопа: Стоп Лосс можно просто подтягивать за ценой на заданной дистанции. Можно начинать перемещать Стоп Лосс не сразу, а после того, как позиция достигла определенной прибыли; при этом сначала перенести его сразу на уровень безубыточности. Такой вариант считается стандартным и даже встроен в терминал MetaTrader 5. Для использования стандартного трейлинг стопа необходимо открыть контекстное меню позиции и выбрать команду «Трейлинг стоп» (рис. 5).
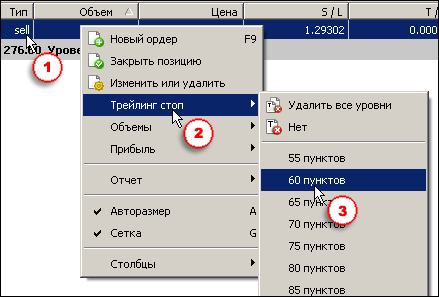
Рис. 5. Включение стандартного трейлинг стопа в терминале. 1 — открыть контекстное меню позиции, 2 — выбрать команду «Трейлинг стоп», 3 — выбрать значение (или установить значение).
Команда «Установить значение» находится в самом низу контекстного меню, на изображении не показана.
Кроме непосредственного отслеживания цены, трейлинг стоп может работать на основе какого-нибудь технического индикатора. Например, на основе скользящих средних, что позволяет не реагировать на кратковременные изменения цены; на индикаторе Ichimoku или на более подходящем; и даже на предназначенном для этих целей индикаторе Parabolic SAR (Stop And Reverse — стоп и разворот), рис. 6.
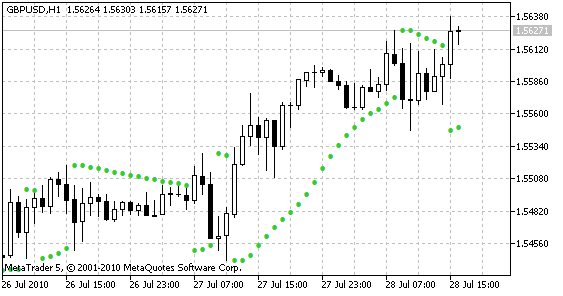
Рис. 6. Индикатор Parabolic SAR.
При процедурном программировании на MQL4 трейлинг стоп обычно выполнялся в виде отдельной функции или был интегрирован в другие функции. Например, в эксперте MACD Sample, входящем в комплект терминала MetaTrader 4, функция трейлинга интегрирована с функцией рыночного закрытия ордеров:
for(cnt=0;cnt<total;cnt++)
  {
   OrderSelect(cnt,SELECT_BY_POS,MODE_TRADES);
   if(OrderType()<=OP_SELL &&
      OrderSymbol()==Symbol())
     {
      if(OrderType()==OP_BUY)
        {

         if(MacdCurrent>0 && MacdCurrent<SignalCurrent && MacdPrevious>SignalPrevious &&
            MacdCurrent>(MACDCloseLevel*Point))
           {
            OrderClose(OrderTicket(),OrderLots(),Bid,3,Violet);
            return(0);
           }

         if(TrailingStop>0)
           {

            if(Bid-OrderOpenPrice()>Point*TrailingStop)
              {
               if(OrderStopLoss()<Bid-Point*TrailingStop)
                 {
                  OrderModify(OrderTicket(),OrderOpenPrice(),Bid-Point*TrailingStop,OrderTakeProfit(),0,Green);
                  return(0);
                 }
              }
           }
        }
      else
        {

         if(MacdCurrent<0 && MacdCurrent>SignalCurrent &&
            MacdPrevious<SignalPrevious && MathAbs(MacdCurrent)>(MACDCloseLevel*Point))
           {
            OrderClose(OrderTicket(),OrderLots(),Ask,3,Violet);
            return(0);
           }

         if(TrailingStop>0)
           {

            if((OrderOpenPrice()-Ask)>(Point*TrailingStop))
              {
               if((OrderStopLoss()>(Ask+Point*TrailingStop)) || (OrderStopLoss()==0))
                 {
                  OrderModify(OrderTicket(),OrderOpenPrice(),Ask+Point*TrailingStop,OrderTakeProfit(),0,Red);
                  return(0);
                 }
              }
           }
        }
     }
  }
Объектно-ориентированный язык MQL5 дает гораздо больше возможностей при разработке экспертов. Он позволяет создавать универсальные и многофункциональные классы, которые в дальнейшем можно легко и быстро интегрировать практически в любого эксперта. Разработкой такого класса и займемся далее в этой статье.
1. Создание базового класса трейлинга
Как уже говорилось выше, разновидностей трейлинг стопа существует огромное количество, но у всех у них есть общие функциональные моменты:
- определение типа (направления) позиции;
- определение текущего уровня Стоп Лосс позиции;
- расчет нового уровня Стоп Лосс;
- проверка на необходимость изменения текущего уровня Стоп Лосс;
- модификация уровня Стоп Лосс для позиции.
От типа трейлинг стопа будет зависеть только значение расчетного уровня Стоп Лосс. Таким образом, основной функционал трейлинга будет входить в базовый класс. Для функционала, зависящего от типа трейлинга, будут созданы подклассы. Обращение к методам этих подклассов будет выполняться через виртуальные методы базового класса.
Поскольку планируется использовать технические индикаторы, для обеспечения их устойчивой работы требуется обеспечить к ним периодическое обращение. Для этой цели будет использоваться таймер. Запланирована возможность программного включения/выключения трейлинга (при использовании класса в составе механической торговой системы), и включение/выключение при помощи графического объекта кнопки (при использовании класса в составе вспомогательных экспертов). В соответствии с этими функциональными требованиями базовый класс будет иметь следующий набор методов:
class CTrailingStop
  {
protected:
public:
   void CTrailingStop(){};
   void ~CTrailingStop(){};
   void Init(){};
   bool StartTimer(){};
   void StopTimer(){};
   void On(){};
   void Off(){};
   bool DoStoploss(){};
   void EventHandle(){};
   void Deinit(){};
   virtual bool Refresh(){};
   virtual void Setparameters(){};
   virtual int Trend(){};
   virtual double BuyStoploss(){};
   virtual double SellStoploss(){};
  };
При вызове метода Init() ему будут передаваться общие параметры, не зависящие от типа используемого трейлинг стопа. При выполнении метода будет производиться установка режима работы трейлинг стопа и подготовка переменных с некоторыми рыночными параметрами.
- Метод StartTimer() — будет использоваться для запуска таймера, необходимого для периодического обращения к индикаторам и принудительного удержания их в кэше терминала.
- Метод Stoptimer() — будет использоваться для остановки таймера при завершении работы эксперта.
- Метод On() — программное включение трейлинг стопа и установка кнопки в нажатое положение (если кнопка используется).
- Метод Off() — программное выключение трейлинг стопа и установка кнопки в отжатое положение (если кнопа используется).
- Метод DoStoploss() — основной метод для управления уровнем Стоп Лосс позиции.
- Метод EventHandle() — используется для обработки событий графика, в частности, для реагирования на нажатие кнопки и включение/выключение трейлинг стопа в зависимости от положения кнопки.
- Метод Deinit() — выполняется при завершении работы эксперта, обеспечивает освобождение хэндла используемого индикатора.
- Метод Refresh() — обеспечивает обновление значений индикатора. Метод необходим для определения текущих значений индикатора перед вычислением значений стоплосс. Кроме того, метод используется самостоятельно — периодически вызывается по таймеру для поддержания индикаторов в работоспособном состоянии.
- Метод SetParameters() — при вызове метода ему передаются параметры индикатора, загружается индикатор с указанными параметрами.
- Метод Trend() — метод определения тренда показываемого индикатором. Если индикатор показывает направление вверх, метод возвращает значение 1, если вниз — значение -1.
- Методы BuyStoploss() и SellStoploss() — будут возвращать рассчитанные по индикатору новые значения Стоп Лосс для позиций buy и sell соответственно.
Метод Init() является первым методом, вызываемым после создания экземпляра класса. В него передаются общие, не зависящие от типа трейлинг стопа, параметры: символ, таймфрейм; устанавливается режим работы трейлинг стопа: по тикам или по барам; присоединять или не присоединять индикатор на график, создавать или нет кнопку. Затем свойства кнопки: координата X кнопки, координата Y кнопки, цвет кнопки, цвет надписи на кнопке.
Необходимые в дальнейшей работе параметры сохраняются в переменных класса. Дополнительно, при выполнении метода Init(), определяются основные неизменные рыночные параметры, необходимые для работы трейлинг стопа: количество знаков после запятой и величина пункта. Наконец, в зависимости от выбранного типа трейлинг стопа, формируется имя кнопки и надпись на ней. Если установлено использование кнопки, то выполняется ее создание.
В разделе «protected» объявим все необходимые переменные:
protected:
string m_symbol;
ENUM_TIMEFRAMES m_timeframe;
bool m_eachtick;
bool m_indicator;
bool m_button;
int m_button_x;
int m_button_y;
color m_bgcolor;
color m_txtcolor;
int m_shift;
bool m_onoff;
int m_handle;
datetime m_lasttime;
MqlTradeRequest m_request;
MqlTradeResult m_result;
int m_digits;
double m_point;
string m_objname;
string m_typename;
string m_caption;
Теперь напишем сам метод Init():
void Init(string             symbol,
          ENUM_TIMEFRAMES timeframe,
          bool   eachtick  =   true,
          bool   indicator =  false,
          bool   button    =  false,
          int    button_x  =      5,
          int    button_y  =     15,
          color  bgcolor   = Silver,
          color  txtcolor  =   Blue)
  {

   m_symbol    = symbol;
   m_timeframe = timeframe;
   m_eachtick  = eachtick;

   if(eachtick)
     {
      m_shift=0;
     }
   else
     {
      m_shift=1;
     }
   m_indicator = indicator;
   m_button    = button;
   m_button_x  = button_x;
   m_button_y  = button_y;
   m_bgcolor   = bgcolor;
   m_txtcolor  = txtcolor;

   m_digits=(int)SymbolInfoInteger(m_symbol,SYMBOL_DIGITS);
   m_point=SymbolInfoDouble(m_symbol,SYMBOL_POINT);

   m_objname="CTrailingStop_"+m_typename+"_"+symbol;
   m_caption=symbol+" "+m_typename+" Trailing";

   m_request.symbol=m_symbol;
   m_request.action=TRADE_ACTION_SLTP;

   if(m_button)
     {
      ObjectCreate(0,m_objname,OBJ_BUTTON,0,0,0);
      ObjectSetInteger(0,m_objname,OBJPROP_XDISTANCE,m_button_x);
      ObjectSetInteger(0,m_objname,OBJPROP_YDISTANCE,m_button_y);
      ObjectSetInteger(0,m_objname,OBJPROP_BGCOLOR,m_bgcolor);
      ObjectSetInteger(0,m_objname,OBJPROP_COLOR,m_txtcolor);
      ObjectSetInteger(0,m_objname,OBJPROP_XSIZE,120);
      ObjectSetInteger(0,m_objname,OBJPROP_YSIZE,15);
      ObjectSetInteger(0,m_objname,OBJPROP_FONTSIZE,7);
      ObjectSetString(0,m_objname,OBJPROP_TEXT,m_caption);
      ObjectSetInteger(0,m_objname,OBJPROP_STATE,false);
      ObjectSetInteger(0,m_objname,OBJPROP_SELECTABLE,false);
      ChartRedraw();
     }

   m_onoff=false;
  };
Можно заметить, что при формировании имени кнопки и надписи для нее, используется переменная m_typename, которая не инициализировалась никаким значением. Присвоение ей значения будет выполняться в конструкторах подклассов, чтобы при использовании разных методов трейлинг стопа у нее было разное, соответствующее типу используемого типа трейлинг стопа, значение.
1.2. Метод StartTimer()
Метод StartTimer() выполняет запуск общего таймера эксперта.
bool StartTimer()
  {
   return(EventSetTimer(1));
  };
При использовании таймера, в функцию эксперта OnTimer() будет необходимо добавлять вызов метода Refresh(), чтобы периодически происходило обращение к индикатору.
1.3. Метод StopTimer()
Метод StartTimer() выполняет остановку таймера эксперта.
void StopTimer()
  {
   EventKillTimer();
  };
По завершении работы эксперта, если использовался таймер, его необходимо остановить, что и делает этот метод. Метод будет вызываться при выполнении метода Deninit() класса.
1.4. Метод On()
Метод On() позволяет производить программное включение трейлинг стопа. Включение выполняется установкой для переменной m_onoff значения true. Если при инициализации класса установлено использование кнопки, то она переводится в нажатое положение.
void On()
  {
   m_onoff=true;
   if(m_button)
     {
      if(!ObjectGetInteger(0,m_objname,OBJPROP_STATE))
        {
         ObjectSetInteger(0,m_objname,OBJPROP_STATE,true);
        }
     }
  }
1.5. Метод Off()
Метод On() позволяет производить программное выключение трейлинг стопа. Выключение выполняется установкой для переменной m_onoff значения false. Если при инициализации класса установлено использование кнопки, то она переводится в отжатое положение.
void Off()
  {
   m_onoff=false;
   if(m_button)
     {
      if(ObjectGetInteger(0,m_objname,OBJPROP_STATE))
        {
         ObjectSetInteger(0,m_objname,OBJPROP_STATE,false);
        }
     }
  }
1.6. Метод EventHandle()
Метод EventHandle() будет вызываться из функции OnChartEvent() эксперта и соответственно ему будут передаваться все параметры, передаваемые в функцию OnChartEvent().
void EventHandle(const int id,const long  &lparam,const double &dparam,const string &sparam)
  {
   if(id==CHARTEVENT_OBJECT_CLICK && sparam==m_objname)
     {
      if(ObjectGetInteger(0,m_objname,OBJPROP_STATE))
        {
         On();
        }
      else
        {
         Off();
        }
     }
  }
Если происходит событие CHARTEVENT_OBJECT_CLICK, и это событие происходит с кнопкой, имеющей имя m_objname (имя объекта, с которым произошло событие, передается в переменной sparam), то в зависимости от состояния кнопки выполняется метод On() или Off().
1.7. Метод Deinit()
Метод Deinit() должен вызываться по завершении работы эксперта. При выполнении метода происходит остановка таймера, освобождение хэндла индикатора и удаление кнопки, если она использовалась.
void Deinit()
  {
   StopTimer();
   IndicatorRelease(m_handle);
   if(m_button)
     {
      ObjectDelete(0,m_objname);
      ChartRedraw();
     }
  }
Виртуальные методы Refresh(), SetParameters(), Trend(), BuyStoploss(), SellStoploss() будут рассмотрены позже — при создании подклассов трейлинг стопа, а пока подробно рассмотрим основной метод базового класса — метод DoStoploss().
1.8. Метод DoStoploss()
Метод DoStoploss() является основным рабочим методом, который должен вызываться из функции OnTick() эксперта на каждом тике. Если значение переменной m_onoff равно false (трейлинг стоп выключен), то сразу выполняется завершение работы метода.
if(!m_onoff)
  {
   return(true);
  }
Далее, если трейлинг стоп работает в побарном режиме, происходит проверка времени — сравнение времени формирующегося бара со временем последнего успешного выполнения функции. Если время совпадает, то происходит завершение работы метода.
datetime tm[1];

if(!m_eachtick)
  {

   if(CopyTime(m_symbol,m_timeframe,0,1,tm)==-1)
     {
      return(false);
     }

   if(tm[0]==m_lasttime)
     {
      return(true);
     }
  }
Если трейлинг стоп включен и проверка времени пройдена, то выполняется основная часть метода — обновляются показания индикатора — вызывается метод Refresh().
if(!Refresh())
  {
   return(false);
  }
Затем, в зависимости от значения возвращаемого методом Trend(), выполняется трейлинг стоп для позиции buy или sell.
switch (Trend())
  {

   case 1:

      break;

   case -1:

      break;
  }
Рассмотрим его работу на примере позиции buy.
if(PositionSelect(m_symbol,1000))
  {
   if(PositionGetInteger(POSITION_TYPE)==POSITION_TYPE_BUY)
     {


      sl=BuyStoploss();

      double minimal=SymbolInfoDouble(m_symbol,SYMBOL_BID)-m_point*SymbolInfoInteger(m_symbol,SYMBOL_TRADE_STOPS_LEVEL);

      sl=NormalizeDouble(sl,m_digits);

      minimal=NormalizeDouble(minimal,m_digits);


      sl=MathMin(sl,minimal);

      double possl=PositionGetDouble(POSITION_SL);

      possl=NormalizeDouble(possl,m_digits);
      if(sl>possl)
        {


         m_request.sl=sl;

         m_request.tp=PositionGetDouble(POSITION_TP);

         OrderSend(m_request,m_result);
         if(m_result.retcode!=TRADE_RETCODE_DONE)
           {

            printf("Не удалось переместить стоплосс позиции %s, ошибка: %I64u",m_symbol,m_result.retcode);

            return(false);
           }
        }
     }
  }
Если позицию удается выделить, проверяется ее тип. Если тип позиции соответствует тренду, то, используя метод BuyStoploss(), получаем требуемое значение Стоп Лосс (в переменную sl). Далее определяем допустимый уровень, на который может быть установлен Стоп Лосс. Если расчетный уровень ближе допустимого, корректируем значение переменой sl. Затем получаем текущее значение Стоп Лосс позиции (в переменную possl), сравниваем значения sl и possl. Если новое значение Стоп Лосс лучше текущего значения, выполняем модификацию позиции.
Перед выполнением модификации заполняем поля sl и tp структуры MqlTradeRequest. Переменной m_request.sl присваивается требуемое значение Стоп Лосс, переменной m_request.tp — существующее значение Тейк Профит (его оставляем без изменений); остальные поля уже заполнены при выполнении метода Init(). После заполнения структуры вызывается функция OrderSend().
По завершении ее работы проверяется значение переменной m_result.retcode. Если значение не равно TRADE_RETCODE_DONE, значит по какой-то причине не удалось выполнить запрошенное функцией OrderSend() действие. При этом в журнал выводится сообщение с номером ошибки и выполняется завершение метода. Если функция OrderSend() выполнена успешно, то запоминается время бара, на котором производилась последняя работа метода DoStoploss(). В случае же ошибки, даже при побарном режиме, на следующем тике произойдет повторная попытка работы метода. Попытки будут продолжаться до тех пор, пока он не завершит свою работу успешно.
Ниже приведен весь код метода DoStopLoss().
bool DoStoploss()
  {

   if(!m_onoff)
     {
      return(true);
     }
   datetime tm[1];

   if(!m_eachtick)
     {

      if(CopyTime(m_symbol,m_timeframe,0,1,tm)==-1)
        {
         return(false);
        }

      if(tm[0]==m_lasttime)
        {
         return(true);
        }
     }

   if(!Refresh())
     {
      return(false);
     }
   double sl;

   switch(Trend())
     {

      case 1:

         if(PositionSelect(m_symbol))
           {

            if(PositionGetInteger(POSITION_TYPE)==POSITION_TYPE_BUY)
              {

               sl=BuyStoploss();

               double minimal=SymbolInfoDouble(m_symbol,SYMBOL_BID)-m_point*SymbolInfoInteger(m_symbol,SYMBOL_TRADE_STOPS_LEVEL);

               sl=NormalizeDouble(sl,m_digits);

               minimal=NormalizeDouble(minimal,m_digits);


               sl=MathMin(sl,minimal);

               double possl=PositionGetDouble(POSITION_SL);

               possl=NormalizeDouble(possl,m_digits);


               if(sl>possl)
                 {

                  m_request.sl=sl;

                  m_request.tp=PositionGetDouble(POSITION_TP);

                  OrderSend(m_request,m_result);

                  if(m_result.retcode!=TRADE_RETCODE_DONE)
                    {

                     printf("Не удалось переместить стоплосс позиции %s, ошибка: %I64u",m_symbol,m_result.retcode);

                     return(false);
                    }
                 }
              }
           }
         break;

      case -1:
         if(PositionSelect(m_symbol))
           {
            if(PositionGetInteger(POSITION_TYPE)==POSITION_TYPE_SELL)
              {
               sl=SellStoploss();

               sl+=(SymbolInfoDouble(m_symbol,SYMBOL_ASK)-SymbolInfoDouble(m_symbol,SYMBOL_BID));
               double minimal=SymbolInfoDouble(m_symbol,SYMBOL_ASK)+m_point*SymbolInfoInteger(m_symbol,SYMBOL_TRADE_STOPS_LEVEL);
               sl=NormalizeDouble(sl,m_digits);
               minimal=NormalizeDouble(minimal,m_digits);
               sl=MathMax(sl,minimal);
               double possl=PositionGetDouble(POSITION_SL);
               possl=NormalizeDouble(possl,m_digits);
               if(sl<possl || possl==0)
                 {
                  m_request.sl=sl;
                  m_request.tp=PositionGetDouble(POSITION_TP);
                  OrderSend(m_request,m_result);
                  if(m_result.retcode!=TRADE_RETCODE_DONE)
                    {
                     printf("Не удалось переместить стоплосс позиции %s, ошибка: %I64u",m_symbol,m_result.retcode);
                     return(false);
                    }
                 }
              }
           }
         break;
     }

   m_lasttime=tm[0];
   return(true);
  }
Обратите внимание на различия в коде для позиции buy и позиции sell. Для позиции sell значение, возвращаемое методом SellStoploss(), увеличивается на величину спреда, поскольку позиция sell закрывается по цене Ask. Соответственно, и отсчет минимального уровня Стоп Лосс для buy выполняется от цены Bid, для sell — от Ask.
На этом создание базового класса трейлинга выполнено, переходим к созданию подклассов.
2. Подкласс трейлинга по индикатору Parabolic SAR
По виртуальным методам класса CTrailingStop уже должен быть понятен состав подкласса — методы SetParameters(), Refresh(), Trend(), BuyStoploss(), SellStoploss() и конструктор класса для установки имени трейлинг стопа. Класс будет иметь имя CParabolicStop. Поскольку класс является подклассом класса CTrailingStop, это будет указано при его объявлении.
class CParabolicStop: public CTrailingStop
За счет такого объявления при вызове виртуальных методов класса CParabolicStop будут выполняться методы подкласса выбранного при загрузке базового класса.
Рассмотрим подробно все методы подкласса.
2.1. Метод CParabolicStop()
Метод имеет такое же имя, как и сам класс, такой метод называется конструктором. Он выполняется автоматически в момент загрузки класса, еще до того, как в программе будут вызваны другие методы класса. При выполнении метода CParabolicStop() выполняется присваивание названия трейлинг стопа переменной m_typename, которая используется для формирования имени и надписи кнопки (при выполнении метода Init() базового класса).
void CParabolicStop()
  {
   m_typename="SAR";
  };
2.2. Метод SetParameters()
При вызове метода SetParameters() ему передаются параметры индикатора, выполняется загрузка индикатора с этими параметрами. Если при выполнении метода Init() базового класса установлен параметр m_indicator, то выполняется присоединение индикатора на график (функция ChartIndicatorAdd()).
bool SetParameters(double sarstep=0.02,double sarmaximum=0.2)
  {
   m_handle=iSAR(m_symbol,m_timeframe,sarstep,sarmaximum);
   if(m_handle==-1)
     {
      return(false);
     }
   if(m_indicator)
     {
      ChartIndicatorAdd(0,0,m_handle);
     }

   return(true);
  }
2.3. Метод Refresh()
Метод Refresh() обеспечивает получение новой цены и обновление показаний индикатора. Для значения цены в разделе protected класса объявлен массив pricebuf, для значения индикатора — массив indbuf. Оба массива имеют размер в один элемент — необходимо только одно значение цены и одно значение индикатора с формирующегося или сформированного бара (в зависимости от параметра m_shift, установленного при инициализации базового класса).
bool Refresh()
  {
   if(CopyBuffer(m_handle,0,m_shift,1,indbuf)==-1)
     {
      return(false);
     }

   if(CopyClose(m_symbol,m_timeframe,m_shift,1,pricebuf)==-1)
     {
      return(false);
     }
   return(true);
  }
2.4. Метод Trend()
В методе Trend() проверятся положение цены относительно линии индикатора. Если цена выше линии, значит тренд восходящий, и метод возвращает значение 1. Если цена ниже линии индикатора, значит тренд нисходящий, и возвращается значение -1. Не исключен случай (редко, но возможно), когда цена равна линии индикатора. В этом случае будет возвращаться значение 0.
int Trend()
  {
   if(pricebuf[0]>indbuf[0])
     {
      return(1);
     }
   if(pricebuf[0]<indbuf[0])
     {
      return(-1);
     }
   return(0);
  }
2.5. Методы BuyStoploss() и SellStoploss()
Поскольку у индикатора Parabolic SAR только одна линия, оба метода полностью идентичны. Они возвращают значение, полученное при выполнении метода Refresh().
virtual double BuyStoploss()
  {
   return(indbuf[0]);
  };

virtual double SellStoploss()
  {
   return(indbuf[0]);
  };
На этом трейлинг стоп, можно сказать, готов. Пока он содержит только один подкласс, но им уже можно пользоваться. Оформим его в виде отдельного включаемого файла и сохраним в каталоге .MQL5Include с именем Sample_TrailingStop.mqh (файл прилагается к статье).
3. Добавление трейлинга по Parabolic в эксперта
Попробуем добавить созданный трейлинг стоп в какого-нибудь эксперта, например в эксперта My_First_EA из статьи Пошаговое руководство по написанию MQL5-советников для начинающих.
3.1. Откроем файл эксперта My_First_EA в редакторе MetaEditor и сохраним его с именем My_First_EA_SARTrailing.
3.2. Подключим файл трейлинг стопа. В верхнюю часть кода эксперта (желательно до объявления внешних переменных) добавим строку:
#include <Sample_TrailingStop.mqh>
3.3. Ниже внешних переменных создаем экземпляр класса CParabolicStop с именем Trailing.
CParabolicStop Trailing;
3.4. В функции OnInit() эксперта проводим инициализацию класса и установку его параметров. Предварительно объявим внешние переменные с параметрами индикатора:
input double TrailingSARStep=0.02;
input double TrailingSARMaximum=0.2;
Затем добавим код в функцию OnInit().
Trailing.Init(_Symbol,PERIOD_CURRENT,true,true,false);
if(!trailing.setparameters(TrailingSARStep,TrailingSARMaximum))
  {
   Alert("trailing error");
   return(-1);
  }
Trailing.StartTimer();
Trailing.On();
3.5. Ищем в коде эксперта функцию OnTimer(). В эксперте My_First_EA не используется функция OnTimer(), значит добавляем ее, а в нее добавляем вызов метода Refresh().
void OnTimer()
  {
   Trailing.Refresh();
  }
3.6. В самый верх функции OnTick() эксперта добавляем вызов метода DoStoploss().
3.7. Компилируем эксперта и пробуем его протестировать. Результаты тестирования эксперта приведены на рис. 7 (без трейлинг стопа) и рис. 8 (с трейлинг стопом).
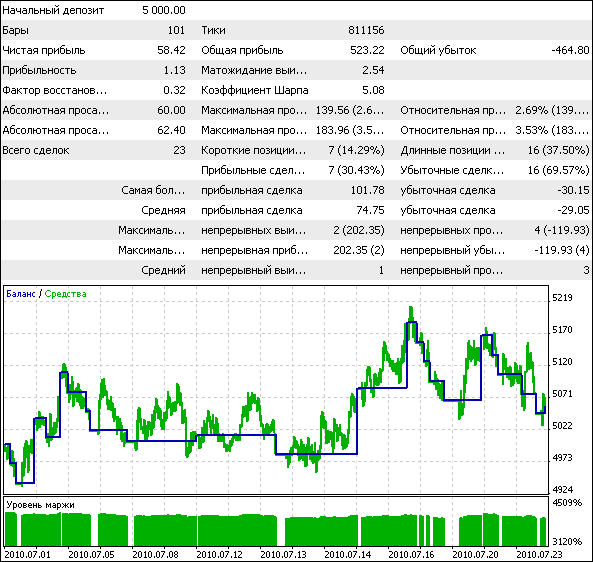
Рис. 7. Результаты тестирования эксперта без трейлинг стопа.
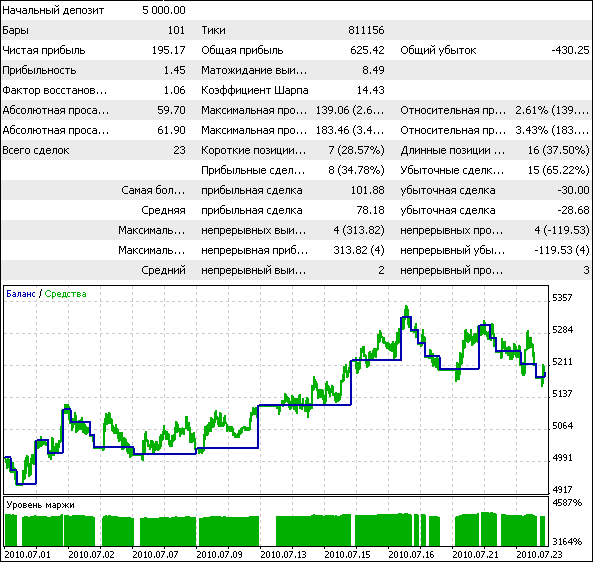
Рис. 8. Результаты тестирования эксперта с трейлинг стопом.
Повышение эффективности при использовании трейлинг стопа очевидно.
Файл My_First_EA_SARTrailing.mq5 прилагается к статье.
4. Подкласс трейлинга по индикатору NRTR
Индикатор NRTR (Nick Rypock Trailing Reverse) по своему названию (Trailing Reverse — подтягивание и переворот) и внешнему виду (рис. 9) располагает к тому, чтобы попробовать создать на нем трейлинг стоп.
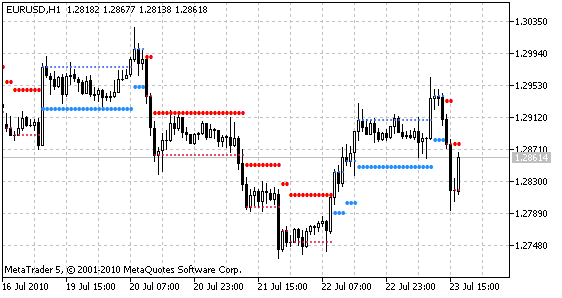
Рис. 9. Индикатор NRTR
Индикатор рисует базовую линию (линию поддержки или сопротивления) и линию цели. При превышении ценой значения цели, базовая линия переносится по ходу движения цены, незначительные колебания цены игнорируются. Пересечение ценой базовой линии считается сменой тренда, при этом меняется расположение базовой линии и линии цели относительно цены. Линии поддержки и цели при тренде вверх окрашены синим цветом, при тренде вниз — красным.
Создадим еще один трейлинг стоп, теперь на индикаторе NRTR.
Объявим еще один класс CNRTRStop входящий в базовый класс CNRTRStop.
class CNRTRStop: public CTrailingStop
Подкласс трейлинга по NRTR будет иметь точно такой же набор методов как трейлинг по Parabolic, за исключением конструктора класса, теперь он будет иметь имя CNRTRStop().
4.1. Метод CNRTRStop()
Теперь в конструкторе класса переменной m_typename будет присваиваться значение NRTR в соответствии с используемым индикатором.
void CNRTRStop()
  {
   m_typename="NRTR";
  };
4.2. Метод SetParameters()
При вызове метода SetParameters() ему будут передаваться параметры индикатора NRTR и выполняться его загрузка. Затем, в зависимости от основных параметров трейлинга, будет выполняться присоединение индикатора на график.
bool SetParameters(int period,double k)
  {
   m_handle=iCustom(m_symbol,m_timeframe,"NRTR",period,k);
   if(m_handle==-1)
     {
      return(false);
     }
   if(m_indicator)
     {

      ChartIndicatorAdd(0,0,m_handle);
     }
   return(true);
  }
4.3. Метод Refresh()
В методе Refresh() выполняется копирование двух буферов индикатора NRTR — буфера линии поддержки и буфера линии сопротивления.
bool Refresh()
  {
   if(CopyBuffer(m_handle,0,m_shift,1,sup)==-1)
     {
      return(false);
     }

   if(CopyBuffer(m_handle,1,m_shift,1,res)==-1)
     {
      return(false);
     }

   return(true);
  }
Для значений индикатора в разделе protected класса объявлено два массива: double sup[] и double res[].
protected:
double sup[1];
double res[1];
4.4. Метод Trend()
В методе Trend() проверятся, какая из линий существует в данный момент времени. Если линия поддержки, значит,индикатор показывает тренд вверх, при этом метод возвращает значение 1. Если существует линия сопротивления, то метод возвращает значение -1.
int Trend()
  {
   if(sup[0]!=0)
     {
      return(1);
     }
   if(res[0]!=0)
     {
      return(-1);
     }

   return(0);
  }
4.5. Метод BuyStoploss()
Метод BuyStoploss() возвращает значение линии поддержки.
double BuyStoploss()
  {
   return(sup[0]);
  }
4.6. Метод SellStoploss()
Метод SellStoploss() возвращает значение линии сопротивления.
double SellStoploss()
  {
   return(res[0]);
  }
Теперь класс трейлинг стопа полностью готов.
5. Добавление трейлинг стопа по NRTR в эксперта
Так же, как уже делали с трейлинг стопом по Parabolic, добавим в эксперта My_First_EA трейлинг стоп по NRTR.
5.1. Откроем в редакторе MetaEditor доработанного ранее эксперта My_First_EA_SARTrailing и сохраним его с именем My_First_EA_NRTRTrailing.
5.2. Внешние параметры трейлинг стопа по Parabolic заменим на параметры трейлинг стопа по NRTR.
input int TrailingNRTRPeriod = 40;
input double TrailingNRTRK   =  2;
5.3. Вместо создания экземпляра класса CParabolicStop создадим экземпляр класса CNRTRStop; код располагается под внешними переменными.
CNRTRStop Trailing;
5.4. В функции OnInit() эксперта заменим параметры вызова метода SetParameters() на параметры NRTR.
Trailing.SetParameters(TrailingNRTRPeriod,TrailingNRTRK)
5.5. Компилируем эксперта и пробуем его протестировать.
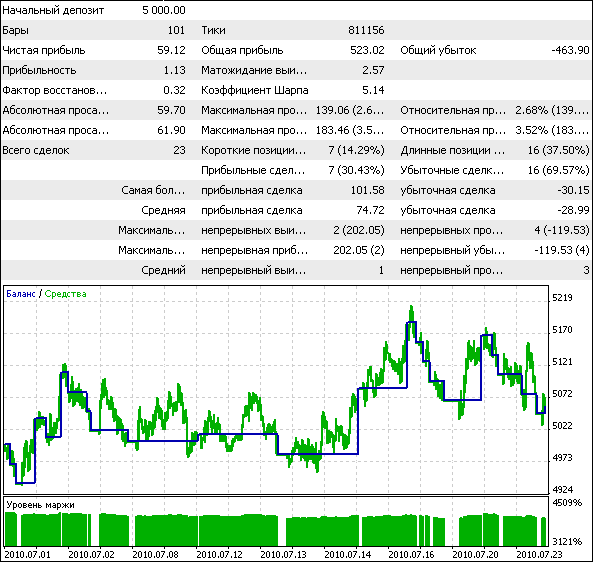
Рис. 10. Результаты тестирования эксперта с трейлинг стопом по NRTR.
Результат работы эксперта (рис. 10) с трейлинг стопом по сравнению с работой эксперта без него (рис. 7) почти не изменился. Использование трейлинг стопа по Parabolic оказалось более эффективным для этого эксперта. Можно сделать вывод, что арсенал из некоторого количества трейлинг стопов может быть очень полезен при разработке экспертов – для проведения экспериментов и выбора наиболее подходящего типа трейлинг стопа.
Файл My_First_EA_NRTRTrailing.mq5 прилагается к статье.
6. Эксперт-помощник
При создании базового класса трейлинга предусматривалась возможность управления включением/выключением трейлинг стопа через кнопку. Создадим эксперта-помощника для сопровождения позиций на различных символах различными типами трейлинг стопа. Эксперт не будет открывать сам позиции, а только сопровождать открытые.
6.1. Создаем в редакторе MetaEditor нового эксперта с именем Sample_TrailingStop.
6.2. Подключаем файл с классом Sample_TrailingStop.mqh.
#include <Sample_TrailingStop.mqh>
6.3. Объявляем внешние параметры для индикаторов.
input double SARStep=0.02;
input double SARMaximum=0.02;
input int NRTRPeriod=40;
input double NRTRK=2;
6.4. Объявляем массив с символами, на которых эксперт сможет работать.
string Symbols[]={"EURUSD","GBPUSD","USDCHF","USDJPY"};
6.5. Объявляем массивы для загрузки классов.
CParabolicStop *SARTrailing[];
CNRTRStop *NRTRTrailing[];
6.6. В функции OnInit() эксперта изменяем размеры массивов для загрузки классов в соответствии с размером массива Symbols.
ArrayResize(SARTrailing,ArraySize(Symbols));
ArrayResize(NRTRTrailing,ArraySize(Symbols));
6.7. В цикле для каждого элемента массива выполняем загрузку экземпляра класса.
for(int i=0;i<ArraySize(Symbols);i++)
  {
   SARTrailing[i]=new CParabolicStop();
   SARTrailing[i].Init(Symbols[i],PERIOD_CURRENT,false,true,true,5,15+i*17,Silver,Blue);
   if(!SARTrailing[i].SetParameters(SARStep,SARMaximum))
     {
      Alert("trailing error");
      return(-1);
     }
   SARTrailing[i].StartTimer();

   NRTRTrailing[i]=new CNRTRStop();
   NRTRTrailing[i].Init(Symbols[i],PERIOD_CURRENT,false,true,true,127,15+i*17,Silver,Blue);
   if(!NRTRTrailing[i].SetParameters(NRTRPeriod,NRTRK))
     {
      Alert("trailing error");
      return(-1);
     }
   NRTRTrailing[i].StartTimer();
  }
Обратите внимание: при вызове методов Init() выполняется вычисление координат кнопок. Слева будут располагаться кнопки включения трейлинг стопа по Paraboloic, справа — по NRTR.
6.8. В функцию OnTick() добавляем вызов метода DoStoploss() для каждого экземпляра трейлинга.
for(int i=0;i<ArraySize(Symbols);i++)
  {
   SARTrailing[i].DoStoploss();
   NRTRTrailing[i].DoStoploss();
  }
6.9. Добавляем обработку событий графика.
void OnChartEvent(const int         id,
                  const long   &lparam,
                  const double &dparam,
                  const string &sparam
                  )
  {
   for(int i=0;i<ArraySize(Symbols);i++)
     {
      SARTrailing[i].EventHandle(id,lparam,dparam,sparam);
      NRTRTrailing[i].EventHandle(id,lparam,dparam,sparam);
     }

  }
6.10. В функции Deinit() выполняем деинициализацию всех экземпляров класса и их удаление.
for(int i=0;i<ArraySize(Symbols);i++)
  {
   SARTrailing[i].Deinit();
   NRTRTrailing[i].Deinit();
   delete(SARTrailing[i]);
   delete(NRTRTrailing[i]);
  }
Компилируем, присоединяем эксперт на график, на графике появляются индикаторы и кнопки (рис. 11) — эксперт готов к работе.
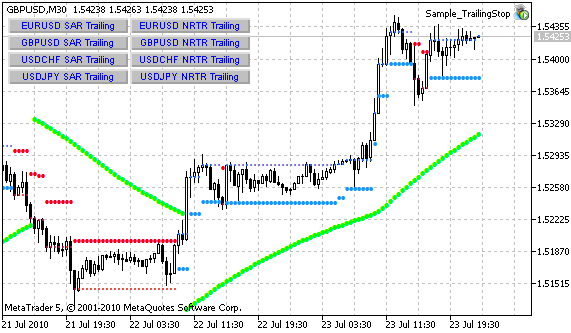
Рис. 11. Кнопки и индикаторы на графике после запуска эксперта Sample_TrailingStop.
Остается только нажать нужную кнопку для сопровождения соответствующей позиции, когда она будет открыта.
Файл эксперта Sample_TrailingStop.mq5 прилагается к статье.
Заключение
Освежим в памяти порядок использования класса CTrailingStop при создании механической торговой системы:
1. Подключить файл Sample_TrailingStop.mqh.
2. Объявить внешние переменные с параметрами индикатора используемого трейлинг стопа.
3. Создать экземпляр класса.
4. Добавить вызов методов Init(), SetParameters(), StartTimer(), On() из функции OnInit() эксперта.
5. Добавить вызов метода Refresh() из функции OnTimer() эксперта.
6. Добавить вызов метода DoStopLoss() из функции OnTick() эксперта.
7. Добавить вызов метода Deinit() из функции OnDeinit() эксперта.
Семь шагов, не более 5-ти минут, и в вашем эксперте уже есть функция трейлинг стопа!
 Здравствуйте, товарищи форекс трейдеры!
В этом уроке мы поговорим о стоп лоссе. Стоп лосс (Stop Loss) – это колоссальной важности вещь, от которой напрямую зависит ваш успех, либо же неудача в трейдинге. Далее мы узнаем, что такое стоп лосс, где его выставлять и каким именно образом, какой стоп лучше использовать, сравним короткие и длинные стоп приказы, ну и наконец придем к выводу, можно ли торговать без стопа и насколько это грамотная идея.
Что такое стоп лосс?

Стоп лосс – это ордер, ограничивающий ваши убытки, автоматически закрывающий вашу позицию при достижении ценой определенного ценового уровня. Допустим, вы посмотрели на указанную свечу и решили, что ее нетипично длинная тень скорее всего свидетельствует о предстоящем развороте. Таким образом, после закрытия свечи, вы открываете ордер на продажу.
 Но спустя некоторое время цена идет вверх, то есть ваше предположение оказалось неверным и цена идет против вашей позиции. Конечно, вы можете в любой момент закрыть позицию вручную, тем самым зафиксировав убыток, но, к примеру, вас в этот момент может просто не оказаться рядом с монитором, либо может сработать какой-то эмоциональный фактор, наивная вера в то, что цена обязательно развернется. Впоследствии убытки могут привести вплоть до полного истощения вашего счета. То есть, теоретически, если у вас нет стоп лосса, то риск сделки будет равен депозиту.
В том случае, когда мы заранее устанавливаем стоп лосс на каком-то уровне, мы тем самым заранее ограничиваем потенциальный риск, зная, что в этой конкретной сделке мы не сможем потерять более определенной суммы, либо, что более грамотно, определенного процента от депозита.
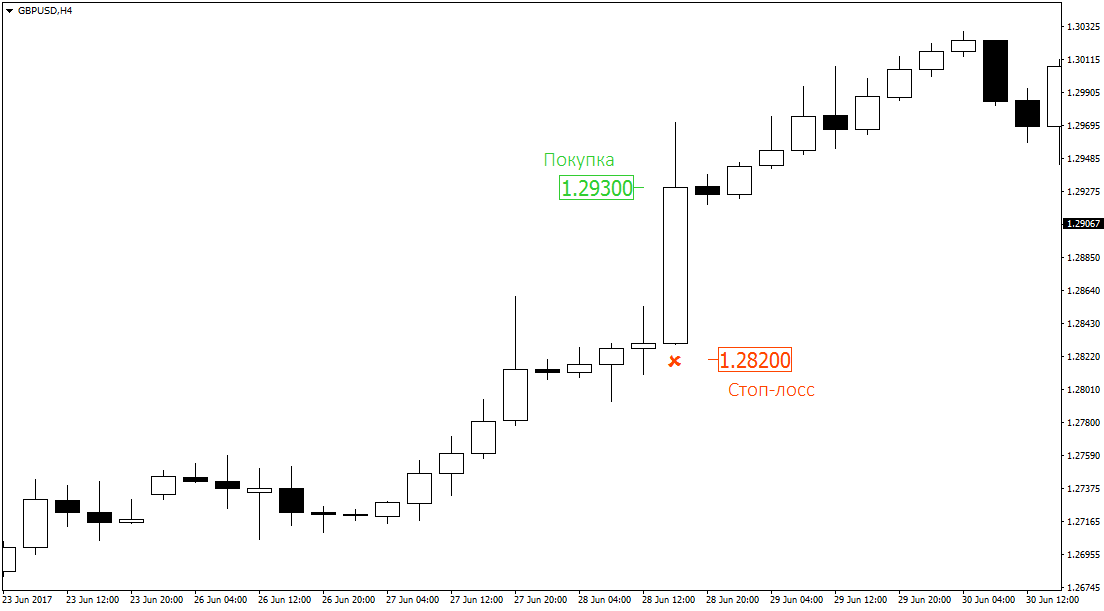
Стоп лосс необходимо ставить в том месте, где точно будет ясно, что мы были неправы. То есть там, где сетап теряет свой смысл. В данном случае очевидно, что наше предположение потеряет свою силу, если цена уйдет за крайнюю точку хвоста. Соответственно, стоп лосс мы ставим немногим выше максимума свечи. На случай каких-либо технических выбросов всегда прибавляем пару пунктов.
 Как устанавливать стоп лосс в MT4/MT5
 Как устанавливать стоп лосс в MT4/MT5
Стандартное окно открытия ордера практически одинаково в терминалах MetaTrader 4 и MetaTarder 5. Помимо кнопок купить/продать здесь имеются поля для установки тейк профита и стоп лосса. Здесь вы можете выбрать стоп лосс еще до открытия сделки, что рекомендуется делать, если рынок достаточно спокоен. В случае продажи стоп ставится выше цены открытия, в случае покупки – ниже.
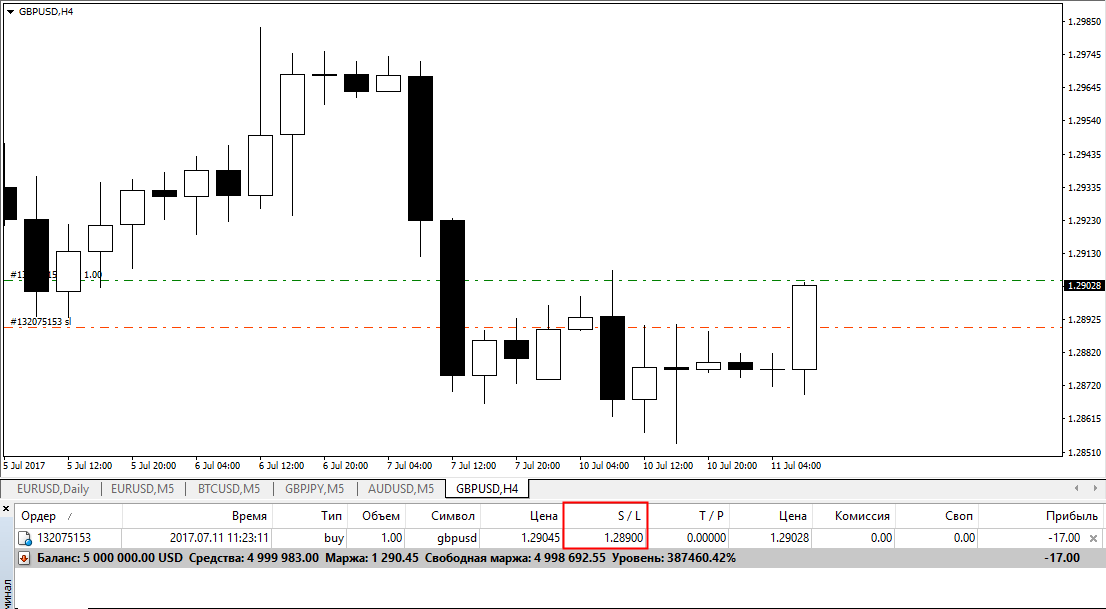
 Если мы откроем позицию, стоп лосс будет отображен на графике в виде штрих-пунктирной линии и также в окне терминала в столбике “S / L”. Для редактирования ордера щелкните два раза по соответствующей строке в терминале.
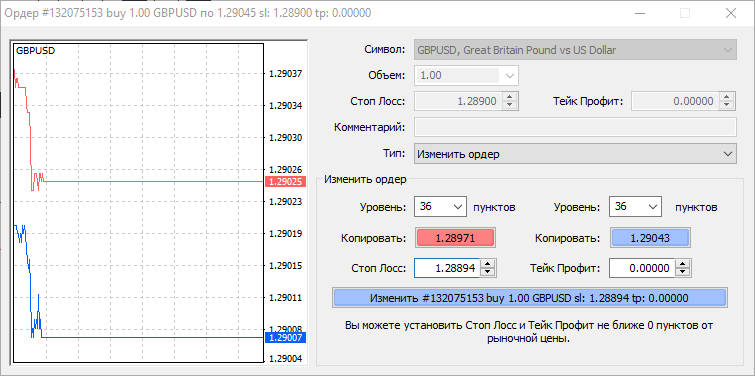
 Здесь вы можете изменить стоп лосс в любую из сторон. Если вы открыли сделку без стоп лосса, то таким образом его можно добавить к позиции. Стоит учесть, что на некоторых типах счетов нельзя поставить стоп лосс одновременно с открытием сделки, и сделать это можно, только открыв позицию.
Способы установки стоп лосса

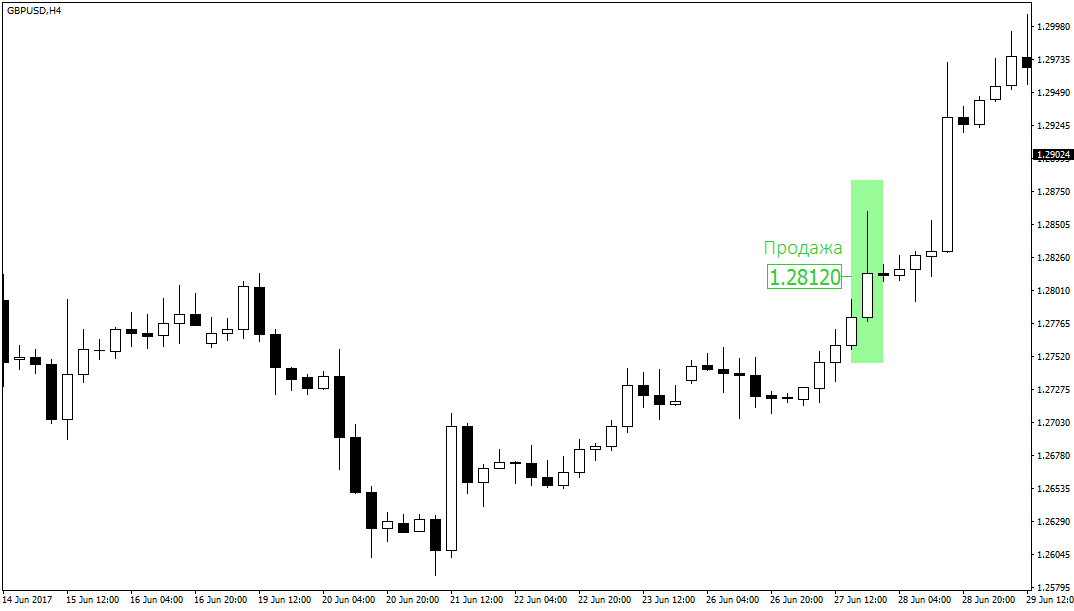
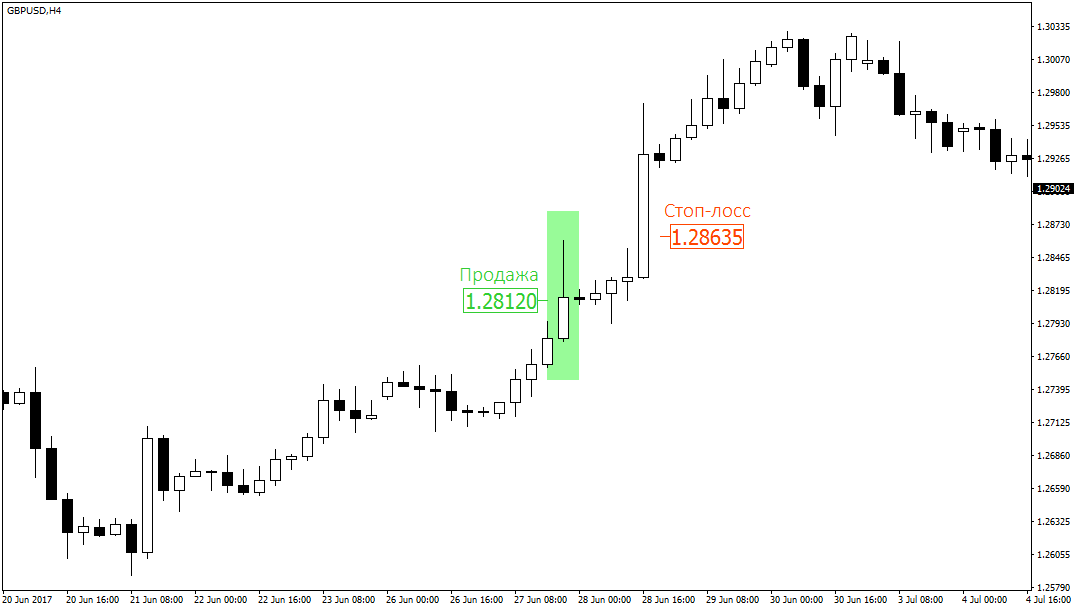
Локальный экстремум. Допустим, в данном случае мы решили, что тренд вверх продолжится и открыли сделку на покупку по текущей цене. Один из самых банальнейших, классических методов установки стоп лосса – установка ниже (в случае покупок), либо выше (в случае продаж) предыдущего экстремума.
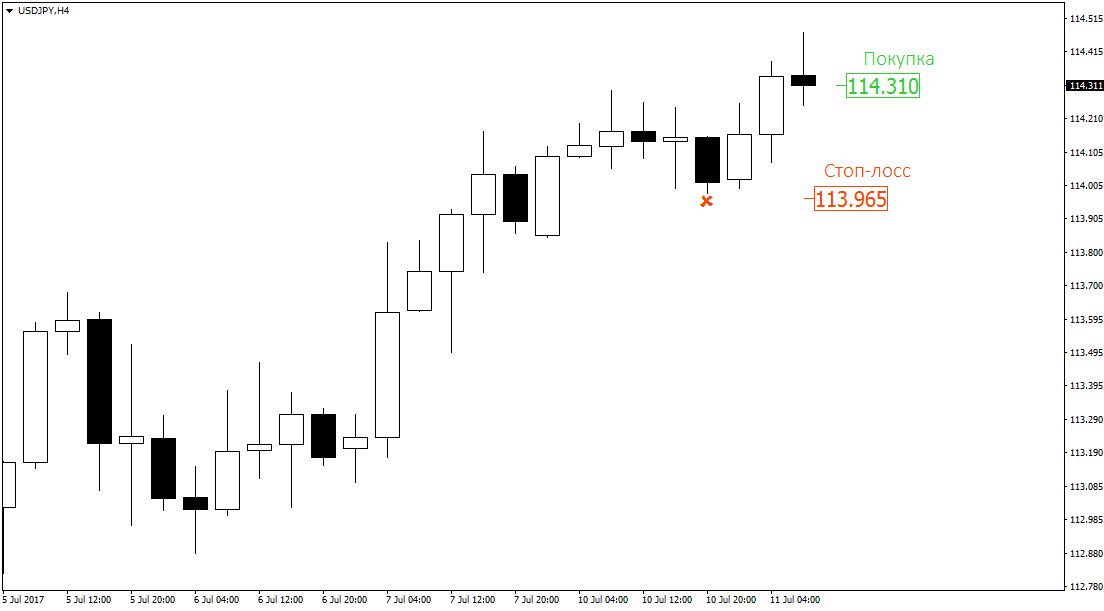
Обратите внимание, что мы никогда не ставим стоп лосс ровно на ценовом максимуме или минимуме (пункт в пункт). Нужно учитывать, что всегда возможны небольшие ценовые всплески, и чтобы стоп по чистой случайности не выбило таким всплеском, мы всегда ставим стоп лосс чуть выше или чуть ниже ориентира (экстремума).
Большая свеча. Следующий способ установки стоп лосса – под крайней точкой или над крайней точкой большой свечи. Под определение большой свечи подходит свеча раза в три больше средней свечи на видимом графике.
Допустим, вы увидели такую большую свечу и решили, что это сигнал к покупкам. В случае с покупкой, стоп лосс можно устанавливать под ее крайней точкой на несколько пунктов ниже минимума.
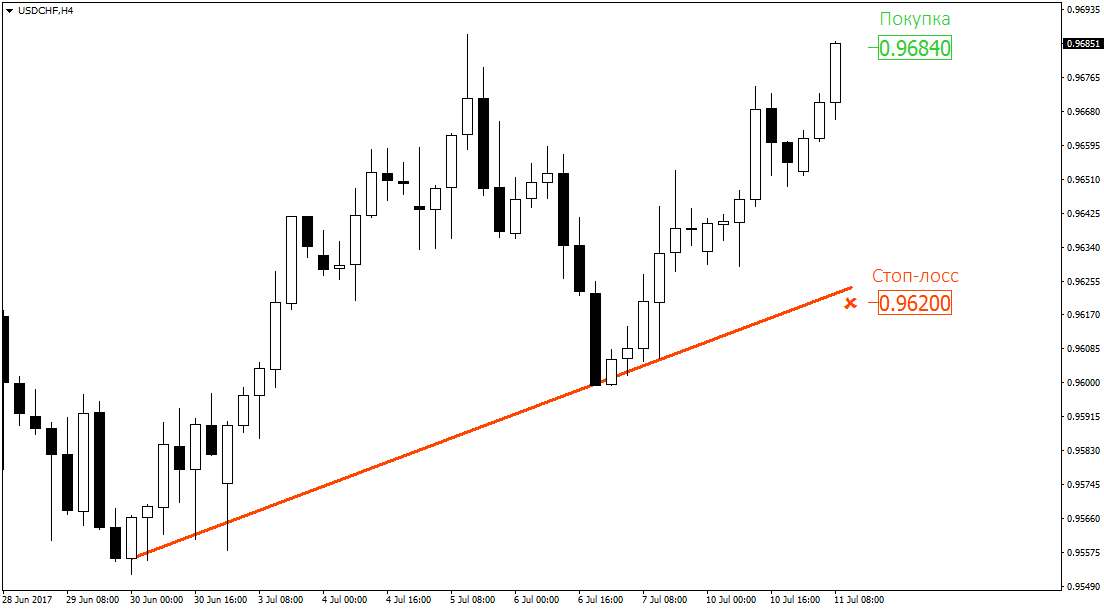
Трендовая линия. Также стоп лосс можно устанавливать под (в случае с покупками) или над (для продаж) трендовой линией. О том, как построить трендовую линию, у нас есть отдельный видео урок. Логичный вопрос, так как цена и, соответственно, трендовая линия будут меняться с течением времени, то стоит ли перемещать стоп лосс? В данном случае, стоп лосс действительно можно перемещать вдоль трендовой линии, например, с каждой новой свечой.
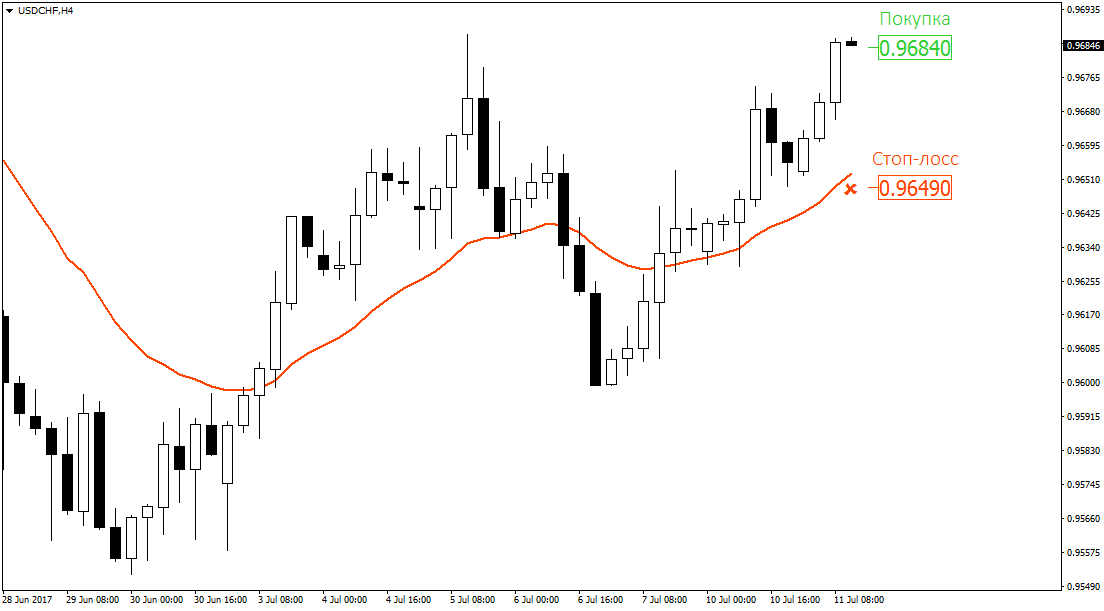
 Скользящая средняя. Еще один метод – выставление стоп лосса по скользящей средней. В целом, здесь есть нечто общее с методом установки по трендовой линии. Такой стоп также можно передвигать вслед за средней.
 По времени. Стоп можно устанавливать не только по цене, но и по времени. По открытии сделки устанавливаем стоп лосс на достаточно большом расстоянии, на случай форс-мажорных обстоятельств. Но, на самом деле, выходим из сделки по истечении какого-то времени, если не было движения в сторону прибыли. Общеизвестная стратегия – фильтр 5 свечей. То есть на основе какого-либо сигнала мы открываем позицию, и, если в течении 5 свечей цена стоит на месте, что значит сигнал не оказал никакого влияния на рынок, то мы просто выходим из сделки.
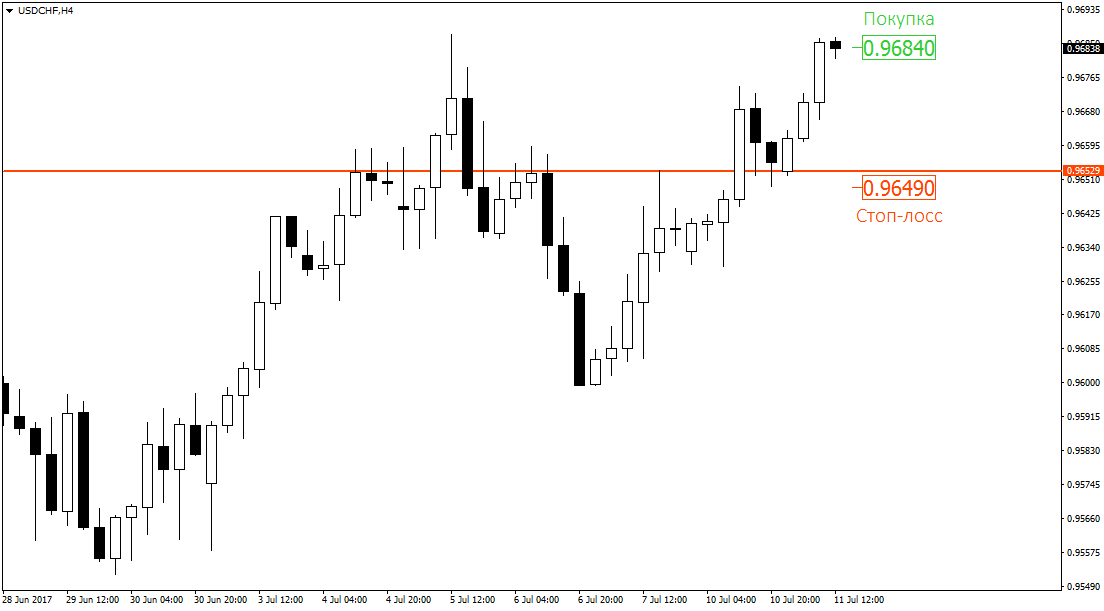
Ключевые уровни. Надежный способ установки стоп лосса – за ближайшим уровнем поддержки/сопротивления. В случае продаж стоп ставим чуть выше уровня сопротивления, в случае покупок – чуть ниже уровня поддержки.
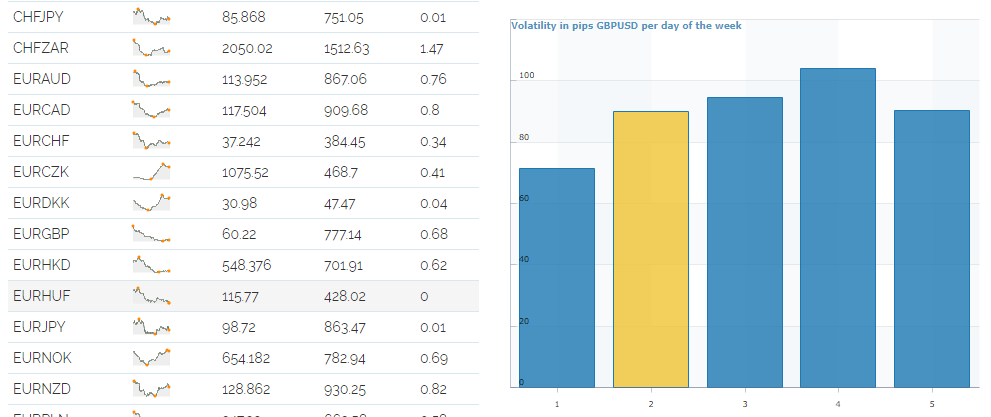
 Волатильность. Неплохим ориентиром для установки стоп лосса является волатильность. Данный метод установки стоп лосса подходит для внутридневной торговли. Данные по волатильности можно смотреть тут. В списке находите нужную пару и смотрите среднюю дневную волатильность. Например, по GBPUSD это значение составляет чуть менее 100 пунктов.
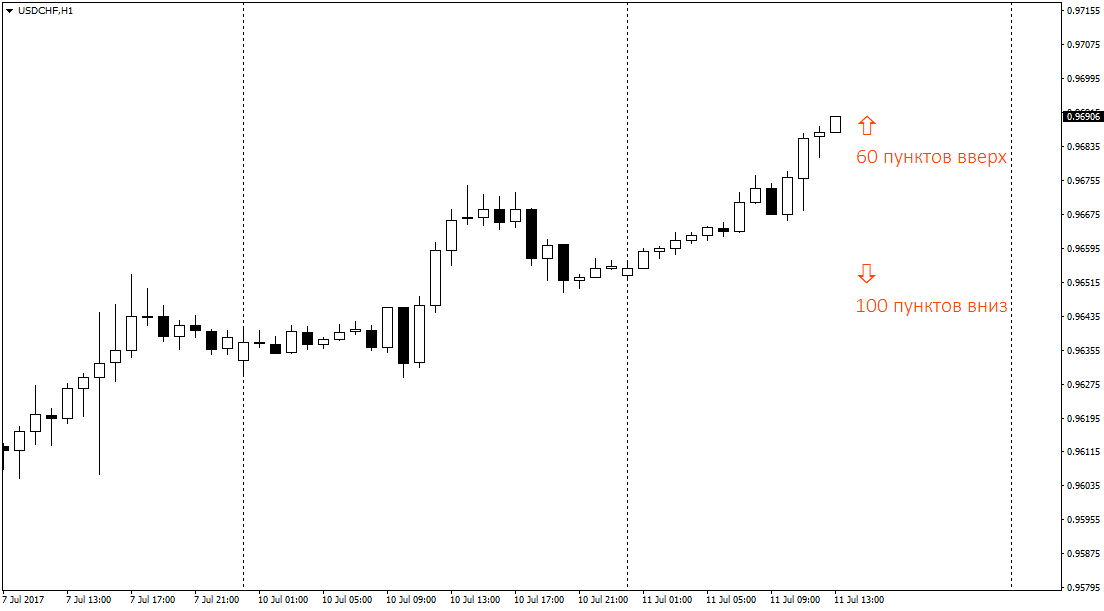
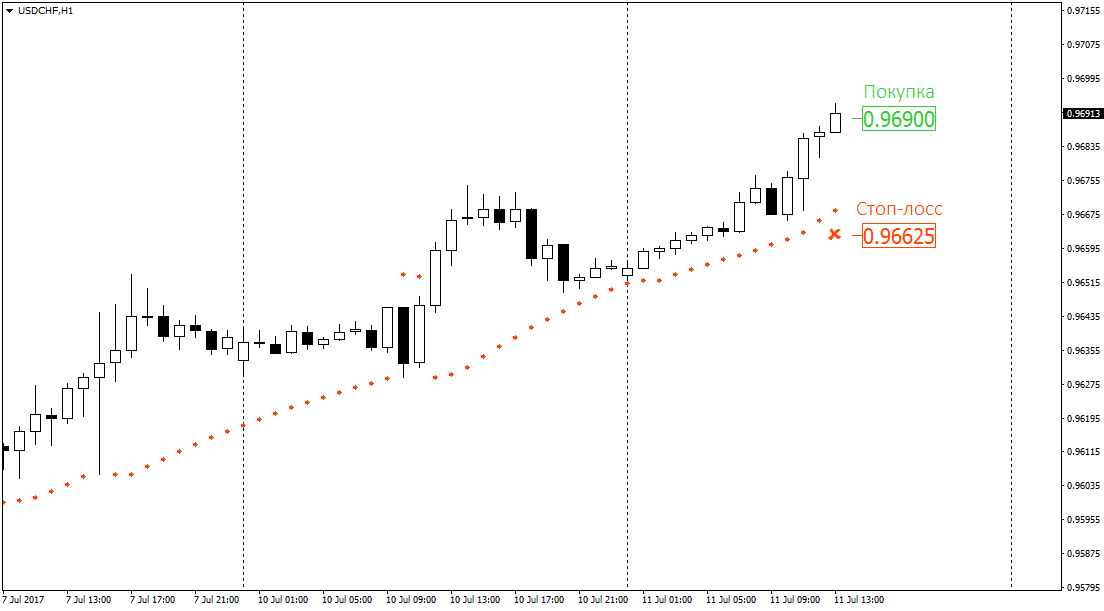
 Далее вычитаем из этого значения, какое расстояние цена уже прошла за день. В данном случае цена уже прошла вверх 60 пунктов. Значит, теоретически цена может либо пройти вверх еще 40 пунктов, либо пройти вниз 100 пунктов. Стоп лосс устанавливаем соответственно этим значениям.
 В целом, этот метод очень субъективный и скорее подходит для определения того, куда цена может пойти, то есть сколько цена еще может выжать из рынка. Но, к примеру, если цена уже прошла 120 пунктов, можно установить совсем небольшой стоп лосс в районе 10-20 пунктов с расчетом на то, что среднедневная волатильность у пары уже исчерпана и вероятность дальнейшего хода цены в том же направлении небольшая.
Parabolic SAR. Еще один классический метод для расчета стопа – индикатор Parabolic SAR. Тут все просто. При открытии сделки устанавливаем стоп лосс на некотором расстоянии за точками Параболика.
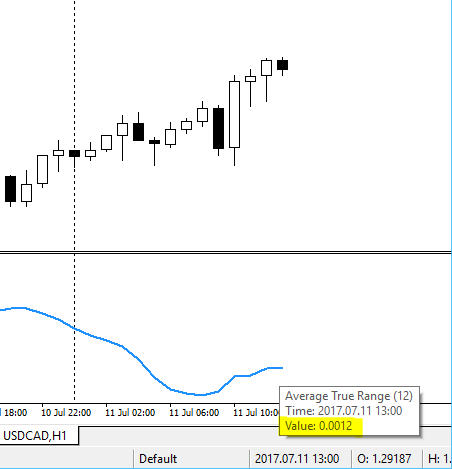
 Индикатор ATR. Способ, который я настоятельно рекомендую – установка стоп лосса по индикатору Average True Range (или ATR). Данный индикатор является показателем волатильности рынка. В качестве инструмента для установки стоп лоссов он очень и очень хорош. Показания индикатора изменяются вместе с волатильностью рынка и, соответственно, мы всегда имеем стоп лосс, соответствующий текущей волатильности рынка.
Для установки стопа смотрим текущее значение ATR. В данном случае 12 пунктов – это минимально возможный стоп лосс для данного инструмента и таймфрейма. Как правило, показания ATR умножают на какой-либо множитель, обычно от 2 до 4. Зависит от стратегии, вашей восприимчивости к риску и взглядов на рынок.
 Лучше всего использовать комбинированный вариант. То есть в качестве ориентира берем показания ATR и при установке стопа корректируем его относительно ближайшего экстремума или уровня поддержки/сопротивления.
 Короткий стоп лосс или длинный? Здесь, опять же, лагеря расходятся. Вы вольны выбирать свой вариант, что вам больше по душе – больше коротких стопов или меньше стопов, но более длинных. Многое здесь зависит от конкретного трейдера.
Можно ли торговать без стоп лосса? Теоретически можно, конечно, но это налагает как торговые, так и эмоциональные риски. Есть опытные трейдеры, торгующие без стоп лосса успешно, однако у них за плечами уже огромный опыт. Если же вы неопытный трейдер, торгуете на рынке менее года – то стоп лосс ставьте всегда.
Также правильно рассчитанный стоп лосс можно двигать за ценой. Однако, никогда не передвигайте стоп лосс против цены. То есть цена идет против вас, а вы пытаетесь отодвинуть стоп лосс подальше – так делать точно не стоит, так как есть определенные ценовые уровни, к которым цена не возвращается на протяжении очень долгого периода времени.
Заключение

На этом все, друзья. Обязательно изучите индикатор ATR, если вы с ним еще не знакомы. Помните, технический анализ – это не точная наука, а искусство. Применяйте комбинированные методики и не забывайте использовать стоп лоссы.
С уважением, Власов Павел
TradeLikeaPro.ru

Hi I’m new to MQL5 and I wanted to add a trailing stop loss to my expert advisor but some reason it does not add. Here is the code:
 if(PositionSelect(_Symbol) && UseTrailingStop == true)
  {
   double TrailingStop = (atr[1] * 3) + close[1];
   Trail.TrailingStop(_Symbol,TrailingStop,0,0);
  }
Please note that close[1] is for the close price of the previous bar and atr[1] is for the value of the average true range. What am i doing wrong?????
asked Jan 23, 2021 at 13:10
![]()
1
There you go: hope this is helpful.
//--- trailing position
   for(i=0;i<PositionsTotal();i++)
     {
      if(Symbol()==PositionGetSymbol(i))
        {
         if(PositionGetInteger(POSITION_TYPE)==POSITION_TYPE_BUY)
           {
            sl=MathMax(PositionGetDouble(POSITION_PRICE_OPEN)+Spread*_Point,Bid-SL*_Point);

            if(sl>PositionGetDouble(POSITION_SL) && (Bid-StopLevel*_Point-Spread*_Point)>PositionGetDouble(POSITION_PRICE_OPEN))
              {
               request.action = TRADE_ACTION_SLTP;
               request.symbol = _Symbol;
               request.sl = NormalizeDouble(sl,_Digits);
               request.tp = PositionGetDouble(POSITION_TP);
               OrderSend(request,result);
               if(result.retcode==10009 || result.retcode==10008) // request executed
                  Print("Moving Stop Loss of Buy position #",request.order);
               else
                 {
                  Print(ResultRetcodeDescription(result.retcode));
                  return;
                 }
               return;
              }
           }

         if(PositionGetInteger(POSITION_TYPE)==POSITION_TYPE_SELL)
           {
            sl=MathMin(PositionGetDouble(POSITION_PRICE_OPEN)-Spread*_Point,Ask+SL*_Point);

            if(sl<PositionGetDouble(POSITION_SL) && (PositionGetDouble(POSITION_PRICE_OPEN)-StopLevel*_Point-Spread*_Point)>Ask)
              {
               request.action = TRADE_ACTION_SLTP;
               request.symbol = _Symbol;
               request.sl = NormalizeDouble(sl,_Digits);
               request.tp = PositionGetDouble(POSITION_TP);
               OrderSend(request,result);
               if(result.retcode==10009 || result.retcode==10008) // request executed
                  Print("Moving Stop Loss of Sell position #",request.order);
               else
                 {
                  Print(ResultRetcodeDescription(result.retcode));
                  return;
                 }
               return;
              }
           }
        }
     }
answered Jan 29, 2021 at 6:21
![]()
1
Совершение сделок
Торговая деятельность в платформе связана с формированием и отсылкой рыночных и отложенных ордеров для исполнения брокером, а также с управлением текущими позициями путем их модификации или закрытия. Платформа позволяет удобно просматривать торговую историю на счете, настраивать оповещения о событиях на рынке и многое другое.
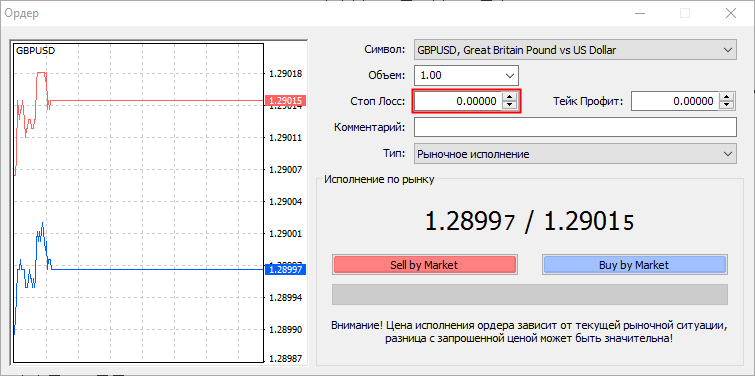
Открытие позиций #
Открытие позиции или вход в рынок — это первичная покупка или продажа определенного объема финансового инструмента. В торговой платформе это можно осуществить путем выставления рыночного ордера, в результате которого заключается сделка. Позиция также может быть открыта и при срабатывании отложенного ордера.
Выставление ордера и общие параметры #
Вызвать диалоговое окно составления ордера можно различными способами:

Рассмотрим общие параметры ордера:
- Символ — имя финансового инструмента, по которому совершается сделка.
- Тип — если в данном поле выбран один из режимов исполнения, совершается рыночная операция с выбранным инструментом. В ином случае происходит выставление отложенного ордера выбранного типа.
- Объем — объем ордера в лотах. Чем больше объем совершаемой сделки, тем больше возможная прибыль или убыток в зависимости от того, куда пойдет цена инструмента. Объем сделки также влияет на размер средств (маржи), которые резервируются на торговом счете для обеспечения позиции.
- Стоп Лосс — уровень Стоп Лосс в ценах или количестве пунктов от цены, указанной в ордере, в зависимости от настроек платформы. Уровень устанавливается для ограничения убытков по позиции. Если оставить в данном поле нулевое значение, данный вид ордера прикреплен не будет;
- Тейк Профит — уровень Тейк Профит в ценах или количестве пунктов от цены, указанной в ордере, в зависимости от настроек платформы. Уровень устанавливается для фиксации прибыли по позиции. Если оставить в данном поле нулевое значение, данный вид ордера прикреплен не будет;
- Комментарий — необязательный текстовый комментарий к ордеру. Максимальная длина комментария составляет 31 символ. Комментарий отображается в списке открытых позиций, а также в истории ордеров и сделок. Комментарий к ордеру может быть изменен брокером или сервером. Например, в случае закрытия по Стоп Лосс или Тейк Профит, в нем будет указана соответствующая информация.
- Существует возможность удобного изменения значений цены, объемов или уровней Стоп Лосс и Тейк Профит на определенную величину:
-
- Удерживая клавишу «Shift», — на 5 пунктов;
- Удерживая клавишу «Ctrl», — на 10 пунктов;
- Удерживая клавиши «Ctrl»+»Shift», — на 50 пунктов.
- В любом из окон выставления ордера можно скрыть или показать тиковый график. Для этого дважды нажмите на окне.
- В торговом окне показываются текущие лучшие цены Bid и Ask.
- После исполнения ордера во вкладке «Торговля» окна «Инструменты» появится соответствующая запись об открытой позиции, а во вкладке «История» — ордер и сделка (сделки), которая была совершена по нему.
- Если в ордере указаны некорректные уровни Стоп Лосс или Тейк Профит, то при нажатии кнопок покупки или продажи в окне появится сообщение «Неверный S/L или T/P» и ордер не будет принят.
Чтобы отправить ордер на покупку, нажмите кнопку Buy, для отправки ордера на продажу — кнопку Sell.
После отсылки приказа в окне будет показан результат его исполнения — успешное совершение торговой операции или отказ с описанием причины, почему она не была исполнена. Если в настройках платформы включена опция «Торговля одним кликом», то при успешном исполнении ордера окно торговли закрывается сразу без уведомления о результате исполнения.
Теперь рассмотрим особенности торговли при различных режимах исполнения. Он зависит от типа инструмента и от брокера.
Совершение сделки в режиме немедленного исполнения #
В этом режиме исполнение рыночного ордера осуществляется по цене, предложенной брокером. При отправке запроса на исполнение, платформа автоматически подставляет в ордер текущие цены. В случае, если брокер принимает цены, ордер будет исполнен.
Если за время обработки ордера цена инструмента изменилась на величину большую, чем указана в поле «Отклонение», то дилер (сервер) может не принять ордер и предложить новые цены исполнения. В таком случае в окне создания появится соответствующее сообщение:

Если вы согласны с новыми ценами, нажмите «Принять», тогда исполнение ордера произойдет по новым ценам. Если новая цена не устраивает, нажмите «Отклонить».
Новые цены будут действительны лишь несколько секунд. Если вы не примете решение за это время, в окне появится надпись «Цена изменилась», и после нажатия кнопки «ОК» вы вернетесь к исходному окну выставления ордера.
Отклонение — величина отклонения цены исполнения ордера от указанной цены, на которую согласен трейдер. Чем больше указанная величина, тем меньше вероятность получить новую цену исполнения (реквот) в ответ на запрос исполнения ордера. Если отклонение меньше или равно заданному параметру, происходит исполнение ордера по новой цене без дополнительного уведомления. В противном случае брокер возвращает новые цены, по которым может быть исполнен ордер.
Совершение сделки в режиме исполнения по запросу #
В этом режиме исполнение рыночного ордера осуществляется по цене, предварительно полученной от брокера. Перед отправкой рыночного ордера у брокера запрашиваются цены его исполнения. После их получения выполнение ордера по данной цене можно либо подтвердить, либо отклонить.
Параметры ордера могут быть изменены только до того, как были запрошены цены. После того, как был выполнен запрос, трейдер может только произвести выставление ордера с заранее выставленными параметрами.
Для получения цен нажмите кнопку «Запрос». После этого в окне появятся кнопки покупки («Buy») и продажи («Sell»). Предложенные после запроса котировки будут действительны всего несколько секунд. Если в течение этого времени вы не примете решение, кнопки «Buy» и «Sell» будут снова скрыты.
Совершение сделки в режиме исполнения по рынку #
В этом режиме исполнения рыночного ордера решение о цене исполнения принимает брокер без дополнительного согласования с трейдером. Отправка рыночного ордера в таком режиме подразумевает досрочное согласие с ценой, по которой он будет выполнен.
В параметре «Заполнение» трейдер может указать дополнительные правила исполнения ордера: «Все/Ничего» или «Все/Частично». Если данное поле неактивно, значит, возможность выбора заблокирована на сервере.
По нажатии кнопки «Sell by Market» или «Buy by Market» будет создан приказ брокеру на исполнение сделки по продаже или покупке, соответственно, по цене, определенной брокером.
Совершение сделки в режиме биржевого исполнения #
В параметре Заполнение трейдер может указать дополнительные правила исполнения ордера: «Все/Ничего» или «Все/Частично». Если данное поле неактивно, значит возможность выбора заблокирована на сервере.
При нажатии кнопки «Sell» или «Buy» будет создан приказ брокеру на исполнение сделки по продаже или покупке, соответственно.
Дополнительную информацию о торговле в режиме биржевого исполнения можно узнать в разделе «Стакан цен».
Управление позициями #
Важным аспектом торговли на финансовых рынках является грамотное управление позициями на счете. В торговой платформе есть все необходимое для этого.
Где отображаются текущие открытые позиции #
Список текущих открытых позиций отображается в окне «Инструменты» на вкладке «Торговля».
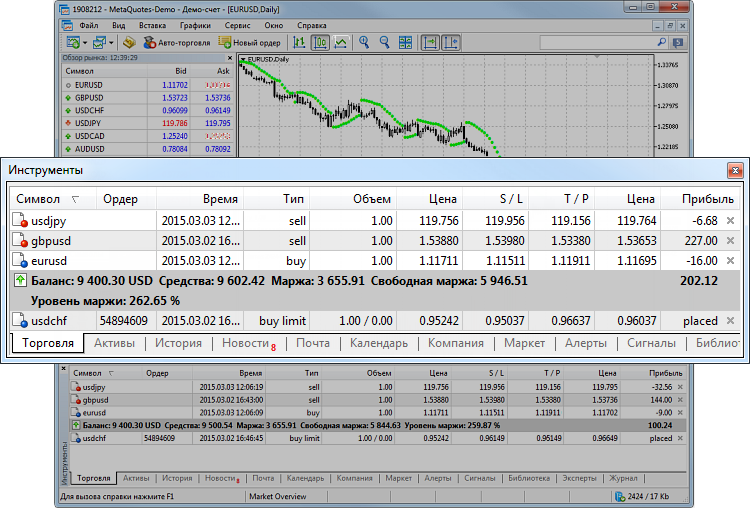
Список открытых позциий:
- Тикет позиции. Уникальное число, которое присваивается каждой вновь открытой позиции. Как правило, соответствует тикету ордера, в результате которого она была открыта, за исключением случаев изменения тикета в результате служебных операций на сервере. Например, начисления свопов переоткрытием позиции.
- Символ — финансовый инструмент, по которому открыта позиция.
- ID — идентификатор позиции во внешней торговой системе (например, на бирже). Этот параметр может не отображаться в зависимости от настроек вашего брокера.
- Время — время открытия позиции. Запись представлена в виде ГГГГ.ММ.ДД ЧЧ:ММ (год.месяц.день час:минута).
- Тип — тип позиции: «Buy» — длинная, «Sell» — короткая.
- Объем — объем торговой операции (в лотах или единицах). Минимальный объем и шаг его изменения ограничивается брокерской компанией, максимальное количество — размером депозита.
- Цена — цена сделки, в результате совершения которой была открыта позиция. Если открытая позиция является результатом совершения нескольких сделок, в данном поле отображается их средневзвешенная цена: (цена сделки 1 * объем сделки 1 + … + цена сделки N * объем сделки N) / (объем сделки 1 + … + объем сделки N). Точность округления средневзвешенной цены равна количеству знаков после запятой в цене символа плюс три дополнительных знака.
- S/L — уровень Стоп Лосс для текущей позиции. Если такой ордер не был установлен, в поле отображается нулевое значение.
- T/P — уровень Тейк Профит для текущей позиции. Если такой ордер не был установлен, в поле отображается нулевое значение.
- Цена — текущая цена финансового инструмента. Для позиций на продажу отображается цена Bid, для позиций на покупку — цена Ask, для позиций по биржевым инструментам (в обоих направлениях) отображается цена последней совершенной сделки (Last).
- Стоимость — рыночная стоимость позиции. Рассчитывается как произведение цены открытия на размер контракта.
- Своп — сумма начисленных свопов.
- Прибыль — в этом поле записывается финансовый результат совершения сделки с учетом текущей цены. Положительный результат свидетельствует о прибыльности совершенной сделки, а отрицательный — об убыточности. Положительные и отрицательные значения подсвечиваются синим и красным цветом, соответственно.
- Изменение — изменение цены актива в процентах с момента совершения операции. Положительные и отрицательные значения подсвечиваются синим и красным цветом, соответственно.
- ID эксперта — значение, указываемое торговым роботом при открытии ордеров и позиций (магический номер).
Список выставленных отложенных ордеров:
- Символ — финансовый инструмент, по которому выставлен отложенный ордер.
- Ордер — номер тикета (уникальный номер) отложенного ордера.
- ID — идентификатор ордера во внешней торговой системе (например, на бирже). Этот параметр может не отображаться в зависимости от настроек вашего брокера.
- Время — время установки отложенного ордера. Запись представлена в виде ГГГГ.ММ.ДД ЧЧ:ММ (год.месяц.день час:минута).
- Тип — тип отложенного ордера: «Sell Stop», «Sell Limit», «Buy Stop», «Buy Limit», «Buy Stop Limit» или «Sell Stop Limit».
- Объем — объем, запрошенный в отложенном ордере, и объем, заполненный сделкой (в лотах или единицах).
- Цена — цена, при достижении которой сработает отложенный ордер.
- S/L — уровень выставленного приказа Стоп Лосс. Если такой ордер не был установлен, в поле отображается нулевое значение.
- T/P — уровень выставленного приказа Тейк Профит. Если такой ордер не был установлен, в поле отображается нулевое значение.
- Цена — текущая цена финансового инструмента. Для ордеров на продажу отображается цена Bid, для ордеров на покупку — цена Ask, для ордеров по биржевым инструментам (в обоих направлениях) отображается цена последней совершенной сделки (Last).
- Комментарий — в этой колонке записываются комментарии к отложенному ордеру. Комментарий можно записать только при выставлении ордера. При модификации комментарий изменить нельзя. Кроме того, комментарий к торговой операции может записать брокерская компания.
- Состояние — в последней колонке отложенного ордера отображается его текущий статус: «Стартовавший», «Установленный» и т.д.
Состояние торгового счета:
- Баланс — количество средств на счете без учета результатов по текущим открытым позициям (депозит).
- Кредит — количество средств, предоставленных трейдеру брокером в кредит.
- Активы — текущая стоимость приобретенных финансовых инструментов (длинных позиций), определенная в валюте депозита трейдера. Стоимость определяется динамически по цене последней сделки по финансовому инструменту с учетом коэффициента ликвидности. Фактически сумма активов эквивалентна сумме денег, которую бы клиент получил при немедленном закрытии длинных позиций. Показатель используется при торговле на биржевых рынках. Более подробное описание приведено в отдельном разделе.
- Обязательства — задолженность по текущим коротким позициям, рассчитываемая как стоимость этих позиций по текущей рыночной цене. Фактически сумма обязательств эквивалентна сумме денег, которую трейдер бы выплатил при немедленном закрытии коротких позиции. Показатель используется при торговле на биржевых рынках. Более подробное описание приведено в отдельном разделе.
- Комиссия — сумма комиссии по ордерам и позициям, накопленная в течение дня/месяца. В зависимости от условий взимания комиссии (регулируются брокером) в течение дня/месяца осуществляется предварительный расчет комиссии, соответствующая сумма блокируется на счете и отображается в данном поле. В конце дня/месяца осуществляется окончательный расчет комиссии, и соответствующая сумма снимается со счета балансовой операцией (отображается в виде отдельной сделки на вкладке «История»), а заблокированные средства разблокируются.
Если комиссия взимается моментально при совершении сделки, ее значение записывается в поле «Комиссия» сделок на вкладке «История». - Заблокировано — при определенных торговых условиях (определяются брокером) прибыль, зафиксированная трейдером в течение дня, не может быть использована для совершения торговых операций (не учитывается в свободной марже). Данная заблокированная прибыль отображается в этом поле. В конце торгового дня данная прибыль разблокируется и зачисляется на баланс счета.
- Средства — средства рассчитываются как Баланс + Кредит — Комиссия +/- Плавающая прибыль/убыток — Заблокировано.
- Маржа — количество средств, требуемых для обеспечения открытых позиций и отложенных ордеров.
- Свободная маржа — количество свободных средств, которые могут быть использованы для открытия позиций. Рассчитывается как Средства — Маржа. В зависимости от торговых условий (определяется брокером), в средствах может учитываться или не учитываться: плавающая прибыль, плавающий убыток или плавающая прибыль и плавающий убыток вместе.
- Уровень маржи — процентное соотношения объема средств, имеющихся на данном счете, к объему маржи (Средства / Маржа * 100).
- Итог сделок — общий финансовый результат по всем открытым позициям.
Строка состояния счета подсвечивается красным цветом, если счет находится в состоянии Margin Call или Stop Out.
Здесь отображаются все параметры позиций: финансовый инструмент, тип, объем, текущая прибыли/убыток, а также другие параметры. Помимо этого, показывается текущее состояние торгового счета и общий финансовый итог по всем открытым позициям.
Суммарную информацию о состоянии активов по всем открытым позициям можно посмотреть на вкладке «Активы».
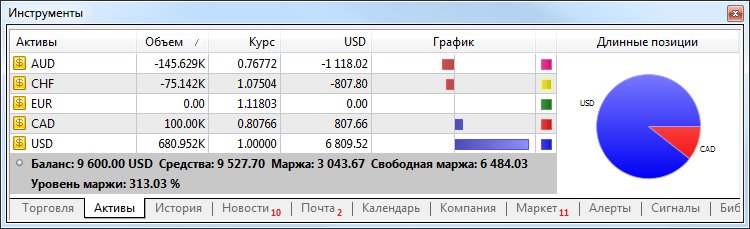
Название валюты или финансового инструмента.
Объем клиентской позиции (в единицах) по данной валюте или торговому инструменту с учетом кредитного плеча.
Курс валюты или инструмента по отношению к валюте депозита.
Количество реально затраченной валюты депозита (без учета плеча) на покупку/продажу валюты или торгового инструмента.
Графическое отображение клиентской позиции в валюте депозита (синими полосами отображаются длинные позиции, красными — короткие).
Для переключения между информацией по коротким и длинным позициям, нажмите на название диаграммы.
Активы счета по валюте депозита отображаются с учетом свободной маржи.
Платформа адаптирует представление активов в зависимости от того, какая система управления рисками используется для торгового счета: Retail Forex, Futures или Биржевая модель.
Тем, кто торгует на Forex или фьючерсами на бирже, раздел «Активы» поможет понять свое текущее положение в рынке. Одни и те же валюты встречаются во множестве различных инструментов: в качестве одной из валют в паре, в качестве базовой валюты и т.д. Например, у вас могут быть разнонаправленные позиции по GBPUSD, USDJPY и GBPJY. В этой ситуации понять, сколько в итоге у вас есть той или иной валюты, и сколько вы должны, весьма проблематично. Еще сложнее, когда таких позиций не три, а гораздо больше. В этой ситуации итоговое состояние счета можно легко посмотреть на вкладке «Активы».
Рассмотрим пример на тех же трех позициях:
- Buy GBPJPY 1 lot at 134.027 — получили 100 000 GBP, отдали 134 027 000 JPY
- Sell USDJPY 1 lot at 102.320 — отдали 100 000 USD, получили 102 320 000 JPY
- Sell GBPUSD 1 lot at 1.30923 — отдали 100 000 GBP, получили 103 920 USD
Мы одновременно купили и продали 100 000 GPB. Суммарно по GBP у нас 0, и вкладка «Активы» эту валюту не показывает. По USD в одном случае мы отдали валюту, в другом — получили. Вкладка «Активы» посчитает итог и просуммирует его с текущим балансом, поскольку валюта депозита у нас также USD. JPY участвовала в двух сделках, вкладка также покажет итоговое значение.

Тем, кто торгует по биржевой модели, раздел поможет понять, как используются деньги. В отличие от предыдущей модели, при совершении сделок деньги сразу списываются/начисляются на баланс. Например, при покупке EURRUB вы сразу получаете евро, а с баланса списывает соответствующая сумма в рублях. Во время торговли баланс счета даже может стать отрицательным: когда вы торгуете на заемные средства, а в роли обеспечения выступают приобретенные активы. В этой ситуации вкладка «Активы» позволит вам легко понять состояние торговое счета.
Дополнительно здесь показывается стоимость ликвидации — сумма денежных средств на счету и стоимости (результата) закрытия текущих позиций по рыночной цене.

Как обезопасить позиции, установив уровни Стоп Лосс и Тейк Профит #
Тейк Профит и Стоп Лосс — это дополнительные ордера, прикрепляемые к позиции или отложенному ордеру. Фактически, они представляют собой указание брокеру закрыть позицию при достижении ценой определенного уровня. Тейк Профит устанавливается для фиксации прибыли, когда цена идет в благоприятном направлении. Стоп Лосс предназначен для ограничения убытка при движении цены в неблагоприятном направлении.
Трейдер, конечно, может контролировать свои позиции самостоятельно или при помощи торгового робота. Однако у такого подход есть ряд недостатков:
- Трейдер не может находится у экрана монитора постоянно и следить за позициями.
- Робот лишен предыдущего недостатка, но он работает на компьютере пользователя. Соответственно, при сбое в работе компьютера или при потере соединения с сервером (проблемы с Интернетом) советник не сможет управлять позициями трейдера.
Здесь на помощь придут Тейк Профит и Стоп Лосс. Эти приказы связаны с торговой позицией, они хранятся и исполняются на сервере брокера, а соответственно не зависят от работоспособности торговой платформы у трейдера.
Данный вид ордеров также можно прикреплять к отложенным ордерам: лимитным, стоп- и стоп-лимитным. Позиция, которая открывается в результате срабатывания отложенного ордера, наследует Тейк Профит или Стоп Лосс, которые были указаны в ордере. Если срабатывает отложенный ордер по финансовому инструменту, по которому уже была открыта позиция, происходит модификация этой позиции: наращивание или уменьшение объема. В этом случае позиции также присваиваются Стоп Лосс и Тейк Профит ордера. При этом, если у ордера они нулевые, то и в позиции данные уровни будут удалены.
Стоп уровни могут быть изменены различными способами:
- Через диалог модификации позиции.
- Мышью на графике финансового инструмента, по которому открыта позиция.
- Через контекстное меню на графике финансового инструмента, по которому открыта позиция.
Модификация позиции #
Чтобы изменить стоп-уровни позиции, нажмите «![]() Изменить или удалить» в ее контекстном меню на вкладке «Торговля».
Изменить или удалить» в ее контекстном меню на вкладке «Торговля».

В появившемся окне уровни можно изменить двумя способами:
- Задать значения уровней напрямую в полях «Стоп Лосс» и «Тейк Профит»;
- Задать значения уровней в количестве пунктов от цены открытия позиции.
Далее нажмите кнопку «Изменить…».
- До тех пор, пока уровни «Стоп Лосс» и «Тейк Профит» не выставлены корректно, кнопка «Изменить…» будет не активна. Условия выставления стоп уровней определяются брокером и указаны в свойствах символов (спецификация контрактов).
- Двойное нажатие левой кнопкой мыши на окне изменения позиции открывает/скрывает тиковый график.
Перейти к модификации позиции можно также через ее контекстное меню на графике:

Управление стоп уровнями на графике #
Чтобы иметь возможность изменять уровни «Стоп Лосс» и «Тейк Профит» на графике, включите опцию «Показывать торговые уровни» в настройках платформы.
Для модификации уровня на графике, нажмите левой кнопкой мыши на нем и, не отпуская кнопку, перетащите уровень до требуемого значения (Drag’n’Drop):

После установки уровня будет открыто окно модификации позиции, в котором его можно будет скорректировать более точно.
Установка стоп уровней через контекстное меню #
Если по инструменту графика имеется открытая позиция, то с помощью подменю «Торговля» контекстного меню графика можно установить стоп уровни:

Цена для установки стоп уровня подставляется по текущему положению курсора на шкале цен графика. Также, в зависимости от цены открытия позиции и ее направленности в меню появляются соответствующие команды установки уровня «Стоп Лосс» или «Тейк Профит».
После выполнения команды будет открыто окно модификации ордера, где цена стоп уровня может быть вручную скорректирована.
Если в настройках платформы включена опция «Торговля одним кликом», выставление стоп-ордеров по указанной цене происходит мгновенно без показа торгового диалога.
Что такое Трейлинг Стоп и как его установить #
«Стоп Лосс» предназначен для минимизации потерь в том случае, если цена финансового инструмента начала двигаться в убыточном направлении. Когда же открытая позиция становится прибыльной, «Стоп Лосс» можно перемещать вручную на безубыточный уровень. Для автоматизации этого процесса используется Трейлинг Стоп (Trailing Stop). Данный инструмент особенно полезен при сильном однонаправленном движении цены, а также в тех случаях, когда нет возможности внимательно следить за изменением состояния рынков.
Трейлинг Стоп всегда связан с открытой позицией или отложенным ордером. Он выполняется в торговой платформе, а не на сервере, как «Стоп Лосс». Для его установки выполните команду «Трейлинг стоп» в контекстном меню позиции или ордера во вкладке «Торговля»:

Выберите желаемую величину расстояния между уровнем ордера «Стоп Лосс» и текущей ценой. Кнопкой «![]() Задать уровень» можно задать Трейлинг Стоп вручную:
Задать уровень» можно задать Трейлинг Стоп вручную:

- Для каждой открытой позиции или ордера можно установить только один Трейлинг Стоп.
- Механизм работы подробно описан в отдельном разделе.
Как нарастить позицию или уменьшить ее объем #
Наращивание или уменьшение объема позиции зависит от типа учета позиций, используемого на торговом счете.
|
Неттинг |
Хеджинг |
|---|---|
|
По одному финансовому инструменту в каждый момент времени может существовать только одна позиция, разнонаправленные (в покупку и в продажу) позиции не допускаются. Таким образом, если совершить торговую операцию на продажу 1 лота финансового инструмента при наличии позиции на покупку объемом 1 лот, позиция будет ликвидирована. Если имеется позиция на покупку объемом 1 лот и совершается торговая операция на покупку еще 1 лота, в итоге будет получена одна позиция объемом 2 лота. При этом цена открытия пересчитывается — рассчитывается средневзвешенная цена открытия: (Цена первой сделки*Объем первой сделки + Цена второй сделки*Объем второй сделки)/(Объем первой сделки + Объем второй сделки). Аналогично происходит при совершении сделки в обратном направлении. Если имеется позиция на покупку объемом 1 лот и совершается торговая операция на продажу 0.5 лота, в итоге будет получена одна позиция на покупку объемом 0.5 лота. |
По одному финансовому инструменту в каждый момент времени может существовать множество позиций, в том числе разнонаправленных (в покупку и в продажу). Нарастить объем существующей позиции невозможно. Для частичного закрытия, нажмите «Закрыть позицию» в контекстном меню нужной позиции. Далее установите значение закрываемого объема и нажмите «Закрыть …». |
Как проанализировать свои входы в рынок на графике #
При торговле важно оценивать правильность выбора момента входа и выхода из рынка. В этом может помочь графическое отображение совершенных сделок на ценовом графике финансового инструмента.
Выберите открытую позицию или сделку на вкладке «Торговля» или «История», а затем пункт «Показать на графике» в контекстном меню. Далее нажмите «Добавить сделки по [Имя символа]». Сделки будут добавлены на все открытые в данный момент графики по этому символу. Если таких графиков нет, будет открыт новый. Вы также можете включить опцию «Показать торговую историю» в настройках графика.
Сделки отмечаются на графике иконками ![]() (сделка на покупку) и
(сделка на покупку) и ![]() (сделка на продажу). При наведении курсора мыши на такой значок будет показана всплывающая подсказка с информацией о сделке: тикет, тип сделки, объем, символ, цена открытия и цена в точке курсора.
(сделка на продажу). При наведении курсора мыши на такой значок будет показана всплывающая подсказка с информацией о сделке: тикет, тип сделки, объем, символ, цена открытия и цена в точке курсора.

Чтобы сделки по всем символам из истории счета показывались на графиках включите опцию «Показать на графиках Автообновление» в конектстном меню или «Показать торговую историю» в настройках платформы.
Закрытие позиций #
Чтобы получить прибыль за счет разницы курсов, необходимо закрыть позицию. При закрытии торговой позиции совершается обратная по отношению к первой торговая операция. Например, если первой торговой операцией была покупка одного лота по GOLD, то для закрытия позиции нужно продать один лот того же финансового инструмента.
- Закрытие позиции может быть осуществлено полностью либо частично, в зависимости от объема сделки, совершаемой в обратном направлении.
- Для закрытия позиции в системе неттинга достаточно совершить торговую операцию по тому же символу и в том же объеме, но в обратном направлении. Для закрытия позиции в системе хеджинга явно выберите команду «Закрыть позицию» в контекстном меню позиции.
Чтобы полностью закрыть позицию, дважды нажмите на нее или выполните команду «![]() Закрыть позицию» в ее контекстном меню на вкладке «Торговля».
Закрыть позицию» в ее контекстном меню на вкладке «Торговля».

После нажатия кнопки «Закрыть…» позиция будет полностью закрыта.
- Если вы хотите закрыть позицию частично, укажите закрываемый объем в поле «Объем».
- При работе в режиме «Исполнение по запросу» перед закрытием необходимо выполнить запрос цены для совершения операции.
Закрытие позиции встречной #
Эта операция позволяет одновременно закрыть две разнонаправленные позиции по одному и тому же инструменту. Если встречные позиции имеют разное количество лотов, то открытой останется только одна из них. Ее объем будет равен разности лотов двух закрытых позиций, а направление позиции и цена открытия — большей (по объему) из закрываемых позиций.
По сравнению с одиночным закрытием двух позиций, закрытие встречной позволяет сэкономить трейдеру один спред:
- При одиночном закрытии трейдер дважды платит спред: закрывает покупку по меньшей цене (Bid), а продажу — по большей (Ask).
- При встречном закрытии для закрытия первой позиции используется цена открытия второй позиции, а для второй позиции — цена открытия первой.
Данный вид операций используется только при хеджинговой системе учета позиций.
Дважды нажмите на позицию или выполните команду » Закрыть позицию» в ее контекстном меню на вкладке «Торговля». В поле «Тип» выберите «Закрыть встречной»:

Выберите встречную позицию и нажмите «Закрыть».
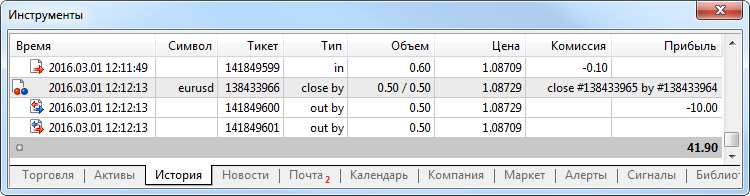
При закрытии позиции встречной выставлется ордер типа «close by». В комментарии к нему указываются тикеты закрываемых позиций.
Закрытие пары встречных позиций происходит двумя сделками типа «out by».
Размер итоговой прибыли/убыкта, полученного в результате закрытия обеих позиций, указывается только в одной сделке.
Массовое закрытие позиций #
Торговая платформа позволяет закрывать сразу все позиции в пару кликов. Например, если на рынке вышла важная новость и вам необходимо быстро зафиксировать прибыль. Для этого воспользуйтесь пунктом «Групповые операции» в контекстном меню раздела торговли:

Список доступных команд формируется в нем интеллектуально, в зависимости от выбранной операции и типа вашего счета.
В меню всегда доступны команды:
- Закрытие всех позиций. Для хеджинговых счетов система в первую очередь пытается закрыть позиции встречными, и уже оставшиеся позиции закрывает по обычной процедуре.
- Закрытие всех прибыльных и всех убыточных позиций.
Если выбрать позицию, в меню появляются дополнительные команды:
- Закрытие всех позиций по тому же символу.
- Закрытие всех позиций в том же направлении (для хеджинговых счетов).
- Закрытие всех встречных позиций по тому же символу (для хеджинговых счетов). Если для закрытия позиции нет соответствующей встречной операции, она останется открытой.
- Разворот позиций (для неттинговых счетов). Например, если выполнить эту команду для позиции на покупку EURUSD объемом два лота, вы получите позицию на продажу EURUSD с таким же объемом в два лота. Для этого на вашем счете будет совершена сделка объемом в четыре лота: два для закрытия текущей позиции и два для открытия позиции в противоположном направлении.
Установка отложенных ордеров #
Отложенный ордер — это распоряжение брокерской компании купить или продать финансовый инструмент в будущем по заданным условиям. Например, если вы хотите продать EURUSD по цене 1.10800, но цена еще не поднялась до этого уровня, вам необязательно ждать. Выставьте отложенный ордер и брокерская компания выполнит его, даже если торговая платформа в этот момент будет выключена.
В отложенном ордере также могут быть указаны уровни Стоп Лосс и Тейк профит. Они будут присвоены позиции, открытой в соответствии с ордером.
В торговой платформе доступно шесть видов отложенных ордеров.
Выставление отложенного ордера и общие параметры #
Установить отложенный ордер можно разными способами:
Далее в окне выставления ордера в поле «Тип» выберите «Отложенный ордер» и символ, по которому необходимо произвести операцию:
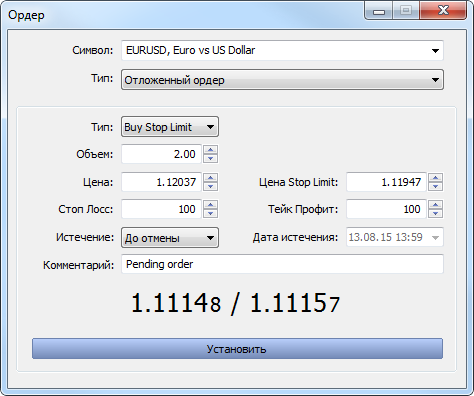
- Тип — тип отложенного ордера
- Объем — объем ордера в лотах.
- Цена — цена срабатывания отложенных ордеров. Для стоп- и лимит-ордеров в данном поле указывается цена, по которой они будут выставлены. Для стоп-лимит ордеров — это цена срабатывания и выставления лимитных ордеров на уровне, указанном в поле «Цена ордера».
- Стоп Лосс — уровень Стоп Лосс. Если оставить в данном поле нулевое значение, данный вид ордера прикреплен не будет.
- Истечение — условия истечения срока действия ордера:
- До отмены — ордер будет находится в очереди до тех пор, пока не будет снят вручную;
- Сегодня — ордер будет действовать только в течение текущего торгового дня;
- Дата и время — ордер будет действовать до даты, указанной в поле «Дата истечения»;
- Дата — ордер будет действовать до 00:00 указанного дня. Если это время не попадает на торговую сессию, истечение наступит в ближайшее торговое время.
- Комментарий — текстовый комментарий к ордеру. Максимальная длина комментария составляет 31 символ.
- Исполнение — дополнительные правила исполнения для лимитных и стоп-лимитных ордеров: «Все/Ничего», «Все/Частично» или «Вернуть». Если данное поле отсутствует, значит возможность выбора заблокирована на сервере.
- Цена Stop Limit — данное поле активно только при выставлении стоп-лимит ордеров. По цене, указанной в нем, будет установлен лимитный ордер при срабатывании стоп-лимитного.
- Тейк Профит — уровень Тейк Профит. Если оставить в данном поле нулевое значение, данный вид ордера прикреплен не будет.
- Дата истечения — дата истечения ордера при выборе условия истечения ордера «Дата и время» или «Дата».
- Кнопка «Установить» является неактивной, если параметры ордера указаны некорректно.
- Ордера Стоп Лосс и Тейк Профит срабатывают только на уже открытых позициях и не работают на самих отложенных ордерах.
- Комментарий к ордеру может быть изменен брокером или сервером.
- Если поля «Исполнение» и «Истечение» неактивны, значит возможность их изменения заблокирована на сервере.
Установка лимитных ордеров #
Лимитные ордера выставляются на «отскок». Трейдер ожидает, что цена дойдет до определенного уровня, например, поддержки или сопротивления, и затем начнет движение в обратном направлении.
Особенность таких ордеров заключается в том, что они исполняются по цене равной или лучшей, чем указана в ордере. Соответственно при их исполнении не бывает проскальзываний. Минусом таких ордеров является отсутствие гарантии исполнения, брокер может отклонить ордер, если цена ушла слишком далеко против него.
Рассмотрим на практике выставление лимитного ордера на покупку — Buy Limit.

В данном примере в момент, когда цена находится на уровне 1.25350 трейдер выставляет лимитный ордер на покупку по цене 1.24620 в расчете на то, что цена после достижения уровня поддержки 1.24453 пойдет вверх.
Для ордеров Sell Limit все происходит наоборот. Они выставляются в расчете на то, что цена поднимется до определенного уровня и пойдет вниз.
Установка стоп-ордеров #
Стоп-ордера устанавливаются на «пробой». Трейдер ожидает, что цена дойдет до определенного уровня, пробьет его и пойдет дальше в том же направлении. Фактически, трейдер предполагает, что рынок уже развернулся, достигнув уровня поддержки или сопротивления.
Особенность таких ордеров в том, что при срабатывании брокеру отправляется приказ на исполнение соответствующего рыночного ордера. Исполнение происходит по цене равной или хуже, чем указана в ордере. Иными словами, если рыночная цена уйдет против трейдера, ордер будет исполнен с проскальзыванием. Однако, в отличие от лимитных ордеров, стоп-ордера гарантированно исполняются.

В данном примере в момент, когда цена находится на уровне 1.28190 трейдер выставляет стоп-ордер на продажу по цене 1.27600 в расчете на то, что на уровне сопротивления 1.28260 рынок развернулся и теперь будет опускаться.
Для ордеров Buy Stop все происходит наоборот. Они выставляются в расчете на то, что рынок уже развернулся, и цена теперь будет расти.
Установка стоп-лимитных ордеров #
Данный вид ордеров представляет собой комбинацию двух предыдущих: стоп-ордера и лимитного. В случае, если цена достигла стоп-цены, выставляется лимитный ордер. Применяется, когда трейдер хочет выставить стоп-ордер, но при этом хочет ограничить проскальзывание.
В примере ниже стоп-лимит ордер выставляется с расчетом на то, что цена дойдя до уровня сопротивления 1 откатится назад и затем будет расти до уровня сопротивления 2.

Как быстро установить ордер на нужный уровень с графика #
Отложенные ордера могут быть установлены с графика с помощью подменю «Торговля» его контекстного меню:
Установите курсор мыши на нужном ценовом уровне на графике и выполните соответствующую команду в контекстном меню.
В зависимости от положения курсора в меню показываются доступные типы ордеров. При вызове меню выше текущей цены можно выставить ордера Sell Limit и Buy Stop, при вызове меню ниже текущей цены можно выставить Buy Limit и Sell Stop.
Дополнительно проверяется допустимое расстояние между выбранной и текущей ценой для данного финансового инструмента («Уровень стопов»).
После выполнения команды будет открыто окно установки ордера, где его параметры можно скорректировать более точно.
Если в настройках платформы включена опция «Торговля одним кликом», выставление ордеров по указанной цене происходит мгновенно без показа торгового диалога.
Управление отложенными ордерами #
При работе на рынке часто возникает необходимость изменения отложенного ордера: задать новую цену срабатывания, изменить стоп-уровни или срок действия.
Модификация ордера #
Чтобы изменить отложенный ордер, нажмите «![]() Изменить или удалить» в его контекстном меню на вкладке «Торговля».
Изменить или удалить» в его контекстном меню на вкладке «Торговля».

В отложенном ордере могут быть изменены практически все поля как и при его выставлении, за исключением объема, политики исполнения и комментария. После установки необходимых параметров нажмите кнопку «Изменить».
При некорректном указании параметров ордера кнопка «Изменить» становится неактивной.
Изменение ордера мышью на графике #
Чтобы иметь возможность изменять отложенные ордера на графике, включите опцию «Показывать торговые уровни» в настройках платформы.
Для отложенных ордеров существует возможность модификации уровней Стоп Лосс и Тейк Профит по отдельности, а также модификации цены ордера вместе со стоп-уровнями:
- Для отдельной модификации стоп-уровней на графике, нажмите на нем левой кнопкой мыши и, не отпуская кнопку, перетащить уровень до требуемого значения (Drag’n’Drop).
- Для модификации всего ордера, захватите его за линию цены. При этом будут перемещаться и цена и стоп-уровни.
- Для Stop Limit ордеров на графике также по отдельности можно изменить и стоп-цену, и цену лимитного ордера. При перетаскивании стоп-уровня, подписанного как «buy stop limit» или «sell stop limit» будут перемещаться все уровни ордера, включая уровень лимитного ордера, Стоп Лосс и Тейк Профит. Цена лимитного ордера, подписанная как «buy limit» или «sell limit» перемещается независимо от других уровней.

После установки уровня будет открыто окно модификации ордера, в котором его можно будет скорректировать более точно. Если в настройках платформы включена опция «Торговля одним кликом» выставление ордеров по указанной цене происходит мгновенно без показа торгового диалога.
Изменение ордера через контекстное меню на графике #

При помощи контекстного меню отложенного ордера на графике можно его изменить, удалить или выставить трейлинг стоп:
Удаление отложенных ордеров #
Отложенный ордер может быть удален из окна его модификации нажатием кнопки «Удалить». Также отложенные ордера могут удаляться автоматически при наступлении времени, указанного в поле «Истечение». При удалении на вкладке «История» окна «Инструменты» отложенный ордер будет помечен как «Отмененный».
Также отложенный ордер может быть удален непосредственно с графика при помощи контекстного меню.
Массовое удаление отложенных ордеров #
Торговая платформа позволяет снимать сразу все отложенные ордера в пару кликов. Например, если на рынке вышла важная новость и вы не хотите срабатывания всех ордеров из-за резкого скачка цены. Для этого воспользуйтесь пунктом «Групповые операции» в контекстном меню раздела торговли:

Список доступных команд формируется в нем интеллектуально, в зависимости от выбранной операции и типа вашего счета.
В меню всегда доступны команды:
- Удаление всех отложенных ордеров.
- Удаление всех отложенных ордеров отдельно по типам: Limit, Stop, Stop Limit.
Если выбрать отложенный ордер, в меню появляются дополнительные команды:
- Удаление всех отложенных ордеров по тому же символу.
- Удаление всех отложенных ордеров того же типа по тому же символу.
Торговая история счета #
Платформа предоставляет полный доступ к торговой истории счета, а также различные инструменты для ее анализа. Откройте вкладку «История» в окне «Инструменты».
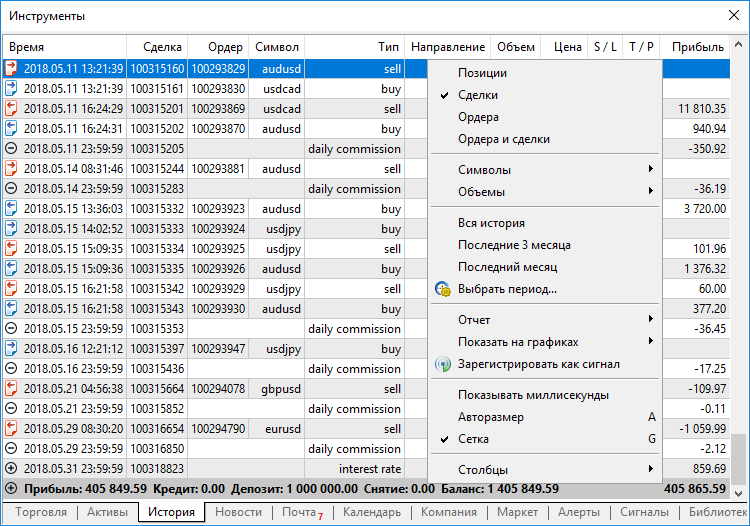
Список сделок, совершенных на торговом счете:
- Время — время совершения сделки. Запись представлена в виде ГГГГ.ММ.ДД ЧЧ:ММ (год.месяц.день час:минута);
- Сделка — номер тикета (уникальный номер) сделки;
- ID — идентификатор сделки во внешней торговой системе (например, на бирже). Этот параметр может не отображаться в зависимости от настроек вашего брокера.
- Ордер — номер тикета (уникальный номер) ордера, по которому была совершена данная сделка. Одному ордеру могут соответствовать несколько сделок, если требуемый объем, указанный в ордере, не был покрыт одним рыночным предложением;
- Символ — финансовый инструмент, по которому была совершена сделка;
- Тип — тип торговой операции: «Buy» — сделка на покупку, «Sell» — сделка на продажу. Возможная ситуация, когда ранее совершенная сделка отменяется. В таком случае тип ранее совершенной сделки меняется на Canceled buy или Canceled sell, а ее прибыль/убыток обнуляется. Ранее полученная прибыль/убыток начисляется/списывается со счета отдельной балансовой операцией;
- Направление — направление совершаемой сделки относительно текущей позиции по тому или иному инструменту: вход («in»), выход («out») или разворот («in/out»);
- Объем — объем совершенной сделки (в лотах или единицах);
- Цена — цена, по которой была совершена сделка;
- Стоимость — рыночная стоимость сделки. Рассчитывается как произведение цены на размер контракта.
- Издержки — сумма издержек при совершении сделки относительно текущей средней цены инструмента (mid-point spread cost). Фактически, это сумма, которую трейдер теряет на спреде при торговле.
Доступность этого показателя зависит от брокера.Расчет осуществляется по следующим формулам:
Forex:
Для сделок Buy: Normalize((Рыночная цена Bid + Рыночная цена Ask)/2 * Размер контракта * Объем в лотах) — Normalize(Цена сделки * Размер контракта * Объем в лотах)
Для сделок Sell: Normalize(Цена сделки * Размер контракта * Объем в лотах) — Normalize((Рыночная цена Bid + Рыночная цена Ask)/2 * Размер контракта * Объем в лотах)CFD, CFD Index, CFD Leverage и Exchange Stocks, Exchange MOEX Stocks:
Для сделок Buy: Normalize((Рыночная цена Bid + Рыночная цена Ask)/2 — Цена сделки) * Размер контракта * Объем в лотах
Для сделок Sell: Normalize(Цена сделки — (Рыночная цена Bid + Рыночная цена Ask)/2) * Размер контракта * Объем в лотахFutures, Exchange Futures, FORTS Futures, Exchange Options, Exchange Margin Options:
Для сделок Buy: Normalize((Рыночная цена Bid + Рыночная цена Ask)/2 — Цена сделки) * Размер контракта * Объем в лотах * Цена тика / Размер тика
Для сделок Sell: Normalize(Цена сделки — (Рыночная цена Bid + Рыночная цена Ask)/2) * Размер контракта * Объем в лотах * Цена тика / Размер тикаРазмер сделки определяется в зависимости от типа торгового инструмента — аналогично расчету прибыли. Для инструментов Forex и CFD — это размер контракта, умноженный на объем сделки;
для фьючерсов — соотношение цены и размера тика, умноженное на объем сделки, и т.д.Значение, полученное по формуле, представляет собой издержки в валюте прибыли инструмента. Если она отличается от валюты депозита счета, осуществляется конвертация.
- S/L — уровень Стоп лосс сделки. Для сделок входа и разворота устанавливается в соответствии со значением Стоп Лосс ордеров, в результате исполнения которых они были совершены. Для сделок выхода используются значения Стоп Лосс соответствующих позиций на момент их закрытия.
- T/P — уровень Тейк профит сделки. Для сделок входа и разворота устанавливается в соответствии со значением Тейк Профит ордеров, в результате исполнения которых они были совершены. Для сделок выхода используются значения Тейк Профит соответствующих позиций на момент их закрытия.
- Комиссия — комиссионный сбор за совершение сделки. Значение комиссии отображается в данном поле только при немедленном начислении комиссии по факту совершения сделки. Также комиссия может быть настроена таким образом, что в течение дня/месяца ее значение накапливается, а затем снимается со счета единой балансовой сделкой. В таком случае ее значение не отображается для каждой сделки. Накопленное за день/месяц значение отображается в строке состояния счета. Способ взимания комиссии регулируется брокером;
- Сбор — отдельный вид комиссий, взимаемый брокером со сделок.
- Прибыль — финансовый результат выхода из позиции. На сделках входа прибыль отображается равной нулю.
- Изменение — изменение цены актива в процентах на момент фиксации прибыли/убытка. Положительные и отрицательные значения подсвечиваются синим и красным цветом, соответственно.
- ID эксперта — значение, указываемое торговым роботом при открытии ордеров и позиций (магический номер).
Результат совершения сделок относительно начального депозита:
- Прибыль — прибыль или убыток относительно начального депозита.
- Кредит — сумма, кредитованная брокерской компанией.
- Депозит — сумма депозита счета (сумма операций типа balance с положительным значением).
- Снятие — сумма снятых со счета средств (сумма операций типа balance с отрицательным значением).
В конце строки отображается значение текущего баланса счета.
Переключение между различными видами представления торговой истории.
Фильтрация истории по финансовым инструментам и переключение между показом объема в лотах и единицах.
Если торговая история на счете слишком большая, или вы хотите изучить результаты за какой-то конкретный промежуток времени, выберите здесь нужный период.
Отчет о торговле можно сохранить в файл, чтобы поделиться им с другими трейдерами или проанализировать во внешней программе. Помимо списка операций и результатов по счету, торговый отчет
включает в себя различные статистические показатели.
Также можно отобразить все сделки на графиках и проанализировать, насколько эффективно вы входили и выходили из рынка.
Торговая история может быть представлена в различных видах:
- В виде позиций. Платформа собирает данные по сделкам, относящимся к позиции (открытие, наращивание, частичное и полное закрытие), и группирует эти данные в единую запись, где можно сразу посмотреть:
- Время открытия и закрытия позиции, определяемое по первой и последней сделке соответственно
- Объем позиции; если позиция закрыта частично, показывается закрытый объем и исходный объем
- Средневзвешенную цену открытия и цену закрытия позиции
- Суммарный финансовый результат по сделкам, относящимся к позиции
- Стоп Лосс и Тейк Профит позиции, которые заполняются в соответствии со значением Стоп Лосс и Тейк Профит сделок, которыми она была открыта и закрыта
- В виде списка ордеров, где можно просмотреть все торговые приказы, отправленные брокеру.
- В виде списка сделок — фактических операций купли-продажи, совершенных на основе ордеров.
- В виде древовидного списка всех операций, где можно просмотреть, каким именно образом обрабатывались торговые приказы.

Для представления истории в виде позиций платформа использует информацию о сделках, совершенных в период, за который запрошена история. Для включения позиции в отчет в выбранный период должна попадать либо дата ее открытия, либо дата закрытия. Если позиция был открыта до начала выбранного интервала, а закрыта после, она не будет отображена в отчете.
Алерты — как настроить оповещения о событиях на рынке #
Алерты — это сигналы, оповещающие трейдера о различных событиях на рынке. Создав алерты, можно отойти от монитора — торговая платформа автоматически оповестит о совершении заданного события.
Оповещения настраиваются на вкладке «Алерты». Создать алерт можно через контекстное меню или клавишей Insert.

Финансовый инструмент, данные которого используются для проверки условия алерта. Если в качестве условия выбран параметр «Время», то символ значения не имеет.
Условие, при котором происходит срабатывание алерта:
- Bid < — если цена спроса меньше заданного значения, произойдет срабатывание алерта;
- Bid > — если цена спроса больше заданного значения, произойдет срабатывание алерта;
- Ask < — если цена предложения меньше заданного значения, произойдет срабатывание алерта;
- Ask > — если цена предложения больше заданного значения, произойдет срабатывание алерта;
- Last < — если последняя цена меньше заданного значения, произойдет срабатывание алерта;
- Last > — если последняя цена больше заданного значения, произойдет срабатывание алерта;
- Объем < — если объем последней совершенной сделки меньше заданного значения, произойдет срабатывание алерта;
- Объем > — если объем последней совершенной сделки больше заданного значения, произойдет срабатывание алерта;
- Время = — при наступлении заданного времени произойдет срабатывание алерта. Указывается локальное время компьютера в формате «ЧЧ:ММ», например: 15:00;
Действие, совершаемое при наступлении события:
- Звук — проигрывание звукового файла;
- Файл — запуск исполняемого файла;
- Письмо — отсылка письма на email, указанный в настройках платформы.
- Уведомление — отсылка Push-уведомления на мобильное устройство. Для отсылки данного уведомления в настройках платформы должен быть указан MetaQuotes ID — уникальный идентификатор, который присваивается каждому мобильному терминалу при установке на устройство. Push-сообщения являются эффективным средство уведомления о событиях, они моментально доставляются на мобильно устройство и не теряются при отсылке. Текст сообщения указывается в поле «Источник».
Время действия алерта. При наступлении указанного времени алерт будет автоматически удален. Указывается локальное время компьютера.
Значение цены, объема или времени, при котором произойдет срабатывание алерта;
В зависимости от типа действия, выполняемого при наступлении события, здесь указывается:
- Звуковой файл в формате *.wav, *.mp3 или *.wma.
- Исполняемый файл формата *.exe, *.vbs или *.bat.
- Шаблон письма для отсылки. При выборе действия «Письмо» и нажатии на данном поле появится окно написания шаблона письма для отсылки на почтовый ящик, указанный в настройках платформы. Можно также просто написать текст письма в данном поле в формате «тема письмаn текст письма».
- Текст push-сообщения. Максимальная длина сообщения составляет 255 символов.
Время между повторениями алерта.
Максимально допустимое количество повторений алертов.
Включить или выключить выбранный алерт. При выключении алерт не удаляется, но перестает работать.
Кнопкой «Тест» можно проверить работоспособность выбранного алерта. Чтобы изменения вступили в силу, нажмите «ОК».
Создание отсылаемого письма #
Если в качестве действия, совершаемого при срабатывании алерта, указана отсылка письма, то по нажатии кнопки ![]() будет открыто окно создания этого письма:
будет открыто окно создания этого письма:

В поле «Кому» укажите название почтового ящика, на который будет отсылаться письмо. Далее укажите тему письма. Ниже расположена область написания текста письма. С помощью подменю «Макросы» контекстного меню этой области в текст письма могут вставлены различные макросы:
- Символ — название финансового инструмента, для которого настроен алерт;
- Bid — цена спроса;
- Bid High — наивысшая цена спроса за период графика (для биржевых инструментов);
- Bid Low — наименьшая цена спроса за период графика (для биржевых инструментов);
- Ask — цена предложения;
- Ask High — наивысшая цена предложения за период графика (для биржевых инструментов);
- Ask Low — наименьшая цена предложения за период графика (для биржевых инструментов);
- Last — последняя цена, по которой была совершена сделка (для биржевых инструментов);
- Last High — наивысшая цена, по которой была совершена сделка за период графика (для биржевых инструментов);
- Last Low — наименьшая цена, по которой была совершена сделка за период графика (для биржевых инструментов);
- Volume — объем сделок, совершенных за период графика;
- Volume High — максимальное значение объема совершенной сделки за торговую сессию (для биржевых инструментов);
- Volume Low — минимальное значение объема совершенной сделки за торговую сессию (для биржевых инструментов);
- Volume Bid — объем ближайшей к рынку сделки на покупку (для биржевых инструментов);
- Volume Ask — объем ближайшей к рынку сделки на продажу (для биржевых инструментов);
- Время — время прихода последней котировки;
- Банк — поставщик ликвидности финансового инструмента;
- Логин — номер текущего счета;
- Баланс — текущее значение баланса;
- Средства — текущее значение средств на счете;
- Прибыль — текущее значении прибыли;
- Маржа — текущее значение маржевых средств;
- Свободная маржа — текущее значение свободной маржи;
- Позиции — список всех открытых позиции на счету;
- Ордеры — текущие активные ордеры (отложенные ордеры, неисполненные на текущий момент ордеры на совершение сделки по рынку).
После создания письма, нажмите кнопку «Применить».
Установка и управление алертами с графика
Алерты можно быстро создавать непосредственно на графике. Для этого нажмите «![]() Алерт» в контекстном меню графика:
Алерт» в контекстном меню графика:
Алерт создается по символу графика. При вызове меню выше текущей цены создается алерт по условию «Bid > выбранная цена», ниже текущей цены — «Bid < выбранная цена». Для алертов, установленных с графика, автоматически выставляется время истечения. Время истечения зависит от таймфрейма графика:
- Для минутных таймфреймов истечение устанавливается в часах, количество которых соответствует количеству минут таймфрейма. Например, на таймфрейме M1 истечение будет равно 1 часу, на таймфрейме M5 — 5 часам, на таймфрейме M30 — 30 часам и т.д.
- Для часовых таймфреймов истечение устанавливается в сутках, количество которых соответствует количеству часов таймфрейма. Например, на таймфрейме H1 истечение будет равно 1 дню, на таймфрейме H2 — 2 дням, на таймфрейме H6 — 6 дням и т.д.
- На дневном таймфрейме истечение будет равно 24 дням.
- На недельном таймфрейме истечение будет равно 2 неделям.
- На месячном таймфрейме истечение будет равно 2 месяцам.
На графике инструмента установленные алерты показываются в виде красных стрелок у правого края окна:

Ценовой уровень алерта можно изменять непосредственно на графике. Для этого достаточно перетащить стрелку алерта мышью.
- 1Account opening
- 2Personal Area
- 3Personal information and access data
- 4Profile verification
- 5About OctaFX
- 6Trading conditions
- 7Trading accounts
- 8Trading platforms
- 9MT4
- 10MT5
- 11Deposit bonus
- 12Champion MT4 Demo Contest
- 13Deposit and withdrawal
- 14IB program
- 15Autochartist
- 16Trade & Win loyalty program
- 17OctaFX Copytrading for Copiers
- 18OctaFX Copytrading for Master Traders
- 19Status program
-
-
How do I sign up?
- 1. Visit the signup page, fill it out, and press Open Account or link via your social media profile.
- 2. Find our message titled Confirm Your Email Address in your inbox, open it, and press Confirm Email—you will be redirected to our site.
- 3. Fill in all the required information and press Continue. Next, finish setting up your trading account, and you’re ready to go.
-
I already have a profile in OctaFX. How can I create a new account?
- Log in to your profile.
- If you are at your dashboard, select the Create Account option in the Your Accounts section.
- Or, scroll down, press Trading Accounts on the menu on the right, and then choose Account List. From there, you can select Open a Real Account or Open a Demo Account.
-
What type of account should I choose?
It depends on the preferred trading platform and the trading instruments you want to trade. View account types comparison. You can always open a new account of another type.
-
What leverage should I select?
You can select 1:1, 1:5, 1:15, 1:25, 1:30, 1:50, 1:100, 1:200 or, 1:500 leverage on OctaTrader, MT4, or MT5. Leverage is a virtual credit given to the client by the company. It modifies your margin requirements. This means that the higher the ratio, the lower the margin you need to open an order. You can use our trading calculator to choose the appropriate amount of leverage for your account. You can change leverage later in your profile.
-
Can I open an Islamic-friendly account?
All of our accounts are Islamic friendly. According to Islamic standards, there is no accumulation, collection, or payment of interest rates.
-
Where can I find your customer agreement?
On a dedicated page. Please make sure you’ve read and agreed to our Customer Agreement before you begin trading.
-
I opened a trading account. What do I do next?
After opening an account, check your email to find your account credentials. Make sure to save them—you will need these credentials to access the trading terminal.
If you’ve already added money into your account, or if you’ve opened a demo account, you can proceed to trading right away—by pressing Trade in your profile or by installing the MetaTrader 5 application for your device.
Additionally, you can download our trading app on your smartphone to trade on the go. If you haven’t added money to your real account, check out the list of available payment methods.
If you are new to trading, find information on trading in our Education section.
-
-
-
What is Personal Area for?
In your Personal Area, you can:
- open new accounts
- manage existing ones
- make deposits
- request withdrawals
- transfer funds between your accounts
- claim bonuses
- restore forgotten passwords.
-
How do I sign in to my Personal Area?
Use your registration email address and Personal Area password to sign in.
You can restore your Personal Area password on a Password restore page. -
I forgot my Personal Area password. How can I restore it?
- Visit our password restoration page
- Enter your registration email address
- Confirm that you’re not a robot
- Press the Restore password button
We will send a restoration link to your email address: press the Create password button in the email and follow it. Enter a new password twice and press the Submit button. Use your email address and the new password to log in.
-
How do I switch between accounts in my Personal Area?
You can select the account in the drop-down list under Primary account. You can also do that in the Your accounts section. Select the account number you need and choose Switch to this account in the drop-down list.
-
How do I change my leverage?
Click the leverage ratio in the Primary account section. Set the new leverage and press the Change button. You can also follow this link to change your leverage.
Make sure you have no open positions or pending orders before changing this parameter. -
How do I switch my MT4 account to regular or swap-free?
Click Yes or No next to ‘Swap-Free’ in the Account Summary, select whether you would like this account to be swap-free or not, and click ‘Change’. Make sure you have no open positions or pending orders before changing this parameter.
-
Where can I find all of my accounts?
You can find all your accounts in the Trading accounts tab in the sidebar menu of your Personal Area. Press Trading accounts and then—Account list. You can also follow this link.
At theYour accounts page, you can:- View general information:
- account number
- account type
- currency
- balance
- Switch between accounts
- Restore password
- Hide or display accounts on the main page
- Make deposits
- Create withdrawal requests
- Review order history
- Log in to a trading terminal.
-
How can I hide an account I am not using anymore from my accounts list?
To hide a trading account, sign in to your Personal Area, find its number in the Your accounts section, press it, and select Hide account from the main page in the drop-down menu.
You can restore the hidden account later: find the Trading accounts tab in the sidebar menu of your Personal Area and select Account list. Find the account number you want to restore, press it, and select Show account on the main page in the drop-down menu. -
How can I close my Personal Area?
Please contact [email protected] if you wish to close your Personal Area.
-
What is Monitoring?
Monitoring allows you to share your performance, charts, profits, orders, and history with others. You can do so by adding your account to Monitoring. You can also use Monitoring to view and compare successful traders’ statistics and learn from them.
-
How do I add my account to Monitoring?
You can add your account to Monitoring in the Trading accounts tab in the sidebar menu of your Personal Area. Press Trading accounts and then—Monitoring. You can also follow this link. Find the number of the account you would like to add and press Add to monitoring.
-
How do I remove my account from Monitoring?
- Open the Monitoring page in your Personal Area.
- Find the number of the account in the Your monitored accounts list.
- Press Remove account.
-
How do I hide my real account balance and positions from Monitoring?
- Open the Monitoring page.
- Find the number of the real account in Your monitored accounts.
- Select Visibility setup and uncheck the required boxes.
- Press Save settings button below to apply the changes.
-
Can I have several Personal Areas?
We designed the OctaFX Personal Area so that you can keep all your trading information in one place. Please be aware that creating several Personal Areas by using multiple email addresses is prohibited.
-
-
-
How do I change my email address?
- Log in to your Personal Area.
- Open the Settings drop-down menu next to your name.
- Select Your details page.
- Press Change next to your current email.
- Enter your new address and press the Change email button.
We will send you a confirmation link to both old and new addresses. We will send confirmation links to both your old and new addresses. Check both of your inboxes and follow the link in each of them to apply the changes.
-
How do I change my phone number?
- Log in to your Personal Area.
- Open the Settings drop-down menu next to your name.
- Go to the Your details page.
- Press Change next to your current phone number.
- Enter your new phone number and press the Change button.
-
I forgot my trading account password. How can I get a new one?
- Log in to your Personal Area.
- Open the Settings drop-down menu next to your name.
- Go to the Restore passwords page.
- Select Account password as the password type you want to restore.
- Choose the account number from the drop-down menu.
- Confirm that you’re not a robot.
- Press the Submit button.
We will send the new password to your email address.
-
How can I change my OctaFX PIN?
- Log in to your Personal Area.
- Open the Settings drop-down menu next to your name.
- Go to the Change passwords page.
- Select OctaFX PIN.
- Enter your current OctaFX PIN and then the new OctaFX PIN—twice.
- Press the Change button to apply the changes.
-
How can I change my Personal Area password?
- Log in to your Personal Area using your current password.
- Open the Settings drop-down menu next to your name.
- Go to the Change passwords page.
- Select the Personal Area password.
- Enter your current Personal Area password and then the new password—twice.
- Press the Change button to apply the changes.
-
How can I change my trading account password?
- Log in to your Personal Area.
- Open the Settings drop-down menu next to your name.
- Go to the Change passwords page.
- Select the Account password.
- Choose the account number from the drop-down menu.
- Enter your current Account password and then the new password—twice.
- Press the Change button to apply the changes.
-
I lost my trading account password/OctaFX PIN. How can I restore it?
- Log in to your Personal Area.
- Open the Settings drop-down menu next to your name.
- Go to the Restore password page.
- Select the password type you want to restore: OctaFX PIN or account password.
- Choose the account number from the drop-down menu if you want to restore the account password.
- Confirm that you’re not a robot.
- Press the Submit button.
We will send the new password to your email address.
-
How can I change my investor password?
You can change your Investor password in the MT4 and MT5 terminals.
For MT4
Please note that the MT4 web terminal does not support this option. You can change your investor password in the desktop MT4 terminal.- Open the Tools drop-down menu.
- Select Options.
- Press the Change button.
- Type the current master password in the text field.
- Select Change investor password.
- Type the new investor password in the New Password text field.
- Re-type the new investor password in the Confirm text field.
- Press the Ok button.
For MT5
- Open the File drop-down menu.
- Select Change password.
- Type the current master password in the text field.
- Select Change investor password.
- Type the new investor password in the New Password text field.
- Re-type the new investor password in the Confirm text field.
- Press the Ok button.
An investor password allows you to watch account performance without being able to open or close orders.
-
-
-
How can I verify my profile?
You need to provide us with a document verifying your identity. It can be a passport, national identity card, or any other government-issued photo ID. The document must not be expired.
You should submit a picture of your ID through your Personal Area or send it to [email protected] When taking a picture, make sure that- your name, photo, date of birth, signature, issue and expiration dates, and serial number are clearly visible
- the entire document is in the photo frame
- the document is not fragmented or folded.
Please do not edit the picture of your document before submitting it.
If you do not reside in the country that issued your primary ID, you need to provide an additional document from your country of residence. It can be a residence permit or any government-issued ID. -
Why should I get my profile verified?
Profile verification allows us to make sure your information is valid. We keep your information confidential and use it solely to verify your identity. Verifying your profile helps us ensure your transactions are authorised and protect you against fraud.
We strongly recommend getting your profile verified before making your first deposit, especially if you want to deposit with Visa or Mastercard.
Please note that you can withdraw funds only after your profile is verified. -
I have submitted my documents. How long will it take to verify my profile?
Verification usually takes just a few minutes. However, it may require up to 24 hours if we have a large number of requests or if you submitted your request overnight or at the weekend.
To help us approve your request quicker, please make sure you submit clear, distortion-free images of your documents.
We will send you an email when we complete your profile verification. -
Is my personal information safe with you? How do you protect it?
We use highly secure technologies to protect your data and financial transactions. Your Personal Area is SSL-secured and protected with 128-bit encryption, which makes your browsing safe and your data inaccessible to third parties. You can read more about data protection in our Privacy Policy.
-
-
-
Where are your servers located?
Our trading servers are located in London. We have a wide network of servers and data centres throughout Europe and Asia, ensuring low latency and stable connection.
-
What are your market opening hours?
OctaTrader, MT4, and MT5 trading hours for all currency pairs except cryptocurrencies are 24/5, starting at 12:00 a.m. on Monday and closing at 11:59 p.m. on Friday server time (EET/EST). Cryptocurrency pair trading is available 24/7. However, any trading is unavailable during server maintenance from 12:00 a.m to 2:00 a.m. on Saturday and 3:30 a.m. to 4:00 a.m. on Sunday.
-
What are the advantages of trading with OctaFX?
We value every trader and do everything possible to make their Forex trading experience with us positive and profitable. Our top priority is providing traders with high-quality services that meet international standards and regulations. We offer:
- market execution of less than a second
- no commission on deposit and withdrawal
- lowest spreads in the industry
- various deposits and withdrawals methods
- negative balance protection
- a wide range of trading tools.
Find out more about our company advantages.
-
Does OctaFX take part in CSR programs?
We are proud to be a socially responsible company and regularly engage in supporting various foundations and charity programs to help those in need. We believe that it’s our responsibility to improve the quality of life of underprivileged people around the globe. You can learn more about how to help at our Charity page.
-
How does OctaFX support sports activities?
Apart from helping various charity organisations, we support sports initiatives across the globe. We signed our first sponsorship agreement back in 2014 with Persib Bandung FC. The same year this team won the Indonesian Super League Cup 2014 and claimed the title of Indonesian champions.
We have also sponsored Southampton FC, an English Premier League team.
We have also supported Bali Sports Foundation, which provides support to disabled athletes in Bali and East Indonesia. It was our pleasure to partner with BSF in helping to transform lives through sport.
Find out more about our current sponsorships.
-
-
-
What is your spread? Do you offer fixed spread?
We offer floating spreads only. This means our spreads vary depending on the market situation.
Here’s why:
Our goal is to provide transparent prices and the tightest spreads we can without applying any additional commission. We simply pass on the best bid/ask price we get from our liquidity pool, and our spread accurately reflects what is available in the market. We choose floating spread over a fixed spread as it is often lower than average. However, you may expect it to widen at market open, during rollover at (server time), during major news releases, or during high volatility periods.You can check minimum, average, and current spreads for all trading instruments on our Spreads and Conditions page.
-
How does floating spread change throughout the day?
Floating spread varies throughout the day depending on the trading session, liquidity, and volatility. It tends to be less tight at market opening on Monday, when high-impact news is released, and at other times of high volatility.
-
Do you have requotes?
No, we do not. A requote occurs when the dealer on the other side of the trade sets an execution delay during which the price changes. As a non-dealing desk broker, OctaFX offsets all orders with the liquidity providers to be executed at their end.
-
Do you have slippage on your platforms?
Slippage is a slight execution price movement that may occur due to the lack of liquidity behind the requested price or when it’s been taken by other traders’ orders. It can also happen due to market gaps. Slippage should be factored in as one of the risks when trading with an ECN broker (financial intermediary that uses electronic communications networks or ECNs) since it cannot guarantee that your order will be executed at the requested price. However, our system is set up to fill orders at the next best available price whenever slippage occurs. Please be aware that slippage can be both positive and negative, and we cannot influence this factor.
-
Do you guarantee stop orders?
Being an ECN broker, we cannot guarantee filling at the requested rate. After being triggered, a pending order turns into a market order and gets filled at the best available price, which primarily depends on the market conditions, available liquidity, trading pattern, and volume.
-
Is it possible to lose more than I deposited? What if my account balance becomes negative?
When your balance becomes negative, our negative balance protection automatically adjusts it to zero.
-
How does negative balance protection work?
Our top priority is giving you the best trading experience, that’s why, regardless of the risks, we have you covered: our risk management system ensures that clients cannot lose more than they initially invested. If your balance becomes negative due to Stop Out, we will compensate the difference and bring your account balance back to zero. We guarantee that your risk is limited to only those funds you have deposited into your account. Please be aware that this does not include any debt payments from the client. Thus, our clients are protected from losses beyond the initial deposit.
You can read more in our Customer Agreement. -
Do I need a certain amount of margin to open my order?
It depends on the currency pair, volume, and account leverage. You can use our Trading Calculator to figure out your required margin.
When you open a hedge (locked or opposite) position, no additional margin will be required. However, if your free margin is negative, you will not be able to open a hedge order. -
My order was not executed correctly. What should I do?
With market execution, we cannot guarantee filling at the requested rate for all of your positions (please check About ECN trading for more details). However, in case you have any doubts, or if you would like an individual review of your orders, we suggest writing a detailed request and sending it to [email protected] Our trade compliance department will investigate your case, provide you with a prompt response, and make corrections to the account if applicable.
-
Do you have any commissions?
We do not charge any commissions for trading. OctaTrader, MT4, and MT5 commissions are included in our spreads as markup.
-
What trading techniques and strategies can I use?
Our clients are welcome to use any trading strategies except arbitrage, including but not limited to scalping, hedging, news trading, and martingale as well as any Expert Advisers.
-
Do you allow hedging/scalping/news trading?
We allow scalping, hedging, and other strategies if the orders are placed in accordance with our Customer Agreement. However, please note that arbitrage trading is not allowed.
-
What tools do you have to track major news releases and times of high market volatility?
Please feel free to use our Economic Calendar to be informed about upcoming releases and our Forex News page to learn more about recent market events. You can expect high market volatility when the event with top priority is about to take place.
-
What is a price gap, and how does it affect my orders?
A price gap means that either the current bid price is higher than the ask price of the previous quote, or the current ask price is lower than the bid of the previous quote.
It is important to understand that you may not be always able to see a price gap on the chart since it can be enclosed in a candle. As the definition implies, in some cases you would need to observe the ask price, while the chart shows only the bid price.
The following rules apply to pending orders executed during a price gap:- if your Stop Loss is within the price gap, the order will be closed by the first price after the gap
- if the pending order price and Take Profit level are within the price gap, the order will be cancelled
- if the Take Profit order price is within the price gap, the order will be executed by its price
- Buy Stop and Sell Stop pending orders will be executed by the first price after the price gap
- Buy Limit and Sell Limit pending orders will be executed by the order’s price.
Let’s imagine that a bid is listed as 1.09004 and ask is 1.0900. In the next tick, bid becomes 1.09012, and ask–1.0902. Then:
- if your Sell order has Stop Loss level at 1.09005, the order will be closed at 1.0902
- if your Take Profit level is 1.09005, the order will be closed at 1.0900
- if your Buy Stop order price is 1.09002 with Take Profit at 1.09022, the order will be cancelled
- if your Buy Stop price is 1.09005, the order will be opened at 1.0902
- if your Buy Limit price is 1.09005, the order will be opened at 1.0900.
-
What happens if I leave my order open overnight?
We won’t charge you any commission for holding an order overnight–all of our accounts are swap-free.
-
Can I trade cryptocurrency at OctaFX?
Yes, you can trade cryptocurrency pairs with us. You can trade Bitcoin, Bitcoin Cash, Ethereum, Litecoin, and Ripple. Here you can learn more about trading cryptocurrencies with us.
-
Can I trade commodities at OctaFX?
Yes, with us you can enjoy the benefits of trading gold, silver, crude oil, and other commodities. Read more about this type of assets on the Commodities trading page.
-
What are commodities?
Сommodities are tradeable physical assets. With us, you can trade metals, including gold, silver, platinum, and copper, as well as energies, like crude oil, natural gas, and other resources.
-
-
-
What trading accounts do you offer?
We offer real and demo accounts. Both are available on OctaTrader, MetaTrader 4, and MetaTrader 5.
Real account allows you to operate real funds. All your profit and loss is real money.
Demo account has simulated funds but real market conditions. You can use it to check our service, get familiar with trading tools, or test your trading strategy risk-free.
You can also open a Champion Demo Contest account on MT4 to participate in our regular Champion Demo Contest.
To find more information on Trading platforms and OctaTrader, MT4, or MT5 accounts, visit section 8 of this page.
-
Do you offer demo accounts?
Yes, we do. You can open as many demo accounts as you want in your profile to practice and test your strategies.
You can also create the OctaFX Champion Demo Contest account to compete with other traders and win money.
-
How can I open a demo account?
- Log in to your profile.
- Scroll down the Dashboard page.
- Press Create Account next to Your Accounts section.
- Choose a trading platform.
- Press Demo beneath Account type.
-
How do I top up my demo account balance?
- Log in to your profile.
- Switch to your demo account on the Dashboard page.
- Press the Top up button at the top of the page.
- Change the top-up amount if you need.
- Press the Proceed button.
-
Why is my demo account deactivated?
We deactivate demo accounts if they go inactive and you do not log into them.
Expiration period of demo accounts:
- MetaTrader 4: 8 days
- MetaTrader 5: 30 days
- OctaTrader: unlimited.
- Demo contest account—immediately upon the end of the contest round.
-
Why is my real account deactivated?
We deactivate real accounts if you never add money and do not log into them.
Expiration period of real accounts:
- MetaTrader 4: 30 days
- MetaTrader 5: 14 days
- OctaTrader: unlimited.
You can create a new account anytime—it is free.
-
Can I have multiple accounts?
You can have multiple demo accounts—as many as you want.
However, you cannot create more than two real accounts for each trading platform. To create three or more accounts, deposit or use for trading at least one of the two existing ones.
-
What account currencies do you offer?
With us, you can open a USD account.
Deposit your accounts in any currency—and we will convert your funds into USD with the exchange rate set by the payment system you use.
-
Can I change my account currency?
No, unfortunately, you cannot change your account currency. But you can always create a new trading account in your profile.
-
Where can I find the access data?
The access details, including login (it matches the account number) and password, are sent by email when you open your trading account. You can find the email by the account number or the key phrase Your New Account Details.
If you lose the email, you can restore your account password.
- Log in to your profile.
- Press ⚙ next to your name.
- Choose Restore Passwords in the drop-down menu.
- Select the password type and the account you need access to.
- Press the Submit button.
We will send your new password by email.
-
Where can I find access details for my trading account?
- Open the Dashboard page.
- Scroll down to Your Accounts section.
- Choose an account from the list and press its number.
- Press Order History in the drop-down menu.
- Select the dates and press the CSV or HTML button, depending on the file format you prefer.
-
-
-
What trading platforms do you offer?
We offer two very well-known trading platforms, MetaTrader 4 and MetaTrader 5, along with our integrated trading platform, OctaTrader. You can compare them and choose the one fitting your requirements.
MT4 and MT5 are available for trading on your:
- computer via any web browser or a desktop app
- Android device via a web browser, the MT4/MT5 mobile app, or the OctaFX Trading App
- iOS device via a mobile web browser.
OctaTrader is available for trading on your:
- computer via any web browser
- mobile device via the OctaFX Trading App.
You can open both demo and real accounts on all these platforms.
-
Can I use my account on another platform?
No, you cannot log in to a trading platform with an account designed for another platform.
For example, you cannot log in to the MetaTrader 5 terminal with a MetaTrader 4 account and vice versa.
-
Can I run several accounts simultaneously?
Yes, you can install several MetaTrader 4 and MetaTrader 5 terminals in different installation folders on your computer and access one trading account on each MT4 and MT5 terminal.
You can also log into one OctaTrader, MT4, or MT5 account via a web browser and another one via an app.
-
Can I trade with my Android or iOS device?
Yes. If you have a mobile device, you can trade on:
- the OctaFX Trading App
- theMT4 or MT5 mobile app
- a mobile web browser.
If you have an iOS device and MT4 or MT5 mobile app installed, you can access your trading account through them.
If you don’t have MetaTrader apps on your iOS device, you can trade on your:
- MT5 or OctaTrader account via the OctaFX Trading App
- MT4 or OctaTrader account via a web browser
on your computer.
-
Do you have a web platform?
Yes, we do. Interface of MetaTrader 4 and MetaTrader 5 web platforms and their major tools, including one-click trading and chart trading are identical to those of desktop apps.
You can log into MT4 or MT5 from any browser:
- enter your login, which matches your trading account number
- enter a password that we have sent you in the Your OctaFX Profile Details email
- select a server
- and choose a platform—MT4 or MT5.
You can also log into the OctaTrader, MT4, or MT5 web platform from your profile:
- choose a trading account on the Dashboard page
- press the Trade button
- enter your trading account password.
OctaTrader also has a web platform available from your profile.
-
-
-
How do I log into MetaTrader 4 with my account?
Open MetaTrader 4 and press File in the toolbar, from there, select Login to Trade Account. In the pop-up window, enter your account number and password and select the server that was provided for your account during registration. You can find it in your profile (Your Accounts section) or the Your New Account Details email we sent you.
If you use the OctaFX Trading App, you don’t need additionally login to the platform.
-
How do I open an order?
To bring up the New Order window you can:
- press F9 on your keyboard if you use Windows and fn+F9 if you use MacOS
- right-click a symbol in the Market Watch window and select New Order from the pop-up menu
- press the New Order button in the toolbar.
In the pop-up window, select the symbol from the drop-down list, set the volume of the order in lots, set Stop Loss and Take Profit levels, and select the type of your order.
If you choose Market execution, simply press Sell by Market or Buy by Market below to open the position at the current market rate.If you’d like to open an order at a pre-set price, select Pending Order as the order type. Next, choose its type (Buy Limit, Sell Limit, Buy Stop, or Sell Stop), and specify the price at which it will be triggered. Press Place to submit the order.
To specify Stop Loss or Take Profit, press the up or down arrow to fill in the current price and adjust it to your Stop Loss or Take Profit price.As soon as the position has been opened, it will appear in the Trade Tab.
MetaTrader 4 also allows you to open and close positions with one click. To enable One-Click trading, select Options from the Tools menu. In the Options window, open the Trade tab, tick One-Click Trading, accept the Terms and Conditions, and press OK to apply the changes.With one-click trading you can perform trading operations on the chart. To enable the One Click Trading panel, right-click the chart and tick One Click Trading in the context menu. You can use this panel to place market orders with specified volumes.
You can also place a pending order from Trading submenu of the chart’s context menu. Right-click on the necessary price level on the chart and select the type of pending order you would like to open. Available pending order types at this price level will be displayed in the menu.
To open a New Order in the OctaFX Trading App, follow these steps:
- choose the symbol you want to trade and tap on it in the list
- set the volume of a position in the upper right part of the screen
- press Sell or Buy to open the order
.
If you want to set a pending order, press Pending Order in the upper left part of the screen. In the pop-up window, you can choose the type of order, symbol, volume, and price. You may also set the limits Stop Loss, Take Profit, and Expiry in this window. After you’ve set everything, press Place Order.
-
What order types are available in MetaTrader 4?
Market orders and pending orders.
Market orders are executed at the current market price.
Pending orders are automated and may differ, depending on the conditions you set:- Buy Limit triggers a Buy order at a price below the current ask price
- Sell Limit triggers a Sell order at a price above the current bid price
- Buy Stop opens a Buy order when the price reaches the pre-defined level above the current ask price
- Sell Stop opens a Sell order when the bid price reaches the order level below the current bid price.
-
How do I set Stop Loss and Take Profit?
To modify a position, please double press S/L (Stop Loss) or T/P (Take Profit) field of the position line in the Trade tab. Alternatively, you can right-click the position line and select Modify or Delete.
Then simply set the Stop Loss or Take Profit level and press Modify below.If you use the OctaFX Trading App, go to the second tab on the bottom of the screen, choose an order you want to modify, and press the pencil icon. Tick Stop Loss and Take Profit options, set the limits, and press Modify Order.
Please consider the following peculiarities for:
- Sell order: Stop Loss should be above current ask price, and Take Profit should be below the current ask price
- Buy order: Stop Loss should be below current bid price, and Take Profit should be above the current bid price.
Note that each trading instrument has a certain stops level, so if the Stop Loss or Take Profit level is too close to the current price, you will not be able to modify the position. You can check minimum Stop Loss and Take Profit distance by right-clicking a trading instrument in the Market Watch window and selecting Symbols from the context menu. Select the required trading instrument in the pop-up window and press Properties.
You can also modify your order from the chart. To do so, enable the Show Trade Levels option in your terminal settings: go to the toolbar and navigate Tools → Options → Charts → Show trade levels.
Then press on a position level and drag it up (to set Take Profit for Buy positions or Stop Loss for Sell positions) or down (Stop Loss for Buy positions or Take Profit for Sell positions). -
How do I close an order?
Find the order in the Trade tab, right-click it, and select Close order. In the pop-up window, press Close order.
You can also close a position by an opposite one. Double-press the position line in the Trade tab, then select Close by in the type field. The list of opposite positions will appear below.
Select one of them from the list and press Close.
If you have more than two opposite positions, you can select Multiple close by in the type field. This operation will close open positions in pairs.
If you use the OctaFX Trading App, go to the second tab on the bottom of the screen, choose an order you want to close, and press a cross icon. Type in the volume and press Close. -
Where can I see my trading history?
All of your closed orders are available in the Account History tab. You can also create an account statement by right-clicking any entry and selecting Save as detailed report.
In the OctaFX Trading App closed orders are available in third tab on the bottom of the screen.
You can also find your trading history in your profile. -
How do I open a new chart?
Right-click the required currency pair in the Market Watch window and select New Chart or simply drag and drop it to the currently open one.
You can also select New Chart from the File menu or press New Chart on the toolbar.
-
Where do I change chart settings?
Right-click the chart and select Properties. If you use a web version, you will see all settings in one pop-up window.The Properties window in the desktop app has two tabs: Colours and Common. Chart elements are listed on the right side of the Сolour tab, each with its own drop-down colour box. You can hover your mouse over any colour sample to view its name and press to select one of preset colours.
In the Сommon tab, you can select type of chart and enable such features as Volume, Grid, and Ask Line.
You can also change chart type by pressing on the desired icon to apply bar, candlestick, or line price data. To change periodicity, press the Periods icon or select the desired timeframe from the toolbar. -
Why am I unable to open a position?
First of all, please make sure you have logged in with your trading account. Connection status in the lower right corner of the window will indicate whether you are connected with our server or not.
If you are unable to open a New Order window and the New Order button in the toolbar is inactive, then you logged in with your investor password and should log in again with your trader password instead.
An ‘Invalid SL/TP’ message means the Stop Loss or Take Profit levels you set up are incorrect.
‘Not enough money’ message means your free margin is not sufficient to open an order. You can check the required margin for any position with our trading calculator.
-
Why I can see only a few currency pairs in MetaTrader 4?
To see all the available trading tools, go to your MetaTrader 4 terminal, right-click on any pair in the Market Watch window, and select Show All.
Press CTRL+U to enable trading tools manually. -
What are your stop levels?
Each trading tool has its own stop levels (limits). You can check the stop level for a specific currency pair by right-clicking on it in Market Watch and selecting Specification.
Please note that we have five-digit pricing, so the distance is shown in points. For instance, the EURUSD minimal distance is shown as 20 points, which equals 2 pips.
-
What do I do if I see ‘Waiting for Update’ on the chart?
Open the Market Watch window, click and hold down the mouse button on the preferred pair. Drag the chosen pair onto the chart indicating ‘Waiting for Update’. Release the mouse button. This will automatically update the chart.
-
Why is the ‘New Order’ button grey?
It means that you have logged into your account using your investor password.
That limits your access to the charts, technical analysis, and Expert Advisors. You are not able to trade if you log in to your account with your investor password. In order to start trading, you have to log in with your trader password, the one you received in our email. -
Why do I see ‘Invalid account’ in the connection status?
An ‘Invalid account’ error indicates that you have entered incorrect login details. Please make sure that:
- you entered the account number
- you used the correct password
- you chose the correct server we assigned to your account
If you’ve lost your trader password, you can restore it in your profile.
-
Why do I see ‘No Connection’ in the connection status?
No Connection’ indicates that you failed to connect to our server. You should do the following:
- Press on the bottom right corner of the terminal window where it is showing ‘No Connection’ and select Re-scan Servers, or select the server with the lowest ping
- If the server does not respond, close the MetaTrader 4 app and restart it again using Run as Administrator mode
- Check your firewall settings and add MetaTrader 4 to the allowed programs or the list of exceptions.
If this doesn’t work, please contact our Customer Support.
-
Do you provide EAs or Indicators? Where can I download them?
We don’t provide or recommend any expert advisors (EAs) or indicators. However, you can download indicators for MetaTrader 4 on the MQLSource Code Library.
It is also possible to download Indicators and EAs from other sources.
-
-
-
How do I log in to MetaTrader 5 with my account?
1. Open MT5, then press File—Login with trading account.
2. In the pop-up window, enter your account number, trader password, and select OctaFX-Real for real accounts or OctaFX-Demo if you want to log in with a demo account. -
Why can’t I log in?
Check the last entry in the Journal tab to find out the exact reason.
• Invalid account means that the credentials you entered upon login were incorrect, including your account number, password, or the trading server. Double-check your access data and try to log in again.
• No connection to OctaFX-Real or No connection to OctaFX-Demo indicates that MT5 is unable to connect to the internet. Check if your internet is working, press the connection status icon, and select Network rescan. If the issue persists, please get in touch with our Customer Support. -
How do I open an order?
There are several ways to open an order in the MT5 web terminal.
• Go to Menu Bar > Tools > New Order.
• Go to Market Watch, double-click or right-click on an instrument, and select New Order from the context menu.After pressing New Order, specify the symbol, type of order and volume. Then, press the Buy or Sell button below.
• Press F9 on your keyboard or open the instrument’s chart and press ALT+T to jump to one-click trading and open positions with pre-selected parameters directly on the chart. To do this, enable the One-Сlick Trading Panel. Go to Tools > Options and make sure One-click trading is ticked. The One-Click Trading Panel is also available in the Market Watch’s Trading tab.
Here’s how to open an order in MT5 in the OctaFX Trading App.
1. Go to the Trade tab.
2. Hit the + icon in the top right corner.
3. Set the order parameters and press Sell by Market or Buy by Market. -
What order types are available in MT5?
There are two general order types: market and pending.
• Market order is an order to open a position at the current market price.
• Pending order is an order to open a position once the price reaches a certain predefined level.There are six types of pending orders.
• Buy Limit is an order to buy an asset at a price lower than the current one. Traders usually open it in anticipation that the asset price will rise after achieving a certain support level.
• Buy Stop is an order to buy an asset at a price higher than the current one. Traders usually open it in anticipation that the asset price will continue to rise further after breaking above a certain resistance level.
• Buy Stop Limit is a joint work of Buy Stop and Buy Limit, which traders use in anticipation of the asset price decrease before it continues to rise. First, you set the alarm for a price higher than the current one and specify the Stop Limit price. When the first price is triggered, a Buy Limit order is placed automatically.
• Sell Limit is an order to sell an asset at a price higher than the current one. Traders usually open it in anticipation that the asset price will decrease after achieving a certain resistance level.
• Sell Stop is an order to sell an asset at a price lower than the current one. Traders usually open it in anticipation that the price will continue to decrease after breaking below a certain support level.
• Sell Stop Limit is a joint work of Sell Stop and Sell Limit, which traders use in anticipation of the asset price increase before it continues to decline. First, you set the alarm for a price lower than the current one and specify the Stop Limit price. A Sell Limit order is placed automatically when the first price is triggered. -
How do I set Stop Loss or Take Profit?
1. Right-click on the position where you would like to set Stop Loss or Take Profit.
2. Select Modify or delete.
3. Set the desired parameters.Keep in mind that for a short position, you can set Stop Loss above and Take Profit below the current Ask price, while when modifying a long position, you should place the Stop Loss below and Take Profit above the current Bid price.
-
How do I close a position?
1. Find the position you want to close in the Trade tab.
2. Right-click on it and select Close position.
3. If one-click trading is enabled, MT5 will close the position immediately at the current price. If not, a Position window will appear. Confirm the closure by pressing Close. -
Why am I unable to open an order?
• If you cannot open a New Order window and the New Order button on the toolbar is inactive, you have logged in with your investor or read-only password. Please log in with your trader password to trade.
• Inactive Sell and Buy buttons in the New Order window indicate that you’ve entered the incorrect order volume. The minimum volume you can trade is 0.01 lot, and the step is 0.01 lot. To open an order, correct the volume.
• A Not enough money message means that your free margin is not sufficient to open the order. To open an order, adjust its volume or deposit to your account to increase your free margin.
• A Market is closed message means that you’re trying to open a position outside the instrument’s trading hours. Check the trading schedule on our website or in the symbol Specifications in MT5. -
How can I check my trading history?
You can view your order history in the History tab of the Toolbox.
To open it, go to Toolbox > History. In case the Toolbox is hidden, go to View > Toolbox or press Ctrl+T on your keyboard.You can also customise your trading history by symbols, volumes, time, positions, and orders. To do this, right-click any empty space in the History tab.
-
How can I add EAs or custom indicators to MT5?
• If you have downloaded an EA or an indicator, go to File > Open data folder > MQL5 and copy the .ex5 file into Experts or Indicators folder. Your EA or indicator will appear in the Navigator window.
• You can also download EAs or indicators directly in MT5 via the Market tab. -
How can I open a chart?
• To open a chart, drag and drop a trading tool from Market Watch to the chart window.
• You can also right-click on a symbol and select New chart. -
How can I customise a chart?
You can change periodicity, scale the charts and switch between chart types on the standard toolbar. If you want to change chart colours, add or remove Bid and Ask lines, Volumes or Grid, right-click the chart and select Properties.
-
How can I add an indicator to a chart?
1. Find your indicator in the Navigator window and drop it to the chart.
2. If required, modify the parameters in the pop-up window and press OK to apply the changes. -
How can I launch an EA?
1. Drag and drop your EA from the Navigator.
2. If required, set the parameters and press OK to apply the changes.
-
-
-
What deposit bonus do you offer?
You can claim 10%, 30%, or 50% bonus on each deposit. Bigger bonuses become available during holidays and other limited-time events.
-
How can I claim the bonus?
There are two ways to claim a bonus. You can:
- activate it manually in your profile after making a deposit
- check the ‘Apply further bonuses automatically’ option in Settings.
The first option is recommended as you can pick bonuses you are able to afford. Keep in mind that you need to have enough funds to sustain your bonuses before you complete them.
-
Does the bonus support my margin on OctaTrader/MT4/MT5?
Yes, bonus funds are a part of your equity and free margin. Bonus supports your margin, but please note that you need to maintain your equity above the bonus amount, otherwise it will be cancelled.
-
Can I withdraw the bonus?
You can withdraw the bonus after completing its trading volume requirement, which is calculated as follows: bonus amount/2 standard lots. If you claim 50% bonus on 100 USD deposit, the volume requirement will be 25 standard lots.
Gold and Platinum status users need to trade less lots to withdraw bonuses.
-
Why am I unable to claim the bonus?
You might not have enough funds to support the bonus. Please make sure your free margin exceeds the bonus amount.
-
How can I check how many lots I need to trade to complete a bonus?
You can track the completion progress and the remaining volume for each bonus in your profile on the Your Deposit Bonuses page.
-
Can I claim a bonus before completing the previous one?
Yes, you can. Volume calculation starts from the first claimed bonus and continues consecutively. After you complete the first bonus, the completion process for the next one will begin.
-
Where can I see my bonus(es) in OctaTrader, MT4, and MT5?
The total amount is shown as Bonus funds in OctaTrader and Credit in MetaTrader 4 and MetaTrader 5 platforms until you meet the volume requirements.
-
Why was my OctaTrader/MT4/MT5 bonus cancelled?
The bonus can be cancelled if:
- your equity falls below the bonus amount
- your personal funds fall below the bonus amount after a withdrawal or internal transfer
- you cancelled the bonus in your profile.
You can get in touch with our Customer Support to specify the reason.
-
-
-
How can I participate?
Sign up or log in Profile on our site, choose the Contests section in the main menu, and then select Open Champion Demo Contest account in the drop-down list.
. -
When does the next round start?
You can find the start date of the next round at the top of the Champion Demo Contest page.
-
My contest account is disabled. Why couldn’t I join the contest and start trading?
You can log in to the MT4 trading platform using the contest login and password only after the round has begun. First, check if you’re trying to enter the right trading platform, as the Champion Demo Contest is only available on MT4. Then, check if the contest round is Active on the main page of your Profile.
You can see the Not yet started, Active, or Finished statuses in your MT4 contest account section. You can log in to the MT4 trading platform and start trading when the contest account is marked as Active.
-
What is a trading platform? Which platform should I use for trading?
You have to download and install the MT4 trading platform or use the browser version. Please, do not confuse it with the MT5 trading platform! This is a different platform and you will not be able to log in and use it to trade in the Champion Demo Contest.
-
Where can I find my contest rank?
You can find your contest rank in the My Accounts list on the main page of your user priofile page.
Note that your current rank will appear in the contest account row marked as Active. By clicking on the Rank link, you can see your personal contest page with detailed information (rank, trades, profit or loss, rank changes, achievements, and more).
-
Can I join the contest right away after signing up?
You can’t join the ongoing contest round, however, you can join the next one. Find the start date of the next round at the top of the Champion Demo Contest page.
-
A round starts tomorrow. Why can’t I log into MT4 trading platform?
You can log into the MT4 trading platform and start trading only when the round has already begun. Note that this happens according to the server time (EEST), not your local time.
-
What are the prizes?
- First place—500 USD
- Second place—300 USD
- Third place—100 USD
- Fourth place—60 USD
- Fifth place—40 USD
-
What is the duration of each round?
The contest round lasts four weeks.
-
When does the current round end?
You can find the end date of the current round under the Current Round tab of the Champion Demo Contest page.
-
When does registration start, and how long does it last?
Registration for each contest is announced prior to its start. Registration for the next round begins at the same time the current round starts. You cannot register to join the current round, just the next one. The registration period is four weeks.
-
Who can participate in the contest?
During the registration period, anyone above legal age can register for the contest.
-
What is a contest profile picture? Why should I upload it?
It’s an image for your personal contest page and round statistics. You can use any image you want or a photo of yourself. Please do not upload your ID or any other legal document.
-
I can’t enter my nickname in the registration form, what’s wrong?
That nickname may already be taken—please choose another. Please choose another nickname. This issue can also occur because you’re not using Latin letters. Please change the input language to English and try to enter your nickname again.
-
What’s an initial deposit?
It’s virtual money in your contest account that we provide. You don’t need to deposit any real funds to participate in the demo contest.
-
Can I withdraw money from my contest account?
The funds in your contest account are virtual, so you can’t withdraw them.
-
Where can I download the MT4 platform?
You can find the latest version of the MT4 platform on the Downloads page.
-
Should I download MT4, or can I use the browser version of this platform too?
You can use the version you find convenient—desktop, mobile, and the browser version of MT4 platform.
-
What server should I use for the contest?
You should use the OctaFX-Demo server.
-
How do I win?
To win one of the prizes, you should have the highest balance when the contest round ends. Note that the gain percentage does not affect your ranking.
-
What trading techniques can I use?
You can use most of the trading techniques but any kind of arbitrage trading or any other abuse of pricing and/or quotes will result in disqualification from the contest.
-
Are hedging or reverse trading strategies allowed?
Yes, you can use these strategies.
-
Where can I see contest ratings and check the current round leaders?
You can find the current round standings on the Champion Demo Contest page.
-
Where can I see previous rounds results?
You can see previous rounds’ winners and statistics in the archive.
-
Can I trade from my smartphone?
Yes, you can use the MT4 mobile app. You can find it on our Downloads page.
-
Can I use my contest account in another rounds or contests?
You can’t use your contest account for multiple contest rounds.You have to open a new Champion Demo Contest account for each round.
-
Can I participate in the contest if my OctaFX account is not verified?
Yes, you can open a Champion Demo Contest account even if your OctaFX account is not verified.
-
What password should I use for trading on MT4?
You should use your Trader password, not your Investor one.
-
How can I find contest stats for another contestant?
If you know the contestant’s nickname, you can search for them under the Current Round tab on the Champion Demo Contest page.
-
How can I find the list of contestants?
Just use the navigation at the bottom of the Current Leaders table on the Champion Demo Contest page.
-
Can I change my contest nickname?
No, it remains the same during the contest.
-
Can I withdraw the prize if I win?
Yes, you can. You are free to withdraw the prize or make more money from trading with it on your real account. If the prize funds are used for real trading, the withdrawal limit is 300% of the prize funds (including both the prize funds and profit). Note that to withdraw you need to be verified.
-
How quickly will I receive the prize money?
Usually, it takes from a couple of days to a week. To get your prize, you’ll need to answer a couple of questions for site news and provide us with your real account information—tell us your real account number so we can transfer the money to it. The account must be verified and can be an OctaFX MT4 or OctaFX MT5 account.
-
What are the trading conditions of the contest?
- number of assets is 74, including cryptocurrencies, energies, and indices
- minimal volume is 0.01 lot
- maximum is not limited
- initial deposit is 1,000 USD
- leverage is 1:500.
-
-
-
How can I deposit my account?
To make a deposit, log into your Profile, choose your primary account at the top of the page, and click New Deposit.
Then, select the payment option you prefer, specify the deposit amount, and click Continue. Fill in additional information if required and confirm the deposit.
All deposit methods available in your region are listed on the New Deposit page.
-
When will the deposited funds be credited to my balance?
In the case of bank transfers, all requests are processed within 1–3 hours during the working time of our Financial Department. The process is instant if you deposit via Skrill, Neteller, Perfect Money, Visa, Mastercard, or crypto.
-
How do USD/EUR exchange rates vary depending on the deposit method?
If your deposit currency differs from USD, the processing bank will convert the currencies at their internal exchange rate when you deposit with Visa or Mastercard. Also, note that the bank may also charge additional transaction fees.
If you deposit via an instant payment provider like Skrill, Neteller, or Perfect Money. However, if the deposit account currency is not USD, the payment provider will convert the funds to dollars using their internal exchange rate and may charge additional fees.
On our side, we do everything to provide our clients with the best rates for financial operations. We also don’t charge any commissions and cover the deposit and withdrawal fees applied by payment systems.
-
Are my funds safe? Are your accounts segregated?
Per international regulations, we use segregated accounts to separate clients’ funds from the company’s balance sheets. This keeps your funds secure and untouched.
-
I have submitted a withdrawal request. When will I receive the funds?
We usually process all requests within 1–3 hours. You will receive an email notification as soon as your request is processed.
-
Do you charge any fees for deposits and withdrawals?
We do not charge our clients any fees. Moreover, we also cover the deposit and withdrawal fees that third parties (like Skrill, Neteller, and others) may apply. However, please be aware that some payment systems may introduce additional fees to operations on their platform, so look closely at third-parties customer agreements and other policies.
-
What is the maximum amount of deposits?
The deposit amount is unlimited, and the withdrawal amount should not exceed your free margin.
-
How frequently can I make deposits or withdrawals?
We do not limit the number of deposit and withdrawal requests. However, to avoid unnecessary delays in processing, we advise depositing (or withdrawing) the funds in one request and not splitting them.
-
Can I submit a withdrawal request if I have open orders?
You can submit a withdrawal request if you have open orders, trades, or positions. Please note that the free margin has to exceed the withdrawal amount you requested. If you have insufficient funds, the request won’t be processed.
-
Which currencies can I use to deposit my account?
You can deposit any currency to our USD account to be converted per the official exchange rate at the moment of transaction. Note that you cannot change the account currency, but, if needed, you can always open a new account in USD. We don’t charge any commission for deposits or withdrawals and keep our conversion rates among the best in the industry.
-
Where can I review my deposit and withdrawal history?
You can find links to the pages with all previous deposits, withdrawals, and transfers on your Profile page on the right, in the Operation history section.
-
How can I withdraw my funds?
Please sign in to your Profile and press Withdraw on the right-hand menu. Verify your account using our Verification flow if you still need to do it. If you are already verified, choose your account and enter the amount you wish to withdraw. Then, fill in your OctaFX PIN and the required information in other fields. Press Request, recheck the data you’ve provided, and then press Confirm if the data is correct.
Note that your free margin must exceed the withdrawal amount. Otherwise, our Financial Department will not be able to process your request.
-
My withdrawal request status is ‘pending’. What does that mean?
If your withdrawal request status says ‘pending’, it means it’s in the queue for processing. We will notify you as soon as our Financial Department approves it.
-
Why was my withdrawal request rejected?
There are two possibilities: some of the data you entered may have contained an error, or there may not have been enough free margin to process your withdrawal.
You can check the exact reason for the rejection in the recent email notification we sent, fix the issue, and retry the withdrawal. -
Can I cancel a withdrawal request?
Yes, you can cancel a withdrawal request on the Withdrawals history page.
-
I have not received the funds, even though my withdrawal has been processed. What should I do?
If you don’t receive your funds for more than 24 hours, get in touch with our Customer Support.
Usually withdrawal takes much less, but please note that if you withdraw using the Local Banks method, it might take us up to 24 hours to reach your bank. -
Can I transfer funds between my real accounts?
Yes, you can create an internal transfer request on your Profile page.
- Choose the Internal transfer option on the right-hand menu.
- Select the accounts to and from which you would like to transfer the funds.
- Enter the amount into the ‘Amount from’ field.
- Enter your OctaFX PIN (you can find it in your welcome email or reset it to get a new one).
- Press theRequest button and confirm your request.
-
Are internal transfers instant?
Internal transfers are processed automatically and instantly unless they require manual processing by the Financial Department for security reasons. In that case, they will process your request within 1–3 hours.
-
Do you charge any fees for internal transfers?
No fees apply to internal transfers.
-
Can I apply a deposit bonus to an internal transfer?
No, deposit bonuses can only be applied to deposits.
-
-
-
Who is an IB?
IB stands for ‘Introducing broker’, a person or a company that refers clients to a broker and receives commission for their trading activity.
-
How can I open a partner account?
-
What IB commission do you offer?
We pay up to 12 USD per lot. IB commission payed depends on the number of active clients you have.
-
What does ‘Active client’ mean?
Active client’ is an account with cumulative personal funds greater than or equal to 100 USD and with at least five valid orders closed within the last 30 days.
-
What is a ‘Valid order’ in the IB program?
IB commission is paid for valid orders only. A valid order is a trade that meets the following conditions:
- The trade lasted for 180 or more seconds.
- The difference between the open price and close price of the order is greater than or equal to 30 points (pips in 4-digit precision terms).
- The order was not opened or closed by means of partial close and/or multiple close by.
-
How often is commission credited to partner accounts?
IB commission is credited to partner accounts daily.
-
Where can I get promo materials?
You can request promo materials at [email protected]
-
How can I attract clients?
You can promote your referral link and referral code on Forex-related websites and forums, social media platforms, or even your own website.
-
-
-
What is a trading signal?
A trading signal is a sign for a trader to open a buy or sell order. It is usually based on technical indicators and often combined with fundamental analysis.
-
What is Autochartist?
Autochartist is a robust market scanning tool offering technical analysis across multiple asset classes. With over a thousand trading signals a month, novice and professional traders can get significant time-saving benefits by having Autochartist continuously scan the market for fresh, high-quality trading opportunities.
-
How does Autochartist work?
Autochartist scans the market 24/5 searching for the following patterns:
- Triangles
- Channels and Rectangles
- Wedges
- Head and Shoulders.
At the beginning of each trading session, Autochartist compiles an email report with predictions for the most popular trading instruments.
-
What is Market Report?
Market Report is a price prediction based on technical analysis delivered to your inbox up to three times a day. It allows you to adjust your trading strategy at the beginning of each trading session, depending on where the market is expected to go.
-
How often do you send out the reports?
Autochartist reports are sent out three times a day at the beginning of each trading session:
- Asian session report goes out at 12 AM (EET)
- European session report is sent at 8 AM (EET)
- American session report—at 1 PM (EET).
-
How can Autochartist report benefit my trading?
Autochartist Market Reports is a convenient way to identify trading opportunities effortlessly—all you need to do is check your email and decide which instruments you will trade today. Moreover, it offers time-saving benefits in analysing the market. Autochartist is based on known and trusted technical analysis theories and is up to 80% correct, thus allowing you to boost your profit potential and avoid missing out on trading opportunities.
-
-
-
What are prize lots? How are they calculated?
Prize lots are rewards you receive for trading. You can exchange them for gifts from our Trade and Win collection.
Prize lots are calculated as follows: 1 traded lot = 1 prize lot.
OctaFX Status Program participants receive more prize lots for trading:- Silver status: 1 traded lot = 1.25 prize lot
- Gold status: 1 traded lot = 1.5 prize lot
- Platinum status: 1 traded lot = 2 prize lots
Prize lots are calculated for closed orders only.
-
Should I trade profitably to receive prize lots?
Prize lots are credited for both profitable and losing orders.
-
Where can I check my prize lots, and what can I exchange them for?
You can check your prize lots and available gifts in
- the Prize lots section in your profile on the OctaFX site
- in the Trade and Win section in the OctaFX Trading App.
Please note that it may take up to 10 minutes for newly earned prize lots to get credited.
-
Why don’t I receive prize lots even though I’m trading?
You might have traded less than one full lot, or your orders might still be open. Please note that prize lots are credited only for closed orders, and it may take up to 10 minutes for them to get credited.
-
When will my prize lots expire?
There is no expiration date for prize lots.
-
Can I withdraw prize lots or add them to my balance?
You can only use prize lots to exchange them for gifts from the Trade and Win collection.
-
Do prize lots affect my deposit bonus lots?
Prize lots don’t affect your deposit bonus lots in any way.
-
The pin is required on checkout. What PIN is that?
This is the same PIN that you use for withdrawals. You might find in the email with login/account number that we sent to your email address when you opened your first account with OctaFX. In case you cannot access the email, you are able to restore the PIN in your personal area.
-
What address should I use for delivery? Can it be different from the one on my account profile?
You can use your current address that you wish prizes should be delivered to. It can be your home or office address.
-
Are gifts delivered for free?
Yes, OctaFX covers all the delivery costs.
-
Can I change my order?
Unfortunately, you cannot change your order since it’s been made. Please, address our Customer Support.
-
Can I order the same gift twice?
You cannot order the same gift twice, however you can collect prize lots and order another gift of your choice.
-
How long does it take for my gift to arrive?
It usually takes from 1 to 3 weeks for gift to arrive. You can also track your order status in «Order history» tab in Trade&Win shop.
-
It’s been more than 2 weeks since I ordered the gift. Where is it?
Please, use tracking code to track your order. It’s available in Personal area. Go to Trade&Win shop and click «Order history» to see tracking codes and order statuses.
-
Can I track my order?
Yes. Tracking is available in Personal area. Go to Trade&Win shop and click «Order history» to see tracking codes and order statuses.
-
Can I order gifts free of charge?
Sure, all orders in Trade&Win promo are made free of charge.
-
Can I share photos of my gift?
You can share the photos of your gift across all SMM channels using #TradeAndWin hashtag. If your photo is the best we will grant you 25 prize lots as a bonus.
-
How to participate in #TradeAndWin 25 lots raffle?
Share the photos of your gift using #TradeAndWin hashtag. If your photo is the best we will grant you 25 prize lots as a bonus.
-
I ordered a gift and it looks different. Why?
Please mind that images used in marketing materials are not necessarily representative of actual gifts. Actual gifts may vary.
-
How can I join Trade & Win program?
Just trade on any of your real accounts and start receiving prize lots for every closed order. You are only eligible to take part in this promotion if you are a resident of Indonesia, Malaysia,Thailand, Pakistan and India.
-
What countries are eligible to take part in this promotion?
The Promotion is open to OctaFX customers in Malaysia, Indonesia, Thailand, Pakistan and India aged 18 or over at the time of entry.
-
Does the scope of gifts in Trade & Win depend on my status?
Yes, it does:
Silver status holders can additionally claim AirPods and Apple Watch.
Gold status holders can additionally claim MacBook Air and iPhone XR, as well as the Silver status gifts.
Platinum status holders can claim MacBook Pro and iPad Pro, as well as the Gold and Silver status gifts. -
How does a faster accumulation of prize lots in Trade and Win work?
You get more prize lots for trading one lot depending on your status:
Silver—1.25 prize lots for one lot traded
Gold—1.5 prize lots for one lot traded
Platinum—2 prize lots for one lot traded.
-
-
-
How do I choose a Master Trader to copy?
Examine the Master Trader’s stats first: risk score, gain, profit and loss, number of copiers, commission, order history, and other statistical data that can help you make an informed decision. Please top up your account to start copying.
-
How can I copy from a Master Trader?
When you subscribe to a Master Trader and press Set up copying, specify the copying proportion and decide whether to add support funds. When you press Start copying, the funds are credited from your Wallet, and the copying starts. You can subscribe to an unlimited number of Master Traders simultaneously.
-
Do you charge any commission for copying?
As a broker, we do not charge commissions. You only pay the Master Trader’s commission, which is specified individually on the Master’s Rating page.
-
How do I stop copying a Master Trader?
You can unsubscribe from the Master Trader and stop copying the orders at any moment. When you unsubscribe, all funds invested with the Master Trader and your profit from copying are credited to your Wallet.
-
How can I withdraw my profit?
You can withdraw funds from your Wallet. To transfer your investments and profit there, end your subscription to the Master Trader. Please note that you won’t receive the full amount of your initial investment back if you complete your subscription to the Master Trader with a loss. The amount of loss will be subtracted from your initial investment.
-
Can I stop copying a Master Trader?
You can unsubscribe from a Master Trader and stop copying their trades at any moment. When you unsubscribe, all funds invested with the Master Trader and your profit from copying will be returned to your Wallet. Before unsubscribing, please make sure all current trades are closed.
-
-
-
How can I become a Master Trader?
Any OctaFX client with an MT4 account can become a Master Trader. Just go to your Master Areaand set up your Master Account.
-
How do I adjust the amount of the commission I charge my Copiers?
If you have already created a Master Trader Account, you can visit the Master Area to edit your settings, adjust commission, or alter the description of your strategy. If you have not already created a Master Trader Account, you can input your settings as you create the account. The new commission will only be charged to Copiers who subscribe to you after the adjustment. The commission amount will remain unchanged for Copiers who currently subscribe to you.
-
When do I get the commission from my Copiers?
This depends on the type of your commission.
Fixed per One Lot is on Saturdays at 5:00 a.m every week. (EET)
Revenue Share is on Sundays at 6:00 p.m. (EET) every week. -
When is the commission charged to my Copiers?
The commission is charged the moment you open an order.
-
How do I receive the commission?
We transfer the commission to your Wallet. Afterwards, you can add the commission to your trading accounts or withdraw it from your Wallet.
-
-
-
Why should I enrol in the status program?
Our status program allows you to enjoy extra benefits based on your balance. You can find the list of all the benefits on the User Statuses page via your Profile.
-
Which benefits can I receive from each status?
Bronze:
- 24/7 Customer Support
- commission-free deposits and withdrawals
- commission-free trading
- a maximum of up to 200 orders via MT4.
Silver:
- all of the benefits from the Bronze status
- trading signals from Autochartist
- premium gifts from Trade and Win, like AirPods and Apple Watch
- faster accumulation of prize lots (1.25 prize lots for one lot traded).
Gold:
- all of the benefits from the Bronze and Silver statuses
- faster withdrawals and deposits
- lowered spreads on all instruments of the Forex Extended group
- premium gifts from Trade and Win, like MacBook Air and iPhone XR
- special terms for completing deposit bonuses—the number of lots to trade equals the bonus amount divided by 2.5
- faster accumulation of prize lots (1.5 prize lots for one lot traded)
- a maximum of up to 500 orders via MT4.
Platinum:
- all of the benefits from Bronze, Silver, and Gold statuses
- lowered spreads on Forex Majors, Forex Extended, and metals
- trading prompts from our experts
- personal manager
- VIP events
- premium gifts from Trade and Win, like MacBook Pro and iPad Pro
- special terms for completing deposit bonuses. For instance, the number of lots to trade equals the bonus amount divided by 3
- faster accumulation of prize lots (2 prize lots for one lot traded)
- a maximum of up to 2,000 orders via MT4.
-
How do I reach a higher status?
We upgrade your status automatically once your overall balance reaches one of these thresholds:
- for Bronze—5 USD
- for Silver—1,000 USD
- for Gold—2,500 USD
- for Platinum—10,000 USD.
-
Do I need to pay to enrol in the status program?
No, it’s free.
-
How long will it take for my user status to change after depositing a certain amount?
Once your balance reaches one of the status thresholds, we will activate your new status immediately.
-
Does the status program allow me to make instant deposits and withdrawals?
Many factors determine the speed of transfers, like your choice of payment method, service, or bank. However, Gold and Platinum status holders will receive faster request processing than those with another status.
-
What instruments are in the Forex extended group?
AUDCAD, AUDCHF, AUDJPY, AUDNZD
CADCHF, CADJPY
CHFJPY
EURAUD, EURCAD, EURCHF, EURGBP, EURJPY, EURNZD
GBPAUD, GBPCAD, GBPCHF, GBPJPY, GBPNZD
NZDCAD, NZDCHF, NZDJPYIf you hold Gold or Platinum status, you can benefit from a spread reduction by 0.3+ pips for all pairs of this group.
In MetaTrader 5, the spread for all instruments in the Forex Extended group is reduced by 0.3 pips. In MetaTrader 4, the Forex Extended group is split into two: Forex Extended1 and Forex Extended2. The spread is reduced by 0.3 pips for the instruments in Forex Extended1 and by 0.6 pips for the instruments in Forex Extended2.
-
Will I lose my status if my overall balance drops below a certain threshold?
That depends on your status, the amount your balance drops, and whether your balance was impacted by trading or withdrawing.
Bronze cannot be downgraded.
Silver can be downgraded to Bronze:- instantly if your balance falls below 800 USD after withdrawal or internal transfer
- in 30 days if your balance falls below 800 USD as a result of your trading activity.
Gold can be downgraded to Silver or even Bronze:
- instantly if your balance falls below 2,000 USD after withdrawal or internal transfer
- in 30 days if your balance falls below 2,000 USD as a result of your trading activity.
Platinum can be downgraded to Gold or even a lower status:
- instantly if your balance falls below 10,000 USD after withdrawal or internal transfer
- in 30 days if your balance falls below 10,000 USD due to your trading activity.
-
Does the scope of gifts in Trade and Win depend on my status?
Yes, it does:
Silver status holders can additionally claim AirPods and Apple Watch.
Gold status holders can additionally claim MacBook Air and iPhone XR, as well as the Silver status gifts.
Platinum status holders can claim MacBook Pro and iPad Pro, as well as the Gold and Silver status gifts. -
What are the VIP events?
These are meetups we conduct behind closed doors to connect traders of your calibre and deliver networking opportunities. Transfer services and other expenses are on us.
-
How does a faster accumulation of prize lots in Trade & Win work?
You get more prize lots for trading one lot depending on your status:
Silver—1.25 prize lots for one lot traded
Gold—1.5 prize lots for one lot traded
Platinum—2 prize lots for one lot traded. -
How does the spread reduction work?
Depending on your user status and the instruments you are trading, you might notice a reduction between the buy and sell prices. In particular:
- Gold status reduces the spread on all pairs of the Forex Extended group by 0.3 to 0.6 pips
- Platinum status also lowers the spread on Majors by 0.1 pips and on metals by 0.3 pips.
-
Stop loss is very important in a trade. But there are professional traders who don’t use stop loss. You can also watch this video in which a millionaire forex trader explains why I don’t use a stop loss. I use a stop loss and I highly recommend that you also use a stop loss. As a trader your primary goal is to minimize risk as much as possible while at the same time you need to maximize profit. When you are trading, go for high reward and low risk trades. I usually look for trades that have a small stop loss like 10-20 pips and a profit target of 100-200 pips. Over the years, I have learned that it is very much possible to reduce risk to as low as 10-20 pips. When I started I would happily open a trade with a stop loss of 50 pips. But now I consider 50 pips to be too risky. I am even reluctant to open a trade with a stop loss of 20 pips. I am happy with a small stop loss of 10-15 pips. When you start it would be difficult to reach this level of perfection. For example in the start if you have a strategy that makes 50 pips with a stop loss of 50 pips, you should try to increase the profit to 100 pips while decreasing the risk to 20 pips. Can you do it? It all depends on the tools that you employ. One of the tools that can help you achieve that is the trailing stop loss.
Have you ever tried to trade US Presidential Elections? Read this post in which I show how to trade US Presidential Elections. The only problem: you can trade US Presidential Elections once in 4 years. Below is a screenshot of what happened in the recent US Presidential Elections. Market sentiment changes with the voter sentiment. Markets are highly emotional now a days. You should know this fact. Modern markets are news driven. Forget the fundamentals in the short run. In the screenshot below, you can see when the news of Donald Trump winning US Presidential Elections broke market reacted negatively and USDJPY started falling sharply.

After a few hours, market changed its mind. After all Donald Trump winning US Presidential Elections was not bad for US economy. USDJPY started rallying. You can see that in the image below. A strong rally has started. Interesting this Dollar rally continued for a few weeks. So you can see how much sentimental markets are now a days. When you develop trading strategies, you should keep this fact in your mind. All we have the price action. That’s all!

A trailing stop loss always trails the price as the name implies. This is how the trailing stop loss works. When you place in a buy order, a trailing stop loss will follow the price upward keeping a safe distance from it. We will specify the safe distance. In the same manner, when we have a sell order, a trailing stop loss will follow the price downward keeping a safe distance from it. Most of the time we fix safe distance as 50 pips. We need to give the price some space to breath. This safe distance is the trailing stop loss. 50 pips trailing stop loss means that our stop loss will trailing price with a minimum distance of 50 pips. We can delay the trailing stop loss kicking in by requiring that a minimum profit level be reached before it starts trailing the price. So unlike a fixed stop loss, a trailing stop loss follows the price. This provides us with opportunities as well as Too tight a trailing stop loss and we will be out of action pretty soon. We want to catch the price movement as much as possible so as to maximize our profits. Never coded before? Don’t worry. MQL5 is an easy language. You just need a little effort to learn it. Read this post on how to code an EA to trade price action with 2 EMAs. Now coming back to our trailing stop loss. The important question is why you need to code an EA. EA can help you a lot when the price moves rapidly. You cannot close the trade manually as fast as an EA can. So let’s add a simple trailing stop loss to our expert advisor:
// define the input variables
// we define the trailing stop loss to be 30 pips
input int trailingSL = 300;
// OnTick() event handler
//check if a position is already open on the chart
//if we have an open position and the trailing stop loss is greater than zero we proceed further
if(PositionSelect(_Symbol) == true && trailingSL > 0)
{
//inform the trade server that we want to modify stop loss and take profit
       request.action = TRADE_ACTION_SLTP;
       request.symbol = _Symbol;
//get the position type from the trade server
       long positionType = PositionGetInteger(POSITION_TYPE);
//get the current stop loss from the trade server
       double currentSL = PositionGetDouble(POSITION_SL);
//convert the trailingSL into price increment
       double trailSL = trailingSL * _Point;
       double trailingStopPrice;
//check if we have a buy trade
       if(positionType == POSITION_TYPE_BUY)
         {
//for a buy trade we will subtract the trailSL from bid price
            trailingStopPrice = SymbolInfoDouble(_Symbol,SYMBOL_BID) - trailSL;

       if(trailingStopPrice > currentSL)
         {
            request.sl = trailingStopPrice;
            OrderSend(request,result);
         }
}
//check if we have a sell trade
     else if(positionType == POSITION_TYPE_SELL)
      {
//for a sell trade we will add the trailSL to the ask price
      trailingStopPrice = SymbolInfoDouble(_Symbol,SYMBOL_ASK) + trailSL;
      if(trailingStopPrice < currentSL)
      {
      request.sl = trailStopPrice;
      OrderSend(request,result);
      }
    }
}
Above we have defined a simple trailing stop loss for our expert advisor. First we define the trailing stop loss in points. I have defined it as 300 points or 30 pips. You can define trailing stop loss as 500 points or 50 pips or whatever you want. Over the years this is what I have learned. Keeping risk low is the strategy that will give you long term success. As I said in the beginning, your goal should be to make 100-200 pips with a small 10-20 pip stop loss. Next we move to the OnTick() event handler. The first thing that we do is check whether we have a position open on the chart or not. This code will only work for a single open position. This code is for educational purposes only.If we have an open position and the trailing stop loss is greater than zero than we proceed to second step in which we will change the stop loss if it is greater than the defined trailing stop loss. As we are using the OnTick() event handler, the code will be checked on each tick. If the conditions defined in the code are fulfilled, it will be executed instantly. Have you ever tried to trade naked? Read this post in which I explain how to trade naked. Watch the videos that explain how to identify the trend as a naked trader.
Now we use the MqlTradeRequest predefined structure. As we have an open position, we ask for request action TRADE_ACTION_SLTP. This informs the trade server that we want to modify the stop loss and the take profit levels. Then we tell the trade server that we will be using the current chart symbol with the request symbol. We define the double variable trailSL in which we convert the trailingSL into price increment using the predefined _Point constant. Then we check if we have the POSITION_TYPE_BUY, we will subtract the trailSL from trailingStopPrice using the SymbolInfoDouble() function that gets the bid price for the current symbol for us. Next we check if the trailingStopLoss is greater than the current stop loss we tell the trade server to modify the stop loss. Trading news can be highly profitable if you know how to do it. Read this post in which I show how to trade NFP Report and make 150 pips with a small stop loss.
In the same manner, if we have a sell order open, we check for it wit POSITION_TYPE_SELL. If this is true, we calculate the trailingTopPrice using the SymbolInfoDouble() function by asking for the ask price and then adding the trailSL to it. We check if we have a trailingStopPrice less than currentSL we tell the trade server to modify the stop loss using the OrderSend() function. As said above, I have coded a simple trailing stop loss. In the code, we just check the bid/ask price and adjust the stop loss in accordance with our trailing stop loss. This way the stop loss trails the price keeping a safe distance from it. In our code, the safe distance is 30 pips. Now keep this in mind, price has the tendency to whipsaw. So it is very much possible that price retraces 30 pips hits the stop loss and starts moving back again. You should keep this in mind. This was a simple code. But keep this in mind. We will try to solve the problem of whipsaw so that we don’t get out of the trade too quickly while the price marches on.Trading exotic pairs like USDZAR can be a highly profitable idea. But you will need to aware of the economic situation in the country before you trade an exotic pair. Read this post in which I explain how to trade USDZAR pair.
How To Add A Minimum Profit?
We have a simple EA. We can now add more functionality to it. How about adding a minimum profit before our trailing stop loss gets activated. Taking some profit in each trade is a good strategy. You should ensure that you take profit no matter how much before the price starts reversing. Sometime waiting for the price to move up and hit your take profit target is not a good idea as price may never reach that level. Below I have added code to the above simple EA. This time we will ensure that there is a minimum profit before the trailing stop loss gets activated:
// define the input variables
//define the trailing stop loss
input int trailingSL = 500;
//define the minimum take profit target
input int minimumTP = 200;
// OnTick() event handler
//check if we have an open position
if(PositionSelect(_Symbol) == true && trailingSL > 0)
{
//tell the trade server we want to change the stop loss
     request.action = TRADE_ACTION_SLTP;
     request.symbol = _Symbol;
//get the position type, current stop loss and the entry price
     long positionType = PositionGetInteger(POSITION_TYPE);
     double currentSL = PositionGetDouble(POSITION_SL);
     double entryPrice = PositionGetDouble(POSITION_PRICE_OPEN);
// calculate the trailSL and minTP
     double minTP = minimumTP * _Point;
     double trailSL = trailingSL * _Point;
     double trailSP;
     double currentProfit;
//check if we have a buy trade open
       if(positionType == POSITION_TYPE_BUY)
     {
       trailSP = SymbolInfoDouble(_Symbol,SYMBOL_BID) - trailSL;
       currentProfit = SymbolInfoDouble(_Symbol,SYMBOL_BID) - entryPrice;
       if(trailSL > currentSL && currentProfit >= minTP)
     {
       request.sl = trailSL;
       OrderSend(request,result);
     }
     }

//check if we have a sell trade open
       else if(positionType == POSITION_TYPE_SELL)
     {
       trailSL = SymbolInfoDouble(_Symbol,SYMBOL_ASK) + trailSL;
       currentProfit = entryPrice – SymbolInfoDouble(_Symbol,SYMBOL_ASK);

    if(trailSL < currentSL && currentProfit >= minProfit)
     {
       request.sl = trailSL;
       OrderSend(request,result);
     }
   }
}
Above code is almost the same as the one for the simple expert advisor. The only addition that we have made is the minimumTP which we have set to 20 pips. This time we have the trailing stop loss set as 50 pips. This is done to provide price action with some breathing space. Just like before on each tick we check whether we have an open position. If we have an open position and the trailing stop loss is greater than zero we ask the trade server for the position type as well as the current stop loss. We also inform the trade server that we want to modify the stop loss of the open position. After that we get the POSITION_OPEN_PRICE and save it as entryPrice. We will calculate our current profit by subtracting the current price from the entry price. This is what we do when we calculate the profit. The rest of the code is almost same except that we have modified the if statement by adding one more condition. This time before we modify the current stop loss we need to check that both trailSL is greater than the currentSL as well as the currentProfit is greater than minTP. We calculate the current profit by subtracting the entry price from current price in case of a buy trade and subtracting current price from entry price in case of a sell trade. FOMC Meeting is very important for USD pairs. If we are trading with an EA, you should code it so that it does not trade during the time of FOMC Meeting Minutes release. Read this post in which I explain how you will trade FOMC Meeting.
When we code an EA, we can take many months. First we write code for a simple EA like that we did in the start. After that we keep on adding more functionality to our EA. With the passage of time we can have a pretty sophisticated EA. It is just like building a skyscraper. First you lay the foundations. Make sure you lay a solid foundation. If you have laid a solid foundation, you can build on it a skyscraper. Below we add more functionality to the trailing stop EA. This time we add a step value to the trailing stop loss EA.
// Input variables
input int trailingSL = 500;
input int minimumTP = 200;
input int stepSize = 10;
// OnTick() event handler

if(PositionSelect(_Symbol) == true && TrailingStop > 0)
{
         request.action = TRADE_ACTION_SLTP;
         request.symbol = _Symbol;
         long positionType = PositionGetInteger(POSITION_TYPE);
         double currentStop = PositionGetDouble(POSITION_SL);
         double entryPrice = PositionGetDouble(POSITION_PRICE_OPEN);
         double minTP = minimumTP * _Point;

    if(stepSize < 10) stepSize = 10;
         double step = stepSize * _Point;
         double trailSL = trailingSL * _Point;
         double trailSP;
         double currentProfit;
    if(positionType == POSITION_TYPE_BUY)
      {
         trailSP = SymbolInfoDouble(_Symbol,SYMBOL_BID) - trailSL;
         currentProfit = SymbolInfoDouble(_Symbol,SYMBOL_BID) - entryPrice;

    if(trailSP > currentStop + step && currentProfit >= minTP)
      {
         request.sl = trailSP;
         OrderSend(request,result);
      }
    }
    else if(posType == POSITION_TYPE_SELL)
     {
         trailSP = SymbolInfoDouble(_Symbol,SYMBOL_ASK) + trailStop;
         currentProfit = SymbolInfoDouble(_Symbol,SYMBOL_ASK) + entryPrice;

    if(trailSP < currentStop - step && currentProfit >= minTP)
      {
        request.sl = trailSP;
        OrderSend(request,result);
      }
   }
}
In the above code, we have defined a minimum step size. This ensures that the trailing stop loss moves in increments of the step size. In the above code, we have defined the step size to be 10. So the trailing stop loss will move in increments of 10 and will always be 50 pips behind the price. Fibonacci levels are used a lot in trading by many traders. You can code an EA that uses Fibonacci levels. The only problem with Fibonacci levels is that they are subjective and each trader will try to draw his own levels. So what to do? Fibonacci Pivot Levels solve this problem by taking the subjective out of the levels. Watch these videos and learn how you can trade with Fibonacci Levels.
CTrailingSL Class
MQL5 unlike MQL4 is an object oriented programming (OOP) language just like C++, Java and Python. Object oriented programming allows us to make classes that we can use again and again. What if we define a CTrailingSL. This class will have all the above features and much more. We don’t need to define the trailing stop loss again. We can define a trailing stop loss object which belongs to this class. Overtime we can also add more functions and methods to this class plus we can also use inheritance and polymorphism and derive new classes from this parent classes that provide us the required functionality that we need. We will define the CTrailingSL class and save the class definition in the include folder in the TrailingSL.mqh file. Below is the code that shows how to do it.
//define the CTrailingSL class
#include <errordescription.mqh>
#include "Trade.mqh"
class CTrailingSL
{
       protected:
            MqlTradeRequest request;

       public:
            MqlTradeResult result;
            bool TrailingStopLoss(string fSymbol, int fTrailPoints, int fMinProfit = 0,
            int fStep = 10);
};


// inform the compiler where to find the class definition
#include <TrailingSL.mqh>
//define the CTrailingSL object trailSL
CTrailingSL trailSL;
// Input variables
input bool useTrailingSL = false;
input int trailingSL = 0;
input int minimumTP = 0;
input int stepSize = 0;

// OnTick() event handler
// Place after order placement code
    if(usseTrailingSL == true && PositionType(_Symbol) != -1)
{
            trailSL.TrailingStopLoss(_Symbol,trailingSL,MinimumTP,stepSize);
}
We start off by defining the CTrailingSL class. MqlTradeRequest is protected while MqlTradeResult is public. We define the boolean funtion TrailingStopLoss that does the grunt work for us.
How To Use A Dynamic Trailing Stop Loss?
The trailing stop loss that we have coded is plain, simple and fixed. As I pointed out price does not move in straight lines. Price whipsaws. Chances are that it will get hit. A easy solution is to make the trailing stop loss dynamic by making it follow an indicator. We can code a trailing stop loss to follow a moving average whether simple or exponential. We can also code a trailing stop loss to follow MACD. We can also use PSAR. We will use the concept of function overloading in our CTrailingSL class to accomplish that. In the above code, we have defined the trailSL object. Below we first use operator overloading to define two different TrailingStopLoss functions. One TradilingStopLoss function has int fTrailPoints and the other has double fTrailPrice.
class CTrailingSL
{
       protected:
          MqlTradeRequest request;
       public:
          MqlTradeResult result;
          bool TrailingStop(string fSymbol, int fTrailPoints, int fMinProfit = 0,
           int fStep = 10);

          bool TrailingStop(string fSymbol, double fTrailPrice, int fMinProfit = 0,
          int fStep = 10);
};

// Input variables
input bool useTrailingSL = false;
input int minimumProfit = 0;
input int stepSize = 0;
input double PSARStepSize = 0.2;
input double PSARMaximum = 0.02;
// OnTick() event handler
double close[];
ArraySetAsSeries(close,true);
CopyClose(_Symbol,0,1,2,close);
// PSAR indicator
double psar[];
ArraySetAsSeries(sar,true);
int psarHandle = iSAR(_Symbol,0,PSARStepSize,PSARMaximum);
CopyBuffer(psarHandle,0,1,2,psar);
// Compare PSAR price with the Close price
bool psarSignal = false;
      if((PositionType(_Symbol) == POSITION_TYPE_BUY && psar[1] < close[1]) ||
         (PositionType(_Symbol) == POSITION_TYPE_SELL && psar[1] > close[1]))
     {
                      psarSignal = true;
     }


// Trailing stop loss
     if(useTrailingSL == true && psarSignal == true)
{
          trailSL.TrailingStopLoss(_Symbol,psar[1],MinimumProfit,stepSize);
}
In the above code we have used PSAR as an example. First we copy the close price to our array close[]. Then we use the CopyBuffer() function to copy psar values to psar[] array. Aftert hat we use an if statement to check if psar value is below the close price or above it and then use it to activate the psarSignal.
How To Code A Breakeven Stop Loss?
Another popular trading strategy that professional traders use is to move the stop loss to breakeven once the profit goes into profit. After that the trade is risk free. If the stop loss gets hit we don’t suffer any loss. Below is how to code a breakeven stop loss. First we define a boolean variable useBreakEven. If it is set to true that we use otherwise we don’t use it.
// Define the Input variables
input bool useBreakEven = false;
input int breakEven = 0;
input int lockProfit = 0;
// OnTick() event handler
MqlTradeRequest request;
MqlTradeResult result;
ZeroMemory(request);
// Break even stop
if(useBreakEven == true && PositionSelect(_Symbol) == true && breakEven > 0)
{
          request.action = TRADE_ACTION_SLTP;
          request.symbol = _Symbol;
          request.tp = 0;
          long positionType = PositionGetInteger(POSITION_TYPE);
          double currentStop = PositionGetDouble(POSITION_SL);
          double entryPrice = PositionGetDouble(POSITION_PRICE_OPEN);
    if(positionType == POSITION_TYPE_BUY)
     {
          double currentPrice = SymbolInfoDouble(_Symbol,SYMBOL_BID);
          double breakEvenPrice = entryPrice + (lockProfit * _Point);
          double currentProfit = currentPrice - entryPrice;

    if(currentStop < breakEvenPrice && currentProfit >= BreakEven * _Point)
     {
        request.sl = breakEvenPrice;
        OrderSend(request,result);
     }
  }

    else if(positionType == POSITION_TYPE_SELL)
     {
       double currentPrice = SymbolInfoDouble(_Symbol,SYMBOL_ASK);
       double breakEvenPrice = entryPrice - (lockProfit * _Point);
       double currentProfit = entryPrice - currentPrice;
    if(currentStop > breakEvenPrice && currentProfit >= BreakEven * _Point)
      {
               request.sl = breakEvenPrice;
               OrderSend(request,result);
      }
    }
}
We define a breakEvenPrice in the MQL5 code above. We calculate this price and then compare this price with the currentStop. If this is true as well as currentProfit we use OrderSend() function to tell the trade server to change the stop loss.
How To Add BreakEvenSL() function?
We can also add a breakeven() function to our CTrailingSL class. As I had said above, we can add more functions to our class and improve upon our code. We just need to code it once and use the class again and again in our expert advisors.
bool BreakEvenSL(string fSymbol, int fBreakEven, int fLockProfit = 0);

#include <TrailingStops.mqh>
// define the CTrailingSL class
CTrailingSL trailSL;
// Input variables
input bool useBreakEven = false;
input int breakEven = 0;
input int lockProfit = 0;

// OnTick() event handler
if(useBreakEven == true && PositionType(_Symbol) != -1)
{
trailSL.BreakEven(SL_Symbol,BreakEven,LockProfit);
}
This was it. Now you must be clear how you can code a trailing stop loss in your EA. Learning MQL5 can be fun. If you are a serious forex trader and you trade on MT5, you should make some effort to learn MQL5. Now Quants on Wall Street use a lot of Monte Carlo Methods in their trading strategies. Read this post in which I explain how to use Monte Carlo Methods in trading. When it comes to machine learning and artificial intelligence, MQL5 is of no use. We can write a DLL in C/C++ and connect MQL5 with R/Python. R and Python are two very powerful data science languages that have many modules on machine learning and deep learning. More on that in future posts.