Каким образом можно заменить стрелки у slick'a? Нашел такой способ:
$(document).ready(function(){
  $('.head-slider__slider').slick({
    dots: true,
  	infinite: true,
  	speed: 1000,
  	nextArrow: '<img src="../img/angle-left.svg" alt="">',
    prevArrow: '<img src="../img/angle-left.svg" alt="">',
  });
});
Но это не сработало. Хочу заменить стандартные иконки на свои SVG'шные.
задан 15 апр 2018 в 19:41
![]()
uzi_no_uziuzi_no_uzi
2,1862 золотых знака16 серебряных знаков42 бронзовых знака
Вот вполне рабочий пример. Изменил arrows таким же образом:
$(document).ready(function() {
  $('.slick-slider').slick({
    slidesToShow: 3,
    centerMode: true,
    centerPadding: '50px',
    prevArrow: "<img src='https://svgshare.com/i/6Ei.svg' class='prev' alt='1'>",
    nextArrow: "<img src='https://svgshare.com/i/6Gf.svg' class='next' alt='2'>",
  });
});
.slider-box {
position: relative;
}
li {
margin-top: 20px;
position: relative;
float: left;
margin-right: 20px;
}
.prev,
.next {
position: absolute;
top: 30%;
height: 60px;
width: 60px;
z-index: 1;
cursor: pointer;
}
.next {
right: 0;
}<script src="https://ajax.googleapis.com/ajax/libs/jquery/2.1.1/jquery.min.js"></script>
<script src="https://cdn.jsdelivr.net/npm/slick-carousel@1.8.1/slick/slick.min.js"></script>
<link rel="stylesheet" href="https://cdn.jsdelivr.net/npm/slick-carousel@1.8.1/slick/slick.css">
<div class="slider-box">
<div class="slick-slider">
<div>
<img src="https://via.placeholder.com/150x150">
</div>
<div>
<img src="https://via.placeholder.com/150x150">
</div>
<div>
<img src="https://via.placeholder.com/150x150">
</div>
<div>
<img src="https://via.placeholder.com/150x150">
</div>
</div>
</div>ответ дан 16 апр 2018 в 6:58
![]()
Замените внешний вид стрелок с помощью css:
$(document).ready(function() {
  $('.single-item').slick({
    arrows: true
  });
});
.single-item {
width: 50%;
margin: 20px auto;
text-align: center;
border: 3px solid purple;
}<script src="https://ajax.googleapis.com/ajax/libs/jquery/2.1.1/jquery.min.js"></script>
<script type="text/javascript" src="https://cdnjs.cloudflare.com/ajax/libs/slick-carousel/1.8.1/slick.min.js"></script>
<link rel="stylesheet" type="text/css" href="https://cdnjs.cloudflare.com/ajax/libs/slick-carousel/1.8.1/slick.min.css" />
<link rel="stylesheet" type="text/css" href="https://cdnjs.cloudflare.com/ajax/libs/slick-carousel/1.8.1/slick-theme.min.css" />
<style>
.slick-prev:before,
.slick-next:before {
display: none;
}
.slick-prev,
.slick-next {
width: 50px;
height: 50px;
z-index:5;
}
.slick-prev,.slick-prev:hover,.slick-prev:focus {
left: 10px;
background: url(https://pp.userapi.com/c841622/v841622565/10d5b/-6kAk3WFMKQ.jpg)
}
.slick-next,.slick-next:hover,.slick-next:focus {
right: 10px;
background: url(http://dom2.fans/all_news/0113/img/play-2.png)
}
</style>
<div class=single-item>
<div>
<h3>1</h3>
</div>
<div>
<h3>2</h3>
</div>
<div>
<h3>3</h3>
</div>
<div>
<h3>4</h3>
</div>
<div>
<h3>5</h3>
</div>
<div>
<h3>6</h3>
</div>
</div>ответ дан 16 апр 2018 в 7:01
![]()
kizosokizoso
9,2933 золотых знака28 серебряных знаков57 бронзовых знаков

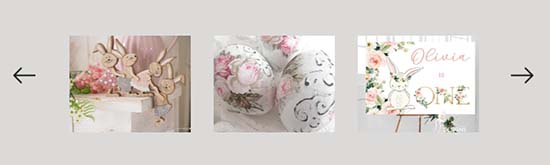
Как показывает практика, для начинающих фронтендеров, самой большой проблемой при кастомизации Slick слайдера, остается настройка стрелок и точек. И если со стилизацией индикаторных точек, мы разобрались на прошлом уроке, то сегодня мы научимся заменять дефолтные стрелки на свои (по макету).
1) HTML разметка
У вас уже должна быть подключена библиотека jQuery и файл самого слайдера slick.min.js. Создадим контейнер для слайдера, внутри которого 6 слайдов с картинками.
<div class="slider">

    <div class="slider__item">

        <img src="img/slides/01.jpg" alt="">

    </div>

    <div class="slider__item">

        <img src="img/slides/02.jpg" alt="">

    </div>

    <div class="slider__item">

        <img src="img/slides/03.jpg" alt="">

    </div>

    <div class="slider__item">

        <img src="img/slides/04.jpg" alt="">

    </div>

    <div class="slider__item">

        <img src="img/slides/05.jpg" alt="">

    </div>

    <div class="slider__item">

        <img src="img/slides/06.jpg" alt="">

    </div>

</div>
2) Инициализация Slick слайдера
Создаем файл script.js и подключаем ранее созданный контейнер для слайдов с классом slider к Slick слайдеру.
$(document).ready(function(){

    $('.slider').slick({

        arrows:true, // показать стрелки

        dots:false, // не показывать точки

        slidesToShow:3, // показывать по 3 слайда

        autoplay:true, // автоматическое проигрывание слайдов

    });

});
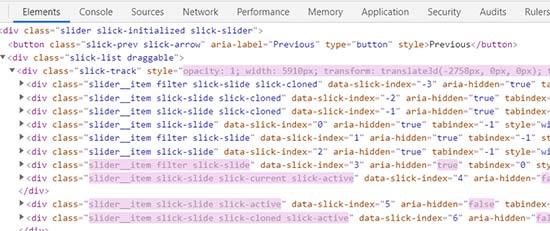
После инициализации слайдера, автоматически создались новые теги, а к элементам добавились новые классы (смотрите инструменты разработчика). Через эти классы мы будем управлять внешним видом слайдера в CSS файле (style.css).
3) Стилизация Slick слайдера
.slick-slider{

        min-width: 0;

}
Все слайды выстроим в ряд и прибьем их к верхнему краю.
.slick-track{

    display: flex;

    align-items: flex-start;

}
Спрячем в ограничивающей оболочке слайдера, контент (картинки), выходящий за её пределы.
.slick-list {

    overflow: hidden;

}
Зададим промежутки между слайдами и сделаем картинки адаптивными.
.slider__item {

    padding: 0px 15px;

}
.slider__item img{
max-width: 100%;
}
4) Настройка стрелок
Данная настройка заключается в замене дефолтных стрелок, на свои. Зададим абсолютное позиционирование для своих стрелок относительно слайдера.
.slider {

    position: relative;

    padding: 0px 60px; // поля между стрелкой и краем слайдера

}
.slider .slick-arrow{
position: absolute;
top: 50%; // выравнивание по вертикали
margin: -15px 0 0 0; // корректировка вертикального выравнивания
z-index: 2; // стрелки сверху картинок
font-size: 0; // убираем надпись на дефолтной стрелке
width: 30px; // ширина стрелки
height: 30px; // высота стрелки
}
Вставляем фоном заранее заготовленные свои стрелки (вырезаем из макета)
.slider .slick-arrow.slick-prev{

    left: 0; // левая стрелка остается с левой стороны слайдера

    background: url('../img/left-arrow.png') 0 0 / 100% no-repeat;

}
.slider .slick-arrow.slick-next{
right: 0; // правая стрелка переместилась справа от слайдера
background: url('../img/right-arrow.png') 0 0 / 100% no-repeat;
}
5) Делаем слайдер адаптивным
Добавим в JS файл свойство responsive со следующими настройками: При максимальной ширине окна 768 пикселей, показывать 2 слайда, а при максимальной ширине окна 550 пикселей — 1 слайд.
responsive:[

{

    breakpoint: 768,

    settings: {

        slidesToShow:2

    }

},

{

    breakpoint: 550,

    settings: {

        slidesToShow:1

    }

}

]
Пример Slick слайдера с кастомными стрелками
-

Создано 20.03.2020 10:16:40
-
Михаил Русаков

Копирование материалов разрешается только с указанием автора (Михаил Русаков) и индексируемой прямой ссылкой на сайт (http://myrusakov.ru)!
Добавляйтесь ко мне в друзья ВКонтакте: http://vk.com/myrusakov.
Если Вы хотите дать оценку мне и моей работе, то напишите её в моей группе: http://vk.com/rusakovmy.
Если Вы не хотите пропустить новые материалы на сайте,
то Вы можете подписаться на обновления: Подписаться на обновления
Если у Вас остались какие-либо вопросы, либо у Вас есть желание высказаться по поводу этой статьи, то Вы можете оставить свой комментарий внизу страницы.
Если Вам понравился сайт, то разместите ссылку на него (у себя на сайте, на форуме, в контакте):
-
Кнопка:
Она выглядит вот так:
-
Текстовая ссылка:
Она выглядит вот так: Как создать свой сайт
- BB-код ссылки для форумов (например, можете поставить её в подписи):

The Slick Slider library is a solid option for displaying slideshows on your website and my go-to solution the majority of the time. In this post, I’ll show you how to set it up for your next project.
Being a developer I personally hate slider plugins. In my opinion they give you so many options that you end up not being able to maintain without having to do all kinds of magic.
They are supposed to make it easy for the end user, the non-technical WordPress blogger looking to maintain their site themselves, but it ends up being overkill as it seeks to provide hundreds of options that sliders really shouldn’t have.
That’s why I prefer the Slick Slider carousel plugin by Ken Wheeler. Not the «plugin» that you install and activate, but the library itself.
Let me show you how to set it up:
How Do I Install It
I always prefer to pull the files into my project. That way I have complete control to customize and 100% uptime. There is a simple CDN option and NPM as well.
1. Place the files in your project
Go to the website, click on Get It Now, and that will shoot you down to a Download button. Download the files.
Go to the Slick folder and choose either the minified slick.min.js file or if you are using a task manager like Gulp then just choose slick.js and put it in your Gulp process to be minified.
Next, you want to add the slick and slick-theme stylesheets to your project. If you are using Sass, then grab the slick.scss and slick-theme.scss and drop it in your Gulp process (or Grunt, Webpack, etc.). If you are not, the grab the regular CSS versions. Be sure to reference/enqueue them so your project recognizes them.
2. Add the fonts folder
Take the ajax-loader.gif and drag it to the provided fonts folder. Then add the fonts folder to your project. Add it in, or someone close to, where you put the slick slider stylesheets/script files so you can reference it easily.
3. Tweak the files
If you open up slick-theme.css or slick-theme.scss, you will see that the fonts folder is being referenced. In the font-face with css (src: url(‘./fonts/slick.eot’)) and in variables with scss($slick-font-path: «./fonts/» !default;).
You will also see that the ajax-loader.gif is being referenced with a relative path.
You will need to adjust these paths depending on where you placed your fonts folder.
How Do I Use It
Many ways!. Here’s a simple example.
Say I want to have a slideshow of three photos. In my html I can put something like:
<div id="homepage-slider">
    <div class="slider-hero">
        <div>
            <img src="/images/2019/12/stock-photo.jpg" />
        </div>
        <div>
            <img src="/images/2019/12/stock-photo.jpg" />
        </div>
        <div>
            <img src="/images/2019/12/stock-photo.jpg" />
        </div>
    </div>
</div>
That gives me my three photos on the page.
Now I need to use JS to initialize the slider functionality like (and do this in a separate JS file. Create one called custom.js or something like that, and be sure to reference/enqueue the file):
(function($) {
    $(document).ready(function() {
        $('.slider-hero').slick({
            dots: true,
            infinite: true,
            cssEase: 'linear',
            swipe: false,
        });
    });

})( jQuery );
See how I am targeting that slider-hero class?
And the options like dots, infinite, etc. are just slider options and these are all explained in the documentation, along with further options like filtering, syncing, etc.
Where Are My Slick Slider Arrows?
Slick slider provides you with some arrows. You’ll find these on line 91 and 95 of slick-theme.css or as a variable in slick-theme.scss.
These look bad. I never liked them. Thus, I went out and found much better replacements arrows.
Here they are for you to use as well:
Next arrow
Previous arrow
So upload these SVG arrows to your project. Then jump back to your slick-theme.scss or slick-theme.css and replace the arrows in the pseudoclass with these instead.
Conclusion
So that’s how you can set up Slick Slider in your next project. It’s simple, lightweight, and can do 99% of what you’ll need with a slider without all the bload and confusion that you find out there with other plugins. Enjoy.
I’m trying to get the next and previous arrows to show up next to the product slider, just like in the Slick Slider example. But my sample doesn’t seem to load the appropriate fonts to make that happen.
Here is my code:
HTML
  <div class="slider">
      <div>
        <img src="http://www.onguardapparel.com/images/products/thumb/8013LN_Cat.jpg" height="100" width="100">
      </div>
      <div>
        <img src="http://www.onguardapparel.com/images/products/thumb/HiddenTailor.9074B.jpg" height="100" width="100">
      </div>
      <div>
        <img src="http://www.onguardapparel.com/images/products/thumb/1600ETY.JPG" height="100" width="100">
      </div>
      <div>
        <img src="http://www.onguardapparel.com/images/products/thumb/VIPERPRO81.jpg" height="100" width="100">
      </div>
      <div>
        <img src="http://www.onguardapparel.com/images/products/thumb/garment_bag.jpg" height="100" width="100">
      </div>
      <div>
        <img src="http://www.onguardapparel.com/images/products/thumb/1077.jpg" height="100" width="100">
      </div>
    </div>
CSS
  body{
    background-color: #fff;
  }
  .slider{
    margin: 60px auto;
    width: 500px;
  }
  div{
    height: 100%;
  }
  p{
    text-align: center;
    font-size: 12px;
    color: white;
  }
JavaScript
$(document).ready(function(){
        $('.slider').slick({
            centerMode: true,
            centerPadding: '60px',
            dots: false,
            infinite: true,
            speed: 300,
            slidesToShow: 4,
            slidesToScroll: 1,
            arrows: true
        });
      });
DEMO:
http://jsfiddle.net/schwany23/j39j568c/
![]()
asked Mar 11, 2015 at 22:24
![]()
In your fiddle, you had forgotten to add the slick-theme.css file as an external resource. If you wanted to follow the default styling of the author, you need that file. Or if you want your own styling then please go ahead and make your own styling and make it youw own theme .css file or something.
<link rel="stylesheet" type="text/css" href="http://kenwheeler.github.io/slick/slick/slick-theme.css"/>
and this css for visibility,
.slick-prev:before, .slick-next:before{
    color:red;
}
The updted jsFiddle can be found here.
Code snippet here…
$(document).ready(function() {
  $('.slider').slick({
    centerMode: true,
    centerPadding: '60px',
    dots: true,
    /* Just changed this to get the bottom dots navigation */
    infinite: true,
    speed: 300,
    slidesToShow: 4,
    slidesToScroll: 1,
    arrows: true
  });
});
body {
background-color: #fff;
}
.slider {
margin: 60px auto;
width: 500px;
}
div {
height: 100%;
}
p {
text-align: center;
font-size: 12px;
color: white;
}
/* added the following to give the background color of the arrows as red for visibility, the default which can be found in the slick-theme.css was white */
.slick-prev:before,
.slick-next:before {
color: red;
}<script src="https://ajax.googleapis.com/ajax/libs/jquery/1.11.0/jquery.min.js"></script><script src="http://kenwheeler.github.io/slick/slick/slick.js"></script>
<link href="http://kenwheeler.github.io/slick/slick/slick.css" rel="stylesheet"/>
<link href="http://kenwheeler.github.io/slick/slick/slick-theme.css" rel="stylesheet"/>
<div class="slider">
<div>
<img src="http://www.onguardapparel.com/images/products/thumb/8013LN_Cat.jpg" height="100" width="100" />
</div>
<div>
<img src="http://www.onguardapparel.com/images/products/thumb/HiddenTailor.9074B.jpg" height="100" width="100" />
</div>
<div>
<img src="http://www.onguardapparel.com/images/products/thumb/1600ETY.JPG" height="100" width="100" />
</div>
<div>
<img src="http://www.onguardapparel.com/images/products/thumb/VIPERPRO81.jpg" height="100" width="100" />
</div>
<div>
<img src="http://www.onguardapparel.com/images/products/thumb/garment_bag.jpg" height="100" width="100" />
</div>
<div>
<img src="http://www.onguardapparel.com/images/products/thumb/1077.jpg" height="100" width="100" />
</div>
</div>Hope this helps
answered Mar 11, 2015 at 23:08
![]()
SaiSai
1,8495 gold badges17 silver badges25 bronze badges
6
if the arrow are on a white background just add a color for them in your css like this:
.slick-prev:before, .slick-next:before {
  color: #09529b !important;
}
answered Aug 16, 2018 at 14:24
![]()
MittchoMittcho
1111 silver badge5 bronze badges
0
If you have included slick-theme.css and are still having problems it is because the theme expects to be in a subfolder (e.g. /theme/slick-theme.css) but the default download puts the slick-theme.css in the same folder as ajax-loader.gif and the fonts folder which are both referenced from the theme.
Solution:
Put the slick-theme.css file in a subfolder or edit the css so that it no longer tries to look in a parent folder. You may also need to change the colour of the arrows as suggested by Sai
![]()
answered Dec 8, 2015 at 0:25
![]()
It is possible to find yourself in a case of a particular logic when you don’t have enough slides.
For example: if you have 4 Slides, Infinite on true and slidesToShow: 4 you will never see the navigation arrows.
Just add one more slide for make appears the navigation.
answered Mar 5, 2021 at 16:34
![]()
FloJDMFloJDM
2983 silver badges12 bronze badges
in slick-theme.css the arrows are signed -25px so please note to change it
since you have given margin=0px for whole page.
![]()
buzatto
9,1905 gold badges22 silver badges30 bronze badges
answered Mar 14, 2021 at 20:14
![]()
the default font size is set to 0 so you just have o set the font-size to 13px and should be appeare on hover
answered Oct 25, 2021 at 10:13
![]()
1