Изменение существующего макета
-
На вкладке Вид нажмите кнопку Образец слайдов.
-
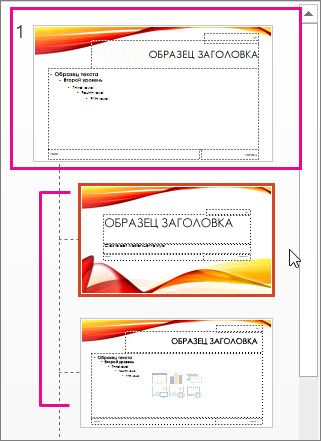
В области эскизов, содержащей образцы и макеты слайдов, выберите макет с самым подходящим расположением заполнителей.
Примечание: На верхнем эскизе всегда показан образец слайдов, а под ним — макеты слайдов.
-
Чтобы изменить существующий макет, выполните одно или несколько следующих действий.
-
Чтобы добавить заполнитель, на вкладке Образец слайдов нажмите кнопку Вставить заполнитель и выберите нужный тип заполнителя из списка. Нажмите расположение на макете и перетащите элемент, чтобы нарисовать заполнитель.
-
Добавление, изменение и удаление замещего на макете слайда.
-
-
Чтобы переименовать настроенный макет, щелкните его правой кнопкой мыши в списке эскизов макетов и выберите пункт Переименовать макет.
-
В диалоговом окне Переименование макета введите новое имя, описывающее созданный макет, и нажмите кнопку Переименовать.
-
На вкладке Образец слайдов выберите команду Закрыть режим образца.
Применение обновлений к слайдам
-
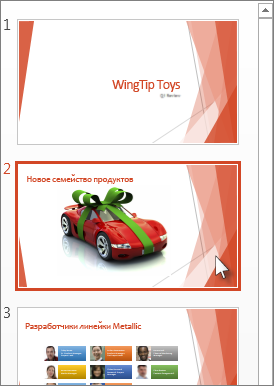
В Обычном режиме в области эскизов нажмите слайд, к которому вы хотите повторно применить измененный макет.
Примечание: Чтобы выделить несколько слайдов, нажмите и удерживайте клавишу CTRL, а затем нажимайте каждый слайд.
-
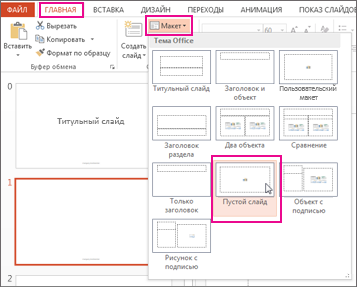
На вкладке Главная в группе Слайды нажмите кнопку Макет и выберите макет, который вы изменили в режиме образца слайдов.
Дополнительные сведения
Общие сведения о макете слайда
Общие сведения об образце слайдов
Добавление заполнителей для текста, изображений, видеозаписей и другого содержимого
Изменение существующего макета
-
На вкладке Вид в группе Режимы образцов выберите пункт Образец слайдов.
-
В области, содержащей образцы слайдов и макеты, выберите макет, который вы хотите изменить.
-
Отредактируйте макет.
Примечание: Если назначение исходного макета изменилось, переименуйте его.
-
В группе Закрыть нажмите кнопку Закрыть режим образца.
Применение обновлений к слайдам
-
В обычном режиме в области с вкладками «Структура» и «Слайды» выберите вкладку Слайды.
-
Щелкните слайды, к которым вы хотите применить измененный макет.
-
На вкладке Главная в группе Слайды нажмите кнопку Макет и выберите макет, который вы изменили.
К началу страницы
Важно:
Office 2007 больше не поддерживается. Перейдите на Microsoft 365, чтобы работать удаленно с любого устройства и продолжать получать поддержку.
Обновить
Изменение существующего макета
-
На вкладке Вид в группе Режимы просмотра презентации выберите пункт Образец слайдов.
-
В области, содержащей образцы слайдов и макеты, выберите макет, который вы хотите изменить.
-
Выполните одно из указанных ниже действий.
-
Добавление в макет одного или нескольких заполнителей содержимого
-
Настройка номеров страниц, придатков и headers для раздаток
-
Настройка нуминга, примечаний и страниц заметок
-
К началу страницы
Download Article
Download Article
This wikiHow teaches you how to edit slide masters in PowerPoint. Slide masters are used to apply the same layout, fonts, styles, images, and placeholders to multiple slides in a PowerPoint presentation. A slide master can have multiple layouts.[1]
-
1
Open PowerPoint. Power Point has a red circular icon with a «P» to the left. Click the icon in the Windows Start menu, or the Applications folder in the Finder on Mac.
-
2
Open or create a new PowerPoint presentation. To open a new PowerPoint presentation, click New in the panel to the left, and then the «Blank Presentation» tile. To open an existing PowerPoint presentation file, click Open in the sidebar to the left, and then click a recent PowerPoint presentation, or click Browse to browse and navigate to a PowerPoint presentation on your computer and click Open.
- If you have PowerPoint presentations saved on your OneDrive, click OneDrive and then click a PowerPoint presentation you wish to open.
Advertisement
-
3
Click View. It’s in the menu bar at the top of the page. This displays the «View» panel at the top of PowerPoint.
-
4
Click Slide Master. It’s in the «View Master» section in the view panel at the top of PowerPoint. It has an icon that resembles a slide with two sections in it. This switches to the Master View mode where you can edit the slide masters and layouts. The slide masters and layouts are listed to the left of the slide view in the center.[2]
-
5
Click a slide master or layout. The slide masters and layouts are displayed to the left of the main view in the center. Clicking a slide master or layout selects it and displays the contents of the slide master or layout in the main view screen in the center. From there you can edit the slide master or layout.
-
6
Click Close Master View. It’s the button on the far right of the panel at the top of PowerPoint in the «Close» section. It’s below an icon with a red «x». When you are finished editing the slide masters and layouts, click this icon to return to the normal slide edit mode.
Advertisement
-
1
Open the slide master view mode. To access slide master view mode, click View and then the Slide Master icon.
-
2
Click Insert Slide Master. It’s in the «Edit Master» section in the panel in the upper-left corner. This adds a new Slide Master to the PowerPoint layout.
-
3
Select a slide master and click Insert Layout. The slide masters and layouts are listed to the left of the view screen in the center. Click a slide master to select it. Then click Insert Layout in the panel at the top in the upper-left corner. It’s to the right of the «Insert Slide Master» icon. This inserts a new layout slide below the slide master.
-
4
Right-click a slide master or layout. Right-clicking a slide master or layout in the list on the left side displays a menu to the right of the slide master or layout.
-
5
Click Delete Slide Master or Delete Layout. This deletes the slide master or layout. When you add a new slide master, it has a number of default layouts. You can delete all the ones you don’t plan on using.
- There must be at least one slide master in the list on the left.
- You can also use the right-click menu to rename or duplicate slide masters and layouts.
Advertisement
-
1
Open the slide master view mode. To access slide master view mode, click View and then the Slide Master icon.
-
2
Click Themes. It’s in the «Edit Themes» box at the top. It’s below an icon that resembles a slide with «Aa» in the middle. This displays a menu with slides.
-
3
Click a theme. Look for a theme that has a color and look that you like and click it This creates a new slide master and layouts based on that theme.
-
4
Click Colors. It’s in the «Background» panel at the top of the page. This displays a drop-down menu with different color schemes.
-
5
Click a color scheme. This applies the color scheme to the slide master and all the layouts below the slide master.
- If you want to create layouts with different themes, color schemes, or fonts, you need to create a new slide master.
-
6
Click Background Styles. It’s in the «Background» panel at the top of the page. This displays a list of different background colors that match your color scheme.
-
7
Click a background color. This applies the background layer to the slide master or layout.
- Applying a background style to a slide master affects all the layouts below the slide master. Applying a background style to a layout only affects that layout.
-
8
Click Format Background (optional). It’s in the «Background Styles» menu. This displays a sidebar menu to the right that gives you more options to edit the background.
-
9
Click a background type. The background types are listed below «Fill» in the «Format Background» menu on the right. The background types are as follows.
- Solid fill: This applies a single color to the background. Use the «Color» drop-down menu to select a color.
- Gradient:. This applies a fade with two or more colors as a background. To change the gradient colors, click a stop below «Color stops» and then use the «Color» drop-down menu to select a color. Select the gradient type using the «Type» drop-down menu.
- Picture or texture fill: This option allows you to use an image as your background. Click File to select an image file from your computer or use the «Texture» drop-down menu to select one of the texture images.
- Pattern fill: This option allows you to use a pattern as your background. Select a pattern in the menu below «Pattern» and then use the «Foreground» and «Background» drop-down menus to select colors for the pattern.
-
10
Click Apply to all (optional). It’s at the bottom of the «Format background» menu on the right. This applies your background settings to slide master and all the layout slides.
- If you do not click Apply to all, it will only apply your background settings to a single layout.
-
11
Click Font. It’s in the «Background» panel at the top of the page. This displays a list of fonts.
-
12
Select a font. Click a font in the list to select it. Each font has a preview of what the font looks like. Selecting a font applies the font to the slide master and all layouts below the slide master.
Advertisement
-
1
Open the slide master view mode. To access slide master view mode, click View and then the Slide Master icon.
-
2
Click a slide master or layout you want to edit. The slide masters and layouts are listed to the left of the main view screen in the middle. Click a layout or slide master displays the slide in the main view screen.
-
3
Click Insert Placeholder. It’s in the «Master Layout» section in the panel at the top. It’s below an icon that resembles a slide with an image in it. This displays a drop-down menu with placeholder types. Placeholders are temporary boxes that indicate where content will eventually be placed in a slide.
-
4
Select a placeholder type. There are 8 different places holder types you can choose from. The placeholder types are as follows:
- Content: Content placeholders can be filled with any type of content, such as text, images, tables, charts, videos.
- Text: Text placeholders are used to indicate where text will go. You can use a text placeholder to format your text before you even know what the text will say.
- Image: Image placeholders will eventually be filled with an image files, such as a JPEG.
- Chart: Chart placeholders are used to indicate where a chart or graph will be placed.
- Table: Table placeholders are used to indicate where a table, such as those created in Excel will be placed.
-
SmartArt: SmartArt is Microsoft’s editable graphics. A smartArt placeholder indicates where smartArt will eventually be placed.[3]
- Media: Media placeholders indicate where media, such as a video file will eventually be placed.
- Online Image: An online image placeholder indicates where you can choose an image from online
-
5
Click and drag within the slide. This places the placeholder within the slide master or layout.
- To edit the position of a placeholder, click and hold a blank spot inside the placeholder bounding box. Then drag the placeholder to where you want to go.
- To rotate a placeholder, click the circular arrow icon above the placeholder bounding box and drag left or right to rotate the bounding box.
- To adjust the size of the placeholder, click and drag the small circles in the corners and sides of the placeholder bounding box.
- To Delete a placeholder, click the place holder and press Delete.
-
6
Right-click placeholder text. When you right-click text within a placeholder, a menu appears that allows you to format the placeholder text.
-
7
Format the placeholder text. Use the box at the top of the menu that appears when you right-click on the text to format the text. You can use this box to select a font, font size, add bold, italic, or underline the text, align the text, or change the text or highlight color. The actual text within a placeholder will not apply to the rest of the slides in a PowerPoint presentation. Only the text style in the placeholder will apply to the slides in a PowerPoint presentation.
- You can also use the options in the menu to add other text effects such as bullets or a numbered list, or text effects such as shadow, glow, or 3D.
Advertisement
-
1
Exit Master View mode. If you haven’t already done so, click Close Master View in the panel at the top to leave master view mode and return to normal view mode.
-
2
Right-click a slide. The slides are listed to the left in PowerPoint. Right-click a slide to display a menu to the right of the slide.
- You can also insert a new slide by click Insert in the menu bar at the top and clicking New Slide
-
3
Hover over Layout. This displays a menu with your slide master and layouts to the right.
-
4
Click a slide layout. This applies the layout to the slide.
-
5
Click the icon inside a placeholder. Depending on the placeholder type, a window will pop-up that allows you to add content to the placeholder. Use the following steps to add content to the placeholder.
- Text: Click the placeholder text to edit it. Highlight the text and press Delete to remove the placeholder text. Then type your own text.
- Image: Click the image icon to open a file browser. Select an image on your computer and click Open.
- Chart: Click the chart icon in the placeholder. Then select a chart type in the menu to the left of the window and click a chart style at the top and click Ok. Use the table to edit the labels and numbers for the chart.
- Table: Click the table icon in the placeholder and then type the number of columns and rows for the table and click Ok. Then click each cell and add your own text to the cell.
- SmartArt: Click the SmartArt icon in the middle of the placeholder. Then select the type or art in the menu on the left. Then select a style in the center and click Ok. Use the pop-up window to add text to the graphic or click the text boxes in the graphic and type your own text.
- Media: Click the media icon in the center of the placeholder and then use the file browser to navigate to an audio or video file on your computer. Click the audio or video file and click Insert.
- Online Image: Click the online image icon in the center of the placeholder. Then use the search bar to search for an image. Click an image you like to select it.
Advertisement
Ask a Question
200 characters left
Include your email address to get a message when this question is answered.
Submit
Advertisement
Thanks for submitting a tip for review!
wikiHow Video: How to Edit a PowerPoint Master Slide
References
About This Article
Article SummaryX
If you want to change the layout or style of all slides in your PowerPoint presentation, you can edit your Slide Master. First, open your PowerPoint presentation and click the «View» tab. Next, click «Slide Master» on the toolbar to open the Slide Master tab. You’ll see the Slide Master for your theme at the top of the left panel. The Slide Master contains formatting for elements like headers, footers, and title placeholders. The smaller slides under the Slide Master are Slide Layouts, which inherit the basics of the Slide Master but feature alternative layouts for different types of presentations. You can edit these separately in addition to making changes to your Slide Master. To resize an element, such as the body or title area on a Slide Master or Layout, click it once and then drag its sizing handle. To move an element, click its border and then drag it to the desired location. You can also customize fonts by selecting the text in an element, such as the title, and then making changes using the font options on the Home tab. To add a placeholder for a certain type of object, such as a picture or a chart, click the «Insert Placeholder» button in the toolbar and select your desired option. You can also use the «Background» panel on the toolbar to change the theme’s colors and style elements. Just make sure the Slide Master is selected in the left panel and not just one of the Layouts first. Click «Colors» on the toolbar to choose a new color scheme, and then «Background Styles» to choose a new background color from the palette. Click «Fonts» to change the font throughout, and «Effects» to add effects to objects, such as drop-shadows. To add a new layout to a Slide Master, click «Insert Layout» in the toolbar. To delete any part of your Slide Master or Layout, click it once and press the «Delete» key on your keyboard. When you’re finished editing your Slide Master, click «Close Master View» in the toolbar to return to regular editing mode—your changes will be applied to all slides in your presentation automatically.
Did this summary help you?
Thanks to all authors for creating a page that has been read 35,937 times.
Is this article up to date?
Download Article
Download Article
This wikiHow teaches you how to edit slide masters in PowerPoint. Slide masters are used to apply the same layout, fonts, styles, images, and placeholders to multiple slides in a PowerPoint presentation. A slide master can have multiple layouts.[1]
-
1
Open PowerPoint. Power Point has a red circular icon with a «P» to the left. Click the icon in the Windows Start menu, or the Applications folder in the Finder on Mac.
-
2
Open or create a new PowerPoint presentation. To open a new PowerPoint presentation, click New in the panel to the left, and then the «Blank Presentation» tile. To open an existing PowerPoint presentation file, click Open in the sidebar to the left, and then click a recent PowerPoint presentation, or click Browse to browse and navigate to a PowerPoint presentation on your computer and click Open.
- If you have PowerPoint presentations saved on your OneDrive, click OneDrive and then click a PowerPoint presentation you wish to open.
Advertisement
-
3
Click View. It’s in the menu bar at the top of the page. This displays the «View» panel at the top of PowerPoint.
-
4
Click Slide Master. It’s in the «View Master» section in the view panel at the top of PowerPoint. It has an icon that resembles a slide with two sections in it. This switches to the Master View mode where you can edit the slide masters and layouts. The slide masters and layouts are listed to the left of the slide view in the center.[2]
-
5
Click a slide master or layout. The slide masters and layouts are displayed to the left of the main view in the center. Clicking a slide master or layout selects it and displays the contents of the slide master or layout in the main view screen in the center. From there you can edit the slide master or layout.
-
6
Click Close Master View. It’s the button on the far right of the panel at the top of PowerPoint in the «Close» section. It’s below an icon with a red «x». When you are finished editing the slide masters and layouts, click this icon to return to the normal slide edit mode.
Advertisement
-
1
Open the slide master view mode. To access slide master view mode, click View and then the Slide Master icon.
-
2
Click Insert Slide Master. It’s in the «Edit Master» section in the panel in the upper-left corner. This adds a new Slide Master to the PowerPoint layout.
-
3
Select a slide master and click Insert Layout. The slide masters and layouts are listed to the left of the view screen in the center. Click a slide master to select it. Then click Insert Layout in the panel at the top in the upper-left corner. It’s to the right of the «Insert Slide Master» icon. This inserts a new layout slide below the slide master.
-
4
Right-click a slide master or layout. Right-clicking a slide master or layout in the list on the left side displays a menu to the right of the slide master or layout.
-
5
Click Delete Slide Master or Delete Layout. This deletes the slide master or layout. When you add a new slide master, it has a number of default layouts. You can delete all the ones you don’t plan on using.
- There must be at least one slide master in the list on the left.
- You can also use the right-click menu to rename or duplicate slide masters and layouts.
Advertisement
-
1
Open the slide master view mode. To access slide master view mode, click View and then the Slide Master icon.
-
2
Click Themes. It’s in the «Edit Themes» box at the top. It’s below an icon that resembles a slide with «Aa» in the middle. This displays a menu with slides.
-
3
Click a theme. Look for a theme that has a color and look that you like and click it This creates a new slide master and layouts based on that theme.
-
4
Click Colors. It’s in the «Background» panel at the top of the page. This displays a drop-down menu with different color schemes.
-
5
Click a color scheme. This applies the color scheme to the slide master and all the layouts below the slide master.
- If you want to create layouts with different themes, color schemes, or fonts, you need to create a new slide master.
-
6
Click Background Styles. It’s in the «Background» panel at the top of the page. This displays a list of different background colors that match your color scheme.
-
7
Click a background color. This applies the background layer to the slide master or layout.
- Applying a background style to a slide master affects all the layouts below the slide master. Applying a background style to a layout only affects that layout.
-
8
Click Format Background (optional). It’s in the «Background Styles» menu. This displays a sidebar menu to the right that gives you more options to edit the background.
-
9
Click a background type. The background types are listed below «Fill» in the «Format Background» menu on the right. The background types are as follows.
- Solid fill: This applies a single color to the background. Use the «Color» drop-down menu to select a color.
- Gradient:. This applies a fade with two or more colors as a background. To change the gradient colors, click a stop below «Color stops» and then use the «Color» drop-down menu to select a color. Select the gradient type using the «Type» drop-down menu.
- Picture or texture fill: This option allows you to use an image as your background. Click File to select an image file from your computer or use the «Texture» drop-down menu to select one of the texture images.
- Pattern fill: This option allows you to use a pattern as your background. Select a pattern in the menu below «Pattern» and then use the «Foreground» and «Background» drop-down menus to select colors for the pattern.
-
10
Click Apply to all (optional). It’s at the bottom of the «Format background» menu on the right. This applies your background settings to slide master and all the layout slides.
- If you do not click Apply to all, it will only apply your background settings to a single layout.
-
11
Click Font. It’s in the «Background» panel at the top of the page. This displays a list of fonts.
-
12
Select a font. Click a font in the list to select it. Each font has a preview of what the font looks like. Selecting a font applies the font to the slide master and all layouts below the slide master.
Advertisement
-
1
Open the slide master view mode. To access slide master view mode, click View and then the Slide Master icon.
-
2
Click a slide master or layout you want to edit. The slide masters and layouts are listed to the left of the main view screen in the middle. Click a layout or slide master displays the slide in the main view screen.
-
3
Click Insert Placeholder. It’s in the «Master Layout» section in the panel at the top. It’s below an icon that resembles a slide with an image in it. This displays a drop-down menu with placeholder types. Placeholders are temporary boxes that indicate where content will eventually be placed in a slide.
-
4
Select a placeholder type. There are 8 different places holder types you can choose from. The placeholder types are as follows:
- Content: Content placeholders can be filled with any type of content, such as text, images, tables, charts, videos.
- Text: Text placeholders are used to indicate where text will go. You can use a text placeholder to format your text before you even know what the text will say.
- Image: Image placeholders will eventually be filled with an image files, such as a JPEG.
- Chart: Chart placeholders are used to indicate where a chart or graph will be placed.
- Table: Table placeholders are used to indicate where a table, such as those created in Excel will be placed.
-
SmartArt: SmartArt is Microsoft’s editable graphics. A smartArt placeholder indicates where smartArt will eventually be placed.[3]
- Media: Media placeholders indicate where media, such as a video file will eventually be placed.
- Online Image: An online image placeholder indicates where you can choose an image from online
-
5
Click and drag within the slide. This places the placeholder within the slide master or layout.
- To edit the position of a placeholder, click and hold a blank spot inside the placeholder bounding box. Then drag the placeholder to where you want to go.
- To rotate a placeholder, click the circular arrow icon above the placeholder bounding box and drag left or right to rotate the bounding box.
- To adjust the size of the placeholder, click and drag the small circles in the corners and sides of the placeholder bounding box.
- To Delete a placeholder, click the place holder and press Delete.
-
6
Right-click placeholder text. When you right-click text within a placeholder, a menu appears that allows you to format the placeholder text.
-
7
Format the placeholder text. Use the box at the top of the menu that appears when you right-click on the text to format the text. You can use this box to select a font, font size, add bold, italic, or underline the text, align the text, or change the text or highlight color. The actual text within a placeholder will not apply to the rest of the slides in a PowerPoint presentation. Only the text style in the placeholder will apply to the slides in a PowerPoint presentation.
- You can also use the options in the menu to add other text effects such as bullets or a numbered list, or text effects such as shadow, glow, or 3D.
Advertisement
-
1
Exit Master View mode. If you haven’t already done so, click Close Master View in the panel at the top to leave master view mode and return to normal view mode.
-
2
Right-click a slide. The slides are listed to the left in PowerPoint. Right-click a slide to display a menu to the right of the slide.
- You can also insert a new slide by click Insert in the menu bar at the top and clicking New Slide
-
3
Hover over Layout. This displays a menu with your slide master and layouts to the right.
-
4
Click a slide layout. This applies the layout to the slide.
-
5
Click the icon inside a placeholder. Depending on the placeholder type, a window will pop-up that allows you to add content to the placeholder. Use the following steps to add content to the placeholder.
- Text: Click the placeholder text to edit it. Highlight the text and press Delete to remove the placeholder text. Then type your own text.
- Image: Click the image icon to open a file browser. Select an image on your computer and click Open.
- Chart: Click the chart icon in the placeholder. Then select a chart type in the menu to the left of the window and click a chart style at the top and click Ok. Use the table to edit the labels and numbers for the chart.
- Table: Click the table icon in the placeholder and then type the number of columns and rows for the table and click Ok. Then click each cell and add your own text to the cell.
- SmartArt: Click the SmartArt icon in the middle of the placeholder. Then select the type or art in the menu on the left. Then select a style in the center and click Ok. Use the pop-up window to add text to the graphic or click the text boxes in the graphic and type your own text.
- Media: Click the media icon in the center of the placeholder and then use the file browser to navigate to an audio or video file on your computer. Click the audio or video file and click Insert.
- Online Image: Click the online image icon in the center of the placeholder. Then use the search bar to search for an image. Click an image you like to select it.
Advertisement
Ask a Question
200 characters left
Include your email address to get a message when this question is answered.
Submit
Advertisement
Thanks for submitting a tip for review!
wikiHow Video: How to Edit a PowerPoint Master Slide
References
About This Article
Article SummaryX
If you want to change the layout or style of all slides in your PowerPoint presentation, you can edit your Slide Master. First, open your PowerPoint presentation and click the «View» tab. Next, click «Slide Master» on the toolbar to open the Slide Master tab. You’ll see the Slide Master for your theme at the top of the left panel. The Slide Master contains formatting for elements like headers, footers, and title placeholders. The smaller slides under the Slide Master are Slide Layouts, which inherit the basics of the Slide Master but feature alternative layouts for different types of presentations. You can edit these separately in addition to making changes to your Slide Master. To resize an element, such as the body or title area on a Slide Master or Layout, click it once and then drag its sizing handle. To move an element, click its border and then drag it to the desired location. You can also customize fonts by selecting the text in an element, such as the title, and then making changes using the font options on the Home tab. To add a placeholder for a certain type of object, such as a picture or a chart, click the «Insert Placeholder» button in the toolbar and select your desired option. You can also use the «Background» panel on the toolbar to change the theme’s colors and style elements. Just make sure the Slide Master is selected in the left panel and not just one of the Layouts first. Click «Colors» on the toolbar to choose a new color scheme, and then «Background Styles» to choose a new background color from the palette. Click «Fonts» to change the font throughout, and «Effects» to add effects to objects, such as drop-shadows. To add a new layout to a Slide Master, click «Insert Layout» in the toolbar. To delete any part of your Slide Master or Layout, click it once and press the «Delete» key on your keyboard. When you’re finished editing your Slide Master, click «Close Master View» in the toolbar to return to regular editing mode—your changes will be applied to all slides in your presentation automatically.
Did this summary help you?
Thanks to all authors for creating a page that has been read 35,937 times.
Is this article up to date?
Содержание
- Возможности редактирования
- Изменение визуального оформления
- Настройка компоновки и шаблоны
- Изменение размера
- Добавление переходов
- Заключение
- Вопросы и ответы
Далеко не во всех случаях полотна презентации – слайды – в своем базовом виде устраивают пользователя. Причин на то может быть сотня. И во имя создания качественной демонстрации нельзя мириться с чем-то, что не вписывается в общие требования и правила. Так что нужно заняться редактированием слайда.
Возможности редактирования
В презентации PowerPoint присутствует широкий выбор инструментов, которые позволят качественно изменить многие стандартные аспекты.
При этом данную программу сложно назвать по-настоящему универсальной площадкой. Если ознакомиться с аналогами PowerPoint, можно увидеть, сколько функций еще недостает в этом приложении. Однако, как минимум, отредактировать слайды можно.
Изменение визуального оформления
Оформление слайдов для презентации играет важнейшую роль, задавая общий характер и тон всему документу. Потому важно верно его настроить.
Необходимые инструменты находятся во вкладке «Дизайн» в шапке приложения.
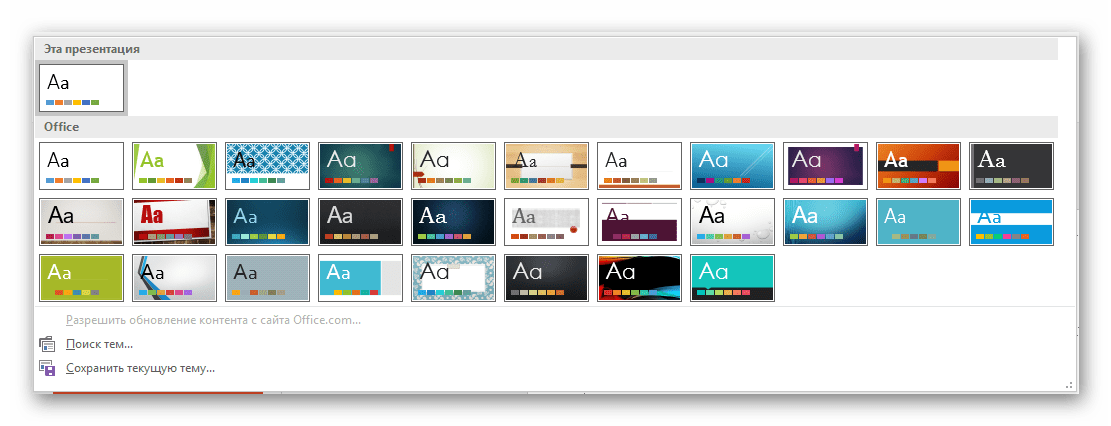
- Первая область называется «Темы». Здесь можно выбрать предустановленные стандартные варианты оформления. Они включают в себя широкий список изменений – фон, дополнительные декоративные элементы, параметры текста в областях (цвет, шрифт, размер, расположение) и так далее. Следует как минимум попробовать каждую, чтобы оценить, как это будет выглядеть в итоге. При нажатии на каждую отдельную тему она автоматически применяется ко всей презентации.
Пользователь также может нажать на специальную кнопку, чтобы развернуть полный список доступных стилей.
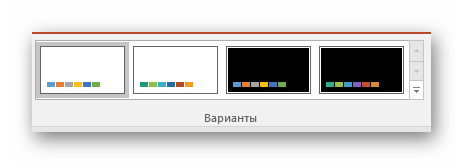
- Область «Варианты» предлагает 4 варианта выбранной темы.
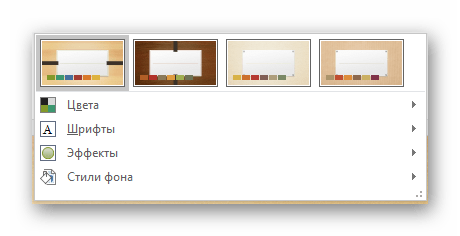
Здесь же можно нажать на специальную кнопку, чтобы открыть дополнительное окно для настройки варианта. Здесь можно произвести более глубокие и точные настройки стиля, если что-то в нем не устраивает.
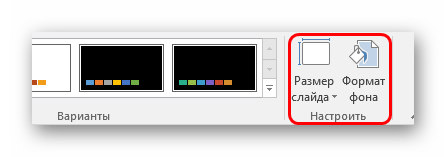
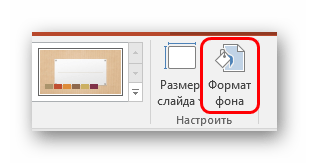
- Область «Настроить» служит для изменения размера и входа в более точный режим настройки внешнего вида.
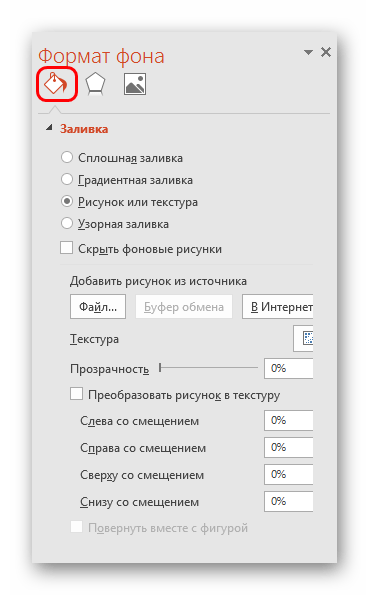
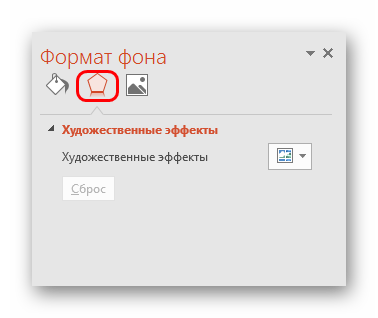
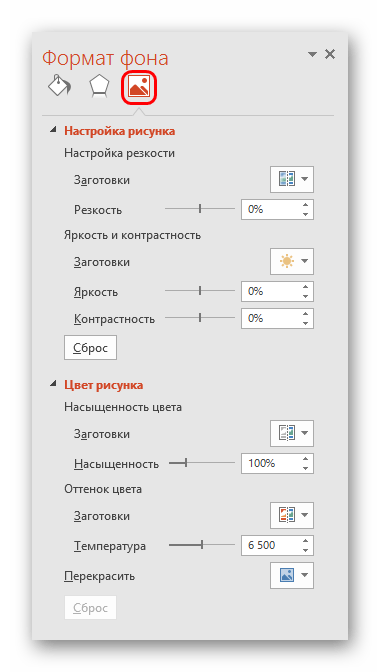
Про последний стоит поговорить отдельно. В «Формате фона» содержится большое число самых разных настроек. В основном они разделены на 3 вкладки.
- Первая – «Заливка». Здесь можно произвести выбор общего фона для слайдов, используя заливку, узорное заполнение, изображения и так далее.
- Вторая – «Эффекты». Тут доступна настройка дополнительных элементов художественного оформления.
- Третья называется «Рисунок» и позволяет производить настройки поставленного в качестве фона изображения.
Любые изменения здесь применяются автоматически. Стоит отметить, что настройка данным способом работает только на конкретном слайде, который был перед этим выбран пользователем. Чтобы распространить результат на всю презентацию, внизу предусмотрена кнопка «Применить ко всем слайдам».
Если ранее не был выбран предустановленный тип дизайна, то здесь будет всего одна вкладка – «Заливка».
Важно помнить, что визуальный стиль тоже требует точности настоящего художника для корректного выполнения. Так что не стоит спешить – лучше перебрать несколько вариантов, чем представить публике дурно выглядящий результат.
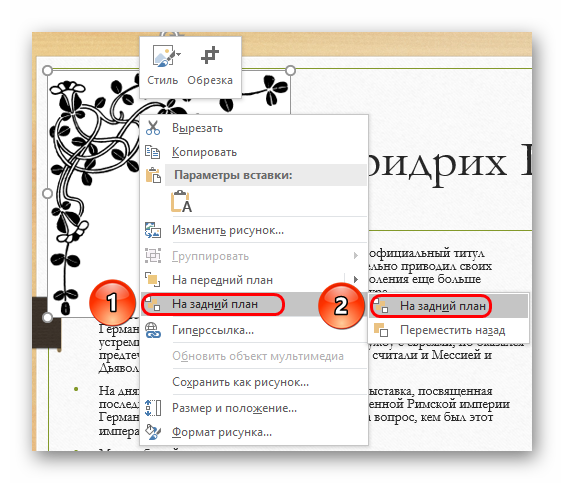
Также можно добавить собственных статичных элементов. Для этого нужно вставить в презентацию специальный элемент или узор, нажать на него правой кнопкой мыши и выбрать во всплывающем меню вариант «На задний план». Теперь это будет красоваться на фоне и не помешает никакому содержимому.
Однако так придется применять узоры к каждому слайду вручную. Так что лучше всего будет добавить такие декоративные элементы в шаблон, но об этом следующий пункт.
Настройка компоновки и шаблоны
Второе, что имеет критически важное значение для слайда – это его содержимое. Пользователь может свободно настроить широкий ряд параметров, касающихся распределения областей для внесения той или иной информации.
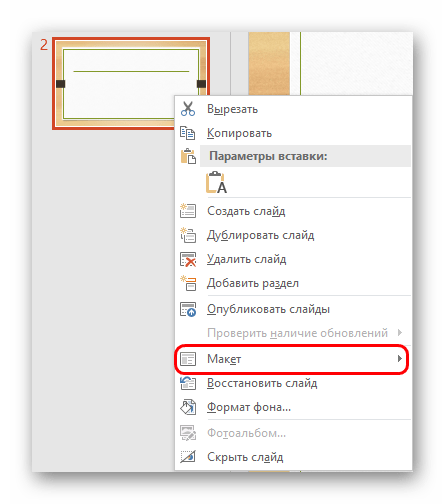
- Для этой цели служат макеты. Чтобы применить один из них к слайду, нужно нажать правой кнопкой мыши на слайде в списке слева и выбрать во всплывающем меню вариант «Макет».
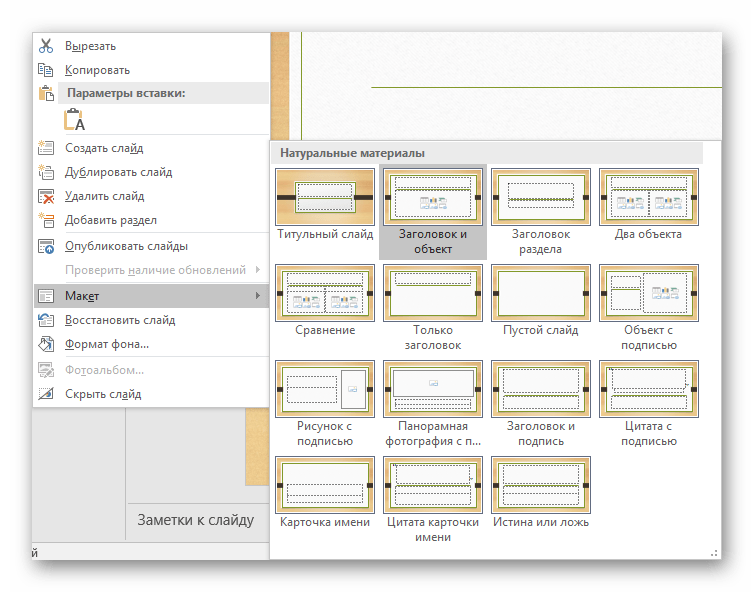
- Появится отдельный раздел, где будут представлены все имеющиеся варианты. Разработчиками программы предусмотрены шаблоны практически на любой случай.
- При нажатии на понравившийся вариант выбранный макет автоматически применится для конкретного слайда.
Стоит отметить, что все новые страницы, которые будут создаваться после него, также будут использовать данный вид компоновки информации.
Однако не всегда имеющиеся стандартные шаблоны могут удовлетворить потребностям пользователя. Так что может понадобиться сделать собственный вариант со всеми нужными вариантами.
- Для этого нужно войти во вкладку «Вид».
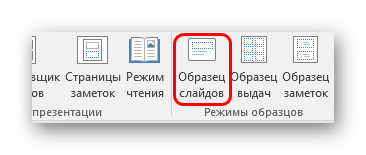
- Здесь нас интересует кнопка «Образец слайдов».
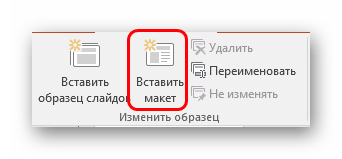
- После ее нажатия программа перейдет в специальный режим для работы с шаблонами. Здесь можно как создать свой собственный, используя кнопку «Вставить макет»…
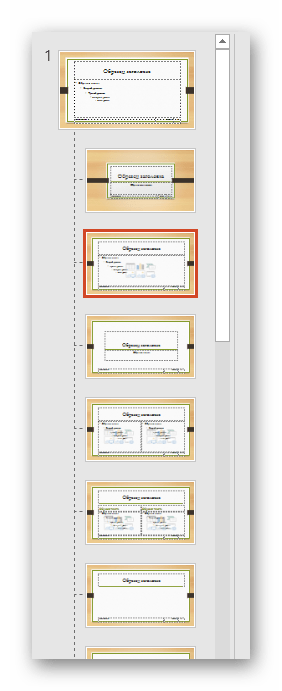
- … так и отредактировать какой-либо из имеющихся, выбрав из бокового списка.
- Здесь пользователь может произвести абсолютно любые установки для типа слайдов, который впоследствии будет широко применяться в презентации. Базовые инструменты во вкладке «Образец слайдов» позволяют добавлять новые области для содержимого и заголовки, настраивать визуальный стиль, изменять размер. Все это дает возможность создать действительно неповторимый шаблон для слайда.
Остальные вкладки («Главная», «Вставка», «Анимация» и др.) позволяют точно так же настраивать слайд, как и в основной презентации, например, можно установить шрифты и цвет для текста.
- После окончания подготовки своего шаблона следует дать ему уникальное имя, чтобы отличать среди других. Это делается с помощью кнопки «Переименовать».
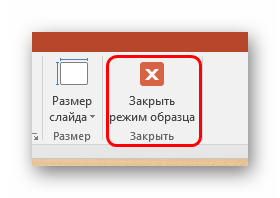
- Остается лишь выйти из режима работы с шаблонами, нажав на кнопку «Закрыть режим образца».
Теперь вышеописанным методом можно применить свой макет для любого слайда и пользоваться дальше.
Изменение размера
Пользователь также может достаточно гибко настраивать габариты страниц в презентации. Настраивать можно, к сожалению, только весь документ, по отдельности каждому слайду назначить свой размер не удастся.
Урок: Как изменить размер слайда
Добавление переходов
Последним аспектом, который касается слайдов, является настройка переходов. Данная функция позволяет определить эффект или анимацию того, как один кадр будет сменять другой. Это позволяет добиться сглаженности перехода между страницами, да и в целом очень приятно смотрится.
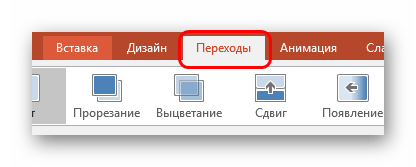
- Настройки этой функции находятся в одноименной вкладке в шапке программы – «Переходы».
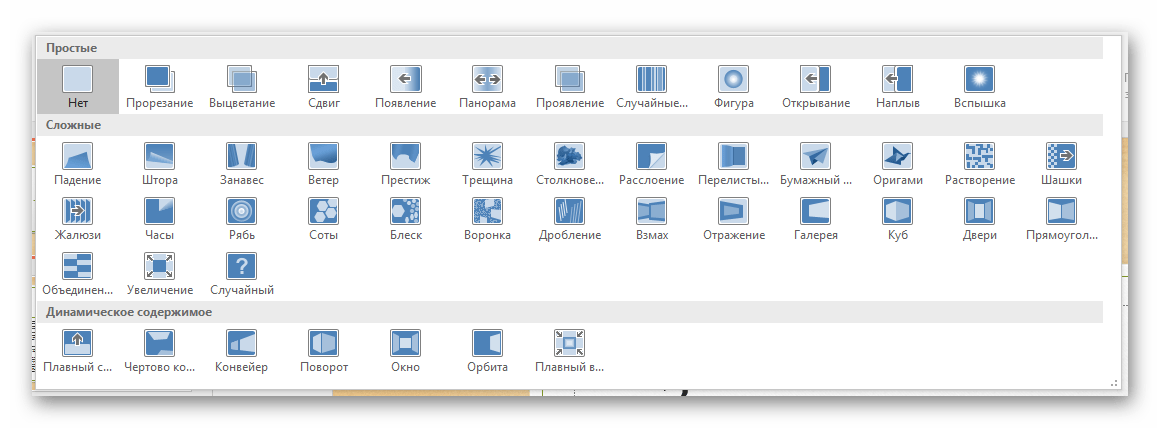
- Первая область под названием «Переход к этому слайду» позволяет выбрать эффект, с которым один слайд будет сменять другой.
- При нажатии на соответствующую кнопку разворачивается полный список всех доступных эффектов.
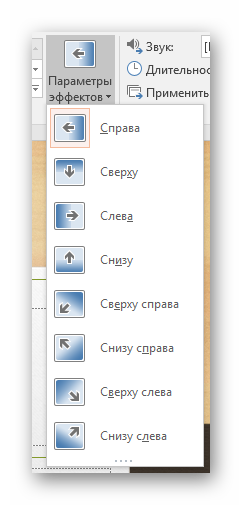
- Для дополнительной настройки анимации следует нажать тут же на кнопку «Параметры эффектов».
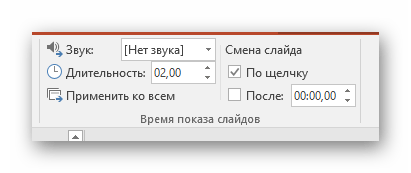
- Вторая область – «Время показа слайдов» — открывает возможности для редактирования длительности автоматического показа, тип переключения перехода, звук при переходе и так далее.
- Для применения полученных эффектов для всех слайдов нужно нажать на кнопку «Применить ко всем».
С этими настройками презентация выглядит лучше во время просмотра. Но стоит также отметить, что большое количество слайдов с такими переходами может значительно увеличить время демонстрации за счет того, что его будут отнимать как раз затраты на переходы. Так что лучше всего делать такие эффекты для небольших документов.
Заключение
Данный набор вариантов не сделает презентацию вершиной мастерства, однако позволит действительно добиться высоких результатов от слайда как в визуальной части, так и в плане функциональности. Так что не всегда можно позволить себе делать документ на стандартной странице.
Макеты в презентации — это очень важный аспект, который поможет придать слайдам необходимый внешний вид и оформление. Но как можно сменить макет?
Как редактировать макет в powerpoint?
Далеко не каждый пользователь знает о том, что в PowerPoint можно менять макеты слайдов. Существуют они для того, чтобы красиво и правильно оформлять информацию. Например, для титульного листа используется один макет, для диаграмм и изображений с текстом второй, а для представления нового блока в презентации уже третий макет. Использование данного функционала будет не только экономить время на создании, но и правильно оформляет информацию. Однако как можно это сделать? Необходимо сделать следующее:
- Добавить новый или взять имеющийся слайд, который необходимо изменить.
- Во вкладке «Главная» в верхней панели инструментов найти «Лента».
- Перейти в «Слайды».
- Кликнуть на клавишу «Макет».
Стоит отметить, что для первого слайда у пользователя по умолчанию будет использоваться титульный лист. Все последующие будут созданы в совершенно другом макете: заголовок и текст.
Данная инструкция позволяет пользователю буквально за пару секунд изменить макет слайда, не трогая объекты вокруг. Но изменить макет можно вместе с дизайном. Это также интересный способ правильно и очень красиво оформить свою презентацию. Чтобы этого сделать, необходимо сделать следующее:
- Зайти во вкладку «Дизайн».
- Перейти в «Лента».
- Выбрать новый вариант «Темы».
- Определиться с новым дизайном
После этого тема выбранного слайда будет моментально меняться. Для каждого макета меняется дизайн. Например, внешний вид титульного листа будет кардинально отличаться от слайда с текстом и заголовком. Однако цветовая гамма и отдельные элементы будут едиными, создавая красивую композицию.
То есть пользователь может выбирать абсолютно любой вариант для дизайна и макет. Они будут иметь общий внешний вид с отличиями от макета. Если использовать макеты и темы, то пользователь очень сильно экономит время на создании презентации, но выглядеть она будет гораздо красивее.
Порой перемещать объекты на слайдах очень сильно утомляют, поэтому проще все установить в линию. Это поможет дополнить презентацию и ее тему, создавая профессиональный внешний вид.
Теперь пользователь точно знает, как правильно играть и менять внешний вид презентации. Зрителям будет намного приятнее смотреть на действительно красивую картинку, которая дополнена информацией и рассказами. Буквально за несколько минут можно создать что-то красивое без лишних проблем и трудозатрат. Темы можно применять одну на всех с помощью одной клавиши. Это самый лучший способ создать хорошее впечатление на визуальную составляющую часть информационной презентации.
Russian (Pусский) translation by Olya Misuraghina (you can also view the original English article)
С Microsoft PowerPoint можно легко и быстро создавать слайды, которые будут достойно выглядеть. Вы можете потратить кучу времени на создание собственных слайдов, но в этом видео я покажу вам, как быстро менять макеты слайдов в PowerPoint, используя пресеты — готовые настройки и стили.
Внимание: В этом уроке мы используем популярный шаблон Simplicity PowerPoint. Вы можете найти больше профессиональных шаблонов PowerPoint на Graphic River.
Как быстро менять макеты слайдов PowerPoint
Внимание: Посмотрите этот короткий видеоурок или следуйте пошаговой инструкции ниже.
1. Просмотрите имеющиеся макеты слайдов
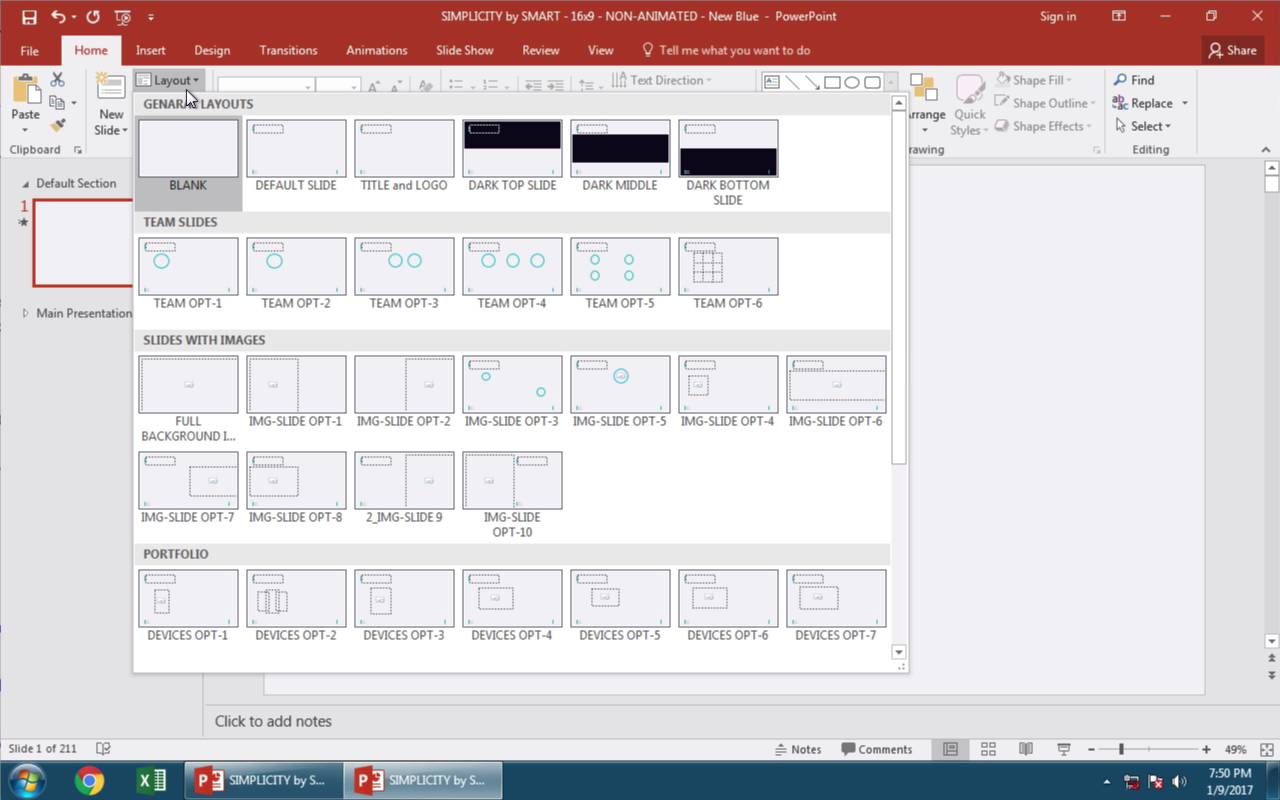
Чтобы использовать макет, убедитесь, что вы находитесь на вкладке «Главная». Движемся дальше, вставляем новый слайд, нажав кнопку «Новый слайд». Теперь нажмите кнопку с выпадающим меню справа, «Макет слайда».
2. Выберите макет слайда, который хотите использовать
Темы PowerPoint, например, шаблон презентаций Simplicity, предлагают множество макетов на выбор. Эти уменьшенные изображения предназначены для предварительного просмотра макетов. Я нажму на один из них — слайд Dark Top (тёмный верх).
3. Быстро поменяйте свой макет слайда PowerPoint
Видите — слайд, над которым мы сейчас работаем, выглядит замечательно. Теперь можно пойти дальше и добавить содержимое в него, например, ввести в эти окошки текст или добавить изображения. Мы в любой момент можем быстро поменять наш макет, нажав на кнопку «Макет» и выбрав другой макет, как это сделал я.
Закругляемся!
Заметьте, что макет слайда изменился, а содержимое осталось. Благодаря предварительным настройкам, можно легко и быстро создать красивую презентацию.
Больше быстрых видео о PowerPoint (уроки по 60 секунд)
Узнайте больше об инструментах PowerPoint за короткое время и умножайте свои знания о PowerPoint. У нас на Envato Tuts+ есть дополнительные уроки о PowerPoint, либо же вы можете перескочить к одному из наших быстрых видеоуроков о PowerPoint:
Внимание: В сегодняшнем уроке мы использовали популярный шаблон PowerPoint Simplicity. Откройте для себя дополнительные возможности дизайна в PowerPoint в нашем Полном руководстве по шаблонам PowerPoint или просмотрите наши лучшие темы PowerPoint на Graphic River.
PowerPoint включает в себя огромный набор функций, которые необходимы для того, чтобы создавать профессионально выглядящие презентации. Любая презентация, как мы уже говорили, состоит из серии слайдов. Слайды содержат информацию, которою мы представляем на экране при общении с аудиторией. Эта информация может включать в себя текст, изображения, графики, видео, звук и другое.
Перед началом работы с информацией на слайдах, нам необходимо понять основы работы со слайдами. В этом уроке вы узнаете, как вставлять новые слайды, изменять макет, работать с заполнителями макета и некоторые другие важные вопросы.
Слайды
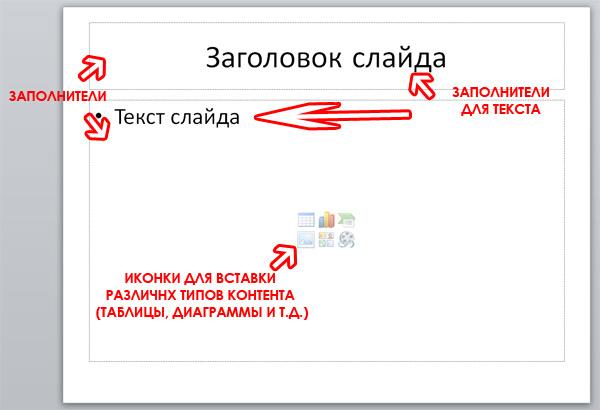
Каждый слайд состоит из набора заполнителей, которые представляют из себя пунктирные блоки. Заполнители предназначены для вставки различных объектов: текста, изображений, диаграмм и т.д. Некоторые заполнители имеют иконки для вставки различного типа контента. Определить тип контента, для которого предназначена та или иная иконка, можно наведя указатель мыши на нужную иконку.
Макеты слайдов
Заполнители представлены в различных макетах. Макеты можно применить к существующим, либо вновь создаваемым слайдам. Другими словами, макет организует содержание слайда с использованием различных видов заполнителей. То, какую информацию мы будем включить в следующий слайд и определяет выбор макета с набором заполнителей.
В приведенном выше примере, макет называется «Заголовок и объект» и включает заполнитель для заголовка и заполнитель для различного вида контента. По названию макета и его внешнему вида мы можем определить, что более всего подходит для вновь создаваемого слайда.
Изменение макета текущего слайда
Для изменения макета существующего слайда:
1. Выберите слайд, который вы хотите изменить (однократным кликом левой кнопкой мыши в панели «Слайды»).
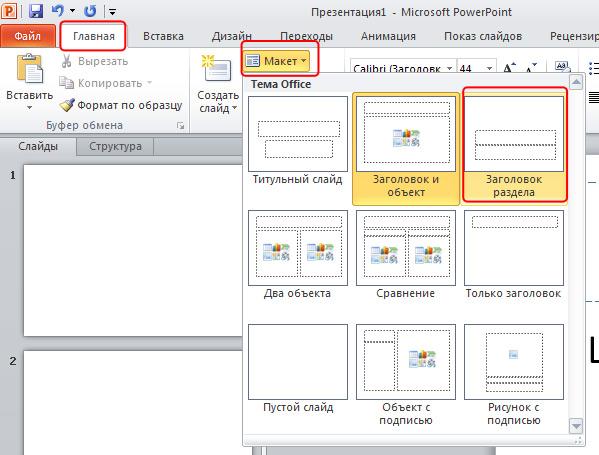
2. Выберите пункт «Макет» в группе «Слайды» в меню «Главная». Появится меню с набором макетов. Щелчком левой кнопкой мыши выберите нужный макет.
Слайд тут же примет внешнее оформление в соответствии с выбранным макетом.
Как удалить заполнитель в макете?
Вы можете легко изменить формат макета, удалив ненужные заполнители из любого слайда.
1. Наведите указатель мыши на пунктирную границу ненужного заполнителя и при изменении вида курсора на направленную в четыре стороны стрелку щелкните левой кнопкой мыши.
2. После появления обводки вокруг пунктирной линии щелкните клавишу «Delete» на клавиатуре. Заполнитель удален.
Вставка тестового поля на слайд
В любой макет на слайде можно добавлять текстовые поля. Для этого в меню «Вставка» выбираем пункт «Надпись»:
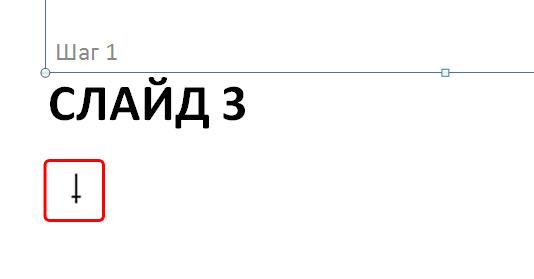
При этом курсор превращается в перечеркнутую снизу линию:
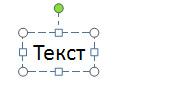
Щелкаем по нужному месту на слайде курсором и появляется заполнитель для ввода текста:
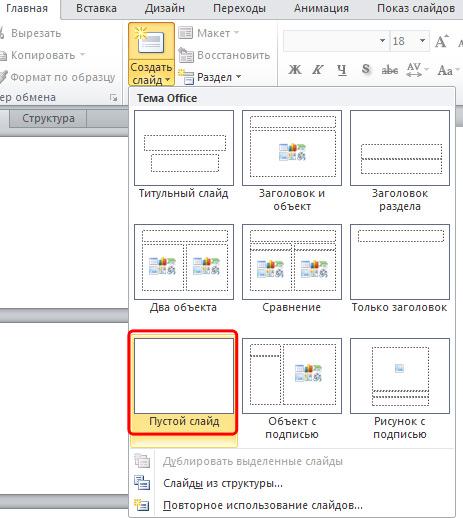
Если на слайде предполагается нестандартная компоновка различных видов контента, то проще всего выбрать макет «Пустой слайд» и располагать новые объекты в любом поле пустого слайда:
Вставка нового слайда c текущим макетом
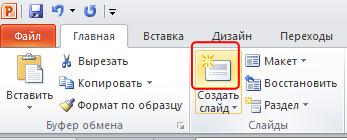
Если при вставке в презентацию нового слайда мы хотим использовать текущий макет, то нужно щелкнуть по кнопке «Создать слайд», которая находится выше текста «Создать слайд»:
Копирование и вставка слайдов
На вкладке «Слайды» в левой панели, выберите слайд, который вы хотите скопировать.
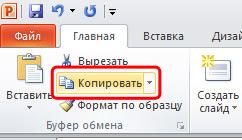
Выберите команду «Копировать» на вкладке «Главная». Также можно щелкнуть правой кнопкой мыши по нужному слайд в панели слайдов и выбрать «Копировать».
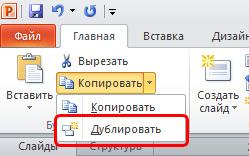
Затем нужно снова войти в это же меню и выбрать «Дублировать».
В левой панели щелкните чуть ниже слайда (или между двумя слайдами), чтобы выбрать место, где вы хотите вставить копию слайда. Горизонтальная линия укажет место вставки:
Выберите команду «Вставить» на вкладке «Главная». Также можно щелкнуть правой кнопкой мыши и выбрать команду «Вставить». Появится копируемый слайд.
Для выбора нескольких слайдов нужно нажать клавишу «Ctrl» на клавиатуре, и, удерживая ее, отметить правой кнопкой мыши нужные слайды.
Дублирование слайдов
Альтернативой копирования – вставки является процесс дублирования слайдов. Эта функция удобна для быстрой вставки похожих слайдов.
1. Выбираем слайд, который нужно продублировать.
2. Заходим в меню «Новый слайд».
3. Щелкаем «Дублировать выделенные слайды» в выпадающем меню:
Удаление слайдов
1. Выберите слайд, который требуется удалить.
2. Нажимаем клавишу « Delete» или «Backspace» на клавиатуре.
Перемещение слайдов
1. Выбираем слайд, который нужно переместить.
2. Нажимаем левую кнопку мыши и удерживая ее, перетаскиваем мышью в новое место.
3. Горизонтальная линия указывает местоположение нового слайда.
4. Отпускаем левую кнопку мыши, и слайд появляется в новом месте.
Если Вы не знаете, как изменить макет слайда в PowerPoint, то самое время приступить к чтению этой статьи. Все пошаговые фото сделаны в 2021 версии программы, но эти советы также помогут и владельцам 2019, 2016 и даже 2010 повер поинта.
Для того чтобы сделать презентацию более информативной порой необходимо вставить короткое видео. Именно про то как вставить видео в презентацию PowerPoint есть отдельная статья, всем советуем.
Как изменить макет слайда в PowerPoint?
Чтобы изменить макет слайда нужно открыть презентацию и выбрать любой из слайдов.
Сразу на в главном меню можно провести все изменения макета слайда.
Для редактирования макета есть две кнопки «Создать слайд» и «Макет».
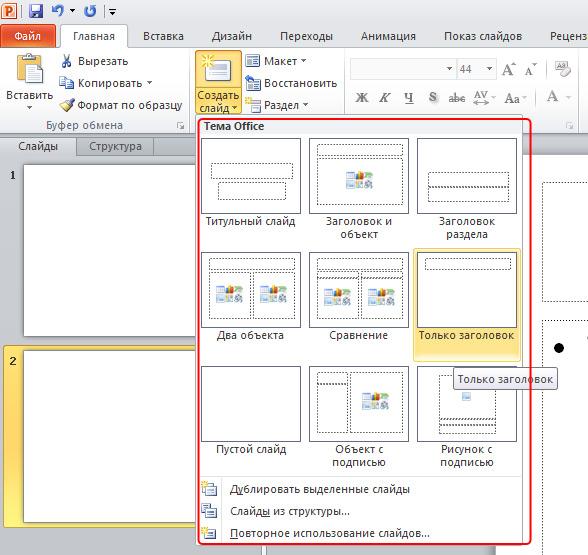
Открыв раздел «Создать слайд» можно увидеть различные типы слайдов. Изменив основной макет можно сделать пустой слайд, титульный слайд или оставить только заголовок. На панели доступно 11 видов макетов, которые будут актуальны под любые цели презентации.
Теперь рассмотрим раздел «Макет». Внимательный читатель может заметить, что и здесь и в разделе «Создать слайд» все те же 11 макетов. В чем разница?
Раздел «Макет» отвечает за активированный (действующий слайд). А вот в разделе «Создать слайд» макет применяется для создания следующего слайда.
Меняем макет в конструкторе
Также изменить макет в презентации powerpoint можно при помощи раздела «Конструктор».
Самую большую часть раздела занимает подраздел «Темы». Здесь можно выбрать любой макет, который будет применяться для всей презентации. Цветовая гамма и дизайн макетов очень разнообразны. Всего по умолчанию доступно 44 различных дизайна.
Если навести курсор на любой из макетов и немного подождать можно увидеть как это будет выглядеть.
Следующим подразделом являются «Варианты». Здесь можно изменить цветовую гамму макетов, обновить шрифты, наложить эффекты или же задать стили фона.
Многообразие одних цветовых гамм кружит голову.
Ну и в самом конце можно изменить размер слайда (стандартный размер сторон презентации 4:3) его можно изменить на 16:9.
Или же можно настроить формат фона. Фон может быть сплошным, градиентным, рисунком и даже текстурой или узором. Вы также можете сделать фоном любой из рисунков или картинок. Даже прозрачность фона может быть настроена до полупозрачного или полностью непрозрачного.
На этом все! Теперь Вы знаете, как изменить макет слайда в PowerPoint. Не забывайте оставлять комментарии и делиться записью с друзьями. Всем спасибо!
Оценка статьи:
Загрузка…

