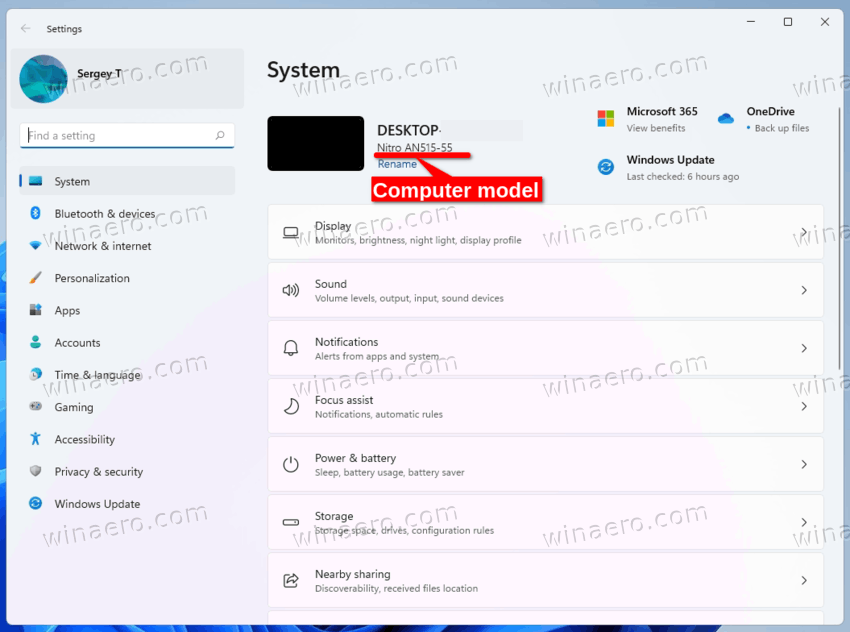
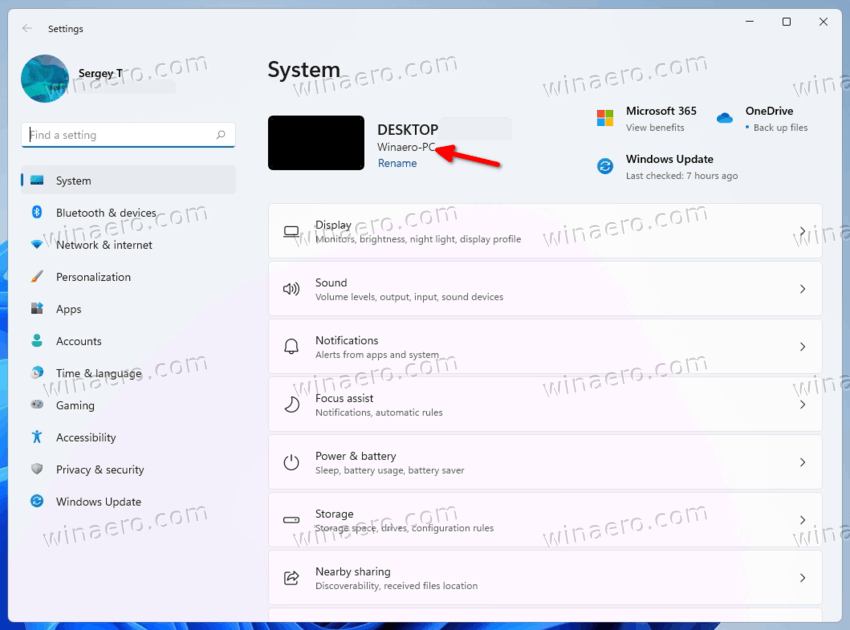
The Windows Settings panel displays an unusual item, System Product Name, under your computer name in Windows 11. However, if you want to change the Windows 11 System Product Name, here is how you can do that. It is possible to change the OEM information using Registry Editor.
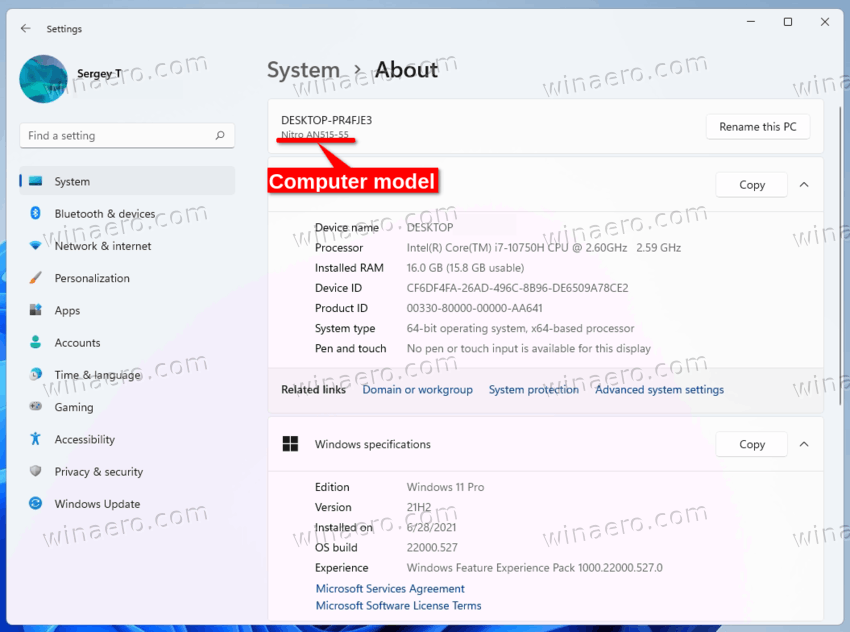
By default, your computer manufacturer specifies the name of the system. For example, if you have a Microsoft Surface, it shows the Surface name under your computer name. However, if you have assembled your computer manually, it displays the motherboard name in the Windows Settings panel. If you want to change the system product name, which is visible in the Windows Settings panel, you need to use Registry Editor.
it is recommended to backup all Registry files before getting started with the steps.
To change Windows 11 System Product Name in Windows Settings, follow these steps:
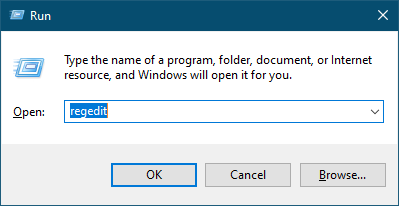
- Press Win+R to open the Run prompt.
- Type regedit and hit the Enter button.
- Click on the Yes option.
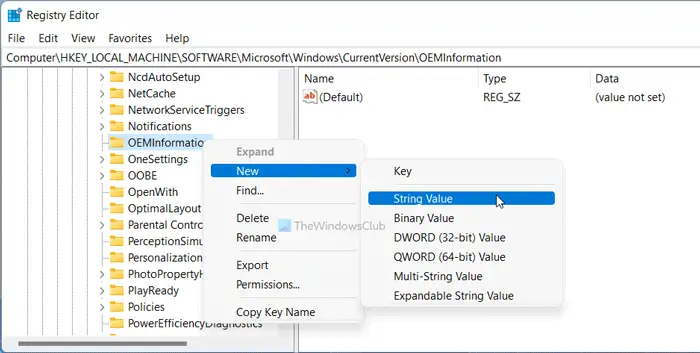
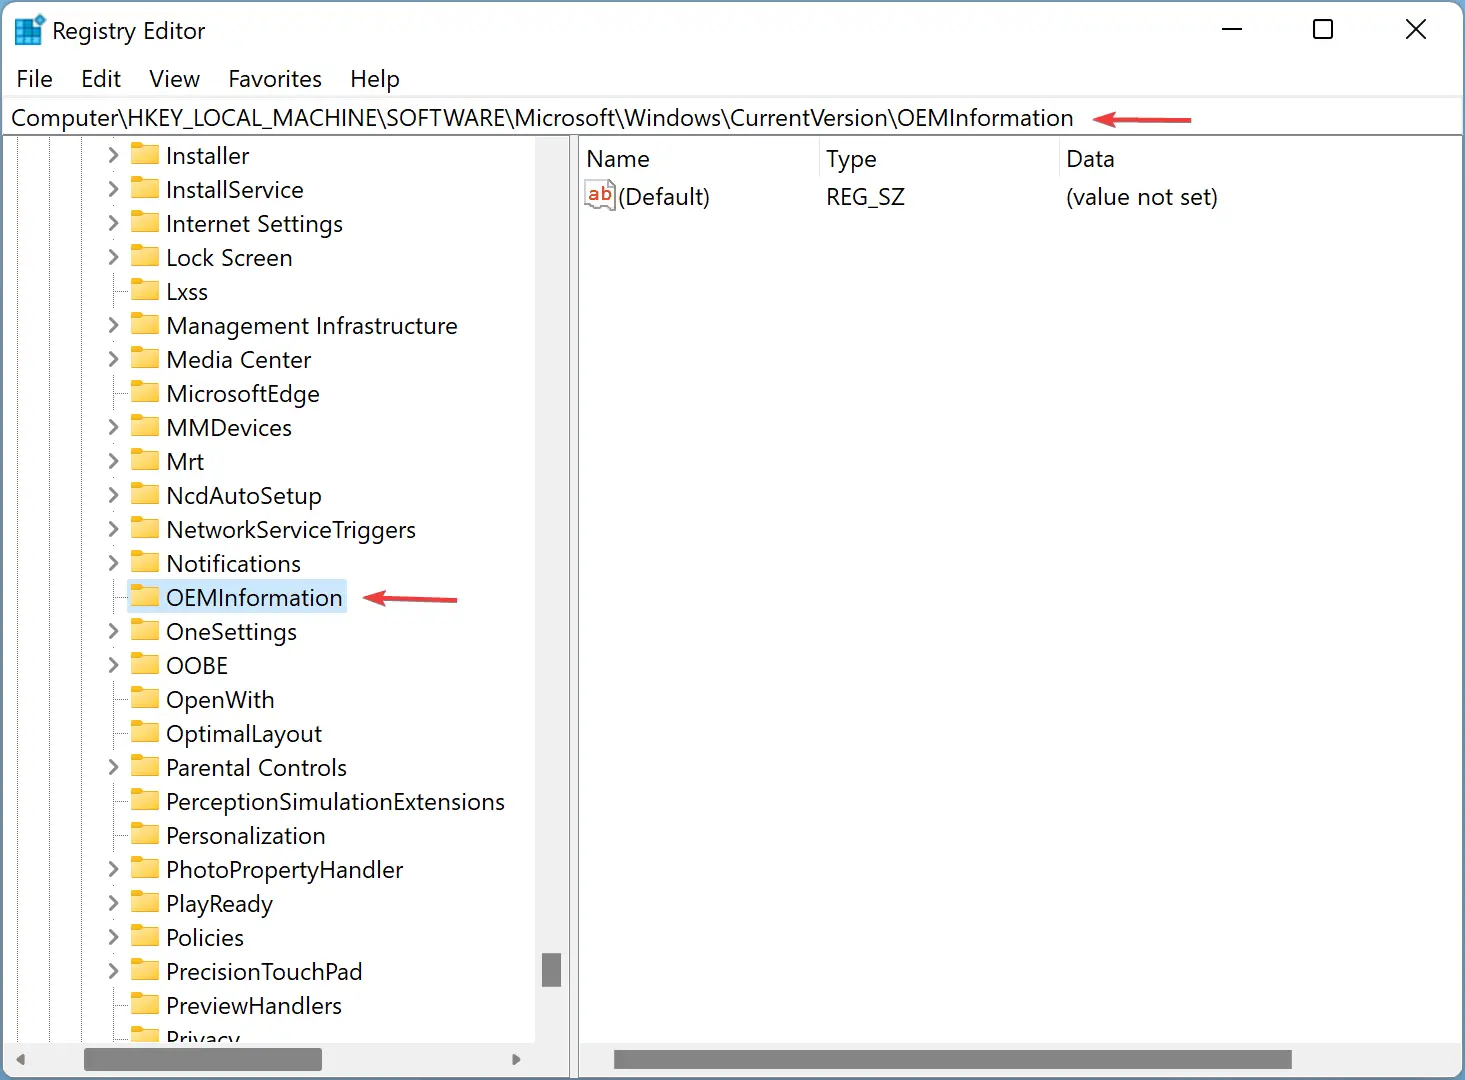
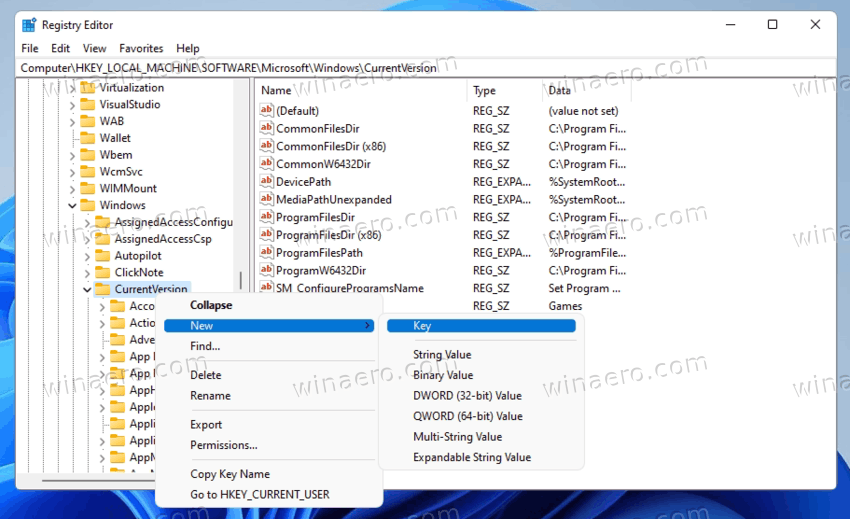
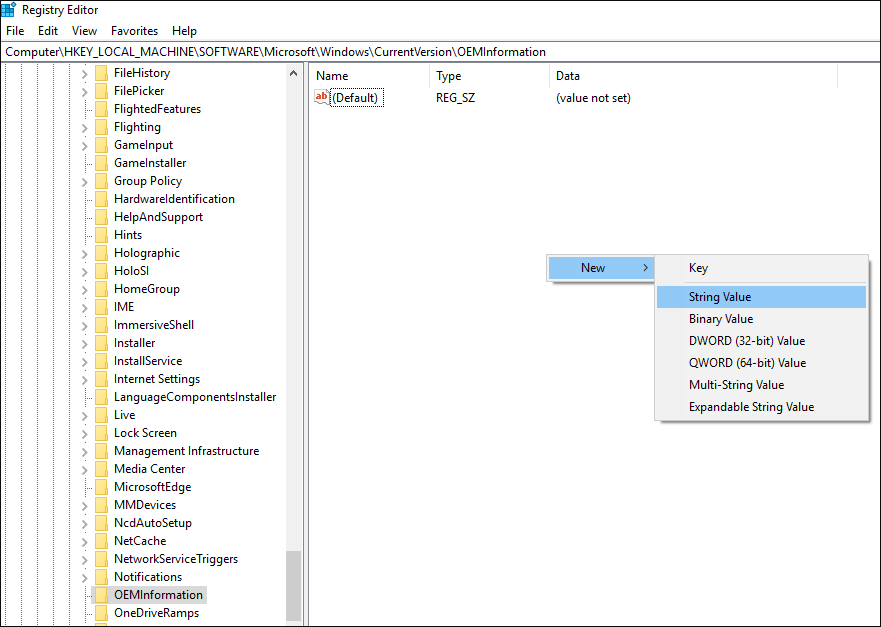
- Navigate to OEMInformation in HKLM.
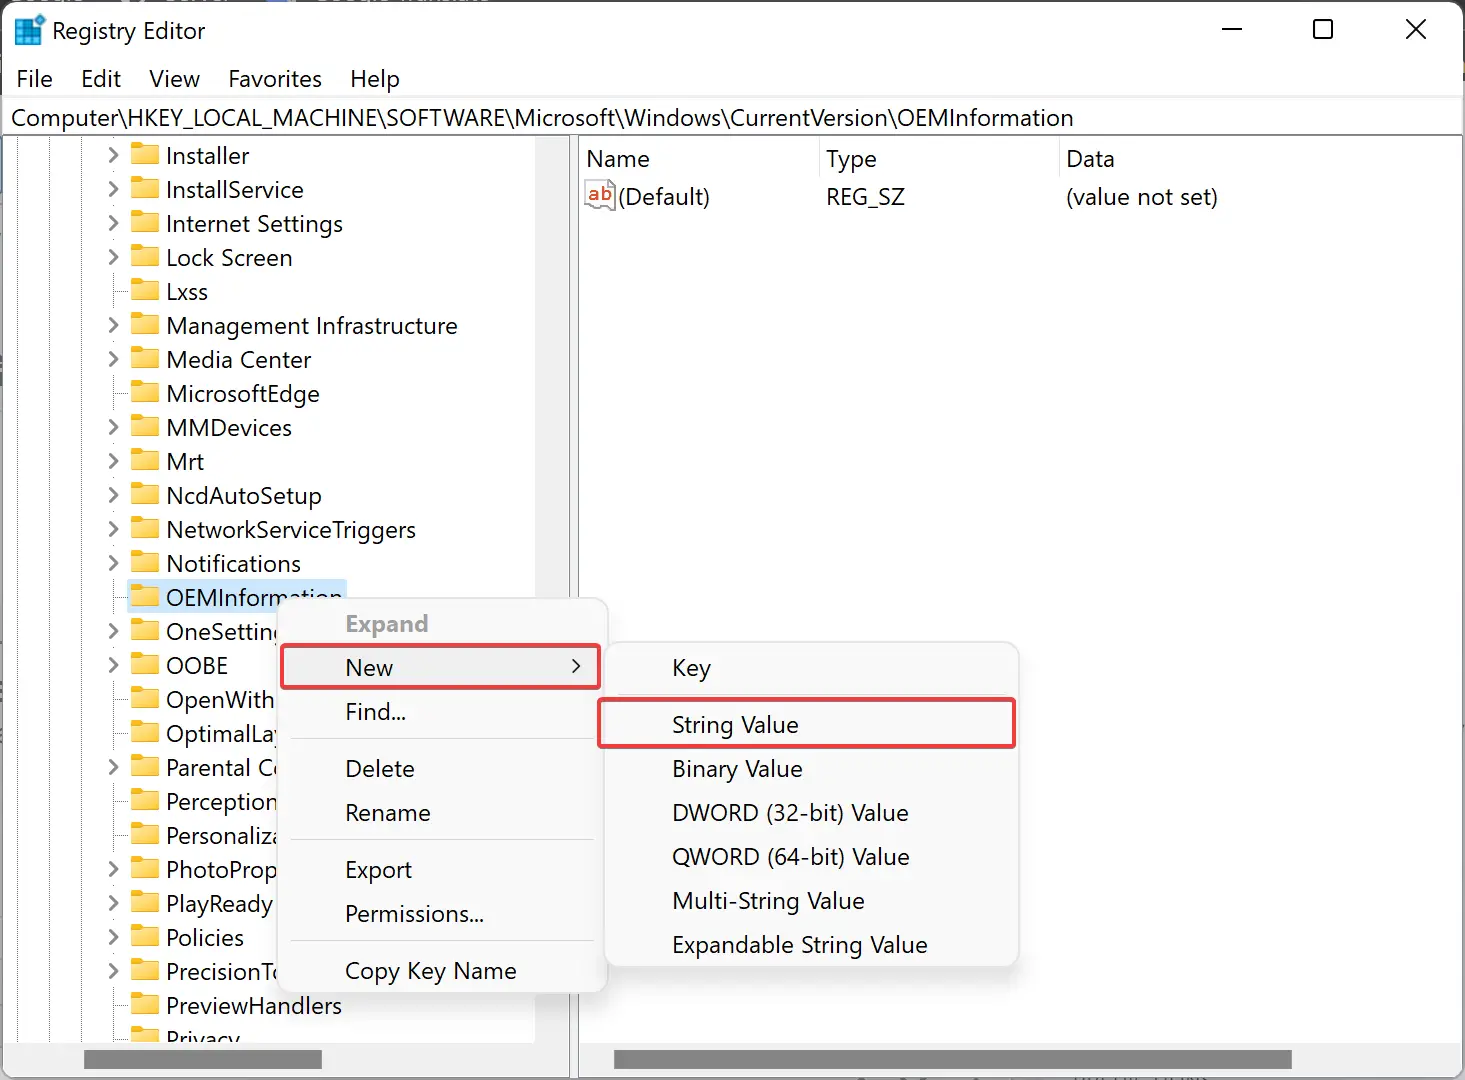
- Right-click on the OEMInformation > New > String value.
- Name it as Model.
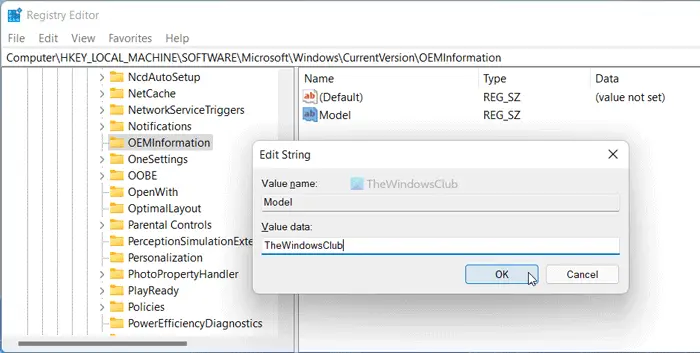
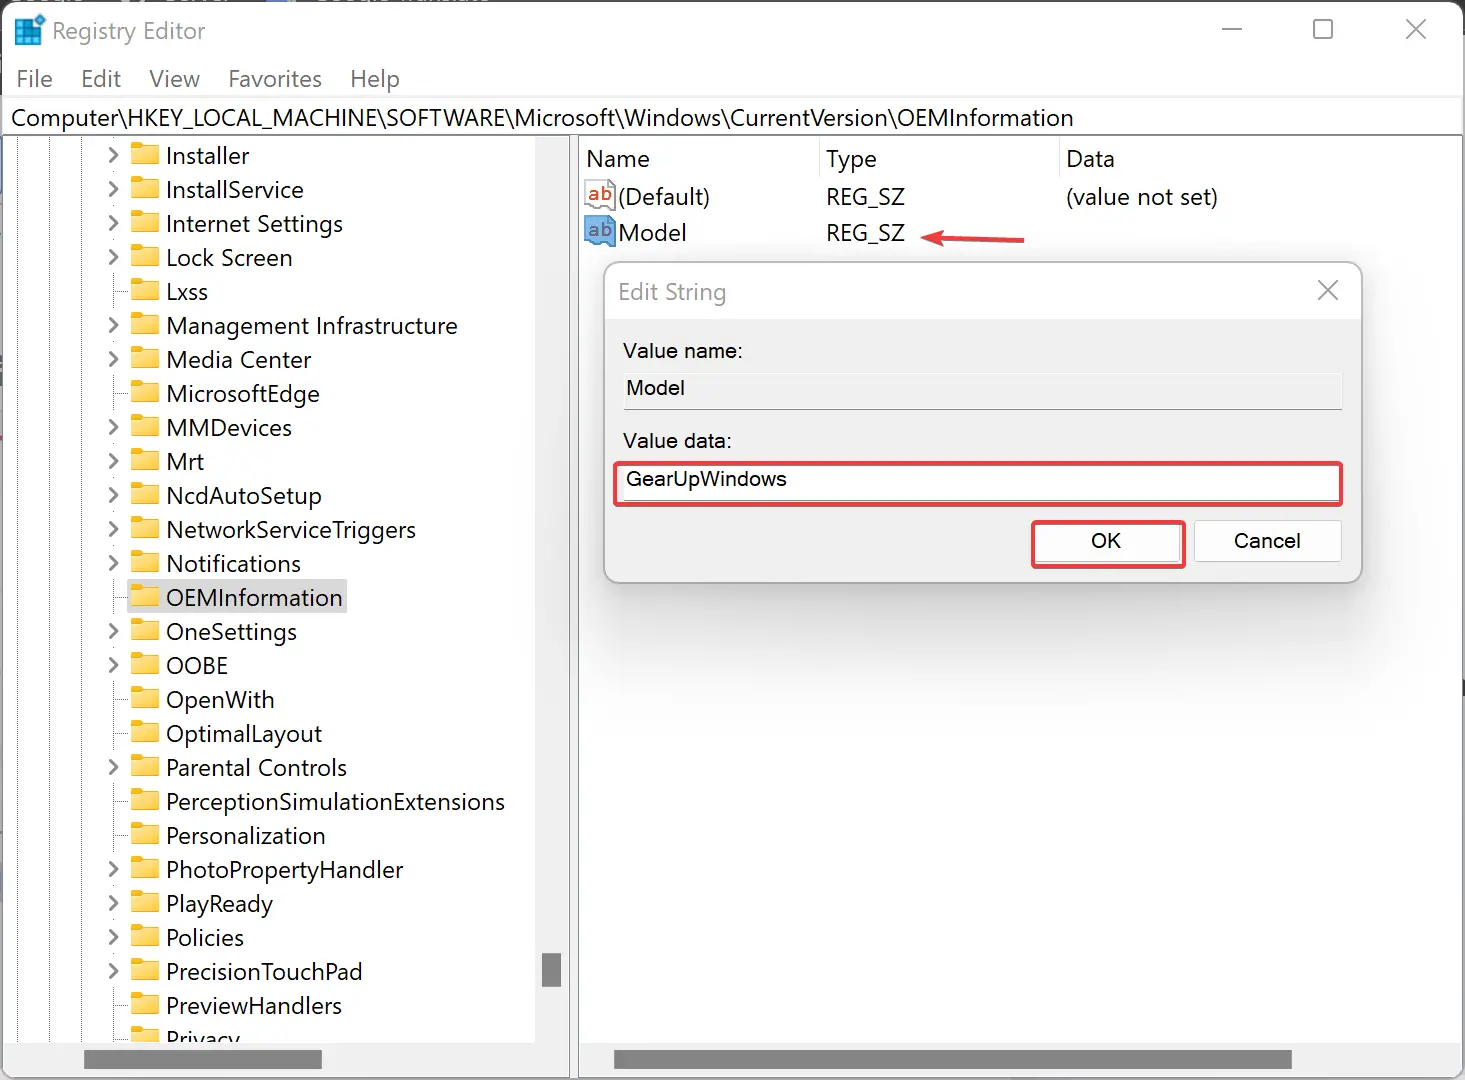
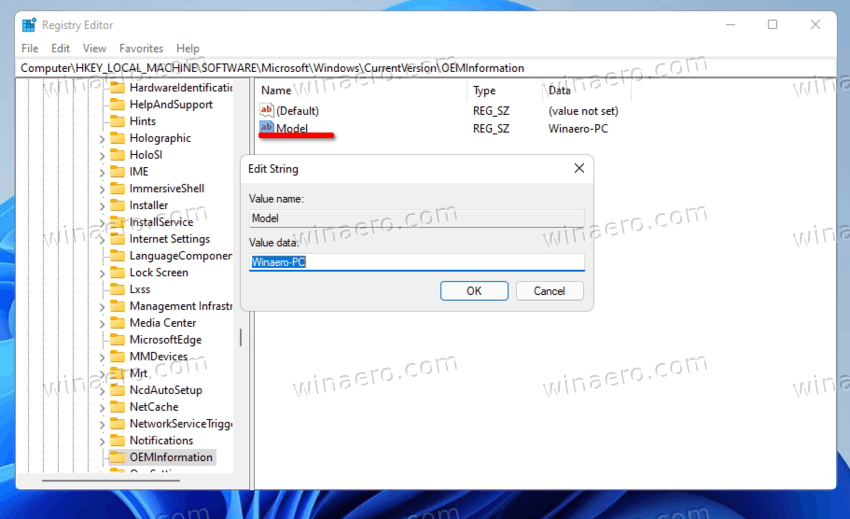
- Double-click on this String Value.
- Set the Value data as the name you want to display.
- Click the OK button.
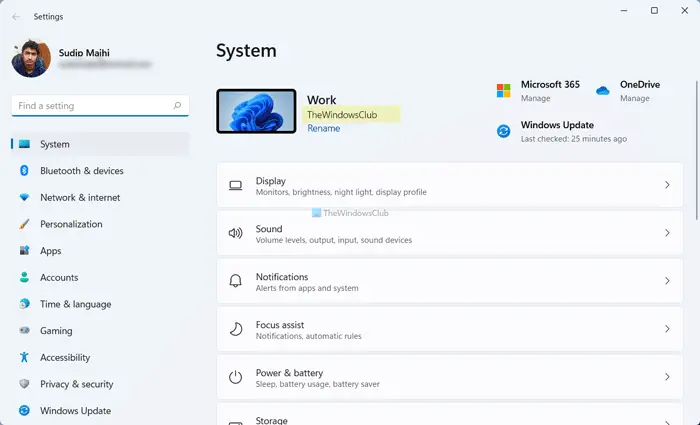
- Restart the Windows Settings panel.
To learn more about these steps, continue reading.
At first, you need to open the Registry Editor on your computer. For that, you can press Win+R to open the Run dialog. Then, type regedit in the empty box, and press the Enter button. Then, if the UAC prompt appears, click on the Yes button.
Once the Registry Editor is opened on your computer, navigate to the following path:
HKEY_LOCAL_MACHINESOFTWAREMicrosoftWindowsCurrentVersionOEMInformation
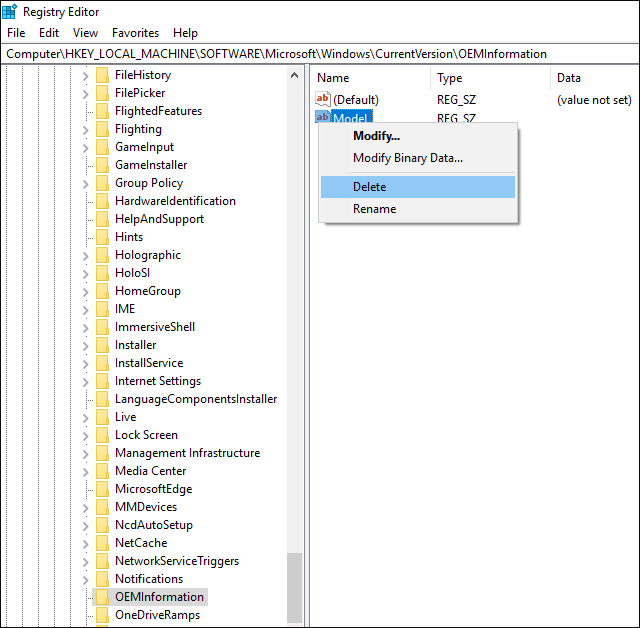
In the OEMInformation key, you can find a String Value named Model. However, if you cannot find the mentioned key, you need to create it manually. For that, right-click on the OEMInformation and select New > String Value.
Then, name it as Model. Next, you need to change the Value data of the Model String Value. To do so, double-click on it and set the Value data as the name you want to display under your computer name.
Once done, click the OK button and restart the Windows Settings panel.
In case you want to display the default name, you need to delete the String Value you created earlier. For that, right-click on the Model String Value and select the Delete option from the context menu. Then, click on the Yes button.
Can I Rename my laptop in Windows 11?
Yes, you can easily rename your laptop or desktop in Windows 11 OS. For this, open the Settings app, and access the About page in the System category. There you will see Rename this PC button on the top-right part. Press that button and a box will open. Enter the new name in the given text field. You can use letters, hyphens, and numbers for a name. Press the Next button and restart your system.
How do I change my OEM information in Windows 11/10?
If you want to change or add OEM information in Windows 11/10, then access the OEMInformation Registry key. The path is:
HKEY_LOCAL_MACHINESOFTWAREMicrosoftWindowsCurrentVersionOEMInformation
Now you can create different String values and rename them to Manufacturer, Model, SupportHours, SupportURL, SupportPhone, etc. After that, double-click on each String value one by one and add the relevant information in the Value data field. Press OK to save the changes.
Read: How to find Computer Name in Windows 11
The Windows Settings panel displays an unusual item, System Product Name, under your computer name in Windows 11. However, if you want to change the Windows 11 System Product Name, here is how you can do that. It is possible to change the OEM information using Registry Editor.
By default, your computer manufacturer specifies the name of the system. For example, if you have a Microsoft Surface, it shows the Surface name under your computer name. However, if you have assembled your computer manually, it displays the motherboard name in the Windows Settings panel. If you want to change the system product name, which is visible in the Windows Settings panel, you need to use Registry Editor.
it is recommended to backup all Registry files before getting started with the steps.
To change Windows 11 System Product Name in Windows Settings, follow these steps:
- Press Win+R to open the Run prompt.
- Type regedit and hit the Enter button.
- Click on the Yes option.
- Navigate to OEMInformation in HKLM.
- Right-click on the OEMInformation > New > String value.
- Name it as Model.
- Double-click on this String Value.
- Set the Value data as the name you want to display.
- Click the OK button.
- Restart the Windows Settings panel.
To learn more about these steps, continue reading.
At first, you need to open the Registry Editor on your computer. For that, you can press Win+R to open the Run dialog. Then, type regedit in the empty box, and press the Enter button. Then, if the UAC prompt appears, click on the Yes button.
Once the Registry Editor is opened on your computer, navigate to the following path:
HKEY_LOCAL_MACHINESOFTWAREMicrosoftWindowsCurrentVersionOEMInformation
In the OEMInformation key, you can find a String Value named Model. However, if you cannot find the mentioned key, you need to create it manually. For that, right-click on the OEMInformation and select New > String Value.
Then, name it as Model. Next, you need to change the Value data of the Model String Value. To do so, double-click on it and set the Value data as the name you want to display under your computer name.
Once done, click the OK button and restart the Windows Settings panel.
In case you want to display the default name, you need to delete the String Value you created earlier. For that, right-click on the Model String Value and select the Delete option from the context menu. Then, click on the Yes button.
Can I Rename my laptop in Windows 11?
Yes, you can easily rename your laptop or desktop in Windows 11 OS. For this, open the Settings app, and access the About page in the System category. There you will see Rename this PC button on the top-right part. Press that button and a box will open. Enter the new name in the given text field. You can use letters, hyphens, and numbers for a name. Press the Next button and restart your system.
How do I change my OEM information in Windows 11/10?
If you want to change or add OEM information in Windows 11/10, then access the OEMInformation Registry key. The path is:
HKEY_LOCAL_MACHINESOFTWAREMicrosoftWindowsCurrentVersionOEMInformation
Now you can create different String values and rename them to Manufacturer, Model, SupportHours, SupportURL, SupportPhone, etc. After that, double-click on each String value one by one and add the relevant information in the Value data field. Press OK to save the changes.
Read: How to find Computer Name in Windows 11
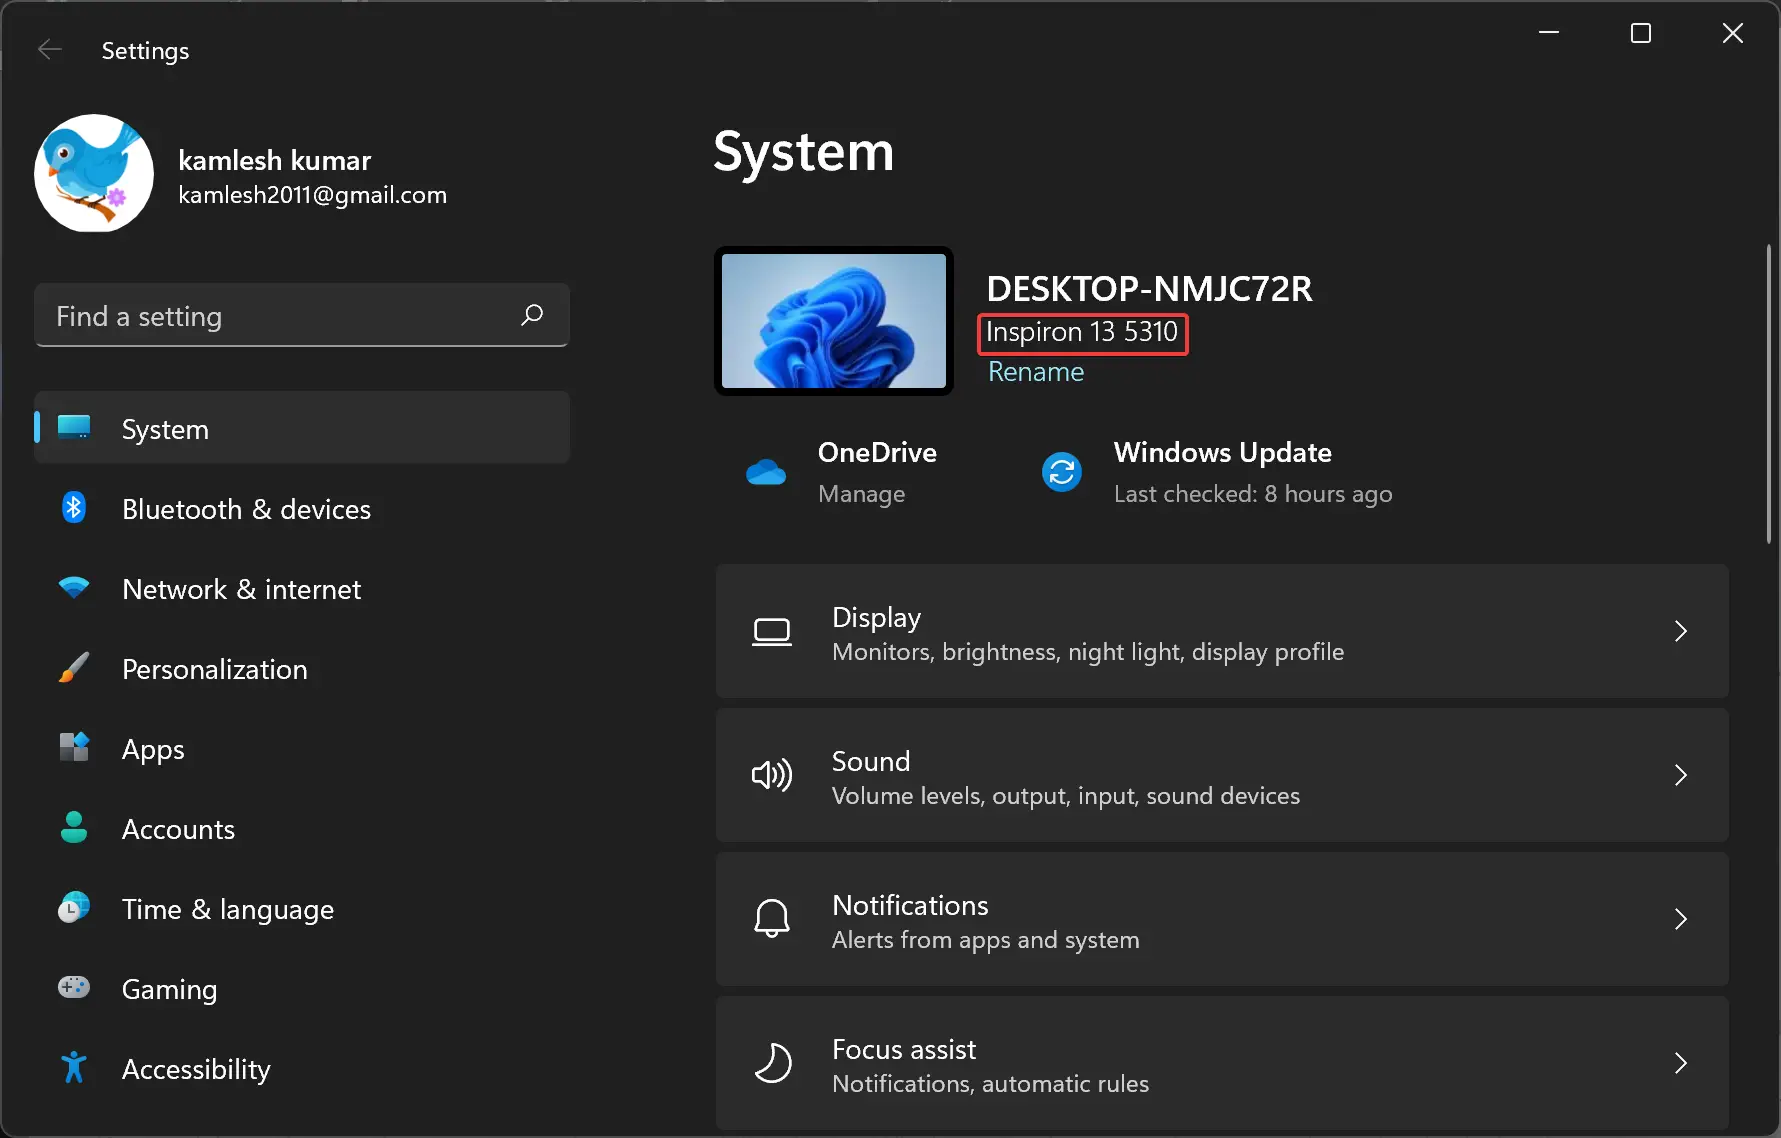
By default, the computer manufacturer specifies the name of the system. For instance, if you have purchased a Dell Inspiron I2 5310 when you open Windows Settings, you will see Inspiron I2 5310 under your computer name. However, if you have assembled your computer, Windows 11/10 shows the motherboard name in the Windows Settings panel by default.
If you wish to change the system product name visible in the Windows Settings panel, you need to take the help of Registry Editor. There is no direct method to change the OEM information in Windows Settings, but you can quickly do it through Registry Editor.
In this gearupwindows article, we will guide you on changing the System Product Name in Windows 11/10.
How to Change System Product Name or Manufacturer Name in Windows 11/10?
If you want to change the System Product Name or Manufacturer Name in Windows 11/10, do the following steps:-
Step 1. At first, open the Registry Editor on your computer.
For that, you can press Windows + R to open the Run dialog. Then, type regedit in the empty box and hit the Enter button. If the UAC prompt appears, click on the Yes button.
Step 2. When the Registry Editor window opens on your computer, navigate to the following path in the left sidebar:-
HKEY_LOCAL_MACHINESOFTWAREMicrosoftWindowsCurrentVersionOEMInformation
Step 3. On the opposite side of the OEMInformation key, you will see a String Value named Model. However, if it doesn’t exist, you must create it manually. For that, right-click on the OEMInformation key and select “New > String Value.”
Step 4. Then, name it as Model. Next, double-click on it and set the “Value data” as the name you want to display under your computer name.
Step 5. Finally, hit the OK button to save the changes.
Once done, open the Windows Settings by pressing Windows + I keys or any other method. If Windows Settings is already opened, just close and reopen the see the changes.

If you want to display the default name, you need to delete the String Value you created above. For that, right-click on the Model String Value and select the Delete option from the context menu. Finally, hit the Yes button.
- Печать
Страницы: [1] Вниз

Тема: Как изменить имя компьютера? (Прочитано 4626 раз)
0 Пользователей и 1 Гость просматривают эту тему.

goodboy

Здравствуйте, сейчас наблюдаю в терминале и системном мониторе идиотское alex-System-Product-Name, как сделать просто alex-pc например?
SergeyIT
Отредактировать /etc/hostname и /etc/hosts
Извините, я все еще учусь
goodboy
Отредактировать /etc/hostname и /etc/hosts
Тут картина такая получается. Файлы редактирую, после перезагрузки содержимое их не изменяется, а вот в терминале и системном мониторе старое имя alex-System-Product-Name
victor00000
goodboy,
grep -Rs "alex-System-Product-Name" /etcпокажи
БТР
Файлы редактирую, после перезагрузки содержимое их не изменяется
как редактируешь? нужно с правами администратора.
goodboy
goodboy,
grep -Rs "alex-System-Product-Name" /etcпокажи
Подскажите как изменить на alex-pc?
xkool
sudo gedit /etc/hostname
sudo gedit /etc/hosts
потом перезагрузись
Лучше маленький доллар, чем большое спасибо.
victor00000
goodboy,
sudo gedit /etc/hostname
sudo gedit /etc/hostsпотом перезагрузись
точно
goodboy
Спасибо, получилось. Решено
- Печать
Страницы: [1] Вверх
You can change the System Product Name in Windows 11 if you are not satisfied with the default value. It can be set by the OEM or automatically by Windows after analyzing your hardware.
Usually, system product name is set by OEM to device’s model. For example, it may say Surface Pro, Allienware, etc. Otherwise, it will be most likely set to your motherboard model. Also, Windows 11 doesn’t assume that you will change it on demand. So it doesn’t include tools or options designed for that purpose.
If you have a laptop, it will show there its current model.
When you assembled your computer yourself and installed Windows on it, it will probably show the motherboard name. In this case you may want to set it to some meaningful or unique name.
Here’s how you can change the computer model for your Windows 11 device.
To change the System Product Name in Windows 11, do the following.
- Press Win + R and type
regeditin the Run text box to open the Registry Editor app. - Go to the following key: HKEY_LOCAL_MACHINESOFTWAREMicrosoftWindowsCurrentVersionOEMInformation.
- If the OEMInformation subkey is missing, right-click the CurrentVersion subkey and select New > Key from the menu. Name it as OEMInformation.

- To the right of the OEMInformation subkey, modify or create the Model string (REG_SZ) value.
- Double-click it and type a system product name of your choice.
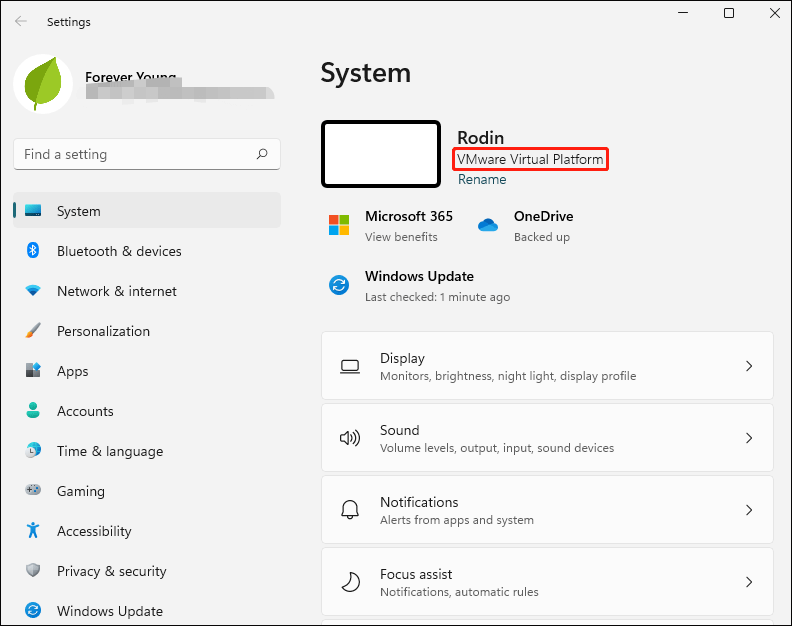
You are done. Close regedit and open the Settings app (Win + I). You should see the product name value you just specified.
The reviewed value is part of the OEM information the user can customize in the Registry. You will find more information about this topic in the following post.
Alternative methods
To save your time, you can use either Winaero Tweaker or a REG file that you can edit to suit your needs. Both options will allow you to take full control on the OEM info used in Windows, including the ability to change the system product name.
REG file
Download the following ZIP archive and extract the REG file from there to any place on your drive. The desktop folder is suitable, as it is a tiny file.
Now, open the extracted REG file in Notepad.
To change the system product name, simply modify the «Model» line and save the file.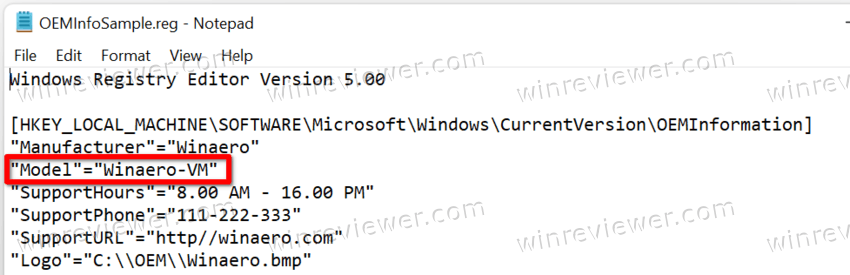
Edit or remove the values you are not going to change, and double-click the REG file to merge it into the Registry.
Winaero Tweaker
The app allows you to change the computer model in Windows. As I already mentioned above, it’s part of the OEM Information tool, available at Tools Change OEM Info.
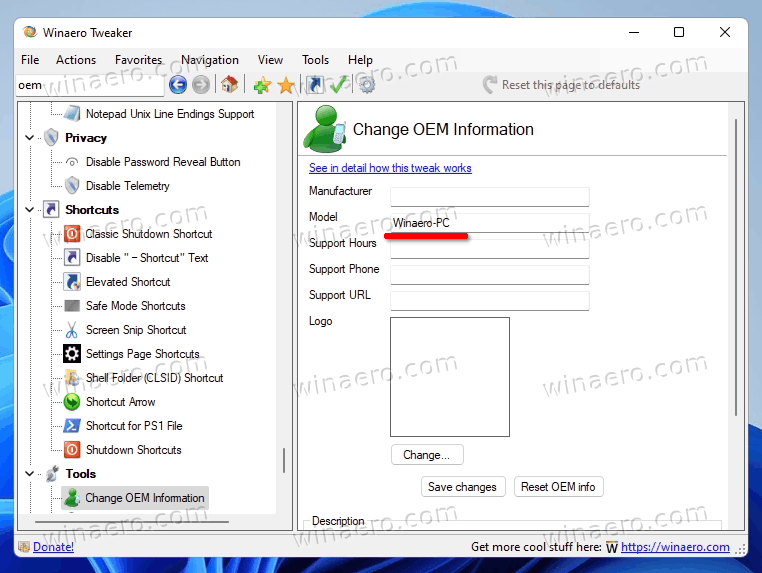
Download the app from here, install and run it.
Navigate to Tools Change OEM Info section
Now, set the Model text box value to a text of your choice. You may leave the rest of values unchanged.
You are done. Regardless of the method you choose, the system product name will now be set to what you need.
Support us
Winaero greatly relies on your support. You can help the site keep bringing you interesting and useful content and software by using these options:
If you like this article, please share it using the buttons below. It won’t take a lot from you, but it will help us grow. Thanks for your support!
-
Partition Wizard
-
Partition Magic
- How to Change System Product Name in Windows 11?
By Vega | Follow |
Last Updated January 15, 2022
If you build the PC yourself, then there usually isn’t a system product name specified, and you are able to create a system product name you prefer. In this article from MiniTool Partition Wizard, we show you how to change system product name in Windows 11.
Where to Find Your System Product Name?
Considering the importance and usefulness of the system’s product name, Windows 11 has it prominently displayed in multiple places. One of the places Windows 11 displays the system product name is the Settings app header. If you open the Settings app, you will see the system product name under the computer name in the header.
So, let us show you how to change system product name in Windows 11.
How to Change System Product Name in Windows 11?
To change the Windows 11 system product name, you need to make a couple of registry changes.
Note: It is recommended to backup all Registry files before getting started with the steps. It will help you restore your registry if something goes wrong.
Here are the steps to change system product name in Windows 11:
Step 1: Press the Win + R key to open the Run dialog.
Step 2: Type regedit in the search box and press the Enter button.
Step 3: After opening the Registry Editor on your computer, navigate to the following path:
HKEY_LOCAL_MACHINESOFTWAREMicrosoftWindowsCurrentVersionOEMInformation
Step 4: In the right panel of the OEMInformation key, double click the Model string value (REG-SZ) to modify it. Or you can right click the Model option and select Modify.

Note: Note: If you can’t find the Model, you need to create it manually. First, right click the empty space in the right pane of OEMInformation. Then select New > String Value and type Model as the name, and press Enter.
Step 5: Under the Value data section, type a system product name you want, and then click the OK button.

After that, restart your computer. Then open the Settings app with the Windows key + I shortcut, and you should see the new system product name under the computer name on the header.
How to Restore the Default System Product Name in Windows 11?
If you no longer want to use the custom product name or want to revert to the original system product name for some reason, you can do so by reverting the changes you just made. To do so, back up the registry and follow the steps below before making changes.
Step 1: Press the Win + R key to open the Run dialog.
Step 2: Type regedit in the search box and press the Enter button.
Step 3: After opening the Registry Editor on your computer, navigate to the following path:
HKEY_LOCAL_MACHINESOFTWAREMicrosoftWindowsCurrentVersionOEMInformation
Step 3: In the right panel of the OEMInformation key, right click the Model string value (REG-SZ) and select the Delete option.
Step 4: When a prompted message pops up, click the Yes button to confirm your action.
Bottom Line
As you can see, a complete guide on how to change system product name in Windows 11 is illustrated in the post. We hope this simple guide can help you. If you are stuck or need some help, please let us know and we will get back to you as soon as possible.
About The Author

Position: Columnist
Vega joined MiniTool as an editor after graduation. She enjoys helping people with computer problems, including disk management, data recovery, and more. She is constantly expanding her knowledge in related fields. And she will continue to bring more easy-to-understand professional articles to help people solve various problems on the PC.
In her daily life, Vega enjoys hanging out with friends, shopping online and listening to music. She is someone who knows how to enjoy life.
На панели настроек Windows под именем вашего компьютера в Windows 11 отображается необычный элемент «Имя продукта системы». Однако, если вы хотите изменить имя продукта системы Windows 11, вот как это можно сделать. Информацию OEM можно изменить с помощью редактора реестра.
По умолчанию производитель вашего компьютера указывает имя системы. Например, если у вас Microsoft Surface, имя Surface отображается под именем вашего компьютера. Однако, если вы собрали свой компьютер вручную, он отображает имя материнской платы на панели настроек Windows. Изменить имя компьютера в Windows 11 довольно просто. Однако, если вы хотите изменить имя системного продукта, которое отображается на панели настроек Windows, вам необходимо использовать редактор реестра.
Перед тем, как приступить к выполнению действий, рекомендуется сделать резервную копию всех файлов реестра.
Чтобы изменить название системного продукта Windows 11 в настройках Windows, выполните следующие действия:
- Нажмите Win + R, чтобы открыть окно «Выполнить».
- Введите regedit и нажмите кнопку Enter.
- Нажмите на опцию Да.
- Перейдите к OEMInformation в HKLM.
- Щелкните правой кнопкой мыши OEMInformation> New> String value.
- Назовите его Model.
- Дважды щелкните это строковое значение.
- Задайте данные значения как имя, которое вы хотите отобразить.
- Щелкните кнопку ОК.
- Перезагрузите панель настроек Windows.
Чтобы узнать больше об этих шагах, продолжайте читать.
Сначала вам нужно открыть редактор реестра на вашем компьютере. Для этого вы можете нажать Win + R, чтобы открыть диалоговое окно «Выполнить». Затем введите regedit в пустом поле и нажмите кнопку Enter. Затем, если появится запрос UAC, нажмите кнопку Да.
После открытия редактора реестра на вашем компьютере перейдите по следующему пути:
HKEY_LOCAL_MACHINE SOFTWARE Microsoft Windows CurrentVersion OEMInformation
В ключе OEMInformation вы можете найти строковое значение с именем Model. Однако, если вы не можете найти указанный ключ, вам необходимо создать его вручную. Для этого щелкните правой кнопкой мыши OEMInformation и выберите New> String Value.
Затем назовите его «Модель». Затем вам нужно изменить данные значения строкового значения модели. Для этого дважды щелкните по нему и установите данные значения в качестве имени, которое вы хотите отображать под именем вашего компьютера.
После этого нажмите кнопку ОК и перезапустите панель настроек Windows.
Если вы хотите отобразить имя по умолчанию, вам необходимо удалить ранее созданное строковое значение. Для этого щелкните правой кнопкой мыши на Модель Строковое значение и выберите Удалить вариант из контекстного меню. Затем нажмите на да кнопка.
Как изменить название производителя в Windows 11/10?
Чтобы изменить название производителя в Windows 11/10, вам необходимо использовать редактор реестра. Для этого откройте редактор реестра и перейдите по этому пути:
HKEY_LOCAL_MACHINE SOFTWARE Microsoft Windows CurrentVersion OEMInformation
После этого создайте строковое значение и назовите его Model. Затем дважды щелкните по нему, чтобы установить данные значения в качестве имени, которое вы хотите отобразить. После этого нажмите кнопку В ПОРЯДКЕ и перезапустите панель настроек Windows.
Как мне изменить название модели моего компьютера?
По умолчанию Windows 11 отображает название модели вашего компьютера на панели настроек Windows. Однако, если вы хотите его изменить, вы должны использовать вышеупомянутый метод. Для этого откройте редактор реестра и перейдите к OEMИнформация в HKLM. Затем дважды щелкните значок Модель String Value и задайте значение Value как имя, которое вы хотите отобразить. Какое бы имя вы ни указали в поле «Значение», оно будет отображаться на панели «Параметры Windows».
Это все! Надеюсь, это руководство помогло вам изменить название системного продукта в Windows 11.
Читайте: Как найти имя компьютера в Windows 11