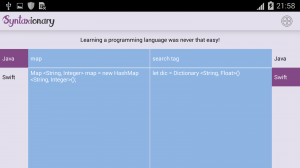
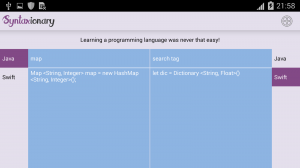
Update: Latest ActionBar (Title) pattern:
FYI, ActionBar was introduced in API Level 11. ActionBar is a window feature at the top of the Activity that may display the activity title, navigation modes, and other interactive items like search.
I exactly remember about customizing title bar and making it consistent through the application. So I can make a comparison with the earlier days and can list some of the advantages of using ActionBar:
- It offers your users a familiar interface across applications that the system gracefully adapts for different screen configurations.
- Developers don’t need to write much code for displaying the Activity Title, icons and navigation modes because ActionBar is already ready with top level abstraction.
For example:
=> Normal way,
getActionBar().setTitle("Hello world App");
getSupportActionBar().setTitle("Hello world App");  // provide compatibility to all the versions
=> Customizing Action Bar,
For example:
@Override
public void setActionBar(String heading) {
    // TODO Auto-generated method stub

    com.actionbarsherlock.app.ActionBar actionBar = getSupportActionBar();
    actionBar.setHomeButtonEnabled(true);
    actionBar.setDisplayHomeAsUpEnabled(false);
    actionBar.setDisplayShowHomeEnabled(false);
    actionBar.setBackgroundDrawable(new ColorDrawable(getResources().getColor(R.color.title_bar_gray)));
    actionBar.setTitle(heading);
    actionBar.show();

}
Styling the Action Bar:
The ActionBar provides you with basic and familiar looks, navigation modes and other quick actions to perform. But that doesn’t mean it looks the same in every app. You can customize it as per your UI and design requirements. You just have to define and write styles and themes.
Read more at: Styling the Action Bar
And if you want to generate styles for ActionBar then this Style Generator tool can help you out.
=================================================================================
Old: Earlier days:
=> Normal way,
you can Change the Title of each screen (i.e. Activity) by setting their Android:label
   <activity android:name=".Hello_World"
                  android:label="This is the Hello World Application">
   </activity>
=> Custom — Title — bar
But if you want to Customize title-bar in your own way, i.e. Want to put Image icon and custom-text, then the following code works for me:
main.xml
<?xml version="1.0" encoding="utf-8"?>
<LinearLayout xmlns:android="http://schemas.android.com/apk/res/android"
    android:orientation="vertical"
    android:layout_width="fill_parent"
    android:layout_height="fill_parent"/>
titlebar.xml
<?xml version="1.0" encoding="utf-8"?>
<LinearLayout xmlns:android="http://schemas.android.com/apk/res/android"
 android:layout_width="400dp"
  android:layout_height="fill_parent"
  android:orientation="horizontal">

<ImageView android:id="@+id/ImageView01"
            android:layout_width="57dp"
            android:layout_height="wrap_content"
            android:background="@drawable/icon1"/>

<TextView

  android:id="@+id/myTitle"
  android:text="This is my new title"
  android:layout_width="fill_parent"
  android:layout_height="fill_parent"
  android:textColor="@color/titletextcolor"
   />
</LinearLayout>
TitleBar.java
public class TitleBar extends Activity {

    @Override
    public void onCreate(Bundle savedInstanceState) {
        super.onCreate(savedInstanceState);
        final boolean customTitleSupported =
                requestWindowFeature(Window.FEATURE_CUSTOM_TITLE);
        setContentView(R.layout.main);
        if (customTitleSupported) {
            getWindow().setFeatureInt(Window.FEATURE_CUSTOM_TITLE,
                R.layout.titlebar);
        }
        final TextView myTitleText = (TextView) findViewById(R.id.myTitle);
        if (myTitleText != null) {
            myTitleText.setText("NEW TITLE");
            // user can also set color using "Color" and then
            // "Color value constant"
            // myTitleText.setBackgroundColor(Color.GREEN);
        }
    }
}
strings.xml
The strings.xml file is defined under the values folder.
<?xml version="1.0" encoding="utf-8"?>
<resources>
    <string name="hello">Hello World, Set_Text_TitleBar!</string>
    <string name="app_name">Set_Text_TitleBar</string>
    <color name="titlebackgroundcolor">#3232CD</color>
    <color name="titletextcolor">#FFFF00</color>
</resources>
Всем привет!
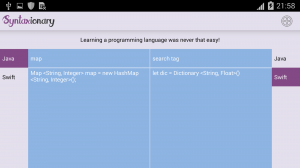
Сегодня я поделюсь с вами очень общей задачей. Как настроить ActionBar на Android. Мы изменим макет, шрифт, размер текста, цвет текста, добавим к нему прослушиватель, вернемся назад, скроем заголовок и домашний значок.
В конце у нас будет что-то вроде этого:
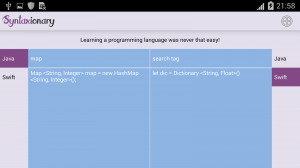
Что ж, давайте начнем с изменения некоторых настроек API.
Загрузка шрифта
Прежде всего, перейдите к 1001freefonts и загрузите шрифт, который вы хотите применить к своему тексту. Это свободно!
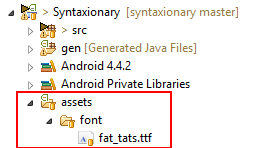
После загрузки создайте папку с именем font в папке assets в корне вашего проекта. (создайте его, если он еще не существует) Это выглядит так: имя проекта> assets> font> yourfont.fft
Создание пользовательских цветов
Мы хотим изменить цвет нашего шрифта также. Поэтому по этой причине создайте два цвета в вашем файле strings.xml следующим образом:
|
1 2 |
|
Создание пользовательского макета ActionBar
Поскольку мы хотим настроить наш actionBar, нам нужно будет создать для него индивидуальный макет. Поэтому в папке макета создайте новый файл layout.xml с именем custom_action_bar.xml следующим образом:
|
01 02 03 04 05 06 07 08 09 10 11 12 13 14 15 16 17 18 19 20 21 22 23 24 |
|
Создать createCutomActionBarTitle () в вашей деятельности
Создайте этот метод и включите для setDisplayShowCustomEnable значение true и для setDisplayShowTitleEnable значение false. Затем накачайте созданный выше файл custom_action_bar.xml. Прочитайте ваш новый загруженный шрифт и установите его в textviews. По крайней мере, добавьте его в панель действий. Сделано с макетом.
|
01 02 03 04 05 06 07 08 09 10 11 12 13 14 |
|
Добавление поведения и навигация назад
Недостаток настраиваемых ActionBars заключается в том, что вам нужно беспокоиться обо всем. Включая поведение по умолчанию, такое как возврат назад и включение действий для новых вставленных текстовых представлений. Мы сделаем это сейчас. Обычно вы переходите от действия к действию и после того, как что-то делаете, вы хотели бы дать пользователям возможность вернуться назад, коснувшись заголовка actionBars. Для этого улучшите метод createCustomActionBarTitle следующим образом:
|
01 02 03 04 05 06 07 08 09 10 11 12 13 14 15 16 17 18 19 20 21 22 23 24 25 26 27 28 29 30 31 |
|
Добавление метаданных в файл манифеста
Мы почти закончили. Чтобы иметь возможность вернуться назад, нам нужно написать запись в файле манифеста. YourTargetActivity – это действие, которое будет вызываться, когда мы нажимаем заголовок actionBars. В нашем случае это будет выглядеть так:
|
01 02 03 04 05 06 07 08 09 10 11 |
|
Вот и все! надеюсь, вам понравится! Приложение для загрузки здесь:
Here is a simple example that shows how you can change title and subtitle textcolor and its size in Android
Method 1
Changing the styles [For support Library]
Go to Values/styles.xml copy this code to change the textcolor and actionbar background color.
<style name="CustomActivityTheme" parent="@style/Theme.AppCompat.Light">
	 <item name="android:actionBarStyle">@style/MyActionBar</item>
	 <item name="actionBarStyle">@style/MyActionBar</item>
	 <item name="android:windowActionBarOverlay">true</item>
	 <!-- other activity and action bar styles here -->
 </style>

 <!-- style for the action bar backgrounds -->
 <style name="MyActionBar" parent="@style/Widget.AppCompat.Light.ActionBar">
	 <item name="android:background">@drawable/actionbar_background</item>
	 <item name="background">@drawable/actionbar_background</item>
	 <item name="android:titleTextStyle">@style/MyTheme.ActionBar.TitleTextStyle</item>
	 <item name="android:subtitleTextStyle">@style/MyTheme.ActionBar.TitleTextStyle</item>
	 <item name="titleTextStyle">@style/MyTheme.ActionBar.TitleTextStyle</item>
	 <item name="subtitleTextStyle">@style/MyTheme.ActionBar.TitleTextStyle</item>
 </style>

 <!-- Text -->
 <style name="MyTheme.ActionBar.TitleTextStyle" parent="@android:style/TextAppearance">
	 <item name="android:textColor">@color/color_title</item>
	 <item name="android:textSize">12sp</item>
 </style>
Note : For applying theme if you are not using the Support Library then change the AppCompat to Holo.
i.e make the Below changes in the parent
parent="@android:style/Theme.Holo.Light"
for ActionBar
parent="@android:style/Widget.Holo.Light.ActionBar"
for title
parent="@android:style/TextAppearance.Holo.Widget.ActionBar.Title"
Now Apply this theme in the AndroidManifest.xml, either for the entire application or a particular activity.
For example
 <application android:allowBackup="true" android:icon="@drawable/ic_launcher" android:label="@string/app_name" android:theme="@style/CustomActivityTheme" >
        <activity android:name="com.example.actionbarcustomize.MainActivity" android:label="@string/app_name" >
            <intent-filter>
                <action android:name="android.intent.action.MAIN" />

                <category android:name="android.intent.category.LAUNCHER" />
            </intent-filter>
        </activity>
 </application>
Make Sure you add the colors in the strings.xml
<?xml version="1.0" encoding="utf-8"?>
<resources>

    <string name="app_name">ActionBarCustomize</string>
    <string name="hello_world">Hello world!</string>
    <string name="menu_settings">Settings</string>

    <drawable name="actionbar_background">#FF0000</drawable>
    <color name="color_title">#00FF00</color>

</resources>
You can use a simple java code to so this.
getActionBar().setTitle(Html.fromHtml("<font color='#ff0000'>ActionBartitle </font>"));
Note : Change getActionBar() to getSupportActionBar() if you are using the support library for ActionBar.
That’s all.. Now Run the application and see the changes.
Hi there!
Today i’m gonna share a very common task with you. How to customize an ActionBar on Android. We will change layout, font, textsize, textcolor, add listener to it, navigate back, hide title and home icon.
At the end we will have something like this:
Well, lets start by changing some API provided settings.
Downloading Font
First of all, go to 1001freefonts and donwload a font you want to apply to your text. It is free!
After downloading, create a folder called font into the folder assets in your projetct’s root. (create it, if not exists already) It looks like this: projectname>assets>font>yourfont.fft
Creating custom colors
We want to change the color of our font also. So for this reason, create two colors in your strings.xml file like this:
<color name="selected">#824986</color>
    <color name="unselected">#E4DFEC</color>
Creating custom ActionBar Layout
As we want to customize our actionBar, we will need to create a customized layout for it. So in your layout folder, create a new layout.xml file called custom_action_bar.xml like this:
< ?xml version="1.0" encoding="utf-8"? >
 < LinearLayout xmlns:android="http://schemas.android.com/apk/res/android"
    android:id="@+id/actionBar"
    android:layout_width="match_parent"
    android:layout_height="match_parent"
    android:gravity="center"
    android:paddingLeft="5dp"
    android:paddingTop="7dp"
    android:orientation="horizontal" >
    < TextView
        android:id="@+id/titleFragment1"
        android:layout_width="wrap_content"
        android:layout_height="wrap_content"
        android:text="Syntax"
        android:textSize="20sp"
        android:textColor="@color/selected" / >

    < TextView
        android:id="@+id/titleFragment2"
        android:layout_width="wrap_content"
        android:layout_height="wrap_content"
        android:textSize="20sp"
        android:text="ionary" / >
< / LinearLayout>
Create createCutomActionBarTitle() in your Activity
Create this method and enable setDisplayShowCustomEnable to true and setDisplayShowTitleEnable to false. Then inflate the above created custom_action_bar.xml file. Read your new downloaded font and set it to the textviews. At least add it to the actionBar. Done with the layout.
    private void createCutomActionBarTitle(){
        this.getActionBar().setDisplayShowCustomEnabled(true);
        this.getActionBar().setDisplayShowTitleEnabled(false);

        LayoutInflater inflator = LayoutInflater.from(this);
        View v = inflator.inflate(R.layout.custom_action_bar, null);

        Typeface tf = Typeface.createFromAsset(getAssets(),"font/yourfont.ttf");
        ((TextView)v.findViewById(R.id.titleFragment1)).setTypeface(tf);
        ((TextView)v.findViewById(R.id.titleFragment2)).setTypeface(tf);

        //assign the view to the actionbar
        this.getActionBar().setCustomView(v);
    }
Adding behaviors and navigate back funcions
A disavantage of customized actionBars is that you have to worry about everything. Including default behaviors like navigating back and enabling actions on the new inserted TextViews. We will do this now. Normally you navigate from activity to activity and after doing something you’d like to give the possibility to the users to navigate back over touching the actionBars title. To do so, enhance the method createCustomActionBarTitle like this:
private void createCutomActionBarTitle(){
        this.getActionBar().setDisplayShowCustomEnabled(true);
        this.getActionBar().setDisplayShowTitleEnabled(false);

        LayoutInflater inflator = LayoutInflater.from(this);
        View v = inflator.inflate(R.layout.action_bar_contribution, null);

        Typeface tf = Typeface.createFromAsset(getAssets(),"font/fat_tats.ttf");
        TextView frag1 = (TextView)v.findViewById(R.id.titleFragment1);
        frag1.setTypeface(tf);
        TextView frag2 = (TextView)v.findViewById(R.id.titleFragment2);
        frag2.setTypeface(tf);

        frag1.setOnClickListener(new OnClickListener() {
            @Override
            public void onClick(View v) {
                startActivity(new Intent(YourCurrentActivity.this, YourTargetActivity.class));
                finish();
            }
        });
        frag2.setOnClickListener(new OnClickListener() {
            @Override
            public void onClick(View v) {
                startActivity(new Intent(YourCurrentActivity.this, YourTargetActivity.class));
                finish();
            }
        });

        //assign the view to the actionbar
        this.getActionBar().setCustomView(v);
    }
Adding MetaData to the Manifest file
We are almost done. To be able to navigate back, we need to write an entry in the manifest file. The “YourTargetActivity” is the activity that will be called, wenn we press the actionBars title. In our case it would look like this:
< activity android:label="yourActivityLabelName"
android:name="your.package.YourActivity"
android:parentactivityname="your.package.YourTargetActivity"
android:screenorientation="landscape"
android:windowsoftinputmode="stateHidden" >


            < meta-data android:name="android.support.PARENT_ACTIVITY"
                 android:value="your.package.YourTargetActivity" >
        < / meta-data>
< / activity>
That’s all! hope you like it! The application to download is here:
3-й курс/Закрытая зона
Немного теории
Прячем и показываем ActionBar
Устанавливаем заголовок и подзаголовок
Программно меняем цвет текста в заголовке
Используем Drawable
Добавляем элементы в ActionBar
Добавляем в меню переключатели
Программное добавление элементов
Split action bar
Используем значок приложения как элемент навигации
Добавляем поле для поиска
Добавляем вкладки
Выпадающий список
Обычный Spinner
Используем правильный Context для ActionBar
CustomView
Узнать высоту панели
Немного теории
Начиная с Android 3.0 (API 11), в приложениях появилась возможность использовать панель действий ActionBar, которая сочетает в себе заголовок и меню, упрощая навигацию и предоставляя быстрый доступ к частым операциям.
ActionBar заменяет Options Menu, которое было в ранних версиях Android, используя новые дополнительные параметры для меню. По умолчанию, новые проекты, создаваемые через шаблоны Empty Activity и др., уже содержат ActionBar. Следует отметить, что в Android 5.0 появился новый компонент Toolbar, который является дальнейшим развитием ActionBar. И он активно вытесняет панель действий. Но вам всё равно следует изучить работу ActionBar, так как основные принципы работы завязаны на ней.
Если запустить программу как есть из шаблона Empty Activity, то увидим заголовок программы.
Если в код программы добавить методы для меню, то справа появится значок из трёх вертикальных точек.
Если щёлкнуть по значку из трёх точек, выстроенных по вертикали, то увидим всплывающее меню с единственным пунктом Settings. Не прикладывая никаких усилий, мы получили готовый элемент ActionBar в своём приложении.
Давайте разбираться, что происходит за кулисами приложения. За появление панели действий отвечает тема Theme.Holo или её производные. В API 21 и выше произошли небольшие изменения. Как я уже сказал выше, появился новый компонент ToolBar, который может заменить панель действий в активности. Поэтому тут нужно быть внимательным и выбирать соответствующую тему, например, Theme.Material.Light.DarkActionBar. Для старых устройств используются библиотеки совместимости. В этом случае активность наследуется от AppCompatActivity, а используемая тема Theme.AppCompat или его производные, например, Theme.AppCompat.Light.DarkActionBar.
В студии версии 4.1 снова всё поменяли и теперь используется тема Theme.MaterialComponents.DayNight.DarkActionBar.
Прячем и показываем ActionBar
Изначально существовали два вида ActionBar для новых устройств и для старых устройств при помощи библиотеки совместимости. Не смешивайте вызовы методов из разных классов, а то получите ошибку. На сегодняшний день студия создаёт проекты с применением библиотеки AndroidX, поэтому будем использовать классы из неё.
Чтобы увидеть разницу в активности с ActionBar и без неё, напишем простой пример. Добавим на форму компонент ToggleButton и пропишем код, скрывающий и показывающий ActionBar:
Вы вошли на сайт, как гость.
Необходимо зарегистрироваться, чтобы прочитать статью


