Last updated on 26 October 2022
When working with videos on DaVinci Resolve, it’s essential to ensure you are using the correct frame rate that your camera shot the footage in. Mixing frame rates is a big no-no, not a good way to start a project.
This easy tutorial will show you how to change the frame rates when using DaVinci Resolve for your video editing.
From animating to video editing, there’s no limit to what you can do with DaVinci Resolve. The platform features different tools and allowing you to adjust the frame rate is one of them.
Follow the steps below to change the frame rates of your clip with DaVinci Resolve.
800+ DaVinci Resolve Animated Elements
Over 800 unique drag & drop animations that work directly in DaVinci Resolve. Improve your video editing with professional video editing tools. No need to hire animators at a high cost & look more professional.
Provided in Apple ProRes 4444 + Alpha channel, MP4 H264 & PNG Photos.

Get 30% off – $84 $49
What is Frame Rate?
A video is an illusion of images being displayed quickly per second otherwise known as FPS (frames per second). The frame rate is also used on cameras to measure how many of these images are captured in a second. So, if you have a video with 24 frames per second, this means 24 images are playing rapidly per second.
The more advanced your camera is, the higher the rates would be, set at 60 or even as high as 1000fps.
Shooting in high frame rates are strictly for capturing more frames so you can slow down the footage otherwise known as Slow Motion. You will never have a project in DaVinci Resolve in slow motion frame rates such as 120fps+.
The only video editors that use high frame rate projects are Gamers because they love the 60fps and 120fps games. When they make gaming videos, they want to get the same feel as the game.
Most editors will ever use frame rates over 30fps as a base project and for good reason. It just looks like Emmerdale or some other lame TV show. Movies are more favourable in 24fps, this is why most films have only ever stuck by the 24fps rule.
Learn more about frame rates.
Favourable Frame Rates
The most popular frame rates to use for video editing are 24fps (Film), 25fps (PAL), 30fps (NTSC).
It’s a bit of confusion around the world on which frame rates to use and when. It usually depends on your country and the refresh rates of your lights when filming.
Personally, I find 30fps to look too “smooth”. I always shoot in multiples of 25fps then edit my videos in 25fps.
Rules for Frame Rates
Stick by your cameras frame rate
If the footage is in 25fps, then you should have your project in 25fps. If you are shooting slow motion such as 50fps or 100fps, still keep your project in 25fps and slow your footage down.
If you slow 50fps footage by 50% in a 50fps project, the footage will appear jumpy to the rest that is playing in normal motion. Slow motion frame rates are only used to capture more frames to use slow motion.
Do not have a higher project frame rate than 30fps
Your frame rates should only vary from 23.987 to 30fps. It’s the most favourable range unless you’re a gamer. Movies are mostly always 24fps, UK and some other countries are always 25fps and the US are around 30fps.
Do not mix frame rates in your timeline
Mixing frame rates causes all sorts of issues. If you’ve ever seen a video and noticed frames looking jumpy, or some frames freezing, they’ve probably mixed framerates. It’s good practice to stick to multiples of what your framerate is. Therefore, you won’t have any issues with the final render.
It’s not always bad, sometimes it’s hard to notice mixed frame rates, but it’s not a good practice at all. Of course, if you have to then do it, but avoid it as much as possible.
You can only do this if you have no clips in your timeline. Is your timeline frame rate unclickable? Scroll down to ‘Why is my timeline frame rate option greyed out?‘
1. Go to ‘File‘ > ‘Project settings…‘

2. Edit your timeline framerate

Why is my timeline frame rate option greyed out?
You can only do this if you have no clips in your timeline. Unfortunately, this is just the way Davinci Resolve works. If you need to change the timeline framerate, you need to create a new timeline:
1. Right-click in your media pool > click ‘Create new timeline‘

2. Deselect ‘Use Project Settings‘

3. Click on the ‘Format’ tab and change the frame rate

4. Click ‘Create’ and copy your old timeline to your new timeline
You can do this easily by double-clicking on your old timeline, selecting all by ‘CMD + A‘ on Mac and ‘CRL + A‘ on Windows, then pasting it in the new timeline by using ‘CMD + V‘ on Mac and ‘CRL + V‘ on Windows.
Summary
There you have it. It’s not the easiest, but I’ve tried to make the steps really simple for you. Hope this helps.
Related
You may have noticed that while it is a powerful tool, it is not always as simple as you might expect to adjust the frame rate in DaVinci Resolve. If you are having trouble understanding how to change the timeline frame rate or even the frame rate of your clips or project itself, you are not alone.
In this article, not only will you learn how to do all of the above. You’ll also understand how to deal with a project using footage with different frame rates, and why templates come at one frame rate, while your project is at another.

Part 1: How to Set Your Project Frame Rate in DaVinci Resolve
In many projects, the frame rate will have been selected in pre-production, so this step will already be clear. If this isn’t the case for you, now is the time to decide for certain which frame rate you will use to edit and deliver your project.
Step 1: How to Choose the Right Frame Rate
Choosing your frame rate in advance will save you a lot of time from potentially having to redo work, especially since in DaVinci Resolve you cannot change your project frame rate once it’s been set. To help you to decide, you can consider the frame rate specifications for different distribution platforms.
- The US uses 23.976 frames per second in general
- Usually, Europe and some of Asia use 25 frames per second
- YouTube and Vimeo both support videos uploaded at a higher frame rate but will play them back at a maximum of 60 frames per second.
Remember to double-check the individual delivery specifications of any film festivals, broadcasters, or theaters where you will be sharing your film project.
Step 2: Project Setup
In DaVinci Resolve, it’s important to set your project frame rate correctly; it cannot be changed after importing any media. If you have DaVinci 16, you can start a timeline with a different frame rate later, but it’s better to get the first step right and save yourself time later.
- Bring up your Project Manager window by selecting File > Project Manager.
- Start a new project by clicking on the New Project button.
- Name your new project and confirm.
- Before importing any materials, click on the cog icon in the bottom right corner
- Select the Master Settings tab.
- Set Timeline Frame Rate to 23.976 fps (or whatever your chosen frame rate is). Remember, once you import any media, you will be unable to change this.
- Make sure your Playback Frame Rate matches your Timeline Frame rate.
- Select Save.
Step 3: Adjust Your Clip(s) Frame Rate
If your footage does not match the frame rate you have selected for your project, you do not have to be concerned. DaVinci Resolve is designed to automatically handle clips of different frame rates in a timeline. Resolve will ensure everything plays back at normal speed at the timeline frame rate.
As an example, if you have a 30 fps timeline and you have some clips that are 30 fps, some at 23.97fps, and some at 60fps all the clips will play at normal speed on the 30 fps timeline. To achieve this DaVinci will create extra frames for the 23.97 fps clips using the frame interpolation settings of the retime process (nearest, frame blend, or optical flow. As set in the project settings) and it will drop every second frame of the 60 pfs clips.
In some cases, this may not be what you want to achieve, for example, if you intended your 60 fps clips to be slow motion b-roll and play at half speed. In this case, you need to change the frame rate of the clip in the media pool or media tab to match the timeline frame rate using the steps below. After changing it the clip will use every frame and play at half speed on your 30 frames per second timeline. It is important to note that the audio will remain unchanged and be out of sync with the footage.
- In the media pool or Media tab click on the FPS (frames per second) column title to group together any clips that share the same FPS value.
- Select clips sharing the same FPS value that you want to adjust, e.g. 60 fps. Press Ctrl as you click on the files to select multiple clips.
- Right-click on your selection and choose Clip Attributes from the dropdown menu.
- Adjust Video Frame Rate row to your timeline frame rate, e.g. 30 fps.
Step 4: Retime Your Clip
- Make sure you are on the Edit tab and are in the timeline you want to adjust
- Select the clip where you want to adjust the speed on your timeline
- Press Control + R on your keyboard to open up speed settings for the clip
- Click on the arrow next to the percentage value.
- Hover over Change Speed from the dropdown menu, and select the new playback speed you want. Remember, sticking to a multiple of 100 will make playback smoother.
Step 5: Play the Same Clip at Different Frame Rates
If you want the same clip to play at two different frame rates within the same project, it’s not enough to duplicate it within the timeline. Any changes you make to one clip’s frame rate will apply to all instances of it within the timeline, even if you copy and paste it within the Edit tab before making the changes.
- Click on the Media Pool tab to view your media
- Select the clip you want to adjust, and press Control + C followed by Control + V to duplicate the clip
- Rename each clip so you know which one to playback at which frame rate. Click once on the file name to rename, and press enter when you’re done.
- Follow the instructions from Step 3 for each clip so each will playback at the desired frame rate.
- Drag each clip into your timeline separately where you want the different speed versions of it to appear.
Part 2: Pro Tips & Troubleshooting
Maybe you’d already started to edit when you realized that your timeline wasn’t set to the correct frame rate. It used to be the case that you would need to start a whole new project with the right frame rate, but in DaVinci Resolve 16 there is a fix for this.
- Make sure you have already opened your chosen project.
- Click Control + N to start a new timeline and give it a name.
- Click on the Use Custom Settings button and go to the Format tab.
- Select the frame rate you need from the Timeline Frame Rate dropdown menu and hit Create.
- Go back to your old timeline using the dropdown menu above the preview panel.
- Click and drag to select everything on your old timeline and press Control + C to copy it.
- Navigate back to your new timeline on the same dropdown menu, and click Control + V to paste your old timeline media onto your new timeline.
As you can see, there are a number of elements to consider when learning how to change the frame rate in DaVinci Resolve 16.
Now that you know more about how frame rates interact with your projects and media within DaVinci Resolve, you’re well prepared to troubleshoot any frame rate issues you might meet along the way. Also, check out a nice way to speed up your project workflows with Dynamic Project Switching in DaVinci Resolve.


Choosing the correct frame rate for your final delivery is very important.
In fact, choosing the correct frame rate should start right before shooting a single video in your camera – be it mirrorless, DSLR, drone, action cameras, smartphones, etc., or screen recording software like OBS Studio.
Or if you are working for a client, it’s a good practice to ask and get the frame rate of your project right before importing your footage into DaVinci Resolve.
Today we’ll see how to set frame rates, change frame rates in the middle of a project, export in different frame rates and many more!
Let’s dive right in.
What is Frame Rate?
Frame Rate is number of images (frames) captured in a second by a camera. So when you capture a 24 frames per second video and play it back – you’ll see 24 images displayed rapidly in a second, resulting in an illusion of a video.
Hopefully, you might have cameras like DSLR, mirrorless, Go Pro, DJI Mavic, or smartphone, which are capable of recording videos at a particular frame rate, say 60 FPS, 23.976 FPS, 120 FPS, etc.
After capturing video, you edit and color grade it, add some visual effects, sound design and export it (final delivery).
So it is ESSENTIAL to know the frame rate at which you’ll edit and export.
If you’re targeting your final render to be uploaded at Youtube – 23.976 FPS should be fine.
23.976 frames per second will result in a motion blur which mimics the film look we are accustomed to.
So if you are not sure what frame rate to consider, you can safely SHOOT and EDIT in 23.976 FPS.
Where to Change or Set Frame Rate in DaVinci Resolve?
You can set or change frame rate at 3 different places in DaVinci Resolve:
- Project level
- Timeline level
- Clip level
Related Article:
Essential DaVinci Resolve Project Settings (For Beginners!)
How to Set or Change Project Timeline Frame Rate Before Importing Any Clips
Project timeline frame rate refers to the frame rate of the timelines inside any given project.
(Your project could have only one timeline or a group of them, according to your requirement.)
The frame rate is always changed or set before importing any clips into the media pool.
This is how you set project frame rate in DaVinci Resolve:
- Click on “File” > “Project Settings” (short cut for project settings is “Shift + 9“).
- Click on “Master Settings“.
- Under “Timeline Format“, there is a “Timeline Frame Rate” dropdown.
- Choose your required frame rate, say, 23.976 FPS from the dropdown.
- Click on “Save“.
Your project timeline frame rate is now set to the required value.
You are good to go ahead and import your required clips.
After you import one or more clips, you’ll note that the timeline frame rate is now locked out under “Project Settings”!
Why is Timeline Frame Rate Greyed Out in Resolve?
The timeline framerate will be disabled or greyed out once you import your footage into the media pool.
After importing, you won’t be able to change the timeline frame rate. This is how it is in DaVinci Resolve!
It’s very important that you know your target frame rate beforehand and set it accordingly.

So choose the correct frame rate before importing the footage into your media pool.
You can still change the frame rate at this stage. All you have to do is delete all the imported clips from the “Media Pool”.
Then go to “Project Settings” -> “Master Settings” -> “Timeline Frame Rate” = It should now be enabled for you to choose the correct frame rate.
But if you’re into the middle of editing and would like to change the frame rate, then there is a work-around.
How to Change the Timeline Frame Rate During the Middle of a Project in Resolve?
You can’t change your existing timeline’s fps (frames per second); however, you can create a new timeline, set your required frame rate, and copy all the clips from your existing timeline to the new one.
Here’s how to change the frame rate of your timeline during editing:
- Under the “Edit” page, click on the “Media Pool” tab.
- Go to the menu “File” -> “New Timeline” (shortcut for the new timeline is “Ctrl + n” or “Cmd + n”).
- Enter the appropriate name.
- Uncheck “Use Project Settings“. This will reveal different tabs like “General”, “Format”, “Monitor”, “Output” etc.
- Click on “Format“.
- Select your desired frames per second from the “Timeline Frame Rate” dropdown.
- Click on “Create“.

- An empty timeline is created.
- Now go back to your timeline with all the edits using the dropdown from the top of the timeline viewer.
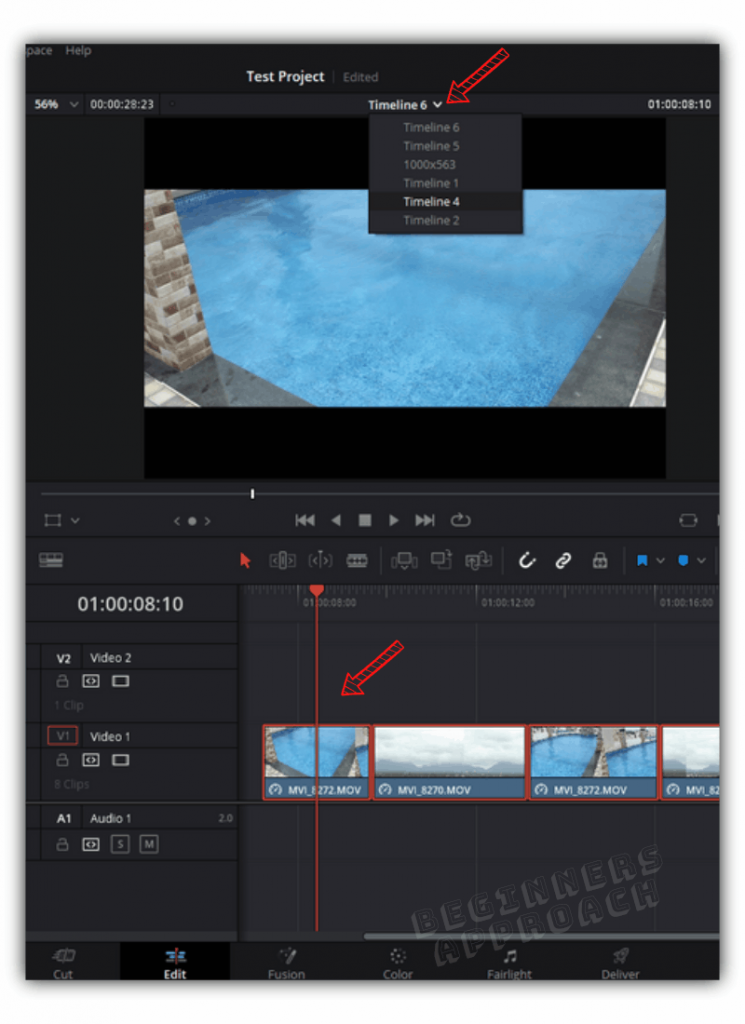
- Copy all the clips by pressing “Ctrl + a” or “Cmd + a”.
- Go to the new timeline by selecting it from the timeline viewer dropdown.
- Press “Ctrl + v” or “Cmd + v”.
- All the clips will now be copied with your new frame rate to the new timeline!
Keep in mind that the new frame rate is only applicable to this particular timeline.
The project timeline frame rate is still the same that is greyed out (and not the new one that you just set while creating a new timeline).
Any new timeline created will still follow the project timeline frame rate unless you uncheck the project settings manually, as discussed above.
Till now, we have seen how to change the frame rate for an individual timeline and project timeline (collection of your created timelines).
Now let’s see how to change the frame rate (fps – frames per second) of a specific clip.
How to Change the Frame Rate of a Clip in DaVinci Resolve?
- Under the “Edit” page, click on “Media Pool”.
- Select your desired clip (or select a group of clips with the help of “Ctrl”/ “Cmd”).
- Right-click on the selected clip(s) and click on “Clip Attributes…“
- Click on the “Video” tab.
- Under “Video Frame Rate“, select your desired frame rate and click on “Ok”.
- Done!
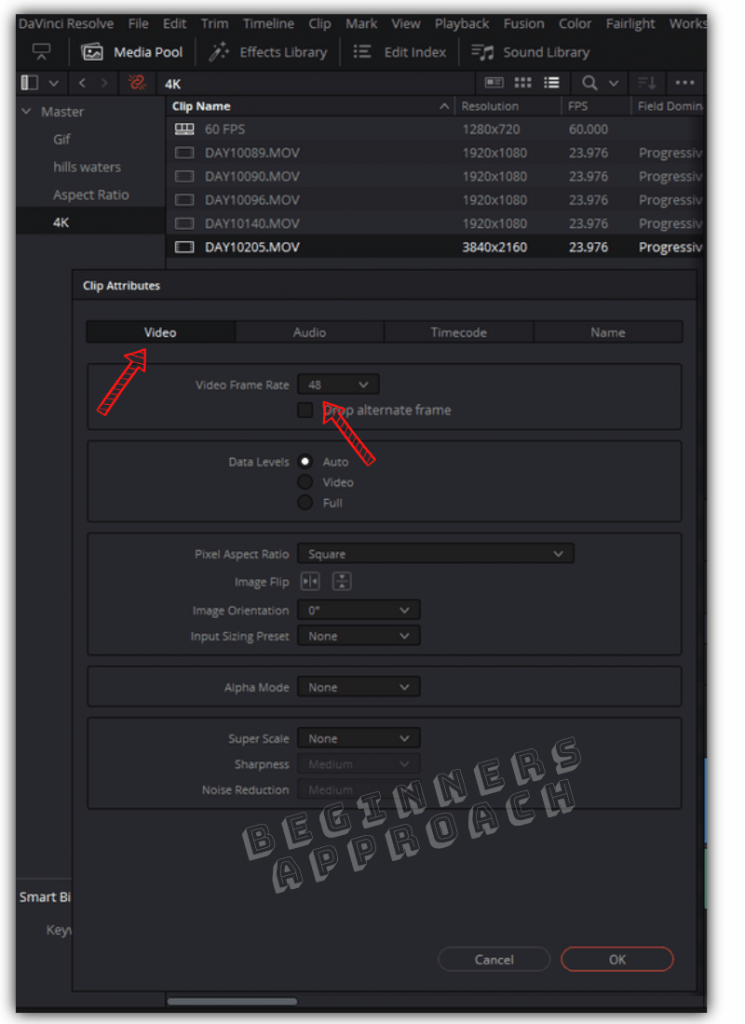
The clip(s) is now updated to the new frame rate.
(You can also do the same operation when the clips are placed in the timeline. Just select your required clips and select “Clip Attributes”.)
The “Clip Attributes” reveal the properties of a clip.
Once you update the frame rate, Resolve will re-interpret the clip with the new frame rate.
When you change the frame rate of a clip, keep in mind:
- The duration of the clip might change.
- The audio of the clip will not be affected. Meaning, if you change the frame rate, the duration of the video may change, but the audio duration remains the same (which might cause out-of-sync issues).
Incoming Clips’ Frame Rate Doesn’t Match with the Project Timeline Frame Rate
After creating a new project, when you import a clip with a different frame rate (other than the one defined in the project timeline frame rate from “Master Settings” under “Project Settings”) into Resolve, then you’ll get a warning:
“The selected clips have a different frame rate to the project. Would you like to change your timeline frame rate to match? You can’t undo this action.”
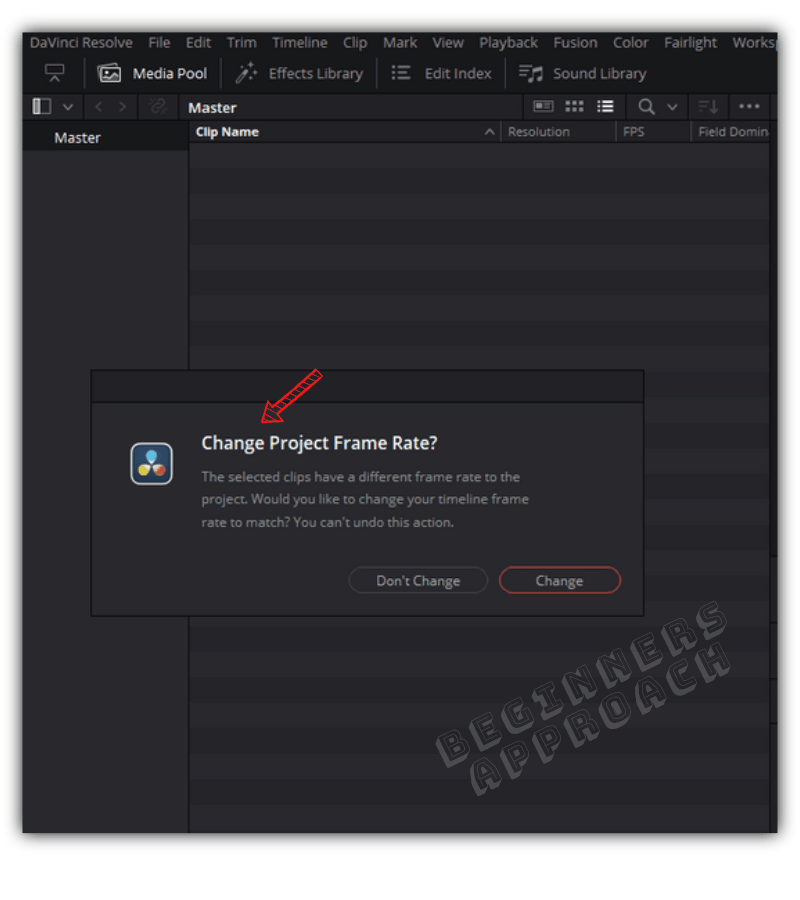
Clicking on “Change” will update the project timeline frame rate with the clip’s frame rate.
Clicking on “Don’t change” will not affect the project timeline frame rate.
If you are sure and would like to have the clip’s frame rate for your final delivery, then click on “Change”. Once done, your frame rate will be locked and greyed out.
Even if you import clips with different frame rates, you won’t get this warning again. These clips will be conformed to the frame rate chosen earlier.
When you go to “Master Settings“, you’ll also notice “Playback Frame Rate” dropdown, which also contains the frame rate (it is independent of the timeline frame rate.)
What is Playback Frame Rate?
Playback frame rate is the frames per second value you set to be output to your monitor (or other external displays).
This doesn’t affect the timeline frame rate or the frame rate of your footage. It is merely for external displays (like your desktop monitor).
Then what is the difference between Timeline Frame Rate and Playback Frame Rate?
Timeline Frame Rate Vs Playback Frame Rate in DaVinci Resolve
The timeline frame rate represents the number of frames per second of your clips in the timeline as required for your final delivery.
The playback frame rate is the number of frames per second your clips will play on your monitor (external display), which is based on the refresh rate (hertz).
For example, let’s say you have a 4K timeline with 23.976 FPS. If you have a 1080p monitor with a 60 Hz refresh rate, it can smoothly display 23.976 fps without any issues (in fact, frame rates up to 60 fps will have no problem in your display).
Anything beyond that will result in, what is called “screen tearing” (but the monitor will still display what it is capable of).
The timeline frame rate can not be changed after importing your files into the timeline.
But the playback frame rate can be changed at any time based on your external display needs.
(If you don’t understand the above technical concept, then let’s keep it simple – keep your playback frame rate the same as the timeline frame rate. That’s it! Once you get the hang of working in Resolve or any video editor, you’ll figure out the difference through your experience).
How to Change Export Frame Rate in DaVinci Resolve?
- Go to the “Deliver” page.
- Click on the “Video” tab.
- Select your desired frame rate from the “Frame Rate” dropdown.
Keep in mind that the frame rate shown on the “Deliver” page will be what you set your project timeline frame rate to be.
If you set your project frame rate to 60 fps, the “Deliver” page will show only the 60 fps option for the export frame rate.
If you set your project frame rate to 23.96 fps, the “Deliver” page will let you choose “23.976”, “24”, and “29.97 (3:2)”.
The general rule is that you won’t be able to select a new frame rate for export, like 60 fps, when your timeline is 24 fps (at the time of this writing).
You have to change the frame rate to the required one by creating a new timeline, assembling all the clips, editing, and then exporting to the desired frame rate (already discussed above).
Mixed Frame Rates in DaVinci Resolve
When you have footage shot at different frame rates like 24 fps, 60 fps, 120 fps, etc, there are many questions that need to be answered like which frame rate to choose for the timeline, which frame rates need to be converted, etc.
Which Timeline Frame Rate to Choose When There Are Mixed Frame Rates in DaVinci Resolve?
- Go to the “Media Pool“. Import all of your clips.
- Click the “List View“. Scroll to the right till you see the “FPS” column.
- Click on the “FPS” header to sort the column in ascending or descending order.
If the majority of your clips are in 24 fps, and you want the final render to be in 24 fps, then you should set the project timeline frame rate to 24 fps.
Import all the clips with different frame rates into the media pool.
Now you need to make a decision of what to do with 60 and 120 fps footage.
If you place them in the timeline, they might not play back the way you intended.
Most probably, you shot them in higher frame rates (60 and 120) for a stylistic slow-motion effect.
If this is the case, then you’ll have to change the 60 and 120 fps clips to 24 fps through the “Clip Attribute” settings (as discussed above).
Now when you place them in the timeline, they play back in 24 fps which will result in buttery smooth slow motion!.
Variable Frame Rates in DaVinci Resolve
DaVinci Resolve doesn’t support variable frame rate footage.
Variable frame rate footage is shot by smartphones and screen recording software like OBS Studio.
When you try to import these clips, either Resolve will show media offline error or cause audio sync issues.
Read this post, “6 Ways to Fix DaVinci Resolve Media Offline Issue” on how to convert variable frame rate footage into constant frame rate.
Conclusion
The best way to have a smooth workflow is to determine the target frame rate before you start production.
For example, you can shoot the majority of the footage at 23.976 fps and slow-motion stylistic footage at 60, 120, or 240 FPS.
In this way, when you start editing, you can set the project timeline frame rate to 23.976 and convert the 60, 120, and 240 fps footage into 23.976 for a slow-motion effect through “Clip Attributes”.
You may also be interested in the below posts:
Zoom Techniques in DaVinci Resolve (Each Under 2 Minutes!)
How to Crop in DaVinci Resolve (In Less Than 2 minutes!)
Quickly Reverse / Rewind in DaVinci Resolve (Important Tips)
How to Change Resolution in DaVinci Resolve (Quickly!)
Change Aspect Ratio in DaVinci Resolve: (Cinematic Look)
How to Move DaVinci Resolve Projects & Databases (Quick Tips)
How To Recover DaVinci Resolve Lost Projects (Crash Recovery!)
Does DaVinci Resolve Support Gif? (Here’s How to Work With Them)
- Login
- Register
- FAQ
- Search
- It is currently Fri Feb 10, 2023 10:55 am
- Print view
How to change the frame rate
- Message
![]() Thu Oct 29, 2015 12:46 pm
Thu Oct 29, 2015 12:46 pm
I have begun to use DaVinci as Video Editor.
Starting with some suspect. as I was a FCP7 user for years, I hace to say the the software is intuitive e really powerfull so I’m very very glad of my choise.
It use in a clever manner the power of my iMac cutting a lot the time of rendering.
I have to litle problem to solve I hope you’ll help me:
1) I CANT change the framerate of the output of my video: it is «FIXED» at 24p and I’d like to use 25p as I work normally with this framerate with my BMPPC. How can I solve the problem?
2) I dont find the audio effect to make an audio dissolve to zero. Can you help me?
Thank you a lot in advance
Francesco Bollorino
Editor of Psychiatry on line Italia
Thematic Channel on Youtube
http://www.youtube.com/PsychiatryonlineITA1

Dwaine Maggart
Blackmagic Design
- Posts: 9958
- Joined: Wed Aug 22, 2012 2:53 pm
![]() Thu Oct 29, 2015 6:23 pm
Thu Oct 29, 2015 6:23 pm
Render frame rate is locked to project frame rate.
Project frame rate cannot be changed after there is a timeline and/or media in the Media Pool.
So the project frame rate must be properly set before you start the project.
Dwaine Maggart
Blackmagic Design DaVinci Support
![]() Thu Oct 29, 2015 10:22 pm
Thu Oct 29, 2015 10:22 pm
To answer #2, to make audio dissolve to zero, you can either:
-use the audio fade handles (quick and easy option).
-use the cross dissolve in the Effects Library.
-use audio keyframes.
It’s all explained very well in the manual, Ch 20.
Gray Cat Films | www.graycatfilms.com
MacPro 12-core | AMD RX 580 | 32GB | DeckLink Mini | Flanders CM170 | Tangent Ripple | OS X Mojave
![]() Mon Nov 02, 2015 2:04 pm
Mon Nov 02, 2015 2:04 pm
Dwaine Maggart wrote:Render frame rate is locked to project frame rate.
Project frame rate cannot be changed after there is a timeline and/or media in the Media Pool.
So the project frame rate must be properly set before you start the project.
I have set the project frame rate to 25p but the redering is at 24p this is the problem…
Francesco Bollorino
Editor of Psychiatry on line Italia
Thematic Channel on Youtube
http://www.youtube.com/PsychiatryonlineITA1
Dwaine Maggart
Blackmagic Design
- Posts: 9958
- Joined: Wed Aug 22, 2012 2:53 pm
![]() Tue Nov 03, 2015 7:03 pm
Tue Nov 03, 2015 7:03 pm
If Project Settings / Master Project Settings / Timeline Format — Timeline frame rate is set to 25 FPS, then the Deliver page Format — Frame Rate selection will not show 24.
Unless: You have a custom Deliver page Preset set to 24 FPS. And you are using Resolve 11. There was a scenario where if you selected a Deliver page preset that had a frame rate different than the project frame rate, that frame rate WOULD be applied on the Deliver page, and there was no way to fix that without restarting Resolve. However, this should not happen in Resolve 12.
Dwaine Maggart
Blackmagic Design DaVinci Support
Ahab’s Compass
- Posts: 3
- Joined: Sat Jan 27, 2018 7:30 pm
- Real Name: Peter Adam
![]() Mon Jan 29, 2018 8:43 pm
Mon Jan 29, 2018 8:43 pm
Is there no support for 90fps timelines? This is sort of a problem if people want to create 90fps videos for Oculus VR at its native refresh rate.
![]() Mon Sep 24, 2018 1:10 pm
Mon Sep 24, 2018 1:10 pm
I wander if finally in 2018 we are able to change the Frame rate of a project?
I worked a whole project with an XML from my client and unfortunately when I finished and I was going to render I found the project was 60p when it should be 30.
I tried to copy and paste the timeline to a new project but even this didn’t work.
Any other idea to change the frame rate?
Thanks!
David Jimenez, Tokyo
![]() Mon Sep 24, 2018 2:19 pm
Mon Sep 24, 2018 2:19 pm
Dwaine, It would be amazing if Resolve eventually moved to having the settings be on a per-timeline basis rather than a per-project basis. I can’t count the number of times I’ve imported all my media only to catch a mistake in the project setting and have to start over again. I’ve also found a lot of situations where having multiple resolutions of timelines would be very useful. Such as projects that have (or get added at the last minute after work has been done) requirements for additional lower resolution or different ratio deliverables, where I want to keep it 99% the same but rework things like titles and text specifically for the lower resolution or ratio.
Thanks for engaging with us on the forums
![]() Mon Sep 24, 2018 3:56 pm
Mon Sep 24, 2018 3:56 pm
Francesco Bollorino wrote:I CANT change the framerate of the output of my video: it is «FIXED» at 24p and I’d like to use 25p as I work normally with this framerate with my BMPPC. How can I solve the problem?
Use this trick:
— BACKUP your project!!!
— remove all content from project (media, timelines, etc.)
— now you can change frame rate in project settings
— press command+z for undo content
DaVinci Resolve 18.1.2 Studio (macOS Big Sure 11.7.3)
Mac Pro 2013, AMD FirePro D700, 64GB RAM
Film Editor, Colorist, DIT, Datalab technician
linkedin.com/in/vít-reiter-film-editor

Gary Hango
- Posts: 823
- Joined: Mon Apr 09, 2018 10:35 pm
- Location: Left Coast
- Real Name: Gary Hango
![]() Mon Sep 24, 2018 6:07 pm
Mon Sep 24, 2018 6:07 pm
Vit, if this really works, it means the Resolve developers should be able to easily program a function to do this.
Microsoft Windows 10 Pro x64
Intel(R) Core(TM) i7-6700, 3.40GHz, 32.0 GB
MB: MSI, BIOS: American Megatrends Inc. A.60, 12/17/2015
NVIDIA GeForce GTX 960, 2Gb
Resolve 18.1.1.0007(Free)
![]() Mon Sep 24, 2018 9:34 pm
Mon Sep 24, 2018 9:34 pm
+1 for changing frame rates and different frame rates for timelines within one project!
Daniel Boist
dbSONIC Media
Germany
4 Installations of DR Studio / Fusion Studio
MacPro (7,1), 28-Core,192 GB, Pro Vega II Duo 64GB
MacPro (6,1) 12-Core,64GB,D700
iMacPro (1,1), 18-Core,64GB,VEGA64 16GB,Decklink Ultrastudio 4K,Sonnet eGFX (VEGA64 16GB)
RCModelReviews
- Posts: 983
- Joined: Wed Jun 06, 2018 1:39 am
- Real Name: Bruce Simpson
![]() Mon Sep 24, 2018 11:07 pm
Mon Sep 24, 2018 11:07 pm
++1 for this.
Although Resolve was designed primarily for professional editors (often focused on 24fps) the reality is that it’s now being used by a wide range of editors (pro and amateur) who, like myself, end up using quite a variety of frame rates, depending on the actual composition, the cameras available and the look we’re going for.
It’s *really* handy (for example) if we can take a 60fps timeline and render it at 30fps or (for YouTube) perhaps a 25fps timeline and render it at 50fps (seems to give fewer compression artifacts for the same bitrate when YT re-encodes it to VP9), etc, etc.
As Resolve becomes a more powerful and general-purpose tool it would be a shame not to support the new markets that are embracing it.
Resolve 15.3 Studio, Fusion 9 Studio
CPU: i7 8700, OS: Windows 10 (1709) 32GB RAM, GPU: RTX3060
I’m refugee from Sony Vegas slicing video for my YouTube channels.
jrb101
- Posts: 12
- Joined: Mon Sep 24, 2018 10:16 am
- Real Name: Jon Baker
![]() Tue Sep 25, 2018 9:27 am
Tue Sep 25, 2018 9:27 am
RCModelReviews wrote:++1 for this.
Although Resolve was designed primarily for professional editors (often focused on 24fps) the reality is that it’s now being used by a wide range of editors (pro and amateur) who, like myself, end up using quite a variety of frame rates, depending on the actual composition, the cameras available and the look we’re going for.
It’s *really* handy (for example) if we can take a 60fps timeline and render it at 30fps or (for YouTube) perhaps a 25fps timeline and render it at 50fps (seems to give fewer compression artifacts for the same bitrate when YT re-encodes it to VP9), etc, etc.
As Resolve becomes a more powerful and general-purpose tool it would be a shame not to support the new markets that are embracing it.
Another +1 for this here! I’m one of those amateur editors you mention in your posts…
This is useful stuff to know — I’m just in the process of migrating from Magix Vegas Pro 16 to Davinci Resolve (or possibly using them side-by-side) and I’ve often rendered out at different frame rates to the timeline for particular «looks» (e.g. taking a 30fps or 60fps timeline and rendering to 24fps for film-like motion). This is something easily achievable in Vegas.
Looks like I’ll just have to alter my editing process slightly to decide on the framerate before editing in Resolve — no biggie, but worth remembering as I haven’t previously needed to think about it!
Jon Baker
Current System: AMD Ryzen 2200G, AMD Radeon RX570 (4GB), 16GB 3000MHz RAM, Win 10, Resolve (Free) 16 BETA 4
It’s low spec, but I only tend to work in 1080p30 or proxy/optimised workflows for 4K!
Hermanni
- Posts: 1
- Joined: Fri May 08, 2020 3:09 pm
- Real Name: Hannes Turppo
![]() Fri May 08, 2020 3:15 pm
Fri May 08, 2020 3:15 pm
I was having problems with changing the timeline framerate too.
I tried the trick suggested above, which included backing up my project, deleting everything including the timeline, changing the framerate and then giving it an easy ctrl + z to hopefully have the project back with the framerate changed.
didn’t work so i resorted to rendering the project in 60fps and then just re-rendering it from 60fps to 30fps in a new project. this works fine but takes time and i’m not quite sure if the quality might suffer.
R.J. Crawfurd
- Posts: 11
- Joined: Thu Mar 26, 2020 12:14 pm
- Real Name: Rob Crawfurd
![]() Sat May 16, 2020 11:38 am
Sat May 16, 2020 11:38 am
The first time I was asked to restore a film, I was wondering whether I should start at 24 or 25 fps, being in Europe. Coming from Vegas editor, I imagined being able to decide later. Halfway through the project I got a bit worried and consulted the forum. I was devastated.
In Europe it is common that films are shot in 24 fps and scanned for TV in 25 fps with about a 4% increase in speed. This has probably been the practice since the invention of the telecine. It prevents the nasty adding or subtracting of one frame per second.
I would like to have the option in a future version of Resolve to be able to render a DCP in 24 fps and a TV version in 50i in the same project. I think Europe will be grateful.
Windows 10 i7 4770
Radeon RX480
24GB RAM
Resolve studio 16.2.4 Studio
Uli Plank
- Posts: 16612
- Joined: Fri Feb 08, 2013 2:48 am
- Location: Germany and Indonesia
![]() Sat May 16, 2020 12:04 pm
Sat May 16, 2020 12:04 pm
Hermanni wrote:…so i resorted to rendering the project in 60fps and then just re-rendering it from 60fps to 30fps in a new project. this works fine but takes time and i’m not quite sure if the quality might suffer.
If you set retiming to ‘Nearest’ it’ll drop every other frame and you’ll have no degradation.
@Rob: It will not be 50i, it’ll be 25 PsF.
Don’t approach DR with your preconceptions from another NLE.
Many features are better, some worse, most are different.
Resolve Studio 18.1.2, MacOS 12.6.2
MacBook M1 Pro, 16 GPU cores, 32 GB RAM
and
iMac 2017, Radeon 580, 32 GB RAM
Speed Editor
Jim Simon
- Posts: 23968
- Joined: Fri Dec 23, 2016 1:47 am
![]() Sat May 16, 2020 2:07 pm
Sat May 16, 2020 2:07 pm
R.J. Crawfurd wrote:I would like to have the option…to be able to render a DCP in 24 fps and a TV version in 50i in the same project.
Bring the 24 fps export back into the project, change it’s frame rate, drop into a new timeline, and Deliver.
Marcelo Lippi
- Posts: 7
- Joined: Sat May 16, 2020 10:54 pm
- Real Name: Marcelo carlos lippi
![]() Sun May 17, 2020 12:05 am
Sun May 17, 2020 12:05 am
Bring the 24 fps export back into the project, change it’s frame rate, drop into a new timeline, and Deliver.
are you sure that the audio frame rate changes? I tested that didn’t happen…
Return to DaVinci Resolve
Who is online
Users browsing this forum: AndreN, Google [Bot], hiixdcaaw766, Mbeare, seanadl, Torbjörn Lindström and 85 guests
В этом уроке я предлагаю рассмотреть самые важные настройки проекта в DaVinci Resolve. Давайте перейдем вниз интерфейса и нажмем вот на эту иконку в виде шестеренки. Перед вами откроется окно Project Settings.
Первый раздел, на который стоит обратить внимание: Master Settings, именно здесь собраны самые важные настройки проекта.
Взгляните на область Timeline Format.
В выпадающем меню Timeline resolution вы можете выбрать размер кадра через предложенные прессеты. Либо же задать его вручную в поле Рrocessing, предварительно выбрав Custom. В настройках Pixel aspect ratio вы можете выбрать соотношение сторон пикселя. Как правило, это может быть Square — квадратный пиксель или синемаскоп.
Далее вы увидите выпадающее меню Timeline frame rate, в котором, гипотетически вы могли бы выбрать количество кадров в секунду для вашего таймлайна, если бы.… это меню не было заблокировано. Я думаю, что на это стоит обратить внимание. Вы должны знать, что количество кадров в секунду определяется при первом импорте какого-либо проекта в рабочую область DaVinci Resolve.
Допустим, если вы экспортируете проект из Premier Pro или Final Cut — DaVinci зафиксирует frame rate программы монтажа и уже не позволит изменить его в дальнейшем.
Создав новый проект непосредственно в самой Davinci, и если вы снова перейдете в настройки проекта, то увидите, что это выпающее меню уже будет активно и вы сможете изменить frame rate на необходимый.
Но пока давайте продолжим знакомство с настройками проекта в DaVinci Resolve.
Playback frame rate – это количество кадров в секунду, с которым проигрывается ваш таймлайн. Хочу это подчеркнуть — не сам проект, а только таймлайн. Зачастую это помагает оптимизировать работу вашего компьютера за счет скорости проигрывания таймлайна.
Теперь взглянем на область Video Monitoring. Здесь находятся настройки вашего дополнительного монитора, отвечающего за контроль цвета. В этой области вы можете выбрать формат дополнительного монитора, тип соединения с платформой DaVinci Resolve, глубину цвета и качество изображения.
Теперь перейдем в раздел Image Scalling. Опции расположенные в самом верху, отвечают за оптимизацию плейбека, а настроки Anti Alias Edges и Deinterlace quality отвечают за качество дебэйринга. В области Input Scalling присутствует одно выпадающее меню с прессетами, отвечающими за масштаб кадра в окне монитора DaVinci Resolve.
Возможно, вы уже столкнулись с тем, что часто какой-либо кинопроект, музыкальное или свадебное видео представляет собой сборную солянку из футаджей разных форматов и размеров. И, допустим, когда на HD-таймлайне, вы будете использовать SD-футадж, DaVinci Resolve всегда вас всегда спросит: как я должна массштабировать этот кадр? «Нужно ли его растянуть по вертикали, горизонтали, смасштабировать ли его так, чтобы отображались все части кадра, или попросту отцентровать относительно окна просмотра»? Собственно говоря, прессеты в этом выпадающем списке и отвечают за то, как DaVinci смасштабирует превью футеджа в окне монитора. Я, как правило, использую настройку Scale full frame crop.
Теперь перейдем в раздел Color Management… и сразу рассмотрим область Color Space and Transforms. В выпадающем меню Color science вы можете выбрать цветовую модель, которую будете использовать в своем проекте. DaVinci Resolve может исспользовать две цветовые модели — классическую YRGB и, набирающую обороты цветовую модель ACES — Academic Color Encording Specification.
Можно сказать, ACES является ни только новым подходом к цветопередаче, но и достаточно успешной попыткой стандартизировать цветовые палитры через разные изделия и приборы. Звучит запутанно, но для вас крайне важно понимать, что каждое видео устройство интерпретирует цвет по-своему. Особенно это заметно на видео камерах и дисплеях.
К примеру, камеры Sony интерпретируют цвет совершенно по другому, в сравнении с камерами Canon. При том, что природа цвета не меняется, если вы взглнянете на исходники с разных камер, то увидите, что цвет одного и того же кадра будет заметно отличаться. Поэтому, я повторюсь.
Цветовая модель ACES — это достаточно удачная попытка стандартизировать интерпретации цвета с разных видеоносителей и устройств. К этому вопросу мы еще вернемся, когда будем говорить о скопах.
Внизу находится область Lookup Tables, в которой вы будете подключать ваши LUTы на глобальном уровне. То есть LUT, подключенный в этой области будет влиять не на отдельно взятый нод или клип, а на весь проект в целом. Изначально, многие начинающие колористы воспринимают LUTы, не иначе, как что-то вроде прессетов. Но на самом деле, это ни так.
LUTы являются мультицветовой платформой для колор грейдинга. В разделе базового курса по цветокоррекции вы найдете очень хороший урок, обьясняющий всю процедуру использования LUTов на разных уровнях, а в пакете Advanced мы разбираем секреты и альтернативы их использования.
Раздел General Options содерджит опции конформинга и настроек Аудио, но в рамках вашего обучения чаще всего вы будете обращаться к областям Сolor и Versions. В этой области вы сможете присваивать имена вашим версиям с помощью выпадающего списка, либо же именовать их вручную.
Мы еще будем говорить об этом в дальнейшем, но уже сейчас можно отметить, что Версии это один из самых удобных инструментов в DaVinci Resolve, благодаря которому вы сможете создавать и сохранять сколько угодно адаптированных копий одного и того же грейдинга.
Раздел Camera Raw. Опции этого раздела отвечают за ту информацию в кадре, которую воспринял непосредственно сенсор камеры. Стоит сказать, что некоторые камеры в обязательном порядке снимают в формате RAW, а некоторые такой возможност не имеют. Но, как не крути, более удобным и гибким в работе являются именно сырой – RAW материал.
Возможность снимать в формате цифрового негатива, без сомнения является важнешим преимуществом таких камер, как RED и Alexa.
В разделе Capture and Playback, вы увидите настройки, которые влияют на качество захвата изображения с других устройств. Например, таких как магнитофоны Betacam или проявоченые машины.
Учитывая, что DaVinci Resolve достаточно пожилая программа, скорее всего, этот раздел оставлен в окне настроек проекта, лишь как дань уважения к аналоговому прошлому.
Стоит отметить, что до выхода 15‑й версии Davinci Resolve, в окне настроек проекта находился раздел Control Panels отвечающий за подключение консоли к интерфейсу программы. Теперь этот раздел перенесен в меню Preferences и закладку System.
Control Panels или другими словами Консоль — это очень удобный и мощный инструмент для работы с цветокоррекцией, который подключается к вашему компьютеру как отдельное устройство. И, хотя Консоль никоем образом не отвечает за качество вашего кадра, она напрямую влияет на удобство вашей работы, что в свою очередь безусловно отражается на качестве.
Можно сказать, что Консоль, это по большому счету большая и многофункциональная мышь.
Хочется отметить, что начиная с 15‑й версии программы, в окно Preferences перенесен раздел автосохранения, опции которого теперь находятся в закладке User.
Так же, как и раздел Keyboard Mapping, где вы сможете не только увидеть горячие клавиши программы, но при желании их изменить.
Home
Blog
How to Change Frame Rates in DaVinci Resolve
If you ever needed to change frame rates in DaVinci Resolve – because it was set wrong or you have a need for multiple options in a single project – you just couldn’t do it. The second you touched the timeline with some footage you were locked in.
Needing a different frame rate meant a whole new project. That is actually no longer the case. More recent versions of Resolve have finally given us this option, though it isn’t as simple as adjusting project settings.
Jordan from Motion Array Tutorials shows you how you can actually pull this off in Resolve. The trick is that you can control the frame rates of individual timelines.
Obviously if you are going to do this you should know what your target frame rate is going to be. Most of the time it is just as simple as checking your footage – which you can do in the list version of the Media Pool – and matching that. Once you know that you just make a new timeline.
Either right click in the Media Pool and hit New Timeline or use the Ctrl/Cmd + N shortcut. In the new pop-up box you should see some settings and options. Hit the “Use Custom Settings” button to reveal more controls. From here you’ll move to the Format tab and there you can simply select the Timeline frame rate from a dropdown list.
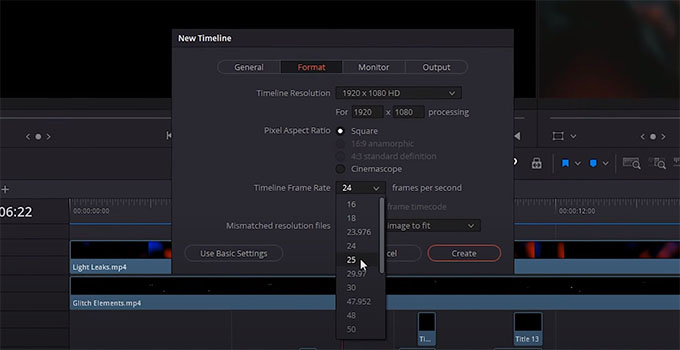
Image Credit: Motion Array
Easy right?
If you already started work on a timeline you don’t even need to start all over. What you should do is set the timeline view options to show the different timelines as tabs. Go to your original timeline and select it all. Ctrl/Cmd + A will do the trick. Then hit copy, or Ctrl/Cmd + C.
Head back to your new timeline and paste it in. Shortcut is Ctrl/Cmd + V. It should all just seamlessly paste in.
Note that the actual project timeline isn’t going to change. That still stays locked down. The specific timeline will be different though and when you head to the deliver page you should see the appropriate options for exporting in your desired frame rate.
It’s good to have this in your bag of tricks as you never know when you might need it and it’ll save tons of time.
Can you share any other quick tips for editing in DaVinci Resolve?
[source: Motion Array Tutorials]
About The Author
Shawn Steiner
Shawn studied both cinema and photography with a strong focus on photojournalism and documentary work. You can check out his Instagram, as well as most other social media accounts, @shawncsteiner to see more of his work.
So you need two clips from the same video file at different frame rates in your DaVinci Resolve timeline? No problem — here’s how you do it.
I would be hard-pressed to admit that I don’t love Resolve — because I do. It’s been a pleasure to watch it grow from “just” color-grading software to a leading NLE. However, every so often, I come across a feature that doesn’t like to respond to my request, which feels like your favorite dog chewing up a prized possession.
Recently, that feature was jumping between different frames per second on the same clip. Although, to defend Resolve, this was perhaps due to me not knowing what I was doing wrong. I had a 60fps video clip, which I duplicated in the timeline, and I intended to change the duplicate clip to 24fps to ensure slow-motion and keep the original at 60fps — one clip in real time, another in slow-motion. The problem was that even though I had duplicated the clip, when I changed the attributes of one clip to 24fps, the other clip also changed to 24fps.

So, let’s look at what’s going on in Resolve to see why this is happening.
First, let’s look at how you can change a video clip at a higher frame rate to a lower frame rate to achieve slow motion.
The shot was from the URSA Mini 4.6K, filmed at 60fps. I didn’t use the speed ramp feature on the camera, so I need to change the frame rate of the clip in the software. To do this, you need to right-click a media clip in the media pool (or timeline) and open the clip attributes.

From here, you change the frame rate to match your project settings.

Adjusting the clip’s internal frame rate from 60fps to 24fps makes the clip 40 percent slower. I would also like the footage to appear again, but in real time. Of course, we’re rendering out 60fps on a 24fps timeline, but the client has cleared the slight discrepancy with motion blur and movement. However, as I said before, when I change the second clip, both clips change, despite being a duplicate. The problem I’m encountering is that I’m changing the base attributes of the clip that exist within the media pool.

Both clip one and clip two, in the timeline, are generated from the media with a red outline in the media pool. It doesn’t matter if I change the clip attributes on the timeline or in the media pool because the effects are applied to the base clip in the media pool, which then affects any tracks and clips where the media has been inserted.
Thankfully, there are two options for getting different frame rates from the same clip.
Adjust the Speed Percentage of Clip Two
First, adjust the clip attributes of the 60fps clip to 24fps, so you have two 24fps clips. With the clip that needs to be reverted to real-time, I would need to increase the clip speed 250 percent. Now, Resolve offers many methods for increasing the speed of a clip, and I’ve already written all the information you need on that here, but it can be as simple as working out the math, right-clicking, and selecting “change speed.”

Duplicated Base Clips
Alternatively, if math wasn’t a strong point for you in school and you would prefer not to mess around with the speed change controls every time you want to edit this clip, there’s another option. Instead, we can duplicate the clip in the media pool or create a sub-clip, then change the clip attributes of the duplicated media.
At first, it may feel like we’ve done the same thing as before, but we haven’t. The difference in duplicating the media in the media pool is that we are changing the frames per second of an entirely new base clip, not a duplicate of a timeline clip. I understand that this may seem confusing because it’s the one individual media file on your desktop that is used. But after you duplicate the 60fps file in the media pool, Resolve now recognizes this as an entirely different clip.

This method also works when creating a sub-clip, which can be beneficial if you want to avoid editing the excess footage a second time. Since you’re editing duplicated clips of duplicated files, it can quickly become confusing. I would suggest appropriately naming the clips in the media pool to avoid becoming overwhelmed when editing on the timeline.
Looking for more on DaVinci Resolve? Check out these articles.
- Review: DaVinci Resolve 16’s Cut Page — Is It Any Good?
- DaVinci Resolve’s New Object Removal Tool — Is It Any Good?
- A Rundown Of The Edit Page Changes in DaVinci Resolve 16
- How to Upload to YouTube Directly from DaVinci Resolve 16
- DaVinci Resolve: THE Total Guide to the Best Free Video Editor