I doubt iptables alone will be enough, as TCP and UDP are fundamentally different protocols.
You can forget setting up an IPsec VPN with such scenario (ISP blocking all UDP ports).
Tunnel all the traffic via ICMP. (best old school solution I know of. Lots of organizations still do not filter out any kind of ICMP) see https://github.com/DhavalKapil/icmptunnel
‘icmptunnel’ works by encapsulating your IP traffic in ICMP echo
packets and sending them to your own proxy server. The proxy server
decapsulates the packet and forwards the IP traffic. The incoming IP
packets which are destined for the client are again encapsulated in
ICMP reply packets and sent back to the client. The IP traffic is sent
in the ‘data’ field of ICMP packets.RFC 792, which is IETF’s rules governing ICMP packets, allows for an
arbitrary data length for any type 0 (echo reply) or 8 (echo message)
ICMP packets.So basically the client machine uses only the ICMP protocol to
communicate with the proxy server. Applications running on the client
machine are oblivious to this fact and work seamlessly.
also, as A.B. points out, you have a UDP-to-raw tunneling software at https://github.com/wangyu-/udp2raw-tunnel
Or in alternative, setup an OpenVPN solution. If you manage to talk outside run OpenVPN over port 53/UDP, or on the lack of that, run it over TCP. Mind you that doing a VPN over TCP will be slower than UDP, but it works.
As for the actual question of changing an IP field: You want to look at the mangle table in iptables, however:
- I suspect your ISP is blocking that too
- I know mangle supports modifying some IP fields, not sure about the one you need. See https://serverfault.com/questions/467756/what-is-the-mangle-table-in-iptables
More alternatives, you can try GRE tunnels (protocol 47), see https://www.tldp.org/HOWTO/Adv-Routing-HOWTO/lartc.tunnel.gre.html ( it is easier than trying to develop an application ). Some organizations block this. Basically it is encapsulating IP/ICMP/UDP over protocol 47.
Or if nothing else works, you can tunnel it via an IP tunnel over SSH (mind you tun over SSH, not TCP port tunneling). see Ip Tunnel Over Ssh With Tun http://www.marcfargas.com/posts/ip-tunnel-over-ssh-with-tun/ By the way, no technology of smart/adaptative/deep inspection traffic shapper/firewall that will detect and block all the methods on this thread will be able to block a TUN over SSH.
PS. It is hard to believe an ISP blocking UDP, and furthermore, NTP and DNS UDP ports.
Asked
7 years, 11 months ago
Viewed
2k times
Is it possible to convert all outgoing udp traffic from a gateway router to tcp on the same port with iptables. Have looked at mangle but unsure how I can use that.
![]()
bummi
27k13 gold badges62 silver badges101 bronze badges
asked Feb 23, 2015 at 15:31
![]()
This is not possible in a generic way for at least the following reasons:
- UDP is a datagram protocol, where each packet is independent from the other. TCP instead is a stream protocol. While it would be possible to concatenate the UDP packets to a TCP stream it is not clear at which boundaries the TCP stream should be split to generate the packets.
- With UDP duplicates, packet loss and reordering of packets could happen. If you cannot be sure about the proper order and that you got all messages and exactly once you can not construct reliable a TCP stream from it.
- TCP acknowledges when it receives packets and if an ACK is missing the packet gets retransmitted. Once you forward TCP to UDP these ACKs can not be done because UDP does not have such mechanism.
It might still be possible to do application specific translations, like UDP DNS to TCP DNS or similar. But this translation depends on the application protocol so you need to have an application specific gateway. iptables as a packet filter works on a lower layer and does not provide such functioniality.
answered Feb 23, 2015 at 18:27
![]()
Steffen UllrichSteffen Ullrich
110k10 gold badges129 silver badges167 bronze badges
Информационная безопасность, Блог компании PENTESTIT
Рекомендация: подборка платных и бесплатных курсов Smm — https://katalog-kursov.ru/

В данной статье речь пойдет про утилиту udp2raw, которая позволяет обходить межсетевые экраны, настроенные на блокировку протокола UDP, используя RAW сокеты, а также туннелировать любые другие протоколы при работе в связке с OpenVPN.
Обзор возможностей
> Официальный сайт инструмента
На нем же представлена схема работы утилиты
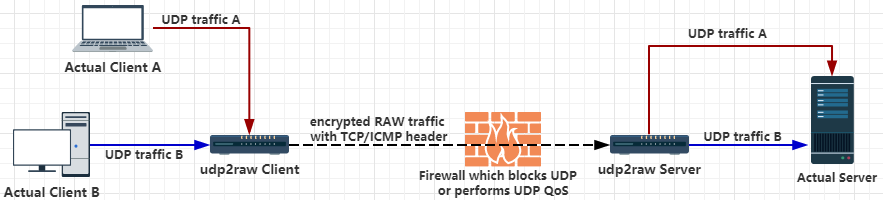
Их схемы становится ясно, что инструмент состоит из клиента и сервера, причем второй требуется разместить за межсетевым экраном. Другие утилиты для туннелирования трафика, как правило, требуют то же самое, например, reGeorg, работа которой описана в другой моей статье на defcon.ru.
Один сервер может обслуживать одновременно несколько клиентов, а один клиент несколько UDP соединений через один RAW сокет.
Вы можете использовать udp2raw как для Linux (включая Android, OpenWRT, Raspberry PI) с правами root, так и для Windows и MacOS, правда, в довольно специфическом виде — в виде образа виртуальной машины. Но образ виртуальной машины занимает всего 4.4 МБ, так что это вполне применимо.
В базовом виде udp2raw может добавлять фейковые ICMP/TCP заголовки к сетевым пакетам, тем самым заставляя межсетевой экран считать их пакетами соответствующих сетевых протоколов, а не UDP.
В режиме FakeTCP, udp2raw симулируем трехсторонний TCP handshake при установке соединения и затем поддерживает корректную установку SYN/ACK флагов непосредственно при передаче данных.
udp2raw может использоваться и как вспомогательный инструмент для стабилизации соединения, защиты от replay атаки (anti-replay window) или просто для шифрования трафика (AES-128-CBC) в режиме обычного UDP туннеля. В этом случае фейковые ICMP/TCP заголовки к пакетам добавляться не будут.
Так же возможно использование udp2raw в связке с OpenVPN, что позволяет использовать udp2raw для туннелирования не только UDP трафика. Схема работы представлена ниже
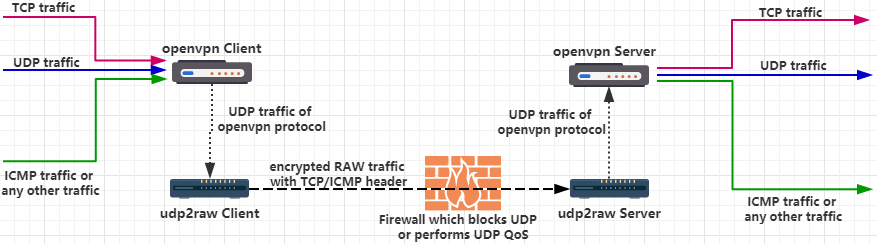
Для конкретно этого случая есть отдельная несложная инструкция на гитхабе разработчика.
Практический пример
Для начала работы с udp2raw в Linux скачиваем архив с github
wget https://github.com/wangyu-/udp2raw-tunnel/releases/download/20170826.0/udp2raw_binaries.tar.gzи распаковываем
root@kalix64:~/tunneling/udp2raw# tar -xvzf udp2raw_binaries.tar.gz
udp2raw_amd64
udp2raw_mips34kc
udp2raw_arm
udp2raw_amd64_hw_aes
udp2raw_arm_asm_aes
udp2raw_mips34kc_asm_aes
udp2raw_x86
udp2raw_x86_asm_aes
Клиент и сервер представляют из себя одно и то же приложение. Различаться будут только ключи при запуске
usage:
run as client : ./this_program -c -l local_listen_ip:local_port -r server_ip:server_port  [options]
run as server : ./this_program -s -l server_listen_ip:server_port -r remote_ip:remote_port  [options]
Предположим, что в сети есть Windows машина с активированным SNMP сервисом и шлюз, блокирующий UDP пакеты, но разрешающий TCP доступ к Windows машине.
Злоумышленнику удалось получить доступ со своей Kali Linux машины к шлюзу и разместить там udp2raw сервер. Если злоумышленник попытается напрямую подключиться к Windows машине на UDP порт 161, то ничего не выйдет.

Тогда он может воспользоваться udp2raw, чтобы спрятать природу SNMP пакетов от межсетевого экрана, запустив на шлюзе
./udp2raw_amd64 -s -l 0.0.0.0:5555 -r 192.168.2.2:161 -a -k "snmptunnel" --raw-mode faketcp

И на Kali машине
./udp2raw_amd64 -c -l 0.0.0.0:4444 -r 192.168.1.5:5555 -a -k "snmptunnel" --raw-mode faketcp
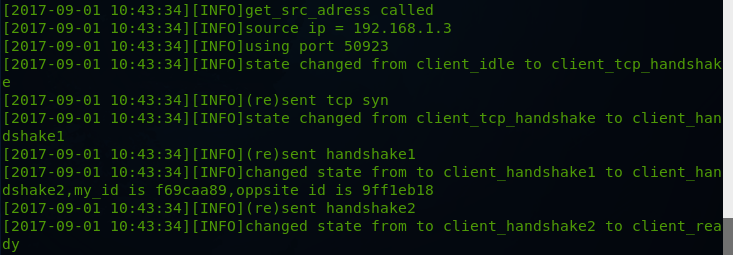
Теперь злоумышленник может получать доступ к SNMP сервису удаленной машины через зашифрованный туннель так
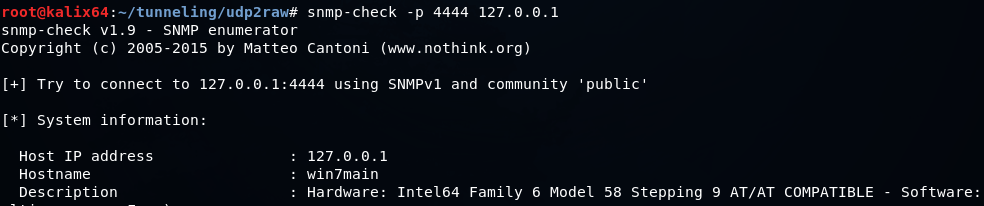
При этом в Wireshark будет виден только TCP трафик

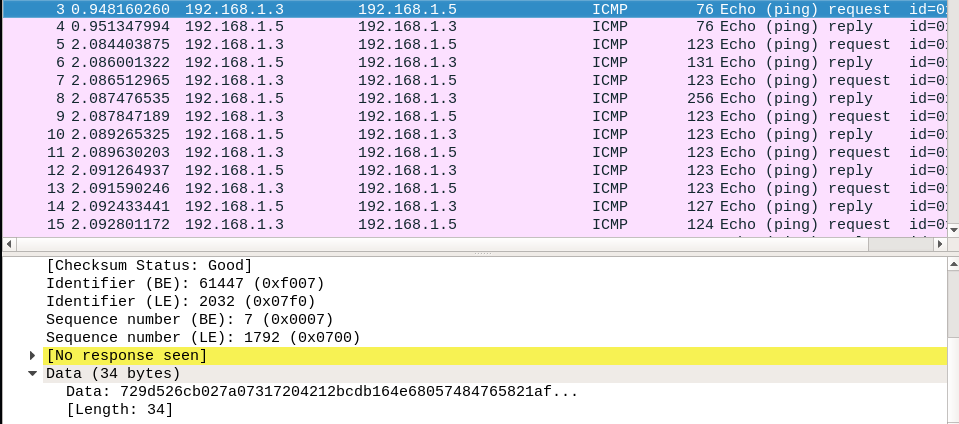
Если использовать ICMP заголовки, то в Wireshark мы увидим следующее
Если проверить трафик на стороне шлюза, то будет видно, что Windows машине отсылаются самые обыкновенные SNMP UDP пакеты

В заключении
Дополнительно можно ускорить работу туннеля, используя kcptun, а так же ознакомиться с другими инструментами для туннелирования трафика: reGeorg, dnscat2, icmptunnel и другими.
В случае использования udp2raw злоумышленником, подобные аномалии в корпоративной сети могут быть обнаружены при помощи IDS, IPS и DPI систем обеспечения сетевой безопасности.

10 Years Ago
how to convert from UDP to TCP? For example I’m used this code for UDP:
Socket peer1 = new Socket(AddressFamily.InterNetwork, SocketType.Dgram, ProtocolType.Udp);
UnicodeEncoding coding = new UnicodeEncoding();
byte[] pp = coding.GetBytes(ping);
peer1.SendTo(pp, receiverIp);
peer1.SendTo(txtBuf, txtBuf.Length, SocketFlags.None, receiverIp);
How to write it use TCP protocol??? Because my code is large, I only want some of codes change.
And another question:
How to define maximum buffer on receiver when I received packet for UDP and TCP?
Edited
10 Years Ago
by mike_2000_17 because:
Moved to C#, correct code-tags and spelling
Recommended Answers
I think you need to have this thread moved to the Software Development category.
Jump to Post
All 2 Replies

JorgeM
966
Problem Solver
Team Colleague
Featured Poster
10 Years Ago
I think you need to have this thread moved to the Software Development category.
nmaillet
97
Posting Whiz in Training
10 Years Ago
how to convert from UDP to TCP
Just Google some C# TCP socket tutorials and read through the MSDN class reference for the Socket class. There is alot to go over, so I’m not going to post everything here. For starters though, during Socket initialization, you’d change it to this:
Socket peer1 = new Socket(AddressFamily.InterNetwork, SocketType.Stream, ProtocolType.Tcp);
Using a stream (which you have to when using TCP) essentially means you read it like you would for a file (with delay and such). Packets are still being used in the backend, but you can’t directly access them.
You would then have to call the Bind() method, to bind the socket to a particular local end point and port number (you can use IPAddress.Any if you want the system to assign it on connection).
Now, you would either call Connect() or Listen(), depending on if you’ll be acting as the client or the server. You can still use SendTo() to send data, but its unnecessary, as each TCP socket will only have one remote end point. You’ll have to create multiple sockets if you are communicating with more than one remote end point.
how to define maximum bufer on receiver when i received packet for UDP and TCP
I’m not sure what you mean. You can set the ReceiveBufferSize property to specify the internal buffer. If you’re talking about the byte array (your buffer), then ReceiveFrom() and Receive() both have overloads to specify the maximum number of bytes to read.
To start look at System.Net.Sockets.Socket. It describes the methods I mentioned in more detail.
Edited
10 Years Ago
by nmaillet
Reply to this topic
Be a part of the DaniWeb community
We’re a friendly, industry-focused community of developers, IT pros, digital marketers,
and technology enthusiasts meeting, networking, learning, and sharing knowledge.
10 Years Ago
how to convert from UDP to TCP? For example I’m used this code for UDP:
Socket peer1 = new Socket(AddressFamily.InterNetwork, SocketType.Dgram, ProtocolType.Udp);
UnicodeEncoding coding = new UnicodeEncoding();
byte[] pp = coding.GetBytes(ping);
peer1.SendTo(pp, receiverIp);
peer1.SendTo(txtBuf, txtBuf.Length, SocketFlags.None, receiverIp);
How to write it use TCP protocol??? Because my code is large, I only want some of codes change.
And another question:
How to define maximum buffer on receiver when I received packet for UDP and TCP?
Edited
10 Years Ago
by mike_2000_17 because:
Moved to C#, correct code-tags and spelling
Recommended Answers
I think you need to have this thread moved to the Software Development category.
Jump to Post
All 2 Replies
JorgeM
966
Problem Solver
Team Colleague
Featured Poster
10 Years Ago
I think you need to have this thread moved to the Software Development category.
nmaillet
97
Posting Whiz in Training
10 Years Ago
how to convert from UDP to TCP
Just Google some C# TCP socket tutorials and read through the MSDN class reference for the Socket class. There is alot to go over, so I’m not going to post everything here. For starters though, during Socket initialization, you’d change it to this:
Socket peer1 = new Socket(AddressFamily.InterNetwork, SocketType.Stream, ProtocolType.Tcp);
Using a stream (which you have to when using TCP) essentially means you read it like you would for a file (with delay and such). Packets are still being used in the backend, but you can’t directly access them.
You would then have to call the Bind() method, to bind the socket to a particular local end point and port number (you can use IPAddress.Any if you want the system to assign it on connection).
Now, you would either call Connect() or Listen(), depending on if you’ll be acting as the client or the server. You can still use SendTo() to send data, but its unnecessary, as each TCP socket will only have one remote end point. You’ll have to create multiple sockets if you are communicating with more than one remote end point.
how to define maximum bufer on receiver when i received packet for UDP and TCP
I’m not sure what you mean. You can set the ReceiveBufferSize property to specify the internal buffer. If you’re talking about the byte array (your buffer), then ReceiveFrom() and Receive() both have overloads to specify the maximum number of bytes to read.
To start look at System.Net.Sockets.Socket. It describes the methods I mentioned in more detail.
Edited
10 Years Ago
by nmaillet
Reply to this topic
Be a part of the DaniWeb community
We’re a friendly, industry-focused community of developers, IT pros, digital marketers,
and technology enthusiasts meeting, networking, learning, and sharing knowledge.
Открытие или перенаправление порта необходимо в тех случаях, когда нужно получить доступ к локальным устройства или службам находящимися за роутером в локальной сети.
Возможные задачи могут выглядеть следующим образом:
1. Необходимо получить доступ к WEB интерфейсу самого роутера.
2. Необходимо перенаправить порт 8080 на WEB сервер расположенный на локальном ПК с IP 192.168.88.100

Все операции с открытием и перенаправлением портов производятся в Межсетевом экране

1. Открытие порта
1.1. Через WEB
Открываются порты для получения доступа к различным службам на самом роутере или контроллере.
Например откроем порт 80 для получения доступа к WEB-интерфейсу роутера.
Переходим в пункт Правила для трафика

Добавляем новое правило

Так выглядит новое созданное правило

Сохраняем добавленные правила

1.2. Через консоль
Необходимо отредактировать файл /etc/config/firewall
nano /etc/config/firewall
Добавляем правило и сохраняем файл:
config rule
option enabled ‘1’
option target ‘ACCEPT’
option src ‘wan’
option proto ‘tcp udp’
option dest_port ‘1194’
option name ‘OpenVPN’
Перезапускаем межсетевой экран
/etc/init.d/firewall restart
2. Перенаправление порта
2.1. Через WEB
Перенаправление используется, чтобы перенаправить запросы с внешнего порта к другому или тому же порту в локальную сеть.
Например перенаправим запросы с внешнего порта 8080 к локальному ПК с IP 192.168.88.100 и его порту 80
Переходим в пункт Перенаправления портов

Добавляем новое правило:

Так выглядит новое правило

Сохраняем и применяем изменения

2.1. Через консоль
Необходимо отредактировать файл /etc/config/firewall
nano /etc/config/firewall
Добавляем правило и сохраняем файл:
config redirect
option target ‘DNAT’
option src ‘wan’
option dest ‘lan’
option proto ‘tcp udp’
option src_dport ‘8080’
option dest_ip ‘192.168.88.100’
option dest_port ’80’
option name ‘8080 to 192.168.88.100:80’
Перезапускаем межсетевой экран
/etc/init.d/firewall restart
3. IPTABLES. Перенаправление порта из локальной сети к статическому IP и порту в интернете или VPN.
Бывают и такие ситуации, при которых Ваше оборудование имеет только Локальный IP адрес и маску подсети.
И не имеет настроек шлюза и DNS.
Также данному устройству можно задать цель, т.е. куда оно будет отправлять данные. Обычно это целевой IP адрес и порт(TCP или UDP).
Проблема заключается в том, что при подключении такого устройства к роутеру, данные, которые оно генерирует, не попадут дальше самого роутера. Т.е. они ограниченны рамками локальной сети.
Без шлюза устройство не «видит» интернет.

В данной ситуации нам поможет пользовательское перенаправление портов с использованием IPTABLES
Необходимо перейти в Межсетевой экран:
Перейти на вкладку Пользовательские правила:

И добавить правило перенаправления:
iptables -t nat -A PREROUTING -d 192.168.88.1 -p TCP —dport 9001 -j DNAT —to-destination 31.58.45.6:9001
Итоговый вид:
# This file is interpreted as shell script.
# Put your custom iptables rules here, they will
# be executed with each firewall (re-)start.
# Internal uci firewall chains are flushed and recreated on reload, so
# put custom rules into the root chains e.g. INPUT or FORWARD or into the
# special user chains, e.g. input_wan_rule or postrouting_lan_rule.
iptables -t nat -A PREROUTING -d 192.168.88.1 -p TCP —dport 9001 -j DNAT —to-destination 31.58.45.6:9001
После, нажимаем Применить:

Перезапустим межсетевой экран. Делаем это через консоль:
/etc/init.d/firewall restart
Проверяем наше перенаправление. Все должно работать.
Сопутствующие статьи:
Как подключиться к роутеру RTU?
Дополнительная информация:
Wiki на GITHUB
Страница роутера на сайте Teleofis
Контроллеры на платформе роутера RTU
12 241
Стандартная настройка OpenVPN — работа по протоколу udp. Однако бывают случаи, когда нужно перейти на tcp. Например, решением следующей ошибки
TLS Error: TLS key negotiation failed to occur within 60 seconds
стал переход на использование протокола tcp для одного-двух клиентов
А что делать с остальными клиентами? Подключаться к каждому по teamviewer’у для редактирования конфига не вариант. Тогда нужно настроить OpenVPN на работу по двум протоколам. Но стандартная его настройка не позволяет включить два протокола в одном конфиге. Значит нужно сделать два конфига, каждый для своего протокола получив таким образом два рабочих независимых инстанса OpenVPN. Рассмотрим решение на примере Gentoo
Стандартно
Стандартный конфиг (openvpn.conf) сервера прост и выглядит приблизитено так:
local 333.33.3.1
port 1194
proto udp
dev tun15
management localhost 7505

ca /etc/openvpn/keys/ca.crt
cert /etc/openvpn/keys/dkc.crt
key /etc/openvpn/keys/dkc.key
dh /etc/openvpn/keys/dh.pem
crl-verify /etc/openvpn/keys/crl.pem

server 192.168.15.0 255.255.255.0
client-config-dir /etc/openvpn/ccd

push "dhcp-option DNS 192.168.12.9"
push "dhcp-option DNS 192.168.12.10"

tls-server
tls-auth keys/ta.key 0
tls-timeout 60
auth SHA512
cipher AES-256-CBC
keepalive 10 60
comp-lzo
max-clients 30
user nobody
group nobody
persist-key
persist-tun
status /var/log/openvpn/openvpn-status.log
# 0 is silent, except for fatal errors
# 4 is reasonable for general usage
# 5 and 6 can help to debug connection problems
# 9 is extremely verbose
log /var/log/openvpn/openvpn.log
verb 3
Разделяем конфиги
Содержимое конфига выше оставляем как есть, только переименуем его. Чуть ниже будет понятно почему так нужно
mv openvpn.conf udp.conf
Теперь на его базе создаем конфиг для tcp-протокола
cp udp.conf tcp.conf
И приводим его к следующему виду
local 333.33.3.1
port 1194
proto tcp
dev tun16
management localhost 7506

ca /etc/openvpn/keys/ca.crt
cert /etc/openvpn/keys/dkc.crt
key /etc/openvpn/keys/dkc.key
dh /etc/openvpn/keys/dh.pem
crl-verify /etc/openvpn/keys/crl.pem

server 192.168.16.0 255.255.255.0
client-config-dir /etc/openvpn/ccd

push "dhcp-option DNS 192.168.12.9"
push "dhcp-option DNS 192.168.12.10"

tls-server
tls-auth keys/ta.key 0
tls-timeout 60
auth SHA512
cipher AES-256-CBC
keepalive 10 60
comp-lzo
max-clients 30
user nobody
group nobody
persist-key
persist-tun
status /var/log/openvpn/openvpn-status.log
# 0 is silent, except for fatal errors
# 4 is reasonable for general usage
# 5 and 6 can help to debug connection problems
# 9 is extremely verbose
log /var/log/openvpn/openvpn.log
verb 3
Я выделил строки, которые нужно было изменить
Запуск
Запуск двух инстансов OpenVPN можно осуществить вручную, но нам нужно, чтоб они запускались сами после перегрузки сервера. В Gentoo это решается очень просто
cd /etc/init.d
ln -s openvpn openvpn.udp
ln -s openvpn openvpn.tcp
Важно! Расширение линка должно быть такое же как и имя конфига
Забираем из автозапуска стандартный openvpn скрипт
rc-update del openvpn
И добавляем свои линки
rc-update add openvpn.udp
rc-update add openvpn.tcp
После запуска
rc-service openvpn.udp start
rc-service openvpn.tcp start
должны подняться интерфейсы tun15, tun16

Если так произошло, примите мои поздравления и подключайте клиентов
5
2
голоса
Оцените статью