Can I change an input field value using CSS when user clicks it?
Like:
<input type=text name=username>
<input type=password name=password>
So, when the user click into this field, the text will go away and he will be able to write something.
I have tried:
input[value="Input desired username here"] {
styles...
}
Any clues?
asked Mar 4, 2013 at 22:26
![]()
2
There’s no need to use css for this. You can use placeholder attribute for your input tag, it will show a default value in input boxes:
<input type="text" name="username" placeholder="Username" />
Please consider that placeholder attribute is not supported in all browsers and if you want to make it cross-browser you can write a javascript code to put a default value in your input-boxes or use this simple and quick fix:
<input type="text" name="username" onFocus="if(this.value=='Username') this.value='';" onBlur="if(this.value=='') this.value='Username';" value="Username" />
answered Mar 4, 2013 at 22:30
![]()
Farid RnFarid Rn
3,1575 gold badges37 silver badges65 bronze badges
5
This is called a placeholder. Modern browsers will allow you to use a placeholder attribute like this:
<input type="text" name="username" placeholder="Input desired username here" />
and it will appear as you would like. Then you will need to utilize Modernizr to back port that functionality to older browsers. Something like this JavaScript will help:
$(document).ready(function () {
  if(!Modernizr.input.placeholder) {
    $('[placeholder]').focus(function () {
      var input = $(this);
      if (input.val() == input.attr('placeholder')) {
        input.val('');
        input.removeClass('placeholder');
      }
    }).blur(function () {
      var input = $(this);
      if (input.val() == '' || input.val() == input.attr('placeholder')) {
        input.addClass('placeholder');
        input.val(input.attr('placeholder'));
    }).blur();
    $('[placeholder]').parents('form').submit(function () {
      $(this).find('[placeholder]').each(function () {
        var input = $(this);
        if (input.val() == input.attr('placeholder')) {
          input.val('');
        }
      })
    });
  }
})
answered Mar 4, 2013 at 22:38
![]()
TheToddTheTodd
4454 silver badges12 bronze badges
В этой статье рассмотрим различные варианты стилизации текстовых полей HTML-форм. Сначала создадим базовый вариант оформления input, а затем множество других, дополняя каждый из них небольшим количеством CSS.
Введение
Веб-формы являются неотъемлемой частью многих веб-сайтов. Они позволяют пользователю ввести те или иные данные, которые затем отправляются на сервер или обрабатываются на стороне клиента, например, для изменения интерфейса.
Веб-формы также часто называют HTML-формами. Их проектирование осуществляется с помощью элементов управления форм (текстовых полей, выпадающих списков, кнопок, чекбоксов и т.д.) и некоторых дополнительных элементов, которые используются для придание форме определённой структуры.
Стилизация формы выполняется через CSS. В этом руководстве остановимся и подробно рассмотрим различные варианты оформления её текстовых полей.
Исходные коды примеров расположены на GitHub в папке text-field проекта «ui-components».
Нормализация стилей
1. Настройка box-sizing.
Обычно хорошей практикой считается для всех элементов включая псевдоэлементы установить box-sizing: border-box:
*, *::before, *::after {
  box-sizing: border-box;
}
В этом случае браузер при рассчитывании ширины и высоты элементов будет включать в них поля (padding) и границы (border). Как правило, это сильно упрощает работу с размерами элементов, и избавляет нас от множества проблем при размещении контента.
2. Нормализация стилей <input>.
Для того чтобы <input> в разных браузерах отображался как можно более одинаково необходимо добавить следующее:
/* 1 – Изменим стили шрифтов */
/* 2 – Удалим margin в Firefox и Safari */
input[type="text"] {
  font-family: inherit; /* 1 */
  font-size: inherit; /* 1 */
  line-height: inherit; /* 1 */
  margin: 0; /* 2 */
}
Базовый вариант оформления input
Для удобного добавления к элементам стилей создадим следующую HTML-разметку:
<div class="text-field">
  <label class="text-field__label" for="login">Логин</label>
  <input class="text-field__input" type="text" name="login" id="login" placeholder="Login" value="itchief">
</div>
Т.е. добавим к <input> с type="text" класс text-field__input, к <label> – text-field__label, а затем обернём их в элемент <div> с классом text-field.
Теперь напишем стили для этих элементов. А также сразу включим в них стили для нормализации, чтобы не добавлять их отдельно:
/* установим отступ 1rem от нижнего края элемента */
.text-field {
  margin-bottom: 1rem;
}
/* стили для label */
.text-field__label {
  display: block;
  margin-bottom: 0.25rem;
}
/* стили для input */
.text-field__input {
  display: block;
  width: 100%;
  height: calc(2.25rem + 2px);
  padding: 0.375rem 0.75rem;
  font-family: inherit;
  font-size: 1rem;
  font-weight: 400;
  line-height: 1.5;
  color: #212529;
  background-color: #fff;
  background-clip: padding-box;
  border: 1px solid #bdbdbd;
  border-radius: 0.25rem;
  transition: border-color 0.15s ease-in-out, box-shadow 0.15s ease-in-out;
}
Примененные CSS свойства к элементу <input>, и то, что они делают:
display: block– устанавливает блочное отображение;width: 100%– занимает всю доступную ширину;height: calc(2.25rem + 2px)– высота элемента определяется путём сложения 2.25rem (font-size * line-height + padding-top + padding-bottom) и 2px (ширина верхней и нижней границы);margin: 0– убираетmarginотступы;padding: 0.375rem 0.75rem– внутренние поля: сверху и снизу – 0.375rem, а слева и справа – 0.75rem;font-family: inherit– чтобы шрифт был такой как у родительского элемента, а не тот который браузер по умолчанию назначает для<input>;font-size: 1rem– устанавливает явный размер шрифта, иначе будет браться из стилей браузера для<input>;font-weight: 400– задаёт начертание шрифта;line-height: 1.5– высота строки (1.5 * размер шрифта);color: #212529– цвет шрифта;background-color: #fff– цвет фона;background-clip: padding-box– указывает, что фон (фоновое изображение) нужно рисовать только до внешнего края отступа (под границей не выводить);border: 1px solid #bdbdbd– устанавливает границу, у которой: 1px (толщина), solid (тип линии) и#bdbdbd(цвет);border-radius: 0.25rem– радиус скругления углов;transition: border-color 0.15s ease-in-out, box-shadow 0.15s ease-in-out– выполняет изменение значений свойствborder-colorиbox-shadowс анимацией длительностью 0.15 секунд посредством временной функциейease-in-out.
В результате получили следующее оформление:
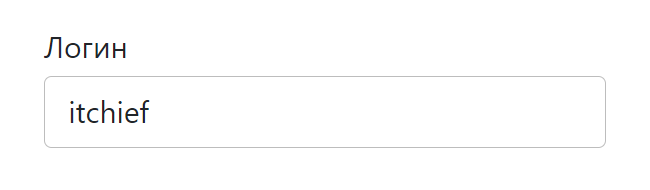
Посмотреть
Стилизуем плейсхолдер. По умолчанию плейсхолдер отображается полупрозрачным или светло-серым цветом. Получить его можно с помощью ::placeholder. Оформим его следующим образом:
.text-field__input::placeholder {
  color: #212529;
  opacity: 0.4;
}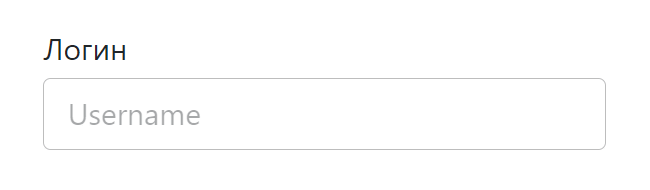
Посмотреть
Стили для <input> в состоянии фокуса (получить это состояние можно с помощью псевдокласса :focus):
.text-field__input:focus {
  color: #212529;
  background-color: #fff;
  border-color: #bdbdbd;
  outline: 0;
  box-shadow: 0 0 0 0.2rem rgba(158, 158, 158, 0.25);
}
Посмотреть
Оформление <input>, когда он находится в состоянии disabled и readonly:
<style>
.text-field__input:disabled,
.text-field__input[readonly] {
  background-color: #f5f5f5;
  opacity: 1;
}
</style>

<!-- disabled -->
<div class="text-field">
  <label for="firstname">Имя пользователя (disabled)</label>
  <input type="text" name="firstname" id="firstname" placeholder="Alaxander" disabled>
</div>
<!-- readonly -->
<div class="text-field">
  <label for="city">Город (readonly)</label>
  <input class="text-field__input" type="text" name="city" id="city" placeholder="Moscow" value="Moscow" readonly>
</div>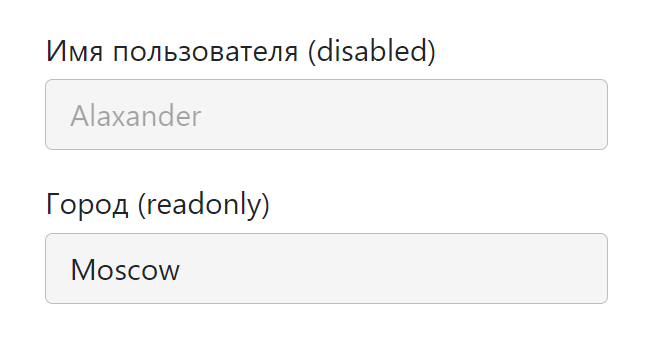
Посмотреть
Этот набор стилей будет у нас отправной точкой для создания других.
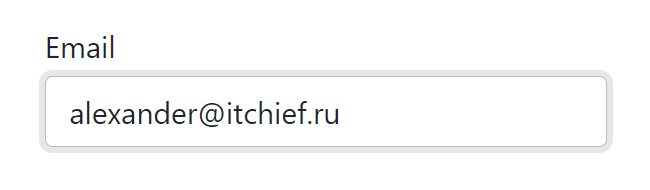
input с иконкой
Рассмотрим пример вставки в input иконки с помощью псевдоэлементов.
Для этого дополнительно обернём элемент <input> в <div> с классами text-field__icon text-field__icon_email:
<div class="text-field">
  <label class="text-field__label" for="email">Email</label>
  <div class="text-field__icon text-field__icon_email">
    <input class="text-field__input" type="email" placeholder="alexander@itchief.ru" value="alexander@itchief.ru">
  </div>
</div>
<div class="text-field">
  <label class="text-field__label" for="text">Найти</label>
  <div class="text-field__icon text-field__icon_search">
    <input class="text-field__input" type="text" placeholder="css" value="css уроки">
  </div>
</div>
Первый класс (text-field__icon) будем использовать для того, чтобы установить относительное позиционирование (position: relative). Это действие позволит нам разместить иконку в нужном месте относительно input, используя уже абсолютное позиционирование (position: absolute). Второй класс (text-field__icon_email) будет определять иконку, которую мы хотим вставить.
.text-field__icon {
  position: relative;
}
.text-field__icon::before {
  content: '';
  color: #bdbdbd;
  position: absolute;
  display: flex;
  align-items: center;
  top: 0;
  bottom: 0;
  left: 0.625rem;
  top: 50%;
  transform: translateY(-50%);
}
.text-field__icon .text-field__input {
  padding-left: 2rem;
}
/* email значок */
.text-field__icon_email::before {
  content: '@';
}
/* иконка лупы */
.text-field__icon_search::before {
  width: 1rem;
  background-image: url("data:image/svg+xml,%3Csvg xmlns='http://www.w3.org/2000/svg' width='16' height='16' fill='%23bdbdbd' viewBox='0 0 16 16'%3E%3Cpath d='M11.742 10.344a6.5 6.5 0 1 0-1.397 1.398h-.001c.03.04.062.078.098.115l3.85 3.85a1 1 0 0 0 1.415-1.414l-3.85-3.85a1.007 1.007 0 0 0-.115-.1zM12 6.5a5.5 5.5 0 1 1-11 0 5.5 5.5 0 0 1 11 0z'%3E%3C/path%3E%3C/svg%3E");
  background-repeat: no-repeat;
  background-position: center;
}![]()
Посмотреть
Ещё один вариант оформления:
![]()
Посмотреть
input с активной svg-иконкой
В этом примере поместим в input иконку, на которую можно нажать.
<div class="text-field">
  <label class="text-field__label" for="search">Найти</label>
  <div class="text-field__icon">
    <input class="text-field__input" type="search" name="search" id="search" placeholder="css" value="css уроки">
    <span class="text-field__aicon">
      <svg xmlns="http://www.w3.org/2000/svg" width="16" height="16" fill="currentColor" viewBox="0 0 16 16"><path d="M11.742 10.344a6.5 6.5 0 1 0-1.397 1.398h-.001c.03.04.062.078.098.115l3.85 3.85a1 1 0 0 0 1.415-1.414l-3.85-3.85a1.007 1.007 0 0 0-.115-.1zM12 6.5a5.5 5.5 0 1 1-11 0 5.5 5.5 0 0 1 11 0z" /></svg>
    </span>
  </div>
</div>
Для этого мы также как и в предыдущем примере обернули <input> в <div class="text-field__icon">...<div>. Саму svg-иконку обернули в <span> с классом text-field__aicon и поместили рядом с <input>.
Оформление выполнили так:
.text-field__icon {
  position: relative;
}
.text-field__icon input {
  padding-right: 2.5rem;
}
.text-field__aicon {
  position: absolute;
  display: flex;
  align-items: center;
  top: 0;
  bottom: 0;
  right: 0.875rem;
  width: 1rem;
  cursor: pointer;
  color: #bdbdbd;
  transition: color 0.15s ease-in-out;
}
.text-field__aicon:hover {
  color: #212529;
}![]()
Посмотреть
Ещё пример вставки иконки в input:
![]()
Посмотреть
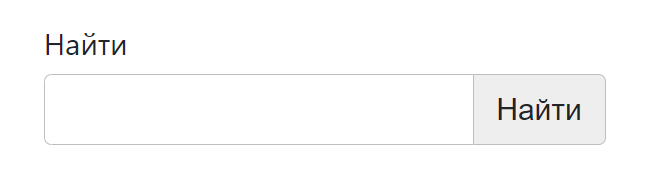
input с кнопкой
HTML-разметка input с кнопкой:
<div class="text-field">
  <label class="text-field__label" for="search">Найти</label>
  <div class="text-field__group">
    <input class="text-field__input" type="search" id="search" name="search">
    <button class="text-field__btn" type="button">Найти</button>
  </div>
</div>
Расположение кнопки справа от input выполним с помощью флексов:
.text-field__group {
  display: flex;
}
/* кнопка */
.text-field__btn {
  display: inline-block;
  font-weight: 400;
  line-height: 1.5;
  color: #212529;
  text-align: center;
  vertical-align: middle;
  cursor: pointer;
  -webkit-user-select: none;
  -moz-user-select: none;
  user-select: none;
  background-color: #eee;
  border: 1px solid #bdbdbd;
  padding: .375rem .75rem;
  font-size: 1rem;
  border-radius: .25rem;
  transition: background-color .15s ease-in-out;
}
.text-field__btn:hover {
  background-color: #bdbdbd;
}
.text-field__group .text-field__input {
  border-top-right-radius: 0;
  border-bottom-right-radius: 0;
  position: relative;
  z-index: 2;
}
.text-field__group .text-field__btn {
  position: relative;
  border-top-left-radius: 0;
  border-bottom-left-radius: 0;
  border-left-width: 0;
}
Посмотреть
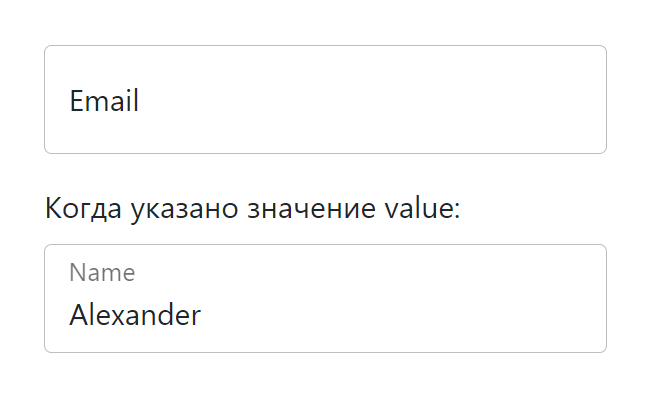
input с плавающим label
Разметка input с плавающим label:
<div class="text-field text-field_floating">
  <input class="text-field__input" type="email" id="email" placeholder="alexander@itchief.ru">
  <label class="text-field__label" for="email">Email</label>
</div>
<p>Когда указано значение value:</p>
<div class="text-field text-field_floating">
  <input class="text-field__input" type="name" id="name" value="Alexander">
  <label class="text-field__label" for="name">Name</label>
</div>
CSS код:
.text-field_floating {
  position: relative;
}
.text-field_floating .text-field__input {
  height: calc(3.5rem + 2px);
  line-height: 1.25;
  padding: 1rem 0.75rem;
}
.text-field_floating .text-field__label {
  position: absolute;
  top: 0;
  left: 0;
  height: 100%;
  padding: 1rem .75rem;
  pointer-events: none;
  border: 1px solid transparent;
  transform-origin: 0 0;
  transition: opacity .15s ease-in-out, transform .15s ease-in-out;
}
.text-field_floating .text-field__input::-moz-placeholder {
  color: transparent;
}
.text-field_floating .text-field__input::placeholder {
  color: transparent;
}
.text-field_floating .text-field__input:focus,
.text-field_floating .text-field__input:not(:placeholder-shown) {
  padding-top: 1.625rem;
  padding-bottom: .625rem;
}
.text-field_floating .text-field__input:focus~.text-field__label,
.text-field_floating .text-field__input:not(:placeholder-shown)~.text-field__label {
  opacity: .65;
  transform: scale(.85) translateY(-.75rem) translateX(.15rem);
}
Посмотреть
Ещё один вариант с «плавающей» меткой:
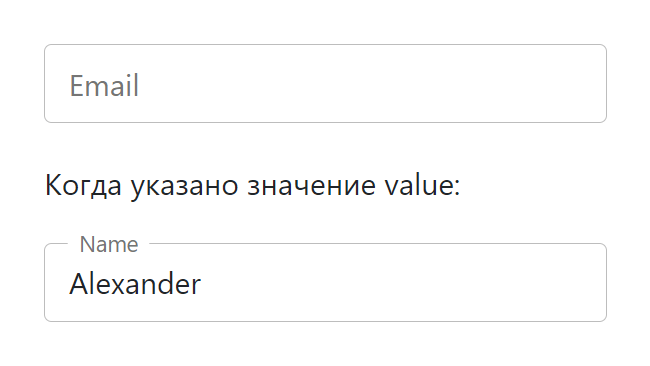
Посмотреть
Третий вариант:
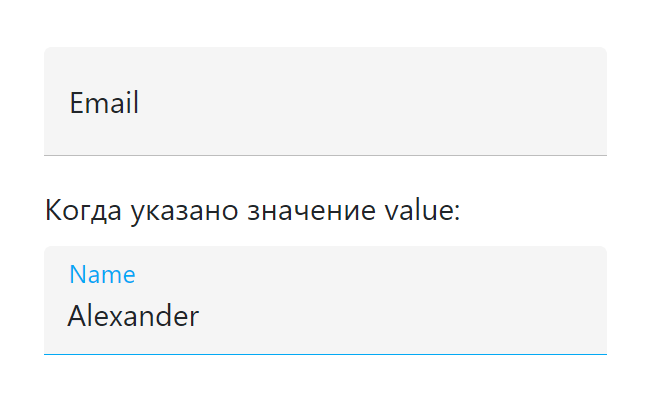
Посмотреть
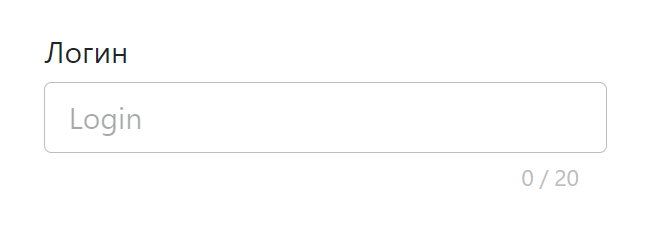
input со счётчиком символов
Пример в котором под input отображается количество набранных символов и максимальная длина:
Посмотреть
Это выполняется посредством следующего кода:
<div class="text-field">
<label class="text-field__label" for="login">Логин</label>
<input class="text-field__input" type="text" name="login" id="login" placeholder="Login" maxlength="20" required>
<div class="text-field__counter"></div>
</div>
<script>
const elemLogin = document.querySelector('#login');
const elemCounter = elemLogin.nextElementSibling;
const maxLength = elemLogin.maxLength;
const updateCounter = (e) => {
const len = e ? e.target.value.length : 0;
elemCounter.textContent = `${len} / ${maxLength}`;
}
updateCounter();
elemLogin.addEventListener('keyup', updateCounter);
elemLogin.addEventListener('keydown', updateCounter);
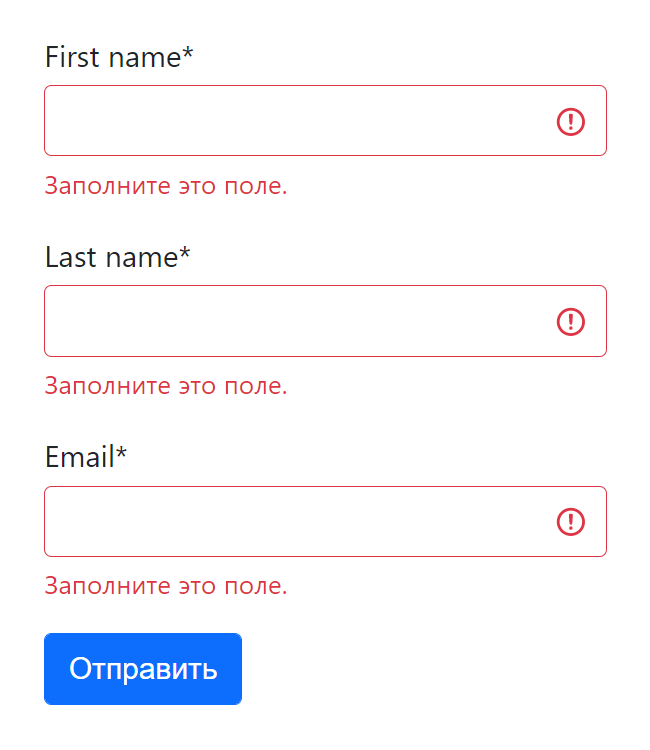
</script>Стили для отображения состояния валидации input
Применить стили в зависимости от состояния поля в CSS можно с помощью специальных псевдоклассов. Например, :valid позволяет выбрать валидные элементы, а :invalid — не валидные.
.text-field__input:invalid,
.text-field__input:valid {
border-color: #dc3545;
padding-right: 2.25rem;
background-image: url("data:image/svg+xml,%3csvg xmlns='http://www.w3.org/2000/svg' viewBox='0 0 12 12' width='12' height='12' fill='none' stroke='%23dc3545'%3e%3ccircle cx='6' cy='6' r='4.5'/%3e%3cpath stroke-linejoin='round' d='M5.8 3.6h.4L6 6.5z'/%3e%3ccircle cx='6' cy='8.2' r='.6' fill='%23dc3545' stroke='none'/%3e%3c/svg%3e");
background-repeat: no-repeat;
background-position: right 0.5625rem center;
background-size: 1.125rem 1.125rem;
}
.text-field__input:valid {
border-color: #198754;
background-image: url("data:image/svg+xml,%3csvg xmlns='http://www.w3.org/2000/svg' viewBox='0 0 8 8'%3e%3cpath fill='%23198754' d='M2.3 6.73L.6 4.53c-.4-1.04.46-1.4 1.1-.8l1.1 1.4 3.4-3.8c.6-.63 1.6-.27 1.2.7l-4 4.6c-.43.5-.8.4-1.1.1z'/%3e%3c/svg%3e");
}
.text-field__input:invalid:focus {
border-color: #dc3545;
box-shadow: 0 0 0 0.25rem rgba(220, 53, 69, 0.25);
}
.text-field__input:valid:focus {
border-color: #198754;
box-shadow: 0 0 0 0.25rem rgb(25 135 84 / 25%);
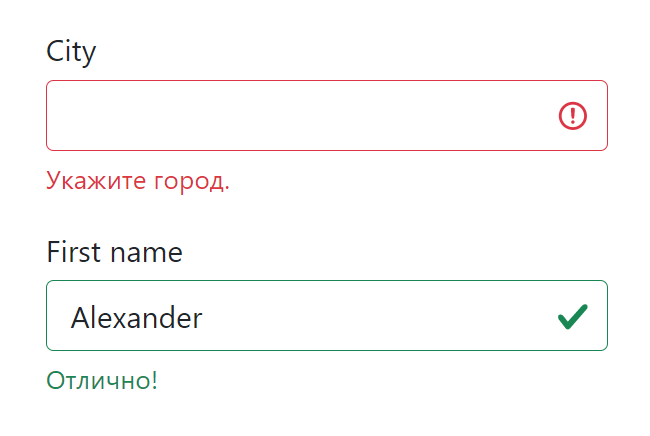
}Но, если вы хотите контролировать этот процесс и добавлять стили с помощью JavaScript, то тогда лучше это делать через классы. Например, использовать класс text-field__input_valid при успешной валидации, а
text-field__input_invalid — при не успешной. Их следует добавлять к <input>.
<div class="text-field">
<label class="text-field__label" for="city">City</label>
<!-- text-field__input_invalid -->
<input class="text-field__input text-field__input_invalid" type="text" name="city" id="city">
<div class="text-field__message">Укажите город.</div>
</div>
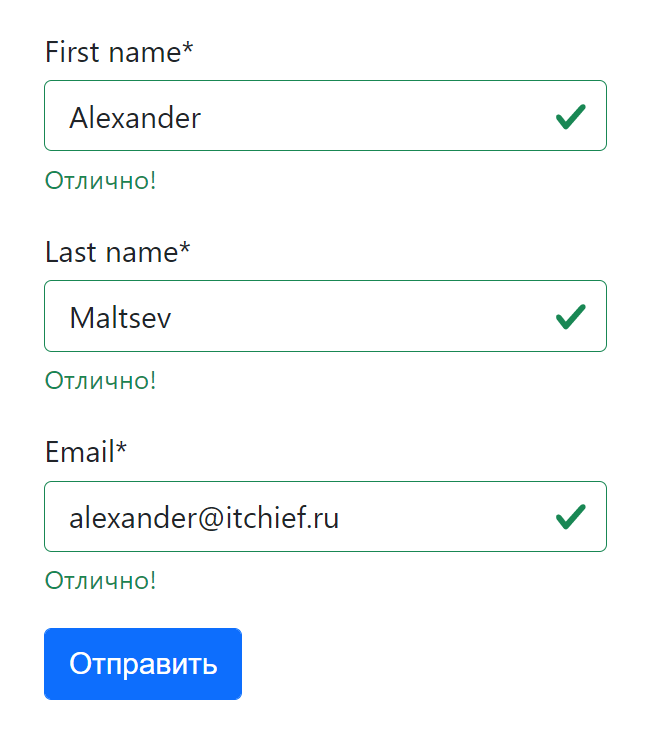
<div class="text-field">
<label class="text-field__label" for="username">First name</label>
<!-- text-field__input_valid -->
<input class="text-field__input text-field__input_valid" type="text" name="firstname" id="firstname"
value="Alexander">
<div class="text-field__message">Отлично!</div>
</div>
Отображать сообщения пользователю или подсказки можно через <div class="text-field__message">...</div>.
Посмотреть
Для <input> с плавающим <label>:
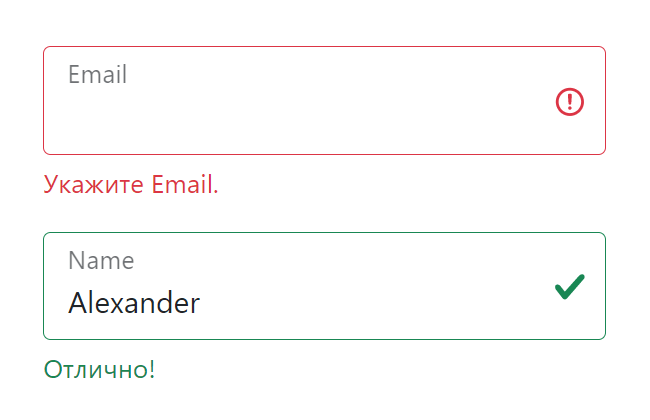
Посмотреть

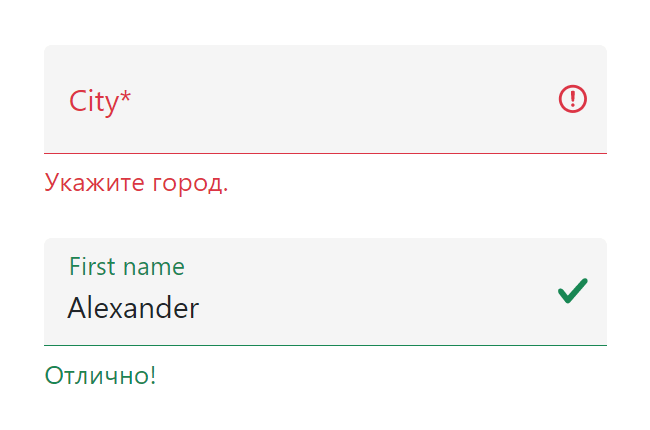
Посмотреть
Посмотреть
Пример валидации формы с помощью JavaScript
Валидацию элементов формы будем осуществлять с помощью функции checkValidity(). После этого, в зависимости от её результата, будем добавлять той или иной класс к <input>, а также сообщение (input.validationMessage) в элемент .text-field__message.
// input - переменная, содержащая элемент <input>
if (input.checkValidity()) {
  input.classList.add('text-field__input_valid');
  input.nextElementSibling.textContent = 'Отлично!';
} else {
  input.classList.add('text-field__input_invalid');
  input.nextElementSibling.textContent = input.validationMessage;
}
Т.к. мы будем сами отображать сообщения, то необходимо отключить стандартные подсказки браузера. Для этого к тегу <form> необходимо добавить атрибут novalidate:
<form id="form" action="#" novalidate>
  ...
</form>
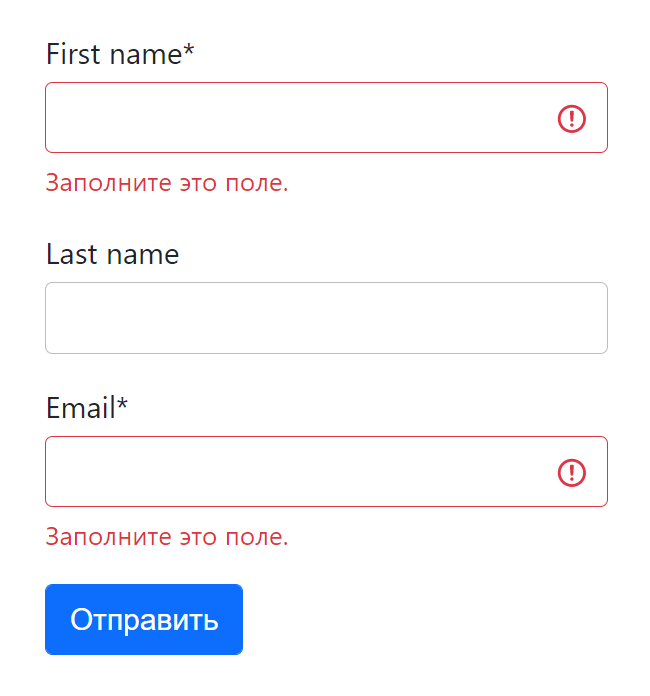
Клиентская проверка формы после нажатия «Отправить»:
Посмотреть
Пример валидации формы в реальном времени:
Посмотреть
Отображение только ошибок:
Посмотреть
The <input> HTML element is used to create interactive controls for web-based forms in order to accept data from the user; a wide variety of types of input data and control widgets are available, depending on the device and user agent. The <input> element is one of the most powerful and complex in all of HTML due to the sheer number of combinations of input types and attributes.
Try it
<input> types
How an <input> works varies considerably depending on the value of its type attribute, hence the different types are covered in their own separate reference pages. If this attribute is not specified, the default type adopted is text.
The available types are as follows:
| Type | Description | Basic Examples |
|---|---|---|
| button | A push button with no default behavior displaying the value of the value attribute, empty by default. |
|
| checkbox | A check box allowing single values to be selected/deselected. |
|
| color | A control for specifying a color; opening a color picker when active in supporting browsers. |
|
| date |
A control for entering a date (year, month, and day, with no time). Opens a date picker or numeric wheels for year, month, day when active in supporting browsers. |
|
| datetime-local |
A control for entering a date and time, with no time zone. Opens a date picker or numeric wheels for date- and time-components when active in supporting browsers. |
|
A field for editing an email address. Looks like atext input, but has validation parameters and relevantkeyboard in supporting browsers and devices with dynamic keyboards. |
|
|
| file |
A control that lets the user select a file. Use the accept attribute to define the types of files that the control can select.
|
|
| hidden |
A control that is not displayed but whose value is submitted to the server. There is an example in the next column, but it’s hidden! |
|
| image |
A graphical submit button. Displays an image defined by the src attribute.The alt attribute displays if the image src is missing.
|
|
| month | A control for entering a month and year, with no time zone. |
|
| number |
A control for entering a number. Displays a spinner and adds default validation. Displays a numeric keypad in some devices with dynamic keypads. |
|
| password |
A single-line text field whose value is obscured. Will alert user if site is not secure. |
|
| radio | A radio button, allowing a single value to be selected out of multiple choices with the same name value. |
|
| range |
A control for entering a number whose exact value is not important. Displays as a range widget defaulting to the middle value. Used in conjunction min and max to define the range of acceptable values.
|
|
| reset | A button that resets the contents of the form to default values. Not recommended. |
|
| search |
A single-line text field for entering search strings. Line-breaks are automatically removed from the input value. May include a delete icon in supporting browsers that can be used to clear the field. Displays a search icon instead of enter key on some devices with dynamic keypads. |
|
| submit | A button that submits the form. |
|
| tel |
A control for entering a telephone number. Displays a telephone keypad in some devices with dynamic keypads. |
|
| text |
The default value. A single-line text field. Line-breaks are automatically removed from the input value. |
|
| time | A control for entering a time value with no time zone. |
|
| url |
A field for entering a URL. Looks like a text input, buthas validation parameters and relevant keyboard in supporting browsers and devices with dynamic keyboards. |
|
| week | A control for entering a date consisting of a week-year number and a week number with no time zone. |
|
| Obsolete values | ||
datetime Deprecated |
A control for entering a date and time (hour, minute, second, and fraction of a second) based on UTC time zone. |
|
Attributes
The <input> element is so powerful because of its attributes; the type attribute, described with examples above, being the most important. Since every <input> element, regardless of type, is based on the HTMLInputElement interface, they technically share the exact same set of attributes. However, in reality, most attributes have an effect on only a specific subset of input types. In addition, the way some attributes impact an input depends on the input type, impacting different input types in different ways.
This section provides a table listing all the attributes with a brief description. This table is followed by a list describing each attribute in greater detail, along with which input types they are associated with. Those that are common to most or all input types are defined in greater detail below. Attributes that are unique to particular input types—or attributes which are common to all input types but have special behaviors when used on a given input type—are instead documented on those types’ pages.
Attributes for the <input> element include the global HTML attributes and additionally:
| Attribute | Type or Types | Description |
|---|---|---|
accept |
file |
Hint for expected file type in file upload controls |
alt |
image |
alt attribute for the image type. Required for accessibility |
autocomplete |
all except checkbox, radio, and buttons |
Hint for form autofill feature |
capture |
file |
Media capture input method in file upload controls |
checked |
checkbox, radio |
Whether the command or control is checked |
dirname |
search, text |
Name of form field to use for sending the element’s directionality in form submission |
disabled |
all | Whether the form control is disabled |
form |
all | Associates the control with a form element |
formaction |
image, submit |
URL to use for form submission |
formenctype |
image, submit |
Form data set encoding type to use for form submission |
formmethod |
image, submit |
HTTP method to use for form submission |
formnovalidate |
image, submit |
Bypass form control validation for form submission |
formtarget |
image, submit |
Browsing context for form submission |
height |
image |
Same as height attribute for <img>; vertical dimension |
list |
all except hidden, password, checkbox, radio, and buttons |
Value of the id attribute of the <datalist> of autocomplete options |
max |
date, month, week, time, datetime-local, number, range |
Maximum value |
maxlength |
text, search, url, tel, email, password |
Maximum length (number of characters) of value |
min |
date, month, week, time, datetime-local, number, range |
Minimum value |
minlength |
text, search, url, tel, email, password |
Minimum length (number of characters) of value |
multiple |
email, file |
Boolean. Whether to allow multiple values |
name |
all | Name of the form control. Submitted with the form as part of a name/value pair |
pattern |
text, search, url, tel, email, password |
Pattern the value must match to be valid |
placeholder |
text, search, url, tel, email, password, number |
Text that appears in the form control when it has no value set |
readonly |
all except hidden, range, color, checkbox, radio, and buttons |
Boolean. The value is not editable |
required |
all except hidden, range, color, and buttons |
Boolean. A value is required or must be check for the form to be submittable |
size |
text, search, url, tel, email, password |
Size of the control |
src |
image |
Same as src attribute for <img>; address of image resource |
step |
date, month, week, time, datetime-local, number, range |
Incremental values that are valid |
type |
all | Type of form control |
value |
all except image |
The initial value of the control |
width |
image |
Same as width attribute for <img> |
A few additional non-standard attributes are listed following the descriptions of the standard attributes.
Individual attributes
accept-
Valid for the
fileinput type only, theacceptattribute defines which file types are selectable in afileupload control. See the file input type. alt-
Valid for the
imagebutton only, thealtattribute provides alternative text for the image, displaying the value of the attribute if the imagesrcis missing or otherwise fails to load. See the image input type. autocomplete-
(Not a Boolean attribute!) The
autocompleteattribute takes as its value a space-separated string that describes what, if any, type of autocomplete functionality the input should provide. A typical implementation of autocomplete recalls previous values entered in the same input field, but more complex forms of autocomplete can exist. For instance, a browser could integrate with a device’s contacts list to autocompleteemailaddresses in an email input field. Seeautocompletefor permitted values.The
autocompleteattribute is valid onhidden,text,search,url,tel,email,date,month,week,time,datetime-local,number,range,color, andpassword. This attribute has no effect on input types that do not return numeric or text data, being valid for all input types exceptcheckbox,radio,file, or any of the button types.See the
autocompleteattribute for additional information, including information on password security and howautocompleteis slightly different forhiddenthan for other input types. autofocus-
A Boolean attribute which, if present, indicates that the input should automatically have focus when the page has finished loading (or when the
<dialog>containing the element has been displayed).Note: An element with the
autofocusattribute may gain focus before theDOMContentLoadedevent is fired.No more than one element in the document may have the
autofocusattribute. If put on more than one element, the first one with the attribute receives focus.The
autofocusattribute cannot be used on inputs of typehidden, since hidden inputs cannot be focused.Warning: Automatically focusing a form control can confuse visually-impaired people using screen-reading technology and people with cognitive impairments. When
autofocusis assigned, screen-readers «teleport» their user to the form control without warning them beforehand.Use careful consideration for accessibility when applying the
autofocusattribute. Automatically focusing on a control can cause the page to scroll on load. The focus can also cause dynamic keyboards to display on some touch devices. While a screen reader will announce the label of the form control receiving focus, the screen reader will not announce anything before the label, and the sighted user on a small device will equally miss the context created by the preceding content. capture-
Introduced in the HTML Media Capture specification and valid for the
fileinput type only, thecaptureattribute defines which media—microphone, video, or camera—should be used to capture a new file for upload withfileupload control in supporting scenarios. See the file input type. checked-
Valid for both
radioandcheckboxtypes,checkedis a Boolean attribute. If present on aradiotype, it indicates that the radio button is the currently selected one in the group of same-named radio buttons. If present on acheckboxtype, it indicates that the checkbox is checked by default (when the page loads). It does not indicate whether this checkbox is currently checked: if the checkbox’s state is changed, this content attribute does not reflect the change. (Only theHTMLInputElement‘scheckedIDL attribute is updated.)Note: Unlike other input controls, a checkboxes and radio buttons value are only included in the submitted data if they are currently
checked. If they are, the name and the value(s) of the checked controls are submitted.For example, if a checkbox whose
nameisfruithas avalueofcherry, and the checkbox is checked, the form data submitted will includefruit=cherry. If the checkbox isn’t active, it isn’t listed in the form data at all. The defaultvaluefor checkboxes and radio buttons ison. dirname-
Valid for
textandsearchinput types only, thedirnameattribute enables the submission of the directionality of the element. When included, the form control will submit with two name/value pairs: the first being thenameandvalue, the second being the value of thedirnameas the name with the value ofltrorrtlbeing set by the browser.<form action="page.html" method="post"> <label >Fruit: <input type="text" name="fruit" dirname="fruit.dir" value="cherry" /> </label> <input type="submit" /> </form> <!-- page.html?fruit=cherry&fruit.dir=ltr -->When the form above is submitted, the input cause both the
name/valuepair offruit=cherryand thedirname/ direction pair offruit.dir=ltrto be sent. disabled-
A Boolean attribute which, if present, indicates that the user should not be able to interact with the input. Disabled inputs are typically rendered with a dimmer color or using some other form of indication that the field is not available for use.
Specifically, disabled inputs do not receive the
clickevent, and disabled inputs are not submitted with the form.Note: Although not required by the specification, Firefox will by default persist the dynamic disabled state of an
<input>across page loads. Use theautocompleteattribute to control this feature. form-
A string specifying the
<form>element with which the input is associated (that is, its form owner). This string’s value, if present, must match theidof a<form>element in the same document. If this attribute isn’t specified, the<input>element is associated with the nearest containing form, if any.The
formattribute lets you place an input anywhere in the document but have it included with a form elsewhere in the document.Note: An input can only be associated with one form.
formaction-
Valid for the
imageandsubmitinput types only. See the submit input type for more information. formenctype-
Valid for the
imageandsubmitinput types only. See the submit input type for more information. formmethod-
Valid for the
imageandsubmitinput types only. See the submit input type for more information. formnovalidate-
Valid for the
imageandsubmitinput types only. See the submit input type for more information. formtarget-
Valid for the
imageandsubmitinput types only. See the submit input type for more information. height-
Valid for the
imageinput button only, theheightis the height of the image file to display to represent the graphical submit button. See the image input type. id-
Global attribute valid for all elements, including all the input types, it defines a unique identifier (ID) which must be unique in the whole document. Its purpose is to identify the element when linking. The value is used as the value of the
<label>‘sforattribute to link the label with the form control. See<label>. inputmode-
Global value valid for all elements, it provides a hint to browsers as to the type of virtual keyboard configuration to use when editing this element or its contents. Values include
none,text,tel,url,email,numeric,decimal, andsearch. list-
The value given to the
listattribute should be theidof a<datalist>element located in the same document. The<datalist>provides a list of predefined values to suggest to the user for this input. Any values in the list that are not compatible with thetypeare not included in the suggested options. The values provided are suggestions, not requirements: users can select from this predefined list or provide a different value.It is valid on
text,search,url,tel,email,date,month,week,time,datetime-local,number,range, andcolor.Per the specifications, the
listattribute is not supported by thehidden,password,checkbox,radio,file, or any of the button types.Depending on the browser, the user may see a custom color palette suggested, tic marks along a range, or even an input that opens like a
<select>but allows for non-listed values. Check out the browser compatibility table for the other input types.See the
<datalist>element. max-
Valid for
date,month,week,time,datetime-local,number, andrange, it defines the greatest value in the range of permitted values. If thevalueentered into the element exceeds this, the element fails constraint validation. If the value of themaxattribute isn’t a number, then the element has no maximum value.There is a special case: if the data type is periodic (such as for dates or times), the value of
maxmay be lower than the value ofmin, which indicates that the range may wrap around; for example, this allows you to specify a time range from 10 PM to 4 AM. maxlength-
Valid for
text,search,url,tel,email, andpassword, it defines the maximum number of characters (as UTF-16 code units) the user can enter into the field. This must be an integer value0or higher. If nomaxlengthis specified, or an invalid value is specified, the field has no maximum length. This value must also be greater than or equal to the value ofminlength.The input will fail constraint validation if the length of the text entered into the field is greater than
maxlengthUTF-16 code units long. By default, browsers prevent users from entering more characters than allowed by themaxlengthattribute. See Client-side validation for more information. min-
Valid for
date,month,week,time,datetime-local,number, andrange, it defines the most negative value in the range of permitted values. If thevalueentered into the element is less than this, the element fails constraint validation. If the value of theminattribute isn’t a number, then the element has no minimum value.This value must be less than or equal to the value of the
maxattribute. If theminattribute is present but is not specified or is invalid, nominvalue is applied. If theminattribute is valid and a non-empty value is less than the minimum allowed by theminattribute, constraint validation will prevent form submission. See Client-side validation for more information.There is a special case: if the data type is periodic (such as for dates or times), the value of
maxmay be lower than the value ofmin, which indicates that the range may wrap around; for example, this allows you to specify a time range from 10 PM to 4 AM. minlength-
Valid for
text,search,url,tel,email, andpassword, it defines the minimum number of characters (as UTF-16 code units) the user can enter into the entry field. This must be a non-negative integer value smaller than or equal to the value specified bymaxlength. If nominlengthis specified, or an invalid value is specified, the input has no minimum length.The input will fail constraint validation if the length of the text entered into the field is fewer than
minlengthUTF-16 code units long, preventing form submission. See Client-side validation for more information. multiple-
The Boolean
multipleattribute, if set, means the user can enter comma separated email addresses in the email widget or can choose more than one file with thefileinput. See the email and file input type. name-
A string specifying a name for the input control. This name is submitted along with the control’s value when the form data is submitted.
Consider the
namea required attribute (even though it’s not). If an input has nonamespecified, ornameis empty, the input’s value is not submitted with the form! (Disabled controls, unchecked radio buttons, unchecked checkboxes, and reset buttons are also not sent.)There are two special cases:
_charset_: If used as the name of an<input>element of type hidden, the input’svalueis automatically set by the user agent to the character encoding being used to submit the form.isindex: For historical reasons, the nameisindexis not allowed.
The
nameattribute creates a unique behavior for radio buttons.Only one radio button in a same-named group of radio buttons can be checked at a time. Selecting any radio button in that group automatically deselects any currently-selected radio button in the same group. The value of that one checked radio button is sent along with the name if the form is submitted,
When tabbing into a series of same-named group of radio buttons, if one is checked, that one will receive focus. If they aren’t grouped together in source order, if one of the group is checked, tabbing into the group starts when the first one in the group is encountered, skipping all those that aren’t checked. In other words, if one is checked, tabbing skips the unchecked radio buttons in the group. If none are checked, the radio button group receives focus when the first button in the same name group is reached.
Once one of the radio buttons in a group has focus, using the arrow keys will navigate through all the radio buttons of the same name, even if the radio buttons are not grouped together in the source order.
When an input element is given a
name, that name becomes a property of the owning form element’sHTMLFormElement.elementsproperty. If you have an input whosenameis set toguestand another whosenameishat-size, the following code can be used:let form = document.querySelector("form"); let guestName = form.elements.guest; let hatSize = form.elements["hat-size"];When this code has run,
guestNamewill be theHTMLInputElementfor theguestfield, andhatSizethe object for thehat-sizefield.Warning: Avoid giving form elements a
namethat corresponds to a built-in property of the form, since you would then override the predefined property or method with this reference to the corresponding input. pattern-
Valid for
text,search,url,tel,email, andpassword, thepatternattribute defines a regular expression that the input’svaluemust match in order for the value to pass constraint validation. It must be a valid JavaScript regular expression, as used by theRegExptype, and as documented in our guide on regular expressions; the'u'flag is specified when compiling the regular expression, so that the pattern is treated as a sequence of Unicode code points, instead of as ASCII. No forward slashes should be specified around the pattern text.If the
patternattribute is present but is not specified or is invalid, no regular expression is applied and this attribute is ignored completely. If the pattern attribute is valid and a non-empty value does not match the pattern, constraint validation will prevent form submission.Note: If using the
patternattribute, inform the user about the expected format by including explanatory text nearby. You can also include atitleattribute to explain what the requirements are to match the pattern; most browsers will display this title as a tooltip. The visible explanation is required for accessibility. The tooltip is an enhancement.See Client-side validation for more information.
placeholder-
Valid for
text,search,url,tel,email,password, andnumber, theplaceholderattribute provides a brief hint to the user as to what kind of information is expected in the field. It should be a word or short phrase that provides a hint as to the expected type of data, rather than an explanation or prompt. The text must not include carriage returns or line feeds. So for example if a field is expected to capture a user’s first name, and its label is «First Name», a suitable placeholder might be «e.g. Mustafa».Note: The
placeholderattribute is not as semantically useful as other ways to explain your form, and can cause unexpected technical issues with your content. See Labels for more information. readonly-
A Boolean attribute which, if present, indicates that the user should not be able to edit the value of the input. The
readonlyattribute is supported by thetext,search,url,tel,email,date,month,week,time,datetime-local,number, andpasswordinput types.See the HTML attribute:
readonlyfor more information. required-
requiredis a Boolean attribute which, if present, indicates that the user must specify a value for the input before the owning form can be submitted. Therequiredattribute is supported bytext,search,url,tel,email,date,month,week,time,datetime-local,number,password,checkbox,radio, andfileinputs.See Client-side validation and the HTML attribute:
requiredfor more information. size-
Valid for
email,password,tel,url, andtext, thesizeattribute specifies how much of the input is shown. Basically creates same result as setting CSSwidthproperty with a few specialities. The actual unit of the value depends on the input type. Forpasswordandtext, it is a number of characters (oremunits) with a default value of20, and for others, it is pixels (orpxunits). CSSwidthtakes precedence over thesizeattribute. src-
Valid for the
imageinput button only, thesrcis string specifying the URL of the image file to display to represent the graphical submit button. See the image input type. step-
Valid for
date,month,week,time,datetime-local,number, andrange, thestepattribute is a number that specifies the granularity that the value must adhere to.If not explicitly included:
stepdefaults to 1 fornumberandrange.- Each date/time input type has a default
stepvalue appropriate for the type; see the individual input pages:date,datetime-local,month,time, andweek.
The value must be a positive number—integer or float—or the special value
any, which means no stepping is implied, and any value is allowed (barring other constraints, such asminandmax).If
anyis not explicitly set, valid values for thenumber, date/time input types, andrangeinput types are equal to the basis for stepping — theminvalue and increments of the step value, up to themaxvalue, if specified.For example, if you have
<input type="number" min="10" step="2">, then any even integer,10or greater, is valid. If omitted,<input type="number">, any integer is valid, but floats (like4.2) are not valid, becausestepdefaults to1. For4.2to be valid,stepwould have had to be set toany, 0.1, 0.2, or any theminvalue would have had to be a number ending in.2, such as<input type="number" min="-5.2">Note: When the data entered by the user doesn’t adhere to the stepping configuration, the value is considered invalid in constraint validation and will match the
:invalidpseudoclass.See Client-side validation for more information.
tabindex-
Global attribute valid for all elements, including all the input types, an integer attribute indicating if the element can take input focus (is focusable), if it should participate to sequential keyboard navigation. As all input types except for input of type hidden are focusable, this attribute should not be used on form controls, because doing so would require the management of the focus order for all elements within the document with the risk of harming usability and accessibility if done incorrectly.
title-
Global attribute valid for all elements, including all input types, containing a text representing advisory information related to the element it belongs to. Such information can typically, but not necessarily, be presented to the user as a tooltip. The title should NOT be used as the primary explanation of the purpose of the form control. Instead, use the
<label>element with aforattribute set to the form control’sidattribute. See Labels below. type-
A string specifying the type of control to render. For example, to create a checkbox, a value of
checkboxis used. If omitted (or an unknown value is specified), the input typetextis used, creating a plaintext input field.Permitted values are listed in Input types above.
value-
The input control’s value. When specified in the HTML, this is the initial value, and from then on it can be altered or retrieved at any time using JavaScript to access the respective
HTMLInputElementobject’svalueproperty. Thevalueattribute is always optional, though should be considered mandatory forcheckbox,radio, andhidden. width-
Valid for the
imageinput button only, thewidthis the width of the image file to display to represent the graphical submit button. See the image input type.
Non-standard attributes
The following non-standard attributes are also available on some browsers. As a general rule, you should avoid using them unless it can’t be helped.
| Attribute | Description |
|---|---|
autocorrect |
A string indicating whether autocorrect is on or off. Safari only. |
incremental |
Whether or not to send repeated searchevents to allow updating live search results while the user is still editing the value of the field. WebKit and Blink only (Safari, Chrome, Opera, etc.). |
mozactionhint |
A string indicating the type of action that will be taken when the user Deprecated: use |
orient |
Sets the orientation of the range slider. Firefox only. |
results |
The maximum number of items that should be displayed in the drop-down list of previous search queries. Safari only. |
webkitdirectory |
A Boolean indicating whether to only allow the user to choose a directory (or directories, if multiple is also present) |
autocorrect
Non-standard
-
(Safari only). A string which indicates whether to activate automatic correction while the user is editing this field. Permitted values are:
on-
Enable automatic correction of typos, as well as processing of text substitutions if any are configured.
off-
Disable automatic correction and text substitutions.
incremental
Non-standard
-
The Boolean attribute
incrementalis a WebKit and Blink extension (so supported by Safari, Opera, Chrome, etc.) which, if present, tells the user agent to process the input as a live search. As the user edits the value of the field, the user agent sendssearchevents to theHTMLInputElementobject representing the search box. This allows your code to update the search results in real time as the user edits the search.If
incrementalis not specified, thesearchevent is only sent when the user explicitly initiates a search (such as by pressing the Enter or Return key while editing the field).The
searchevent is rate-limited so that it is not sent more frequently than an implementation-defined interval. orient
Non-standard
-
Similar to the -moz-orient non-standard CSS property impacting the
<progress>and<meter>elements, theorientattribute defines the orientation of the range slider. Values includehorizontal, meaning the range is rendered horizontally, andvertical, where the range is rendered vertically. results
Non-standard
-
The
resultsattribute—supported only by Safari—is a numeric value that lets you override the maximum number of entries to be displayed in the<input>element’s natively-provided drop-down menu of previous search queries.The value must be a non-negative decimal number. If not provided, or an invalid value is given, the browser’s default maximum number of entries is used.
webkitdirectory
Non-standard
-
The Boolean
webkitdirectoryattribute, if present, indicates that only directories should be available to be selected by the user in the file picker interface. SeeHTMLInputElement.webkitdirectoryfor additional details and examples.Though originally implemented only for WebKit-based browsers,
webkitdirectoryis also usable in Microsoft Edge as well as Firefox 50 and later. However, even though it has relatively broad support, it is still not standard and should not be used unless you have no alternative.
Methods
The following methods are provided by the HTMLInputElement interface which represents <input> elements in the DOM. Also available are those methods specified by the parent interfaces, HTMLElement, Element, Node, and EventTarget.
checkValidity()-
Returns
trueif the element’s value passes validity checks; otherwise, returnsfalseand fires aninvalidevent at the element. reportValidity()-
Returns
trueif the element’s value passes validity checks; otherwise, returnsfalse, fires aninvalidevent at the element, and (if the event isn’t canceled) reports the problem to the user. select()-
Selects the entire content of the
<input>element, if the element’s content is selectable. For elements with no selectable text content (such as a visual color picker or calendar date input), this method does nothing. setCustomValidity()-
Sets a custom message to display if the input element’s value isn’t valid.
setRangeText()-
Sets the contents of the specified range of characters in the input element to a given string. A
selectModeparameter is available to allow controlling how the existing content is affected. setSelectionRange()-
Selects the specified range of characters within a textual input element. Does nothing for inputs which aren’t presented as text input fields.
stepDown()-
Decrements the value of a numeric input by one, by default, or by the specified number of units.
stepUp()-
Increments the value of a numeric input by one or by the specified number of units.
CSS
Inputs, being replaced elements, have a few features not applicable to non form elements. There are CSS selectors that can specifically target form controls based on their UI features, also known as UI pseudo-classes. The input element can also be targeted by type with attribute selectors. There are some properties that are especially useful as well.
UI pseudo-classes
| Pseudo-class | Description |
|---|---|
:enabled |
Any currently enabled element that can be activated (selected, clicked on, typed into, etc.) or accept focus and also has a disabled state, in which it can’t be activated or accept focus. |
:disabled |
Any currently disabled element that has an enabled state, meaning it otherwise could be activated (selected, clicked on, typed into, etc.) or accept focus were it not disabled. |
:read-only |
Element not editable by the user |
:read-write |
Element that is editable by the user. |
:placeholder-shown |
Element that is currently displaying placeholder text,including <input> and <textarea> elements with the placeholder attribute present that has, as yet, no value.
|
:default |
Form elements that are the default in a group of related elements. Matches checkbox and radio input types that were checked on page load or render. |
:checked |
Matches checkbox and radio input types that are currently checked (and the ( <option> in a<select> that is currently selected).
|
:indeterminate |
checkbox elements whose indeterminate property is set to true by JavaScript, radio elements, when all radio buttons with the same name value in the form are unchecked, and <progress> elements in an indeterminate state
|
:valid |
Form controls that can have constraint validation applied and are currently valid. |
:invalid |
Form controls that have constraint validation applied and are currently not valid. Matches a form control whose value doesn’t match the constraints set on it by its attributes, such as required,pattern,step and max.
|
:in-range |
A non-empty input whose current value is within the range limits specified by the min and max attributes and the step.
|
:out-of-range |
A non-empty input whose current value is NOT within the range limits specified by the minand max attributes ordoes not adhere to the step constraint.
|
:required |
<input>, <select>, or <textarea> element that has the required attribute set on it.Only matches elements that can be required. The attribute included on a non-requirable element will not make for a match. |
:optional |
<input>, <select>, or<textarea> element that does NOT have the required attribute set on it.Does not match elements that can’t be required. |
:blank |
<input> and <textarea> elements that currently have no value. |
:user-invalid |
Similar to :invalid, but is activated on blur. Matchesinvalid input but only after the user interaction, such as by focusing on the control, leaving the control, or attempting to submit the form containing the invalid control. |
Pseudo-classes example
We can style a checkbox label based on whether the checkbox is checked or not. In this example, we are styling the color and font-weight of the <label> that comes immediately after a checked input. We haven’t applied any styles if the input is not checked.
<input id="checkboxInput" type="checkbox" />
<label for="checkboxInput">Toggle the checkbox on and off</label>
input:checked + label {
  color: red;
  font-weight: bold;
}
Attribute selectors
It is possible to target different types of form controls based on their type using attribute selectors. CSS attribute selectors match elements based on either just the presence of an attribute or the value of a given attribute.
/* matches a password input */
input[type="password"] {
}

/* matches a form control whose valid values are limited to a range of values*/
input[min][max] {
}

/* matches a form control with a pattern attribute */
input[pattern] {
}
::placeholder
By default, the appearance of placeholder text is a translucent or light gray. The ::placeholder pseudo-element is the input’s placeholder text. It can be styled with a limited subset of CSS properties.
::placeholder {
  color: blue;
}
Only the subset of CSS properties that apply to the ::first-line pseudo-element can be used in a rule using ::placeholder in its selector.
appearance
The appearance property enables the displaying of (almost) any element as a platform-native style based on the operating system’s theme as well as the removal of any platform-native styling with the none value.
You could make a <div> look like a radio button with div {appearance: radio;} or a radio look like a checkbox with [type="radio"] {appearance: checkbox;}, but don’t.
Setting appearance: none removes platform native borders, but not functionality.
caret-color
A property specific to text entry-related elements is the CSS caret-color property, which lets you set the color used to draw the text input caret:
HTML
<label for="textInput">Note the red caret:</label>
<input id="textInput" class="custom" size="32" />
CSS
input.custom {
  caret-color: red;
  font: 16px "Helvetica", "Arial", "sans-serif";
}
Result
object-position and object-fit
In certain cases (typically involving non-textual inputs and specialized interfaces), the <input> element is a replaced element. When it is, the position and size of the element’s size and positioning within its frame can be adjusted using the CSS object-position and object-fit properties
Styling
Additional features
Labels
Labels are needed to associate assistive text with an <input>. The <label> element provides explanatory information about a form field that is always appropriate (aside from any layout concerns you have). It’s never a bad idea to use a <label> to explain what should be entered into an <input> or <textarea>.
Associated labels
The semantic pairing of <input> and <label> elements is useful for assistive technologies such as screen readers. By pairing them using the <label>‘s for attribute, you bond the label to the input in a way that lets screen readers describe inputs to users more precisely.
It does not suffice to have plain text adjacent to the <input> element. Rather, usability and accessibility requires the inclusion of either implicit or explicit <label>:
<!-- inaccessible -->
<p>Enter your name: <input id="name" type="text" size="30" /></p>

<!-- implicit label -->
<p>
  <label>Enter your name: <input id="name" type="text" size="30" /></label>
</p>

<!-- explicit label -->
<p>
  <label for="name">Enter your name: </label>
  <input id="name" type="text" size="30" />
</p>
The first example is inaccessible: no relationship exists between the prompt and the <input> element.
In addition to an accessible name, the label provides a larger ‘hit’ area for mouse and touch screen users to click on or touch. By pairing a <label> with an <input>, clicking on either one will focus the <input>. If you use plain text to «label» your input, this won’t happen. Having the prompt part of the activation area for the input is helpful for people with motor control conditions.
As web developers, it’s important that we never assume that people will know all the things that we know. The diversity of people using the web—and by extension your website—practically guarantees that some of your site’s visitors will have some variation in thought processes and/or circumstances that leads them to interpret your forms very differently from you without clear and properly-presented labels.
Placeholders are not accessible
The placeholder attribute lets you specify text that appears within the <input> element’s content area itself when it is empty. The placeholder should never be required to understand your forms. It is not a label, and should not be used as a substitute, because it isn’t. The placeholder is used to provide a hint as to what an inputted value should look like, not an explanation or prompt.
Not only is the placeholder not accessible to screen readers, but once the user enters any text into the form control, or if the form control already has a value, the placeholder disappears. Browsers with automatic page translation features may skip over attributes when translating, meaning the placeholder may not get translated.
Note: Don’t use the placeholder attribute if you can avoid it. If you need to label an <input> element, use the <label> element.
Client-side validation
Warning: Client-side validation is useful, but it does not guarantee that the server will receive valid data. If the data must be in a specific format, always verify it also on the server-side, and return a 400 HTTP response if the format is invalid.
In addition to using CSS to style inputs based on the :valid or :invalid UI states based on the current state of each input, as noted in the UI pseudo-classes section above, the browser provides for client-side validation on (attempted) form submission. On form submission, if there is a form control that fails constraint validation, supporting browsers will display an error message on the first invalid form control; displaying a default message based on the error type, or a message set by you.
Some input types and other attributes place limits on what values are valid for a given input. For example, <input type="number" min="2" max="10" step="2"> means only the number 2, 4, 6, 8, or 10 are valid. Several errors could occur, including a rangeUnderflow error if the value is less than 2, rangeOverflow if greater than 10, stepMismatch if the value is a number between 2 and 10, but not an even integer (does not match the requirements of the step attribute), or typeMismatch if the value is not a number.
For the input types whose domain of possible values is periodic (that is, at the highest possible value, the values wrap back around to the beginning rather than ending), it’s possible for the values of the max and min properties to be reversed, which indicates that the range of permitted values starts at min, wraps around to the lowest possible value, then continues on until max is reached. This is particularly useful for dates and times, such as when you want to allow the range to be from 8 PM to 8 AM:
<input type="time" min="20:00" max="08:00" name="overnight" />
Specific attributes and their values can lead to a specific error ValidityState:
| Attribute | Relevant property | Description |
|---|---|---|
max |
validityState.rangeOverflow |
Occurs when the value is greater than the maximum value as defined by the max attribute
|
maxlength |
validityState.tooLong |
Occurs when the number of characters is greater than the number allowed by the maxlength property |
min |
validityState.rangeUnderflow |
Occurs when the value is less than the minimum value as defined by the min attribute |
minlength |
validityState.tooShort |
Occurs when the number of characters is less than the number required by the minlength property |
pattern |
validityState.patternMismatch |
Occurs when a pattern attribute is included with a valid regular expression and the value does not match it. |
required |
validityState.valueMissing |
Occurs when the required attribute is present but the value is null or radio or checkbox is not checked. |
step |
validityState.stepMismatch |
The value doesn’t match the step increment. Increment default is 1, so only integers are valid on type="number"is step is not included. step="any" will never throw this error.
|
type |
validityState.typeMismatch |
Occurs when the value is not of the correct type, for example an email does not contain an @ or a url doesn’t contain a protocol. |
If a form control doesn’t have the required attribute, no value, or an empty string, is not invalid. Even if the above attributes are present, with the exception of required, an empty string will not lead to an error.
We can set limits on what values we accept, and supporting browsers will natively validate these form values and alert the user if there is a mistake when the form is submitted.
In addition to the errors described in the table above, the validityState interface contains the badInput, valid, and customError boolean readonly properties. The validity object includes:
validityState.valueMissingvalidityState.typeMismatchvalidityState.patternMismatchvalidityState.tooLongvalidityState.tooShortvalidityState.rangeUnderflowvalidityState.rangeOverflowvalidityState.stepMismatchvalidityState.badInputvalidityState.validvalidityState.customError
For each of these Boolean properties, a value of true indicates that the specified reason validation may have failed is true, with the exception of the valid property, which is true if the element’s value obeys all constraints.
If there is an error, supporting browsers will both alert the user and prevent the form from being submitted. A word of caution: if a custom error is set to a truthy value (anything other than the empty string or null), the form will be prevented from being submitted. If there is no custom error message, and none of the other properties return true, valid will be true, and the form can be submitted.
function validate(input) {
  let validityState_object = input.validity;
  if (validityState_object.valueMissing) {
    input.setCustomValidity("A value is required");
  } else if (validityState_object.rangeUnderflow) {
    input.setCustomValidity("Your value is too low");
  } else if (validityState_object.rangeOverflow) {
    input.setCustomValidity("Your value is too high");
  } else {
    input.setCustomValidity("");
  }
}
The last line, setting the custom validity message to the empty string is vital. If the user makes an error, and the validity is set, it will fail to submit, even if all the values are valid, until the message is null.
Custom validation error example
If you want to present a custom error message when a field fails to validate, you need to use the Constraint Validation API available on <input> (and related) elements. Take the following form:
<form>
  <label for="name">Enter username (upper and lowercase letters): </label>
  <input type="text" name="name" id="name" required pattern="[A-Za-z]+" />
  <button>Submit</button>
</form>
The basic HTML form validation features will cause this to produce a default error message if you try to submit the form with either no valid filled in, or a value that does not match the pattern.
If you wanted to instead display custom error messages, you could use JavaScript like the following:
const nameInput = document.querySelector("input");

nameInput.addEventListener("input", () => {
  nameInput.setCustomValidity("");
  nameInput.checkValidity();
});

nameInput.addEventListener("invalid", () => {
  if (nameInput.value === "") {
    nameInput.setCustomValidity("Enter your username!");
  } else {
    nameInput.setCustomValidity(
      "Usernames can only contain upper and lowercase letters. Try again!"
    );
  }
});
The example renders like so:
In brief:
- We check the valid state of the input element every time its value is changed by running the
checkValidity()method via theinputevent handler. - If the value is invalid, an
invalidevent is raised, and theinvalidevent handler function is run. Inside this function we work out whether the value is invalid because it is empty, or because it doesn’t match the pattern, using anif ()block, and set a custom validity error message. - As a result, if the input value is invalid when the submit button is pressed, one of the custom error messages will be shown.
- If it is valid, it will submit as you’d expect. For this to happen, the custom validity has to be cancelled, by invoking
setCustomValidity()with an empty string value. We therefore do this every time theinputevent is raised. If you don’t do this, and a custom validity was previously set, the input will register as invalid, even if it currently contains a valid value on submission.
Note: Always validate input constraints both client side and server side. Constraint validation doesn’t remove the need for validation on the server side. Invalid values can still be sent by older browsers or by bad actors.
Note: Firefox supported a proprietary error attribute — x-moz-errormessage — for many versions, which allowed you set custom error messages in a similar way. This has been removed as of version 66 (see bug 1513890).
Localization
The allowed inputs for certain <input> types depend on the locale. In some locales, 1,000.00 is a valid number, while in other locales the valid way to enter this number is 1.000,00.
Firefox uses the following heuristics to determine the locale to validate the user’s input (at least for type="number"):
- Try the language specified by a
lang/xml:langattribute on the element or any of its parents. - Try the language specified by any
Content-LanguageHTTP header. Or, - If none specified, use the browser’s locale.
Technical summary
| Content categories |
Flow content, listed, submittable, resettable, form-associated element, phrasing content. If the type is nothidden, then labelable element, palpable content.
|
|---|---|
| Permitted content | None; it is a void element. |
| Tag omission | Must have a start tag and must not have an end tag. |
| Permitted parents |
Any element that accepts phrasing content. |
| Implicit ARIA role |
|
| Permitted ARIA roles |
|
| DOM interface | HTMLInputElement |
Accessibility concerns
Labels
When including inputs, it is an accessibility requirement to add labels alongside. This is needed so those who use assistive technologies can tell what the input is for. Also, clicking or touching a label gives focus to the label’s associated form control. This improves the accessibility and usability for sighted users, increases the area a user can click or touch to activate the form control. This is especially useful (and even needed) for radio buttons and checkboxes, which are tiny. For more information about labels in general see Labels .
The following is an example of how to associate the <label> with an <input> element in the above style. You need to give the <input> an id attribute. The <label> then needs a for attribute whose value is the same as the input’s id.
<label for="peas">Do you like peas?</label>
<input type="checkbox" name="peas" id="peas" />
Size
Interactive elements such as form input should provide an area large enough that it is easy to activate them. This helps a variety of people, including people with motor control issues and people using non-precise forms of input such as a stylus or fingers. A minimum interactive size of 44×44 CSS pixels is recommended.
- Understanding Success Criterion 2.5.5: Target Size | W3C Understanding WCAG 2.1
- Target Size and 2.5.5 | Adrian Roselli
- Quick test: Large touch targets — The A11Y Project
Specifications
| Specification |
|---|
| HTML Standard # the-input-element |
Browser compatibility
BCD tables only load in the browser
See also
How would you set the default value of a form <input> text field in JavaScript?
![]()
asked Sep 30, 2011 at 10:32
![]()
1
This is one way of doing it:
document.getElementById("nameofid").value = "My value";
![]()
answered Sep 30, 2011 at 10:33
![]()
12
I use setAttribute():
<input type="text" id="example"> // Setup text field
<script type="text/javascript">
  document.getElementById("example").setAttribute('value','My default value');
</script>
![]()
answered Jun 18, 2014 at 14:37
![]()
Pepe AmoedoPepe Amoedo
8456 silver badges2 bronze badges
5
if your form contains an input field like
<input type='text' id='id1' />
then you can write the code in javascript as given below to set its value as
document.getElementById('id1').value='text to be displayed' ;
answered Sep 30, 2011 at 10:38
![]()
VaradaVarada
15.5k13 gold badges47 silver badges67 bronze badges
1
2023 Answer
Instead of using document.getElementById() you can now use document.querySelector() for different cases
more info from another Stack Overflow answer:
querySelectorlets you find elements with rules that can’t be
expressed withgetElementByIdandgetElementsByClassName
EXAMPLE:
document.querySelector('input[name="myInput"]').value = 'Whatever you want!';
or
let myInput = document.querySelector('input[name="myInput"]');
myInput.value = 'Whatever you want!';
Test:
document.querySelector('input[name="myInput"]').value = 'Whatever you want!';<input type="text" name="myInput" id="myInput" placeholder="Your text">answered Nov 19, 2020 at 19:10
![]()
RunsisRunsis
7718 silver badges18 bronze badges
2
If you are using multiple forms, you can use:
<form name='myForm'>
    <input type='text' name='name' value=''>
</form>

<script type="text/javascript">
    document.forms['myForm']['name'].value = "New value";
</script>
answered Mar 17, 2017 at 14:42
![]()
David CaissyDavid Caissy
2,1315 gold badges24 silver badges26 bronze badges
5
Try out these.
document.getElementById("current").value = 12

// or

var current = document.getElementById("current");
current.value = 12
![]()
answered Dec 11, 2012 at 18:23
![]()
dallinchasedallinchase
3252 silver badges3 bronze badges
2
The answer is really simple
// Your HTML text field

<input type="text" name="name" id="txt">

//Your javascript

<script type="text/javascript">
document.getElementById("txt").value = "My default value";
</script>
Or if you want to avoid JavaScript entirely: You can define it just using HTML
<input type="text" name="name" id="txt" value="My default value">
![]()
answered Sep 2, 2015 at 5:59
![]()
php-coderphp-coder
9551 gold badge12 silver badges23 bronze badges
2
<input id="a_name" type="text" />
Here is the solution using jQuery:
$(document).ready(function(){
  $('#a_name').val('something');
});
Or, using JavaScript:
document.getElementById("a_name").value = "Something";
Happy coding 
answered Apr 8, 2021 at 6:39
![]()
Rashed RahatRashed Rahat
2,0802 gold badges20 silver badges36 bronze badges
The simple answer is not in Javascript the simplest way to get the placeholder is through the place holder attribute
<input type="text" name="text_box_1" placeholder="My Default Value" />
answered Aug 6, 2014 at 15:38
![]()
RWolfeRWolfe
4479 silver badges27 bronze badges
4
document.getElementById("fieldId").value = "Value";
or
document.forms['formId']['fieldId'].value = "Value";
or
document.getElementById("fieldId").setAttribute('value','Value');
answered Feb 5, 2018 at 11:59
![]()
2
It’s simple; An example is:
<input type="text" id="example"> // Setup text field
<script type="text/javascript">
var elem = document.getElementById("example"); // Get text field
elem.value = "My default value"; // Change field
</script>
answered Apr 4, 2014 at 8:00
![]()
If the field for whatever reason only has a name attribute and nothing else, you can try this:
document.getElementsByName("INPUTNAME")[0].value = "TEXT HERE";
answered Jul 25, 2020 at 18:34
![]()
<form>
  <input type="number"  id="inputid"  value="2000" />
</form>


<script>
var form_value = document.getElementById("inputid").value;
</script>
You can also change the default value to a new value
<script>
document.getElementById("inputid").value = 4000;
</script>
![]()
Marcello B.
4,03711 gold badges47 silver badges64 bronze badges
answered Oct 17, 2018 at 6:43
![]()
TobilobaTobiloba
1,4101 gold badge10 silver badges7 bronze badges
This part you use in html
<input id="latitude" type="text" name="latitude"></p>
This is javaScript:
<script>
document.getElementById("latitude").value=25;
</script>
answered Jan 3, 2019 at 8:13
![]()
You can also try:
document.getElementById('theID').value = 'new value';
answered Sep 2, 2015 at 10:56
![]()
1
Direct access
If you use ID then you have direct access to input in JS global scope
myInput.value = 'default_value'<input id="myInput">answered Jun 26, 2020 at 16:11
![]()
Kamil KiełczewskiKamil Kiełczewski
80.5k29 gold badges352 silver badges327 bronze badges
The following code work perfectly well:
var $div = ('#js-div-hour input');
$div.attr('value','2022/01/10');
answered Jan 6, 2022 at 13:13
![]()
How would you set the default value of a form <input> text field in JavaScript?
![]()
asked Sep 30, 2011 at 10:32
![]()
1
This is one way of doing it:
document.getElementById("nameofid").value = "My value";
![]()
answered Sep 30, 2011 at 10:33
![]()
12
I use setAttribute():
<input type="text" id="example"> // Setup text field
<script type="text/javascript">
  document.getElementById("example").setAttribute('value','My default value');
</script>
![]()
answered Jun 18, 2014 at 14:37
![]()
Pepe AmoedoPepe Amoedo
8456 silver badges2 bronze badges
5
if your form contains an input field like
<input type='text' id='id1' />
then you can write the code in javascript as given below to set its value as
document.getElementById('id1').value='text to be displayed' ;
answered Sep 30, 2011 at 10:38
![]()
VaradaVarada
15.5k13 gold badges47 silver badges67 bronze badges
1
2023 Answer
Instead of using document.getElementById() you can now use document.querySelector() for different cases
more info from another Stack Overflow answer:
querySelectorlets you find elements with rules that can’t be
expressed withgetElementByIdandgetElementsByClassName
EXAMPLE:
document.querySelector('input[name="myInput"]').value = 'Whatever you want!';
or
let myInput = document.querySelector('input[name="myInput"]');
myInput.value = 'Whatever you want!';
Test:
document.querySelector('input[name="myInput"]').value = 'Whatever you want!';<input type="text" name="myInput" id="myInput" placeholder="Your text">answered Nov 19, 2020 at 19:10
![]()
RunsisRunsis
7718 silver badges18 bronze badges
2
If you are using multiple forms, you can use:
<form name='myForm'>
    <input type='text' name='name' value=''>
</form>

<script type="text/javascript">
    document.forms['myForm']['name'].value = "New value";
</script>
answered Mar 17, 2017 at 14:42
![]()
David CaissyDavid Caissy
2,1315 gold badges24 silver badges26 bronze badges
5
Try out these.
document.getElementById("current").value = 12

// or

var current = document.getElementById("current");
current.value = 12
![]()
answered Dec 11, 2012 at 18:23
![]()
dallinchasedallinchase
3252 silver badges3 bronze badges
2
The answer is really simple
// Your HTML text field

<input type="text" name="name" id="txt">

//Your javascript

<script type="text/javascript">
document.getElementById("txt").value = "My default value";
</script>
Or if you want to avoid JavaScript entirely: You can define it just using HTML
<input type="text" name="name" id="txt" value="My default value">
![]()
answered Sep 2, 2015 at 5:59
![]()
php-coderphp-coder
9551 gold badge12 silver badges23 bronze badges
2
<input id="a_name" type="text" />
Here is the solution using jQuery:
$(document).ready(function(){
  $('#a_name').val('something');
});
Or, using JavaScript:
document.getElementById("a_name").value = "Something";
Happy coding
answered Apr 8, 2021 at 6:39
![]()
Rashed RahatRashed Rahat
2,0802 gold badges20 silver badges36 bronze badges
The simple answer is not in Javascript the simplest way to get the placeholder is through the place holder attribute
<input type="text" name="text_box_1" placeholder="My Default Value" />
answered Aug 6, 2014 at 15:38
![]()
RWolfeRWolfe
4479 silver badges27 bronze badges
4
document.getElementById("fieldId").value = "Value";
or
document.forms['formId']['fieldId'].value = "Value";
or
document.getElementById("fieldId").setAttribute('value','Value');
answered Feb 5, 2018 at 11:59
![]()
2
It’s simple; An example is:
<input type="text" id="example"> // Setup text field
<script type="text/javascript">
var elem = document.getElementById("example"); // Get text field
elem.value = "My default value"; // Change field
</script>
answered Apr 4, 2014 at 8:00
![]()
If the field for whatever reason only has a name attribute and nothing else, you can try this:
document.getElementsByName("INPUTNAME")[0].value = "TEXT HERE";
answered Jul 25, 2020 at 18:34
![]()
<form>
  <input type="number"  id="inputid"  value="2000" />
</form>


<script>
var form_value = document.getElementById("inputid").value;
</script>
You can also change the default value to a new value
<script>
document.getElementById("inputid").value = 4000;
</script>
![]()
Marcello B.
4,03711 gold badges47 silver badges64 bronze badges
answered Oct 17, 2018 at 6:43
![]()
TobilobaTobiloba
1,4101 gold badge10 silver badges7 bronze badges
This part you use in html
<input id="latitude" type="text" name="latitude"></p>
This is javaScript:
<script>
document.getElementById("latitude").value=25;
</script>
answered Jan 3, 2019 at 8:13
![]()
You can also try:
document.getElementById('theID').value = 'new value';
answered Sep 2, 2015 at 10:56
![]()
1
Direct access
If you use ID then you have direct access to input in JS global scope
myInput.value = 'default_value'<input id="myInput">answered Jun 26, 2020 at 16:11
![]()
Kamil KiełczewskiKamil Kiełczewski
80.5k29 gold badges352 silver badges327 bronze badges
The following code work perfectly well:
var $div = ('#js-div-hour input');
$div.attr('value','2022/01/10');
answered Jan 6, 2022 at 13:13
![]()
В HTML5 появилось специальное поле <input> с атрибутом type="number" для вода чисел. Рассмотрим его возможности.
Для поля доступны следующие атрибуты:
| Атрибут | Описание |
|---|---|
step |
Шаг изменения значения |
max |
Максимальное значение |
min |
Минимальное значение |
placeholder |
Подсказка |
readonly |
Только для чтения |
disabled |
Заблокирован |
list |
Связка со списком опций datalist по id |
required |
Обязательный для заполнения |
1
Шаг изменения
Атрибут step="1" задает на сколько будет увеличиваться или уменьшаться значение в поле. Может быть как целым (10) так и дробным (0.1).
<input type="number" step="1" placeholder="step = 1">
<input type="number" step="10" placeholder="step = 10">
<input type="number" step="0.1" placeholder="step = 0.1">
HTML
Пример:
2
Минимальное значение
Атрибут min="1" задает минимально возможное значение value. Это значение должно быть меньше или равно значению max. Может быть целым, отрицательным или дробным.
<input type="number" step="10" min="0" placeholder="min = 0">
<input type="number" step="10" min="-100" placeholder="min = -100">
<input type="number" step="0.1"min="-0.1" placeholder="min = -0.1">
HTML
Пример:
3
Максимальное значение
Атрибут max="100" задает максимально возможное значение value.
<input type="number" step="1" max="10" placeholder="max = 10">
<input type="number" step="10" max="100" placeholder="max = 100">
<input type="number" step="0.1" max="1.5" placeholder="max = 1.5">
HTML
Пример:
4
Опции по умолчанию
У поля есть возможность задать список с рекомендуемыми значениями с помощью элемента <datalist>.
<input type="number" list="input-list">

<datalist id="input-list">
	<option value="111">
	<option value="222">
	<option value="333">
	<option value="444">
	<option value="555">
</datalist>
HTML
Пример:
5
Валидация
Если указать атрибут required, то при отправки формы будет проверятся заполнено поле или нет, а также превышение введенного значения value в атрибутах min и max.
Проверить значение регулярным выражением с помощью атрибута pattern не получится, т.к. он не поддерживается.
<form>
	<input type="number" step="10" min="0" max="100" required>
	<input type="submit" value="Отправить">
</form>
HTML
Пример:
Также доступны CSS псевдо свойства :invalid и :valid, с помощью них можно применить стили к неправильно заполненному полю.
<form>
	<div class="row">
		<input type="number" step="10" min="0" max="100" required>
		<span></span>
	</div>
	<div class="row">
		<input type="number" step="10" min="0" max="100" required>
		<span></span>
	</div>
</form>
HTML
input[type="number"]:invalid+span:after {
	content: '✖';
	padding-left: 5px;
	color: red;
}

input[type="number"]:valid+span:after {
	content: '✓';
	padding-left: 5px;
	color: green;
}
CSS
Пример:
6
Стилизация
Стандартными CSS-стилями можно изменить инпут:
input[type="number"] {
	background-color: #eee;
	vertical-align: top;
	outline: none;
	padding: 0;
	height: 40px;
	line-height: 40px;
	text-indent: 10px;
	display: inline-block;
	width: 100%;
	box-sizing: border-box;
	border: 1px solid #ddd;
	font-size: 14px;
	border-radius: 3px;
}

input[type="number"]:focus {
	outline: 2px solid blue;
}
CSS
Пример:
7
Убрать стрелки
input[type="number"] {
	-moz-appearance: textfield;
	-webkit-appearance: textfield;
	appearance: textfield;
}

input[type="number"]::-webkit-outer-spin-button,
input[type="number"]::-webkit-inner-spin-button {
	display: none;
}
CSS
8
Как стилизовать стрелки
К стрелкам не применить CSS стили, но есть JS-методы stepUp() и stepDown() для изменения значения. Так можно скрыть стрелки и добавить свои кнопки:
<div class="number">
	<button class="number-minus" type="button" onclick="this.nextElementSibling.stepDown(); this.nextElementSibling.onchange();">-</button>
	<input type="number" min="0" value="1" readonly>
	<button class="number-plus" type="button" onclick="this.previousElementSibling.stepUp(); this.previousElementSibling.onchange();">+</button>
</div>
HTML
.number {
	display: inline-block;
	position: relative;
	width: 100px;
}
.number input[type="number"] {
	display: block;
	height: 32px;
	line-height: 32px;
	width: 100%;
	padding: 0;
	margin: 0;
	box-sizing: border-box;
	text-align: center;
	-moz-appearance: textfield;
	-webkit-appearance: textfield;
	appearance: textfield;
}
.number input[type="number"]::-webkit-outer-spin-button,
.number input[type="number"]::-webkit-inner-spin-button {
	display: none;
}
.number-minus {
	position: absolute;
	top: 1px;
	left: 1px;
	bottom: 1px;
	width: 20px;
	padding: 0;
	display: block;
	text-align: center;
	border: none;
	border-right: 1px solid #ddd;
	font-size: 16px;
	font-weight: 600;
}
.number-plus {
	position: absolute;
	top: 1px;
	right: 1px;
	bottom: 1px;
	width: 20px;
	padding: 0;
	display: block;
	text-align: center;
	border: none;
	border-left: 1px solid #ddd;
	font-size: 16px;
	font-weight: 600;
}
CSS
Результат:
29.09.2020, обновлено 08.10.2020
Другие публикации
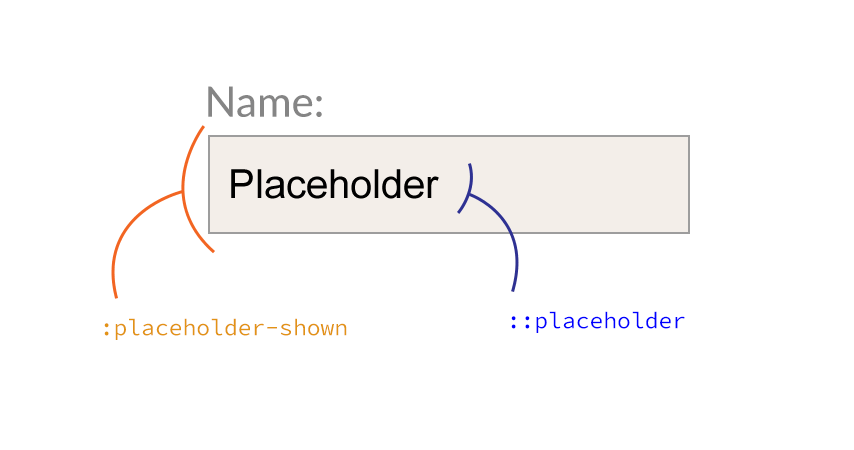
CSS стили для атрибута placeholder можно задать через псевдокласс ::placeholder и вендорными префиксами для разных браузеров.
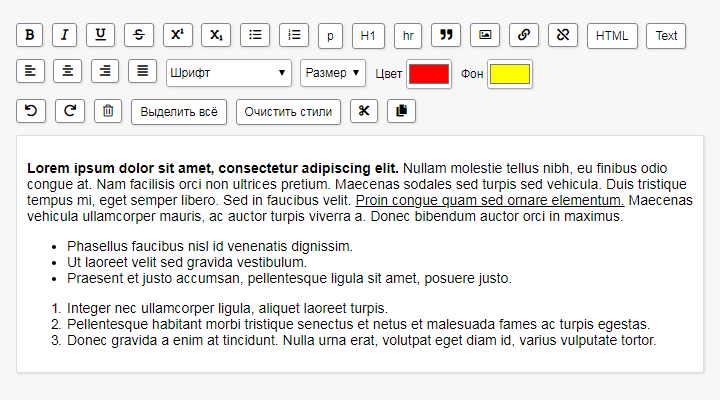
Если добавить атрибут contenteditable к элементу, его содержимое становится доступно для редактирования пользователю, а…
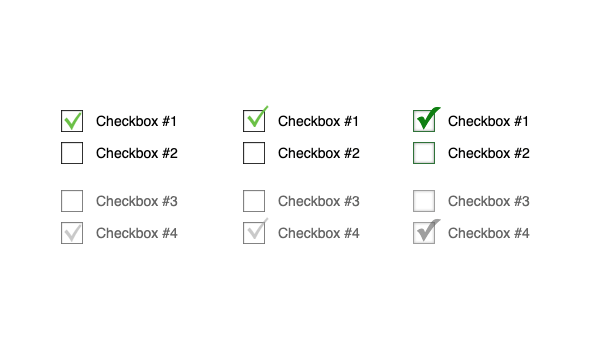
Несколько примеров как изменить внешний вид чекбоксов с помощью CSS, изображений и немного JS.
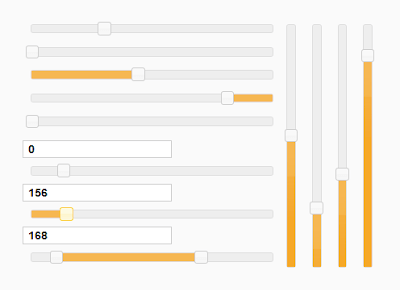
jQuery UI Slider – гибкий плагин, который позволяет создать элементы интерфейса в виде ползунков в различных вариантах.
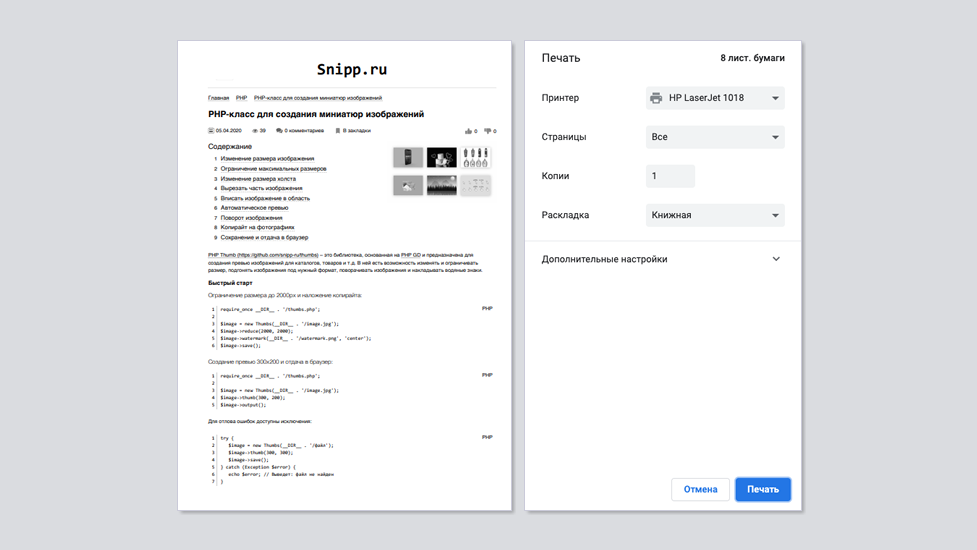
Очень часто разработчики забывают про печатную версию сайта, поэтому можно встретить такой результат на бумаге…

Примеры, приведенные ниже позволят ограничить ввод символов в текстовые поле. Например, можно ограничить количество…