После обновления до Ubuntu 16.04 из коробки установлен php7. Для моих проектов использую php5.6. Подскажите, как управлять версиями, и использовать php5.6 по умолчанию?
$ php -v
PHP 7.0.6-1+donate.sury.org~xenial+1 (cli) ( NTS )
Copyright (c) 1997-2016 The PHP Group
Zend Engine v3.0.0, Copyright (c) 1998-2016 Zend Technologies
with Zend OPcache v7.0.6-dev, Copyright (c) 1999-2016, by Zend Technologies

$ whereis php
php: /usr/bin/php /usr/bin/php7.0 /usr/bin/php5.6 /usr/lib/php /etc/php /usr/share/php7.0-opcache /usr/share/php7.0-gd /usr/share/php /usr/share/php5.6-opcache /usr/share/php7.0-mcrypt /usr/share/php7.0-json /usr/share/php7.0-common /usr/share/php7.0-readline /usr/share/php5.6-json /usr/share/php7.0-xml /usr/share/php7.0-mysql /usr/share/php5.6-common /usr/share/php5.6-readline /usr/share/man/man1/php.1.gz
задан 7 мая 2016 в 10:32
если эти пакеты установлены из официального репозитория, то используется механизм альтернатив (alternatives) и /usr/bin/php является символической ссылкой (symlink) на /etc/alternatives/php, которая, в свою очередь, тоже является символической ссылкой на реальный исполняемый файл. в вашем случае — /usr/bin/php7.0.
«перенаправить» на другую альтернативу можно, например, так:
$ sudo update-alternatives --config php
если есть альтернативы, то будет предложен пронумерованный список альтернатив (в частности, с указанием пути к реальным файлам) с предложением ввести номер (из списка) для изменения текущего выбора альтернативы.
ответ дан 7 мая 2016 в 10:59
aleksandr barakinaleksandr barakin
67.5k200 золотых знаков74 серебряных знака217 бронзовых знаков
Уже было. Странно, что не нашли. Сам пользуюсь:
устанавливаем с репозитория не официального (7.0 и 5.6):
sudo add-apt-repository ppa:ondrej/php
sudo apt-get update
sudo apt-get install php7.0 php5.6 php5.6-mysql php-gettext php5.6-mbstring php-mbstring php7.0-mbstring php-xdebug libapache2-mod-php5.6 libapache2-mod-php7.0
и переключаемся с помощью следующих команд (для Apache и для командной строки разные!!!):
php5.6 -> php7.0 :
Apache:
sudo a2dismod php5.6 ; sudo a2enmod php7.0 ; sudo service apache2 restart
CLI:
update-alternatives --set php /usr/bin/php7.0
php7.0 -> php5.6 :
Apache:
sudo a2dismod php7.0 ; sudo a2enmod php5.6 ; sudo service apache2 restart
CLI:
sudo update-alternatives --set php /usr/bin/php5.6
0xdb
51.3k194 золотых знака56 серебряных знаков227 бронзовых знаков
ответ дан 19 фев 2017 в 18:47
Vladimir ChVladimir Ch
5636 серебряных знаков12 бронзовых знаков
Еще вариант, phpenv как менеджер версий:
https://github.com/phpenv/phpenv
$(phpenv version-name)— текущая версия php;~/.phpenv/versions/$(phpenv version-name)/etc/php.ini— php.ini
текущей версии php;phpenv global 5.6.0— использовать версию php 5.6.0.
ответ дан 10 мая 2016 в 18:43
jekabyjekaby
2,78910 серебряных знаков21 бронзовый знак
New versions of PHP bring new features and fixes for security issues and bugs. Migrating from one version to another can often lead to incompatibilities. As of writing this article, PHP 7.2 is the latest stable release and PHP 7.3 is expected to be released in December 2018. Drupal.org recommends PHP 7.1+ for new projects and encourages the community to plan an upgrade for older versions.
Drupal, as we know, is a CMF written in PHP. It uses various PHP libraries and components including the Symfony framework, the Twig template engine, PHPUnit, Guzzle, etc. Hence, it is always recommended to do a compatibility check with all the components, libraries and core/contributed modules of your Drupal site before upgrading to newer versions of PHP.
Now, the process of changing the PHP version of your Drupal site may vary with your hosting provider and the access level that you have on the server. But for this tutorial, Ubuntu 16.04.4 LTS with Apache 2.4.18 and Nginx 1.10.3 was used. Few commands, configuration files, and directory paths may differ with your system and the version of web servers.
Checking the current PHP version
First and foremost, let us see what all versions of PHP are currently installed on our system.
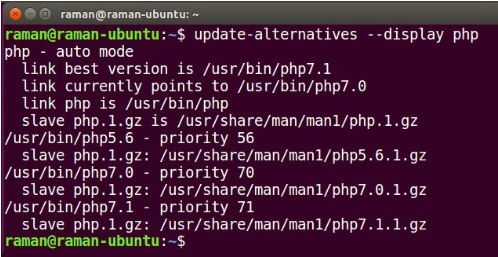
$ update-alternatives --display phpYou may also check all the installed PHP packages along with its extensions using:
$ apt list --installed | grep "php*"
By default, the one with the highest priority will be the command line version. That is, if we use the interactive shell or parse a PHP file through the terminal, this version will be used.
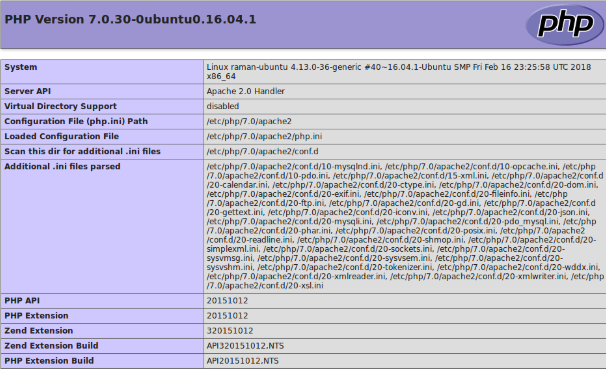
$ php -vHowever, this selected command line version may/may not be the configured with your web server. To check the PHP version configured with the web server, you may create a phpinfo() page or echo out the PHP_VERSION_ID constant / phpversion() function.
$ cd /var/www/html/drupal8
$ drush php-eval "echo phpversion();If you do not have the access to your server through SSH, you may also view the current PHP version using the Status Reports of your Drupal site available under /admin/reports/status.
Why Update to PHP 7?
Here are some of the reasons why you need to upgrade from PHP 5 to PHP 7:
- PHP 7 is twice as fast as PHP 5. The huge upward shift in performance is one of the reasons why an upgrade is important. This means your website loads in lesser time, giving your web users another reason to stay on your website.
- PHP 7 supports simultaneous execution of asynchronous tasks. Tasks such as networks, access to the database, timers and perform events related to I/O operations can be done asynchronously by putting in place a single PHP event-loop.
- It is mobile-first. Of course, you need to offer a better value proposition to your users. And mobile users cant be ignored here. PHP 7 offers exactly what businesses need to do to cater to the needs of mobile device users.
It offers reduced memory usage, execution engine improvements, and native local threat storage which are specifically suited to mobile devices that have limited browsing features.
- Uses lesser memory. PHP 7 has demonstrated that technology infrastructure can process higher computing requests without consuming proportionately higher memory.
Since Apache and Nginx are the most popular web servers in the market, we will have a quick look on how to change the PHP version on them. Also, it is highly recommended to have a backup of your Drupal site before tinkering around with any of the configurations on your server.
Now, in my case, I have PHP 7.0 configured on the web server and Drupal is giving a nice recommendation to upgrade it. But I do not have the latest PHP 7.2 installed on my system, so, I will first download it along with the required PHP extensions.
These include extensions for URL, JSON, Image, Library, Mbstring, Open SSL, and XML. But, just to ensure that all the extensions get installed, let’s install them manually.
$ sudo add-apt-repository ppa:ondrej/php
$ sudo apt-get update
$ sudo apt-get install php7.2 php7.2-fpm php7.2-xml php7.2-mysql php7.2-gd
You may view the packages using dpkg -l php7.2* to confirm.
I. Command Line Version
To change the command line version of PHP you may use the following command. Again, changing this won’t affect the version used by the web server.
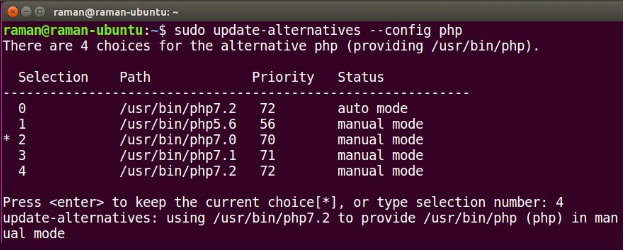
$ sudo update-alternatives --config phpEnter the choice number mentioned besides the desired PHP version
or
$ sudo update-alternatives -set php /usr/bin/php7.2II. Apache
For Apache web server, the a2enmod and a2dismod scripts can be used for enabling and disabling the PHP modules.
Disable all the previously enabled PHP modules
$ sudo a2dismod php5.6
$ sudo a2dismod php7.0
$ sudo a2dismod php7.1
Enable the new PHP version module
$ sudo a2enmod php7.2Restart the web server
$ sudo service apache2 restartPHP version for a specific website can also be set through to the .htaccess file in the following way.
AddHandler application/x-httpd-php72 .phpIII. Nginx
For Nginx, we simply need to update the PHP-FPM socket in its configuration file. But before that make sure that the PHP-FPM is installed for your version and is running as a service.
Take a backup of the default configuration file and then open it up in your favourite text editor.
$ cp /etc/nginx/sites-available/default /etc/nginx/sites-available/default.bak
$ sudo vim /etc/nginx/sites-available/default
Change the FastCGI backend to use the new PHP-FPM socket, save and exit the file
location ~ .php$ {
        include snippets/fastcgi-php.conf;
        fastcgi_pass unix:/run/php/php7.2-fpm.sock;
}
Run the configuration test
$ nginx -t
Restart the web server
$ sudo service nginx restartWe have now successfully changed the PHP version of our Drupal site. Now, navigate to Manage → Reports → Status report to ensure that the version has been changed and there are no errors or warning from any Drupal module or PHP library.
As expected, it did not produce any errors or warnings on a raw Drupal 8 installation. If you face any issues, make sure you installed all the required PHP extensions for your PHP version, check the log messages and refer the issue queues of the core and contrib modules.
For a free website analysis and the best Drupal migration plan for your company’s needs, speak to our Drupal experts today.
Introduction
This guide will show you how to migrate from PHP 7.x to PHP 8 on an Apache web server. Check the migration guide for new features and incompatible changes.
Prerequisites
- A fully-updated Ubuntu Linux 20.04 server, running Apache.
Before proceeding, it is recommended to make a backup of your server. Then, test the backup by deploying a new instance from the backup, then verify that the test instance boots and has the correct data. If you do not make a backup before proceeding, you risk losing your data.
1. List Installed PHP Modules
Before upgrading PHP, find all the PHP 7.x modules currently installed on the server. These will need to be upgraded along with PHP core to their respective 8 versions.
Take note of the version number of the current PHP installation; this will be needed later.
$ dpkg -l | grep php


Output:

php-common                                  install

php7.x-cli                                  install

php7.x-curl                                 install

[...]
2. Install PHP 8
Ubuntu may not yet have PHP version 8 in its official repositories, and you can install PHP 8 from the ondrej/php repository, a long-time and community-trusted repository for Ubuntu PHP packages.
Add the necessary repository.
$ sudo apt install software-properties-common

$ sudo add-apt-repository ppa:ondrej/php

$ sudo apt update
Install PHP 8.
$ sudo apt install php8.0
3. Install Modules
Install related PHP modules; below are some of the most frequently used. Please refer back to step 1 and manually install any modules necessary that are missing, replacing 7.x with 8.0.
$ sudo apt install php8.0-common php8.0-fpm php8.0-mysql php8.0-gmp php8.0-xml php8.0-xmlrpc php8.0-curl php8.0-mbstring php8.0-gd php8.0-dev php8.0-imap php8.0-opcache php8.0-readline php8.0-soap php8.0-zip php8.0-intl php8.0-cli libapache2-mod-php8.0
Once complete, restart PHP
$ sudo systemctl restart php8.0-fpm.service
Verify PHP has been installed correctly.
$ php -v
3. Enable PHP 8 in Apache
The a2enmod and a2dismod scripts can be used for enabling and disabling PHP versions in Apache.
-
Disable the previous PHP version installed. Replace
7.xwith the version number noted in step 1.$ sudo a2dismod php7.x -
Enable PHP 8.
$ sudo a2enmod php8.0 -
Restart the Apache web server.
$ sudo systemctl restart apache2.service
4. Verify Apache is Using PHP 8
-
Navigate to the document root of a website on the server. For this example the document root is
/var/www/html.$ cd /var/www/html -
Create a PHP file.
$ sudo nano phpinfo.php -
Add the following content to the file.
<?php phpinfo(); ?> -
Open a browser and access the file at
http://[ip-address]/phpinfo.phporhttp://[domain]/phpinfo.phpand verify it displays the correct PHP version.
Remember to remove
phpinfo.phpwhen finished to prevent exposing sensitive information about your server.
Conclusion
You have now successfully migrated from PHP 7.x to PHP 8 on your Apache web server.
There are two main methods to install a new PHP version and tell Apache to use it: mod_php and php-fpm.
Note: The preffered method is php-fpm, and many new distributions (including Fedora) are using it by default.
Install PHP as Apache SAPI module
Here is the guide around this for Unix systems, from the official documentation. It has some missing points (at least for my setup), so I walk through the steps:
-
Build PHP from source. In the
./configurestep, use--with-apxs2. This will build shared Apache 2 handler module for you.Make sure you have
apxscommand defined in your path, or specify its path as the option’s value (i.e.--with-apxs2=/path/to/apxs).For instance, if you installed Apache system-wide and want to install this command as well (e.g. on a local environment), on Fedora and its derivatives, you can install it by:
sudo dnf install httpd-devel -
After building is done (i.e. after
makeormake test), runmake install(as root, perhaps). Obviously, this will install PHP to the path you specified (i.e. with--prefix).What is done just before PHP being installed is, because of the
--with-apxs2option, installing PHP apache2handler SAPI module. It prepares the shared object (e.g. in/usr/lib64/httpd/modules/libphp.so), and activates the module (e.g. in/etc/httpd/conf/httpd.conf), by adding one of the following lines to the Apache configuration file, depending on the PHP version you installed (the line is inserted below the section «Dynamic Shared Object (DSO) Support»):# In the case of PHP8 LoadModule php_module /usr/lib64/httpd/modules/libphp.so # In the case of PHP7 LoadModule php7_module /usr/lib64/httpd/modules/libphp.soNote: While switching on the PHP versions, specially major ones, keep in mind to check there is only one of these
LoadModules for PHP available, otherwise the Apache server refuses to start.
Install PHP as PHP-FPM (FastCGI Process Manager)
TBD. 
Final steps
PHP 8.0 and above extra step
In the case your distribution does not support PHP8 yet (e.g. Fedora 34) and you installed Apache2 from the package manager, you should take one more step.
The problem is, from PHP 8.0 onwards, Apache2 uses different identifiers for SAPI modules than before. These identifier are used in order to detect whether you are using mod_php or php-fpm, in the configuration files. For PHP5, it was php5_module and mod_php5; for PHP7, it is php7_module and mod_php7, and for PHP8, it is php_module and mod_php.
In this case, navigate to Apache2 configurations directory (e.g. /etc/httpd), and start editing the file conf.d/php.conf. There are two IfModule sections there: One for enabling php-fpm if you don’t use mod_php, and the other for enabling mod_php if you are using it (i.e. using LoadModule somewhere in the configurations). You should update these conditions to cover PHP8 as well.
For instance, consider the following:
<IfModule !mod_php5.c>
  <IfModule !mod_php7.c>
    # Enable PHP-FPM configuration
  </IfModule>
</IfModule>
You should surround the core configuration with one more IfModule section like this:
    <IfModule !mod_php.c>
      # Enable PHP-FPM configuration
    </IfModule>
And do the same for the mod_php enabler configuration section as well.
Last step
Restart the Apache service:
service httpd restart
Now, phpinfo() should show you the new PHP version you just installed. You should be happy now. 
Okay, I know we’re not upgrading Apache, but y’know what I mean — let’s upgrade a Debian web server using PHP 7.3 to PHP 7.4!
0) Assumptions
I’m assuming:
- The server runs Debian 9 (Stretch) or Debian 10 (Buster) with Apache version 2.4.38* (though it should work for other versions)
- Apache is using the PHP module, not PHP-FPM
- You have sudo and SSH access
- You’ve made backups and any sites you’re hosting can tolerate downtime 😉
* You can get this info by running /usr/sbin/apache2 -v
1) Gather information
Default PHP version
Just as a sanity check, check to make sure the default PHP installation is 7.3 by running:
php --version
Enter fullscreen mode
Exit fullscreen mode
You should get something which looks like this:
PHP 7.3.27-1~deb10u1 (cli) (built: Feb 13 2021 16:31:40) ( NTS )
Copyright (c) 1997-2018 The PHP Group
Zend Engine v3.3.27, Copyright (c) 1998-2018 Zend Technologies
    with Zend OPcache v7.3.27-1~deb10u1, Copyright (c) 1999-2018, by Zend Technologies
Enter fullscreen mode
Exit fullscreen mode
Apache PHP version
Create a PHP file named phpinfo.php with the following content in, and place it somewhere publicly accessible (e.g. /var/www/html/phpinfo.php)
<?php
phpinfo();
?>
Enter fullscreen mode
Exit fullscreen mode
Navigate to this file (e.g. http://{server IP}}/phpinfo.php) and take note of the PHP Version in the header.
Enabled PHP modules
A common issue people face once they’ve successfully completed a PHP upgrade is missing modules — do you know which PHP modules you have enabled at the moment?
Didn’t think so 😅 so let’s get a list. We can view the currently enabled PHP modules, and also save a copy to ~/php_mods.txt, by running:
php -m | tee ~/php_mods.txt
Enter fullscreen mode
Exit fullscreen mode
For example, here’s some of the enabled PHP modules I have on a test machine:
samt@testvm-1:~$ php -m
[PHP Modules]
bcmath
bz2
calendar
Core
ctype
curl
date
ftp
gd
gettext
hash
iconv
imagick
intl
json
sysvsem
sysvshm
tokenizer
xml
xmlreader
xmlwriter
xsl
Zend OPcache
zip
zlib

[Zend Modules]
Zend OPcache
Enter fullscreen mode
Exit fullscreen mode
2) Updates
Before upgrading PHP, you should ensure your web server is up to date.
Let’s update APT first.
sudo apt update
Enter fullscreen mode
Exit fullscreen mode
And then install any applicable updates.
sudo apt upgrade -y
Enter fullscreen mode
Exit fullscreen mode
You should then ideally reboot your web server if possible by running sudo reboot
3) Add PPA repository
We’ll start by ensuring a couple of required packages are installed.
sudo apt -y install lsb-release apt-transport-https ca-certificates
Enter fullscreen mode
Exit fullscreen mode
And then we can add Ondřej Surý’s PPA repository GPG key.
sudo wget -O /etc/apt/trusted.gpg.d/php.gpg https://packages.sury.org/php/apt.gpg
Enter fullscreen mode
Exit fullscreen mode
And finally the repository itself.
echo "deb https://packages.sury.org/php/ $(lsb_release -sc) main" | sudo tee /etc/apt/sources.list.d/php.list
Enter fullscreen mode
Exit fullscreen mode
If you use Ondřej’s repository to install PHP 7/8 on a server for your business, please consider donating to him!
4) Update package list
Now that we have Surý’s repository installed, let’s update our package list.
sudo apt update
Enter fullscreen mode
Exit fullscreen mode
5) Install PHP 7.4
We can now install PHP 7.4 like any other package.
sudo apt -y install php7.4
Enter fullscreen mode
Exit fullscreen mode
We can then check to see if this has automatically updated the default PHP by running:
php --version
Enter fullscreen mode
Exit fullscreen mode
Which should return something similar to:
PHP 7.4.18 (cli) (built: May  3 2021 11:59:44) ( NTS )
Copyright (c) The PHP Group
Zend Engine v3.4.0, Copyright (c) Zend Technologies
    with Zend OPcache v7.4.18, Copyright (c), by Zend Technologies
Enter fullscreen mode
Exit fullscreen mode
6) Install PHP modules
You may find that some PHP modules (the ones you checked in step 1) are now missing — normally this presents as an error in the web application you might be hosting, such as WordPress.
Some common extensions can be installed in one go by running:
sudo apt-get install php7.4-{bcmath,bz2,intl,gd,mbstring,mysql,zip,curl}
Enter fullscreen mode
Exit fullscreen mode
Refer to the file you created in step 1 (~/php_mod.txt) for any other missing ones.
7) Configure Apache
Now that PHP 7.4 is installed, we need to load the relevant PHP module into Apache.
First we’ll remove the old module.
sudo a2dismod php7.3
Enter fullscreen mode
Exit fullscreen mode
You’ll be prompted to restart Apache, don’t do that yet, and instead run:
sudo a2enmod php7.4
Enter fullscreen mode
Exit fullscreen mode
Provided you don’t get any error messages, you can now restart Apache with:
sudo service apache2 restart
Enter fullscreen mode
Exit fullscreen mode
Finally, reload the phpinfo.php file you created in step 1 and confirm the PHP Version has changed to 7.4.
If you’ve made it this far, and everything is still working — well done! You’ve taken a really important step to ensure your web server is secure, and you might even notice a performance increase.
Originally posted on my blog
The previous tutorial provided the steps required to install multiple PHP versions on Ubuntu 20.04 LTS. You can follow How To Install Multiple Versions Of PHP On Ubuntu 20.04 LTS.
Switch PHP versions — CLI
Verify the currently active PHP as shown below.
# Verify PHP
php --version# Output
PHP 8.0.13 (cli) (built: Nov 22 2021 09:50:43) ( NTS )
Copyright (c) The PHP Group
Zend Engine v4.0.13, Copyright (c) Zend Technologies
    with Zend OPcache v8.0.13, Copyright (c), by Zend Technologies
We can configure multiple versions of PHP installed on Ubuntu 20.04 LTS using the commands as shown below.
# PHP 7.0
sudo update-alternatives --set php /usr/bin/php7.0
sudo update-alternatives --set phar /usr/bin/phar7.0
sudo update-alternatives --set phar.phar /usr/bin/phar.phar7.0# PHP 8.0
sudo update-alternatives --set php /usr/bin/php8.0
sudo update-alternatives --set phar /usr/bin/phar8.0
sudo update-alternatives --set phar.phar /usr/bin/phar.phar8.0
Now we can switch among PHP 7.0 or PHP 8.0 using the commands as shown below.
# Switch PHP
sudo update-alternatives --config php# Output
There are 2 choices for the alternative php (providing /usr/bin/php).Selection Path Priority Status
------------------------------------------------------------
0 /usr/bin/php8.0 80 auto mode
1 /usr/bin/php7.0 70 manual mode
* 2 /usr/bin/php8.0 80 manual modePress <enter> to keep the current choice[*], or type selection number: 1
update-alternatives: using /usr/bin/php7.0 to provide /usr/bin/php (php) in manual mode# Switch
sudo update-alternatives --config phar# Output
There are 2 choices for the alternative phar (providing /usr/bin/phar).Selection Path Priority Status
------------------------------------------------------------
0 /usr/bin/phar8.0 80 auto mode
1 /usr/bin/phar7.0 70 manual mode
* 2 /usr/bin/phar8.0 80 manual modePress <enter> to keep the current choice[*], or type selection number: 1
update-alternatives: using /usr/bin/phar7.0 to provide /usr/bin/phar (phar) in manual mode# Switch
sudo update-alternatives --config phar.phar# Output
There are 2 choices for the alternative phar.phar (providing /usr/bin/phar.phar).Selection Path Priority Status
------------------------------------------------------------
0 /usr/bin/phar.phar8.0 80 auto mode
1 /usr/bin/phar.phar7.0 70 manual mode
* 2 /usr/bin/phar.phar8.0 80 manual modePress <enter> to keep the current choice[*], or type selection number: 1
update-alternatives: using /usr/bin/phar.phar7.0 to provide /usr/bin/phar.phar (phar.phar) in manual mode
Now, again verify the currently active PHP as shown below.
# Verify PHP
php --version# Output
PHP 7.0.33-57+ubuntu20.04.1+deb.sury.org+1 (cli) (built: Nov 19 2021 06:39:53) ( NTS )
Copyright (c) 1997-2017 The PHP Group
Zend Engine v3.0.0, Copyright (c) 1998-2017 Zend Technologies
    with Zend OPcache v7.0.33-57+ubuntu20.04.1+deb.sury.org+1, Copyright (c) 1999-2017, by Zend Technologies
This is helpful for the applications reliable on the PHP in CLI mode to run console based programs. We can switch among the multiple versions of PHP installed on Ubuntu systems.
Switch PHP versions — Apache Web Server
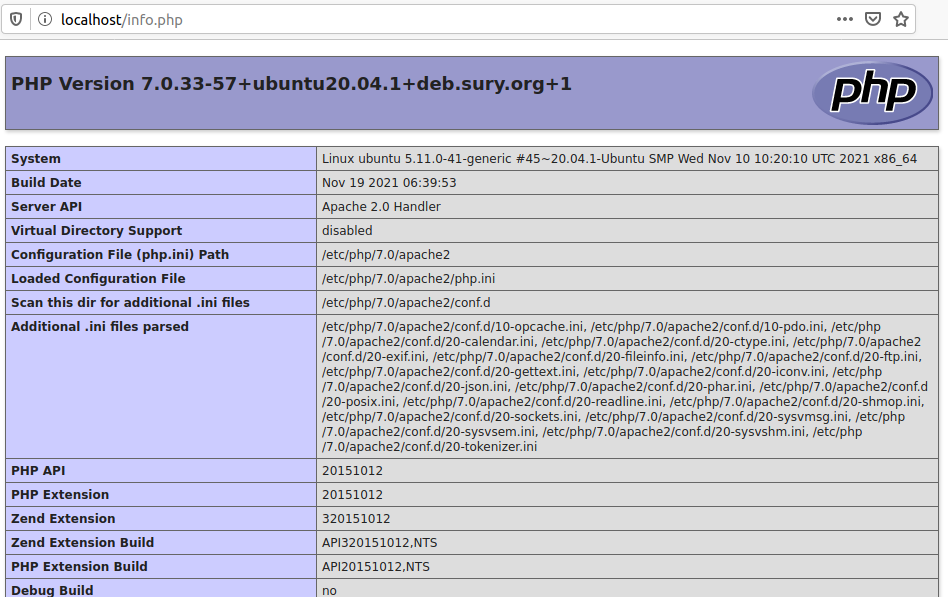
Similar to CLI mode, we can also switch among multiple versions of PHP for the Apache Web Server. In the previous tutorial — How To Install Multiple Versions Of PHP On Ubuntu 20.04 LTS, we saw that the PHP version remains same i.e. PHP 7.0 even after installing the recent version of PHP i.e. PHP 8.0 as shown in Fig 1.
Fig 1
We can switch among the PHP versions for the Apache Web server using the commands as shown below.
# Disable PHP 7.0
sudo a2dismod php7.0# Output
Module php7.0 disabled.
To activate the new configuration, you need to run:
systemctl restart apache2# Enable PHP 8.0
sudo a2enmod php8.0# Output
Considering dependency mpm_prefork for php8.0:
Considering conflict mpm_event for mpm_prefork:
Considering conflict mpm_worker for mpm_prefork:
Module mpm_prefork already enabled
Considering conflict php5 for php8.0:
Enabling module php8.0.
To activate the new configuration, you need to run:
systemctl restart apache2# Restart Apache Web Server
sudo service apache2 restart
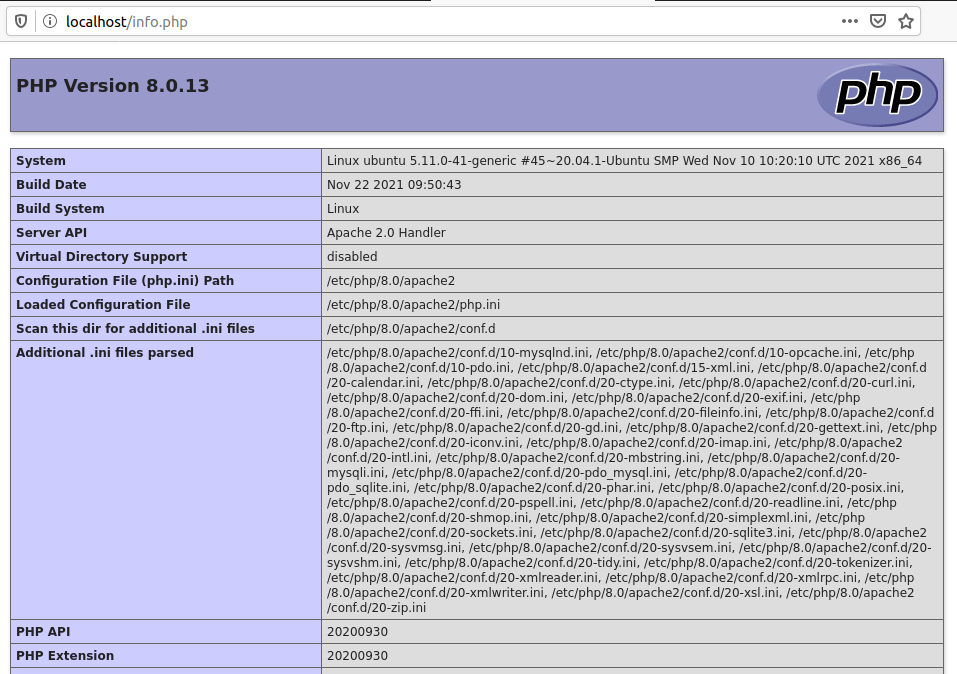
Now, again refresh the info.php using the Web Browser. It should be similar to Fig 2.
Fig 2
We can also switch back to PHP 7 using the same commands.
Switch PHP versions — Apache Web Server — PHP FPM
Instead of switch PHP version for Apache Web Server which impacts all the Virtual Hosts, we can also configure the selected Virtual Host to use the PHP version specified by us. We can do so using PHP FPM installed by us as shown in How To Install Multiple Versions Of PHP On Ubuntu 20.04 LTS.
# Check Status - PHP 7.0 FPM
systemctl status php7.0-fpm# Output
● php7.0-fpm.service - The PHP 7.0 FastCGI Process Manager Loaded: loaded (/lib/systemd/system/php7.0-fpm.service; enabled; vendor preset: enabled) Active: active (running) since Sat 2021-12-04 20:35:28 PST; 1h 14min ago Docs: man:php-fpm7.0(8) Main PID: 42546 (php-fpm7.0) Status: "Processes active: 0, idle: 2, Requests: 0, slow: 0, Traffic: 0req/sec" Tasks: 3 (limit: 9432) Memory: 18.1M CGroup: /system.slice/php7.0-fpm.service ├─42546 php-fpm: master process (/etc/php/7.0/fpm/php-fpm.conf) ├─42548 php-fpm: pool www └─42549 php-fpm: pool www Dec 04 20:35:28 ubuntu systemd[1]: Starting The PHP 7.0 FastCGI Process Manager... Dec 04 20:35:28 ubuntu systemd[1]: Started The PHP 7.0 FastCGI Process Manager.# Check Status - PHP 8.0 FPM
systemctl status php8.0-fpm# Output
● php8.0-fpm.service - The PHP 8.0 FastCGI Process Manager Loaded: loaded (/lib/systemd/system/php8.0-fpm.service; enabled; vendor preset: enabled) Active: active (running) since Sat 2021-12-04 21:15:28 PST; 35min ago Docs: man:php-fpm8.0(8) Process: 61492 ExecStartPost=/usr/lib/php/php-fpm-socket-helper install /run/php/php-fpm.sock /etc/php/8.0/fpm/pool.d/www.co> Main PID: 61489 (php-fpm8.0) Status: "Processes active: 0, idle: 2, Requests: 0, slow: 0, Traffic: 0req/sec" Tasks: 3 (limit: 9432) Memory: 10.7M CGroup: /system.slice/php8.0-fpm.service ├─61489 php-fpm: master process (/etc/php/8.0/fpm/php-fpm.conf) ├─61490 php-fpm: pool www └─61491 php-fpm: pool www Dec 04 21:15:28 ubuntu systemd[1]: Starting The PHP 8.0 FastCGI Process Manager... Dec 04 21:15:28 ubuntu systemd[1]: Started The PHP 8.0 FastCGI Process Manager.
We can see that both PHP 7.0 FPM and PHP 8.0 FPM are in running state. Now, enable Apache2 to use multiple versions of PHP using the command as shown below.
# Install FCGID
sudo apt install libapache2-mod-fcgid# Enable FCGID
sudo a2enmod actions fcgid alias proxy_fcgi# Restart Apache
sudo service apache2 restart
Also, update the Virtual Host as shown below.
<VirtualHost *:80>
----
----<FilesMatch .php$>
# For Apache version 2.4.10 and above
SetHandler "proxy:unix:/run/php/php7.0-fpm.sock|fcgi://localhost"
</FilesMatch>----
----
</VirtualHost>
Also, reload Apache as shown below.
# Reload Apache
sudo service apache2 reload
Now, check the output of info.php using the Browser. It should show the configurations specific to PHP 7. Similarly, we can change PHP 7 to PHP 8 for the selected virtual host, without impacting the other virtual hosts.
Switch PHP versions — NGINX
Switching PHP version for NGINX is straight-forward, since it uses PHP FPM to execute the PHP scripts. We can simply specify the PHP version while configuring the Server Block as shown below. You can also follow How To Install PHP For Nginx On Ubuntu 20.04 LTS for more details.
# Server Block with PHP FPM
sudo nano /etc/nginx/sites-available/example.comserver {
...
...# pass the PHP scripts to FastCGI
location ~ .php$ {
root /var/www/example.com/html;
fastcgi_intercept_errors on;
fastcgi_pass unix:/run/php/php7.0-fpm.sock;
fastcgi_index index.php;
fastcgi_param SCRIPT_FILENAME $document_root/$fastcgi_script_name;
include fastcgi_params;
}...
...
}
Summary
This tutorial provided the steps required to switch among the multiple PHP versions installed on Ubuntu 20.04 LTS for CLI, Apache Web Server, and NGINX.

