В последнее время новые версии ядер выходят достаточно часто. Раз в несколько месяцев выходит стабильный релиз. Ну а нестабильные кандидаты в релизы выходят и того чаще. Линус Торвальдс и множество разработчиков по всему миру постоянно работают над улучшением новых ядер и добавлением в них все больше и больше функциональности.
С каждой новой версией в ядре Linux появляется поддержка нескольких новых устройств, например, новых процессоров, видеокарт или даже сенсорных экранов. За последнее время, поддержка нового оборудования очень сильно улучшилась. Также в ядро включаются новые файловые системы, улучшается работа сетевого стека, исправляются ошибки и баги.
Если вам нужна более подробная информация об изменениях в какой-то определенной версии ядра смотрите ее Changelog на kernel.org, а в этой статье мы рассмотрим обновление ядра Linux до самой новой версии. Я попытаюсь не привязывать инструкцию к определенной версии ядра, новые ядра выходят достаточно часто и она будет актуальна для каждого из них. Рассмотрим обновление ядра Ubuntu и CentOS. Сначала давайте рассмотрим как обновить ядро в Ubuntu.
Обновление ядра Ubuntu вручную
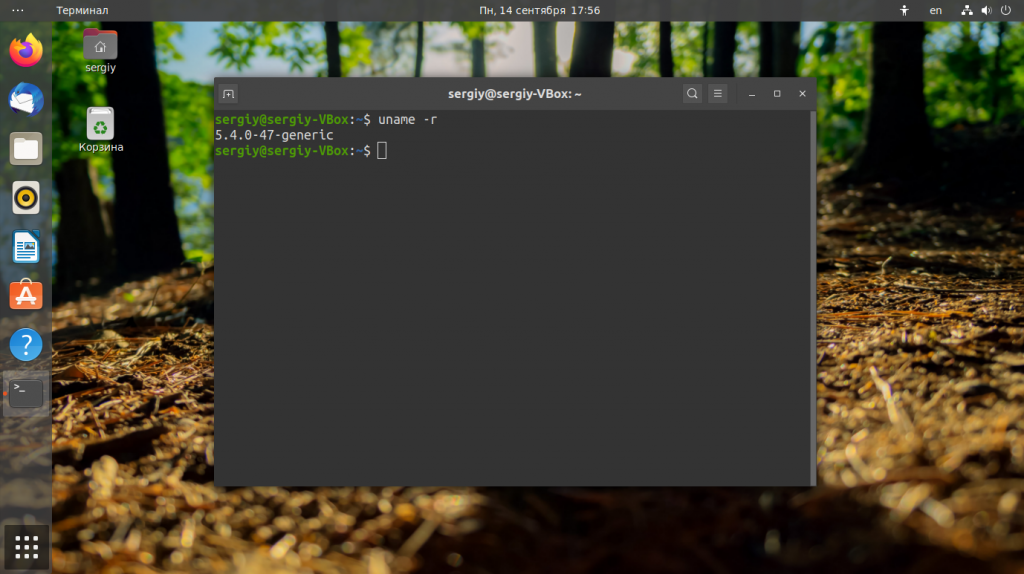
Давайте сначала посмотрим какое ядро у вас установлено. Для этого откройте терминал и выполните:
uname -r
Например, у меня сейчас используется версия 5.4, и я могу обновиться к самой новой версии. Разработчики Ubuntu уже позаботились о том чтобы их пользователи не собирали ядро вручную и сделали deb пакеты новой версии ядра. Их можно скачать с официального сайта Canonical.
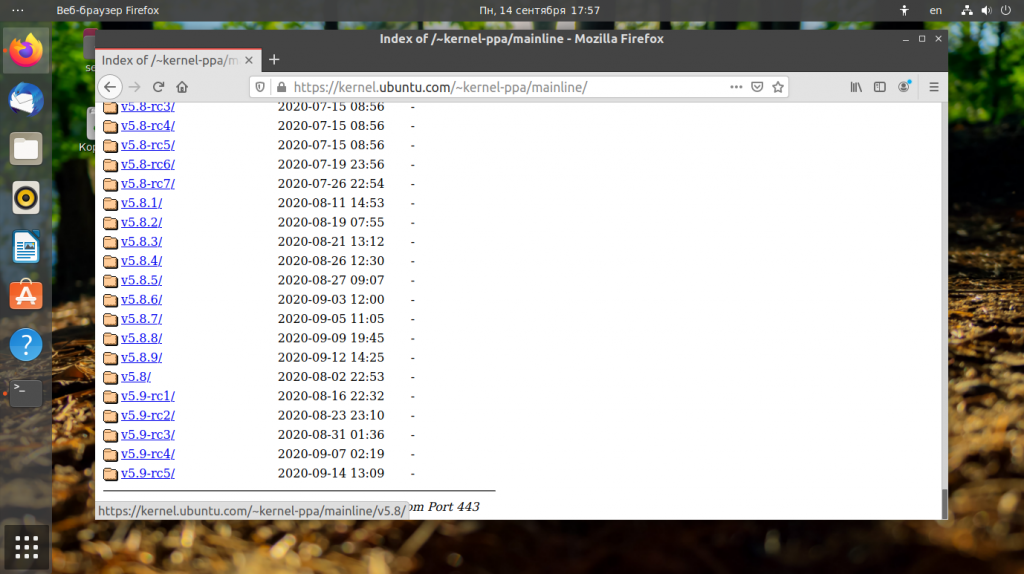
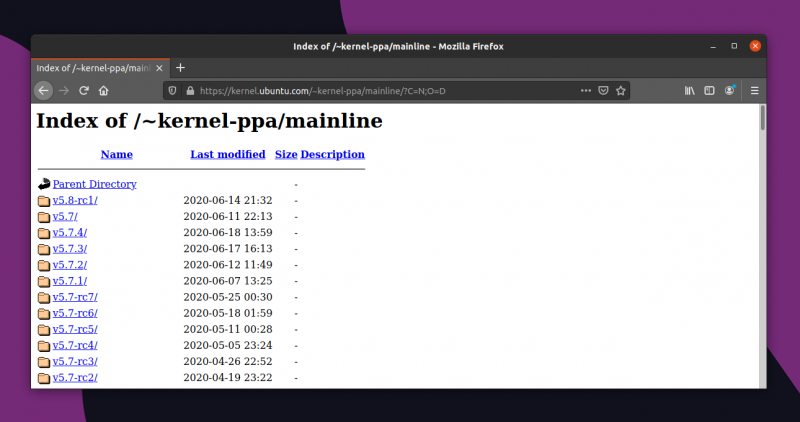
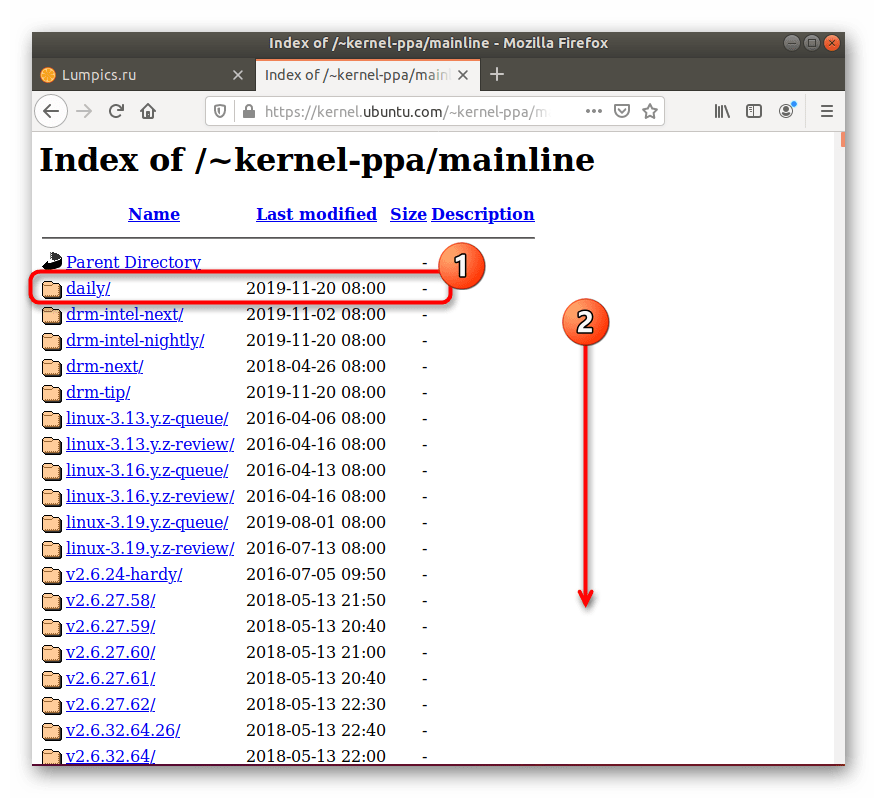
Я мог бы привести здесь команды wget для загрузки, если была бы известна версия ядра, но в нашем случае лучше будет использовать браузер. Откройте сайт http://kernel.ubuntu.com/~kernel-ppa/mainline/. Здесь находятся все, собираемые командой Ubuntu ядра.
Пролистайте вниз, именно там находятся более новые версии ядер:
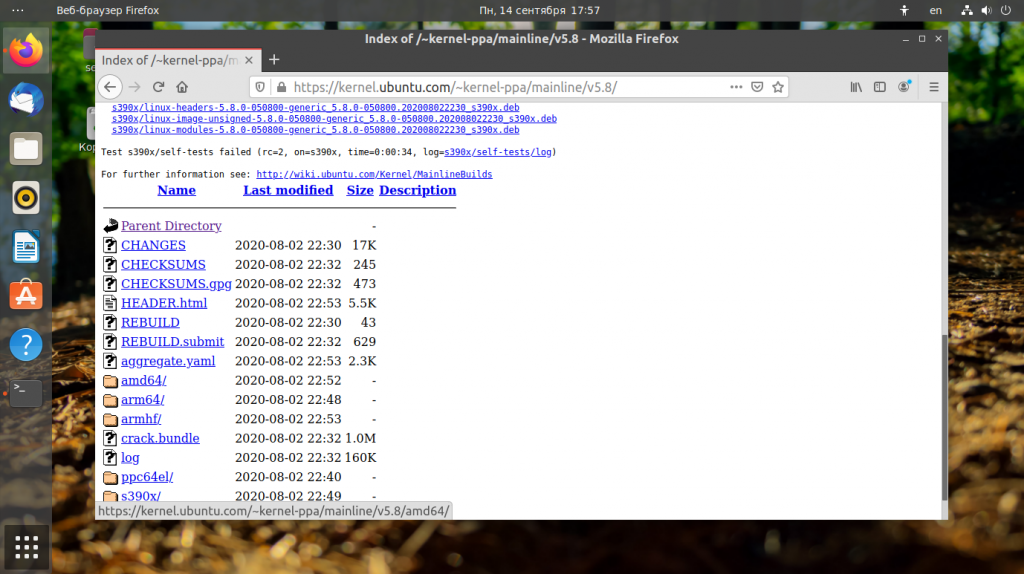
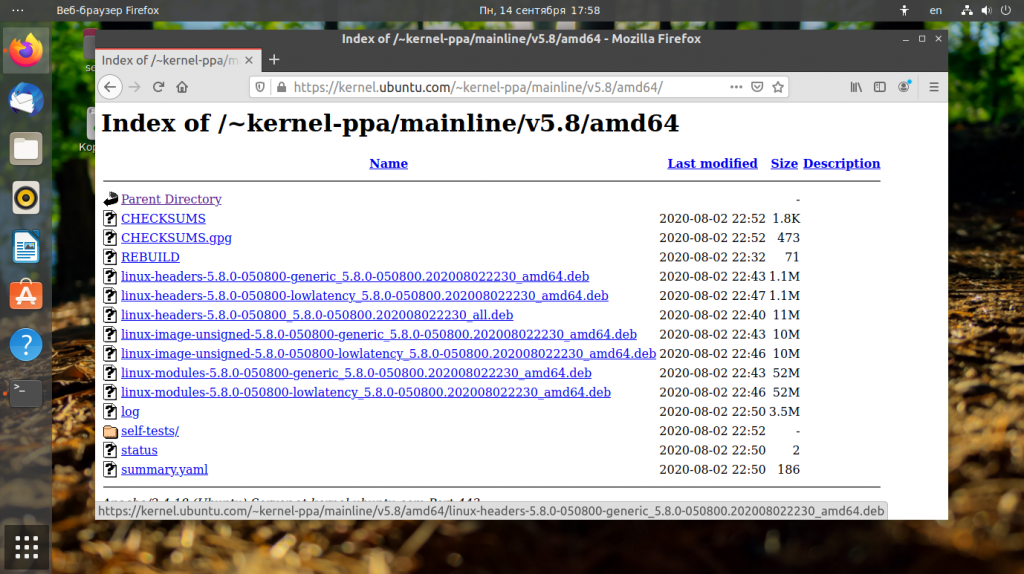
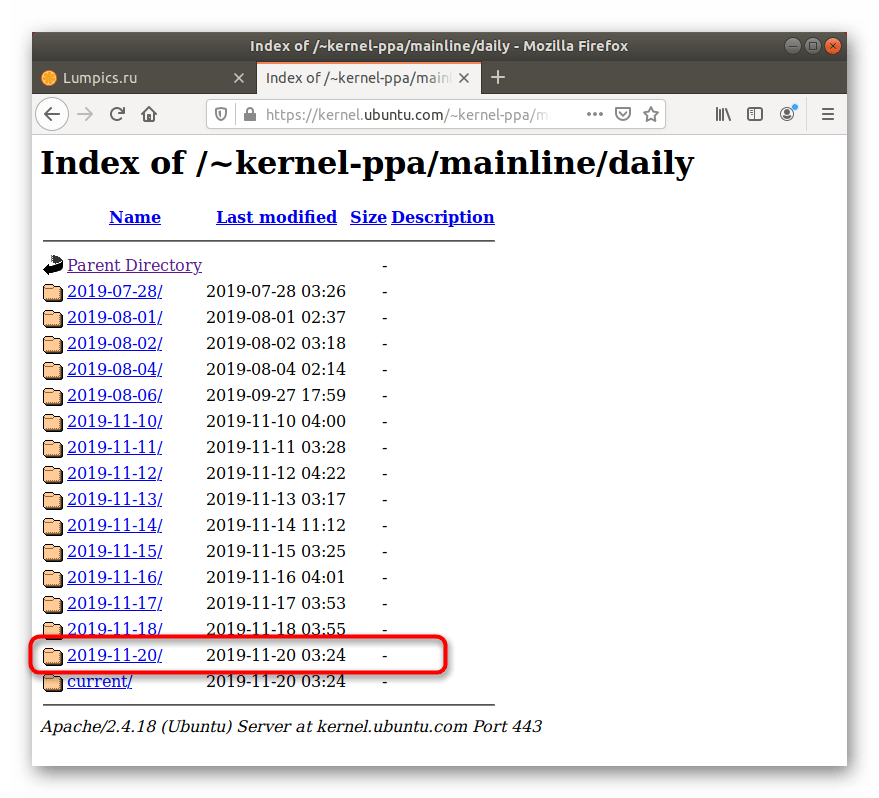
Кроме того, в самом верху есть папка daily/current, в которой находятся самые свежие, ночные сборки ядер. Выберите нужную версию ядра, затем выберите архитектуру. Для 64-битных систем вам понадобится архитектура amd64:
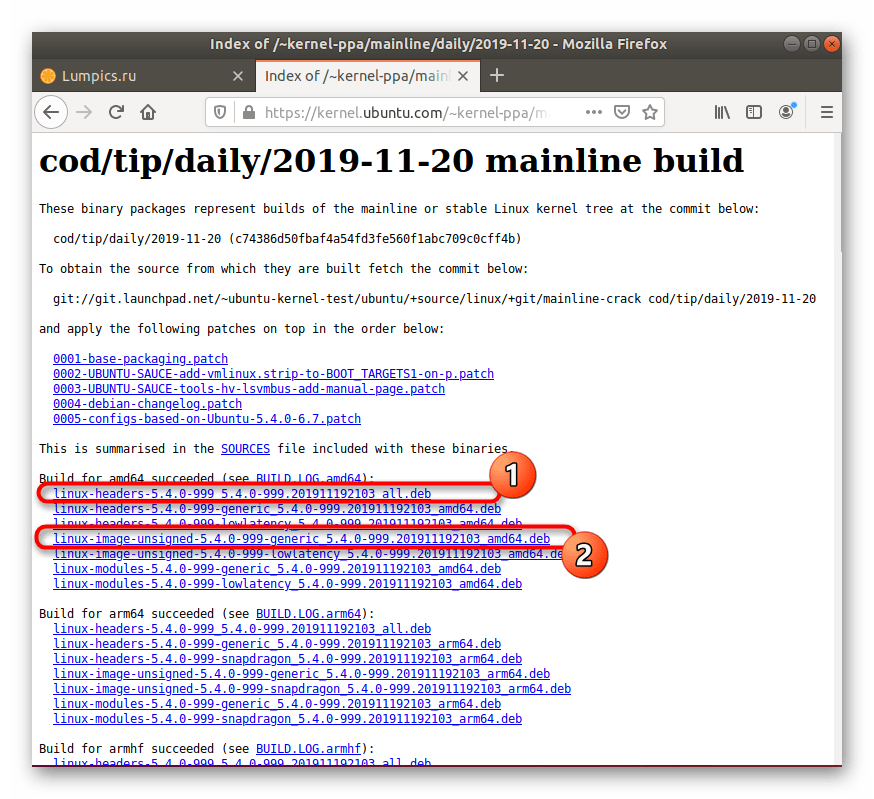
Далее надо скачать четыре файла: два linux-headers, linux-image и linux-modules. Как видите, там есть несколько типов ядер: lowlatency и generic. Ядро lowlatency судя из названия имеет более низкие задержки при работе с прерываниями. Зато ядро generic имеет большую пропускную способность. В большинстве случаев достаточно ядра generic. Скачайте linux-headers для all и generic, а также linux-image-generic и linux-modules-generic:
После завершения загрузки можно переходить к установке. Перейдите в папку с установочными пакетами, например, ~/Downloads:
cd ~/Downloads
Запустите установку:
dpkg -i linux-headers* linux-image* linux-modules*
Если эта команда не сработала, можно пойти другим путем. Установите утилиту gdebi:
sudo apt install gdebi
Затем с помощью нее установите ядро:
sudo gdebi linux-headers*.deb linux-image-*.deb linux-modules-*.deb
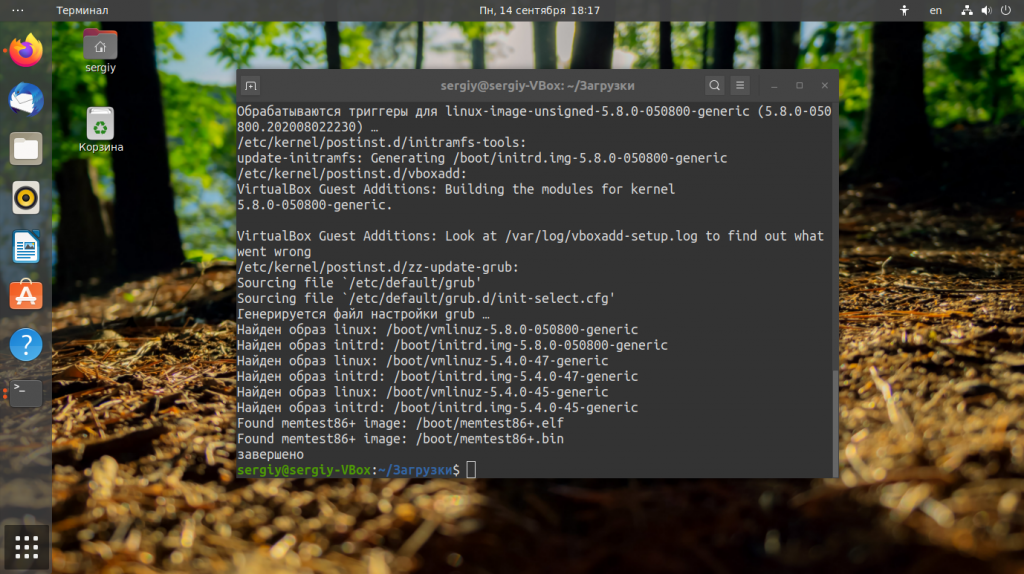
Ядро установлено, осталось обновить загрузчик:
sudo update-grub
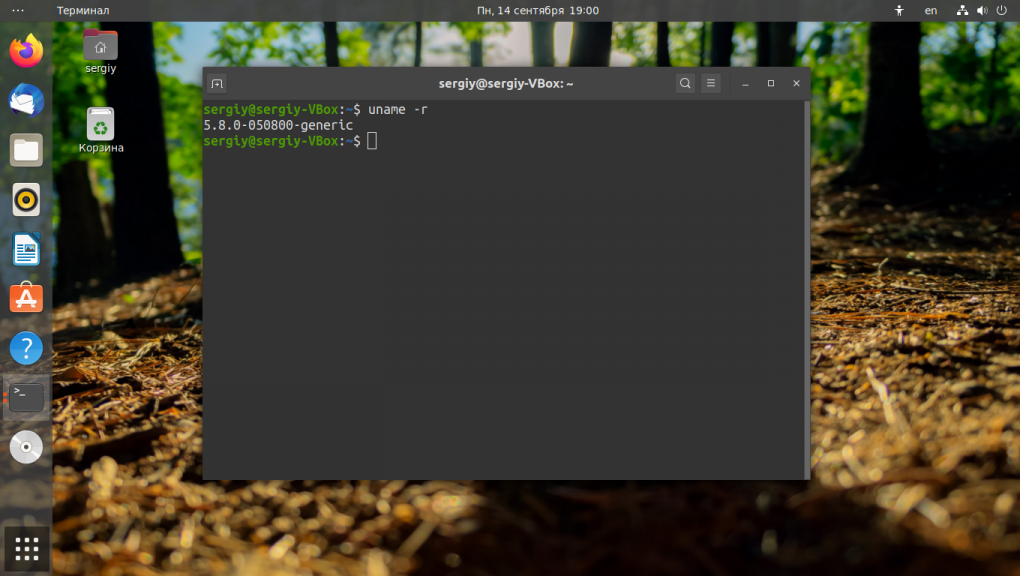
Теперь можно перезагружать компьютер и смотреть что получилось. После перезагрузки убедимся, что обновление ядра Linux до самой новой версии прошло успешно:
uname -r
Как видите ядро успешно установлено и работает. Но не спешите удалять старую версию ядра, рекомендуется иметь несколько версий ядра в системе, чтобы в случае неполадок иметь возможность загрузиться со старой рабочей версии. Если вы хотите настроить автоматическое обновление ядра в Ubuntu — используйте утилиту UKKU.
Если во время установки произошли какие-либо ошибки или ядро обновилось неправильно, и теперь система не загружается с новым ядром, вы можете использовать старое ядро. Также система может не запускаться, если вы используете проприетарный драйвер для видеокарты NVIDIA в таком случае не спешите качать самую новую версию ядра, используйте только стабильные ядра, в них, как правило, уже добавлена поддержка этого модуля.
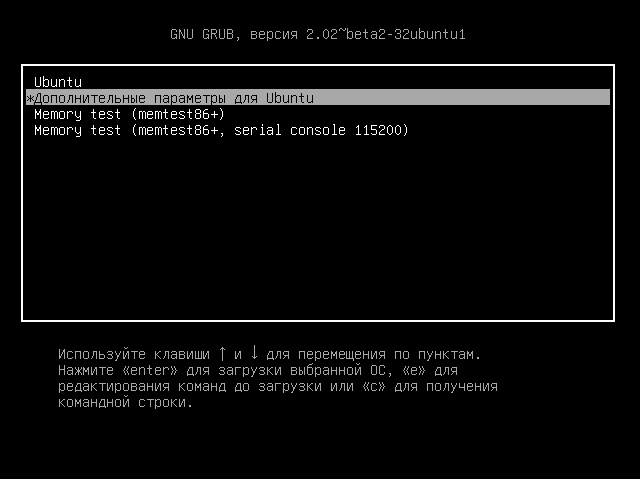
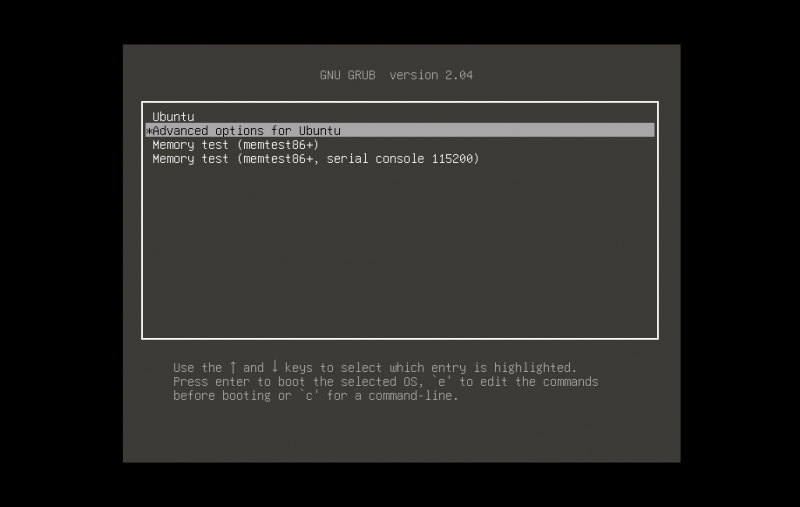
А чтобы восстановить работу системы выберите пункт Advanced options for Ubuntu в меню Grub:
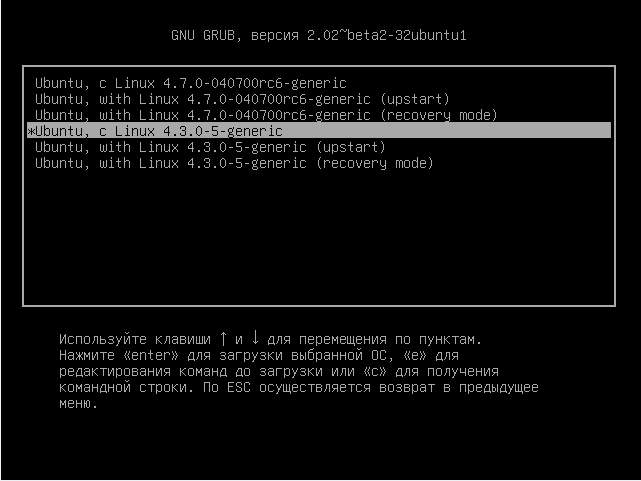
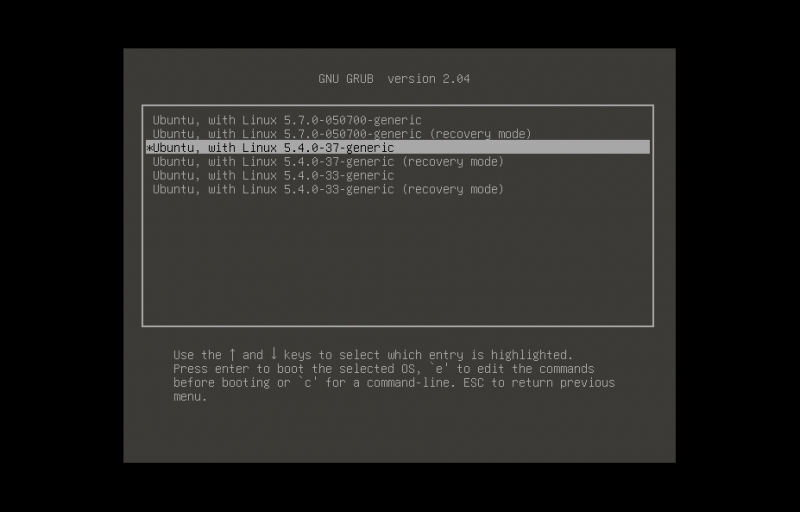
И запустите предыдущее работающее ядро:
После загрузки останется удалить неверно установленное ядро и еще раз обновить Grub. Найдите точное имя пакета ядра с помощью apt search. Например:
sudo apt search linux-headers-5.8
Затем удалите этот пакет:
sudo apt remove linux-headers-5.8-000055-generic
Аналогично надо поступить с ядром. После этого обновите конфигурацию Grub:
sudo update-grub
Теперь ваша система вернулась к прежнему состоянию. Вы можете попробовать устанавливать более старую версию ядра или попробовать еще раз.
Обновление ядра Linux до в CentOS
А теперь давайте рассмотрим как обновить ядро Linux самой новой версии в CentOS. Инструкция проверена на CentOS 8, но скорее всего, будет работать и на RHEL 8, Fedora и других подобных дистрибутивах.
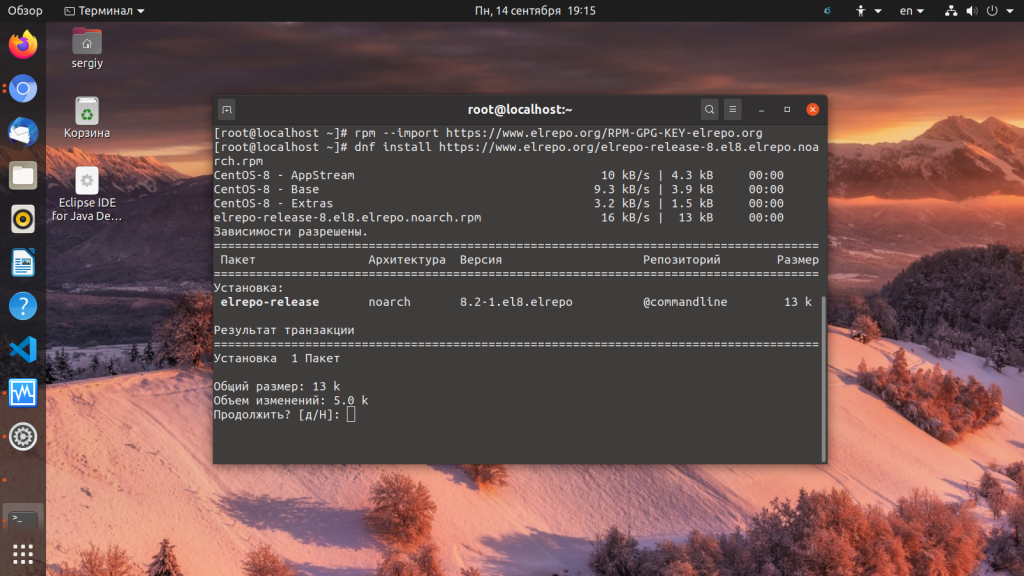
Как правило, новые ядра не включены в официальные репозитории CentOS, поэтому чтобы получить последнюю стабильную версию нам необходимо будет добавить репозиторий ELRepo. Это репозиторий коммерческих пакетов (Enterprise Linux Packages) он также поддерживается в RHEL и Fedora.
Для добавления репозитория сначала необходимо импортировать ключ:
sudo rpm --import https://www.elrepo.org/RPM-GPG-KEY-elrepo.org
Для того чтобы добавить репозиторий и необходимые компоненты в RHEL 7 и CentOS 7 выполните:
sudo yum install https://www.elrepo.org/elrepo-release-7.el7.elrepo.noarch.rpm
В CentOS 8 выполните:
sudo dnf install https://www.elrepo.org/elrepo-release-8.el8.elrepo.noarch.rpm
В CentOS 6:
sudo yum install https://www.elrepo.org/elrepo-release-6.el6.elrepo.noarch.rpm
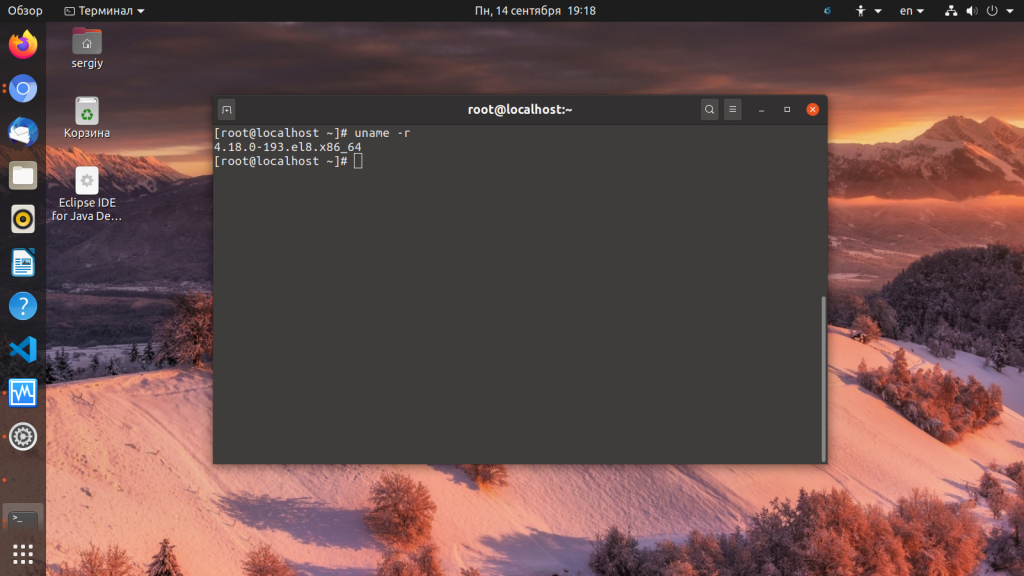
Готово, теперь посмотрим текущую версию ядра:
uname -r
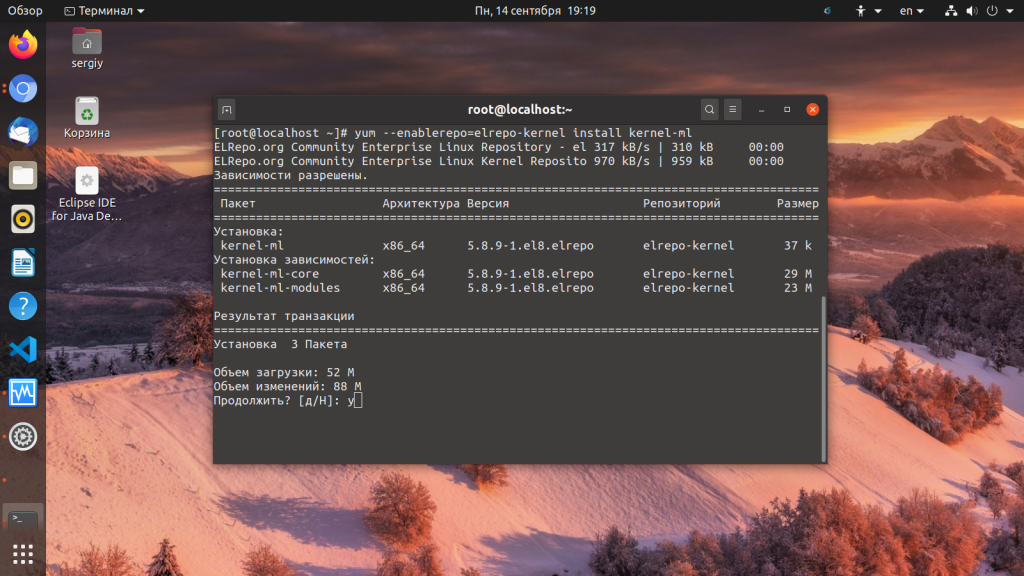
Можем устанавливать самую новую версию ядра Linux командой:
sudo yum --enablerepo=elrepo-kernel install kernel-ml
Пакет kernel-ml, это текущий стабильный mainline релиз, на данный момент, это 5.8. После того как установка нового ядра Linux завершена, обновите конфигурационный файл загрузчика:
sudo grub2-mkconfig -o /boot/grub2/grub.cfg
Затем можете перезагружать систему. Обновление ядра в CentOS завершено.
Если после перезагрузки у вас возникли какие-либо проблемы с новым ядром, просто удалите его с помощью команды:
yum remove kernel-ml -y
Или:
dnf remove kernel-ml -y
И перезагрузите компьютер, чтобы вернуть систему к прежнему состоянию.
Выводы
В этой инструкции мы рассмотрели как обновить ядро Linux до 4.4 в Ubuntu и CentOS, но мы говорили только об обновлении ядра из бинарников. Также можно собрать ядро из исходных кодов, которые доступны для загрузки на официальном сайте ядра. О сборке ядра Linux я писал в отдельной статье. Вроде все разобрали, если остались вопросы — пишите в комментариях.
Статья распространяется под лицензией Creative Commons ShareAlike 4.0 при копировании материала ссылка на источник обязательна .
Introduction
The Linux kernel is like the central core of the operating system. It works as sort of a mediator, providing an interface between software applications and computer hardware.
The Linux kernel is the foundation on which all the different types of Linux, operate. It is Open Source software – anyone can decompile, examine, and modify the code.
As technology progresses, developers discover patches and updates to the Linux kernel. These patches can improve security, add functionality, or even improve the speed at which the operating system functions.
If you’re running a Linux operating system (like Ubuntu), it’s a good idea to check and update the kernel regularly.

Prerequisites
- A server running Ubuntu Linux
- Access to the Terminal (CTRL-ALT-T or Applications menu > Accessories > Terminal)
- A user account with sudo privileges
- The apt tool, built into Ubuntu
- The Update Manager, built into Ubuntu (optional)
Tutorial on Updating Ubuntu Kernel
Option A: Use the System Update Process
Step 1: Check Your Current Kernel Version
At a terminal window, type:
uname –srThe terminal returns an output similar to:
Linux 4.4.0-64 genericThe first two digits (in this case, 4.4) are the overall kernel package. The third digit is the version, and the fourth digit shows you the level of patches and fixes.
For more details, refer to our full guide on checking the Linux kernel version. While inspecting the system, you can also check which version of Ubuntu you are running.
Step 2: Update the Repositories
At a terminal, type:
sudo apt-get update
This command refreshes your local list of software, making a note of any newer revisions and updates. If there’s a newer version of the kernel, the command will find it and mark it for download and installation.
Step 3: Run the upgrade
While still in the terminal, type:
sudo apt-get dist-upgradeThe “dist-upgrade” switch asks Ubuntu to handle any dependencies intelligently. That is, if a particular software package is dependent on another software package to run, this command will make sure that the second package is upgraded before upgrading the first one.
This method is a safe way to upgrade your Ubuntu Linux kernel. The kernel updates accessible through this utility have been tested and verified to work with your version of Ubuntu.
Option B: Use the System Update Process to Force a Kernal Upgrade
There are instances in which a newer kernel has been released but not thoroughly tested with your version of Ubuntu. For example, you might be running Ubuntu 17.10 (Artful Aardvark), and you know that Ubuntu 18.04 (Bionic Beaver) is available.
Updating the kernel in this way requires a more substantial process.
Step 1: Back Up Your Important Files
You’ve probably already done this, but it’s important enough that it’s worth repeating.
Step 2: Use the Software Updater
Launch the software updater by hitting the super key (the “windows” key on most keyboards), and search for Update Manager.
The update manager will notify you if there are any updates needed. If you performed the steps in Part A, it should say your computer is up to date.
Click the Settings button.
A new window should open up with several tabs.
Step 3: Configure the Software Updater
Click the Updates tab.
Tick the first three checkboxes, under “Install updates from:”
- Important security updates
- Recommended updates
- Unsupported updates
Then, at the bottom of this tab, look for a drop-down labeled “Notify me of a new Ubuntu version:”
Click that drop-down, and select:
- For long-term support versions (If you want to stick with tested and reliable versions with full support)
- For any new version (If you like playing with the latest-and-greatest, and don’t mind if things are a little buggy)
Close this window, and then re-open it. It should offer the option to upgrade if there’s a new version out. (It usually takes a few days after release for the upgrade to become available, and for the server traffic to lighten up.)
Step 4: Force the Upgrade
If for some reason the system does not offer an upgrade, you can force it by opening a terminal and typing:
update-manager –d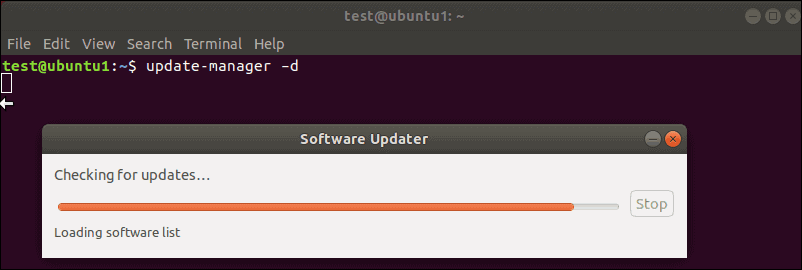
The system should respond with a window showing release notes for the new kernel (and version) of Ubuntu.
If everything looks good, click upgrade, and the process will proceed.
Option C: Manually Update the Kernel (Advanced Procedure)
If you just want to upgrade to the latest (untested) kernel available, and you’re aware of the risks, there’s a third procedure for selecting and installing a new kernel.
Before performing this step, it’s worth checking your system configuration. Are you running any custom drivers (especially video drivers)? Any custom configurations or packages? Those may not be compatible with the new kernel.
If you make a mistake and find that the new kernel is incompatible, a recovery option should be available. But it’s better to take precautions and prevent a problem than to try to fix one.
It’s also a good idea to research the release notes for the kernel you want to install. Note the revision number and any features that you intend to work with.
This process will use Ukuu, a graphical utility for updating the kernel. There are other methods, including manually downloading and installing the kernel, or even getting a copy of the source code and compiling it. Those methods are more complicated, and outside the scope of this guide.
Step 1: Install Ukuu
At the terminal, type the following (hit enter after each line):
sudo apt-add-repository ppa:teejee2008/ppasudo apt-get updatesudo apt-get install ukuuThe first command adds the TeeJeeTech repositories of open-source software for Linux to your basic repositories. The second command refreshes the database, so you’ve got a list of the latest revisions. The third command installs the Ukuu software.
Step 2: Launch Ukuu
At the terminal, type:
sudo ukuu-gtkThe Ukuu utility will launch and should display a list of the available Linux kernel versions.
Step 3: Install the Kernel
Select the kernel you wish to install, then click the “Install” button on the right-hand side.
Step 4: Reboot the System
Once the kernel finishes installing, reboot your system. Once you’re back into the operating system, you can relaunch Ukuu to verify the installation.
Step 5: In Case of Failure
If there’s a catastrophic problem, the GRUB, or boot utility, will keep a copy of the old kernel that you can select and boot into.
On the boot screen, select Advanced options for Ubuntu – then select the previous kernel (identified by the revision number). There’s no need to use the “upstart” or “recovery mode” options.
Step 6: Uninstalling the Kernel
The Ukuu utility also offers the ability to remove old kernels on Ubuntu. Simply click the same kernel that you installed previously, and click Remove on the right-hand side.
Conclusion
For most users, upgrading the kernel in Ubuntu is pretty straightforward. Most systems will prompt when the upgrade is ready. But if you’re looking for a custom kernel, or want to override the automatic process, this guide provides a good foundation for doing so.
I am assuming that you already know what is Linux kernel. This is the core software that drives any Linux distribution. This is what Linus Torvalds created around 30 years ago and this is what he still works on.
A newer version of the Linux kernel is released every few months with new features (such as support for more hardware), bug fixes, etc.
But most Linux distribution does not provide the latest Linux kernel unless you are using an Arch-based distribution or some other rolling release distribution.
Linux distributions are responsible for your system’s stability and this is why they don’t release a newer version of Linux Kernel to its users unless they test it for regression on their end. They often use a specific kernel release as the base and provide updates on this base kernel, instead of giving you the latest mainline kernel.
This does not mean that you cannot use the latest Linux kernel in Ubuntu or other distributions you are using.
In this tutorial, I’ll discuss various ways to get a new Linux kernel on Ubuntu.
Using the latest Linux kernel version in Ubuntu: Things you should know
In my opinion, there is no ‘real’ need of upgrading to a newer Linux kernel unless it provides you a good enough reason.
Why install a new Linux kernel version manually?
What could be such a reason? Well, suppose the new Linux kernel introduces support for your sound card or Wi-Fi card or some other hardware component. You read some official forum that the problem you are having with the hardware component could be fixed with a newer Linux kernel version.
HWE kernel option is also available
You should also keep in mind that Ubuntu has this hardware stack enablement (HWE) feature that lets you use somewhat newer Linux kernel on an Ubuntu LTS release.
Older kernels remain available
Another thing to note here is that installing a new kernel doesn’t mean that the older kernel has been removed from the system. It remains at your disposal. By default, Ubuntu boots into the newest Linux Kernel installed on the system.
Two ways of installing new kernel in Ubuntu: Command line and GUI
There are two ways to install newer Linux kernel:
- Manually download the DEB file for new Linux kernel and install it in terminal
- Use a GUI tool like Ukuu and install newer Linux kernel
The GUI tool Ukuu is not open source anymore and it locks a few features which I have discussed in its section.
Let’s see the methods.
Method 1: Manually install new Linux kernel in Ubuntu using command line
The latest Linux kernel is called the mainline Linux kernel. You’ll see this term used often.
🚧
I must warn you that you should be aware of the risk. If something goes wrong, you may revert to a previous Kernel version but you must not panic. Make a backup of the Ubuntu system to be sure. If you are easily baffled by troubleshooting, avoid playing with manual upgrades and stick to your distribution’s system updates.
Step 1: Check current installed version
You may want to first check current installed version of kernel. You can do this by using the uname command in the terminal:
uname -rAs you can see in the output below, I have kernel version 5.4 installed.
[email protected]:~$ uname -sr
Linux 5.4.0-40-generic
Step 2: Download the mainline Linux kernel of your choice
Now you have to download the desired kernel build provided by Ubuntu from here.
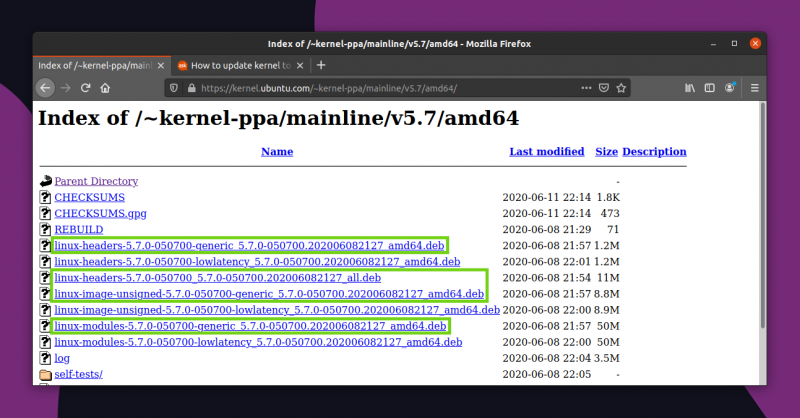
You can see kernel list like this. I am going to download kernel 5.7. You also should keep in mind to install the stable kernel instead of rc (release candidate).
Now download appropriate kernel files for your architecture. For 64 bit architecture, you should download these kind of files
- linux-headers-VERSION-NUMBER_all.deb
- linux-headers-VERSION-NUMBER_amd64.deb
- linux-image-VERSION-NUMBER_amd64.deb
- linux-modules-VERSION-NUMBER_amd64.deb
Hence I will download these files:
Step 4: Install the downloaded kernel
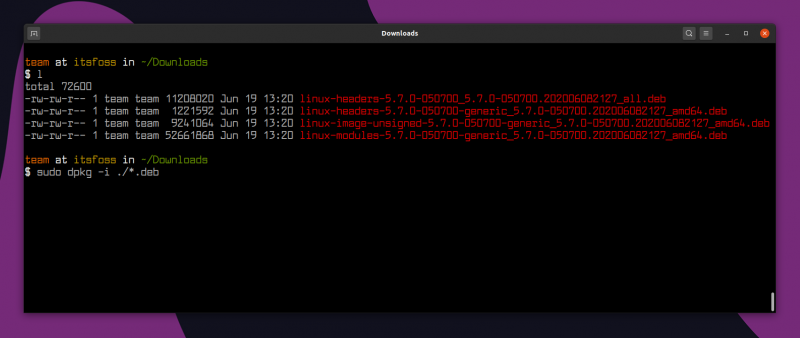
Now it’s time to install downloaded kernel. First do into the directory where you’ve downloaded kernel and enter following command. Make sure there isn’t any other “.deb” file in that directory other than downloaded kernel files.
sudo dpkg -i *.deb
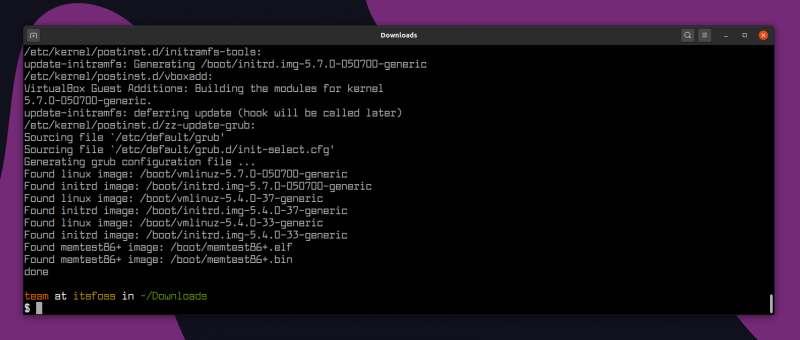
It will take some time. After installation finished, you will see screen like this.
Step 5: Reboot Ubuntu and enjoy the new Linux kernel.
Now you’ve installed new kernel in Ubuntu successfully, it’s time to reboot the machine. Ubuntu by default boots into the newer kernel version.
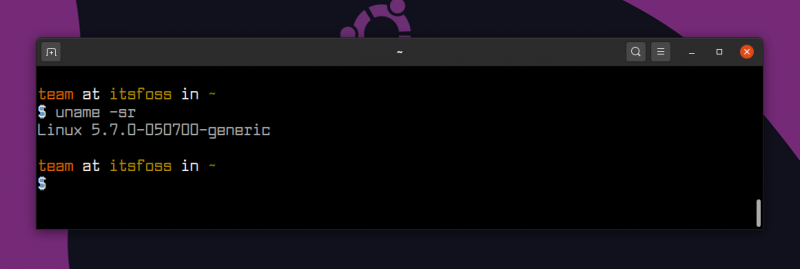
After rebooting, check kernel version with same uname -sr command you used earlier. As you can see, it’s updated to 5.7.0.
Rollback the changes and downgrade Linux kernel
If you didn’t like new Linux Kernel or if you discovered issues with it. You can easily downgrade the Kernel. You just have to:
- Boot into an older kernel
- Remove the newer Linux kernel you don’t want
Let’s see how to do that.
When you are booting into your system, on the grub menu, select the Advanced options for Ubuntu.
If you do not see the grub menu, try holding the shift key or use Esc key to bring the grub menu.
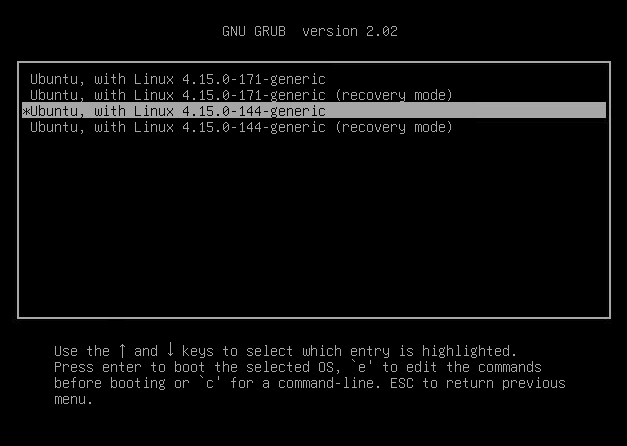
In here, you’ll see all the Linux kernels installed on your system. Select an older one. Don’t choose the recovery mode, just go with the normal ones.
Now that you have booted into your good old kernel, we have to remove new kernel.
You can use the apt or dpkg command to remove the installed kernel version. Do you remember the version of new kernel you installed manually? For me it was kernel 5.7. So here’s what I use to delete it.
Change the commands with the version you want to install:
sudo apt remove linux-headers-5.7.0*
sudo apt remove linux-image-5.7.0*
sudo apt remove linux-modules-5.7.0*
You can see, I have two packages associated with kernel 5.7.0. If I remove the first package it will automatically remove all it’s related dependencies.
You can upgrade Linux kernel on your own in Linux command line. But the kernel upgrade procedure is much easier and more convenient with a GUI tool called Ukuu (Ubuntu Kernel Update Utility).
This GUI tool is developed by Tony George who has provided us with several other useful tools for Ubuntu such as battery monitor for Ubuntu, app backup tool Aptik etc.
You should know that Ukuu of version above 18.9 is now paid and closed source. Version 18.9 is still free and open source.
Paid version contains additional features like:
- Downloading and installing newer kernel versions automatically
- Deleting downloaded packages after install
- Option to stay on same series of a kernel release
- Automatically removing older kernels.
- UI improvements.
If you want the additional features, you can purchase it from developer’s official website. Ukuu free version can still be used for installing and removing kernels, though.
Step 1: Install Ukuu in Ubuntu
You can download the deb files for the old Ukuu version 18.9 which is free to use but not updated lately.
Step 2: Install kernel with Ukuu
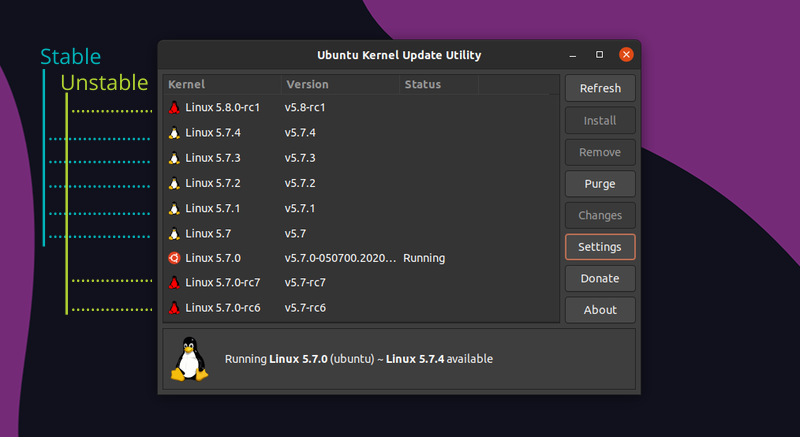
Once you have installed Ukuu, start it. It will refresh the list of available Linux kernels available for Ubuntu.
By default, it will show you all the available kernels, including the unstable release kernel (tagged with RC and with red Tux icon).
Kernel versions from the distributions are labeled with the logo and the other versions have just the good old Tux logo.
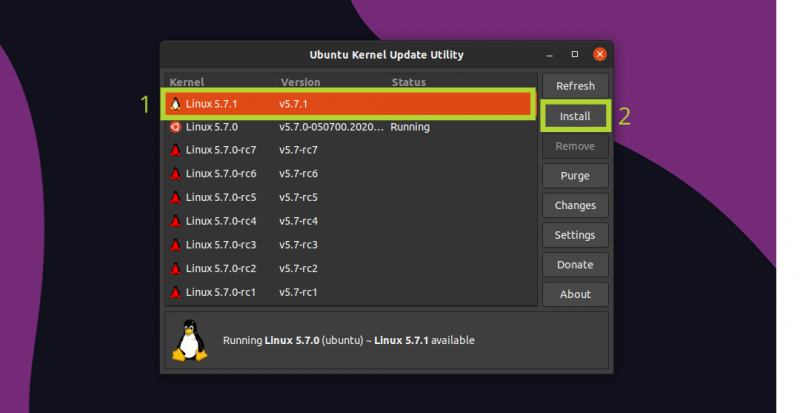
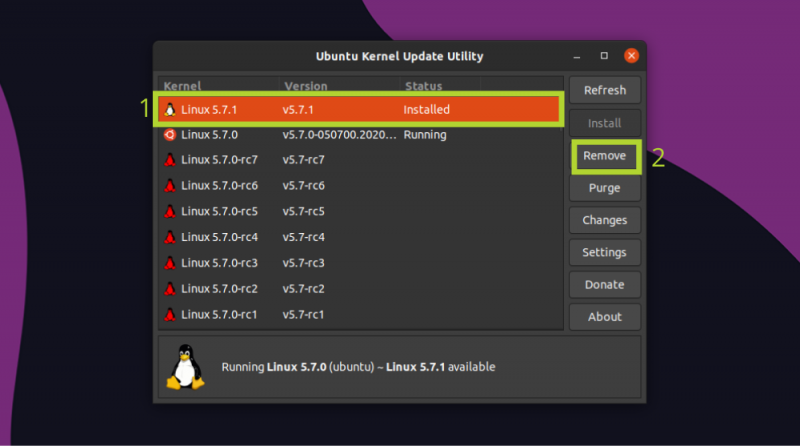
As you can see I have kernel 5.7.0 installed already, now I will install kernel 5.7.1 using Ukuu.
Again, you should avoid the release candidates. Select the desired Kernel version and click on install to install the newer Linux kernel version.
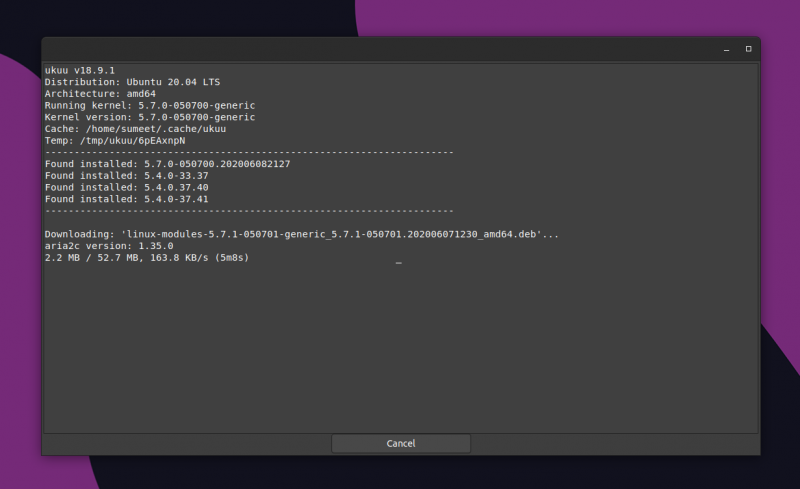
Of course, it will require admin password for this action. Once you have entered your password, you can see the installation progress in the application itself. Focus on the end result to know if it new Linux kernel was installed successfully or not.
Note: If the installation fails, no need to panic. Nothing will be wrong the system. Just try a different Kernel version and it might work.
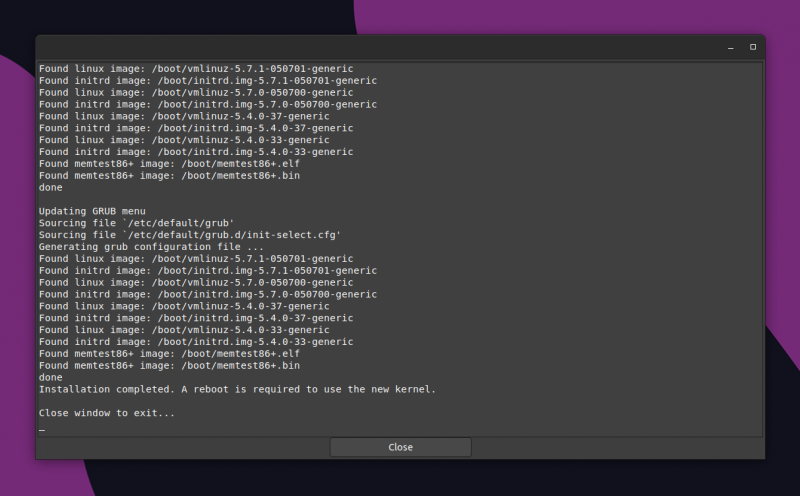
You should see something like this when installation finished successfully.
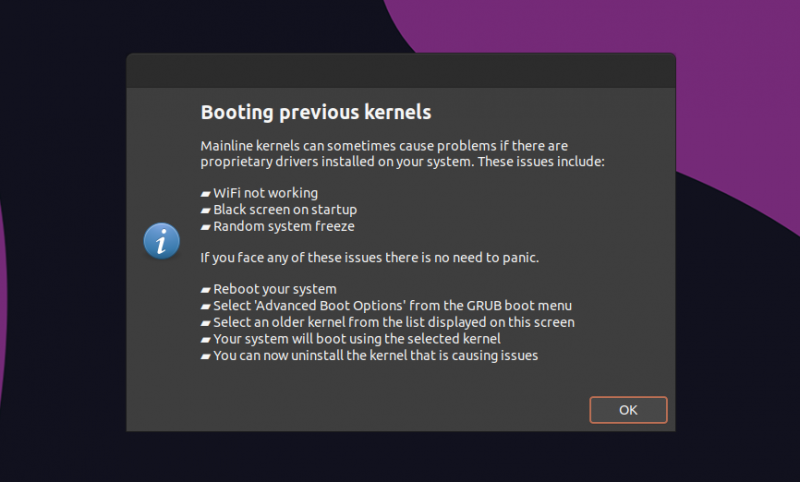
Once installation finishes, you’ll see a very helpful screen that tells you if anything goes wrong with the new Linux kernel, you can always choose to boot into the older kernel from the grub menu.
When you boot into the system next, you’ll be running the Linux kernel you had just installed.
Rollback the changes/Downgrade Linux Kernel with Ukuu
Rollbacking done in two steps:
- Boot into an older kernel
- Remove the newer Linux kernel you don’t want
Let’s see how to do that.
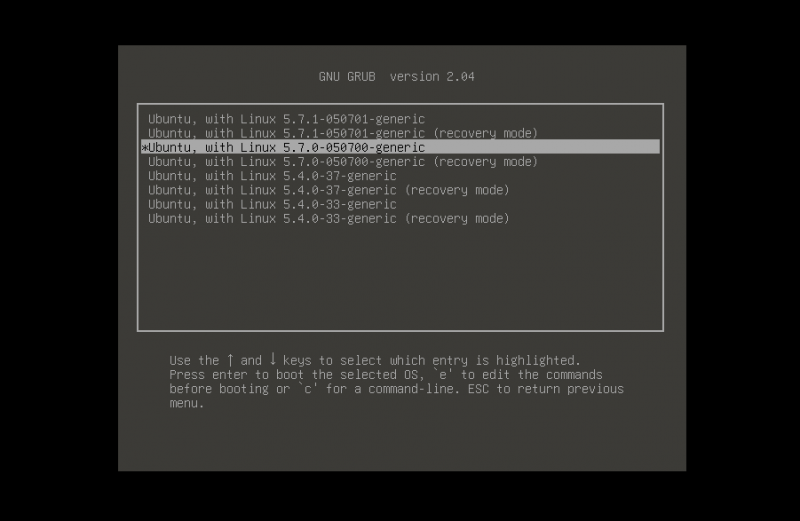
When you are booting into your system, on the grub menu, select the Advanced options for Ubuntu.
Select your old kernel to boot into it.
Once you boot into the system with the older Linux kernel, start Ukuu again. Make sure that you are not deleting the kernel that you are running at present.
Select the newer kernel version which you don’t want anymore and click on Remove.
That’s all you need to do here to downgrade the Linux kernel in Ubuntu.
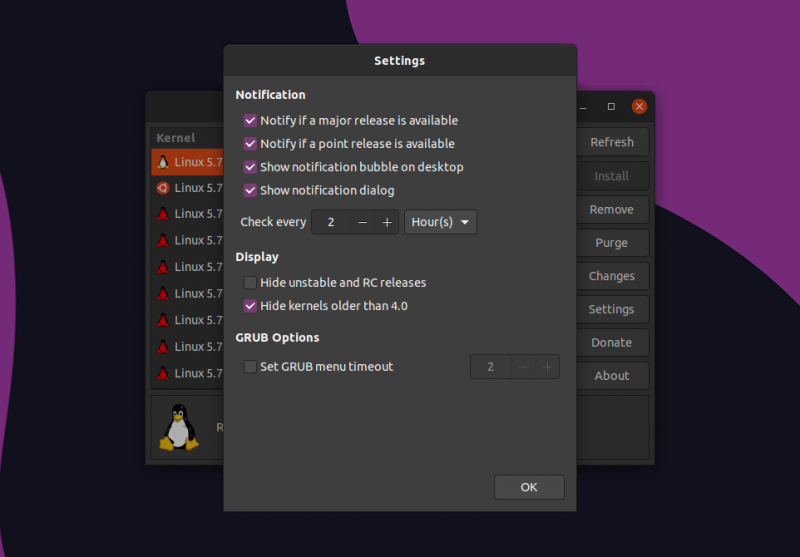
While we are discussing it, I would like to point out a few more features of Ukuu. Ukuu has settings option that allows you to not display release candidates of kernels in the list. You can also hide Linux kernel versions older than version 4.0.
You can also choose the option to display desktop notifications in case new Linux Kernel are available.
You can also remove Ukuu using apt remove ukuu command.
How do you upgrade Linux kernel?
I hope this tutorial was helpful in showing you how to install the mainline Linux kernel in Ubuntu.
So, do you often upgrade the Linux kernel on your own or do you wait for your distribution to provide the upgrade? How do you do it?
Опубликовано 17.03.2022
При использовании некоторых программ требуется установка конкретной версии ядра, обычно старее чем после установки системы. Данная инструкция поможет установить конкретную версию ядра в Ubuntu.
Проверить текущую используемую версию ядра можно командой
Если версия ядра не подходит, то действуем по инструкции.
Содержание
- Проверка доступных версия ядра
- Установка конкретной версии ядра
- Проверка списка установленных ядер
- Изменение настроек grub
- Загрузка с определенной версии ядра
- Удаление других версия ядра
Проверка доступных версия ядра
Обновляем список доступных пакетов
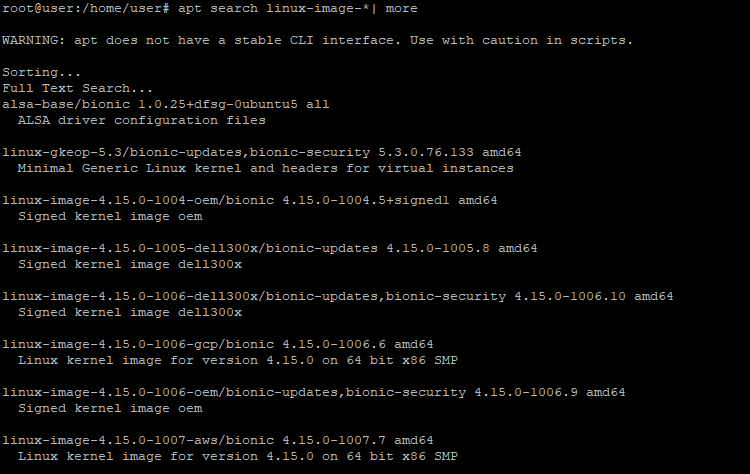
Проверить все доступные версии ядер
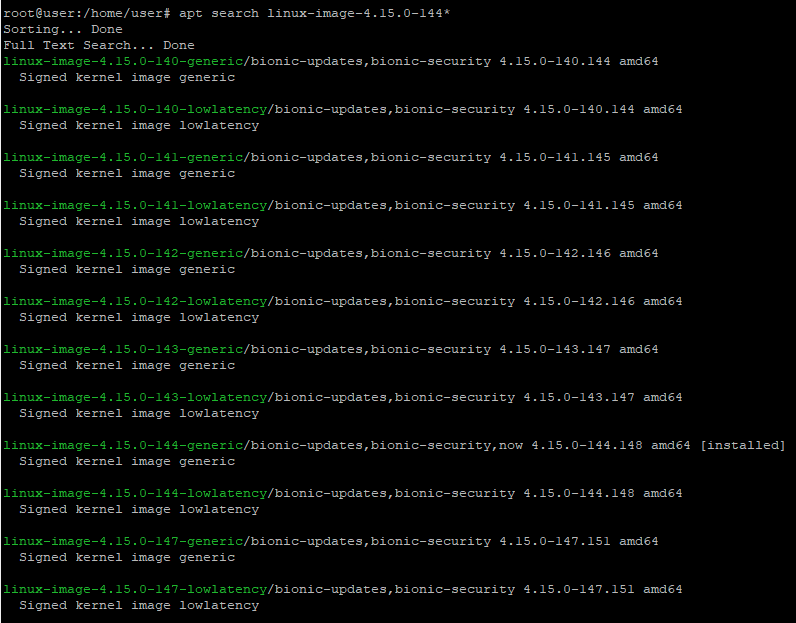
apt search linux-image-*| moreТак же можно посмотреть конкретную версию ядра
apt search linux-image-4.15.0-144*Установка конкретной версии ядра
Устанавливаем само ядро и все возможные модули (на всякий случай)
apt install linux-headers-4.15.0-144
apt install linux-headers-4.15.0-144-generic
apt install linux-modules-4.15.0-144-generic
apt install linux-image-4.15.0-144-generic
apt install linux-modules-extra-4.15.0-144-generic
Проверка списка установленных ядер
Проверить ядра, установленные в системе можно командой
dpkg --list | grep linux-imageИзменение настроек grub
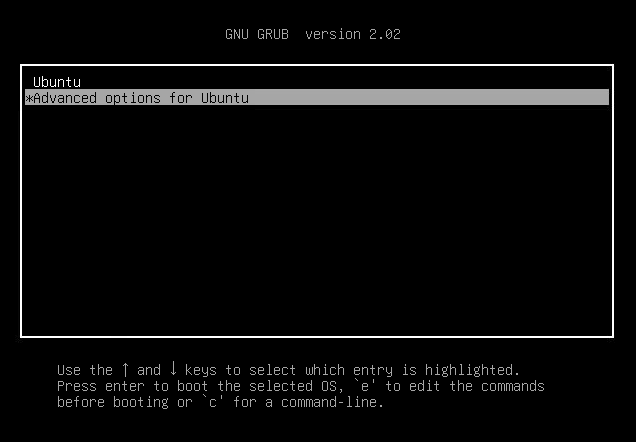
Для загрузке определенного ядра, необходимо его выбрать в advanced mode. В некоторых установках время может быть крайне малым или вообще быть равным 0.
делаем копию
cp /etc/default/grub /etc/default/grub.bakи открываем настройки
меняем таймаут загрузки GRUB_TIMEOUT
после чего обновляем настройки grub
Загрузка с определенной версии ядра
Если меню не появляется, при загрузке, а вместо него верный экран, необходимо нажать shuft.
Перегружаем систему и в меню grub выбираем расширенные настройки
и выбираем нужную версию ядра системы
и загружаемся с него.
Проверяем версию ядра
uname -r
4.15.0-144-generic
Удаление других версия ядра
Что бы при перезагрузке системы Ubuntu загружала необходимое ядро, необходимо удалить из системы не используемые версии.
apt remove --purge linux-image-4.15.0-171-generic
apt remove --purge linux-image-unsigned-4.15.0-171-generic
apt remove --purge linux-modules-4.15.0-171-generic
apt remove --purge linux-headers-4.15.0-171-generic
apt remove --purge linux-headers-4.15.0-171
Содержание
- Обновляем ядро в Ubuntu
- Определяем текущую версию ядра в Ubuntu
- Способ 1: Ручной режим обновления
- Способ 2: Автоматическое обновление ядра
- Решение проблем с загрузчиком GRUB после обновления ядра
- Вопросы и ответы
Ядро дистрибутивов Linux — основа операционной системы, которая отвечает за совместимость с устройствами и выполняет другие важные опции. Сейчас разработчики стараются раз в несколько месяцев или даже чаще выпускать обновления ядер для введения новых функций и поддержки производимого оборудования. К Ubuntu эта тема тоже относится, поэтому некоторые обладатели данного дистрибутива сталкиваются с необходимостью инсталляции апдейтов. Выполняется данная процедура относительно сложно, поскольку каждое действие будет производиться через «Терминал». Далее мы хотим продемонстрировать два способа, позволяющих справиться с поставленной задачей.
Официальный сайт, на котором находится информация по каждому обновлению ядра, называется kernel.org. Именно там вы можете просмотреть абсолютно все апдейты и изменения, внесенные в интересующую версию. Что же касается самого процесса обновления, то происходит он в ручном или автоматическом режиме. Каждый из этих вариантов имеет свои сложности и особенности, поэтому мы предлагаем детально изучить их по очереди, чтобы в итоге остановиться на оптимальном. Однако для начала давайте разберемся, как узнать текущую версию ядра.
Определяем текущую версию ядра в Ubuntu
Определение текущей версии ядра в Убунту происходит через стандартный «Терминал» путем ввода всего одной команды. Для этого даже не понадобятся права суперпользователя, а весь процесс займет всего несколько секунд.
- Откройте меню приложений и запустите оттуда «Терминал». Вы можете открыть консоль и другим удобным для вас способом.
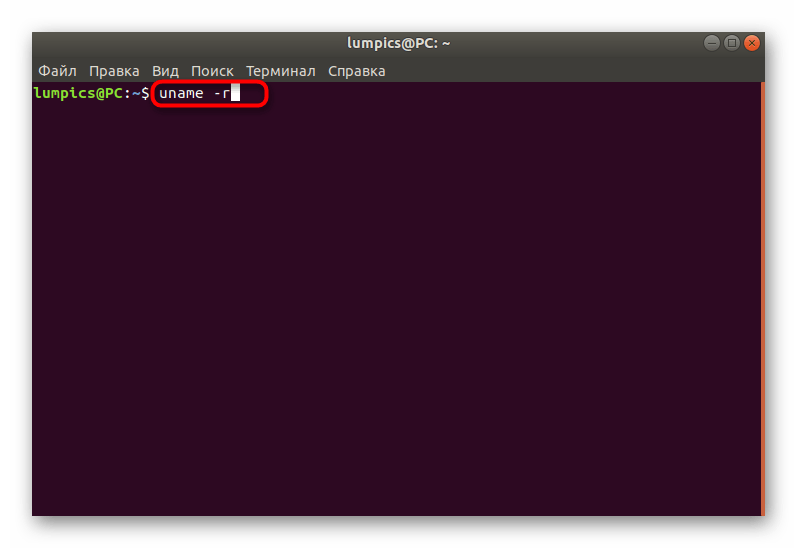
- Введите команду
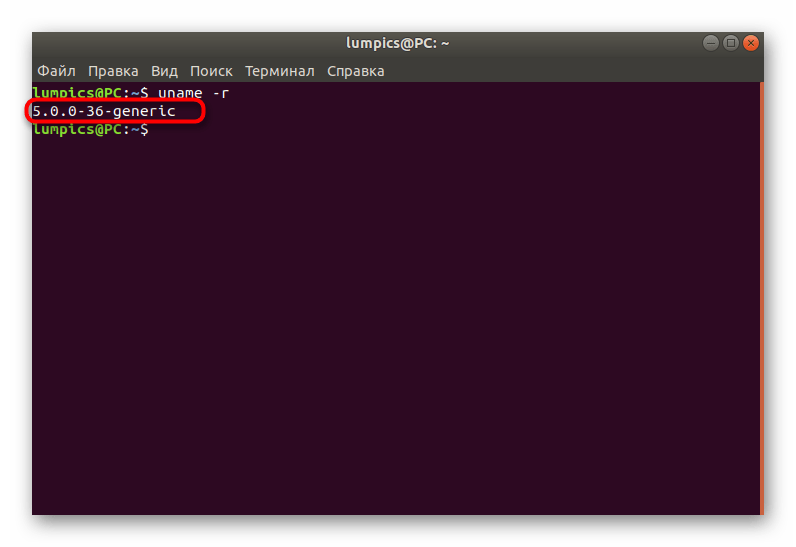
uname -rи нажмите на клавишу Enter. - В новой строке отобразится тип ядра и его версия.
Теперь вы знаете, какое именно ядро используется в вашей сборке и сможете понять, стоит ли его сейчас обновлять и от какого типа отталкиваться. В будущем, по завершении инсталляции апдейтов, мы рекомендуем задействовать эту команду, чтобы определить корректность установки файлов.
Способ 1: Ручной режим обновления
Ручной режим обновления ядра в Ubuntu займет немного больше времени, нежели автоматический, но при этом вы получите вариативность в выборе версий и даже сможете их скачать заранее с другого компьютера, например, на флешку, если подключение к сети на главном ПК отсутствует. От вас потребуется лишь предварительно выбрать подходящую сборку и задействовать приведенные команды, чтобы инсталлировать ее.
Перейти на официальный сайт для скачивания файлов ядра Linux
- Откройте браузер и перейдите по указанной выше ссылке. Здесь вы можете выбрать первую директорию под названием «daily». В ней находятся последние версии ядра, обновляемые каждый день. В противном случае просто опускайтесь в самый низ по списку, чтобы отыскать последнюю подходящую сборку.
- Откройте директорию с версией, чтобы получить DEB-пакеты.
- Скачайте «linux-headers» и «linux-image» подходящих архитектур и одинаковых версий в удобное расположение. Для этого достаточно будет кликнуть по синим ссылкам.
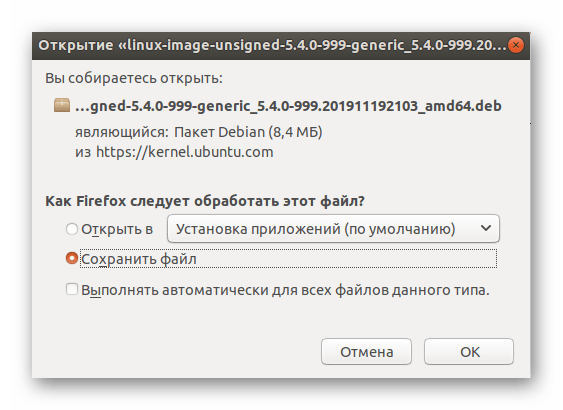
- При появлении уведомления об обработке файлов отметьте маркером пункт «Сохранить файл».
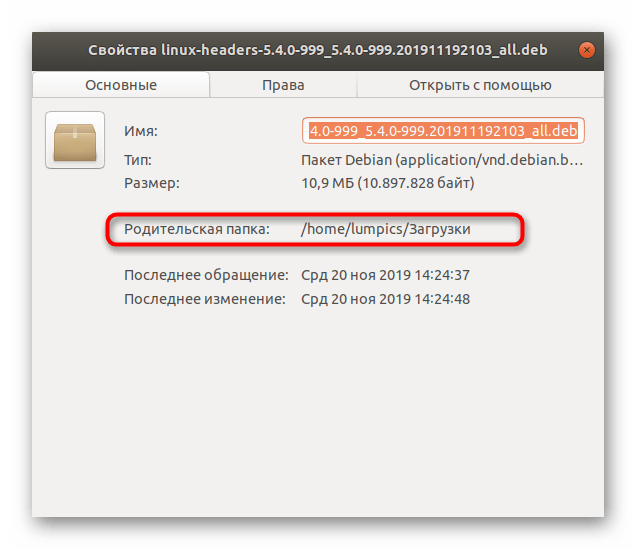
- Перейдите к расположению загруженных пакетов и щелкните по одному из них правой кнопкой мыши.
- В появившемся контекстном меню вас интересует пункт «Свойства».
- Обратите внимание на сноску «Родительская папка». Скопируйте этот путь, если вы затрудняетесь ввести его самостоятельно в консоли при необходимости.
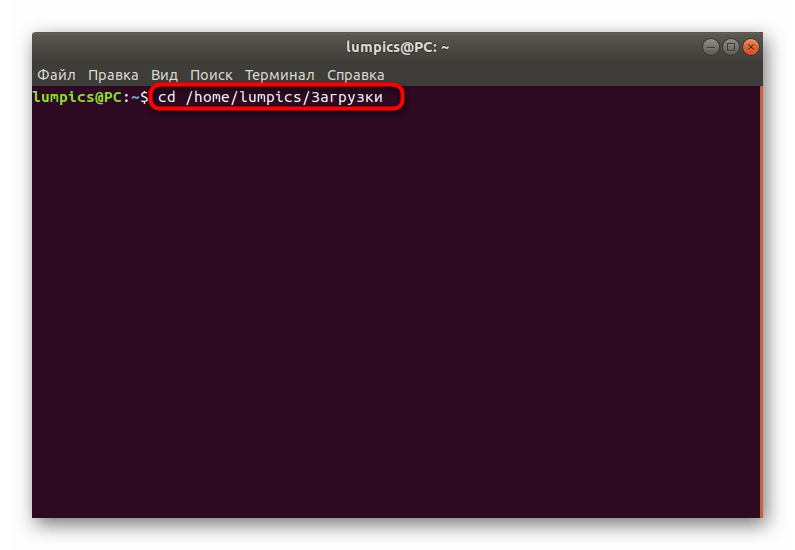
- Теперь запустите новый сеанс в «Терминале», откуда перейдите к папке назначения, определенной ранее, введя
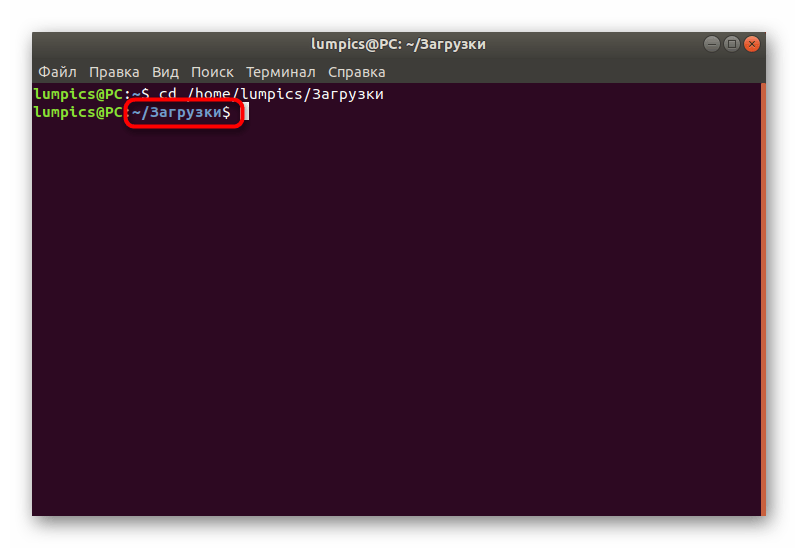
cd + путь. - Если перемещение прошло успешно, в новой строке ввода дополнительно появится надпись текущей директории, из которой и будут выполняться последующие команды.
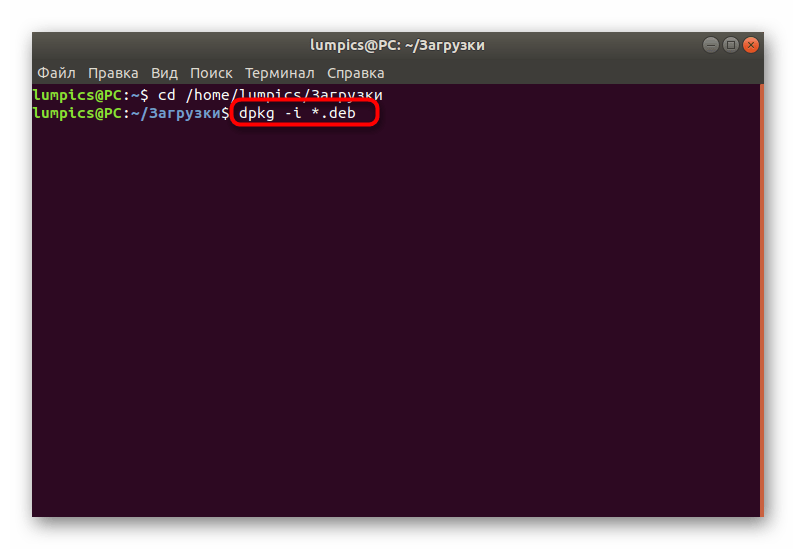
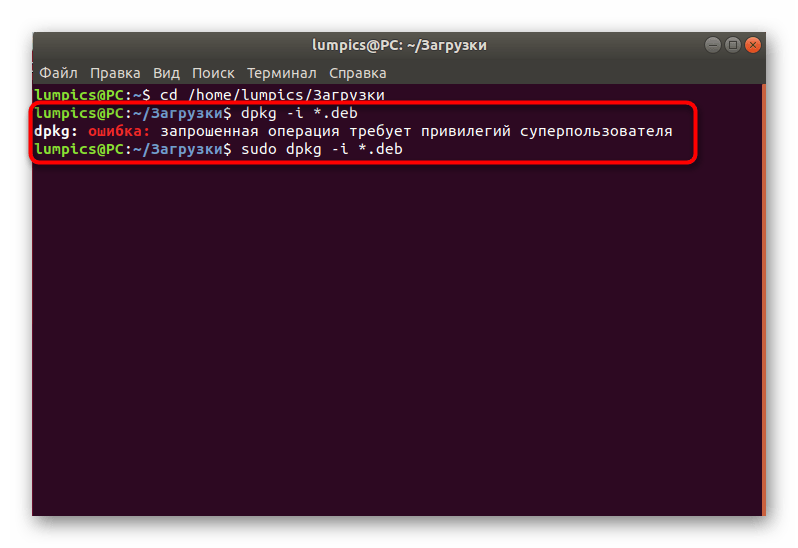
- Задействуйте команду
dpkg -i *.debдля запуска инсталляции. - Если появится уведомление о том, что операция требуется привилегий суперпользователя, добавьте перед основной строкой слово
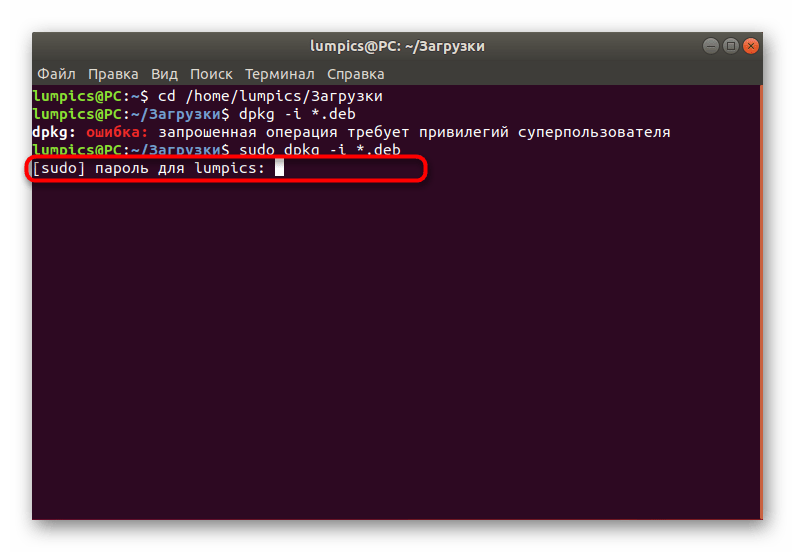
sudo. - Для подтверждения прав суперпользователя потребуется ввести пароль. Учитывайте, что символы при написании не отображаются, но вводятся. Как только наберете свой пароль, нажмите на Enter для подтверждения.
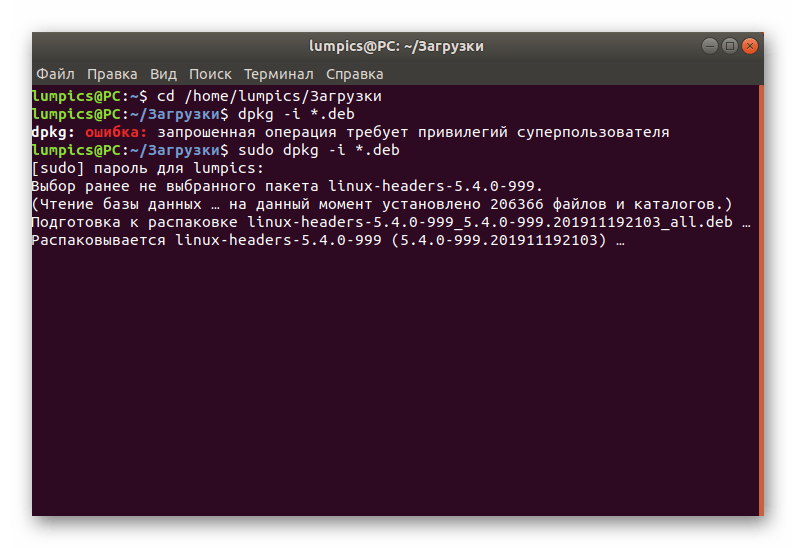
- Начнется распаковка имеющихся архивов. Она займет определенный промежуток времени. Не прерывайте терминальную сессию и не выполняйте других действий во время данной операции.
- Вы будете уведомлены об успешном завершении операции или же на экране может появиться ошибка, свидетельствующая о нарушении зависимостей. Если этого не произошло, обратите внимание только на последние действия следующей инструкции, а если установка прервалась, потребуется выполнять дополнительные манипуляции.
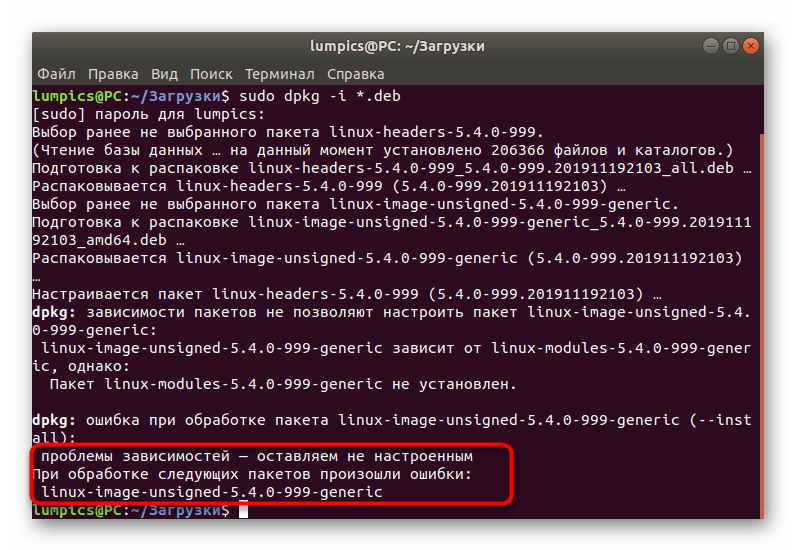
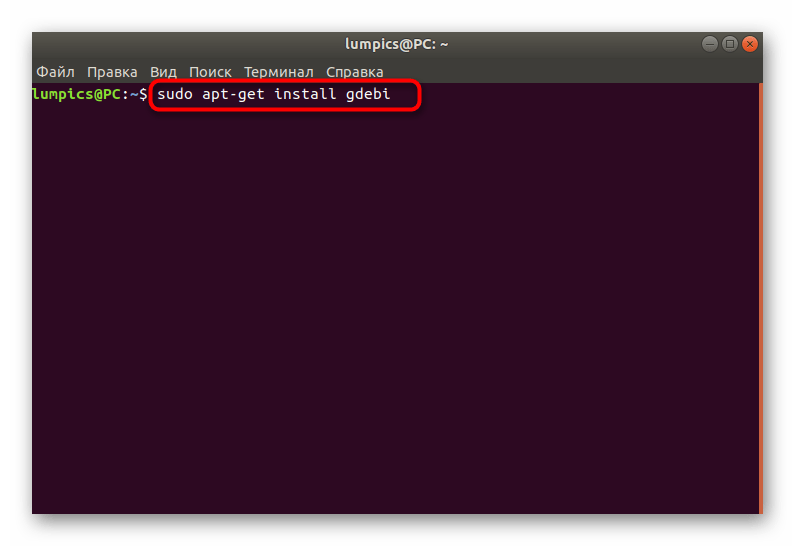
Проблемы с инсталляцией ядра через стандартный менеджер пакетов — ситуация часто встречающаяся. В большинстве случаев она решается путем использования стороннего установщика. Для начала его следует добавить, а потом уже воспользоваться встроенными функциями.
- Вы можете задействовать эту же сессию «Терминала» или создать новую. Введите в ней команду
sudo apt-get install gdebiи нажмите на Enter. - Для подтверждения прав доступа потребуется ввести пароль суперпользователя.
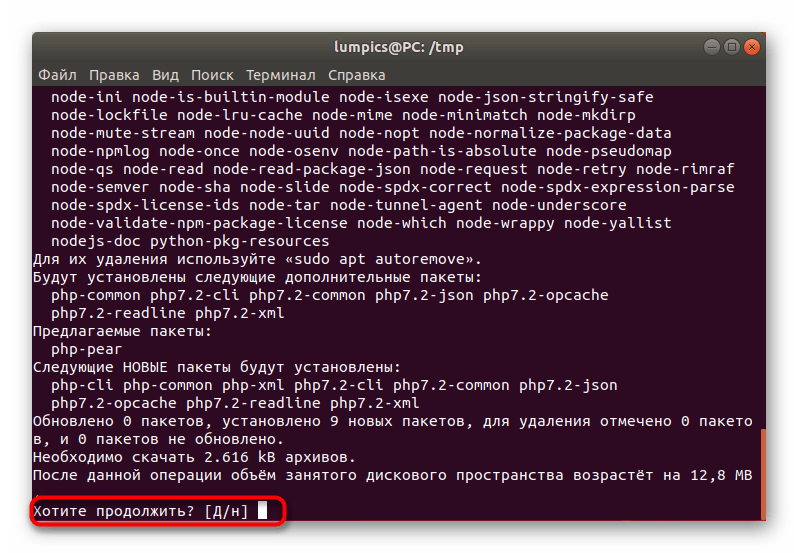
- При появлении уведомления о расширении объема занятого дискового пространства выберите вариант Д.
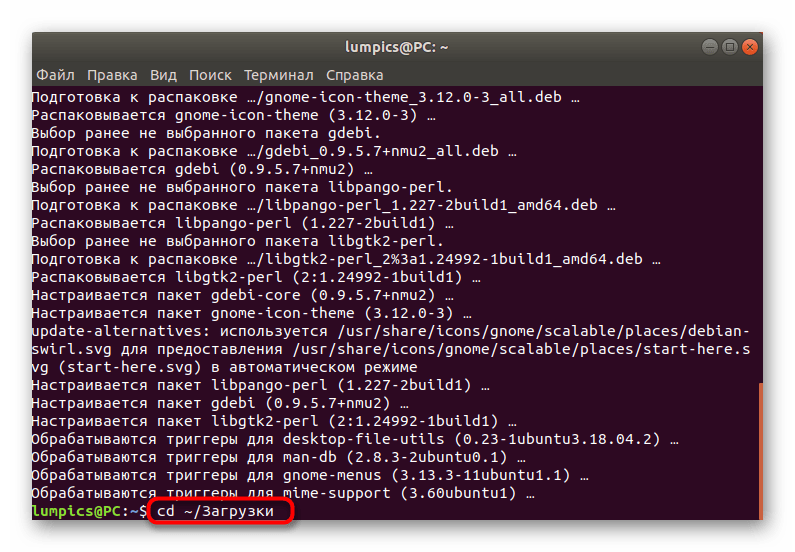
- После этого снова переместитесь к тому пути, куда были помещены DEB-пакеты, например, через команду
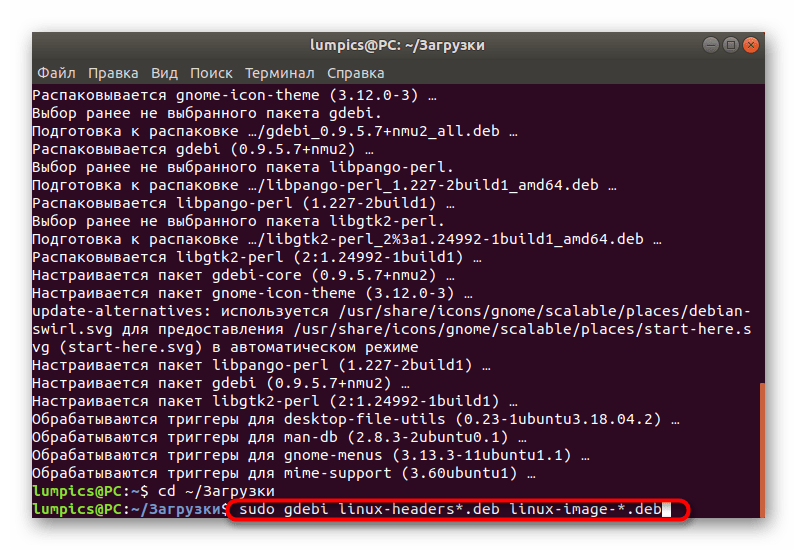
cd ~/Загрузки. - Используйте строку
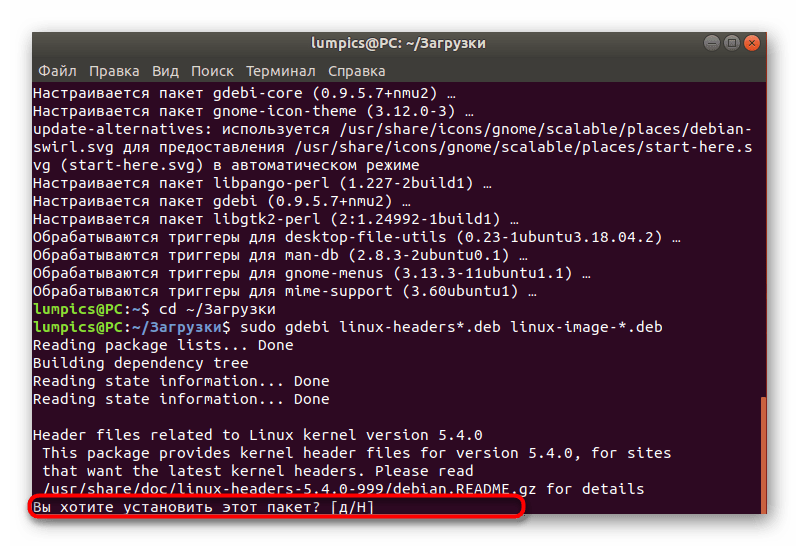
sudo gdebi linux-headers*.deb linux-image-*.deb. - Ожидайте окончания чтения и распаковки файлов.
- Подтвердите операцию инсталляции пакетов.
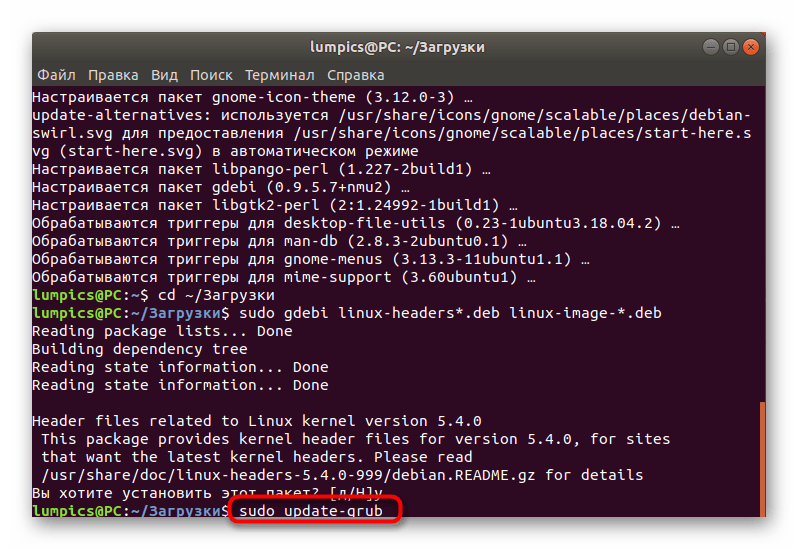
- Для применения всех изменений потребуется обновить загрузчик путем ввода
sudo update-grub. - Вы будете уведомлены, что обновление прошло успешно.
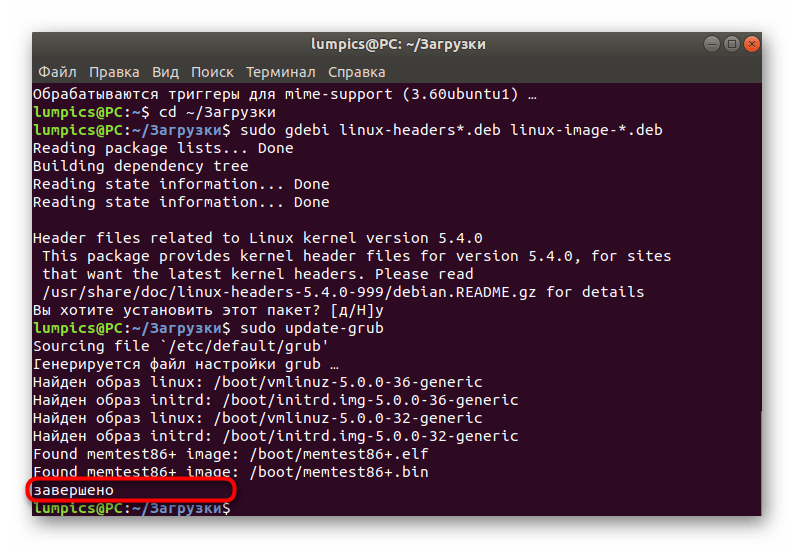
Сразу же после перезагрузки компьютера все изменения вступят в силу. Теперь вы будете использовать операционную систему на новом ядре. Если вдруг загрузчик по каким-либо причинам сломался, обратитесь к разделу в конце данного материала. Там мы детально расскажем о причинах неполадок и опишем метод решения.
Способ 2: Автоматическое обновление ядра
Этот метод подойдет тем пользователям, которые хотят получать обновления регулярно, задействовав для этого одно и то же средство, устанавливающее на ПК самую последнюю версию ядра. Осуществляется эта операция путем использования скрипта. Давайте рассмотрим, как создать его и инсталлировать апдейты для ядра Ubuntu.
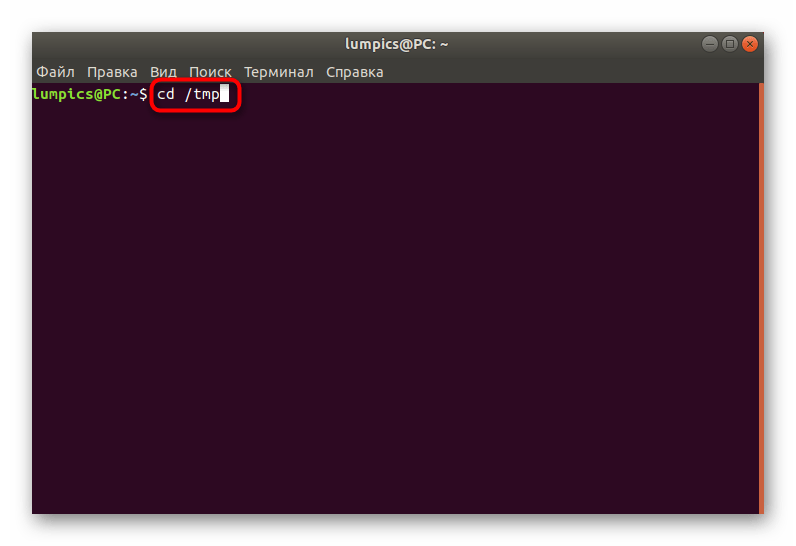
- Для начала перейдите в папку, куда будет инсталлирован скрипт. Запустите консоль и введите команду
cd /tmp. - Используйте команду
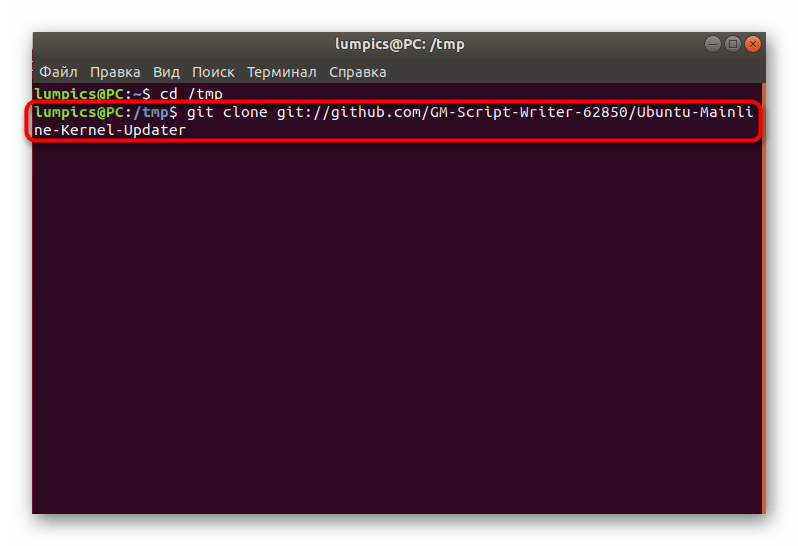
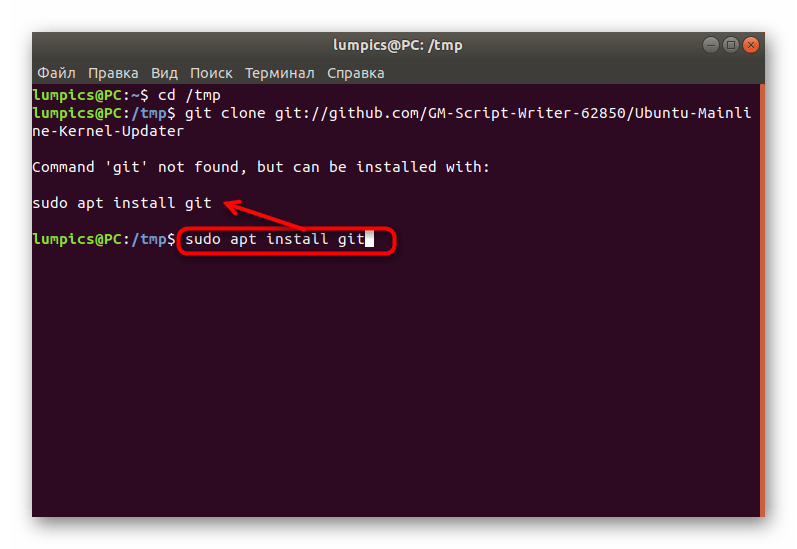
git clone git://github.com/GM-Script-Writer-62850/Ubuntu-Mainline-Kernel-Updater. - Если вы получили уведомление об отсутствии команды git, следуйте приведенной рекомендации по инсталляции.
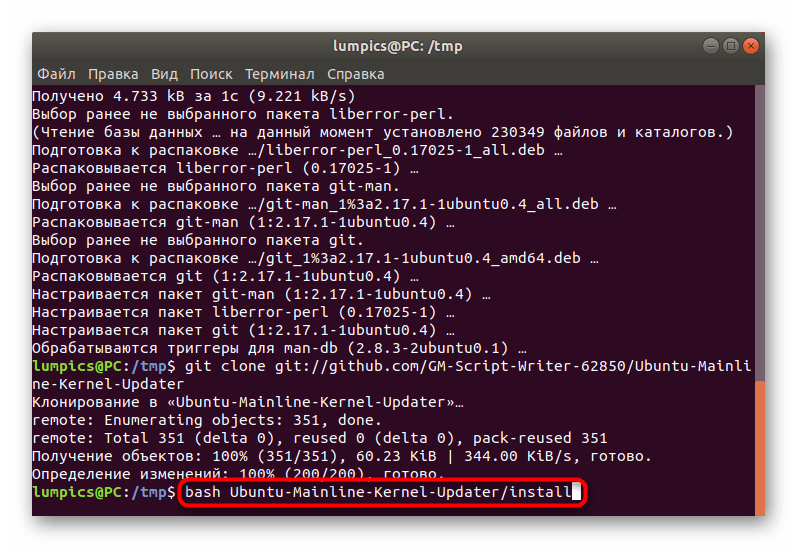
- После останется только записать скрипт путем вода
bash Ubuntu-Mainline-Kernel-Updater/install. - Подтвердите добавление файлов, выбрав положительный вариант ответа.
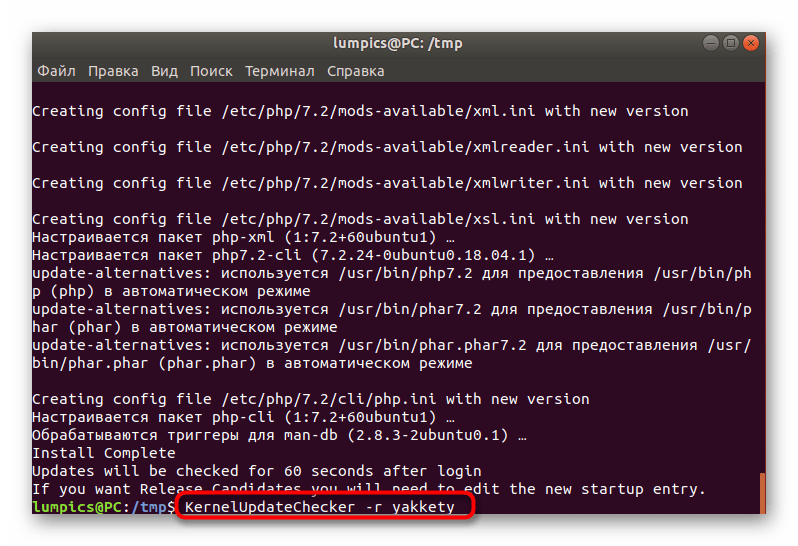
- Проверка обновлений запускается через
KernelUpdateChecker -r yakkety. Учтите, что ветка -r используется для определения версии дистрибутива. Указывайте опцию в соответствии со своими потребностями. - Если апдейты ядра будут найдены, установите их через
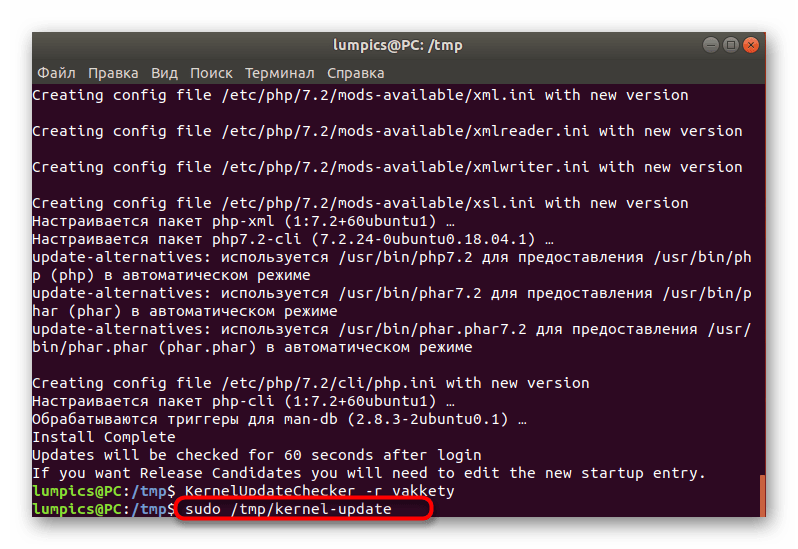
sudo /tmp/kernel-update. - По окончании обязательно проверьте текущее активное ядро через uname -r и обновите GRUB.
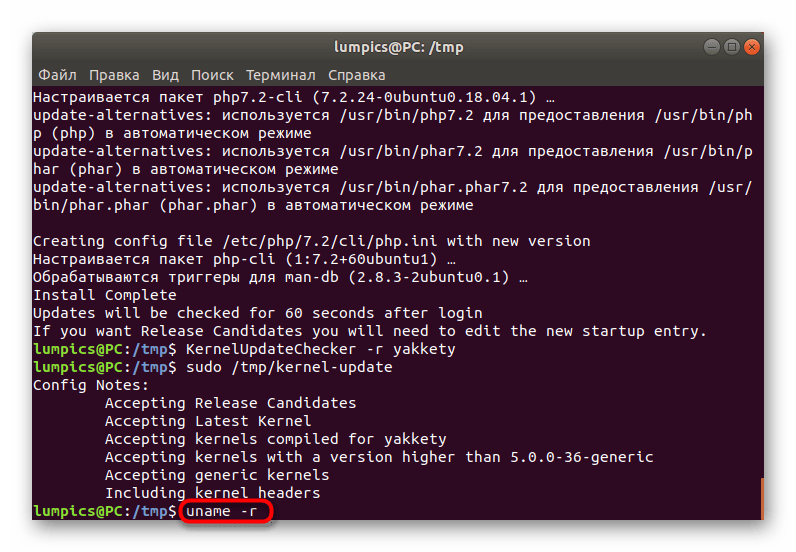
Теперь каждый раз, когда понадобится выполнить поиск обновлений ядра, вы можете задействовать указанную выше команду для осуществления поставленной задачи в автоматическом режиме. Вам лишь останется подтверждать все предупреждения о расширении занятого дискового пространства. Если скрипт больше не нужен, рекомендуется удалить его из системы через следующие команды:
rm ~/.config/autostart/KernelUpdate.desktop

sudo rm /usr/local/bin/KernelUpdate{Checker,ScriptGenerator}
Решение проблем с загрузчиком GRUB после обновления ядра
Иногда во время инсталляции апдейтов для ядра происходят ошибки или же пользователь сам завершил установку файлов невовремя. В таких ситуациях возникает неполадка, при которой операционная система попросту перестает загружаться. Касается это и обладателей проприетарных драйверов от компании NVIDIA. Решение здесь одно: загрузиться со старого ядра и удалить новое с дальнейшей переустановкой или выбором более стабильной версии.
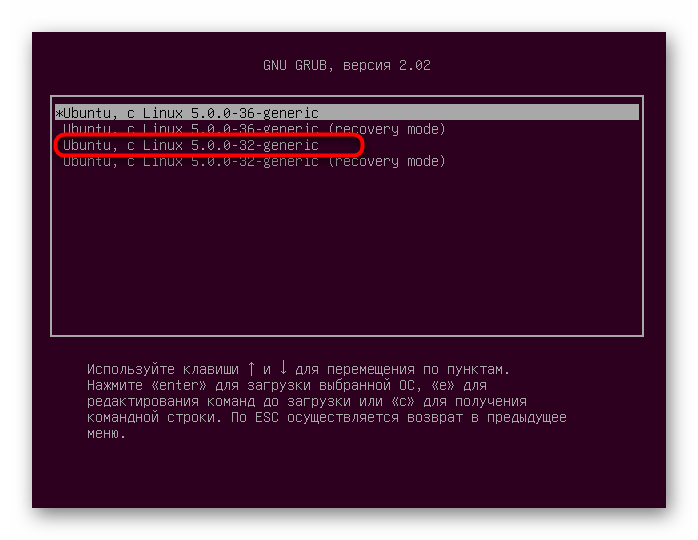
- Включите компьютер и сразу же нажмите на клавишу Esc, чтобы перейти к меню загрузок. Используйте стрелки для перемещения к пункту «Дополнительные параметры для Ubuntu», а затем нажмите на Enter.
- Отыщите здесь ваше старое рабочее ядро и выберите его для загрузки.
- Войдите в свою учетную запись, и после успешного включения графической оболочки запустите консоль.
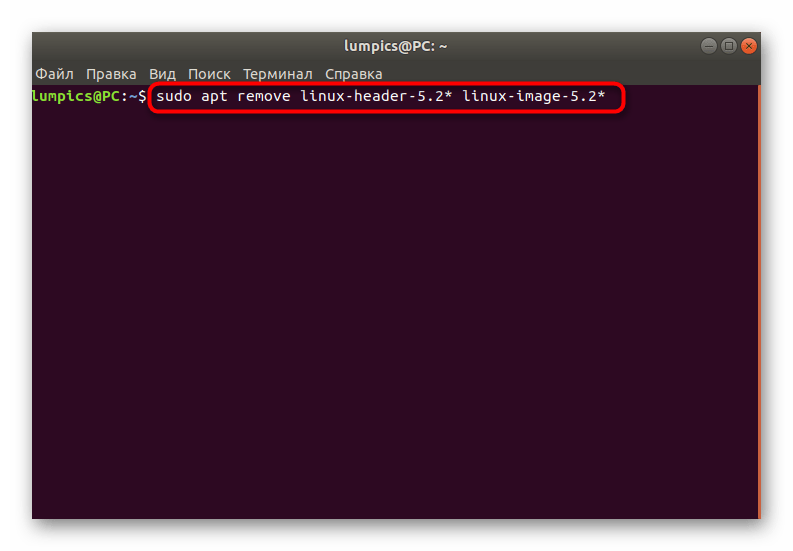
- Введите
sudo apt remove linux-header-5.2* linux-image-5.2*, где 5.2 — версия установленного ранее ядра. - Укажите пароль для предоставления прав суперпользователя.
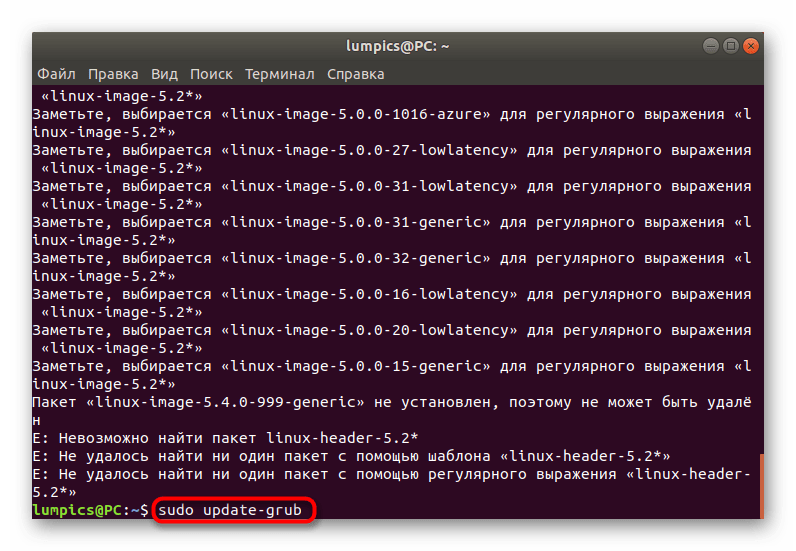
- После успешного удаления обновите загрузчик через
sudo update-grub. - Вы будете уведомлены о том, что генерация файла прошла успешно, и теперь вы снова будете загружаться со старого ядра.
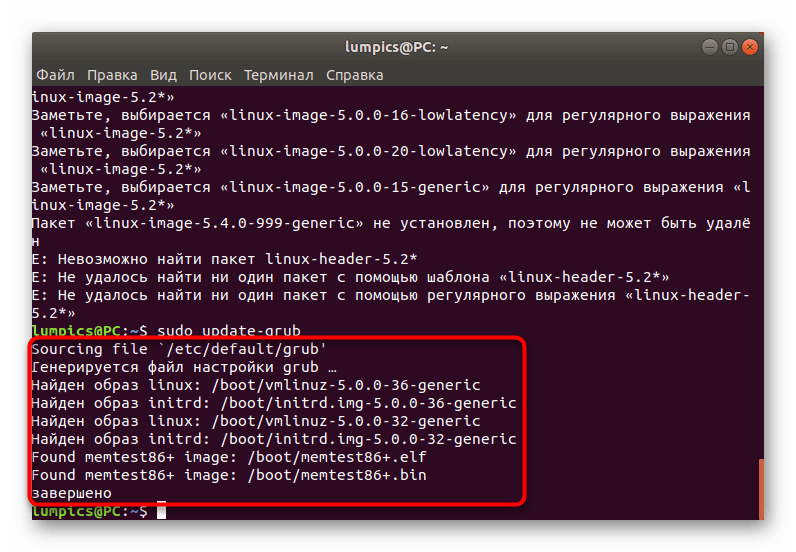
В рамках сегодняшнего материала вы узнали о двух методах обновления ядра в Ubuntu. Как видите, для осуществления каждого из них придется выполнить ряд консольных команд, но выбор самого варианта уже зависит от ваших потребностей. Используйте представленную в конце статьи инструкцию, чтобы быстро решить возникшие неполадки с загрузкой ПК после инсталляции новой версии ядра.
Эта статья описывает шаги необходимые для обновления ядра Linux.
Сборка нового ядра из свежего исходного кода является практически тем же процессом, как и во время установки системы. Разница заключается в том, что для экономии времени можно конвертировать конфигурацию от старого ядра под изменения, сделанные в новом ядре, вместо того, чтобы снова устанавливать все опции (например, с помощью make menuconfig).
В новом ядре могут быть опции или возможности, которых нет в старом ядро, или наоборот, из нового ядра могут быть убраны некоторые из опций, которые были в старом ядре. Поэтому в конфигурационном файле нового ядра могут быть новые опции, которые отсутствуют в конфигурационном файле старого ядра, или некоторых опций больше нет в новом ядре, но они присутствовали в конфигурационном файле старого ядра.
Эта статья демонстрирует, как обращаться с такими изменениями файла конфигурации путём конвертации старой конфигурации в конфигурацию, пригодную для нового ядра.
Обновления ядра в Gentoo включает следующие шаги:
- Шаг 1: Установка нового исходного кода ядра.
- Шаг 2: Установка символьной ссылки на новый исходный код ядра.
- Шаг 3: Вход в каталог с новым ядром.
- Шаг 4: Настройка файла .config для опций, которые были удалены или добавлены в конфигурацию нового ядра.
- Шаг 5: Сборка ядра и initramfs.
- Шаг 6: Обновление загрузчика.
- Шаг 7: Удаление или сохранение старого ядра.
Важно
Разумно будет сделать резервную копию конфигурации ядра, чтобы не потерять предыдущую конфигурацию. Многие пользователи потратили много времени на поиск оптимальной конфигурации системы, и терять эту информацию им точно не хочется. Для создания такой резервной копии вы можете использовать один из способов в разделе про копирование предыдущей конфигурации ядра.
Установка нового исходного кода ядра
Для обновление ядра в начале нужно установить новый исходный код ядра. Этот исходный код иногда устанавливается в результате обновления системы при запуске следующей команды:
root #emerge --ask --update --deep --with-bdeps=y --newuse @world
Конечно, исходный код ядра можно установить напрямую, используя команду (замените gentoo-sources на любую версию ядра, которую используете):
root #emerge --ask --update --deep --with-bdeps=y --newuse sys-kernel/gentoo-sources
Установка нового исходного кода ядра не дает пользователю обновленное ядро. Новый исходный код нужно собрать в новое ядро и установить, а затем перезапустить систему.
Установка символьной ссылки на новый исходный код ядра
Конфигурация ядра сохранена в файле .config, в каталоге с исходным кодом ядра.
Символьная ссылка /usr/src/linux должна всегда указывать на каталог, в котором находится исходный код используемого в настоящий момент ядра. Это может быть сделано одним из трех способов:
- По умолчанию: Настройка ссылки с помощью eselect
- Альтернатива 1: Ручное обновление символьной ссылки
- Альтернатива 2: Установка исходного кода ядра с
USE="symlink"
По умолчанию: Настройка символьной ссылки с помощью eselect
Для настройки символьной ссылки с помощью eselect:
user $eselect kernel list
Available kernel symlink targets:
 [1] linux-3.14.14-gentoo *
 [2] linux-3.16.3-gentoo
Это вывод доступных исходных кодов ядра. Звездочка указывает на выбранный исходный код.
Для выбора исходного кода ядра, например, второго в списке, выполните:
root #eselect kernel set 2
Альтернатива 1: Изменение символьной ссылки вручную
Для изменения символьной ссылки вручную:
root #ln -sf /usr/src/linux-3.16.3-gentoo /usr/src/linux
user $ls -l /usr/src/linux
lrwxrwxrwx 1 root root 19 Oct 4 10:21 /usr/src/linux -> linux-3.16.3-gentoo
Альтернатива 2: Установка исходного кода ядра с USE-флагом symlink
Это заставит /usr/src/linux ссылаться на свежеустановленный исходный код ядра.
Если необходимо, это можно изменить одним из двух методов.
Переход в каталог с новым ядром
После того, как была изменена символьная ссылка, смените рабочую директорию на каталог с новым ядром.
Заметка
Эта команда необходима, даже если вы уже находились в каталоге /usr/src/linux, когда изменялась символьная ссылка. Пока вы не перезайдете в каталог, консоль всё ещё будет в каталоге старого ядра.
Конвертация файла .config для нового ядра
Копирование предыдущей конфигурации ядра
Конфигурацию от старого ядра необходимо скопировать в каталог с новым. Старую конфигурацию можно найти в нескольких местах:
- В файловой системе procfs, если параметр ядра Enable access to .config through /proc/config.gz был включен в работающем на данный момент ядре:
-
root #zcat /proc/config.gz > /usr/src/linux/.config
- Из старого ядра. Такое будет работать только в случае, если старое ядро было собрано с CONFIG_IKCONFIG:
-
root #/usr/src/linux/scripts/extract-ikconfig /path/to/old/kernel >/usr/src/linux/.config
- В каталоге /boot, если туда был установлен конфигурационный файл:
-
root #cp /boot/config-3.14.14-gentoo /usr/src/linux/.config
- В каталоге ядра, которое работает на данный момент:
-
root #cp /usr/src/linux-3.14.14-gentoo/.config /usr/src/linux/
- В каталоге /etc/kernels/, если
SAVE_CONFIG="yes"настроено в /etc/genkernel.conf и ядро было собрано с помощью genkernel:
-
root #cp /etc/kernels/kernel-config-x86_64-3.14.14-gentoo /usr/src/linux/.config
Обновление файла .config
Заметка
Комманды make oldconfig и make menuconfig могут вызываться автоматически с помощью genkernel во время сборки, если вы включите параметры OLDCONFIG и MENUCONFIG в файле /etc/genkernel.conf. Если вы включили параметр OLDCONFIG в конфигурации genkernel или с помощью параметра —oldconfig комманды genkernel, перейдите к разделу с сборкой.
Новое ядро обычно требует новый файл .config для поддержки новых опций ядра. Файл .config с предыдущего ядра может быть сконвертирован для использования новым ядром. Конвертация может быть выполнена несколькими способами, например, с помощью команд make oldconfig или make olddefconfig.
make oldconfig
Важно
make syncconfig стал частью внутреннего устройства; по возможности используйте make oldconfig. make silentoldconfig был удален, начиная с ядра Linux версии 4.19.
Следующая конфигурация похожа на текстовый интерфейс из make config. Для новых опций она предоставляет выбор пользователю. Например:
root #make oldconfig
Anticipatory I/O scheduler (IOSCHED_AS) [Y/n/m/?] (NEW)
Надпись (NEW) в конце строки означает, что это новая опция. В левой части, в квадратных скобках, указаны возможные ответы: Yes, no, module или ? для справки. Рекомендуемый ответ (т.е. по умолчанию) написан большими буквами (здесь Y). В справке дано пояснение к опции или драйверу.
К сожалению, make oldconfig не дает исчерпывающей информации для каждой опции, так что иногда трудно выбрать правильный ответ. В этом случае, лучше запомнить название параметра и найти его позже с помощью одного из инструментов конфигурации ядра. Для просмотра списка новых опций, используйте make listnewconfig перед make oldconfig.
make olddefconfig
make olddefconfig оставит все настройки с старого файла .config, и установит новые настройки в их рекомендуемое значение (т.е. в значение по умолчанию):
make help
Используйте make help для просмотра других доступных методов преобразования конфиг файла:
Наблюдение различий
Инструмент diff может быть использован для сравнения старого и нового файла .config, чтобы просмотреть вновь добавленные опции:
user $diff <(sort .config) <(sort .config.old) | awk '/^<.*(=|Linux)/ { $1=""; print }'
CONFIG_64BIT_TIME=y
CONFIG_AMD_NB=y
CONFIG_ARCH_CLOCKSOURCE_INIT=y
CONFIG_ARCH_HAS_GIGANTIC_PAGE=y
CONFIG_ARCH_HAS_PTE_DEVMAP=y
CONFIG_ARCH_HAS_SET_DIRECT_MAP=y
CONFIG_ARCH_STACKWALK=y
CONFIG_ARCH_USE_MEMREMAP_PROT=y
CONFIG_BLK_PM=y
CONFIG_CC_CAN_LINK=y
CONFIG_CC_DISABLE_WARN_MAYBE_UNINITIALIZED=y
CONFIG_CC_HAS_ASM_INLINE=y
CONFIG_CC_HAS_KASAN_GENERIC=y
CONFIG_CC_HAS_WARN_MAYBE_UNINITIALIZED=y
CONFIG_CPU_SUP_AMD=y
CONFIG_CPU_SUP_HYGON=y
CONFIG_CPU_SUP_ZHAOXIN=y
CONFIG_CRYPTO_LIB_AES=y
CONFIG_CRYPTO_LIB_ARC4=y
CONFIG_CRYPTO_LIB_DES=y
CONFIG_CRYPTO_LIB_SHA256=y
CONFIG_DEBUG_MISC=y
CONFIG_DRM_I915_FORCE_PROBE=""
CONFIG_DRM_I915_SPIN_REQUEST=5
CONFIG_DRM_I915_USERFAULT_AUTOSUSPEND=250
CONFIG_DYNAMIC_EVENTS=y
CONFIG_EFI_EARLYCON=y
CONFIG_GCC_PLUGINS=y
CONFIG_GENERIC_GETTIMEOFDAY=y
CONFIG_HAVE_ARCH_JUMP_LABEL_RELATIVE=y
CONFIG_HAVE_ARCH_STACKLEAK=y
CONFIG_HAVE_ASM_MODVERSIONS=y
CONFIG_HAVE_EISA=y
CONFIG_HAVE_FAST_GUP=y
CONFIG_HAVE_FUNCTION_ARG_ACCESS_API=y
CONFIG_HAVE_GENERIC_VDSO=y
CONFIG_HAVE_MOVE_PMD=y
CONFIG_HAVE_PCI=y
CONFIG_INIT_STACK_NONE=y
CONFIG_IO_URING=y
CONFIG_KASAN_STACK=1
CONFIG_LEDS_TRIGGER_AUDIO=y
CONFIG_LSM="lockdown,yama,loadpin,safesetid,integrity"
CONFIG_MMC_SDHCI_IO_ACCESSORS=y
CONFIG_NETFILTER_XT_TARGET_MASQUERADE=m
CONFIG_NET_VENDOR_GOOGLE=y
CONFIG_NET_VENDOR_MICROCHIP=y
CONFIG_NET_VENDOR_PENSANDO=y
CONFIG_NET_VENDOR_XILINX=y
CONFIG_NF_NAT=m
CONFIG_NF_NAT_MASQUERADE=y
CONFIG_NVMEM_SYSFS=y
CONFIG_OPTIMIZE_INLINING=y
CONFIG_POWER_SUPPLY_HWMON=y
CONFIG_PROC_PID_ARCH_STATUS=y
CONFIG_SKB_EXTENSIONS=y
CONFIG_SND_INTEL_NHLT=y
CONFIG_UBSAN_ALIGNMENT=y
CONFIG_UNIX_SCM=y
CONFIG_USB_AUTOSUSPEND_DELAY=2
CONFIG_X86_ACPI_CPUFREQ_CPB=y
CONFIG_X86_MCE_AMD=y
# end of Gentoo Linux
# Linux/x86 5.4.0-gentoo Kernel Configuration
И какие были удалены:
user $diff <(sort .config) <(sort .config.old) | awk '/^>.*(=|Linux)/ { $1=""; print }'
CONFIG_ANON_INODES=y
CONFIG_ARCH_DISCARD_MEMBLOCK=y
CONFIG_ARCH_HAS_SG_CHAIN=y
CONFIG_ARCH_HAS_ZONE_DEVICE=y
CONFIG_ARCH_SUPPORTS_OPTIMIZED_INLINING=y
CONFIG_ARM_GIC_MAX_NR=1
CONFIG_AUDIT_TREE=y
CONFIG_AUDIT_WATCH=y
CONFIG_BACKLIGHT_LCD_SUPPORT=y
CONFIG_CRYPTO_WORKQUEUE=y
CONFIG_DEFAULT_CFQ=y
CONFIG_DEFAULT_IO_DELAY_TYPE=0
CONFIG_DEFAULT_IOSCHED="cfq"
CONFIG_DEFAULT_SECURITY=""
CONFIG_DMA_DIRECT_OPS=y
CONFIG_FB_BACKLIGHT=y
CONFIG_GENERIC_HWEIGHT=y
CONFIG_HAVE_DEBUG_STACKOVERFLOW=y
CONFIG_HAVE_GENERIC_GUP=y
CONFIG_HAVE_MEMBLOCK=y
CONFIG_IA32_AOUT=y
CONFIG_INET6_XFRM_MODE_BEET=y
CONFIG_INET6_XFRM_MODE_TRANSPORT=y
CONFIG_INET6_XFRM_MODE_TUNNEL=y
CONFIG_INET_XFRM_MODE_TRANSPORT=y
CONFIG_INET_XFRM_MODE_TUNNEL=y
CONFIG_IO_DELAY_TYPE_0X80=0
CONFIG_IO_DELAY_TYPE_0XED=1
CONFIG_IO_DELAY_TYPE_NONE=3
CONFIG_IO_DELAY_TYPE_UDELAY=2
CONFIG_IOSCHED_CFQ=y
CONFIG_IOSCHED_NOOP=y
CONFIG_MAY_USE_DEVLINK=y
CONFIG_NO_BOOTMEM=y
CONFIG_RWSEM_XCHGADD_ALGORITHM=y
CONFIG_X86_DEV_DMA_OPS=y
# Linux/x86 4.19.86-gentoo Kernel Configuration
Так же, ядро предоставляет скрипт для точного сравнения двух файлов, даже, если опции уже были добавлены в файл:
user $/usr/src/linux/scripts/diffconfig .config.old .config
После этого опции могут быть изучены и изменены при необходимости коммандой:
Цель menuconfig полезна тем, что она безопасно управляет зависимостями опций от других опций.
Сборка
Важно
Когда установлены внешние модули ядра (например, nvidia или zfs), возможно, необходимо выполнить make modules_prepare, как написано ниже, перед тем, как собрать ядро. Некоторые модули не могут быть установлены или подготовлены до того, как будет собрано ядро.
Важно
Не забудьте перенастроить загрузчик для нового ядра, и пересобрать initramfs, если он используется.
На этом шаге следуйте инструкциям статьи ручная конфигурация.
Автоматическая сборка и установка
It is possible to automatically build and install the newly emerged kernel using Portage hooks. While other approaches are also possible, the following is based on genkernel and gentoo-sources package. It requires the following prerequisites:
- genkernel all is able to build and install the kernel to which the /usr/src/linux symlink points into
$BOOTDIRand the bootloader. - The
symlinkuse flag is set for the kernel ebuild.
If those are fulfilled, simply install a post_pkg_postinst Portage hook as shown below.
Файл /etc/portage/env/sys-kernel/gentoo-sourcesAutomated kernel build and installation portage hook
post_pkg_postinst() { # Eselect the new kernel or genkernel will build the current one eselect kernel set linux-"${PV}"-gentoo CURRENT_KV=$(uname -r) # Check if genkernel has been run previously for the running kernel and use that config if [[ -f "${EROOT}/etc/kernels/kernel-config-${CURRENT_KV}" ]] ; then genkernel --kernel-config="${EROOT}/etc/kernels/kernel-config-${CURRENT_KV}" all # Use latest kernel config from current kernel elif [[ -f "${EROOT}/usr/src/linux-${CURRENT_KV}/.config" ]] ; then genkernel --kernel-config="${EROOT}/usr/src/linux-${CURRENT_KV}/.config" all # Use known running good kernel elif [[ -f /proc/config.gz ]] ; then zcat /proc/config.gz >> "${EROOT}/tmp/genkernel.config" genkernel --kernel-config="${EROOT}/tmp/genkernel.config" all rm "${EROOT}/tmp/genkernel.config" # No valid configs known, compile a clean one else genkernel all fi }Переустановка внешних модулей ядра
Заметка
Этап modules_prepare не требуется, если вы собираете всё ядро, так как эта функция выполняется как часть этого процесса обычной сборки.Все внешние модули ядра, такие как двоичные (binary) модули ядра, необходимо пересобрать для каждого нового ядра. Если ядро ещё не собрано, оно должно быть подготовлено для сборки его внешних модулей:
root #make modules_prepareПакеты с модулями ядра можно пересобрать заново, используя набор
@module-rebuild:
root #emerge --ask @module-rebuildРешение проблем сборки
Если возникают проблемы при пересборке текущего ядра, то может помочь очистка исходного кода ядра. Удостоверьтесь, что сохранили файл .config, так как данная операция удалит его. Удостоверьтесь, что не используется окончание файла .bak или ~ для бэкапа, так как make distclean очищает и такие файлы.
root #cp .config /usr/src/kernel_config_bk
root #make distclean
root #mv /usr/src/kernel_config_bk .configОбновление загрузчика
The upgraded and built kernel needs to be set up and eventually a bootloader or boot item updated, see Kernel/Configuration#Setup. Users of Grub can use the method below, users of other bootloaders must consult the handbook.
After making sure /boot partition is mounted,
Использование grub-mkconfig
The following command can be executed for updating grub’s configuration file:
root #grub-mkconfig -o /boot/grub/grub.cfgUsing systemd-boot-gen to update systemd-boot UEFI configuration
Предупреждение
Installing from cargo, the Rust package manager, should be done at one’s own risk. The Gentoo project cannot verify what is built from it and could contain security risks particularly at the bootloader level. This could mean installing a rootkit if compromised. Proceed with the following section with caution.Manual installation of systemd-boot-gen:
user $cargo install systemd-boot-genCopy the kernel parameters to /etc/default/cmdline, the file should contain:
Файл
/etc/default/cmdlineCMDLINE="<kernel command line parameters>"И запустите, используя права администратора:
user $sudo ~/.cargo/bin/systemd-boot-genThis will generate the boot configuration in /boot/loader/entries/ for all the available /boot/vmlinuz-* that have a matching /boot/initramfs-*.
Сохранение или удаление старого ядра
Сохранение старого исходного кода ядра
Исходные коды ядра постепенно становятся неподдерживавыми. Некоторым пакетам необходим текущий код для сборки. Чтобы защитить новую версию от удаления с помощью depclean, можно добавить его в набор world (файл /var/lib/portage/world) так:
root #emerge --noreplace sys-kernel/gentoo-sources:здесь.новая.версияСтарые версии, который больше не поддерживаются, могут быть удалены из набора world:
root #emerge --deselect sys-kernel/gentoo-sources:здесь.ненужная.версияУдаление старого ядра
Смотрите статью Удаление ядра.
Смотрите также
- Genkernel — утилита созданная Gentoo, которая используется для автоматизации процесса сборки ядра и initramfs.
- Dracut — an initramfs infrastructure and aims to have as little as possible hard-coded into the initramfs.
- Kernel/Configuration — описывает ручную конфигурацию и настройку ядра Linux.
- Обновление GRUB на новое ядро
Внешние ресурсы
- Журнал изменений ядра с разьяснениями некоторых новых возможностей
Download Article
Download Article
Updating the kernel in Linux can give you the latest drivers, features, fixes, and other critical updates. If it’s your first time updating the kernel in Linux Mint, don’t worry—we’ll walk you through the process step-by-step.
Steps
-
1
Check which kernel you have by running the following command
-
Type/Copy/Paste: uname -a
- This should print the version of the kernel that you are using make a note of it.
-
Type/Copy/Paste: uname -a
-
2
Then you will want to check which kernel is newly available at http://www.kernel.org.
- Make a note of the latest stable kernel. For example, the website will tell you which is a stable kernel. You should always select the stablest kernel in order to make sure your system doesn’t crash and burn with a research or development kernel.
Advertisement
-
3
Make sure you know whether your Linux operating system is a 32-bit or 64-bit. You can find this information out by opening up a terminal and typing the following.
-
Type/Copy/Paste: file /sbin/init
- this will inform you about the bit version of the operating system, whether it is 32-bit or 64-bit
-
Type/Copy/Paste: file /sbin/init
-
4
Download the following files which correspond to your system. In this example we will simulate installing/upgrading stable Linux kernel 3.10.4 for a 32-bit and 64-bit system.
-
5
Understand that nevertheless Linux Mint is based upon Ubuntu Linux so point your browser towards http://kernel.ubuntu.com/~kernel-ppa/mainline/
- Select the folder that contains the latest stable kernel and download the following files. You may have to scroll down a long list of folders until you find the correct folder. In this case we will select the /v3.10.4-saucy/ folder.
-
6
Try using Linux-Kernel-3.10.4 stable. In order to perform the installation and upgrade, you will need to download three important files.
-
32-bit
- Download these three files if you are on a 32-bit Linux Mint operating system.
- linux-headers-3.10.4-031004-generic_3.10.4-031004.201307282043_i386.deb
- linux-headers-3.10.4-031004_3.10.4-031004.201307282043_all.deb
- linux-image-3.10.4-031004-generic_3.10.4-031004.201307282043_i386.deb
-
64-bit
- Download these three files if you are on a 64-bit Linux Mint operating system.
- linux-headers-3.10.4-031004-generic_3.10.4-031004.201307282043_amd64.deb
- linux-headers-3.10.4-031004_3.10.4-031004.201307282043_all.deb
- linux-image-3.10.4-031004-generic_3.10.4-031004.201307282043_amd64.deb
-
32-bit
-
7
Create folder by running the following commands
- Type/Copy/Paste: mkdir Linux-Kernel-3.10.4-Upgrade
- Type/Copy/Paste: cd /home/«your_user_name»/Downloads
-
8
Follow the 32-bit Instructions:
- Copy the following files to your Linux-Kernel-3.10.4-Upgrade folder, using the following command below.
- Type/Copy/Paste: cp -r linux-headers-3.10.4-031004-generic_3.10.4-031004.201307282043_i386.deb /home/«your_user_name»/Linux-Kernel-3.10.4-Upgrade
- Type/Copy/Paste: cp -r linux-headers-3.10.4-031004_3.10.4-031004.201307282043_all.deb /home/«your_user_name»/Linux-Kernel-3.10.4-Upgrade
- Type/Copy/Paste: cp -r linux-image-3.10.4-031004-generic_3.10.4-031004.201307282043_i386.deb /home/«your_user_name»/Linux-Kernel-3.10.4-Upgrade
- Copy the following files to your Linux-Kernel-3.10.4-Upgrade folder, using the following command below.
-
9
Follow the 64-bit Instructions:
- Copy the following files to your Linux-Kernel-3.10.4-Upgrade folder, using the following command below
- Type/Copy/Paste: cp -r linux-headers-3.10.4-031004-generic_3.10.4-031004.201307282043_amd64.deb /home/«your_user_name»/Linux-Kernel-3.10.4-Upgrade
- Type/Copy/Paste: cp -r linux-headers-3.10.4-031004_3.10.4-031004.201307282043_all.deb /home/«your_user_name»/Linux-Kernel-3.10.4-Upgrade
- Type/Copy/Paste: cp -r linux-image-3.10.4-031004-generic_3.10.4-031004.201307282043_amd64.deb /home/«your_user_name»/Linux-Kernel-3.10.4-Upgrade
- Copy the following files to your Linux-Kernel-3.10.4-Upgrade folder, using the following command below
-
10
Type/Copy/Paste: cd /home/«your_user_name»/Linux-Kernel-3.10.4
- this will change you into your Linux-Kernel-3.10.4 upgrade folder
-
11
Type/Copy/Paste: sudo -s dpkg -i *.deb
- this command will install all the kernel deb packages
-
12
Type/Copy/Paste: sudo -s update-grub
- This command will update your GNU GRUB bootloader letting your system know you have installed a new kernel and to boot this newly installed kernel
-
13
Reboot your Linux Mint operating system with your newly installed kernel and log back in and run the following command below.
-
14
Check to see if the installation was successful by typing the following command.
-
Type/Copy/Paste: uname -a
- This command should display your new kernel
-
Type/Copy/Paste: uname -a
Advertisement
Add New Question
-
Question
Does this work on a phone?
Living Concrete
Top Answerer
No. Linux Mint is not a phone operating system. It is intended for desktop machines and laptops only.
-
Question
Why are kernels necessary for Linux?
All operating systems have kernels, however Linux gives you the ability to update them on your own. A kernel is used to convert binary into electrical signals, so that your cpu knows what to do.
-
Question
Can I delete the Linux-Update folder after rebooting, or does it have to stay?
Dewey Spencer
Community Answer
Yes, you could actually delete that folder after step 11. Once you use the «sudo -s dpkg …» command, you’ve unpacked the .deb packages, and the contents are now installed in their respective locations. It’s probably wise to keep them around until after you’ve confirmed everything has worked though.
See more answers
Ask a Question
200 characters left
Include your email address to get a message when this question is answered.
Submit
Advertisement
Thanks for submitting a tip for review!
About This Article
Thanks to all authors for creating a page that has been read 262,020 times.
Is this article up to date?
Download Article
Download Article
Updating the kernel in Linux can give you the latest drivers, features, fixes, and other critical updates. If it’s your first time updating the kernel in Linux Mint, don’t worry—we’ll walk you through the process step-by-step.
Steps
-
1
Check which kernel you have by running the following command
-
Type/Copy/Paste: uname -a
- This should print the version of the kernel that you are using make a note of it.
-
Type/Copy/Paste: uname -a
-
2
Then you will want to check which kernel is newly available at http://www.kernel.org.
- Make a note of the latest stable kernel. For example, the website will tell you which is a stable kernel. You should always select the stablest kernel in order to make sure your system doesn’t crash and burn with a research or development kernel.
Advertisement
-
3
Make sure you know whether your Linux operating system is a 32-bit or 64-bit. You can find this information out by opening up a terminal and typing the following.
-
Type/Copy/Paste: file /sbin/init
- this will inform you about the bit version of the operating system, whether it is 32-bit or 64-bit
-
Type/Copy/Paste: file /sbin/init
-
4
Download the following files which correspond to your system. In this example we will simulate installing/upgrading stable Linux kernel 3.10.4 for a 32-bit and 64-bit system.
-
5
Understand that nevertheless Linux Mint is based upon Ubuntu Linux so point your browser towards http://kernel.ubuntu.com/~kernel-ppa/mainline/
- Select the folder that contains the latest stable kernel and download the following files. You may have to scroll down a long list of folders until you find the correct folder. In this case we will select the /v3.10.4-saucy/ folder.
-
6
Try using Linux-Kernel-3.10.4 stable. In order to perform the installation and upgrade, you will need to download three important files.
-
32-bit
- Download these three files if you are on a 32-bit Linux Mint operating system.
- linux-headers-3.10.4-031004-generic_3.10.4-031004.201307282043_i386.deb
- linux-headers-3.10.4-031004_3.10.4-031004.201307282043_all.deb
- linux-image-3.10.4-031004-generic_3.10.4-031004.201307282043_i386.deb
-
64-bit
- Download these three files if you are on a 64-bit Linux Mint operating system.
- linux-headers-3.10.4-031004-generic_3.10.4-031004.201307282043_amd64.deb
- linux-headers-3.10.4-031004_3.10.4-031004.201307282043_all.deb
- linux-image-3.10.4-031004-generic_3.10.4-031004.201307282043_amd64.deb
-
32-bit
-
7
Create folder by running the following commands
- Type/Copy/Paste: mkdir Linux-Kernel-3.10.4-Upgrade
- Type/Copy/Paste: cd /home/«your_user_name»/Downloads
-
8
Follow the 32-bit Instructions:
- Copy the following files to your Linux-Kernel-3.10.4-Upgrade folder, using the following command below.
- Type/Copy/Paste: cp -r linux-headers-3.10.4-031004-generic_3.10.4-031004.201307282043_i386.deb /home/«your_user_name»/Linux-Kernel-3.10.4-Upgrade
- Type/Copy/Paste: cp -r linux-headers-3.10.4-031004_3.10.4-031004.201307282043_all.deb /home/«your_user_name»/Linux-Kernel-3.10.4-Upgrade
- Type/Copy/Paste: cp -r linux-image-3.10.4-031004-generic_3.10.4-031004.201307282043_i386.deb /home/«your_user_name»/Linux-Kernel-3.10.4-Upgrade
- Copy the following files to your Linux-Kernel-3.10.4-Upgrade folder, using the following command below.
-
9
Follow the 64-bit Instructions:
- Copy the following files to your Linux-Kernel-3.10.4-Upgrade folder, using the following command below
- Type/Copy/Paste: cp -r linux-headers-3.10.4-031004-generic_3.10.4-031004.201307282043_amd64.deb /home/«your_user_name»/Linux-Kernel-3.10.4-Upgrade
- Type/Copy/Paste: cp -r linux-headers-3.10.4-031004_3.10.4-031004.201307282043_all.deb /home/«your_user_name»/Linux-Kernel-3.10.4-Upgrade
- Type/Copy/Paste: cp -r linux-image-3.10.4-031004-generic_3.10.4-031004.201307282043_amd64.deb /home/«your_user_name»/Linux-Kernel-3.10.4-Upgrade
- Copy the following files to your Linux-Kernel-3.10.4-Upgrade folder, using the following command below
-
10
Type/Copy/Paste: cd /home/«your_user_name»/Linux-Kernel-3.10.4
- this will change you into your Linux-Kernel-3.10.4 upgrade folder
-
11
Type/Copy/Paste: sudo -s dpkg -i *.deb
- this command will install all the kernel deb packages
-
12
Type/Copy/Paste: sudo -s update-grub
- This command will update your GNU GRUB bootloader letting your system know you have installed a new kernel and to boot this newly installed kernel
-
13
Reboot your Linux Mint operating system with your newly installed kernel and log back in and run the following command below.
-
14
Check to see if the installation was successful by typing the following command.
-
Type/Copy/Paste: uname -a
- This command should display your new kernel
-
Type/Copy/Paste: uname -a
Advertisement
Add New Question
-
Question
Does this work on a phone?
Living Concrete
Top Answerer
No. Linux Mint is not a phone operating system. It is intended for desktop machines and laptops only.
-
Question
Why are kernels necessary for Linux?
All operating systems have kernels, however Linux gives you the ability to update them on your own. A kernel is used to convert binary into electrical signals, so that your cpu knows what to do.
-
Question
Can I delete the Linux-Update folder after rebooting, or does it have to stay?
Dewey Spencer
Community Answer
Yes, you could actually delete that folder after step 11. Once you use the «sudo -s dpkg …» command, you’ve unpacked the .deb packages, and the contents are now installed in their respective locations. It’s probably wise to keep them around until after you’ve confirmed everything has worked though.
See more answers
Ask a Question
200 characters left
Include your email address to get a message when this question is answered.
Submit
Advertisement
Thanks for submitting a tip for review!
About This Article
Thanks to all authors for creating a page that has been read 262,020 times.

