Приветствую всех посетителей сайта Info-Comp.ru! Сегодня мы с Вами поговорим о таких объектах Microsoft SQL Server, как «Представления», Вы узнаете, что это за объекты, для чего они нужны, а также как создавать, изменять и удалять представления на языке T-SQL.

Заметка! Что такое T-SQL. Подробное описание для начинающих.
Содержание
- Представление (VIEW) в Microsoft SQL Server
- Для чего нужны представления
- Какие бывают представления
- Работа с представлениями на T-SQL
- Исходные данные
- Создание представлений
- Изменение представлений
- Удаление представлений
- Обновляемые представления в Microsoft SQL Server
Представление (VIEW) в Microsoft SQL Server
Представление (VIEW) – это объект базы данных Microsoft SQL Server, который хранит в себе запрос SELECT и в случае обращения к данному объекту будет возвращен результирующий набор данных, который формирует запрос, указанный в определении представления.
Иными словами, это виртуальная (логическая) таблица, она не содержит в себе данных, но к ней можно обращаться как к обычной таблице, и она будет возвращать Вам данные. Обычно такой объект называют «Вьюха».
Для чего нужны представления
Если достаточно часто в своих SQL запросах Вы используете однотипные вложенные запросы, которые возвращают табличные данные, т.е. являются производными таблицами, то для удобства и сокращения кода Вы можете сохранить такие вложенные запросы в виде представления. И затем, где Вам требуется использовать именно тот набор данных, который Вы указали в запросе, Вы будете указывать название представления, точно так же как мы указываем название таблиц, согласитесь — это очень удобно!
Таким образом, представления нужны для:
- Упрощения и сокращения кода запроса;
- Повышения читабельности кода запроса;
- Сокрытия сложности реализации задачи от пользователя;
- Обеспечения эффективных путей доступа к данным;
- Обеспечения корректности производных данных;
- Более легкого управления. Чтобы внести изменения в алгоритм, формирующий данные, которые возвращает представление, не требуется изменять код везде, где используется этот алгоритм, достаточно изменить код в одном определении представления.
Как Вы понимаете, представления мы можем использовать не только для упрощения и сокращения кода SQL запроса, а еще для повышения безопасности, сокрытия сложности реализации алгоритмов и для обеспечения корректности производных данных.
Заметка! Для чего нужны хранимые процедуры в языке T-SQL.
Какие бывают представления
Представления бывают:
- Пользовательские – это те, которые мы сами создаем;
- Системные – это представления, которые уже есть в SQL сервере. Они возвращают нам системную информацию.
Исходные данные
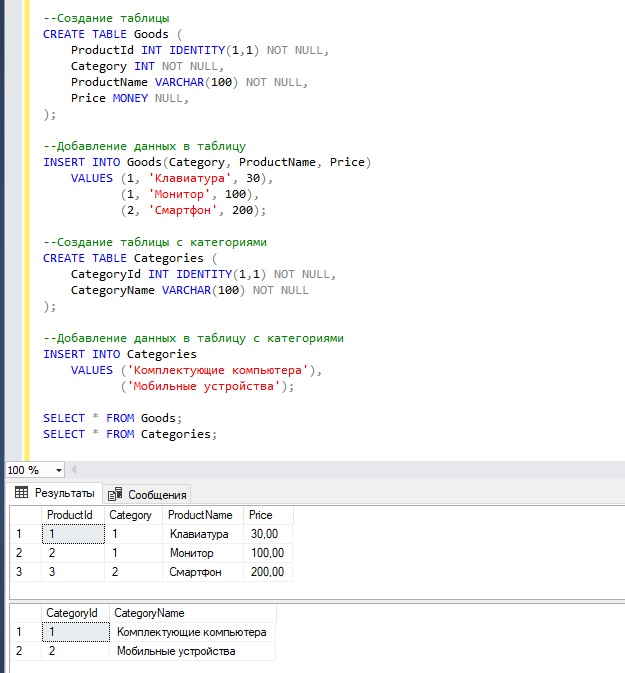
Сначала нам необходимо создать тестовые данные для наших примеров.
Допустим, у нас будет таблица Goods, которая хранит некую информацию о товарах, и таблица Categories, которая хранит данные о категориях товара.
   --Создание таблицы
   CREATE TABLE Goods (
	ProductId INT IDENTITY(1,1) NOT NULL,
	Category INT NOT NULL,
	ProductName VARCHAR(100) NOT NULL,
	Price MONEY NULL,
   );

   --Добавление данных в таблицу
   INSERT INTO Goods(Category, ProductName, Price)
	VALUES (1, 'Клавиатура', 30),
	       (1, 'Монитор', 100),
	       (2, 'Смартфон', 200);

   --Создание таблицы с категориями
   CREATE TABLE Categories (
	CategoryId INT IDENTITY(1,1) NOT NULL,
	CategoryName VARCHAR(100) NOT NULL
   );

   --Добавление данных в таблицу с категориями
   INSERT INTO Categories
	VALUES ('Комплектующие компьютера'),
	       ('Мобильные устройства');

   SELECT * FROM Goods;
   SELECT * FROM Categories;
Заметка! Всем тем, кто только начинает свое знакомство с языком SQL, рекомендую прочитать книгу «SQL код» – это самоучитель по языку SQL для начинающих программистов. В ней очень подробно рассмотрены основные конструкции языка.
Создание представлений
Представим, что нам постоянно требуется знать, сколько товаров в той или иной категории, но писать каждый раз SQL запрос на получение таких данных нам не хочется и это не очень удобно. Поэтому мы приняли решения сохранить запрос на получение таких данных в виде представления и, когда нам потребуется узнать количество товаров в категории, мы просто будем обращаться к этому представлению.
Создается представление с помощью инструкции CREATE VIEW.
Для решения нашей задачи мы можем создать следующее представление.
   CREATE VIEW CountProducts
   AS
	SELECT C.CategoryName AS CategoryName,
		   COUNT(*) AS CntProducts
	FROM Goods G
	INNER JOIN Categories C ON Category = C.CategoryId
	GROUP BY C.CategoryName;
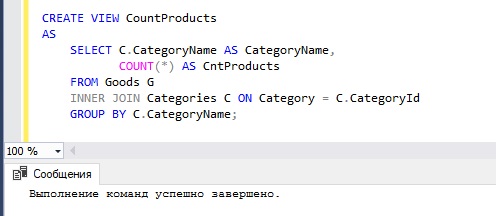
После инструкции CREATE VIEW мы указали название представления, затем мы указали ключевое слово AS и только после этого мы написали запрос, результирующий набор которого и будет содержать наше представление.

Примечание! В представлении нельзя использовать секцию ORDER BY, т.е. сортировку, в случае необходимости, отсортировать данные Вы можете, когда будете обращаться к этому представлению. Использование ORDER BY возможно, только если указан оператор TOP.
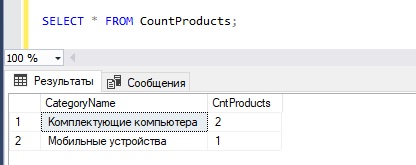
Теперь, для того чтобы получить данные о количестве товаров в категории, мы можем обратиться к этому представлению, например, как к обычной таблице.
SELECT * FROM CountProducts;
Изменение представлений
А сейчас давайте допустим, что нам нужно, чтобы это представление возвращало еще и идентификатор категории, если Вы обратили внимание, то в предыдущем примере таких данных нет. Для этого используем инструкцию ALTER VIEW, которая подразумевает изменение представления.
   ALTER VIEW CountProducts
   AS
	SELECT C.CategoryId,
		   C.CategoryName AS CategoryName,
		   COUNT(*) AS CntProducts
	FROM Goods G
	INNER JOIN Categories C ON Category = C.CategoryId
	GROUP BY C.CategoryId, C.CategoryName;

   GO

   SELECT * FROM CountProducts;
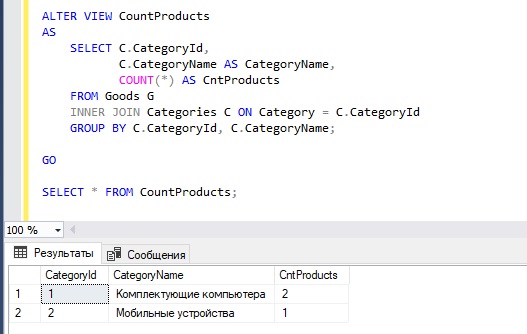
В данном случае мы написали инструкцию ALTER VIEW, которая говорит SQL серверу, что мы хотим изменить существующий объект, затем указали название представления, чтобы сервер мог определить, какое именно представление мы хотим изменить, после ключевого слова AS мы указали новое определение представления, т.е. измененный запрос SELECT.
Чтобы отделить инструкцию изменения представления от SQL запроса на выборку, мы написали команду GO.
Заметка! Транзакции в T-SQL – основы для новичков с примерами.
Удаление представлений
Если Вам представление больше не требуется, т.е. Вы им больше не будете пользоваться, и оно не используется в других представлениях, функциях или процедурах, иными словами, на него никто не ссылается, то Вы его можете удалить, это делается с помощью инструкции DROP VIEW.
DROP VIEW CountProducts;
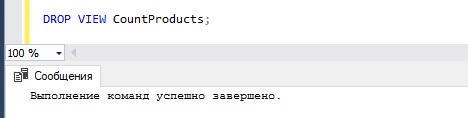
Теперь данного представления больше нет, и к нему Вы больше обратиться не сможете.
Обновляемые представления в Microsoft SQL Server
Кроме того, что к представлению можно обращаться и извлекать данные, представление позволяет еще и изменять данные базовой таблицы, такие представления называются «Обновляемые представления». Однако для этого необходимо выполнение следующих условий:
- Любое изменение (UPDATE, INSERT или DELETE) должно касаться столбцов только одной базовой таблицы;
- Столбцы, данные которых Вы хотите изменить, должны напрямую ссылаться на столбцы базовой таблицы, иными словами, нельзя внести изменения в столбцы, которые были сформированы в представлении, например, агрегатной функцией или другими вычислениями.
Допустим, у нас есть представление, которое возвращает список товаров. Для примера мы его назвали GoodsUpdate.
   CREATE VIEW GoodsUpdate
   AS
	SELECT ProductId, Category, ProductName, Price
	FROM Goods;

   GO
Заметка! Чем отличаются функции от хранимых процедур в T-SQL.
И в данном случае мы можем изменить данные, хранящиеся в таблице Goods, через представление, не обращаясь к этой таблице напрямую.
   SELECT * FROM GoodsUpdate;

   GO

   UPDATE GoodsUpdate SET Price = Price + 10
   WHERE Category = 2;

   GO

   SELECT * FROM GoodsUpdate;
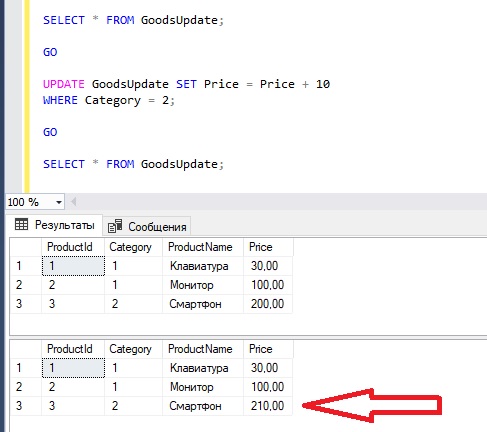
Мы видим, что данные успешно изменены.
Заметка! Для комплексного изучения языка SQL и T-SQL рекомендую пройти онлайн-курсы по T-SQL, на которых используется последовательная методика обучения и рассматриваются все объекты SQL Server и конструкции языка T-SQL.
На сегодня это все, надеюсь, материал был Вам интересен и полезен, до новых встреч!
In my previous article, we looked at how to use the CREATE VIEW SQL statement to create views. In this one, we are moving on and focusing on how to modify views. We will continue using examples on a sample database and data created
in the first write-up so in order to follow along, head over and read the Creating views in SQL Server
part before starting with this one.
Introduction
The primary goal will be to get familiar with the ALTER VIEW command used to modify views and change the output. A view is based on the result set from a query, and this command allows us to change the structure and definition of a query.
Ironically, before modifying a view, we will create another view with a bit more complex T-SQL using aggregates in it rather than having a simple SELECT statement that is pulling everything from a table. We will not go over the
syntax again since T-SQL is exactly the same as in CREATE VIEW SQL statement except the fact that instead of the
CREATE reserved keyword ALTER is used.
Creating view
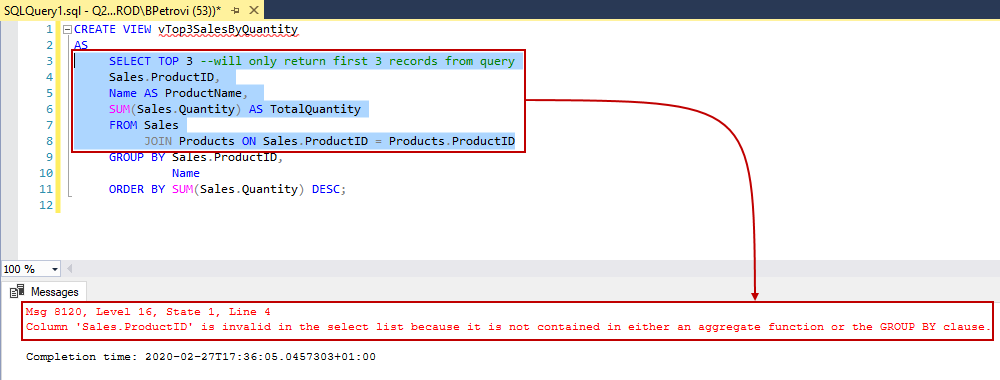
As I mentioned earlier, let’s use the code from below to create a bit more complex view:
|
CREATE VIEW vTop3SalesByQuantity AS SELECT TOP 3 —will only return first 3 records from query Sales.ProductID, Name AS ProductName, SUM(Sales.Quantity) AS TotalQuantity FROM Sales JOIN Products ON Sales.ProductID = Products.ProductID GROUP BY Sales.ProductID, Name ORDER BY SUM(Sales.Quantity) DESC; |
But before we run the script, we can again just highlight the SELECT statement and see what it returns as shown
below:
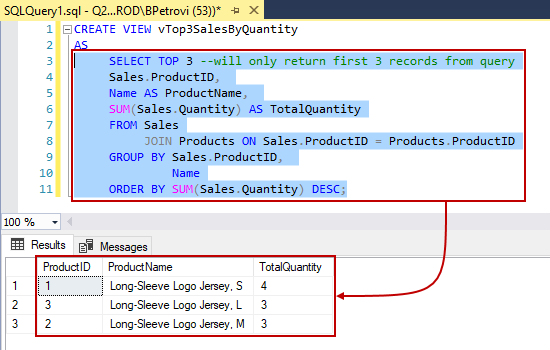
Basically, what we are doing here is for each product in the Product table, we are fetching all the quantities and add them together per product. As you can see, we have our Long-Sleeve Logo Jersey product in different sizes and sold quantities. We only have four products in our table, so that’s why we’re selecting only the top three records.
Everything looks good, so we can execute the whole CREATE VIEW SQL statement to create the view with the SELECT
statement that has SUM in it which is an aggregate:
The SUM is considered an aggregate because, in general, it adds the numbers together. Therefore, we also have the
GROUP BY clause, followed by ORDER BY or otherwise, we’d run into some errors. In this particular case, this is what
we’d get:
Msg 8120, Level 16, State 1, Line 4
Column ‘Sales.ProductID’ is invalid in the select list because it is not contained in either an aggregate function or the GROUP BY clause.
Once created, we can query this view by saying select everything from the name of the view and we should get the
same result as before:
|
SELECT * FROM vTop3SalesByQuantity; |

Hopefully, all this rings the bell from the first article. The point being, the complexity of a view can be as much
as the complexity of the SELECT statement can get.
Let’s move on and take a look at how we can alter views. We will take the script of the first view as an example because it has a simple SELECT statement. If you remember the CREATE VIEW SQL syntax, a view can be modified by simply using the ALTER VIEW keyword instead, and then changing the structure of the SELECT statement.
To get started, in SQL Server Management Studio (SSMS) we can simply right-click the view from
Object Explorer, and from the context menu navigate to Script View as |
ALTER To | New Query Editor Window as shown below:
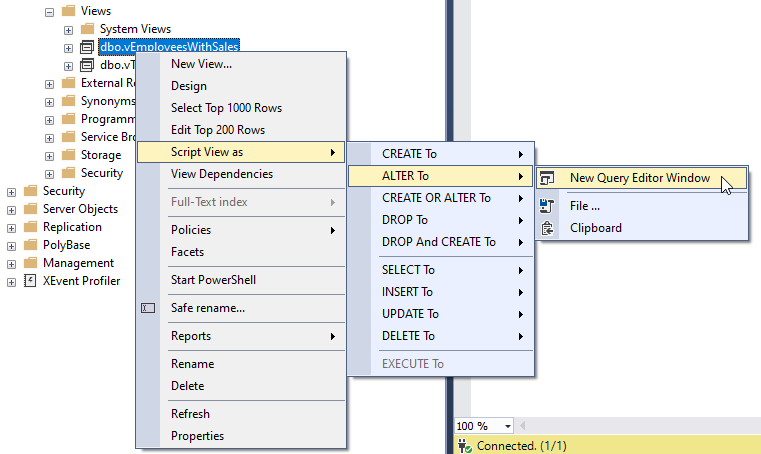
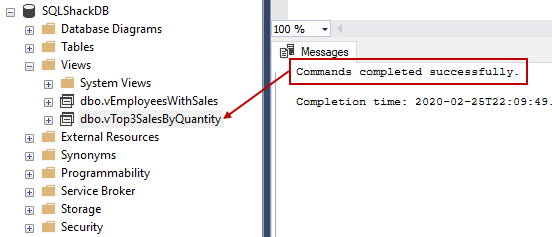
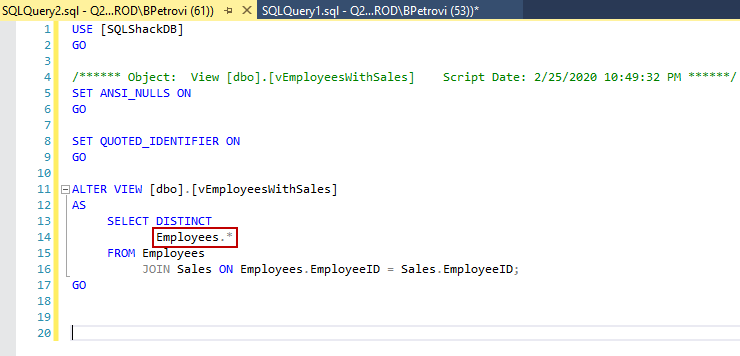
SSMS will take the existing structure of the view and generate the following code in a new query editor:
|
1 2 3 4 5 6 7 8 9 10 11 12 13 14 15 16 17 |
USE [SQLShackDB] GO /****** Object: View [dbo].[vEmployeesWithSales] Script Date: 2/25/2020 10:49:32 PM ******/ SET ANSI_NULLS ON GO SET QUOTED_IDENTIFIER ON GO ALTER VIEW [dbo].[vEmployeesWithSales] AS SELECT DISTINCT Employees.* FROM Employees JOIN Sales ON Employees.EmployeeID = Sales.EmployeeID; GO |
What we are interested in is the SELECT part of the code. Selecting everything is generally a bad thing. Why? For
example, let’s say that we have an application using this view and that it’s relying on a specific output AKA the
signature. There could be a problem if we change the underlying table e.g. add extra columns or remove some, etc. In
other words, anything we do to the underlying table when saying select everything from (Employees.*) will shine
through this view:
Therefore, let’s change the previously created view with the CREATE VIEW SQL statement by using the ALTER VIEW
statement. Note that changing the view using this command does not affect dependent stored procedures or triggers and does not change permissions.
Previously, we generated a T-SQL script to modify our view within SSMS. This is the easiest and fastest way. But
hey, if you like typing and doing it old school, just make sure that you’re connected to the appropriate database,
type ALTER VIEW, followed by the name of the view, and then followed by an AS. After this, it goes the view definition:
|
ALTER VIEW vEmployeesWithSales AS SELECT —statement that defines the view |
As you can see, this is essentially the same thing as with the CREATE VIEW SQL syntax, we only change the definition of an existing view. So, let’s see what we can do with this SELECT statement and change the definition of the view to eliminate some potential problems.
For the purpose of this example, we can consider the code from below as one solution:
|
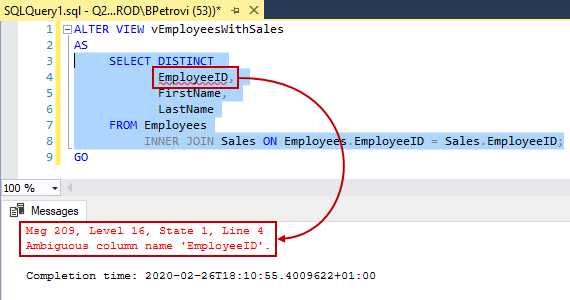
ALTER VIEW vEmployeesWithSales AS SELECT DISTINCT Employees.EmployeeID, FirstName, LastName FROM Employees INNER JOIN Sales ON Employees.EmployeeID = Sales.EmployeeID; GO |
Before we run the script, let’s go through the SELECT part to see what we changed. Instead of fetching all columns
from the Employees table, we are returning just three columns:
- Employees.EmployeeID
- FirstName
- LastName
Notice that the EmployeeID column is fully qualified because EmployeeID exists in
both tables that we are referencing. On the other hand, FirstName and LastName
only exist in the Employees table, so we don’t need to fully qualify those.
This is a very common mistake, and that’s why it’s always a good idea to run and check only the SELECT part in a
batch to see what it returns. Simply remove the alias from the EmployeeID column and execute the
SELECT part as shown below:
Msg 209, Level 16, State 1, Line 4
Ambiguous column name ‘EmployeeID’.
- Note: Now, that I’ve mentioned batches, bear in mind that CREATE VIEW SQL must be the only statement in a batch or the first statement in a query batch or you might get an error from SQL Server
In our case, you’ll see the error message “Ambiguous column name ‘EmployeeID’”. This is the SQL Server way of saying that we have referenced more than one column with the same name in the FROM clause.
If you remember the view’s definition, views are pretty much just virtual tables. So, if we head over to
Object Explorer, expand the Views folder, then vEmployeesWithSales, and then the Columns folder, we should see the following:
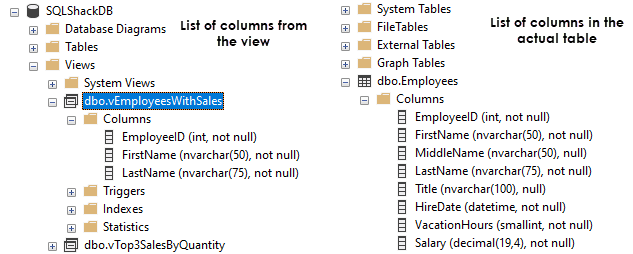
When we initially created this view using the CREATE VIEW SQL statement, we specified that all columns from the
Employees table should be retrieved. However, now rather than eight columns we only fetch three.
Conclusion
In this part of learning the CREATE VIEW SQL statement, we learned how to use the ALTER VIEW command to modify an existing view and change the output. I promised more in the first part, but rather than making this a long and boring article, we’ll continue our journey in the next one. We haven’t even touched how to use the DLM language for inserting data through a view, so that’s is what we’ll cover in the next part of the series.
I hope this article has been informative for you and I thank you for reading it. Stay tuned for the next one…
Table of contents
- Author
- Recent Posts

Bojan aka “Boksi”, an AP graduate in IT Technology focused on Networks and electronic technology from the Copenhagen School of Design and Technology, is a software analyst with experience in quality assurance, software support, product evangelism, and user engagement.
He has written extensively on both the SQL Shack and the ApexSQL Solution Center, on topics ranging from client technologies like 4K resolution and theming, error handling to index strategies, and performance monitoring.
Bojan works at ApexSQL in Nis, Serbia as an integral part of the team focusing on designing, developing, and testing the next generation of database tools including MySQL and SQL Server, and both stand-alone tools and integrations into Visual Studio, SSMS, and VSCode.
See more about Bojan at LinkedIn
View all posts by Bojan Petrovic
Summary: in this tutorial, you will learn how to use the MySQL ALTER VIEW to modify the definition of an existing view.
Introduction to MySQL ALTER VIEW statement
The MySQL ALTER VIEW statement changes the definition of an existing view. The syntax of the ALTER VIEW is similar to the CREATE VIEW statement:
Code language: SQL (Structured Query Language) (sql)
ALTER [ALGORITHM = {UNDEFINED | MERGE | TEMPTABLE}] VIEW view_name [(column_list)] AS select_statement;
MySQL ALTER VIEW examples
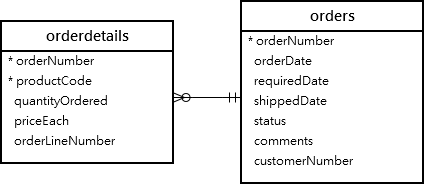
See the following tables orders and orderdetails from the sample database.
1) ALTER VIEW simple example
First, create a view based on the orders and orderdetails tables:
CREATE VIEW salesOrders AS SELECT orderNumber, productCode, quantityOrdered, priceEach, status FROM orders INNER JOIN orderDetails USING (orderNumber);Code language: SQL (Structured Query Language) (sql)
Second, query data from the view salesorders:
Code language: SQL (Structured Query Language) (sql)
SHOW CREATE VIEW salesorders;

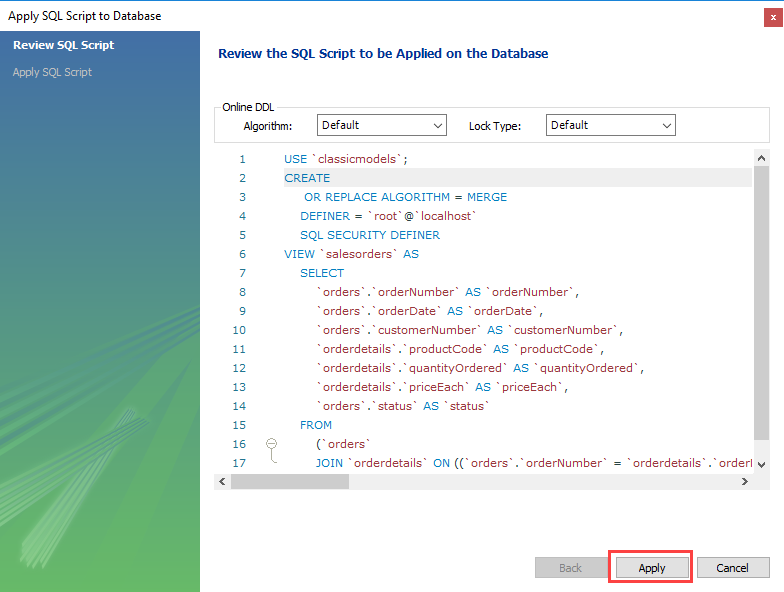
Third, use the ALTER VIEW statement to change the processing algorithm of the view from UNDEFINED to MERGE and add customerNumber column to the view:
Code language: SQL (Structured Query Language) (sql)
ALTER ALGORITHM=MERGE VIEW salesOrders AS SELECT orderNumber, customerNumber, productCode, quantityOrdered, priceEach, status FROM orders INNER JOIN orderDetails USING (orderNumber);
Finally, show the view information to see the effect:
Code language: SQL (Structured Query Language) (sql)
SHOW CREATE VIEW salesorders;

2) ALTER VIEW using MySQL Workbench
Using MySQL Workbench to modify an existing view is more practical. Because you need to see the whole view definition before changing it.
First, open the Views, right-click the view that you want to modify, and select Alter View… menu item:
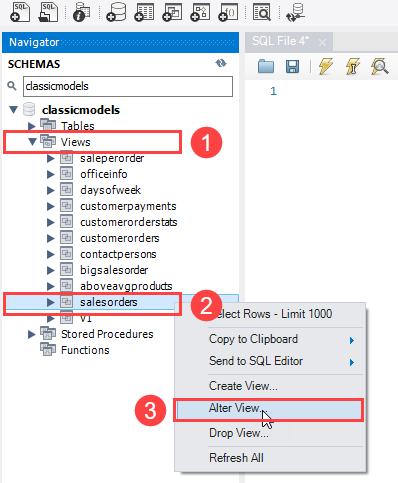
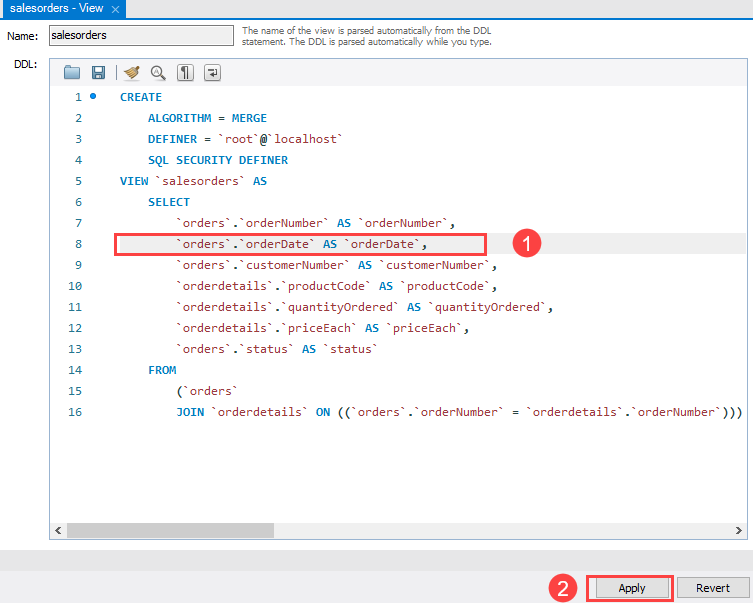
MySQL Workbench will open an editor that displays the view’s DDL.
Second, change the DDL of the view and click the Apply button to confirm the changes. If you want to revert the change, click the Revert button:
MySQL Workbench opens a confirmation window.
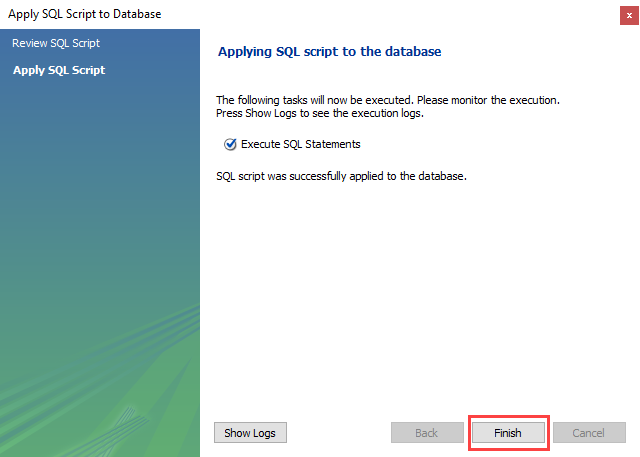
Third, click the Apply button to apply the change.
Note that MySQL Workbench uses CREATE OR REPLACE VIEW statement instead of ALTER VIEW statement
Finally, click the Finish button to close the window.
In this tutorial, you have learned how to use the MySQL ALTER VIEW statement to modify an existing view. In addition, you learned how to use MySQL Workbench to alter a view.
Was this tutorial helpful?
In this SQL Server tutorial, we will discuss how to alter view in SQL Server. We will discuss various ways and examples to modify a view. The following are some examples that we are going to discuss.
- Can we alter view in SQL Server?
- Alter view permission in SQL Server
- Alter view query in SQL Server
- Alter view in SQL Server management studio
- Alter view add column SQL Server
- Alter view column data type in SQL Server
- Alter view name in SQL Server
- Create or Alter view in SQL Server
- If exists alter view in SQL Server
- Alter view with schemabinding in SQL Server
If you have not yet installed SQL Server, first install SQL Server 2019.
Yes, we can alter a view in SQL Server. There are multiple ways to alter a view in SQL Server. We have to use the ALTER VIEW command to alter a view in SQL Server.
However, we can also alter a view using SQL Server management studio. Using SQL Server management studio makes it easy to work with any object in the database. But before that let us discuss the permissions required to alter a view in SQL Server.
Alter view permission in SQL Server
To alter a view in SQL Server, you need to have ALTER permission on the view. You will also need to have certain permissions on the underlying objects according to the operations you are performing.
For example, if you are referring to a SELECT statement on a table in your view, you need to have SELECT permission on the table.
Similarly, if your view is referencing any other objects like views or functions, you need to take care of the permissions on those objects.
Also, check: How to delete a view in SQL Server
Alter view query in SQL Server
In SQL Server, you can use the ALTER VIEW statement to modify or alter a view. The general syntax of the ALTER VIEW statement is:
ALTER VIEW <view name>
AS
<SELECT statement>
For example, I have created a view that retrieves some selected data from a table.
USE BackupDatabase
GO
CREATE VIEW dbo.SelectView
AS
SELECT [ProductID]
      ,[Name]
      ,[ProductNumber]
      ,[Color]
      ,[StandardCost]
      ,[ListPrice]
      ,[Size]
      ,[Weight]
  FROM [BackupDatabase].[SalesLT].[Product]
For now, this view is selecting all the records because I have not used the WHERE condition. Suppose I want to alter this view so that it returns a record according to a specified condition, I will use the ALTER VIEW statement as:
USE BackupDatabase
GO
ALTER VIEW dbo.SelectView
AS
SELECT [ProductID]
      ,[Name]
      ,[ProductNumber]
      ,[Color]
      ,[StandardCost]
      ,[ListPrice]
      ,[Size]
      ,[Weight]
  FROM [BackupDatabase].[SalesLT].[Product] WHERE ListPrice > 500
Now if you retrieve the data using the view, you can see that the records are returned according to the specified condition.
USE BackupDatabase
GO
SELECT * FROM dbo.SelectView
In this way, you can modify a view in SQL Server using the T-SQL query method.
Read: SQL Server bulk insert from CSV file
Alter view in SQL Server management studio
If you are connecting to your database using SQL Server management studio, you can alter a view from the object explorer window also.
- To alter a view in your database, navigate to your database in the object explorer window.
- Expand the database and right click on Views and navigate to your view.
- Right click on the veiw that you want to alter and select Design.

- You will see a window where you can design your view graphically without any T-SQL query.
- Here you can add or remove tables, select or unselect columns, make joins etc very easily.
- Here you can also view or edit the resulting T-SQL query. This means you can alter your view graphically as well as with the query simultaneously.

- Once you have made all the modifications, you can save the view from the File menu or simply press Ctrl+S and the view will be altered.
In this way, you can alter a view in SQL Server using SQL Server management studio.
Also, read: SQL Server function return table
Alter view add column SQL Server
If you want to add a column into your view, you have to write the whole view body again and add the desired column into it.
If your view is very complex, you may find it difficult to do this. To make this process easy, you can script your view in SQL Server management studio and you will get the original view body, In this body, you can add the desired column. Let us see how to do it.
- Connect to your database using SQL Server management studio.
- In the object explorer window, expand your database and navigate to your view that yu want to modify.
- Right click on the view and click on Script View as, then click on ALTER TO and then click on New Query Editor Window.

- You will see the body of the view in a new query editor window.

- Here you can add or remove any column in your SELECT statement.
- Once you have added the column, you can just run the query and the view will be altered.
Thus, you might have learned how to add a column to your existing view in SQL Server.
Read: How to select latest record in SQL Server
Alter view column data type in SQL Server
When you create a view, the data types of the columns in the view are the same as they are in the underlying tables.
But, in certain scenarios, you may want some column value of a different data type. In that case, you can convert or cast the data type of the column using the CONVERT or the CAST functions respectively.
For example, I have created a view as below:
USE [BackupDatabase]
GO
SET ANSI_NULLS ON
GO
SET QUOTED_IDENTIFIER ON
GO
CREATE VIEW [SalesLT].[Orders]
AS
SELECT SUM(UnitPrice*OrderQty*(1.00-UnitPriceDiscount)) AS Revenue,
         OrderDate, ProductID, COUNT_BIG(*) AS COUNT
      FROM SalesLT.SalesOrderDetail AS od, SalesLT.SalesOrderHeader AS o
      WHERE od.SalesOrderID = o.SalesOrderID
      GROUP BY OrderDate, ProductID
GO
In the above code, the data type of the Revenue column is a number. If I want to change its data type to varchar, I can use the CAST function as:
USE [BackupDatabase]
GO
SET ANSI_NULLS ON
GO
SET QUOTED_IDENTIFIER ON
GO
ALTER VIEW [SalesLT].[Orders]
AS
SELECT CAST(SUM(UnitPrice*OrderQty*(1.00-UnitPriceDiscount)) AS varchar) AS Revenue,
         OrderDate, ProductID, COUNT_BIG(*) AS COUNT
      FROM SalesLT.SalesOrderDetail AS od, SalesLT.SalesOrderHeader AS o
      WHERE od.SalesOrderID = o.SalesOrderID
      GROUP BY OrderDate, ProductID
GO
Hence, in this way you can modify the data type of a column in a view.
Read: SQL Server stored procedure vs function
Alter view name in SQL Server
To modify the name of a view in SQL Server, there are two methods that you can use:
- Using SQL Server management studio
- Using T-SQL query
However, while changing the name of a view in SQL Server, you have to be careful because if there is any object in the database that is dependent on this view may not function.
Therefore, before renaming a view, make sure to check which objects are dependent on it. Also, it is advisable to drop the view and create it again instead of renaming it. Now let us see how we can rename a view in SQL Server.
Using SQL Server management studio:
- In the object explorer window, naviagte to your view, right click on the view that you want to rename and click on Rename.
- Now specify the new name for the view and press enter. The view will be renamed. Look at the below image for reference:

Using T-SQL query:
To rename a view in SQL Server using the T-SQL query method, you can use the system stored procedure named sp_rename. The general syntax is:
EXEC sp_rename
    @objname = <schema_name.view_name>,
    @newname = <view_name>;
There are two parameters that you have to provide to this stored procedure:
- @objname: The original name of the view
- @newname: The new name for the view
Make sure that you have to specify the schema name in the @objname parameter along with the view name. Also, you have to specify only the view name in the @newname parameter. For example:
USE BackupDatabase
GO
EXEC sp_rename
    @objname = 'SalesLT.vOrders',
    @newname = 'Orders';
In the above T-SQL code, I have changed the name of my view from SalesLT.vOrders to SalesLT.Orders. But, I did not specify the schema name in the @newname parameter.

You will see a warning as shown in the above image. But it is just a warning and not an error. Therefore the view will be renamed.
Thus, you might have learned how you can rename a view in SQL Server.
Read: SQL Server INSERT INTO SELECT
Create or Alter view in SQL Server
You can use the CREATE OR ALTER VIEW statement in SQL Server to alter a view if it already exists in the database, otherwise create a new view with the same set of queries in the view body.
This helps to avoid errors in two situations:
- You are trying to alter a view that does not exist. In this case, a new view will be created with the same set of queries.
- You are trying to create a view, but it already exists in the database. In this case, you will alter the already existing view in the database instead of creating a new one.
Let us see how you can use the CREATE OR ALTER VIEW statement in SQL Server. I have not created any view with the name SalesLT.vOrders. If I run the below T-SQL query the first time, a view will be created with the name SalesLT.vOrders.
USE [BackupDatabase]
GO
CREATE OR ALTER VIEW [SalesLT].[vOrders]
   WITH SCHEMABINDING
   AS
      SELECT SUM(UnitPrice*OrderQty*(1.00-UnitPriceDiscount)) AS Revenue,
         OrderDate, ProductID, COUNT_BIG(*) AS COUNT
      FROM SalesLT.SalesOrderDetail AS od, SalesLT.SalesOrderHeader AS o
      WHERE od.SalesOrderID = o.SalesOrderID
      GROUP BY OrderDate, ProductID;
GO
If I run this T-SQL query again, I will not get any error because the view will be altered this time as it already exists in the database.

Hence, in this way, you can use the CREATE OR ALTER VIEW statement in SQL Server to create or alter a view in the database.
Read: SQL Server DateTime vs Datetime2
If exists alter view in SQL Server
In this section, I will explain how you can use the IF EXISTS statement with the ALTER VIEW statement.
Sometimes, you may want to modify a view that you have already dropped. In that case, if you try to alter the view, you may face an error saying that the view does not exist.
In such cases, you may want to add a validation check for the existence of the view in the database. You can use the IF EXISTS statement for this. This statement will check if the view exists in the database or not. For example:
USE BackupDatabase
GO
IF EXISTS(SELECT 1 FROM sys.views WHERE name = 'vOrders')
BEGIN
EXECUTE('ALTER VIEW SalesLT.vOrders
AS
SELECT SUM(UnitPrice*OrderQty*(1.00-UnitPriceDiscount)) AS Revenue,
         OrderDate, ProductID, COUNT_BIG(*) AS COUNT
      FROM SalesLT.SalesOrderDetail AS od, SalesLT.SalesOrderHeader AS o
      WHERE od.SalesOrderID = o.SalesOrderID
      GROUP BY OrderDate, ProductID')
END- Firstly, the IF EXISTS statement will check if there is a view named vOrders in the database.
- If the view already exists, the EXECUTE statement will execute the ALTER VIEW query to alter the table.

In this way, you can verify the existence of a view in the database before issuing the ALTER VIEW command.
Read: Types of Backup in SQL Server
Alter view with schemabinding in SQL Server
Creating a view with the SCHEMABINDING option means that you are binding the view with the underlying tables. This means you cannot alter your underlying tables in such a way that will affect the view definition.
This means, first you have to change the view definitions, only then you will be able to change the definition of the underlying table.
To alter an existing view and bind it with the underlying tables, you can specify the SCHEMABINDING option in the ALTER VIEW statement.
For example, in the above section, I have created a view named SalesLT.Orders. Now If I want to bind this view with its underlying tables, I will write the ALTER VIEW statement as:
USE [BackupDatabase]
GO
SET ANSI_NULLS ON
GO
SET QUOTED_IDENTIFIER ON
GO
ALTER VIEW [SalesLT].[Orders]
WITH SCHEMABINDING
AS
SELECT CAST(SUM(UnitPrice*OrderQty*(1.00-UnitPriceDiscount)) AS varchar) AS Revenue,
         OrderDate, ProductID, COUNT_BIG(*) AS COUNT
      FROM SalesLT.SalesOrderDetail AS od, SalesLT.SalesOrderHeader AS o
      WHERE od.SalesOrderID = o.SalesOrderID
      GROUP BY OrderDate, ProductID
GO
If the statement is executed successfully the view will be bound to the underlying tables.
Note:
If you want to alter a table that is bind to view using the SCHEMABINDING option, you have to drop the table and create it again. You cannot disable the SCHEMABINDING option of the view.
You may also like to read the following SQL Server tutorials.
- SQL Server logical operators and example
- How to use union in view SQL Server
- How to see view definition in SQL Server
- Pass parameters to view in SQL Server
- How to test stored procedure in SQL Server
Thus, you might have learned how to alter a view in various ways in SQL Server. And here is the list of topics that we covered in this tutorial.
- Can we alter view in SQL Server?
- Alter view in SQL Server management studio
- Alter view add column SQL Server
- Alter view column data type in SQL Server
- Alter view name in SQL Server
- Alter view permission in SQL Server
- Create or Alter view in SQL Server
- If exists alter view in SQL Server
- Alter view with schemabinding in SQL Server
I am Bijay having more than 15 years of experience in the Software Industry. During this time, I have worked on MariaDB and used it in a lot of projects. Most of our readers are from the United States, Canada, United Kingdom, Australia, New Zealand, etc.
Want to learn MariaDB? Check out all the articles and tutorials that I wrote on MariaDB. Also, I am a Microsoft MVP.