FAQ
В Windows вы можете изменить язык отображения для системы, настроек, функций и т. д. Вы также можете добавить несколько языков и переключать их в любое время.
※Примечание: Если вы получили сообщение «Разрешен только один языковой пакет» или «Ваша лицензия Windows поддерживает только один язык отображения», это означает, что у вас версия Windows 10/11 для одного языка, и вы не можете добавить новый язык, если не приобретите обновление до Windows 10/11 Домашняя или Windows 10/11 Pro.
Пожалуйста, перейдите к соответствующей инструкции, исходя из текущей операционной системы Windows на вашем компьютере:
- Windows 11
- Windows 10
Windows 11
Содержание:
- Установка языкового пакета
- Изменение отображения языка
- Удаление языкового пакета
Установка языкового пакета
При установке нового языкового пакета Windows необходимо подключиться к Интернету, чтобы загрузить его. Убедитесь, что ваш ноутбук находится в доступном сетевом окружении.
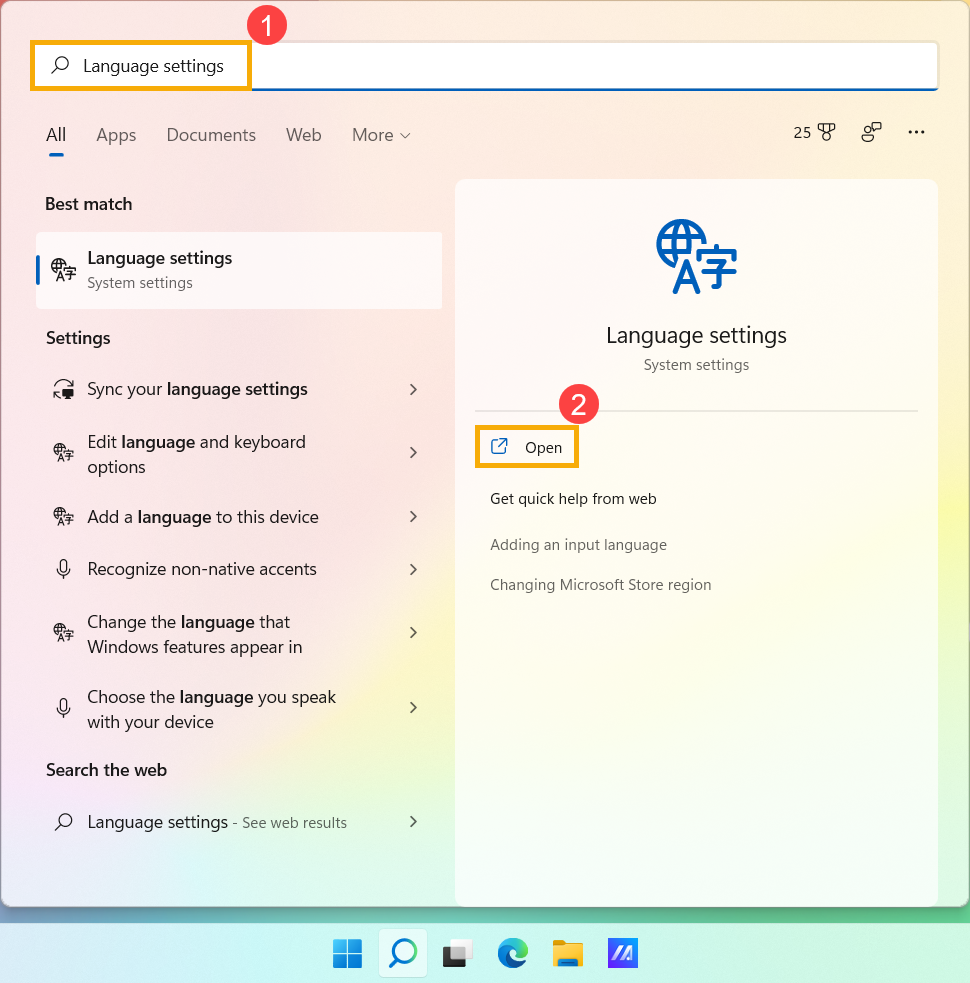
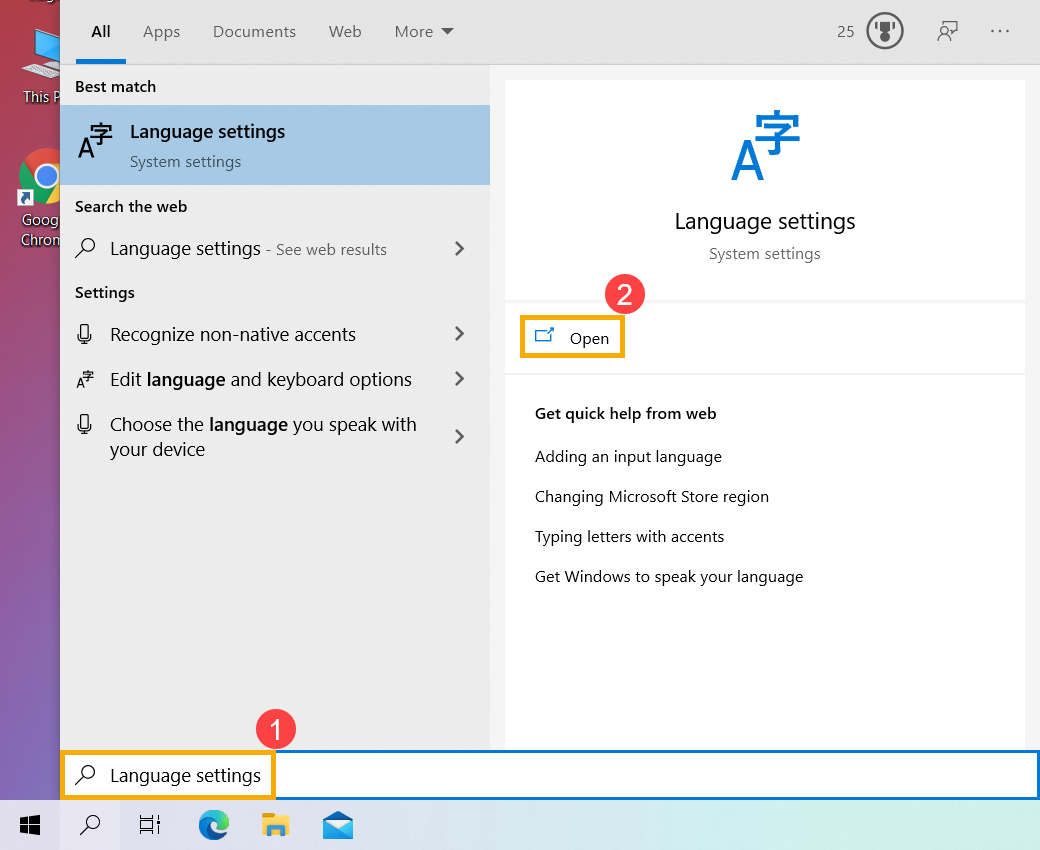
- Введите и найдите [Языковые настройки] в строке поиска Windows ①, а затем нажмите [Открыть] ②.

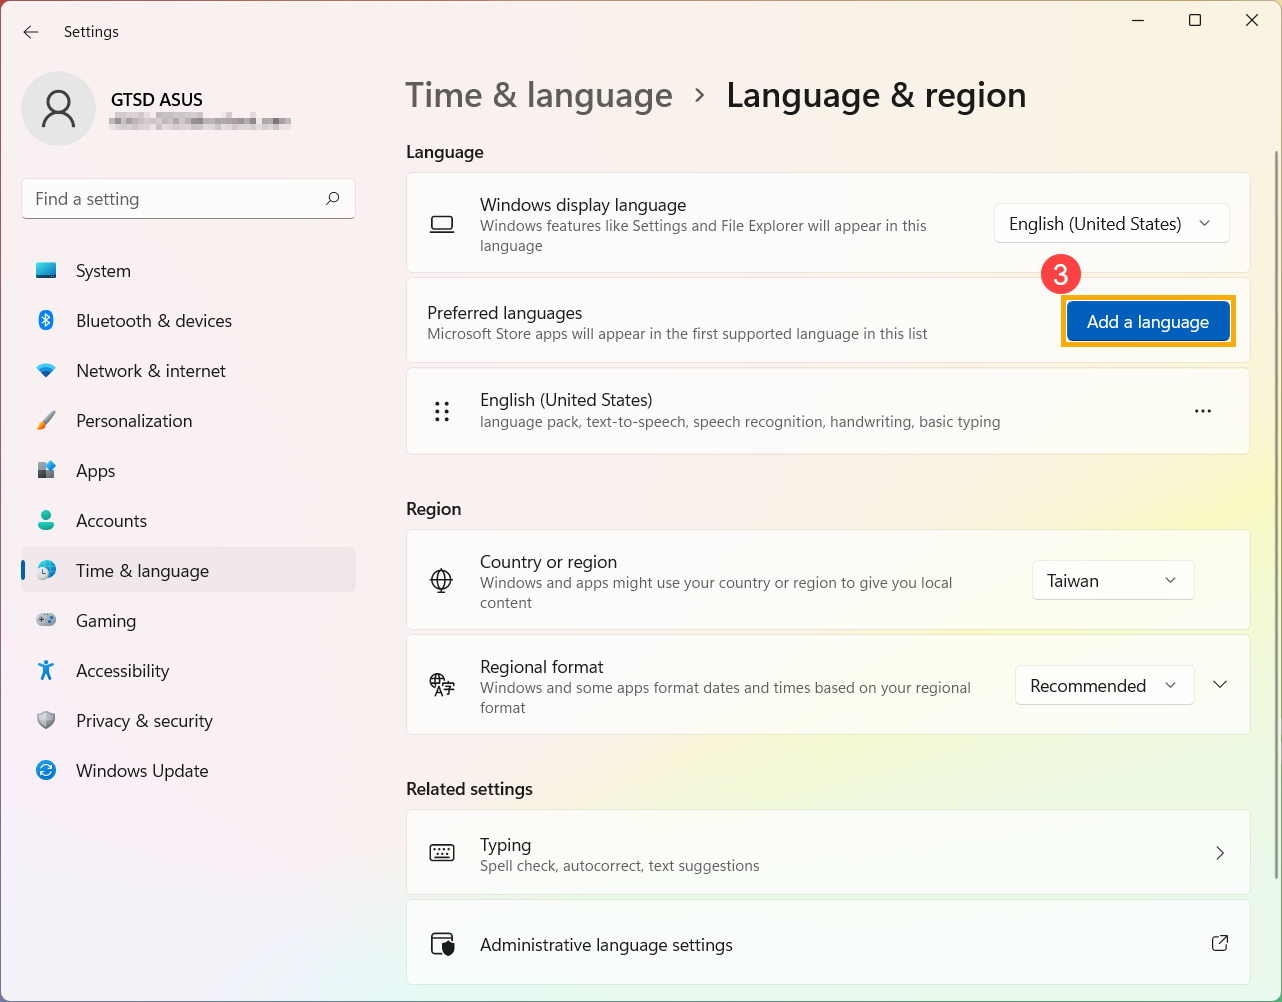
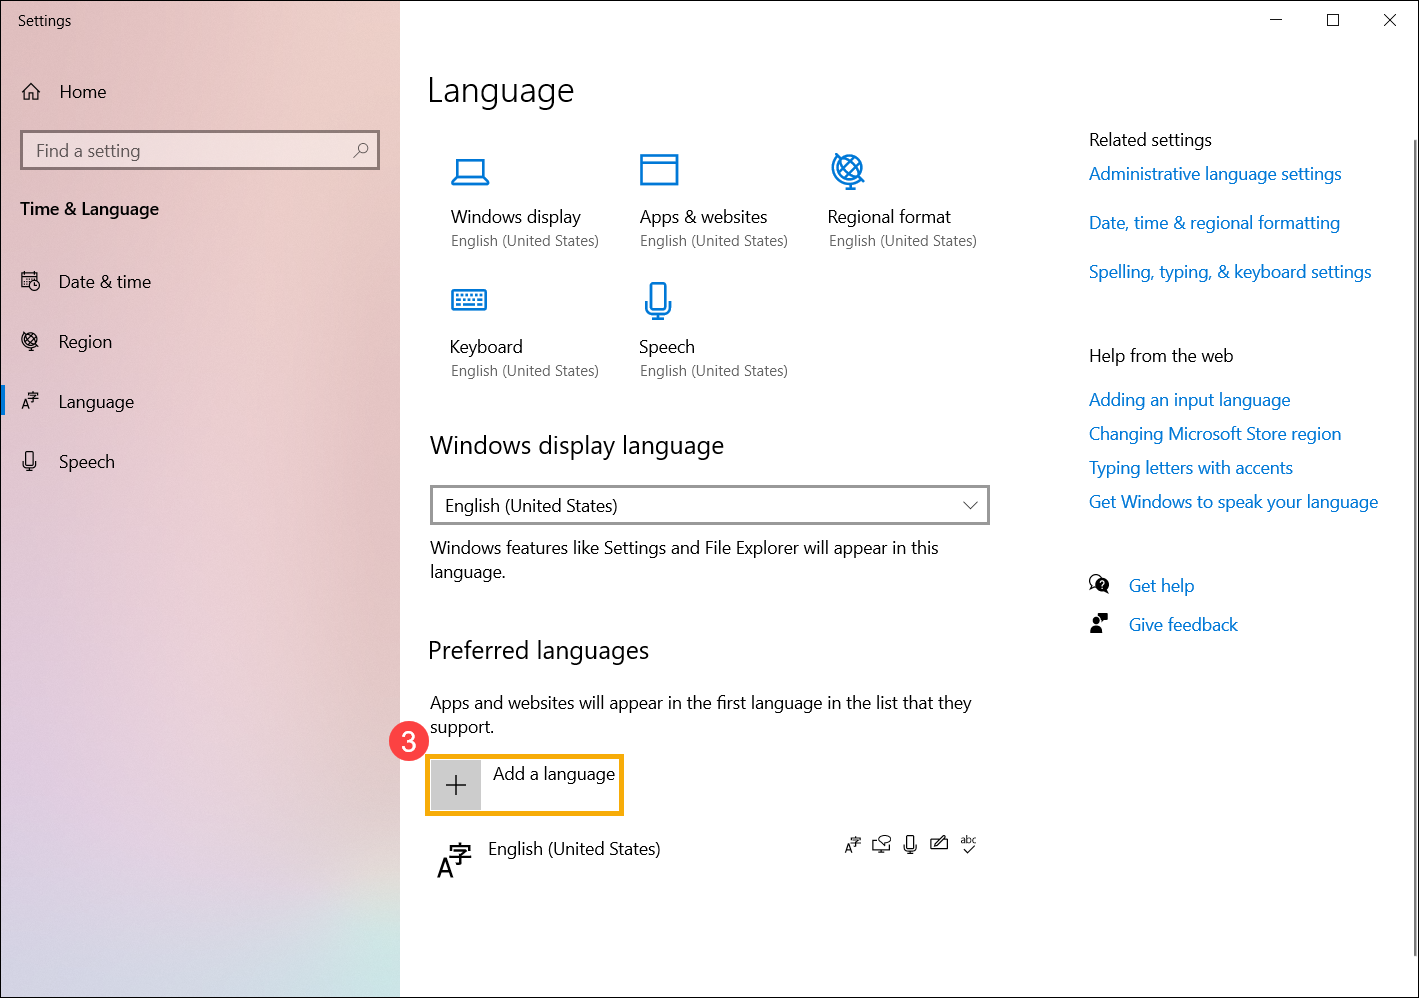
- В предпочтительных языках нажмите [Добавить язык]③.
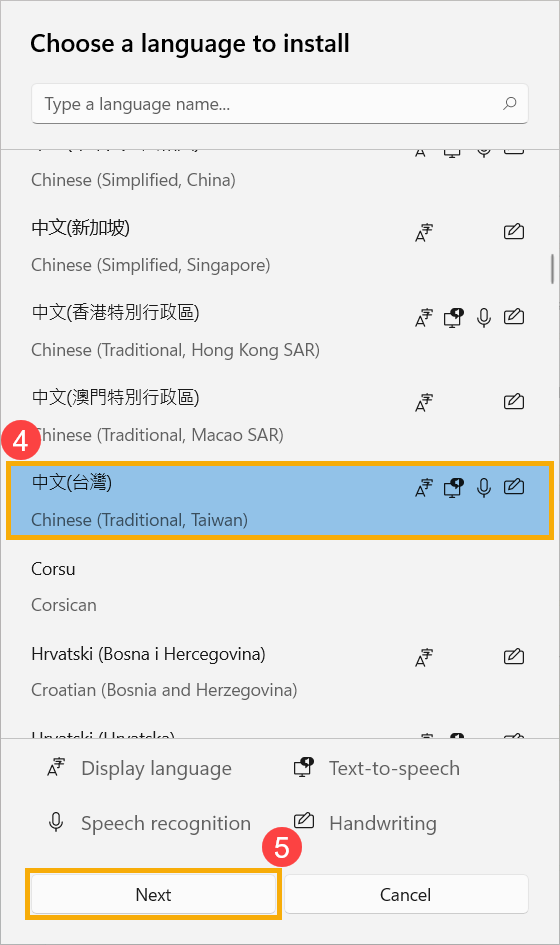
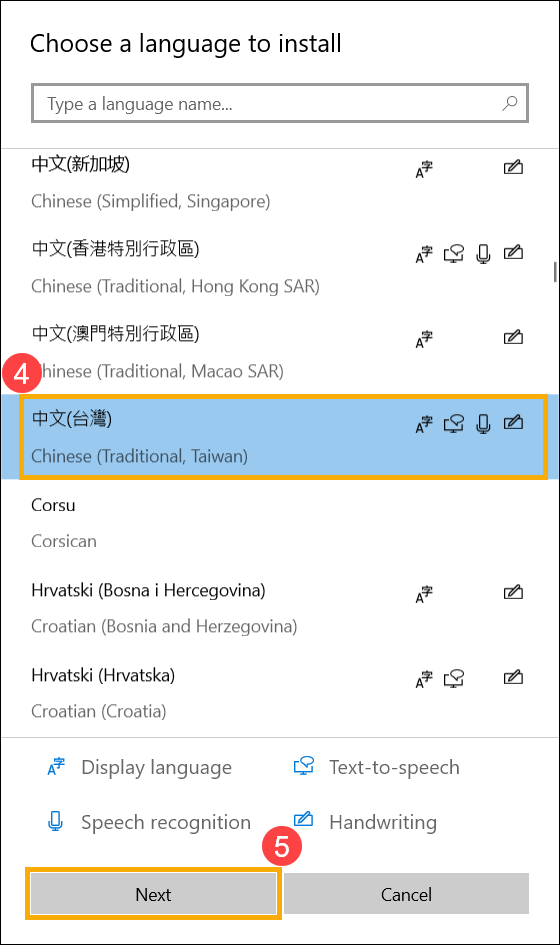
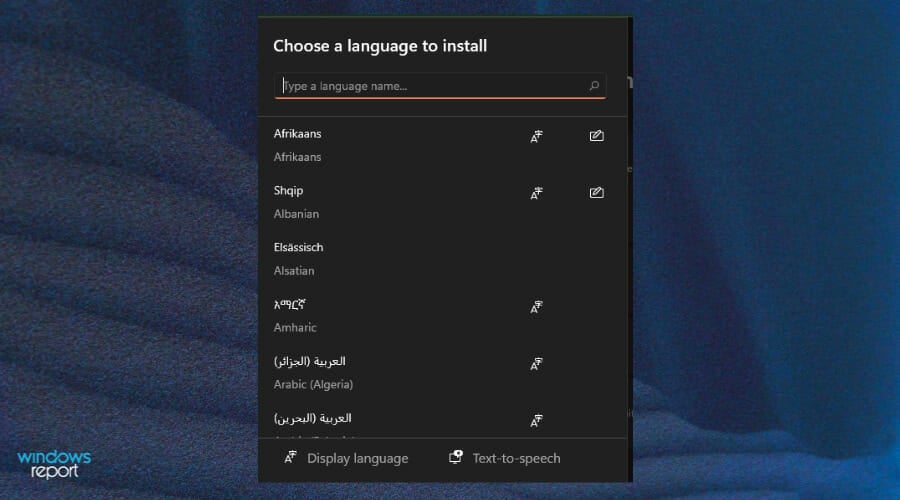
- Выберите язык, который вы хотите установить, из списка④, а затем нажмите [Далее]⑤. Далее в качестве примера используется китайский (традиционный, тайваньский).
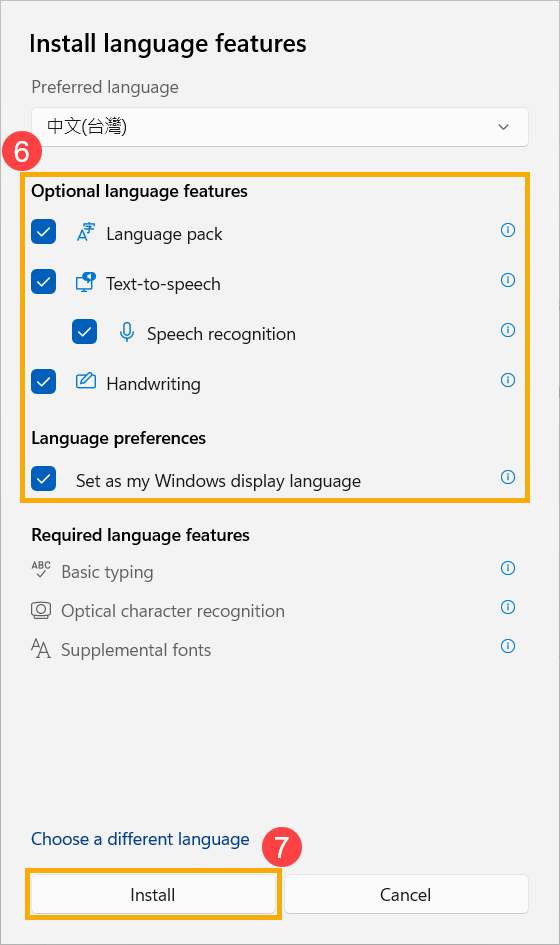
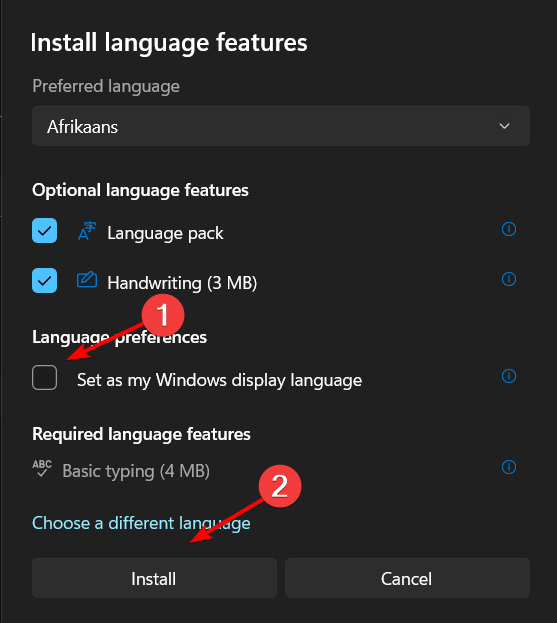
- Вы можете выбрать языковые функции, которые хотите установить⑥, а затем выбрать [Установить]⑦. Windows начнет загрузку и установку языкового пакета и связанных с ним функций.
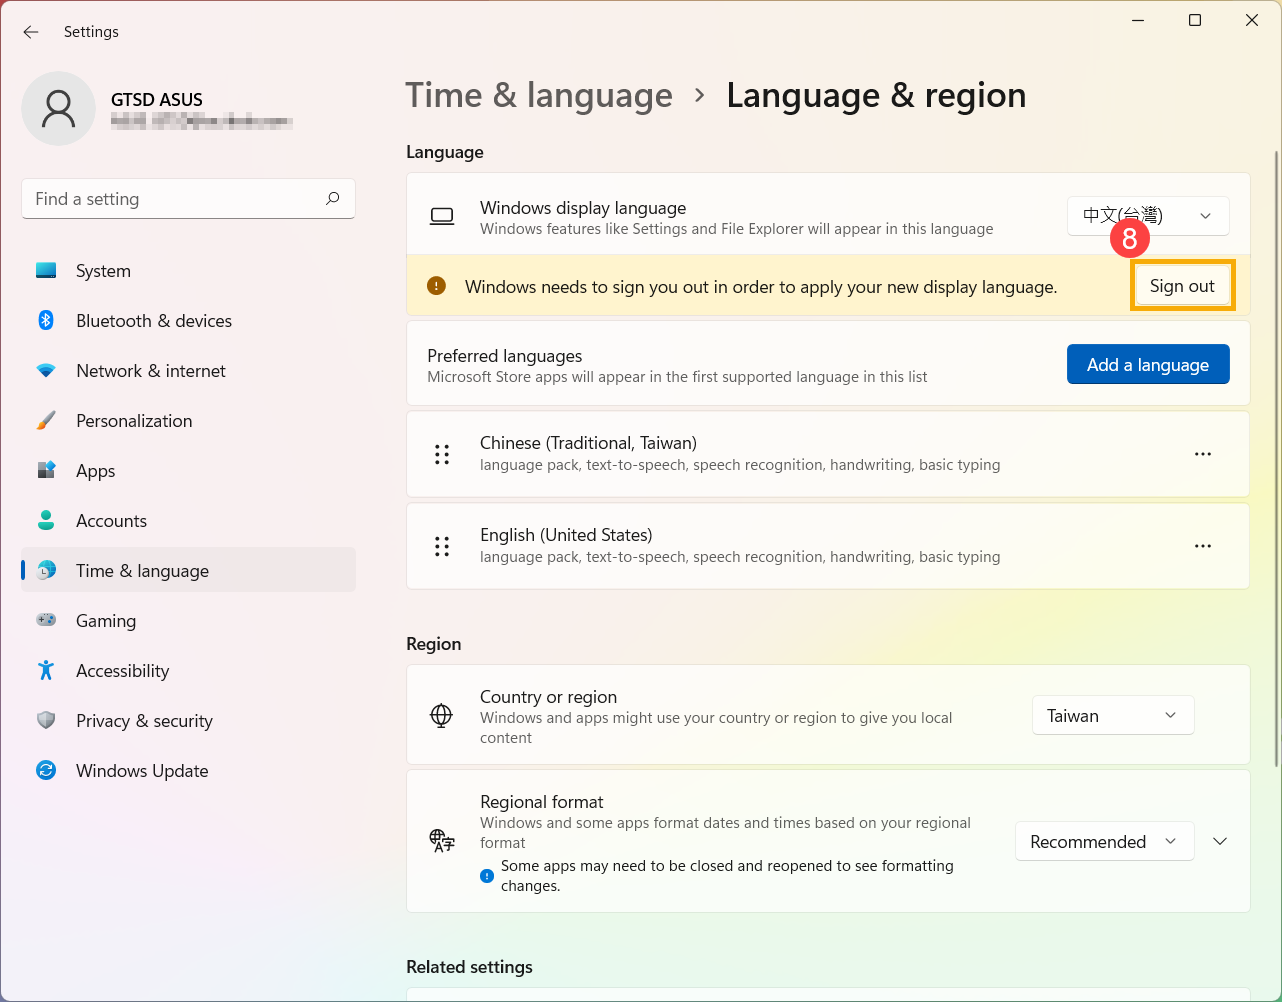
- Если на предыдущем шаге вы выбрали Установить в качестве языка интерфейса Windows, после завершения установки языкового пакета вы получите следующее уведомление. Вы можете выбрать [Выход]⑧, и компьютер выйдет из системы, чтобы применить язык. Перед выходом убедитесь, что все ваши работы сохранены.
Если вы не выберете выход, Windows изменит язык интерфейса в следующий раз, когда вы войдете в систему.
Вернуться в начало
Изменение отображения языка
Если вы загрузили несколько языковых пакетов, вы можете переключить язык интерфейса в любое время.
- Введите и найдите [Языковые настройки] в строке поиска Windows ①, а затем нажмите [Открыть] ②.
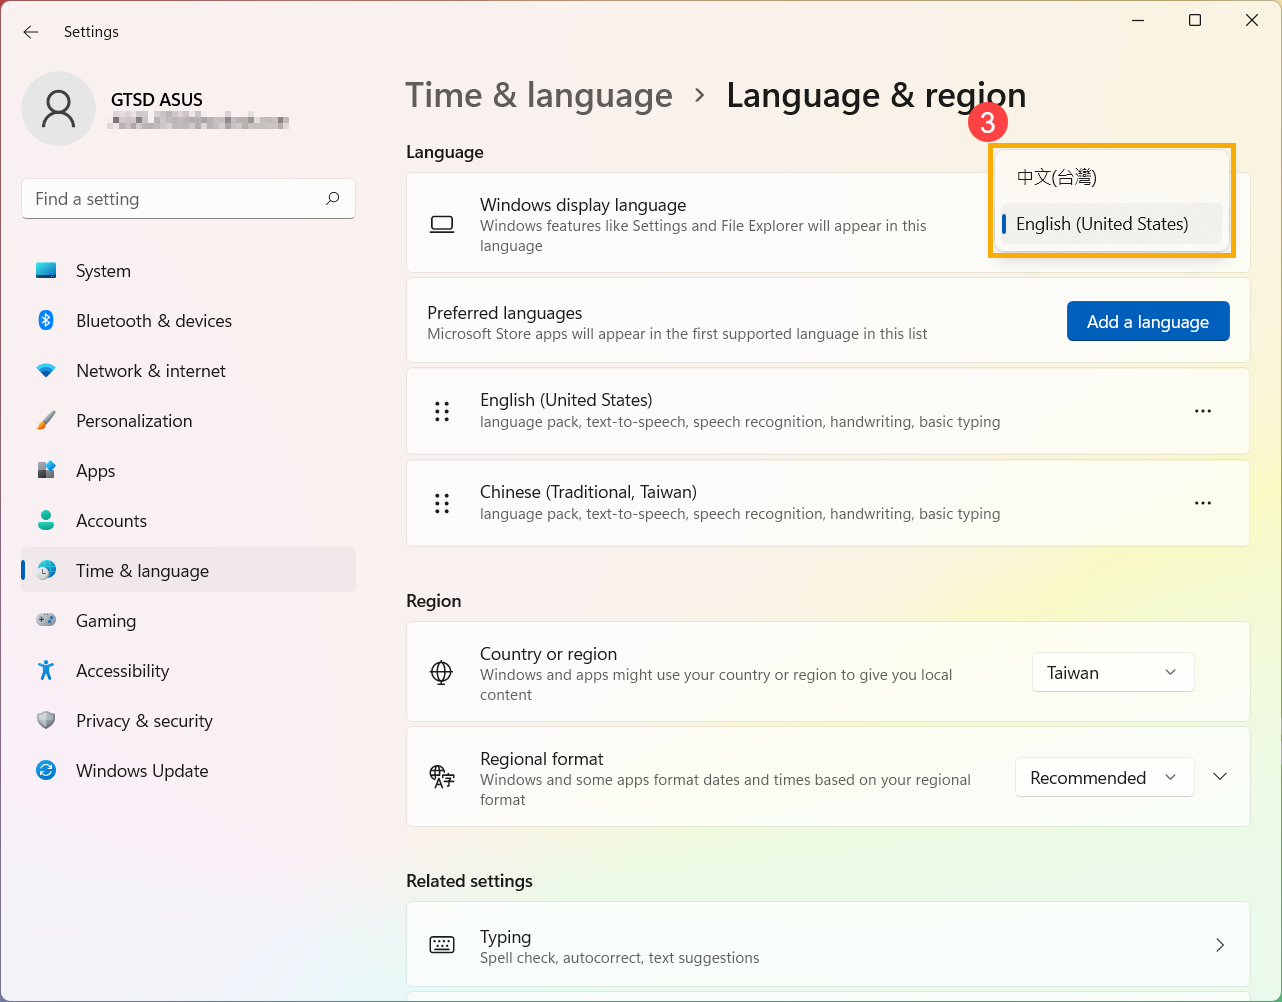
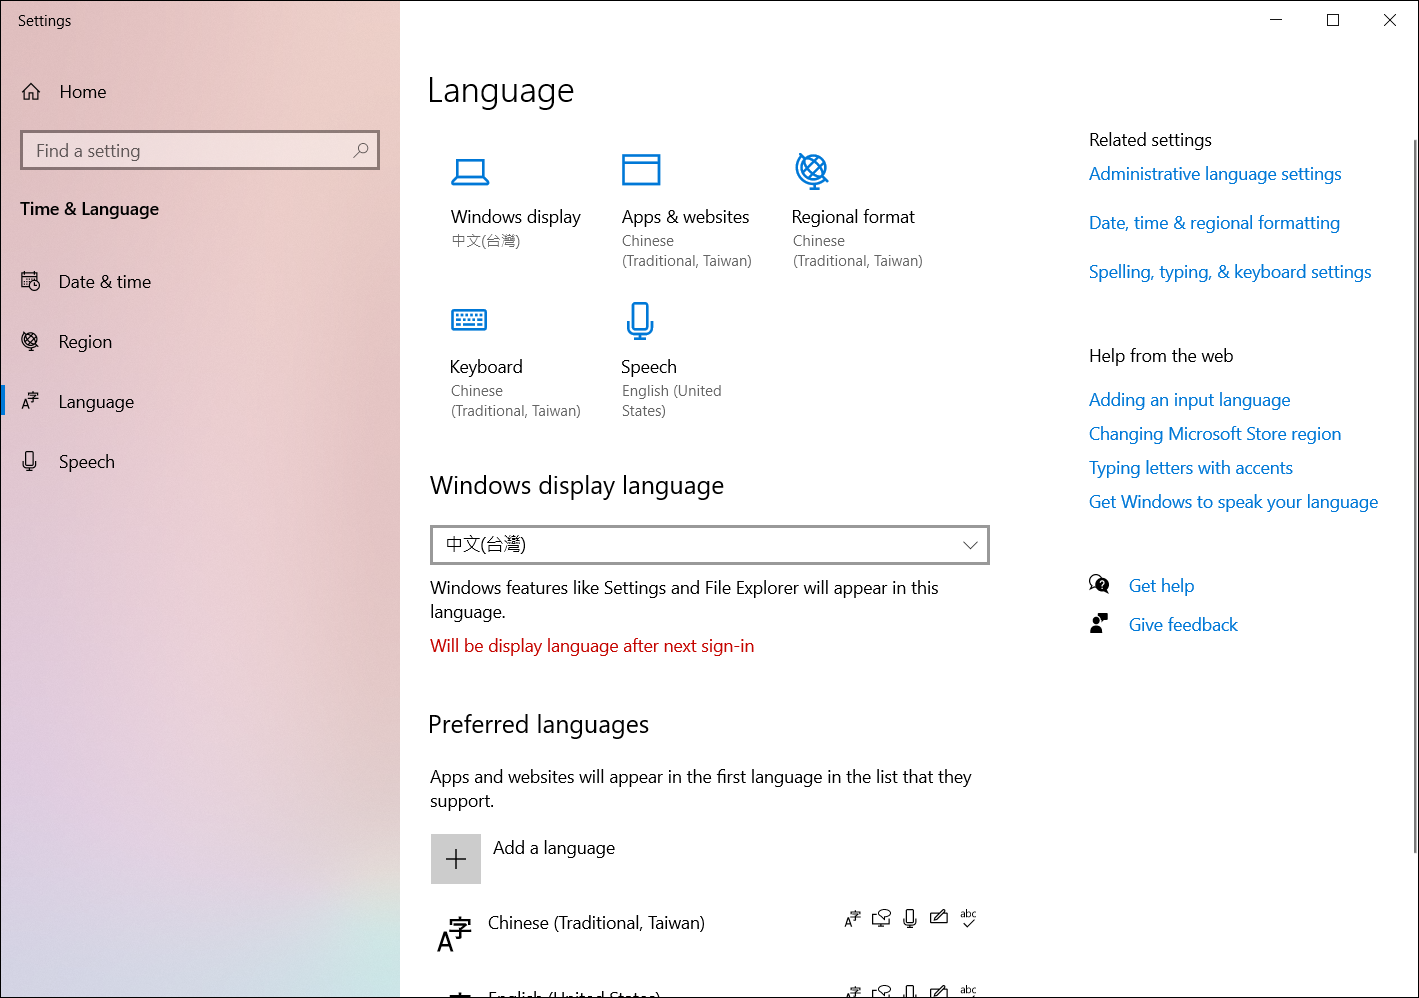
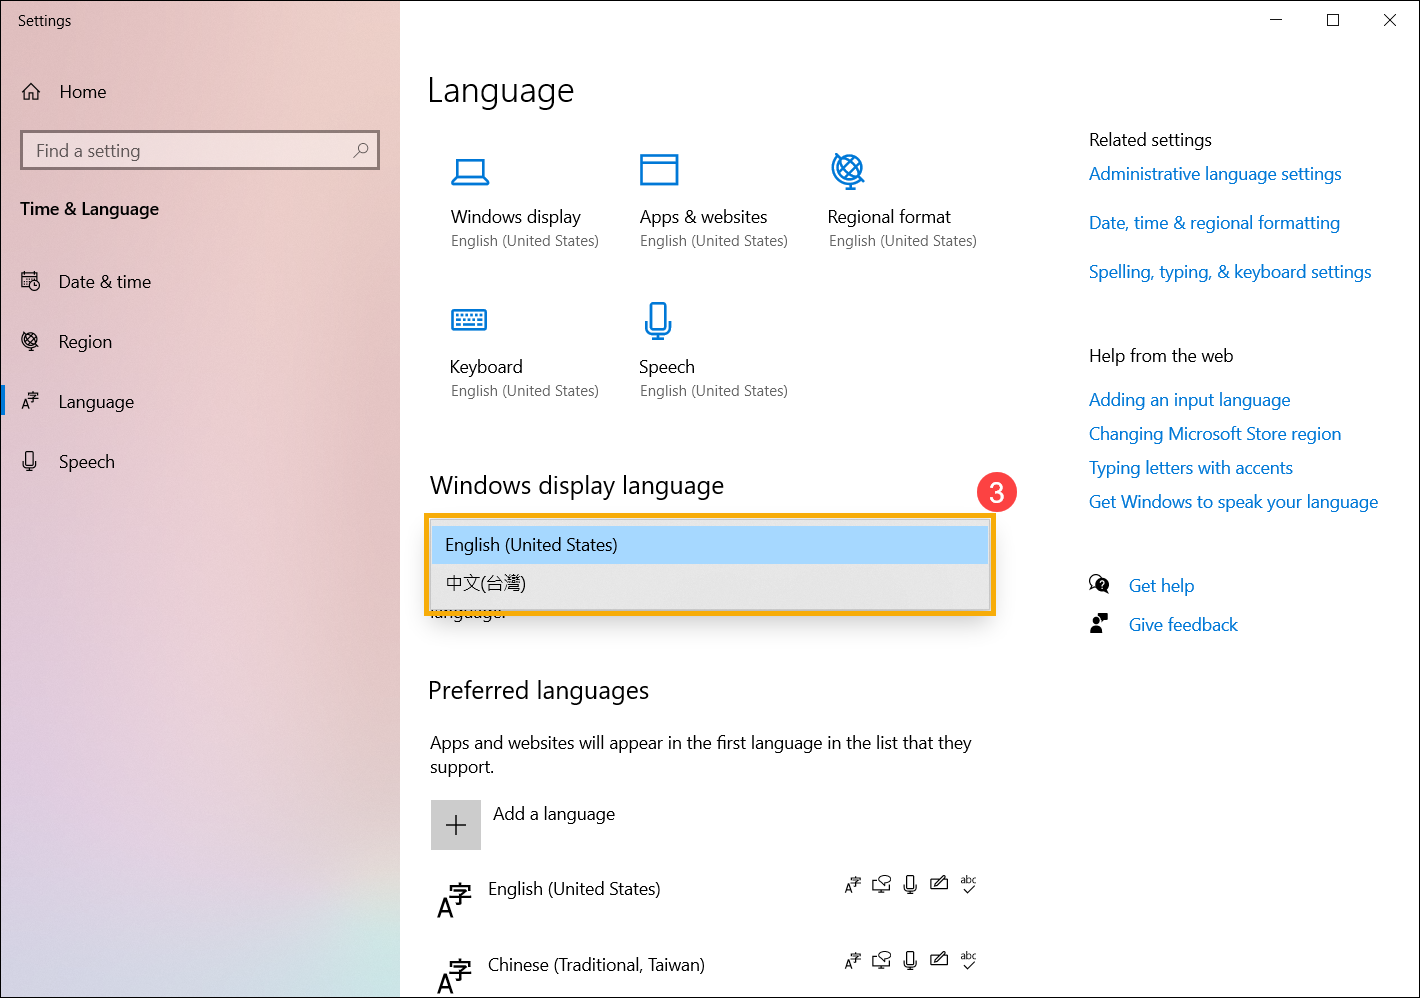
- Выберите нужный язык из раскрывающегося меню в разделе Язык интерфейса Windows③.
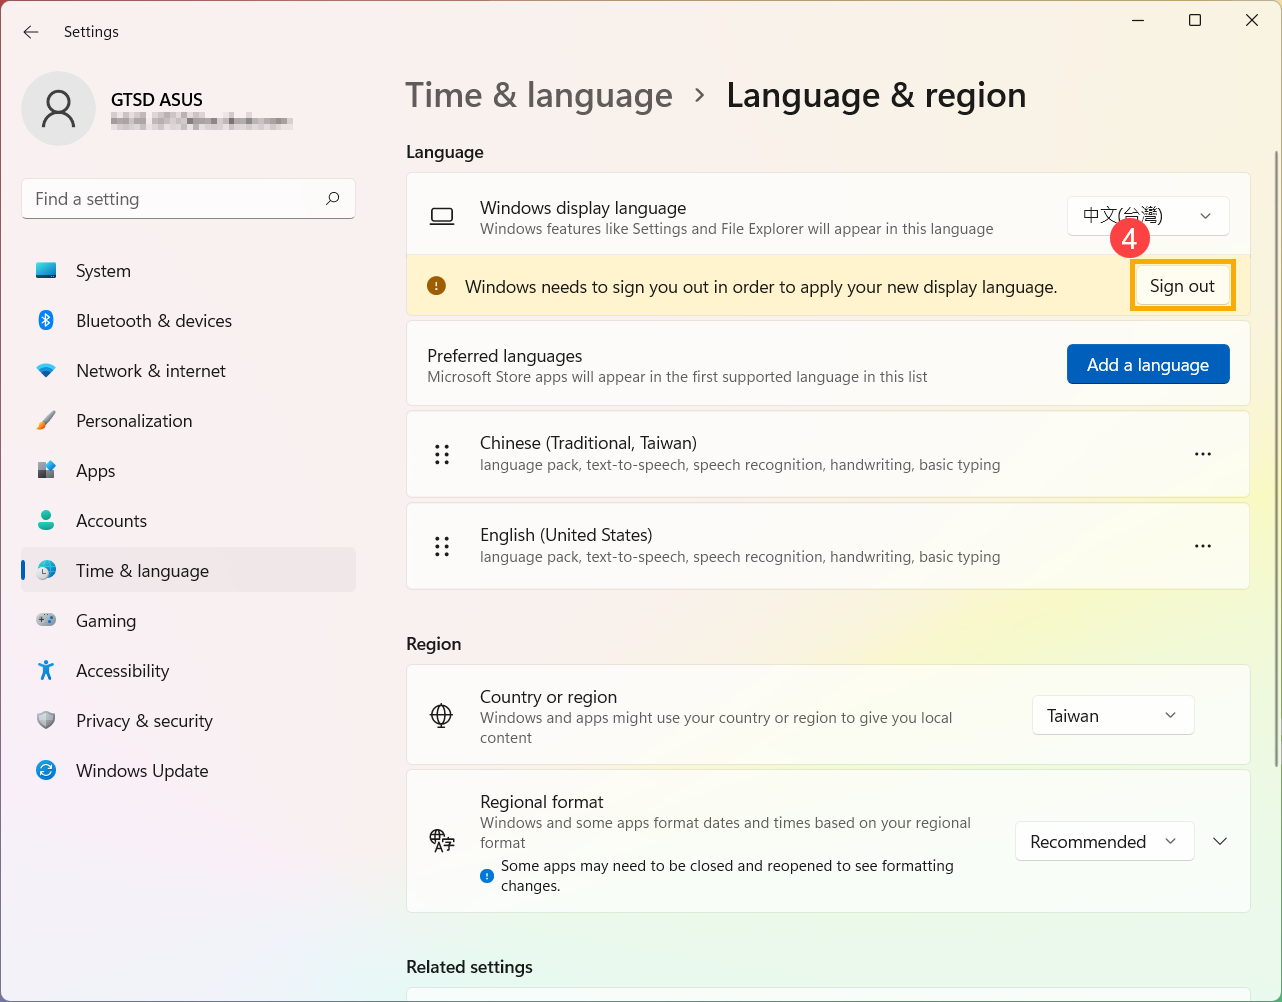
- После выбора языка интерфейса Windows вы получите следующее уведомление. Вы можете выбрать [Выход]④, и компьютер выйдет из системы, чтобы завершить изменения языка системы. Перед выходом убедитесь, что все ваши работы сохранены.
Если вы не выберете выход, Windows изменит язык интерфейса в следующий раз, когда вы войдете в систему.
Вернуться в начало
Удаление языкового пакета
Установка нескольких языковых пакетов может повлиять на свободное место на жестком диске, поэтому вы можете удалить языковые пакеты, которые больше не будете использовать.
- Введите и найдите [Языковые настройки] в строке поиска Windows ①, а затем нажмите [Открыть] ②.
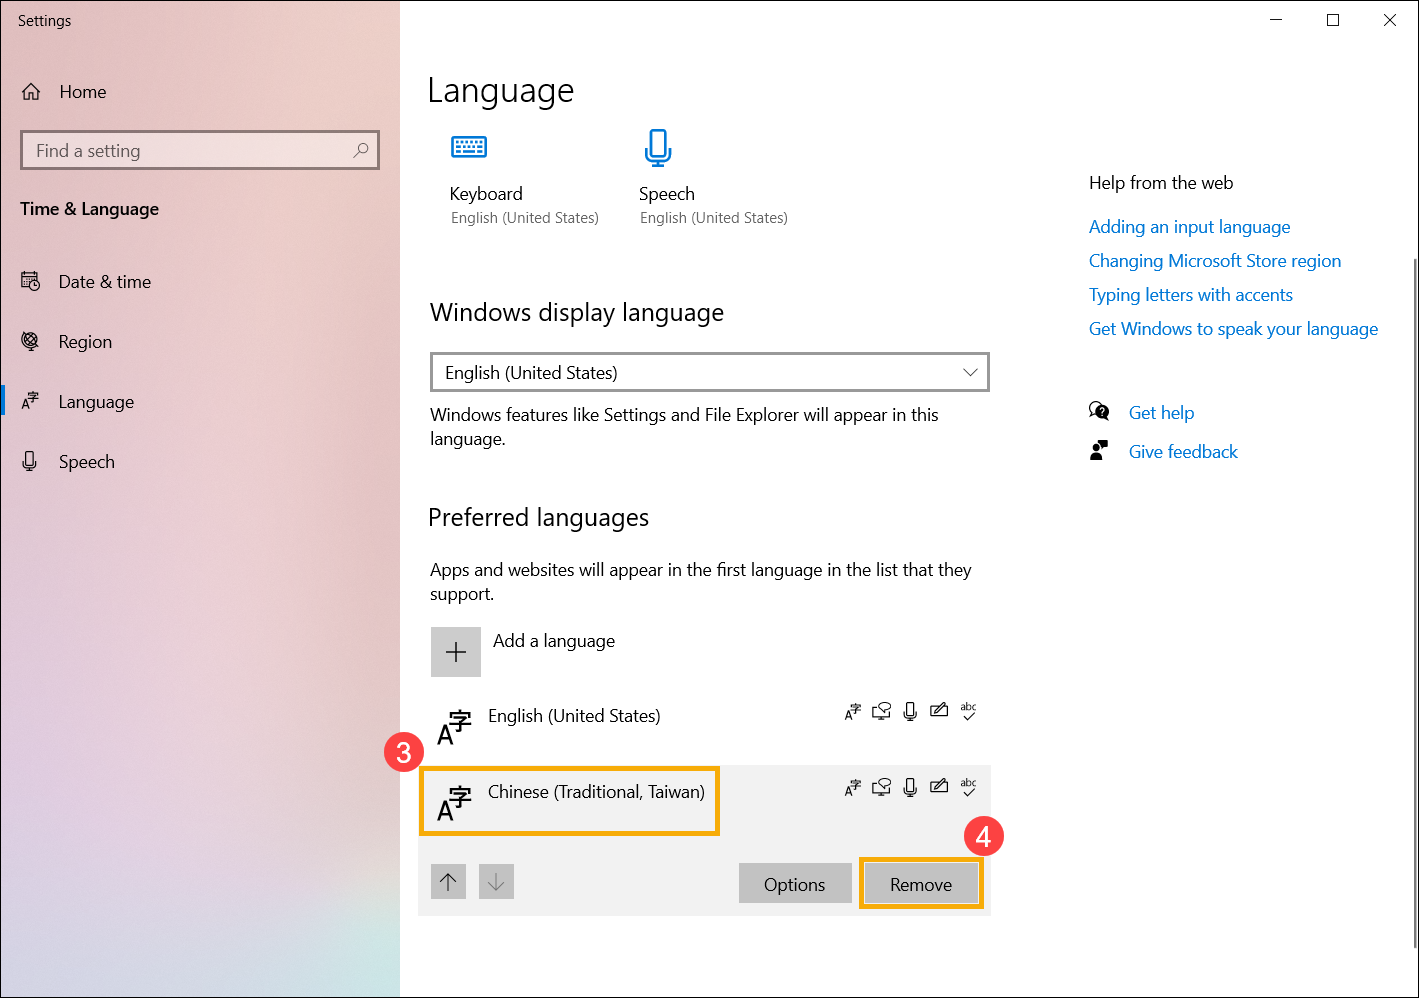
- Выберите значок [Дополнительно] ③ рядом с языком, который вы хотите удалить, а затем нажмите [Удалить] ④. Языковые пакеты и все соответствующие языки клавиатуры будут удалены.
 рядом с языком, который вы хотите удалить, а затем нажмите [Удалить] ④. Языковые пакеты и все соответствующие языки клавиатуры будут удалены.
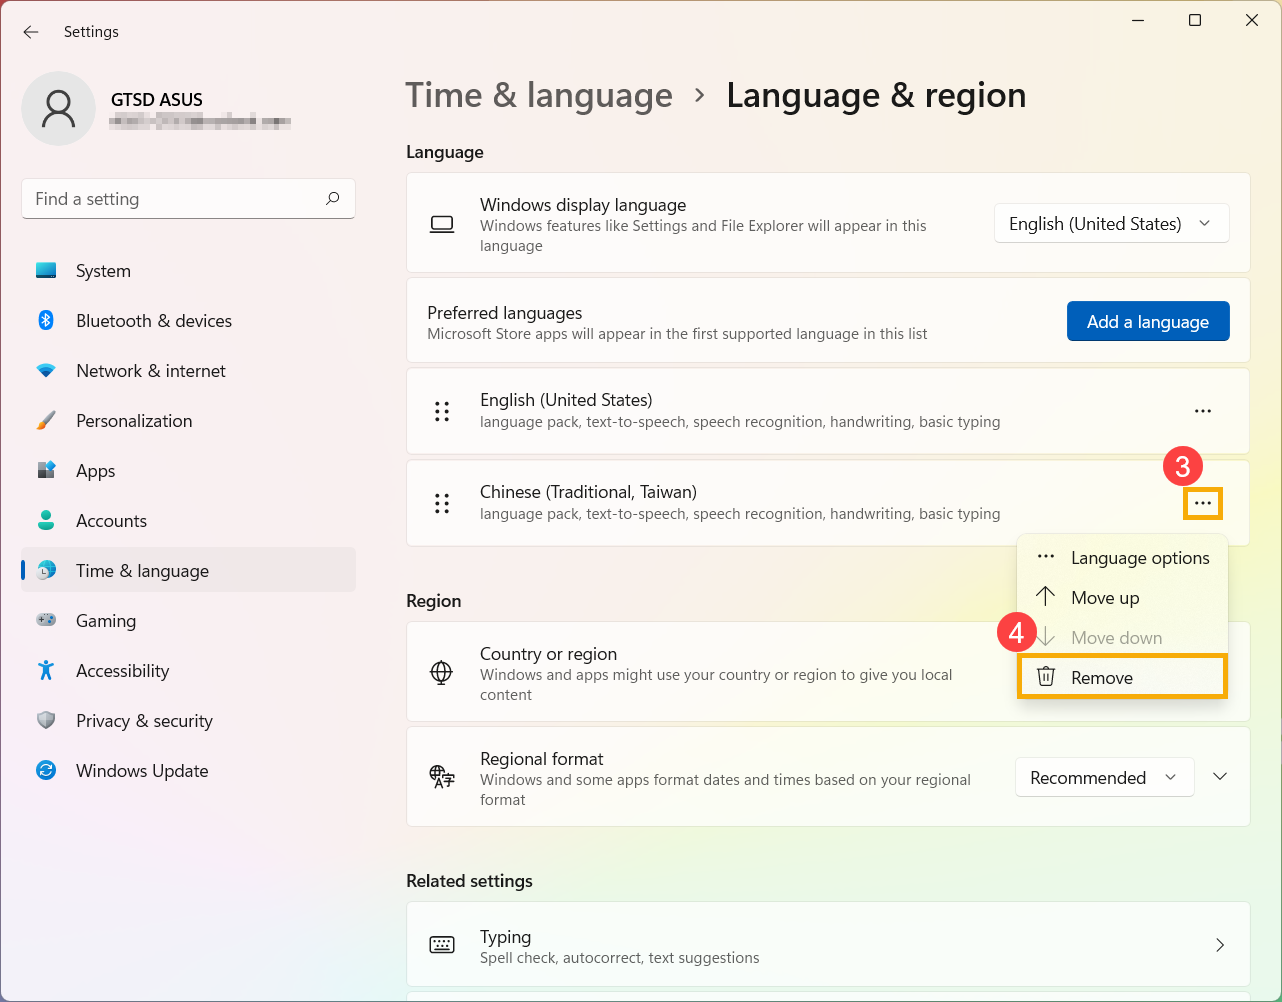
Вернуться в начало
Windows 10
Содержание:
- Установите языковой пакет
- Измените отображение языка
- Удалите языковой пакет
Установите языковой пакет
При установке нового языкового пакета Windows необходимо подключиться к Интернету, чтобы загрузить его. Убедитесь, что ваш ноутбук находится в доступном сетевом окружении.
- Введите и выполните поиск [Языковые настройки] в строке поиска Windows①, а затем щелкните [Открыть] ②.
- На предпочитаемых языках щелкните [Добавить язык] ③.
- Выберите язык, который вы хотите установить, из списка④, а затем выберите [Далее] ⑤. Ниже в качестве справочного материала используется китайский (традиционный, тайваньский).
- Вы можете выбрать языковые компоненты, которые хотите установить ⑥, а затем выбрать [Установить] ⑦. Windows начнет загрузку и установку языкового пакета и связанных функций.
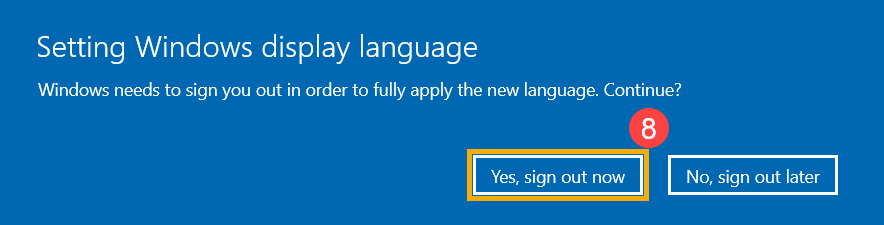
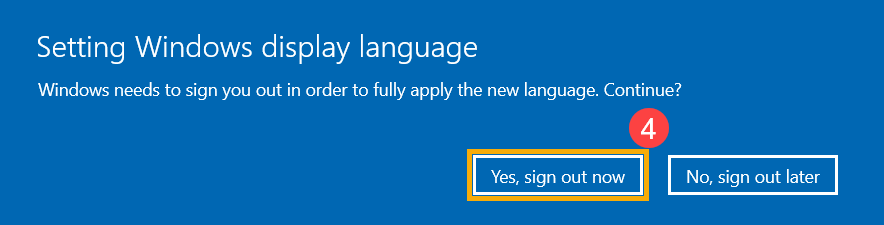
- Если на предыдущем шаге вы выбрали «Установить в качестве моего языка отображения Windows», после завершения установки языкового пакета вы получите следующее уведомление. Вы можете выбрать [Да, выйти сейчас] ⑧, и компьютер выйдет из системы, чтобы применить язык. Перед выходом убедитесь, что все ваши работы были сохранены.
Если вы выберете выход позже, Windows изменит язык отображения в следующий раз, когда вы войдете в систему.


Вернуться в начало
Изменить отображение языка
Если вы скачали несколько языковых пакетов, вы можете в любой момент переключить язык отображения.
- Введите и выполните поиск [Языковые настройки] в строке поиска Windows①, а затем щелкните [Открыть] ②.
- Выберите нужный язык из раскрывающегося меню в разделе «Язык интерфейса Windows» ③.
- Вы можете выбрать [Да, выйти сейчас] ④, и компьютер выйдет из системы, чтобы завершить изменение языка системы. Перед выходом убедитесь, что все ваши работы были сохранены.
Если вы выберете выход позже, Windows изменит язык отображения в следующий раз, когда вы войдете в систему.


Вернуться в начало
Удалить языковой пакет
Установка нескольких языковых пакетов может повлиять на пространство на жестком диске, поэтому вы можете удалить языковые пакеты, которые больше не будете использовать.
- Введите и выполните поиск [Языковые настройки] в строке поиска Windows①, а затем щелкните [Открыть] ②.
- Выберите язык, который вы хотите удалить③, а затем выберите [Удалить] ④. Языковые пакеты и все соответствующие языки клавиатуры будут удалены.
Вернуться в начало
-
Категория
Настройки Windows/ Система -
Тип
Product Knowledge
Эта информация была полезной?
Yes
No
- Приведенная выше информация может быть частично или полностью процитирована с внешних веб-сайтов или источников. Пожалуйста, обратитесь к информации на основе источника, который мы отметили. Пожалуйста, свяжитесь напрямую или спросите у источников, если есть какие-либо дополнительные вопросы, и обратите внимание, что ASUS не имеет отношения к данному контенту / услуге и не несет ответственности за него.
- Эта информация может не подходить для всех продуктов из той же категории / серии. Некоторые снимки экрана и операции могут отличаться от версий программного обеспечения.
- ASUS предоставляет вышеуказанную информацию только для справки. Если у вас есть какие-либо вопросы о содержании, пожалуйста, свяжитесь напрямую с поставщиком вышеуказанного продукта. Обратите внимание, что ASUS не несет ответственности за контент или услуги, предоставляемые вышеуказанным поставщиком продукта.
by Claire Moraa
Claire likes to think she’s got a knack for solving problems and improving the quality of life for those around her. Driven by the forces of rationality, curiosity,… read more
Updated on January 26, 2023
- Windows allows users to change the text display language which is used in menus and other graphic elements of the system.
- However, it may sometimes happen that you can’t change the display language because of a few limitations.
- This should not worry you because you can easily tweak the settings and select your preferred system language in a few easy steps.
XINSTALL BY CLICKING THE DOWNLOAD FILE
- Download Restoro PC Repair Tool that comes with Patented Technologies (patent available here).
- Click Start Scan to find Windows 11 issues that could be causing PC problems.
- Click Repair All to fix issues affecting your computer’s security and performance
- Restoro has been downloaded by 0 readers this month.
The ability to change the display language of your operating system is useful for people who are multilingual, but it’s also good for users who want to try out other languages or switch from one to another.
To accommodate users around the world, Windows 11 allows you to change such settings.
If a computer comes to you with different language settings, and you travel frequently, it can be useful to set the operating system’s language accordingly whenever you are in a new location.
You can tweak the settings to display a different one, and you may also add more options so that you can switch with ease and get a multilingual experience.
There are several reasons for wanting to change the Windows system language. Maybe you bought a Windows PC on the last trip abroad or over the Internet, and it comes in one that you don’t understand.
Perhaps you have the computer you bought, but now upgrading to a new operating system changes your default system language.
Whatever your reasons, it should be easy to change the Windows 11 display language. However, when you upgrade to the OS, you can encounter an issue where it is not correctly set.
You might see the language change, but it still displays the same that you originally had on your system even after a reboot.
How do I change the display language in Windows 11?
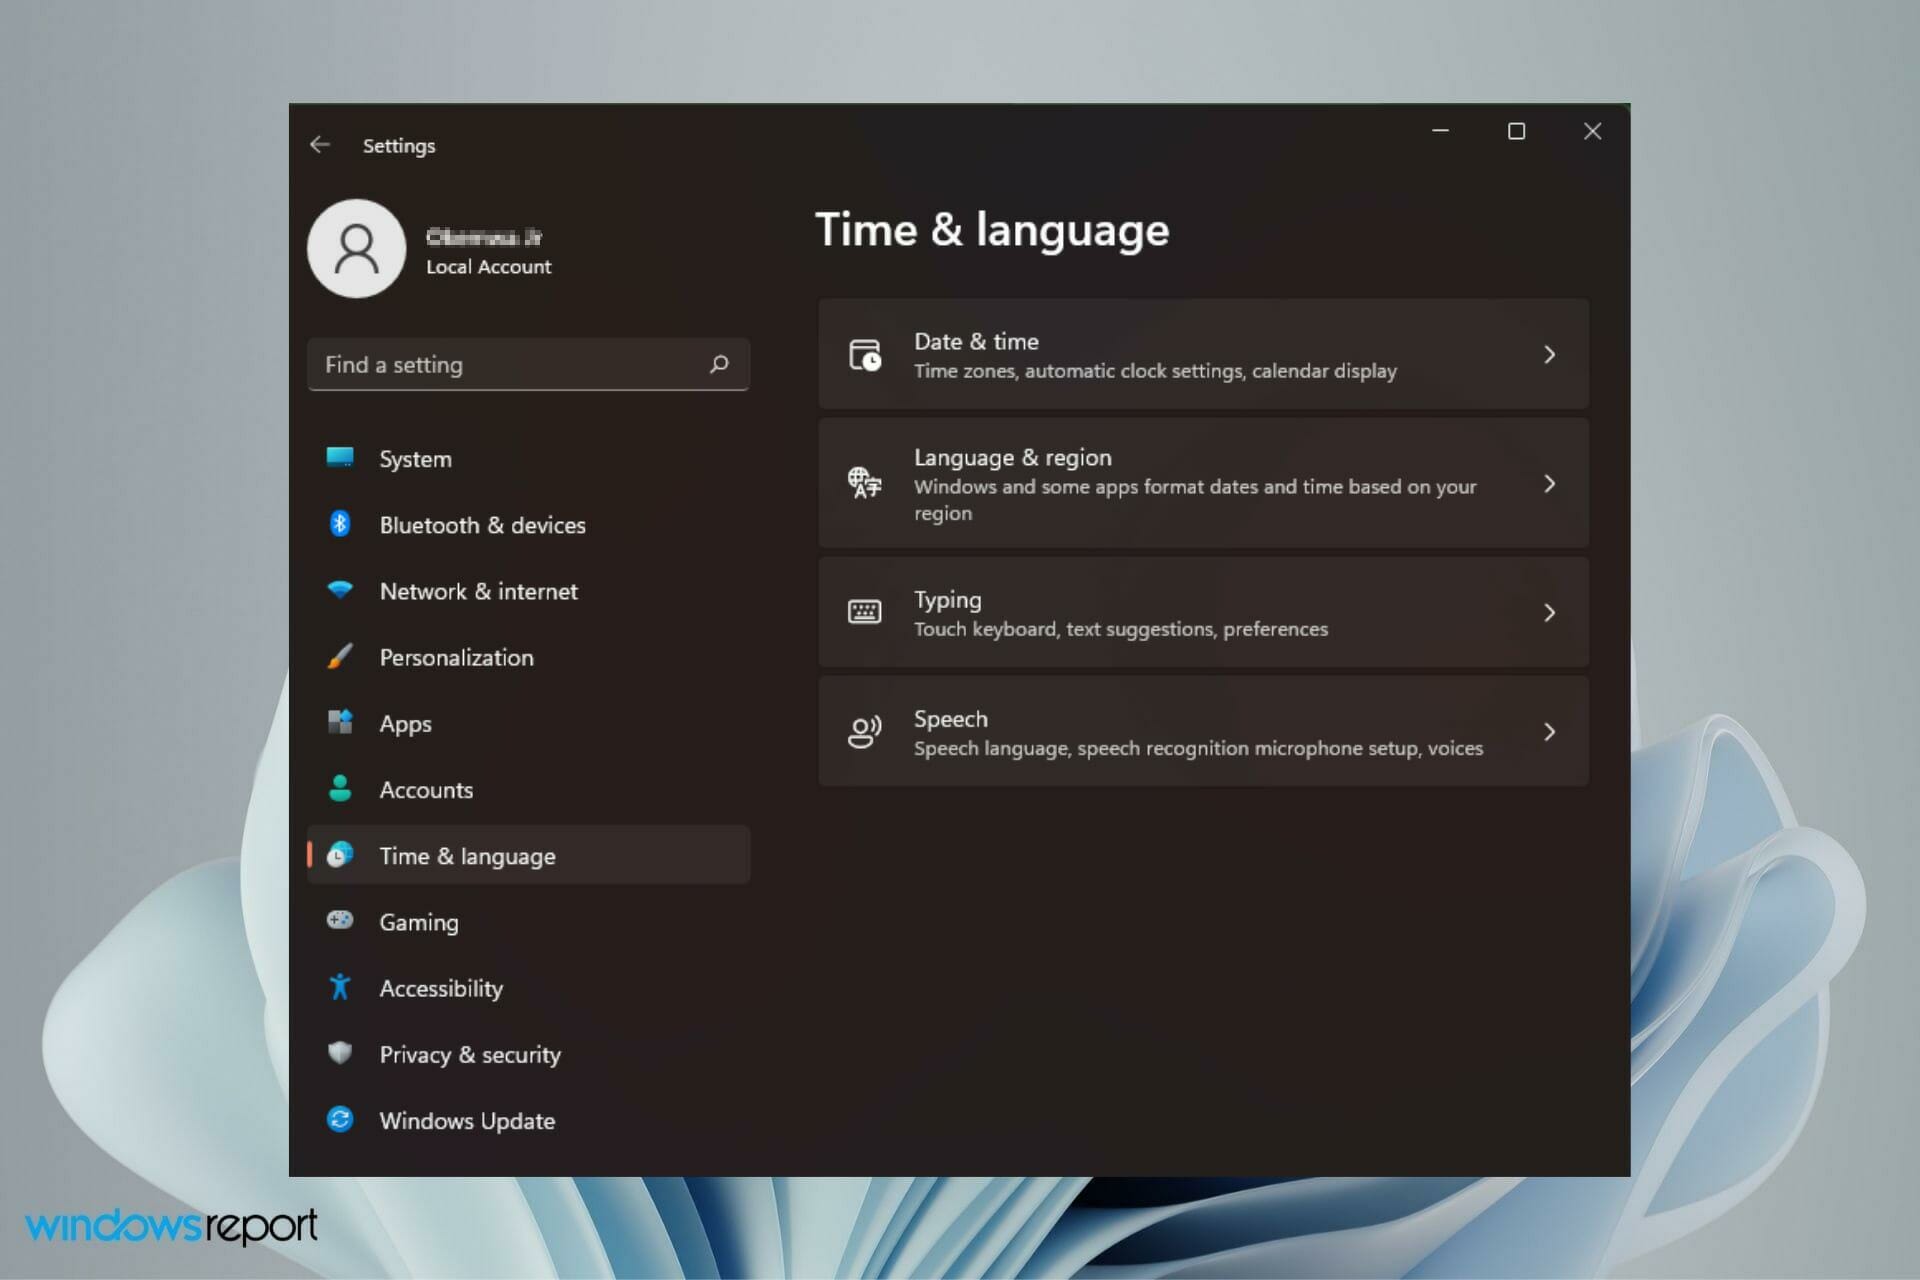
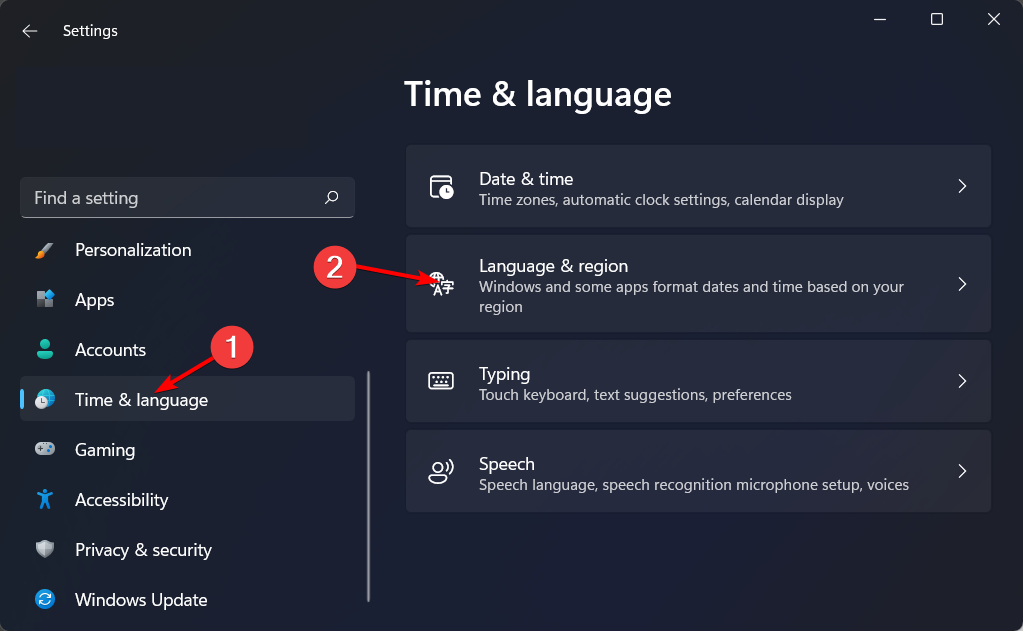
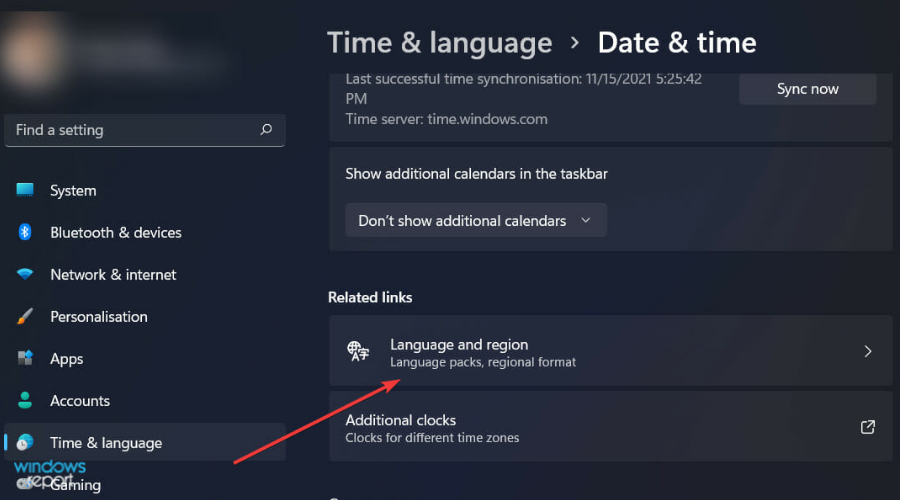
- Press Windows + I in order to open Settings and navigate to Time & language followed by Language & region.

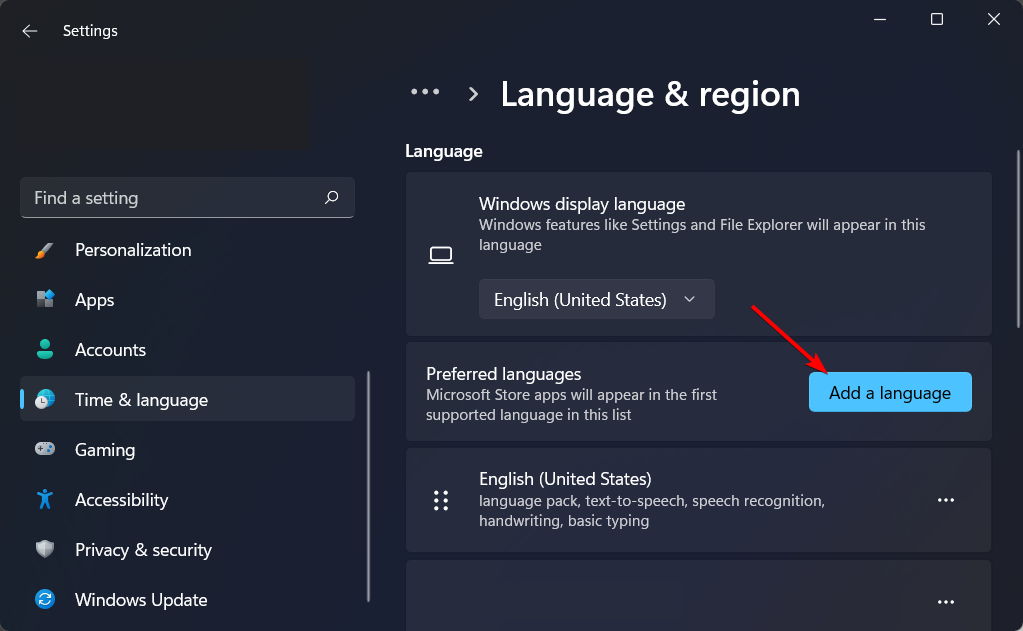
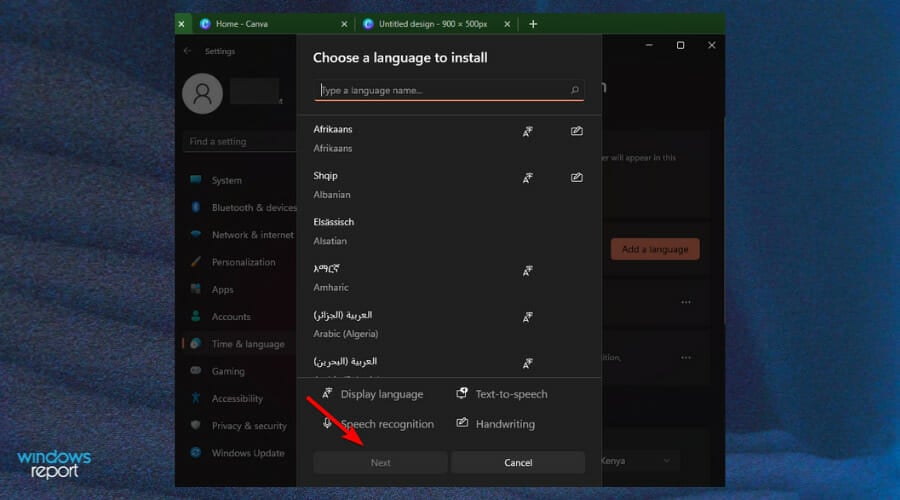
- Next, click on the Add a language button.
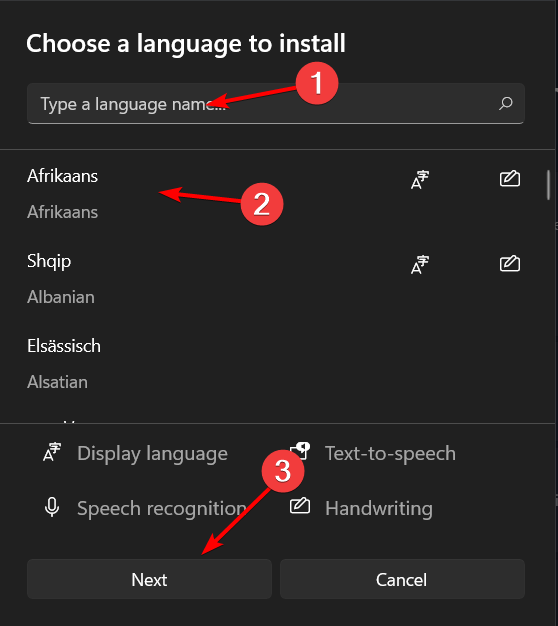
- Now, search for the desired language, click on it and select Next.

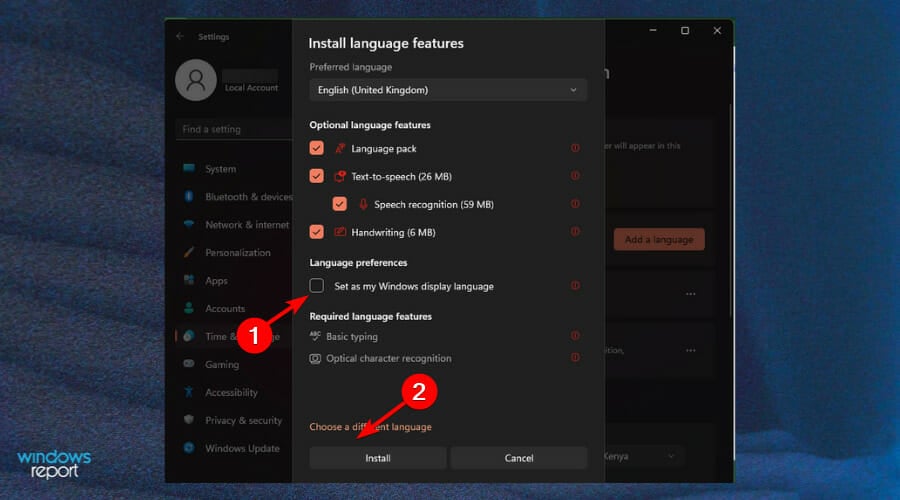
- Check the Set as my Windows display language and select Install.

For related ways in which you can tweak your system, check out our post on how to change display language in Windows 10.
Why can’t I change my Windows display Language?
The inability to change your display language can be a frustrating experience since you need to understand what you are doing on your device. If you can’t maneuver, you can be stuck for a while.
It might seem like a small issue at first glance, but it’s actually pretty important if you want to use your computer in multiple languages.
Some of the reasons you may be unable to change the display language are:
- You don’t have administrator privileges – If your user account doesn’t have administrator privileges, or you are logging in as a guest, you may not be able to make any changes. You need to sign in to your Microsoft account to make any changes.
- Note that you need to enable additional languages for your country/region – You can only change the display language in Windows if you have set multiple languages for your country or region.
- You need to download and install the language pack – The pack contains several languages you can choose from. Without it, you will only be able to access the default language on your device. You can install the language pack and choose one from the list so that you can be able to toggle between languages.
What can I do if I can’t change the display language?
1. Install the language pack
- Press the Windows + I keys to open Settings.

- Select Time & language on the left pane.

- Choose the Language and region option.
- Click the Add a language button.
- Select your preferred language and press Next.
- Check the box for Set as my Windows display language then press Install.
- Restart your PC to effect the changes.

2. Adjust the region settings
- Press the Windows + I keys to open Settings.
- Click on Time & language.
- Click the Language and region page on the right side.
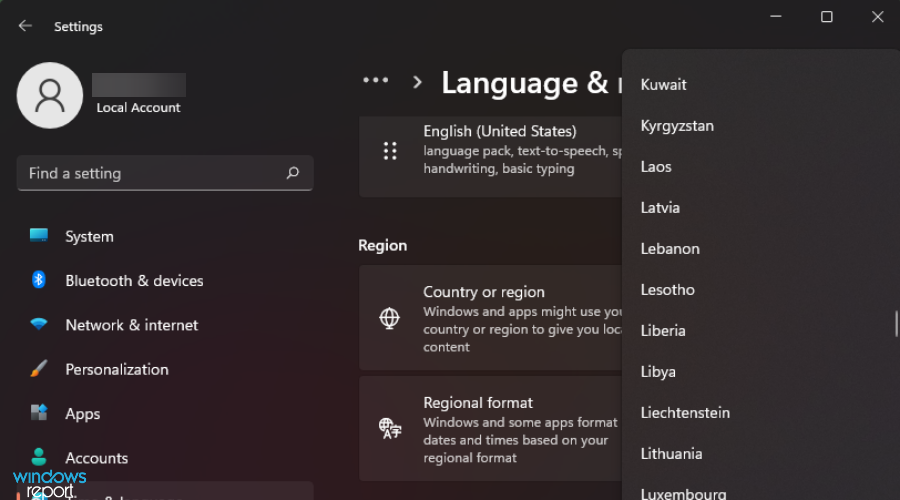
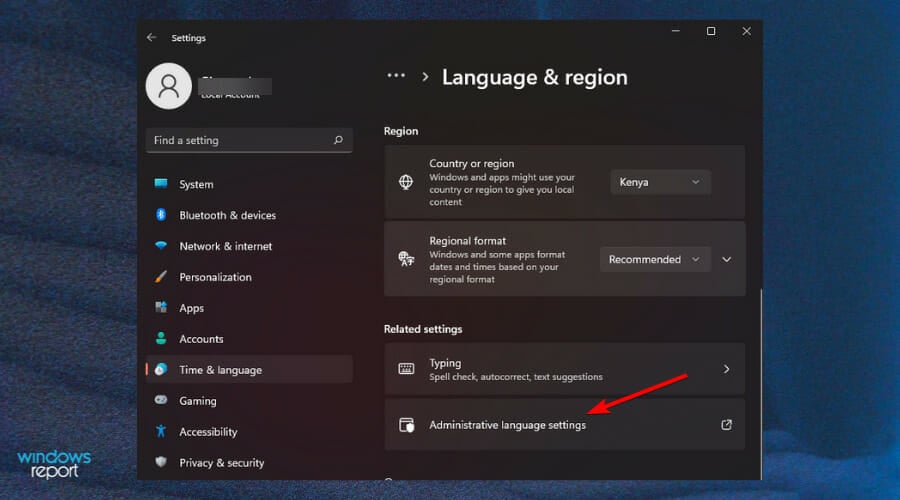
- Under Country or region, update your location if applicable.
- Next, go back to the Administrative language settings.
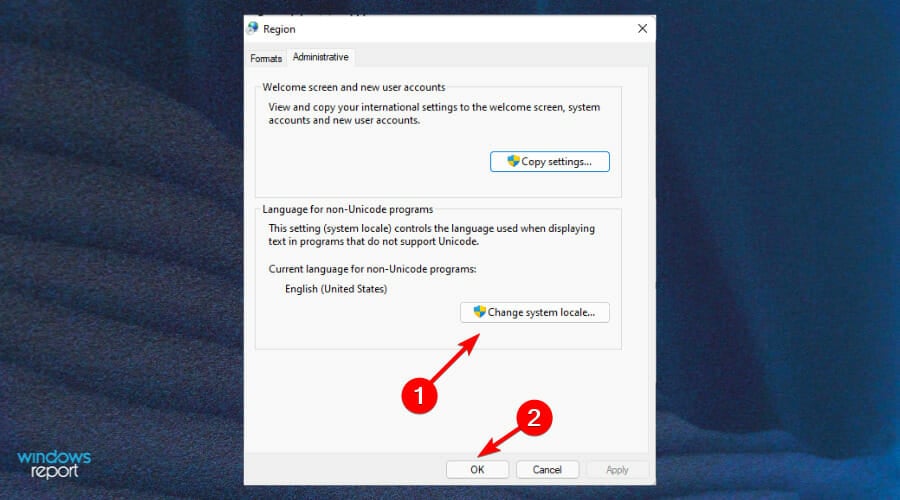
- Select Change system locale button then press OK.
- Specify the new language, check the Beta: Use Unicode UTF-8 for worldwide language support box and then click the OK button.
- Restart your PC and try changing your display language again.

3. Disable sync for language settings
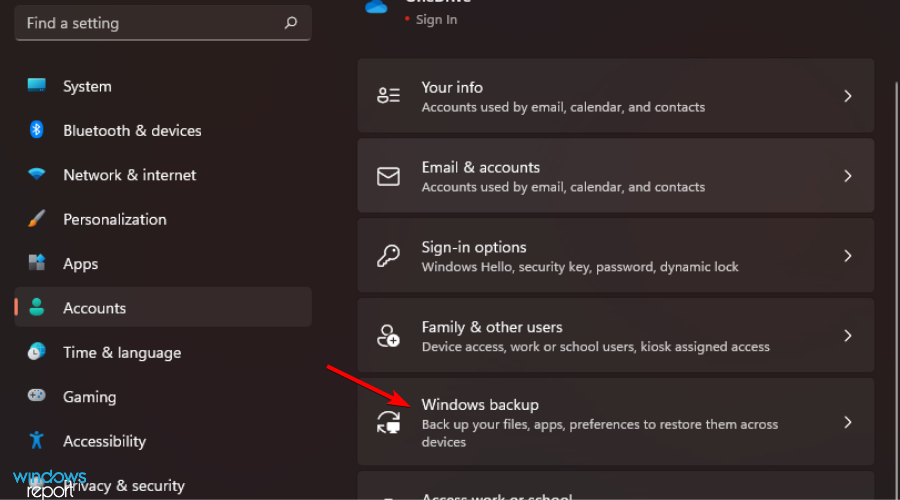
- Press the Windows + I keys to open Settings.
- Click on Accounts.
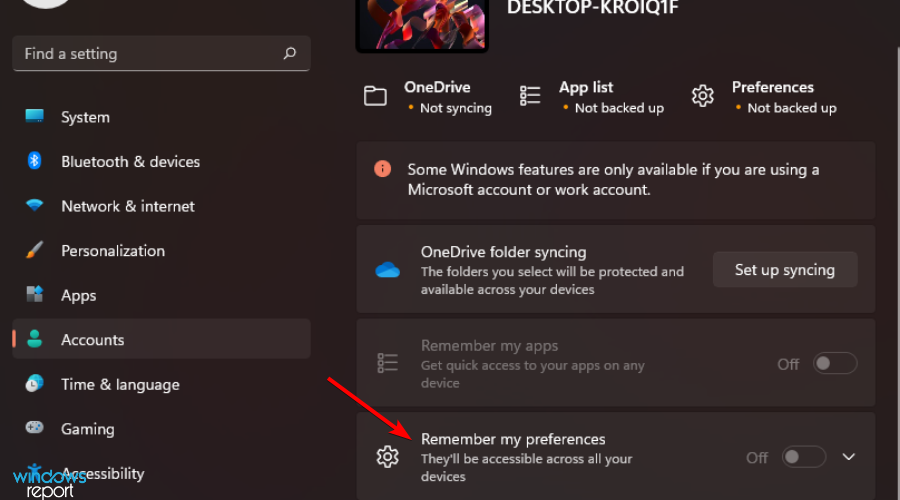
- Click the Windows backup page on the right side.
- Click Remember my preferences and toggle it on.
- Clear the Language preferences option.
- You should now be able to change your display language.

How do I add a display language in Windows 11?
- Hit the Windows key to open Settings.
- Click on Time & language.
- Select Language and region on the right pane.
- Under the Language section, press the Add a language button.
- Select your preferred language from the drop-down list and click Next to install.
How do I add the language bar to my taskbar in Windows 11?
Some PC issues are hard to tackle, especially when it comes to corrupted repositories or missing Windows files. If you are having troubles fixing an error, your system may be partially broken.
We recommend installing Restoro, a tool that will scan your machine and identify what the fault is.
Click here to download and start repairing.
Having the language bar floating on your taskbar is the most efficient way of switching between languages while you’re working on your computer. Once you add it, you’ll be able to change your keyboard layout with a single click instead of navigating through the Control Panel.
To add it to the taskbar, follow the steps below:
- Press the Windows + I keys simultaneously to open Settings.
- Select Time & language.
- Select Typing option on the right pane.
- Click on Advanced keyboard settings option.
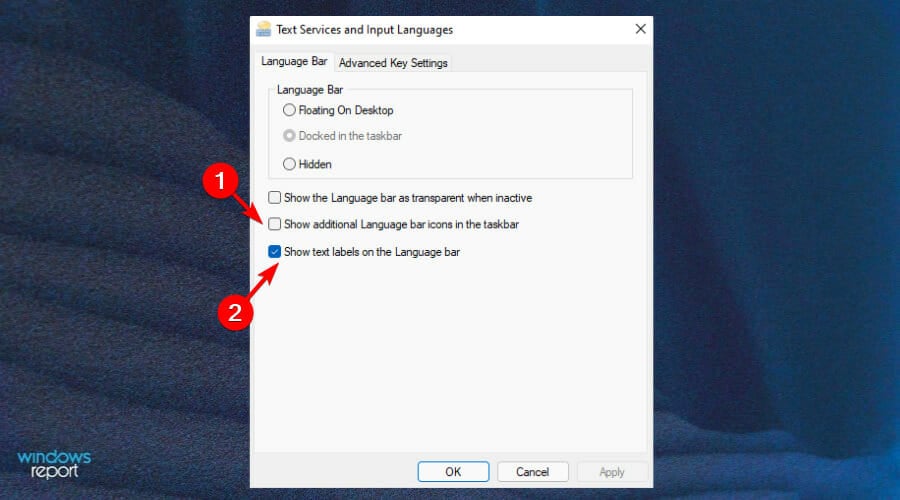
- Check the Use the Desktop language bar when it’s available box and select Language bar options.
- On the Language Bar tab, select Floating On Desktop.
- Also, check the Show additional Language bar icons in the taskbar and Show text labels on the Language bar boxes.
- The language bar should now appear on the taskbar.

How do I change the Welcome screen language in Windows 11?
To change your Welcome screen language, follow the steps below:
- Press the Windows key to open Settings.
- Select Time & language.
- Select Language and region on the right pane.
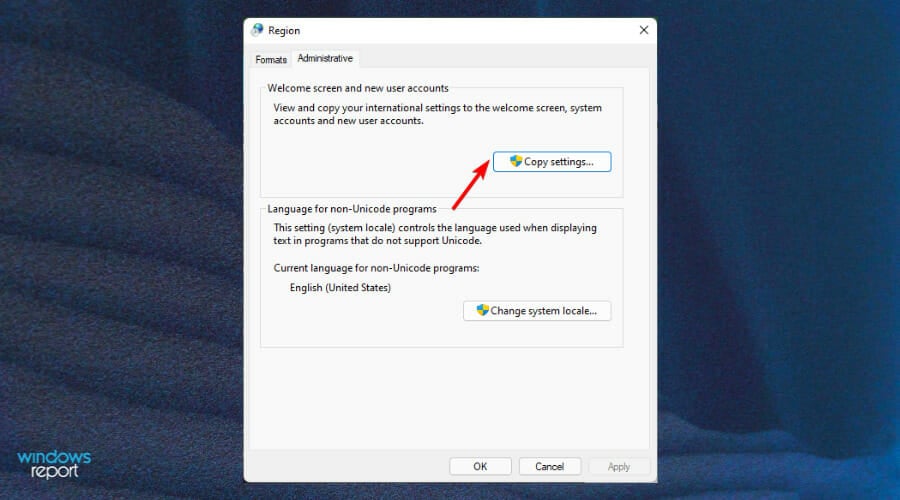
- Scroll down and go to Administrative language settings.
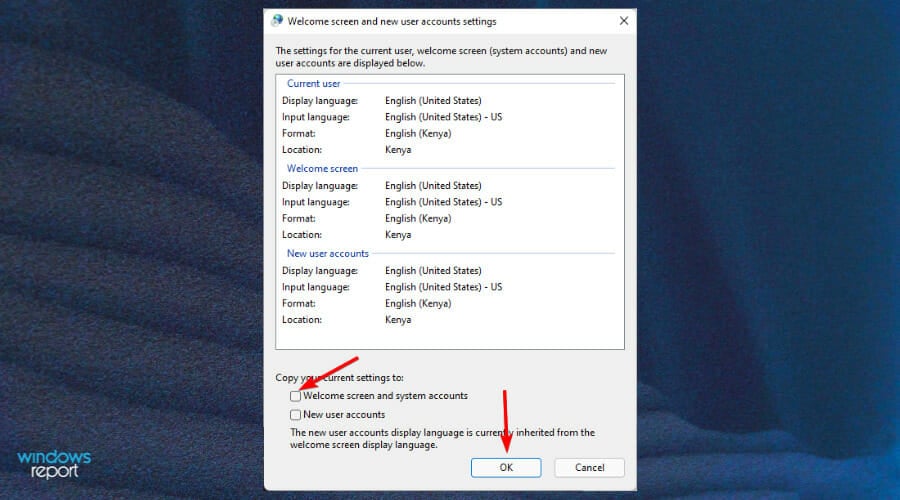
- Under the Administrative tab, select Copy settings.
- Check the Welcome screen and system accounts box, and proceed to saving the changes by clicking OK and restart your computer.
- Your Welcome screen is now changed.

What can I do if my Windows license supports only one display language?
If your edition of Windows is not licensed to support multiple display languages, but you have already added another during installation, you can still keep using that new language pack.
This will give you enough time while you’re evaluating whether you want to purchase a product key that will enable all of its features going forward.
Alternatively, you can refer to our guide on how to fix the language not supported error to easily bypass this issue and prevent it from appearing again.
Once you are ready and have selected your preferred system language, you can proceed to uninstall and install language packs for a fresh start and avoid errors.
Should you experience any difficulties and your language pack does not work, we have an excellent guide to help you solve the problem.
Additionally, your system language is not the only setting you can tweak to select your preferred choice. You can also change your keyboard language.
Although you may rarely need to change your display language, knowing how to will come in handy when you travel to a new region and desperately need to use your PC.
That’s it for this article and we hope you were able to successfully change your system language.
Remember that language packs take up a lot of drive space so you might want to exercise some limitations in installing multiple languages you don’t need.
If you have any further comments, suggestions, or queries on this subject, share in the comment section below.
![]()
Newsletter
by Claire Moraa
Claire likes to think she’s got a knack for solving problems and improving the quality of life for those around her. Driven by the forces of rationality, curiosity,… read more
Updated on January 26, 2023
- Windows allows users to change the text display language which is used in menus and other graphic elements of the system.
- However, it may sometimes happen that you can’t change the display language because of a few limitations.
- This should not worry you because you can easily tweak the settings and select your preferred system language in a few easy steps.
XINSTALL BY CLICKING THE DOWNLOAD FILE
- Download Restoro PC Repair Tool that comes with Patented Technologies (patent available here).
- Click Start Scan to find Windows 11 issues that could be causing PC problems.
- Click Repair All to fix issues affecting your computer’s security and performance
- Restoro has been downloaded by 0 readers this month.
The ability to change the display language of your operating system is useful for people who are multilingual, but it’s also good for users who want to try out other languages or switch from one to another.
To accommodate users around the world, Windows 11 allows you to change such settings.
If a computer comes to you with different language settings, and you travel frequently, it can be useful to set the operating system’s language accordingly whenever you are in a new location.
You can tweak the settings to display a different one, and you may also add more options so that you can switch with ease and get a multilingual experience.
There are several reasons for wanting to change the Windows system language. Maybe you bought a Windows PC on the last trip abroad or over the Internet, and it comes in one that you don’t understand.
Perhaps you have the computer you bought, but now upgrading to a new operating system changes your default system language.
Whatever your reasons, it should be easy to change the Windows 11 display language. However, when you upgrade to the OS, you can encounter an issue where it is not correctly set.
You might see the language change, but it still displays the same that you originally had on your system even after a reboot.
How do I change the display language in Windows 11?
- Press Windows + I in order to open Settings and navigate to Time & language followed by Language & region.
- Next, click on the Add a language button.
- Now, search for the desired language, click on it and select Next.
- Check the Set as my Windows display language and select Install.
For related ways in which you can tweak your system, check out our post on how to change display language in Windows 10.
Why can’t I change my Windows display Language?
The inability to change your display language can be a frustrating experience since you need to understand what you are doing on your device. If you can’t maneuver, you can be stuck for a while.
It might seem like a small issue at first glance, but it’s actually pretty important if you want to use your computer in multiple languages.
Some of the reasons you may be unable to change the display language are:
- You don’t have administrator privileges – If your user account doesn’t have administrator privileges, or you are logging in as a guest, you may not be able to make any changes. You need to sign in to your Microsoft account to make any changes.
- Note that you need to enable additional languages for your country/region – You can only change the display language in Windows if you have set multiple languages for your country or region.
- You need to download and install the language pack – The pack contains several languages you can choose from. Without it, you will only be able to access the default language on your device. You can install the language pack and choose one from the list so that you can be able to toggle between languages.
What can I do if I can’t change the display language?
1. Install the language pack
- Press the Windows + I keys to open Settings.
- Select Time & language on the left pane.
- Choose the Language and region option.
- Click the Add a language button.
- Select your preferred language and press Next.
- Check the box for Set as my Windows display language then press Install.
- Restart your PC to effect the changes.
2. Adjust the region settings
- Press the Windows + I keys to open Settings.
- Click on Time & language.
- Click the Language and region page on the right side.
- Under Country or region, update your location if applicable.
- Next, go back to the Administrative language settings.
- Select Change system locale button then press OK.
- Specify the new language, check the Beta: Use Unicode UTF-8 for worldwide language support box and then click the OK button.
- Restart your PC and try changing your display language again.
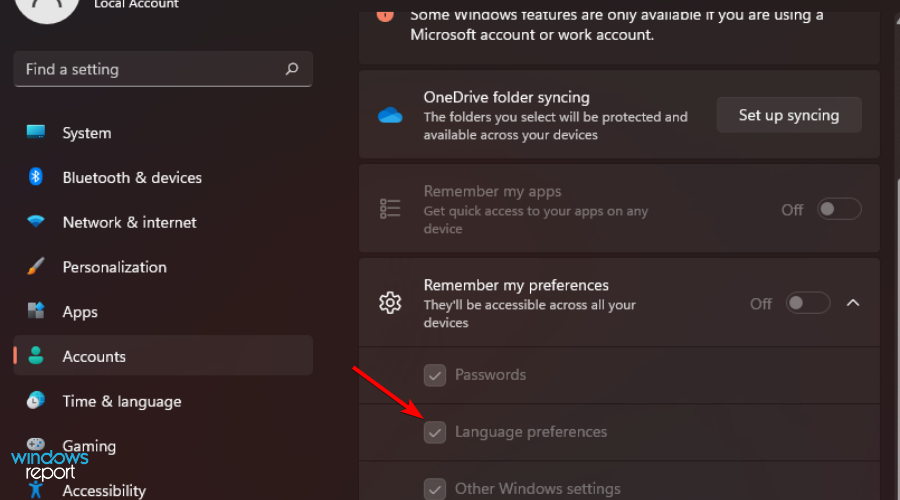
3. Disable sync for language settings
- Press the Windows + I keys to open Settings.
- Click on Accounts.
- Click the Windows backup page on the right side.
- Click Remember my preferences and toggle it on.
- Clear the Language preferences option.
- You should now be able to change your display language.
How do I add a display language in Windows 11?
- Hit the Windows key to open Settings.
- Click on Time & language.
- Select Language and region on the right pane.
- Under the Language section, press the Add a language button.
- Select your preferred language from the drop-down list and click Next to install.
How do I add the language bar to my taskbar in Windows 11?
Some PC issues are hard to tackle, especially when it comes to corrupted repositories or missing Windows files. If you are having troubles fixing an error, your system may be partially broken.
We recommend installing Restoro, a tool that will scan your machine and identify what the fault is.
Click here to download and start repairing.
Having the language bar floating on your taskbar is the most efficient way of switching between languages while you’re working on your computer. Once you add it, you’ll be able to change your keyboard layout with a single click instead of navigating through the Control Panel.
To add it to the taskbar, follow the steps below:
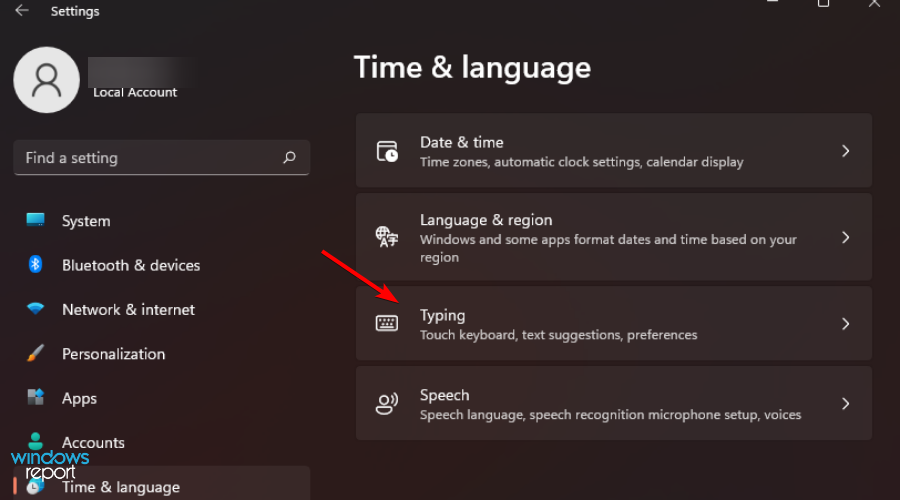
- Press the Windows + I keys simultaneously to open Settings.
- Select Time & language.
- Select Typing option on the right pane.
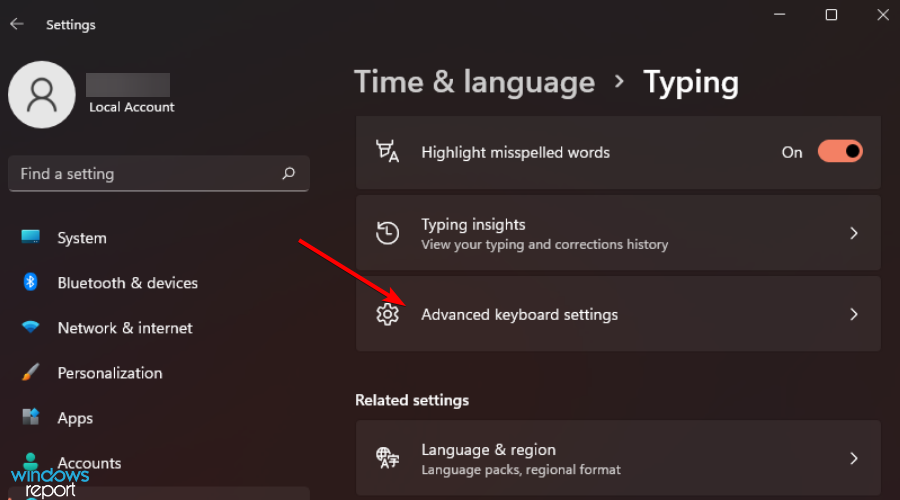
- Click on Advanced keyboard settings option.
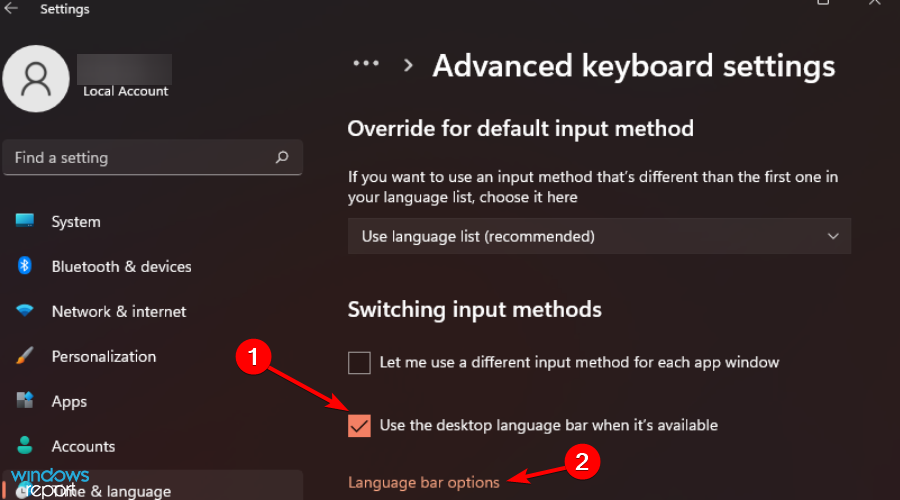
- Check the Use the Desktop language bar when it’s available box and select Language bar options.
- On the Language Bar tab, select Floating On Desktop.
- Also, check the Show additional Language bar icons in the taskbar and Show text labels on the Language bar boxes.
- The language bar should now appear on the taskbar.
How do I change the Welcome screen language in Windows 11?
To change your Welcome screen language, follow the steps below:
- Press the Windows key to open Settings.
- Select Time & language.
- Select Language and region on the right pane.
- Scroll down and go to Administrative language settings.
- Under the Administrative tab, select Copy settings.
- Check the Welcome screen and system accounts box, and proceed to saving the changes by clicking OK and restart your computer.
- Your Welcome screen is now changed.
What can I do if my Windows license supports only one display language?
If your edition of Windows is not licensed to support multiple display languages, but you have already added another during installation, you can still keep using that new language pack.
This will give you enough time while you’re evaluating whether you want to purchase a product key that will enable all of its features going forward.
Alternatively, you can refer to our guide on how to fix the language not supported error to easily bypass this issue and prevent it from appearing again.
Once you are ready and have selected your preferred system language, you can proceed to uninstall and install language packs for a fresh start and avoid errors.
Should you experience any difficulties and your language pack does not work, we have an excellent guide to help you solve the problem.
Additionally, your system language is not the only setting you can tweak to select your preferred choice. You can also change your keyboard language.
Although you may rarely need to change your display language, knowing how to will come in handy when you travel to a new region and desperately need to use your PC.
That’s it for this article and we hope you were able to successfully change your system language.
Remember that language packs take up a lot of drive space so you might want to exercise some limitations in installing multiple languages you don’t need.
If you have any further comments, suggestions, or queries on this subject, share in the comment section below.
![]()
Newsletter
Как поменять язык на компьютере
Варианты для разных операционных систем.

Как поменять язык интерфейса на компьютере с Windows
Настроить язык системы в Windows 10 и 11 можно с помощью панели управления. Для этого действуйте так.
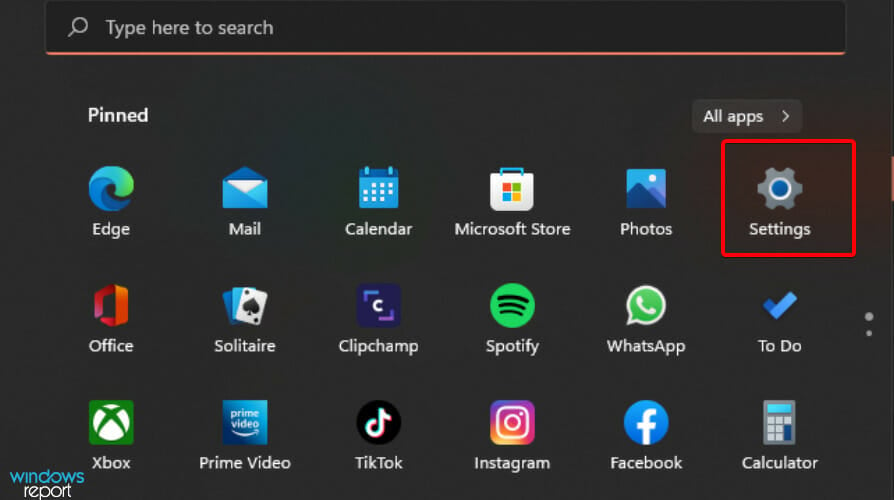
1. Щёлкните правой кнопкой по значку «Пуск». Выберите пункт «Параметры» (Settings).
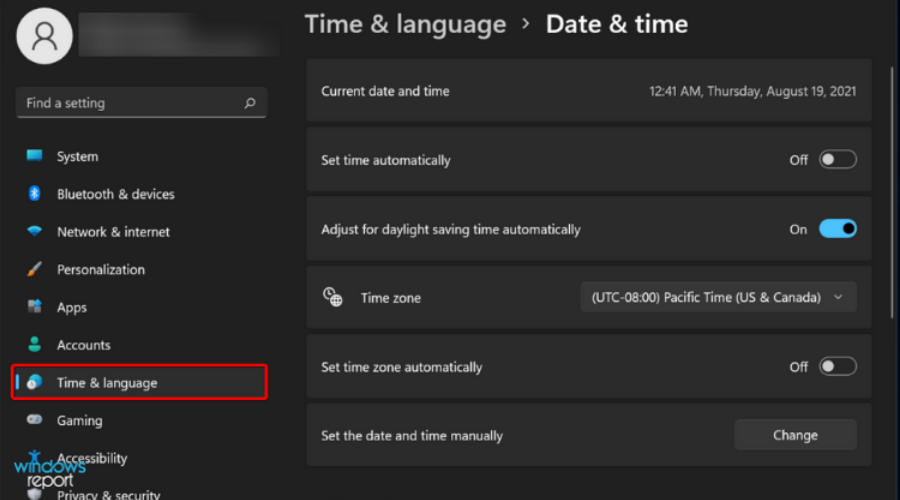
2. В открывшемся меню нажмите «Время и язык» (Time & Language).
3. Щёлкните по вкладке «Язык» (Language) в меню слева.
4. Нажмите «Добавить язык» (Add a language). Эта кнопка со значком «+» находится в нижней части окна, в разделе с доступными языками.
5. Выберите ещё один язык, который будете использовать на компьютере. Нажмите «Далее» (Next).
6. Щёлкните по нужному языку — откроется страница со списком доступных опций. Можно выбрать распознавание рукописного текста, а также перевод речи в текст.
7. Нажмите «Установить» (Install). Новый язык появится в общем списке, все необходимые файлы постепенно загрузятся на компьютер.
8. В пункте «Отображаемый язык интерфейса» (Windows display language) выберите диалект из выпадающего списка.
9. Система предложит перезапустить ваш профиль для применения изменений. Подтвердите действие. Войдите под вашим аккаунтом обратно. Выбранный язык станет основным для всех системных меню, окон и прочих элементов.
Как поменять язык системы на компьютере с macOS
В macOS переключить язык можно в системных настройках. Для этого нужно сделать следующее:
1. На рабочем столе щёлкните по логотипу Apple в верхнем левом углу экрана. Отроется выпадающее меню, в нём выберите «Системные настройки».
2. Далее нажмите на пункт «Язык и регион» со значком в виде флага.
3. Кликните по кнопке «+», которая находится в нижнем левом углу поля «Предпочитаемые языки». Откроется всплывающее окно со списком языков.
4. Выберите в нём нужный и нажмите «Добавить».
5. Подтвердите, что хотите использовать этот язык как основной, когда появится запрос с синей кнопкой.
6. Если после добавления языка решите, что основным всё-таки должен быть другой, то перетащите нужный в начало списка «Предпочитаемые языки». Перезагрузите систему, чтобы изменения вступили в силу.
Как поменять язык системы на компьютере с Linux
Предлагаем вариант настройки через графический интерфейс одной из самых популярных версий Linux — Ubuntu.
1. На рабочем столе щёлкните по области со значками в верхнем правом углу. Из выпадающего меню выберите «Параметры системы» (Settings), далее найдите пункт «Регион и язык» (Region & Language).
2. Кликните по названию языка в пункте «Язык» (Language). Откроется список с установленными в системе языками. Если нужный уже есть, то щёлкните по нему и нажмите кнопку «Выбрать» (Select).
3. Если желаемого варианта нет, то его придётся загрузить. Нажмите на «Управление установленными языками» (Manage Installed Languages), затем — «Установка / удаление языков» (Install / Remove Languages).
4. Выберите нужный язык из списка галочкой и нажмите «Применить» (Apply).
5. После установки добавленный язык появится в списке доступных, выберите его для активации. Перезагрузите систему.
6. После перезапуска Ubuntu предложит переименовать системные папки в соответствии с новым основным языком. Вы можете сохранить старые имена либо подтвердить обновление.
Читайте также 🖥💿⚙️
- Как изменить тип файла в Windows, macOS и Linux
- Как узнать температуру процессора, видеокарты и других частей компьютера
- Как узнать характеристики своего компьютера
- Как выбрать материнскую плату и не разочароваться
- Как настроить в BIOS загрузку с флешки