Visual Studio Code ships by default with English as the display language and other languages rely on Language Pack extensions available from the Marketplace.
VS Code detects the operating system’s UI language and will prompt you to install the appropriate Language Pack, if available on the Marketplace. Below is an example recommending a Simplified Chinese Language Pack:
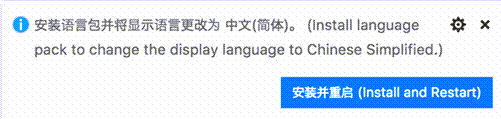
After installing the Language Pack extension and following the prompt to restart, VS Code will use the Language Pack matching your operating system’s UI language.
Note: This topic explains how to change the display language in the VS Code UI via Language Packs such as French or Chinese. If you want to add programming language support, for example for C++ or Java, refer to the Programming Languages section of the documentation.
Changing the Display Language
You can also override the default UI language by explicitly setting the VS Code display language using the Configure Display Language command.
Press ⇧⌘P (Windows, Linux Ctrl+Shift+P) to bring up the Command Palette then start typing «display» to filter and display the Configure Display Language command.

Press Enter and a list of installed languages by locale is displayed, with the current locale highlighted.
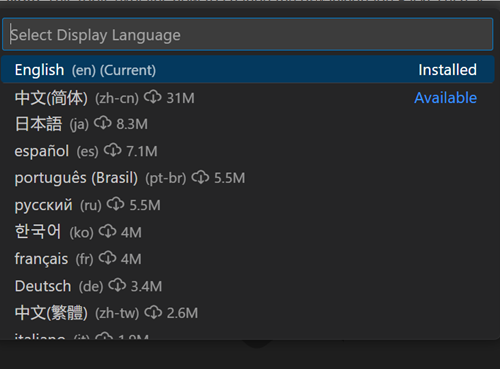
Use the Install additional languages… option to install more Language Packs from the Marketplace, or select a different locale from the list. Changing the locale requires a restart of VS Code. You will be prompted to restart when you select a locale.
The Configure Display Language command writes to the Runtime Configuration Arguments file argv.json in your user VS Code folder (.vscode).
The locale can also be changed by editing the argv.json file directly (Preferences: Configure Runtime Arguments) and restarting VS Code.
Available locales
| Display Language | Locale |
|---|---|
| English (US) | en |
| Simplified Chinese | zh-cn |
| Traditional Chinese | zh-tw |
| French | fr |
| German | de |
| Italian | it |
| Spanish | es |
| Japanese | ja |
| Korean | ko |
| Russian | ru |
| Portuguese (Brazil) | pt-br |
| Turkish | tr |
| Polish | pl |
| Czech | cs |
Marketplace Language Packs
As described above, VS Code ships with English as the default display language, but other languages are available through Marketplace Language Packs.
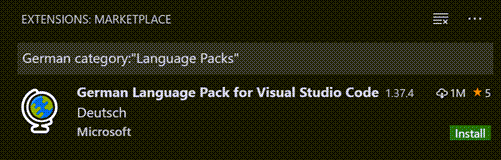
You can search for Language Packs in the Extensions view (⇧⌘X (Windows, Linux Ctrl+Shift+X)) by typing the language you are looking for along with category:"Language Packs".
You can have multiple Language Packs installed and select the current display language with the Configure Display Language command.
Setting the Language
If you want to use a specific language for a VS Code session, you can use the command-line switch --locale to specify a locale when you launch VS Code.
Below is an example of using the --locale command-line switch to set the VS Code display language to French:
code . --locale=fr
Note: You must have the appropriate Language Pack installed for the language you specify with the command-line switch. If the matching Language Pack is not installed, VS Code will display English.
Common questions
Unable to write to file because the file is dirty
This notification may mean that your argv.json file wasn’t saved after a previous change. Check if there are any errors in the file (Preferences: Configure Runtime Arguments), make sure the file is saved, and try to install the Language Pack again.
Can I contribute to a language pack’s translations?
Yes, the Visual Studio Code Community Localization Project is open to anyone, where contributors can provide new translations, vote on existing translations, or suggest process improvements.
How can I enable a programming language like Python?
Refer to the Programming Languages section to learn how to install support for programming languages, such as PHP, Python, and Java.
2/2/2023
How to change UI language in Visual Studio Code (1.0 released April 2016)?
asked Apr 26, 2016 at 14:45
![]()
Paul VerestPaul Verest
58.4k47 gold badges197 silver badges323 bronze badges
- Open VScode
- Press F1 and type ‘display’
- Choose ‘Configure display language’
- Select your language. On top are installed languages, below are other languages. The one you select will be installed as an extension.
- Accept to restart.
- you can see that the language you choose has been added to the extensions by selecting ‘extension’ icon on the left toolbar (look for ‘xxx language Pack’)
More info Here
Previous original answer (for older vscode):
- Open VSCode
- Press F1 and type ‘language’
- Choose «Configure language» in the menu
- Change the ‘locale’ value. See ‘here’ for available languages.
Example: "locale":"en-US"
- Save
- Restart vscode
answered Apr 27, 2016 at 8:16
![]()
Eric Bole-FeysotEric Bole-Feysot
13.3k7 gold badges45 silver badges51 bronze badges
6
Since my Chinese (or whatever language this is in your screenshot) is pretty bad I describe how to set the display language to american English without using VSCode.
- Close VSCode
-
Open the file locale.json with a text editor (I suggest not to use VSCode).
On Windows the file is located under
C:UsersUserNameAppDataRoamingCodeUserOn Linux it’s under
$HOME/.config/Code/UserOn a Mac it’s under
$HOME/Library/Application Support/Code/User -
Change the file content to
{ "locale":"en-US" } - Open VSCode again
answered Apr 26, 2016 at 15:27
![]()
3
See «Display Language» https://code.visualstudio.com/docs/getstarted/locales
I had trouble with this and the answer from Eric Bole-Feysot did not help as it is missing an important step.
- Open VS Code
- Press F1
- Type «configure display language»
- Select «configure display language» from the options displayed beneath the inputbox
- Change JSON to
"locale": "en-US"
- Close window and be prompted to save.
- Re-start VS code

Hope that helps.
![]()
Paul Verest
58.4k47 gold badges197 silver badges323 bronze badges
answered Jun 12, 2018 at 14:27
![]()
KyloRenKyloRen
2,6805 gold badges28 silver badges57 bronze badges
1
For Windows user,
Go to following folder,
C:UsersUserNameAppDataRoamingCodeUser
Edit locale.json or create it, if not exist with following content
{
 "locale":"en"
}
Supported locales can be found in the following links
https://go.microsoft.com/fwlink/?LinkId=761051
Cheers
answered Feb 3, 2018 at 6:42
![]()
HongsoogHongsoog
4833 silver badges9 bronze badges
- Preferences->Extension
- search «LanguageName Language Pack»
(example) «English Language Pack» - Install
answered Nov 10, 2018 at 5:01
![]()
1
Please refer to VSCode Display Language.
- Change language for temporary folder
click: File->Preferences->Settings, User seting json file will open and add » «locale»=»en» «, save the file and restart.
Or you can use a command: >>> code . —locale=[lang] (lang refer to language code)
- Permanently change language
Press Ctrl+Shift+P to bring up the Command Palette then start typing «config» to filter and display the Configure Language command. Add » «locale»=»en» » into the Jason file, save and restart
answered May 6, 2017 at 6:35
![]()
In Visual Studio Community for Mac 7.0 go to
Settings->Visual Style->User Interface Language
answered May 19, 2017 at 9:21
![]()
Ralf HundewadtRalf Hundewadt
1,0381 gold badge13 silver badges24 bronze badges
For mac OS user:
At $home/Library/Application Support/Code/User,
create a new file with name «locale.json» (it wasn’t there for me), and type:
{
  "locale": "en-US"
}
Worked for me. The latter part is the same to others’ answer I guess, just there wasn’t «locale.json» for me so I tried creating it myself, found it worked.
answered Jun 6, 2018 at 12:50
![]()
As a Ubuntu user, the only option that seemed available to me was to start Visual Studio Code at the command line, explicitly specifying the language:
code --locale en
(The interface had been in French, due to the language I’d applied for my operating system. I’m trying to learn French, but having VSCode in French was a bit much, I still need to earn money writing software 😛)
https://code.visualstudio.com/docs/getstarted/locales
answered Jun 18, 2022 at 19:54
![]()
kokocielkokociel
4698 silver badges17 bronze badges
| Order | Area | TOCTitle | PageTitle | ContentId | DateApproved | MetaDescription |
|---|---|---|---|---|---|---|
|
8 |
getstarted |
Display Language |
Visual Studio Code Display Language (Locale) |
413A7FA3-94F8-4FCB-A4A3-F4C1E77EF716 |
2/2/2023 |
How to change the display language (locale) of Visual Studio Code. |
Display Language
Visual Studio Code ships by default with English as the display language and other languages rely on Language Pack extensions available from the Marketplace.
VS Code detects the operating system’s UI language and will prompt you to install the appropriate Language Pack, if available on the Marketplace. Below is an example recommending a Simplified Chinese Language Pack:

After installing the Language Pack extension and following the prompt to restart, VS Code will use the Language Pack matching your operating system’s UI language.
Note: This topic explains how to change the display language in the VS Code UI via Language Packs such as French or Chinese. If you want to add programming language support, for example for C++ or Java, refer to the Programming Languages section of the documentation.
Changing the Display Language
You can also override the default UI language by explicitly setting the VS Code display language using the Configure Display Language command.
Press kb(workbench.action.showCommands) to bring up the Command Palette then start typing «display» to filter and display the Configure Display Language command.

Press kbstyle(Enter) and a list of installed languages by locale is displayed, with the current locale highlighted.

Use the Install additional languages… option to install more Language Packs from the Marketplace, or select a different locale from the list. Changing the locale requires a restart of VS Code. You will be prompted to restart when you select a locale.
The Configure Display Language command writes to the Runtime Configuration Arguments file argv.json in your user VS Code folder (.vscode).
The locale can also be changed by editing the argv.json file directly (Preferences: Configure Runtime Arguments) and restarting VS Code.
Available locales
| Display Language | Locale |
|---|---|
| English (US) | en |
| Simplified Chinese | zh-cn |
| Traditional Chinese | zh-tw |
| French | fr |
| German | de |
| Italian | it |
| Spanish | es |
| Japanese | ja |
| Korean | ko |
| Russian | ru |
| Portuguese (Brazil) | pt-br |
| Turkish | tr |
| Polish | pl |
| Czech | cs |
Marketplace Language Packs
As described above, VS Code ships with English as the default display language, but other languages are available through Marketplace Language Packs.
You can search for Language Packs in the Extensions view (kb(workbench.view.extensions)) by typing the language you are looking for along with category:"Language Packs".

You can have multiple Language Packs installed and select the current display language with the Configure Display Language command.
Setting the Language
If you want to use a specific language for a VS Code session, you can use the command-line switch --locale to specify a locale when you launch VS Code.
Below is an example of using the --locale command-line switch to set the VS Code display language to French:
Note: You must have the appropriate Language Pack installed for the language you specify with the command-line switch. If the matching Language Pack is not installed, VS Code will display English.
Common questions
Unable to write to file because the file is dirty
This notification may mean that your argv.json file wasn’t saved after a previous change. Check if there are any errors in the file (Preferences: Configure Runtime Arguments), make sure the file is saved, and try to install the Language Pack again.
Can I contribute to a language pack’s translations?
Yes, the Visual Studio Code Community Localization Project is open to anyone, where contributors can provide new translations, vote on existing translations, or suggest process improvements.
How can I enable a programming language like Python?
Refer to the Programming Languages section to learn how to install support for programming languages, such as PHP, Python, and Java.
| Order | Area | TOCTitle | PageTitle | ContentId | DateApproved | MetaDescription |
|---|---|---|---|---|---|---|
|
8 |
getstarted |
Display Language |
Visual Studio Code Display Language (Locale) |
413A7FA3-94F8-4FCB-A4A3-F4C1E77EF716 |
2/2/2023 |
How to change the display language (locale) of Visual Studio Code. |
Display Language
Visual Studio Code ships by default with English as the display language and other languages rely on Language Pack extensions available from the Marketplace.
VS Code detects the operating system’s UI language and will prompt you to install the appropriate Language Pack, if available on the Marketplace. Below is an example recommending a Simplified Chinese Language Pack:
After installing the Language Pack extension and following the prompt to restart, VS Code will use the Language Pack matching your operating system’s UI language.
Note: This topic explains how to change the display language in the VS Code UI via Language Packs such as French or Chinese. If you want to add programming language support, for example for C++ or Java, refer to the Programming Languages section of the documentation.
Changing the Display Language
You can also override the default UI language by explicitly setting the VS Code display language using the Configure Display Language command.
Press kb(workbench.action.showCommands) to bring up the Command Palette then start typing «display» to filter and display the Configure Display Language command.
Press kbstyle(Enter) and a list of installed languages by locale is displayed, with the current locale highlighted.
Use the Install additional languages… option to install more Language Packs from the Marketplace, or select a different locale from the list. Changing the locale requires a restart of VS Code. You will be prompted to restart when you select a locale.
The Configure Display Language command writes to the Runtime Configuration Arguments file argv.json in your user VS Code folder (.vscode).
The locale can also be changed by editing the argv.json file directly (Preferences: Configure Runtime Arguments) and restarting VS Code.
Available locales
| Display Language | Locale |
|---|---|
| English (US) | en |
| Simplified Chinese | zh-cn |
| Traditional Chinese | zh-tw |
| French | fr |
| German | de |
| Italian | it |
| Spanish | es |
| Japanese | ja |
| Korean | ko |
| Russian | ru |
| Portuguese (Brazil) | pt-br |
| Turkish | tr |
| Polish | pl |
| Czech | cs |
Marketplace Language Packs
As described above, VS Code ships with English as the default display language, but other languages are available through Marketplace Language Packs.
You can search for Language Packs in the Extensions view (kb(workbench.view.extensions)) by typing the language you are looking for along with category:"Language Packs".
You can have multiple Language Packs installed and select the current display language with the Configure Display Language command.
Setting the Language
If you want to use a specific language for a VS Code session, you can use the command-line switch --locale to specify a locale when you launch VS Code.
Below is an example of using the --locale command-line switch to set the VS Code display language to French:
Note: You must have the appropriate Language Pack installed for the language you specify with the command-line switch. If the matching Language Pack is not installed, VS Code will display English.
Common questions
Unable to write to file because the file is dirty
This notification may mean that your argv.json file wasn’t saved after a previous change. Check if there are any errors in the file (Preferences: Configure Runtime Arguments), make sure the file is saved, and try to install the Language Pack again.
Can I contribute to a language pack’s translations?
Yes, the Visual Studio Code Community Localization Project is open to anyone, where contributors can provide new translations, vote on existing translations, or suggest process improvements.
How can I enable a programming language like Python?
Refer to the Programming Languages section to learn how to install support for programming languages, such as PHP, Python, and Java.
Недавно мы беседовали с Анной Леоновой о её пути в программировании. Аня пишет код в редакторе Visual Studio Code и сегодня поделится своими настройками. Вы узнаете, как установить программу и подготовить её для комфортной работы.
Статья для тех, кто только знакомится с программированием и ищет мощный бесплатный редактор — такой, чтобы один раз установить и много лет не менять.
Что за Visual Studio Code?
Это популярная бесплатная программа для разработчиков, которая помогает писать код. Например:
- Знает синтаксис разных языков программирования и помогает вам не ошибиться в точке с запятой или скобочке.
- Сама подставляет некоторые распространённые фрагменты кода.
- Помнит названия ваших переменных и подсказывает их, чтобы не было ошибок.
- Умеет загружать ваш код на Гит.
- Помогает отлаживать код.
- Поддерживает плагины, которые превращают её в мегакомбайн для разработчика.
VSCode — один из самых популярных редакторов кода, потому что он бесплатный и открытый, его можно сделать каким угодно под свои задачи. Есть и другие: например, Sublime Text или продукты компании JetBrains.
👉 Помните, что не редактор делает ваш код крутым, а ваши собственные знания алгоритмов, типов данных и возможностей языка. Хороший программист напишет хороший код хоть на салфетке, а плохому не поможет даже самый навороченный софт.
Установка
Перейдите на code.visualstudio.com и скачайте актуальную версию редактора под свою операционную систему — есть поддержка для Linux, Windows и Mac OS. Далее просто следуйте командам программы-загрузчика и откройте редактор.

Перед знакомством с интерфейсом вернитесь на официальный сайт и добавьте в закладки страницу с документацией — Docs. Документацию рекомендуем изучить всю сразу до начала работы с проектом. Если не получится — постепенно в свободное время. Документация — это инструкция к инструменту. Если вы хорошо изучите возможности VS Code, то сможете его полностью настроить и оформить под себя.
❌ Новички часто выбирают редактор методом тыка: скачивают несколько программ, визуально оценивают их интерфейс и начинают работать там, где им кажется удобнее или красивее. Редко бывает так, что программиста устраивает стандартный интерфейс и настройки — новички в этом случае прыгают между разными редакторами, сравнивают их базовые возможности и теряют время.
✅ Выбирайте редактор, который можно как угодно изменять и настраивать. Нравится внешний вид Sublime Text, но не хватает мощи VS Code — нет проблем: находите тему, меняете шрифт, добавляете пару расширений и готово. Чтобы быстро освоить VS Code, изучайте интерфейс по документации.
Настройка
VS Code готов к работе сразу после установки — в него по умолчанию добавлено большинство плагинов для веб-разработки. Можно сразу загрузить проект или начать программировать в новом файле. Нужно только привыкнуть к интерфейсу.
Если вы раньше пользовались другим редактором и не удалили его с компьютера, то VS Code автоматически предложит перенести сохранённые настройки. Для переноса вам достаточно кликнуть на всплывающую подсказку и перезагрузить VS Code — переносятся плагины, расширения и установленные горячие клавиши.
Если у вас ещё не было кодового редактора, то ниже мы рассмотрим несколько базовых настроек, которые помогут персонализировать интерфейс VS Code.
Устанавливаем русский язык. На левой боковой панели нажмите Extensios и в строке поиска напишите Russian Language Pack — это языковой пакет, который адаптирует VS Code под русский язык. Выберите расширения, кликните Install и перезапустите редактор. У вас должен открыться русифицированный интерфейс.

Если после перезагрузки язык не изменился — на левой боковой панели нажмите значок шестерёнки и выберите раздел Command Palette. Появится строка поиска: напишите Display, выберите команду Configure Display Language и нажмите Enter. Смените язык с английского на русский и повторно перезагрузите редактор.

Меняем цветовую тему. В левой боковой панели нажмите на значок шестерёнки, перейдите в раздел «Цветовая тема» и выберите тему, встроенную в редактор.
Если ничего не нравится — установите любую внешнюю тему, которую получится найти в интернете. Если тема совместима с VS Code, то после скачивания она сама откроется в редакторе и вам достаточно нажать «Установить». Начать поиск рекомендуем с официального маркетплейса, где собраны тысячи бесплатных тем.

Добавляем любимый шрифт. В боковой панели нажмите на шестерёнку, выберите раздел «Параметры» → «Текстовый редактор» → «Шрифт». Перед вами будет вкладка Font Family, в которую нужно вписать название выбранного шрифта — если этот шрифт скачан или сохранён в операционной системе, то он сразу отобразится в редакторе. Здесь же можно изменить размер и жирность шрифта.

Включаем автосохранение. В боковой панели выберите шестерёнку, перейдите в «Параметры» → «Текстовый редактор» → «Файлы». Вы увидите вкладку Auto Save, в которой нужно указать период сохранения файлов. Мы рекомендуем режим afterDelay с задержкой в одну секунду — так вы будете сразу сохранять всё, что запишете. Если вы выберете режим onFocusChange, то изменения в рабочем файле будут сохраняться каждый раз, когда вы будете открывать другие вкладки редактора. В режиме onWindowChange изменения происходят сразу после того, когда вы сворачиваете VS Code и открываете окна других программ.

Горячие клавиши
Горячие клавиши — это помощник программиста и инструмент для быстрого выполнения рутинных задач. Предположим, нам нужно создать новый HTML-файл и написать его структуру. Без горячих клавиш этот процесс выглядит так:
- Переходим в меню и открываем вкладку «Файл».
- Выбираем команду «Новый файл».
- Возвращаемся в меню и повторно открываем вкладку «Файл».
- Находим команду «Сохранить как».
- Пишем название файла, выбираем место хранение, указываем расширение (HTML) и нажимаем кнопку «Сохранить».
- Вручную прописываем скелет HTML-документа или тратим время, чтобы найти и скопировать структуру из интернета.
Мы превратили простую задачу в многоэтапный процесс, где нужно постоянно отрывать руки от клавиатуры, хвататься за мышку и искать нужные команды в выпадающем списке. Теперь посмотрим, как это же действие можно выполнить с помощью горячих клавиш. Для примера мы используем Mac OS — в других системах горячие клавиши будут немного отличаться, но сути это не меняет:
- Command + N — создаём новый файл.
- Shift + Command + S — включаем команду «Сохранить как».
- Пишем название файла, выбираем место хранения, указываем расширение (HTML) и нажимаем кнопку «Сохранить».
- ! + tab — создаём структуру HTML-документа и можем работать.
С горячими клавишами мы сократили количество рутинных действий и быстро выполнили простую задачу — создали HTML-файл и написали структуру. В случае с объёмными проектами горячие клавиши помогают сэкономить часы работы.
В VS Code под горячие клавиши запрограммированы все команды. За один раз их не выучить, да и не нужно — понаблюдайте за своим рабочим процессом и выберите одну команду, которую вы выполняете чаще остальных. Посмотрите, какие горячие клавиши помогают автоматизировать процесс — выпишите эти клавиши и попробуйте применить. Когда привыкнете — выберите другую команду, и так до тех пор, пока не научитесь выполнять большинство действий без мышки и меню.
Для просмотра всех горячих клавиш нажмите в боковой панели на шестерёнку и выберите раздел «Сочетания клавиш». Или воспользуйтесь горячими клавишами и нажмите Command + K + Command + S. Перед вами появится длинный список с названием команд и комбинацией кнопок, которые установлены по умолчанию — любую команду можно перепрограммировать или найти с помощью поисковика.
Что дальше
А дальше прочитайте нашу статью про Vim и подключите его к своему VSCode 🙂
Иллюстратор:
Даня Берковский