I have looked at several other questions but I can’t seem to figure any of them out, so here is my problem: I would like to have a div or a span, when you hover over it an area would appear and would be like a drop down.
Such as I have an div, and I want to hover over it and have it show some info about the item I hovered over
<html>
<head>
<title>Question1</title>
<styles type="css/text">

  #cheetah {
      background-color: red;
      color: yellow;
      text-align: center;
  }

  a {
      color: blue;
  }

  #hidden {
      background-color: black;
   }

   a:hover > #hidden {
      background-color: orange;
      color: orange;
  }
</styles>

</head>
<body>
  <div id="cheetah">
     <p><a href="#">Cheetah</a></p>
  </div>
  <div id="hidden">
     <p>A cheetah is a land mammal that can run up 2 60mph!!!</p>
  </div>
</body>
</html>
But this ^ doesn’t seem to work, I don’t know why… and if there is a way to do that in CSS, I would like to know, but I want any and all suggestions.
![]()
asked Dec 23, 2011 at 9:43
![]()
2
You can achieve this in CSS only if the hidden div is a child of the element you use for hovering:
http://jsfiddle.net/LgKkU/
answered Dec 23, 2011 at 9:52
![]()
ptriekptriek
8,9304 gold badges31 silver badges29 bronze badges
You cannot affect a non-child element using :hover from within CSS2, which is supported by all common browsers.
You can affect a sibling element using CSS2.1 selectors, like so:
a:hover + .sibling { ... }
However, this only works for direct siblings. This means you could have HTML like this:
<p><a href="#">Cheetah</a> <span class="sibling">Blah Blah Blah</span></p>
Notice that the a and the span are direct siblings.
Here’s a fiddle showing the siblings working: http://jsfiddle.net/vUUxp/
However, not all browsers support the CSS2.1 sibling selectors, so you need to decide based on your target audience if you can use this or not.
Edit: Corrected my mistake on the CSS version for the + selector: it’s 2.1 that defines it, not CSS3. I also added a link showing browser support. Otherwise, the answer is the same.
answered Dec 23, 2011 at 9:55
![]()
OverZealousOverZealous
39.1k15 gold badges97 silver badges100 bronze badges
1
Or, if you’re open to it, use jQuery.
Something like this would work:
$("#element") // select your element (supports CSS selectors)
    .hover(function(){ // trigger the mouseover event
        $("#otherElement") // select the element to show (can be anywhere)
            .show(); // show the element
    }, function(){ // trigger the mouseout event
        $("#otherElement") // select the same element
            .hide(); // hide it
    });
And remember to wrap this in a DOM ready function ($(function(){...}); or $(document).ready(function(){...});).
answered Dec 23, 2011 at 9:56
![]()
PuragPurag
16.9k4 gold badges53 silver badges74 bronze badges
You can absolutely do this in CSS3 now using the ~ adjacent sibling selector.
triggerSelector:hover ~ targetSelector {
    display: block;
}
For example, if you want a tooltip to appear when hovering over an adjacent button:
.button:hover ~ .tooltip {
    display: block;
}
answered Nov 6, 2018 at 0:17
![]()
brandonscriptbrandonscript
66.4k30 gold badges157 silver badges216 bronze badges
Improve Article
Save Article
Improve Article
Save Article
In this article, we will see how to affect other elements when one element has hovered using CSS. if we define 2 HTML elements where we want to hover over one element & at the same moment want to change the style of another element then both the elements should be directly related as either parent-child or sibling, which indicates either one element must be inside another element or both elements should be within the same target element so that the hover effect can be seen. Hover is used to add styling to the elements when the mouse hovers over them, i.e. when you place your cursor over the element then some text will appear which tells you about the functionality of that element. It is generally used for navigation when the UI of any website or software is complex.
Approach: This task can be accomplished by adding one element inside the other element & accordingly declaring the required CSS properties for the parent-child elements, so that whenever hovering outside the element then automatically the property of the inner element will change.
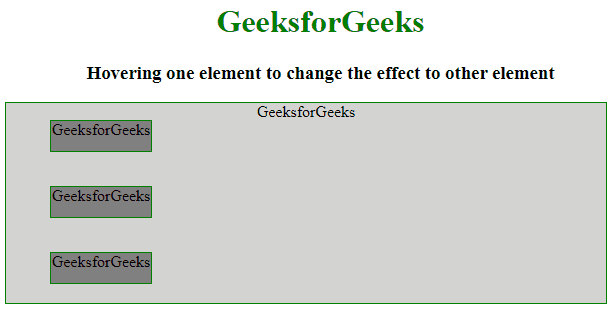
Example 1: In the below example, we will see how other element gets affected when we hover over one element.
HTML
<!DOCTYPE html>
<html>
<head>
<style>
body {
text-align: center;
}
h1 {
color: green;
}
.parent {
width: 600px;
height: 200px;
background-color: lightgrey;
}
.child {
margin-left: 45px;
width: 100px;
height: 30px;
background-color: grey;
}
div {
outline: 1px solid green;
}
.parent:hover .child {
background-color: green;
}
</style>
</head>
<body>
<h1>GeeksforGeeks</h1>
<h3>
Hovering one element to change
the effect to other element
</h3>
<div class="parent"> GeeksforGeeks
<div class="child">
GeeksforGeeks
</div>
<br>
<div class="child">
GeeksforGeeks
</div>
<br>
<div class="child">
GeeksforGeeks
</div>
</div>
</body>
</html>
Explanation: In the above example, we have made two div elements named parent and child. If we hover over the parent element then automatically it will affect the child element.
Output:
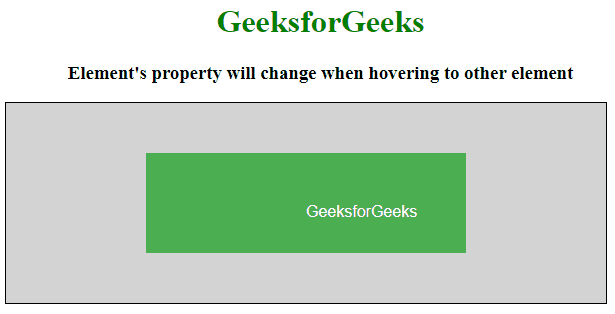
Example 2: In the below example, we will create two div elements. When you hover on one element then other elements will change their property.
HTML
<!DOCTYPE html>
<html>
<head>
<style>
body {
text-align: center;
}
h1 {
color: green;
}
.parent {
width: 600px;
height: 200px;
background-color: lightgrey;
}
.child {
width: 30px;
height: 30px;
background-color: grey;
}
div {
outline: 1px solid black;
}
.parent:hover .child {
background-color: green;
}
.child {
background-color: #4CAF50;
border: none;
color: white;
padding: 50px 160px;
margin-top: 50px;
text-align: center;
text-decoration: none;
display: inline-block;
font-size: 16px;
}
</style>
</head>
<body>
<h1>GeeksforGeeks</h1>
<h3>
Element's property will change when
hovering to other element
</h3>
<div class="parent">
<button class="child">
GeeksforGeeks
</button>
</div>
</body>
</html>
Output:
В течении нескольких последних лет наблюдается удивительная экспансия языков клиентской части веб приложений, особенно HTML5 и CSS3.
Теперь можно выполнять множество операций, которые раньше были немыслимы без применения JavaScript и изображений, например, скругленные углы, адаптивные шаблоны, модульные сетки, прозрачные цвета и многое другое.
Но всегда не хватало возможности обрабатывать событие click средствами CSS. Некоторые специалисты полагают, что такой опции не должно быть, так как интерактивное взаимодействие с пользователем является полем действия для JavaScript. Их доводы разумны, но использование JavaScript даже для простых нажатий утомительно.
В настоящее время нет официальных средств CSS для обработки события click. Но тем не менее, существуют способы, которые можно использовать для «обнаружения» нажатия с помощью только CSS без JavaScript.


Примечание
Описанные способы не предназначены для «реальной жизни». Материалы урока следует рассматривать как основу для экспериментов. Тем более что некоторые методы плохо поддерживаются в браузерах. Назначение урока — прикоснуться к границам возможностей CSS.
Используем чекбокс
Наверняка вы уже встречались с данным методом. Это самый популярный метод для обработки события click средствами CSS.
Метод основан на использовании чекбокса. Данный элемент имеет бинарную сущность и может быть только в одном из двух состояний. Поэтому данный метод является вполне надежным способом для обработки событий click в CSS.
HTML
<input type="checkbox">
<p class="to-be-changed">Здесь будет красный цвет. Или уже есть...</p>
CSS
.to-be-changed {
    color: black;
}

input[type=checkbox]:checked ~ .to-be-changed {
    color: red;
}
Метод основан на использовании псевдо-класса :checked и селектора ~. Обратите внимание, что он будет работать и с селектором +. Сущность метод заключается в том, что “если чекбокс отмечен, то следующие элементы с классом .to-be-changed будет красным”.
Чекбокс выглядит не очень привлекательно. Но вы можете сделать внешний вид более интересным скрыв чекбокс и привязав к нему метку. Как-то вот так:
<input type="checkbox" id="toggle">
<label for="toggle">Нажми меня!</label>
<p class="to-be-changed">Здесь будет красный цвет. Или уже есть...</p>
Итак, мы прячем чекбокс и используем метку для реагирования на событие click:
input[type=checkbox] {
    position: absolute;
    top: -9999px;
    left: -9999px;
}

label {
    display: block;
    background: #08C;
    padding: 5px;
    border: 1px solid rgba(0,0,0,.1);
    border-radius: 2px;
    color: white;
    font-weight: bold;
}

input[type=checkbox]:checked ~ .to-be-changed {
    color: red;
}
У нас получилась кнопка, нажатие на которую меняет цвет текста в параграфе. Повторное нажатие на кнопку меняет цвет обратно.
(Обратите внимание, что существуют различные методы для скрытия чекбокса. Очевидный — применение display:none.)
Плюсы
- Бинарный, есть только два состояния — отмечен или не отмечен
- Повторное нажатие приводит к восстановлению состояния (данный пункт может оказаться минусом)
- Позволяет организовать обработку связанных событий click (если первый чекбокс отмечен и второй чекбокс отмечен, то выполняем следующее действие)
Минусы
- Элементы должны иметь общего предка
- Требуется дополнительная разметка HTML (input, label и так далее)
- Требуется дополнительные действия для работы на мобильных браузерах
Способ с :target
Есть другой способ с использованием псевдо-класса :target. Данный псевдо-класс похож на псевдо-класс :hover тем, что соответствует только определенным условиям.
Специальное событие для псевдо-класса :target зависит от “идентификатора фрагмента”. Если говорить просто, то данный псевдо-класс ссылается на хэштег, который располагается в конце URL, и становится активным, когда хэштег и ID совпадают.
HTML
<a href="#id">Нажми меня!</a>
<p id="id" class="to-be-changed">Здесь будет красный цвет. Или уже есть...</p>
CSS
.to-be-changed {
    color: black;
}

.to-be-changed:target {
    color: red;
}
При нажатии на ссылку (href="#id") изменяется URL и осуществляется переход по метке #id на странице. В данный момент элемент с идентификатором id может быть выделен с помощью псевдо-класса :target.
Плюсы
- Простой код CSS
- Отлично подходит для выделения разделов
Минусы
- Мусор в истории браузера
- Происходит прокручивание страницы
- Требуется тег ссылки или операции с URL для включения хэштега
- Можно воздействовать только на один элемент (так как ID является уникальным)
- Нет способов возврата к исходному состоянию без использования другого хэштега, ссылки или операций с URL
Способ с :focus
Продолжим наш обзор способом с использованием другого псевдо-класса — :focus. Идея почти такая же, как и в предыдущем случае, за исключением того, что не предполагается изменения URL. Здесь мы полагаемся на фокус ввода на определенном элементе.
Когда вы находитесь на странице, то с помощью клавиши табуляции можно перемещаться от одного элемента к другому. Такой метод очень удобен при работе с формами для перехода между элементами без использования мыши. Также метод применяется для навигации слабовидящими людьми по странице.
Важно, что некоторые элементы могут получать фокус ввода, например, ссылки, параграфы, поля ввода и многие другие. Вам только нужно установить для них атрибут tabindex с числовым значение для них.
HTML
<span tabindex="0">Нажми меня!</span>
<p class="to-be-changed">Здесь будет красный цвет. Или уже есть...</p>
CSS
span:focus ~ .to-be-changed {
    color: red;
}
Когда происходит нажатие на элементе спан, или переключение на него с помощью клавиши табуляции, он получает фокус ввода и соответствует псевдо-классу :focus. Селектор соседей делает остальную работу. Если по каким-то причинам использовать атрибут tabindex не требуется, то можно просто установить ссылку с адресом #.
Плюсы
- Очень простой код CSS и HTML
- Отличная навигация
Минусы
- Требуется либо элемент с фокусом, либо атрибут tabindex
- Соответствие возникает только при наличии фокуса ввода (нажатие где-нибудь в другом месте страницы смешивает алгоритм работы)
Способ с переходами
Вероятно, данный метод является самым «грязным» способом обработки события click в CSS.
Идея заключается в «хранении» стиля CSS в переходе CSS. Используем псевдо-бесконечную задержку, чтобы предотвратить возврат в исходное состояние. Звучит сложно, но в действительности очень просто в реализации.
HTML
<span>Нажми меня!</span>
<p class="to-be-changed">Здесь будет красный цвет. Или уже есть...</p>
CSS
.to-be-changed {
    transition: all 0s 9999999s;
}

span:active ~ .to-be-changed {
    transition: all 0s;
    color: red;
}
Задержка составляет примерно 116 дней. Не бесконечность, но некое ее подобие для наших условий. Поэтому изменения сохраняются и нет возврата к исходному состоянию.
Плюсы
- Просто и изящно
- Сохраняется состояние, даже если переход не закончился
Минусы
- Плохая поддержка в браузерах (нет в IE9 и Opera Mini)
- Работает только со значениями, которые можно использовать с переходами
- Нет способов возврата к исходному состоянию
- Нет реальной бесконечности ожидания (если ваш проект предполагает ожидание более 116 дней)
Как сделать так, чтобы при наведении на один элемент (hover) менять стили другого элемента?
Можно ли это сделать только на css?
К примеру: навожу на блок и хочу чтобы все заголовки в этом блоке стали другого цвета.

Как записать?
Так не работает:

.block:hover {  .block h1 { color: red;} }
Ответы
Ответ 1
.section { background: #ccc; } .layer { background: #ddd; } .section:hover img { border: 2px solid #333; } .section:hover .layer { border: 2px solid #F90; }
Источник.
Lorem Ipsum
Ответ 2
Для соседних элементов: .block1:hover + .block2 h1 { color: red;} Для любых элементов(оба блока должны быть внутри одного элемента): .block1:hover ~ .block2 h1 { color: red;}
нет
Проведите надо мной
да
да
нет
нет
Ответ 3
.block:hover h1{ color: blue; }
zagolovok
zagolovok
Ответ 4
.s:hover~.d { color: red; }
wow
hey
Ответ 5
Если нужно изменить все заголовки в одном блоке, на который навели курсор мыши, то вот так: .main:hover h2 { color: red; }
Если же нужно изменять стиль элемента, который находится выше элемента с псевдоклассо :hover, то я делал так (размещал изменяемый элемент ниже элемента с псевдоклассом :hover и при помощи flexbox вытягивал его на нужное мне место): .main { display: flex; flex-direction: column; font: 10px Arial, sans-serif; color: #333; } .one { order: -1; } .two:hover ~ .one { color: red; }How are you?
Lorem ipsum dolor sit amet, consectetur adipisicing elit. Sapiente.
Hi
Lorem ipsum dolor sit amet, consectetur adipisicing elit. Sapiente.
Ok
Lorem ipsum dolor sit amet, consectetur adipisicing elit. Sapiente.
So-so
Lorem ipsum dolor sit amet, consectetur adipisicing elit. Sapiente.
How are you?
Hi
Ok
So-so
Ответ 6
Заранее говорю, русский язык у меня не самая сильная сторона, заранее извиняюсь з ошибки, если будут ;) Выше показанные примеры все правильные, но они очень ограничены при желании изменить другой элемент(который может быть совсем далеко) будет не возможно что-то изменить. Но я могу предложить вариант с JavaScript и он чень простой для усвоения. Главное не бойтесь использовать :) function changeItem() { document.getElementById('one-two').style.width = '200px'; }// функция, которая сработает при наведении. //она означает - выбрать элемент к Id у которого надо что-то изменить. // когда в скобки где написано one-two добавите Id своего элемента function rechangeItem() { document.getElementById('one-two').style.width = '100px'; }// тут всё также. но наобарот. протсес происходящий про отводе курсора. #one, #two, #one-two { width: 100px; height: 30px; background: red; margin: 30px; } /*Надеюсь, что тут все понятно, заданы елементарные свойства :)*/
Ответ 7
div { padding:20px; background:#eee; border:1px solid #ccc; margin:10px; } .anotherdiv{ visibility:hidden; opacity:0; transition:all 1s; } .div:hover + .anotherdiv{ visibility:visible; opacity:1; }
Contrary to popular belief, Lorem Ipsum is not simply rando text. It has roots in a piece of classical Latin literature from 45 BC, making it ove 2000 years old. Richard McClintock, a Latin professor at Hampden-Sydney College in Virginia looked up one of the more obscure Latin words, consectetur, from a Lorem Ipsum passage and going through the cites of the word in classical literature, discovered the undoubtable source. Lorem Ipsum comes from sections 1.10.32 and 1.10.33 of "de Finibus Bonorum et Malorum" (The Extremes of Good and Evil) by Cicero, written in 45 BC. This book is a treatise on the theory of ethics, very popular during the Renaissance. The first line of Lorem Ipsum, "Lorem ipsum dolor sit amet..", comes from a line in section 1.10.32. The standard chunk of Lorem Ipsum used since the 1500s is reproduced below for thos interested. Sections 1.10.32 and 1.10.33 from "de Finibus Bonorum et Malorum" by Cicero are also reproduced in their exact original form, accompanied by English versions from the 1914 translation by H. Rackham.
Ответ 8
По сути, ответа на поставленый вопрос нет пока. "Как при наведении на один элемент (hover) менять стили другого элемента css?" Видимо если элементы не соседние и не дочерние, то только скриптами.
Ответ 9
Здесь по классическому CSS за меня всё уже сказали, однако добавлю, что если Вы хотите писать так, как указали (цитирую): .block:hover { .block h1 { color: red;} } Можете использовать препроцессоры CSS (SASS/LESS). Это так скажем усовершенствованный CSS, в котором помимо внутренних блоков можн также использовать усовершенствованные переменные, вычисления и т.д.. Такие файлы компилируютс препроцессором в оригинальный CSS, и к тому же сжимаются (минифицируются, убираются переносы и лишние пробелы, размер файла становится меньше). Достаточно интересная область, достойная внимания.

Big thanks to Mike and Robertc for their helpful posts!
If you have two elements in your HTML and you want to :hover over one and target a style change in the other the two elements must be directly related—parents, children or siblings. This means that the two elements either must be one inside the other or must both be contained within the same larger element.
I wanted to display definitions in a box on the right side of the browser as my users read through my site and :hover over highlighted terms; therefore, I did not want the ‘definition’ element to be displayed inside the ‘text’ element.
I almost gave up and just added javascript to my page, but this is the future dang it! We should not have to put up with back sass from CSS and HTML telling us where we have to place our elements to achieve the effects we want! In the end we compromised.
While the actual HTML elements in the file must be either nested or contained in a single element to be valid :hover targets to each other, the css position attribute can be used to display any element where ever you want. I used position:fixed to place the target of my :hover action where I wanted it on the user’s screen regardless to its location in the HTML document.
The html:
<div id="explainBox" class="explainBox"> /*Common parent*/

  <a class="defP" id="light" href="http://en.wikipedia.or/wiki/Light">Light                            /*highlighted term in text*/
  </a> is as ubiquitous as it is mysterious. /*plain text*/

  <div id="definitions"> /*Container for :hover-displayed definitions*/
    <p class="def" id="light"> /*example definition entry*/ Light:
      <br/>Short Answer: The type of energy you see
    </p>
  </div>

</div>
The css:
/*read: "when user hovers over #light somewhere inside #explainBox
    set display to inline-block for #light directly inside of #definitions.*/
#explainBox #light:hover~#definitions>#light {
  display: inline-block;
}

.def {
  display: none;
}

#definitions {
  background-color: black;
  position: fixed;
  /*position attribute*/
  top: 5em;
  /*position attribute*/
  right: 2em;
  /*position attribute*/
  width: 20em;
  height: 30em;
  border: 1px solid orange;
  border-radius: 12px;
  padding: 10px;
}
In this example the target of a :hover command from an element within #explainBox must either be #explainBox or also within #explainBox. The position attributes assigned to #definitions force it to appear in the desired location (outside #explainBox) even though it is technically located in an unwanted position within the HTML document.
I understand it is considered bad form to use the same #id for more than one HTML element; however, in this case the instances of #light can be described independently due to their respective positions in uniquely #id‘d elements. Is there any reason not to repeat the id #light in this case?