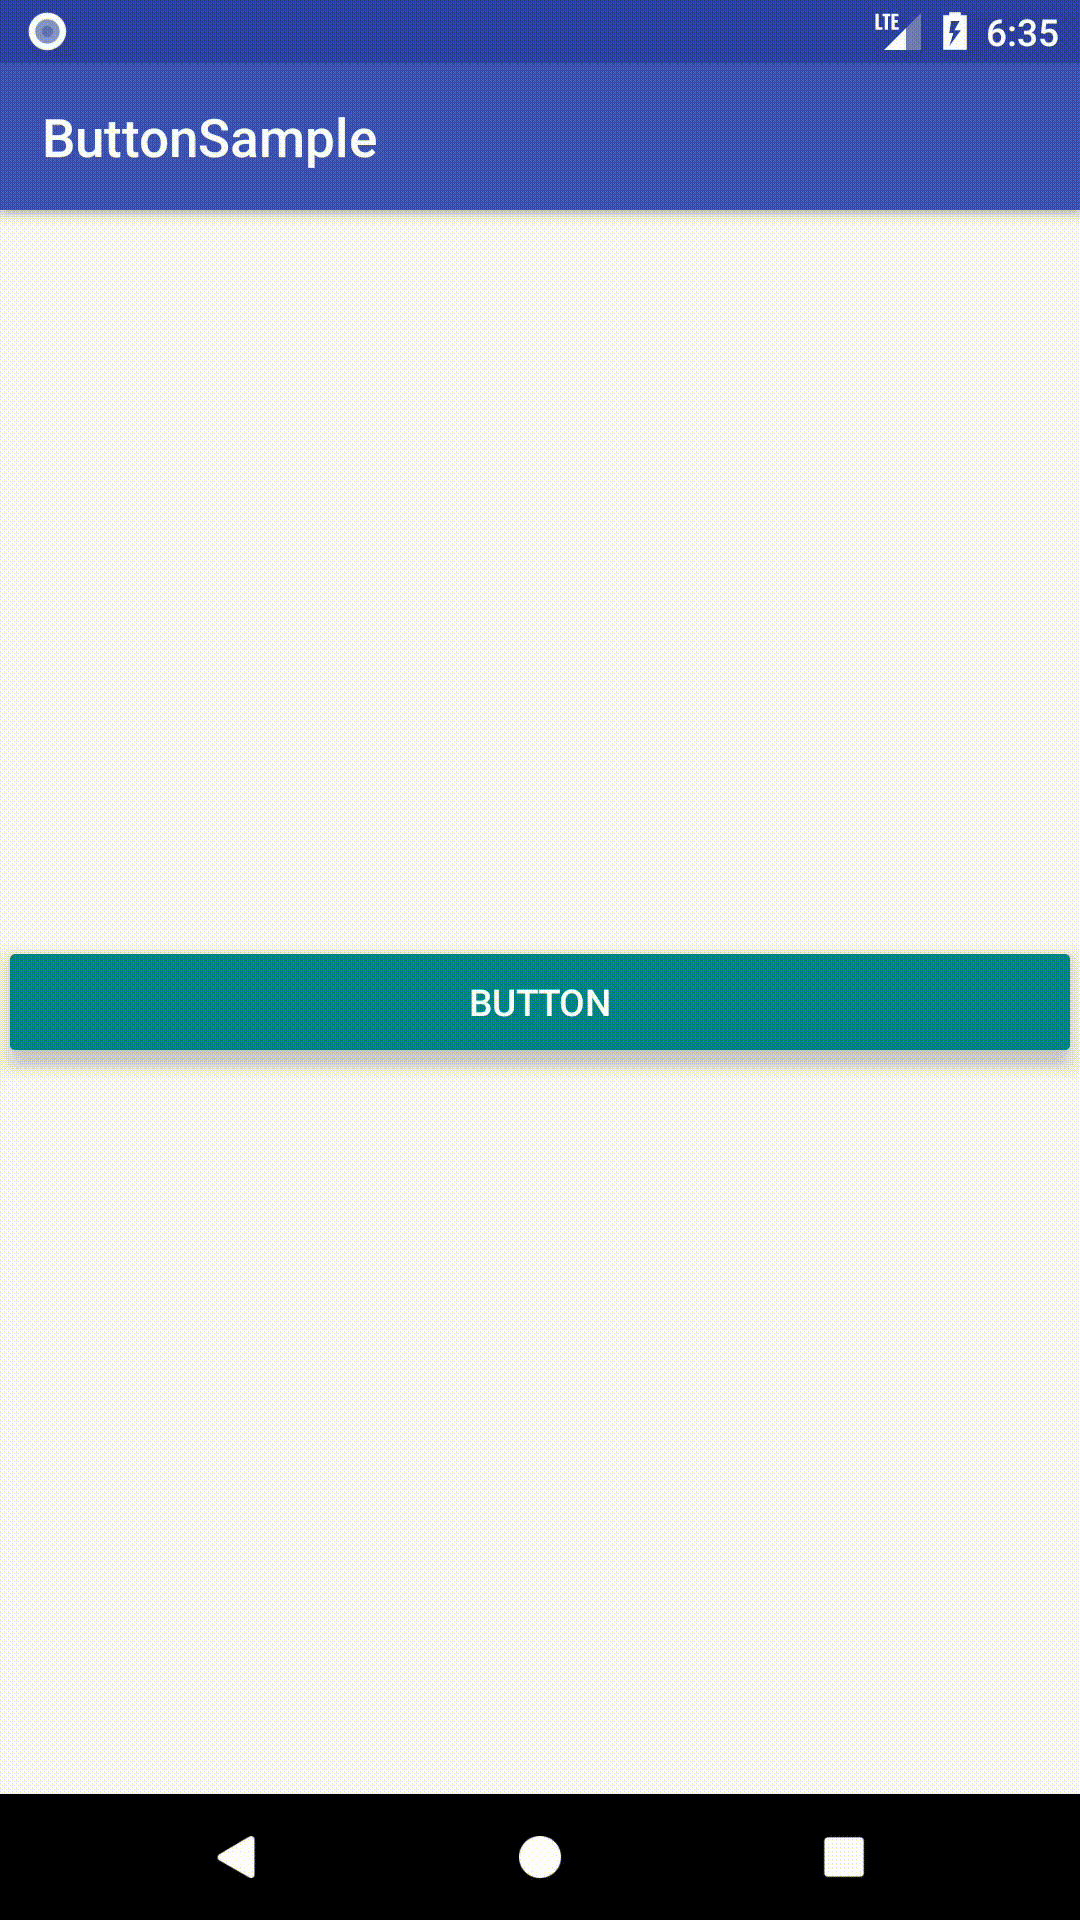
How to change the width of a Button programmatically. I am able to change the height but the width does not change. Following is my code snippet
private void createButton(final String label)
{

    Button button = new Button(this);
    button.setText(label);


    button.setWidth(10);
    button.setHeight(100);

    button.setOnClickListener(new OnClickListener()
    {

        @Override
        public void onClick(View v)
        {


        }
    });
    mMenuContainer.addView(button, mMenuItemLayoutParamters);


}
But the width of the Button occupies the width of the screen.
![]()
CopsOnRoad
215k70 gold badges617 silver badges421 bronze badges
asked Jul 2, 2012 at 12:43
![]()
button.setLayoutParams(new LinearLayout.LayoutParams(10, 100));
Should have work for you.
There is one Awesome Example online for this : check this
you should apply LayoutParams of the ViewGroup that contains your View. That is, if your button is inside RelativeLayout, you should use RelativeLayout.LayoutParams
answered Jul 2, 2012 at 12:52
![]()
MKJParekhMKJParekh
33.9k11 gold badges86 silver badges98 bronze badges
5
you can do it this way.
LinearLayout.LayoutParams params = button.getLayoutParams();
params.width = 100;
button.setLayoutParams(params);
but make sure you do this, after adding your button to a parent. and LinearLayout.LayoutParams is used when parent is a LinearLayout and when parent is RelativeLayout use RelativeLayout.LayoutParams.
answered Jul 2, 2012 at 12:48
![]()
Aqif HamidAqif Hamid
3,5113 gold badges25 silver badges38 bronze badges
1
ConstraintLayout.LayoutParams layoutParams = (ConstraintLayout.LayoutParams) yourButton.getLayoutParams();
layoutParams.width = 150;
yourButton.setLayoutParams(layoutParams);
the «ConstraintLayout» can change up to your layout and set size by «layoutParams.width». This case it’s work for me!
answered Jan 10, 2019 at 6:47
![]()
0
can do this
    int width= (int)getResources().getDimension(R.dimen.button_width);
    int heigth= (int)getResources().getDimension(R.dimen.button_heigth);
    ViewGroup.LayoutParams layoutParams = new ViewGroup.LayoutParams(width, heigth);
    button.setLayoutParams(layoutParams);
answered Nov 25, 2014 at 18:52
![]()
Cícero MouraCícero Moura
1,9401 gold badge24 silver badges35 bronze badges
I solved by using this:
//ImageButton creation
final ImageButton server_icon_button=new ImageButton(getApplicationContext());
//setting background image in drawable
server_icon_button.setBackgroundResource(R.drawable.bonsai);
//After adding ImageButton to the parent i done this
server_icon_button.getLayoutParams().height=180;
server_icon_button.getLayoutParams().width=100;
I hope this help.
answered Aug 22, 2016 at 9:56
![]()
In my case I am using AppCompatImageButton (and AppCompat).
It turns out that if I keep density adjusted images in the various drawable
folders: drawable-ldpi, drawable-mdpi, drawable-hdpi, etc.. then the button won’t scale.
Instead I had to put a single drawable for each button in drawable-nodpi.
Make sure the drawable-nodpi button image is of the largest size you need. Android will not scale the button size up; however, it can scale the size down. I created a button in XML like this:
<RelativeLayout
    xmlns:android="http://schemas.android.com/apk/res/android"
    xmlns:app="http://schemas.android.com/apk/res-auto"
    xmlns:meter="http://schemas.android.com/apk/res-auto"
    android:layout_width="wrap_content"
    android:layout_height="wrap_content">

    <android.support.v7.widget.AppCompatImageButton
        android:id="@+id/button"
        style="@style/ButtonStyle"
        android:baselineAlignBottom="true"
        android:layout_width="wrap_content"
        android:layout_height="wrap_content"
        android:minHeight="0dp"
        android:minWidth="0dp"
        app:srcCompat="@drawable/button_selector"
        android:background="?attr/selectableItemBackgroundBorderless"
        android:contentDescription="@string/button"
        android:focusable="true">
</RelativeLayout>

<!-- styles.xml -->
<style name="ButtonStyle" parent="MyAppTheme">
    <item name="android:scaleType">centerInside</item>
    <item name="android:adjustViewBounds">true</item>
    <item name="colorControlHighlight">@color/buttonColorPressed</item>
    <item name="colorButtonNormal">@color/buttonColor</item>
</style>

<!-- v21/styles.xml -->
<style name="TargetButton" parent="MyAppTheme">
    <item name="android:scaleType">centerInside</item>
    <item name="android:adjustViewBounds">true</item>
    <item name="colorControlHighlight">@color/buttonColorPressed</item>
    <item name="colorButtonNormal">@color/buttonColor</item>
    <item name="android:elevation">@dimen/button_elevation</item>
</style>

<!-- drawable/button_selector.xml -->
<selector xmlns:android="http://schemas.android.com/apk/res/android">
    <item android:drawable="@drawable/button_pressed" android:state_pressed="true"/>
    <item android:drawable="@drawable/button"/>
</selector>

<!-- drawable/button.xml -->
<bitmap xmlns:android="http://schemas.android.com/apk/res/android"
      android:src="@drawable/ic_button"
      android:gravity="center" />

<!-- drawable/button_pressed.xml -->
<bitmap xmlns:android="http://schemas.android.com/apk/res/android"
      android:src="@drawable/ic_button_pressed"
      android:gravity="center" />
Next, in onCreate when you retrieve the button, call adjustButtonSize (which i put in my base class):
    mButton = (AppCompatImageButton) findViewById(R.id.button);
    adjustButtonSize(mButton);

public void adjustButtonSize(AppCompatImageButton button) {
    DisplayMetrics displayMetrics = getResources().getDisplayMetrics();
    int width = displayMetrics.widthPixels;
    int height = displayMetrics.heightPixels;
    ViewGroup.LayoutParams params = button.getLayoutParams();
    params.height = height / 10;         // 10%
    params.width = ((width * 20) / 100); // 20%
    button.setLayoutParams(params);
}
answered Apr 3, 2017 at 22:01
![]()
Try using only mMenuContainer.addView(button);
![]()
StarsSky
6,7116 gold badges38 silver badges63 bronze badges
answered Jul 2, 2012 at 12:49
![]()
NikoNiko
8,0155 gold badges48 silver badges85 bronze badges
You can try out this kotlin code.
This is great when you want to give the size of another view to some other view.
class MainActivity : AppCompatActivity() {

    override fun onCreate(savedInstanceState: Bundle?) {
        super.onCreate(savedInstanceState)
        setContentView(R.layout.activity_main)

        equalToButton.post(Runnable { zeroButton.height = equalToButton.height })
    }
}
answered Mar 27, 2018 at 6:40
![]()
Anirudha MahaleAnirudha Mahale
2,4303 gold badges35 silver badges55 bronze badges
Improve Article
Save Article
Improve Article
Save Article
A Button is an essential part of an application, or software, or webpage. It allows the user to interact with the application or software. In windows forms, you are allowed to set the size of the button automatically using the AutoSize Property of the button.
It is provided by Button class which helps programmers to create a button whose size is increased or decrease according to the content it contains. If you want to resize the button automatically according to its contents, then set the value of this property to true. And if you want to resize the button manually, then set the value of this property to false. You can use this property in two different methods:
1. Design-Time: It is the easiest method to resize the button automatically. Using the following steps you will set the AutoSize property of the button:
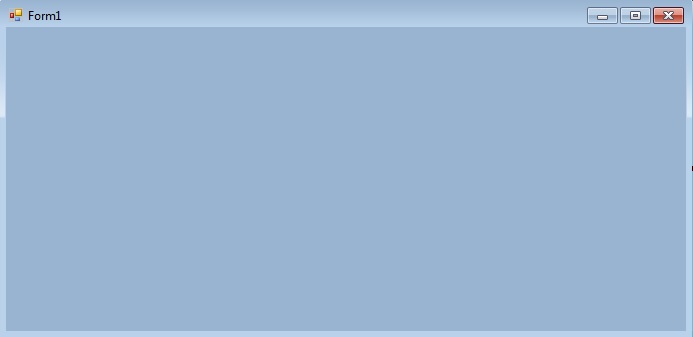
- Step 1: Create a windows form as shown in the below image:
Visual Studio -> File -> New -> Project -> WindowsFormApp
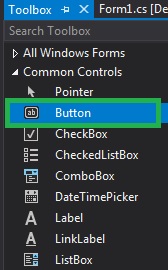
- Step 2: Drag the Button control from the ToolBox and drop it on the windows form. You are allowed to place a Button control anywhere on the windows form according to your need.
- Step 3: After drag and drop you will go to the properties of the Button control to set the AutoSize property of the Button.
Output:


2. Run-Time: It is a little bit trickier than the above method. In this method, you can set the AutoSize property of the Button programmatically with the help of given syntax:
public override bool AutoSize { get; set; }
The value of this property is of System.Boolean type. Following steps are used to set the AutoSize property of the Button:
- Step 1: Create a button using the Button() constructor is provided by the Button class.
// Creating Button using Button class
Button MyButton = new Button();
- Step 2: After creating Button, set the AutoSize property of the Button provided by the Button class.
// Set the AutoSize property of the button
Mybutton.AutoSize = true;
- Step 3: And last add this button control to from using Add() method.
// Add this Button to form
this.Controls.Add(Mybutton);
Example:
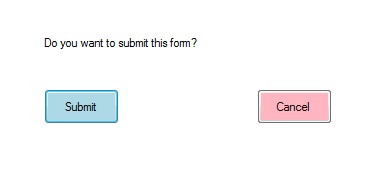
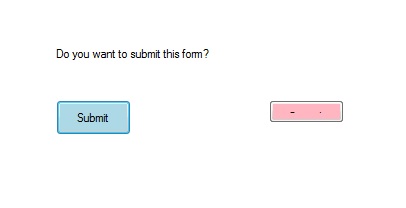
usingSystem;usingSystem.Collections.Generic;usingSystem.ComponentModel;usingSystem.Data;usingSystem.Drawing;usingSystem.Linq;usingSystem.Text;usingSystem.Threading.Tasks;usingSystem.Windows.Forms;namespaceWindowsFormsApp8 {publicpartialclassForm1 : Form {publicForm1(){InitializeComponent();}privatevoidForm1_Load(objectsender, EventArgs e){Label l =newLabel();l.AutoSize =true;l.Text ="Do you want to submit this form?";l.Location =newPoint(222, 145);this.Controls.Add(l);Button Mybutton =newButton();Mybutton.Location =newPoint(225, 198);Mybutton.Text ="Submit";Mybutton.AutoSize =true;Mybutton.BackColor = Color.LightBlue;Mybutton.Padding =newPadding(6);this.Controls.Add(Mybutton);Button Mybutton1 =newButton();Mybutton1.Location =newPoint(438, 198);Mybutton1.Text ="Cancel";Mybutton1.AutoSize =false;Mybutton1.BackColor = Color.LightPink;Mybutton1.Padding =newPadding(6);this.Controls.Add(Mybutton1);}}}Output:
Before setting the AutoSize property of the cancel button to false the output is like this:After setting the AutoSize property of the cancel button to false the output is like this:


Improve Article
Save Article
Improve Article
Save Article
A Button is an essential part of an application, or software, or webpage. It allows the user to interact with the application or software. In windows forms, you are allowed to set the size of the button automatically using the AutoSize Property of the button.
It is provided by Button class which helps programmers to create a button whose size is increased or decrease according to the content it contains. If you want to resize the button automatically according to its contents, then set the value of this property to true. And if you want to resize the button manually, then set the value of this property to false. You can use this property in two different methods:
1. Design-Time: It is the easiest method to resize the button automatically. Using the following steps you will set the AutoSize property of the button:
- Step 1: Create a windows form as shown in the below image:
Visual Studio -> File -> New -> Project -> WindowsFormApp - Step 2: Drag the Button control from the ToolBox and drop it on the windows form. You are allowed to place a Button control anywhere on the windows form according to your need.
- Step 3: After drag and drop you will go to the properties of the Button control to set the AutoSize property of the Button.
Output:
2. Run-Time: It is a little bit trickier than the above method. In this method, you can set the AutoSize property of the Button programmatically with the help of given syntax:
public override bool AutoSize { get; set; }
The value of this property is of System.Boolean type. Following steps are used to set the AutoSize property of the Button:
- Step 1: Create a button using the Button() constructor is provided by the Button class.
// Creating Button using Button class
Button MyButton = new Button();
- Step 2: After creating Button, set the AutoSize property of the Button provided by the Button class.
// Set the AutoSize property of the button
Mybutton.AutoSize = true;
- Step 3: And last add this button control to from using Add() method.
// Add this Button to form
this.Controls.Add(Mybutton);
Example:
usingSystem;usingSystem.Collections.Generic;usingSystem.ComponentModel;usingSystem.Data;usingSystem.Drawing;usingSystem.Linq;usingSystem.Text;usingSystem.Threading.Tasks;usingSystem.Windows.Forms;namespaceWindowsFormsApp8 {publicpartialclassForm1 : Form {publicForm1(){InitializeComponent();}privatevoidForm1_Load(objectsender, EventArgs e){Label l =newLabel();l.AutoSize =true;l.Text ="Do you want to submit this form?";l.Location =newPoint(222, 145);this.Controls.Add(l);Button Mybutton =newButton();Mybutton.Location =newPoint(225, 198);Mybutton.Text ="Submit";Mybutton.AutoSize =true;Mybutton.BackColor = Color.LightBlue;Mybutton.Padding =newPadding(6);this.Controls.Add(Mybutton);Button Mybutton1 =newButton();Mybutton1.Location =newPoint(438, 198);Mybutton1.Text ="Cancel";Mybutton1.AutoSize =false;Mybutton1.BackColor = Color.LightPink;Mybutton1.Padding =newPadding(6);this.Controls.Add(Mybutton1);}}}Output:
Before setting the AutoSize property of the cancel button to false the output is like this:After setting the AutoSize property of the cancel button to false the output is like this:
|
0 / 0 / 0 Регистрация: 23.06.2012 Сообщений: 28 |
|
|
1 |
|
Задать размер кнопки программно29.10.2014, 21:09. Показов 10503. Ответов 3
Здравствуйте. Заранее спасибо!
__________________
0 |

|
0 / 0 / 0 Регистрация: 27.11.2013 Сообщений: 45 |
|
|
29.10.2014, 21:25 |
2 |
|
inTV = (EditText) findViewById(R.id.editText2); только id’шники и названия переменных сам поменяй на свои
0 |
|
Spelcrawler 535 / 504 / 114 Регистрация: 12.03.2014 Сообщений: 1,671 |
||||
|
30.10.2014, 08:33 |
3 |
|||
Размер в пикселях. Добавлено через 7 минут
В программе я использую несколько кнопок, размер которых зависит от размера экрана (не обязательно пропорционально). А это зачем? Задавайте размер сразу в dp в xml файле. Выглядеть будет одинаково на всех устройствах, если хотите уменьшить кнопки на больших экранах лучше создать отдельный layuot файл в папке Код values-xxhdpi/layout/my_layout.xml Андроид сам подставит нужный лейаут в зависимости от устройства. Только названия файлов в папке values-xxhdpi и values должны быть одинаковыми.
0 |

|
semiromid 7 / 7 / 2 Регистрация: 28.08.2014 Сообщений: 179 |
||||
|
30.10.2014, 09:13 |
4 |
|||
1 |
29.12.2019C#
Кнопка является неотъемлемой частью приложения, программного обеспечения или веб-страницы. Это позволяет пользователю взаимодействовать с приложением или программным обеспечением. В формах Windows вы можете автоматически устанавливать размер кнопки, используя свойство AutoSize кнопки.
Он предоставляется классом Button, который помогает программистам создавать кнопки, размер которых увеличивается или уменьшается в зависимости от содержимого, которое он содержит. Если вы хотите изменить размер кнопки автоматически в соответствии с ее содержимым, установите для этого свойства значение true . А если вы хотите изменить размер кнопки вручную, установите для этого свойства значение false. Вы можете использовать это свойство двумя разными способами:
1. Время разработки: это самый простой способ автоматически изменить размер кнопки. Используя следующие шаги, вы установите свойство AutoSize кнопки:
2. Время выполнения: это немного сложнее, чем описанный выше метод. В этом методе вы можете установить свойство AutoSize для кнопки программно с помощью заданного синтаксиса:
public override bool AutoSize { get; set; }
Значение этого свойства имеет тип System.Boolean . Следующие шаги используются для установки свойства AutoSize кнопки:
- Шаг 1. Создание кнопки с помощью конструктора Button () предоставляется классом Button.
// Creating Button using Button class
Button MyButton = new Button();
- Шаг 2: После создания Button установите свойство AutoSize для Button, предоставляемого классом Button.
// Set the AutoSize property of the button
Mybutton.AutoSize = true;
- Шаг 3: И последнее добавление этой кнопки управления с использованием метода Add ().
// Add this Button to form
this.Controls.Add(Mybutton);
Пример:
usingSystem;usingSystem.Collections.Generic;usingSystem.ComponentModel;usingSystem.Data;usingSystem.Drawing;usingSystem.Linq;usingSystem.Text;usingSystem.Threading.Tasks;usingSystem.Windows.Forms;namespaceWindowsFormsApp8 {publicpartialclassForm1 : Form {publicForm1(){InitializeComponent();}privatevoidForm1_Load(objectsender, EventArgs e){Label l =newLabel();l.AutoSize =true;l.Text ="Do you want to submit this form?";l.Location =newPoint(222, 145);this.Controls.Add(l);Button Mybutton =newButton();Mybutton.Location =newPoint(225, 198);Mybutton.Text ="Submit";Mybutton.AutoSize =true;Mybutton.BackColor = Color.LightBlue;Mybutton.Padding =newPadding(6);this.Controls.Add(Mybutton);Button Mybutton1 =newButton();Mybutton1.Location =newPoint(438, 198);Mybutton1.Text ="Cancel";Mybutton1.AutoSize =false;Mybutton1.BackColor = Color.LightPink;Mybutton1.Padding =newPadding(6);this.Controls.Add(Mybutton1);}}
}Выход:
Перед тем как установить для свойства AutoSize кнопки отмены значение false, вывод будет выглядеть следующим образом:После установки для свойства AutoSize кнопки отмены значения false, вывод будет выглядеть следующим образом:


Рекомендуемые посты:
- C # | Проверьте, имеет ли Hashtable фиксированный размер
- Как установить видимость кнопки в C #?
- Как установить размер RadioButton в C #?
- C # | Создание HybridDictionary с указанным начальным размером и чувствительностью к регистру
- C # | Проверьте, имеет ли ArrayList фиксированный размер
- Как установить цвет фона кнопки в C #?
- C # | Проверьте, имеет ли объект SortedList фиксированный размер
- C # | Проверьте, имеет ли ListDictionary фиксированный размер
- C # | Проверьте, имеет ли HybridDictionary фиксированный размер
- C # | Создание чувствительного к регистру HybridDictionary с указанным начальным размером
- C # | Как изменить размер одномерного массива
- Как установить шрифт кнопки в C #?
- C # | Проверьте, имеет ли массив фиксированный размер или нет
- Кнопка в C #
- Как установить основной цвет кнопки в C #?
Как установить размер кнопки в C #?
0.00 (0%) 0 votes
Post Views: 99 621
Одним из важных компонентов пользовательского интерфейса в приложения является кнопка. Она используется для выполнения различных действий пользователя.
В этой статье мы приведём примеры использования и стилизации кнопки.
Добавляем кнопку на разметку
Пользовательский интерфейс приложения определён в XML-файле с разметкой. Вы можете добавить элемент Button и установить атрибуты вручную. Или вы можете, воспользовавшись инструментом дизайна, добавить Button из палитры элементов и задать атрибуты.
<Button
    android:id="@+id/account_b"
    android:layout_width="wrap_content"
    android:layout_height="wrap_content"
    android:layout_marginEnd="8dp"
    android:layout_marginStart="8dp"
    android:text="Добавить аккаунт"
    />
Атрибуты кнопки
Button является подклассом TextView и наследует атрибуты от TextView и View. Ниже приведены некоторые важные атрибуты кнопки, которые можно использовать для настройки стиля и поведения.
- background: установка в качестве фона как цвета, так и drawable
- onClick: установить метод, который будет запускаться при нажатии на кнопку
- minHeight: для определения минимальной высоты кнопки
- minWidth: для определения минимальной ширины кнопки
- stateListAnimator: определение анимации при изменении состояния кнопки
- focusable: для определения того, будет ли обработано нажатие клавиши
- clickable: указать, является ли кнопка кликабельной
- gravity: установка выравнивания текста кнопки
- textAppearance: установить стиль текста
Включение и выключение кнопки
Вы можете использовать атрибут enabled для включения или выключения кнопки, установив его в true или false. Также это можно сделать программно, вызвав метод setEnabled(), как показано ниже:
((Button)findViewById(R.id.button)).setEnabled(false);
Кнопка с Drawable
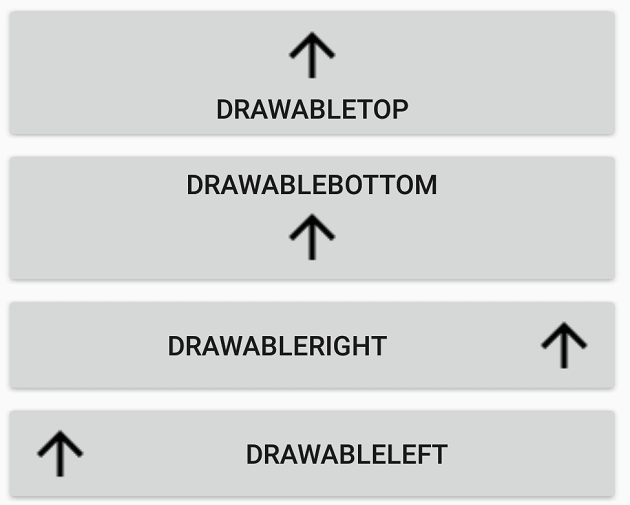
Вы можете отображать на кнопке вместе с текстом изображение, используя drawableTop, drawableRight, drawableBottom или drawableLeft, в зависимости от того, где располагать картинку, как показано на скриншоте ниже.
ImageButton
Android также предоставляет ImageButton, задачей которого является использование изображения в качестве кнопки. Чтобы установить изображение, вы можете использовать атрибут src. Вы также можете использовать разные изображения, которые будут меняться в зависимости от состояния кнопки, меняя в XML drawable selector как показано ниже.
<ImageButton
    android:id="@+id/img_b"
    android:layout_width="match_parent"
    android:layout_height="wrap_content"
    android:onClick="doSomething"
    android:src="@drawable/img_state"
    />
Пример XML drawable selector
<?xml version="1.0" encoding="utf-8"?>
<selector xmlns:android="http://schemas.android.com/apk/res/android">
  <item android:drawable="@drawable/arrow_down"
      android:state_pressed="true"/>
  <item android:drawable="@drawable/arrow_up"
      android:state_focused="true"/>
  <item android:drawable="@drawable/arrow_up"/>
</selector>
Обработка нажатий на кнопку
Клики можно обрабатывать двумя способами. Первый — это установить атрибут onClick в разметке XML. Второй — назначить кнопке слушатель в коде активности или фрагмента.
Чтобы установить атрибут onClick, сначала определите метод типа void, принимающий в качестве параметра View, в активности или фрагменте и затем используйте имя этого метода как значение для атрибута onClick, как показано ниже.
public void doSomething(View v) {
  //do something
}
<Button
    android:id="@+id/button"
    android:layout_width="match_parent"
    android:layout_height="wrap_content"
    android:onClick="doSomething"
    android:text="Делай что-нибудь"
    />
Ниже приведён код обработки нажатия с помощью слушателя.
Button doSomethingButton = (Button) findViewById(R.id.do_something_b);

doSomethingButton.setOnClickListener(new View.OnClickListener() {
  @Override public void onClick(View view) {
    //пишем код
  }
});
Дизайн и стили кнопок
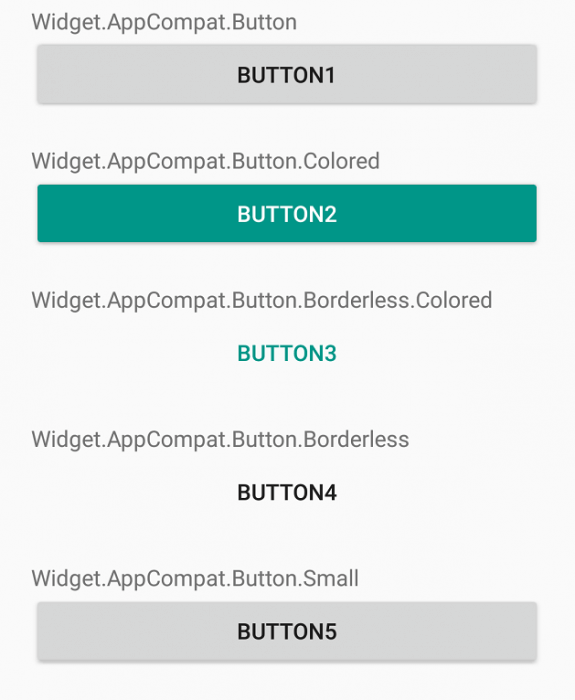
Вы можете применять стили и темы для изменения внешнего вида кнопок. Платформа Android предоставляет заранее определённые стили. На рисунке ниже вы можете увидеть, как отображаются кнопки с различными стилями.
Пример применения темы для кнопки.
<Button
    android:id="@+id/button3"
    android:layout_width="match_parent"
    android:layout_height="wrap_content"
    android:text="Button3"
    style="@style/Widget.AppCompat.Button.Borderless.Colored"
    />
Настройка стилей кнопок
Вы можете изменить цвета по умолчанию для стилей, применяемых к кнопке, установив атрибут colorAccent на уровне приложения и атрибут colorButtonNormal на уровне виджета для нужных цветов. Атрибут colorControlHighlight используется для установки цвета кнопки, когда она находится в нажатом состоянии.
Как только вы определите собственный стиль, вы можете применить его к кнопкам с помощью атрибута theme. Ниже приведен пример пользовательской темы.
<style name="PurpleButton" parent="@style/Widget.AppCompat.Button.Colored">
  <item name="colorButtonNormal">#1a237e</item>
  <item name="colorControlHighlight">#673ab7</item>
</style>
Кнопка с закруглёнными углами
Вы можете определить элемент inset, как показано ниже, чтобы создать кнопку с закруглёнными углами и сохранить файл с drawable в папке res/drawable. Вы можете увеличить или уменьшить атрибут радиуса элемента, чтобы отрегулировать радиус углов кнопки.
<?xml version="1.0" encoding="utf-8"?>
<inset xmlns:android="http://schemas.android.com/apk/res/android"
    android:insetBottom="6dp"
    android:insetLeft="4dp"
    android:insetRight="4dp"
    android:insetTop="6dp">
  <ripple android:color="?attr/colorControlHighlight">
    <item>
      <shape android:shape="rectangle"
          android:tint="#0091ea">
        <corners android:radius="10dp"/>
        <solid android:color="#1a237e"/>
        <padding android:bottom="6dp"/>
      </shape>
    </item>
  </ripple>
</inset>
Затем определите стиль, задающий атрибут background для xml drawable и примените его к кнопке с помощью атрибута style.
<style name="RoundedCornerButton" parent="@style/Widget.AppCompat.Button.Colored">
  <item name="background">@drawable/btn_rounded_corner</item>
  <item name="colorButtonNormal">#1a237e</item>
  <item name="colorControlHighlight">#673ab7</item>
</style>

Высота и тень кнопки
Вы можете установить атрибуты elevation и translationZ, чтобы нарисовать тень кнопки.
<Button
    ...
    android:elevation="6dp"
    android:stateListAnimator="@null"
    android:translationZ="4dp"/>

Настройка анимации тени
Вы можете определить различные свойства теней для разных состояний кнопки и анимировать переход путём определения селектора. Вы можете применить аниматор к кнопке, используя свойство stateListAnimator.
Обратите внимание, что stateListAnimator установлен в null в приведённом выше примере. Это было сделано для удаления аниматора по умолчанию, чтобы elevation и translationZ работали.
Чтобы настроить анимацию тени при изменении состояния кнопок, вам нужно определить селектор, как показано ниже, в папке res/animator и установить свойство stateListAnimator своей темы для определённого аниматора.
<?xml version="1.0" encoding="utf-8"?>
<selector xmlns:android="http://schemas.android.com/apk/res/android">
  <item android:state_enabled="true" android:state_pressed="true">
    <set>
      <objectAnimator android:duration="120"
          android:propertyName="translationZ"
          android:valueTo="8dp"
          android:valueType="floatType"/>
      <objectAnimator android:duration="120"
          android:propertyName="elevation"
          android:valueTo="4dp"
          android:valueType="floatType"/>
    </set>
  </item>
  <item android:state_enabled="true">
    <set>
      <objectAnimator android:duration="120"
          android:propertyName="translationZ"
          android:startDelay="80"
          android:valueTo="4dp"
          android:valueType="floatType"/>
      <objectAnimator android:duration="120"
          android:propertyName="elevation"
          android:valueTo="2dp"
          android:valueType="floatType"/>
    </set>
  </item>
</selector>
Примените следующую тему, которая использует аниматор, к кнопке с использованием атрибута style или theme.
<style name="CustomAnimationButton" parent="@style/Widget.AppCompat.Button">
  <item name="colorButtonNormal">#1a237e</item>
  <item name="colorControlHighlight">#673ab7</item>
  <item name="android:stateListAnimator">@animator/button_elevation</item>
</style>
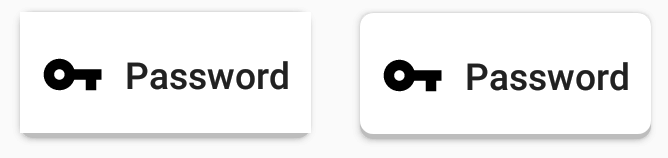
Простая кнопка логина
Совмещая всё вышесказанное, можно создать красивую кнопку, позволяющую, например, заходить пользователям на свои аккаунты. Код разметки будет выглядеть следующим образом:
<Button
    android:id="@+id/btn_email_password"
    android:layout_width="wrap_content"
    android:layout_height="wrap_content"
    android:layout_gravity="center_horizontal"
    android:layout_marginTop="4dp"
    android:background="@drawable/element_background"
    android:drawablePadding="8dp"
    android:fontFamily="sans-serif-medium"
    android:paddingLeft="8dp"
    android:paddingRight="8dp"
    android:text="Password"
    android:textAllCaps="false"
    android:textStyle="normal"
    />
Стиль фона:
<?xml version="1.0" encoding="utf-8"?>
<layer-list xmlns:android="http://schemas.android.com/apk/res/android">

  <item>
    <shape android:shape="rectangle">
      <solid android:color="#BDBDBD"/>
      <corners android:radius="5dp"/>
    </shape>
  </item>

  <item
      android:bottom="2dp"
      android:left="0dp"
      android:right="0dp"
      android:top="0dp">
    <shape android:shape="rectangle">
      <solid android:color="#ffffff"/>
    </shape>
  </item>
</layer-list>
Кроме того, с помощью атрибута drawableLeft можно добавить изображение к нашей кнопке, в том числе и векторное. На старых устройствах, векторные изображения вызывают падение всего приложения, поэтому сделаем это программно в коде активности при помощи AppCompatResources:
((Button) findViewById(R.id.btn_email_password)).setCompoundDrawablesWithIntrinsicBounds(
    AppCompatResources.getDrawable(this, R.drawable.ic_vpn_key_black_24dp), null, null, null);
Метод setCompoundDrawablesWithIntrinsicBounds() делает то же, что и атрибуты drawableLeft, drawableTop и так далее. В качестве параметров нужно указать, где именно будет размещаться изображение (указываем null в случае, если здесь изображение не нужно).
Кнопка — это неотъемлемая часть приложения, программного обеспечения или веб-страницы. Это позволяет пользователю взаимодействовать с приложением или программным обеспечением. В формах Windows вы можете установить размер кнопки автоматически, используя свойство AutoSize кнопки.
Он предоставляется классом Button, который помогает программистам создавать кнопку, размер которой увеличивается или уменьшается в зависимости от содержимого, которое она содержит. Если вы хотите автоматически изменять размер кнопки в соответствии с ее содержимым, установите для этого свойства значение true . А если вы хотите изменить размер кнопки вручную, установите для этого свойства значение false. Вы можете использовать это свойство двумя разными способами:
1. Design-Time: It is the easiest method to resize the button automatically. Using the following steps you will set the AutoSize property of the button:
2. Run-Time: It is a little bit trickier than the above method. In this method, you can set the AutoSize property of the Button programmatically with the help of given syntax:
public override bool AutoSize { get; set; }
The value of this property is of System.Boolean type. Following steps are used to set the AutoSize property of the Button:
- Step 1: Create a button using the Button() constructor is provided by the Button class.
// Creating Button using Button class
Button MyButton = new Button();
- Step 2: After creating Button, set the AutoSize property of the Button provided by the Button class.
// Set the AutoSize property of the button
Mybutton.AutoSize = true;
- Step 3: And last add this button control to from using Add() method.
// Add this Button to form
this.Controls.Add(Mybutton);
Example:
usingSystem;usingSystem.Collections.Generic;usingSystem.ComponentModel;usingSystem.Data;usingSystem.Drawing;usingSystem.Linq;usingSystem.Text;usingSystem.Threading.Tasks;usingSystem.Windows.Forms;namespaceWindowsFormsApp8 {publicpartialclassForm1 : Form {publicForm1(){InitializeComponent();}privatevoidForm1_Load(objectsender, EventArgs e){Label l =newLabel();l.AutoSize =true;l.Text ="Do you want to submit this form?";l.Location =newPoint(222, 145);this.Controls.Add(l);Button Mybutton =newButton();Mybutton.Location =newPoint(225, 198);Mybutton.Text ="Submit";Mybutton.AutoSize =true;Mybutton.BackColor = Color.LightBlue;Mybutton.Padding =newPadding(6);this.Controls.Add(Mybutton);Button Mybutton1 =newButton();Mybutton1.Location =newPoint(438, 198);Mybutton1.Text ="Cancel";Mybutton1.AutoSize =false;Mybutton1.BackColor = Color.LightPink;Mybutton1.Padding =newPadding(6);this.Controls.Add(Mybutton1);}}}Output:
Before setting the AutoSize property of the cancel button to false the output is like this:After setting the AutoSize property of the cancel button to false the output is like this:
В моем случае я использую AppCompatImageButton (и AppCompat).
Оказывается, если я буду держать изображения с коррекцией плотности в различных доступных
папок: drawable-ldpi, drawable-mdpi, drawable-hdpi и т.д., тогда кнопка не будет масштабироваться.
Вместо этого я должен был поместить одну кнопку для каждой кнопки в drawable-nodpi.
Убедитесь, что изображение кнопки с рисунком nodpi имеет наибольший размер, который вам нужен. Android не будет масштабировать размер кнопки; однако он может масштабировать размер вниз. Я создал кнопку в XML следующим образом:
<RelativeLayout
    xmlns:android="http://schemas.android.com/apk/res/android"
    xmlns:app="http://schemas.android.com/apk/res-auto"
    xmlns:meter="http://schemas.android.com/apk/res-auto"
    android:layout_width="wrap_content"
    android:layout_height="wrap_content">

    <android.support.v7.widget.AppCompatImageButton
        android:id="@+id/button"
        style="@style/ButtonStyle"
        android:baselineAlignBottom="true"
        android:layout_width="wrap_content"
        android:layout_height="wrap_content"
        android:minHeight="0dp"
        android:minWidth="0dp"
        app:srcCompat="@drawable/button_selector"
        android:background="?attr/selectableItemBackgroundBorderless"
        android:contentDescription="@string/button"
        android:focusable="true">
</RelativeLayout>

<!-- styles.xml -->
<style name="ButtonStyle" parent="MyAppTheme">
    <item name="android:scaleType">centerInside</item>
    <item name="android:adjustViewBounds">true</item>
    <item name="colorControlHighlight">@color/buttonColorPressed</item>
    <item name="colorButtonNormal">@color/buttonColor</item>
</style>

<!-- v21/styles.xml -->
<style name="TargetButton" parent="MyAppTheme">
    <item name="android:scaleType">centerInside</item>
    <item name="android:adjustViewBounds">true</item>
    <item name="colorControlHighlight">@color/buttonColorPressed</item>
    <item name="colorButtonNormal">@color/buttonColor</item>
    <item name="android:elevation">@dimen/button_elevation</item>
</style>

<!-- drawable/button_selector.xml -->
<selector xmlns:android="http://schemas.android.com/apk/res/android">
    <item android:drawable="@drawable/button_pressed" android:state_pressed="true"/>
    <item android:drawable="@drawable/button"/>
</selector>

<!-- drawable/button.xml -->
<bitmap xmlns:android="http://schemas.android.com/apk/res/android"
      android:src="@drawable/ic_button"
      android:gravity="center" />

<!-- drawable/button_pressed.xml -->
<bitmap xmlns:android="http://schemas.android.com/apk/res/android"
      android:src="@drawable/ic_button_pressed"
      android:gravity="center" />
Далее, в onCreate, когда вы извлекаете кнопку, вызовите adjustButtonSize (который я поместил в базовый класс):
    mButton = (AppCompatImageButton) findViewById(R.id.button);
    adjustButtonSize(mButton);

public void adjustButtonSize(AppCompatImageButton button) {
    DisplayMetrics displayMetrics = getResources().getDisplayMetrics();
    int width = displayMetrics.widthPixels;
    int height = displayMetrics.heightPixels;
    ViewGroup.LayoutParams params = button.getLayoutParams();
    params.height = height / 10;         // 10%
    params.width = ((width * 20) / 100); // 20%
    button.setLayoutParams(params);
}