Прохождение игры
-
Страница 7 из 8
- Страница 1
- Страница 2
- Страница 3
- Страница 4
- Страница 5
- Страница 6
- Страница 7
- Страница 8
- Страница 1
- Страница 2
- Страница 3
- Страница 4
- Страница 5
- Страница 6
- Страница 7
- Страница 8
Концовка: «Escape»
В меню выбираем опцию «Изменить свою судьбу».
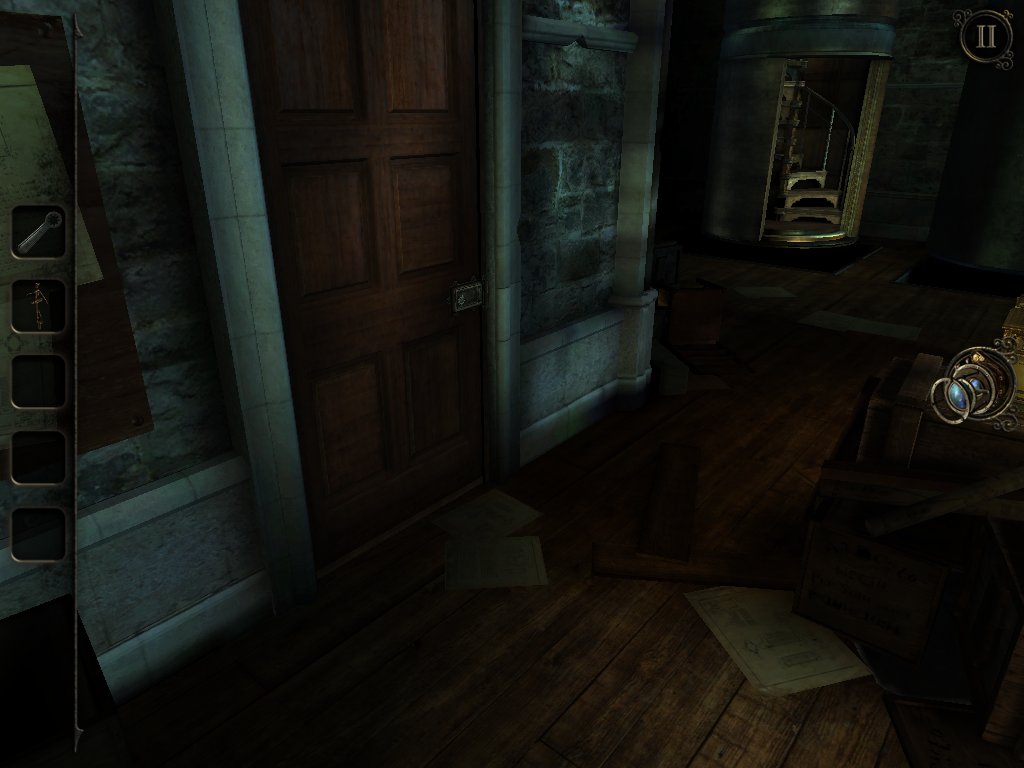
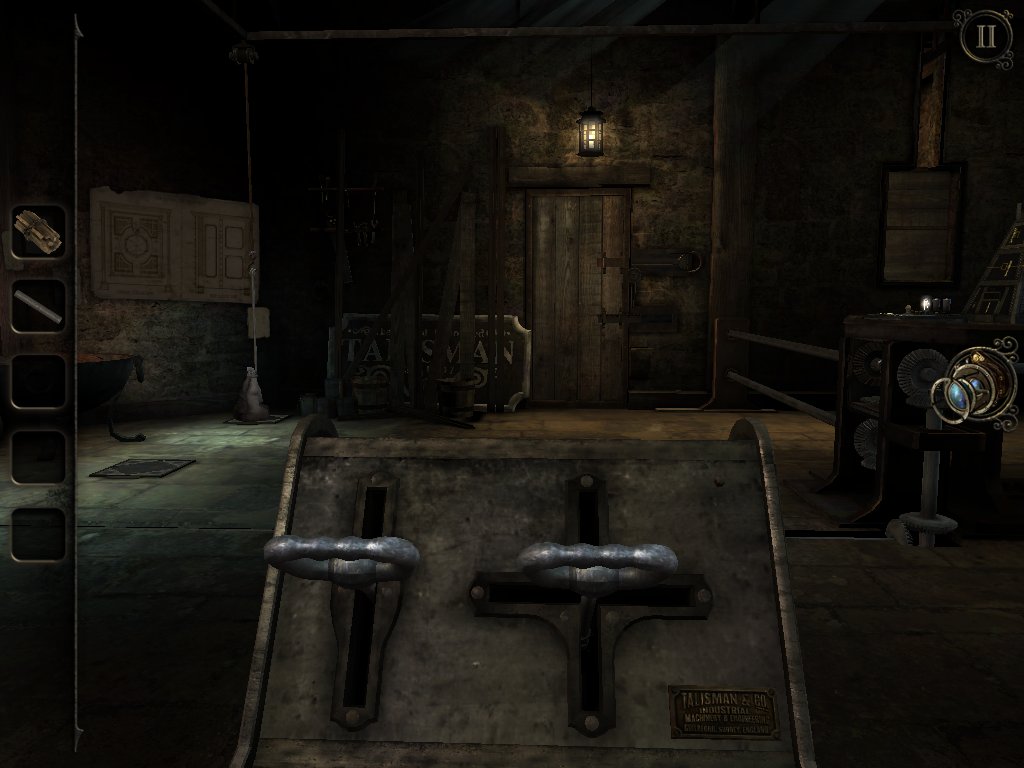
Заходим в дверь, ведущую в библиотеку.

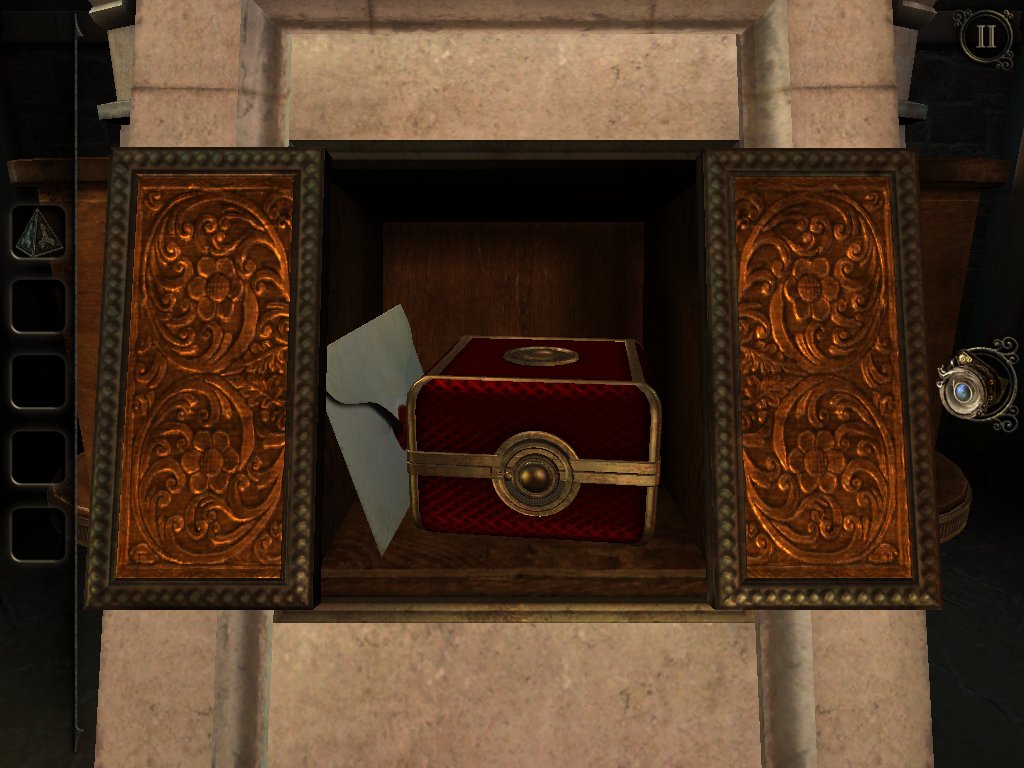
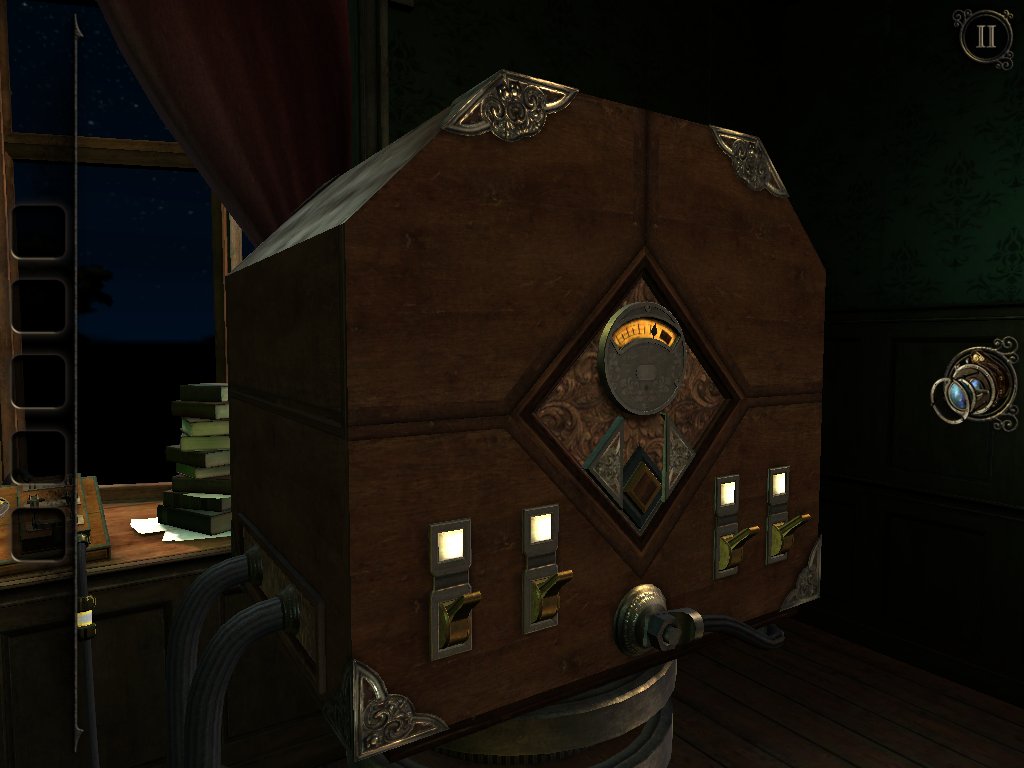
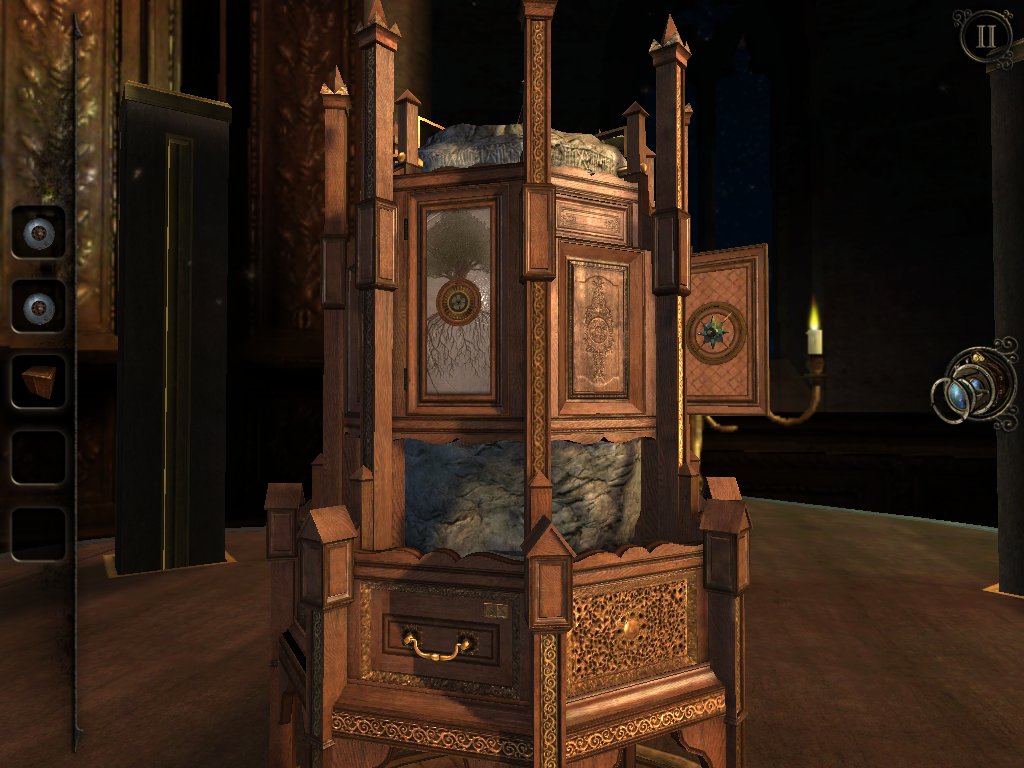
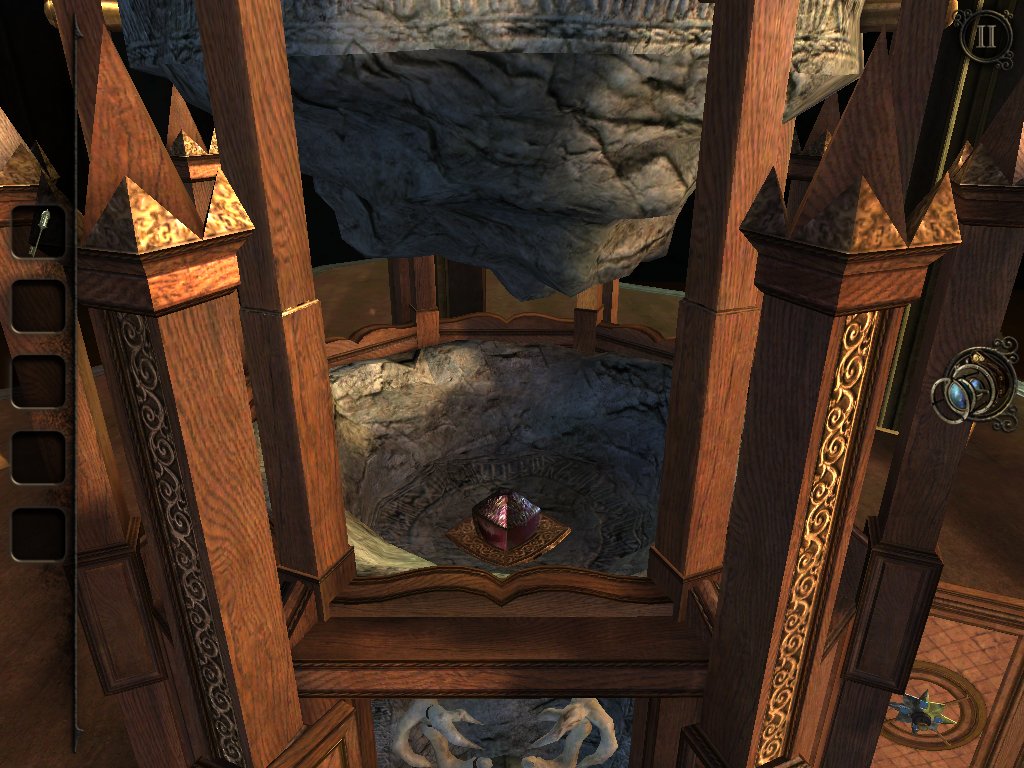
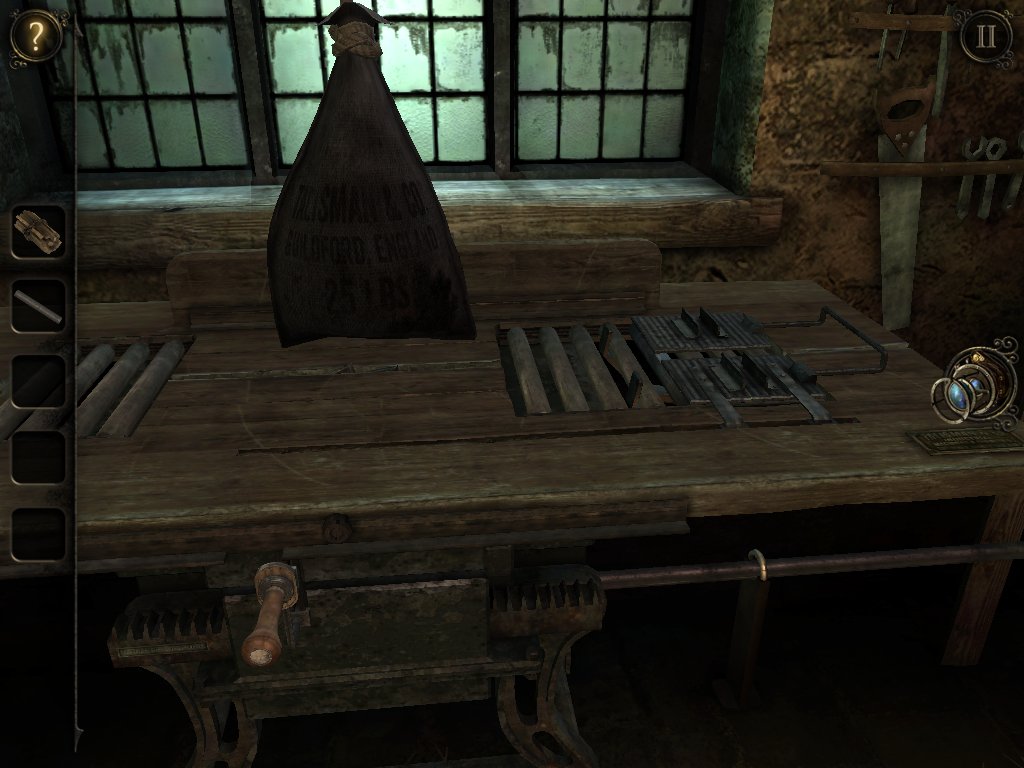
Направляемся к автомату гадалки Мэри, который стоит в углу справа. Приближаем взгляд к лотку, забираем из него МАЛЕНЬКОЕ УСТРОЙСТВО. Рассматриваем его в инвентаре, преобразовываем в ключ. Возвращаемся в центральную комнату с бассейном. Входим в кабинет (дверь с красной шторой).

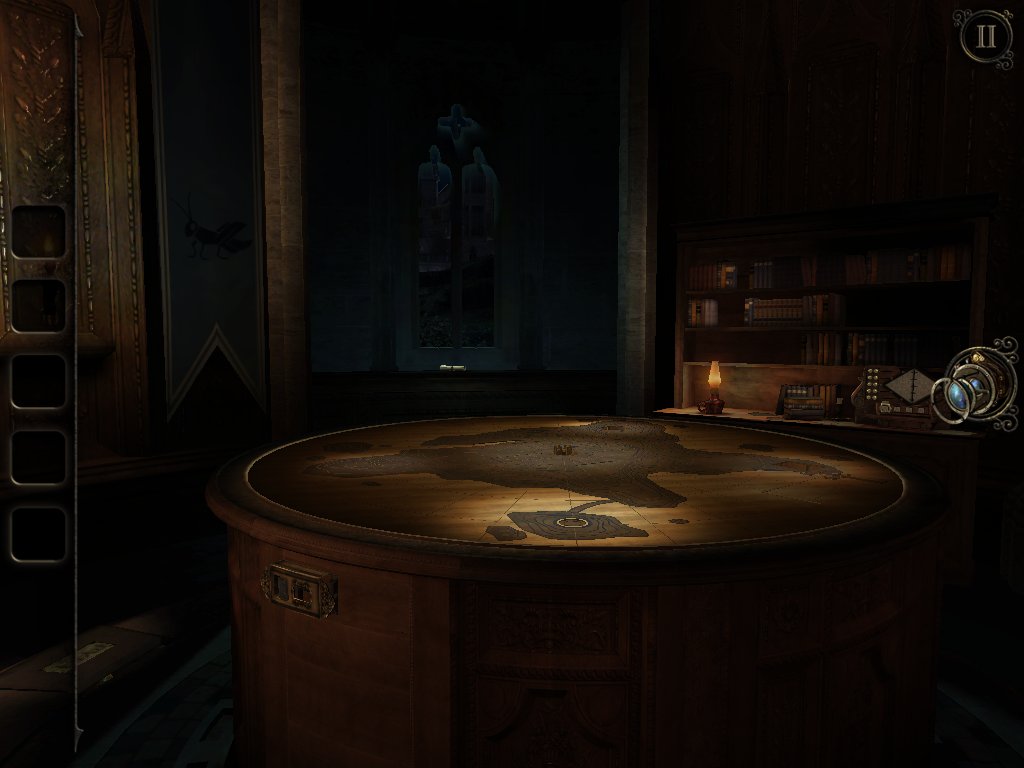
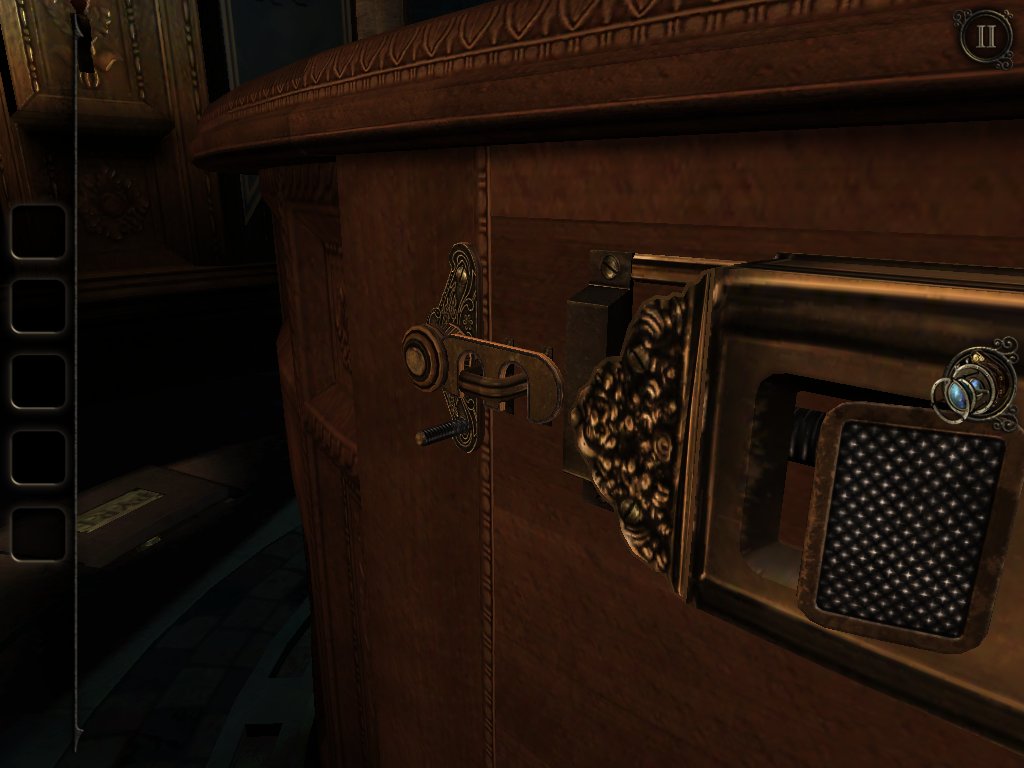
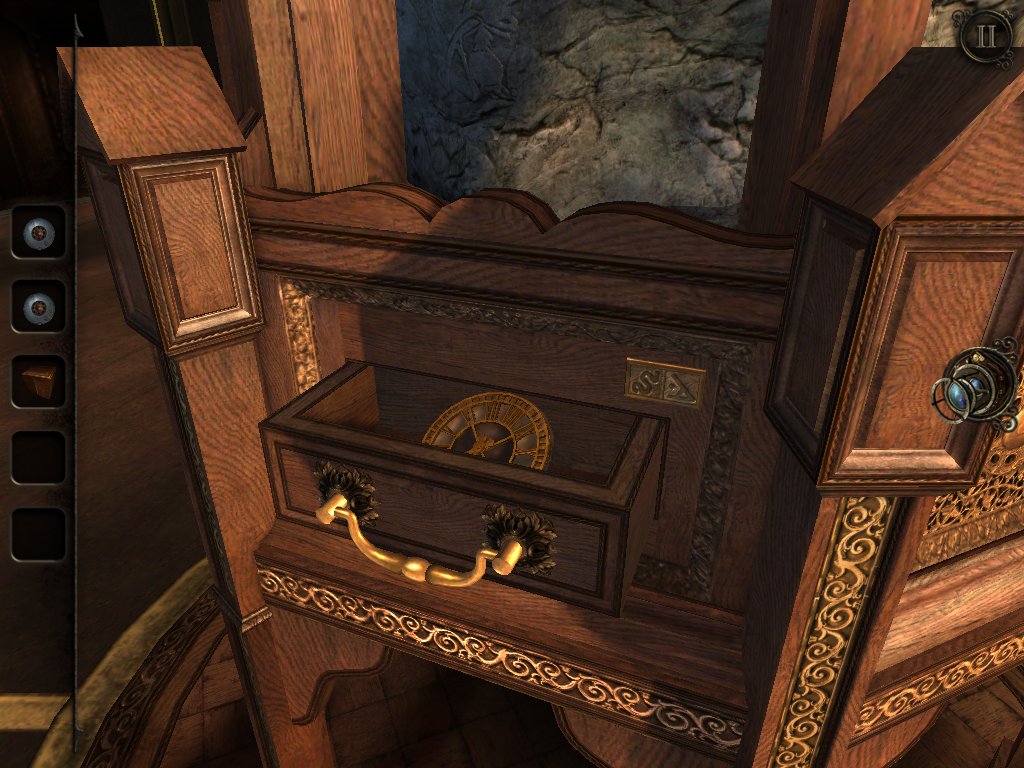
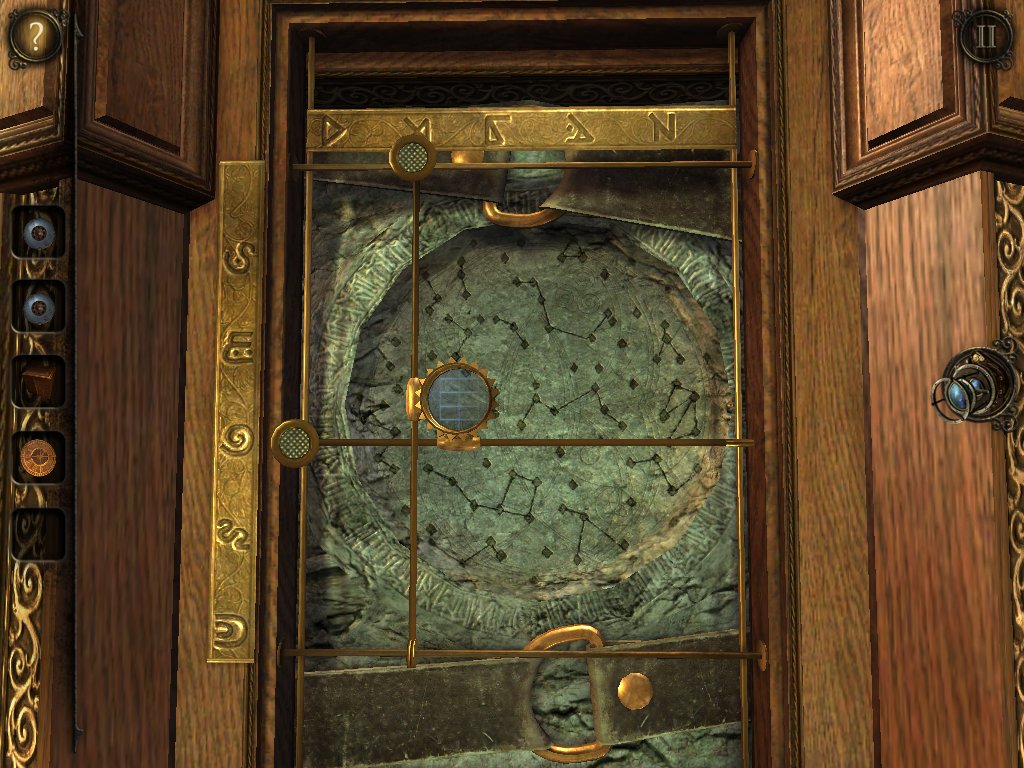
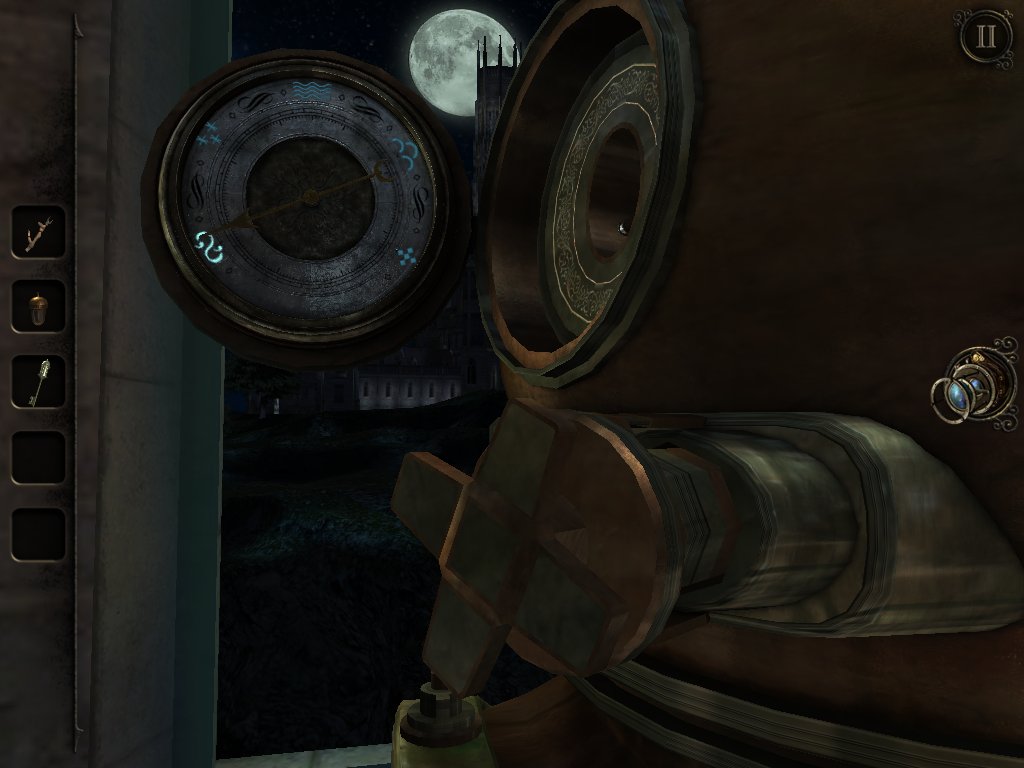
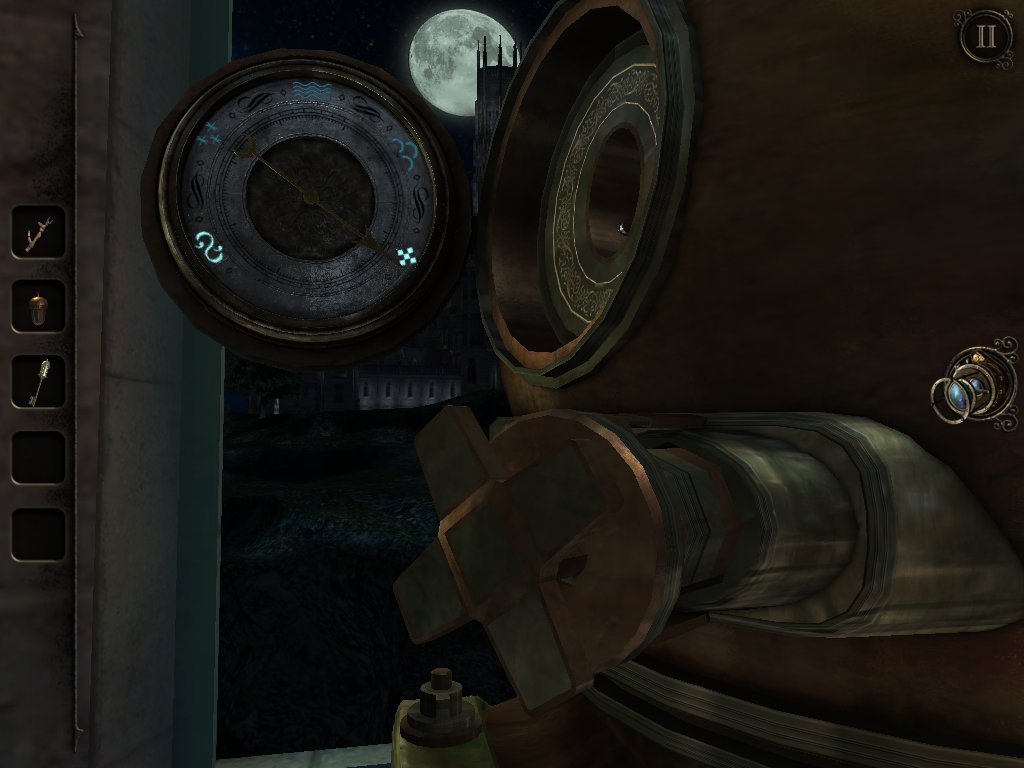
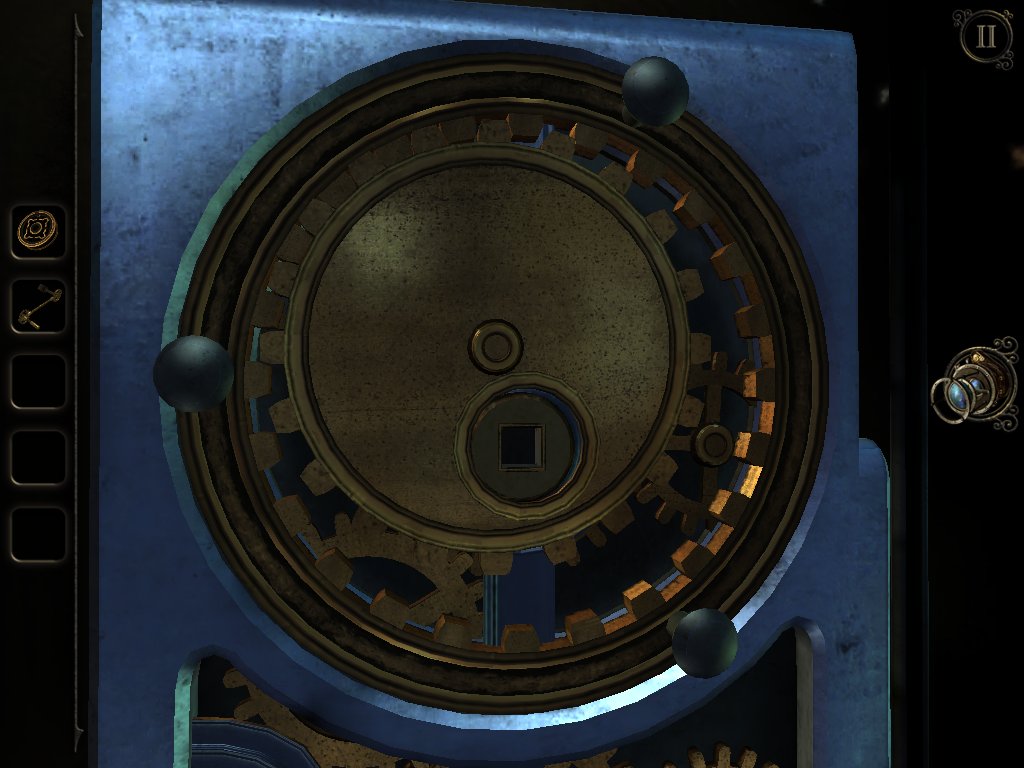
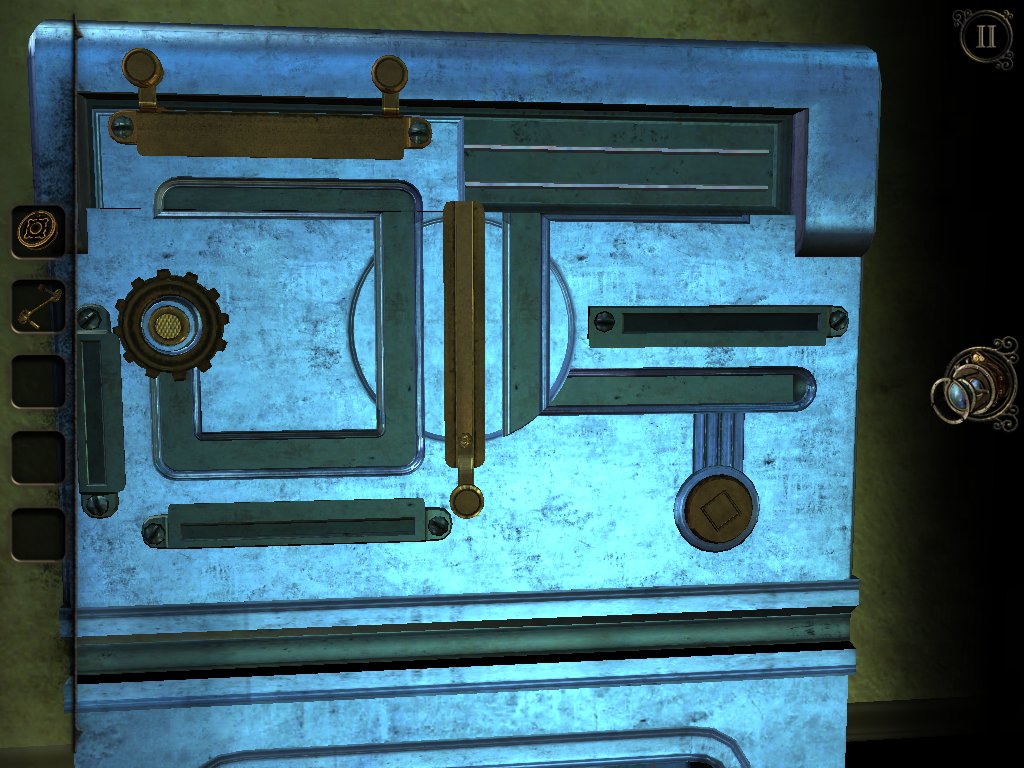
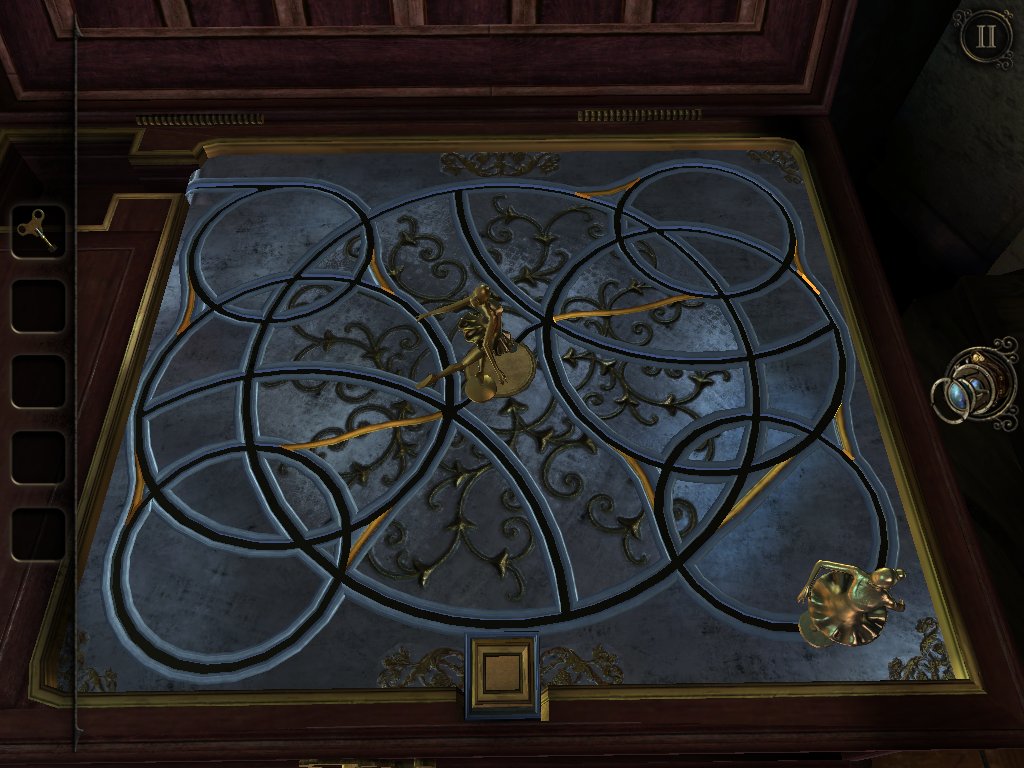
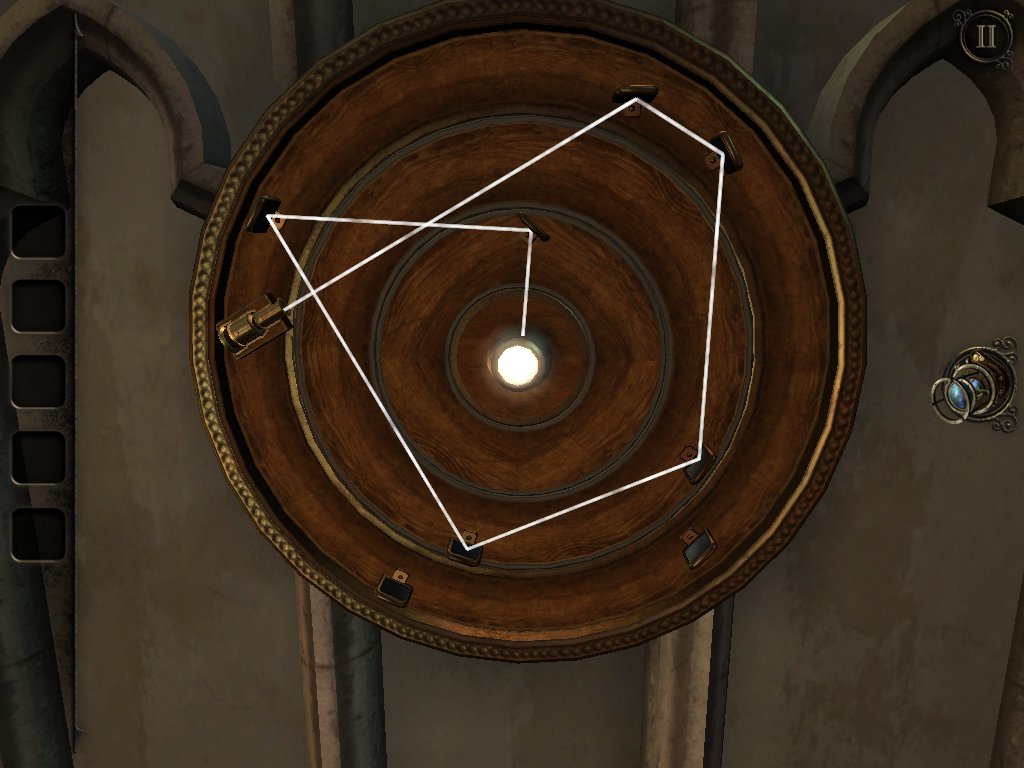
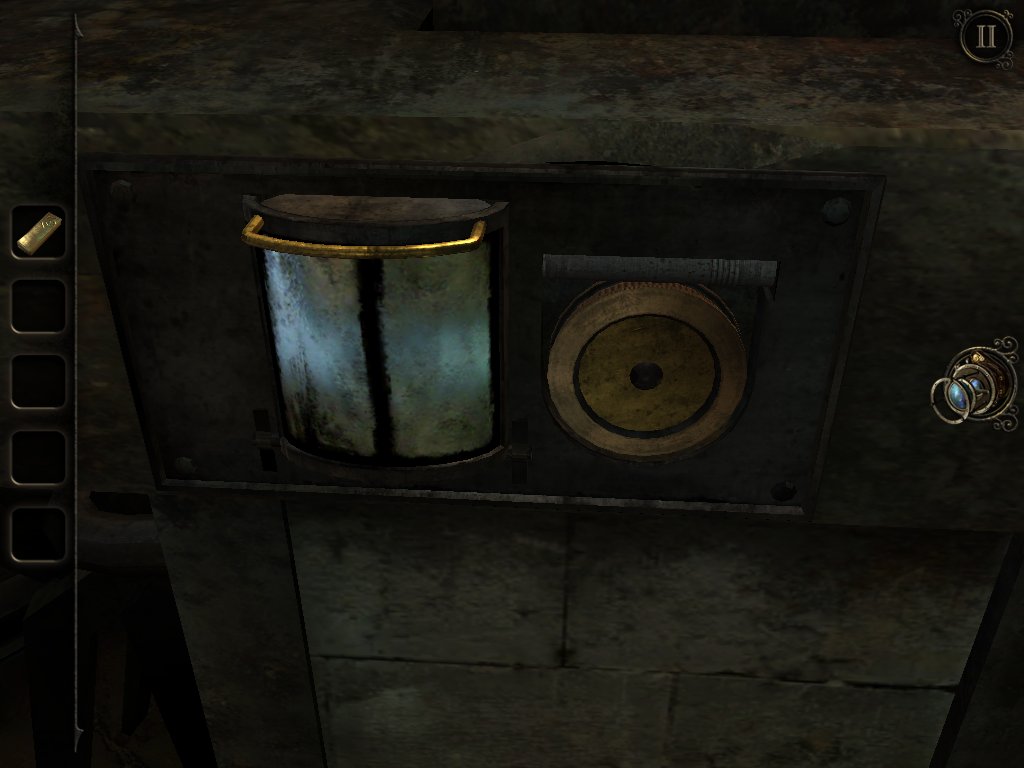
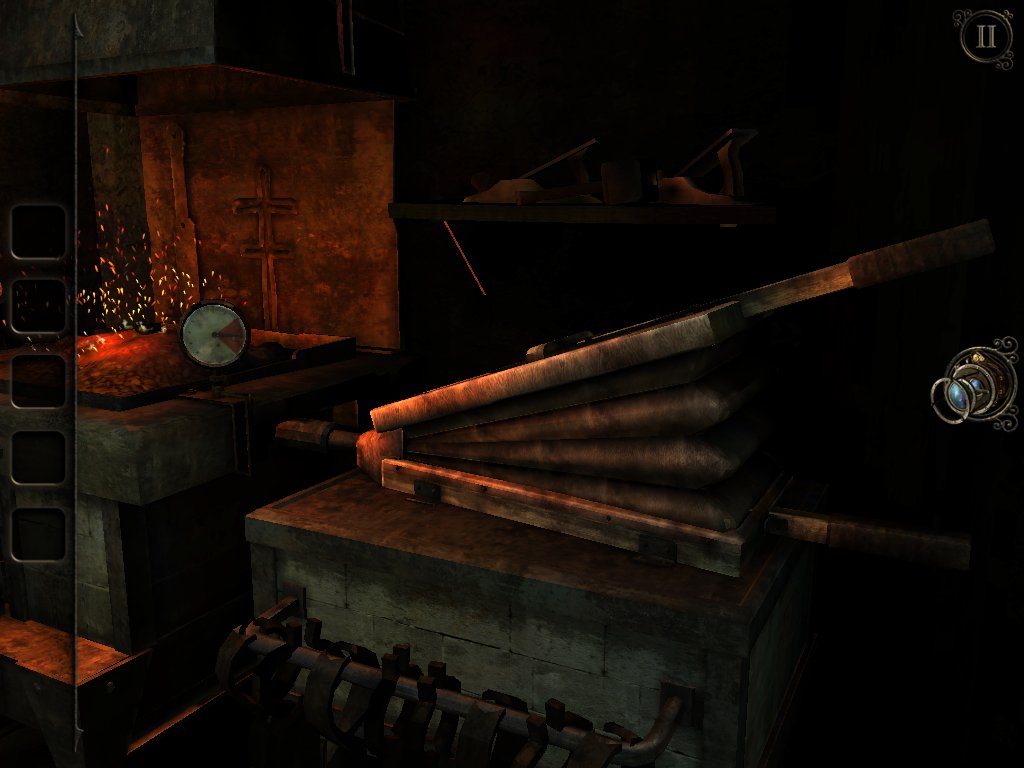
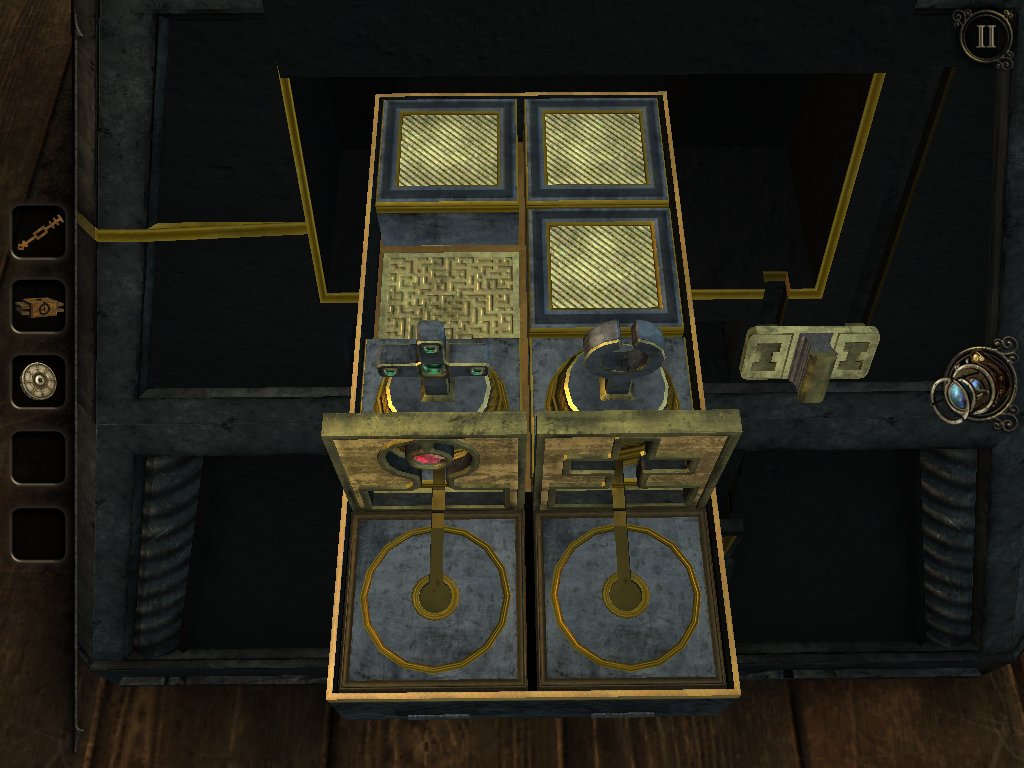
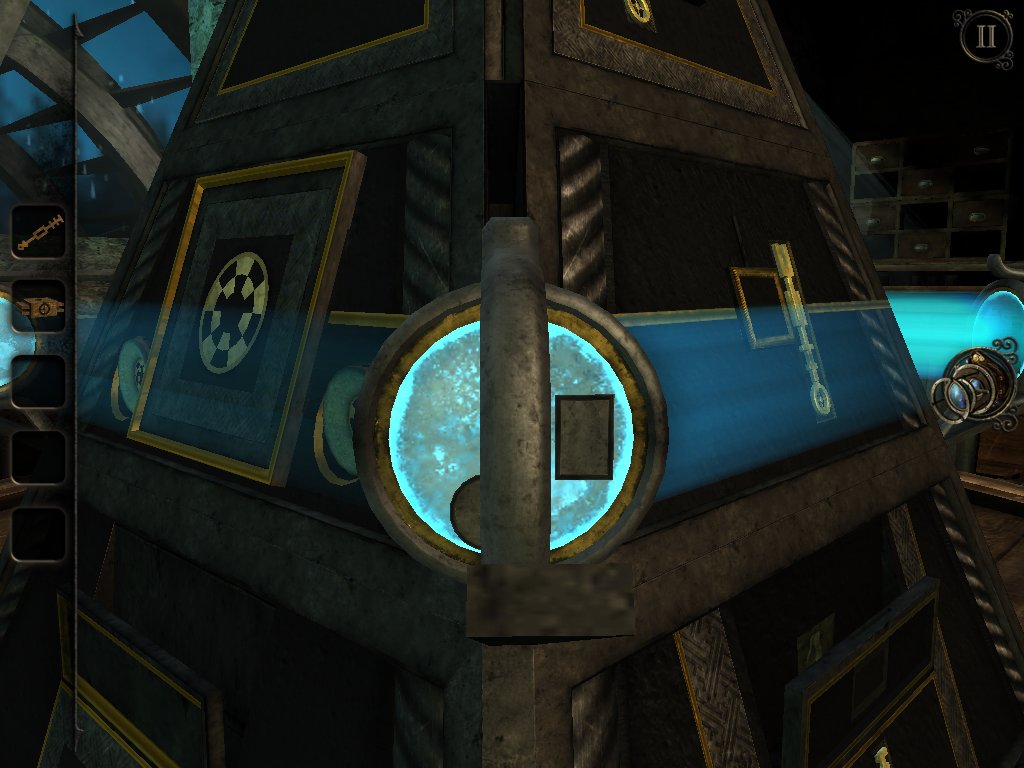
Приближаем взгляд к рабочему столу, смотрим на замочную скважину выдвижного ящика справа. Вставляем МАЛЕНЬКОЕ УСТРОЙСТВО в виде ключа, поворачиваем его. Выдвигаем ящик, смотрим на его левую сторону. Двигаем влево бегунок, забираем из ящика РУКОЯТКУ. Устанавливаем ее в скважину левого выдвижного ящика и поворачиваем. Открываем ящик, читаем страницу дневника от 30 июля. Смотрим на внутреннюю поверхность правой боковины ящика, двигаем бегунок вверх.
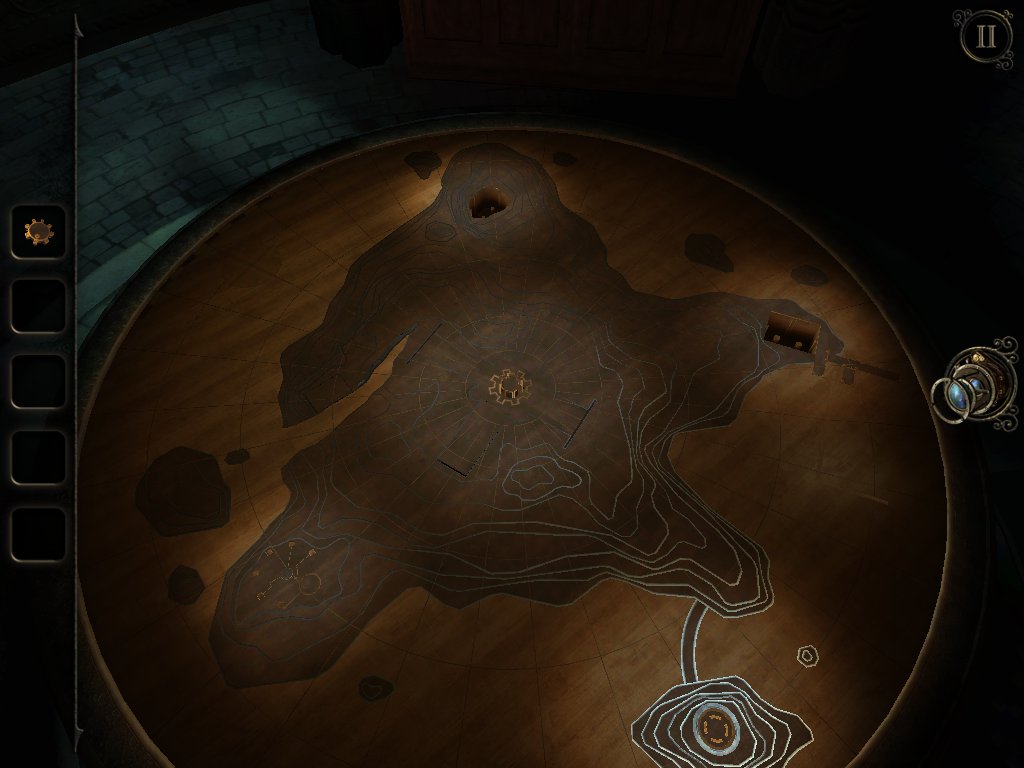
Автоматически перемещаем взгляд к трем кругам в центре боковины стола.
Поворачиваем левый круг, двигаем бегунок.
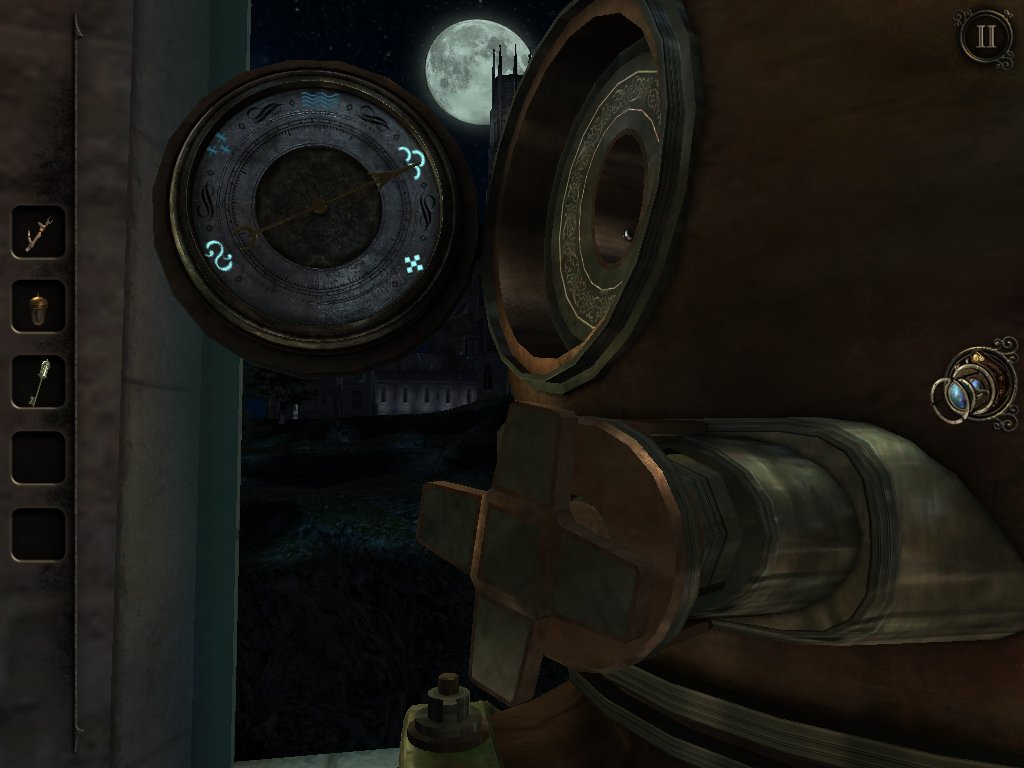
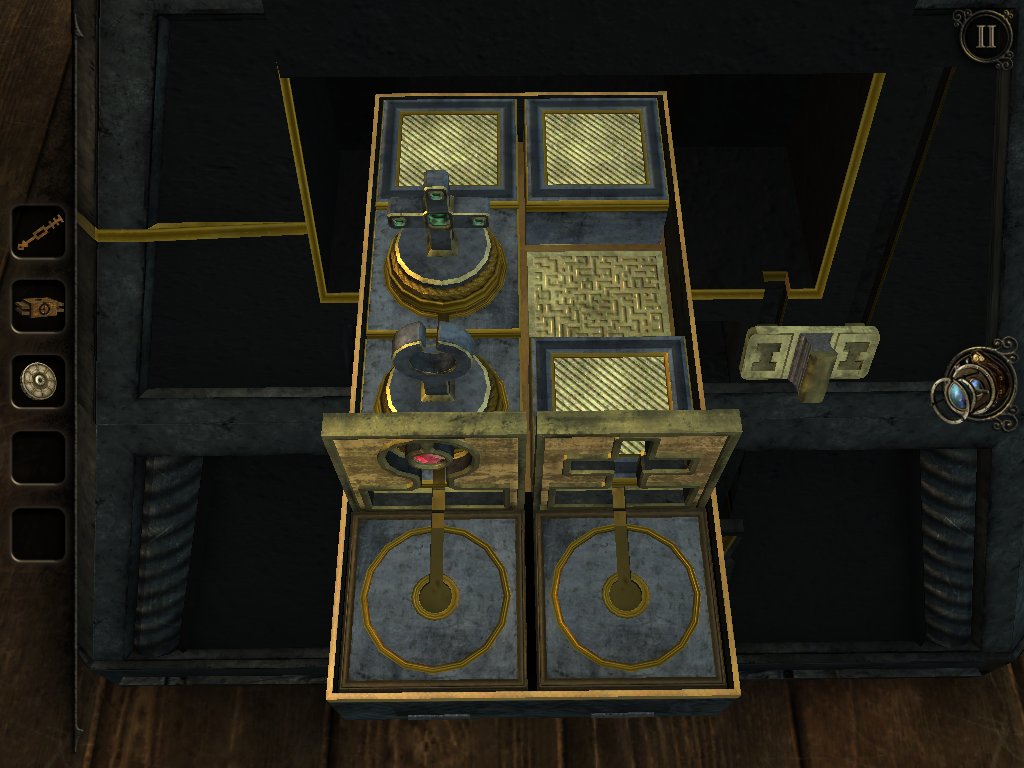
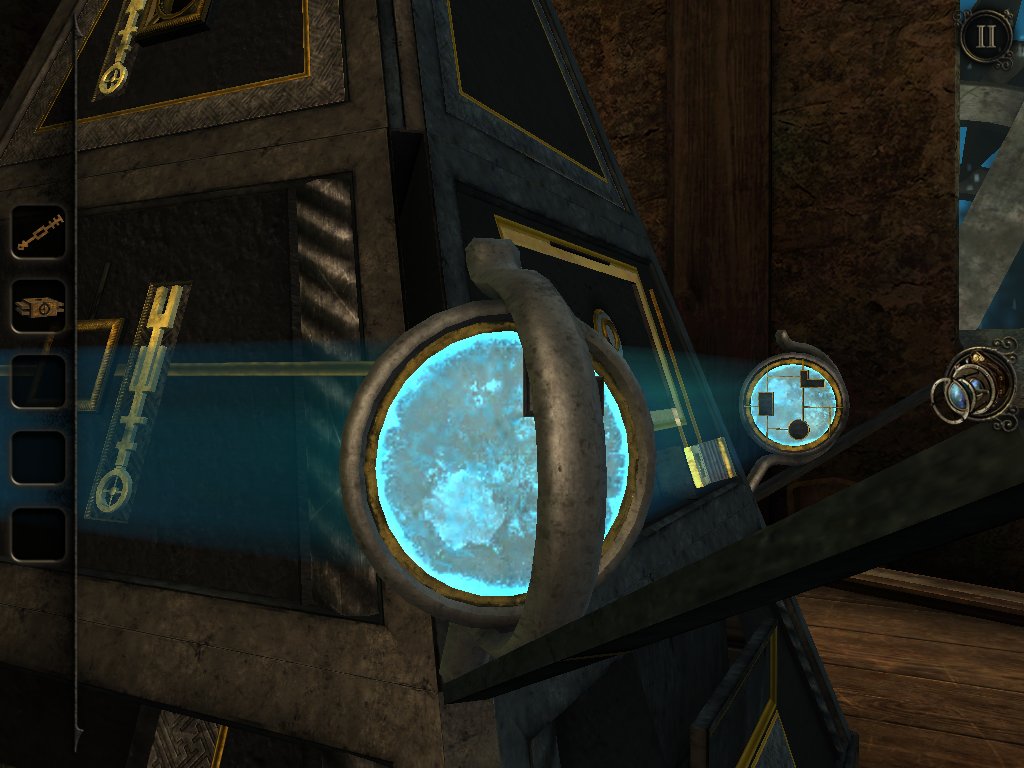
Автоматически перемещаемся к дверце справа.
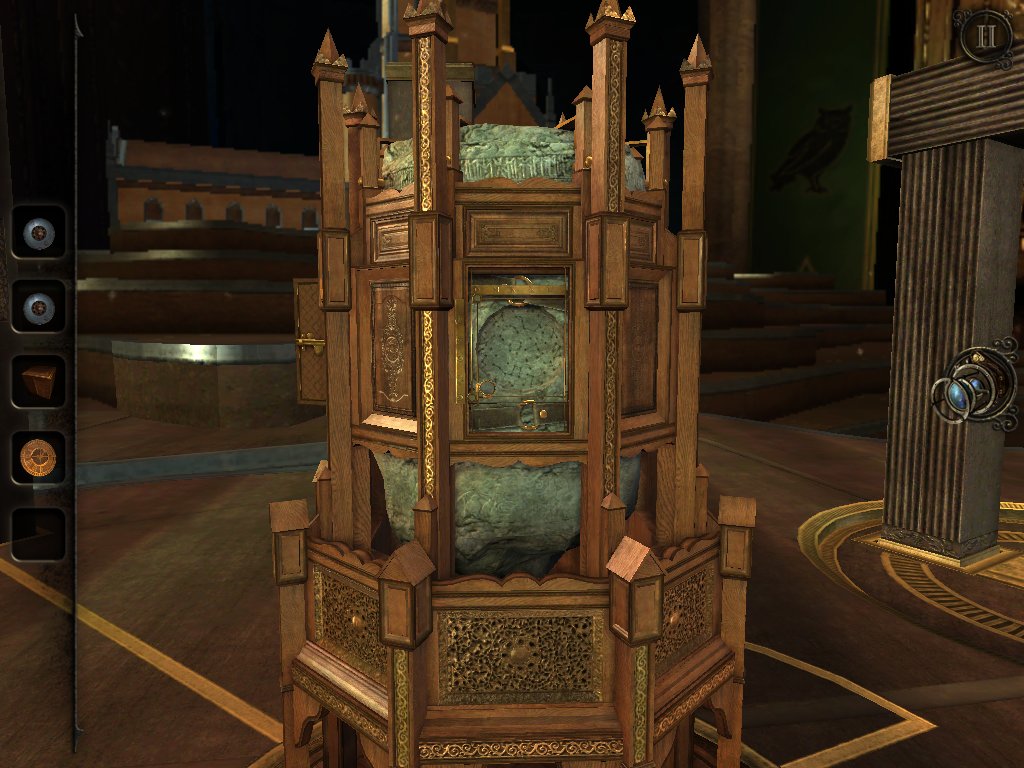
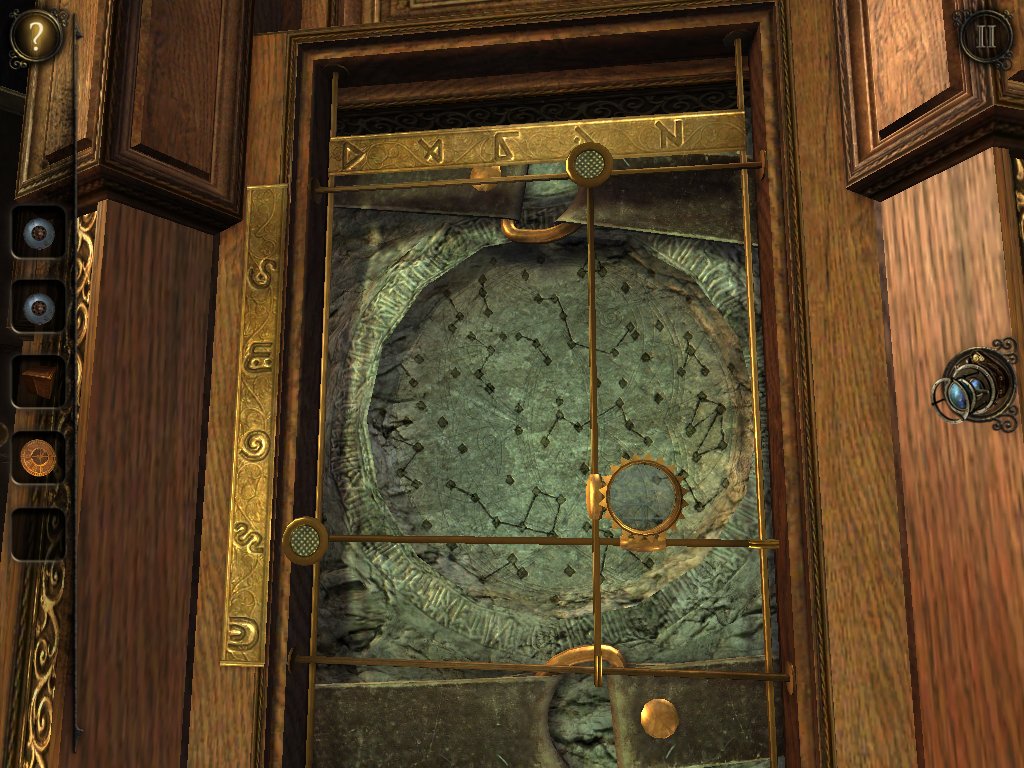
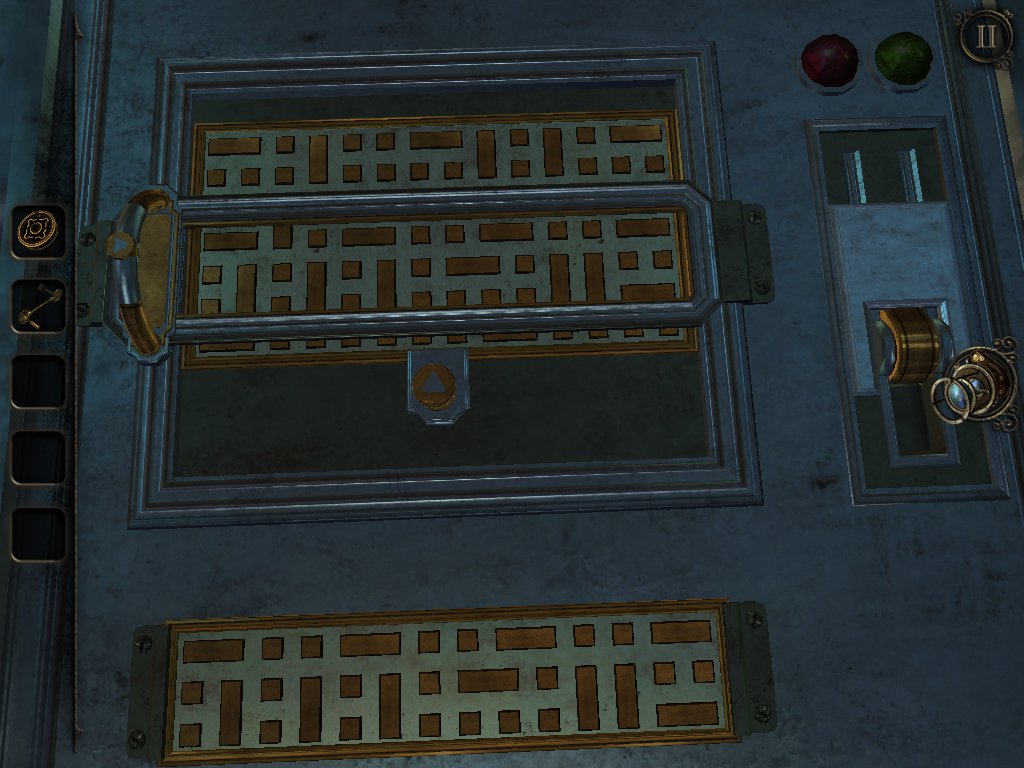
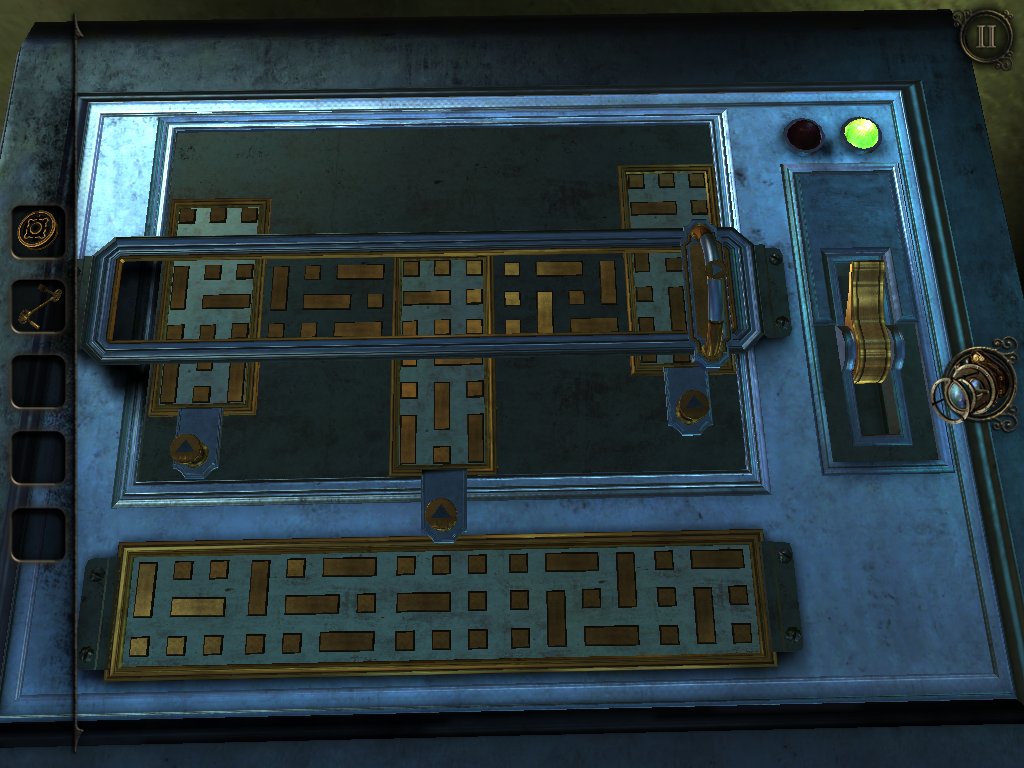
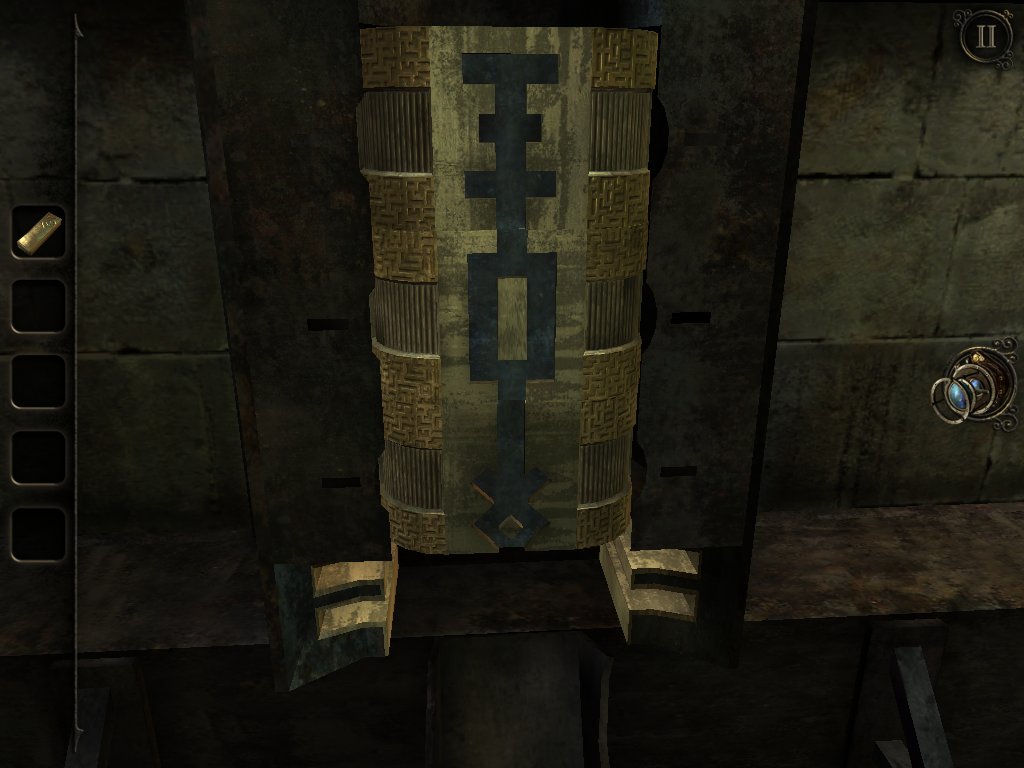
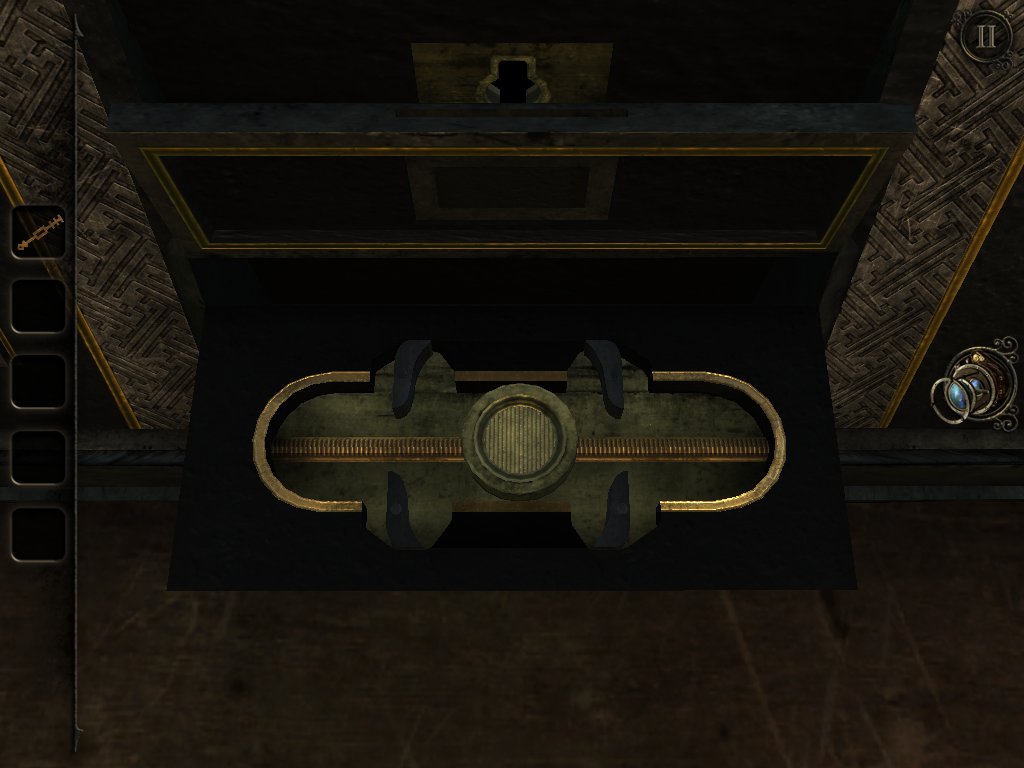
Открываем дверцу, читаем страницу дневника от 25 июля. Приближаем взгляд к головоломке внизу.

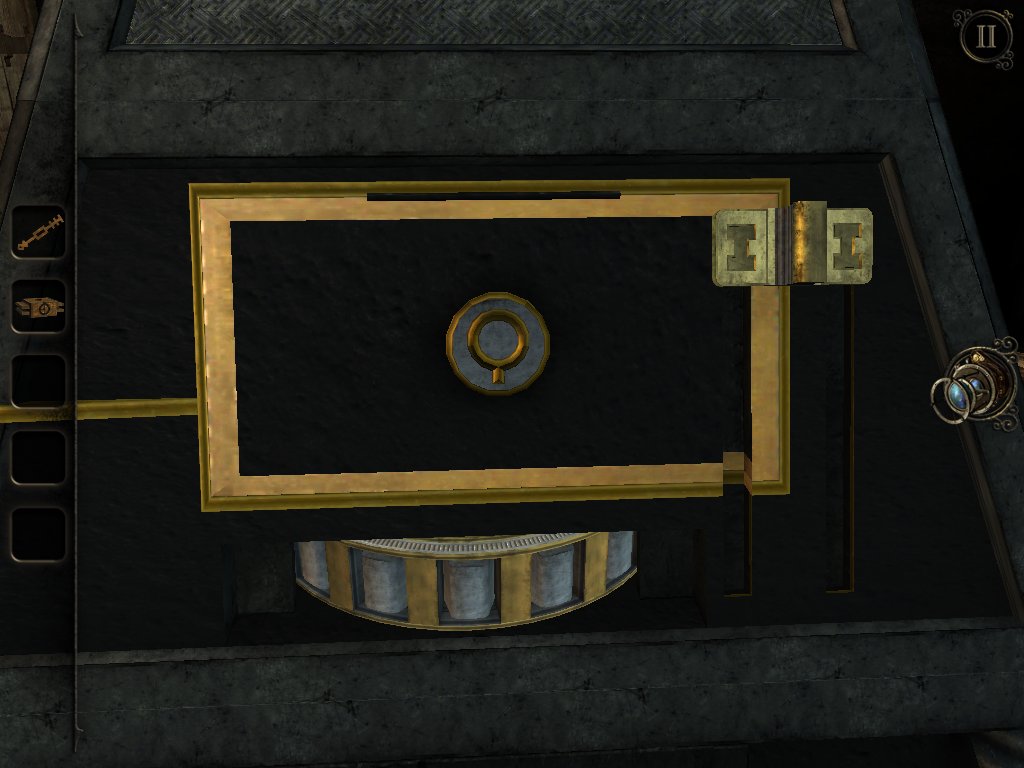
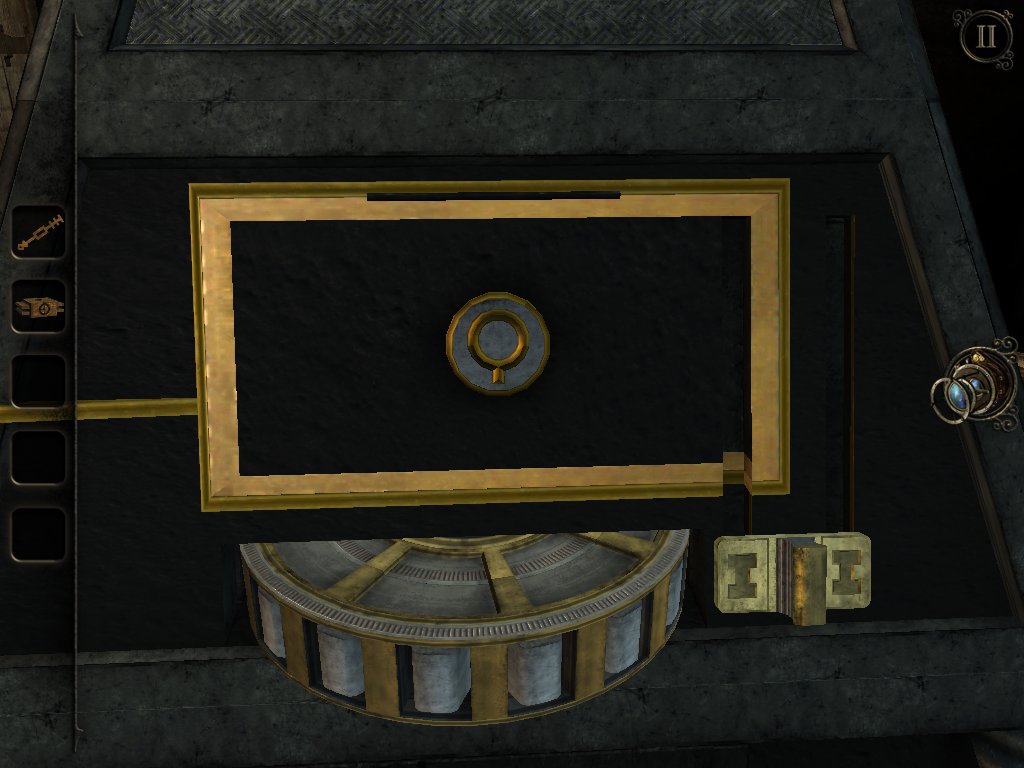
Двигаем рамку, перемещаем бегунки.
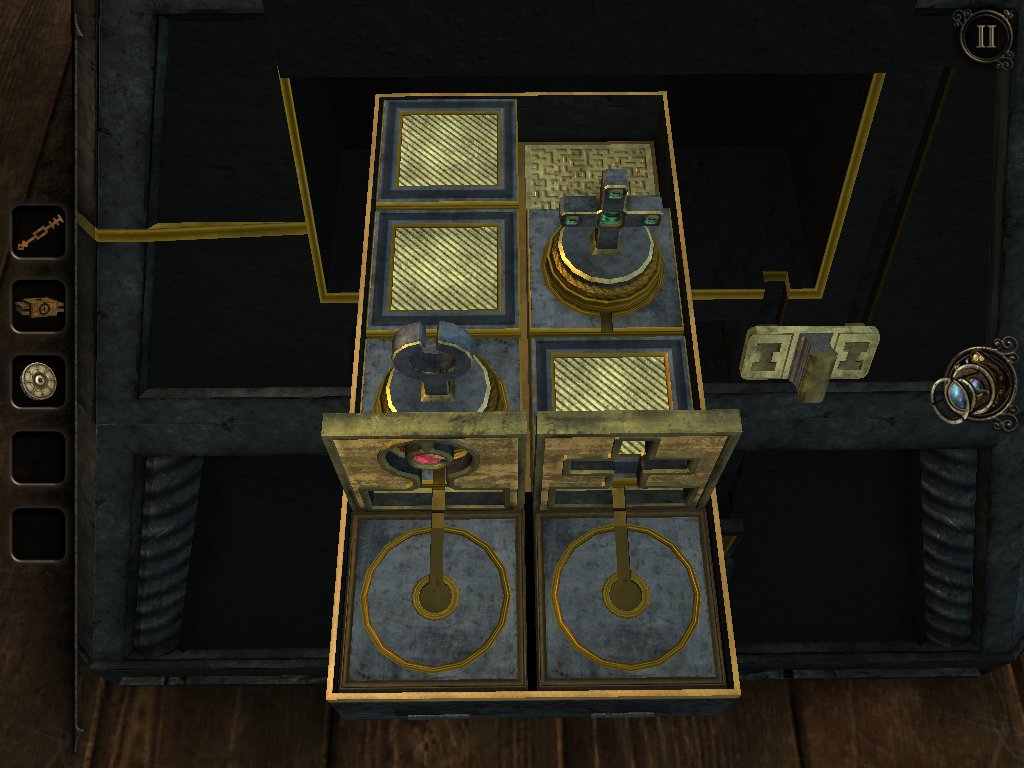
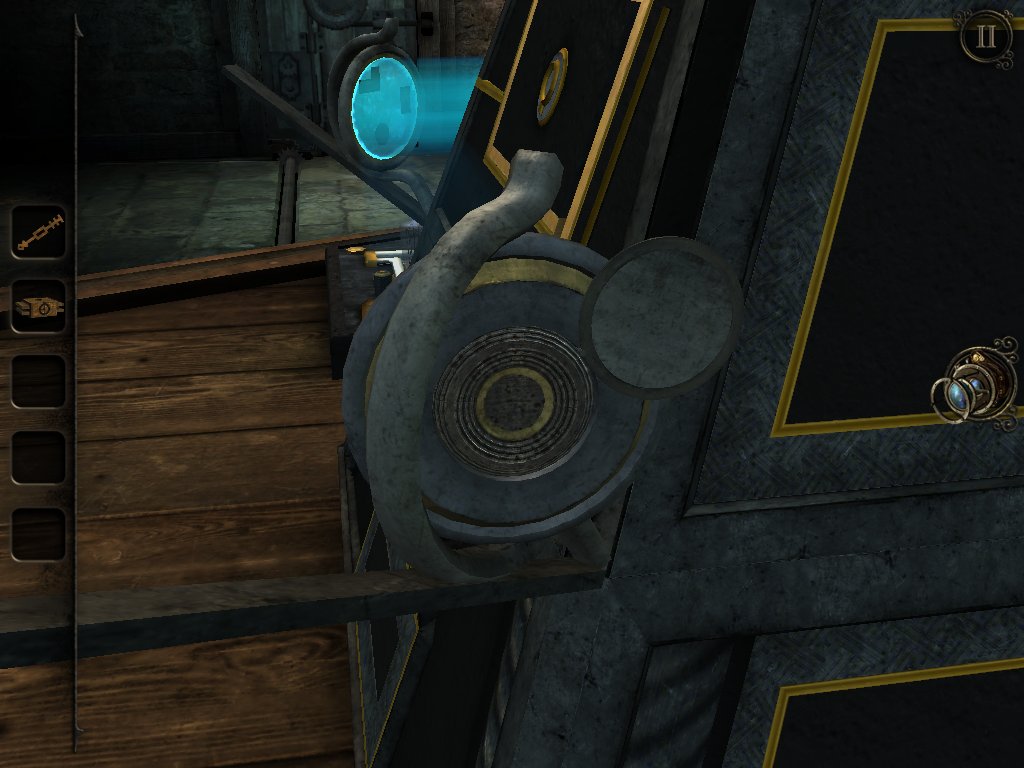
Автоматически переводим взгляд к кругам на боковине.
Поворачиваем левый и правый круги, выдвигаем ящик. Берем из него ЖЕТОН. Отодвигаемся. Спешим в центральную комнату, следуем в библиотеку. Направляемся к автомату гадалки Мэри. Выдвигаем лоток, кладем в него ЖЕТОН, задвигаем лоток.

Гадалка оживает, раскладывает карты и указывает на одну из них.
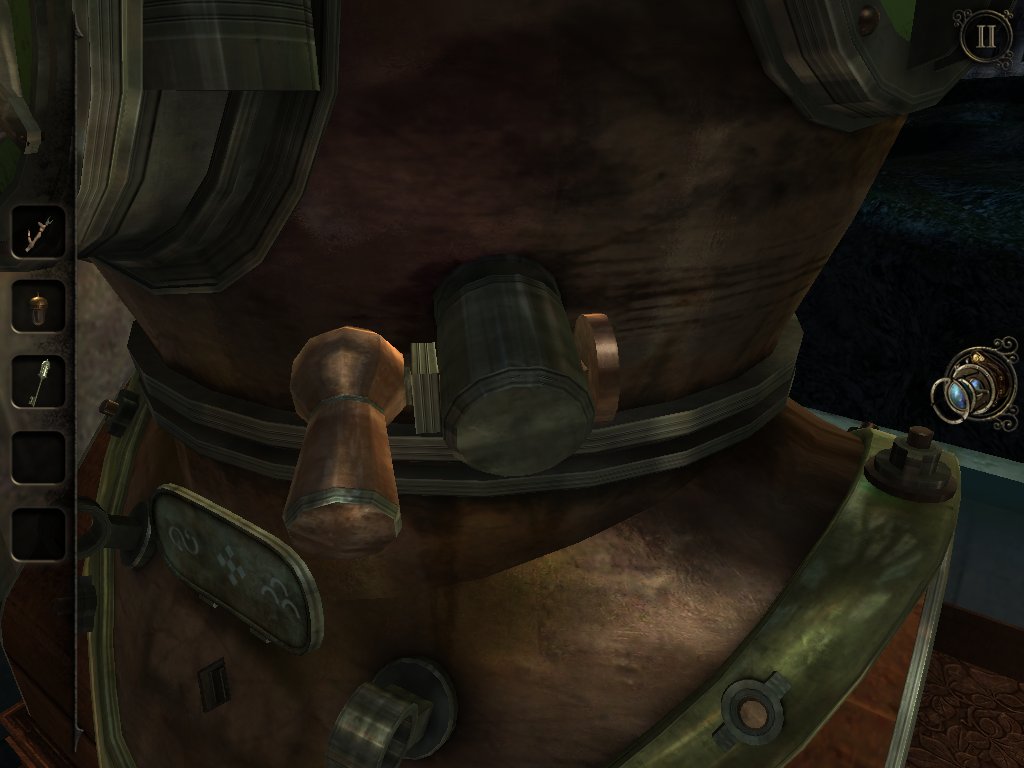
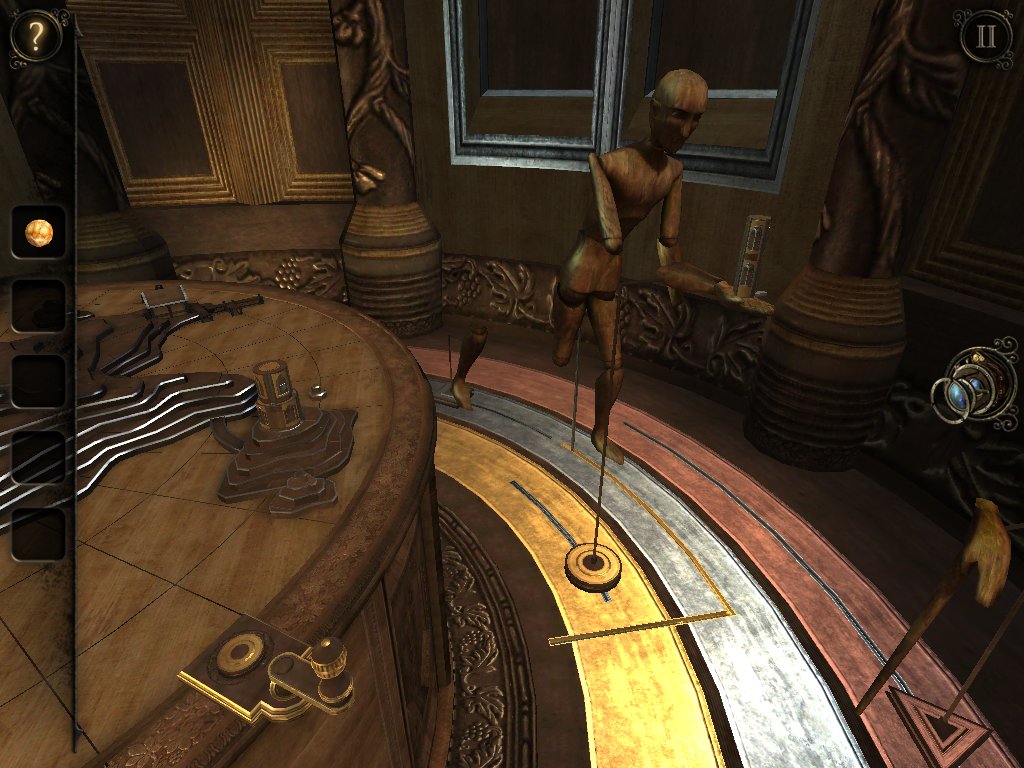
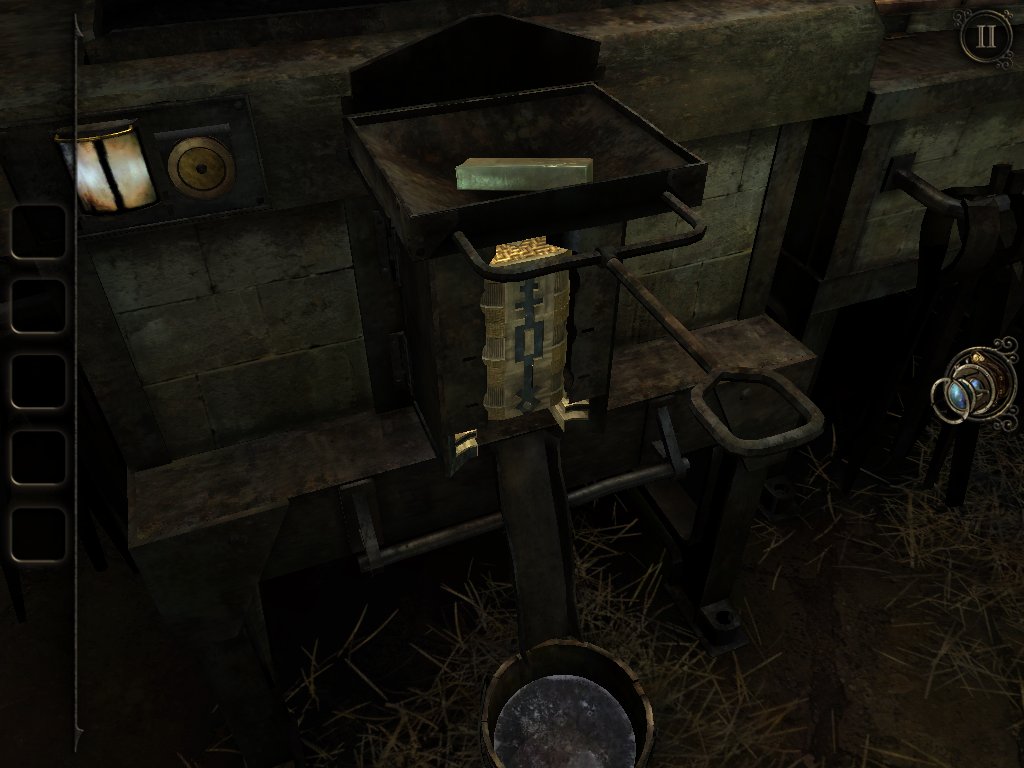
Забираем из выдвинувшегося ящика РУЧНОЙ МАХОВИК. Отодвигаемся.

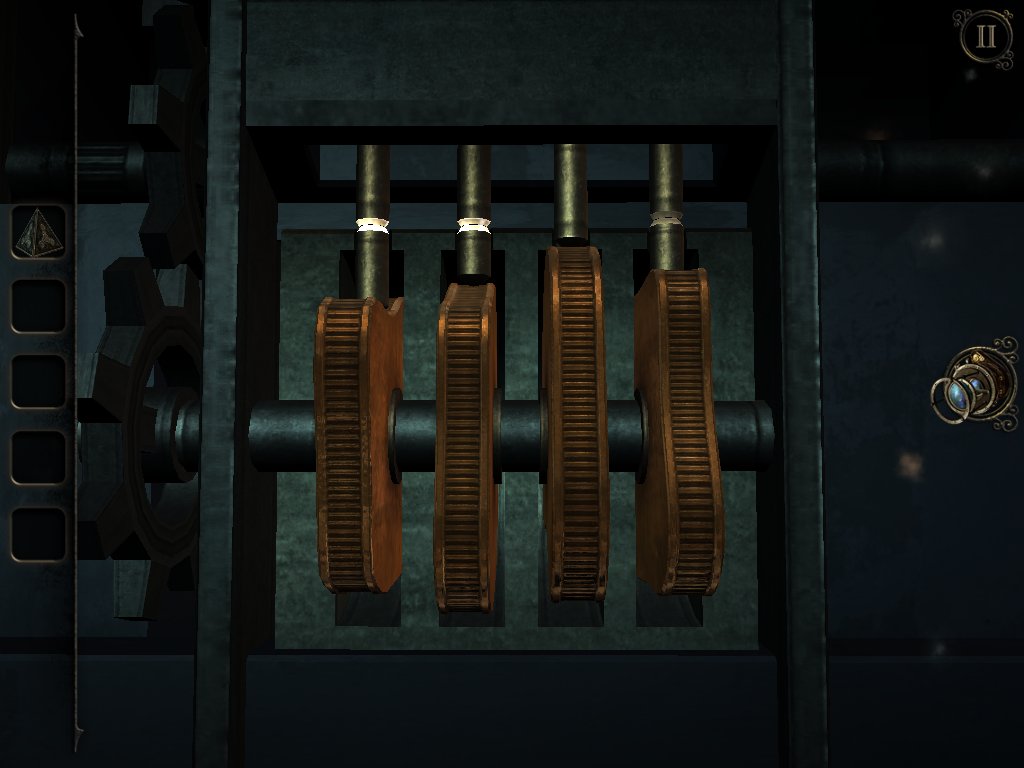
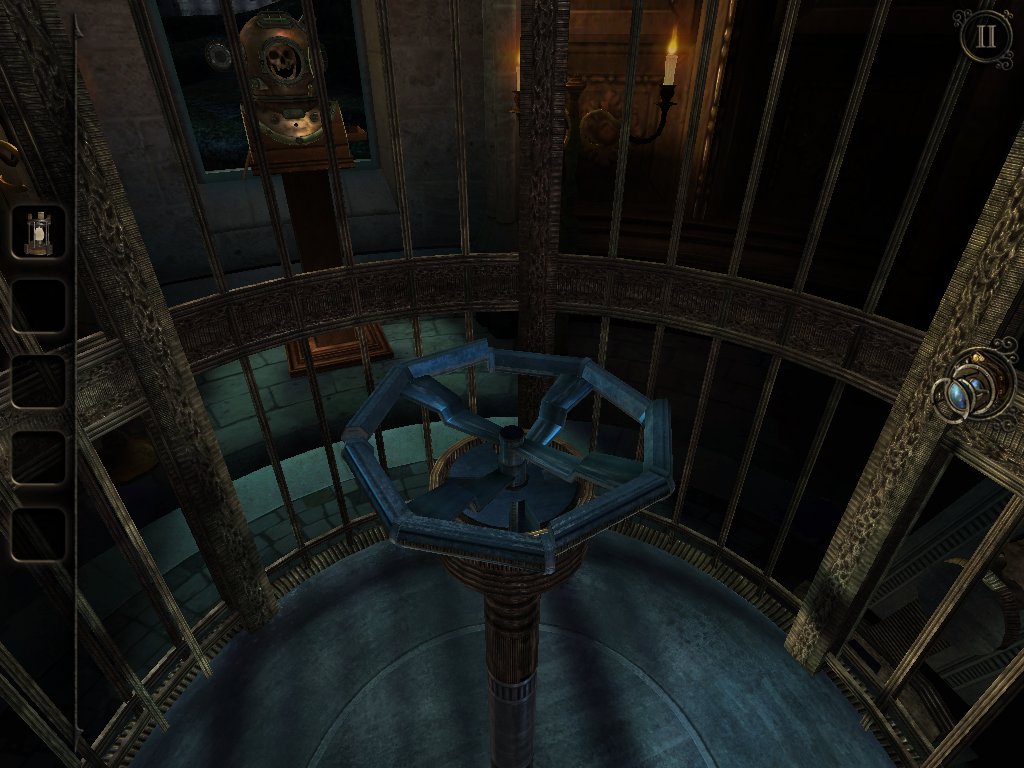
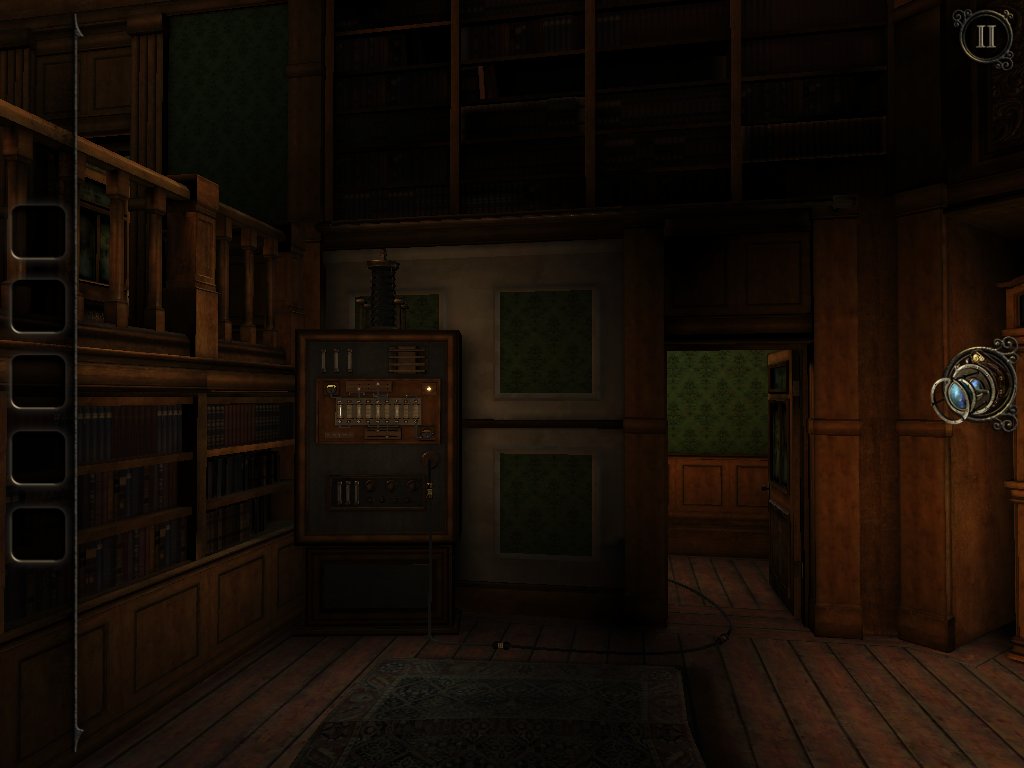
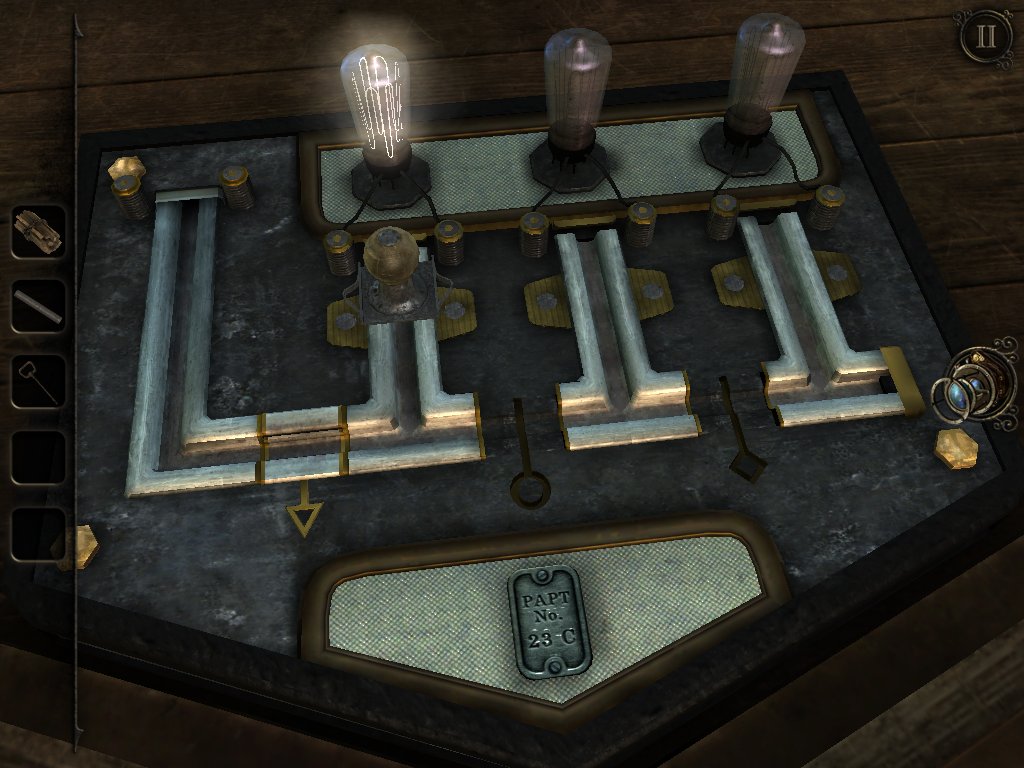
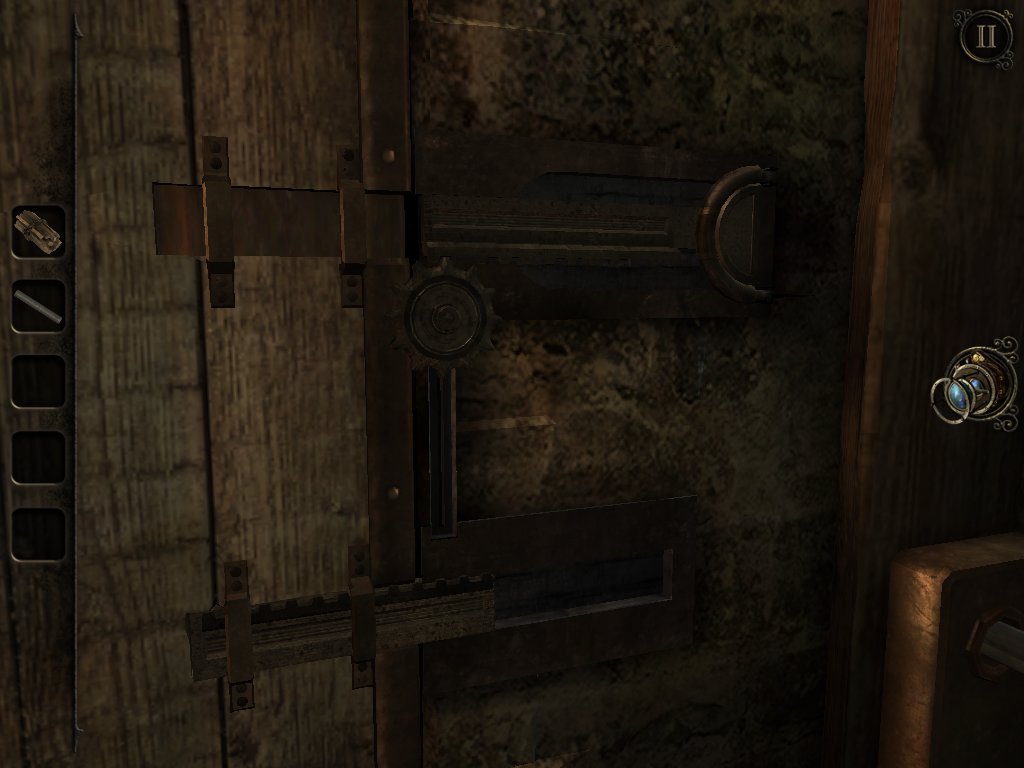
Читаем надпись, появившуюся на стекле будки. Возвращаемся в комнату с бассейном. Идем в комнату, в которой начинали игру. Устанавливаем РУЧНОЙ МАХОВИК на панель справа от решетки. Поворачиваем его, входими в открывшийся проход. Приближаем взгляд к счетному устройству у стены справа. Поворачиваем левый рычаг.

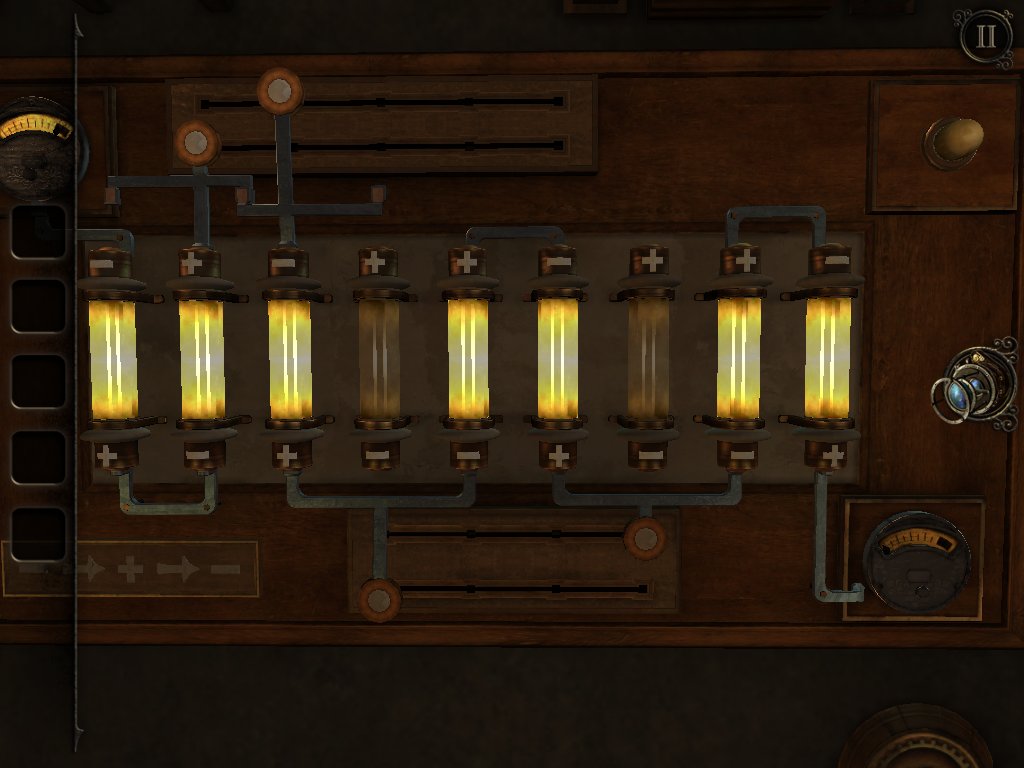
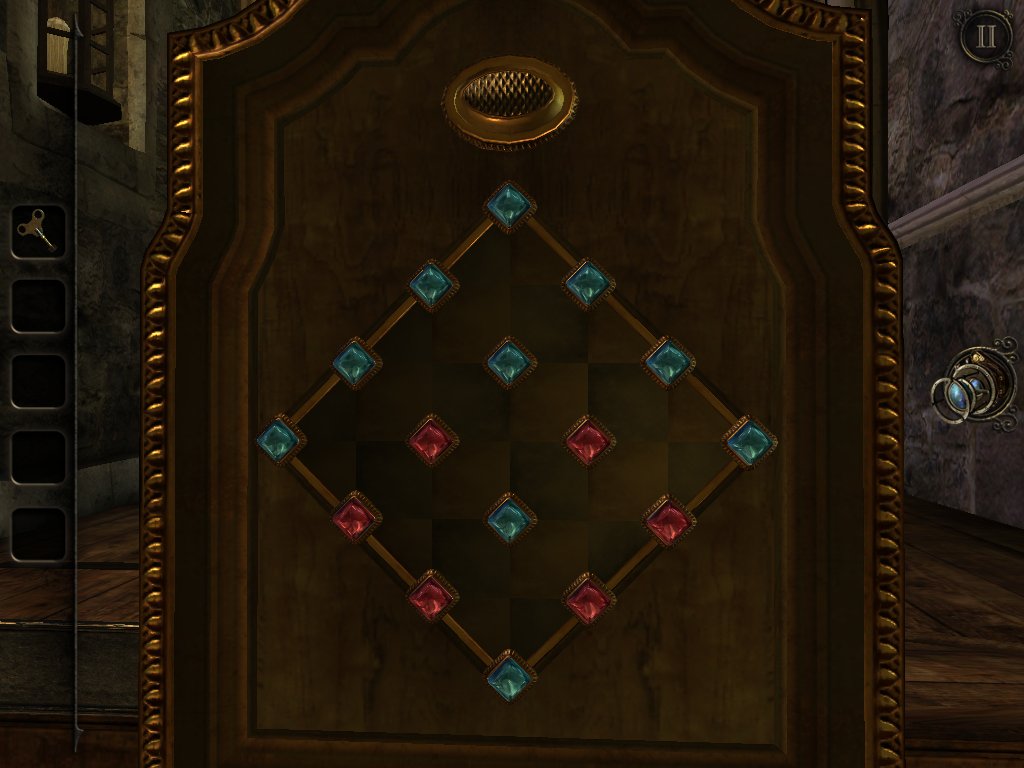
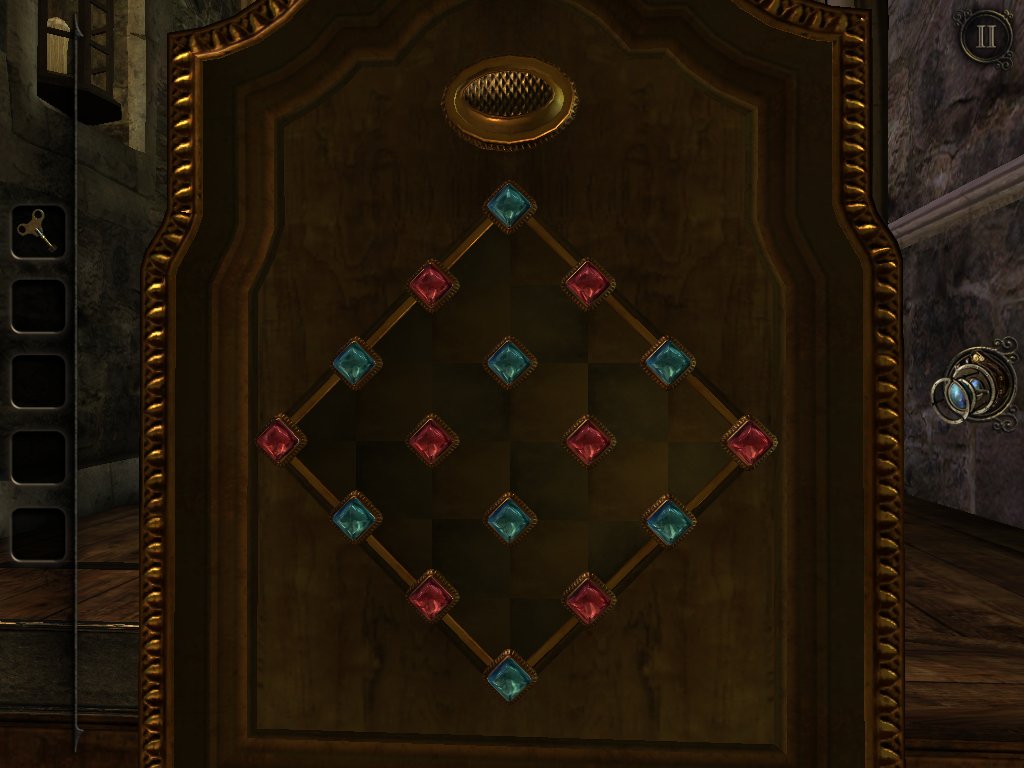
Составляем арифметическое действие, двигая тумблеры в сторону нужных чисел, действия с которыми дают нужный результат (08+04+05=17).

Поворачиваем рычаг в центре, двигаем тумблеры в сторону нужных чисел (07×04+3=31).

Поворачиваем правый рычаг, решаем следующую головоломку (08×02+07+03-05+09=30). Перемещаем взгляд к устройству справа.

Двигаем бегунки в положение, отмеченное светящимися точками
Загорается слово Library (библиотека).
Поворачиваемся к шкафчику с выдвижными ящиками, достаем страницу из дневника от 27 июля. Идем в центральную комнату. Направляемся в библиотеку.

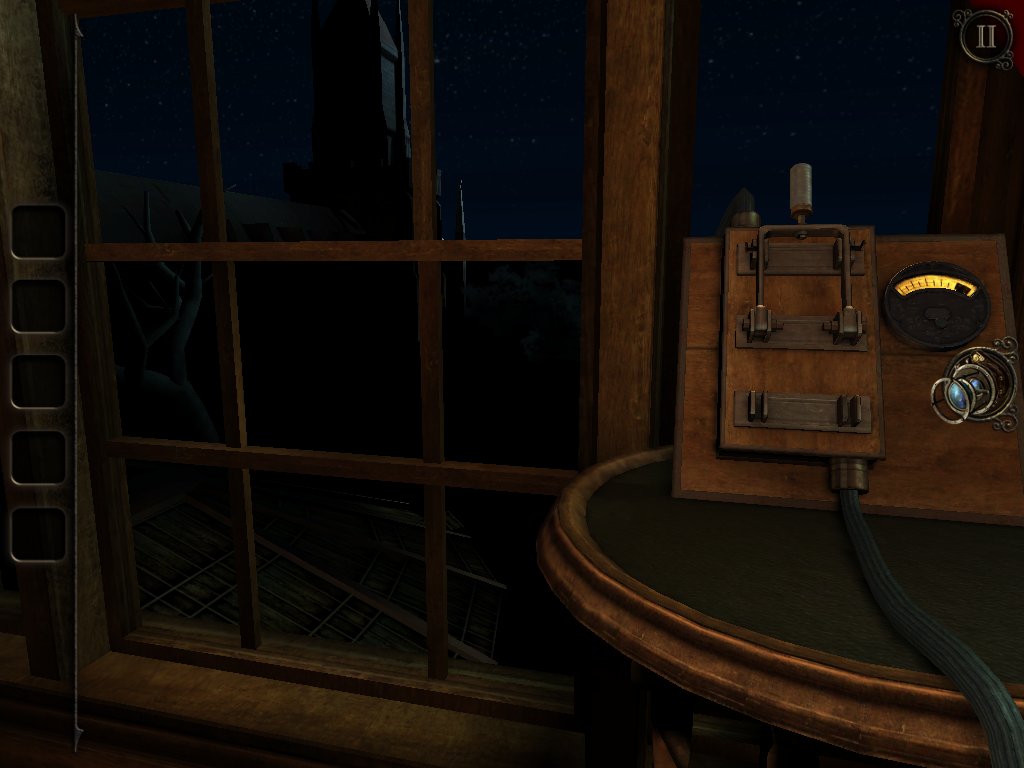
Приближаем взгляд к звонящему телефону. Переводим на аппарате рычажок в правое положение.
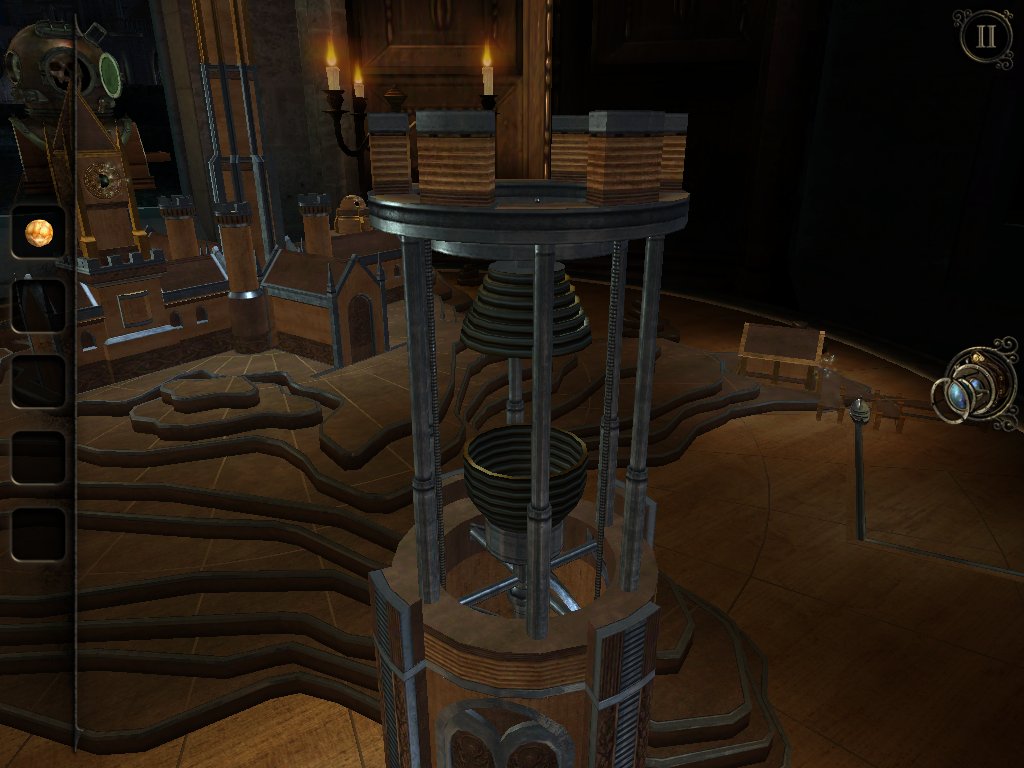
Автоматически перемещаем взгляд к фонографу.
Достаем из открывшегося цилиндра КРЕСТООБРАЗНЫЙ КЛЮЧ. Обращаем внимание на номер 1795. Отодвигаемся и направляемся в комнату со счетным устройством. Приближаем взгляд к шкафчику с выдвижными ящиками, вставляем КРЕСТООБРАЗНЫЙ КЛЮЧ в скважину. Поворачиваем ключ, выдвигаем ящик, достаем ЖЕТОН. Выходим из приближения. Перемещаемся в библиотеку. Приближаемся к автомату гадалки Мэри. Выдвигаем лоток, кладем в него ЖЕТОН, задвигаем лоток.

Гадалка раскладывает карты и указывает на одну из них.
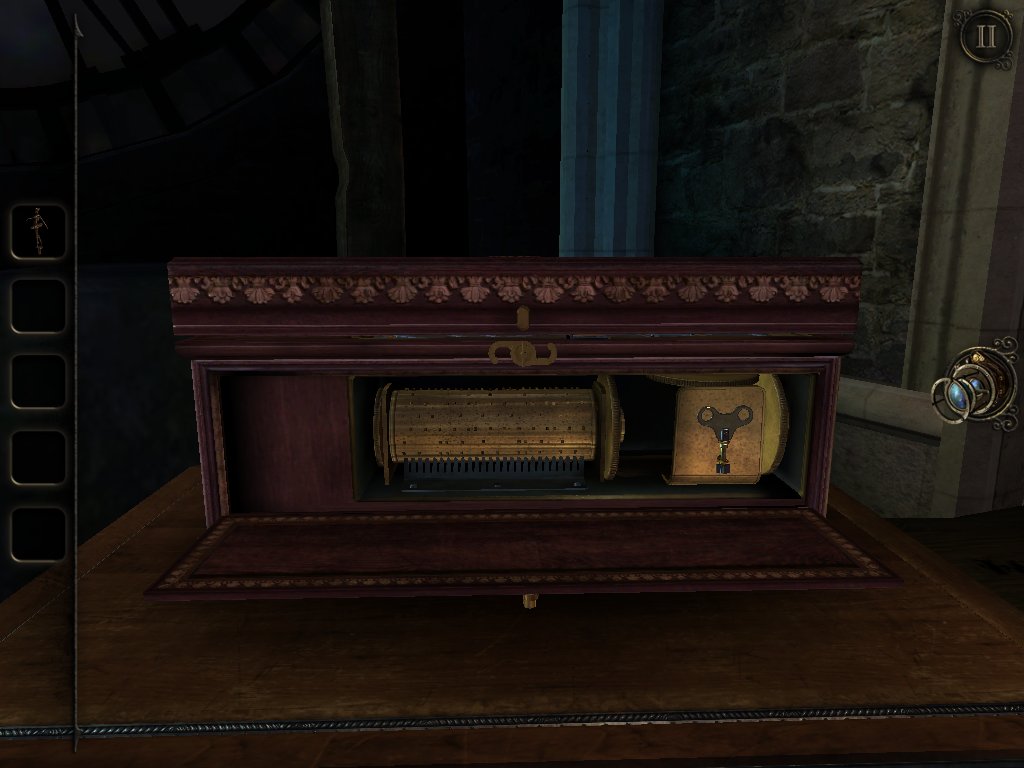
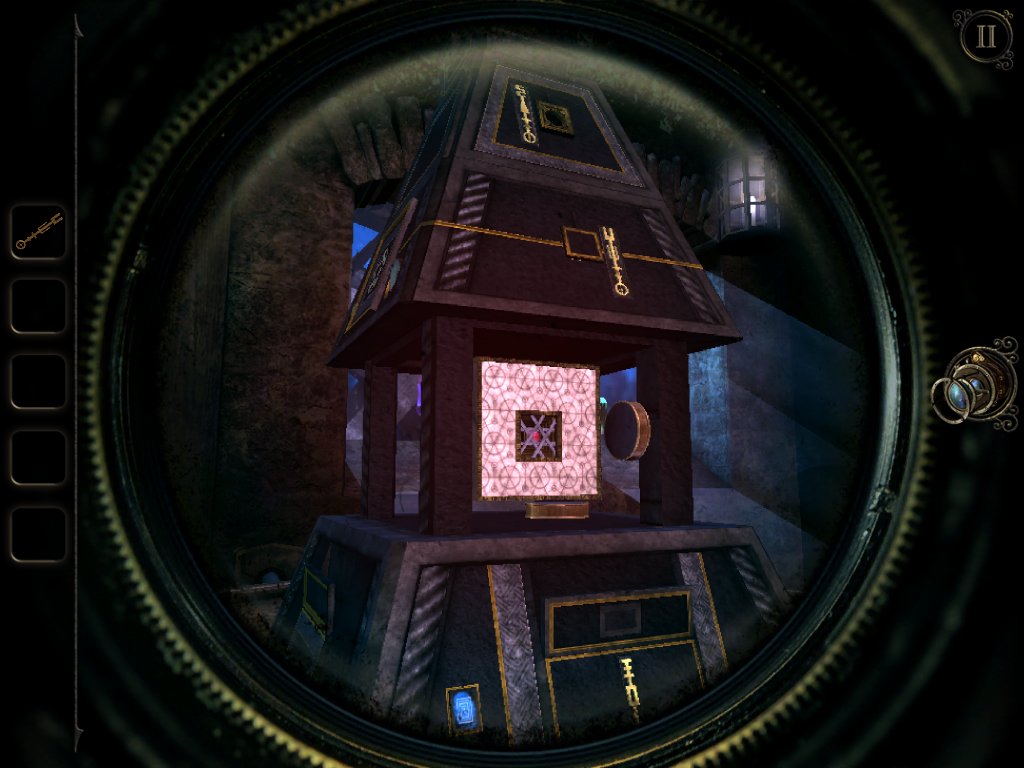
Из выдвинувшегося ящика достаем ИЗОГНУТУЮ РУКОЯТКУ. Поднимаемся в комнату на втором этаже библиотеки.

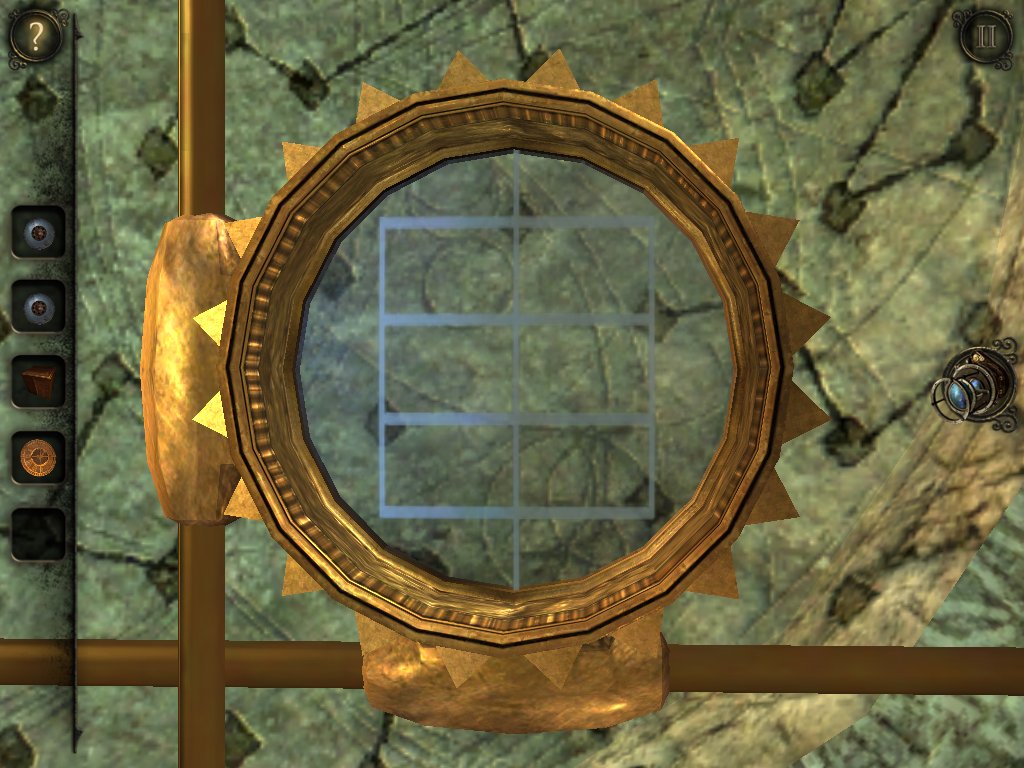
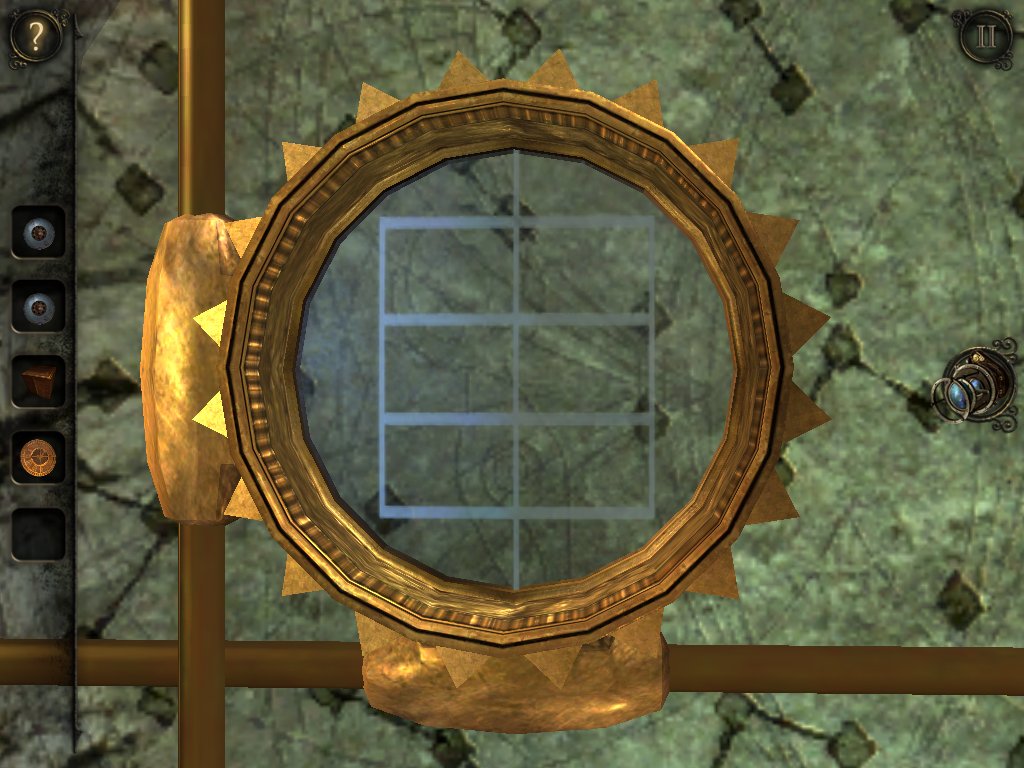
Приближаем взгляд к правой стороне закрытой книги, вставляем в прорезь ИЗОГНУТУЮ РУКОЯТКУ. Вращаем ее, раскрываем книгу.

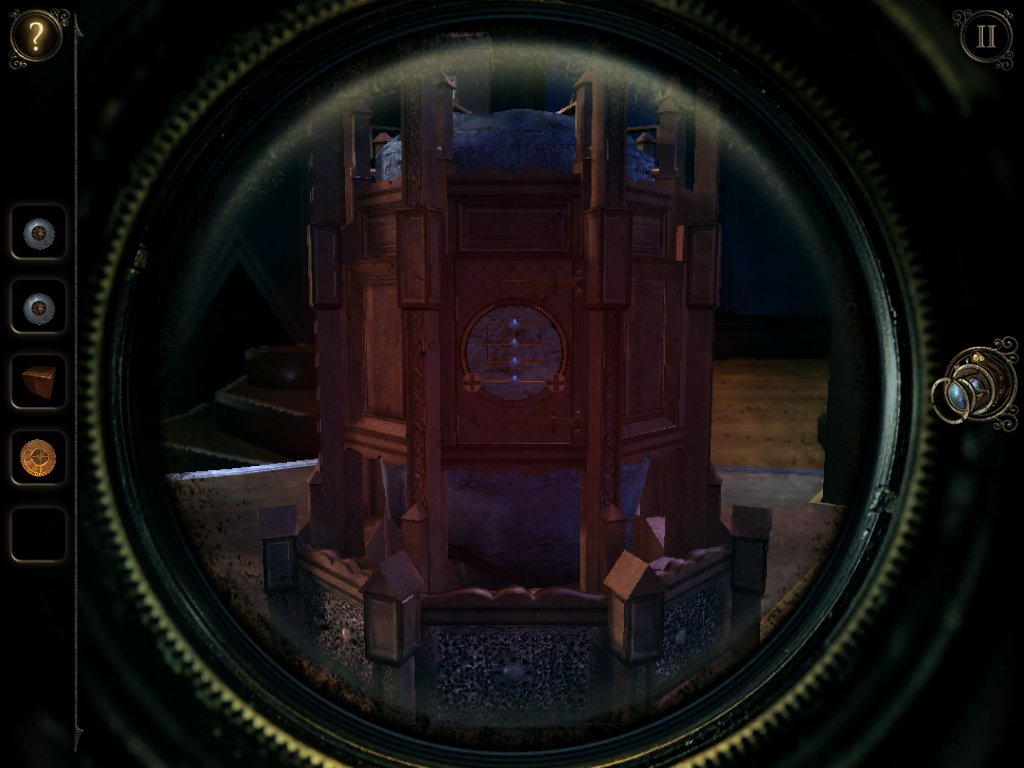
С помощью ОКУЛЯРА заглядываем за кулисы появившейся сцены. Приближаем взгляд к фонографу, забираем ПУСТОЙ ВОСКОВОЙ ЦИЛИНДР. Отодвигаемся и спускаемся к фонографу в библиотеке. Вставляем ЦИЛИНДР в фонограф (в цилиндр, из которого забирали рукоятку). Выходим из приближения и движемся в центральную комнату. Следуем в оранжерею.

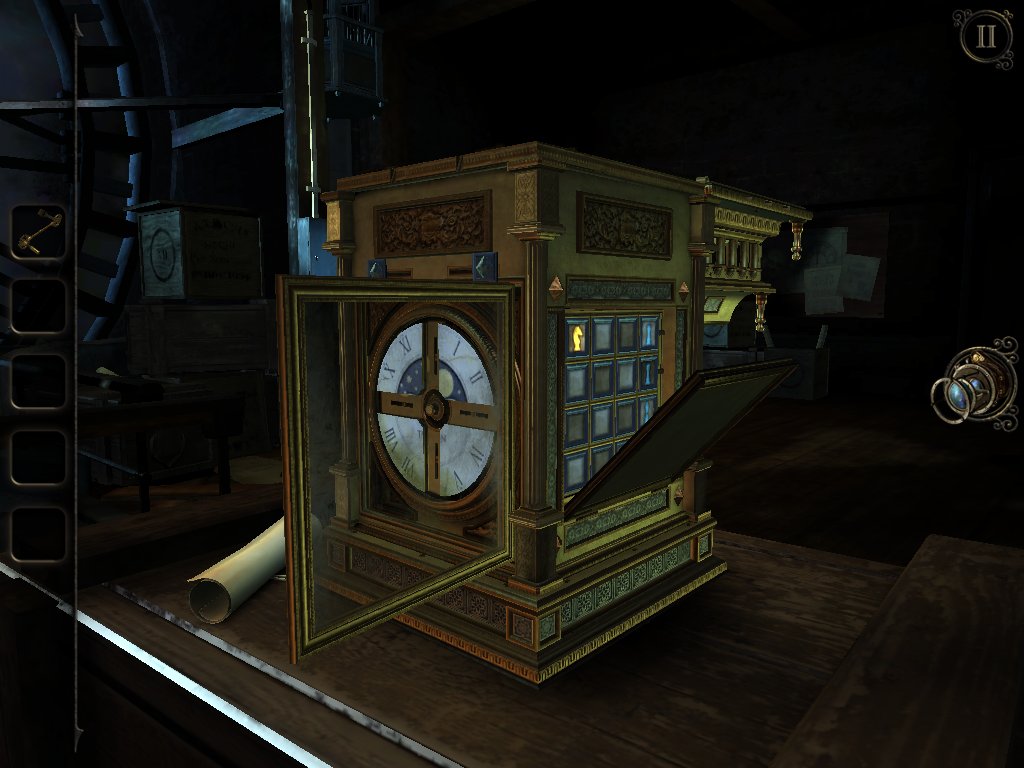
Приближаем взгляд к фонографу на столе, читаем лежащую рядом с ним страницу дневника от 7 августа. Вставляем ИЗОГНУТУЮ РУКОЯТКУ в гнездо, вращаем ее.
Начинает звучать музыка, записанная на пластинке.
С помощью телефонного диска набираем номер 1795.
Автоматически отодвигаемся от аппарата.
Возвращаемся в библиотеку. Забираем из фонографа ЗАПИСАННЫЙ ВОСКОВОЙ ЦИЛИНДР. Отодвигаемся и поднимаемся на второй этаж. С помощью ОКУЛЯРА заглядываем за кулисы сцены в книге. Устанавливаем ЦИЛИНДР в фонограф, нажимаем на кнопку. Из выдвинувшегося ящика забираем ЖЕТОН. Читаем страницу дневника от 3 августа. Выходим из приближения. Следуем к автомату гадалки в библиотеке. Выдвигаем лоток, кладем в него ЖЕТОН, задвигаем лоток.
Гадалка раскладывает карты и указывает на одну из них.
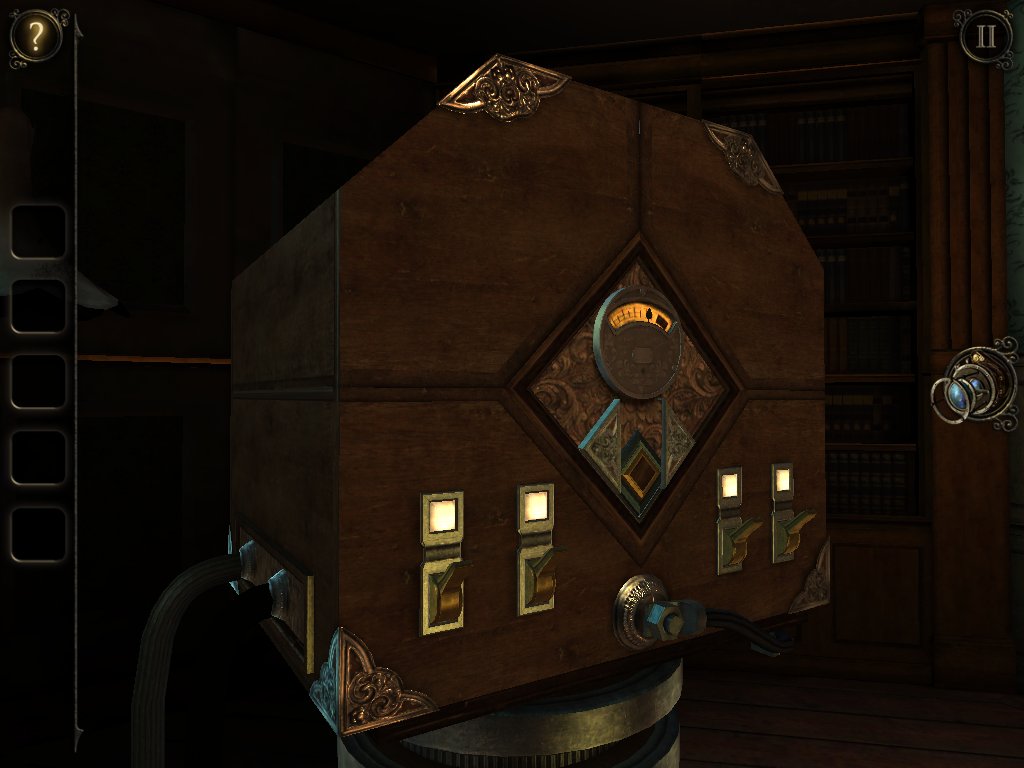
Из выдвинувшегося ящика достаем МЕТАЛЛИЧЕСКОЕ УСТРОЙСТВО. Отодвигаемся, заходим в кабину лифта и поднимаемся. Проходим коридор.

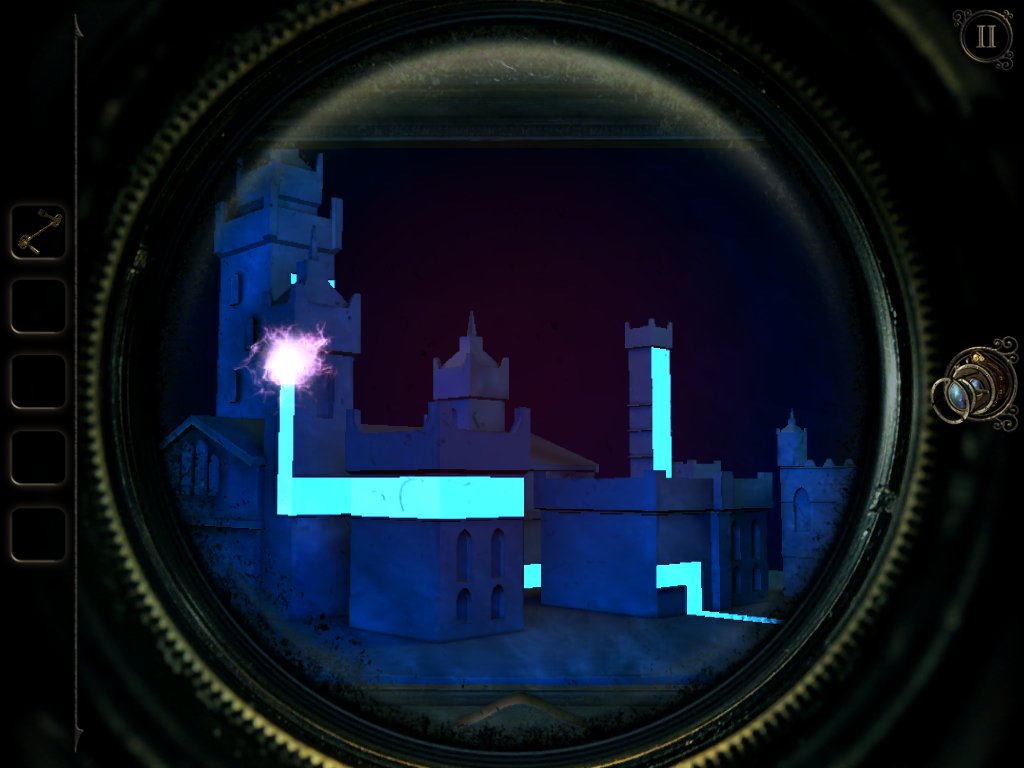
Приближаем взгляд к ограждению в месте, находящемуся рядом со столиком, на котором стоял сейф. Вставляем в гнездо МЕТАЛЛИЧЕСКОЕ УСТРОЙСТВО. Используем ОКУЛЯР. Двигаем мышью, вращаем колесо таким образом, чтобы соединить части ключа. Забираем КЛЮЧ, отодвигаемся. Идем в центральную комнату, следуем в оранжерею.

В первом помещении приближаем взгляд к нарушенной кирпичной кладке стены, слева от двери в соседнее помещение. Вынимаем кирпичи, с помощью ОКУЛЯРА заглядываем в отверстие. Вращаем диски, создаем изображение головки ключа. Выходим из приближения, перемещаемся в соседнее помещение. Оборачиваемся, приближаем взгляд к отверстию в стене. Вставляем КЛЮЧ в прорезь, поворачиваем его.
Ничего не происходит.
Возвращаемся к отверстию в кирпичной стене с обратной стороны. Заглядываем в него с помощью ОКУЛЯРА. Поворачиваем планку ключа, выходим из приближения. Снова спешим в соседнее помещение. Вставляем КЛЮЧ в прорезь, поворачиваем его.
Вновь ничего не происходит.
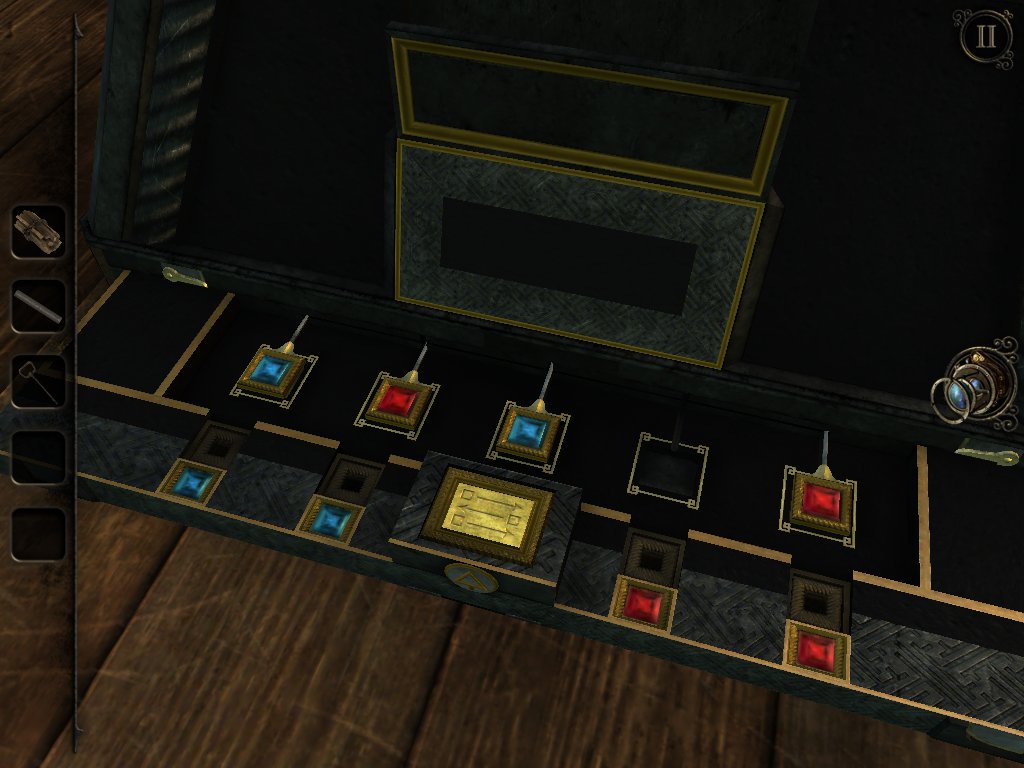
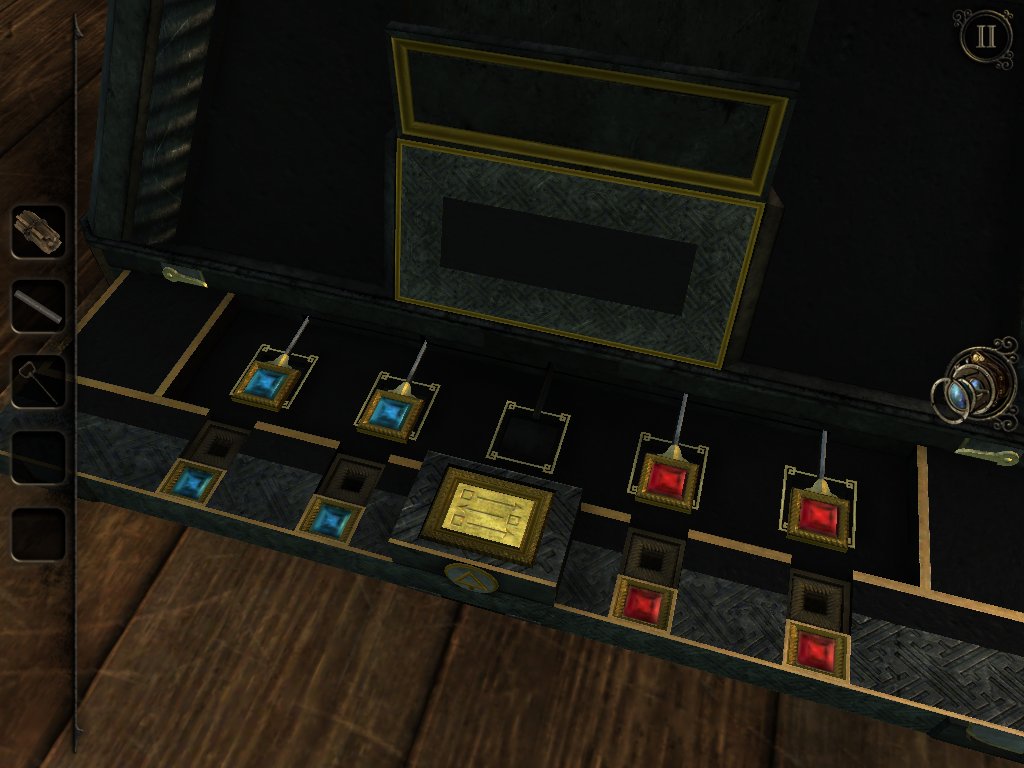
Повторяем манипуляцию с планкой ключа в отверстии в кирпичной стене. Возвращаемся и поворачиваем КЛЮЧ в третий раз. Достаем из выдвинувшегося ящика ЖЕТОН. Выходим из приближения, идем к автомату гадалки. Выдвигаем лоток, кладем в него ЖЕТОН, задвигаем лоток.

Гадалка раскладывает карты и указывает на одну из них.
Из выдвинувшегося ящика берем НЕОБЫЧНЫЙ АРТЕФАКТ.

Автомат с гадалкой отключается.
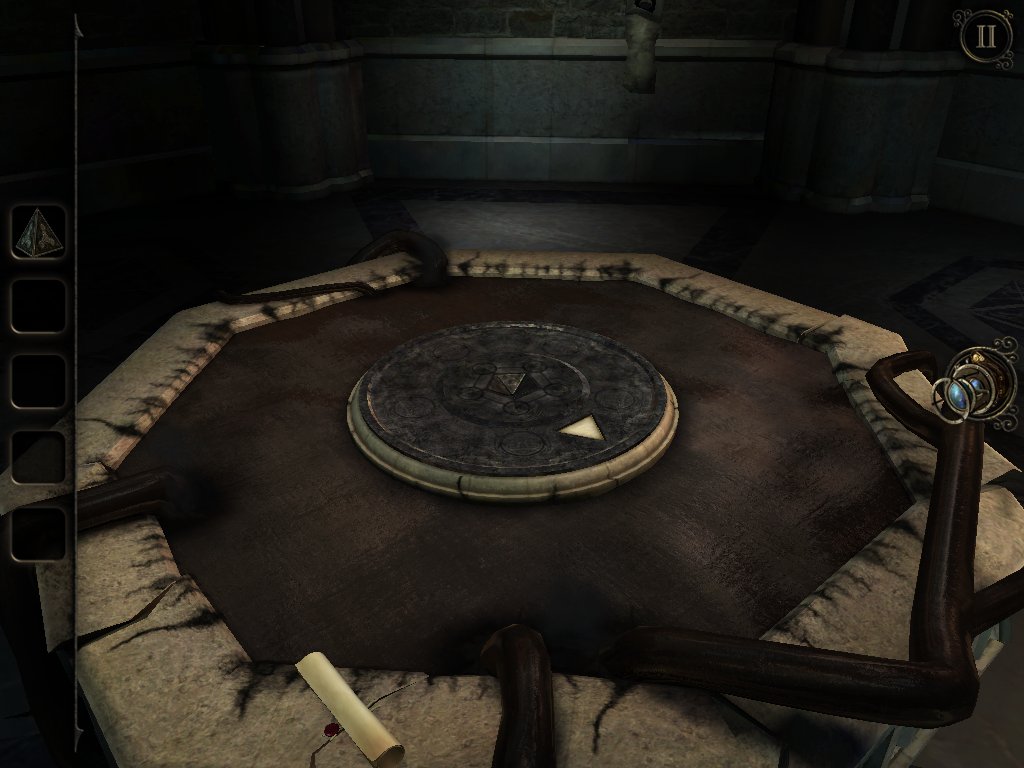
Возвращаемся в центральную комнату, направляемся через пролом в стене в башню с проектором. Выполняем все действия, описанные в пятом эпизоде до того момента, когда нужно войти в дверь купе поезда. Вместо этого помещаем НЕОБЫЧНЫЙ АРТЕФАКТ на башенку слева. Вращаем колесико, заглядываем в окошко с помощью ОКУЛЯРА.

Решаем головоломку, в которой нужно двигать бегунок за исходящим из кристалла лучом, чтобы зажечь все ячейки. Нажимаем на кнопку, открывшуюся на вершине башенки, следуем на выход в новый проем. Смотрим третий финал игры, читаем письмо.
Концовка «LOST»
Из центральной комнаты идем в пролом, направляясь в башню с проектором. Выполняем все действия до того момента, когда нужно войти в дверь купе поезда. Вместо этого, устанавливаем на правую башенку НЕОБЫЧНЫЙ АРТЕФАКТ. НЕ ЗАГЛЯДЫВАЕМ в него, а переводим взгляд не его обратную сторону. С помощью ОТВЕРТКИ вывинчиваем винт, сдвигаем крышку вправо. Возвращаемся к окошку, открываем его, заглядываем внутрь с помощью ОКУЛЯРА. Решаем уже знакомую головоломку с направлением на кристалл всех лучей. НЕ ПРОXОДИМ в появившуюся дверь, а помещаем второй НЕОБЫЧНЫЙ АРТЕФАКТ на башенку слева. Решаем головоломку с бегунком и лучами. Выходим в новую дверь.

Игра пройдена на 100%..
P.S. Видеопрохождение этой игры смотрите на следующей страничке
Сергей А. Пликус
lenin 17
-
Страница 7 из 8
- Страница 1
- Страница 2
- Страница 3
- Страница 4
- Страница 5
- Страница 6
- Страница 7
- Страница 8
- 1
- …
- 6
- 7
- 8
In The Room Three, there are four possible endings that can be achieved. Exploring the hub area of Grey Holm for hidden puzzles will lead the player to find two strange artifacts and a screwdriver. These items will be carried with the player to the final puzzle, where they can be used to change a projection of Metatron’s Cube. This determines the doorway the player can go through. The four endings are represented by Maggy’s tarot cards, and are titled Imprisoned, Release, Escape, and Lost. None of the endings in the game have been confirmed to be canon by Fireproof, however they have said that if they were to continue the original trilogy, they would most likely continue off of the ‘Lost’ ending.
Achieving the Items[]
The player requires certain items in order to change the ending they receive. There are two paths the player can take individually, and unlocking either or both of these provides them with the necessary items. They can be achieved in any order, but can only be completed incrementally, as different rooms become available to the player.
The Screwdriver[]
The screwdriver is picked up as the player naturally progresses through the game. It must be used to transplant a mechanical part from the Study to the Elevator Room during the activation of the last doorway machine. After it is used, it will remain in the player’s inventory for the rest of the game, minus The Observatory.
The Star-Shaped Artifact[]
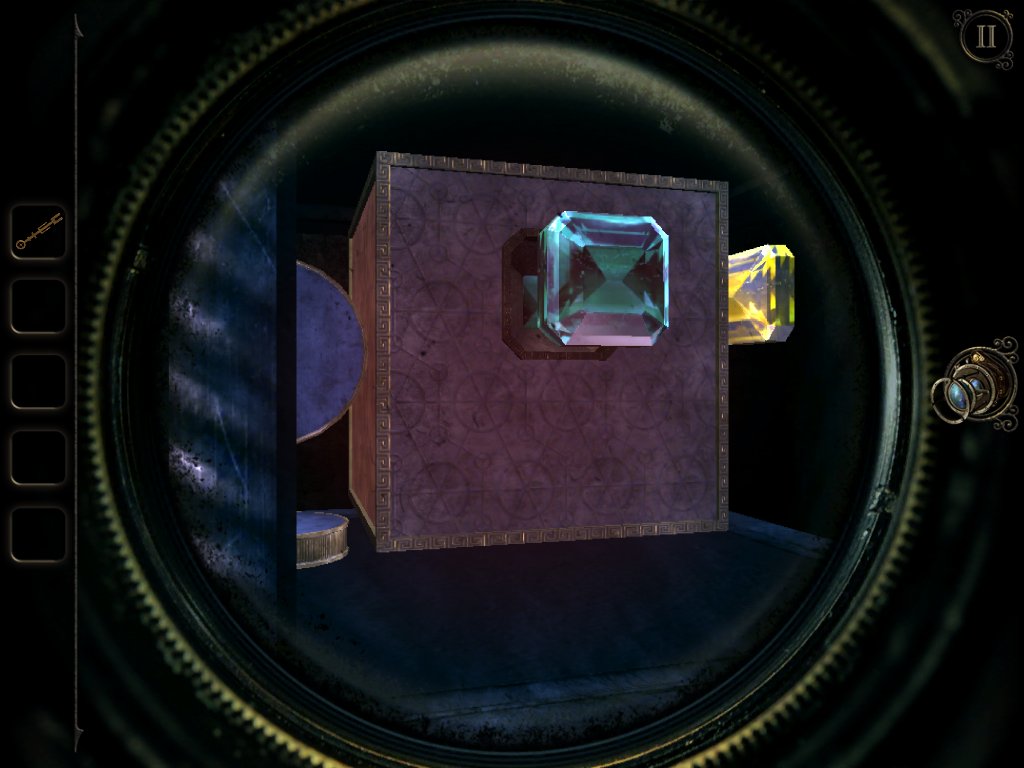
The path to this artifact is a crystal collection quest. In the Conservatory, the player may observe that one of the scientific instruments on the back table has a wheel with three slots. One slot contains a purple crystal. The other two are empty.
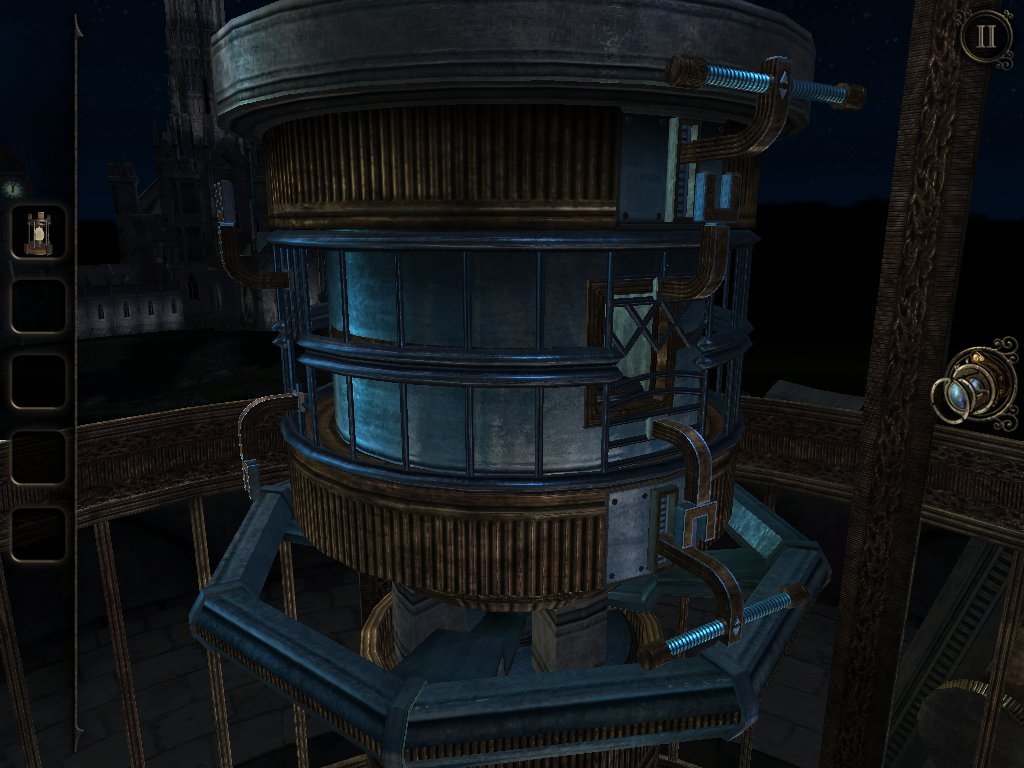
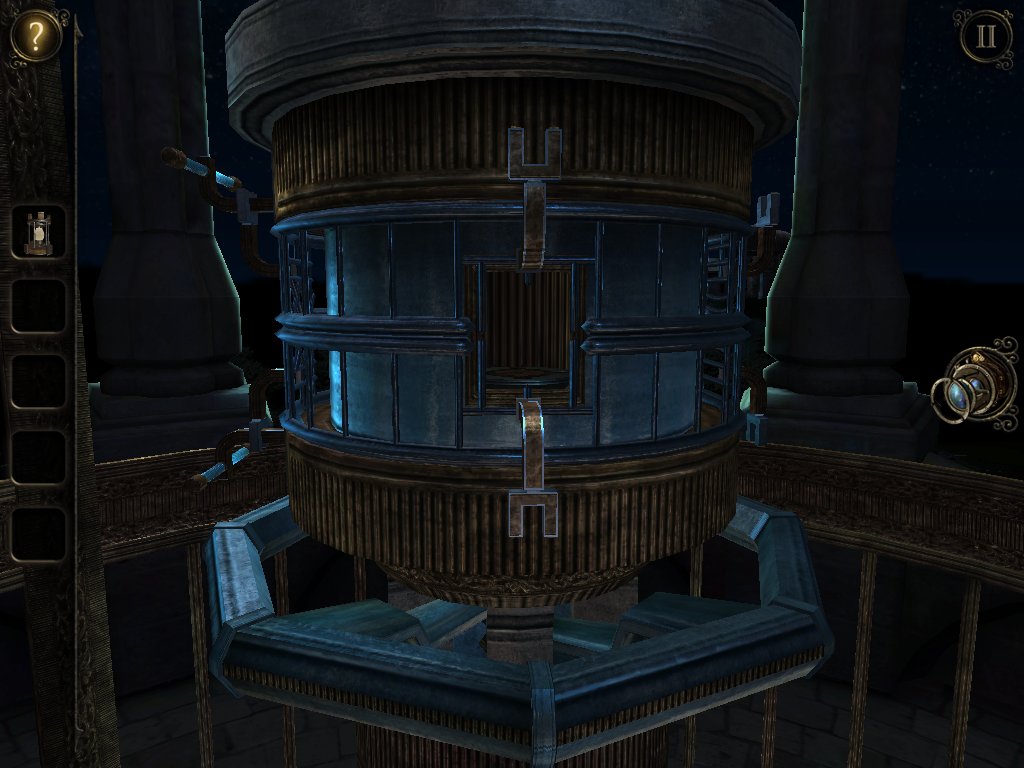
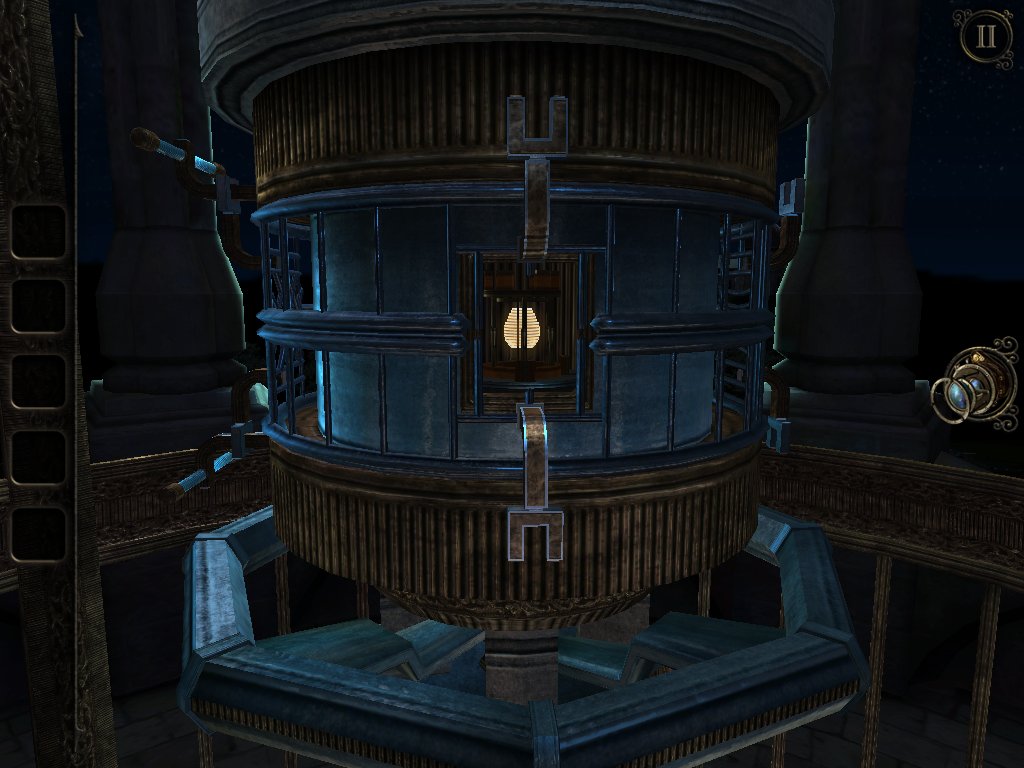
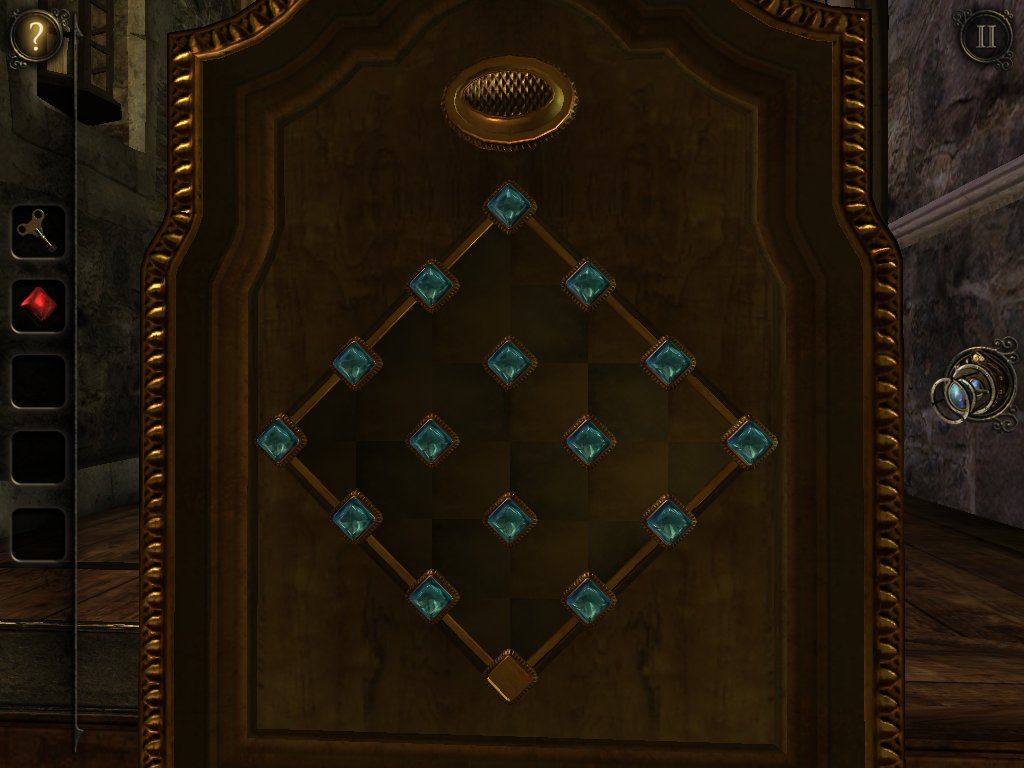
One of the crystals can be found in the safe of the Elevator Room. On the far end of the balcony railing is a small golden dome. By rolling the dome back and forth, the player is able to swing a large pendulum at the center of the opening until it hits the railing on the opposite side. This will shatter the table that the safe rests on, and send the safe falling down into the Altar Room. From here, the crystal can be retrieved.
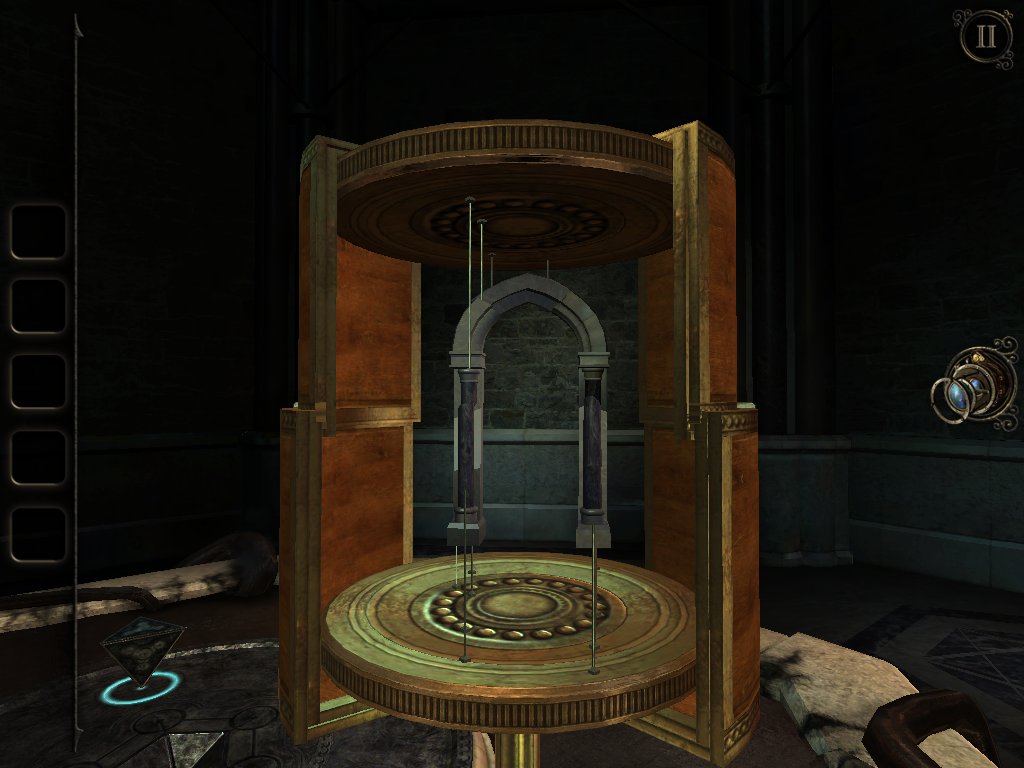
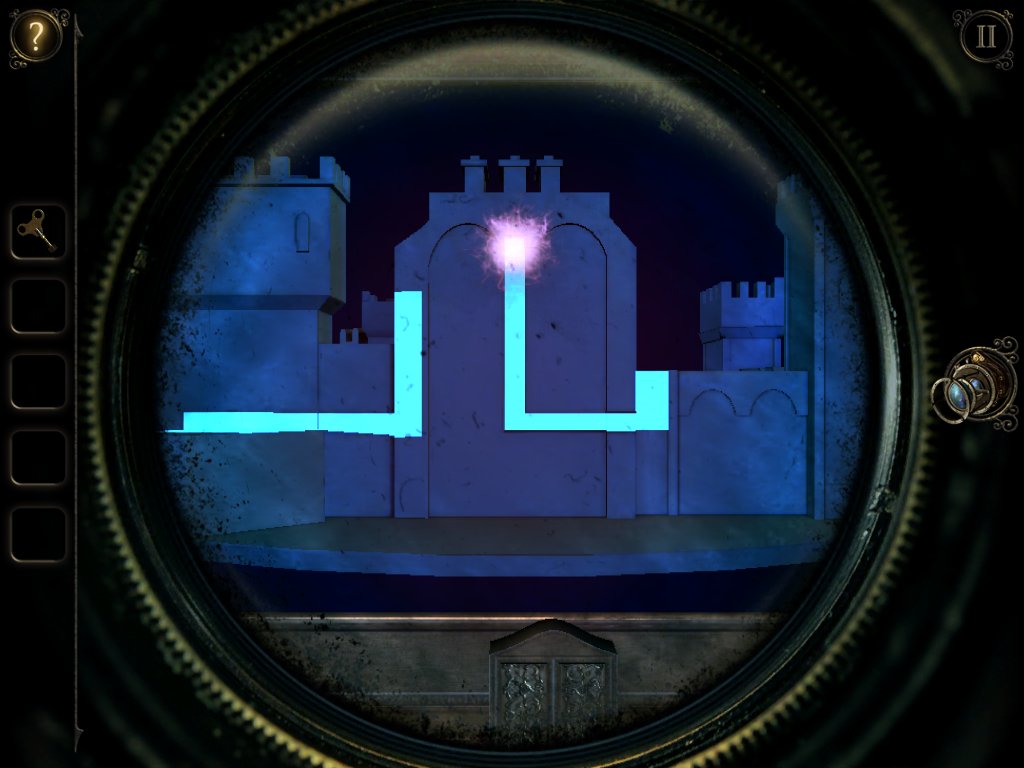
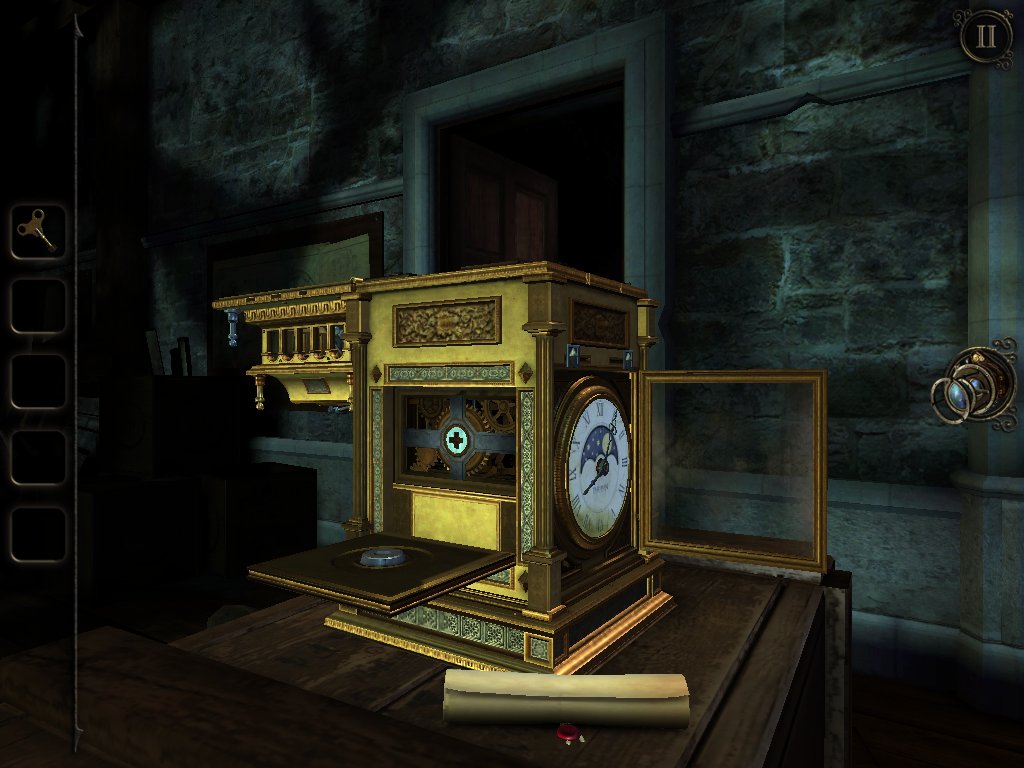
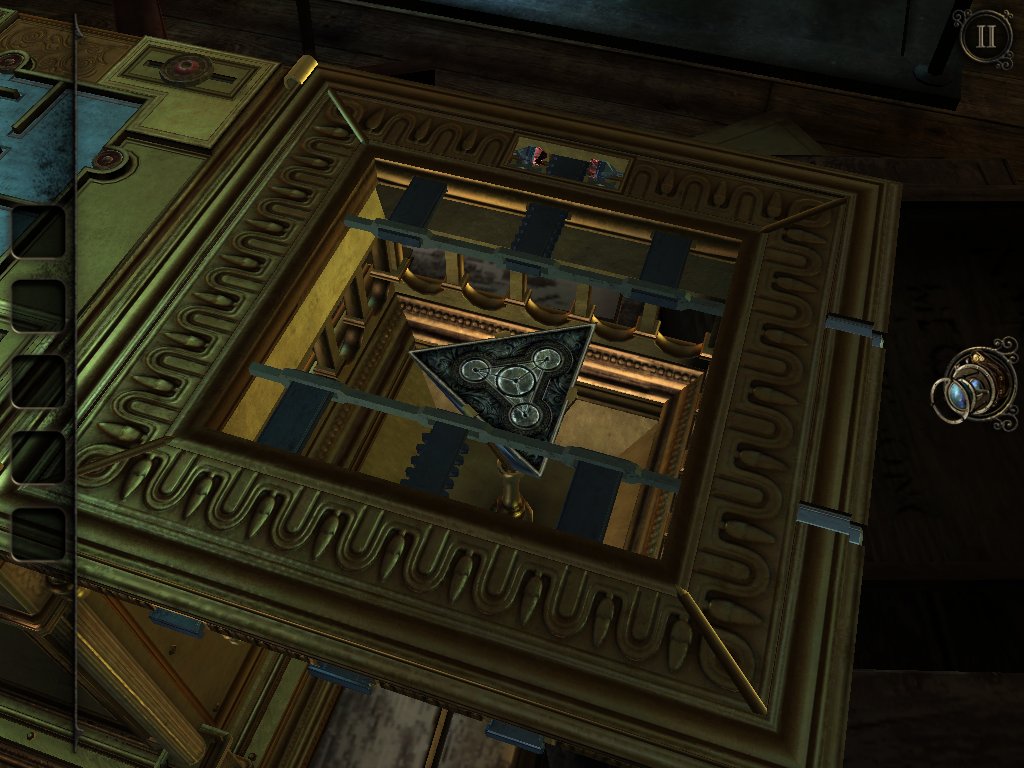
The other crystal is located within the grandfather clock in the Study, and it can only be accessed every 15 minutes in real time (on an hour, quarter past, half past, and quarter to). By observing the clock face with the eyepiece, the intervals are more clearly visible, marked in blue. At any one of these intervals, the player is able to open the clock and solve the puzzle inside. This will reward them with the other crystal.
Once they have found both crystals, the player can attach them to the machine in the conservatory, which powers a viewing screen. The screen is used to navigate a temple, similar to the larger puzzle in The Observatory. When this puzzle is completed, the contraption opens and reveals the star-shaped artifact, which the player can take.
The Rectangular Artifact[]
This artifact is found by relying on the «Mystical Maggie» fortune telling booth.
The First Token[]
By pulling out the token tray of the fortune telling machine, the player will find a key to the desk in the study. The desk has several drawers which must be solved in order to unlock a token to give to Maggy. She will show the first of four tarot cards — Imprisoned — which represents the game’s default ending. She will also give the player a wheel with a handle. On the glass, the player will find a message from Maggy: “He deceives you”.
The Second Token[]
The wheel given by Maggy can be used to open the grate at the back of the room where the player first entered Grey Holm. Following a set of stairs down to a Basement room, they find a machine with three levers and a lighted indicator. Pulling these levers reveals three separate math puzzles. The player must direct a number of switches to reach the total indicated at the top of the switchboard. Completing these (8 + 4 + 5 = 17, 7 x 4 + 3 = 31 and 2 x 5 + 4 + 12 — 5 + 9 = 30) allows them to power up the phone in the Library. Answering the phone there allows them to collect a handle from the gramophone.
The handle must be used back in the Basement room, where there is a filing shelf on a table at the back of the room. Attaching the lever to the filing shelf activates a Simon Says-style puzzle, instructing the player to open the drawers in a specific order. This reveals a second token which can be given to Maggy. This time, Maggy reveals the second tarot card, Escape, and provides the player with a winding handle to be used on the Conservatory gramophone. It allows the gramophone to be wound and play a record, but is temporarily useless until the Conservatory is unlocked.
The Third Token[]
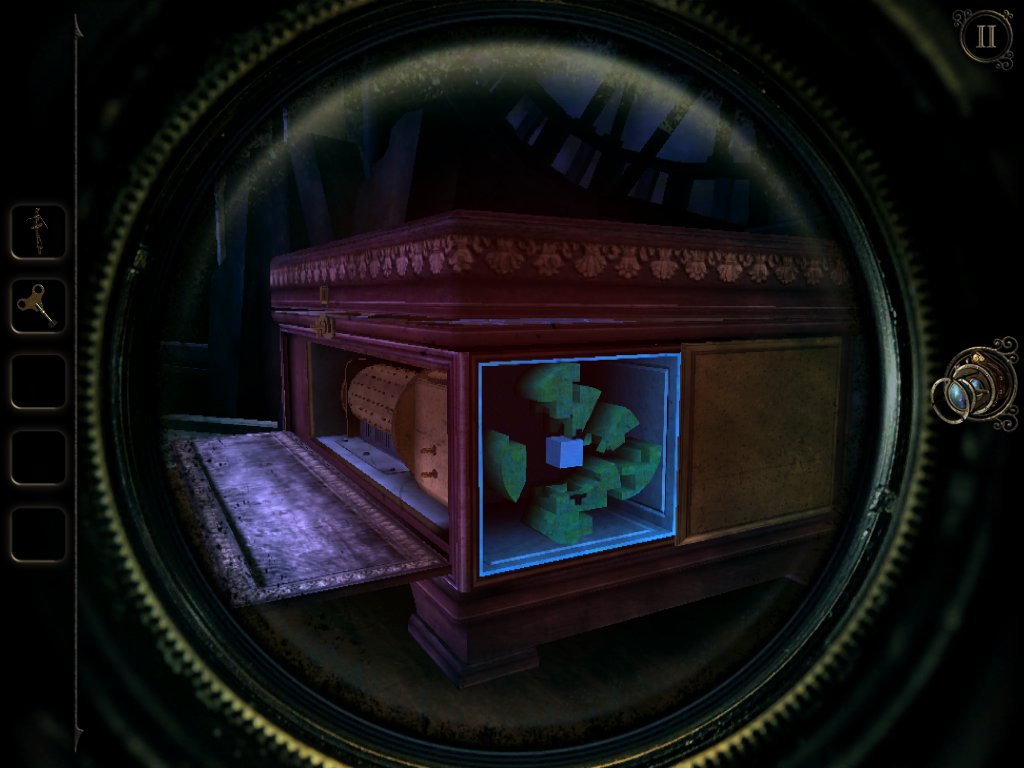
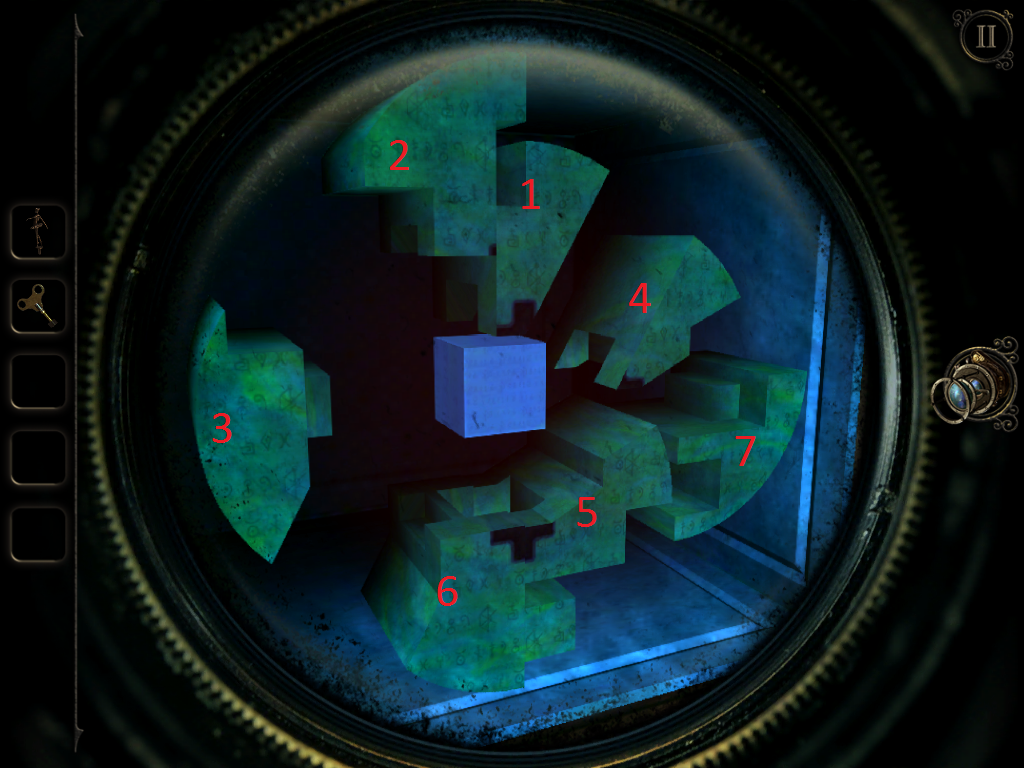
The contraption on the desk of the upper Library can be closed, revealing a metal cube fit into the underside of the left half. On the right half, a circular indentation can be seen. By taking the cube to the Conservatory and placing it in front of the box with the null icon, the player can morph its shape to a sphere. Returning to the upper Library, placing it in the indentation, and opening the contraption again reveals a pop-up theatre which can be entered using the superzoom lens. Inside is another gramophone. The player must press the button on the gramophone to release a blank wax cylinder.
The player must place the blank cylinder into the Library gramophone, then return to the Conservatory. By playing the Conservatory gramophone, dialing the number for the Library phone (1795), and returning to pull the lever on the Library phone, the player is able to record the music from the Conservatory onto the wax cylinder. Once this is done, playing the etched cylinder in the gramophone inside the popup theatre will reveal the next token for Maggy. This time, she reveals the third card, Release, and provides you with a metal device. If you haven’t started the process to get to the forge she will write another message: “The forge awaits”.
The Fourth Token[]
The metal device can be used in the Elevator Room to reveal a key. This key fits in the box in the indent of the tree in the Conservatory, but does not unlock the drawer beneath it. To reveal the problem, the player must remove the bricks from the crumbling wall behind the tree and superzoom into a hole there. Doing so allows the player to turn a lever on the end of the key which activates one of two tumblers in the lock. Turning the key 180 degrees and repeating this step unlocks the drawer, which contains the final token.
Maggy will display the final card, Lost, before a compartment underneath the machine opens, revealing her circuitry. At the center of the mechanism is the rectangular artifact. When it is removed, Maggy will experience a brief power surge and then power down.
Imprisoned[]
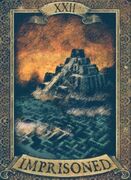
“As you like puzzles so much, I have one final riddle for you, to occupy your eternity: ‘What is the difference between a maze and a labyrinth?’ But how can I expect you to answer when you cannot tell a Room from a Prison?”
Imprisoned is the default ending to the game, and does not require any extra steps. The doorway will show the door to the train compartment that the player was in at the beginning of the game.
Upon entering, the player finds a note on the table within the compartment. The note is from The Craftsman, revealing his deception and informing them that they have been trapped. The camera zooms out to show a train speeding along above a seemingly endless maze. It then pulls back further, showing this vision happening inside of a box, the one from the first scene of the game, which The Craftsman is in the process of closing on the altar in the center of Grey Holm. Once it is closed, a doorway on the other side opens — presumably to the Null Planet — and tendrils begin to reach out.
Escape[]
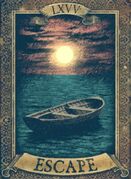
“Whatever it was that drew me is gone. I can sense it no longer, and I finally feel free.”
The Escape ending is found by placing and solving the Craftsman’s rectangular artifact before leaving the puzzle. The doorway will show a wooden door, and little sound will be heard.
Upon exiting, we emerge in the Grey Holm boathouse. Null tendrils begin spreading throughout the room, following us through the door. The protagonist is hit by one of the tendrils, falls into the boat, and loses consciousness. They regain consciousness a moment later, floating a good distance from Grey Holm. A bird can be seen flying above them, and the sky is clear and blue. The protagonist stands up, and watches as Grey Holm is destroyed by Null tendrils. They turn around to look at the mainland, and the screen fades to white.
The ending card is a journal entry by the protagonist describing their newfound freedom from curiosity and ability to move on with their life.
Release[]

“When we opened the gateway, something was waiting. It has always been waiting… now it is here. Soon we are doomed.”
The Release ending is found by placing and solving the Craftsman’s star-shaped artifact before leaving the puzzle. The doorway will show a shadowy wooden door, and the sound of thunder can be heard beyond it. Additional Null tendrils also creep out from the doorway.
Upon exiting, we emerge in the Grey Holm boathouse. Null tendrils begin spreading throughout the room, following us through the door. The protagonist is hit by one of the tendrils, falls into the boat, and loses consciousness. They regain consciousness a moment later, floating a good distance from Grey Holm. There are large Null tendrils in the sky, emerging down from dark storm clouds. The protagonist watches as Grey Holm is destroyed, and then looks back at the tendrils in the sky. The screen fades to white.
The ending card is a letter written to The Craftsman from the protagonist, who claims to be «in Bethlehem». This most likely refers to the hospital of St. Mary’s of Bethlehem, an asylum for the insane in London, and the protagonist mentions they have bribed a warder at said hospital in order to deliver their message. They admit to being less than trustworthy, but warn of the great power they have unleashed upon the world by opening the portal, and beg The Craftsman to come see them.
Lost[]
The Lost Ending is found by placing and solving both Craftsman artifacts, then using the screwdriver to move the panel blocking the star-shaped artifact’s projector. The doorway will show only a wall of Null Goop.
The cinematic begins with a far away view of the Null Planet. We warp closer and closer to the planet, and then we warp onto the planet’s surface. A sandstorm rages around the player, obscuring most of their surroundings, but several ziggurats can be seen nearby. In front of us is a temple. The temple door opens, and the screen fades to black.
In The Room Three, there are four possible endings that can be achieved. Exploring the hub area of Grey Holm for hidden puzzles will lead the player to find two strange artifacts and a screwdriver. These items will be carried with the player to the final puzzle, where they can be used to change a projection of Metatron’s Cube. This determines the doorway the player can go through. The four endings are represented by Maggy’s tarot cards, and are titled Imprisoned, Release, Escape, and Lost. None of the endings in the game have been confirmed to be canon by Fireproof, however they have said that if they were to continue the original trilogy, they would most likely continue off of the ‘Lost’ ending.
Achieving the Items[]
The player requires certain items in order to change the ending they receive. There are two paths the player can take individually, and unlocking either or both of these provides them with the necessary items. They can be achieved in any order, but can only be completed incrementally, as different rooms become available to the player.
The Screwdriver[]
The screwdriver is picked up as the player naturally progresses through the game. It must be used to transplant a mechanical part from the Study to the Elevator Room during the activation of the last doorway machine. After it is used, it will remain in the player’s inventory for the rest of the game, minus The Observatory.
The Star-Shaped Artifact[]
The path to this artifact is a crystal collection quest. In the Conservatory, the player may observe that one of the scientific instruments on the back table has a wheel with three slots. One slot contains a purple crystal. The other two are empty.
One of the crystals can be found in the safe of the Elevator Room. On the far end of the balcony railing is a small golden dome. By rolling the dome back and forth, the player is able to swing a large pendulum at the center of the opening until it hits the railing on the opposite side. This will shatter the table that the safe rests on, and send the safe falling down into the Altar Room. From here, the crystal can be retrieved.
The other crystal is located within the grandfather clock in the Study, and it can only be accessed every 15 minutes in real time (on an hour, quarter past, half past, and quarter to). By observing the clock face with the eyepiece, the intervals are more clearly visible, marked in blue. At any one of these intervals, the player is able to open the clock and solve the puzzle inside. This will reward them with the other crystal.
Once they have found both crystals, the player can attach them to the machine in the conservatory, which powers a viewing screen. The screen is used to navigate a temple, similar to the larger puzzle in The Observatory. When this puzzle is completed, the contraption opens and reveals the star-shaped artifact, which the player can take.
The Rectangular Artifact[]
This artifact is found by relying on the «Mystical Maggie» fortune telling booth.
The First Token[]
By pulling out the token tray of the fortune telling machine, the player will find a key to the desk in the study. The desk has several drawers which must be solved in order to unlock a token to give to Maggy. She will show the first of four tarot cards — Imprisoned — which represents the game’s default ending. She will also give the player a wheel with a handle. On the glass, the player will find a message from Maggy: “He deceives you”.
The Second Token[]
The wheel given by Maggy can be used to open the grate at the back of the room where the player first entered Grey Holm. Following a set of stairs down to a Basement room, they find a machine with three levers and a lighted indicator. Pulling these levers reveals three separate math puzzles. The player must direct a number of switches to reach the total indicated at the top of the switchboard. Completing these (8 + 4 + 5 = 17, 7 x 4 + 3 = 31 and 2 x 5 + 4 + 12 — 5 + 9 = 30) allows them to power up the phone in the Library. Answering the phone there allows them to collect a handle from the gramophone.
The handle must be used back in the Basement room, where there is a filing shelf on a table at the back of the room. Attaching the lever to the filing shelf activates a Simon Says-style puzzle, instructing the player to open the drawers in a specific order. This reveals a second token which can be given to Maggy. This time, Maggy reveals the second tarot card, Escape, and provides the player with a winding handle to be used on the Conservatory gramophone. It allows the gramophone to be wound and play a record, but is temporarily useless until the Conservatory is unlocked.
The Third Token[]
The contraption on the desk of the upper Library can be closed, revealing a metal cube fit into the underside of the left half. On the right half, a circular indentation can be seen. By taking the cube to the Conservatory and placing it in front of the box with the null icon, the player can morph its shape to a sphere. Returning to the upper Library, placing it in the indentation, and opening the contraption again reveals a pop-up theatre which can be entered using the superzoom lens. Inside is another gramophone. The player must press the button on the gramophone to release a blank wax cylinder.
The player must place the blank cylinder into the Library gramophone, then return to the Conservatory. By playing the Conservatory gramophone, dialing the number for the Library phone (1795), and returning to pull the lever on the Library phone, the player is able to record the music from the Conservatory onto the wax cylinder. Once this is done, playing the etched cylinder in the gramophone inside the popup theatre will reveal the next token for Maggy. This time, she reveals the third card, Release, and provides you with a metal device. If you haven’t started the process to get to the forge she will write another message: “The forge awaits”.
The Fourth Token[]
The metal device can be used in the Elevator Room to reveal a key. This key fits in the box in the indent of the tree in the Conservatory, but does not unlock the drawer beneath it. To reveal the problem, the player must remove the bricks from the crumbling wall behind the tree and superzoom into a hole there. Doing so allows the player to turn a lever on the end of the key which activates one of two tumblers in the lock. Turning the key 180 degrees and repeating this step unlocks the drawer, which contains the final token.
Maggy will display the final card, Lost, before a compartment underneath the machine opens, revealing her circuitry. At the center of the mechanism is the rectangular artifact. When it is removed, Maggy will experience a brief power surge and then power down.
Imprisoned[]
“As you like puzzles so much, I have one final riddle for you, to occupy your eternity: ‘What is the difference between a maze and a labyrinth?’ But how can I expect you to answer when you cannot tell a Room from a Prison?”
Imprisoned is the default ending to the game, and does not require any extra steps. The doorway will show the door to the train compartment that the player was in at the beginning of the game.
Upon entering, the player finds a note on the table within the compartment. The note is from The Craftsman, revealing his deception and informing them that they have been trapped. The camera zooms out to show a train speeding along above a seemingly endless maze. It then pulls back further, showing this vision happening inside of a box, the one from the first scene of the game, which The Craftsman is in the process of closing on the altar in the center of Grey Holm. Once it is closed, a doorway on the other side opens — presumably to the Null Planet — and tendrils begin to reach out.
Escape[]
“Whatever it was that drew me is gone. I can sense it no longer, and I finally feel free.”
The Escape ending is found by placing and solving the Craftsman’s rectangular artifact before leaving the puzzle. The doorway will show a wooden door, and little sound will be heard.
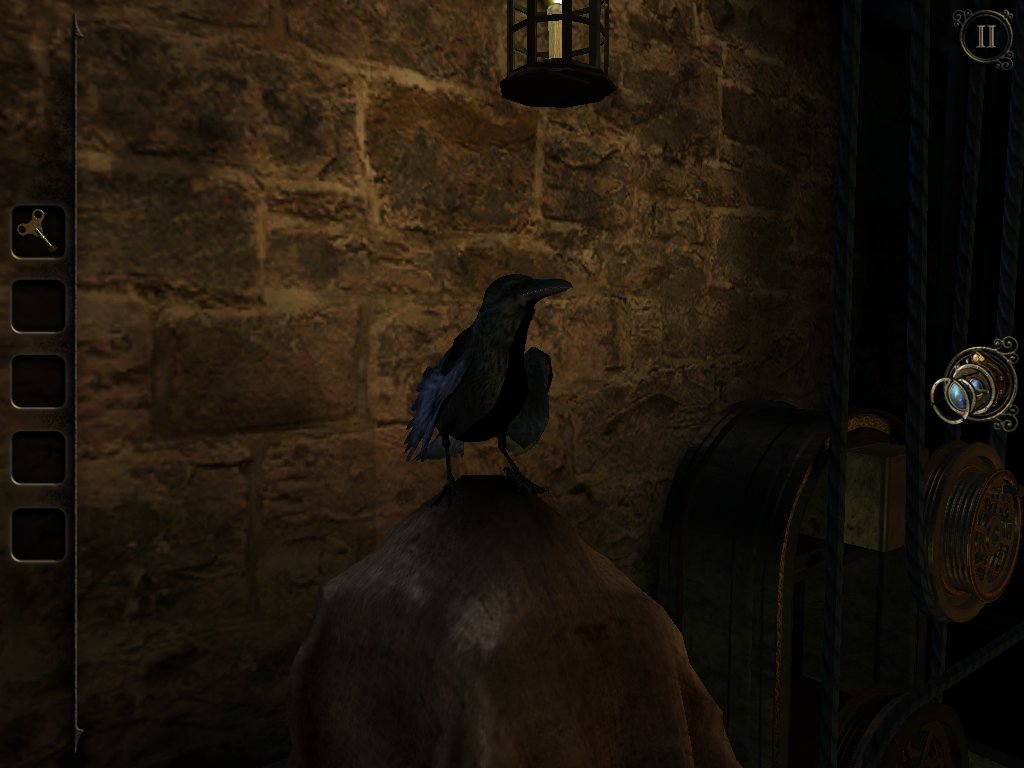
Upon exiting, we emerge in the Grey Holm boathouse. Null tendrils begin spreading throughout the room, following us through the door. The protagonist is hit by one of the tendrils, falls into the boat, and loses consciousness. They regain consciousness a moment later, floating a good distance from Grey Holm. A bird can be seen flying above them, and the sky is clear and blue. The protagonist stands up, and watches as Grey Holm is destroyed by Null tendrils. They turn around to look at the mainland, and the screen fades to white.
The ending card is a journal entry by the protagonist describing their newfound freedom from curiosity and ability to move on with their life.
Release[]
“When we opened the gateway, something was waiting. It has always been waiting… now it is here. Soon we are doomed.”
The Release ending is found by placing and solving the Craftsman’s star-shaped artifact before leaving the puzzle. The doorway will show a shadowy wooden door, and the sound of thunder can be heard beyond it. Additional Null tendrils also creep out from the doorway.
Upon exiting, we emerge in the Grey Holm boathouse. Null tendrils begin spreading throughout the room, following us through the door. The protagonist is hit by one of the tendrils, falls into the boat, and loses consciousness. They regain consciousness a moment later, floating a good distance from Grey Holm. There are large Null tendrils in the sky, emerging down from dark storm clouds. The protagonist watches as Grey Holm is destroyed, and then looks back at the tendrils in the sky. The screen fades to white.
The ending card is a letter written to The Craftsman from the protagonist, who claims to be «in Bethlehem». This most likely refers to the hospital of St. Mary’s of Bethlehem, an asylum for the insane in London, and the protagonist mentions they have bribed a warder at said hospital in order to deliver their message. They admit to being less than trustworthy, but warn of the great power they have unleashed upon the world by opening the portal, and beg The Craftsman to come see them.
Lost[]
The Lost Ending is found by placing and solving both Craftsman artifacts, then using the screwdriver to move the panel blocking the star-shaped artifact’s projector. The doorway will show only a wall of Null Goop.
The cinematic begins with a far away view of the Null Planet. We warp closer and closer to the planet, and then we warp onto the planet’s surface. A sandstorm rages around the player, obscuring most of their surroundings, but several ziggurats can be seen nearby. In front of us is a temple. The temple door opens, and the screen fades to black.
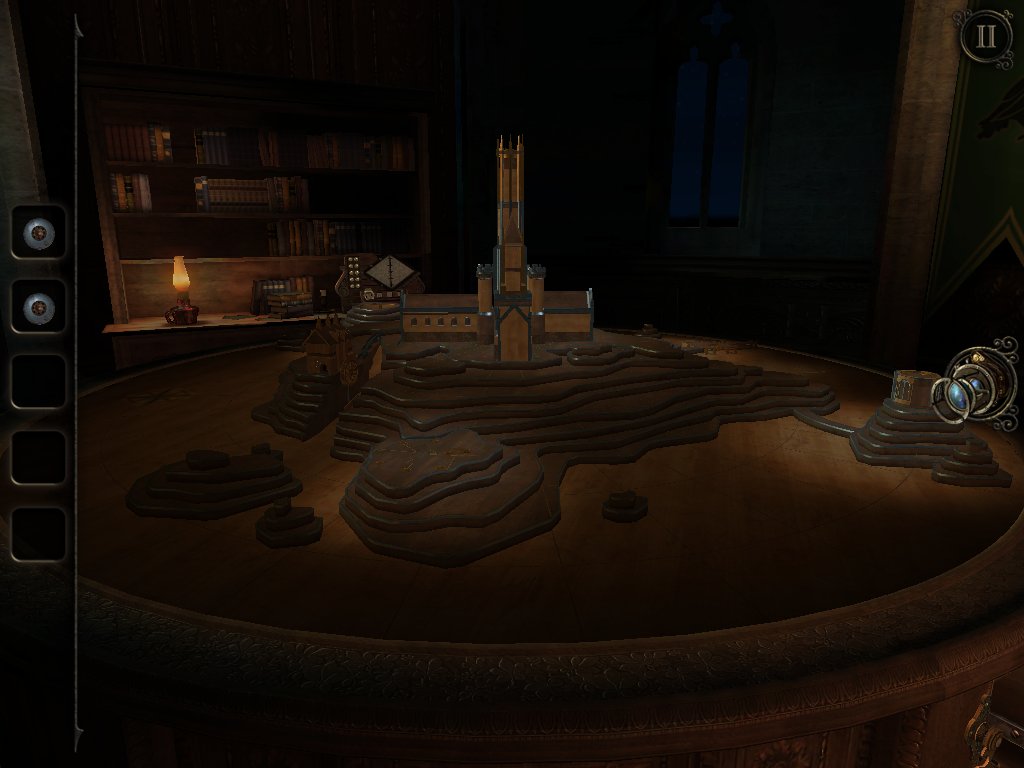
При разработке многих игр разработчики оставляют лазейки, позволяющие каждому игроку увидеть свой финал. Не остались в стороне и создатели The Room Three. Прохождение приводит игрока в финальную комнату башни, и далее только от вас зависит то, какую концовку вы увидите. Более того, сами разработчики подсказывают, что всего в игре 4 финала, и дают без использования сохранений «изменить свою судьбу».
Что вам понадобится
К концу игры у вас должно быть несколько ключевых предметов. Ниже представлены краткие способы их получения, однако предполагается, что вы очень внимательно проходили игру до этого момента.
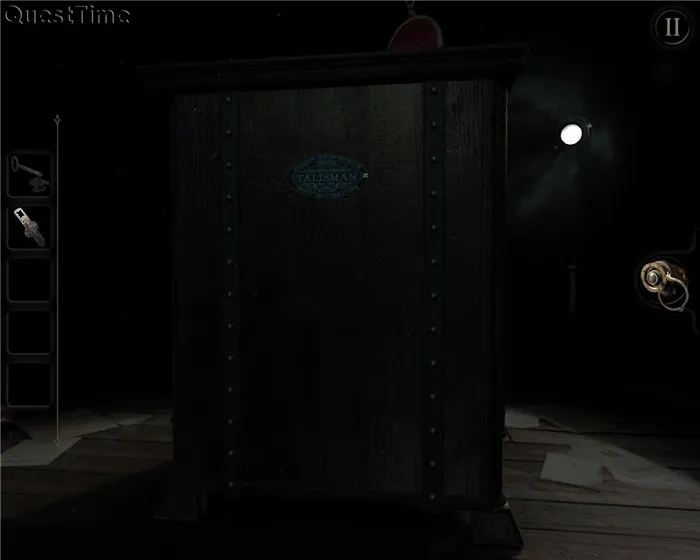
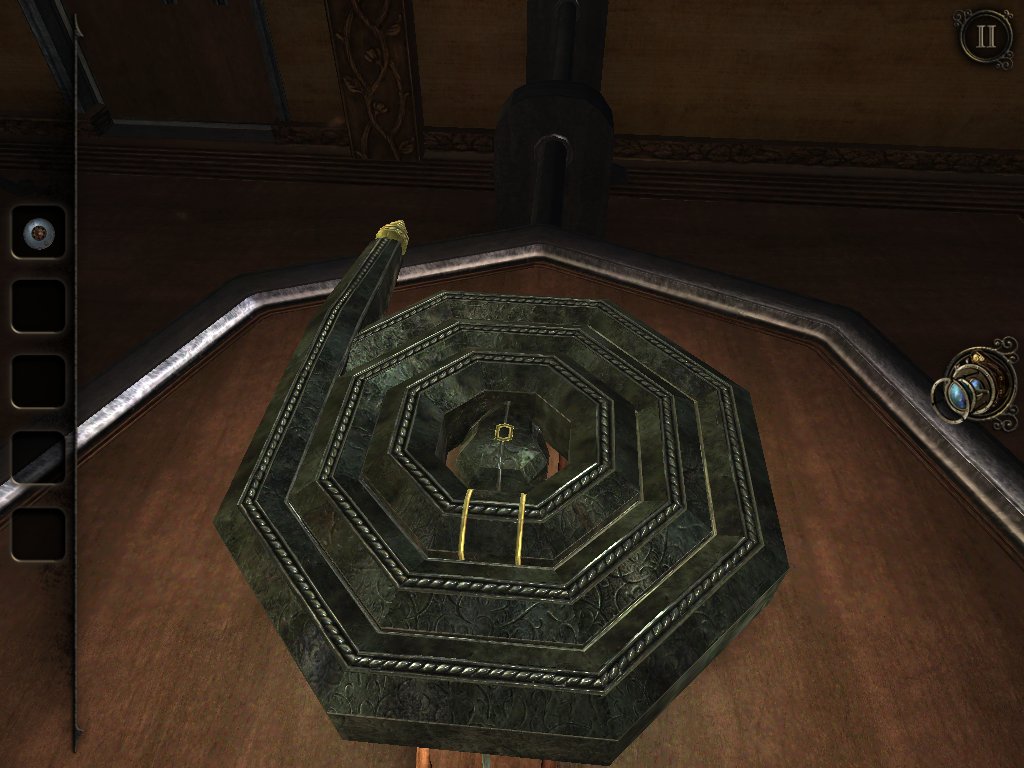
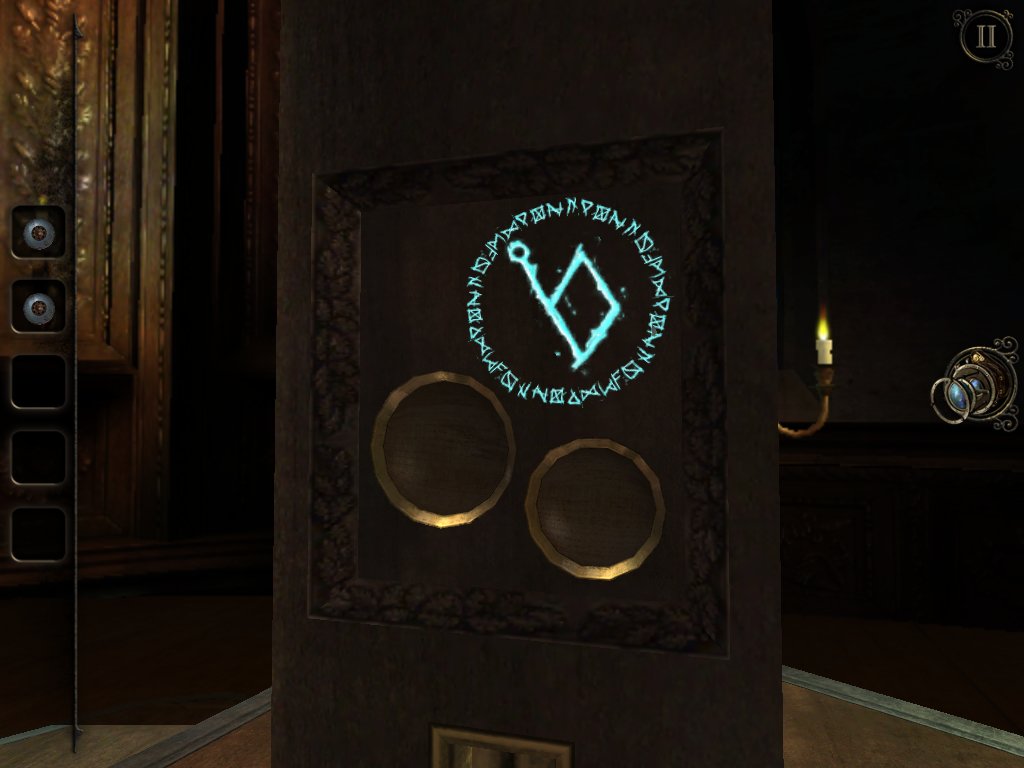
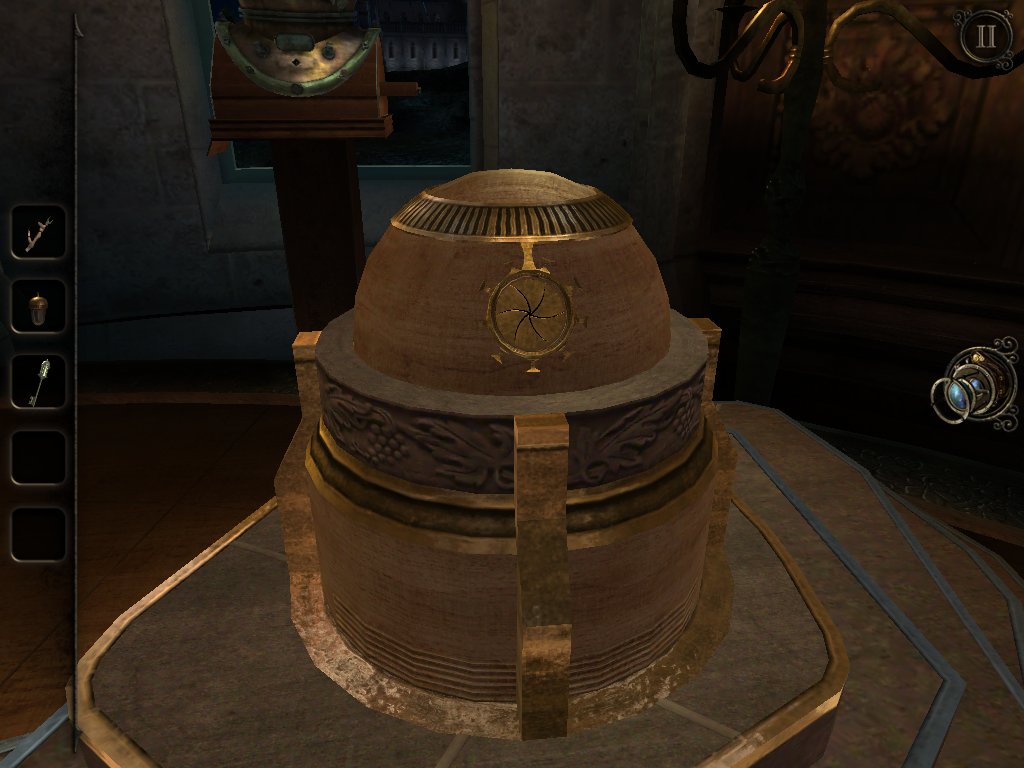
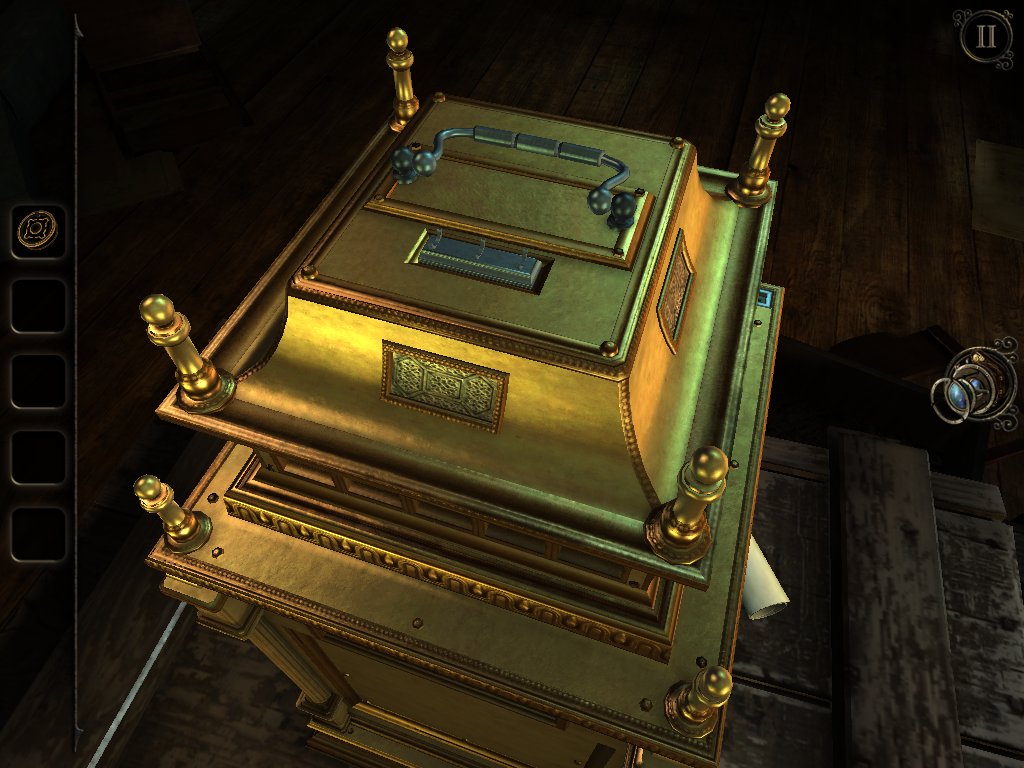
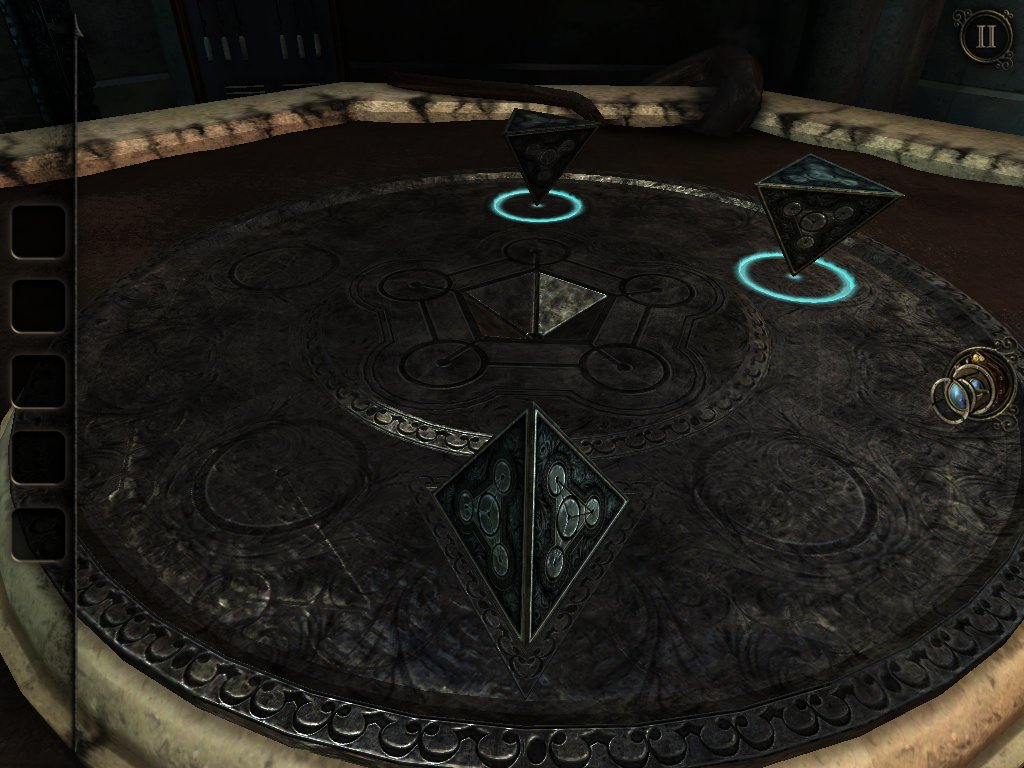
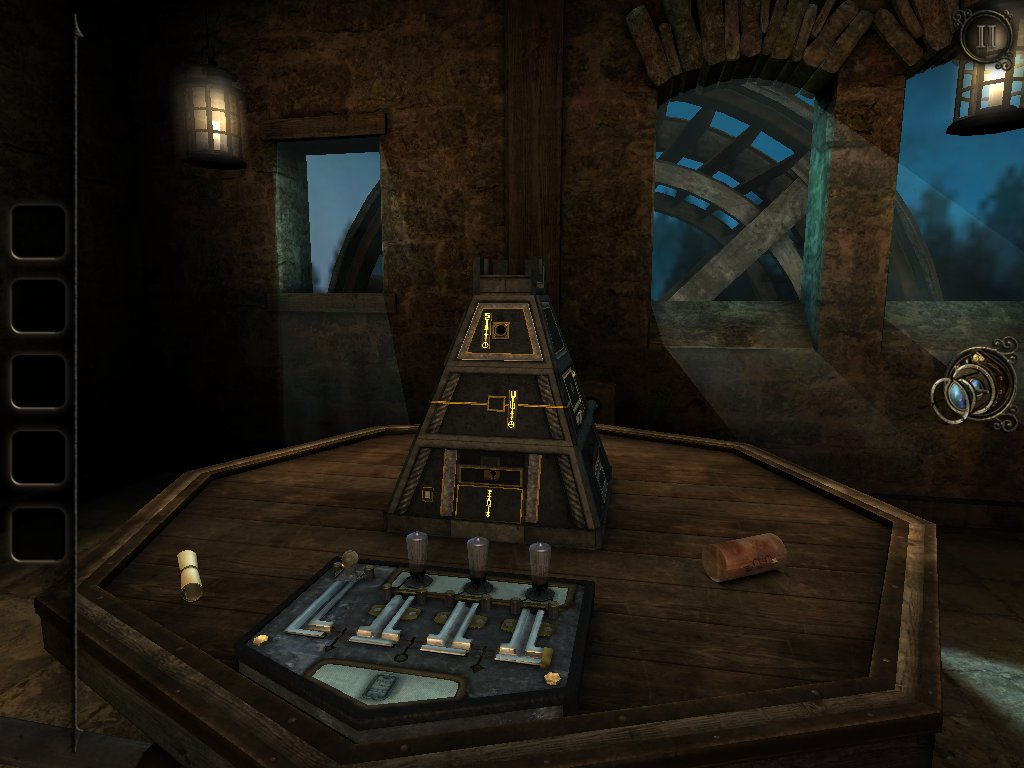
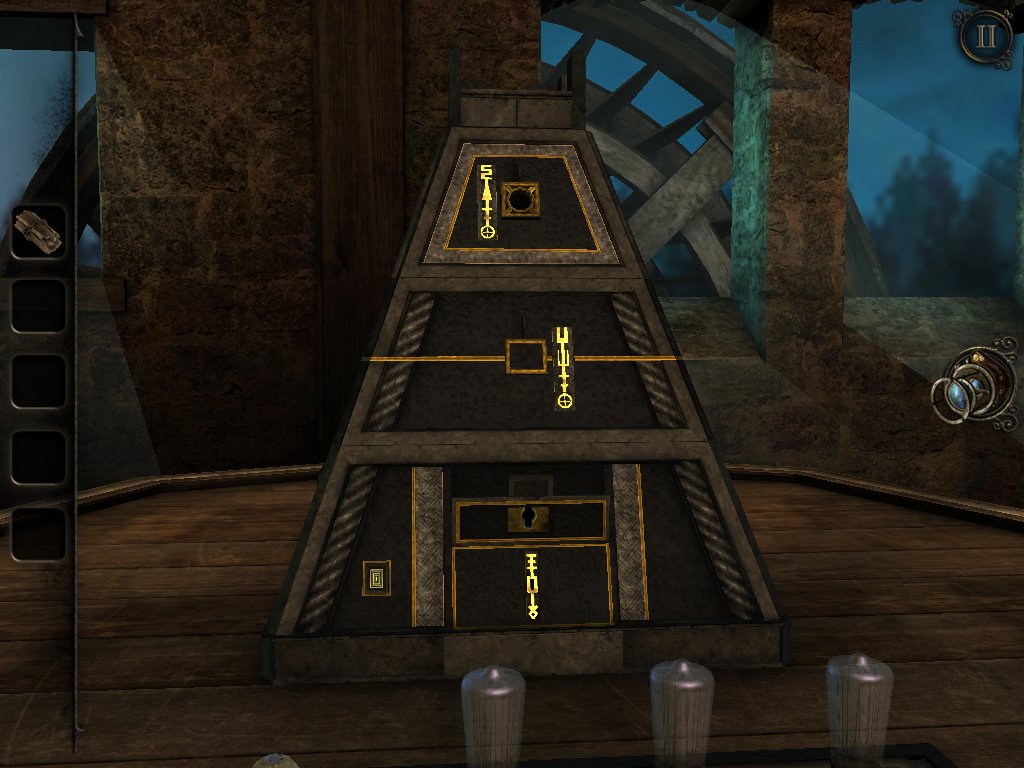
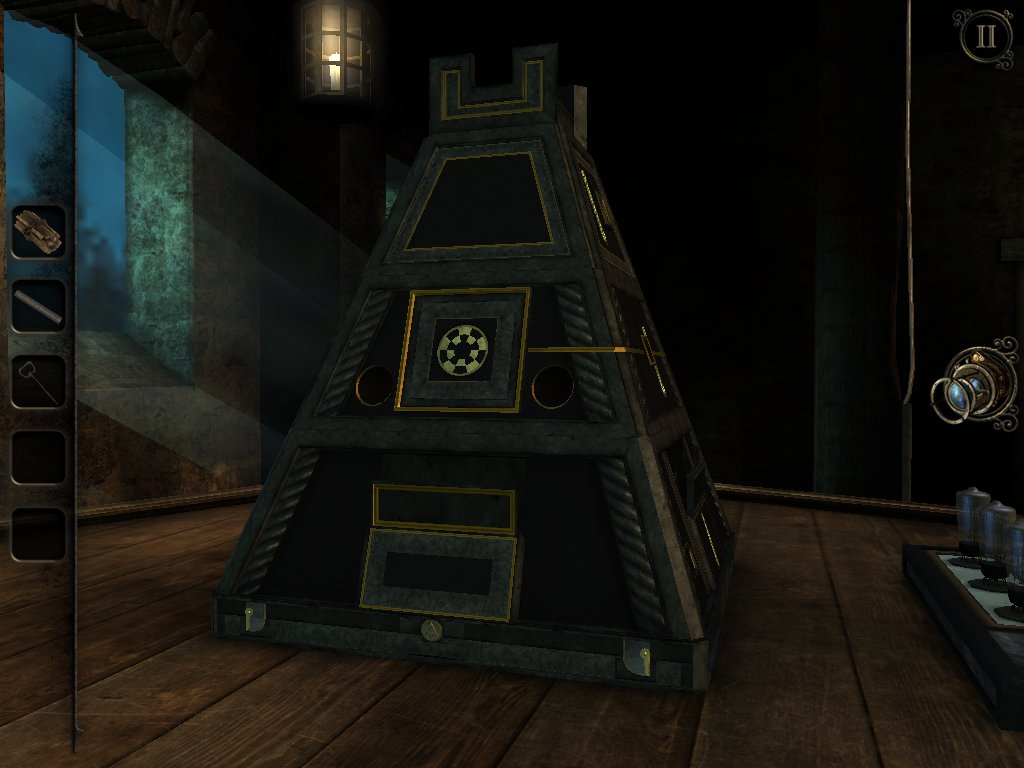
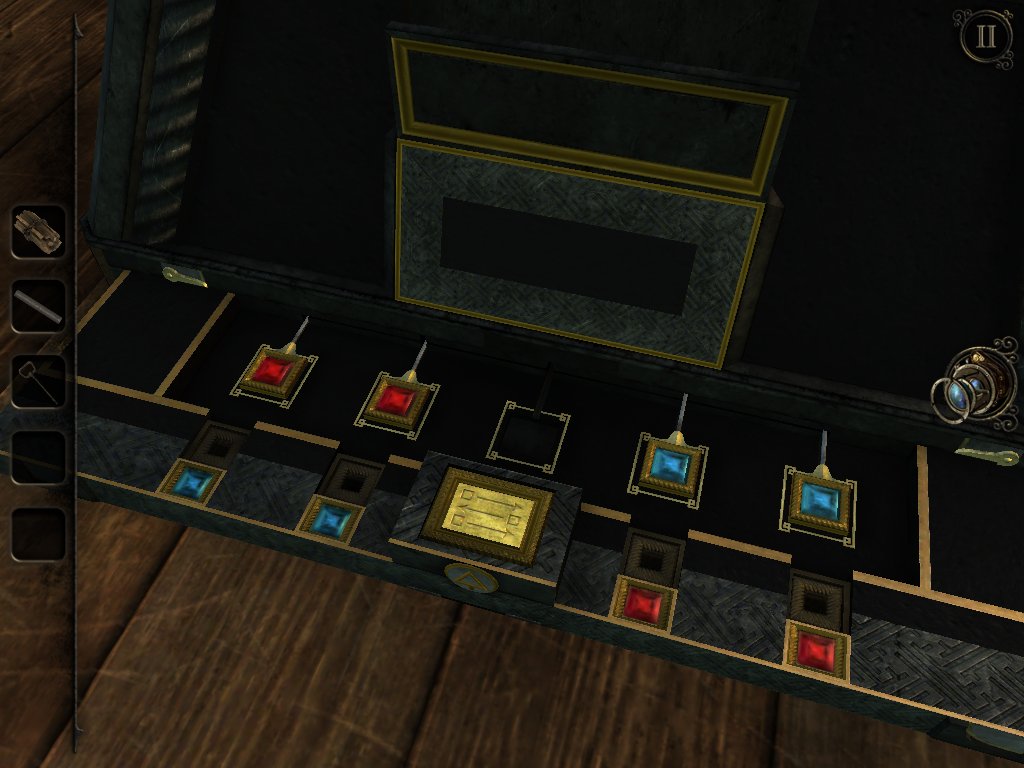
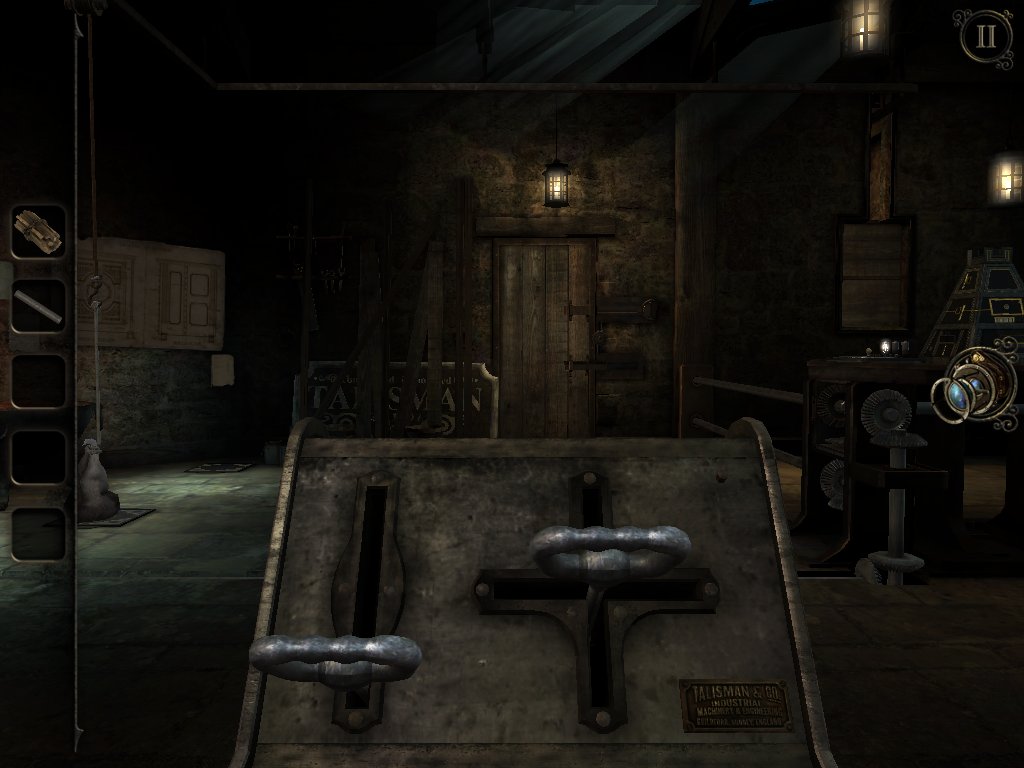
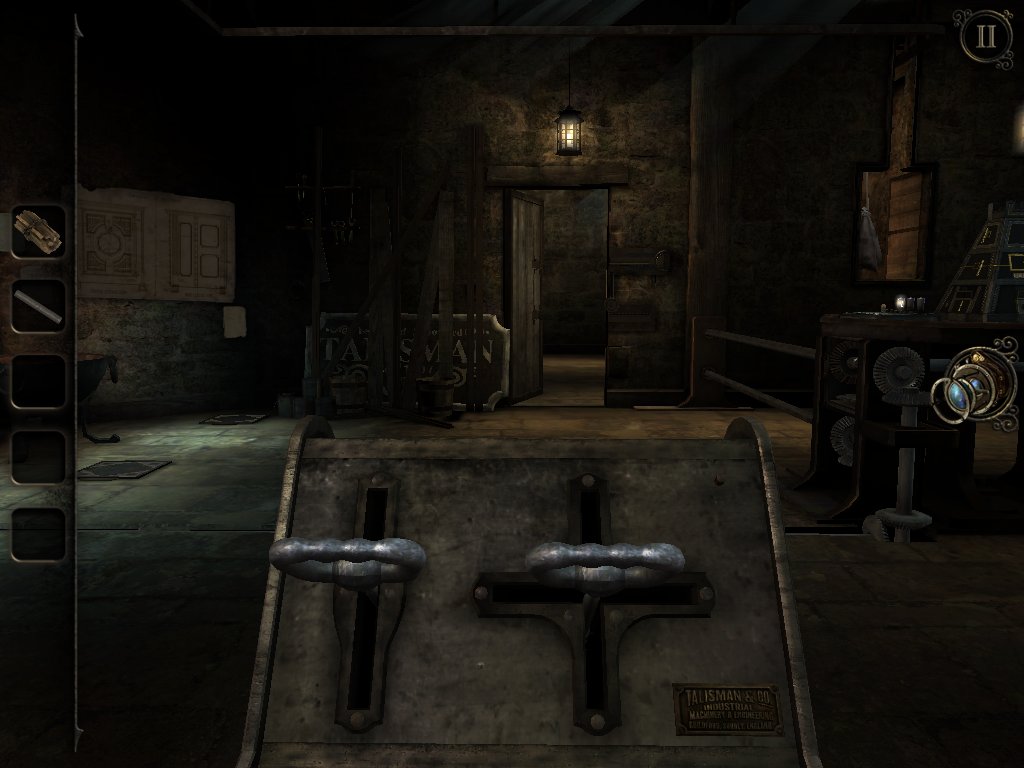
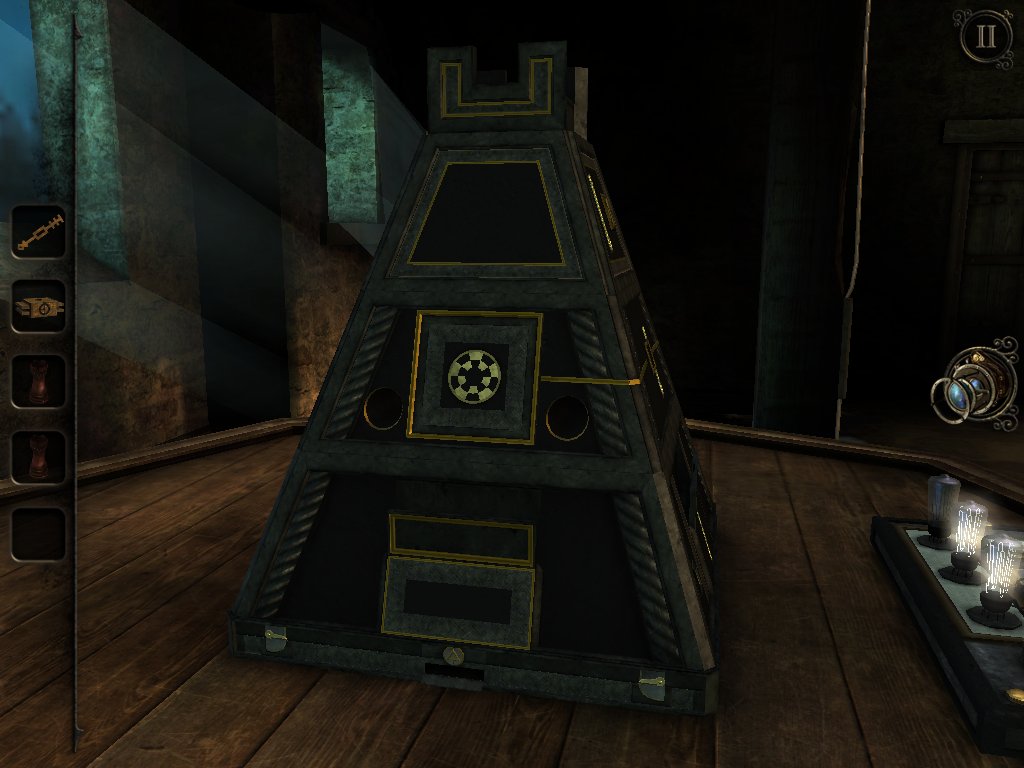
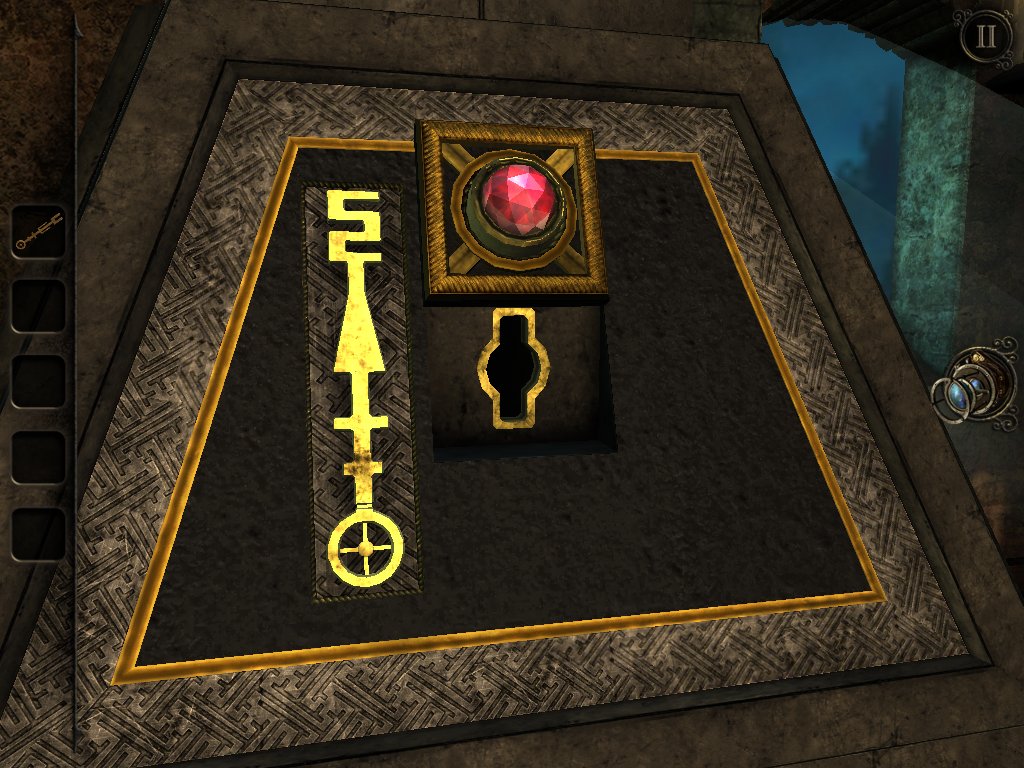
- Первый предмет — это «Ключ мастера». Получить его можно тут же, в последней локации. Установите последнюю пирамиду на постамент в центре зала.
- Два «Необычных артефакта». Один из них должен быть треугольным, а второй — прямоугольным.
- «Отвертка». Она должна валяться у вас в инвентаре еще с 4 эпизода.
Как видите, не так уж и много предметов, хотя получить некоторые было достаточно трудно. Каждый из них пригодится вам для получения отдельной оригинальной концовки, но если вы хотите открыть последний вариант финала, то понадобятся все 4 предмета.
Финал
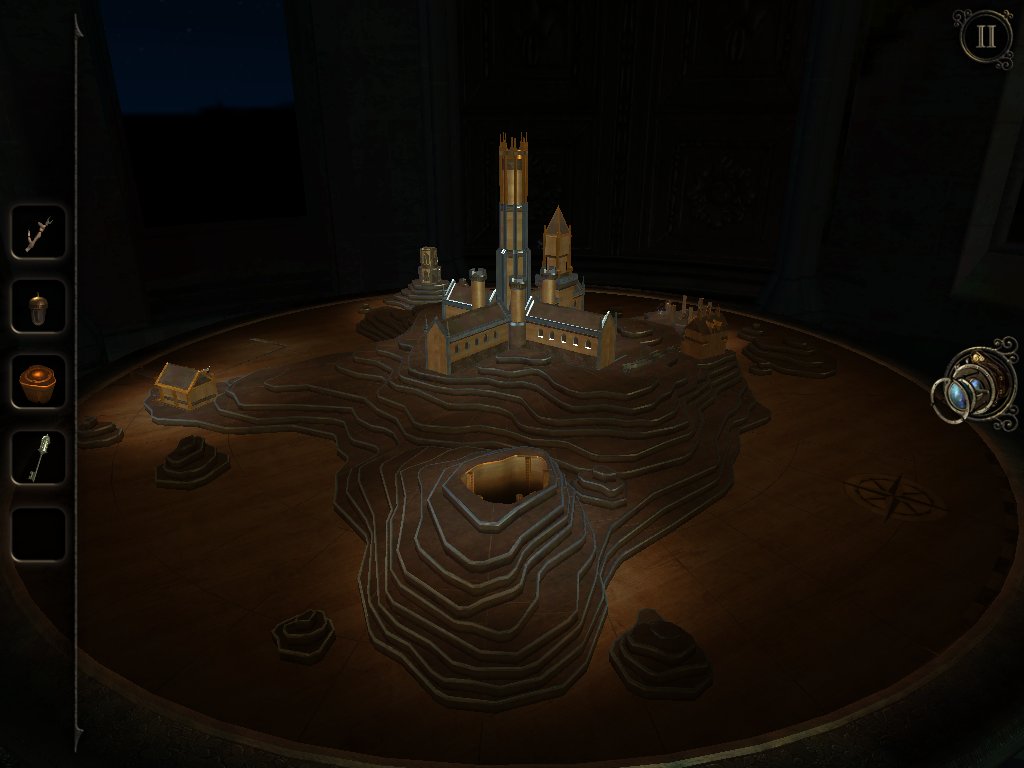
Итак, вы на финальной площадке. The Room Three, прохождение которой провело вас по самым запутанным лабиринтам, готова открыть свои тайны. С чего начать, выбор невелик.

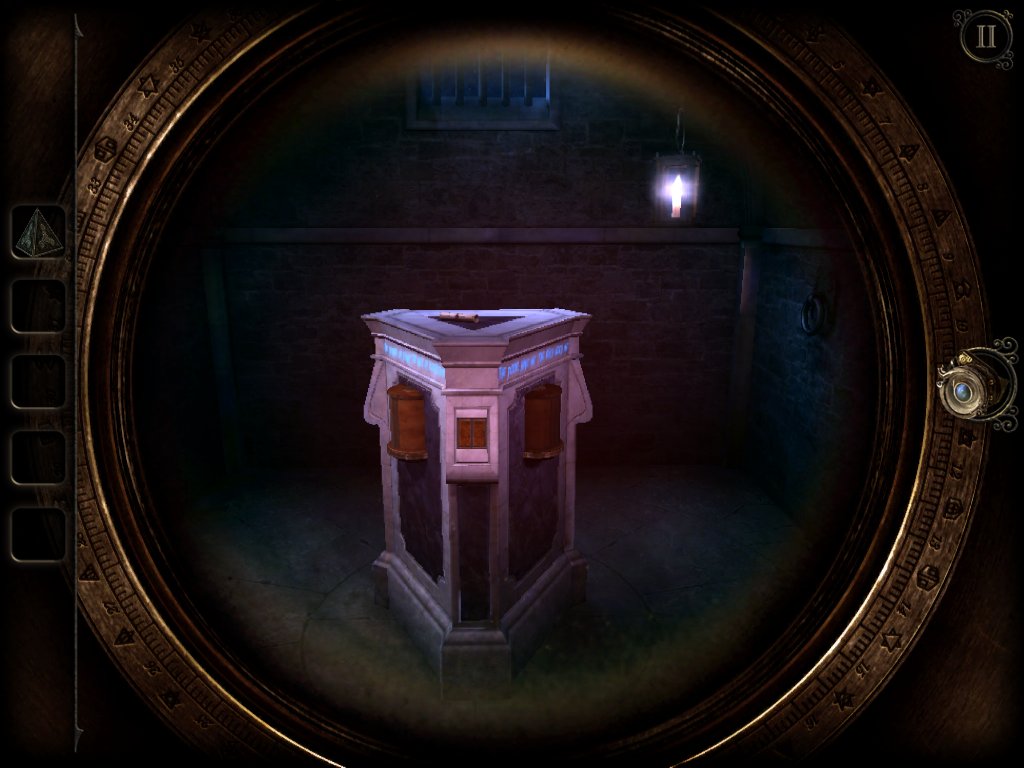
Подходите к постаменту в центре и используйте «Ключ мастера». Произойдет небольшая трансформация, и на краю откроется небольшое хранилище, из которого вы заберете «Металлическое кольцо». Его нужно применить на небольшую конструкцию тут же. Дальше небольшая головоломка. Используя рычаг и диск, поверните шестерни в правую сторону, чтобы они оказались напротив металлических стержней. Нажмите на коричневую кнопку рядом с диском и включите проектор.
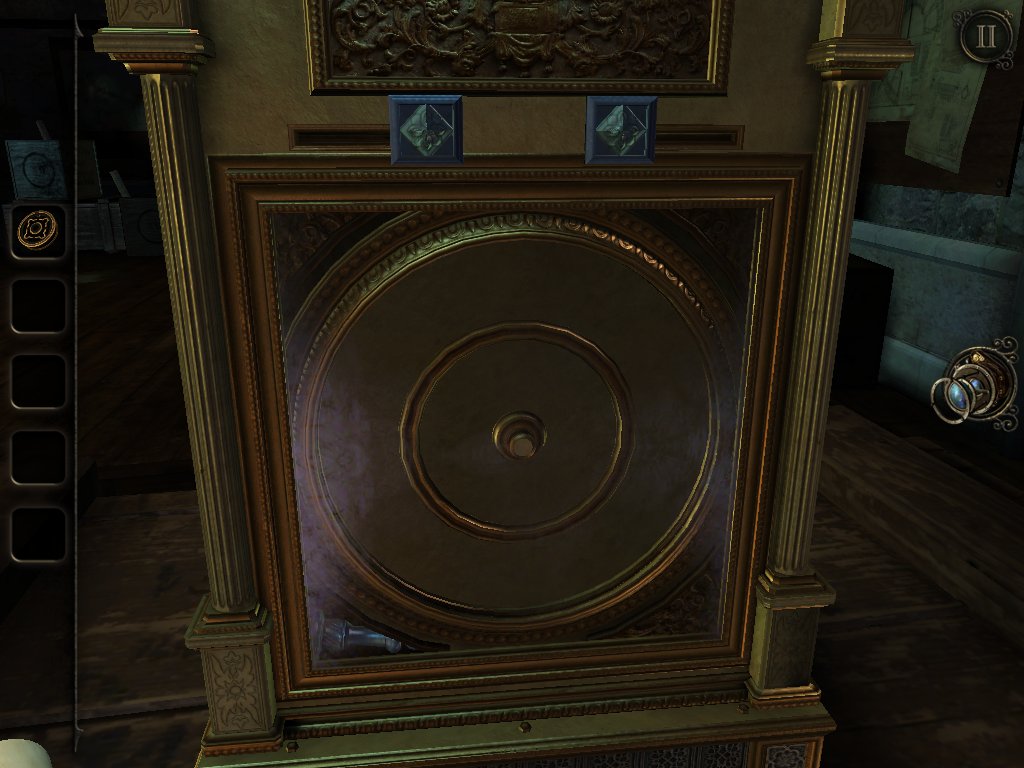
Теперь необходимо перенаправить луч света. Для этого поверните постамент с зеркалом, расположенный на внешней дуге. В результате должен повернуться цилиндр, а вы сможете взять «Зеркало». Его нужно установить на постамент во внутреннем круге и убрать зеркало на внешнем. Теперь луч перенаправляется в «Ключ мастера».
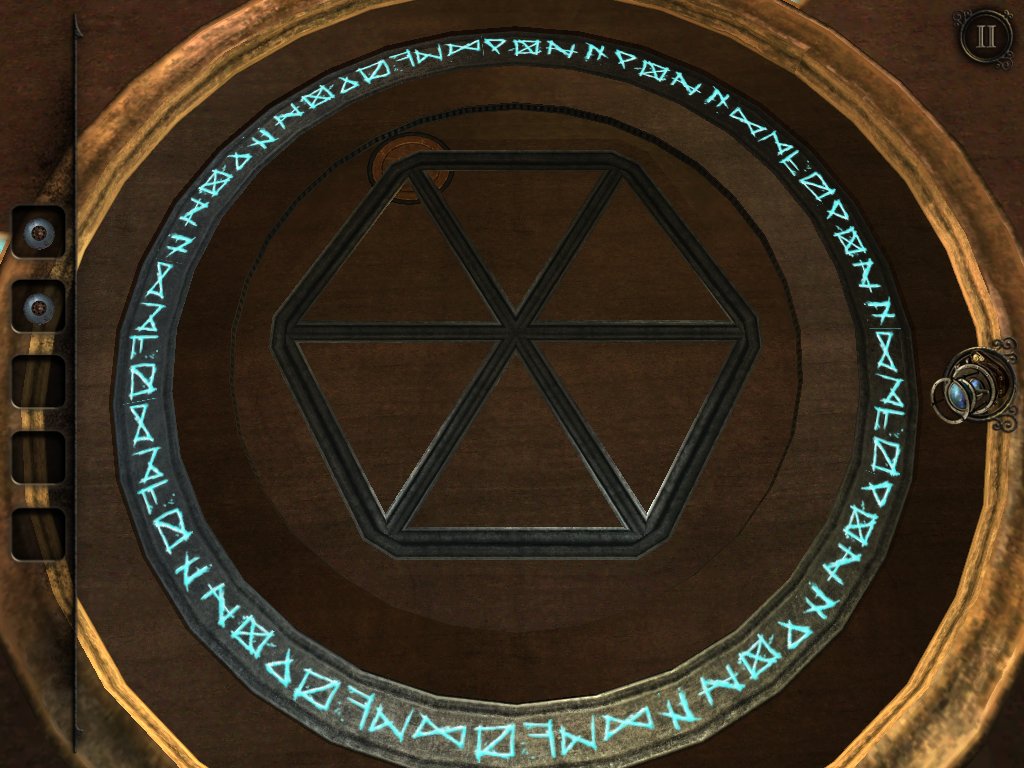
«Нырните» в него. Перед вами простенькая задачка. Нужно сделать так, чтобы в кристалл в центре били лучи со всех прожекторов. Сделать это очень просто. Один из переключателей блокирует состояние некоторых излучателей, другой изменяет состояние оставшихся.
Когда вы решите последнюю головоломку The Room Three, прохождение закончится и появится красный луч. В результате откроется выход — дверь, которая будет смутно напоминать купе поезда из самого начала этого долгого приключения.

Вторая концовка
В The Room Three прохождение концовок не займет у вас много времени. Как вариант, вы можете сохраниться сразу перед выходом в дверь во время первого финала, поскольку его процедура повторяется раз за разом.
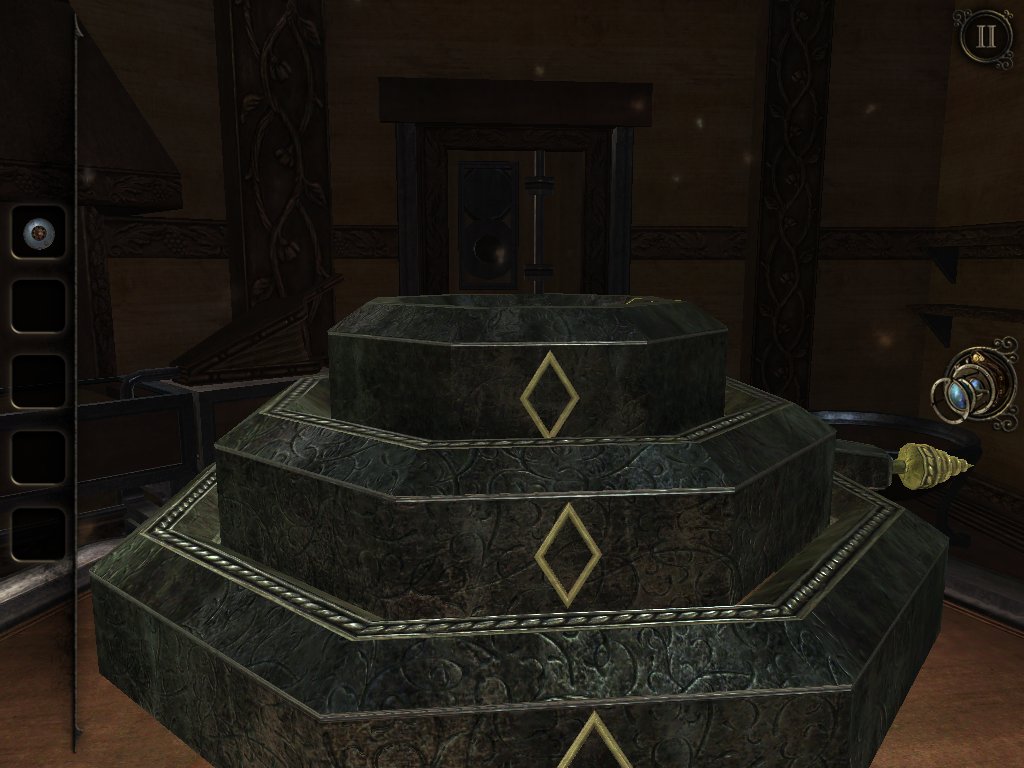
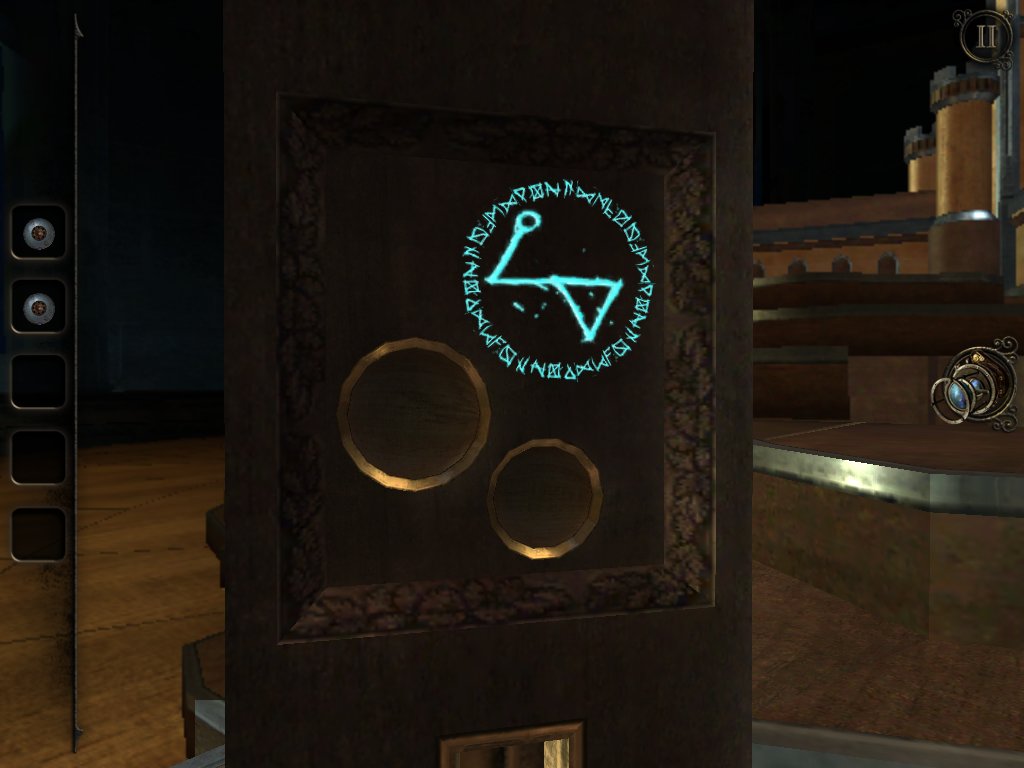
Чтобы открыть вторую карту в финальных титрах, вам понадобится прямоугольный «Необычный артефакт». После того как вы запустили два луча и появилась дверь в купе вагона, немного отойдите от постамента и встаньте лицом к ней. Слева и справа от вас появится два новых пьедестала.
Подходите к левому и поместите на него указанный «Необычный артефакт». Еще одна простенькая головоломка. Во внутреннем круге есть небольшое отверстие, через которое периодически проскальзывает луч света. На самом деле он вращается вокруг кристалла в центре. Просто поймайте темп и начните поворачивать отверстие так, чтобы оно в течение продолжительного времени пропускало свет, и устройство активируется.
Теперь вы можете смело идти в дверь, которая поменяла свою форму. Прохождение игры The Room Three завершено, а вы открыли вторую карту Таро в титрах.
Третий финал
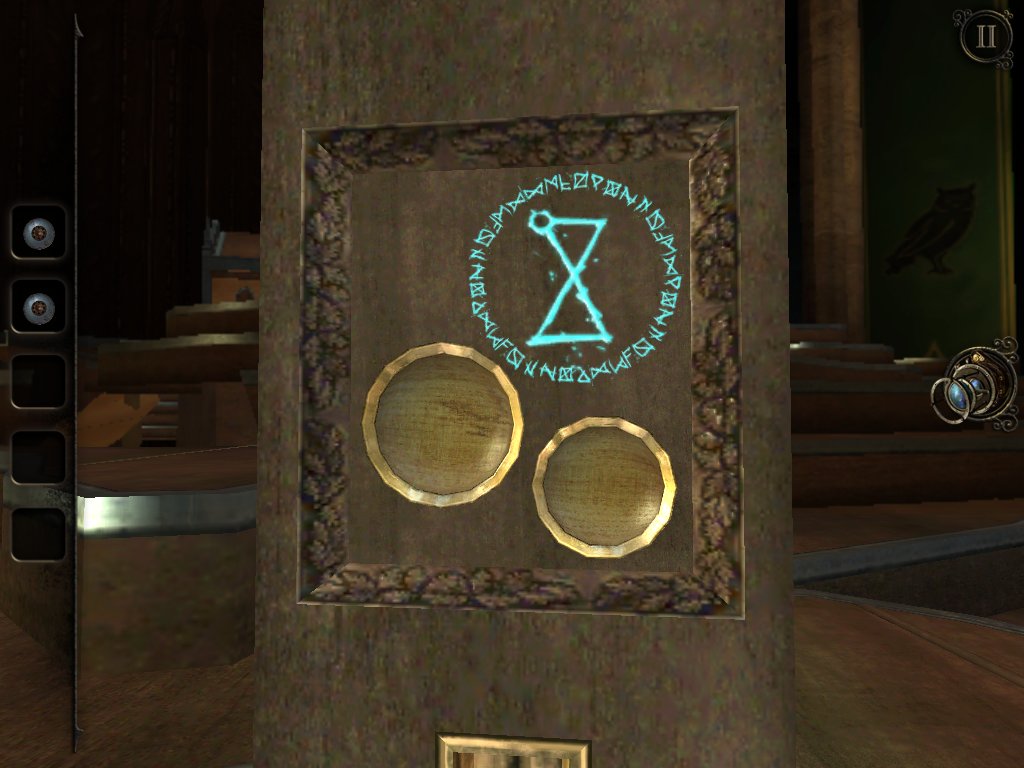
Отматываем время назад. К тому моменту, как вы пустили красный луч. В этот раз идите не к левой, а к правой башенке. Только разместить надо на ней уже треугольный «Необычный артефакт».
Здесь вам придется решить еще одну задачку. Она абсолютно идентична той, которую вы решали при активации «Ключа мастера», только лучей в этот раз шесть, а не четыре. Закончив с процедурой, вы активируете луч и опять поменяете вид двери.
Тут вам предстоит увидеть еще одну альтернативную концовку и открыть третью карту судьбы в титрах.

Последний заход
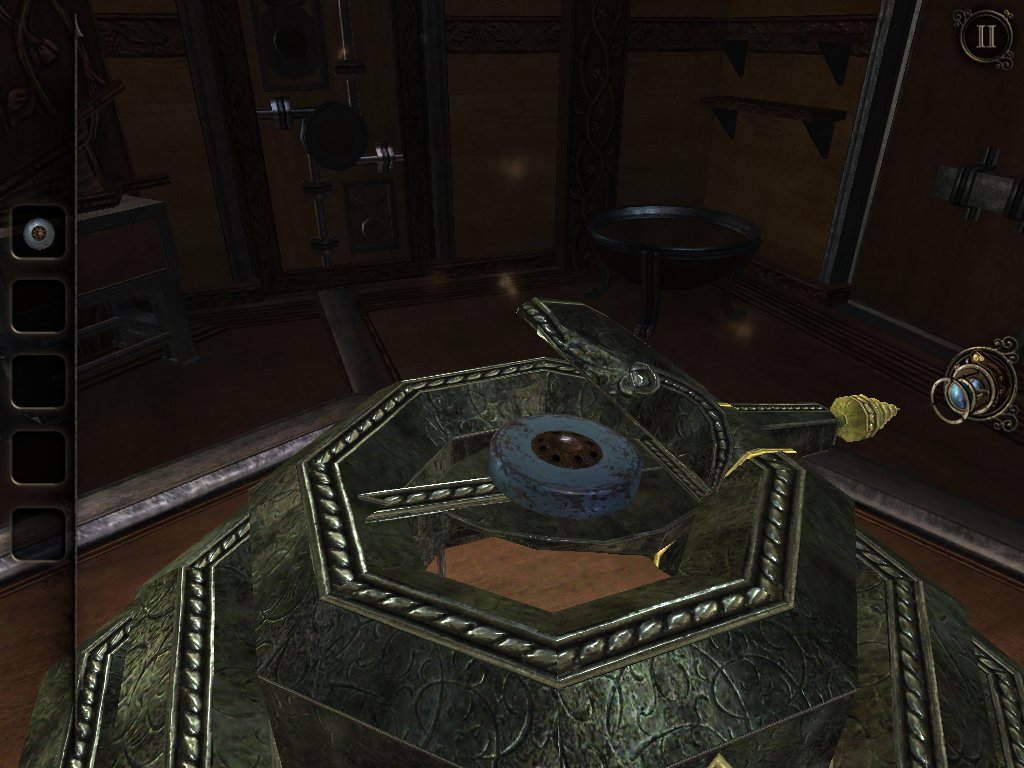
Внимательный и догадливый читатель, наверное, уже понял, каким будет последний финал игры The Room Three. Прохождение явно намекает на то, что вам надо запустить одновременно все три проектора. Поэтому действуйте по пунктам.
- Активируйте «Ключ мастера» так же, как и при первой концовке.
- Теперь идите и включите проектор с треугольным артефактом.
- Затем вам нужно активировать устройство с прямоугольным артефактом. Однако в этот момент погаснет первый проектор.
- Подойдите к нему и осмотрите. С обратной стороны используйте отвертку и отодвиньте панельку, загораживающую луч света.
Все, теперь все возможные лучи проекторов светят в сторону двери. Но её там нет. Вместо этого появился непонятный черный провал. Заходите в него и смотрите последнюю возможную концовку из четырех. На этом заканчивается наша статья «The Room Three: прохождение». Альтернативные концовки подробно рассмотрены и разложены по полочкам, а фанатам игры остается только ждать продолжения.
Android OS: 4.1+
Версия игрушки: 1.0.1
Язык: русский
Таблетка: не нужна
The Room Three на Андроид – это таинственная игра, в которой вы попадёте на волшебный остров, где всё живёт своей жизнью. Каждый предмет таит в себе массу загадок и может нести в себе мощный энергетический заряд, способный помочь вам либо сильно навредить. Вы здесь оказались не по своей воле и чтобы выбраться вам нужно пройти суровые испытания, а после встретиться с таинственным незнакомцем — «Мастером».


Весь игровой процесс полностью построен на загадках, поэтому вам предстоит долгое и увлекательное путешествие по мрачным локациям, на каждой из которых создаётся нереальная атмосфера слежения и присутствия третьих лиц. Вы будто пленник которого водят на коротком поводу показывая лишь то, что вам необходимо знать. Хватит ли у вас смелости и ума, чтобы увидеть то что скрыто от вашего взора?


Взаимодействуйте с предметами, изучайте их структуру и особенности, используйте энергию и выстраивайте цепочку событий. В The Room Three вы самостоятельно строите сюжет и можете влиять на концовку. В ходе игры можно возвращаться назад и переигрывать миссии, чтобы увидеть как изменится ваша судьба от того или иного решения. Попробуйте построить свою историю и не затеряться в волшебных локациях.


Игра отлично подойдёт всем кто обожает сюжет и не требует динамического экшена. Здесь нужно внимательно исследовать каждый уголок, искать предметы и использовать каждую зацепку, чтобы разгадать очередную головоломку. В игре очень приятная графика и великолепный звук. В главной роли выступаете вы сами играя от первого лица. Удобное сенсорное управление позволяет легко взаимодействовать с предметами, а постоянные задания и мрачный сюжет надолго увлекут вас в мир The Room Three.
Запускаем новую игру. Мы оказываемся в вагоне поезда. Проходим обучение: осматриваемся, фокусируемся на журнале, листаем его, уменьшаем, смотрим на коробку, забираем «Маленький ключик
» с её верхней грани, смотрим на чемодан, открываем его защёлки и потом открываем чемодан. Замечаем небольшую задвижку на верхней крышке, поворачиваем её и забираем «Окуляр
». Опять фокусируемся на коробке, включаем окуляр и по кусочкам собираем замочную скважину. Используем ключ на замочную скважину и поворачиваем его. Забираем «Пирамиду с символами
».
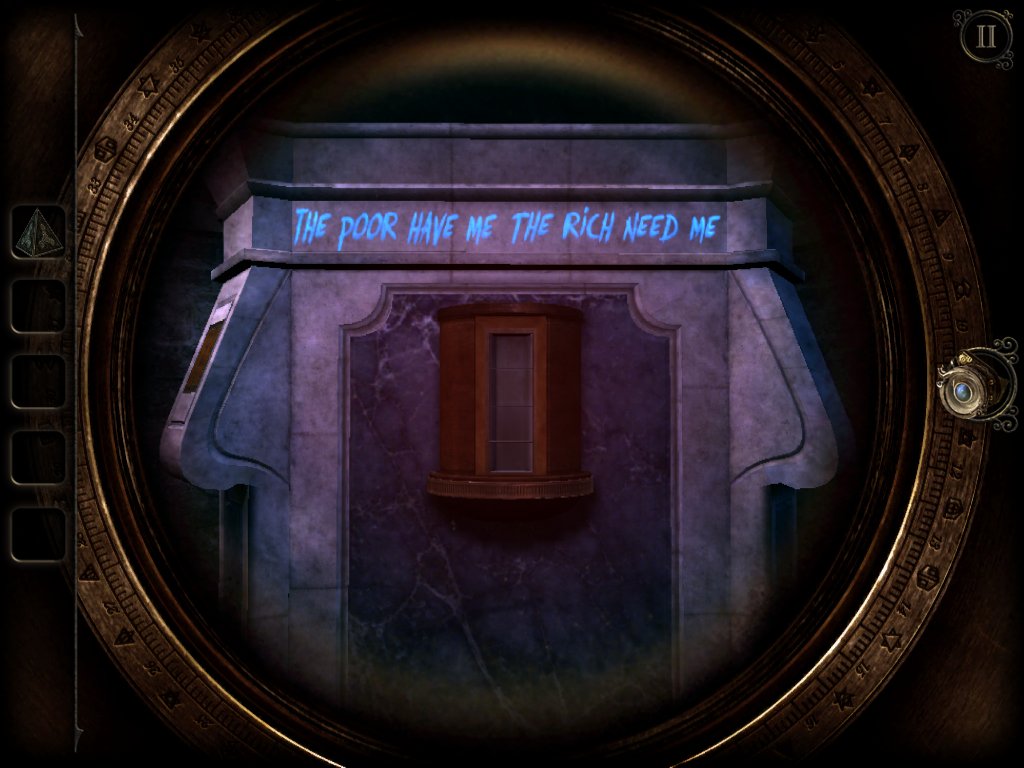
В двери перед нами есть небольшое закрытое окошко, открываем шпингалет. Наблюдаем за уходящим Мастером, осматриваемся в комнате, в которой находимся. У мраморного стола 3 стороны, включаем окуляр и читаем надписи. Необходимо на каждой, вращая барабаны за нижнюю грань, выставить то, о чём говорится в надписях на этой стороне. «Двигатель полёта, источник знаний» — перо, «Безмолвны, когда нам нечем показать» — часы, «У бедняка нет, а богачу не нудно» — ничего, пустая ячейка. Читаем открывшееся письмо, забираем «Коробку с орнаментом
». Тыкаем на коробку в инвентаре, чтобы осмотреть её. Повернув кольцо на передней стенке, открываем и забираем «Линзы
». Наблюдаем серебристое свечение у замочной скважины. Включаем окуляр и двойным нажатием залетам в замочную скважину. Решаем головоломку с замком: необходимо установить штифты так, чтобы они были на одном уровне. Правильный уровень подсвечивается белым. Переходим в центральный зал, осматриваем стол. Применяем пирамиду с символами на белый светящийся треугольник на столе. Забираем «Эмблему
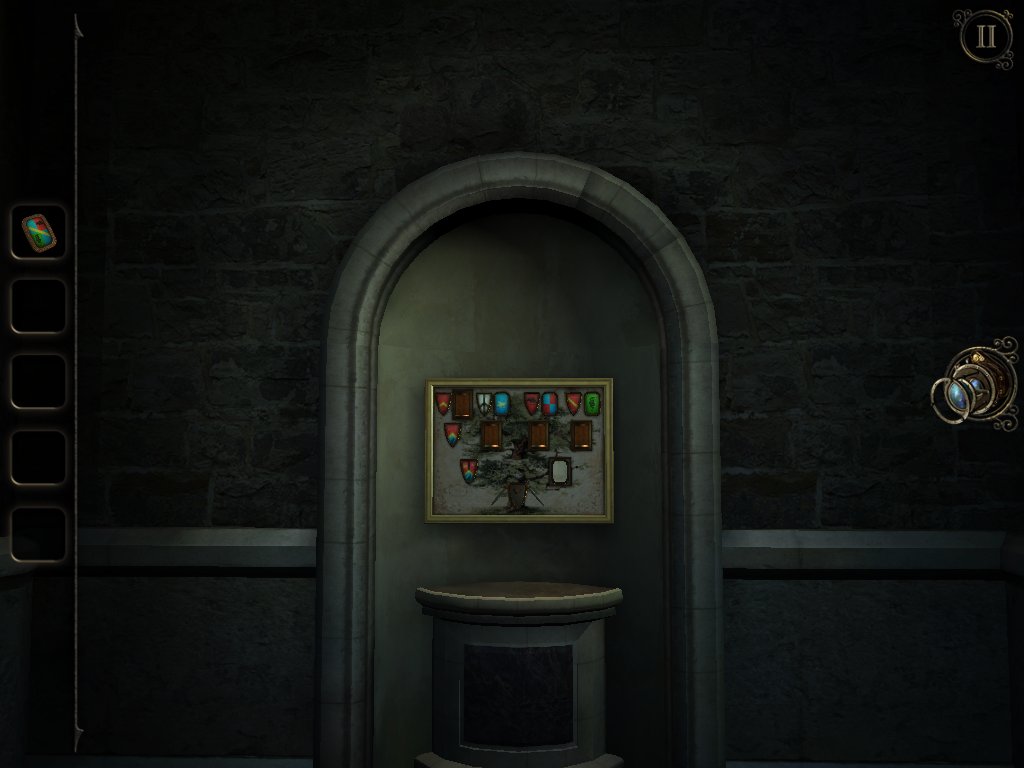
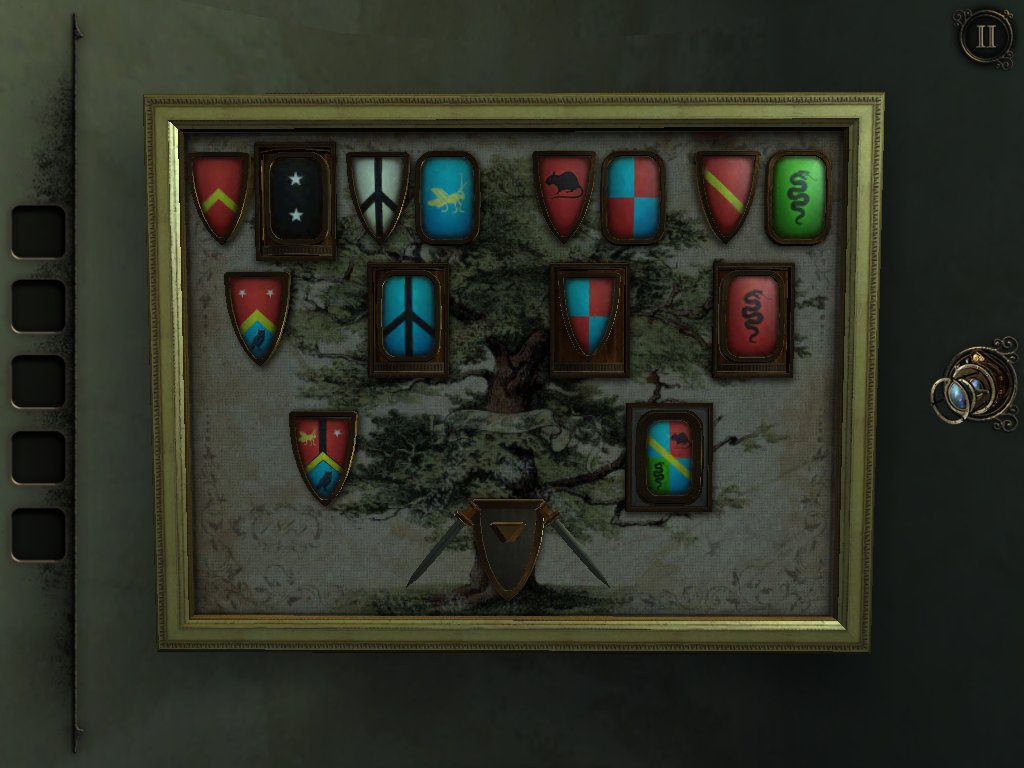
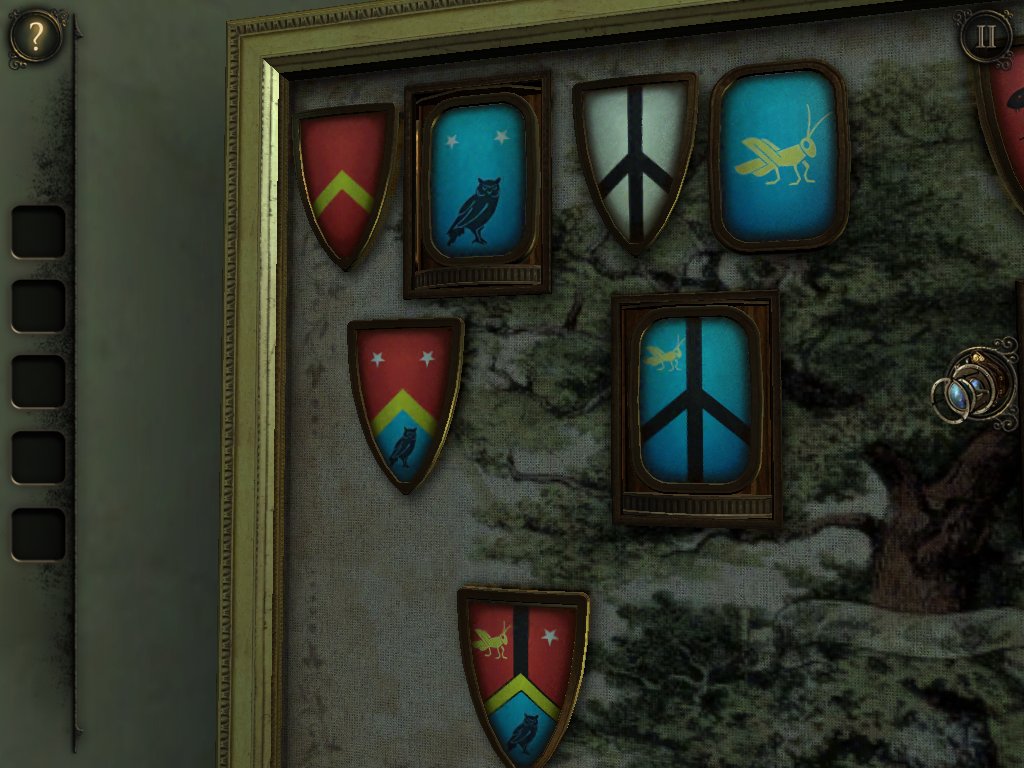
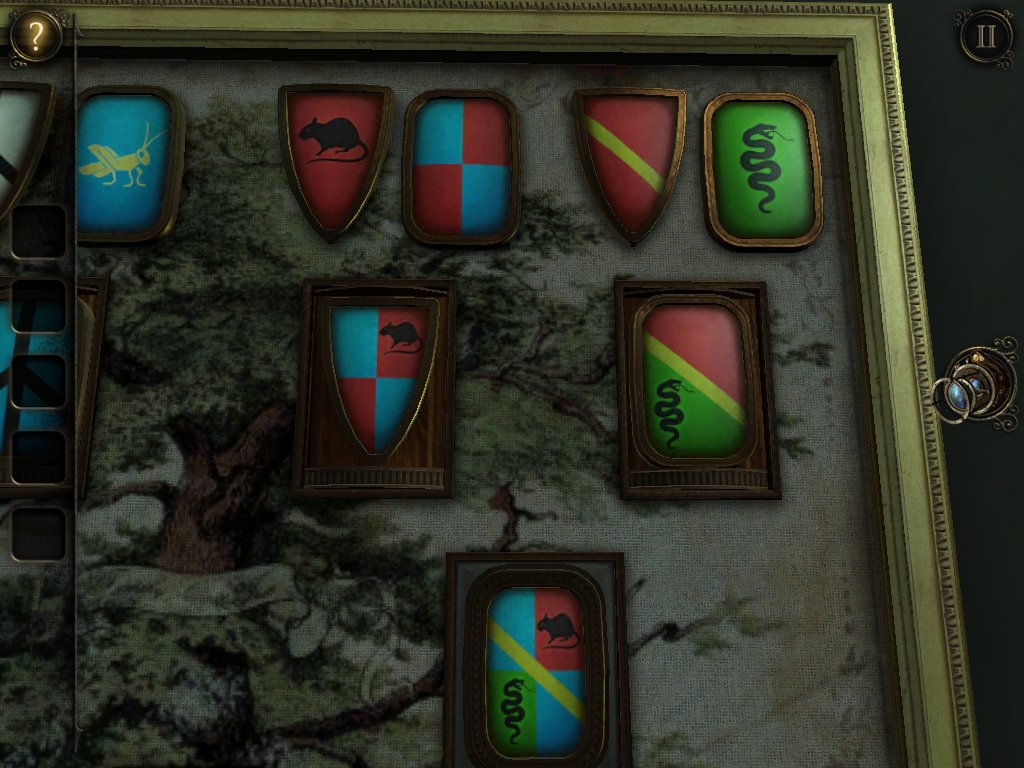
», осматриваем зал и двигаемся к генеалогическому древу. Применяем эмблему на белый овал и начинаем новую мини игру: нужно правильно подобрать гербы потомков.
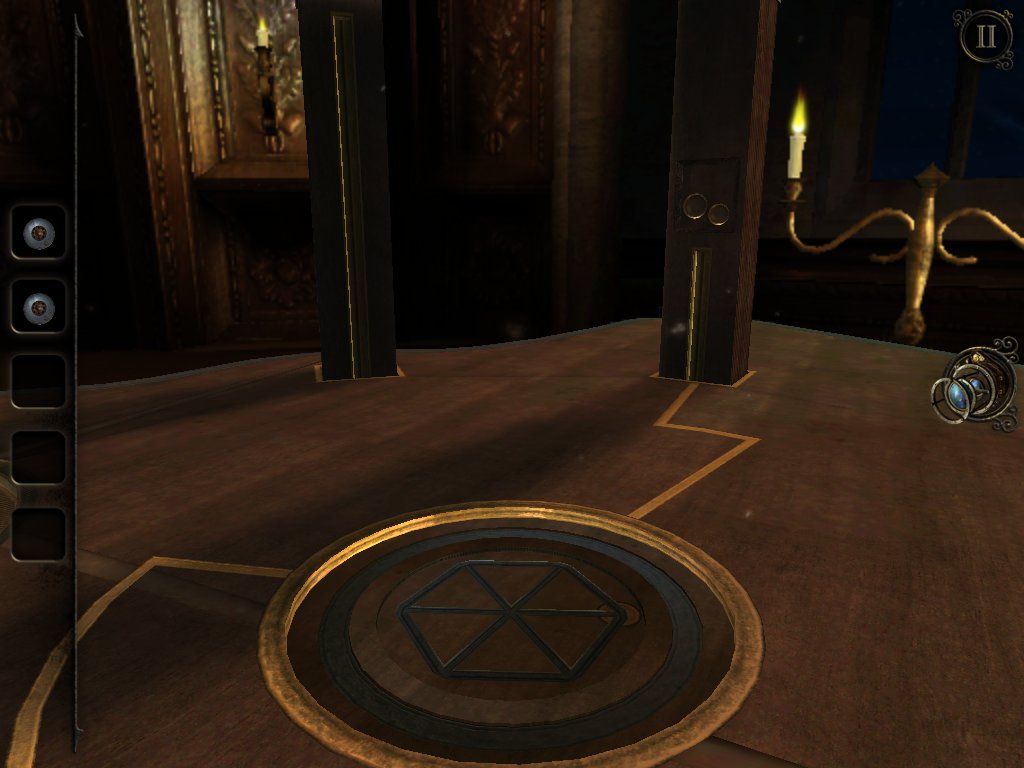
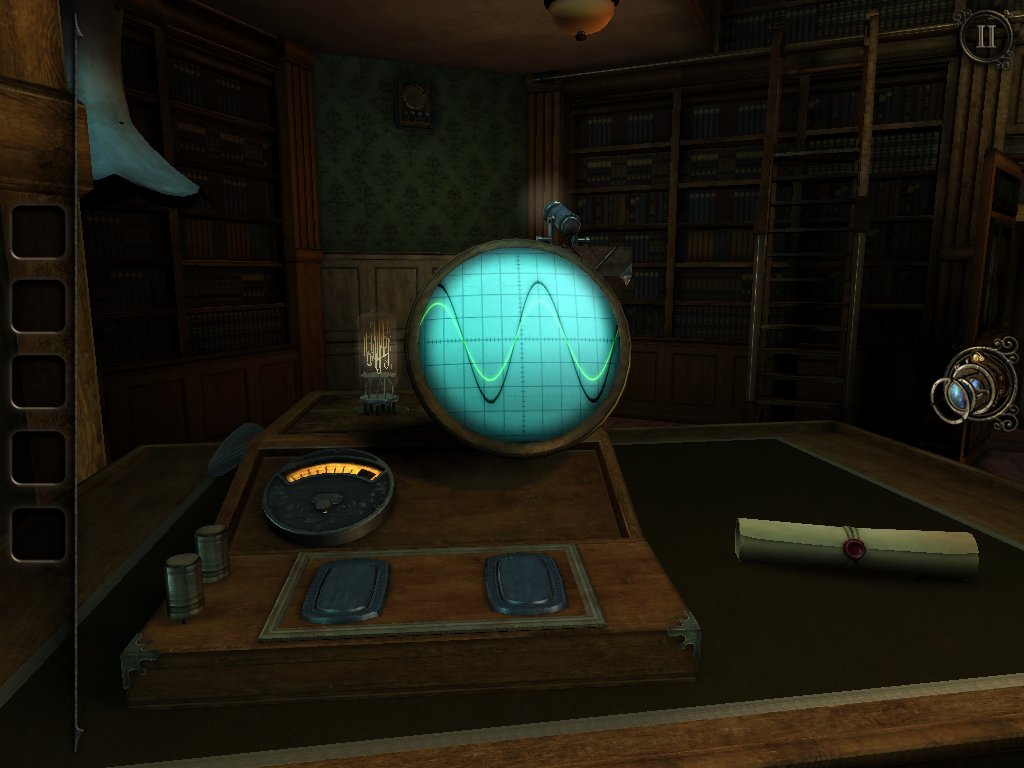
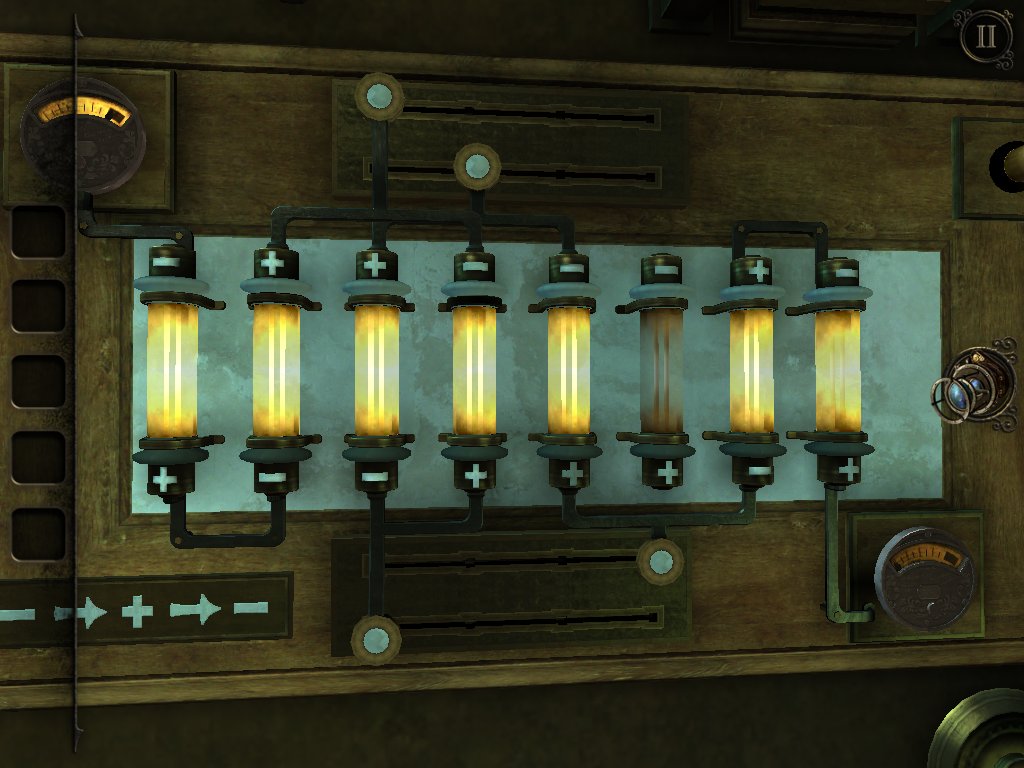
Заходим в открывшуюся арку и попадаем в кабинет. Смотрим на генератор, нам нужно запустить ток, правильно передвинув рычаги. Это несложно, нужно просто соблюдать полярность: плюс к минусу, а минус к плюсу.

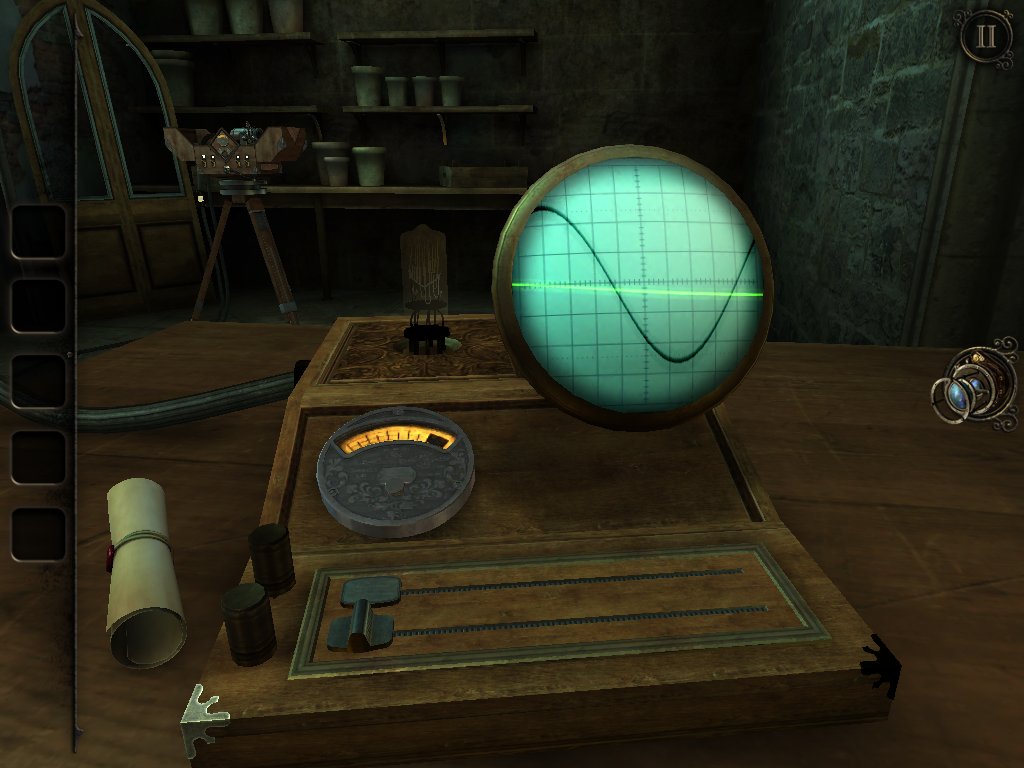
Включаем рычаг на окне и наблюдаем за включением света у маяка. Поворачиваем 4 выключателя на приборе на треноге и нажимаем кнопку. Новая мини-игра: нужно выставить на осциллографе правильную частоту и амплитуду сигнала, поворачивая 2 ручки. Лазер из прибора открывает нам портал в стене, направляемся туда.
Мы попадаем в маяк. На полу слева от круглого стола виден люк, отодвинем его и заберём «Висящую в рамке сферу
». Сбоку у стола есть защёлка: её нужно отодвинуть одной рукой, а другой открыть крючок вверх. Открываем ящик до конца и забираем «Деревянный инструмент
». Вставляем его в башню посреди стола, вращаем по часовой стрелке и наблюдаем появление макета острова. Рассмотрим поближе полученную сферу в рамке: перевернём её и покрутим, пока она не откроется, забираем из неё «Магнит
».

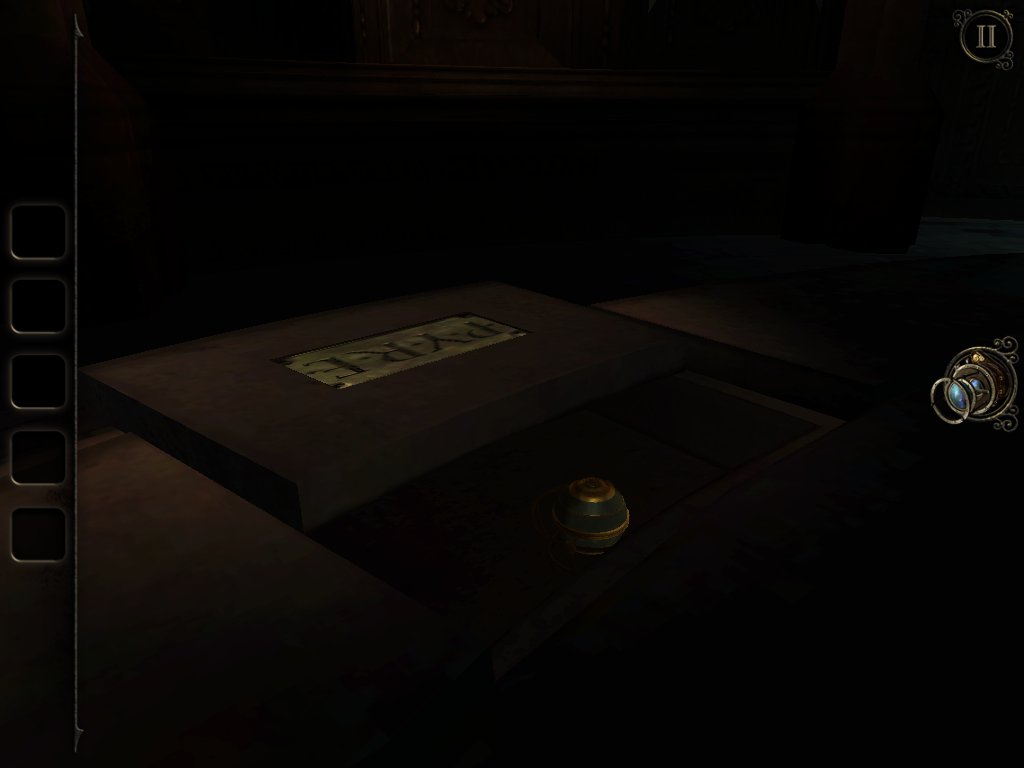
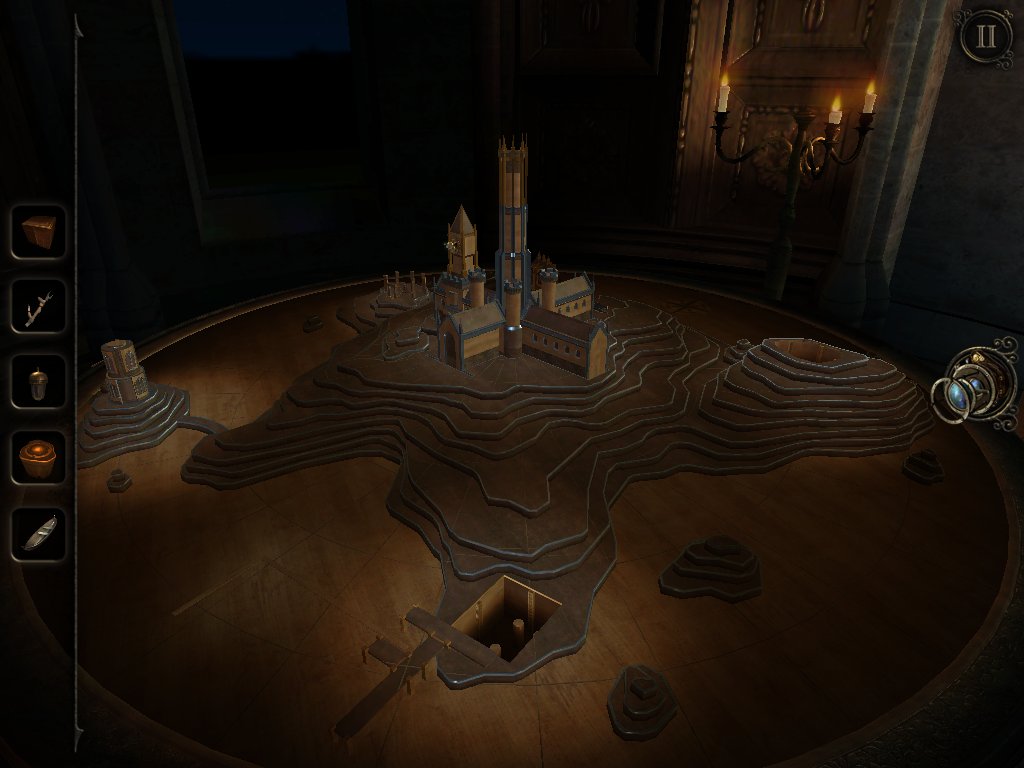
Направляемся к столу, на котором стоит прибор с буквами. Тут нужно написать название острова (PYRE). Делается это следующим образом: выбирается текущая буква бегунком и нажимаются 2 кнопки так, чтобы повернувшиеся стрелки указали на нужную букву. Забираем «Резную деревянную рамку
». Осматриваем модель на столе, вставляем её в круг с двумя дырками на отдельном выступе и поворачиваем.

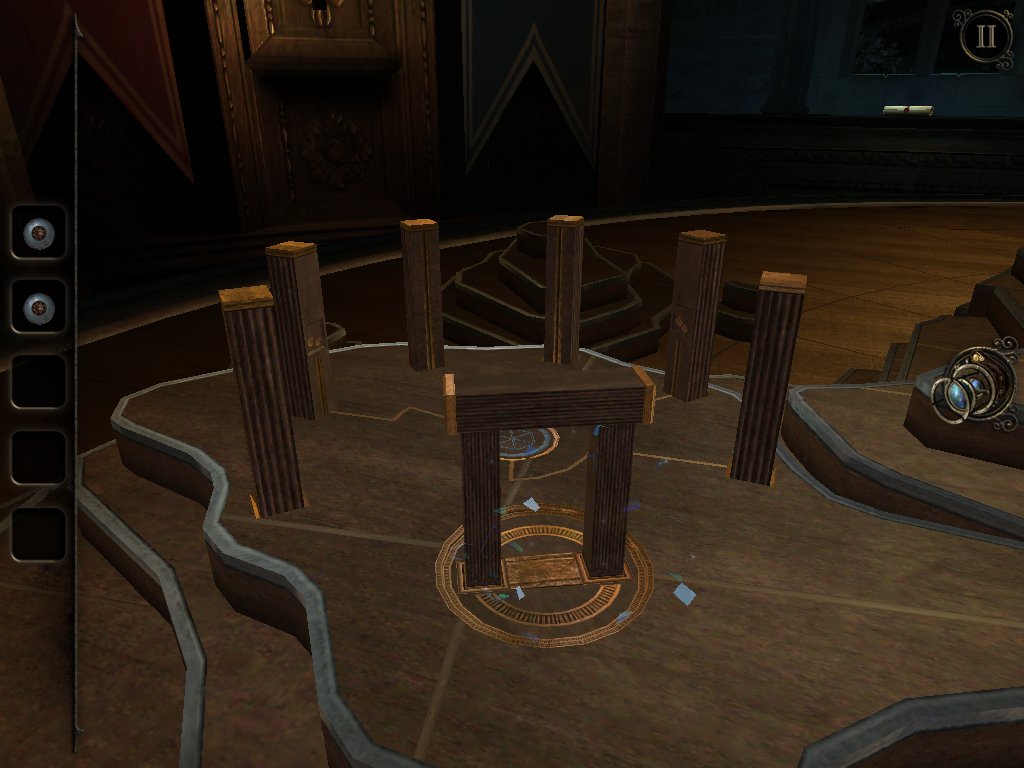
Включаем окуляр и попадаем внутрь арки. Осматриваем колонны: на трёх из них есть 2 круглых углубления: ставим на них 2 пальца и на колонне загорается фигура. Её нужно повторить на круге в центре.


На появившейся башне находим круг со стрелками, включаем окуляр и составляем буквы сторон света.

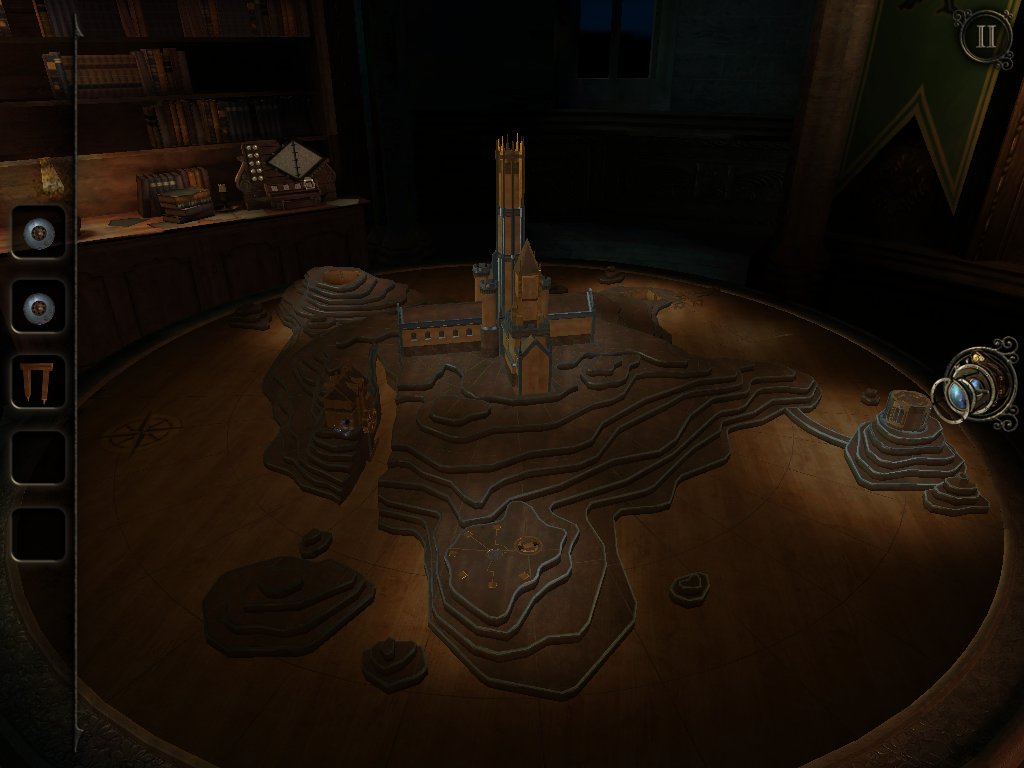
Забираем «Деревянную модель
». Продолжаем осматривать башню, замечаем небольшой ящик с ручкой, выдвигаем его и забираем «Небольшой циферблат часов». После этого выходим из арки. Осматриваем модель острова и вставляем циферблат в часовую башню. Залетаем внутрь башни и разбираем модельку филина, в конце получая «Модель лодки
». Выходим из башни, осматриваем модель острова и находим причал. Ставим деревянную модель из инвентаря в углубление, ставим модель лодки на появившийся держатель, заводим лодку к пристани и залетам внутрь здания. Разбираем модель мыши и забираем «Ключ
». Снова осматриваем модель и находим кузню с водяным колесом. Вращаем его и залетам в открывшееся окошко. Разбираем модель змеи: тянем за хвост, совмещаем 3 слоя и забираем ещё один «Магнит
». С этими находками отправляемся в арку на острове. На башне находим радужный круг с двумя круглыми ручками и вставляем в них магниты. Осматриваем башню и видим на ней 2 латунных таблички с символами:


Переходим на круг с магнитиками, включаем окуляр и выставляем пимпочки на дорожках согласно картинке на карте с созвездиями. Забираем «Деревянную модель
». Идём к модели острова и ставим полученную модель как второй этаж башни маяка. Вставляем ключ в замочную скважину на 2 этаже модели башни маяка и залетаем внутрь. Крутим ручку, придвигая части манекена и залетам во вновь открывающиеся модели маяка.
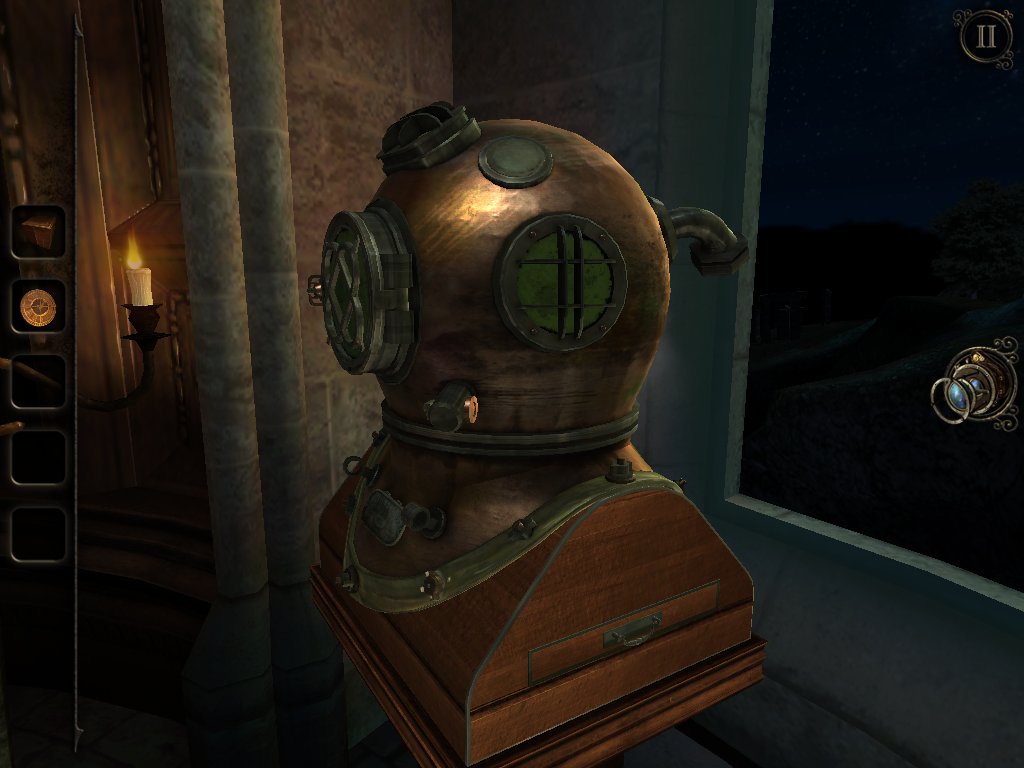
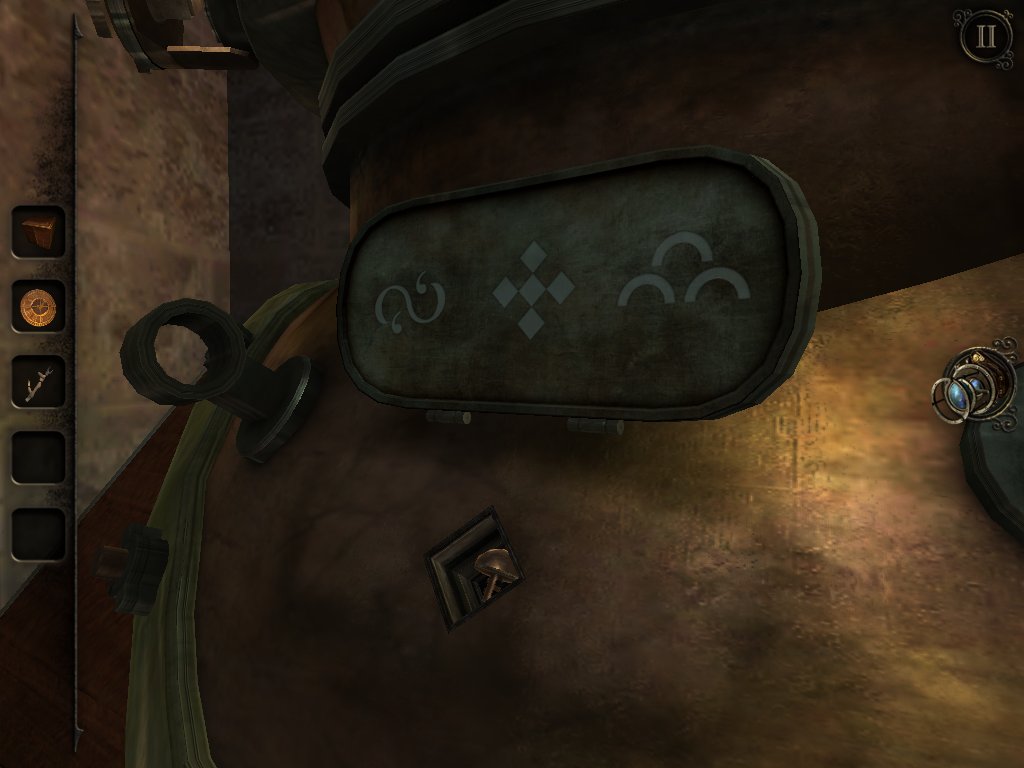
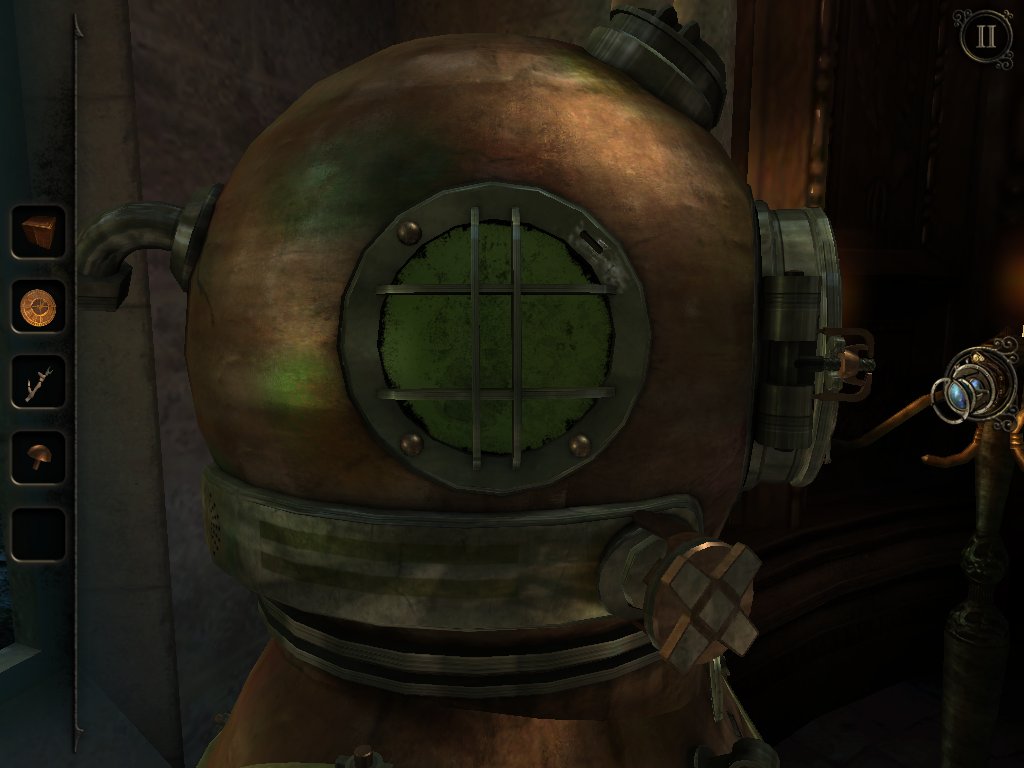
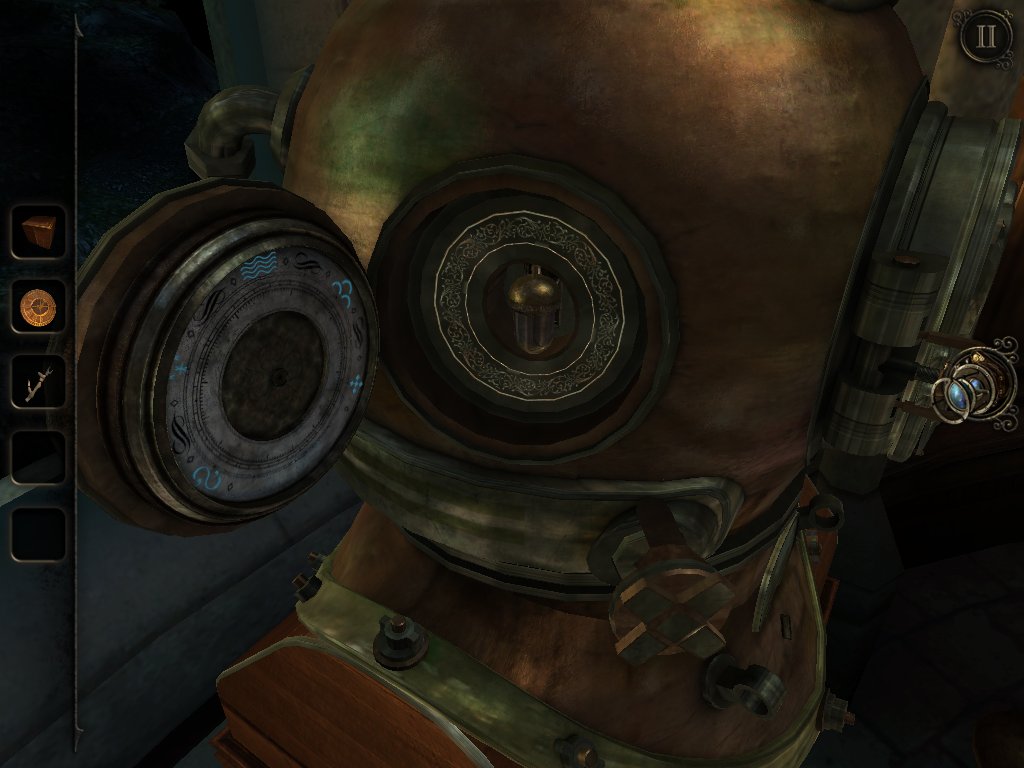
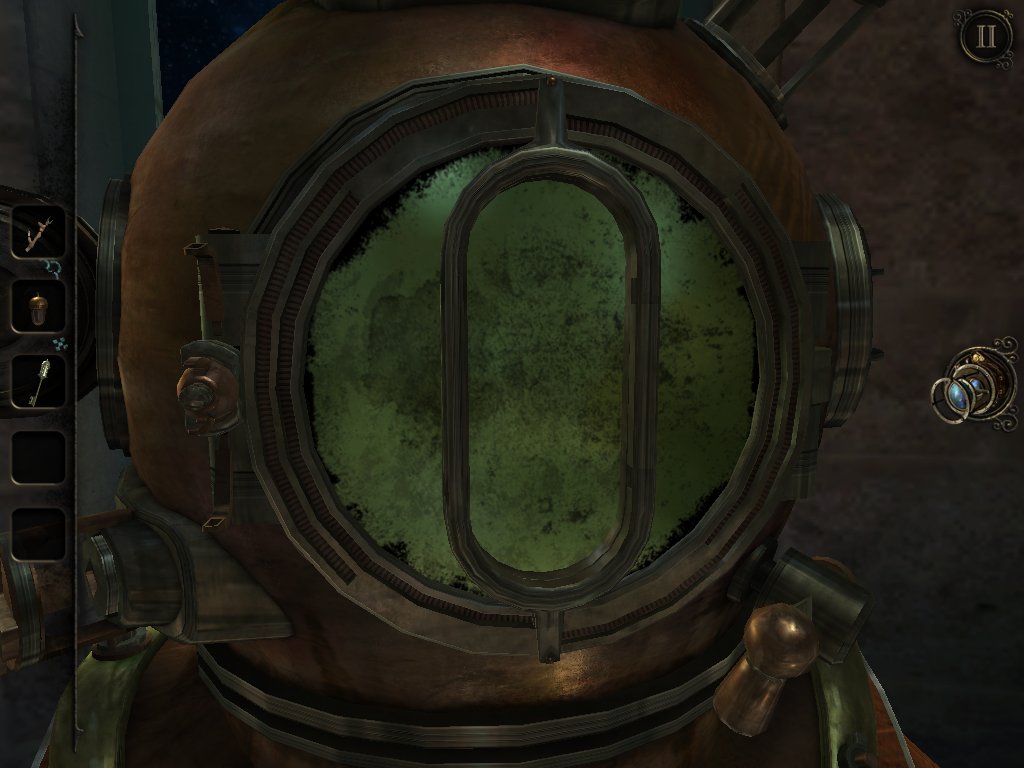
Осматриваем стоящий на постаменте водолазный шлем: поворачиваем небольшой переключатель впереди-снизу в правильное положение.

Забираем заклёпку и запоминаем символы на табличке:

Вставляем заклёпку в левый иллюминатор шлема и переключаем. Забираем «Металлический жёлудь
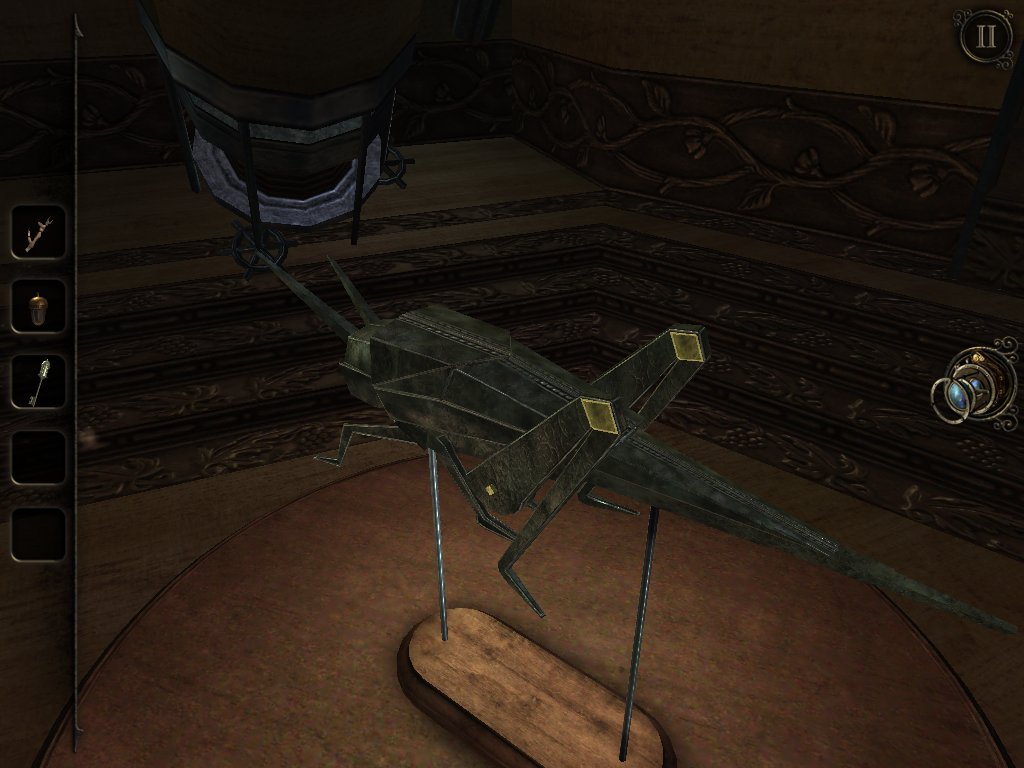
». Подробнее осматриваем его и, вращая шляпку, раскрываем в ключ. Поворачиваем выключатель в углублении, откуда забрали жёлудь и забираем новую деревянную модель. Ставим её в оставшееся место на карте. Поворачиваем купол обсерватории и залетам внутрь. Разбираем модель кузнечика и получаем «Металлическую стрелку
». Вставляем стрелку в циферблат у водолазного шлема. Крутим рукоятку, последовательно останавливаясь на трёх фигурах, которые мы запомнили ранее в правильном порядке.
Забираем медный краник и одеваем его на вентиль ниже. Вращаем овалы на шлеме, приводя их в вертикальное положение, поворачиваем разблокированную гайку барашек и забираем «Хрустальный пузырёк
» изо рта черепа. Осматриваем постамент шлема и с правой стороны выдвигаем плоский ящичек, забирая оттуда «Олений рог
» Снова идём к арке на острове. Вставляем жёлудь-ключ в картинку дерева, вставляем рог в череп. Дальше нужно поворотами частей добиться симметрии. Вставляем хрустальный пузырёк под камень и забираем «Светящийся драгоценный камень
». Его вставляем в модель маяка и забираем «Светящуюся лампу
». Опускается лифт, заходим в него, собираем центральный пульт воедино, повернув, поднимаемся к маяку. Поворачивая верхнюю и нижнюю половины, открываем окошечко, в которое вставляем светящуюся лампу. Забираем новую «Пирамиду с символами
». Эпизод «Маяк» пройден!
Идём в центральный зал и ставим новую пирамиду на светящийся треугольник на столе. Поворотами верхней и нижней части пытаемся составить полную арку.

Заходим в появившийся проход и идём в библиотеку. Запускаем генератор и идём вверх по лестнице.

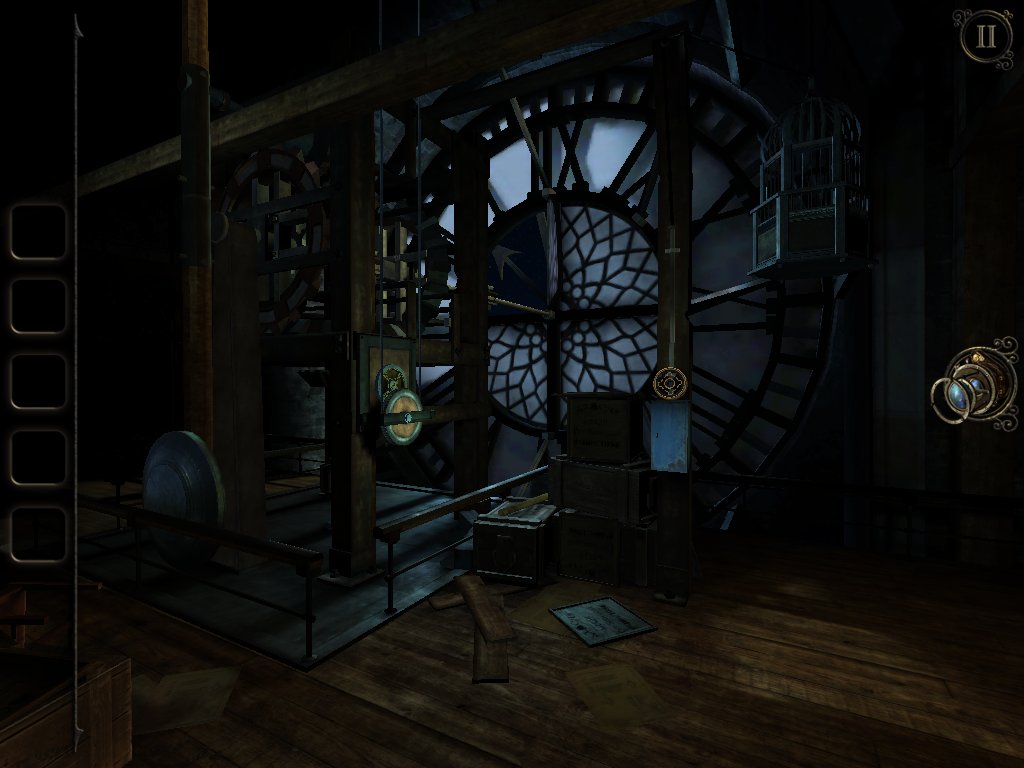
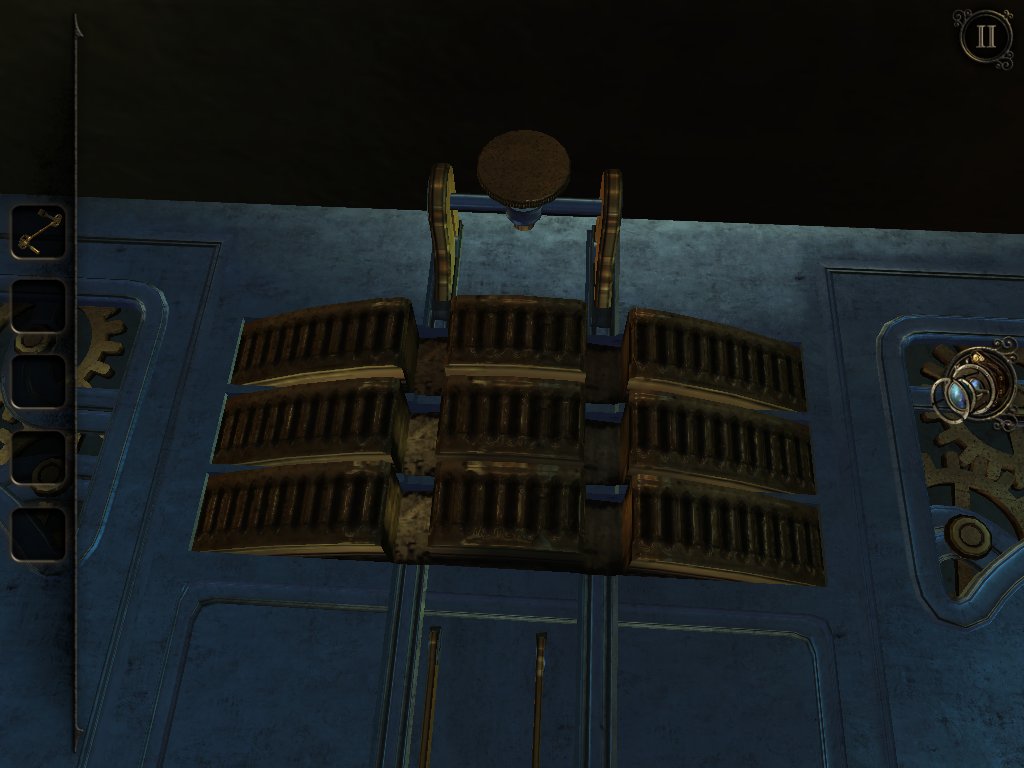
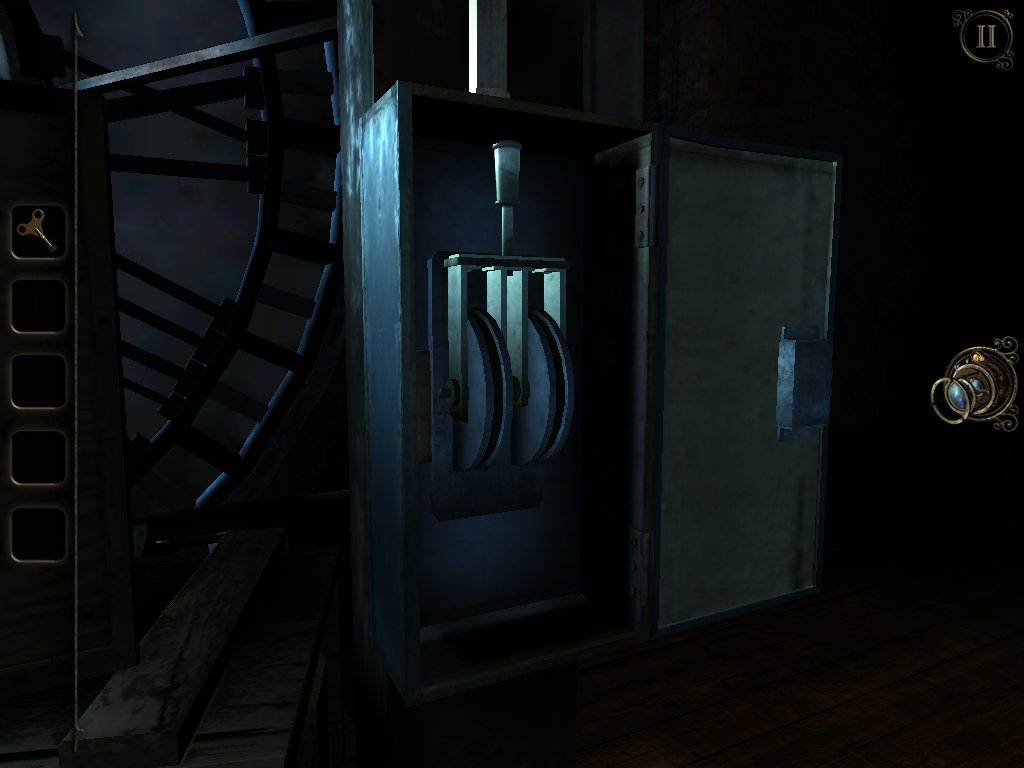
Поворачиваем выключатель у окна и наблюдаем включение света на улице. Идём вниз, поворачиваем 4 выключателя на приборе на треноге и нажимаем кнопку. Снова мини-игра с осциллографом, только на этот раз частоту и амплитуду надо подбирать нажатием двух кнопок. Заходим появившийся проход и попадаем в часовую башню.
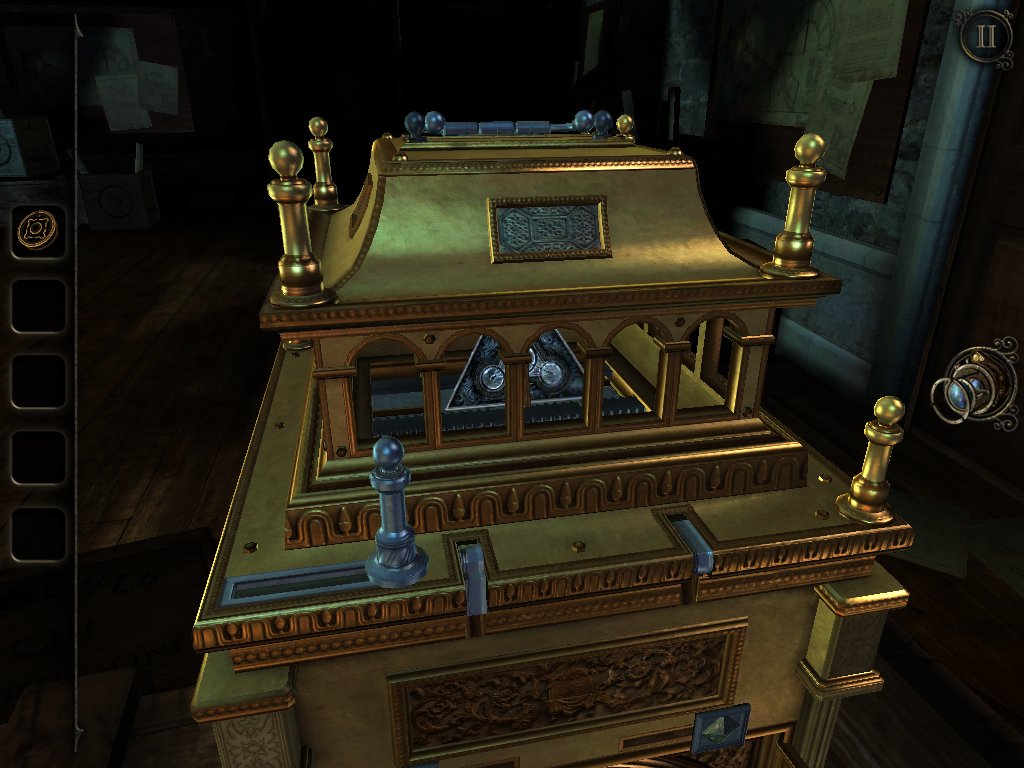
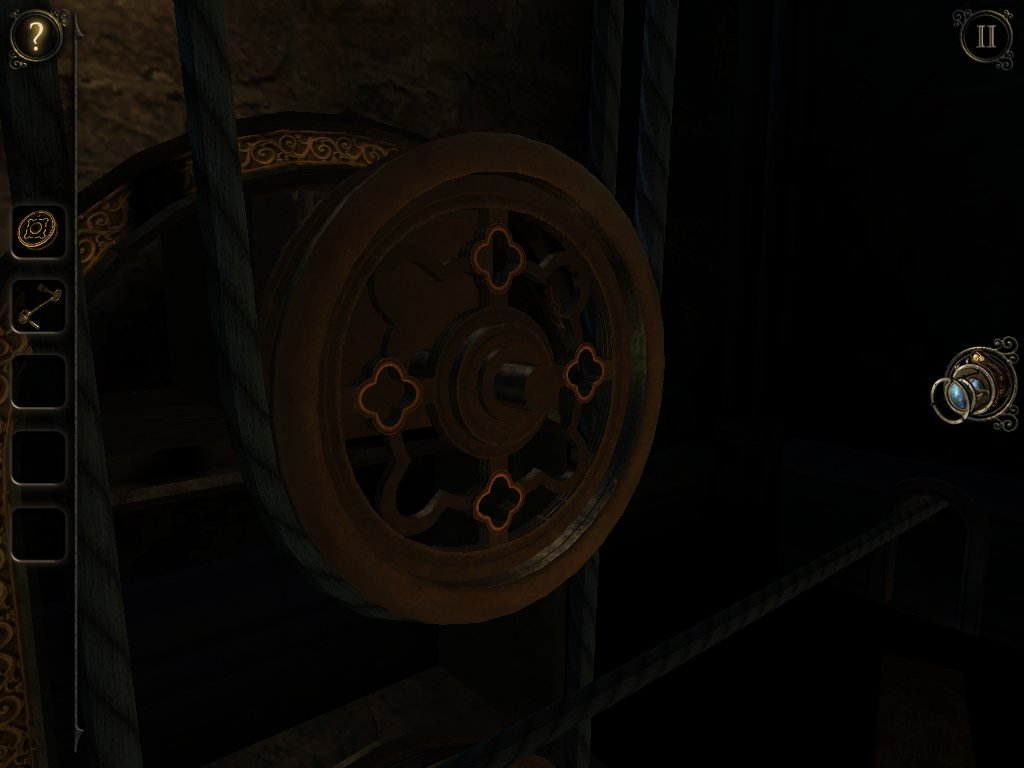
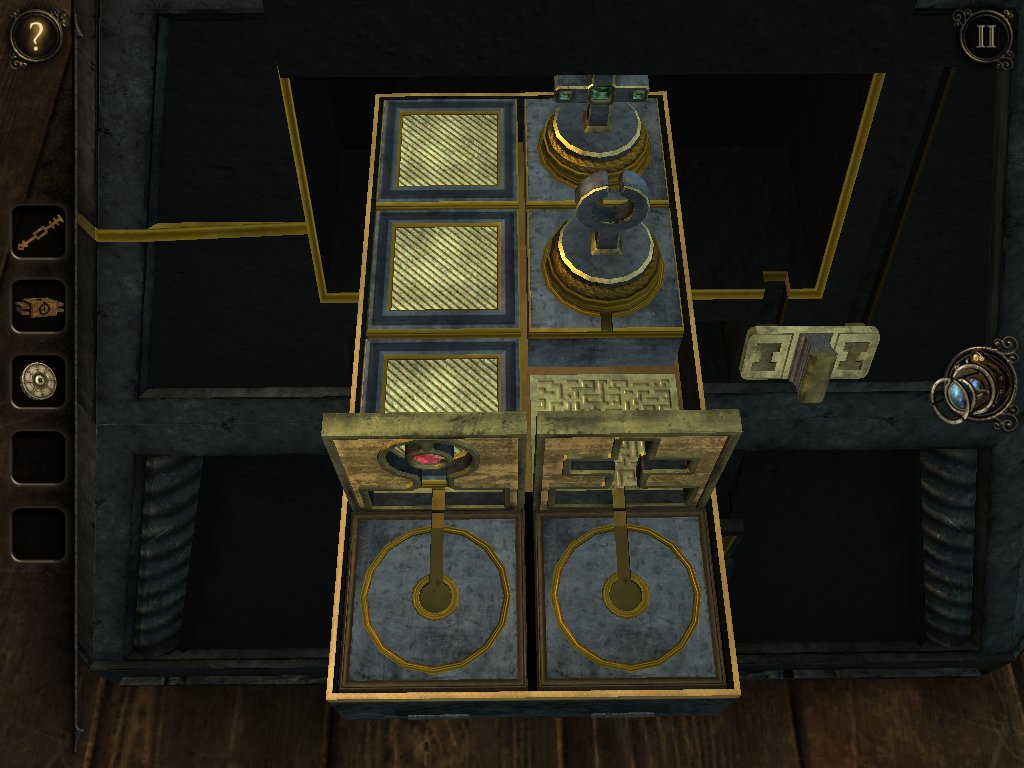
Осматриваем комнату и забираем «Колесо с рукояткой
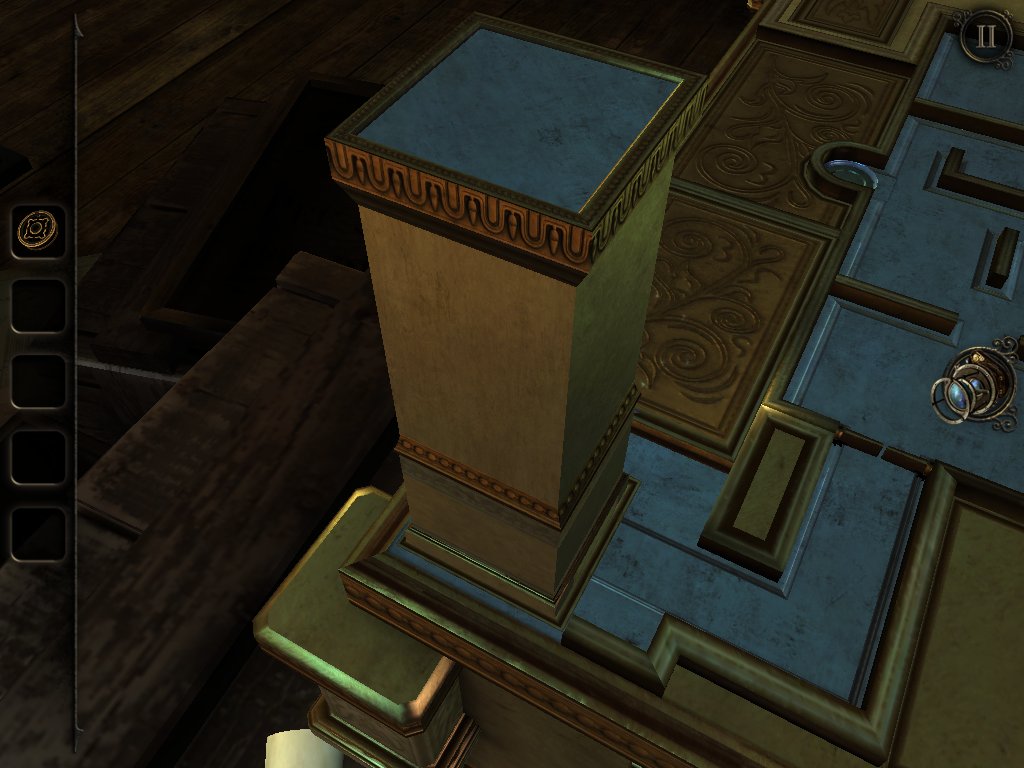
» с голубого щитка справа от часового механизма. Осматриваем модель на столе, перекидываем ручку сверху в другую сторону. Передвигаем 2 защёлки над круглым диском за стеклом и открываем дверцу, забираем «Маленький металлический столбик
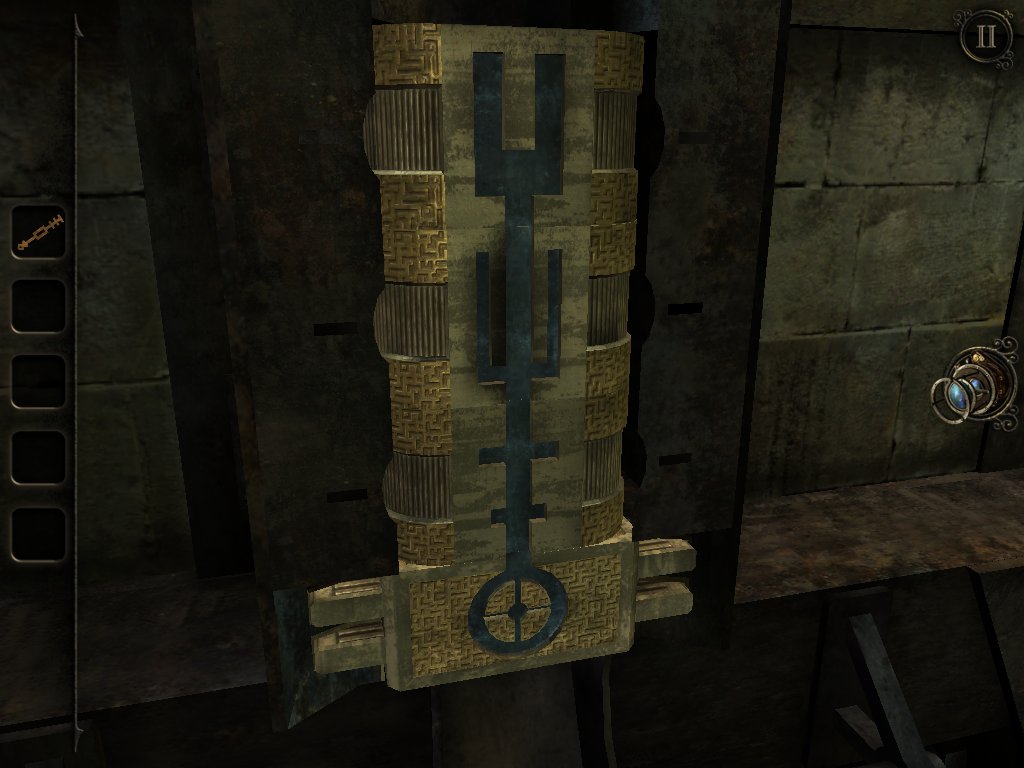
». Вставляем его в металлическую рамку сверху и двигаем. Раскрываем коробку, сдвигаем левую панель на ней. Заходим внутрь появившегося столбика. Открываем справа круглую дверку и забираем «Изогнутую рукоятку
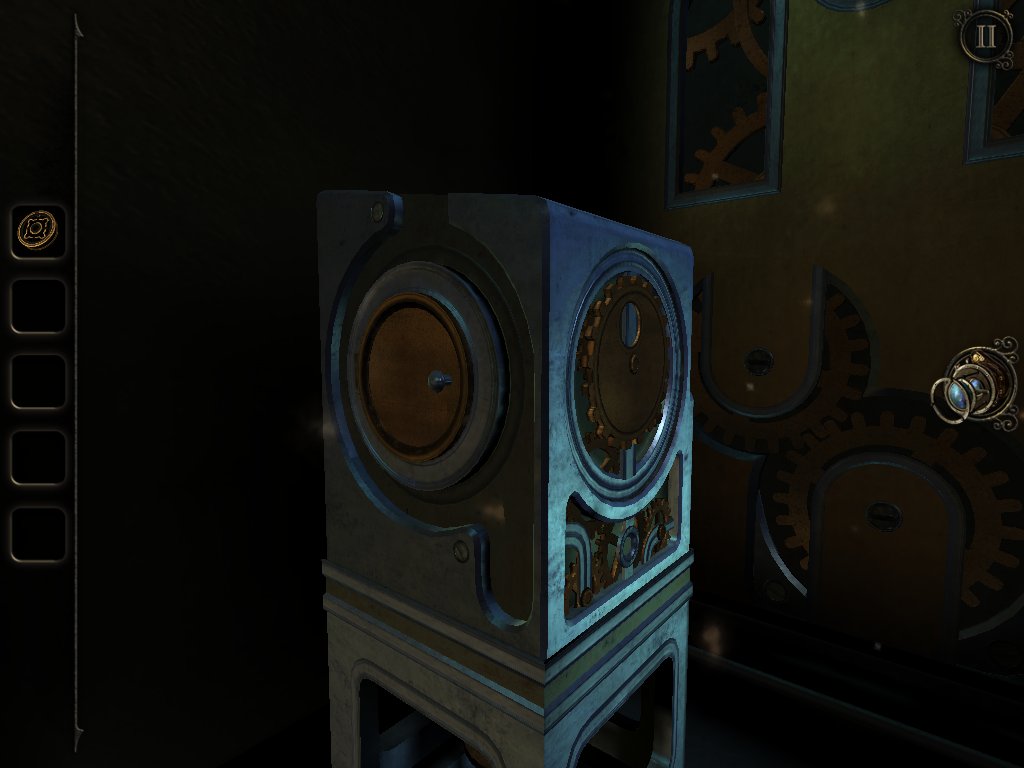
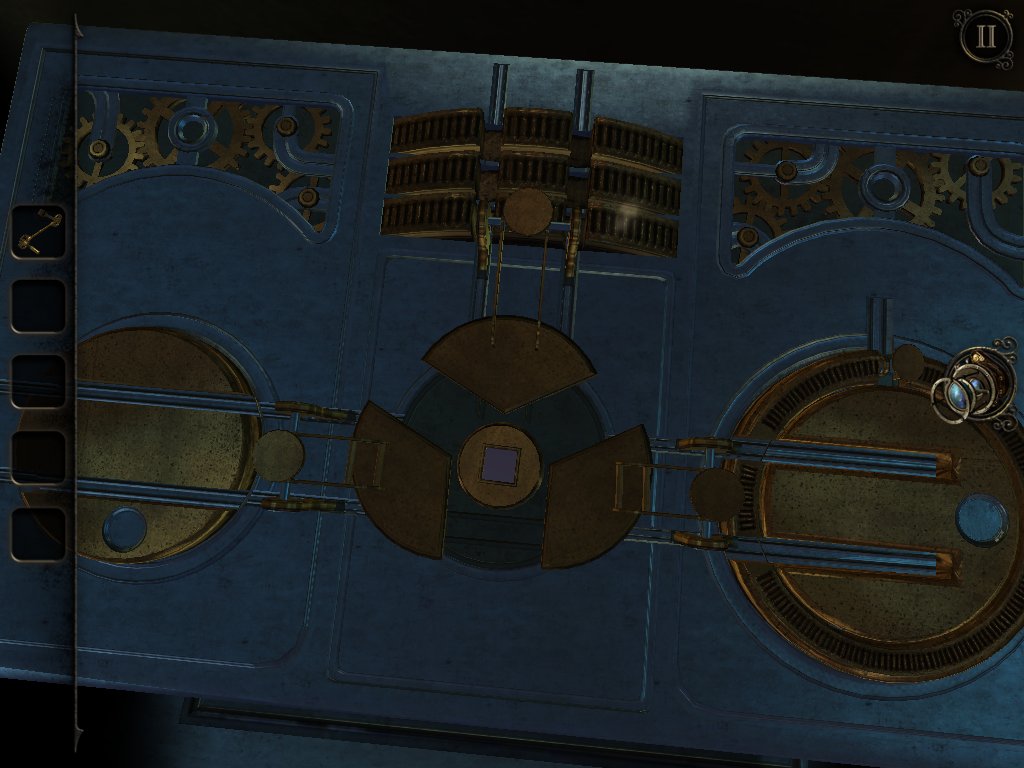
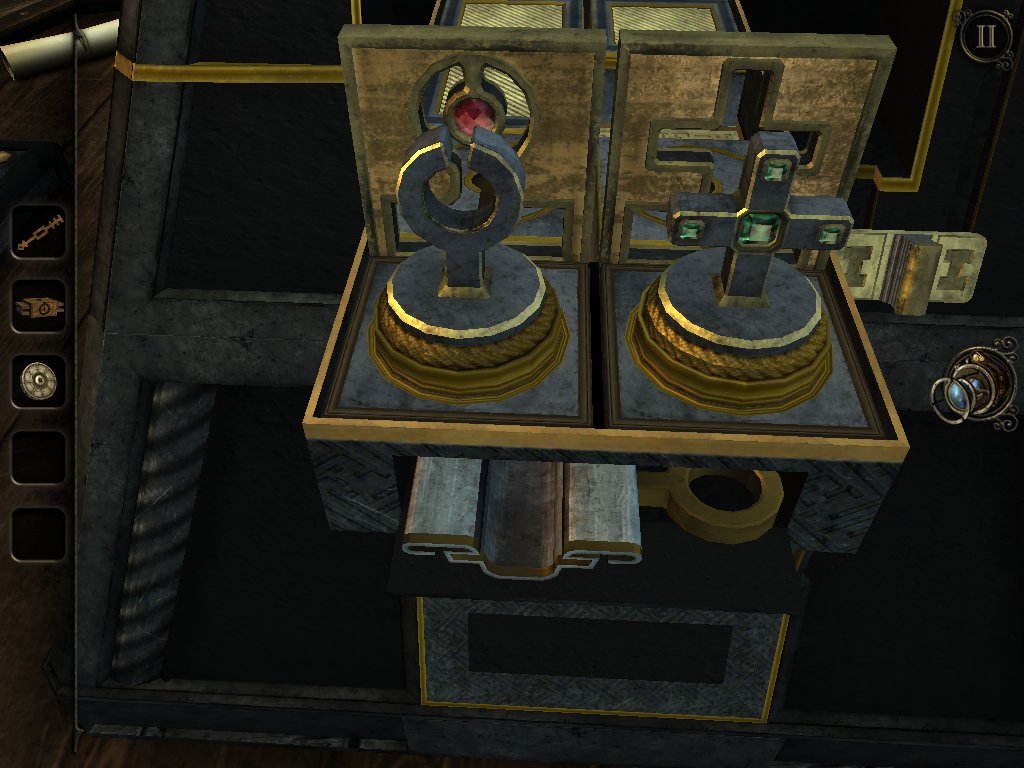
». Слева вращаем центральный круг так, чтобы совместить его со штырями, забираем металлическое кольцо. Вставляем его в переднюю панель, вращаем, пока не откроется квадратное гнездо и вставляем в него рукоятку. Смотрим на открывшуюся сверху головоломку: нужно сместить вверх панельку, чтобы в прорези была та же картинка, что и снизу, после этого нужно передвинуть ползунок в правую позицию.

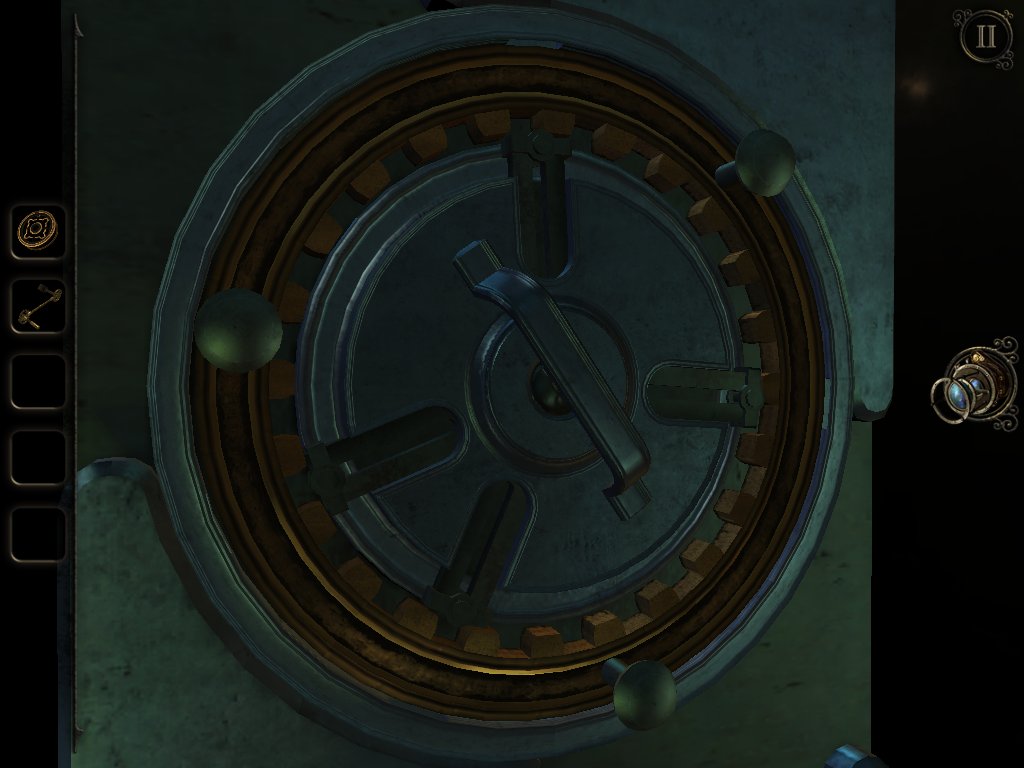
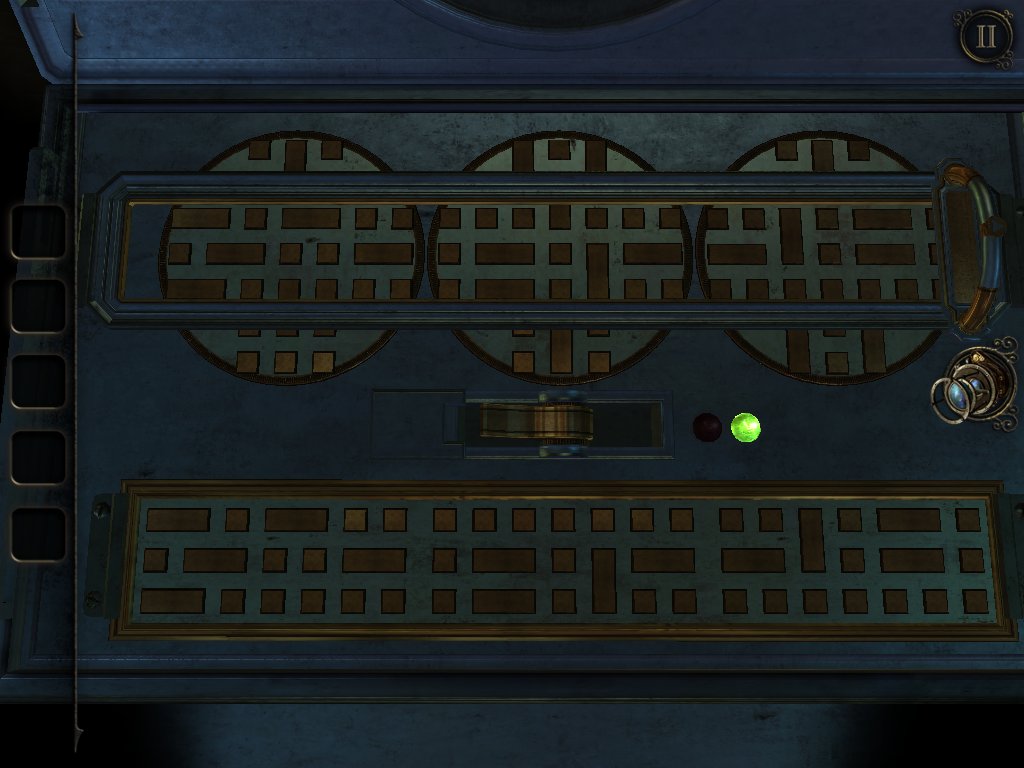
Включаем выключатель и видим, как появляется 4 шайбы. Их нужно загнать в 4 лузы, используя манипуляторы с обоих краёв. Заходим в выдвинувшийся блок. Вставляем рукоятку в квадратное гнездо и, передвигая блоки, загоняем шестерёнку в левый круг. Сверху появляется знакомая головоломка: делаем так, чтобы картинка верху была такая же, как снизу.

Забираем «Шестерню». Её нужно вставить во вращающееся колесо сбоку часового механизма. Идём по появившейся лестнице наверх. Вставляем в левое колесо с рукояткой и вращаем. Решаем головоломку с картиной: надеваем окуляр, светящееся облачко нужно привести в низу в центр, вращая здание и передвигая облачко по светящимся линиям. Забираем «Циферблат
», идём вниз и вставляем его в модель сбоку. Решаем задачу с шахматным конём: им нужно съесть всех ферзей. Напомню, что конь ходит буквой «Г». Влетаем внутрь появившегося блока и приводим все 3 рычага в центр, вращая разные объекты. Открываем рычагами центральное гнездо и вставляем туда рукоятку. Очередная головоломка на совпадение картинок.

Забираем «Рукоятку с гнездом
» и выходим в комнату. Выходя, забираем фигурку балерины сбоку от шахматной головоломки. Вставляем рукоятку в шестерню двери и поворачиваем. Идём вниз. Открываем шкатулку, она оказывается музыкальной. Забираем «Заводной ключик
» с передней панели, осматриваем правую и сдвигаем её. Включаем окуляр и собираем замочную скважину, в которую вставляем заводной ключик и поворачиваем. Теперь задача проста: нужно привести балерину в центр, в нужный момент открывая жёлтые дорожки. Когда одна уже в центре, ставим вторую и повторяем. Забираем красный «Драгоценный камень
» и вставляем его в панель в этой же комнате с другими камнями синего цвета.

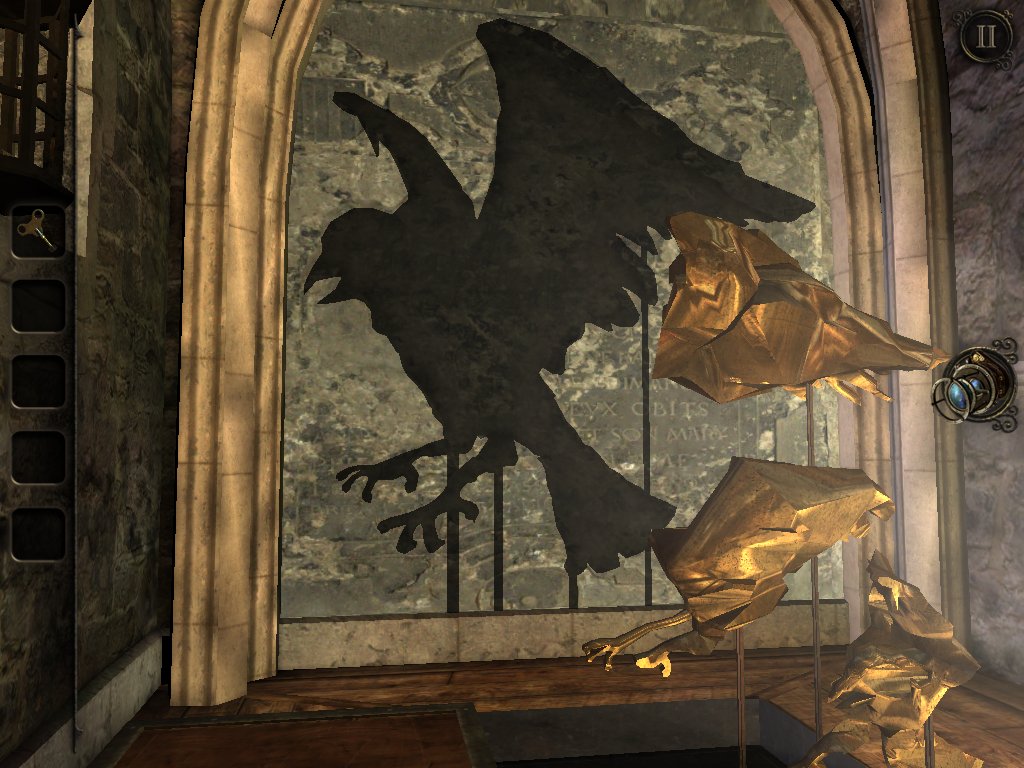
Далее нужно из камней составить картинки, что изображены снизу слева и права. После каждой картинки нужно нажать кнопку сверху. Теперь с помощью кнопок справа нужно повернуть детали скульптуры так, чтобы на стене получилась картинка ворона.

Забираем «Ключ с эмблемой птицы
», идём наверх, вставляем его в голубой ящик на стене и поворачиваем рубильник. Снова идём вверх по лестнице и наблюдаем, как ворон активирует колокол. Звук разбивает кристалл у картины в подвале, идём туда. Знакомая мини-игра с приведением сгустка света вниз. Забираем полученные «Стрелки часов
» и вставляем их в циферблат часов в модели в первой комнате. Вставляем заводной ключик в гнездо и поворачиваем стрелки часов. От боя часов кристалл ломается, и мы можем забрать новую пирамидку. Эпизод «Часовая башня» пройден!
Третий уровень перенесет вас в заброшенный храм, где придется избегать жутких ловушек и решать головоломки. Магическое зеркало исказит действительность, мы откроем сундук с сокровищами и подожжем крошечное соломенное чучело.
Следуйте за нашими движениями, и вы решите каждую загадку.
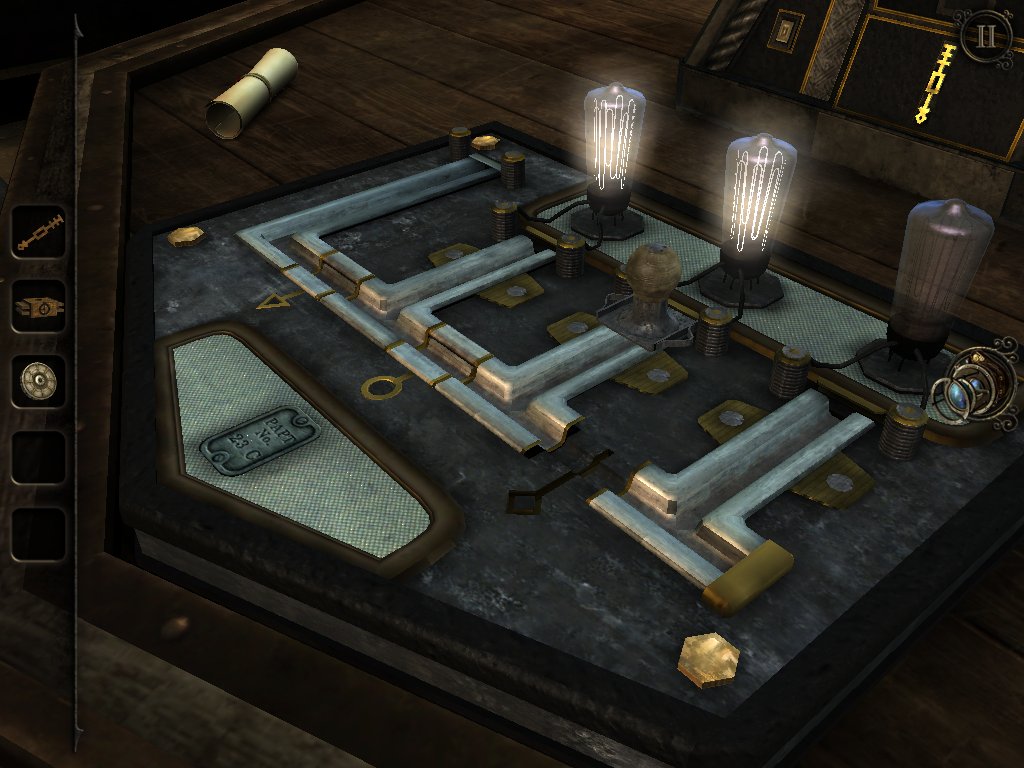
Оглянитесь вокруг. Найдите металлическую пластинку и выдвиньте ее. Тапните по стене, чтобы огромная каменная плита упала вперед.

Посмотрите на коробку, расположенную на столе. Сбоку есть металлический замок. Передвиньте рычаг к середине, чтобы открыть его. Поверните рычажок, который был спрятан за замком. Откроется новое отделение. Возьмите предмет, который был в скрытом отделении.

Возьмите золотую башню, которая стоит сверху на коробке.

На полу находится сундук с сокровищами. Справа есть ручка. Поверните ее. Выдвиньте полку. Возьмите веревку.

Посмотрите на арбалет. Возьмите маленькую деревянную ручку. Возвращайтесь к коробке.

Поместите маленькую деревянную ручку в подходящий слот. Теперь вы можете управлять рычагом. Двигать его вверх и вниз. Таким образом, нужно поместить белые кубики в соответствующие им по форме слоты, которые находятся напротив.
После того как вы решите головоломку, откроется новое отделение, в котором находится пусковой механизм. Возьмите его и возвращайтесь к арбалету.

Прикрепите металлическую деталь, которую вы получили в начале уровня к арбалету. Затем нужно крепко завязать верёвку. Откроется полка, наполненная стрелами. Возьмите одну.

Зарядите арбалет. Посмотрите на стену слева. Вам нужно попасть в глаз фигурки. Если выстрел удачный, откроется новая область. Если нет, попробуйте еще.

Перед вами новая головоломка. Слева от вас есть маленькую игральную фишку. Поместите ее на «игровое поле».
Смысл головоломки перейти на правую сторону игрового поля, не задев противника — фишку-скелет, которая будет вас преследовать на протяжение всей головоломки.
Двигайтесь, как показано на скриншоте. Откроется полка с ключом внутри. Возьмите ключ.

Вставьте ключ в ящик с сокровищами, расположенный на другой стороне комнаты. Сейчас поверните обе ручки двумя пальцами и откройте ящик. Откройте его и возьмите большой каменный блок.

Возвращайтесь к головоломке. Под столом деревянная конструкция. Прикрепите к ней каменный блок, чтобы завершить конструкцию.
Прокрутите колесо вправо, пока молоток не примет вертикальное положение. Опустите вниз деревянный рычаг, чтобы молоток разбил камень. Повторите действие трижды. За вами находится осколок стекла. Возьмите его.

Поместите осколок в разбитое зеркало. Над зеркалом появится маленький кодовый замок.

Идите к сундуку с сокровищами. Слева будет песочница. Протрите площадку пальцами. Появятся два символа.

Ведите эти символы и откройте кодовый замок. На столе появится новая головоломка. Передвиньте окошко в центр. Вы услышите щелчок, и дверь откроется.

Смотрите через линзу в открывшиеся отверстие. Вы увидите зеленые линии. Двигайте камеру так, чтобы линии образовали контуры дверного прохода.
В следующей комнате сделайте то же самое. Появятся несколько новых символов. Возвращайтесь к зеркалу и снова вводите символы, открывающие кодовый замок.

Установите золотую башню в углу замка. Появится нож. Возьмите его.

Введите комбинацию в кодовый замок. Зеркало вернет вас к первой головоломке.

Поместите нож в самом верху коробки. Откроется окно, содержащее соломенную фигурку и маленький рубин. Возьмите оба предмета.

Осмотрите заднюю часть коробки с помощью линзы. Вы увидите карту. Она пригодится вам прямо сейчас.
Введите первую пару символов в замок над зеркалом — перевернутая «t» и пара наконечников стрелы. Возвращайтесь к головоломке в форме замка.

Осмотрите заднюю сторону коробки. Там будут рубины. Поместите найденный недавно рубин в отверстие в самом верху. Теперь тапните по трем рубинам, руководствуясь картой, которую мы видели в другой головоломке. Или воспользуйтесь скриншотом. Внутри будет кусочек кремня. Возьмите его.

Поместите соломенную фигурку и кусочек кремня в каменную чашу, которая находится между сундуком и песочницей. Ударьте кремнем по камню несколько раз, пока не появится огонь. Это откроет две новых области.

Возьмите новую стрелу и зарядите арбалет. На этот раз стреляем в мешочки с песком, которые появились после сожжения фигурки в другой части помещения. Появится секретное отделение в другой стороне комнаты.

Возьмите металлический объект в форме звезды.

Идите к сундуку с сокровищами и установите металлический объект в предназначенное для него отверстие. Закройте крышку и откройте ее снова. Вы получите металлический предмет.

Поместите предмет на циферблат, который находится спереди коробки.

Смотрите сквозь линзу. Крутите железную деталь, пока розовая лента не завершит круг. Замок сразу же откроется.

Когда коробка откроется перед вами, появится жуткий человеческий череп. Возьмите его.

Повесьте череп на стену, как указано на картинке. Поверните рычаг вправо, чтобы открыть его.

Появляется новая головоломка. Поверните влево верхнюю часть, чтобы соединить символ. Возьмите кристалл. Крутите камерой, пока плавающие красные палочки не соединятся, образовав такой же символ.
This The Room 3 walkthrough will help you make the most of this ingenious little indie puzzler, without wanting to rage quit. The Room 3 sees the player attending the world’s worst job interview. You made the train and when you arrive, you’re met with a note that bears good news — you’re a definite candidate for an apprenticeship. The bad news is that you’re trapped amongst a variety of elaborate puzzles and if you don’t solve them, you’ll be passed over for the position. And probably die.
So we’ve stepped in to help you ace the interview and defeat the dastardly puzzles created by Craftsman. Although you may want to reconsider your career path.
Chapter 1 — The Lighthouse
Once you’ve left the relative safety of the train, you’ll be deposited outside of this door. Examine the panel and slide the latch to peek through to the room beyond.
Once you’ve finished spying, zoom back out, pop on your eyepiece, and examine the podium in the middle of the room.
Match the items in the rotating compartments with the trite brain teasers painted on each side. The silent face without hands is a watch, the power of flight and well of knowledge is a feather, and nothing is needed by the rich, but it’s all the poor have.
You’ll be rewarded with a note and a box containing an attachment for your eyepiece.
Using your newly modded eyepiece, examine the keyhole in the door. The tumblers are connected in pairs — the two on the left are connected, as are the two on the right. Simply turn one wheel of each pair until they both light up, and repeat with the next pair.
Enter the room and chuck your pyramid onto the table to receive an emblem.
You’ll need to use this on the wall behind you.
Insert the emblem into the space at the bottom right and you’ll be presented with another puzzle.
Arrange the left side like so.
This is what the right side should look like.

Go through to the newly opened room and investigate the contraption on the left.

Arrange the switches as pictured to restore power.
Flip the lever on the board on the desk.
Now examine the large box to the right. Flip all four switches and press the button that’s revealed after doing so.

Turn your attention to the small panel at the back of the room. Turn the knob on the left until you see a light switch on at the other side off the room. Turn the right dial until the waveforms are overlayed.
This will bring you to a new room.
Examine the left side of the table and pull back the cover, then flip the latch.
Take the cog from the drawer and slot it into the middle of the table, then watch what looks like the intro to Game of Thrones unfold.
Before we proceed with the goings on at the table, look to the left and you’ll spot a plaque on the floor.
Slide it back to reveal a hidden compartment.
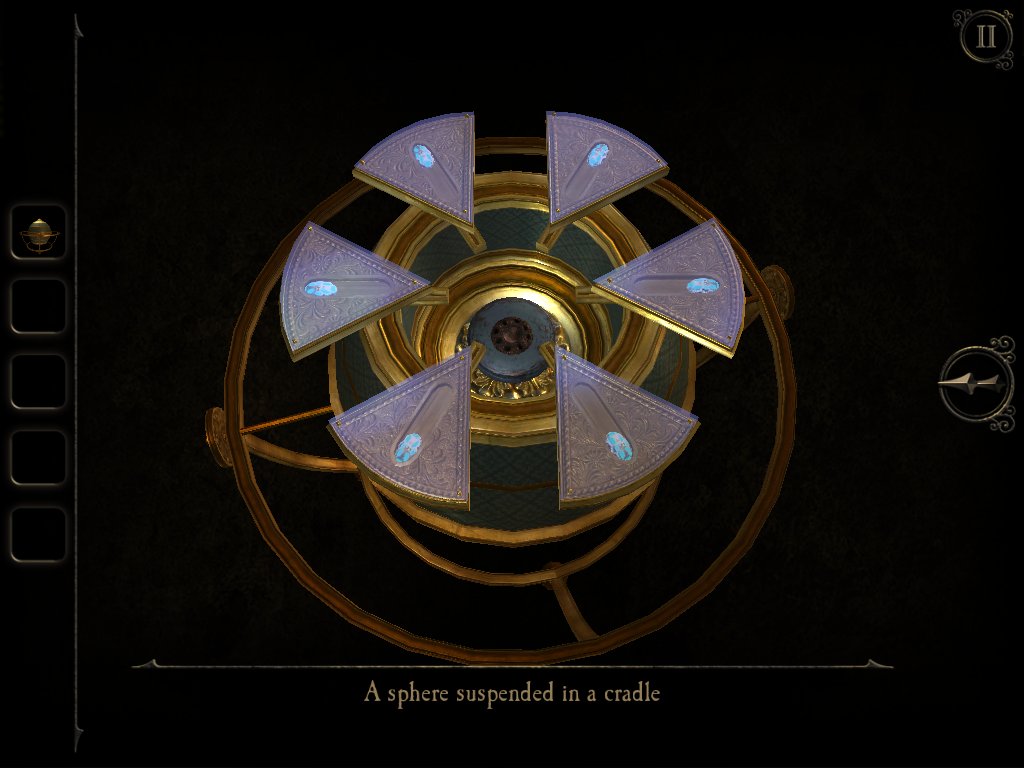
Grab the sphere tucked away in here and spin it around to find the hidden magnet. We’ll need this later.
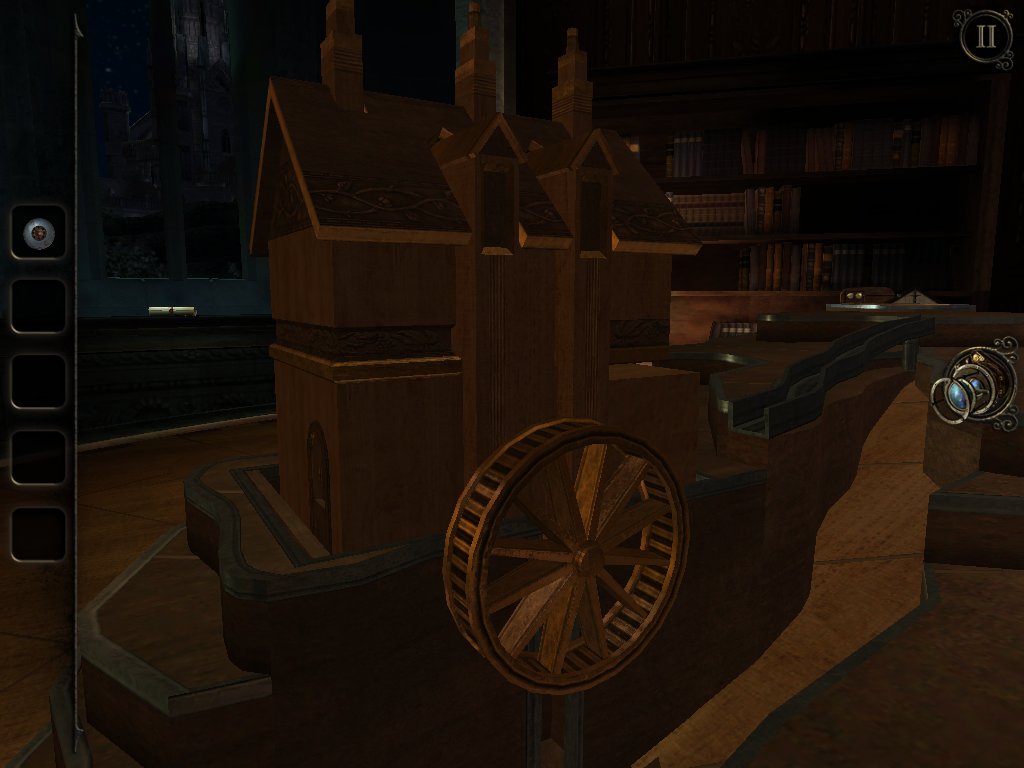
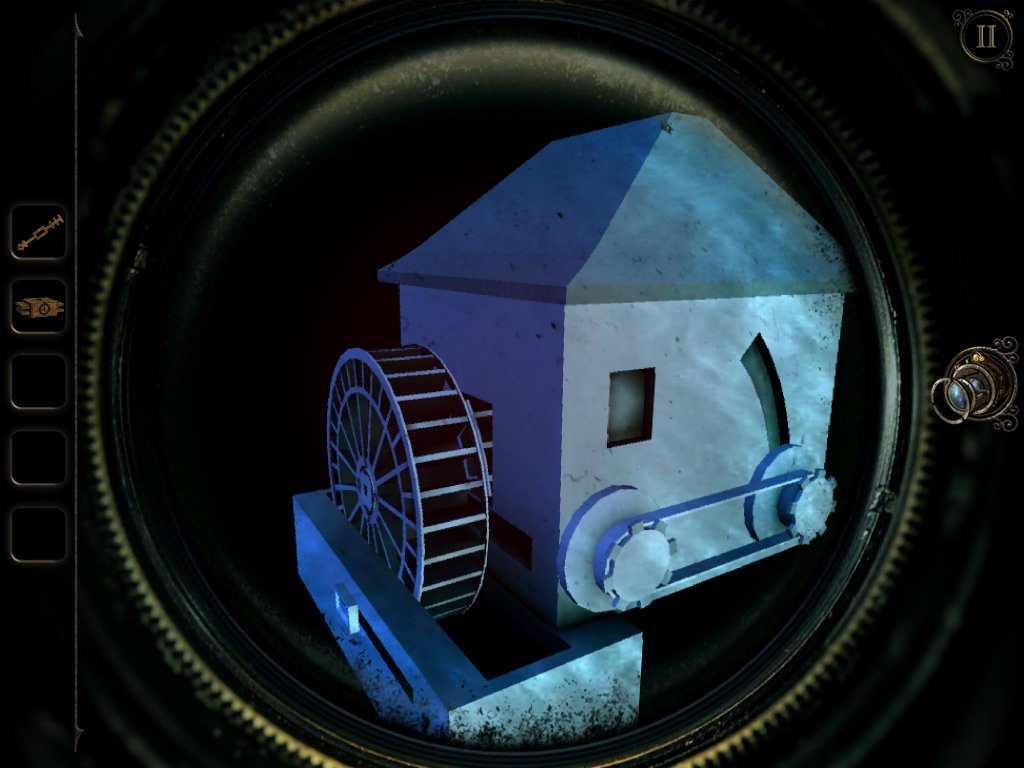
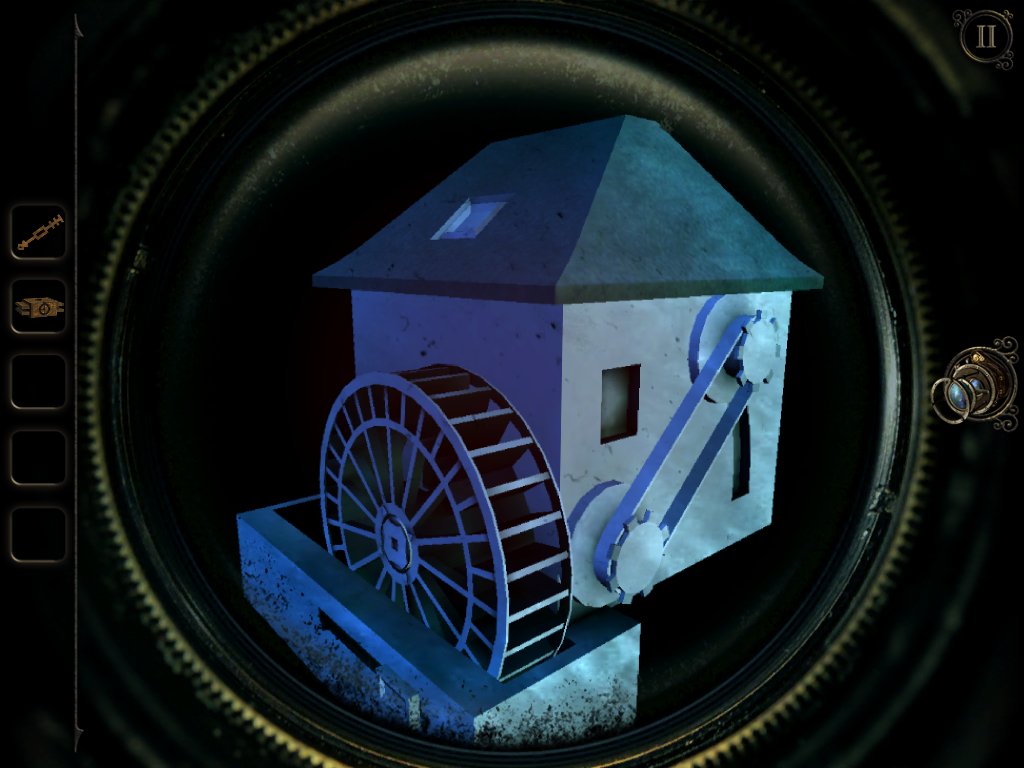
Back at the table, spin the waterwheel on the side of the small house to open up a tiny door. Use the eyepiece to look inside.
Pull on the snake’s tail to start this puzzle.
Match up the diamond patterns on its body so that three of the same kind run along the side.
Push the button on the back of its head to make it relinquish the second magnet.
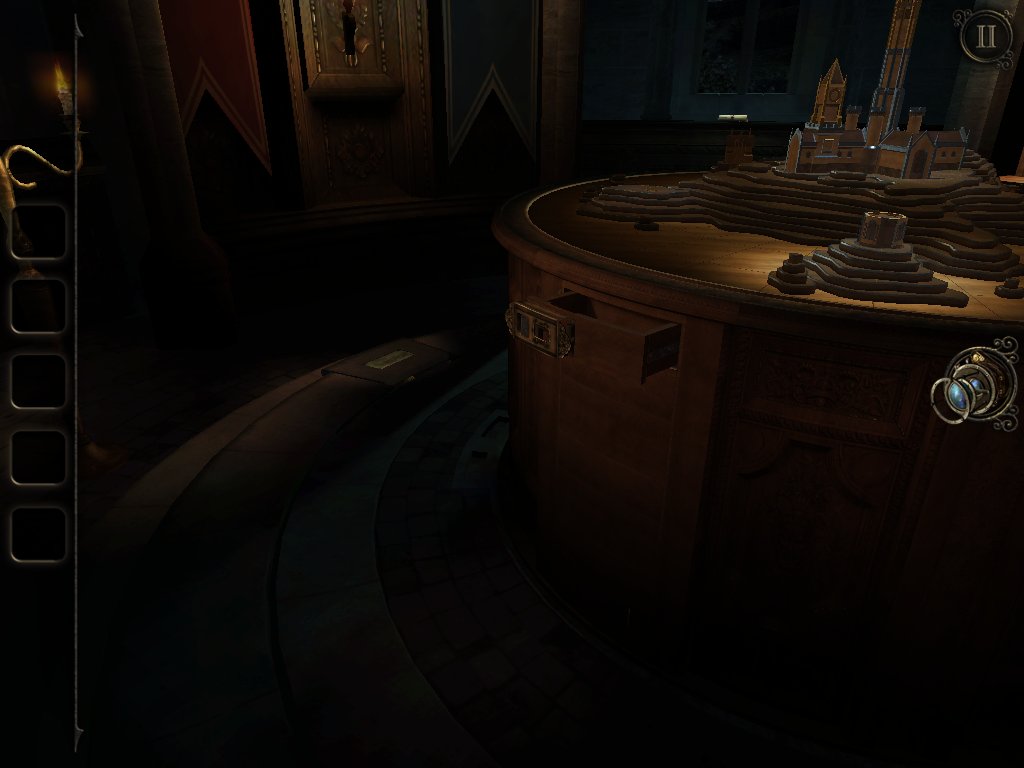
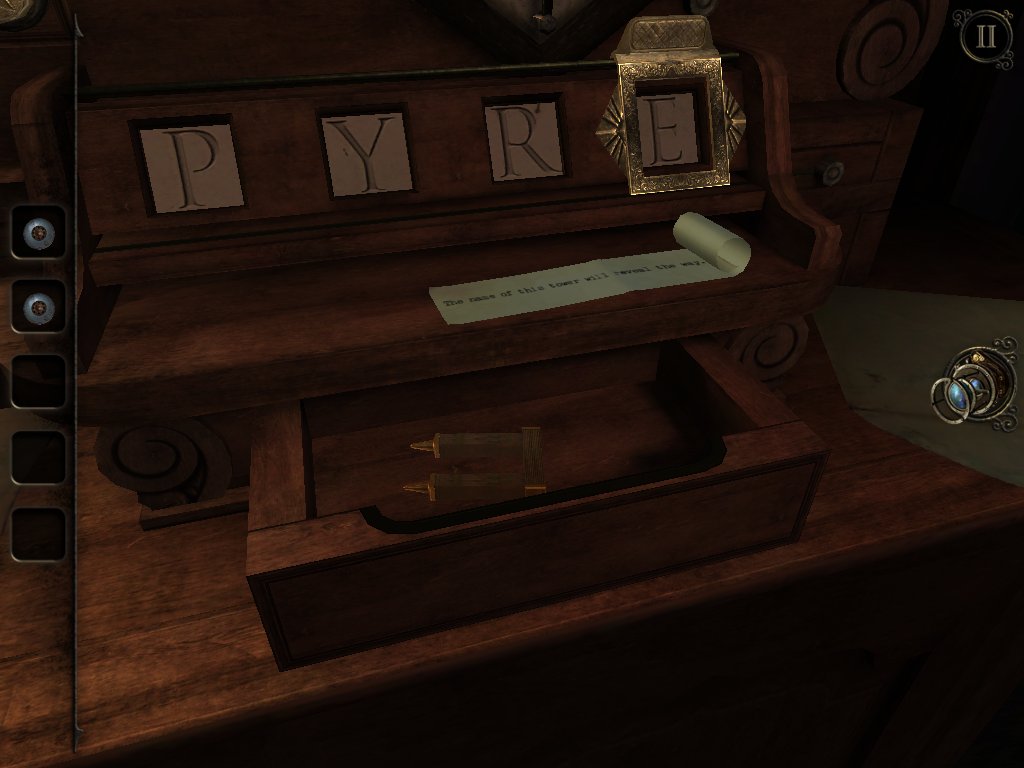
Zoom out and investigate the desk behind the table.
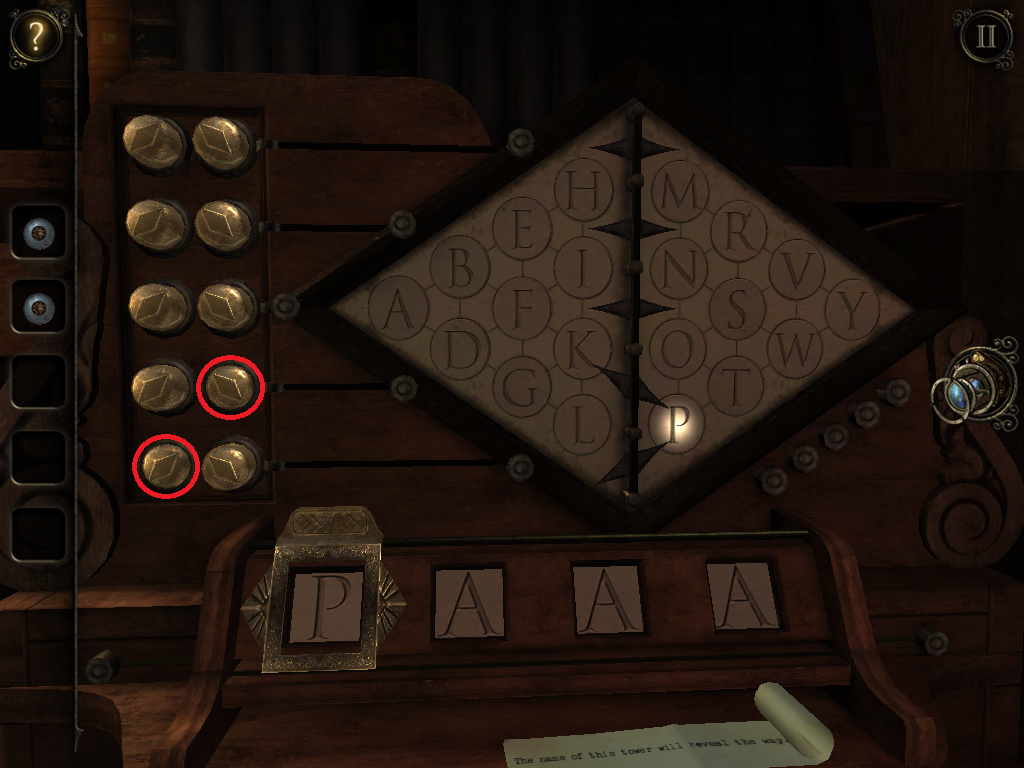
You need to enter the name of the tower — Pyre. With the slider on the first letter, hit the switches pictured above.
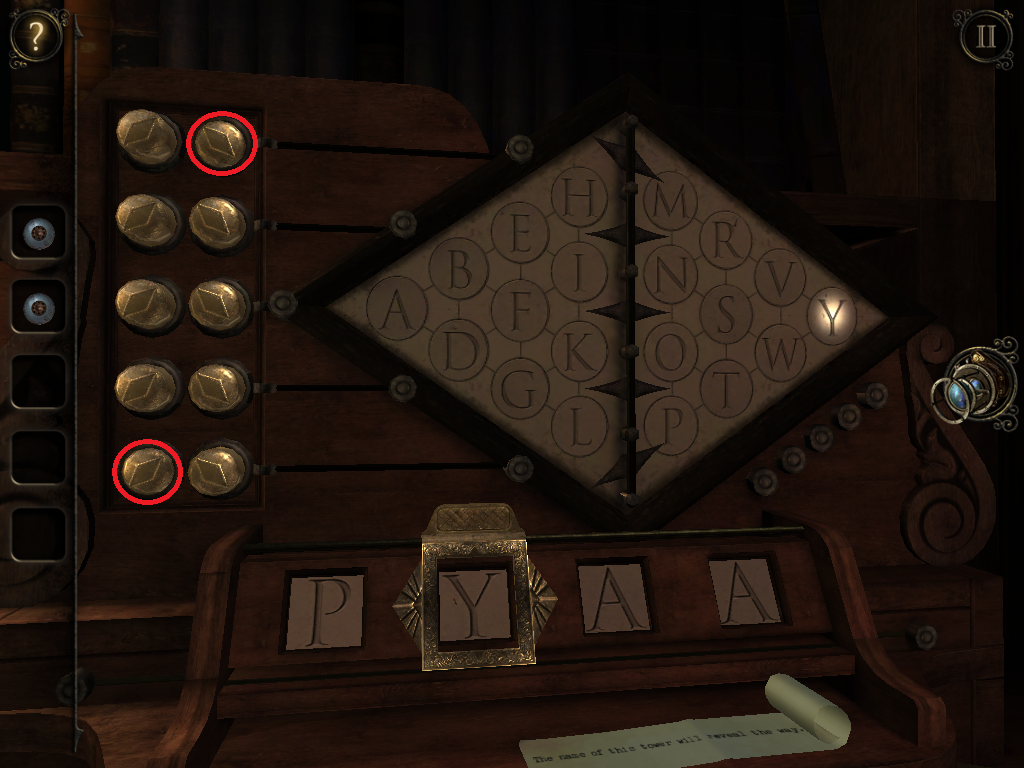
Slide it over to the second letter and push the knobs pictured above.
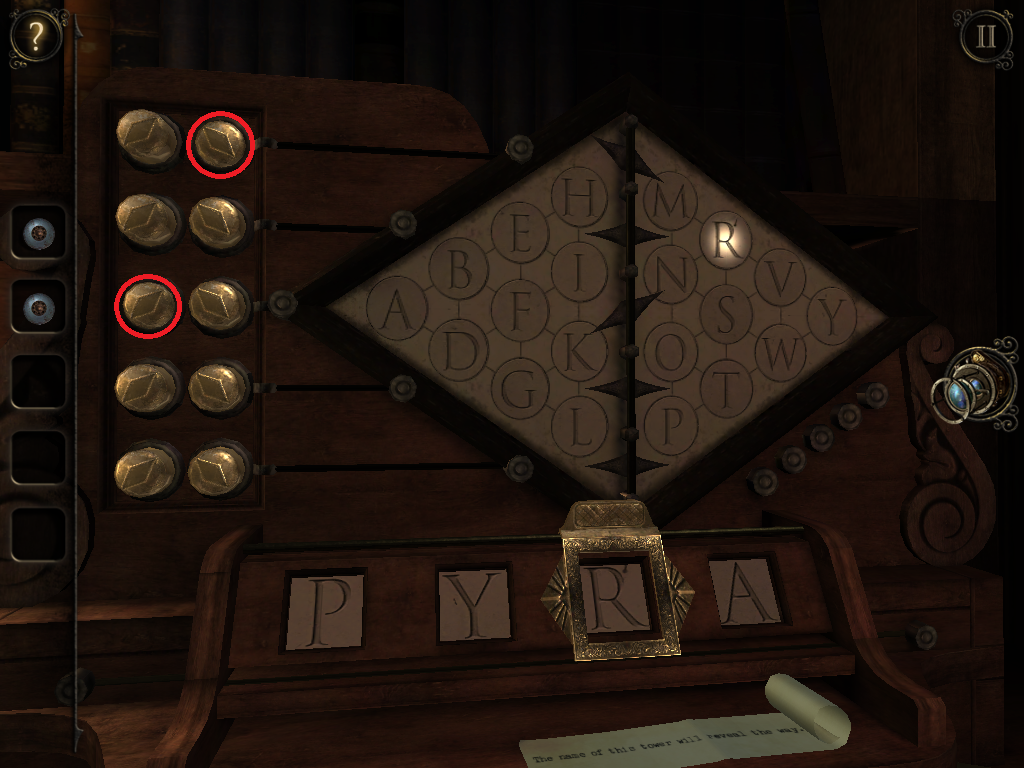
Now for the third letter.
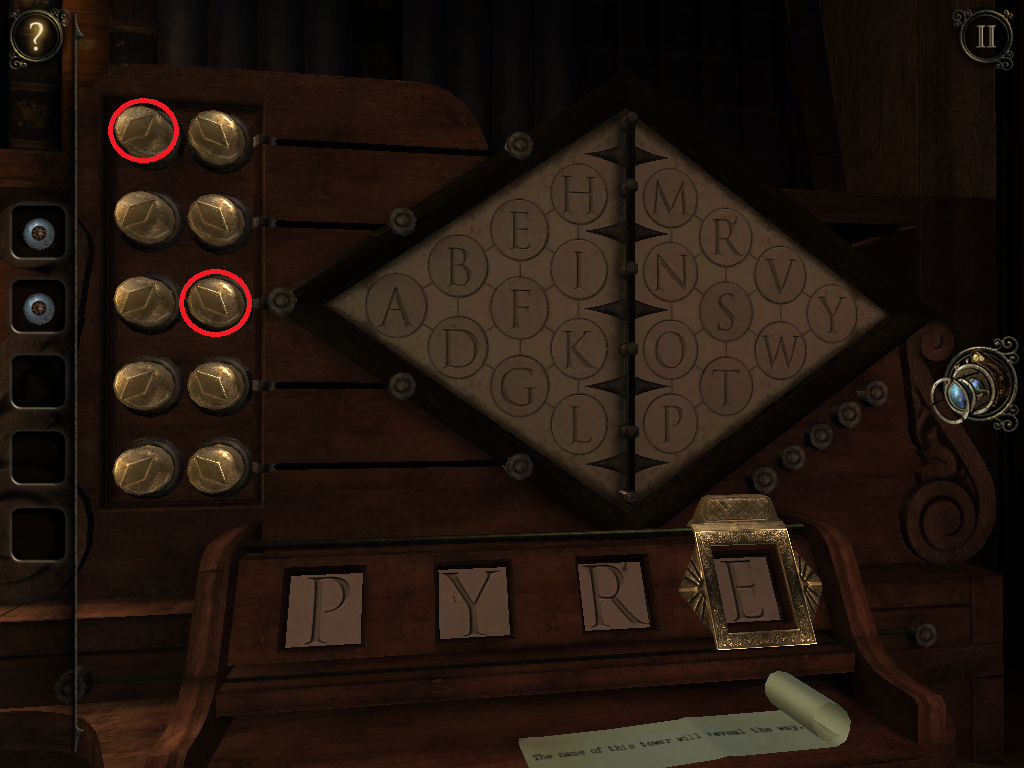
And finally, the ‘e’.
Grab the wooden arch and head back to the table.
Pop the wooden arch into the slot with the fancy gold patterns around it.
Use the eyepiece to enter the archway.
There are three pillars with a pair of circles etched into them. Examine each one and press both circles at the same time to reveal three hidden symbols.
Here’s the first one.
And the second one.
And the third.
Touch the panel on the floor and draw all three symbols, one a time. You’ll know if you’ve done it right because the letters around the edge will light up.
This will prompt a new tower to spring up. Whip out your eyepiece and examine the panel at the back.
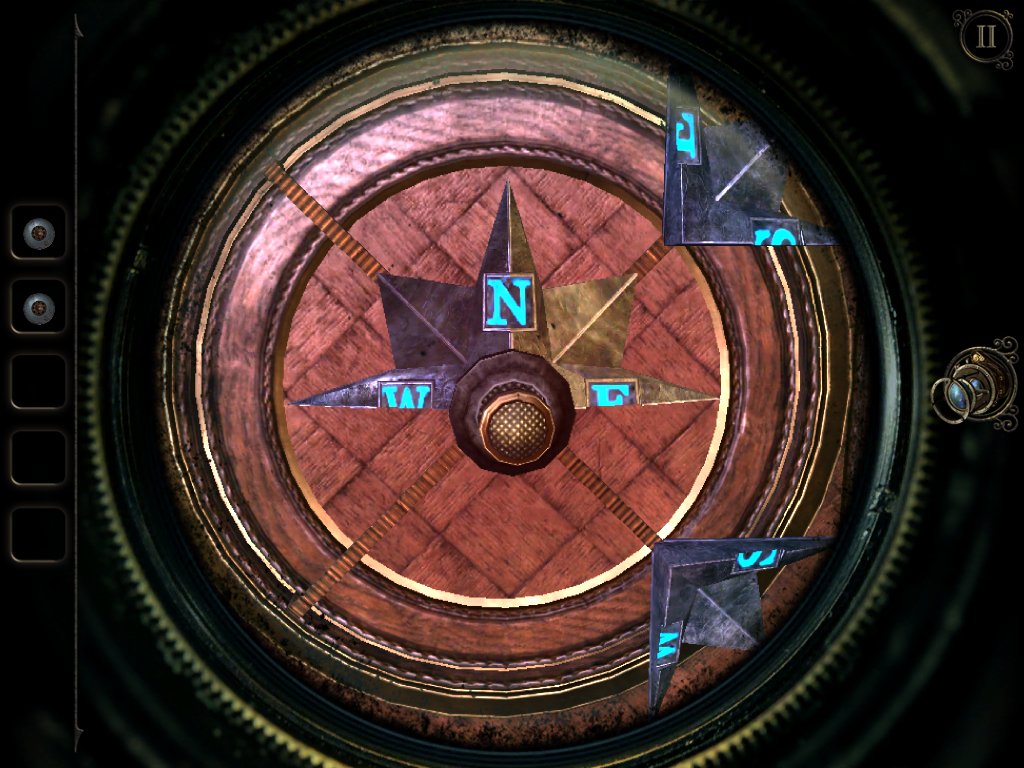
You need to reconstruct the compass. Turn the dial until the piece you want to move is in the right spot, then drag it to the centre. Repeat until it’s complete.
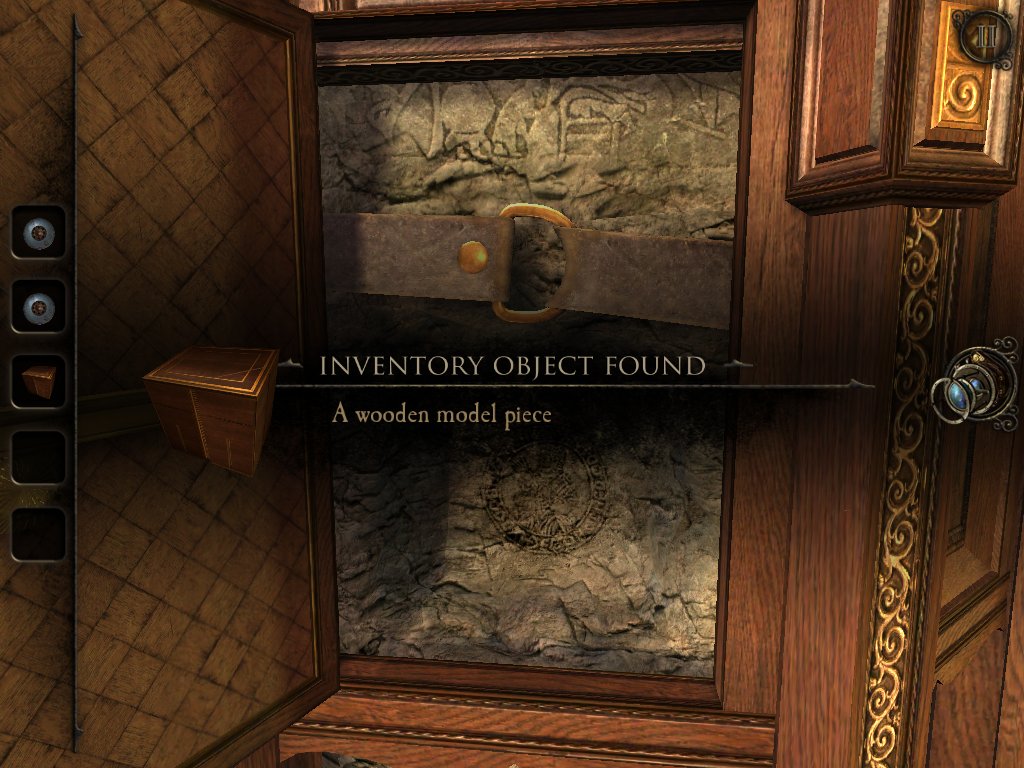
The panel will pop open, allowing you to pick up a wooden model piece.
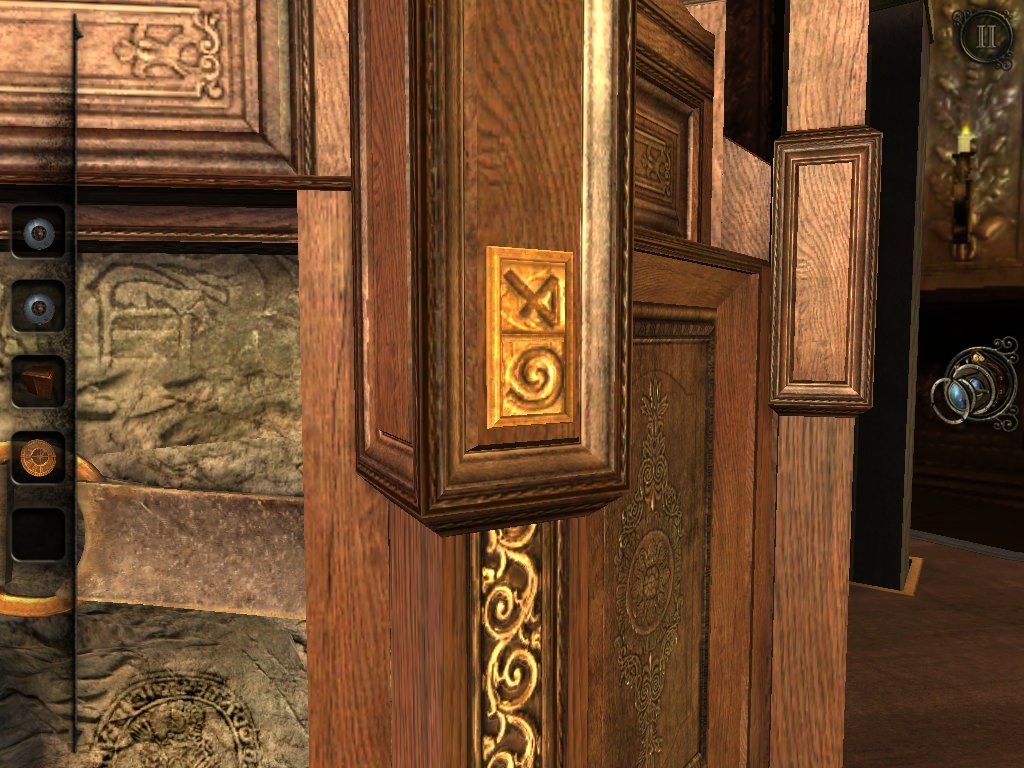
While you’re here, make a note of these symbols.
Move around to the left and open the small drawer.
Take the model clock face and make a note of the symbols above the drawer.
Move around the tower to access the constellation chart.
Use the pairs of symbols to set the sliders on the star chart.
Double tap the lens for a closer look and make a note of the pattern.
Set the sliders to the second position as above.
This is what you’ll find at these coordinates.
Face the front of the tower and equip your eyepiece once more.
Drag the magnets from your inventory onto the edges of the circle.
Slide them around the outer edge to move the diamonds and arrange them in the same formation as the constellations.
You’ll receive a wooden model piece for your troubles, soslot it into the hole at the top of the raised area on the table.
You’ll be sent up a floor to a new room, along with the table.
Investigate the diver’s helmet and open the drawer on the right of the stand to find an antler and a note.
Now examine the dial on the helmet and turn it so that the matching symbols are next to one another,
Take the rivet from behind the plaque and make a note of the symbols on the underside.
Use the rivet on the hole on the left side of the helmet and slide it over once you insert it.
Pick up the metal acorn, flip the switch behind it, and take the wooden model piece.

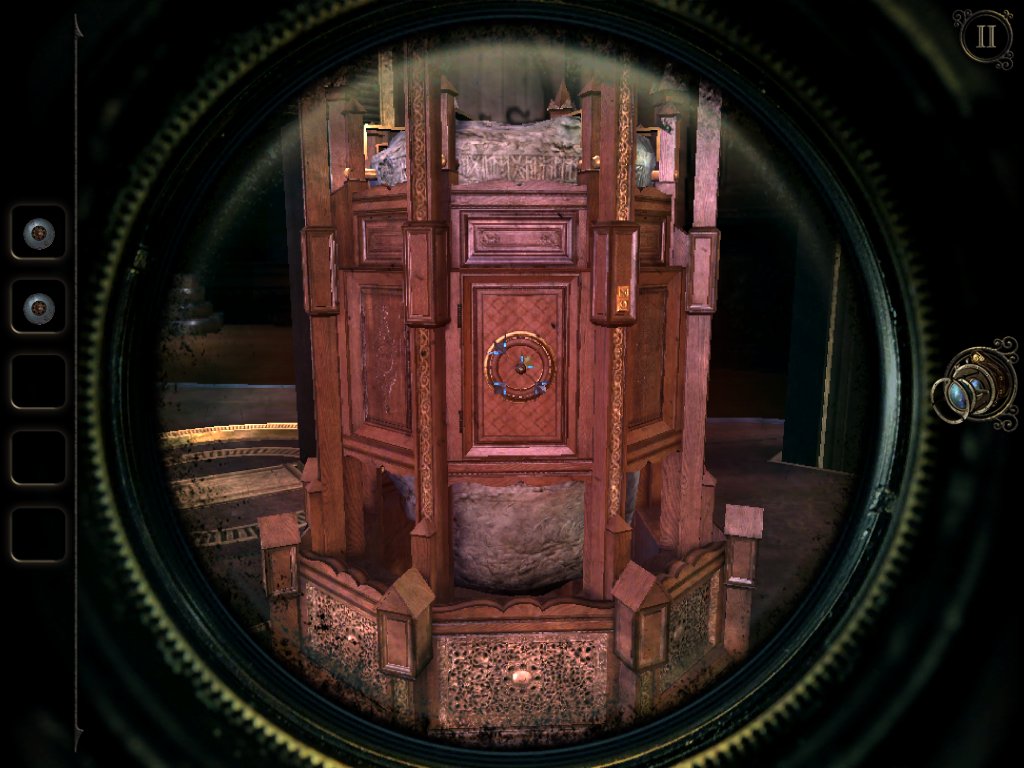
Return to the table and attach the clock face onto the clock tower, then use your eyepiece to look inside.
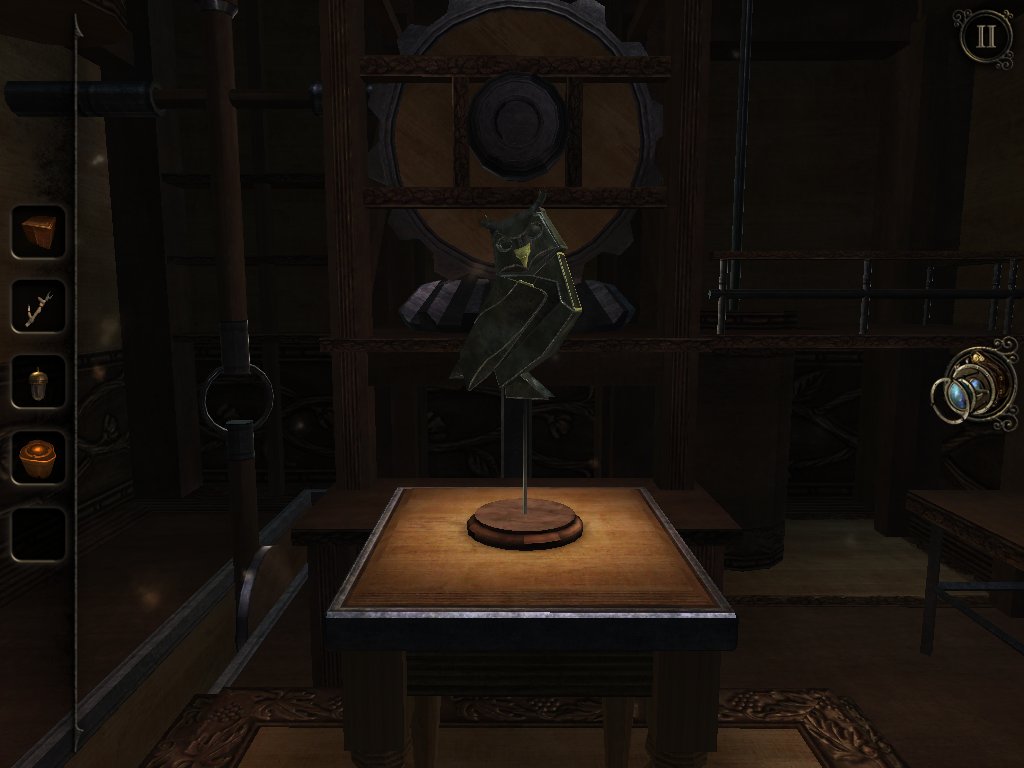
Push the owl’s beak up and twist its head around.
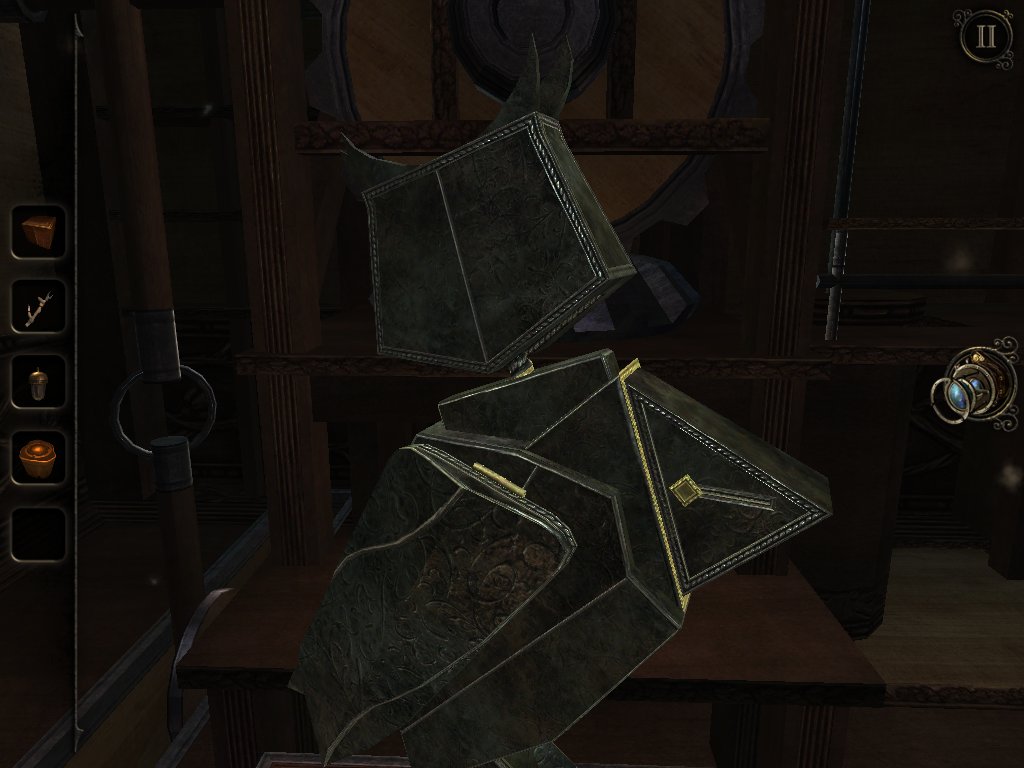
Pull its wing and remove the model boat, then head back to the table.
Slot the wooden model piece into hole by the miniature jetty and place the boat at the end of the rail to the left.
Slide the boat up to the boathouse, then use your eyepiece to look inside.
Slide the switch on the rat’s back to open its head.
Spin the wheel, then press the two buttons that appear on either side.
Slide the bum back and take the key.
Insert the model piece from the diver’s helmet stand onto the table.
Spin the top around until the metal ring lines up with the metal circle on the roof. Once it’s open, use your eyepiece to peek inside.
Push the grasshopper’s legs down and flip the two switches.
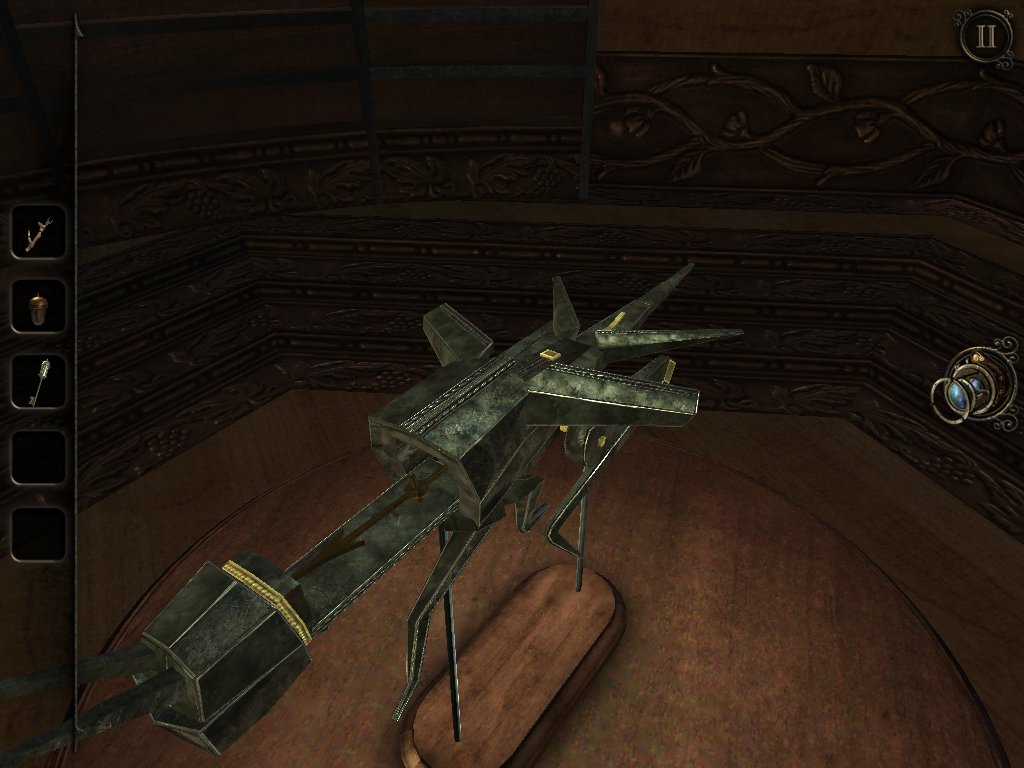
Pull its head and take the metal pointer.
Return to the diver’s helmet and attach the pointer to the open panel. Turn it anticlockwise to point at the three symbols from the underside of the plaque in order. This is the first symbol.
Continue turning it anticlockwise to the second symbol.
After hitting the third symbol, you’ll be given a copper tap.
Attach it to the right side of the helmet like so and give it a turn.
Now align the two metal frames so that they’re overlaid in the position above and the helmet will pop open. Retrieve the crystal phial and head back to the table.
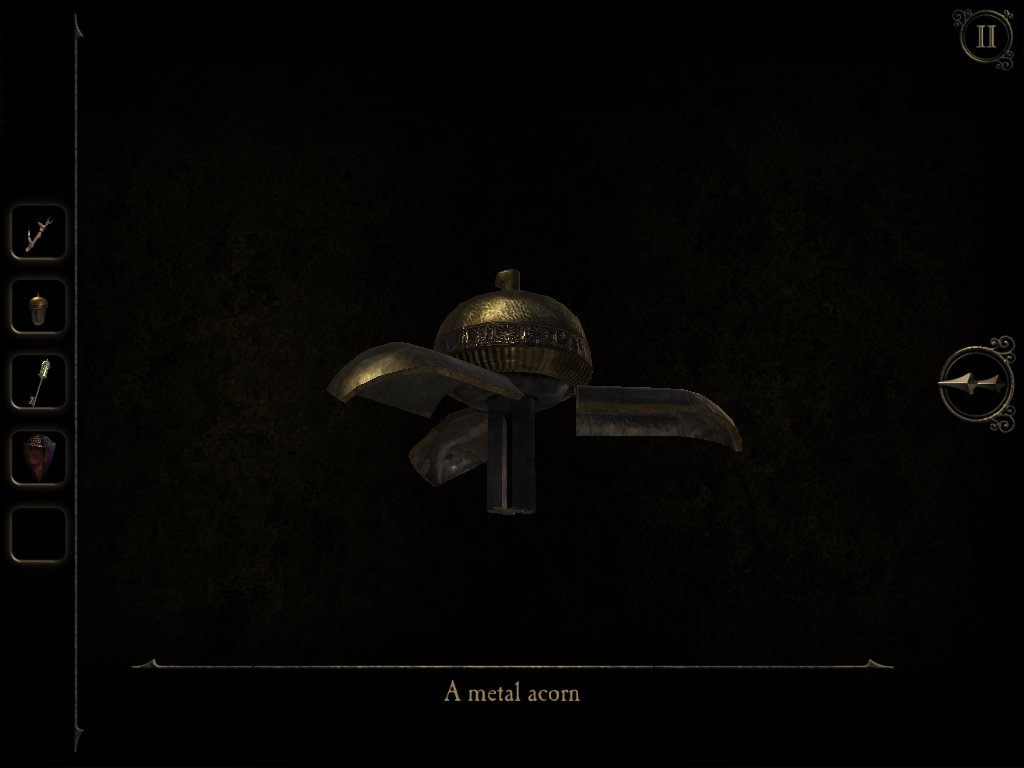
Access the metal acorn in your inventory and twist it to reveal a key.
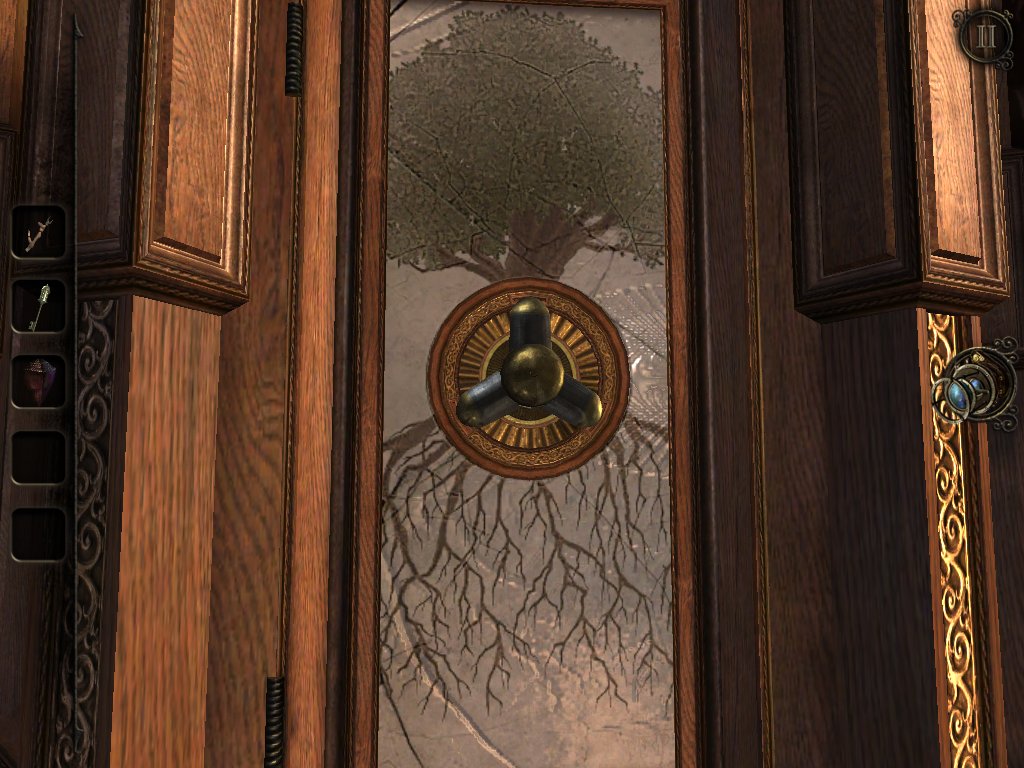
Use the eyepiece on the wooden arch and insert the acorn key into the panel on the tower with the tree painted onto it.
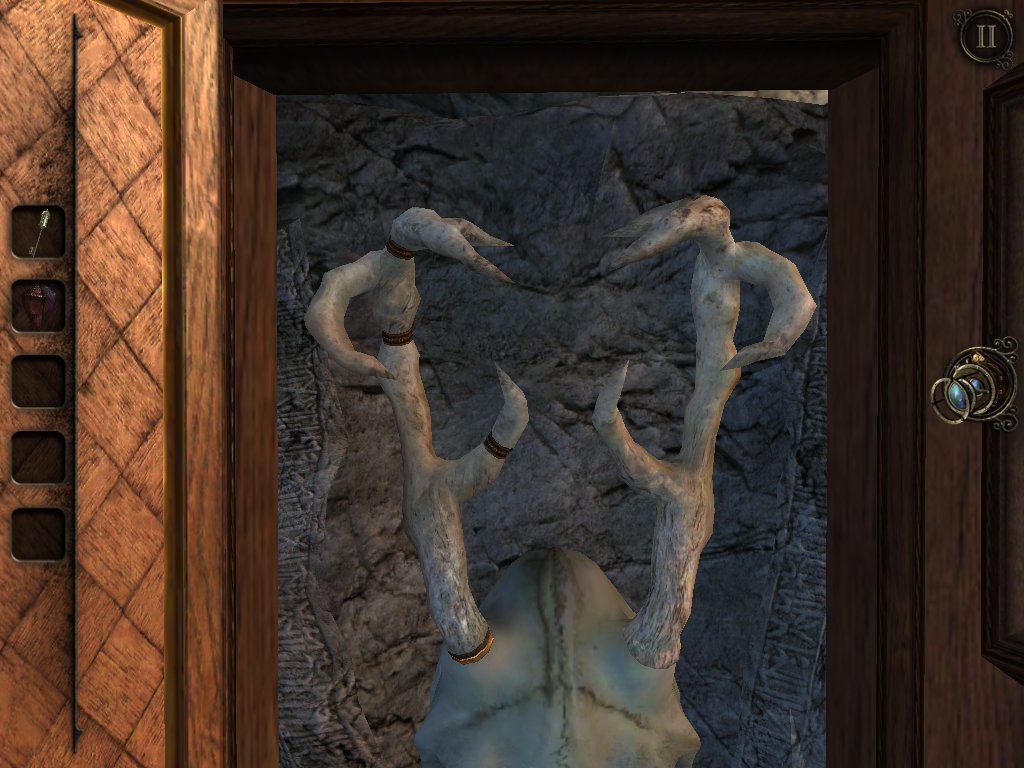
Attach the antler to the skull and rotate the three pieces until they mirror the one on the right.
Slot the crystal phial into the hole that’s revealed above, and once it’s been smashed, pick up the gemstone.

Now use the small key on the two-tiered tower and use the eyepiece to look inside.
There’s a mannequin with three missing body parts. Rotate the lever to the left to attach the first limb, then use the eyepiece to enter the small tower and repeat with the next limb. Continue a third time until you reach peak limb-ception and complete the puzzle.
The top of the tower will open up, allowing you to insert the gemstone into the top. This will create a glowing lamp, so pick up this new item.
Enter the newly materialised cage and spin the metal bars so that they fan out into a wheel.
Push the top bar down to lock the upper cylinder in place, then rotate the bottom half to align it with a matching pattern.
Once the rectangular patterns have been matched up, the plain rectangle — a.k.a. a hole — should be lined up over the opening in the cylinder.
Slot the lamp into the hole.

Take the pyramid to complete the chapter.
Chapter 2: The Clock Tower
Place your new pyramid on the table and a device will rise up from the gloopy liquid. Use the dials to line up the shapes with the partial arch on the wall to make a complete archway.
Head through the new door and over to the left corner
Arrange the sliders as above to get the power flowing.
Follow the wire and flip the lever.
Follow the wire to the box and flip all four switches to reveal the button in the middle. Give it a push.
Head over to this panel and press and hold the left button until the lamp in the background switches on, then press and hold the button on the right to match up the waveforms.
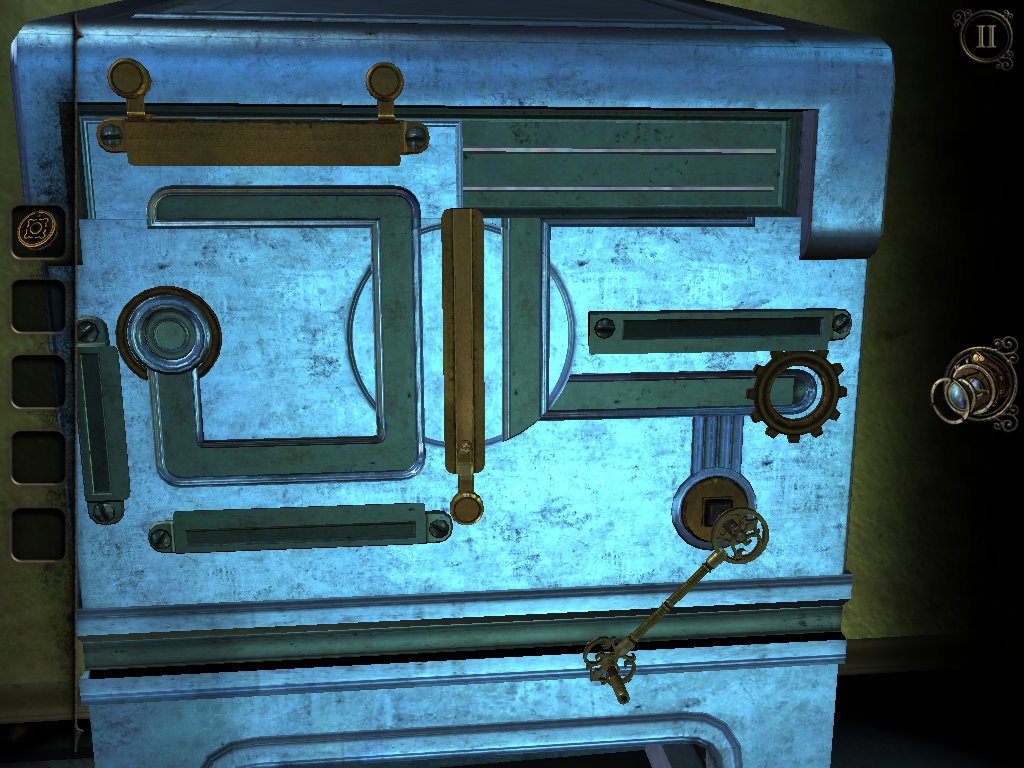
Once you arrive in the new area, grab the wheel with a handle from the top of the grey box by the face of the clock tower.
Examine the gold box and flip the handle over into the cradle.
Now examine the side of the box with a metal pillar stuck behind the glass door. Slide the two latches at the top to the outer edges to open the door and retrieve the metal pillar.
Slot the metal pillar onto the top of the box and slide it over to the left to mirror its gold counterpart.
Flip open the lid and slide over the gold panel at the bottom left corner of the maze. This will prompt a tower to appear. Use your eyepiece to look inside.
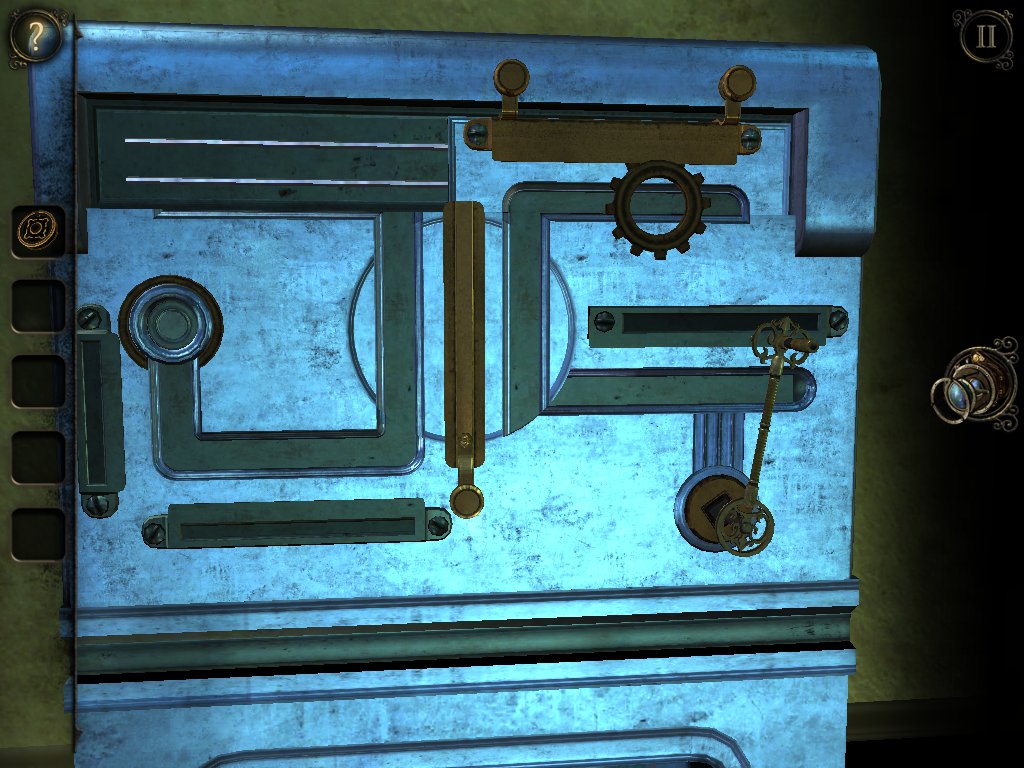
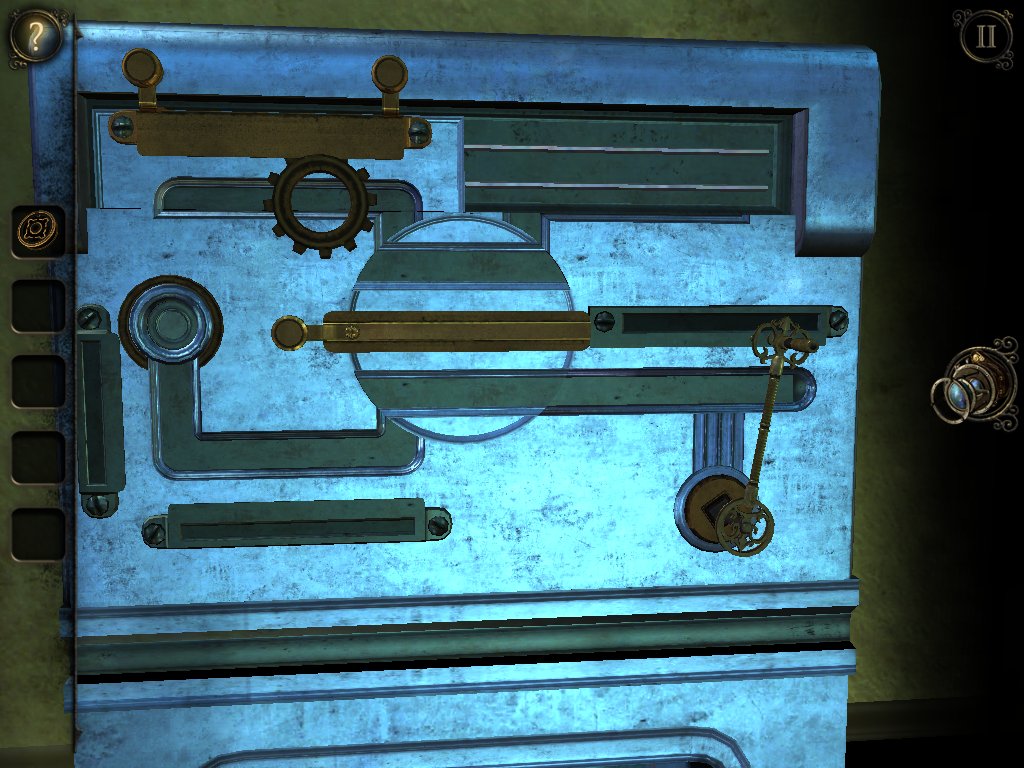
Open up the circular panel on the left of the box to find a crank handle.
Inspect the right side of the box and turn the centre piece until it aligns with the four metal pins on the outer edge. When they drop into place, take the metal ring.
Pop the metal ring onto the front of the box and rotate it so that the hole is over the square slot. Insert and use the crank handle to reveal a panel at the top of the box.
Slide the frame into the position above so that it matches the image at the bottom, then pull the handle on the left across to the right and flip the switch.
You’ll be deposited back outside to solve the maze puzzle. Use the bottom left switch to move the discs horizontally, and the one on the right to move them vertically.
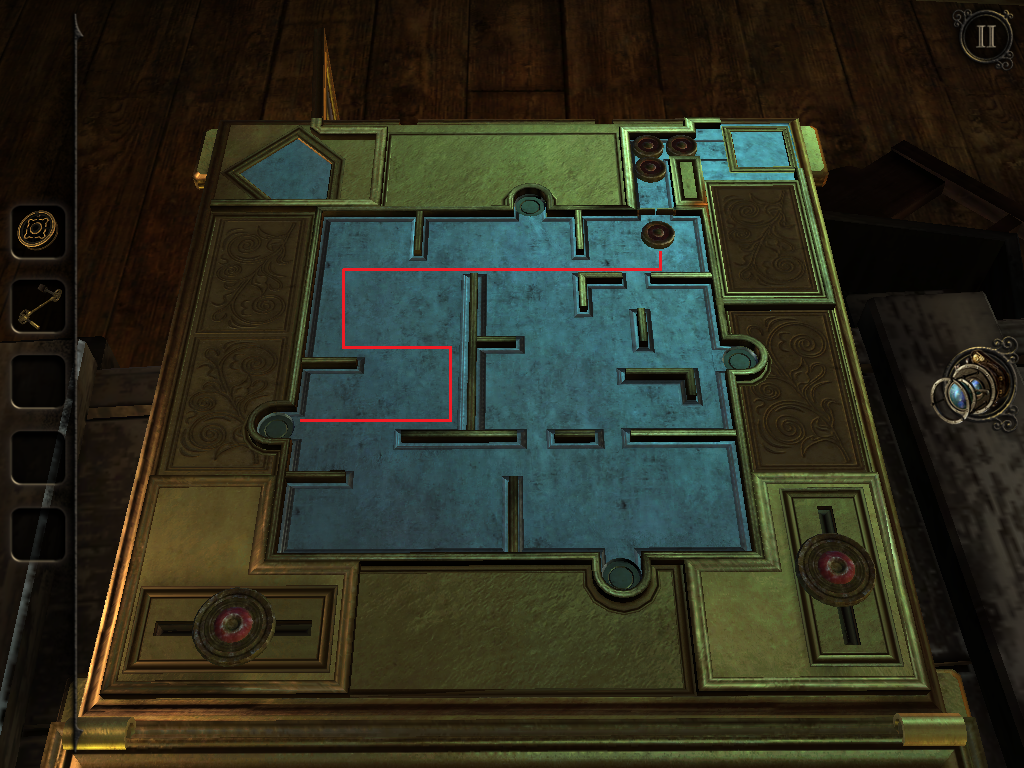
Here’s what to do with the first puck.

Here’s the path for the second one.
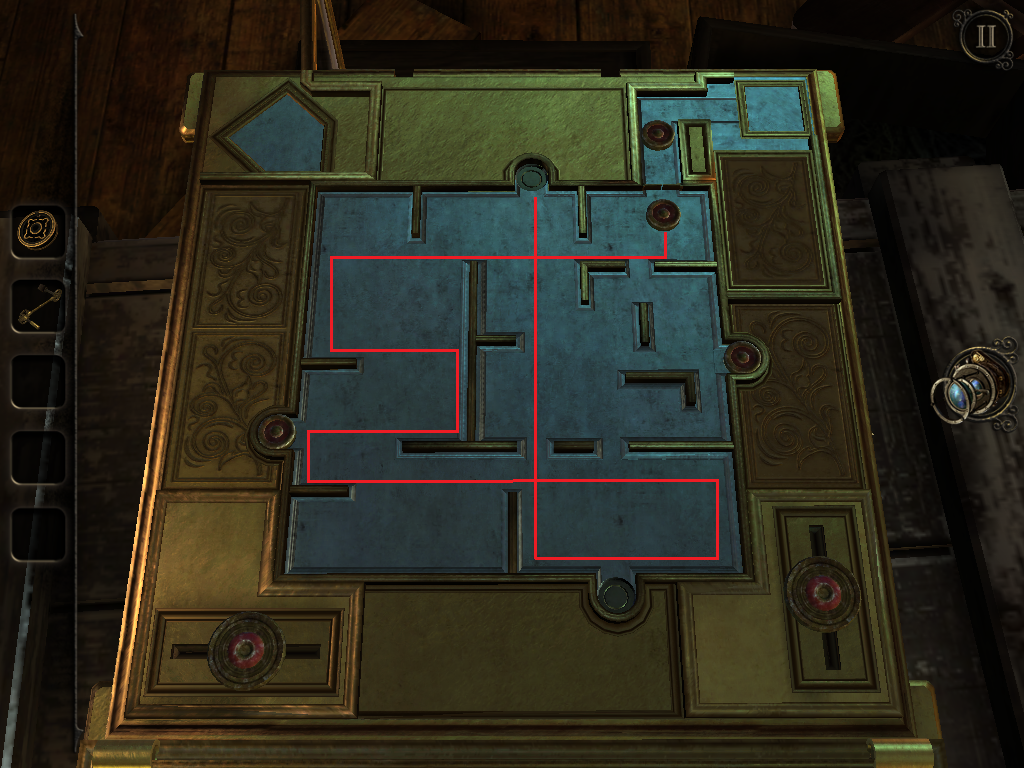
The third route.

And the final puck’s path.
Use your eyepiece to peek into the newly opened hole and insert the crank handle into the slot on the right.

Rotate the disc in the middle so that the lines are horizontal and move the gear over to it using the crank.
Rotate the disc to the vertical position and slide the top section across to the right, Use the crank to move the gear onto the top panel.
Rotate the central disc to the horizontal position and slide the top panel back over to the left.
Now spin the centre circle to the vertical position again and use the crank to get the gear to the end of the track over on the left, then push the button that pops up.
Scoot up to the top of the box and line up the panels underneath the metal frame to match the bottom image, then slide the handle from left to right, flip the switch, and grab the gear.
Now that you’re back in the main room, stick the gear into this mechanism, to the left of the grey box.
Make your way up the new staircase and examine the wheel to the left.
Pop the metal wheel over this one and spin it anticlockwise to ring the bell above.
Use your eyepiece to view the painting and you’ll see a puzzle inside. This is really straightforward — just rotate the camera so that blue lines form connected pathways to move the purple blob along. Keep spinning it to reveal the route and take the clock face that’s your reward.
Make your way back downstairs and push the clock face onto the side of the gold box to reveal a panel on the side. The aim of this puzzle is to defeat the rooks with the gold knight.
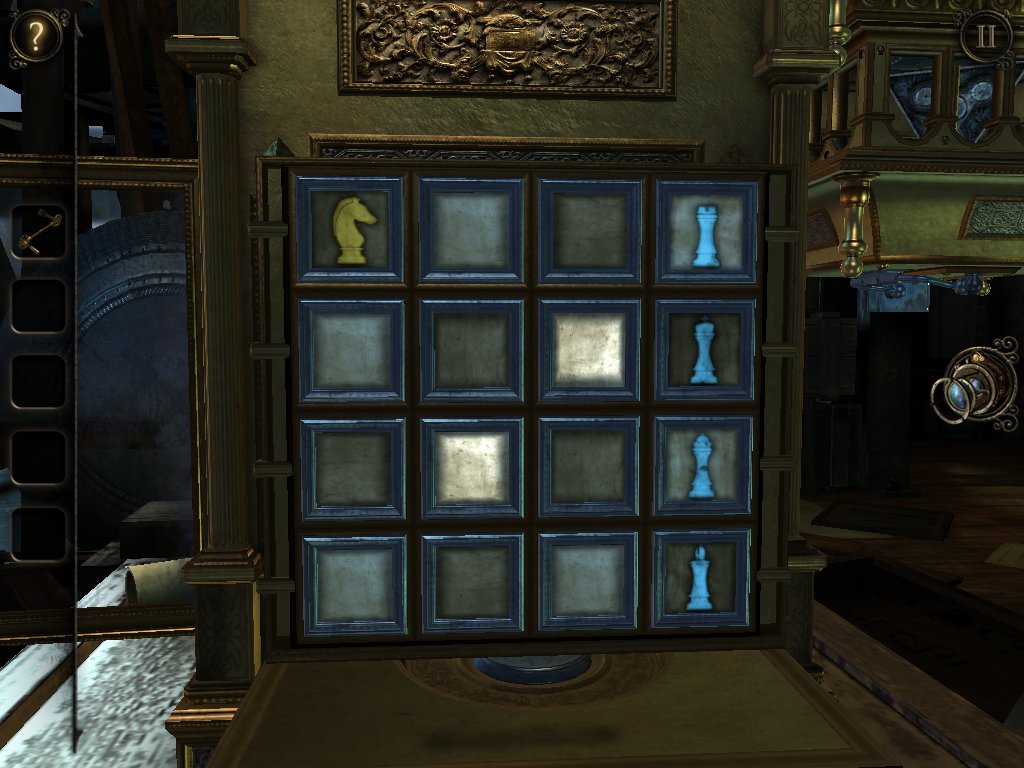
Tap the knight to view the possible positions it can move to. Tap the top of the two squares.
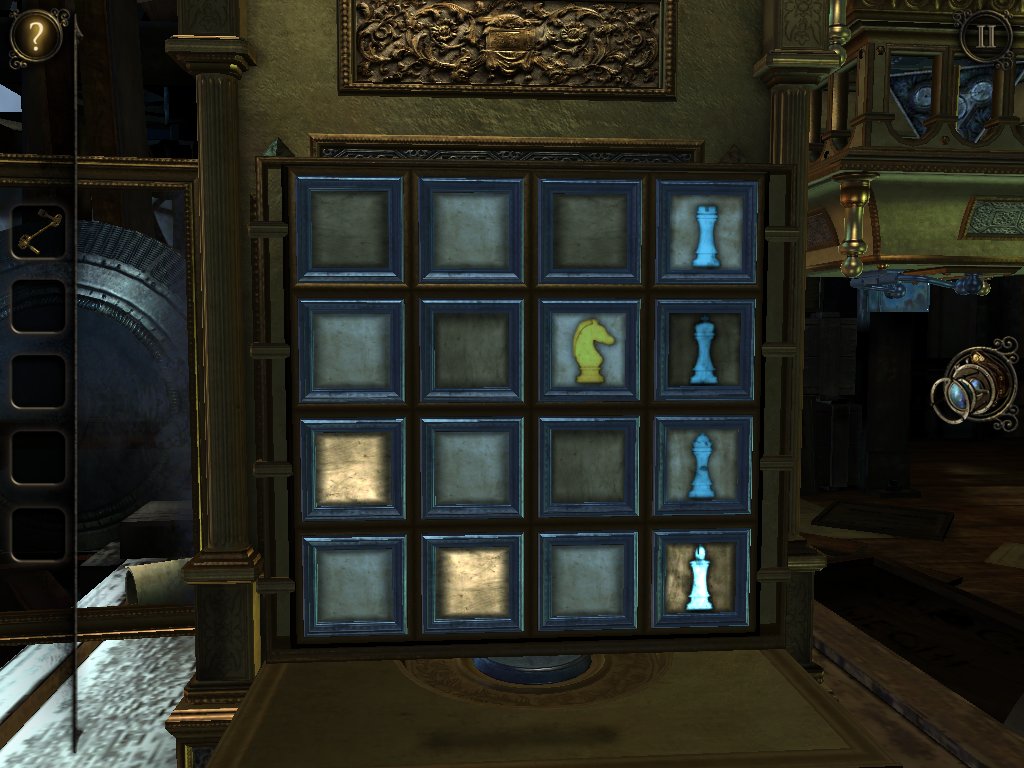
From here, take the rook highlighted at the bottom right.
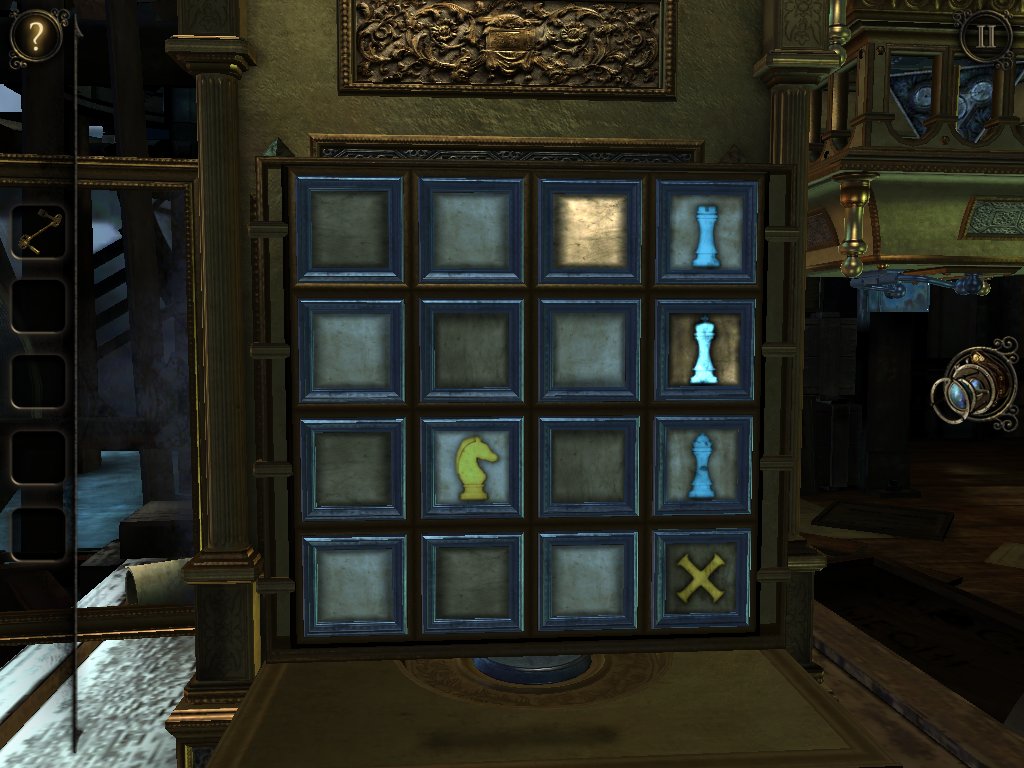
The board will reset, so tap the knight and move it to the square pictured above, then take the highlighted rook.
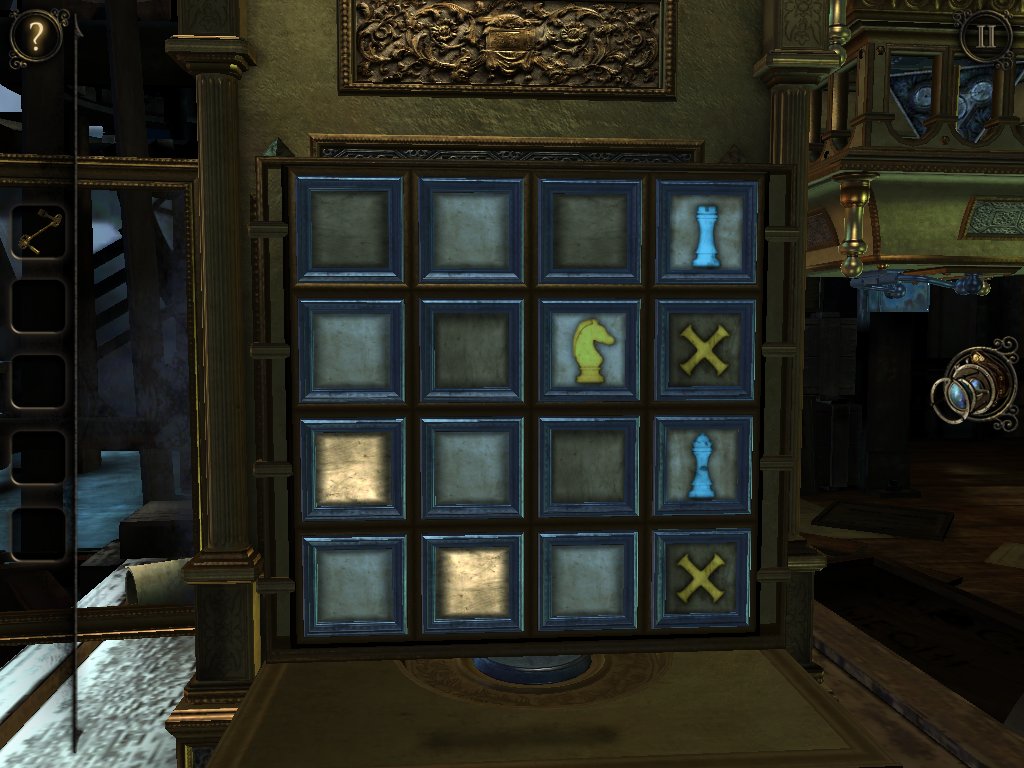
Once the board resets, move the knight to the position above.
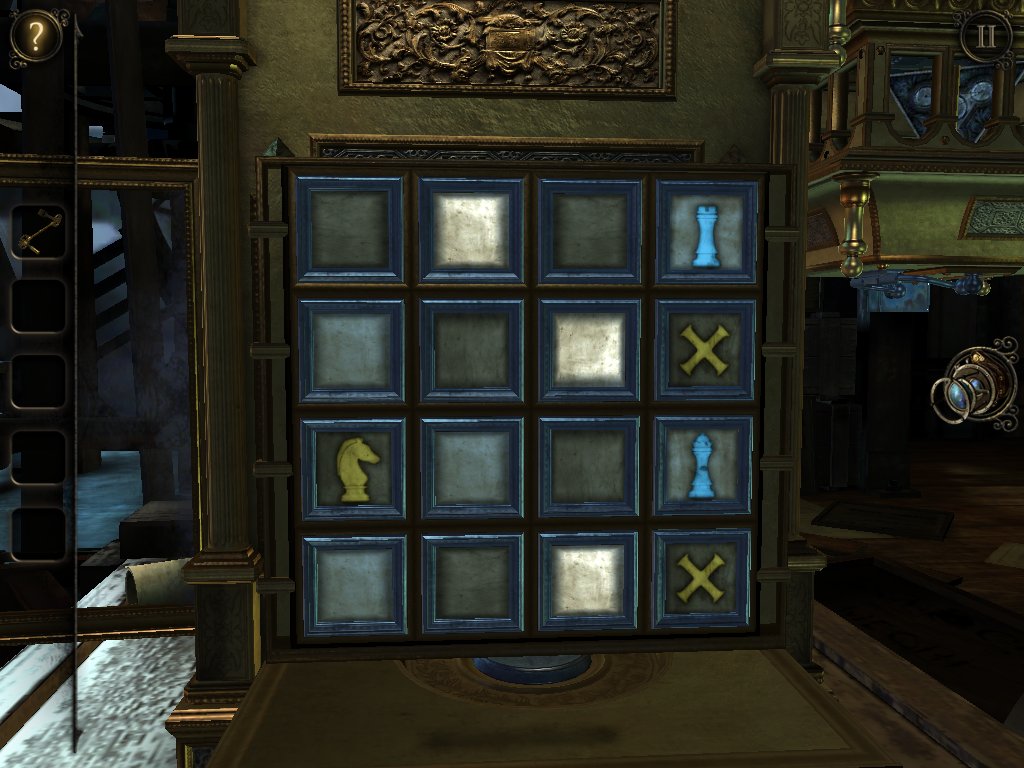
Then to this square.
The next move is to the top of the board.

Now move it to this space. From here you can take the rook at the top.

After the final reset, move the knight to the square as above.

Then down to the bottom, where you can take the last highlighted rook.
Look inside the opening that materialises using your eyepiece.
Rotate the disc on the left so that the lines are horizontal and slide the handle on the edge over tot he middle.
Spin the left disc around to the horizontal position. You’ll need to use your other hand to slip the latch at the top into the third slot to keep the disc in place. Slide the handle over to the middle.
To get the third handle to the middle, spin the dials around until you’ve created two vertical tracks for the handle to be pulled through, and yank it down.
Retract all three handles and insert the crank into the hole. Twirl it around to pop the lid open.
Match the pattern beneath the metal frame to the one at the bottom of the panel, slide the handle over, and flip the switch. Pick up the handle with the socket.
Back in the main room, grab the ballerina figurine from the side of the box.
Open the door to the left of the stairs using the handle you just picked up and head on through.
Examine the red box in the corner, flip the latch, and pick up the winding key.
Slide the panel over on the right side of the box and whip out your eyepiece.
Slot the pieces into place in the order above, then use the winding key in the hole.
Open the lid to find another simple puzzle. Press the button to depress the gold pieces in the track and guide the ballerina into the centre. Insert the ballerina figurine you picked up earlier and repeat the process.
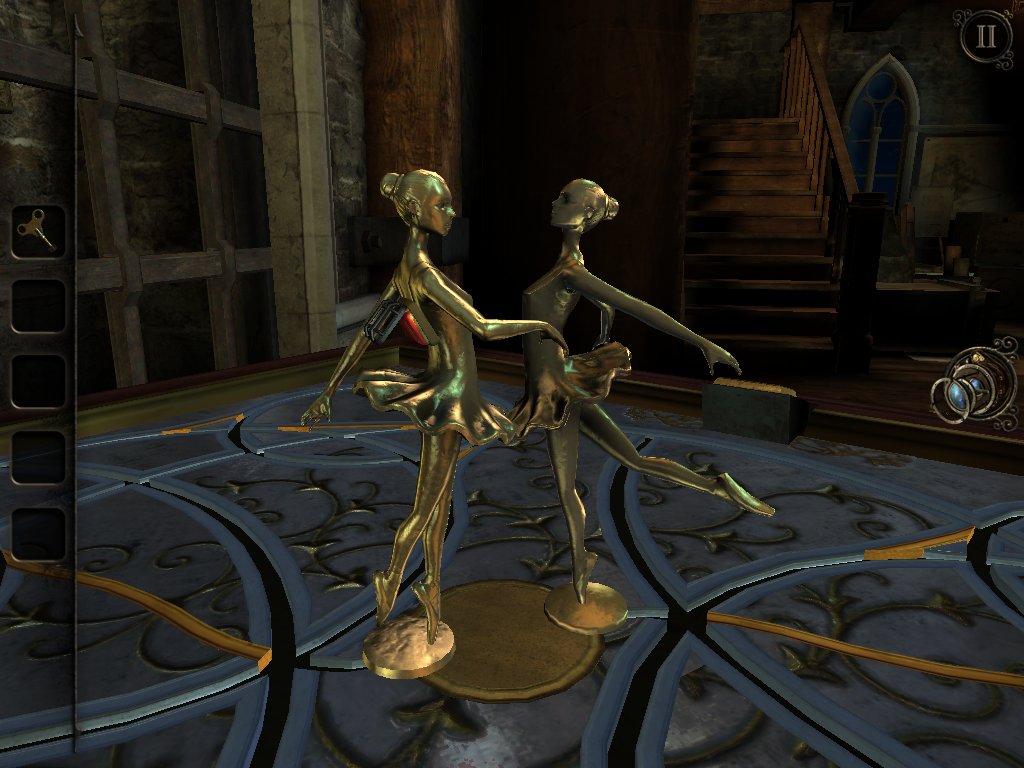
Once they’ve been reunited, take the gem from the figurine’s back.
Turn around and head over to the wooden board on the wall.
Insert the red gem into the hole at the bottom.
Recreate this pattern and hit the button at the top.
Do the same for this one.
Now rotate the pieces in front of the lights using the four buttons to cast a crow’s shadow on the wall. You’ll be rewarded with a key,
Return to the main room and use the key to open the grey box. Flip the switch inside.
Follow the crow upstairs where he’ll fly into the bell above.
Go back to the room with the painting and use your eyepiece to guide a second purple blob to freedom. You’ll receive clock hands for doing so.
Attach the clock hands to the clock face on the gold box, then use the winding key on the hole to the left.
This will set the third bell ringing and grant you access to another pyramid, wrapping up the chapter.
Chapter 3: The Forge
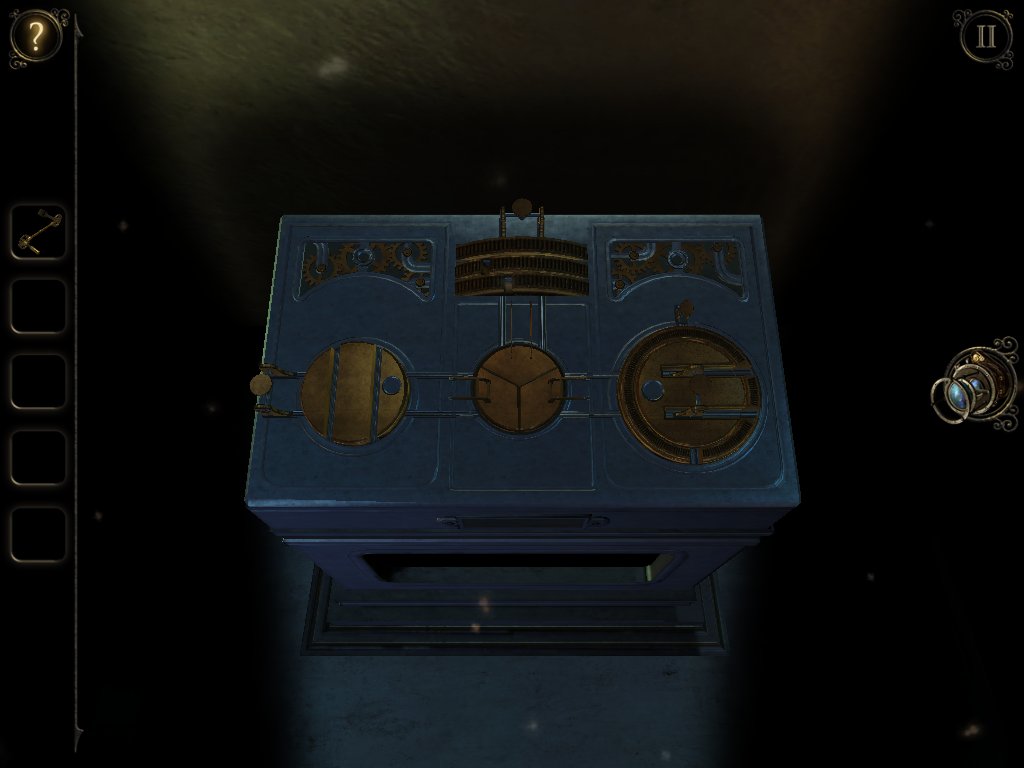
Place the pyramid onto the table and pick up the optical device.
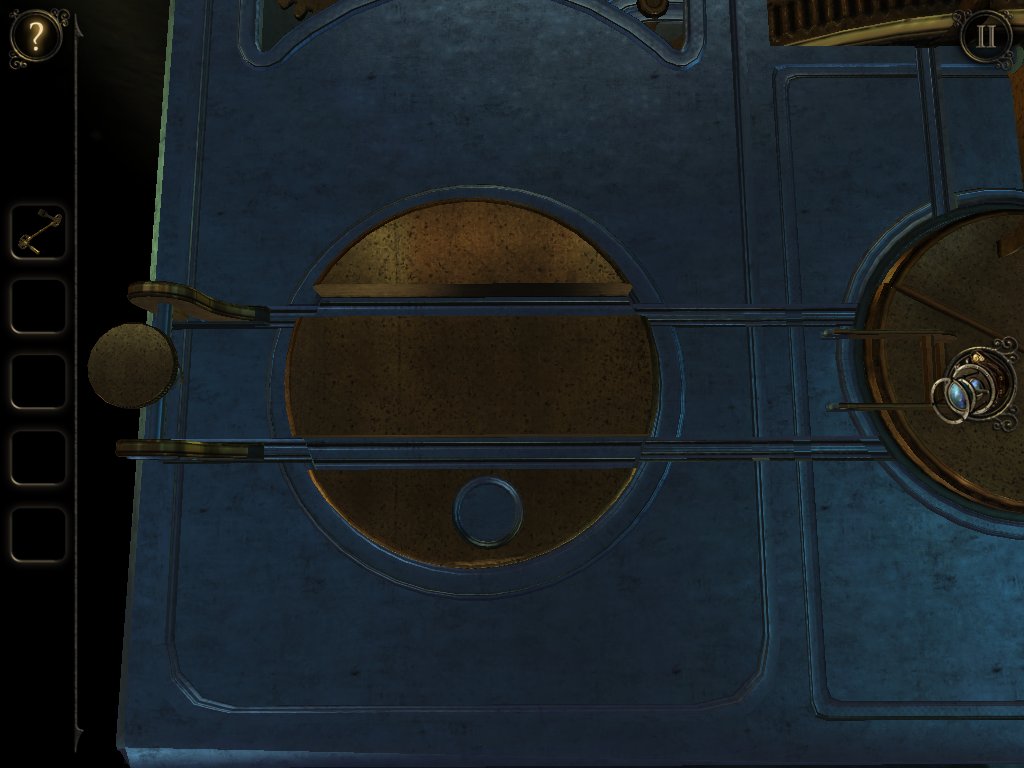
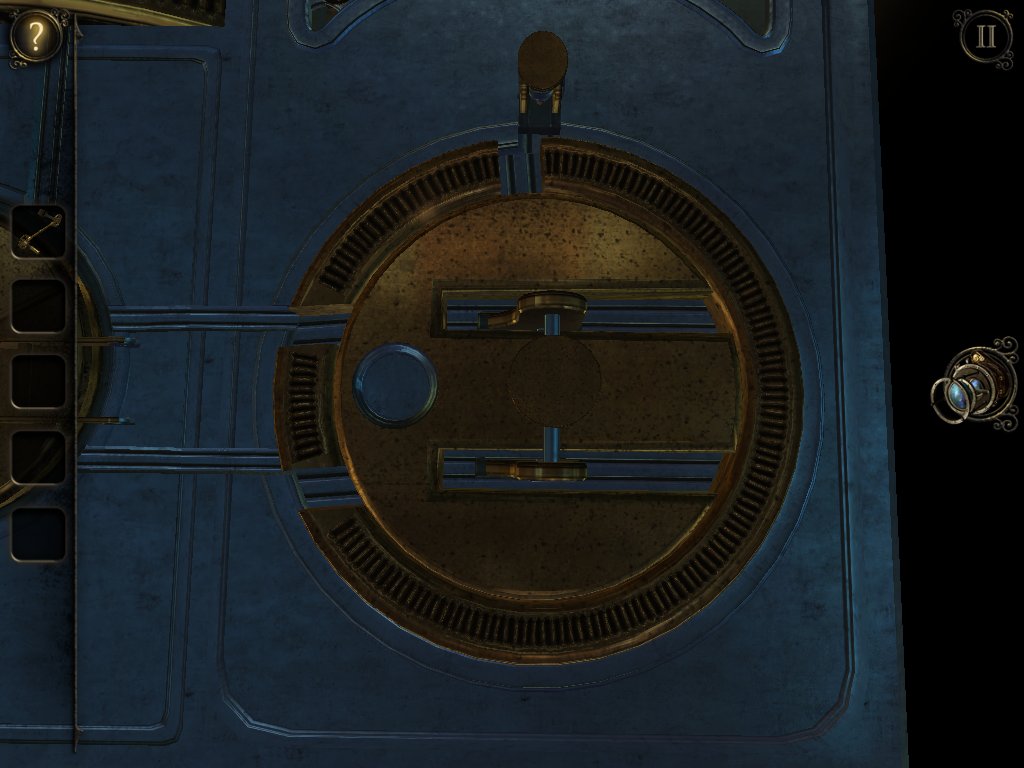
Attach the optical device to the circular wooden panel on the nearby door and rotate the dials so that the beam of light hits the gem in the middle.
Go through to the room beyond and get the power up and running by arranging the sliders as pictured above.
Flip the lever followed by the switches on the box, and push the button. Move the bottom slider on the panel above so that it’s in sync with the one at the top to create the doorway.
Pick up the leather case from the right side of the table and open it to find kindling.
Now examine the front of the pyramid and push the button on the bottom left. Take the flint from inside.

Take a gander at the control panel to the right and pick up the small key.
There’s a trapdoor in the corner of the room by the window. Slide open the cover on the padlock and open it using the small key. Pick up the metal rod.
Open the trapdoor and yank the handle back to redirect the flow of water.
Head back to the pyramid and flip the small catches on the bottom corners of the left side.
A panel will slide out with an accompanying puzzle.
Move the inner blue stone to the left, and the inner red stone to the right as above.
Move the outer red stone to the right, and the blue stone from the middle to the left edge, like so.
Move the blue stone from the right into the middle, and the rightmost red stone to the outer right edge. Now your panel should look like this.
Finally, move the red stone from the left over to the right, and the blue stone from the middle to the now empty space on the left.
Take the metal casting and insert it into the panel in front of the pyramid. Guide the handle on the left around to the first light bulb.
Go back to the control panel and insert the metal rod into the slot on the right. You need to guide the sandbag onto the pressure plate in the back left corner of the room. This is another straightforward one, so move the bag over there.
Once the plate is depressed, the top lock on the door will have slid back. Push the metal handle over to the left to lock it into place, as we need to move the sandbag again.
Steer the sandbag over to the pressure plate at the front left of the room to open the wooden door ahead.
Head through the door and pull back the latch on the panel to the right. Return to the control panel.
Guide the sandbag through the newly opened hatch and into the room beyond.
Use the handle on the left to lift the saw blade and split the sack open. Take the metal bar and go back to the main room.

Now you need to use the forge. Open the drawer on the front, pop the kindling in, and close it again.
Stick the flint onto the top of the circular mechanism and start spinning it around until the forge is lit.
Arrange the column of blocks in the pattern above which is the shape of the key needed for the bottom level of the pyramid.
Pull out the drawer above, chuck in the metal bar, and shut it again.
Keep pumping the bellows until the forge spits out a key.
Use the key at the bottom of the pyramid and a small drawer will open. Slide the round component over to the left.

A panel on the left will have opened containing a small connector. Take it out and slide the component over to the right.

A panel on the right will have opened. Take the hollowed-out metal block.
Zoom in on the panel above the compartment that held the hollowed-out metal block and insert the connector on the right side.
Spin the dial at the bottom until you can pick it up.
Now we need to solve another puzzle by following a convoluted set of directions to switch the positions of the blocks with pieces on top of them.
Move the cross up, and the ringed piece to the left. Move the gold block in the middle row down a space.
Move the cross to the right, the top left gold block down a space, and the top right gold block across to the left.
Move the cross up, the bottom right gold block up, and the ringed piece to the right.
Move the gold block from the middle left down a space, and slide the gold block from the right over to the left. Move the ringed piece up one. The blocks should now look like this.
Starting with the ringed piece, simply move all of the blocks around clockwise until the pieces align with the cutouts. Take the metal casting.
Slot the metal casting into the panel at the front of the pyramid and slide the handle around to the second light bulb.
Head back into the room with the circular saw.
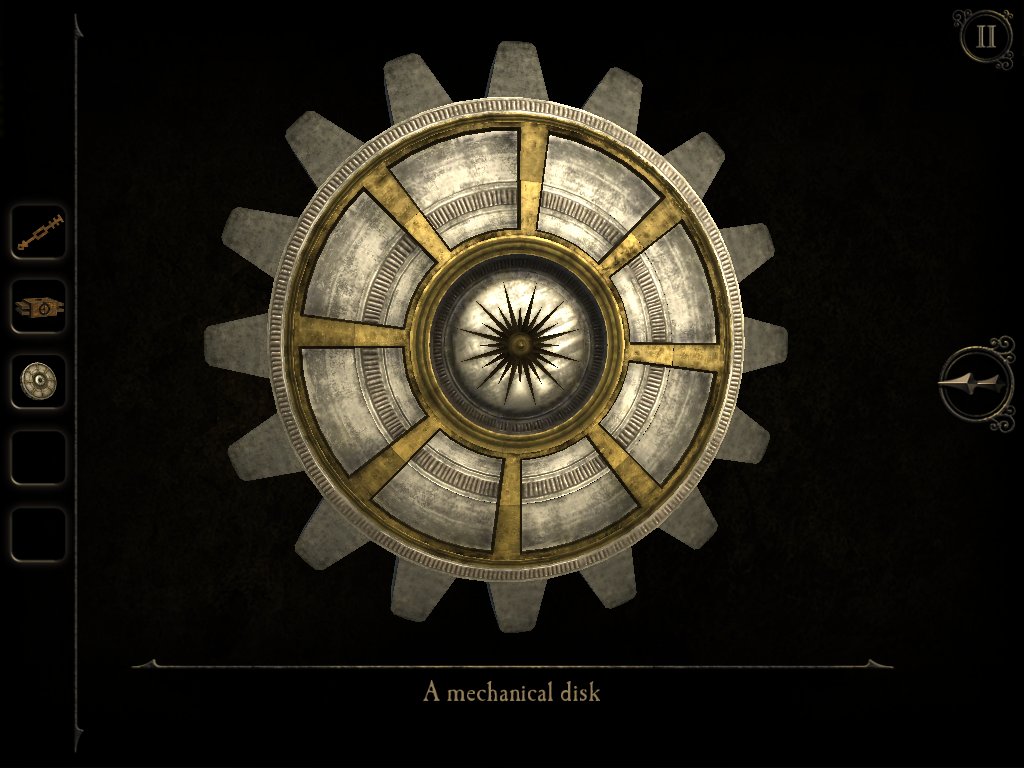
Examine the mechanical disk in your inventory and spin it around until the the edges pop out.
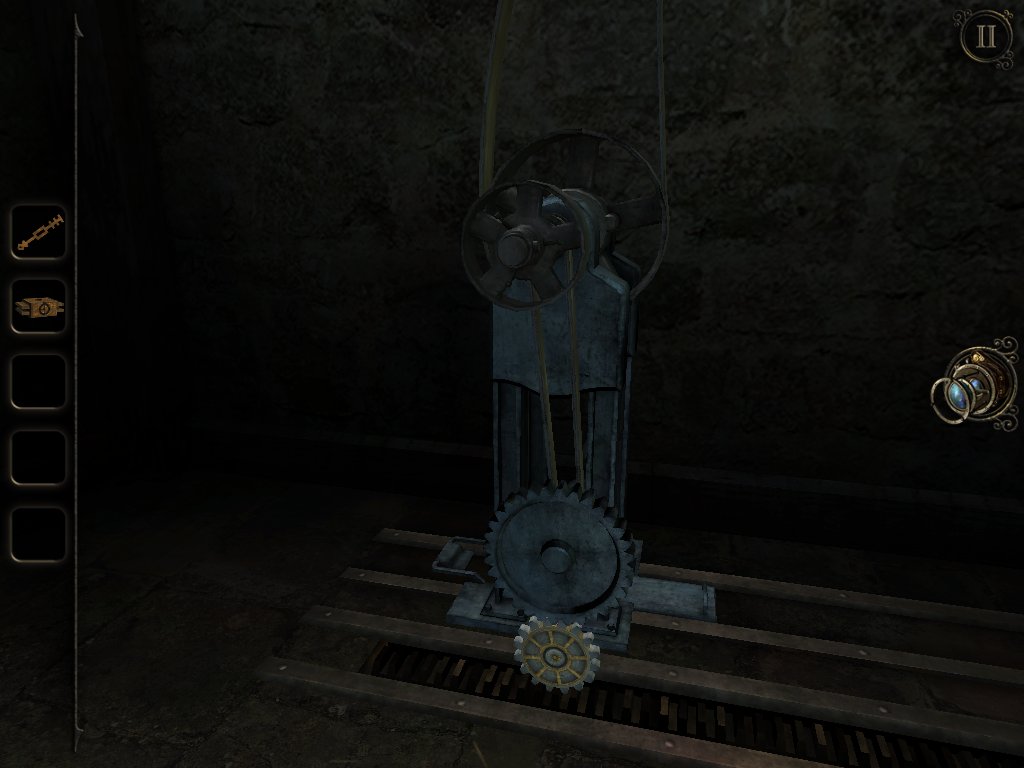
Attach it to the bottom of this mechanism and once it’s finished its journey across the rails, grab the belt left in its wake.
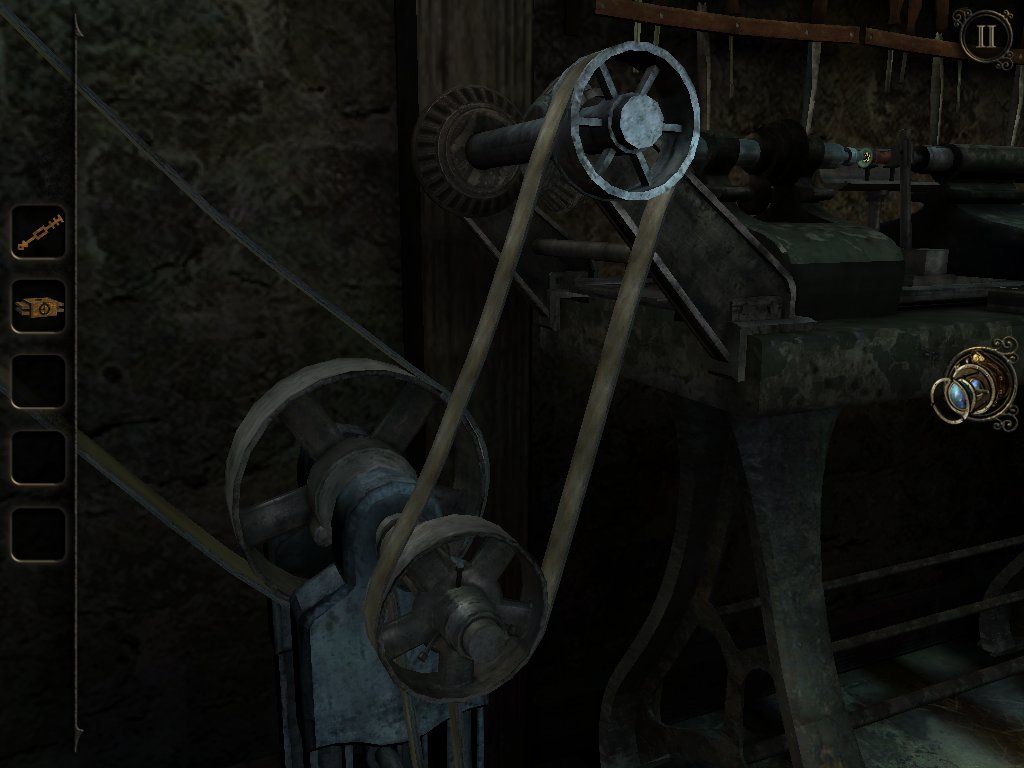
Use the belt to attach the wheel at the top to the wheel on the table.
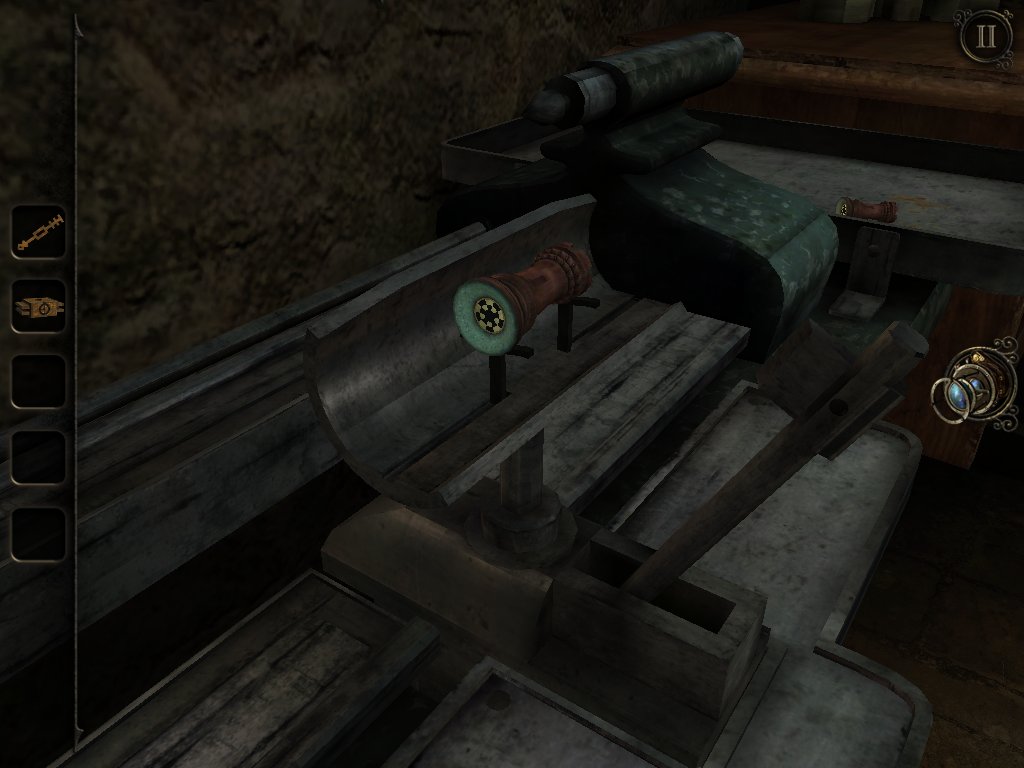
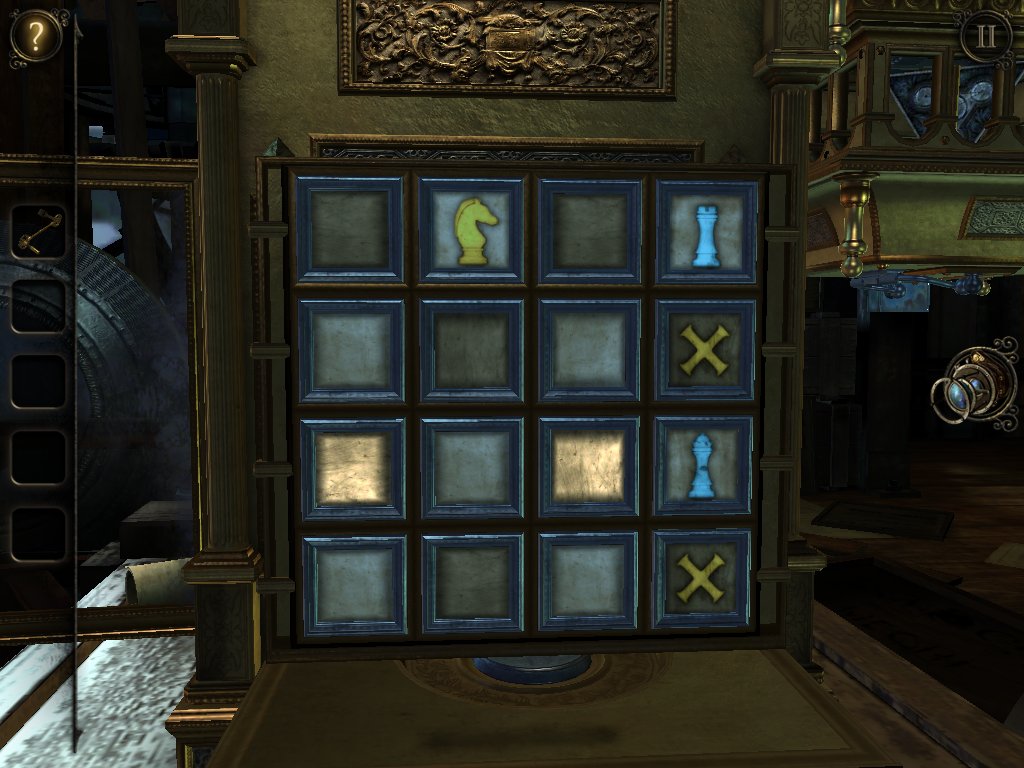
Turn on the milling machine and pick up the two chess pieces.
Slot the chess pieces into the holes on the left side of the pyramid.
Whip out your eyepiece again. Use the slider on the left to move the water wheel and align it with portion you can see inside of the house. Do this successfully and the wheel will become magically restored. Move it over to the right.
Now slide the gear on the right upwards and push the button on the roof. The top of the house will open up revealing another slider for you to push up.
Back outside the pyramid, press the button on the back of the lens to shoot out a beam of light.
Move over to the lens on the right and rotate it to match the position above.
Do the same with the next one. You want the shapes being made by rotating the lenses to match the outlines on the last lens in the chain.
Press the button on the back of the first lens and a keyhole will be revealed.
Head back to the forge and arrange the column of blocks to match the pattern for the next key. Follow the same process as before, but this time, use the key we made earlier to put in the drawer at the top.
Use the key on the second tier of the pyramid and have your eyepiece to hand for the next puzzle.
This is another really simple one. Rotate the cube using the dials to line up the coloured indentations with gems of the matching colour. Push each one into the cube before addressing the next one.
Once you’re victorious, take the red gem and pop it onto the slot at the top of the pyramid next to the emblem of the key required to open the lock.
Turn to the next page for the rest of our The Room 3 walkthrough…
This The Room 3 walkthrough will help you make the most of this ingenious little indie puzzler, without wanting to rage quit. The Room 3 sees the player attending the world’s worst job interview. You made the train and when you arrive, you’re met with a note that bears good news — you’re a definite candidate for an apprenticeship. The bad news is that you’re trapped amongst a variety of elaborate puzzles and if you don’t solve them, you’ll be passed over for the position. And probably die.
So we’ve stepped in to help you ace the interview and defeat the dastardly puzzles created by Craftsman. Although you may want to reconsider your career path.
Chapter 1 — The Lighthouse
Once you’ve left the relative safety of the train, you’ll be deposited outside of this door. Examine the panel and slide the latch to peek through to the room beyond.
Once you’ve finished spying, zoom back out, pop on your eyepiece, and examine the podium in the middle of the room.
Match the items in the rotating compartments with the trite brain teasers painted on each side. The silent face without hands is a watch, the power of flight and well of knowledge is a feather, and nothing is needed by the rich, but it’s all the poor have.
You’ll be rewarded with a note and a box containing an attachment for your eyepiece.
Using your newly modded eyepiece, examine the keyhole in the door. The tumblers are connected in pairs — the two on the left are connected, as are the two on the right. Simply turn one wheel of each pair until they both light up, and repeat with the next pair.
Enter the room and chuck your pyramid onto the table to receive an emblem.
You’ll need to use this on the wall behind you.
Insert the emblem into the space at the bottom right and you’ll be presented with another puzzle.
Arrange the left side like so.
This is what the right side should look like.
Go through to the newly opened room and investigate the contraption on the left.
Arrange the switches as pictured to restore power.
Flip the lever on the board on the desk.
Now examine the large box to the right. Flip all four switches and press the button that’s revealed after doing so.
Turn your attention to the small panel at the back of the room. Turn the knob on the left until you see a light switch on at the other side off the room. Turn the right dial until the waveforms are overlayed.
This will bring you to a new room.
Examine the left side of the table and pull back the cover, then flip the latch.
Take the cog from the drawer and slot it into the middle of the table, then watch what looks like the intro to Game of Thrones unfold.
Before we proceed with the goings on at the table, look to the left and you’ll spot a plaque on the floor.
Slide it back to reveal a hidden compartment.
Grab the sphere tucked away in here and spin it around to find the hidden magnet. We’ll need this later.
Back at the table, spin the waterwheel on the side of the small house to open up a tiny door. Use the eyepiece to look inside.
Pull on the snake’s tail to start this puzzle.
Match up the diamond patterns on its body so that three of the same kind run along the side.
Push the button on the back of its head to make it relinquish the second magnet.
Zoom out and investigate the desk behind the table.
You need to enter the name of the tower — Pyre. With the slider on the first letter, hit the switches pictured above.
Slide it over to the second letter and push the knobs pictured above.
Now for the third letter.
And finally, the ‘e’.
Grab the wooden arch and head back to the table.
Pop the wooden arch into the slot with the fancy gold patterns around it.
Use the eyepiece to enter the archway.
There are three pillars with a pair of circles etched into them. Examine each one and press both circles at the same time to reveal three hidden symbols.
Here’s the first one.
And the second one.
And the third.
Touch the panel on the floor and draw all three symbols, one a time. You’ll know if you’ve done it right because the letters around the edge will light up.
This will prompt a new tower to spring up. Whip out your eyepiece and examine the panel at the back.
You need to reconstruct the compass. Turn the dial until the piece you want to move is in the right spot, then drag it to the centre. Repeat until it’s complete.
The panel will pop open, allowing you to pick up a wooden model piece.
While you’re here, make a note of these symbols.
Move around to the left and open the small drawer.
Take the model clock face and make a note of the symbols above the drawer.
Move around the tower to access the constellation chart.
Use the pairs of symbols to set the sliders on the star chart.
Double tap the lens for a closer look and make a note of the pattern.
Set the sliders to the second position as above.
This is what you’ll find at these coordinates.
Face the front of the tower and equip your eyepiece once more.
Drag the magnets from your inventory onto the edges of the circle.
Slide them around the outer edge to move the diamonds and arrange them in the same formation as the constellations.
You’ll receive a wooden model piece for your troubles, soslot it into the hole at the top of the raised area on the table.
You’ll be sent up a floor to a new room, along with the table.
Investigate the diver’s helmet and open the drawer on the right of the stand to find an antler and a note.
Now examine the dial on the helmet and turn it so that the matching symbols are next to one another,
Take the rivet from behind the plaque and make a note of the symbols on the underside.
Use the rivet on the hole on the left side of the helmet and slide it over once you insert it.
Pick up the metal acorn, flip the switch behind it, and take the wooden model piece.
Return to the table and attach the clock face onto the clock tower, then use your eyepiece to look inside.
Push the owl’s beak up and twist its head around.
Pull its wing and remove the model boat, then head back to the table.
Slot the wooden model piece into hole by the miniature jetty and place the boat at the end of the rail to the left.
Slide the boat up to the boathouse, then use your eyepiece to look inside.
Slide the switch on the rat’s back to open its head.
Spin the wheel, then press the two buttons that appear on either side.
Slide the bum back and take the key.
Insert the model piece from the diver’s helmet stand onto the table.
Spin the top around until the metal ring lines up with the metal circle on the roof. Once it’s open, use your eyepiece to peek inside.
Push the grasshopper’s legs down and flip the two switches.
Pull its head and take the metal pointer.
Return to the diver’s helmet and attach the pointer to the open panel. Turn it anticlockwise to point at the three symbols from the underside of the plaque in order. This is the first symbol.
Continue turning it anticlockwise to the second symbol.
After hitting the third symbol, you’ll be given a copper tap.
Attach it to the right side of the helmet like so and give it a turn.
Now align the two metal frames so that they’re overlaid in the position above and the helmet will pop open. Retrieve the crystal phial and head back to the table.
Access the metal acorn in your inventory and twist it to reveal a key.
Use the eyepiece on the wooden arch and insert the acorn key into the panel on the tower with the tree painted onto it.
Attach the antler to the skull and rotate the three pieces until they mirror the one on the right.
Slot the crystal phial into the hole that’s revealed above, and once it’s been smashed, pick up the gemstone.
Now use the small key on the two-tiered tower and use the eyepiece to look inside.
There’s a mannequin with three missing body parts. Rotate the lever to the left to attach the first limb, then use the eyepiece to enter the small tower and repeat with the next limb. Continue a third time until you reach peak limb-ception and complete the puzzle.
The top of the tower will open up, allowing you to insert the gemstone into the top. This will create a glowing lamp, so pick up this new item.
Enter the newly materialised cage and spin the metal bars so that they fan out into a wheel.
Push the top bar down to lock the upper cylinder in place, then rotate the bottom half to align it with a matching pattern.
Once the rectangular patterns have been matched up, the plain rectangle — a.k.a. a hole — should be lined up over the opening in the cylinder.
Slot the lamp into the hole.
Take the pyramid to complete the chapter.
Chapter 2: The Clock Tower
Place your new pyramid on the table and a device will rise up from the gloopy liquid. Use the dials to line up the shapes with the partial arch on the wall to make a complete archway.
Head through the new door and over to the left corner
Arrange the sliders as above to get the power flowing.
Follow the wire and flip the lever.
Follow the wire to the box and flip all four switches to reveal the button in the middle. Give it a push.
Head over to this panel and press and hold the left button until the lamp in the background switches on, then press and hold the button on the right to match up the waveforms.
Once you arrive in the new area, grab the wheel with a handle from the top of the grey box by the face of the clock tower.
Examine the gold box and flip the handle over into the cradle.
Now examine the side of the box with a metal pillar stuck behind the glass door. Slide the two latches at the top to the outer edges to open the door and retrieve the metal pillar.
Slot the metal pillar onto the top of the box and slide it over to the left to mirror its gold counterpart.
Flip open the lid and slide over the gold panel at the bottom left corner of the maze. This will prompt a tower to appear. Use your eyepiece to look inside.
Open up the circular panel on the left of the box to find a crank handle.
Inspect the right side of the box and turn the centre piece until it aligns with the four metal pins on the outer edge. When they drop into place, take the metal ring.
Pop the metal ring onto the front of the box and rotate it so that the hole is over the square slot. Insert and use the crank handle to reveal a panel at the top of the box.
Slide the frame into the position above so that it matches the image at the bottom, then pull the handle on the left across to the right and flip the switch.
You’ll be deposited back outside to solve the maze puzzle. Use the bottom left switch to move the discs horizontally, and the one on the right to move them vertically.
Here’s what to do with the first puck.
Here’s the path for the second one.
The third route.
And the final puck’s path.
Use your eyepiece to peek into the newly opened hole and insert the crank handle into the slot on the right.
Rotate the disc in the middle so that the lines are horizontal and move the gear over to it using the crank.
Rotate the disc to the vertical position and slide the top section across to the right, Use the crank to move the gear onto the top panel.
Rotate the central disc to the horizontal position and slide the top panel back over to the left.
Now spin the centre circle to the vertical position again and use the crank to get the gear to the end of the track over on the left, then push the button that pops up.
Scoot up to the top of the box and line up the panels underneath the metal frame to match the bottom image, then slide the handle from left to right, flip the switch, and grab the gear.
Now that you’re back in the main room, stick the gear into this mechanism, to the left of the grey box.
Make your way up the new staircase and examine the wheel to the left.
Pop the metal wheel over this one and spin it anticlockwise to ring the bell above.
Use your eyepiece to view the painting and you’ll see a puzzle inside. This is really straightforward — just rotate the camera so that blue lines form connected pathways to move the purple blob along. Keep spinning it to reveal the route and take the clock face that’s your reward.
Make your way back downstairs and push the clock face onto the side of the gold box to reveal a panel on the side. The aim of this puzzle is to defeat the rooks with the gold knight.
Tap the knight to view the possible positions it can move to. Tap the top of the two squares.
From here, take the rook highlighted at the bottom right.
The board will reset, so tap the knight and move it to the square pictured above, then take the highlighted rook.
Once the board resets, move the knight to the position above.
Then to this square.
The next move is to the top of the board.
Now move it to this space. From here you can take the rook at the top.
After the final reset, move the knight to the square as above.
Then down to the bottom, where you can take the last highlighted rook.
Look inside the opening that materialises using your eyepiece.
Rotate the disc on the left so that the lines are horizontal and slide the handle on the edge over tot he middle.
Spin the left disc around to the horizontal position. You’ll need to use your other hand to slip the latch at the top into the third slot to keep the disc in place. Slide the handle over to the middle.
To get the third handle to the middle, spin the dials around until you’ve created two vertical tracks for the handle to be pulled through, and yank it down.
Retract all three handles and insert the crank into the hole. Twirl it around to pop the lid open.
Match the pattern beneath the metal frame to the one at the bottom of the panel, slide the handle over, and flip the switch. Pick up the handle with the socket.
Back in the main room, grab the ballerina figurine from the side of the box.
Open the door to the left of the stairs using the handle you just picked up and head on through.
Examine the red box in the corner, flip the latch, and pick up the winding key.
Slide the panel over on the right side of the box and whip out your eyepiece.
Slot the pieces into place in the order above, then use the winding key in the hole.
Open the lid to find another simple puzzle. Press the button to depress the gold pieces in the track and guide the ballerina into the centre. Insert the ballerina figurine you picked up earlier and repeat the process.
Once they’ve been reunited, take the gem from the figurine’s back.
Turn around and head over to the wooden board on the wall.
Insert the red gem into the hole at the bottom.
Recreate this pattern and hit the button at the top.
Do the same for this one.
Now rotate the pieces in front of the lights using the four buttons to cast a crow’s shadow on the wall. You’ll be rewarded with a key,
Return to the main room and use the key to open the grey box. Flip the switch inside.
Follow the crow upstairs where he’ll fly into the bell above.
Go back to the room with the painting and use your eyepiece to guide a second purple blob to freedom. You’ll receive clock hands for doing so.
Attach the clock hands to the clock face on the gold box, then use the winding key on the hole to the left.
This will set the third bell ringing and grant you access to another pyramid, wrapping up the chapter.
Chapter 3: The Forge
Place the pyramid onto the table and pick up the optical device.
Attach the optical device to the circular wooden panel on the nearby door and rotate the dials so that the beam of light hits the gem in the middle.
Go through to the room beyond and get the power up and running by arranging the sliders as pictured above.
Flip the lever followed by the switches on the box, and push the button. Move the bottom slider on the panel above so that it’s in sync with the one at the top to create the doorway.
Pick up the leather case from the right side of the table and open it to find kindling.
Now examine the front of the pyramid and push the button on the bottom left. Take the flint from inside.
Take a gander at the control panel to the right and pick up the small key.
There’s a trapdoor in the corner of the room by the window. Slide open the cover on the padlock and open it using the small key. Pick up the metal rod.
Open the trapdoor and yank the handle back to redirect the flow of water.
Head back to the pyramid and flip the small catches on the bottom corners of the left side.
A panel will slide out with an accompanying puzzle.
Move the inner blue stone to the left, and the inner red stone to the right as above.
Move the outer red stone to the right, and the blue stone from the middle to the left edge, like so.
Move the blue stone from the right into the middle, and the rightmost red stone to the outer right edge. Now your panel should look like this.
Finally, move the red stone from the left over to the right, and the blue stone from the middle to the now empty space on the left.
Take the metal casting and insert it into the panel in front of the pyramid. Guide the handle on the left around to the first light bulb.
Go back to the control panel and insert the metal rod into the slot on the right. You need to guide the sandbag onto the pressure plate in the back left corner of the room. This is another straightforward one, so move the bag over there.
Once the plate is depressed, the top lock on the door will have slid back. Push the metal handle over to the left to lock it into place, as we need to move the sandbag again.
Steer the sandbag over to the pressure plate at the front left of the room to open the wooden door ahead.
Head through the door and pull back the latch on the panel to the right. Return to the control panel.
Guide the sandbag through the newly opened hatch and into the room beyond.
Use the handle on the left to lift the saw blade and split the sack open. Take the metal bar and go back to the main room.
Now you need to use the forge. Open the drawer on the front, pop the kindling in, and close it again.
Stick the flint onto the top of the circular mechanism and start spinning it around until the forge is lit.
Arrange the column of blocks in the pattern above which is the shape of the key needed for the bottom level of the pyramid.
Pull out the drawer above, chuck in the metal bar, and shut it again.
Keep pumping the bellows until the forge spits out a key.
Use the key at the bottom of the pyramid and a small drawer will open. Slide the round component over to the left.
A panel on the left will have opened containing a small connector. Take it out and slide the component over to the right.
A panel on the right will have opened. Take the hollowed-out metal block.
Zoom in on the panel above the compartment that held the hollowed-out metal block and insert the connector on the right side.
Spin the dial at the bottom until you can pick it up.
Now we need to solve another puzzle by following a convoluted set of directions to switch the positions of the blocks with pieces on top of them.
Move the cross up, and the ringed piece to the left. Move the gold block in the middle row down a space.
Move the cross to the right, the top left gold block down a space, and the top right gold block across to the left.
Move the cross up, the bottom right gold block up, and the ringed piece to the right.
Move the gold block from the middle left down a space, and slide the gold block from the right over to the left. Move the ringed piece up one. The blocks should now look like this.
Starting with the ringed piece, simply move all of the blocks around clockwise until the pieces align with the cutouts. Take the metal casting.
Slot the metal casting into the panel at the front of the pyramid and slide the handle around to the second light bulb.
Head back into the room with the circular saw.
Examine the mechanical disk in your inventory and spin it around until the the edges pop out.
Attach it to the bottom of this mechanism and once it’s finished its journey across the rails, grab the belt left in its wake.
Use the belt to attach the wheel at the top to the wheel on the table.
Turn on the milling machine and pick up the two chess pieces.
Slot the chess pieces into the holes on the left side of the pyramid.
Whip out your eyepiece again. Use the slider on the left to move the water wheel and align it with portion you can see inside of the house. Do this successfully and the wheel will become magically restored. Move it over to the right.
Now slide the gear on the right upwards and push the button on the roof. The top of the house will open up revealing another slider for you to push up.
Back outside the pyramid, press the button on the back of the lens to shoot out a beam of light.
Move over to the lens on the right and rotate it to match the position above.
Do the same with the next one. You want the shapes being made by rotating the lenses to match the outlines on the last lens in the chain.
Press the button on the back of the first lens and a keyhole will be revealed.
Head back to the forge and arrange the column of blocks to match the pattern for the next key. Follow the same process as before, but this time, use the key we made earlier to put in the drawer at the top.
Use the key on the second tier of the pyramid and have your eyepiece to hand for the next puzzle.
This is another really simple one. Rotate the cube using the dials to line up the coloured indentations with gems of the matching colour. Push each one into the cube before addressing the next one.
Once you’re victorious, take the red gem and pop it onto the slot at the top of the pyramid next to the emblem of the key required to open the lock.
Turn to the next page for the rest of our The Room 3 walkthrough…
Посмотрите полный список похожих игр здесь и выберите ту, которая больше всего похожа на The Room Three. Там же можно добавить новую игру в список похожих игр.
Игра The Room Three: прохождение концовки. Игра The Room Three: прохождение концовки Прохождение игры room three на телефоне
При создании многих игр разработчики оставляют лазейки, позволяющие каждому игроку увидеть свою собственную концовку. Создатели «Комнаты три» не остались в стороне. Прохождение ведет игрока в последнюю комнату башни, а дальше вы сами решаете, какую концовку хотите увидеть. Кроме того, сами разработчики утверждают, что всего в игре 4 концовки и что вы можете изменить свою судьбу без сохранения.
В конце игры у вас должно быть несколько важных предметов. Ниже приведены краткие способы их получения, но предполагается, что до этого момента вы очень внимательно следили за ходом игры.
- Первый предмет — ключ волшебника. Вы можете получить его прямо там, на последнем месте. Поместите последнюю пирамиду на постамент в центре комнаты.
- Два «необычных объекта». Один из них должен быть треугольным, а другой — прямоугольным.
- «Отвертка». Он должен быть в вашем инвентаре с 4-го эпизода.
Как видите, предметов не так уж много, хотя достать некоторые было довольно сложно. Каждый из этих предметов полезен для получения отдельной начальной концовки, но если вы хотите разблокировать финальную версию финала, вам понадобятся все 4 предмета.
Финал
Итак, вы находитесь на последней игровой площадке. Комната номер три, экскурсия по которой провела вас через самые запутанные лабиринты, вот-вот раскроет свои секреты. С чего начать? Вариантов не так много.

Подойдите к постаменту в центре и используйте мастер-ключ. Он немного трансформируется и откроет небольшое хранилище в конце, из которого вы получите «металлическое кольцо». Здесь она должна использоваться на небольшой конструкции. Далее следует небольшая головоломка. С помощью рычага и диска поверните шестеренки вправо так, чтобы они оказались напротив металлических стержней. Нажмите коричневую кнопку рядом с отсеком и включите проектор.
Теперь вам нужно перенаправить луч света. Для этого поверните основание с зеркалом по внешней дуге. Это должно заставить цилиндр вращаться, и вы сможете получить «зеркало». Его следует поместить на основание внутреннего круга, а зеркало внешней дуги убрать. Теперь луч направлен на «Главный ключ».
Погрузитесь в него с головой». Перед вами стоит простая задача. Вы должны сделать так, чтобы лучи от всех проекторов попали на кристалл в центре. Это очень легко сделать. Один из переключателей блокирует состояние одной части излучателей, а другой изменяет состояние других излучателей.
Когда вы решите последнюю головоломку в третьей комнате, решение закончится и появится красная полоса. Отсюда открывается выход, дверь, смутно напоминающая вагон поезда в начале этого долгого приключения.

Вторая концовка
В The Room Three вам не потребуется много времени, чтобы дойти до конца. В качестве альтернативы вы можете сохранить себя непосредственно перед выходом из двери во время первой концовки, поскольку процесс повторяется снова и снова.
Чтобы разблокировать вторую карту в конечных титрах, вам нужен прямоугольник «Необычный артефакт». Как только вы собьете две балки и появится дверь в отсек вагона, немного отойдите от платформы и встаньте лицом к ней. Слева и справа от вас появятся два новых постамента.
Подойдите к тому, что слева, и положите на него этот «Необычный артефакт». Еще одна простая головоломка. Во внутреннем круге есть небольшое отверстие, через которое иногда проскальзывает луч света. На самом деле он вращается вокруг кристалла в центре. Просто нажмите на газ и начните поворачивать отверстие так, чтобы оно пропускало свет в течение длительного времени, и устройство включится.
Теперь вы можете спокойно пройти через дверь, которая изменила форму. Игра «Комната три» завершена, и вы разблокировали вторую карту таро в титрах.
Что вам понадобится
В конце игры у вас должно быть несколько важных предметов. Ниже приведены краткие способы их получения, но предполагается, что до этого момента вы очень внимательно следили за ходом игры.
- Первый предмет — ключ волшебника. Вы можете получить его прямо там, на последнем месте. Поместите последнюю пирамиду на постамент в центре комнаты.
- Два «необычных объекта». Один из них должен быть треугольным, а другой — прямоугольным.
- «Отвертка». Он должен быть в вашем инвентаре с 4-го эпизода.
Как видите, предметов не так уж много, хотя достать некоторые было довольно сложно. Каждый из этих предметов полезен для получения отдельной начальной концовки, но если вы хотите разблокировать финальную версию финала, вам понадобятся все 4 предмета.
Финал
Итак, вы находитесь на последней игровой площадке. Комната номер три, экскурсия по которой провела вас через самые запутанные лабиринты, вот-вот раскроет свои секреты. С чего начать? Вариантов не так много.
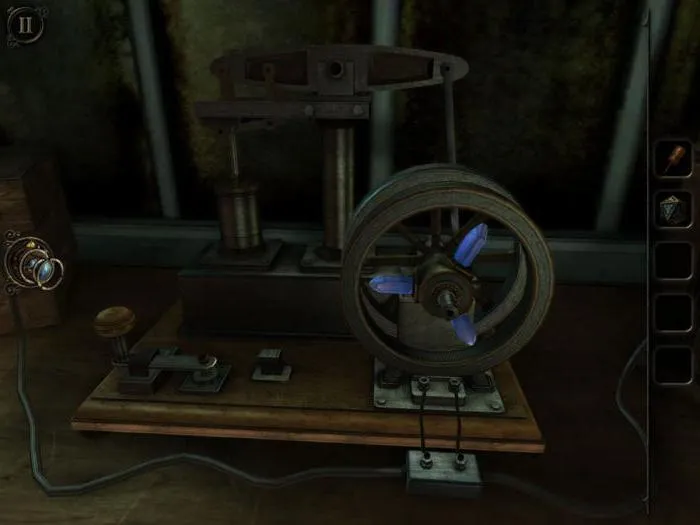
Подойдите к постаменту в центре и используйте мастер-ключ. Он немного трансформируется и откроет небольшое хранилище в конце, из которого вы получите «металлическое кольцо». Здесь она должна использоваться на небольшой конструкции. Далее следует небольшая головоломка. С помощью рычага и диска поверните шестеренки вправо так, чтобы они оказались напротив металлических стержней. Нажмите коричневую кнопку рядом с отсеком и включите проектор.
Теперь вам нужно перенаправить луч света. Для этого поверните основание с зеркалом по внешней дуге. Это должно заставить цилиндр вращаться, и вы сможете получить «зеркало». Его следует поместить на основание внутреннего круга, а зеркало внешней дуги убрать. Теперь луч направлен на «Главный ключ».
Погрузитесь в него с головой». Перед вами стоит простая задача. Вы должны сделать так, чтобы лучи от всех проекторов попали на кристалл в центре. Это очень легко сделать. Один из переключателей блокирует состояние одной части излучателей, а другой изменяет состояние других излучателей.
Когда вы решите последнюю головоломку в третьей комнате, решение закончится и появится красная полоса. Отсюда открывается выход, дверь, смутно напоминающая вагон поезда в начале этого долгого приключения.

Вторая концовка
В The Room Three вам не потребуется много времени, чтобы дойти до конца. В качестве альтернативы вы можете сохранить себя непосредственно перед выходом из двери во время первой концовки, поскольку процесс повторяется снова и снова.
Чтобы разблокировать вторую карту в конечных титрах, вам нужен прямоугольник «Необычный артефакт». Как только вы собьете две балки и появится дверь в отсек вагона, немного отойдите от платформы и встаньте лицом к ней. Слева и справа от вас появятся два новых постамента.
Подойдите к тому, что слева, и положите на него этот «Необычный артефакт». Еще одна простая головоломка. Во внутреннем круге есть небольшое отверстие, через которое иногда проскальзывает луч света. На самом деле он вращается вокруг кристалла в центре. Просто нажмите на газ и начните поворачивать отверстие так, чтобы оно пропускало свет в течение длительного времени, и устройство включится.
Теперь вы можете спокойно пройти через дверь, которая изменила форму. Игра «Комната три» завершена, и вы разблокировали вторую карту таро в титрах.
Mysterious Artifact #2 Solution
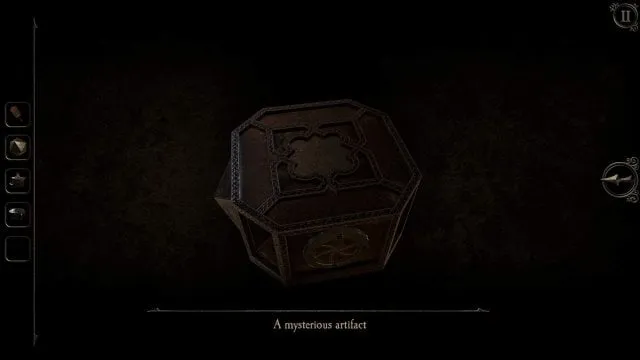
Предметы для поиска:
- Маленький механизм
- Ручка
- Купон №1
- Кривошипное колесо
- Крестообразный ключ
- Купон №2
- Ручная рукоятка
- Металлический предмет
- Восковой цилиндр
- Купон №3
- Металлическая посуда
- Ключ
- Купон №4
- Таинственный артефакт (восьмиугольной формы)
Маленький механизм
Идите к гадалке на первом этаже библиотеки (комната слева от стола, стол — это дверь с занавеской). Под окном с гадалкой находится щель для вытаскивания монет. Извлеките маленький механизм. Загляните в свой инвентарь, его можно превратить в ключ.
Возьмите ключ от маленького механизма и пройдите в офис (комната с занавесом в главную комнату). Используйте его, чтобы открыть правый верхний ящик стола. Ящик имеет ложное дно, посмотрите на левую сторону внешней комнаты. Имеется желтый переключатель, сдвиньте его, чтобы отодвинуть двойное дно ящика. Верните ручку.
Используйте ручку на ящике с левой стороны шкафа. На правой стороне внутренней части ящика находится выключатель. Нажимайте на него и решайте головоломки (только нажимая), пока не выпадет жетон.
Кривошипное колесо
Возьмите купон из выключателя и поместите его в кривошипное колесо в библиотеке. Положите монету в гнездо для монет и выньте кривошипное колесо.
Крестообразный ключ
Пройдите через комнату с краном в комнату напротив библиотеки. (Из главной комнаты, похоже, есть ворота в эту комнату.) Вставьте коленчатое колесо в замок рядом с воротами. Зайдите внутрь и решите математическую головоломку справа. (Потяните за рычаги, чтобы увидеть ящики, в которых нужно решать математические уравнения. Стрелки показывают порядок уравнения, вы начинаете снизу вверх. После решения математических задач обязательно задвиньте ящики обратно с помощью рычагов. Установите ползунки в нужные положения так, чтобы загорелся индикатор «Библиотека». Зайдите в библиотеку и услышите звонок. Возьмите трубку рядом с фонографом на первом этаже библиотеки. Возьмите крестообразный ключ.
Решайте в каждом математическом ящике, снизу вверх:
- Левый ящик: 8 + 4 + 5?
- Правый ящик: 2 x 5 + 4 + 12 — 5 + 9.
- Вернитесь в комнату математических головоломок (комната напротив библиотеки в главном зале, за воротами). Используйте крестообразный ключ в ящике с шестью ящиками в левом углу комнаты. Отверстие для ключа находится в верхней части коробки.
Поверните ключ. Следуйте за анимацией и открывайте ящики в том же порядке (верхний слева, нижний слева, внутренний верхний, внутренний нижний). Выньте купон.
Ручная рукоятка
Верните монету к скрепке в библиотеке и положите ее в гнездо для монет. Извлеките рукоятку. Вы пока не будете использовать его для следующих двух пунктов.
Металлическое изделие
Поднимитесь по лестнице в библиотеку рядом с гадалкой и обратите внимание, что там стоит стол с двумя плакатами. Если вы посмотрите на нижнюю часть плакатов сбоку, то увидите, что они закреплены на раме, похожей на книгу, с ручками по бокам. Поднимите левую ручку, и под ней окажется металлический предмет (в форме коробки).
Четыре конца могут быть выполнены в любом порядке. Чтобы разблокировать альтернативные концовки, необходимо использовать два таинственных артефакта в последней комнате с головоломками (через темную дверь с щупальцами в главной комнате).
Alternate Endings
Для каждой из концовок необходимо сначала решить последнюю головоломку на столе. Каждый раз это одна и та же головоломка. Затем, когда открывается последняя дверь, два столба также поднимаются со стола. Эти два столба соответствуют загадочным предметам, которые вы нашли.
Я не помню, сколько раз я кричала: «Откуда мне знать? «, чтобы сыграть в эту игру. Есть так много мелких деталей, которые я предпочитаю не замечать, потому что думаю: «Это не принесет никакой пользы» или что-то в этом роде.
The Room 3: Things I Like
В этой игре вы должны быть очень внимательны к каждой вещи, даже если кажется, что вы ничего не можете сделать, вы просто должны нажимать и нажимать, если вы можете увеличить изображение, значит, вы можете что-то сделать с этой вещью.
Кривая конструкция головоломки, на мой взгляд, действительно удивительна. Они начинаются с более простой головоломки и заставляют вас подумать: «Чувак, эта игра проста, чувак». Я действительно не могу поверить, что вы произнесли это слово несколько часов спустя. Я скорее думаю, что вы скажете: «Я не понимаю этого, я вообще не понимаю подтекста!
Самое удивительное в кривой дизайна — это время разблокировки большего количества комнат. Нет ощущения, что вводится новый геймплей. Она вписывается в общую игру, как кривая.
Как всегда, пока вам не испортили настроение, позвольте мне закончить свой обзор большим «двумя руками вниз» за Fireproof Games. The Room 3 обладает таким качеством, что я не думаю, что ее можно сравнить с другими играми-головоломками. Я думаю, что The Room 3 еще раз доказала, что она является законодателем мод на рынке.
Conclusion
Я много думал об этом, но не думаю, что вам действительно нужно прохождение для всех пяти глав. Помимо советов от людей из Fireproof (которые действительно полезны, особенно если вы не знаете, с чего начать), если вы действительно застряли, вы всегда можете обратиться к этому «уже сделанному» руководству от AppUnwrapper, которое поможет вам завершить все главы.
Однако у меня есть несколько контрольных списков, которые помогут вам пройти все главы, основываясь только на подсказках.
Правило номер один в любой логической игре, но в этой игре очень важно делать заметки. Если вы хотите проработать главы самостоятельно, полагаясь только на себя и подсказки, делайте заметки. Серьезно, вы не выживете, если не будете вести записи.
Take Notes
Что вы хотите, чтобы я оставил? Ну, что вы видели, записывайте. Нажмите на все, и если вы увидите ответ от игры, значит, вам стоит посетить это место еще раз. Поэтому если вы видите ответ от игры (например: Этот шкаф заперт, похоже, что он вообще не работает), записывайте! Запишите местоположение, где вы его нашли, как вы его нашли, в какой комнате.
Чтобы помочь вам начать вести записи, есть пять основных комнат, а последняя комната откроется, когда вы пройдете все главы.
Room Name
Главная комната: Здесь вы помещаете треугольник каждый раз, когда заканчиваете главу. Это также центр, по которому вы переходите из одной комнаты в другую.
- Библиотека: Это комната с входной дверью на первом этаже. Когда вы войдете в эту комнату, вы увидите жуткого картографа. Он также оснащен лифтом.
- Офис: Это тот, что с красным занавесом. Как только вы войдете в комнату, вы увидите письменный стол и классические часы за ним.
- Оранжерея: Оранжерея находится через дорогу от библиотеки. У него есть каменная стена, похожая на замок.
- Первая комната: Не забудьте и про эту комнату. Если вы запомните и будете внимательны, то должны помнить, что за этой комнатой находится большая железная дверь.
- Последняя комната: Эта комната будет разблокирована после того, как вы пройдете все главы. Когда вы входите в эту комнату, это означает, что вы готовы закончить игру.
- Конечно, кроме этих пяти комнат есть и другие. Однако вполне возможно использовать эти пять комнат в качестве отправной точки. Кроме того, позвольте мне сказать, что вы часто будете находить эти комнаты при попытке разблокировать другие концовки.
Если в других главах вы можете легко полагаться на подсказки, то эти альтернативные концовки находятся на совершенно другом уровне. Здесь нет никаких подсказок, так что вы действительно предоставлены сами себе. Если вы вели свои записи, вы должны знать, что есть некоторые моменты, двери, которые не связаны с другими главами. Эти левые части являются ключом к нашей альтернативной концовке.
All Endings Walkthrough
Итак, без лишних слов, вот полные решения всех концовок. Однако я придерживаюсь иного подхода, чем другие люди. Когда большинство людей склонны объяснять каждую концовку отдельно, я покажу вам все концовки сразу. Таким образом, собрав все необходимые вещи, вы сможете разблокировать их все сразу.
Назад в прошлое. До того момента, когда вы отпустите красную полосу. На этот раз идите в правую башню, а не в левую. Вам просто нужно поместить на него треугольный «Необычный артефакт».
Третий финал
Здесь вам придется решать другую проблему. Она абсолютно идентична головоломке, которую вы решали, когда активировали «Мастер-ключ», только на этот раз здесь шесть спиц вместо четырех. После завершения процесса активируйте луч и снова измените внешний вид двери.
Здесь вы увидите другую альтернативную концовку и разблокируете третью карту Destiny в титрах.
Наблюдательный и подозрительный читатель, вероятно, уже догадался, каким будет финал «Комнаты три». В руководстве четко указано, что вы должны включить все три проектора одновременно. Поэтому действуйте шаг за шагом.
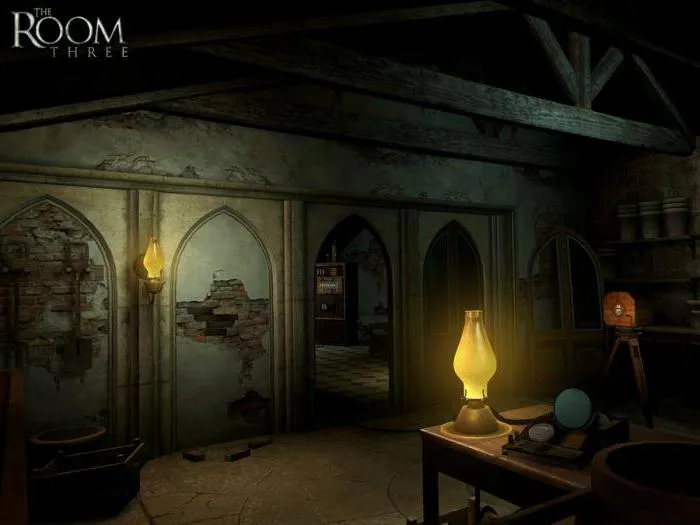
Последний заход
Активируйте «Мастер-ключ» тем же способом, что и в первой концовке.
- Теперь активируйте проектор с треугольным артефактом.
- Затем необходимо активировать устройство с помощью прямоугольного объекта. Однако в этот момент первый проектор выключается.
- Подойдите к нему и осмотрите его. С обратной стороны отодвиньте отверткой пластину, блокирующую луч света.
- Вот и все, все возможные лучи прожекторов теперь светят в сторону двери. Но их там нет. Вместо этого появилась непонятная черная пустота. Зайдите внутрь и увидите последний возможный конец четверки. На этом мы завершаем нашу статью The Room Three: Walkthrough. Альтернативные концовки подробно и всесторонне описаны, и у поклонников игры нет иного выбора, кроме как ждать сиквела.
Это прохождение предназначено для Steam-версии игры для ПК.
Игровой интерфейс
На игровом экране, в левой части экрана, ячейки снабжения постоянно открыты и могут быть использованы во время игры. В правом верхнем углу экрана находится значок, при нажатии на который открывается меню игры. На этапе обучения, в первой части игры, пояснения появляются на экране в определенные моменты, когда активирована функция подсказки. После того как необходимые компоненты определены и объединены, в правой части экрана появляется значок факела, позволяющий исследовать объект в другом цветовом диапазоне для получения дополнительной информации. В игре нет курсора.
Интерфейс оболочки
Разрешить параметры конфигурации:
Отрегулируйте громкость,
Вызовите опцию настроек графики,
Посмотрите на список программистов.
Мы можем повернуть последний колпачок клавиши, чтобы придать ему другую форму.
Подойдите и посмотрите на стены кабинета.
Увеличьте (двойной щелчок) стену с вертикальной панелью и заклепками посередине. Отложите панель в сторону в одной из секций. Проверьте конфигурацию замочной скважины. Возьмите ключ (нажмите на изображение ключа в инвентаре). Поверните торцевую крышку так, чтобы она совпала с замочной скважиной. Закройте инвентарь (нажмите на стрелку вправо). Удерживая ключ левой кнопкой мыши, перетащите его в замочную скважину (изображение ключа становится четким, когда он находится в активной области). Поверните ключ в замке. Выньте металлическую пластину с художественной гравировкой из открывшейся ниши. Подойдите поближе. Поверните камеру вправо.
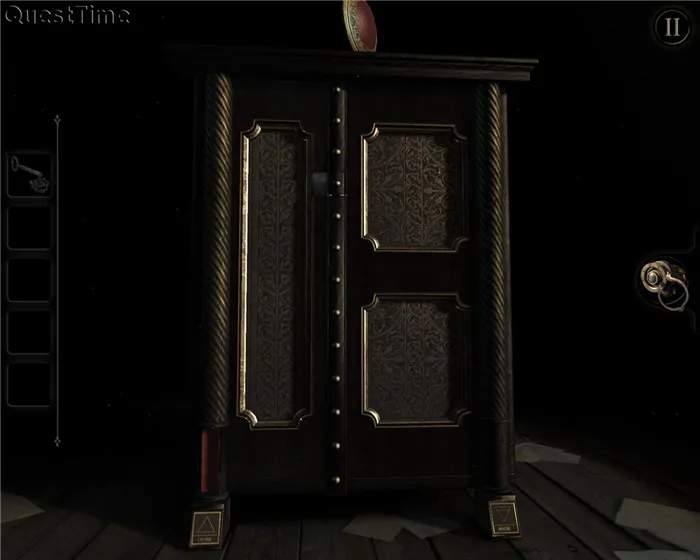
Увеличьте заводскую табличку производителя. Установите пластину на винт, который фиксирует пластину. Поверните против часовой стрелки и выкрутите винт. Извлеките линзу из углубления. Автоматически извлеките его из шкафа. Объектив также автоматически вставляется в окуляр. Нажмите на нее. Мы видим изображение стены в другой цветовой гамме. Мы изучаем появившийся рисунок. Нажмите на окуляр, чтобы переключиться в обычный режим просмотра.