Программа mysqlcheck используется для проверки целостности (-c, -m, -C), восстановления (-r), анализа (-a) или оптимизации (-o) таблиц базы данных MySQL. Некоторые опции (например -e и -q) могут использоваться одновременно.
Не все опции поддерживаются различными движками MySQL. Опции -c, -r, -a и -o взаимоисключаемые, что означает, что будет применена последняя указанная опция.
Если не указано ничего, то будет применена опция -c. Альтернативами (синонимами) являются:
mysqlrepair: опция по умолчанию -r
mysqlanalyze: опция по умолчанию -a
mysqloptimize: опция по умолчанию -o
Использование:
mysqlcheck [OPTIONS] database [tables]
или:
mysqlcheck [OPTIONS] --databases DB1 [DB2 DB3...]
или
mysqlcheck -uлогин -pпароль [--auto-repair] [--check] [--optimize] [--all-databases] [имя_базы_данных]
Опции:
-A, --all-databases
Проверить все базы данных. Аналогична опции —databases, если указать все базы данных.
-1, --all-in-1
Вместо выполнения запросов для каждой таблицы в отдельности выполнить все запросы в одном отдельно для каждой таблицы. Имена таблиц будут представлены в виде списка имен, разделенных запятой.
-a, --analyze
Анализировать данные таблицы.
--auto-repair
Если проверенная таблица повреждена, автоматически восстановить ее. Исправления будут произведены после проверки всех таблиц, если были обнаружены повреждения.
-#, --debug=...
Выводит информацию журнала отладки. Часто используется следующий набор параметров: ‘d:t:o,filename’
--character-sets-dir=...
Директория, где находятся установки символов.
-c, --check
Проверить таблицу на наличие ошибок.
-C, --check-only-changed
Проверить только таблицы, измененные со времени последней проверки или некорректно закрытые.
--compress
Использовать сжатие данных в протоколе сервер/клиент.
-?, --help
Вывести данную вспомогательную информацию и выйти из программы.
-B, --databases
Проверить несколько баз данных. Обратите внимание на разницу в использовании: в этом случае таблицы не указываются. Все имена аргументов рассматриваются как имена баз данных.
--default-character-set=...
Установить набор символов по умолчанию.
-F, --fast
Проверить только базы данных, которые не были закрыты должным образом.
-f, --force
Продолжать даже при получении ошибки SQL.
-e, --extended
При использовании данного параметра совместно с CHECK TABLE можно быть уверенным в целостности таблицы. Если же использовать этот параметр с REPAIR TABLE, запустится расширенное восстановление таблицы.
-h, --host=...
Хост базы данных.
-m, --medium-check
Быстрее, чем —extended-check, но находит только 99,99 процентов всех ошибок.
-o, --optimize
Оптимизировать таблицу.
-p, --password[=...]
Используемый пароль при подключении к серверу. Если пароль не указан, у пользователя запрашивается пароль с терминала.
-P, --port=...
Номер порта, используемого для подключения по TCP/IP.
--protocol=(TCP | SOCKET | PIPE | MEMORY)
Для указания протокола соединения, который надлежит использовать.
-q, --quick
При использовании данной опции совместно с CHECK TABLE предотвращается сканирование строк для корректировки неправильных связей. Это наиболее быстрый метод проверки. Если же использовать этот параметр с REPAIR TABLE, программа попытается восстановить только систему индексов. Это наиболее быстрый метод восстановления таблицы.
-r, --repair
Может исправить почти все, за исключением уникальных ключей, имеющих дубликаты.
-s, --silent
Выводить только сообщения об ошибках.
-S, --socket=...
Файл сокета, используемый для подсоединения.
--tables
Перекрывает опцию —databases (-B).
-u, --user=#
Имя пользователя MySQL, если этот пользователь в данное время не является активным.
-v, --verbose
Вывести информацию о различных этапах.
-V, --version
Вывести информацию о версии и выйти из программы.
Posted By: Mar. 12, 2020
How to check and repair MySQL Databases
You will need know how to check and repair MySQL databases or tables when you troubleshoot your website as they may have become corrupt. The mysqlcheck command is a maintenance tool that can be used to check, repair, analyze and optimize multiple tables from the command line. One of the best features of using mysqlcheck is that you don’t need to stop the MySQL service to perform the database maintenance.
In this tutorial, we will show you how to check/repair MySQL databases and tables.
Note : It is recommended to take a backup of your databases before performing a database repair operation.
Basic Syntax of mysqlcheck
A basic syntax of mysqlcheck is shown below:
mysqlcheck [OPTION] DATABASENAME TABLENAME -u root -p
A brief explanation of each option that you can use with mysqlcheck as shown below:
-c : Used to check a table for errors
-C : Used to check a tables that are changed after last week.
-a : Used to analyze tables.
-A : Used to check all databases.
-g : Used to check tables for version-dependent changes.
-B, –databases : Used to specify multiple databases.
-F : Used to check tables that are not closed properly.
–fix-db-names : Used to fix the database name.
–fix-table-names : Used to fix the table name.
–e : Used to perform an extended check.
-r : Used to repair corrupt table.
Check a Specific Table in a MySQL Database
In some cases, you need to check a specific table in a specific database. In that case, you can use the following syntax:
mysqlcheck -c databasename tablename -u root -p
For example, checks authors table in books database by running the following command:
mysqlcheck -c books authors -u root -p
You should get the following output:
books.authors OK

Check All Tables in a MySQL Database
If you want to check all the tables in a specific database use the following syntax:
mysqlcheck -c databasename -u root -p
For example, check all tables in books database by running the following command:
mysqlcheck -c books -u root -p
You should get the following output:
 Enter password:
 books.accountant                                   OK
 books.authors                                      OK
 books.writer                                       OK

Check and Optimize All Tables and All MySQL Databases
You can check all tables and all databases using the following command:
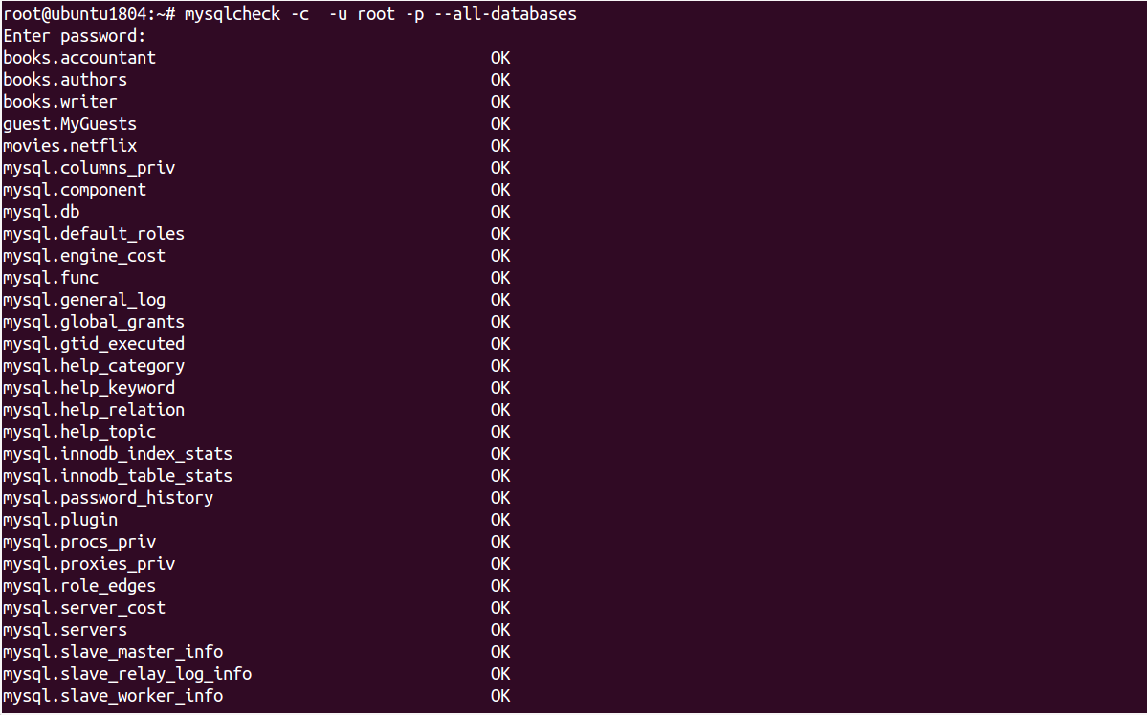
mysqlcheck -c -u root -p --all-databases
Output:
 Enter password:
 books.accountant                                   OK
 books.authors                                      OK
 books.writer                                       OK
 guest.MyGuests                                     OK
 movies.netflix                                     OK
 mysql.columns_priv                                 OK
 mysql.component                                    OK
 mysql.db                                           OK
 mysql.default_roles                                OK
 mysql.engine_cost                                  OK
 mysql.func                                         OK
 mysql.general_log                                  OK
 mysql.global_grants                                OK
 mysql.gtid_executed                                OK
 mysql.help_category                                OK
 mysql.help_keyword                                 OK
 mysql.help_relation                                OK
 mysql.help_topic                                   OK
 mysql.innodb_index_stats                           OK
 mysql.innodb_table_stats                           OK
 mysql.password_history                             OK
 mysql.plugin                                       OK
 mysql.procs_priv                                   OK
 mysql.proxies_priv                                 OK
 mysql.role_edges                                   OK
 mysql.server_cost                                  OK
 mysql.servers                                      OK
 mysql.slave_master_info                            OK
 mysql.slave_relay_log_info                         OK
 mysql.slave_worker_info                            OK
You can optimize all tables and all databases using the following command:
mysqlcheck -o root -p --all-databases
Output:
 Enter password:
 books.accountant
 note     : Table does not support optimize, doing recreate + analyze instead
 status   : OK
 books.authors
 note     : Table does not support optimize, doing recreate + analyze instead
 status   : OK
 books.writer
 note     : Table does not support optimize, doing recreate + analyze instead
 status   : OK
 guest.MyGuests
 note     : Table does not support optimize, doing recreate + analyze instead
 status   : OK
 movies.netflix
 note     : Table does not support optimize, doing recreate + analyze instead
 status   : OK
 mysql.columns_priv
 note     : Table does not support optimize, doing recreate + analyze instead
 status   : OK
 mysql.component
 note     : Table does not support optimize, doing recreate + analyze instead
 status   : OK
 mysql.db
 note     : Table does not support optimize, doing recreate + analyze instead
 status   : OK
 mysql.default_roles
 note     : Table does not support optimize, doing recreate + analyze instead
 status   : OK
 mysql.engine_cost
 note     : Table does not support optimize, doing recreate + analyze instead
 status   : OK
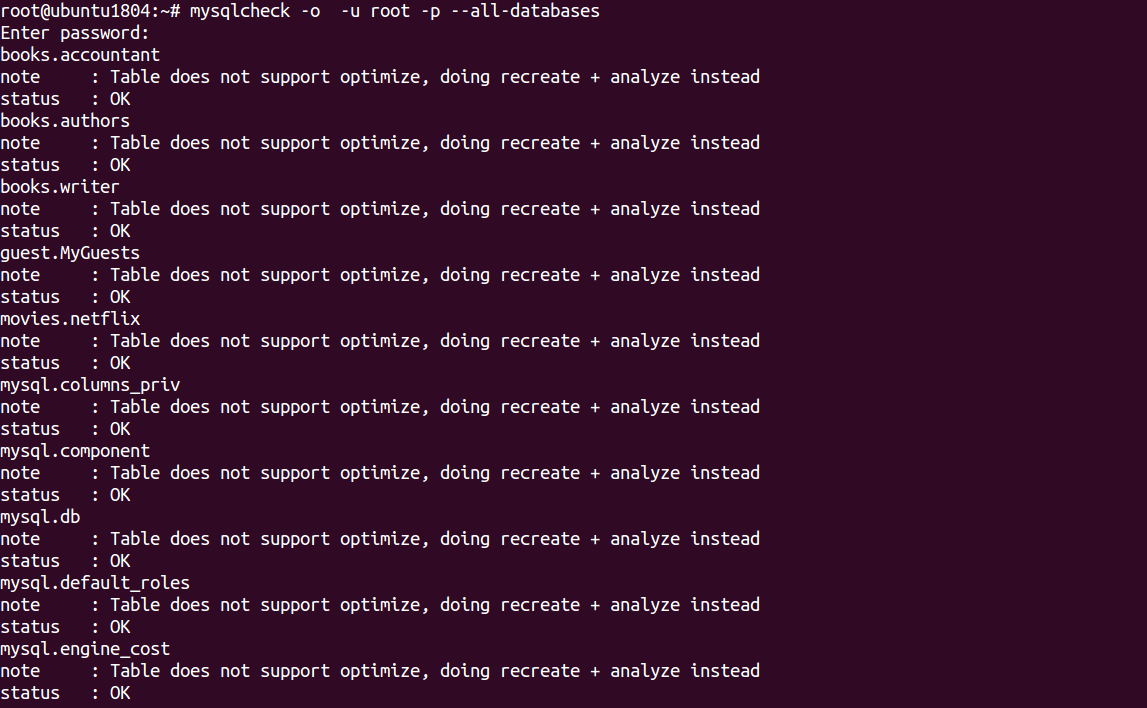
In the above output, you should see “Table does not support optimize” which means the InnoDB table that doesn’t support this option.
Repair MySQL Databases
To repair accountant tables in books database run the following command:
mysqlcheck -r books accountant -u root -p
Output:
 mysqlcheck -r books accountant -u root -p
 Enter password:
 books.accountant                                   OK

To repair all tables in both books and movies database run the following command:
mysqlcheck -r --databases books movies -u root -p
Output:
 Enter password:
 books.accountant                                   OK
 books.authors                                      OK
 books.writer                                       OK
 movies.netflix                                     OK

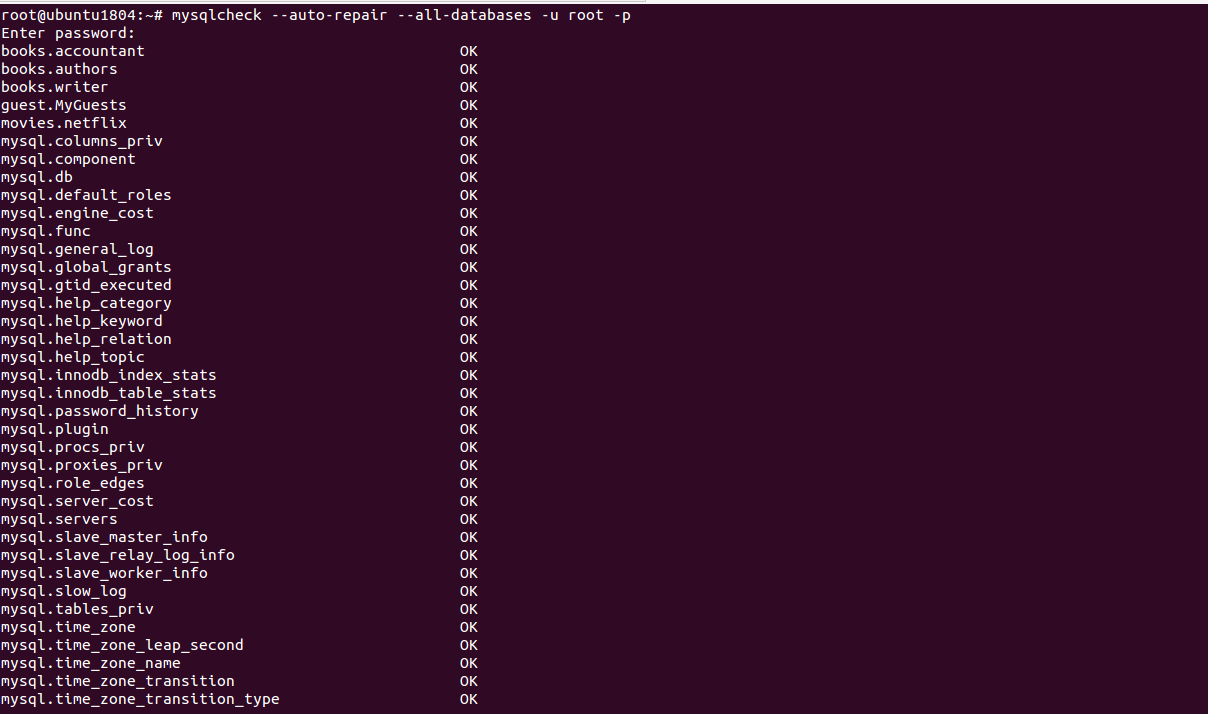
To check and repair all tables in all databases run the following command:
mysqlcheck --auto-repair --all-databases -u root -p
Output:
 Enter password:
 books.accountant                                   OK
 books.authors                                      OK
 books.writer                                       OK
 guest.MyGuests                                     OK
 movies.netflix                                     OK
 mysql.columns_priv                                 OK
 mysql.component                                    OK
 mysql.db                                           OK
 mysql.default_roles                                OK
 mysql.engine_cost                                  OK
 mysql.func                                         OK
 mysql.general_log                                  OK
 mysql.global_grants                                OK
 mysql.gtid_executed                                OK
 mysql.help_category                                OK
 mysql.help_keyword                                 OK
 mysql.help_relation                                OK
 mysql.help_topic                                   OK
 mysql.innodb_index_stats                           OK
 mysql.innodb_table_stats                           OK
 mysql.password_history                             OK
 mysql.plugin                                       OK
 mysql.procs_priv                                   OK
 mysql.proxies_priv                                 OK
 mysql.role_edges                                   OK
 mysql.server_cost                                  OK
 mysql.servers                                      OK
 mysql.slave_master_info                            OK
 mysql.slave_relay_log_info                         OK
 mysql.slave_worker_info                            OK
 mysql.slow_log                                     OK
 mysql.tables_priv                                  OK
 mysql.time_zone                                    OK
 mysql.time_zone_leap_second                        OK
 mysql.time_zone_name                               OK
 mysql.time_zone_transition                         OK
 mysql.time_zone_transition_type                    OK
Important note: InnoDB storage engine does not support repair. So you will need to change MySQL storage engine from InnoDB to MyISAM.
Check, Repair and Optimize MySQL Database with PHPMyAdmin
You can also check, repair and optimize tables and databases using the PHPMyAdmin web interface.
You can follow the below steps to check, repair and optimize tables and databases:
1- Open the phpMyAdmin tool through a web browser as shown below:
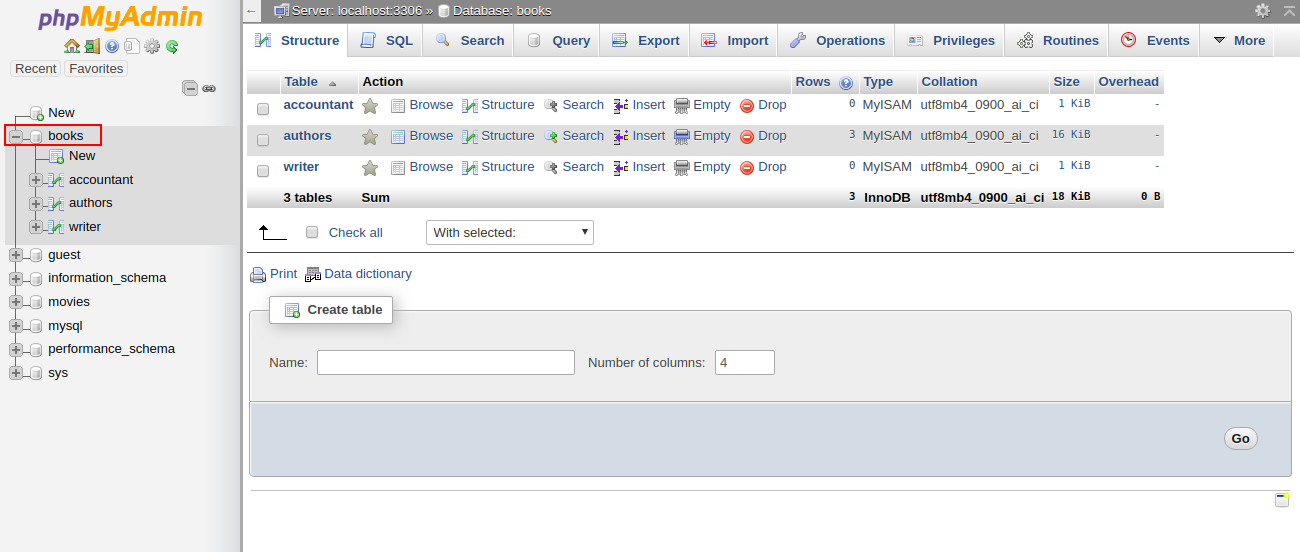
2- Select the affected database in the left pane. You should see all the tables in the right pane in the following screen:
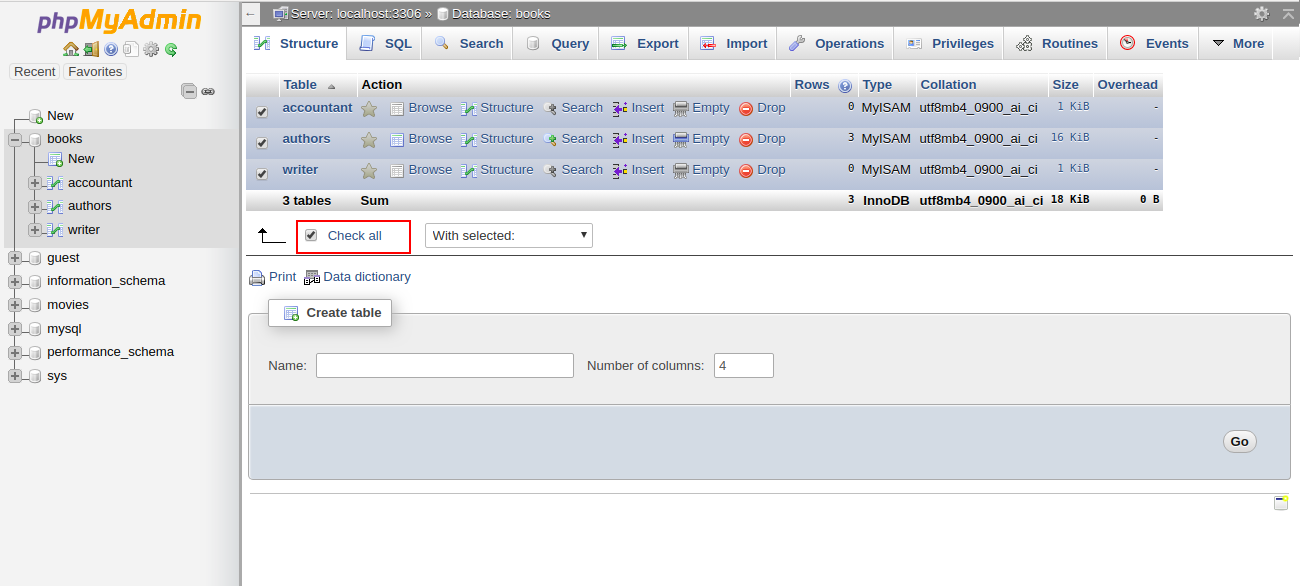
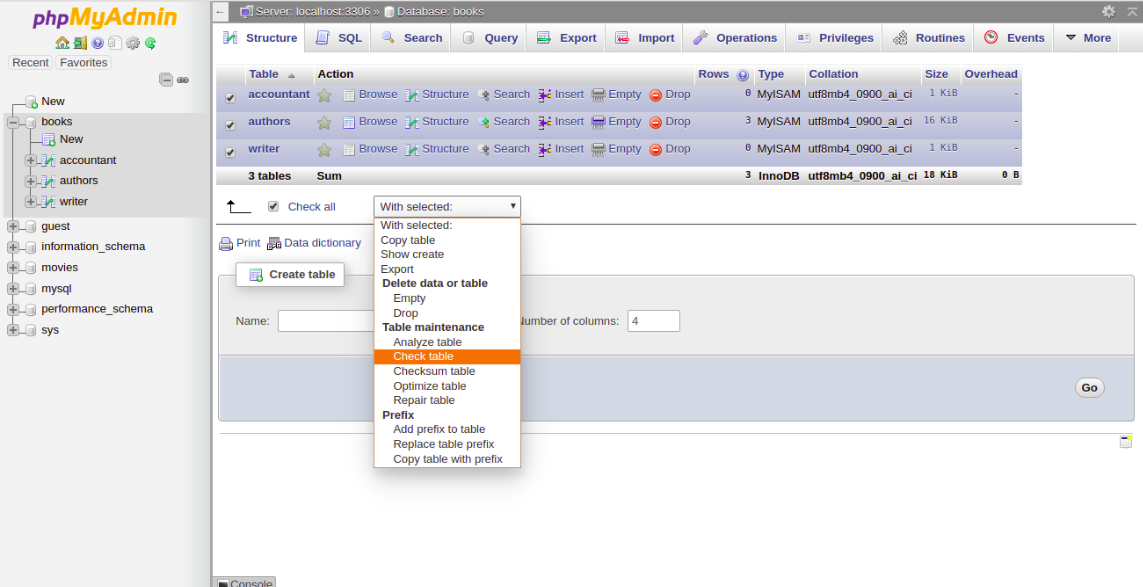
3- Click Check All to select all the tables. At the bottom of the window, choose Check Table from the menu. You should see a summary of the tables in the following screen:
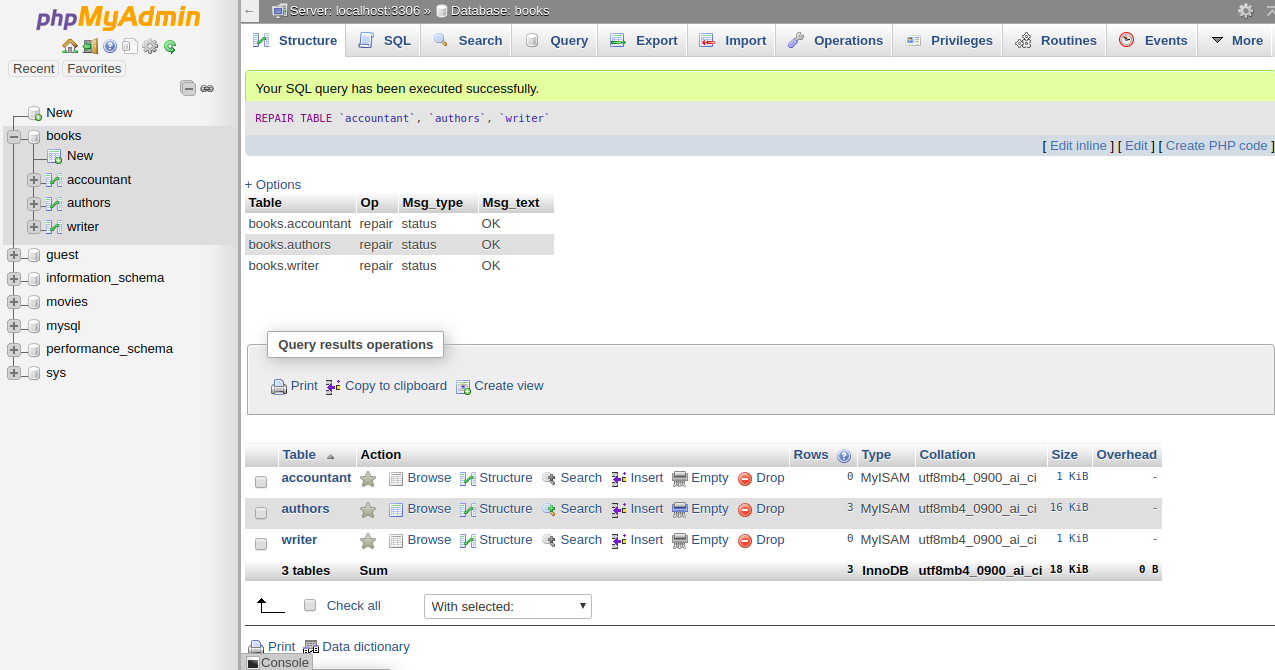
4- To repair the table, Check All to select all the tables and choose Repair Table from the menu. You should see the following page:
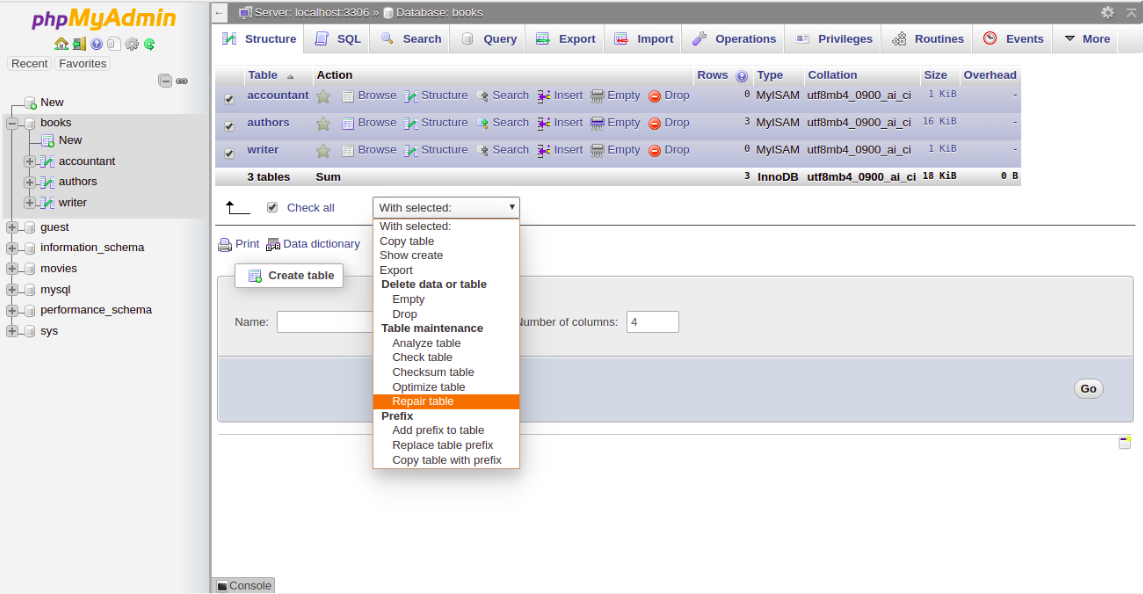
Then you should get a confirmation that the command been executed successfully:
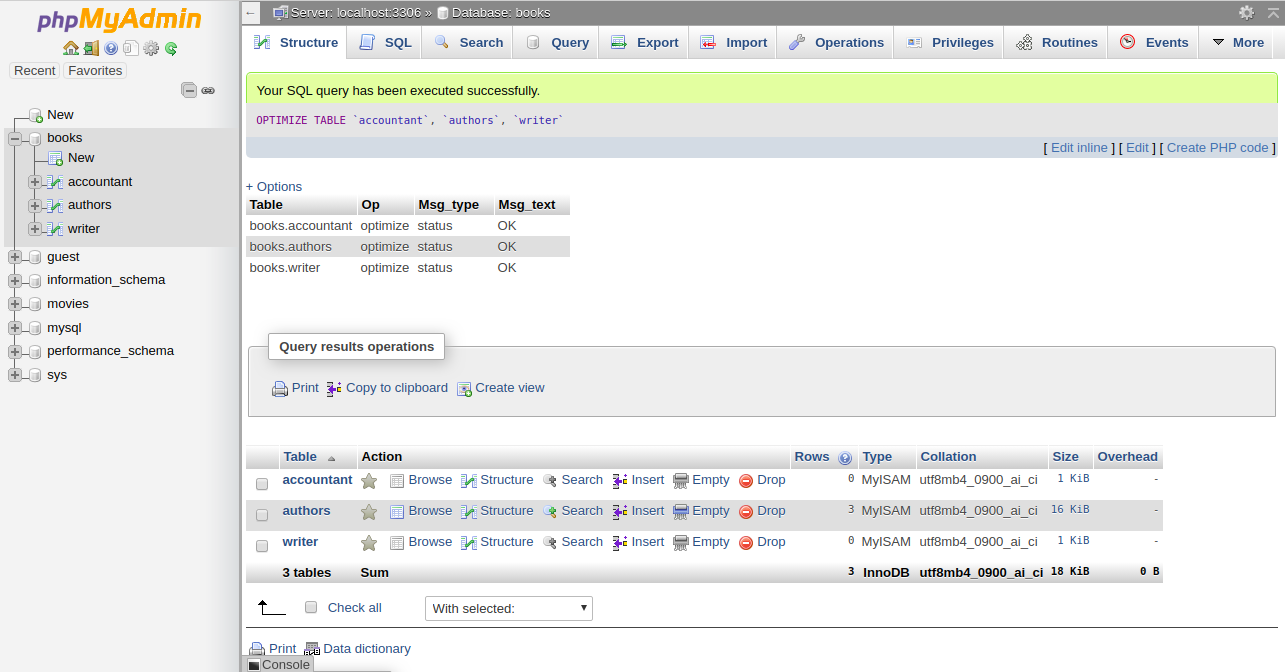
5- To optimize the table, Check All to select all the tables and choose Optimize Table from the menu. You should see the following page:

Then you should get a confirmation that the command been executed successfully:
Conclusion
In the above tutorial, we learned how to check and repair MySQL table using mysqlcheck command-line tool. We also learned how to check, repair and optimize database tables using the PHPMyAdmin web interface. I hope you can now easily fix your corrupted tables using this tool.
mysqlcheck offers an efficient way to perform maintenance of tables and databases in MySQL. It can check tables, repair them if found corrupt, optimize them and perform combined operations of checking, repairing, and optimizing altogether. mysqlcheck command-line utility in MySQL is intended to be used when the mysqld server is running. It can execute CHECK TABLE, REPAIR TABLE, ANALYZE TABLE and OPTIMIZE TABLE statements in the most convenient way for the user.
In this blog, we explore the different ways of using mysqlcheck command line for checking, repairing, and optimizing tables and databases in MySQL. Start verifying and taking corrective actions for your tables and databases using this guide.
Table of Contents
- What is MySQL?
- Business Benefits of Using MySQL
- What is mysqlcheck Client?
- mysqlcheck Command
- Using mysqlcheck for MySQL Database Tables
- Part 1: Creating a MySQL Database Back-Up
- Part 2: Running mysqlcheck Command
- Running mysqlcheck to Analyze a Table in MySQL Database
- Running mysqlcheck to Repair Tables in a MySQL Database
- Running mysqlcheck to Optimize Tables in a MySQL Database
- Part 3: Using mysqlcheck in Compound Commands
- Running mysqlcheck to Optimize and Repair Tables in a MySQL Database
- Part 4: mysqlcheck Command Modifications
- Conclusion
What is MySQL?

MySQL is the world’s most popular Open Source Relational Database Management System (RDBMS) used by all types of Small and Medium-Size Businesses (SMBs) and large enterprises. MySQL was initially developed, marketed, and supported by MySQL AB, a Swedish company but later got acquired by Sun Microsoft Systems (currently known as Oracle Corporation). Just like other typical databases, MySQL can store user/business/customer information in the form of rows and columns in a table. It provides referential integrity between rows and columns of various tables and processes user requests using SQL.
MySQL holds a highly regarded name in businesses working with databases and Cloud-based Data Warehousing solutions. It’s scalable, reliable, and user-friendly. It also works cross-platform which means that users can run MySQL on Linux and Windows, and restore backups from the other platform.
Business Benefits of Using MySQL
MySQL is popular all over the world and is used by leading tech giants owing to the following reasons:
Easy to Install and Deploy
Businesses can set up and run SQL queries on their data using MySQL in minutes. MySQL enables them to deliver new applications faster than proprietary databases.
High Speed
It’s a no-brainer that if you are working with large datasets, you wouldn’t want to spend an extensive amount of time working with datasets and tables. Unlike other databases, MySQL is comparatively faster and can query information from large datasets helping in business intelligence activities.
Read more on the top 10 MySQL ETL tools for your business here.
Industry Standards
Whether you are a developer who is required for rapid development of software or a freelancer who seeks to work with databases, MySQL has been in use for over 20 years and you can be sure of using MySQL as a fully integrated transaction-safe, ACID-compliant database.
Reliability and High Availability
MySQL has a well-established reputation for reliability among its 5 million user base. In addition to reliability, MySQL Cluster gives 99.999 percent availability.
Multiple Platform Support
MySQL can be used on 20 platforms including Linux, Solaris, AIX, HP-UX, Windows, and Mac OS X. This provides organizations with complete flexibility in delivering a solution on the platform of their choice.
What is mysqlcheck Client?
mysqlcheck is a table maintenance program to check, repair, optimize, or analyze multiple tables from the command line. It works with InnoDB, MyISAM, and ARCHIVE tables and provides three levels of checking:
- Table-specific
- Database-specific
- All databases
mysqlcheck table client for MySQL consists of four SQL statements to perform the table maintenance action:
- CHECK TABLE,
- REPAIR TABLE,
- ANALYZE TABLE, and
- OPTIMIZE TABLE
While performing table repair or analysis, it is important to bear in mind that table maintenance operations like mysqlcheck can become time-consuming processes especially when you have a large number of entries in your tables. If you use the –databases or –all-databases option to process all tables in one or more databases, a mysqlcheck call might take you a long time to complete.
Note: For performing mysqlcheck operation, you must run the mysqld server. This means that you do not have to stop the server to perform table maintenance. mysqlcheck is different from myisamchk and aria_chk utilities that don’t require the server to be running.
mysqlcheck Command
There are three ways to use mysqlcheck command-line tool:
./client/mysqlcheck [OPTIONS] database [tables]
./client/mysqlcheck [OPTIONS] --databases DB1 [DB2 DB3...]
./client/mysqlcheck [OPTIONS] --all-databases
A fully-managed No-code Data Pipeline platform like Hevo Data, helps you integrate data from PostgreSQL and/or MySQL and load data from 100+ different sources to a destination of your choice in real-time in an effortless manner. Hevo with its minimal learning curve can be set up in just a few minutes allowing the users to load data without having to compromise performance. Its strong integration with umpteenth sources provides users with the flexibility to bring in data of different kinds, in a smooth fashion without having to code a single line.
Get Started with Hevo for Free
A few Salient Features of Hevo are as follows:
Completely Automated: The Hevo platform can be set up in just a few minutes and requires minimal maintenance.
Real-Time Data Transfer: Hevo provides real-time data migration, so you can have analysis-ready data always.
100% Complete & Accurate Data Transfer: Hevo’s robust infrastructure ensures reliable data transfer with zero data loss.
Scalable Infrastructure: Hevo has in-built integrations for 100+ sources that can help you scale your data infrastructure as required.
24/7 Live Support: The Hevo team is available round the clock to extend exceptional support to you through chat, email, and support calls.
Schema Management: Hevo takes away the tedious task of schema management & automatically detects the schema of incoming data and maps it to the destination schema.
Live Monitoring: Hevo allows you to monitor the data flow so you can check where your data is at a particular point in time.
Sign up here for a 14-Day Free Trial!
Using mysqlcheck for MySQL Database Tables
Important Note: Before we proceed with table check, repair, or analysis operations, it’s best advised to create a backup of your table(s), for some circumstances might lead to a potential data loss.
As a result, we’ve split this tutorial into four sections for your convenience:
- Part 1: Creating a MySQL Database Back-Up
- Part 2: Running mysqlcheck Command
- Part 3: Using mysqlcheck in Compound Commands
- Part 4: mysqlcheck Command Modifications
Part 1: Creating a MySQL Database Back-Up
To create a backup of all your existing MySQL databases, follow these steps:
Step 1: Log in to your MySQL server using Secure Shell (SSH).
Step 2: Stop MySQL server using the appropriate command based on your Linux distribution:
For CentOS and Fedora, type:
service mysqld stopFor Debian and Ubuntu, type:
service mysql stopStep 3: Input the following command to copy all of your databases to a directory name based on the current time.
cp -rfv /var/lib/mysql /var/lib/mysql$(date +%s)Step 4: Restart MySQL server with the command appropriate for your Linux distribution:
For CentOS and Fedora, type:
service mysqld startFor Debian and Ubuntu, type:
service mysql startPart 2: Running mysqlcheck Command
To use the mysqlcheck table command and check tables, follow these steps:
Step 1: As an administrator, change your directory to MySQL Data Directory.
cd /var/lib/mysqlStep 2: Now type in the mysqlcheck command to check for an existing table in a database. In our example, we are checking for a table called “email” under the database “customers”.
$ mysqlcheck -c customers email
customers.email                         OK
Notice our result. If a table passes the check, mysqlcheck displays OK for the table.
Not only this, mysqlcheck command can be used to CHECK (-c, -m, -C), REPAIR (-r), ANALYZE (-a), or OPTIMIZE (-o) table within your databases. The -c, -r, -a, and -o options work exclusively.
Some of the options (like -e (–extended) or -q (–quick)) can also be used at the same time but not all options are supported by all storage engines.
Running mysqlcheck to Analyze a Table in MySQL Database
As an example, the following command analyzes the “email” table within our “customers” database:
$ mysqlcheck -a customers email
customers.email                         OK
Running mysqlcheck to Repair Tables in a MySQL Database
The following command repairs all tables in the “customers” and “leads” databases:
$ mysqlcheck -r --databases customers leadsNote: If you see a note stating: The storage engine for the table doesn’t support repair it means that you are doing REPAIR on an InnoDB.
Running mysqlcheck to Optimize Tables in a MySQL Database
The following mysqlcheck database command optimizes all tables in all your MySQL databases.
$ mysqlcheck -o --all-databasesFor user reference, this is a table showcasing the most used options for the mysqlcheck database command.
| Option | Description |
| -c, –check | Check the tables for errors |
| -a, –analyze | Analyze the tables |
| -o, –optimize | Optimize the tables |
| -r, –repair | Perform a repair that can fix almost anything except unique keys that are not unique |
| –auto-repair | If a checked table is corrupted, automatically fix it |
| -A, –all-databases | Check all tables in all databases. This is the same as –databases with all databases selected |
| -B, –databases | Process all tables in the named databases. With this option, all name arguments are regarded as database names, not as table names |
| –tables | Overrides the –databases or -B option such that all name arguments following the option are regarded as table names |
| -g, –check-upgrade | Check tables for version-dependent changes. It may be used with –auto-repair to correct tables requiring version-dependent updates |
| –compress | Compress all information sent between client and server |
| –debug-info | Print debugging information, memory, and CPU statistics when the program exits |
| -e, -–extended | Check and repair tables |
| -q, –quick | The fastest method of checking |
| -?, –help | Display a help message and exit |
A more extensive list of other mysqlcheck database command options can be found on this page.
Likewise, these mysqlcheck table/database options can be combined together to perform a joint operation. Have a look at how this can be performed in the following section.
Part 3: Using mysqlcheck in Compound Commands
The mysqlcheck command-line utility can be extended for giving compound commands. For instance, let’s assume a case where there is a need to repair and optimize the “email” table from our previously stated “customer” database.
mysqlcheck table command options like -c (check), -r (repair), -a (analyze), and -o (optimize) options work exclusively and can be used concurrently in the same mysqlcheck command.
Running mysqlcheck to Optimize and Repair Tables in a MySQL Database
The following mysqlcheck command checks, optimizes, and auto-repairs all corrupted tables in the “customer” database. The auto repair option automatically fixes a checked table if found corrupted.
$ mysqlcheck --auto-repair -o customersAnd the following mysqlcheck command optimizes and auto-repairs all tables in all your MySQL databases.
$ mysqlcheck --auto-repair -o --all-databasesPart 4: mysqlcheck Command Modifications
The command mysqlcheck can be altered, changing its default behavior from checking tables (–check) to repairing or optimizing tables. This can be done by changing the binary “check” and replacing it with “repair”, or “analyze”, or “optimize”.
These are the commands you get after substitution:
| Command | Meaning |
| mysqlrepair | The default option is –repair |
| mysqlanalyze | The default option is –analyze |
| mysqloptimize | The default option is –optimize |
All these commands when invoked would perform the same operation as mysqlcheck -[option] when used.
If you would like to learn about MySQL database export command-line utility, see our blog on MySQL Export Database Command Line: 3 Easy Methods. If you would like to know more about MySQL Analytics tools, visit our other informative blog here- MySQL Analytics Tools: A Quick Guide.
Conclusion
mysqlcheck table/database commands are ideal for automated optimizations of MySQL databases and tables. The more your database expands and the number of tables increases, the more likely it is that your tables/databases will encounter mistakes from time to time. In those circumstances, mysqlcheck can be a lifesaver.
Managing growing databases and the number of associated processes like business analytics isn’t an easy job. We find numerous business teams trapped and trying to figure out how to examine their data in a timely and efficient manner. One way of doing this is migrating your data to a Cloud-based Data Warehouse. But what if we told you that you can manage all your source connections from a single place?
Our tool Hevo with its strong integration with 100+ Sources & BI tools such as MySQL, PostgreSQL, MS SQL Server, MySQL compatible Aurora, Google Cloud SQL for MySQL allows you to not only export data from sources & load data in the destinations, but also transform & enrich your data, & make it analysis-ready so that you can focus only on your key business needs and perform insightful analysis using BI tools.
Visit our Website to Explore Hevo
Hevo lets you migrate your data from your favorite applications to any Data Warehouse of your choice like Amazon Redshift, Snowflake, Google BigQuery, or Firebolt within minutes with just a few clicks.
Want to take Hevo for a spin? Sign Up here for a 14-day free trial and experience the feature-rich Hevo suite first hand. You can also check Hevo’s pricing plans on this page.
Share your most frequently used MySQL commands, as well as those for your tables and databases. Suggest to us any more MySQL topics you’d like us to cover in the comments below. We’d appreciate hearing from you.
MariaDB starting with 10.5.2
From MariaDB 10.5.2, mariadb-check is the name of the tool, with mysqlcheck a symlink .
Contents
- Using mysqlcheck
- Options
- Option Files
- Option Groups
- Notes
- Default Values
- mysqlcheck and auto-repair
- mysqlcheck and all-databases
- mysqlcheck and verbose
mysqlcheck is a maintenance tool that allows you to check, repair, analyze and optimize multiple tables from the command line.
It is essentially a commandline interface to the CHECK TABLE, REPAIR TABLE, ANALYZE TABLE and OPTIMIZE TABLE commands, and so, unlike myisamchk and aria_chk, requires the server to be running.
This tool does not work with partitioned tables.
Using mysqlcheck
./client/mysqlcheck [OPTIONS] database [tables]
OR
./client/mysqlcheck [OPTIONS] --databases DB1 [DB2 DB3...]
OR
./client/mysqlcheck [OPTIONS] --all-databases
mysqlcheck can be used to CHECK (-c, -m, -C), REPAIR (-r), ANALYZE (-a),
or OPTIMIZE (-o) tables. Some of the options (like -e or -q) can be
used at the same time. Not all options are supported by all storage engines.
The -c, -r, -a and -o options are exclusive to each other.
The option --check will be used by default, if no other options were specified.
You can change the default behavior by making a symbolic link to the binary, or
copying it somewhere with another name, the alternatives are:
Options
mysqlcheck supports the following options:
Option Files
In addition to reading options from the command-line, mysqlcheck can also read options from option files. If an unknown option is provided to mysqlcheck in an option file, then it is ignored.
The following options relate to how MariaDB command-line tools handles option files. They must be given as the first argument on the command-line:
In MariaDB 10.2 and later, mysqlcheck is linked with MariaDB Connector/C. However, MariaDB Connector/C does not yet handle the parsing of option files for this client. That is still performed by the server option file parsing code. See MDEV-19035 for more information.
Option Groups
mysqlcheck reads options from the following option groups from option files:
Notes
Default Values
To see the default values for the options and also to see the arguments you get
from configuration files you can do:
./client/mysqlcheck --print-defaults
./client/mysqlcheck --help
mysqlcheck and auto-repair
When running mysqlcheck with --auto-repair (as done by
mysql_upgrade), mysqlcheck will first
check all tables and then in a separate phase repair those that failed the
check.
mysqlcheck and all-databases
mysqlcheck --all-databases will ignore the internal log tables general_log and slow_log as these can’t be checked, repaired or optimized.
mysqlcheck and verbose
Using one --verbose option will give you more information about what mysqlcheck is doing.
Using two --verbose options will also give you connection information.
If you use three --verbose options you will also get, on stdout, all ALTER, RENAME, and CHECK commands that mysqlcheck executes.
Одной из ярких причин возникновения ошибок в базе данных может послужить неправильная остановка сервера MySQL. Как это обычно бывает, сбой в электропитании сервера, либо иные причины, повлекшие за собой банальное отключение машины, либо перезагрузку. Иногда, и нередко подобного рода сбои могут повлечь за собой проблемы, которые решаются лишь путем восстановления данных из бэкапа, и это к вопросу для чего нужно делать бэкапы. Наличие ошибок в базе данных может проявиться не сразу, однако если они есть, то вы их рано или поздно обязательно заметите. Проблемы, как правило, проявляются в виде ошибок после запросов к базе, либо база начинает уходить в раздумье на не свойственное для этого время.
Давайте посмотрим, что можно предпринять первым делом, чтобы попытаться исправить ситуацию. Утилита mysqlcheck как правило устанавливается по умолчанию с сервером MySQL может быть использована для проверки баз данных на ошибки. Рассмотрим пример ее использования.
Использование утилиты mysqlcheck
# mysqlcheck -u root -p --optimize --auto-repair --all-databases
Назначение параметров:
--optimize – Оптимизируем все базы.
--auto-repair – Ремонтируем все базы.
--all-databases – Проверяем ошибки у всех баз.
Если база данных больших размеров, а вам нужно срочно поправить определенную таблицу, то вы можете запустить проверку определенной таблицы в базе данных.
Проверка отдельной таблицы в базе данных:
# mysqlcheck -r имя_базы имя_таблицы_в_базе -u root -p
Исправление таблиц MyISAM.
Так же существует утилита myisamchk, отличается от предыдущей утилиты тем, что перед её использованием необходимо останавливать сервер баз данных, в то время как mysqlcheck может использоваться при работающем сервере. Рассмотрим пример использования утилиты myisamchk.
Останавливаем сервер MySQL
# service mysqld stop
Анализируем базу данных на наличие ошибок
# myisamchk -s /var/db/mysql/наша_база/*.MYI
Обратите внимание, что путь к базам данных у вас может отличаться, этот момент вам следует так же уточнить. Если есть ошибки, то появиться сообщение подобного вида:
myisamchk: warning: 2 client is using or hasn't closed the table properly
MyISAM-table '/var/db/mysql/наша_база/ary_mem.MYI' is usable but should be fixed
Исправляем ошибки с помощью myisamchk
# myisamchk -r /var/db/mysql/наша_база/ary_mem.MYI
Исправляем ошибки по всем таблицам в базе (рекурсивно)
# myisamchk -r /var/db/mysql/наша_база/*.MYI
Процесс исправления ошибок будет сопровождаться подобным выводом сообщений в окне консоли:
- Fixing index 1
- Fixing index 2
- Fixing index 3
После того как ошибки исправлены, можно запустить сервер MySQL, чтобы убедиться что всё в порядке.
Запуск сервера MySQL
# service mysqld start
Хотелось бы отметить один момент, что команды остановки и запуска сервера MySQL, а так же пути расположения баз данных на вашем сервере могут отличаться, поэтому вам так же следует эти моменты учесть.
Introduction
MySQL offers several different ways to analyze and repair databases. Errors and anomalies appear for numerous reasons, some of which include:
- A MySQL update or downgrade.
- Rapid changes in indexes or data.
- Table inconsistencies.
When checking for corrupted data and repairing tables, the steps taken to fix the errors depend on how you connect to the database, the database server state, the type of error, and the database engine used.
This article shows you multiple ways to troubleshoot and repair a MySQL database.
Prerequisites
- Terminal or command line with root privileges.
- MySQL version 8.0 installed and configured.
- A corrupt database or database table.
How to Check MySQL Table for Errors
Running diagnostics is the first step to troubleshooting for issues. There are two ways to check a MySQL table for errors:
- Through a MySQL
CHECK TABLEquery. - Using the terminal program
mysqlcheck.
Check a Table with CHECK TABLE
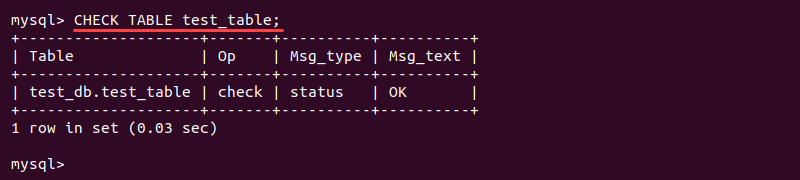
The CHECK TABLE query works in MySQL while the service is running. The general use is:
CHECK TABLE <table name> [, table name, table name] [option] [option];The simplest use is one table without any options:
CHECK TABLE <table name>;The output of the CHECK TABLE query shows an informative table about the check results:
The available options when checking tables are:
FOR UPGRADE— discovers version inconsistencies. For example, MySQL 8.0 does not support two-digit years, so a table containing such values is marked for upgrade.QUICK— does not check rows for incorrect linking. This is helpful in avoiding timeouts.FAST— performs a check on tables that are not closed properly.CHANGED— only checks tables with changes since the last check or that have not closed properly.MEDIUM— checks table rows to verify the validity of deleted links and performs a checksum for the rows.EXTENDED— does a check for complete consistency.
Without any options, CHECK TABLE performs a MEDIUM check on MyISAM tables and views. The FOR UPGRADE and QUICK perform checks on InnoDB engine tables and views while other options are ignored.
You can also combine the options for a more detailed check. For example, to do a quick check to find out whether a table closed adequately, run:
CHECK TABLE <table name> FAST QUICK;Any options that do not apply to the tables are ignored.
Check a Table With mysqlcheck
The mysqlcheck command is the command-line version of CHECK TABLE. The program runs in the terminal while the MySQL service is operating. To perform the check:
1. As the root user, navigate to the directory where the databases are stored:
sudo su
cd /var/lib/mysql
2. Check the whole database with:
mysqlcheck <database name>
Alternatively, check a specific table within the database by providing the table name as well:
mysqlcheck <database name> <table name>
There are several methods how to repair a database in MySQL. However, keep in mind that these methods are not a quick fix and can result in data loss. If the database tables are corrupt often, identify the reason for the occurrence.
Before making any changes and starting repairs, create a copy of the directory:
cp -rfv /var/lib/mysql /var/lib/mysql_copyAlternatively, make a backup version of the database before trying any of the repair solutions. Follow our guide: How to Back Up & Restore a MySQL Database.
Below you will find three options how to repair a MySQL database.
Repairing MySQL Database with REPAIR TABLE Query
After scanning and locating the database and the tables with problems, the quickest way to fix the issue is with the REPAIR TABLE query:

If the server shuts down during the repair, rerun the REPAIR TABLE operation when the server starts again. Make sure to do this before performing any other operations on the same table. In normal conditions, a MyISAM table will not result in data loss from using this method.
Repairing MySQL Database with mysqlcheck
The mysqlcheck command is an alternative to repairing database tables in the terminal.
1. First, navigate to the MySQL database folder as the root user:
cd /var/lib/mysql2. Add the -r option to the mysqlcheck command to repair the database table:
mysqlcheck -r <database> <table name>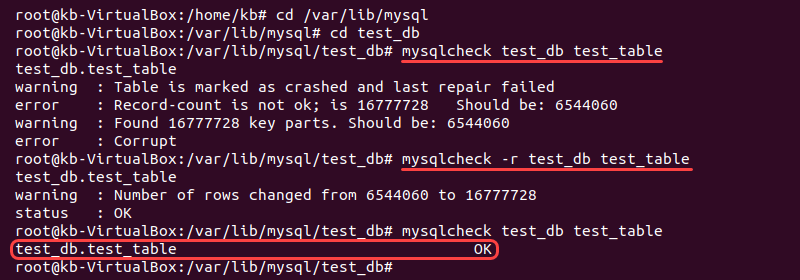
The mysqlcheck -r command is the terminal version of the REPAIR TABLE query.
Repairing MySQL Database with ALTER TABLE
Use the ALTER TABLE query to rebuild the table using the same storage engine. For example, if you have an InnoDB table, run:
ALTER TABLE <table name> ENGINE = InnoDB;To rebuild a MyISAM table, use:
ALTER TABLE <table name> ENGINE = MyISAM;If you are unsure which storage engine the table uses, run the following query to find out:
SHOW CREATE TABLE <table name>;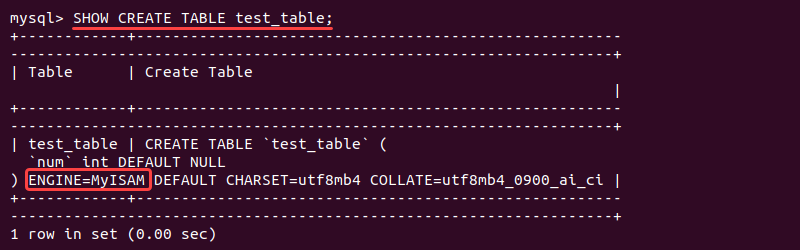
Running Engine-Specific Diagnostics and Repairs to MySQL Database
Depending on the database engine used, MySQL provides engine-specific approaches for analyzing and repairing a database table.
MyISAM tables are prone to corruptions. However, most of the time the errors are easy to fix.
When working with InnoDB databases, corruptions appear when the checksum values don’t match. Errors typically happen due to a power outage or some other hardware issue.
Checking and Repairing MyISAM Tables with myisamchk
MySQL provides a specific checker for MyISAM tables.
1. Shut down the MySQL server. Open the terminal and run:
systemctl mysql stop2. As the root user, navigate to the location of the database:
cd /var/lib/mysql/<database name>3. To check a specific table, run:
myisamchk <table name>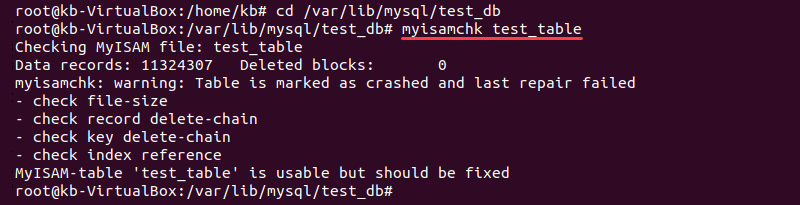
4. Repair a table by running:
myisamchk --recover <table name>5. Restart the MySQL server:
systemctl restart mysql6. Lastly, check the table in MySQL after recovery:
sudo mysql -u <user> -p <password>
USE <database name>;
SELECT * FROM <table name> LIMIT 4;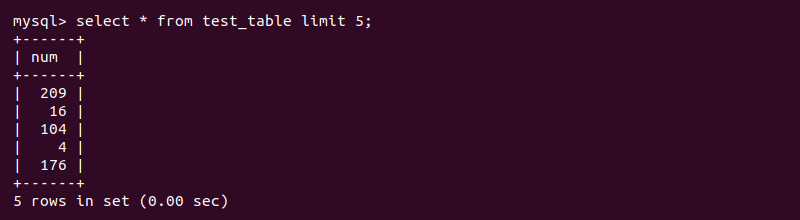
Running the InnoDB Recovery Process
MySQL documentation suggests running the InnoDB recovery process for InnoDB databases.
1. Locate and open the global configuration file using your favorite text editor. For Ubuntu and Debian systems, the location is:
cd /etc/mysql/my.cnfNote: For CentOS and Fedora, the location is:
cd /etc/my.cnf2. Add the following option to the my.cnf file:
[mysqld]
innodb_force_recovery=4
By default, the forced recovery option is set to 0 (off) and goes up to 6. Every new level includes the recovery features of the lower numbers.
3. Save and close the file.
4. Restart the MySQL server to ensure the new configuration file applies:
systemctl restart mysql5. In the home folder, export all the databases to a backup file with the mysqldump command:
sudo mysqldump --all-databases --add-drop-database --add-drop-table --routines > <file name>.sql6. Start MySQL client and drop all the affected database tables. To drop a database table, try:
DROP TABLE IF EXISTS <table name>;If the table does not drop, try removing the database table manually. Log in as the root user and navigate to the directory where the databases are:
sudo sucd /var/lib/mysql/<database name>Remove the database table:
rm -r <table name>7. Stop the MySQL server:
systemctl stop mysql8. In the my.cnf file, comment out the innodb_force_recovery option added in step 2 to disable the recovery mode. Then, save the file and close.
9. Start the MySQL server up again:
systemctl start mysql10. Restore the database from the backup .sql file in the MySQL shell. Log into the MySQL client:
sudo mysql -u <username> -p <password>11. Run the following query to import the databases:
USE <database name>;
# Turning off auto commit is optional and speeds things up for larger databases
SET autocommit=0;
SOURCE <file name>.sql;
12. Lastly, test the database to confirm everything works correctly. If not, restore the database from backup and try an alternate method.
Conclusion
This tutorial outlines several different methods to repair a MySQL database. Since database corruptions are bound to happen, MySQL provides multiple ways to discover and fix errors in a database, some of which are outlined in this article.
However, since recovery sometimes results in data loss, the best way to protect your information is to create regular backups and follow the best database security practices.
If you suspect corruption in the original database, you can do the following:
For MyISAM tables:
CHECK TABLE <table_name>;
REPAIR TABLE <table_name>;
For InnoDB tables:
http://www.mysqlperformanceblog.com/2008/07/04/recovering-innodb-table-corruption/
I’ve personally seen corruption with MyISAM tables on a few rare occasions that CHECK and REPAIR was able to detect and correct. I’ve never experienced corruption with InnoDB tables, so can’t speak from personal experience regarding the info provided in the link.
That said, if I were in your shoes, I would start by taking a closer look at the output file produced by mysqldump to see if I could pinpoint the source of the error. mysqldump usually outputs a single INSERT statement per table with all of the data on a single line, so it’s a little tricky to diagnose errors because the line number included with the error message does not help much. So, what I would do is to edit the mysqldump output file and insert newlines between each row. For example:
Original:
INSERT INTO table VALUES (a,b,c),(d,e,f),(g,h,i), ...
Change To:
INSERT INTO table VALUES (a,b,c),
(d,e,f),
(g,h,i),
...
Since you’re comfortable with the command line, you could probably automate this with sed, etc.
Then, try to import the modified file. You should get the same error, but this time the line number will help pinpoint the exact row that’s causing the problem. At that point, you should be able to diagnose the problem (or post the offending portion of the mysqldump output here and we’ll try to help).
EDIT:
Is the error message you cited happening when you import the database? Or does the database import successfully, but the application produces the error message when accessing the database? I was assuming the former, but now thinking it may be the latter after re-reading your question.
One more idea: Does your database include stored procs? If so, mysqldump will not include those by default. You need to use the —routines option:
mysqldump --routines -u <user> -p<password> <database> > output