This article will cover the steps needed for you to update your Kali Linux system repo. The Kali Linux Operating system is Debian-Linux-based. The distribution comes with several advanced tools meant for streamlined utilities, accuracy boosting, quick and easy execution of pen-testing, and social engineering tools.
You Might Be Interested In
Like any other Linux distro, Kali supports audio play files, office, web browsers, programming software, and other software supported by either major OSs (Windows and macOS). Additionally, the OS comes with a Kali NetHunter App Store used in easing browsing, installation, and keeping your apps up to date.
Kali Linux comes with a large set of tested and pre-installed applications, making it simpler for use than other systems. The system was officially released into the market in 2013 as a complete re-branding of Backtrack Linux with a GNOME UI. Their developers ripped all the unwanted stuff off Backtrack by getting rid of junky utilities and updating the useful ones in the white-hat community.
To add on, the OS includes slightly over 600 completely free tools. It also has an open-source Git tree that is publicly available. It is a well-known OS among Cybersecurity professionals.
After that overview of Kali Linux, let us get into updating our Linux repositories.
Updating Kali Linux
Below is a step-by-step process to aid in updating your Kali system.
Note: We hope that you have Kali Linux OS installed on your PC. However, our complete guide on installing Kali Linux will really help if you haven’t installed it.
Alternatively, you can install Kali Linux on the virtual box if you already have a primary OS and would love to have another OS running on your PC.
Step 1: Configure Kali Linux Repositories
The first step is configuring the Kali repositories before updating them. Double-check that your sources.list file at/etc/apt/sources.list has all the relevant repositories. Be sure only to use the official Kali repositories. This is because the unofficial repositories can endanger your system security.
grep -v '#' /etc/apt/sources.list | sort -u
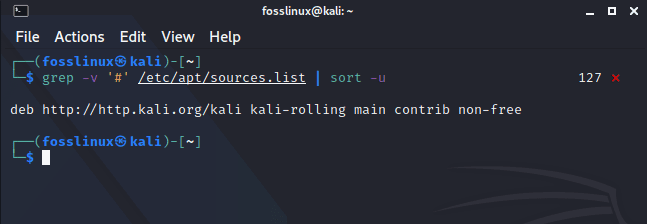
relevant sources list link
After running that command, you will see a link displayed below it. Once copied and pasted on the browser, will redirect you to the official relevant repositories of Kali Linux.
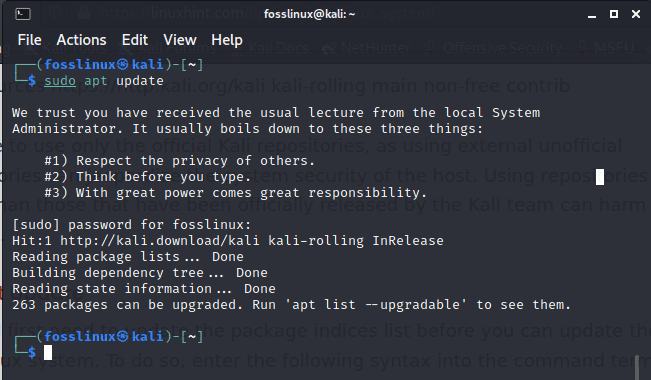
Step 2: Starting the Update Process.
To update the Kali Linux system, we will first need to update the package indices list. To do this, copy and paste the following command in your terminal:
sudo apt update
updating the system
After that, you can go ahead and check for the updates that have been released by keying the following command in your terminal:
apt list --upgradable

checking released upgrades
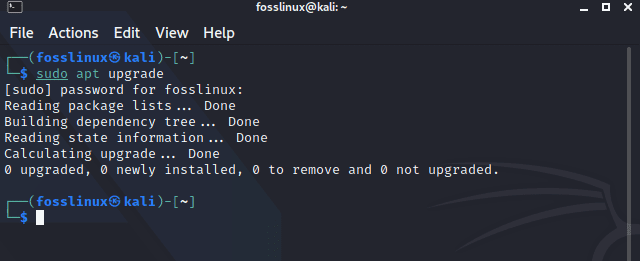
Upon running this command, you will see all the packages that can be upgraded. There are two ways to update them. First, you can update an individual package by entering the following command into your terminal:
apt install PACKAGE-NAME
Secondly, you can enter one command that can update all the packages simultaneously:
sudo apt upgrade

upgrading the system
After running the command to update a single package or update all the packages, you will wait for the updates to automatically download and install completely. This will take several minutes depending on the speed of your internet and your machine’s specs.
We still have a few steps to cover once the updates have finished installing.
Step 3: Updating Held-Back Packages
A time it could be that you have not actually updated all the packages. This is because some of them may not be listed. This issue mostly arises due to package dependency issues or other package-related issues.
You can counter check whether your system has any form of shortcomings in the updates you previously did by entering the following command in your terminal:
sudo apt upgrade
final check in case of shortcomings.
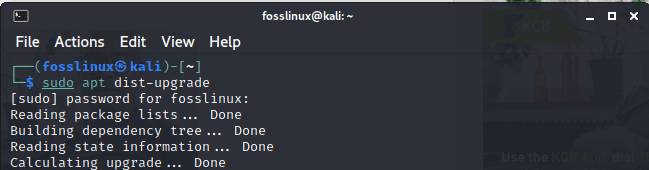
The procedure of downloading the with-held packages for penetration testing and other software/tools is the same as the one used for downloading the listed packages. Copy and paste the following command to individually download each package:
sudo apt install PACKAGE-NAME
or enter the command below to download all the packages at once:
sudo apt dist-upgrade
update all command
Step 4: Uninstalling Outdated Packages
After you have completed checking out the held-back packages, you can remove all the obsolete packages on your system using the following command:
sudo apt autoremove
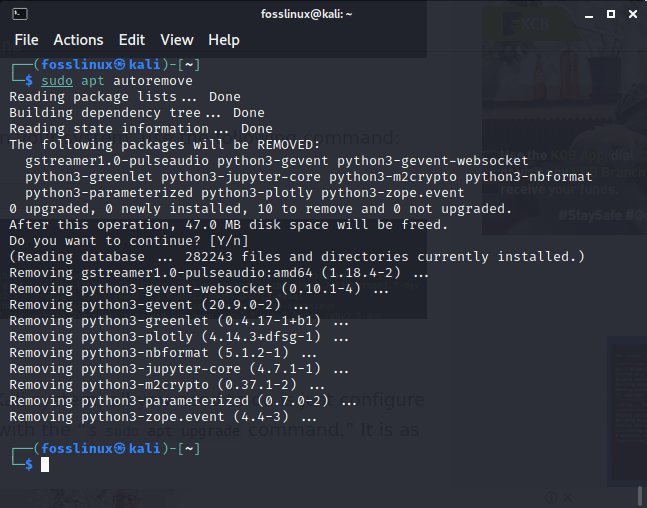
uninstalling outdated packages
Final Thought
In summary, the article has optimally covered steps on how you can upgrade your Kali system. Here, all you need to do is configuring the repositories and install them in your system using the “sudo apt update and sudo apt upgrade” command. The process is as simple as that.
Note that you should be mindful when you are using third-party repositories. This is because of the potential risks that it poses to your Kali system. These risks may cost you to install the OS repeatedly, which means you will lose all your data and files unless backed up. Finally, we looked at how we can free up some space in our hard disk drive by deleting the outdated packages using the “sudo apt autoremove command.” Having gone through all that, we hope you find this article useful, and if you did, please let us know in the comment section below.
You Might Be Interested In
Kali Linux — операционная система на основе Debian, предназначенная для аудита безопасности операционных систем, сетевого оборудования, приложений. Помимо поиска уязвимостей в состав ОС входят различные фреймворки, языки программирования и готовые приложения для непосредственного проникновения в скомпрометированную систему или реверс инжиниринга исследуемых программ.
В этой статье мы рассмотрим как выполняется настройка Kali Linux после установки. Kali Linux — очень достойный мультитул для специалистов в области информационной безопасности, хакеров и QA инженеров. Обычно эту операционную систему используют временно, запуская так называемый образ LiveCD, но иногда её устанавливают для постоянного использования.
1. Обновление системы
Для поддержания операционной системы и программного обеспечения в актуальном состоянии необходимо периодически её обновлять. Сделать это можно следующими командами:
sudo apt update
sudo apt upgrade
sudo apt full-upgrade
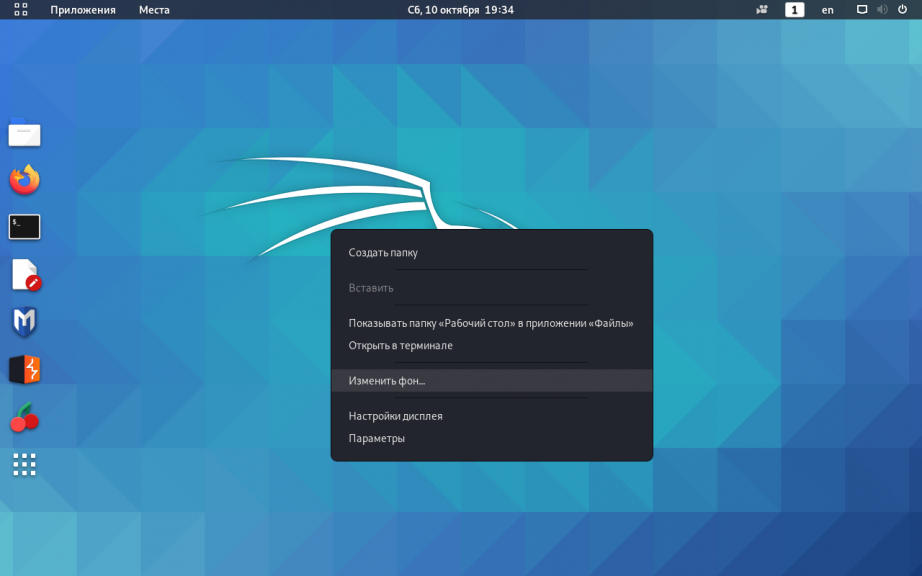
2. Фон рабочего стола
Самый простой способ изменить фон рабочего стола Kali Linux — просто кликнуть по нему правой кнопкой мыши и открыть опцию Изменить фон:
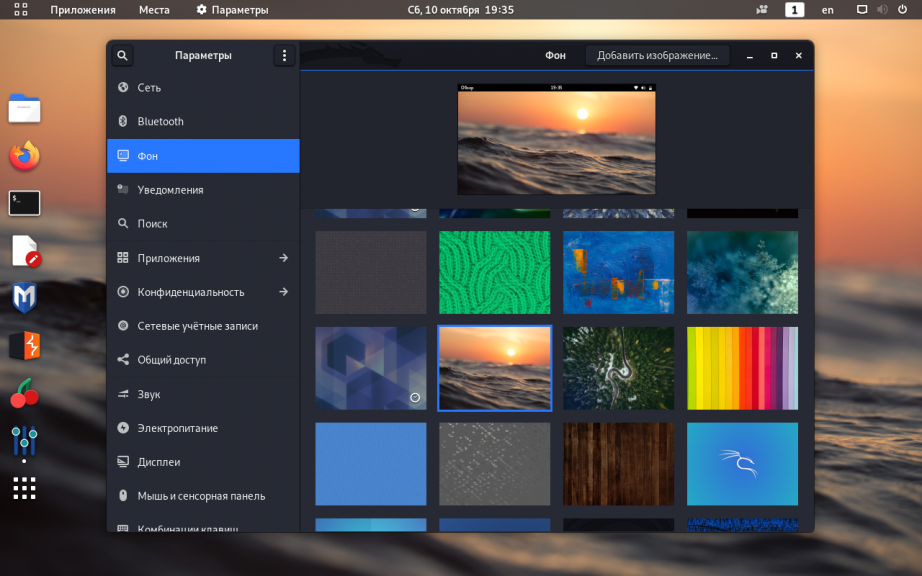
В открывшемся окне можно выбрать существующие обои или перейти в другой каталог, где уже были предварительно загружены изображения:
3. Настройка репозиториев
Kali Linux имеет три основные ветки (branches) репозиториев. Если вы выполните команду:
grep -v '#' /etc/apt/sources.list | sort -u
Вы увидите, что по умолчанию установлен репозиторий:
deb http://http.kali.org/kali kali-rolling main non-free contrib
Программное обеспечение в репозитории kali-rolling, часто обновляется и подойдёт всем, кто хочет периодически получать новые версии ПО.
В том случае, если вам в первую очередь требуется стабильность операционной системы и программ установите ветку kali-last-snapshot в файле /etc/apt/sources.list нужно заменить старое значение на:
deb http://http.kali.org/kali kali-last-snapshot main non-free contrib
В данном репозитории точечно применяются только критические обновления безопасности для ОС и программного обеспечения, новые версии программ в нём не публикуются.
И третья, официальная ветка Kali Linux — kali-experimental подойдёт энтузиастам готовым устанавливать программное обеспечение на стадии тестирования. Программы в этой ветке не всегда стабильно работают и могут потребовать другие дополнительные репозитории для полноценного обновления предлагаемого ПО. Установить данный репозиторий можно добавив следующую строку в файл /etc/apt/sources.list:
deb http://http.kali.org/kali kali-experimental main non-free contrib
4. Установка Gnome Tweak Tool
Несмотря на то, что в Kali Linux присутствует довольно широкий выбор программного обеспечения для аудита безопасности, пентестов, разработки и прочего ПО, инструментов с графическим интерфейсом для настройки ОС относительно мало, это довольно аскетичная операционная система. Но особых затруднений, чтобы исправить данный недостаток нет. Далее будет показана установка утилиты gnome-tweak-tool.
Установите, если не установлен репозиторий из ветки kali-rolling -в файл /etc/apt/sources.list нужно добавить строку:
deb http://http.kali.org/kali kali-rolling main non-free contrib
Обновите список пакетов из данного репозитория:
sudo apt update
Установите gnome-tweak-tool, выполнив команду:
sudo apt install gnome-tweak-tool
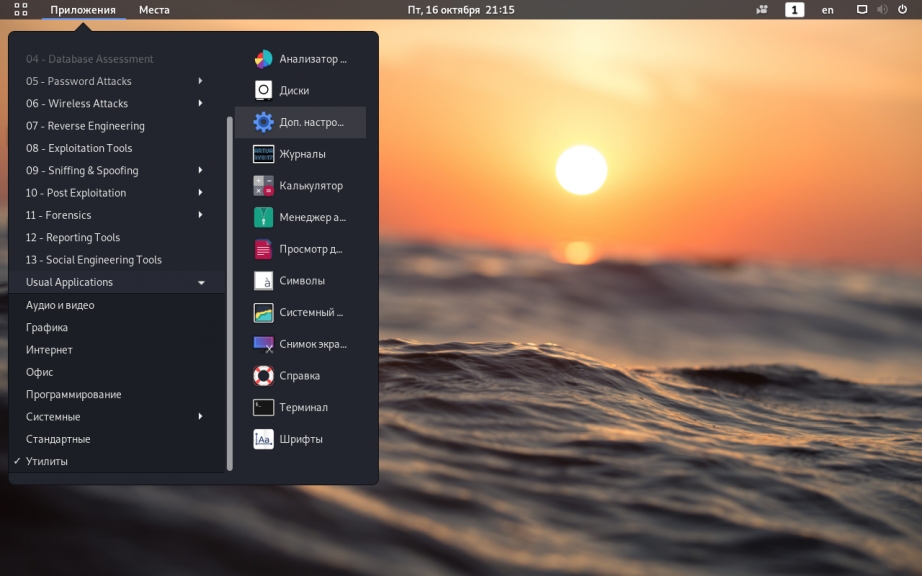
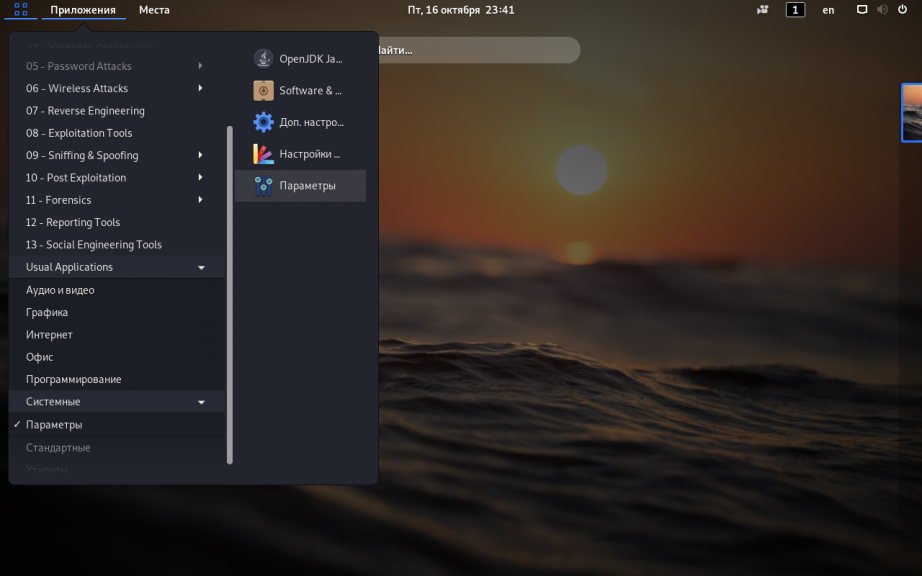
Запустить утилиту можно из меню Приложения => Утилиты => Дополнительные Настройки GNOME:
Откроется стандартное окно программы:
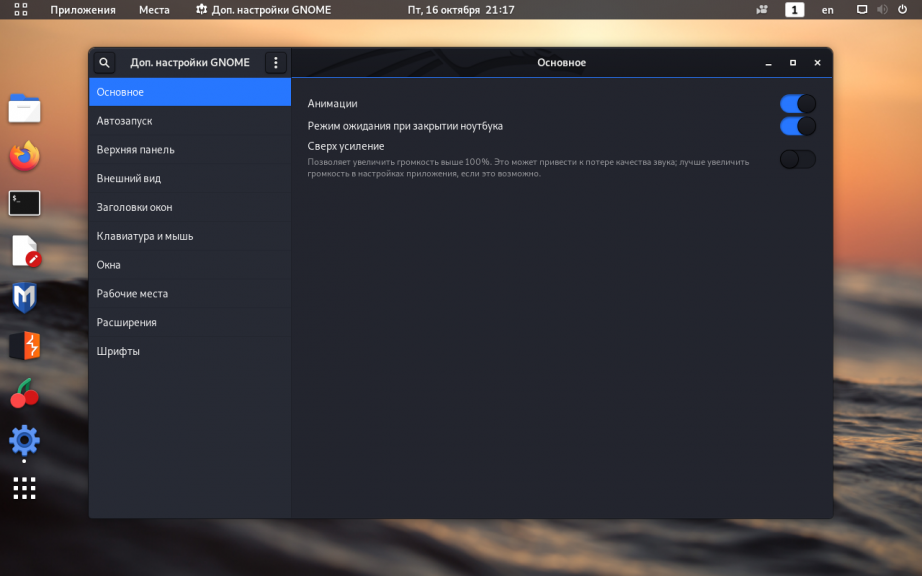
В нём можно изменять настройки автозапуска программ, окон, мыши, клавиатуры и шрифтов.
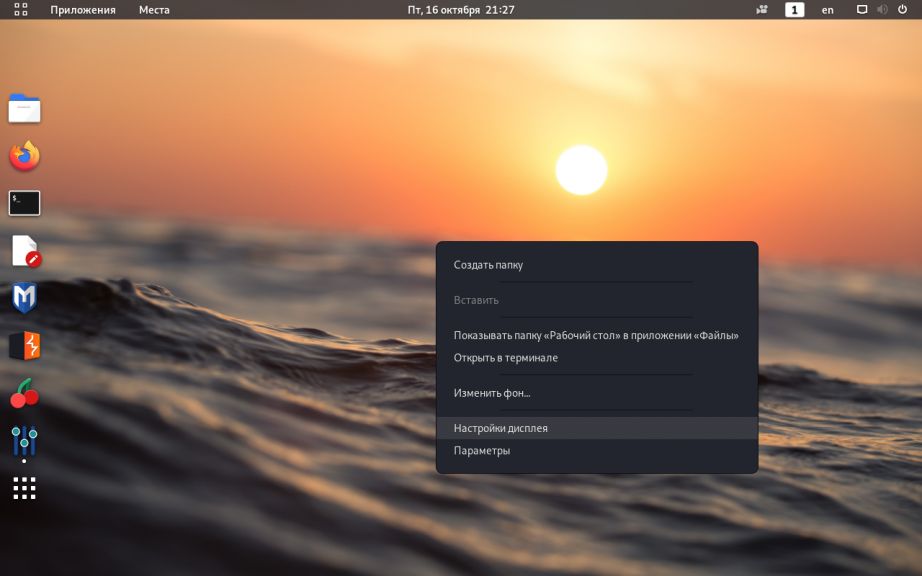
5. Отключение блокировки экрана
Чтобы выключить блокировку экрана в Kali Linux достаточно кликнуть по рабочему столу и открыть Настройки дисплея:
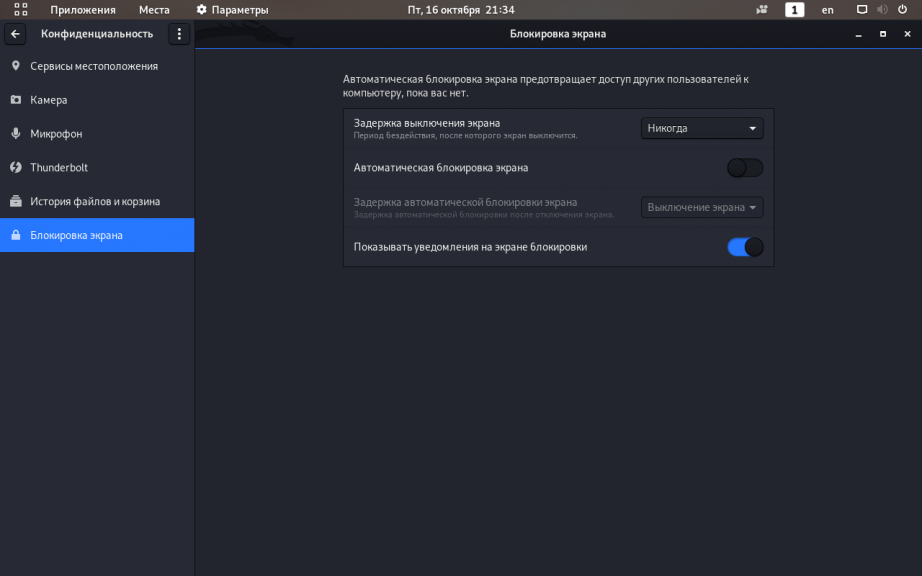
В открывшемся окне перейдите в раздел Конфиденциальность => Блокировка экрана. Переведите опцию Автоматическая блокировка экрана в крайнее левое положение (выключено):
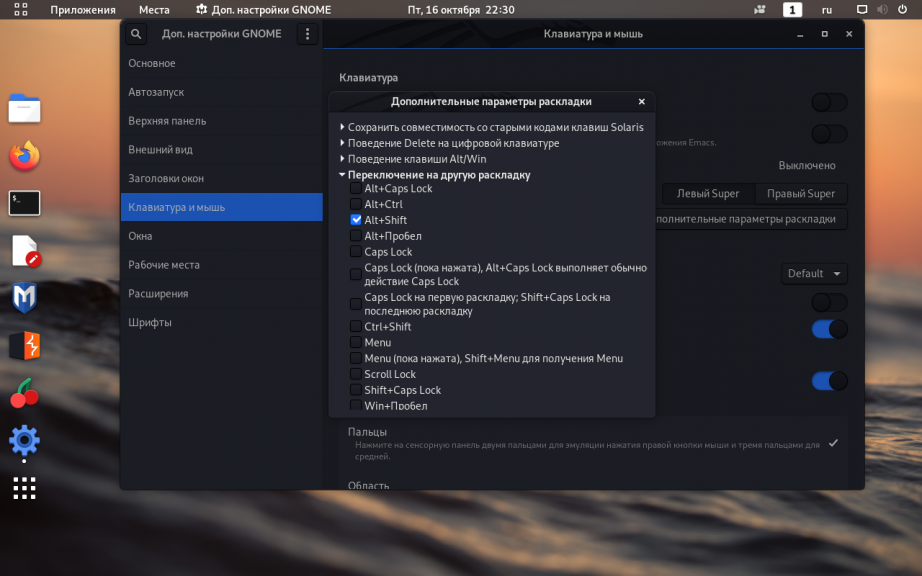
6. Настройка раскладки клавиатуры
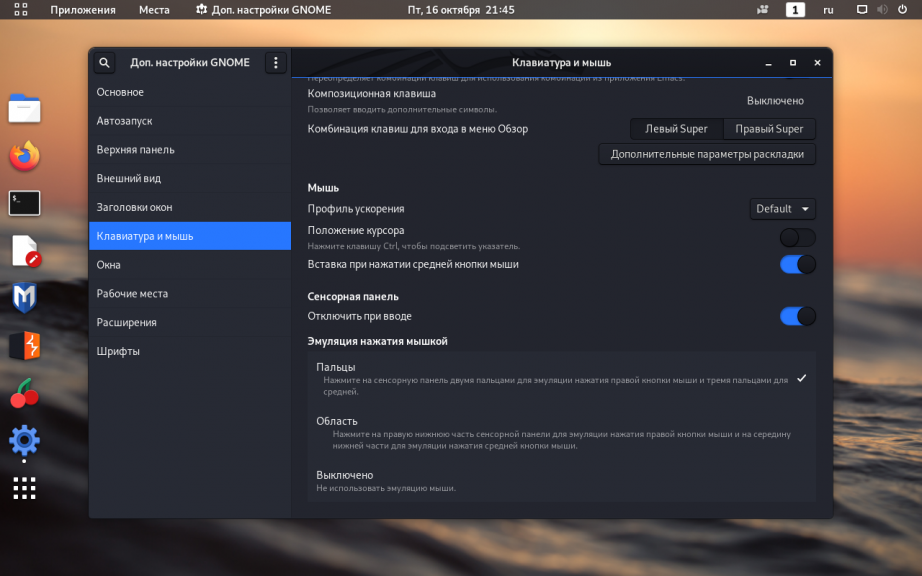
Чтобы изменить комбинацию клавиш для переключения раскладки клавиатуры откройте Дополнительные настройки GNOME, перейдите во вкладку Клавиатура и мышь, затем нажмите на кнопку Дополнительные параметры раскладки:
Раскройте меню Переключение на другую раскладку и отметьте флажок напротив нужной вам комбинации (в данном примере выбрана комбинация Alt+Shift):
7. Автоматический вход в систему
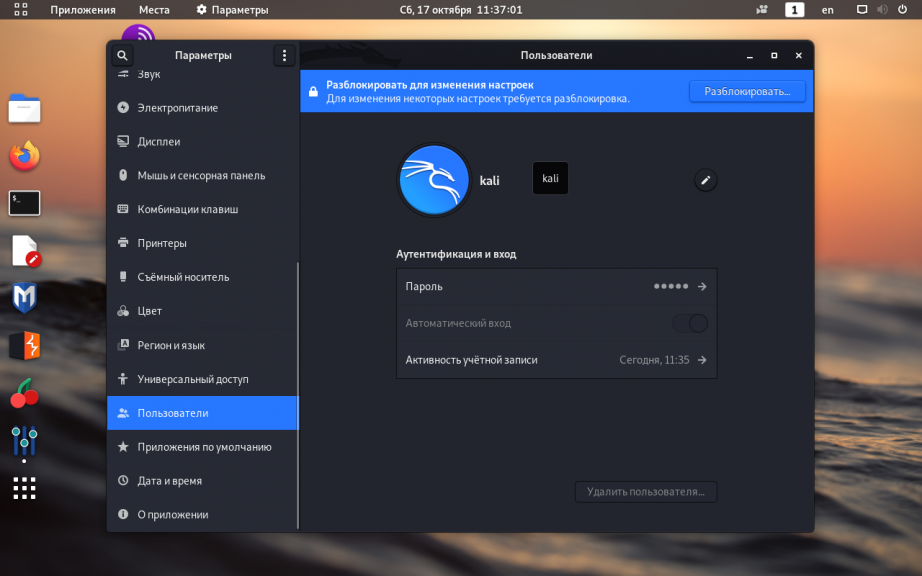
Чтобы при запуске операционной системы каждый раз не вводить пароль для входа, через главное меню откройте утилиту Параметры:
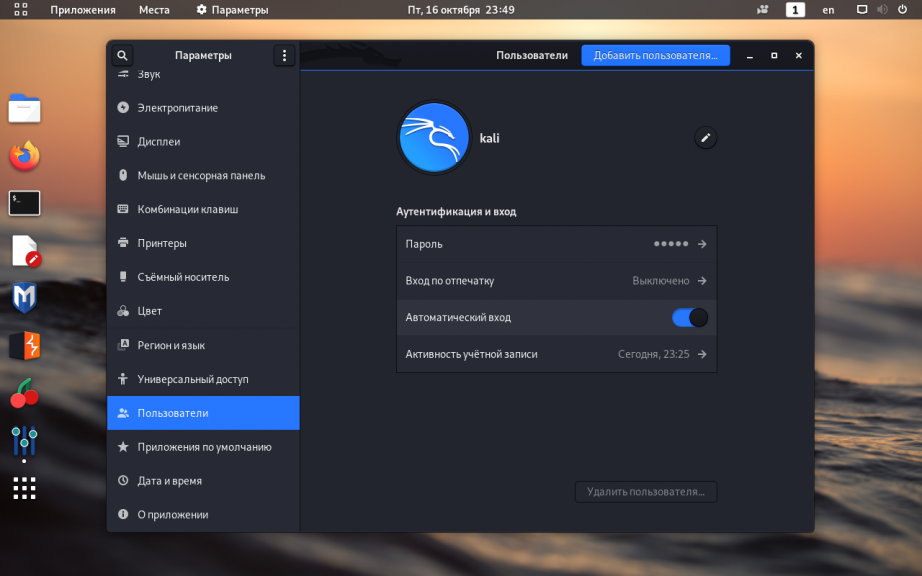
Перейдите на вкладку Пользователи и в правом верхнем углу окна нажмите кнопку Разблокировать (потребуется пароль суперпользователя), чтобы у вас появилась возможность изменять настройки:
Переведите переключатель опции Автоматический вход в крайнее правое положение (включено):
8. Установка Tor Browser
Чтобы обеспечить себе дополнительную анонимность в интернете, при просмотре вебсайтов, лучше всего использовать Tor-браузер. Для его установки зайдите на официальную страницу проекта TOR и скачайте нужную вам версию. В данном примере будет скачана 64-битная русская версия:
wget https://www.torproject.org/dist/torbrowser/10.0.1/tor-browser-linux64-10.0.1_ru.tar.xz
Распакуйте скачанный архив командой:
tar xvfJ tor-browser-linux64-10.0.1_ru.tar.xz
Затем выполните такую команду:
mv tor-browser*/Browser/ /home/kali/
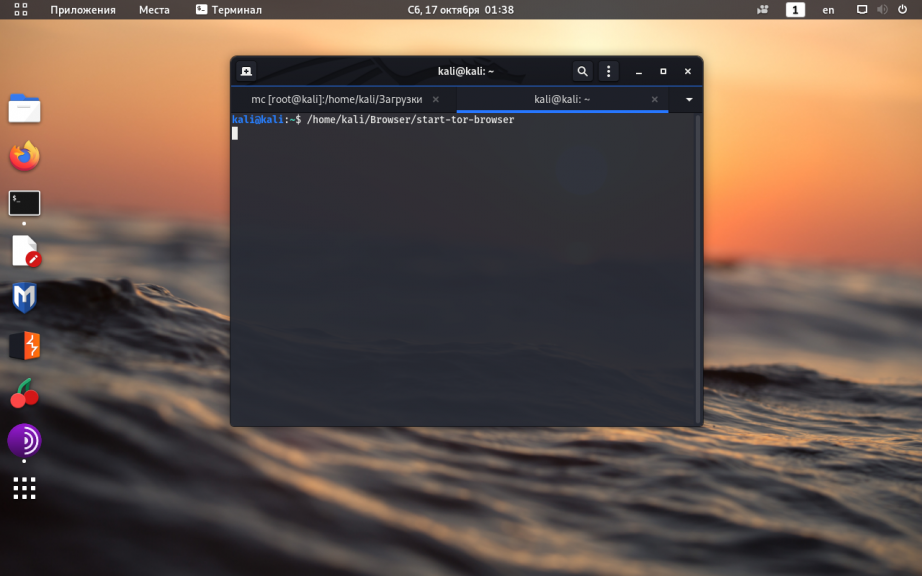
Здесь /home/kali/ —в данном примере домашняя директория пользователя. В результате такой установки, путь к запускаемому файлу программы Tor-браузер будет такой:
/home/kali/Browser/start-tor-browser
Уже сейчас Tor-браузером можно пользоваться, просто запустите этот файл.
Но удобнее создать для него ярлык на рабочем столе. Отредактируйте файл:
nano Рабочий стол/Tor_Browser.desktop
Впишите в него следующий текст:
[Desktop Entry]

Name=Tor Browser

Encoding=UTF-8

Exec=sh -c "/home/kali/Browser/start-tor-browser "

Icon=/home/kali/Browser/browser/chrome/icons/default/default48.png

StartupNotify=false

Terminal=false

Type=Application
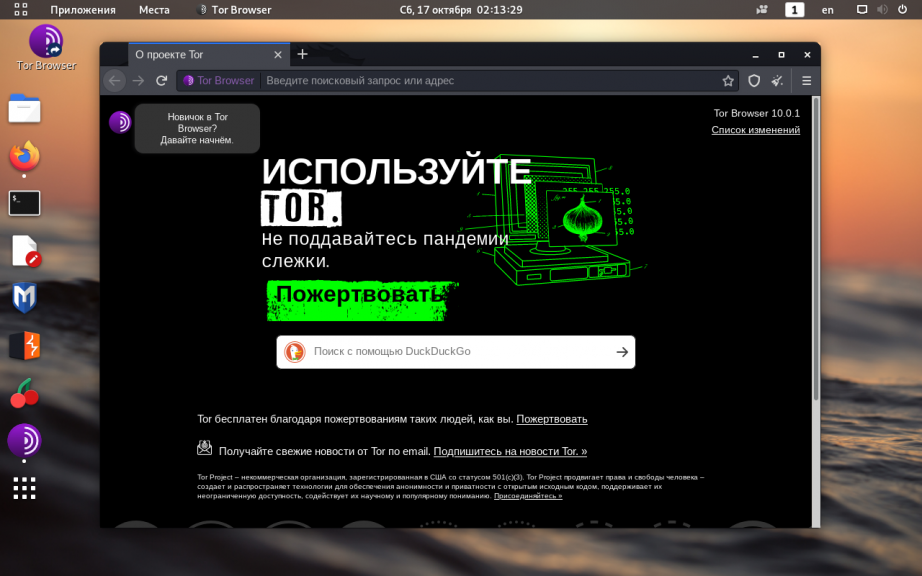
Если всё сделано верно, при нажатии на ярлык откроется окно браузера Tor:
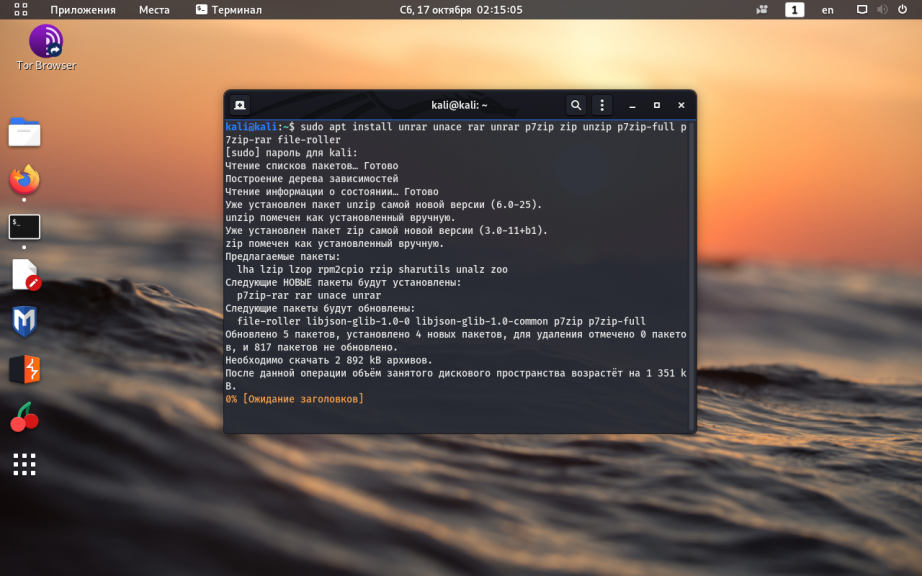
9. Установка архиваторов
По умолчанию, в большинстве Linux операционных систем, в качестве архиваторов используются программы tar и gzip. Но бывают ситуации, когда требуются архиваторы, работающие с другими форматами, например — zip, 7z, rar. Установить эти утилиты можно командой:
sudo apt install unrar unace rar unrar p7zip zip unzip p7zip-full p7zip-rar file-roller
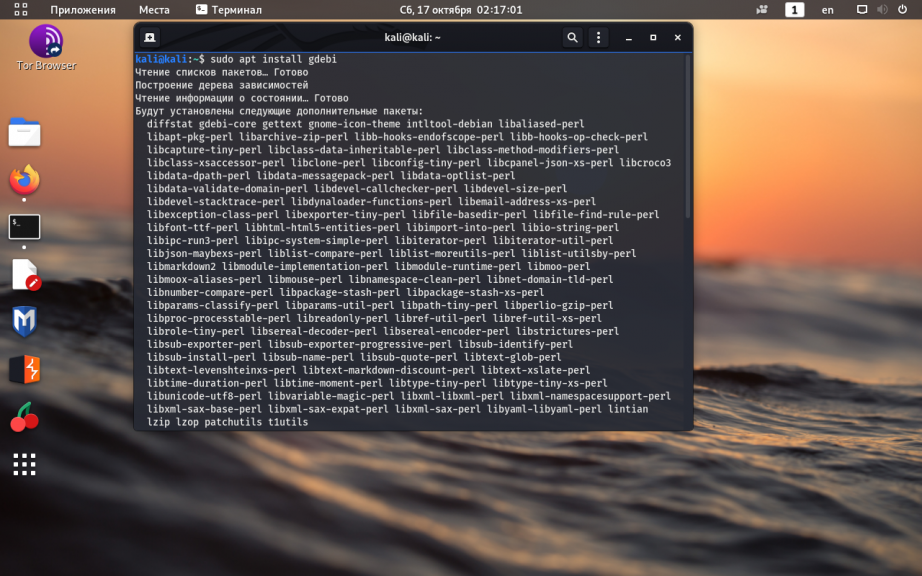
10. Установка GDebi
Kali Linux основана на операционной системе Debian и по умолчанию работает с установочными пакетами deb. Обычно, для установки программы из deb-файла применяется программа dpkg.
Однако dpkg не умеет разрешать зависимости при установке программы. Вместо неё лучше использовать программу gdebi, у которой нет такого недостатка. Установить gdebi можно командой:
sudo apt install gdebi
11. Установка htop и nethogs
Для удобного мониторинга системных ресурсов и полосы пропускания сетевого трафика можно установить утилиты htop и nethogs:
sudo apt install htop nethogs
12. Установка FileZilla
Одним из самых удобных клиентов FTP с открытым исходным кодом, по праву считается FileZilla. Установите её командой:
sudo apt install filezilla filezilla-common
13. Установка драйверов Nvidia
Если вам необходимо использовать все возможности вашей видеокарты, необходимо установить для неё драйвер. В примере ниже описывается установка драйверов NVIDIA. Для этого выполните:
sudo apt install nvidia-driver nvidia-cuda-toolkit
Теперь настройка Kali Linux почти завершена.
Выводы
Настройка Kali Linux после установки завершена. На самом деле, администрирование Kali Linux мало чем отличается от Debian или Ubuntu. Ввиду того, что эта операционная система в большей степени предназначена для специалистов в области информационной безопасности и разного рода узконаправленных в этой сфере задач, разработчики убрали некоторые программы, облегчающие настройку ОС, оформление рабочего стола, работу с мультимедийными файлами, а также элементы украшений интерфейса. Но потратив немного времени и установив вручную недостающие элементы, её вполне можно использовать как обычную рабочую станцию Linux.

Статья распространяется под лицензией Creative Commons ShareAlike 4.0 при копировании материала ссылка на источник обязательна .
This is a small guide on how to add official Kali Linux Repositories – I’ve updated it to include all versions of Kali Linux till date i.e. Kali 1.x, Kali 2.0/Kali Sana and Kali Rolling. 
The single most common causes of a broken Kali Linux installation are following unofficial advice, and particularly arbitrarily populating the system’s sources.list file with unofficial repositories. The following post aims to clarify what repositories should exist in sources.list, and when they should be used.
Any additional repositories added to the Kali sources.list file will most likely BREAK YOUR KALI LINUX INSTALL.
Edit your sources.list
The easiest way is to edit the /etc/apt/sources.list
root@kali:~# vi /etc/apt/sources.list
(or)
root@kali:~# leafpad /etc/apt/sources.list
Add official repo’s only:
Copy paste the following repositories (remove existing lines or you can comment them out – your take). Following repo list was taken from official Kali sources.list Repositories page:
The Kali Rolling Repository
Kali-Rolling is the current active repository since the release of Kali 2016.1 and 2016.2. Kali Rolling users are expected to have the following entries in their sources.list:
deb http://http.kali.org/kali kali-rolling main contrib non-free
deb-src http://http.kali.org/kali kali-rolling main contrib non-free
Save and close the file.
Retired Kali Sana (Kali 2.0) Repositories
For access to the retired Kali Sana or Kali 2.0 repositories, have the following entries in your sources.list:
deb http://old.kali.org/kali sana main non-free contrib
deb-src http://old.kali.org/kali sana main non-free contrib
Save and close the file.
Retired Kali moto (1.0) Repositories
For access to the retired moto repositories, have the following entries in your sources.list:
deb http://old.kali.org/kali moto main non-free contrib
deb-src http://old.kali.org/kali moto main non-free contrib
Save and close the file.
OLD Instructions (Kali 1.0 – does not work anymore)
I’ve kept these for historical purpose only, these repo’s worked on Kali 1.x (2013 – 2015). Do no follow these anymore.
# Regular repositories
deb http://http.kali.org/kali sana main non-free contrib
deb http://security.kali.org/kali-security sana/updates main contrib non-free
# Source repositories
deb-src http://http.kali.org/kali sana main non-free contrib
deb-src http://security.kali.org/kali-security sana/updates main contrib non-free
Clean your apt-get
apt-get clean
Do an apt-get update
apt-get update
Do an upgrade
apt-get upgrade
Finally do a distribution upgrade
apt-get dist-upgrade
That’s it, you’re set.
Conclusion
Despite what many unofficial guides instruct you to do, avoid adding extra repositories to your sources.list files. Don’t add kali-dev, kali-rolling or any other Kali repositories unless you have a specific reason to – which usually, you won’t. If you must add additional repositories, drop a new sources file in /etc/apt/sources.list.d/ instead. [Source: Offensive Security Blog]
If you must, (despite warning many users will be tempted), do try it in a VirtualBox/VMWare first and take snapshots so that you can roll back. Kali updates are quite big and takes a lot of time to download and their DVD ISO’s are not very up to date. You can build your own custom updated ISO by following these instructions and keep using that offline.
Thanks for reading. If I have made a mistake, please correct me.