Problem
When trying to import an SSL certificate into a Java keystore, the following error is encountered:
Keytool error: java.lang.Exception: Certificate not imported, alias <mykey> already exists
Symptom
C:work>keytool -importcert -file uat_slc_cm02.cert -keystore C:work.keystore
Picked up _JAVA_OPTIONS: -Xmx512M
Enter keystore password:
keytool error: java.lang.Exception: Certificate not imported, alias <mykey> already exists
C:work>
Cause
When you add a certificate to the Java keystore, the default alias is ‘mykey’ so when an attempt is made to add a second certificate, keytool reports that it exists.
Environment
The problem can occur in any environment running the Java Developers Kit.
Diagnosing The Problem
Listing the keystore shows the default certificate alias of «mykey»:
C:work>keytool -list -v -keystore C:work.keystore
Picked up _JAVA_OPTIONS: -Xmx512M
Enter keystore password:
Keystore type: jks
Keystore provider: SUN
Your keystore contains 1 entry
Alias name: mykey
Creation date: Oct 13, 2020
Entry type: trustedCertEntry
…
…
…
Resolving The Problem
To resolve the problem, you must provide a unique alias when you add a certificate.
You have these certs:
07/20/2020 10:50 AM 1,168 server1.cert
07/20/2020 10:50 AM 814 server2.cert
07/20/2020 10:50 AM 814 server3.cert
07/20/2020 10:50 AM 1,168 server4.cert
You can then do the following statements giving each cert a different alias:
keytool -importcert -file server1.cert -alias server1 -keystore .keystore
keytool -importcert -file server2.cert -alias server2 -keystore .keystore
keytool -importcert -file server3.cert -alias server3 -keystore .keystore
keytool -importcert -file server4.cert -alias server4 -keystore .keystore
Document Location
Worldwide
[{«Line of Business»:{«code»:»»,»label»:»»},»Business Unit»:{«code»:»BU048″,»label»:»IBM Software»},»Product»:{«code»:»SSCVRDQ»,»label»:»Informix JDBC»},»ARM Category»:[],»Platform»:[{«code»:»PF025″,»label»:»Platform Independent»}],»Version»:»All Version(s)»}]
I’ve a linux centos server running glassfish 3.1.2 app server. The default certs coming from GlassFish install for ports 4848 and 8181 are 1024 bits. I need to replace these with 2048 bits versions. Looking for help to create the keytool command line code that does this.
I located the certs here:
# keytool -list -keystore keystore.jks
   Keystore type: JKS
   Keystore provider: SUN
   Your keystore contains 2 entries
   glassfish-instance, Feb 7, 2012, PrivateKeyEntry,
   Certificate fingerprint (SHA1): 40:...:46
   s1as, Feb 7, 2012, PrivateKeyEntry,
   Certificate fingerprint (SHA1): 3C:...:FC
asked Feb 23, 2015 at 19:09
Here you go, I always keep this page bookmarked as a reference, The Most Common Java Keytool Keystore Commands.
So you’ll need to delete the certificate before you can re-add it. From the above page:
Delete a certificate from a Java Keytool keystore
- keytool -delete -alias mydomain -keystore keystore.jks
![]()
slm
9,68910 gold badges48 silver badges54 bronze badges
answered Feb 23, 2015 at 20:27
James SpiteriJames Spiteri
1
I differ with the response above. What I have found is if you create the CSR from the existing keystore you can just replace the certificate. All you do is import the new certificate using the same alias as the old one.
keytool -importcert -alias old_cert_alias -file new_cert_file.cer -keystore your_key_store.jks
answered Sep 15, 2021 at 14:42
![]()
1
Error: «Certificate not imported, alias <mykey> already exists» when importing root certificates
calendar_today
Updated On:
Products
Data Loss Prevention Enforce
Issue/Introduction
Errors occur when importing the CA Certificate into Tomcat in the Data Loss Prevention (DLP) Enforce console.
Keytool error: java.lang.Exception: Certificate not imported, alias <mykey> already exists
Resolution
When importing a new certificate into Tomcat (DLP Enforce console) the alias must be unique.
- In the case of tomcat the alias must be tomcat
- It is best to create a new keystore file for this purpose
See How to create a SSL certificate signed by a trusted Certificate Authority
Feedback
thumb_up
Yes
thumb_down
No
Содержание
- What’s keytool, why can’t it be found, and why does Firebase even want a “SHA-1”?
- What is “keytool”?
- Ok, where is it?
- I already installed Android Studio, do you mean I have to install Java too?
- I installed the Android SDK with Unity, do you mean that I need to install the JDK or Android Studio to use Firebase?
- debug.keystore doesn’t exist!
- This sounds cool, but what’s the SHA-1 and why does Firebase care?
- Wrap Up
- ошибка keytool: java.ленг.Исключение: не удалось установить цепочку из ответа
- 6 ответов
- Шаг 1:
- Шаг 2:
- Шаг 3:
- Шаг 4:
- Файл хранилища ключей не существует
- 7 ответов
If you’ve followed any of the Firebase tutorials for Android, you probably came across an instruction like “Add the SHA-1 hash for your project.” You may have even been linked to this page, where you were told to type keytool -list -v followed by a strange symbols involving -keystore .
Now for many developers, including most Google employees with the standard dev tools, this just works and we don’t question it. Others will get one of these super exciting error messages:
keytools: command not found
‘keytool’ is not recognized as an internal or external command
This is also an optional step for many of Firebase’s products. Currently Firebase Dynamic Links and some Firebase Authentication products (such as Google Authentication and Phone Authentication) are the only products that need a SHA-1.
Whenever I need to figure out what a command does, I search for man . My first result is Oracle’s documentation saying:
Manages a keystore (database) of cryptographic keys, X.509 certificate chains, and trusted certificates.
That’s a really cool one liner, but what you need to know is that it generates a file (called a “keystore”) that can be used to “sign” an Android application. This signature is used to verify authenticity. The really cool thing here is that it’s practically impossible to fake a signature without stealing the keystore file, but you can publish a “fingerprint” of your signature so anyone can validate the signature on their own.
Ok, where is it?
keytool is a standard program that ships with the Java Development Kit (JDK) or runtime (JRE). Both Oracle’s JDK and OpenJDK ship with it, and on MacOS and Linux it’s usually simple enough to just install the JDK and call it a day.
On Windows or complex environments, you’ll want to look in the /bin directory of the JDK. You can either invoke it directly by typing this full path, or add it to your system’s $PATH environment variable.
I already installed Android Studio, do you mean I have to install Java too?
keytool ships with a standard Android Studio install as part of the JRE needed to run Android Studio itself. If you look at where you installed Android Studio (usually C:Program FilesAndroidAndroid Studio on Windows or /Applications/Android Studio on Mac), you’ll find a folder inside called jre . You’ll be able to find the keytool command there.
Helpful hint: you can drag/drop this keytool application to get its full path in your terminal on MacOS, Windows 10, and most standard Linux distributions!
I installed the Android SDK with Unity, do you mean that I need to install the JDK or Android Studio to use Firebase?
If you navigate to your Unity installation, you should see keytool under PlaybackEngines/AndroidPlayer/OpenJDK . Once again, you can drag and drop this into a terminal as demonstrated above or you can add this to your $PATH if you feel so inclined.
debug.keystore doesn’t exist!
If you’ve gone through all of this, enter the appropriate command line, and you get a new message saying:
keytool error: java.lang.Exception: Keystore file does not exist:
All you have to do is perform a full Android build. debug.keystore will be auto-generated the first time you make an Android device build of an application.
If you want to look for the debug.keystore on your own, this is usually stored in a hidden folder named .android in your user home directory. You can type into a terminal ls
/.android/debug.keystore on Linux and MacOS or dir %USERPROFILE%.androiddebug.keystore on Windows to find it.
This sounds cool, but what’s the SHA-1 and why does Firebase care?
The act of signing an application doesn’t have any intrinsic value without some way of verifying the identity of the signer. This is what the SHA-1 fingerprint provides, you can pull the SHA-1 out of a signed Android game or application and check it against some central point of authority to ensure the signature itself was valid. But who is the authority for something that lives on a local development machine?
When an application talks to Firebase, Firebase should only consider the application legitimate if its SHA-1 corresponds to one you have listed in the Firebase Console for your application. This means that Firebase itself acts as an authority and can tell that an incoming application looks like one that you’ve made.
When your application tries to use any Firebase service on Android, Firebase’s servers confirm that two things are true:
- the application ID matches one of the applications in your project.
- the SHA-1 of of the signed game or application matches a SHA-1 that the developer uploaded to the Firebase project’s console.
This has an interesting side effect that a combination of package id and the SHA-1 are used to match a game or application with a Firebase project. Because of this, you cannot have two Firebase projects that contain the same package id and signing signature. It is expected that you’ll use the same development SHA-1 across many projects, but if you ever see An OAuth2 client already exists for this package name and SHA-1 in another project , you’ll want to ensure that your package name is unique.
Wrap Up
Go ahead and finish setting up Firebase with Android, Unity, or whatever else you needed a keytool to unlock. And don’t forget to run through this checklist when you’re ready to ship. You’ll probably see keytool surface once again when you’re ready to sign a release build.
Источник
создать хранилище ключей:
создать запрос подписи сертификата (CSR):
Я ухожу с моим хостинг-провайдера и получить сертификаты. Эти я установил следующим образом:
когда я установил окончательный сертификат (мой.crt) я получил следующую ошибку:
Я считаю, что я импортировал цепь и в правильном порядке, поэтому я очень смущен этим сообщением. Кто-нибудь видит, что я делаю не так?
6 ответов
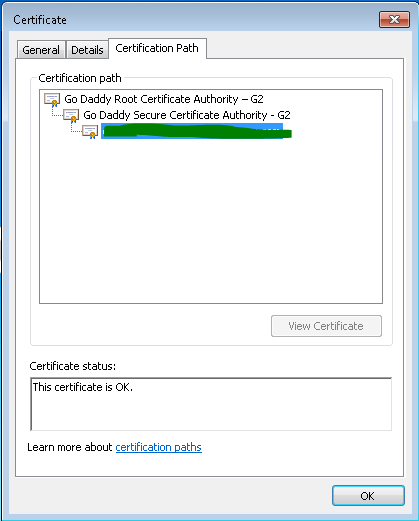
Я только что обнаружил, что файлы godaddy, поставляемые с моим сертификатом, являются промежуточными сертификатами (на самом деле они кажутся одинаковыми промежуточными сертификатами).
Я получил правильный корневой и промежуточный сертификаты, дважды щелкнув по моему сертификату и глядя на путь сертификата. отсюда я также могу загрузить каждый из этих сертификатов и использовать шаги, используемые в вопросе, чтобы импортировать их
я боролся с той же проблемой около двух недель, пока не нашел способ обойти ее. Проблема была в том, что корневые и промежуточные сертификаты, которые пришли с моим сертификатом от Godaddy, не были теми, которые мне нужны. Я много раз заглядывал в репозиторий Godaddy, не найдя подходящих сертификатов.
Я просмотрел свой сертификат на своем ноутбуке (используя Windows 8.1). Там я увидел цепочку сертификатов, и я смог экспортировать корневые и промежуточные сертификаты. Тогда Я импортировал их в мое хранилище ключей, и он работал так, как должен.
для этого выполните следующие действия:
Просмотр сертификатов на компьютере под управлением Windows. Вы сможете увидеть цепочку сертификатов на третьей вкладке, которая выглядит следующим образом.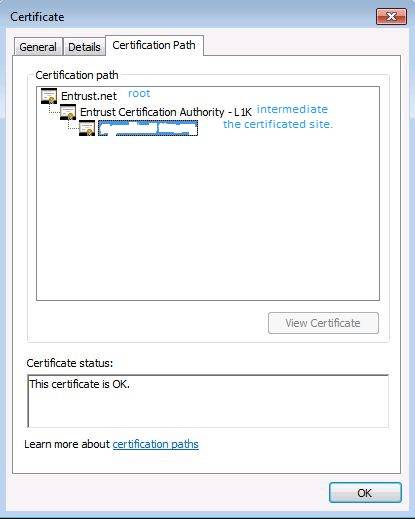
выберите корневой сертификат из цепочки и нажмите на кнопку «Просмотреть сертификат».
Примечание.: Прежде чем импортировать эти сертификаты, мне пришлось удалить те, которые были на моем хранилище ключей и не работали. Для этого я использовал следующие инструкции:
Если вы не уверены, что находится внутри вашего keytool, вы можете просмотреть с помощью:
Я получил ту же ошибку при попытке импортировать сертификаты CA certified в хранилище ключей в среде Linux.
Я выполнил набор шагов и успешно импортировал его.
после получения сертификатов CA certified выполните следующие действия для импорта сертификатов в хранилище ключей.
Шаг 1:
импортируйте корневой сертификат в cacerts, который будет доступен в папке JAVA_HOME/jre/lib/security, используя следующее команда:
после того, как вы введете выше команду он будет запрашивать пароль, введите пароль и нажмите на да.
Шаг 2:
импорт корневого сертификата с помощью следующей команды:
после того, как вы введете выше команду он будет запрашивать пароль, введите пароль и нажмите на да.
Шаг 3:
импорт промежуточного сертификата с помощью следующей команды:
как только вы введете над командой его подскажет для замены уже сертификата введите yes.
Примечание: промежуточный сертификат опционный можно проигнорировать, он приходит с сертификатом корня.
Шаг 4:
импорт сертификата сайта с помощью следующей команды:
Environment выполняются эти команды java версии 7. сертификат выдается GODADDY.
чтобы решить эту проблему, используют дополнительный переключатель (-trustcacerts) в командах keytool.
команда для импорта промежуточных сертификатов из промежуточного.файл cer для сертификатов.KS файл ключей должен выглядеть так:
keytool-storetype JCEKS-storepass passwd-сертификаты хранилища ключей.КС-импорт -псевдоним промежуточными -trustcacerts -файл промежуточными.cer
команда для импорта сертификата из http.файл cer для сертификатов.KS файл ключей должен выглядеть так:
keytool-storetype JCEKS-storepass passwd-сертификаты хранилища ключей.KS-import-псевдоним http -trustcacerts -файл http.cer
повторная попытка завершить процесс создания и импорта подписанного SSL-сертификата.
загрузите цепочку сертификатов, откройте ее в Windows — она хранит сертификат CA и ваш ответ сертификата от CA.
сначала импортируйте сертификат CA в хранилище ключей, а затем импортируйте ответ из CA.
следующий шаг очень важен перед импортом сертификатов в локальное хранилище ключей. После получения подписанных сертификатов от CA).
импортируйте корневой сертификат в cacerts, который будет доступен в папке JAVA_HOME/jre/lib/security, используя следующую команду:
keytool-importcert-псевдоним корневой файл [корневой сертификат] — keystore cacerts после того, как вы введете выше команду он будет запрашивать пароль, введите пароль и нажмите на да.
Источник
Файл хранилища ключей не существует
Я пытаюсь получить отпечаток SHA1, чтобы получить ключ Google API. Им в следующем каталоге:
/ Library / Java/JavaVirtualMachines / jdk1.8.0_20.jdk/содержание/главная / bin
затем я выполняю команду с сайта google:
keytool-list-v-keystore mystore.хранилища ключей
но это дает эту ошибку:
я следовал учебникам, но я не могу заставить его работать! Кто-нибудь знаешь, что я делаю не так?
кстати: я использую Macbook Pro с Xamarin Studio 5.5.2.
7 ответов
Вы сказали, что выполняете команду from.
ваш файл keystore в этот каталог, а? Если нет, то вам нужно указать путь к файлу хранилища ключей, например
используется хранилище должна использоваться для входа в приложение. Для отладочных сборок Xamarin это будет хранилище ключей отладки, расположенное по адресу /Users/[USERNAME]/.local/share/Xamarin/Mono for Android/debug.keystore . Команда на OSX для этого будет.
или в Windows 7
команда Linux & Mac
даст вам SHA1, SHA256, MD5 для ключа отладки по умолчанию. И его можно использовать для разработки и отладки с помощью сервисов google play.
пожалуйста, укажите полный путь отладки.хранилище ключей. Пример: C:/Users/myusername/.android / отладка.хранилище ключей вместо
/.android / отладка.хранилища ключей
я столкнулся с той же проблемой, но решил с помощью следующей команды:
OS: Windows 7
для моего случая debug.keystore генерируется после первого запуска приложения на Android Studio
последнее обновление для Mac & Ubuntu
Я нашел это руководство от teamtreehouse форум. надеюсь, это вам поможет.
1) Открыть Командная Строка при нажатии Пуск+R и набрав cmd.исполняемый.
2) с помощью Проводник Windows, найди там свой JDK каталог находится (обычно Program Files > > Java) и копирует путь.
3) в Командная Строка, введите cd, а затем каталог каталога bin вашего JDK. е.г: компакт-диск C:Program файлыJavajdk1.8.0_25bin-это команда, которую я использую (Ваша может отличаться).
4) Используя Проводник Windows, найдите где ваш .каталог android находится (обычно в разделе Пользователи >> [YOUR WINDOWS USERNAME] ) и скопировать путь.
5) теперь используйте следующую команду:
замена [PATH_TO_.ANDROID_DIRECTORY] С копируемым путем. Обратите внимание, что вы должны запустить эту команду в терминале/командной строке в каталоге bin вашего JDK (вы сделали это на Шаге 3).
шахты C:Program FilesJavajdk1.8.0_121bin>keytool -exportcert -alias androiddebugkey -keystore C:UsersHoSiLuan.androiddebug.keystore -list -v
не забывайте использовать C:UsersHoSiLuan.androiddebug.keystore вместо
/.androiddebug.keystore . Я все еще получил ошибку, когда введите этот укороченный способ.
затем вам будет предложено ввести пароль как обычно, который вы можете ввести (пароль android) . После этого вы увидите список сертификатов, напечатанных на экране.
Источник