Некоторые любят погорячее, а некоторые — понадежнее, поэтому те вторые некоторые не верят всяческим self-signed сертификатам.
Задача: заставить websphere принять и простить такой self-signed сертификат.
1. Для этого сначала делается простая пара ключей:
>keytool -genkey -keyalg RSA -keystore server.keystore -dname «CN=cn, OU=ou, O=o, L=l, ST=st, C=LV» -storepass server -keypass server -alias alias
2. Сделать запрос:
>keytool -certreq -alias alias -keystore server.keystore -storepass server -file request.csr
3. request.csr надо недоверчивой компании, чтобы те подписали ваш сертификат, и прислали его подписанным обратно.
4. При замене начального сертификата на подписанный вывалится ошибка:
>keytool -import -keystore server.keystore -alias alias -storepass server -file signed.cer
keytool error: java.lang.Exception: Failed to establish chain from reply
Чтобы решить ошибку, вам необходима цепь сертификатов — chain of trust — обычно это файл с расширением .pem.
keytool толком не умеет добавлять цепь, поэтому:
А) открываем chainoftrust.pem любым редактором и видим следующее:
——BEGIN CERTIFICATE——
Blablabla на кучу строк
——END CERTIFICATE——
——BEGIN CERTIFICATE——
Blablabla на кучу строк
——END CERTIFICATE——
.
——BEGIN CERTIFICATE——
Blablabla на кучу строк
——END CERTIFICATE——
Б) Каждый блок сохраняете в отдельный файлик: 1.cer, 2.cer и так далее.
Источник

We stand with our friends and colleagues in Ukraine. To support Ukraine in their time of need visit this page.
Tomcat installation error: keytool error: java.langException: Failed to establish chain from reply
During the import, this error might occur: keytool error: java.langException: Failed to establish chain from reply
This error explicitly refers to the fact that the certificate to be imported does not match either:
— The common name of the created key entry of imported certificates, or
— The alias of the key entry.
In order to avoid this error, the following points should be double-checked:
- Alias of the imported certificate: If you are importing the chain files in PEM format, each of them should have different aliases( e.g.: root for root certificates, intermediate1 or intermediate2 for intermediate certificates). The alias of private key entry (keystore alias) should match with end-entity certificate.
- The end-entity certificate imported to the keystore does not match the private key in that keystore. This means that the imported certificate differs from the key entry in the keystore either in common name or alias. To avoid this, the keystore verbose output can be checked and the correct domain name and the alias can be found:
Command is the following: keytool -list -keystore ‘keystore name’ -v
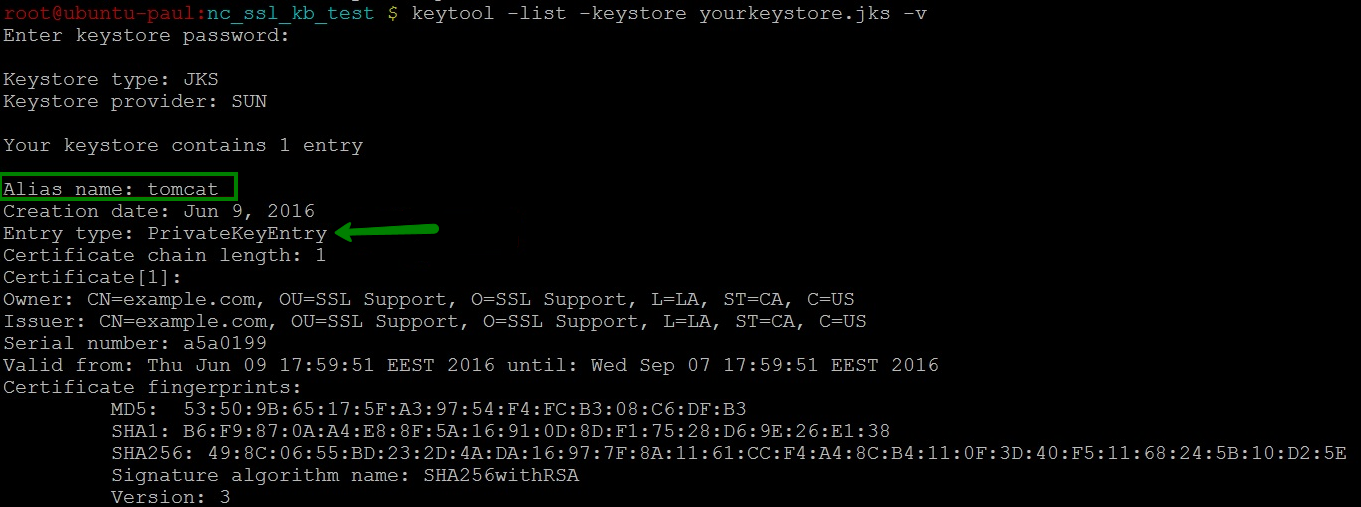
Once this is checked, rerun the import command to the correct keystore.
Once the entries are deleted, import the certificate in the correct order.
Источник
Создать хранилище ключей:
Сгенерировать запрос подписи сертификата (CSR):
Затем я отправляюсь на хостинг-провайдера и получаю несколько сертификатов. Они установлены следующим образом:
Когда я установил окончательный сертификат (my.crt), я получил следующую ошибку:
Я считаю, что я импортировал цепочку и в правильном порядке, поэтому я очень смущен этим сообщением. Может ли кто-нибудь увидеть, что я делаю неправильно?
ОТВЕТЫ
Ответ 1
Я только что обнаружил, что файлы godaddy, поставляемые вместе с моим сертификатом, являются промежуточными сертификатами (на самом деле они кажутся одним и тем же промежуточным сертификатом).
Я получил правильные корневые и промежуточные сертификаты, дважды щелкнув по моему сертификату и посмотрев путь к сертификату. отсюда я также мог загрузить каждый из этих сертификатов и использовать шаги, используемые в вопросе для их импорта

Ответ 2
Я боролся с той же проблемой около двух недель, пока не нашел способ обойти это. Проблемы заключались в том, что корневые и промежуточные сертификаты, которые поставлялись с моим сертификатом от Godaddy, были не теми, которые мне нужны. Я много раз искал в репозитории Godaddy, не в состоянии найти подходящие сертификаты.
Я просмотрел свой сертификат на своем ноутбуке (используя Windows 8.1). Там я увидел цепочку сертификатов, и я смог экспортировать корневые и промежуточные сертификаты. Затем я импортировал их в хранилище ключей и работал так, как должен.
Для этого выполните следующие действия:
Просмотр сертификата на компьютере под управлением Windows. Вы увидите цепочку сертификатов на третьей вкладке, которая выглядит следующим образом. 
Выберите корневой сертификат из цепочки и нажмите кнопку «Просмотреть сертификат».
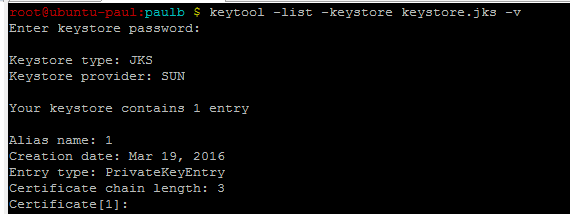
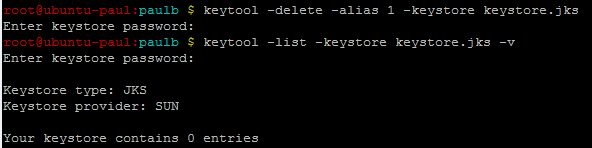
Примечание: Прежде чем я импортировал эти сертификаты, мне пришлось удалить те, которые были в моем хранилище ключей, и не работали. Для этого я использовал следующие инструкции:
Если вы не знаете, что находится внутри вашего keytool, вы можете просмотреть, используя:
Ответ 3
У меня такая же ошибка при попытке импортировать сертификаты, сертифицированные CA, в хранилище ключей в среде Linux.
Я выполнил множество шагов и успешно импортировал их.
После получения сертификатов, сертифицированных CA, выполните следующие шаги для импорта сертификатов в хранилище ключей.
шаг 1:
Импортировать корневой сертификат в cacerts, который будет доступен в папке JAVA_HOME/jre/lib/security, используя следующую команду:
Как только вы введете команду выше, она предложит ввести пароль, ввести пароль и нажать «Да».
шаг 2:
Импортировать корневой сертификат, используя следующую команду:
Как только вы введете команду выше, она предложит ввести пароль, ввести пароль и нажать «Да».
шаг 3:
Импортировать промежуточный сертификат, используя следующую команду:
после того, как вы введете команду выше, она предложит заменить уже имеющийся сертификат, введите yes.
Примечание: промежуточный сертификат является необязательным, его можно игнорировать, он поставляется с корневым сертификатом.
шаг 4:
Импортировать сертификат сайта, используя следующую команду:
Среда, выполняемая этими командами, представляет собой сертификат Java версии 7. GODADDY.
Ответ 4
Чтобы устранить эту проблему, используйте дополнительные ключи (-trustcacerts) в командах keytool.
Команда для импорта промежуточных сертификатов из файла intermediate.cer в файл certsks keystore должна выглядеть следующим образом:
keytool -storetype JCEKS -storepass passwd -keystore certificates.ks -import -alias промежуточное -trustcacerts файл intermediate.cer
Команда для импорта сертификата из файла http.cer в файл сертификатов cert.ks должна выглядеть так:
keytool -storetype JCEKS -storepass passwd -keystore certificates.ks -import -alias http -trustcacerts файл http.cer
Повторите попытку завершения процесса создания и импорта подписанного SSL-сертификата.
Ответ 5
Загрузите цепочку сертификатов, откройте ее в Windows — она хранит сертификат CA и ваш сертификат от CA.
Сначала импортируйте CA cert в хранилище ключей, а затем импортируйте ответ из CA.
Ответ 6
Следующий шаг очень важен, прежде чем импортировать сертификаты в локальный магазин ключей. После получения подписанных сертификатов от CA).
импортировать корневой сертификат в cacerts, который будет доступен в папке JAVA_HOME/jre/lib/security, используя следующую команду:
keytool -importcert -alias root -file [корневой сертификат] -keystore cacerts после ввода команды введите пароль, введите пароль и нажмите «Да».
Источник
Adblock
detector
Problem
keytool error: java.lang.Exception: Failed to establish chain from reply
Resolving The Problem
Solution: Make sure all the certificates from the chain are imported into the keystore. You can identify the certificates from the chain by opening the certificate received from the CA. Double click the file and go to the certification path tab. You should be able to get the path chain from there. In order to obtain the individual certs from the chain, contact your Certification Authority (i.e. Verisign or Entrust). If this is a self signed certificate contact your IT admin to obtain the individual certs from the chain.
[{«Product»:{«code»:»SSFUEU»,»label»:»IBM OpenPages with Watson»},»Business Unit»:{«code»:»BU059″,»label»:»IBM Software w/o TPS»},»Component»:»Not Applicable»,»Platform»:[{«code»:»PF025″,»label»:»Platform Independent»}],»Version»:»Version Independent»,»Edition»:»»,»Line of Business»:{«code»:»LOB10″,»label»:»Data and AI»}}]
Historical Number
00001381
Error: «keytool error: java.lang.Exception: Failed to establish chain from reply» when importing signed certificates for DLP Enforce
calendar_today
Updated On:
Products
Data Loss Prevention Enforce
Issue/Introduction
When you import signed certificates for the Data Loss Prevention (DLP) Enforce console, you see the error, «keytool error: java.lang.Exception: Failed to establish chain from reply.»
Environment
The Certificate Authority (CA) sends you a signed certificate in response to your certificate signing request (CSR). The self-signed certificate must return the root certificate along with the signed certificate.
Resolution
- Place the signed certificate into the directory (<drive>vontujrebin) with the .keystore file.
If the signed certificate is provided in the body of an email, paste it into a text document exactly as it appears on the screen, including the top and bottom lines:
-----Begin Certificate-----

	...

	-----End Certificate-----
Note: Make sure that no extra lines, spaces, trailing carriage returns, or characters have been inadvertently added, or the file will not work.
- Import your new root certificate as follows:
keytool -import -alias root -keystore .keystore -trustcacerts -file <root cert filename> - Save this file in the same directory where the .keystore file is located. If the signed certificate is provided as an attachment to an email, copy this file into the same directory where the .keystore file is located.
- Use the following command to update the .keystore file with the signed certificate:
keytool -import -alias tomcat -keystore .keystore -trustcacerts -file <signed certificate filename>
If you see the following error again, you are likely missing an Intermediate Certification Authority (CA) Certificate.
keytool error: java.lang.Exception: Failed to establish chain from reply
In this case, you need to import the intermediate certifcates as follows:
keytool -import -keystore .keystore -trustcacerts -file <intermediate certificate filename>
For example, as of April 2006, all SSL certificates purchased through the Symantec (formerly VeriSign) Web site require the installation of an Intermediate Certificate Authority (CA) Certificate. The SSL certificates are signed by an Intermediate CA using a two-tier hierarchy (also known as trust chain) which enhances the security of your SSL certificates.
Note: This has also been seen to happen where the signed certificate received (from Veri-sign) was in the wrong format (x509 instead of PKCS#7). If so, obtain the correct format for the signed cert, and re-try importing to the .keystore.
Feedback
thumb_up
Yes
thumb_down
No
After your certificate is activated and issued, you can proceed with its installation on GlassFish.
Since GlassFish uses keystores (.jks files), the certificate files need to be imported into the keystore with the corresponding private key before installation. For this, you will need to locate the keystore that was used to generate the CSR. This keystore is the only one that contains the private key for your certificate. If you cannot retrieve the keystore, the certificate will need to be reissued with a new keystore.
Certificate files can be downloaded from your SSLs.com account or retrieved from the email sent by Comodo (now Sectigo). The .zip archive downloaded from your account will contain your certificate and CA bundle in PEM format (.crt and .ca-bundle files), and in the PKCS#7 format (.p7b). We recommend importing the certificate files in PKCS#7 format (.p7b / .cer) since this process is simpler; however, they can be imported in PEM as well.
Importing the certificate
The certificate files should be uploaded to your server so they can be imported into the keystore. It is sufficient to import the certificate in only one of the following formats.
– PKCS#7 (.p7b, .cer)
Importing the certificate in PKCS#7 is done with a single command:
keytool -import -trustcacerts -alias myalias -file file.p7b -keystore mykeystore.jks
You will be prompted to enter the keystore password that was set when creating the keystore. The myalias value should be the same alias that was initially set for the keystore. You can review the alias with this command: keytool -list -v -keystore mykeystore.jks
Below is a screenshot of an example import:

– PEM (.crt, .ca-bundle)
Importing the certificate files in PEM requires first importing the CA certificates (.ca-bundle file), and then importing the certificate itself. If you do not have the .ca-bundle file, you can download it from your SSLs.com account.
The CA bundle can be imported with this command:
keytool -import -trustcacerts -alias ca -file file.ca-bundle -keystore mykeystore.jks
The alias used to import the CA bundle can be any name, but it has to be different from the alias of the keystore.
When the CA bundle is imported, you can import the certificate with the following command:
keytool -import -trustcacerts -alias myalias -file file.crt -keystore mykeystore.jks
Here the alias has to be the same as the keystore alias. The screenshot below illustrates the import process for certificate files in PEM:

Installation
When the keystore is ready, it should be imported into the default GlassFist keystore, which can be found in the following location: glassfish4/glassfish/domains/domain1/config/keystore.jks
domain1 is the default domain created by GlassFish. If you have added a new domain to GlassFish, the corresponding directory name should be used instead.
The following command is used to import one keystore into another:
keytool -importkeystore -srckeystore mykeystore.jks -destkeystore keystore.jks
You will be prompted to type in the password for both keystores, starting from the destination keystore keystore.jks. The password for GlassFish keystores is the same as the GlassFish master password for the domain; by default, it is changeit. Depending on the certificate format you used for import, there will be a different number of imported entries. If you used different passwords for the keystore and the private key, the private key password will need to be entered too.
Note: For the certificate to work on GlassFish, the GlassFish master password for the domain, the keystore password, and the private key password must all be the same. If one of the passwords does not match the others, please see the Troubleshooting section at the end to change it.
You will receive a confirmation saying the import was successful, as shown below:

Once your keystore is imported, GlassFish configuration needs to be updated to start using the new certificate. This can be done using the GlassFish administration console, or by manually updating configuration in the domain.xml file.
Web Interface (GlassFish Administration Console)
To access the GlassFish Administration Console remotely, the secure administration feature needs to be enabled for the domain first. This can be done by using the following command: asadmin enable-secure-admin example.com
Once enabled, you can access the administration console via https://example.com:4848. You will need to bypass the certificate warning given by the self-signed certificate that is installed on GlassFish by default.
To enable the certificate via the GlassFish Administration Console, enter this menu: Configurations >> server-config >> HTTP Service >> HTTP Listeners >> http-listener-2:
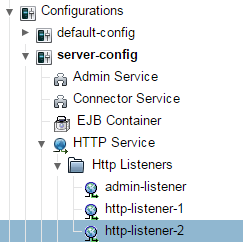
Switch to the SSL tab, enter your certificate alias myalias as the Certificate NickName, and click Save:
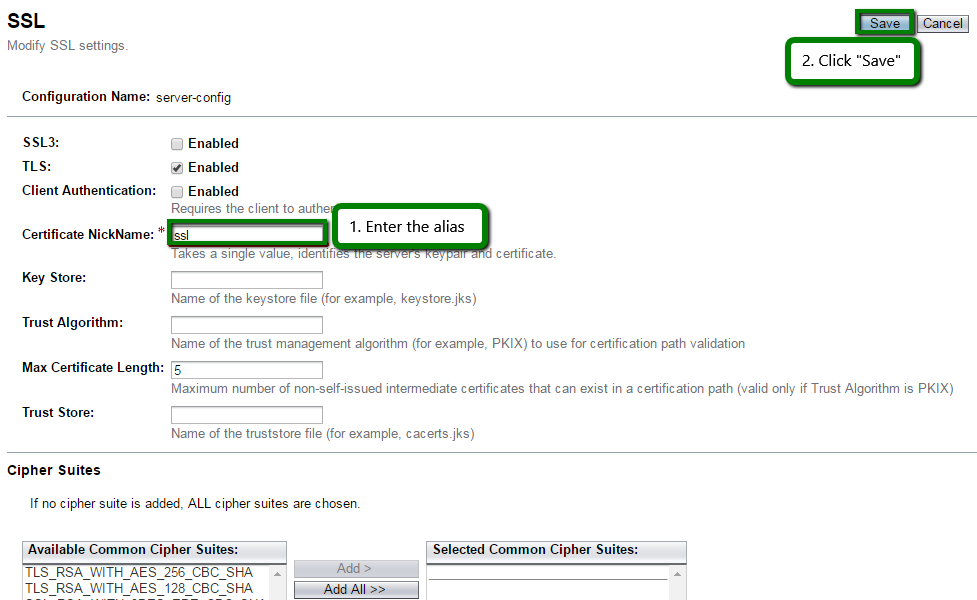
The default GlassFish port for HTTPS is 8181; you may want to change it to the usual 443 in the General tab:
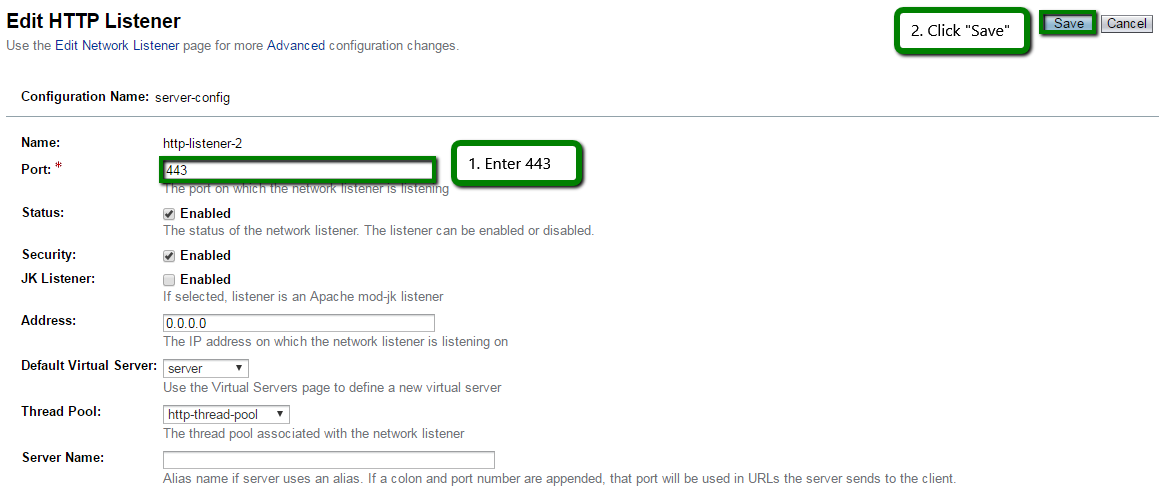
The certificate can be installed for the GlassFish Administration Console in the same way by going to HTTP Listeners >> admin-listener.
It is possible not all configuration references will be updated to the new alias. In this case, it will be necessary to update them manually in domain.xml.
Editing domain.xml
Instead of using the web interface (GlassFish Administration Console), you can manually edit the domain.xml configuration file with the appropriate certificate alias and port. The file is located in glassfish4/glassfish/domains/domain1/config/domain.xml.
Before opening the file, we recommend stopping the GlassFish service for this domain with the following command:
asadmin stop-domain example.com
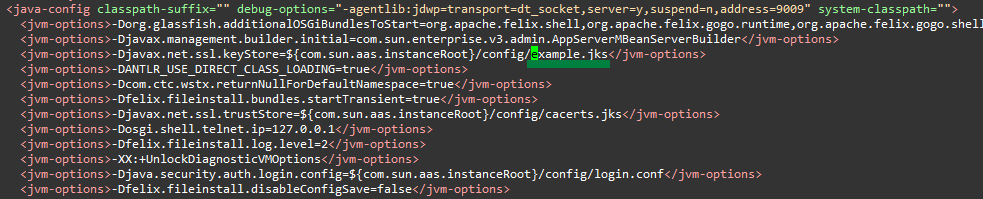
Open the file with your preferred text editor and locate any reference to s1as, which is the default certificate alias used by GlassFish. s1as should be replaced with myalias,our certificate alias.
If the file contains references to port 8181, you can also update them to 443:

If all aliases are updated to your alias, the certificate will also be installed for the GlassFish Administration Console.
Save the changes in domain.xml and start the domain:
asadmin start-domain example.com
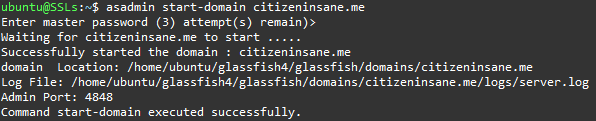
This completes the installation, and the domain can now be accessed via HTTPS.
You can use this tool to check certificate installation: https://decoder.link/sslchecker.
Optional configuration
Using your own keystore
Instead of importing your keystore into the default GlassFish keystore keystore.jks, you can edit domain.xml to reference your own keystore instead. Similar to the above editing, all references to keystore.jks need to be replaced with your mykeystore.jks keystore filename. In this case, your personal keystore should be placed into the same directory with the default keystore:
Redirect to HTTPS
To redirect all HTTP traffic to HTTPS, open default-web.xml (or your web.xml file if you have one) located in the domain config directory glassfish4/glassfish/domains/domain1/config and add the following within <web-app> … </web-app>:
<security-constraint>
<web-resource-collection>
<web-resource-name>Viewpoint Secure URLs</web-resource-name>
<url-pattern>/*</url-pattern>
</web-resource-collection>
<user-data-constraint>
<transport-guarantee>CONFIDENTIAL</transport-guarantee>
</user-data-constraint>
</security-constraint>
An example of what it might look like:
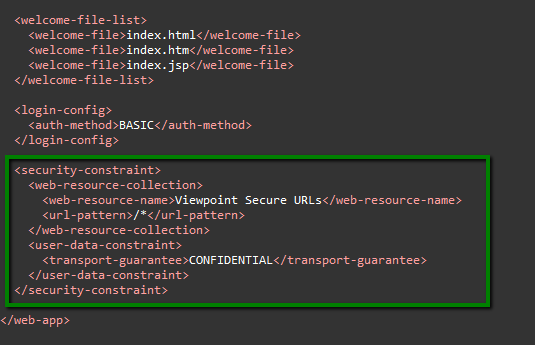
Save the changes and restart the domain – this will complete the setup.
Troubleshooting
This section covers several more or less common errors that can be encountered during installation, checking errors, and guidelines for password changes.
Errors
keytool error: java.io.IOException: Keystore was tampered with, or password was incorrect
This keytool error will be displayed during any action with the keystore if the entered keystore password or private key password is incorrect.
If you do not remember the password, unfortunately, there is no way to recover it, and you will need to create a new keystore.
keytool error: java.lang.Exception: Failed to establish chain from reply
The above error occurs when the keystore does not have the intermediate certificates (otherwise known as the CA bundle) needed to establish the full chain. Make sure you have imported the CA bundle certificates first, or better, try importing the certificate in PKCS#7.
There is a process already using the admin port 4848 — it probably is another instance of a GlassFish server.Command start-domain failed.
If you cannot start the domain with this error being displayed, you will need to kill the java process manually. First, run this command to locate the process:
sudo netstat -ntulp
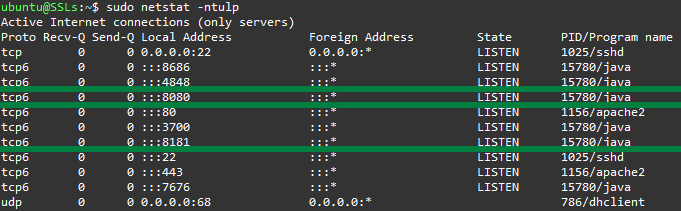
Copy the PID of java running on your GlassFish ports (15780 in the above screenshot), and run this command to kill the process:
kill 15780
You will now be able to start the domain using the usual asadmin commands.
Checking errors / Debug
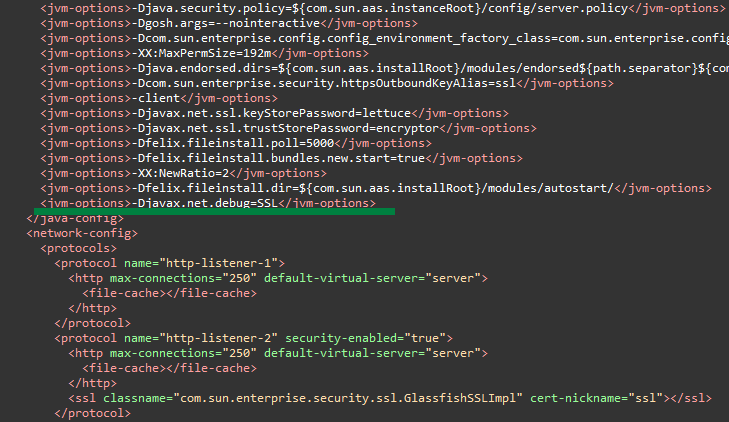
If you encounter any issues with the HTTPS connection, it is worth checking the server log for errors, which is located in glassfish4/glassfish/domains/domain1/logs/server.log.
This will contain sufficient information on the SSL errors; however, if you feel it is not enough, you can set the debug level to SSL in domain.xml by adding the following JVM option within the <java-config> section: <jvm-options>-Djavax.net.debug=SSL</jvm-options>
Checking the keystore
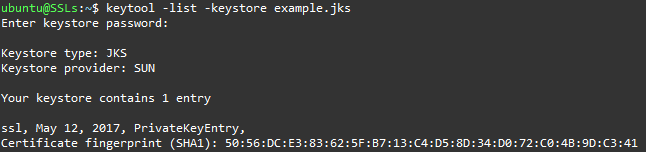
You can check the content of a keystore with this command:
keytool -list -keystore mykeystore.jks
This will give you a short list of all entries in the keystore. To get more information on each entry (e. g., how many certificates it contains, or if there is a private key), you can add the -v flag:
keytool -list -v -keystore mykeystore.jks
In the below example, the keystore example.jks contains only one entry with a private key:
Changing passwords
For the certificate to work, the GlassFish master password for the domain, the keystore password, and the private key password must all be the same. If they are not, you will receive various errors upon HTTPS connection and in the server log. To make sure all three passwords are the same, you can use the commands below to change them.
– GlassFish domain master password
The GlassFish master password is “changeit” by default and can be changed with the change-master-password subcommand of asadmin:
asadmin change-master-password domain1

– Keystore password
The password to a keystore can be changed with the following keytool command:
keytool -storepasswd -keystore mykeystore.jks

– Private key password
The password to the private key within the keystore can be changed with this command:
keytool -keypasswd -alias myalias -keystore mykeystore.jks

Sources
For further reading, you can refer to the documentation listed below:
Keytool: https://docs.oracle.com/javase/6/docs/technotes/tools/windows/keytool.html
GlassFish documentation: https://javaee.github.io/glassfish/documentation
GlassFish Administration Guide: https://javaee.github.io/glassfish/doc/4.0/administration-guide.pdf
GlassFish Security Guide: https://javaee.github.io/glassfish/doc/4.0/security-guide.pdf
Skip to navigation
Skip to main content

Infrastructure and Management
- Red Hat Enterprise Linux
- Red Hat Virtualization
-
Red Hat Identity Management
- Red Hat Directory Server
- Red Hat Certificate System
- Red Hat Satellite
- Red Hat Subscription Management
- Red Hat Update Infrastructure
- Red Hat Insights
- Red Hat Ansible Automation Platform
Cloud Computing
- Red Hat OpenShift
- Red Hat CloudForms
- Red Hat OpenStack Platform
-
Red Hat OpenShift Container Platform
- Red Hat OpenShift Data Science
-
Red Hat OpenShift Online
- Red Hat OpenShift Dedicated
- Red Hat Advanced Cluster Security for Kubernetes
- Red Hat Advanced Cluster Management for Kubernetes
- Red Hat Quay
- OpenShift Dev Spaces
- Red Hat OpenShift Service on AWS
Storage
- Red Hat Gluster Storage
- Red Hat Hyperconverged Infrastructure
- Red Hat Ceph Storage
- Red Hat OpenShift Data Foundation
Runtimes
- Red Hat Runtimes
- Red Hat JBoss Enterprise Application Platform
- Red Hat Data Grid
- Red Hat JBoss Web Server
- Red Hat Single Sign On
- Red Hat support for Spring Boot
- Red Hat build of Node.js
- Red Hat build of Thorntail
- Red Hat build of Eclipse Vert.x
- Red Hat build of OpenJDK
- Red Hat build of Quarkus
Integration and Automation
- Red Hat Process Automation
- Red Hat Process Automation Manager
- Red Hat Decision Manager
All Products
Issue
- I have an issue with when I tries to import a SSL certificate into my keystore.
Here is what I did
1) Create a key store.
/usr/java/jdk1.5.0_11/bin/keytool -genkey -validity 1600 -keyalg rsa -sigalg SHA1withRSA -keystore example.keystore -alias example
2) Create a SSL request file
/usr/java/jdk1.5.0_11/bin/keytool -certreq -keystore example.keystore -sigalg SHA1withRSA -file example.req -alias example
3) I have sent the req file to our Allianz CA and they came back with
the cert file.
I then ran this command
/usr/java/jdk1.5.0_11/bin/keytool -import -file signed_example.cer -keystore example.keystore -alias example
and It prompted me for password and asked me to confirm whether I should trust the certificate I am importing. I type yes. I got this error
keytool error: java.lang.Exception: Failed to establish chain from reply
- While we import certificate we get the below error output
[root@app1 bin]# keytool -importcert -alias jboss -keystore abc.keystore -file partners-entrustcert.crt Enter keystore password: keytool error: java.lang.Exception: Failed to establish chain from reply
Environment
- Java 1.4 or later
Subscriber exclusive content
A Red Hat subscription provides unlimited access to our knowledgebase, tools, and much more.
Current Customers and Partners
Log in for full access
Log In