Код Расшифровка ошибки
0 ОК
21 1 или более хеш-плат не обнаружены
22 Аномальная связь по управлению питанием
23 Все хэш-платы не могут быть включены
24 Некоторые платы не включаются
25 Не удалось поднять частоту хэш-платы
26 Не удалось установить напряжение
27 Тест чипа BIST не пройден
28 Ненормальная связь платы хешрейта не может быть автоматически восстановлена во время работы
29 Ненормальная связь по питанию во время работы не может быть восстановлена автоматически
30 Подключение к майнинговому пулу прервано
31 Повреждение отдельных микросхем, что приводит к искусственно завышенной вычислительной мощности
32 Hashboard перегрелся
33 Невозможно прочитать температуру чипа
34 Неправильное подключение кабеля связи платы управления
35 Аномальный источник питания
36 Некоторые чипы не работают должным образом
37 Тип платы управления / версия прошивки / количество микросхем не совпадает
38 Наконец, у некоторых чипов низкая вычислительная мощность.
39 Аномальные параметры старения
40 Проверьте, совпадают ли направления переднего и заднего ветра, согласуются ли они с другими машинами, и если они не совпадают, измените направление вентилятора.
41 Измерьте температуру воздухозаборника горной машины. если она превышает 40 градусов, необходимо улучшить температурную обстановку в шахте.
42 Если определенная плата вычислительной мощности часто перегревается, проблемную плату вычислительной мощности можно заменить (ремонт головоломки).
43 Ошибка, не удается прочитать температуру чипа, не удается прочитать температуру чипа, номер платы вычислительной мощности»1.Проверьте, не ослаблены ли винты на обоих концах клеммы питания и подключения кабеля SPI
44 Замените источник питания
45 Замените плату управления
46 Замените проблемную плату вычислительной мощности (ремонт головоломки)
47 Ошибка включена, неверное подключение кабеля связи платы управления, неправильное подключение кабеля SPI платы управления, номер платы вычислительной мощности «1.Проверьте, соответствует ли способ (последовательность) подключения кабеля SPI платы вычислительной мощности другим машинам той же модели
48 Замените плату управления»
49 Ошибка, неправильный источник питания, неправильный источник питания,, «1.Обратите внимание, что если нет явных отклонений в вычислительной мощности всей машины (ни одна плата не упала), нет необходимости иметь с этим дело.
50 Проверьте, не ослаблены ли винты на обоих концах клеммы питания и подключения кабеля SPI
51 Замените источник питания»
52 Ошибка, некоторые чипы работают неправильно, и количество ядер на чипе ненормально. Номер платы вычислительной мощности: Номер чипа, «1.Обратите внимание, что если нет явных отклонений в вычислительной мощности всей машины (ни одна плата не упала), нет необходимости иметь с этим дело.
53 Перезапустите майнер, чтобы узнать, по-прежнему ли сообщается о той же ошибке
54 Замените проблемную плату вычислительной мощности (ремонт головоломки)
55 ErrInvVidtype, тип платы управления/версия прошивки/количество микросхем не соответствует, тип платы управления/версия прошивки/количество микросхем не соответствует, «видтип, тип майнера, подтип, номер микросхемы», «После накопления нескольких единиц (>10) обратитесь к разработчику программного обеспечения, чтобы решить эту проблему сразу»
56 ErrBadRearChips, последние несколько чипов имеют низкую вычислительную мощность, а последние несколько чипов имеют низкую вычислительную мощность, в настоящее время не нуждаются в обработке
57 ErrInvTuneParam, параметры старения являются ненормальными, начальная частота старения и напряжение неверны, и в настоящее время старение не нуждается в обработке.
58 ,,,,,
59 ,,,,,»внимание:
60 Каждый раз, когда вы выполняете шаг решения, вам необходимо снова включить питание, чтобы убедиться, что оно вернулось в нормальное состояние.
61 После замены каждой детали, если проблема не решена, замененные детали следует вернуть на исходную машину.
62 Установлено, что отремонтированная плата вычислительной мощности требует добавления кода ошибки и простого описания проблемы».
Troubleshooting mining malfunctions can be complex, yet InnoMonitor provides miners with a tool to quickly and accurately identify faulty parts. By inputting an IP range on Innosilicon’s website and running the batch management scan, issues may arise that require additional research before attempting any repairs or fixes; however, another scan will help confirm abnormalities.
Tracking down the source of an error code
When encountering an error code from a miner, it can be difficult to pinpoint where the fault lies. However, with some understanding of common miner issues and their corresponding error codes, it is possible to locate the fault part accurately.
Restarting the miner is generally a good first step when troubleshooting. This allows for any abnormal conditions to reset and for any malfunctioning parts to be re-engaged or reconnected. To accurately identify faulty parts in a miner, one should first download and open InnoMonitor, a batch management tool. This tool is available on the website of Innosilicon. After opening, input the IP range the miner is associated with and press the “Scan” icon.
If there is an issue with the miner, but no error code is reported, it is necessary to enter the miner log backstage to find the actual error code. To do this, ensure you have opened InnoMonitor and followed instructions up until now. Once you are in the log backstage, observe carefully and take note of any variables or irregularities in comparison to other miners in your system. This could be abnormal fan speeds or temperatures, so pay close attention to data values like these.
If the issue persists, examining the various components of the miner can help identify which parts require attention. For example, if Error Code 30 is encountered (which indicates an inability to connect to the mining pool), checking whether the pool is configured correctly or examining whether the network port of the miner is connected properly are two possible solutions. Similarly, if Error Code 35 (abnormal power output) appears, restarting or replacing the power supply could rectify this issue.
If Error Codes 21 (individual hash boards not detected) or 24 (hash board fault) present themselves, powering off and cooling for 10 minutes before turning back on may resolve these errors temporarily. Additionally, checking that all power supplies and cables are tightly connected can help identify faulty hash boards, which may need replacement to restore the normal operation of the miner. Furthermore, checking that all data cables are connected in proper sequence and making sure screws at both ends of terminals and SPI cable connections are secure should be examined since they can cause unexpected results if loose or broken.
For more complex errors such as chip abnormality (Error Code 31) or voltage difference warnings (Error Code 164), consulting after-sales personnel or replacing particular components like control boards may be necessary.
Although locating faults within miners requires an understanding of specific error codes and potential solutions for each one, anyone familiar with mining processes can identify exactly what needs fixing by following the steps outlined above.
Innosilicon error code definitions
Error Code 32: ErrHighAirTemp – High air temperature, fans may be rotating in different directions
Error Code 30: NoPoolConnection – Unable to connect to the mining pool
Error Code 22, 29: Battery12CCommunicationFailure – Battery 12C communication is abnormal
Error Code 35, 40, 41: AbnormalPowerOutput – Abnormal power output
Error Code 21: IndividualHashBoardsNotDetected – Individual hash boards are not detected
Error Code 23, 24, 27: DataCableConnectionSequenceIncorrect – The data cable connection sequence is incorrect
ErrorCode 31: HashBoardFault1- Hash board fault (individual chip)
ErrorCode 25, 26, 28, 33, 36, 42: HashBoardFault2- Hash board fault (all chips)
ErrorCode 37 : ControlBoardorHashBoardDoesNotMatch- The control board or hash board does not match
ErrorCode 38 : ErrBadRearChips – The last few chips have a low hash rate, it is recommended to replace them
ErrorCode 39 : ErrInvTuneParam- Aging parameter abnormal, initial aging frequency voltage is incorrect
Error Code 41: PSU_STARTUP_VOLT – Startup voltage problem b/p – off for 15 minutes
Error Code 42: SETPLL_PLANB_FAIL – Low frequency on chip
Error Code 43 : VOLT_DIFF_FAIL – Failure, overvoltage on chip
ErrorCode 47 : WATCHDOG – Watchdog reset
ErrorCode 51 : SPI_HighSpeed- Chip overvoltage – drive in low mode
Error Code 52 : CONF_PARA1 – In connected mode, changes pool
ErrorCode 53 : CONF_PARA2 – Use this, a hash is underrated on a board
Error Code 57: PSU_BAD_POWER – B/p insufficient power
ErrorCode 161 : Dec_Power- Underestimate board frequency
ErrorCode 164: VoltAB_Diff_Warn- Voltage difference warning
Conclusion
By understanding the various error codes and their potential solutions, miners can quickly identify which parts of the mining process require attention. Whether it’s an inability to connect to a pool or abnormally low power output, these errors can be solved by following some simple steps outlined in this article. Additionally, complex issues such as chip abnormalities or voltage difference warnings may require consultation with after-sales personnel or replacement of particular components like control boards. With this knowledge in hand, anyone familiar with mining processes should now be able to maintain their miner effectively and efficiently.
-
#1
Есть кто сталкивался и решил проблему на innosilicon Т2Т 30TH, выскакивает ошибка 43. Машинка стоит работает час, два потом график падает и она будто бы заново включается. Бывает что включиться без одной платы, бывает все заработают. Блок питания поменял проблема не решилась.
-
#3
Пишет 43 сам понять не могу ее в списке нет. иногда очень редко бывает что появляется 33 потом пропадает сразу
-
#6
Пишет 43 сам понять не могу ее в списке нет. иногда очень редко бывает что появляется 33 потом пропадает сразу
логи и карту чипов бы скинул.
Ссылки:
/error — код ошибки на устройстве с описанием ошибки
/logs — системный лог
/mlogs — лог cgminer’a
/stat — графическая карта чипов с hw,temp и прочим
/fan — настройка оборотов кулеров
Заходить через вебморду, добавить после http://айпи асика/ТУТ указать то что перечислил выше
-
#7

И иногда ооочень редко проскакивает вот эта ошибка
-
#8
логи и карту чипов бы скинул.
Ссылки:
/error — код ошибки на устройстве с описанием ошибки
/logs — системный лог
/mlogs — лог cgminer’a
/stat — графическая карта чипов с hw,temp и прочим
/fan — настройка оборотов кулеровЗаходить через вебморду, добавить после http://айпи асика/ТУТ указать то что перечислил выше
Сейчас сделаю
-
#11
/logs ничего не показывает
-
#12
/logs ничего не показывает
Наверное прошивка последняя стоит. она не показывает логи. нужно откатить на предыдущую для просмотра логов.
-
#13
Зачем ставить корявый переводчик на веб морду? Он затрудняет поиск ошибок на языке оригинала.
140-137 чипы в красной зоне.

-
#14
Наверное прошивка последняя стоит. она не показывает логи. нужно откатить на предыдущую для просмотра логов.
Подскажи где скачать предыдущую прошивку?
-
#15
Зачем ставить корявый переводчик на веб морду? Он затрудняет поиск ошибок на языке оригинала.
140-137 чипы в красной зоне.
Посмотреть вложение 234677
Гугл сам переводит( есть машинка у которой так же чипы и она работает уже давно без проблем.
Подскажи где скачать предыдущую прошивку?
Могу убрать перевод если так лучше будет разобраться.
-
#17
Гугл сам переводит( есть машинка у которой так же чипы и она работает уже давно без проблем.
Могу убрать перевод если так лучше будет разобраться.
В ошибке и указаны эти чипы на первой хеш плате.

-
#19
получается нужно сначала устранить эту проблему?
Может термоленты рассохлись или что там между радиатором и чипами. Разбирал как то T2TZ, там обрывки лент торчали из платы. В любом случае без логов это гадание на кофейной гуще. Можно ещё замерить мультиметром напряжение сети и вольтаж на клеммах хеш плат, подтянуть их. Если доберешься до логов, скопируй их в .txt и закинь сюда.
-
#20
получается нужно сначала устранить эту проблему?
Добрый день! У меня всё то же самое. и ошибка 43 , и чипы 137-140 красные на второй плате двух T2T 33 Th. Можно ли узнать, удалось ли решить проблему? сегодня принес после ремонта плату, установил, но проблему ремонтник не решил, только денег взял.
1. Download the batch management tool (Inno Monitor Download) to the desktop and open it.
2. Enter the IP range where the miner is located, and click to start scanning.

If the miner does have a problem, but the batch tool fails to report an error code, enter the miner log backstage to find the error code. The method is as follows:
 3. Check the miner failure according to the error code and confirm the fault location.
Notice:
(1) Every time you perform a solution step, you need to re-power on to confirm whether it is back to normal
(2) If the problem is not solved after replacing each part, the replaced part should be installed back to the original miner
(3) Make sure that the miner to be repaired requires an error code and a simple description of the problem.
|
Error code |
Question |
Treatment plan |
|
32 |
Over-temperature protection |
① Whether the fan is usually working, and whether the rotation direction of the two fans is the same. If not, change the direction of the fan; If the fan does not rotate, replace the fan first; if the fault persists, the control board or power supply needs to be replaced. ② Whether the temperature of the air inlet of the fan is too high (recommond to use GS320 infrared thermometer), and move the miner to the lower position of the shelf and place it; If it exceeds 40 degrees, the temperature environment of the mining farm must be improved. ③ If a particular hash board is frequently overheated, the problematic hash board can be replaced. |
|
Notes: If the problem occurs massively, the abnormal miner temperature shall be taken into top priority.(i.e. local fan failure) |
||
|
30 |
Unable to connect to the mining pool |
1. Some miners ① Check whether the pool is configured correctly ② Check whether the network port of the miner is tightly connected ③ Exchange network cables with normal ④ Replacing the control board 2. All miners ① Check whether the pool address is configured correctly ② Check whether the operator’s network is interrupted ③ Check the local network setting (such as the setting of DNS,DHCP,ports and other settings) |
|
22、29 |
Battery 12C communication is abnormal |
① Restart ② Replace the power supply, you can choose the Lianli Small Steel Cannon PSU 2500W ③ Replace the control board |
|
35、40、41 |
Abnormal power out put |
① Restart ② Replace the power supply ③ Replace the faulty hash board or control board. ④ Check whether the screws at both ends of the power terminal and the connection of the SPI cable are loose ⑤ Observe the miner’s hash rate. If there is no obvious abnormality (not falling off the board), there is no need to deal with it. |
|
21 |
Individual hash boards are not detected |
① Check the power supply and cable connection of the hash board, and then plug it in again ② Replace the faulty hash board ③ Replace the control board |
|
34 |
The data cable connection sequence is incorrect |
① Replace the control board ② Check whether the data cable and power cable connection sequence are consistent |
|
23、24、27 |
Hash board failure |
① Power off and turn on the miner after cooling for 10 minutes ② Check whether the screws at both ends of the power terminal and the connection of the SPI cable are loose ③ Replace the hash board ④ Replace the control board ⑤ Replace the PSU |
|
25、26、28、33、36、42 |
Hash board failure |
① No treating is needed if the hash rate is normal ② Replace the hash board ③ Check whether the screws at both ends of the power terminal and the connection of the SPI cable are loose ④ Replace the power supply ⑤ Replace the control board |
|
31 |
Individual chip abnormality |
① No treating is needed if the hash rate is normal ② Replace the chip |
|
37 |
The Control board or hash board does not match |
Replace with the specific control board parts for this model of miner |
|
38 |
The last few chips have a low hash rate |
No need to deal with |
|
39 |
Aging initial frequency voltage is incorrect |
No need to deal with |
302
320
322
329
352
360
410
412
420
422
430
431
432
440
441
442
450
451
452
510
511
512
520
521
522
530
ли
разъем хэш-платы.
531
532
540
541
542
550
551
552
560
561
562
590
591
592
600
610
нормальный
режим
701
710
712
802
2000
2021
2030
2340
2350
5070
5072
5110
5112
8410
- Manuals
- Brands
- INNOSILICON Manuals
- Computer Hardware
- A4+ LTCMaster
- User manual
-
Contents
-
Table of Contents
-
Bookmarks
Quick Links
A4+ LTCMaster
USER MANUAL
INNOSILICON CONFIDENTIAL
Related Manuals for INNOSILICON A4+ LTCMaster
Summary of Contents for INNOSILICON A4+ LTCMaster
-
Page 1
A4+ LTCMaster USER MANUAL INNOSILICON CONFIDENTIAL… -
Page 2: Table Of Contents
INNOSILICON A4+ LTCMaster High Efficient LTCMaster Table of Contents 1. OVERVIEW 2. MINER ASSEMBLE 2.1 Check the miner before power on 2.2 Connect the PSU 2.3 Connect the Ethernet Cable 3. ENTER THE MINER CONSOLE 4. CONFIG THE MINER 5. APPENDIX 5.1 Modify the login password…
-
Page 3: Overview
A4+ LTCMaster 1. OVERVIEW Part Number A4+ LTCMaster Hash Rate 620Mh/s (+-8% ) Power 750W +/-8% Size (L×W×H) 350mm×125mm×158mm Net Weight 3.83KG (without PSU) Operating Temperature 0-40 ℃ Required rated PSU 1000W or above, 9 * PCI-E 6Pin Network Connection…
-
Page 4: Miner Assemble
A4+ LTCMaster 2. CABLE CONNECTION 2.1 CHECK THE MINER BEFORE POWER ON · Check the warranty sticker is well or not, especially the hashboards PSU port side. If the warranty sticker is damaged when you received the miner, please contact our After-sales.
-
Page 5: Connect The Psu
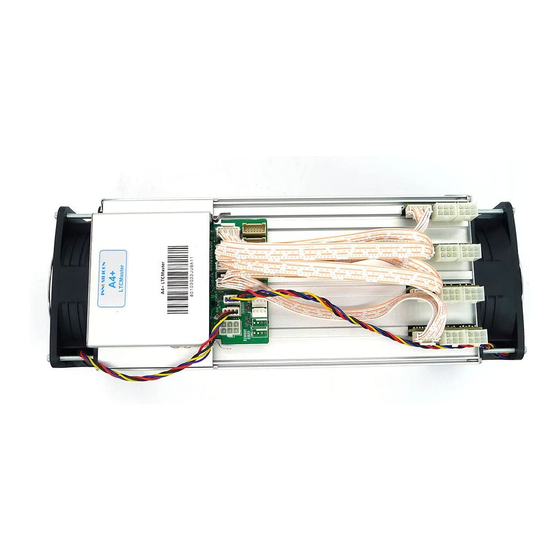
A4+ LTCMaster 2.2 CONNECT THE PSU Every hash board needs to be inserted with 2 PSU cables, controller only needs 1 PSU cable according to the following image . 2.3 CONNECT THE ETHERNET CABLE Insert one end of the Ethernet cable into the router and the other end into the slot shown in the following…
-
Page 6: Enter The Miner Console
A4+ LTCMaster 3. ENTER THE MINER CONSOLE By default, the miner uses Static IP to access the control webpage of the miner. Input 192.168.1.254 into the browser, then click ‘Enter’ to enter the miner’s control webpage (Chrome is the suggested browser).
-
Page 7
A4+ LTCMaster · Press the OK button twice to confirm the changes.Then modify the IP address of the miner (Do it as the follow step g) to guarantee the miner and the router have the same network segment.Then connect the miner with the router,connect the PC with the router and select the “Obtain the IP address automatically”.Now you can enter the IP through the browser into the control interface… -
Page 8: Config The Miner
A4+ LTCMaster · Press the OK button twice to confirm the changes.Then modify the IP address of the miner (Do it as the follow 4.4) to guarantee the miner and the router have the same network segment.Then connect the miner with the router,connect the PC with the router and select the “Obtain the IP address automatically”.Now you can enter the IP through the browser into the control interface…
-
Page 9
A4+ LTCMaster Password is wrong/error?—Please contact our after-sales people. 4.3 Enter the mining pool’s URL, Worker, password according to the following image, then click .The miner will start mining, and the page will return to the ‘Miner Configuration’ page. It will show the user’s modified setting. -
Page 10
A4+ LTCMaster 4.4 To avoid IP conflict when using 2 or more miners at the same time, the IP address needs to be changed. Enter the network interface shown in the following image, and modify the IP address to you need, then click the “Save”… -
Page 11
A4+ LTCMaster HW: means error in calculating INNOSILICON CONFIDENTIAL… -
Page 12: Appendix
A4+ LTCMaster 5. APPENDIX 5.1 MODIFY THE LOGIN PASSWORD Select the “Administration” interface at System, then you can modify your password. Then click to save your new password. Note: As the factory reset will not reset the password to the default password, you must take care your new password.
-
Page 13
A4+ LTCMaster Build date is the version of the firmware. If your miner build date is before NOV 24,please upgradeyour miner via a TF card. Here is the instruction: http://www.innosilicon.com.cn/api/download.php?url=TF-card-firmware-update-manual-en.pdf If your miner build date is NOV 24 or later, a web upgrade is OK, you can do it as below .
- Manuals
- Brands
- INNOSILICON Manuals
- Computer Hardware
- A4+ LTCMaster
- User manual
-
Contents
-
Table of Contents
-
Bookmarks
Quick Links
A4+ LTCMaster
USER MANUAL
INNOSILICON CONFIDENTIAL
Related Manuals for INNOSILICON A4+ LTCMaster
Summary of Contents for INNOSILICON A4+ LTCMaster
-
Page 1
A4+ LTCMaster USER MANUAL INNOSILICON CONFIDENTIAL… -
Page 2: Table Of Contents
INNOSILICON A4+ LTCMaster High Efficient LTCMaster Table of Contents 1. OVERVIEW 2. MINER ASSEMBLE 2.1 Check the miner before power on 2.2 Connect the PSU 2.3 Connect the Ethernet Cable 3. ENTER THE MINER CONSOLE 4. CONFIG THE MINER 5. APPENDIX 5.1 Modify the login password…
-
Page 3: Overview
A4+ LTCMaster 1. OVERVIEW Part Number A4+ LTCMaster Hash Rate 620Mh/s (+-8% ) Power 750W +/-8% Size (L×W×H) 350mm×125mm×158mm Net Weight 3.83KG (without PSU) Operating Temperature 0-40 ℃ Required rated PSU 1000W or above, 9 * PCI-E 6Pin Network Connection…
-
Page 4: Miner Assemble
A4+ LTCMaster 2. CABLE CONNECTION 2.1 CHECK THE MINER BEFORE POWER ON · Check the warranty sticker is well or not, especially the hashboards PSU port side. If the warranty sticker is damaged when you received the miner, please contact our After-sales.
-
Page 5: Connect The Psu
A4+ LTCMaster 2.2 CONNECT THE PSU Every hash board needs to be inserted with 2 PSU cables, controller only needs 1 PSU cable according to the following image . 2.3 CONNECT THE ETHERNET CABLE Insert one end of the Ethernet cable into the router and the other end into the slot shown in the following…
-
Page 6: Enter The Miner Console
A4+ LTCMaster 3. ENTER THE MINER CONSOLE By default, the miner uses Static IP to access the control webpage of the miner. Input 192.168.1.254 into the browser, then click ‘Enter’ to enter the miner’s control webpage (Chrome is the suggested browser).
-
Page 7
A4+ LTCMaster · Press the OK button twice to confirm the changes.Then modify the IP address of the miner (Do it as the follow step g) to guarantee the miner and the router have the same network segment.Then connect the miner with the router,connect the PC with the router and select the “Obtain the IP address automatically”.Now you can enter the IP through the browser into the control interface… -
Page 8: Config The Miner
A4+ LTCMaster · Press the OK button twice to confirm the changes.Then modify the IP address of the miner (Do it as the follow 4.4) to guarantee the miner and the router have the same network segment.Then connect the miner with the router,connect the PC with the router and select the “Obtain the IP address automatically”.Now you can enter the IP through the browser into the control interface…
-
Page 9
A4+ LTCMaster Password is wrong/error?—Please contact our after-sales people. 4.3 Enter the mining pool’s URL, Worker, password according to the following image, then click .The miner will start mining, and the page will return to the ‘Miner Configuration’ page. It will show the user’s modified setting. -
Page 10
A4+ LTCMaster 4.4 To avoid IP conflict when using 2 or more miners at the same time, the IP address needs to be changed. Enter the network interface shown in the following image, and modify the IP address to you need, then click the “Save”… -
Page 11
A4+ LTCMaster HW: means error in calculating INNOSILICON CONFIDENTIAL… -
Page 12: Appendix
A4+ LTCMaster 5. APPENDIX 5.1 MODIFY THE LOGIN PASSWORD Select the “Administration” interface at System, then you can modify your password. Then click to save your new password. Note: As the factory reset will not reset the password to the default password, you must take care your new password.
-
Page 13
A4+ LTCMaster Build date is the version of the firmware. If your miner build date is before NOV 24,please upgradeyour miner via a TF card. Here is the instruction: http://www.innosilicon.com.cn/api/download.php?url=TF-card-firmware-update-manual-en.pdf If your miner build date is NOV 24 or later, a web upgrade is OK, you can do it as below .