![]()
Download Article
![]()
Download Article
If your cabinets and cabinet drawers are made of wood, chances are they will either expand, shrink—or both—over time. Dry or humid air within your home can affect the function of your cabinet drawers. Very humid air can cause the drawer box sides to expand enough to cause them to bind at the top. Extremely dry air can cause the drawer boxes to lose their moisture content and shrink, causing the glide wheels to “jump the tracks.” The glides on any material may simply need adjustment due to daily use. Adjusting your cabinet drawers to accommodate these changes is very simple and usually requires nothing more than a Phillips head screwdriver and a flashlight!
-

1
Remove the contents of the drawers. Begin by removing the contents of the drawers that need adjusting AND the cabinet below.
- You will need access to the inside of the cabinet to assess the adjustments that need to be made.
-
2
Open and close the drawer slowly, assessing the problem.[1]
While doing so, check to see if it binds at the top against the face frame as you close it.- If not, open and close the drawer very slowly to see if the guide wheel drops or “pops” off the track at any point.
- If neither issue occurs, then your width adjustment is probably OK.
- Open and close the drawer again, doing so very slowly. If the drawer glide on one side of the drawer or the other begins to lift off the guide wheel, near the face frame of the cabinet (when the drawer is nearly closed), then an adjustment needs to be made.
- This will be covered by the following steps.
Advertisement
-
3
Close the drawer completely. All four edges of the drawer face should touch against the face frame (or all protective bumper pads, if applied).
- If the drawer is out of alignment, there will be a growing gap starting from the point where the edge of the drawer face touches the face frame.
-
4
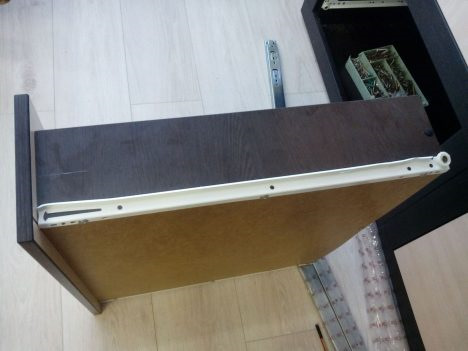
Remove the drawer from the cabinet.[2]
Pull the drawer open all the way until it stops.- Then, while pulling slightly, lift from the drawer face end and the drawer should clear the track and come right out.


Advertisement
-
1
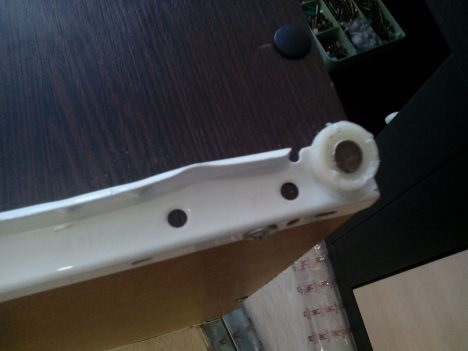
Check for the presence of bent plastic guide brackets. Some glides are secured to the inside edge of the face frame with a screw and mounted into a plastic bracket that is attached to the inside rear of the cabinet.
- Sometimes with this type of mounting, the glides can become slightly bent or twisted.
- Check to see if this is the case. If so, remove the glide screws and the glide, then use a little pressure or twisting to return the glide to shape, if possible.
- This should be very simple. If too bent, then both the right and left glides will need to be replaced, as they are sold only in a set.
-
2
Replace overly bent guides. Be sure to replace the damaged, useless glides.
- Take one to your home center to get a proper replacement.
- They cost about $6 to $8 for a set.
- The good news, however, is that this type of damage is usually very “fixable” and replacement is not needed.
-
3
Remove the drawer and set it aside. More often, your glides will be mounted on wood rails that run from the backside of the face frame to the inside rear of the cabinet. The glide can be adjusted at several points along the railing and are usually mounted with 3 or four screws per rail.
- If your drawer binds at the top, against the face frame, this is a fairly simple adjustment.
-
4
Loosen the screw that holds the glide.[3]
Use the Phillips screwdriver to loosen the screw that holds the drawer glide to the inside of the face frame.- Loosen it only. Do not remove it.
- This screw is located in a vertical oblong hole in the glide to allow for up and down adjustment.
-
5
Slide the glide downward.[4]
With the mounting screw loosened, slide the drawer glide downward and retighten the screw.- Repeat the same process with the drawer glide at the opposite side of the drawer space.
- Do any necessary fine-tuning to the glides and tighten the screws to secure the glides.[5]
-
6
Adjust the mounting brackets if necessary. If the glides are mounted in a bracket at the inside rear of the cabinet, the mounting bracket typically has elongated slots for adjustment.
- Loosen the mounting screws enough to adjust the bracket.
- Tighten ONE screw enough to secure the bracket so you can test the adjustment.
- When satisfied with the adjustment, you may tighten all screws.
- NOTE: Because of the way the glides are designed and mounted, it is very unlikely that a drawer would bind at the bottom.


Advertisement
-
1
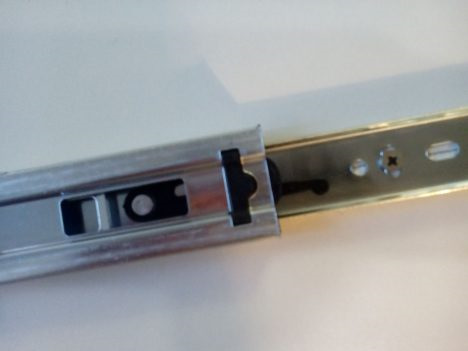
Identify a drawer with wheels that drop off the track as the drawer is closed. Typical drawer glide designs consist of a pair of rails that are mounted to the drawer and a pair of rails that are mounted to the cabinet.
- The drawer rails have a small wheel located at the end near the back of the drawer and the cabinet rails have a small wheel located near the face frame of the cabinet.
- The drawer wheel travels along the track of the cabinet rail, while the wheel on the cabinet rail supports the track of the drawer rail.
- Either the right or left cabinet rail has a “hooked” channel along the top edge to keep the drawer wheel securely in the track.
- The corresponding drawer rail has a slightly “hooked” edge along the bottom to keep the drawer from slipping off the cabinet rail.
- The rails along the opposite side of the drawer and cabinet do not have these “hooked” edges.
- If the right and left rails are not parallel, then this is when the drawer is likely to drop off the track along that edge. You can usually feel this occur as you close the drawer.
- You are also likely to feel a temporary bind and a “pop” of the wheel back onto the track as you open the drawer.
-
2
Check the position of your rails and wheels. With the drawer fully closed, use a flashlight to look at the drawer rails and cabinet rails from inside the cabinet and below the drawers.
- If the drawer has jumped the track, the drawer glide wheel along the “non-hooked” edge will be off or nearly off the track.
-
3
Adjust a minor derailment. You can make the adjustment by loosening the mounting screws along on the cabinet rail mounting bracket at the inside rear of the cabinet.
- Nudge the bracket inward until the glide wheel on the drawer is properly traveling along cabinet rail.
- Then, secure it in place by tightening the bracket screws.
-
4
Fix a drawer rail that jumps off as the drawer is closed. If the drawer rail jumps off the guide wheel at the face frame as the drawer is closed, then you have to use the following trick to realign the rail.
- Remove the mounting screw that holds the rail to the face frame of the cabinet.
- Take one or more of the ¾” washers and use as spacers between the face frame and the rail.
- You can gage the number of washers you will need by comparing the thickness of a number of washers with how much the rail needs to be moved.
-
5
Align the washers with the hole where the screw will be replaced. Since you have now increased the space between the rail and the face frame, you will need to use one of the longer screws described at the beginning of the tutorial.
- Your drawer should now open and close without jumping the track!
- Use this same trick if the cabinet glides are mounted to wood rails that run from front to back. You may use washers to adjust the back end of the glide as you did the face frame end of the glide.


Advertisement
-
1
Fix a wheel that lifts off. Fixing a glide wheel that lifts of the rail when the drawer is closed requires a different solution than fixing a wheel that “jumps” the track.
- This scenario is when the wheel lifts straight up off the track surface at either the front or back of the drawer.
- This, too, is an easy adjustment.
-
2
Loosen the mounting screw. If the wheel lifts off the track at the back of the drawer, simply loosen the mounting screw on the rail or the mounting bracket.
- Then, slightly raise the rail until the wheel rides properly on the track.
- Be sure not to raise it too much, or the opposite wheel will lift off its track.
-
3
Make any necessary small adjustments to align support wheel. If the drawer glide lifts from the support wheel on the rail at the face frame, this will require a small adjustment.
- However, the adjustment will be made at the rear end of the rail and not at the face frame.
-
4
Raise the right cabinet glide rail if the left drawer glide is lifted off the support wheel.
- Raising the cabinet glide at the opposite corner will lower the drawer glide back onto the support wheel at the face frame.
- Here is the “formula” to keep in mind: Raising right rear lowers left front; raising left rear lowers right front! Think in opposites!
- When using washers or any other material for spacers, either run the mounting screws through the spacers or have two equal-size spacers “straddle” the mounting screws to avoid distorting the shape of the glide rail.
- Distortion and twisting can cause binding—and that’s what we’re trying to adjust!


Advertisement
Add New Question
-
Question
How do I fix a crooked drawer door when one side is all in and the other is not?

Take both of the sides out, then push it back in straight.
Ask a Question
200 characters left
Include your email address to get a message when this question is answered.
Submit
Advertisement
Video
Things You May Need
- Phillips screwdriver or variable-speed drill with Phillips bit
- Flashlight (To see the drawer glides from inside the cabinet)
- Several ¾” flat washers with small center holes (approx. ¼” diameter hole)
- Several wood screws about ¼” longer than the screws mounting the drawer glide to the inside of the cabinet. They must be the same diameter of the original screws.
References
- ↑ Mike Katona. DIY Home Improvement Specialist. Expert Interview. 25 August 2021.
- ↑ Mike Katona. DIY Home Improvement Specialist. Expert Interview. 25 August 2021.
- ↑ Mike Katona. DIY Home Improvement Specialist. Expert Interview. 25 August 2021.
- ↑ Mike Katona. DIY Home Improvement Specialist. Expert Interview. 25 August 2021.
- ↑ Mike Katona. DIY Home Improvement Specialist. Expert Interview. 25 August 2021.
About This Article
Thanks to all authors for creating a page that has been read 30,057 times.
Did this article help you?
Get all the best how-tos!
Sign up for wikiHow’s weekly email newsletter
Subscribe
You’re all set!
![]()
Download Article
![]()
Download Article
If your cabinets and cabinet drawers are made of wood, chances are they will either expand, shrink—or both—over time. Dry or humid air within your home can affect the function of your cabinet drawers. Very humid air can cause the drawer box sides to expand enough to cause them to bind at the top. Extremely dry air can cause the drawer boxes to lose their moisture content and shrink, causing the glide wheels to “jump the tracks.” The glides on any material may simply need adjustment due to daily use. Adjusting your cabinet drawers to accommodate these changes is very simple and usually requires nothing more than a Phillips head screwdriver and a flashlight!
-
1
Remove the contents of the drawers. Begin by removing the contents of the drawers that need adjusting AND the cabinet below.
- You will need access to the inside of the cabinet to assess the adjustments that need to be made.
-
2
Open and close the drawer slowly, assessing the problem.[1]
While doing so, check to see if it binds at the top against the face frame as you close it.- If not, open and close the drawer very slowly to see if the guide wheel drops or “pops” off the track at any point.
- If neither issue occurs, then your width adjustment is probably OK.
- Open and close the drawer again, doing so very slowly. If the drawer glide on one side of the drawer or the other begins to lift off the guide wheel, near the face frame of the cabinet (when the drawer is nearly closed), then an adjustment needs to be made.
- This will be covered by the following steps.
Advertisement
-
3
Close the drawer completely. All four edges of the drawer face should touch against the face frame (or all protective bumper pads, if applied).
- If the drawer is out of alignment, there will be a growing gap starting from the point where the edge of the drawer face touches the face frame.
-
4
Remove the drawer from the cabinet.[2]
Pull the drawer open all the way until it stops.- Then, while pulling slightly, lift from the drawer face end and the drawer should clear the track and come right out.
Advertisement
-
1
Check for the presence of bent plastic guide brackets. Some glides are secured to the inside edge of the face frame with a screw and mounted into a plastic bracket that is attached to the inside rear of the cabinet.
- Sometimes with this type of mounting, the glides can become slightly bent or twisted.
- Check to see if this is the case. If so, remove the glide screws and the glide, then use a little pressure or twisting to return the glide to shape, if possible.
- This should be very simple. If too bent, then both the right and left glides will need to be replaced, as they are sold only in a set.
-
2
Replace overly bent guides. Be sure to replace the damaged, useless glides.
- Take one to your home center to get a proper replacement.
- They cost about $6 to $8 for a set.
- The good news, however, is that this type of damage is usually very “fixable” and replacement is not needed.
-
3
Remove the drawer and set it aside. More often, your glides will be mounted on wood rails that run from the backside of the face frame to the inside rear of the cabinet. The glide can be adjusted at several points along the railing and are usually mounted with 3 or four screws per rail.
- If your drawer binds at the top, against the face frame, this is a fairly simple adjustment.
-
4
Loosen the screw that holds the glide.[3]
Use the Phillips screwdriver to loosen the screw that holds the drawer glide to the inside of the face frame.- Loosen it only. Do not remove it.
- This screw is located in a vertical oblong hole in the glide to allow for up and down adjustment.
-
5
Slide the glide downward.[4]
With the mounting screw loosened, slide the drawer glide downward and retighten the screw.- Repeat the same process with the drawer glide at the opposite side of the drawer space.
- Do any necessary fine-tuning to the glides and tighten the screws to secure the glides.[5]
-
6
Adjust the mounting brackets if necessary. If the glides are mounted in a bracket at the inside rear of the cabinet, the mounting bracket typically has elongated slots for adjustment.
- Loosen the mounting screws enough to adjust the bracket.
- Tighten ONE screw enough to secure the bracket so you can test the adjustment.
- When satisfied with the adjustment, you may tighten all screws.
- NOTE: Because of the way the glides are designed and mounted, it is very unlikely that a drawer would bind at the bottom.
Advertisement
-
1
Identify a drawer with wheels that drop off the track as the drawer is closed. Typical drawer glide designs consist of a pair of rails that are mounted to the drawer and a pair of rails that are mounted to the cabinet.
- The drawer rails have a small wheel located at the end near the back of the drawer and the cabinet rails have a small wheel located near the face frame of the cabinet.
- The drawer wheel travels along the track of the cabinet rail, while the wheel on the cabinet rail supports the track of the drawer rail.
- Either the right or left cabinet rail has a “hooked” channel along the top edge to keep the drawer wheel securely in the track.
- The corresponding drawer rail has a slightly “hooked” edge along the bottom to keep the drawer from slipping off the cabinet rail.
- The rails along the opposite side of the drawer and cabinet do not have these “hooked” edges.
- If the right and left rails are not parallel, then this is when the drawer is likely to drop off the track along that edge. You can usually feel this occur as you close the drawer.
- You are also likely to feel a temporary bind and a “pop” of the wheel back onto the track as you open the drawer.
-
2
Check the position of your rails and wheels. With the drawer fully closed, use a flashlight to look at the drawer rails and cabinet rails from inside the cabinet and below the drawers.
- If the drawer has jumped the track, the drawer glide wheel along the “non-hooked” edge will be off or nearly off the track.
-
3
Adjust a minor derailment. You can make the adjustment by loosening the mounting screws along on the cabinet rail mounting bracket at the inside rear of the cabinet.
- Nudge the bracket inward until the glide wheel on the drawer is properly traveling along cabinet rail.
- Then, secure it in place by tightening the bracket screws.
-
4
Fix a drawer rail that jumps off as the drawer is closed. If the drawer rail jumps off the guide wheel at the face frame as the drawer is closed, then you have to use the following trick to realign the rail.
- Remove the mounting screw that holds the rail to the face frame of the cabinet.
- Take one or more of the ¾” washers and use as spacers between the face frame and the rail.
- You can gage the number of washers you will need by comparing the thickness of a number of washers with how much the rail needs to be moved.
-
5
Align the washers with the hole where the screw will be replaced. Since you have now increased the space between the rail and the face frame, you will need to use one of the longer screws described at the beginning of the tutorial.
- Your drawer should now open and close without jumping the track!
- Use this same trick if the cabinet glides are mounted to wood rails that run from front to back. You may use washers to adjust the back end of the glide as you did the face frame end of the glide.
Advertisement
-
1
Fix a wheel that lifts off. Fixing a glide wheel that lifts of the rail when the drawer is closed requires a different solution than fixing a wheel that “jumps” the track.
- This scenario is when the wheel lifts straight up off the track surface at either the front or back of the drawer.
- This, too, is an easy adjustment.
-
2
Loosen the mounting screw. If the wheel lifts off the track at the back of the drawer, simply loosen the mounting screw on the rail or the mounting bracket.
- Then, slightly raise the rail until the wheel rides properly on the track.
- Be sure not to raise it too much, or the opposite wheel will lift off its track.
-
3
Make any necessary small adjustments to align support wheel. If the drawer glide lifts from the support wheel on the rail at the face frame, this will require a small adjustment.
- However, the adjustment will be made at the rear end of the rail and not at the face frame.
-
4
Raise the right cabinet glide rail if the left drawer glide is lifted off the support wheel.
- Raising the cabinet glide at the opposite corner will lower the drawer glide back onto the support wheel at the face frame.
- Here is the “formula” to keep in mind: Raising right rear lowers left front; raising left rear lowers right front! Think in opposites!
- When using washers or any other material for spacers, either run the mounting screws through the spacers or have two equal-size spacers “straddle” the mounting screws to avoid distorting the shape of the glide rail.
- Distortion and twisting can cause binding—and that’s what we’re trying to adjust!
Advertisement
Add New Question
-
Question
How do I fix a crooked drawer door when one side is all in and the other is not?
Take both of the sides out, then push it back in straight.
Ask a Question
200 characters left
Include your email address to get a message when this question is answered.
Submit
Advertisement
Video
Things You May Need
- Phillips screwdriver or variable-speed drill with Phillips bit
- Flashlight (To see the drawer glides from inside the cabinet)
- Several ¾” flat washers with small center holes (approx. ¼” diameter hole)
- Several wood screws about ¼” longer than the screws mounting the drawer glide to the inside of the cabinet. They must be the same diameter of the original screws.
References
- ↑ Mike Katona. DIY Home Improvement Specialist. Expert Interview. 25 August 2021.
- ↑ Mike Katona. DIY Home Improvement Specialist. Expert Interview. 25 August 2021.
- ↑ Mike Katona. DIY Home Improvement Specialist. Expert Interview. 25 August 2021.
- ↑ Mike Katona. DIY Home Improvement Specialist. Expert Interview. 25 August 2021.
- ↑ Mike Katona. DIY Home Improvement Specialist. Expert Interview. 25 August 2021.
About This Article
Thanks to all authors for creating a page that has been read 30,057 times.
Did this article help you?
Get all the best how-tos!
Sign up for wikiHow’s weekly email newsletter
Subscribe
You’re all set!
Рассказ одного из миллиона намучившихся с этими долбанными направляющими мужиков России)
Итак читаем и наслаждаемся:
Сравнительно недавно я купил себе горку с местом под большой телевизор, у вроде как, приличной компании Евромебель. Горка ничего так, стоит уже несколько месяцев. Одно только меня сильно бесило — это как выезжают ящики. Они шумят, периодически застревают, колесики на направляющих стираются, оставляют опилки, выскакивают из пазов, ящики проваливаются и царапают мебель внутри. Да чего с этой ужасной хренью только не происходило. Когда шкаф в очередной раз провалился, я вырвал его в припадке злости изуродовав роликовые направляющие.
Вот такая ужасная фурнитура устанавливается на горку за 30000 рублей. Дальше я напишу не просто лечение, а апргейд мебели до приличного уровня.
Сначала я думал заменить эти направляющие на такие же. Цена им 30 рублей за комплект.
Но ходя по магазину фурнитуры, я увидел вот такие шариковые направляющие. Они стоили, ужас, сколько целых 50 рублей за 40 см и 75 рублей за 50 см. На 25 — 30 рублей дороже. Купил себе комплекты на всю горку. Называются они шариковые направляющие. шириной взял 3,5 см. Есть и помощнее для нагруженных ящиков.
Переживал, как я буду все отмерять и ровно их прикручу. Оказалось все просто. Пара часов с линейкой, шуруповертом и карандашом.
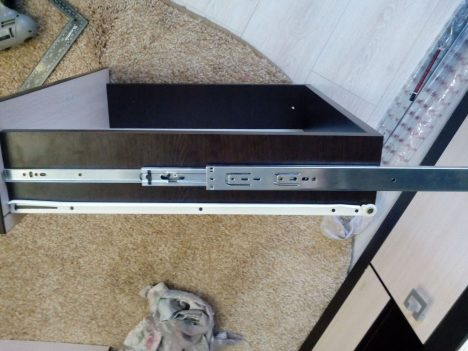
Первым делом разбираем направляющие, прижав усик на широкой части. Остается только тонкая часть, которую нужно прикрутить ровно по центру боковины ящика. Старую фурнитру я пока не снимал, дальше скажу зачем. Когда прикручиваем тонкую часть направляющей, последний саморез, который самый близкий к фасаду не прикручивайте. Его прикрутим потом, когда все станет на место и нужно будет навести красоту по высоте. Чтобы все зазоры были одинаковые.

Прикрутил с обеих сторон фурнитуру на ящики и собрал ее. Затем с обеими направляющими я запихнул ящики обратно. Дальше отметил центр на фасаде полки и на стенке ящика как на картинке. С обеих сторон отметил линию, на которой должна крепиться основная часть направляющей.
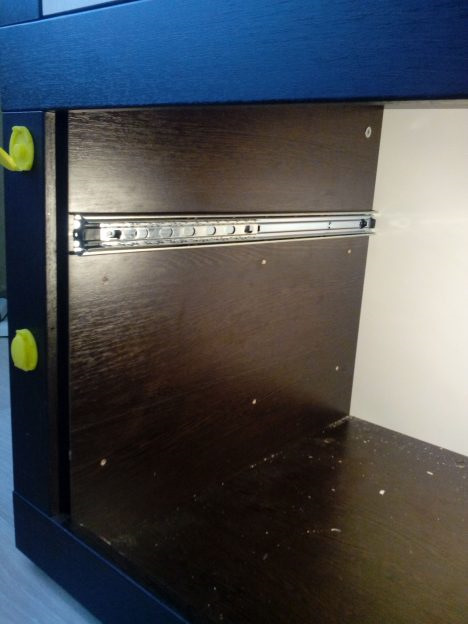
Старые направляющие с стен снимаем. Затем от верхней части отмерил то же расстояние около задней стенки, начертил линию. И на нее прикрутил, толстую часть направляющей. Точно также и остальные.
На этом этапе можно удалить старые роликовые направляющие и выкинуть их в мусорку, потому что это говно. Вставить ящики и закрыть их.
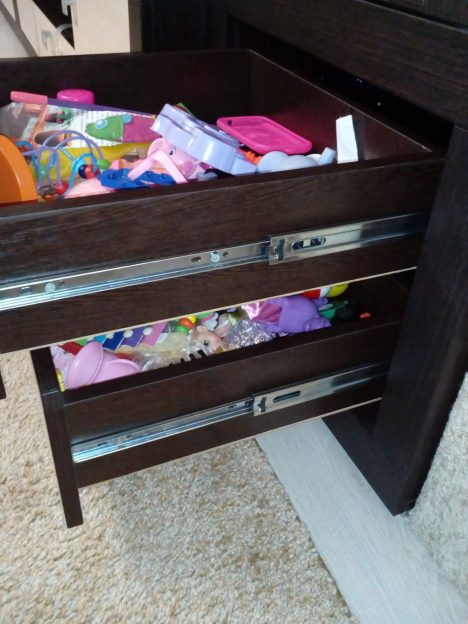
Посмотреть на зазоры. Если зазоры разные нужно их подкорректировать перемещая направляющую по ящику. Я просто постучал в нужную сторону по крышке и затем, когда меня устроило расположение ящиков, притянул последние саморезы, самые ближайшие к фасаду (крышке ящика).
Ребята, это земля и небо.
Ящик выдвигается тихо и как по рельсам. Ребенок пальцем может его открыть.
Ящик выдвигается ПОЛНОСТЬЮ, а не на 2/3 как с роликовым говном.
Держит приличную нагрузку.
Ничего не застревает, не заедает, не стирается, не оставляет пластиковых опилок в мебели.
Воодушевленный такой движухой, на следующий день, я поехал и купил еще несколько комплектов чтобы заменить в кухне. Но на этот раз я взял их шириной 4 см. Они держат большую нагрузку, ибо посуда тяжелее мелочевки.

Принцип тот же. Отмечаем центр на боковине шкафа. Крепим на нее тонкую часть направляющей, не прикручивая ближайший к крышке саморез.
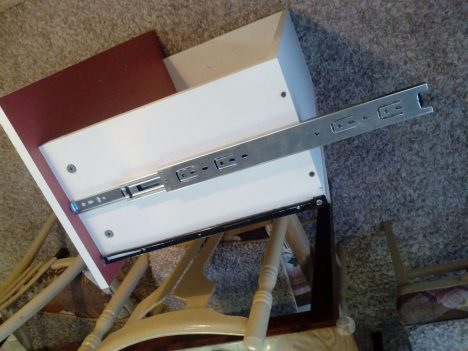
Закрываем шкаф с обеими направляющими, по факту он едет по старым роликам, новая фурнитура держится только на ящике. Закрываем шкаф, отмечаем линию крепления на стенках ящика. Чтобы не высчитывать все на бумаге.
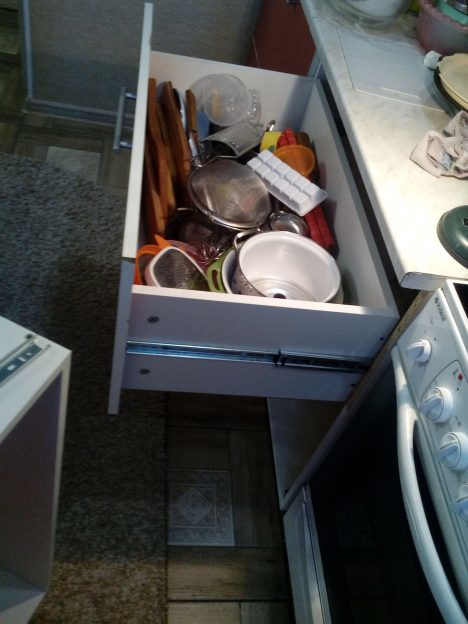
На горку ушло 280 рублей, на кухню около 300. Жена получает удовольствие от открывания шкафов, которые раньше злили всю семью.