1. Function
This LCD colour TV set incorporates a Lamp error detection feature that automatically turns off the power for safety under abnormal lamp or lamp
circuit conditions. If by any chance anything is wrong with the lamp or lamp circuit or if the lamp error detection feature is activated for some rea-
son, the following will result.
1) The power is interrupted in about 500ms after it is turned on.
(A central icon on the front of the TV flash on and off.: ON for 400ms and OFF for 1600ms.).
2) If the above phenomenon 1) occurs 5 times, it becomes impossible to turn on the power.
(A central icon keep flashing on/off.)
2. Measures
1) Set the lamp error detection to OFF
Enter the adjustment process mode, referring to «4. Entering and exiting the adjustment process mode.»
The adjustment process mode can ignore «5 times count», so If the above phenomenon 1) occurs 1~4 times, the lamp will go out.
If Lamp Error detection pin (6pin of LB: P9602) is «High» by a trouble with the lamp and lamp circuit, it can boot-up by the adjustment process
mode.
Please execute «Lamp Error detection off-mode».
While holding down the «VOL (-)» and «CH (
After a central icon flash off, separate the fingers from key on the set.
Touch the power supply key on the set again, so the power will boot-up.
Then, you can check the operation to see if the lamp and lamp circuit are in trouble.
If you fail boot-up, retry the procedure.
2) Resetting the lamp error count
After the lamp and lamp circuit are improved from a trouble, reset the lamp error count.
(Because the power cannot be turned on, if a lamp error is detected 5 consecutive times)
a) Enter the adjustment process mode, referring to «4. Entering and exiting the adjustment process mode.»
b) Using the cursor ( / ) key, move to the cursor to [LAMP ERROR RESET], Line 8 on adjustment process mode service page 2/21.
c) With the cursor ( / ) keys, select the [LAMP ERROR RESET] value.
Finally press the cursor (OK)., the count is reset.
Check LAMP ERROR Count on adjustment process mode Page 2/21.
Table of contents of adjustment process mode Page 2/21
INDUSTRY INIT
INDUSTRY INIT (-Publicl)
Public MODE
Center Acutime
RESET
Backlight Acutime
RESET
LAMP ERROR RESET
ADJ PARAM SET
VIC XPOS
VIC YPOS
VIC SIGNAL TYPE
VIC READ
)» keys on the set at once, touch the power supply key on the set.
Enter
OFF
OFF
OFF
OFF
Resetting to «0»
OFF
Enter
0
0
MAIN
OFF
5 – 8
LC-40/46LE810E (1st Edition)
Entering and exiting the adjustment process mode
Please execute the following procedures to enter the adjustment process mode when the power supply shuts down.
1) While holding down the “VOL (-)” and “INPUT” keys on the set at once, touch the power supply key on the set.
Please separate the fingers from key on the set when boot-up is confirmed with lighting of a central icon etc.
After a while, The letter “K” appears on the screen. This state is in Inspection mode.
2) Next, hold down the “VOL (-)” and “CH ( DOWN )” keys on the set at once.
Multiple lines of blue characters appearing on the screen indicate that the set is now in the adjustment Process mode.
If you fail to enter the adjustment process mode (the display is the same as normal startup), retry the procedure.
3) To exit the adjustment process mode after the adjustment is done, unplug the AC power cord to force off the power.
(When
the power is turned off with the remote controler, once unplug the AC
power cord and plug it in again. In this case, wait for 10 seconds or so
after unplugging.)
Lamp Error detection
1. Function
This
LCD colour TV set incorporates a Lamp error detection feature that
automatically turns off the power for safety under abnormal lamp or lamp
circuit conditions. If by any chance anything is wrong with the lamp or
lamp circuit or if the lamp error detection feature is activated for
some reason, the following will result.
1) The power is interrupted in about 500ms after it is turned on.
(A central icon on the front of the TV flash on and off.: ON for 400ms and OFF for 1600ms.).
2) If the above phenomenon 1) occurs 5 times, it becomes impossible to turn on the power.
(A central icon keep flashing on/off.)
2. Measures
1) Set the lamp error detection to OFF
Enter the adjustment process mode, referring to “4. Entering and exiting the adjustment process mode.”
The
adjustment process mode can ignore “5 times count”, so If the above
phenomenon 1) occurs 1> 4 times, the lamp will go out.
If Lamp
Error detection pin (6pin of LB: P9602) is “High” by a trouble with the
lamp and lamp circuit, it can boot-up by the adjustment process mode.
Please execute “Lamp Error detection off-mode”.
While holding down the “VOL (-)” and “CH ( DOWN )” keys on the set at once, touch the power supply key on the set.
After a central icon flash off, separate the fingers from key on the set.
Touch the power supply key on the set again, so the power will boot-up.
Then, you can check the operation to see if the lamp and lamp circuit are in trouble.
If you fail boot-up, retry the procedure.
2) Resetting the lamp error count
After the lamp and lamp circuit are improved from a trouble, reset the lamp error count.
(Because the power cannot be turned on, if a lamp error is detected 5 consecutive times)
a) Enter the adjustment process mode, referring to “4. Entering and exiting the adjustment process mode.”
b)
Using the cursor ( LEFT/ RIGH) key, move to the cursor to [LAMP ERROR
RESET], Line 8 on adjustment process mode service page 2/21.
c) With the cursor (LEFT / RIGH) keys, select the [LAMP ERROR RESET] value.
Finally press the cursor (OK)., the count is reset.
Check LAMP ERROR Count on adjustment process mode Page 2/21.
White Balance Adjustment
For white balance adjustment, adjust the offset values on pages 11/21.
[Condition of the unit for inspection] : Modulated light (+16), Colour temperature (High)
AV MODE: DYNAMIC
Active Backlight: OFF
OPC: OFF
Asing Time: Min,60 minute
[Input signal condition] : HDMI 1080i 15IRE (LO), 78IRE (HI)
[Adjustment reference device] : Minolta CA-210
[Adjustment procedure]
1) Display the current adjustment status at R/G/B_GAIN (HI). (Page 11/21 of process adjustment)
The signal of 78IRE is input.
2) Read the value of the luminance meter. x = 0.272, y = 0.277
3)
Change R_GAIN (HI)/B_GAIN (HI) (Adjustment offset value) on page 11/21
of process adjustment so that the values of the luminance meter
approach x = 0.272 and y = 0.277.
(Basically,
G is not changed. If adjustment fails with R and B, change G. When G is
lowered, the weaker of R or B must be fixed.)
4) Display the adjustment status of the current R/G/B_GAIN (LO).
The signal of 15IRE is input.
Change
R_GAIN (LO)/B_GAIN (LO) (adjustment offset value) on page 11/21 of
process adjustment so that the values of the luminance meter
approach x = 0.272 and y = 0.277.
5) Both HI and LO are repeating the step from 1 to 4 until becoming an aim value.
[Adjustment reference standard value]
Adjustment spec ± 0.002 Inspection spec ± 0.004 (point LO)
Adjustment spec ± 0.001 Inspection spec ± 0.002 (point HI)
6) After completing adjustments, set EEP SAVE (21/21) to ON in the process menu to save the white balance adjustment value.
Confirmation item
1. HDMI-CEC Inspection
After repairing the CEC function, check the operation about HDMI-CEC circuit
2. CI card Inspection
After repairing the CI function, check that the DTV signal is received in the UK setting by inserting CAM
And check the KEY certification by inserting CAM which is prepare for CI+
3. LAN Inspection
After repairing the LAN function, check the communication by connecting PC and LAN terminal.
Initialization to factory settings
[Factory setting with adjustment process mode]
# Enter the adjustment process mode.
# Move the cursor to [INDUSTRY INIT] on page 2/21.
# Use the R/C key to select a region from [EUROPE/RUSSIA] and press the [OK] key.
# “EXECUTING” display appears.
# When succeeding: Background colour (green)
When failing: Background colour (red)
The following items are initialized in the factory setting.
1) User settings
2) Channel data (e.g. broadcast frequencies)
3) Maker option setting
4) Password data
Upgrading the software
1. Turn on the AC power.
2. Insert the upgrading USB flash memory for upgrade into the service slot.
(After a while, an external input changes into USB automatically.)
3.
Use the Menu button and cursor keys ( LEFT/RIGHT /UP /DOWN ), CH keys
(UP /DOWN ) of R/C or on the set to select Menu — Setup — Information —
Software update on OSD menu.
4. The message (Insert the USB memory device contains the software update file) shows up. Push OK when if there is no problem.
5.
After a while, if software update file is detected in the USB memory
device, the following screen shows up. Select OK when if there is no
problem.
NOTE: If there is no software update file in the USB memory device, caution shows up.
Please insert the correct file and retry software update.
NOTE: If software update file in the USB memory device doesn’t mutch this model, caution shows up.
Please insert the correct file and retry software update.
NOTE: If software update file in the USB memory device is already installed, caution shows up.
Please reconfirm the software version and reinstall (if necessary).
6. The caution for update showes up.
# The picture will temporary go dark until the software update display apeeares
# Wait several minutes and don’t unplug the AC cord
Select OK when if there is no problem.
7. Software update starts.
Please wait for a while until the bar shows 100%
NOTE: Do not take out the USB memory device during updating.
8. When all the procedures are complete, the upgrade success screen shows up.
The new software version can be confirmed on screen.
After a while, Turn off power and boot-up automatically.
NOTE: TV is restarted automatically, the AC code need not be pulled out.
9. After boot-up, the following caution shows up.
Select OK when if there is no problem.
Software update is completed, please remove the USB memory device.

Category: LED Television Repair and Service
Contents of this article
- Software update
- How to enter to service mode
- Lamp error detection
- Factory reset
SHARP LC- 60LE660
Upgrading the software
1. Turn on the AC power.
2. Insert the upgrading USB flash memory for upgrade into the service slot.
(After a while, an external input changes into USB automatically.)
3. Use the Menu button and cursor keys ( LEFT/RIGHT /UP /DOWN ), CH keys (UP /DOWN ) of R/C or on the set to select Menu — Setup — Information — Software update on OSD menu.
4. The message (Insert the USB memory device contains the software update file) shows up. Push OK when if there is no problem.
5. After a while, if software update file is detected in the USB memory device, the following screen shows up. Select OK when if there is no problem.
NOTE: If there is no software update file in the USB memory device, caution shows up.
Please insert the correct file and retry software update.
NOTE: If software update file in the USB memory device doesn’t mutch this model, caution shows up.
Please insert the correct file and retry software update.
NOTE: If software update file in the USB memory device is already installed, caution shows up.
Please reconfirm the software version and reinstall (if necessary).
6. The caution for update showes up.
# The picture will temporary go dark until the software update display apeeares
# Wait several minutes and don’t unplug the AC cord
Select OK when if there is no problem.
7. Software update starts.
Please wait for a while until the bar shows 100%
NOTE: Do not take out the USB memory device during updating.
8. When all the procedures are complete, the upgrade success screen shows up.
The new software version can be confirmed on screen.
After a while, Turn off power and boot-up automatically.
NOTE: TV is restarted automatically, the AC code need not be pulled out.
9. After boot-up, the following caution shows up.
Select OK when if there is no problem.
Software update is completed, please remove the USB memory device.
Entering and exiting the adjustment process mode
Please execute the following procedures to enter the adjustment process mode when the power supply shuts down.
1) While holding down the “VOL (-)” and “INPUT” keys on the set at once, touch the power supply key on the set.
Please separate the fingers from key on the set when boot-up is confirmed with lighting of a central icon etc.
After a while, The letter “K” appears on the screen. This state is in Inspection mode.
2) Next, hold down the “VOL (-)” and “CH ( DOWN )” keys on the set at once.
Multiple lines of blue characters appearing on the screen indicate that the set is now in the adjustment Process mode.
If you fail to enter the adjustment process mode (the display is the same as normal startup), retry the procedure.
3) To exit the adjustment process mode after the adjustment is done, unplug the AC power cord to force off the power.
(When the power is turned off with the remote controler, once unplug the AC power cord and plug it in again. In this case, wait for 10 seconds or so after unplugging.)
Lamp Error detection
1. Function
This LCD colour TV set incorporates a Lamp error detection feature that automatically turns off the power for safety under abnormal lamp or lamp circuit conditions. If by any chance anything is wrong with the lamp or lamp circuit or if the lamp error detection feature is activated for some reason, the following will result.
1) The power is interrupted in about 500ms after it is turned on.
(A central icon on the front of the TV flash on and off.: ON for 400ms and OFF for 1600ms.).
2) If the above phenomenon 1) occurs 5 times, it becomes impossible to turn on the power.
(A central icon keep flashing on/off.)
2. Measures
1) Set the lamp error detection to OFF
Enter the adjustment process mode, referring to “4. Entering and exiting the adjustment process mode.”
The adjustment process mode can ignore “5 times count”, so If the above phenomenon 1) occurs 1> 4 times, the lamp will go out.
If Lamp Error detection pin (6pin of LB: P9602) is “High” by a trouble with the lamp and lamp circuit, it can boot-up by the adjustment process mode.
Please execute “Lamp Error detection off-mode”.
While holding down the “VOL (-)” and “CH ( DOWN )” keys on the set at once, touch the power supply key on the set.
After a central icon flash off, separate the fingers from key on the set.
Touch the power supply key on the set again, so the power will boot-up.
Then, you can check the operation to see if the lamp and lamp circuit are in trouble.
If you fail boot-up, retry the procedure.
2) Resetting the lamp error count
After the lamp and lamp circuit are improved from a trouble, reset the lamp error count.
(Because the power cannot be turned on, if a lamp error is detected 5 consecutive times)
a) Enter the adjustment process mode, referring to “4. Entering and exiting the adjustment process mode.”
b) Using the cursor ( LEFT/ RIGH) key, move to the cursor to [LAMP ERROR RESET], Line 8 on adjustment process mode service page 2/21.
c) With the cursor (LEFT / RIGH) keys, select the [LAMP ERROR RESET] value.
Finally press the cursor (OK)., the count is reset.
Check LAMP ERROR Count on adjustment process mode Page 2/21.
White Balance Adjustment
For white balance adjustment, adjust the offset values on pages 11/21.
[Condition of the unit for inspection] : Modulated light (+16), Colour temperature (High)
AV MODE: DYNAMIC
Active Backlight: OFF
OPC: OFF
Asing Time: Min,60 minute
[Input signal condition] : HDMI 1080i 15IRE (LO), 78IRE (HI)
[Adjustment reference device] : Minolta CA-210
[Adjustment procedure]
1) Display the current adjustment status at R/G/B_GAIN (HI). (Page 11/21 of process adjustment)
The signal of 78IRE is input.
2) Read the value of the luminance meter. x = 0.272, y = 0.277
3) Change R_GAIN (HI)/B_GAIN (HI) (Adjustment offset value) on page 11/21 of process adjustment so that the values of the luminance meter
approach x = 0.272 and y = 0.277.
(Basically, G is not changed. If adjustment fails with R and B, change G. When G is lowered, the weaker of R or B must be fixed.)
4) Display the adjustment status of the current R/G/B_GAIN (LO).
The signal of 15IRE is input.
Change R_GAIN (LO)/B_GAIN (LO) (adjustment offset value) on page 11/21 of process adjustment so that the values of the luminance meter
approach x = 0.272 and y = 0.277.
5) Both HI and LO are repeating the step from 1 to 4 until becoming an aim value.
[Adjustment reference standard value]
Adjustment spec ± 0.002 Inspection spec ± 0.004 (point LO)
Adjustment spec ± 0.001 Inspection spec ± 0.002 (point HI)
6) After completing adjustments, set EEP SAVE (21/21) to ON in the process menu to save the white balance adjustment value.
Confirmation item
1. HDMI-CEC Inspection
After repairing the CEC function, check the operation about HDMI-CEC circuit
2. CI card Inspection
After repairing the CI function, check that the DTV signal is received in the UK setting by inserting CAM
And check the KEY certification by inserting CAM which is prepare for CI+
3. LAN Inspection
After repairing the LAN function, check the communication by connecting PC and LAN terminal.
Initialization to factory settings
[Factory setting with adjustment process mode]
# Enter the adjustment process mode.
# Move the cursor to [INDUSTRY INIT] on page 2/21.
# Use the R/C key to select a region from [EUROPE/RUSSIA] and press the [OK] key.
# “EXECUTING” display appears.
# When succeeding: Background colour (green)
When failing: Background colour (red)
The following items are initialized in the factory setting.
1) User settings
2) Channel data (e.g. broadcast frequencies)
3) Maker option setting
4) Password data
|
SHARP LC60-LE822ERU (шасси: Неизвестно) |
||||||
|
||||||
|
||||||
|
||||||
|
||||||
|
||||||
|
||||||
|
||||||
|
||||||
|
||||||
|
||||||
|
||||||
|
||||||
|
||||||
|
||||||
|


|
|
Все права на контент принадлежат участникам создавшим его. Частичное копирование возможно, только со ссылкой на первоисточник !!!

Статистика сайта
| Последние темы | Читаемые темы | Лучшие пользователи | Новые пользователи | ||||||||||
| Новые Файлы | Новые Прошивки | Новые Статьи, Блоги | Счетчики для пользователей | ||||||||||
|
|||||||||||||
| Новые сайты | Новые Мастера в Вашем городе | Последние Новости | Участники прошедшие тест | ||||||||||
 Зарегистрировано всего
Хорошо, спорить не люблю — вышел давно из этого возраста, хотя в споре рождается ИСТИНА…
Никогда глупых постов не создавал — их на форуме и так достаточно, поэтому то и мало моих сообщений.
Есть у меня пара экземпляров из этой серии, возьмем один из них (могу и второй так же продемонстрировать) — «не копаный,» ни разу не вскрытый и полностью рабочий, чуть-чуть больной , но об этом чуть позже…
Captain сказал(а):
Насчет защит, если с разъема лампу дернуть — инвертор погаснет, т.е. защита работает.
Не погаснет в этой модели.
Captain сказал(а):
Все давно разжевано было на форуме. И подобные топики при расказе что там есть чтот такое что ведет себя не адекватно — всего лиш миф. А миф рождается либо не пониманием работы аппарата (как следствие неверная диагностика), либо не пониманием основ электроники (как следствие неверный ремонт).
Разжевано, да не все.
И мой топик не миф.
Миф -это то, что защита инвертора в этой модели работает как и во всех других.
Сейчас разрушим.
Captain сказал(а):
Заводской не доработки там нету.
Есть, как не прискорбно
Captain сказал(а):
И спорить, рассуждать, обсуждать тут нечего.
Есть о чем и поспорить, и порассуждать и по обсуждать.
Лучше один раз увидеть, чем сто раз услышать.
Сейчас вместе первый раз один экземплярчик вскроем и все увидим.
Вскрываем в первый раз (до нас еще никто тут не был):
ссылка скрыта от публикации
Все целехонькое, лампы все целые. Предварительно проверяю — телевизор включается и работает ( и работал до последнего его черного дня, буфер ошибок — 0), проверяю количеством срабатываний защиты с одной отключенной лампой — пять запусков — все стартует и работает уходя в защиту через те же шесть секунд, после пяти включений на шестой блокируется и уходит в общую блокировку, т.е. не включается.
Все казалось бы прекрасно, НО!!!…
Подключаем внешнюю лампу для наглядности эксперимента.
Смотрим далее… —
ссылка скрыта от публикации
ссылка скрыта от публикации
ссылка скрыта от публикации
Кто сомневается — может проверить сам лично.
Вот теперь, как
Captain сказал(а):
И спорить, рассуждать, обсуждать тут нечего.
спорьте, рассуждайте, обсуждайте…. И про мифы… И про непонимание работы аппарата… И про непонимание основ электроники…
Да и спорить то действительно не о чем, все наглядно показано.
Captain сказал(а):
Сколько не делал таких аппаратов, то только самый первый один раз вернулся (не подумал, поторопился, не обратил внимания). Повторов более не было, и это при условии что я их дофига сделал.
Видимо не обратил ты на это внимания, поторопился (извини «брат», не обижайся) — всякое бывает…
Captain сказал(а):
Первые шесть секунд проц делает перестарты инвертора чтоб его зажечь. Если он плохо стартует — повод задуматься и отремонтировать подсветку правильно.
Не делает проц никаких перестартов и инвертор стартует отменно — на OFL1 и OFL2 появляеются +3.3v (подвязаны от скалера сюда же подмешана и регулировка яркости подсветки) и если по LMP_EROR придет единица (3.3v) (контролируется основным процом) сработает защита и ошибка пропишется в буфер, если ноль — будет продолжен нормальный режим работы. Через шесть секунд после старта этот алгоритм далее не работает и виновато в этом ПО (не мною писаное). И задумываться тут не о чем и подсветку следует оставить в покое.
Я не учу, а констатирую и еще это к тому непониманию работы аппарата (неверной диагностике) и непониманию основ электроники (неверному ремонту), про которые ты пишешь.
А по поводу того
Captain сказал(а):
Чтоб не возникало мнений что я тут выпендриваюсь — могу на спор поднять этот телик.
тебе и карты в руки, я в начале говорил что он немного больной

и надеюсь, что
Captain сказал(а):
Ему не надо будет блокировать защиту, он будет нормально стартовать и не вернется в течении года (а может и более)..
и сделано будет как
Captain сказал(а):
Делать правильно надо и всё……
Цена вопроса???
Раз уж тему перенесли во флейм, скажу:
Ладно парни, писал все ради истины, кого если чем зацепил — не обижайтесь, стоит ли из-за этого железа бодаться.
Спасибо тем, кто принял участие в теме.
Всем успехов в работе и личной жизни !!!
Александр. Нижний Новгород.

LAMP ERROR DETECTION
For 37” LCD TV: Functional description
This LCD colour television has a function (lamp error
detection) to be turned OFF automatically for safety when the lamp or lamp
circuit is abnormal.
If the lamp or lamp circuit is abnormal, or some other
errors happen, and the lamp error detection is executed, the following occur.
- The main unit of television is turned OFF 5 seconds after it
is turned ON. (The power LED on the front side of TV turns from green to red.) - If the situation “1” happens 5 times sequentially,
television cannot be turned ON. (The power LED remains red.)
Countermeasures
When television is turned OFF by the lamp error detection
mentioned above, it enters the adjustment process with the power LED red.
Entering the adjustment process turns OFF the error detection and turns ON TV.
This enables the operation check to detect errors in the lamp or lamp circuit.
Check whether “L ERROR RESET” indicates the lamp error detection was executed. After confirming
that the lamp or lamp circuit is normal, reset the lamp error counter pushing
“OK” in the R/C.
After resetting counter the label “***OK***” appears on
Screen.
Reset standby cause error list
After confirming that the lamp error counter has been
erased, select “STAND BY CAUSE RESET” on point 3, of the adjustment process and
select ON using the right cursor. For execute press “OK” in the R/C and the label
“***OK***” appears on Screen.
For 32” LCD TV: Functional
description
This LCD color television has a function (lamp error
detection) to be turned OFF automatically (Inverter unit) for safety when the
lamp or lamp circuit is abnormal.
If the lamp or lamp circuit is abnormal, or some other
errors happen, and the lamp error detection is executed, the following occur.
The Inverter circuit stops but the rest of TV continues working. The power led
is green.
Countermeasures
Proceed to repair the inverter unit to solve the problem
that produces the lamp error.
Reset standby cause error list
For 32” this is not necessary because the lamp error
detection is not operative by software.
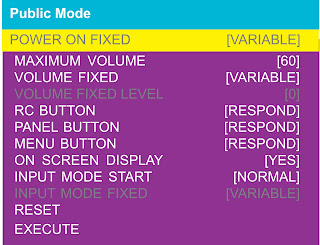
HOW TO ENTER PUBLIC MODE
- Turn on the power and enter in the Adjustment Process mode
(ADJ1 or Service Mode) as usual. - In the [INIT], of Service, turns ON the Public Mode option.
- Turn off TV by pressing Main Power switch.
- While pressing “VOL+”and “P▲” keys at the same time, press
Main Power switch for more than 2 seconds.
After this sequence the TV will turn on showing the Public
Mode setting screen as follows:
- Is possible to select each item of function by pressing
cursor UP/DOWN keys on the remote control or CH ▲/▼ keys on the LCD TV. - The setting position of each item of functions is made by
pressing cursor RIGHT/LEFT keys on the remote control or VOL(+)(-) keys on the
LCD TV. - Select EXECUTE position after you set all function, and
press cursor RIGHT/LEFT keys on the remote control or VOL(+)/(-) keys on the
LCD TV for confirmation.
Public Mode Settings.
- POWER ON FIXED
[VARIABLE / FIXED]. When it is
set to “FIXED” the TV is impossible to be switch off by Main Switch or Remote
Control. - MAXIMUM VOLUME [0
=> 60]. Is possible to set the
maximum volume at limited level. - VOLUME FIXED [VARIABLE / FIXED]. Is possible to fix the sound volume at limited level. When
“FIXED” is selected the sound volume before limited is fixed. - VOLUME FIXED LEVEL [0
=> 60]. If “FIXED” has been
selected, is possible to set a fixed volume at the level that is chosen. - RC BUTTON [RESPOND / NO RESPOND]. If “NO RESPOND” is selected, the remote control keys are
inoperative. - PANEL BUTTON [RESPOND / NO RESPOND]. If “NO RESPOND” has been selected, the set’s
keys remain deactivated (Except POWER key). - MENU BUTTON [RESPOND / NO RESPOND]. If “NO RESPOND” has been selected, “MENU”
key, of remote control, is inoperative. - ON SCREEN DISPLAY [YES /NO]. If “NO” has been selected, the On Screen Display does not appear.
- INPUT MODE START [ NORMAL=>TV (X) =>INPUT1 => INPUT2
=> INPUT3 => INPUT4 =>INPUT5 à Toggles]. When any
other item than “NORMAL” has been selected, the sets will start in a selected
input mode at the next power-on. - INPUT MODE FIXED [VARIABLE /FIXED]. If “FIXED” has been selected, any channels
and input modes other than those selected at the start mode cannot be picked
up. - RESET: Cancel all
Public Mode settings. (It returns to the factory settings) - EXECUTE: Select
this item, and press cursor RIGHT/LEFT keys on the remote control or VOL(+)/(-)
keys on the LCD TV for confirmation the functions settings.