In this article we will learn to show flash success and error message in laravel. Flash messages are useful when we want to notify the user about their recent activity like submit a form or making any action on website so in this case it may multiple type of messages you want to show to your users. Sometimes you want to show error messages and redirect back to last page with error message and sometime want to show success message after successful submitting of form.
To understand flash messages we will use an example to implement the flash message and that will work any version of laravel 5, laravel 6, laravel 7, laravel 8 and laravel 9 as well.
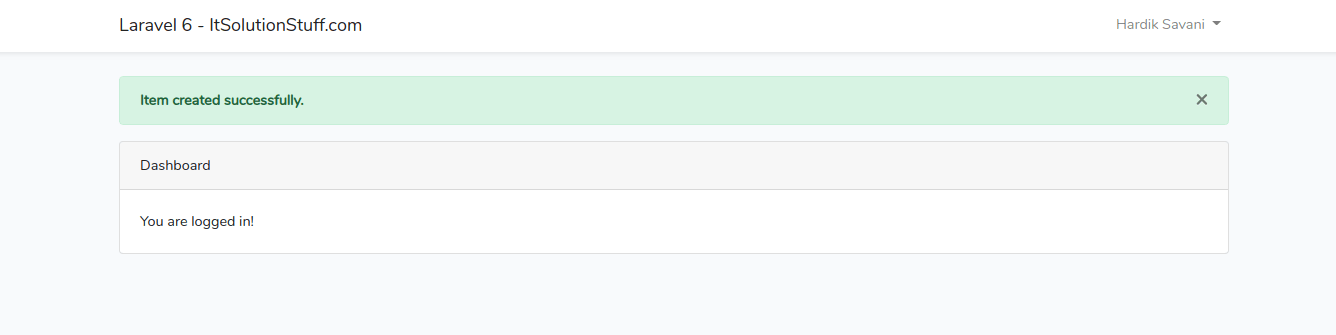
laravel stores all messages in session for one request and then in next request it removes from session.
In this example we will user bootstrap alert to show the messages and set the any type of message like error message after redirect, success message after redirect , warning message after redirect etc.
Let’s start the tutorial of show flash success and error message in laravel
Step 1: Create a laravel project
First step is to create the Laravel 8 project using composer command or you can also read the How to install laravel 8 ? and Laravel artisan command to generate controllers, Model, Components and Migrations
composer create-project laravel/laravel crudStep 2: Create a Flash View File
Now, Create a file to show the flash message in our application. In laravel there is 5 types of messages we can show in laravel as follow
- Success
- Error
- Warning
- Info
- Validations
So lets create file and show them as follow
@if ($message = Session::get('success'))
<div class="alert alert-success alert-block">
	<button type="button" class="close" data-dismiss="alert">×</button>
        <strong>{{ $message }}</strong>
</div>
@endif


@if ($message = Session::get('error'))
<div class="alert alert-danger alert-block">
	<button type="button" class="close" data-dismiss="alert">×</button>
        <strong>{{ $message }}</strong>
</div>
@endif


@if ($message = Session::get('warning'))
<div class="alert alert-warning alert-block">
	<button type="button" class="close" data-dismiss="alert">×</button>
	<strong>{{ $message }}</strong>
</div>
@endif


@if ($message = Session::get('info'))
<div class="alert alert-info alert-block">
	<button type="button" class="close" data-dismiss="alert">×</button>
	<strong>{{ $message }}</strong>
</div>
@endif


@if ($errors->any())
<div class="alert alert-danger">
   <ul>
       @foreach ($errors->all() as $error)
            <li>{{ $error }}</li>
      @endforeach
   </ul>
</div>

@endif
Step 3: Include flash view in theme layout
Next, Include the above create file resources/views/flash-messages.blade.php in our application theme as follow
<!DOCTYPE html>
<html lang="{{ str_replace('_', '-', app()->getLocale()) }}">

<head>
  <meta charset="utf-8">
  <meta name="viewport" content="width=device-width, initial-scale=1">

  <title>How to Show Flash Success and Error Message in Laravel - Readerstacks </title>
  <script src="{{asset('js/app.js')}}" crossorigin="anonymous"></script>
   <link href="//netdna.bootstrapcdn.com/bootstrap/4.1.1/css/bootstrap.min.css" rel="stylesheet" />

</head>

<body>
    <div class="container">

        <div class="panel panel-primary">
            <div class="panel-heading">
                <h2>How to Show Flash Success and Error Message in Laravel - Readerstacks</h2>
            </div>
            <div class="panel-body">
            @include('flash-message')
            @yield('content')
            </div>
        </div>
    </div>
</body>
</html>
This will include the messages view in all pages of application.
Step 4: Show Flash Messages
In this final step we will show the error messages according the message types so you can create a controller a put the follow code
<?php

namespace AppHttpControllers;

use AppModelsArticle;
use IlluminateHttpRequest;
use IlluminateSupportFacadesValidator;

class ArticleController extends Controller
{
    /**
     * Display a listing of the resource.
     *
     * @return IlluminateHttpResponse
     */
    public function index(Request $request)
    {
        $articles = Article::paginate(2);

        return view('articles.list ', ['articles' => $articles]);
    }

    /**
     * Show the form for creating a new resource.
     *
     * @return IlluminateHttpResponse
     */
    public function create()
    {
        return view('articles.create');
    }

    /**
     * Store a newly created resource in storage.
     *
     * @param  IlluminateHttpRequest  $request
     * @return IlluminateHttpResponse
     */
    public function store(Request $request)
    {
        $validator = Validator::make($request->all(), [
            'title' => "required",
            'email' => "required|email|unique:articles",
            'image' => 'required|image|mimes:jpeg,png,jpg,gif,svg|max:4096',
        ]);
        if ($validator->fails()) {
            return redirect()->back()->withInput()->withErrors($validator->errors());
        }

        return redirect()->route("articles.index")
            ->with('success', 'You have successfully created the article.');
    }

    public function edit($id)
    {
        return view('articles.update', ["article" => Article::find($id)]);
    }


    public function update(Request $request, $id)
    {
        $validator = Validator::make($request->all(), [
            'title' => "required",
            'email' => "required|email|unique:articles,email," . $id,
            'image' => 'required|image|mimes:jpeg,png,jpg,gif,svg|max:4096',
        ]);
        if ($validator->fails()) {

             $request->session()->flash('error', 'Some Errors in the form');
             return redirect()->back()->withInput()->withErrors($validator->errors());
        }

        return redirect()->route("articles.index")
            ->with('success', 'You have successfully created the article.');
    }


    public function destroy(Request $request,$id)
    {
        Article::find($id)->delete();
        $request->session()->flash('info', 'Just deleted the article');

        return redirect()->route("articles.index")
            ->with('success', 'You have successfully deleted the article.');
    }
}
So here to show messages we used as follow
Show Error message after validation failed
return redirect()->back()->withInput()->withErrors($validator->errors());
Show Success message After Redirect
 return redirect()->route("articles.index")
            ->with('success', 'You have successfully created the article.');
Show Info message After Redirect
return redirect()->route("articles.index")
            ->with('info', 'You have successfully deleted the article.');
Version
![]()
![]()
HTTP Session
-
Introduction
- Configuration
- Driver Prerequisites
-
Interacting With The Session
- Retrieving Data
- Storing Data
- Flash Data
- Deleting Data
- Regenerating The Session ID
- Session Blocking
-
Adding Custom Session Drivers
- Implementing The Driver
- Registering The Driver
Introduction
Since HTTP driven applications are stateless, sessions provide a way to store information about the user across multiple requests. That user information is typically placed in a persistent store / backend that can be accessed from subsequent requests.
Laravel ships with a variety of session backends that are accessed through an expressive, unified API. Support for popular backends such as Memcached, Redis, and databases is included.
Configuration
Your application’s session configuration file is stored at config/session.php. Be sure to review the options available to you in this file. By default, Laravel is configured to use the file session driver, which will work well for many applications. If your application will be load balanced across multiple web servers, you should choose a centralized store that all servers can access, such as Redis or a database.
The session driver configuration option defines where session data will be stored for each request. Laravel ships with several great drivers out of the box:
-
file— sessions are stored instorage/framework/sessions. -
cookie— sessions are stored in secure, encrypted cookies. -
database— sessions are stored in a relational database. -
memcached/redis— sessions are stored in one of these fast, cache based stores. -
dynamodb— sessions are stored in AWS DynamoDB. -
array— sessions are stored in a PHP array and will not be persisted.
Note
The array driver is primarily used during testing and prevents the data stored in the session from being persisted.
Driver Prerequisites
Database
When using the database session driver, you will need to create a table to contain the session records. An example Schema declaration for the table may be found below:
Schema::create('sessions', function ($table) {
$table->string('id')->primary();
$table->foreignId('user_id')->nullable()->index();
$table->string('ip_address', 45)->nullable();
$table->text('user_agent')->nullable();
$table->text('payload');
$table->integer('last_activity')->index();
});
You may use the session:table Artisan command to generate this migration. To learn more about database migrations, you may consult the complete migration documentation:
php artisan session:table
php artisan migrate
Redis
Before using Redis sessions with Laravel, you will need to either install the PhpRedis PHP extension via PECL or install the predis/predis package (~1.0) via Composer. For more information on configuring Redis, consult Laravel’s Redis documentation.
Note
In thesessionconfiguration file, theconnectionoption may be used to specify which Redis connection is used by the session.
Interacting With The Session
Retrieving Data
There are two primary ways of working with session data in Laravel: the global session helper and via a Request instance. First, let’s look at accessing the session via a Request instance, which can be type-hinted on a route closure or controller method. Remember, controller method dependencies are automatically injected via the Laravel service container:
<?php
namespace AppHttpControllers;
use AppHttpControllersController;
use IlluminateHttpRequest;
class UserController extends Controller
{
/**
* Show the profile for the given user.
*
* @param Request $request
* @param int $id
* @return Response
*/
public function show(Request $request, $id)
{
$value = $request->session()->get('key');
//
}
}
When you retrieve an item from the session, you may also pass a default value as the second argument to the get method. This default value will be returned if the specified key does not exist in the session. If you pass a closure as the default value to the get method and the requested key does not exist, the closure will be executed and its result returned:
$value = $request->session()->get('key', 'default');
$value = $request->session()->get('key', function () {
return 'default';
});
The Global Session Helper
You may also use the global session PHP function to retrieve and store data in the session. When the session helper is called with a single, string argument, it will return the value of that session key. When the helper is called with an array of key / value pairs, those values will be stored in the session:
Route::get('/home', function () {
// Retrieve a piece of data from the session...
$value = session('key');
// Specifying a default value...
$value = session('key', 'default');
// Store a piece of data in the session...
session(['key' => 'value']);
});
Note
There is little practical difference between using the session via an HTTP request instance versus using the globalsessionhelper. Both methods are testable via theassertSessionHasmethod which is available in all of your test cases.
Retrieving All Session Data
If you would like to retrieve all the data in the session, you may use the all method:
$data = $request->session()->all();
Determining If An Item Exists In The Session
To determine if an item is present in the session, you may use the has method. The has method returns true if the item is present and is not null:
if ($request->session()->has('users')) {
//
}
To determine if an item is present in the session, even if its value is null, you may use the exists method:
if ($request->session()->exists('users')) {
//
}
To determine if an item is not present in the session, you may use the missing method. The missing method returns true if the item is not present:
if ($request->session()->missing('users')) {
//
}
Storing Data
To store data in the session, you will typically use the request instance’s put method or the global session helper:
// Via a request instance...
$request->session()->put('key', 'value');
// Via the global "session" helper...
session(['key' => 'value']);
Pushing To Array Session Values
The push method may be used to push a new value onto a session value that is an array. For example, if the user.teams key contains an array of team names, you may push a new value onto the array like so:
$request->session()->push('user.teams', 'developers');
Retrieving & Deleting An Item
The pull method will retrieve and delete an item from the session in a single statement:
$value = $request->session()->pull('key', 'default');
Incrementing & Decrementing Session Values
If your session data contains an integer you wish to increment or decrement, you may use the increment and decrement methods:
$request->session()->increment('count');
$request->session()->increment('count', $incrementBy = 2);
$request->session()->decrement('count');
$request->session()->decrement('count', $decrementBy = 2);
Flash Data
Sometimes you may wish to store items in the session for the next request. You may do so using the flash method. Data stored in the session using this method will be available immediately and during the subsequent HTTP request. After the subsequent HTTP request, the flashed data will be deleted. Flash data is primarily useful for short-lived status messages:
$request->session()->flash('status', 'Task was successful!');
If you need to persist your flash data for several requests, you may use the reflash method, which will keep all of the flash data for an additional request. If you only need to keep specific flash data, you may use the keep method:
$request->session()->reflash();
$request->session()->keep(['username', 'email']);
To persist your flash data only for the current request, you may use the now method:
$request->session()->now('status', 'Task was successful!');
Deleting Data
The forget method will remove a piece of data from the session. If you would like to remove all data from the session, you may use the flush method:
// Forget a single key...
$request->session()->forget('name');
// Forget multiple keys...
$request->session()->forget(['name', 'status']);
$request->session()->flush();
Regenerating The Session ID
Regenerating the session ID is often done in order to prevent malicious users from exploiting a session fixation attack on your application.
Laravel automatically regenerates the session ID during authentication if you are using one of the Laravel application starter kits or Laravel Fortify; however, if you need to manually regenerate the session ID, you may use the regenerate method:
$request->session()->regenerate();
If you need to regenerate the session ID and remove all data from the session in a single statement, you may use the invalidate method:
$request->session()->invalidate();
Session Blocking
Warning
To utilize session blocking, your application must be using a cache driver that supports atomic locks. Currently, those cache drivers include thememcached,dynamodb,redis, anddatabasedrivers. In addition, you may not use thecookiesession driver.
By default, Laravel allows requests using the same session to execute concurrently. So, for example, if you use a JavaScript HTTP library to make two HTTP requests to your application, they will both execute at the same time. For many applications, this is not a problem; however, session data loss can occur in a small subset of applications that make concurrent requests to two different application endpoints which both write data to the session.
To mitigate this, Laravel provides functionality that allows you to limit concurrent requests for a given session. To get started, you may simply chain the block method onto your route definition. In this example, an incoming request to the /profile endpoint would acquire a session lock. While this lock is being held, any incoming requests to the /profile or /order endpoints which share the same session ID will wait for the first request to finish executing before continuing their execution:
Route::post('/profile', function () {
//
})->block($lockSeconds = 10, $waitSeconds = 10)
Route::post('/order', function () {
//
})->block($lockSeconds = 10, $waitSeconds = 10)
The block method accepts two optional arguments. The first argument accepted by the block method is the maximum number of seconds the session lock should be held for before it is released. Of course, if the request finishes executing before this time the lock will be released earlier.
The second argument accepted by the block method is the number of seconds a request should wait while attempting to obtain a session lock. An IlluminateContractsCacheLockTimeoutException will be thrown if the request is unable to obtain a session lock within the given number of seconds.
If neither of these arguments is passed, the lock will be obtained for a maximum of 10 seconds and requests will wait a maximum of 10 seconds while attempting to obtain a lock:
Route::post('/profile', function () {
//
})->block()
Adding Custom Session Drivers
Implementing The Driver
If none of the existing session drivers fit your application’s needs, Laravel makes it possible to write your own session handler. Your custom session driver should implement PHP’s built-in SessionHandlerInterface. This interface contains just a few simple methods. A stubbed MongoDB implementation looks like the following:
<?php
namespace AppExtensions;
class MongoSessionHandler implements SessionHandlerInterface
{
public function open($savePath, $sessionName) {}
public function close() {}
public function read($sessionId) {}
public function write($sessionId, $data) {}
public function destroy($sessionId) {}
public function gc($lifetime) {}
}
Note
Laravel does not ship with a directory to contain your extensions. You are free to place them anywhere you like. In this example, we have created anExtensionsdirectory to house theMongoSessionHandler.
Since the purpose of these methods is not readily understandable, let’s quickly cover what each of the methods do:
- The
openmethod would typically be used in file based session store systems. Since Laravel ships with afilesession driver, you will rarely need to put anything in this method. You can simply leave this method empty. - The
closemethod, like theopenmethod, can also usually be disregarded. For most drivers, it is not needed. - The
readmethod should return the string version of the session data associated with the given$sessionId. There is no need to do any serialization or other encoding when retrieving or storing session data in your driver, as Laravel will perform the serialization for you. - The
writemethod should write the given$datastring associated with the$sessionIdto some persistent storage system, such as MongoDB or another storage system of your choice. Again, you should not perform any serialization — Laravel will have already handled that for you. - The
destroymethod should remove the data associated with the$sessionIdfrom persistent storage. - The
gcmethod should destroy all session data that is older than the given$lifetime, which is a UNIX timestamp. For self-expiring systems like Memcached and Redis, this method may be left empty.
Registering The Driver
Once your driver has been implemented, you are ready to register it with Laravel. To add additional drivers to Laravel’s session backend, you may use the extend method provided by the Session facade. You should call the extend method from the boot method of a service provider. You may do this from the existing AppProvidersAppServiceProvider or create an entirely new provider:
<?php
namespace AppProviders;
use AppExtensionsMongoSessionHandler;
use IlluminateSupportFacadesSession;
use IlluminateSupportServiceProvider;
class SessionServiceProvider extends ServiceProvider
{
/**
* Register any application services.
*
* @return void
*/
public function register()
{
//
}
/**
* Bootstrap any application services.
*
* @return void
*/
public function boot()
{
Session::extend('mongo', function ($app) {
// Return an implementation of SessionHandlerInterface...
return new MongoSessionHandler;
});
}
}
Once the session driver has been registered, you may use the mongo driver in your config/session.php configuration file.
Laravel 8 shows a flash message example; This tutorial will provide you a complete guide on how to show flash messages with redirect in laravel 8 app.
Flash messages are very important things in any laravel 8 web or app. Alert messages are considered valuable from a user experience perspective. Sometimes, you need to use various types of flash message notification like alert-success, alert danger, alert info, alert warning messages with bootstrap in laravel 8 app. So, here, you will learn the various method to show or display flash error, warning, info, and success message in laravel 8 applications.
This laravel 8 flash message example tutorial will add several ways to give a flash message like redirect with success message, redirect with an error message, redirect with a warning message, and redirect with info message. And as well as, use a bootstrap flash alert layout that way it displays a pretty layout.
Flash Messages in Laravel 8
- Success Flash Message
- Error Flash Message
- Warning Flash Message
- Info Flash Message
- Sweet Alert Flash Success Message
- Sweet Alert Flash Error Message
1 – Success Flash Message
First of all, we need to add the below code in your HTML files:
@if(Session::has('success'))
    <div class="alert alert-success">
        {{Session::get('success')}}
    </div>
@endif
The second thing, When you send the success message. So you can use the below code in your controller:
return Redirect::to("/")->withSuccess('Success message');
The success flash message will look like:

2 – Error Flash Message
If you want to display an error message in your blade views, so you can add the below code in your blade file:
@if(Session::has('fail'))
    <div class="alert alert-danger">
       {{Session::get('fail')}}
    </div>
@endif
The second thing, add the below code in your controller, where you want to send the warning message:
return Redirect::to("/")->withFail('Error message');
The error flash message will look like:

3 – Warning Flash Message
To display an warning message in your blade views, so you can add the below code in your blade file:
@if(Session::has('warning'))
    <div class="alert alert-danger">
       {{Session::get('warning')}}
    </div>
@endif
The second thing, add the below code in your controller, where you want to send the error message:
return Redirect::to("/")-->with('warning',"Don't Open this link");
The warning flash message will look like:

4 – Info Flash Message
To display an info message in your blade views, so you can add the below code in your blade file:
@if(Session::has('info'))
    <div class="alert alert-danger">
       {{Session::get('info')}}
    </div>
@endif
The second thing, add the below code in your controller, where you want to send the info message:
return Redirect::to("/")-->with('info',"Don't Open this link");
The Info flash message will look like:

Now, you will learn how to use sweet alert message in your laravel application. So, first of all, you need to include sweet alert CDN or sweet alert js library in your laravel 8 application:
5 – Sweet Alert Flash Success Message
If you want to show a success message with sweet alert. So you can use the below code in your blade view files:
   @if(Session::has('success'))
     <script type="text/javascript">
        swal({
            title:'Success!',
            text:"{{Session::get('success')}}",
            timer:5000,
            type:'success'
        }).then((value) => {
          //location.reload();
        }).catch(swal.noop);
    </script>
    @endif
If you use the above code for a success message, this message automatically hides after 5 seconds.
The sweet alert-success message will look like:
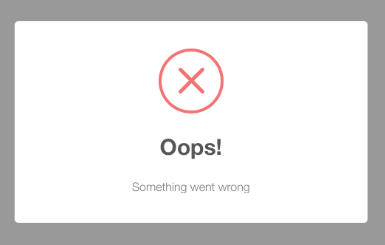
6 – Sweet Alert Flash Error Message
If you want to show an error message with a sweet alert. So you can use the below code in your blade view files:
   @if(Session::has('fail'))
   <script type="text/javascript">
      swal({
          title:'Oops!',
          text:"{{Session::get('fail')}}",
          type:'error',
          timer:5000
      }).then((value) => {
        //location.reload();
      }).catch(swal.noop);
  </script>
  @endif
If you use the above code for an error message, this message automatically hides after 5 seconds.
The sweet alert error message will look like:
Conclusion
Laravel 8 flash message tutorial, you have learned how to implement flash messages in laravel 8 applications.
Recommended Laravel Posts
(0:00)
Вот о чём я хочу, чтобы вы подумали. Часто когда пользователь выполняет какое-либо действие в вашем приложении, вы хотите дать ему какое-то уведомление, чтобы сообщить, например: «Эй, ваша учетная запись была успешно деактивирована».
Поэтому, возможно, это было бы полезно и для нашего маленького блога здесь. Введём Blog Article, небольшой текст и опубликуем статью. И заметьте, что, да, нас сюда перенаправили, и если честно, в данном случае совершенно очевидно, что всё прошло успешно.
(0:30)
Но, как вы можете себе представить, во многих других случаях, вам действительно понадобятся какие-то уведомления. Даже нечто настолько простое, как нажатие на кнопку Log Out, может выдать вам сообщение, подтверждающее статус: «Вы вышли из системы».
Давайте в этом уроке разберёмся как с этим справиться. Я покажу вам два способа, во-первых, мы сделаем это вручную, а затем дальше, я покажу вам небольшой пакет, который вы сможете притянуть, и с его помощью можно до смешного просто всё это сделать.
Наш первый шаг — идём на PHPArticlesController.
(1:00)
Теперь, когда пользователь создаёт новую статью, как мы знаем, метод PHPstore() вызывается, когда мы сделали новую статью и сохранили её. И на самом деле, немного не в тему — здесь мы создаём статью и передаём её методу сохранения PHPsave(), но также, если вы предпочитаете, то могли бы использовать метод PHPcreate().
Так же, как мы это делали, когда мы передавали массив атрибутов:
то же самое было бы верно здесь. Так что если вы хотите, вы могли бы сказать: получить статьи аутентифицированного пользователя и создать новую, используя запрос из формы:
PHP
Auth::user()->articles()->create($request->all());
(1:30)
так что, если мы удалим вот это, то всё будет по-прежнему работать точно таким же образом.
Хорошо, но в любом случае, мы создали новую статью, и мы перенаправим пользователя назад к списку статей, но я также хочу отобразить то, что мы называем «сообщением-вспышкой» (flash). Сообщение, которое показывается на экране для следующего запроса, а позднее, если перезагрузить страницу, его больше не будет видно.
Вот как мы можем сделать это в Laravel. У нас есть фасад сессии, так что мы могли бы сказать:
PHP
Session::flash('flash message', 'Your article has been created!');
(2:00)
Я хочу показать сообщение, мы даём ему какой-нибудь идентификатор, flash message, а затем тело, как насчет Your article has been created (т.е. ваша статья была создана). Хорошо, это сработает для конкретной сессии. Однако, когда мы перенаправляем, то мы не увидим это сообщение, нам всё равно нужно отобразить его где-то в нашем представлении.
Так давайте сделаем это. Давайте вернёмся к нашей мастер-странице; если это относится к каждому виду, то мастер-страница – хорошее место, куда это стоит поместить.
(2:30)
И давайте вставим это прямо здесь, в верхней части нашего контейнера, и позднее мы сможем извлечь паршл, но сейчас давайте просто вставим наш код прямо здесь.
Давайте скажем, если у сессии есть этот ключ:
PHP
@if (Session::has('flash message'))
то в этом случае мы хотим отобразить его. Так почему бы нам не использовать:
<div class="alert alert-success"></div>
Это специфические классы из Twitter Bootstrap, которые просто немного облегчат нам работу. И потом внутри здесь мы выведем сообщение
PHP
{{ Session::get('flash_message') }}
(3:00)
ОК, таким образом, мы уже узнали несколько методов API.
Для начала – PHPSession::flash(). Думайте о нём, в качестве единовременного флэш-сообщения. Также есть такие вещи, как PHPSession::put() – поместить это в сессию. Разница между этим и flash-сообщением в том, что последнее носит временный характер, только для одного запроса.
Так что у нас есть эти два, и ещё мы можем увидеть такие методы, как PHPSession::has(). Есть ли у нас этот ключ в сессии?
(3:30)
И если он есть, то через PHPget() получим значение, связанное с этим ключом. Давайте посмотрим, как это выглядит в браузере.
Поэтому ещё раз я создам новую статью. Просто напишем test (в название) и test (в тело), и, когда мы добавим статью, точно, вы увидите сообщение прямо здесь. Теперь вот что я имел в виду про то, что это одноразовое сообщение. Если мы перезагрузим эту страницу, сообщение только промелькнуло, так что мы его больше не видим, и это значит, что это идеально подходит для таких маленьких сообщений с уведомлениями.
(4:00)
Вы вероятно обнаружите, что для большинства производственных приложений вам понадобится немного больше гибкости.
Например, когда нас перенаправляют назад на эту страницу с flash-сообщением, оно как бы отображается всё время. Может быть, вы хотите отображать сообщение в течение четырех секунд и чтобы затем оно ускользнуло наверх? Вы хотите, чтобы оно исчезло.
Но в других ситуациях, для действительно важных сообщений, вы и правда хотите, чтобы они отображались постоянно. И чтобы пользователь должен был нажать на маленькую кнопку ‘х’, чтобы признать, что «Да», он прочитал сообщение и теперь хочет удалить его.
(4:30)
Так что, похоже, что на самом деле, нам нужно здесь чуть больше гибкости. Давайте посмотрим, как мы могли бы это сделать. Ну, для начала, если мы вернёмся к нашему представлению, то почему бы нам не добавить маленький х наверху, и я просто вставлю вот этот код:
<button type="button" class="close" data-dismiss="alert" aria-hidden="true">×</button>
Это на самом деле взято с сайта Twitter Bootstrap. Просто код, который можно добавить чтобы поставить кнопочку х. Итак, позвольте мне показать вам, как это выглядит.
laravel5.dev/articles/create
test2, опубликуем статью. И теперь мы получаем сообщение, и вы увидите, вот он маленький х.
(5:00)
Но если я нажму на него, то ничего пока не происходит, потому что Twitter Bootstrap там требуется немного JavaScript. Так почему бы нам не добавить его? Давайте разместим это внизу, прямо перед закрывающим </body>.
И для реального проекта вы, вероятно, будете хранить его локально. Но я просто вставлю это здесь. Мы получаем последнюю версию jQuery, даже не версию в кэше, просто будем ссылаться на неё напрямую. И далее у нас есть весь JavaScript для Twitter Bootstrap, который хранится на CDN.
(5:30)
Так что имейте в виду, мы делаем это для удобства. На самом деле, если вы используете Twitter Bootstrap, вы можете загрузить специальный файл JavaScript, который будет включать в себя только те компоненты, которые ваше приложение на самом деле станет использовать.
Но это всего лишь пример, и для нас этого здесь вполне достаточно. Так что теперь давайте попробуем ещё разок. Мы создадим третью тестовую статью test3, и если мы добавим её сейчас, то у нас есть кнопка х, и если мы нажимаем на неё, наше сообщение будет удалено. Довольно просто.
(6:00)
Но, как я уже сказал, в некоторых ситуациях, вы можете захотеть это использовать, а в других, вам не нужно, чтобы пользователь нажимал на кнопку закрытия. Вы просто захотите быстрое сообщение, которое исчезнет через две-три секунды.
Так что, может быть, вы могли бы отображать кнопку только тогда, когда в сессии устанавливается некоторое другое значение. Например:
PHP
@if (Session::has('flash_message_important'))
в таком случае мы хотим сохранить его на экране до тех пор, пока пользователь не удалит его. Так что отображаем кнопку только при этом условии.
(6:30)
Мы могли бы сказать: если у нас есть flash_message_important, в этом случае давайте добавим здесь класс alert_important. В противном случае мы не должны ничего отображать:
PHP
{{ Session::has('flash_message_important') ? 'alert-important' : '' }}
И кстати, здесь, у нас также есть функции-помощники, в Laravel 5 есть функция PHPsession(). И она на самом деле может быть довольно гибкой. Если мы посмотрим на неё вот здесь (в Foundation/helpers.php).
(7:00)
Если мы просто вызовем session(), и мы ничего не передадим, нам вернётся то, что хранится в контейнере IoC, так что вы всё ещё можете делать нечто вроде PHPsession()->get() or PHPsession()->flash(), и всё прочее. Очень похоже на использование PHPredirect() или PHPview(). Но если мы передаем туда массив, то Laravel будет считать, что мы даём что-то для сессии. И, наконец, если мы просто передаём какую-то строку, то предполагается, что мы делаем эквивалент PHPSession::get().
И это значит, если я переключусь обратно (к app.blade.php), вы могли бы изменить это примерно так:
PHP
{{ session('flash_message') }}
(7:30)
и получить точно такой же эффект. Также это означает, идём назад в PHPArticlesController, что вместо того, чтобы добавлять PHPuse Session в верхней части файла или глобально ссылаться на него, как мы сделали здесь, вы могли бы просто сказать PHPsession()->flash(). Вот так.
Хорошо, давайте вернемся к нашему представлению. Теперь, если мы даём сессии ключ flash_message, то на самый следующий запрос мы отобразим его. Но также, если существует нечто под названием flash_message_important, то мы хотим также отобразить кнопку закрытия.
(8:00)
Наконец, мы могли бы написать немного JavaScript, чтобы скрыть сообщение. И я просто использую здесь немного jQuery. Мы по сути хотим сказать: «дайте мне div, с классом alert, то есть, дайте мне коллекцию всех элементов на странице, которые соответствуют CSS, но отфильтруйте их, потому что я не заинтересован в элементах класса alert_important, которые не должны применяться.
js$('div.alert').not('.alert-important')
Тогда мы просто хотим подождать, задержку в течение примерно 3 секунд, и затем сдвинуть сообщение вверх.
js$('div.alert').not('.alert-important').delay(3000).slideUp(300)
(8:30)
Хорошо, давайте посмотрим на это в браузере. Так что ещё раз мы создаем четвёртый пост в блоге. Мы добавляем его и обратите внимание, что сообщение отображается в течение нескольких секунд, а затем ускользает наверх. Круто, не так ли? Но теперь мы передадим дополнительный ключ к этой сессии.
Вернёмся к нашему редактору, открываем PHPArticlesController, и теперь, на самом деле, мы можем это сделать несколькими способами.
Один, продублируем это, вот так:
PHP
session()->flash('flash_message', 'Your article has been created!');
session()->flash('flash_message_important', true)
(9:00)
Давайте посмотрим, если это сработает.
Это будет наша пятая попытка (пишем Fifth). Таким образом, мы добавим статью, и теперь вы увидите, что она не скрылась, но у нас есть кнопка х, так что вы можете вручную отключить сообщение, когда его прочитаете.
Круто, но, как я уже сказал, есть несколько способов сделать это.
Так что да, мы могли бы сделать это так, но также мы могли бы добавить здесь метод PHPwith(). Итак, когда мы делаем PHPredirect() и вызываем PHPwith(), это предполагает, что мы выведем flash-сообщение.
(9:30)
Так что мы могли бы сделать так:
PHP
return redirect('articles')->with([
    'flash_message' => 'Your article has been created',
    'flash_message_important' => true
]);
И этот подход был бы эквивалентен.
Теперь, всякий раз когда мы создаем новую статью, мы перенаправляем обратно на страницу списка статей, и также, в процессе через «вспышку» передаём несколько ключей для сессии. Сообщение и индикатор того, является ли оно важным и должно остаться или не столь важное и может исчезнуть.
(10:00)
Так что, если мы вернемся к app.blade.php, это прекрасный пример того, что можно выделить в partial. Давайте откроем нашу боковую панель и перейдём в resources/views. И давайте добавим здесь каталог partials — partials/flash.blade.php и сюда я его и вставлю.
Теперь, если я переключусь назад, я могу сказать:
PHP
@include('partials.flash')
и мы получим тот же конечный результат.
(10:30)
Здорово, теперь вы знаете, как это делать, но до сих пор это не меняет тот факт, что код всё ещё является немного громоздким.
На самом деле, вот что я предпочёл бы сделать в моём реальном проекте. Может быть, я бы вызвал функцию PHPflash() например так:
PHP
flash('Your article has been created');
и затем я мог бы удалить всё это и перенаправить. И это бы всё ещё дало тот же самый результат. И потом, если бы я захотел показать что это важно, то может быть, я бы ещё добавил метод important():
PHP
flash('Your article has been created')->important();
Это было бы предпочтительнее, на мой взгляд.
И на самом деле нечто подобное очень легко реализовать.
(11:00)
Я уже забежал вперёд и сделал это, так что если вы хотите, то можете притянуть небольшой пакет, который даёт вам такого рода API. Давайте я покажу как это сделать.
Назад в терминал, я сделаю:
shcomposer require laracasts/flash
и теперь пока это притягивается, мы можем пойти в наш файл config/app.php и нам нужно добавить поставщика услуг, так что мы можем сделать это прямо здесь:
PHP
'LaracastsFlashFlashServiceProvider'
(11:30)
и быстрое замечание здесь, если вы когда-нибудь задумывались, «Откуда же я должен был это знать?». Для любого пакета, который вы можете притянуть, вам достаточно посмотреть документацию часто прямо на GitHub, и там вам скажут точно что нужно делать.
- Шаг 1 — composer require
- Шаг 2 — добавить поставщика услуг
- Шаг 3 — добавить псевдоним (alias)
И на этой ноте, если вы хотите сделать специальный фасад, то вы можете добавить его здесь, но это не обязательный шаг.
Вы могли бы сделать что-то вроде этого:
PHP
'Flash' => 'LaracastsFlashFlash'
(12:00)
Хорошо, это должно сработать. Назад к PHPArticlesController. Теперь, да, у нас есть вспомогательная функция, которую вы могли бы использовать. Или, если вы предпочитаете подход с фасадом, то могли бы сказать PHPFlash… и информационное сообщение:
или сообщение об ошибке:
или сообщение об успешном выполнении:
а потом за кадром автоматически обрабатывается процесс настройки для вас этих ключей.
Позвольте мне показать вам, как это выглядит. Существует класс-уведомитель, и заметьте, к примеру, если бы мы запустили PHPFlash::success(), то мы создаём новое flash-сообщение, и оно только передаёт несколько ключей в сессию.
(12:30)
Очень похоже на то, как мы делали раньше.
Это просто даёт вам более хороший API или более хорошую обертку, чтобы вам не пришлось повторяться снова и снова. И также круто, что у вас есть несколько представлений, которые вы могли бы притянуть и модифицировать как вам нужно. Итак, позвольте мне показать вам, как это работает.
Давайте вернёмся к app.blade.php, и мы не будем ссылаться на наш собственный partial, мы сошлёмся на partial из представления. Откроем flash/message.blade.php.
(13:00)
И вы увидите – это то, что мы получаем из пакета.
Так что, если мы переключимся назад, я могу включить представление из пакета с помощью ссылки на имя пакета – flash:: и затем имя нужного представления (в этом случае оно называется message):
PHP
@include ('flash::message')
Итак, давайте посмотрим, как это выглядит.
Просто чтобы убедиться, что вы всё поняли – мы создаём статью, мы выдаём flash-сообщение, и затем мы перенаправляемся назад к списку статей. ОК, давайте попробуем.
(13:30)
Мы создаём новую статью. Я думаю, что мы сейчас находимся на седьмой, добавим её, и ещё раз мы получим тот же самый результат.
В данном случае у нас было информационное сообщение, но может быть, вы захотите сообщение об успешном исполнении, тогда можно сказать:
и передать текст сообщения. И вы увидите, что в основном, вся разница в том, что мы добавили другое имя класса, а затем Twitter Bootstrap узнал его, но если вы не используете его, то вы можете подключиться к нему с помощью CSS и стилизовать его как вы захотите.
(14:00)
Так что на этот раз я думаю, что результат должен быть зелёным. И, да, сообщение зелёное.
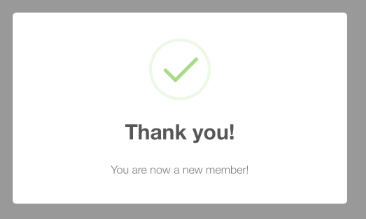
Мы уже видели flash-сообщения, которые должны оставаться или скрываться, но, возможно, вы также захотите, своего рода, накладываемое сообщение. Так, например, если вы зарегистрируетесь на Laracasts, я отображаю модальное окно, которое говорит: «Эй, добро пожаловать на Laracasts! Большое спасибо за регистрацию!». Это немного другой стиль и он также идёт в пакете. Позвольте я вам покажу. На этот раз, вместо сообщения PHPsuccess(), мы используем сообщение PHPoverlay().
(14:30)
И вы увидите, если мы перейдём прямо к нему, к функции PHPoverlay() в FlashNotifier.php, то здесь мы даём ей сообщение, а также заголовок, так что, мы могли бы сказать:
PHP
flash()->overlay('Your article has been successfully created!', 'Good Job');
На самом деле не очень хороший пример для использования наложения, но вы поняли идею.
Так что если вы захотите использовать этот метод, то единственное, что вам придётся сделать, это активировать его. Так что я закомментирую вот это, и мы выберем PHPmodal(). Если мы вкратце его рассмотрим, то вы увидите, что у нас есть id="flash-overlay-modal".
(15:00)
Так что вы можете найти его просто вызывая на нём метод PHPmodal():
js$('#flash-overlay-modal').modal();
Ещё раз, мы просто используем здесь плагин Twitter Bootstrap, поэтому мы ссылаемся на скрипт, и затем мы активируем плагин, так сказать. Хорошо, так почему бы нам не попробовать это в браузере?
Последний раз уже, я думаю. Мы пишем: final, final, добавим статью, и на этот раз мы получаем накладку, которую вы можете просмотреть и закрыть, когда готовы. Итак, на самом деле это всё что нужно здесь знать.
(15:30)
Вы можете притянуть этот пакет, или если вы не хотите этим заморачиваться, то не забывайте, что вы всё ещё можете сказать:
и потом всё, что вам нужно сделать, это в вашем представлении слушать, существует ли ключ с таким именем, и если это так, то выдать значение, связанное с ним. «Вы зарегистрированы!» или нечто в этом роде. Так что на Laracasts, например, я использую именно этот пакет, когда вы зарегистрировались. У меня есть небольшое сообщение, которое говорит что вы вошли:
PHP
flash('You are now logged in');
(16:00)
Это чистый, быстрый, простой способ, и это намного проще, чем всегда добавлять PHPwith():
PHP
return redirect('articles')->with('flash_message', 'You are now logged in.');
Эти маленькие победы, когда вы делаете ваш код чуть чище и чуть короче, действительно имеют большой эффект на конечный результат.
Хорошо, так что теперь вы освоили искусство сообщений-вспышек.
After a successful ajax request, I want to send a flash message to my view (For example, upon editing, I’d like to redirect the user to the homepage with $flash = «Your shop has been update» ). Within the controller, it is easy but I don’t know what to do within JavaScript. Do any of you know how to figure it out? Im using Laravel
Controller
   public function postUpdate (Request $request)
    {
            $this->validate($request, [
                'website_name' => 'required',
                'website_url' => 'required',
                'category' => 'required',
                'type' => 'required',
                'sells' => 'required',
                'location' => 'required',
                'description' => 'required',
                'payment' => 'required'
            ]);
            Shop::where('username', '=', Auth::user()->username)->update(['website_name' => Input::get('website_name'),
                'website_url' => Input::get('website_url'), 'type' => Input::get('type'), 'category' => Input::get('category'), 'sells' => Input::get('sells'), 'location' => Input::get('location'),
                'payment' => Input::get('payment'), 'description' => Input::get('description')]);
        return Response::json(['message' => 'Success', 'message_class' => 'alert alert-success fade in']);
    }
AJAX
$(".update-form").submit(function(s){

            s.preventDefault();

            var website_name = $('input[name=website_name]').val();
            var website_url = $('input[name=website_url]').val();
            var type = $('#type option:selected').val();
            var category = $('#category option:selected').val();
            var sells = $('input[name=sells]').val();
            var location = $('input[name=location]').val();
            var payment = $('input[name=payment]').val();
            var description = $("textarea#message").val();

                $.ajax({
                type: "POST",
                url: "advertiser/update",
                data: {
                    _token: token, website_name: website_name, website_url: website_url, type: type, category: category, sells: sells, location: location, payment: payment, description: description

                },

                success: function() {
                   $('.modal-backdrop').remove();
                    $('body').load('advertiser')

                },

                error: function(data) {
                    $('body').load('advertiser')

                }
                      })


        });
HTML
<div class="row" id="errors">
@if (Session::has('message'))
<div class="{!! Session::get('message_class') !!}">
<a href="#" class="close" data-dismiss="alert">×</a>
<strong>Note!</strong> {!! Session::get('message') !!}
</div>
@endif
@if($errors->has())
<div class="alert alert-danger fade in">
<a href="#" class="close" data-dismiss="alert">×</a>
<p>the following errors have occured:</p>
<ul>
@foreach($errors->all() as $error)
<li>{{$error}}</li>
@endforeach
</ul>
</div>
@endif
Easy Flash Messages for Your Laravel App
This composer package offers a Twitter Bootstrap optimized flash messaging setup for your Laravel applications.
Installation
Begin by pulling in the package through Composer.
composer require laracasts/flash
Next, as noted above, the default CSS classes for your flash message are optimized for Twitter Bootstrap. As such, either pull in the Bootstrap’s CSS within your HTML or layout file, or write your own CSS based on these classes.
<link rel="stylesheet" href="//maxcdn.bootstrapcdn.com/bootstrap/3.3.5/css/bootstrap.min.css">
Usage
Within your controllers, before you perform a redirect, make a call to the flash() function.
public function store()
{
    flash('Welcome Aboard!');

    return home();
}
You may also do:
flash('Message')->success(): Set the flash theme to «success».flash('Message')->error(): Set the flash theme to «danger».flash('Message')->warning(): Set the flash theme to «warning».flash('Message')->overlay(): Render the message as an overlay.flash()->overlay('Modal Message', 'Modal Title'): Display a modal overlay with a title.flash('Message')->important(): Add a close button to the flash message.flash('Message')->error()->important(): Render a «danger» flash message that must be dismissed.
With this message flashed to the session, you may now display it in your view(s). Because flash messages and overlays are so common, we provide a template out of the box to get you started. You’re free to use — and even modify to your needs — this template how you see fit.
@include('flash::message')
Example
<!DOCTYPE html>
<html lang="en">
<head>
    <meta charset="UTF-8">
    <title>Document</title>
    <link rel="stylesheet" href="//maxcdn.bootstrapcdn.com/bootstrap/3.3.5/css/bootstrap.min.css">
</head>
<body>

<div class="container">
    @include('flash::message')

    <p>Welcome to my website...</p>
</div>

<!-- If using flash()->important() or flash()->overlay(), you'll need to pull in the JS for Twitter Bootstrap. -->
<script src="//code.jquery.com/jquery.js"></script>
<script src="//maxcdn.bootstrapcdn.com/bootstrap/3.3.5/js/bootstrap.min.js"></script>

<script>
    $('#flash-overlay-modal').modal();
</script>

</body>
</html>
If you need to modify the flash message partials, you can run:
php artisan vendor:publish --provider="LaracastsFlashFlashServiceProvider"
The two package views will now be located in the resources/views/vendor/flash/ directory.
flash('Welcome Aboard!');

return home();
flash('Sorry! Please try again.')->error();

return home();
flash()->overlay('You are now a Laracasts member!', 'Yay');

return home();
Learn exactly how to build this very package on Laracasts!
Hiding Flash Messages
A common desire is to display a flash message for a few seconds, and then hide it. To handle this, write a simple bit of JavaScript. For example, using jQuery, you might add the following snippet just before the closing </body> tag.
<script>
$('div.alert').not('.alert-important').delay(3000).fadeOut(350);
</script>
This will find any alerts — excluding the important ones, which should remain until manually closed by the user — wait three seconds, and then fade them out.
Multiple Flash Messages
Need to flash multiple flash messages to the session? No problem.
flash('Message 1');
flash('Message 2')->important();

return redirect('somewhere');
Done! You’ll now see two flash messages upon redirect.
September 26, 2020
Category : Laravel
I am going to explain you example of laravel 8 flash message example. We will use laravel 8 flash message from controller. step by step explain laravel 8 flash message notification. this example will help you flash message laravel 8. you will do the following things for create flash message laravel 8.
we will define various type of flash message notification like alert success, alert danger, alert info, alert warning messages in bootstrap laravel 8 projects. When you have success task on controller method then you can use success flash message, if you have any error task then you can use error flash message.
Flash messages are required in laravel 8 application because that way we can give alter with what progress complete, error, warning etc. In this tutorial, I added several ways to give a flash message like redirect with success message, redirect with an error message, redirect with a warning message and redirect with info message. In this example, we use a bootstrap flash alert layout that way it becomes good layout.
So, you have to just follow the basic three step to integrate flash message in your laravel 8 application. So let’s follow below step:
Step 1: Create Global File For Flash Message
In first step we will create new blade file flash-message.blade.php. In this file we will write code of bootstrap alert and check which messages come.
There are following alert will added:
1)success
2)error
3)warning
4)info
5)validation error
So, let’s create flash-message.blade.php file and put bellow code on that file.
resources/views/flash-message.blade.php
@if ($message = Session::get('success'))
<div class="alert alert-success alert-block">
    <button type="button" class="close" data-dismiss="alert">×</button>
    <strong>{{ $message }}</strong>
</div>
@endif
@if ($message = Session::get('error'))
<div class="alert alert-danger alert-block">
    <button type="button" class="close" data-dismiss="alert">×</button>
    <strong>{{ $message }}</strong>
</div>
@endif
@if ($message = Session::get('warning'))
<div class="alert alert-warning alert-block">
    <button type="button" class="close" data-dismiss="alert">×</button>
    <strong>{{ $message }}</strong>
</div>
@endif
@if ($message = Session::get('info'))
<div class="alert alert-info alert-block">
    <button type="button" class="close" data-dismiss="alert">×</button>
    <strong>{{ $message }}</strong>
</div>
@endif
@if ($errors->any())
<div class="alert alert-danger">
    <button type="button" class="close" data-dismiss="alert">×</button>
    Please check the form below for errors
</div>
@endif
Step 2: Use Flash Message in Theme
In this step we have to just include flash-message.blade.php file in your theme default file. You have to just include this flash file in your default theme blade file like as bellow:
@include('flash-message')
You can also see i added flash file on my theme, so you can add that way. Let’s see bellow example:
resources/views/layouts/app.blade.php
<!DOCTYPE html>
<html lang="en">
<head>
<meta charset="utf-8">
<meta http-equiv="X-UA-Compatible" content="IE=edge">
<meta name="viewport" content="width=device-width, initial-scale=1">
<!-- Styles -->
<link href="/css/app.css" rel="stylesheet">
</head>
<body>
<div id="app">
@include('flash-message')
@yield('content')
</div>
<!-- Scripts -->
<script src="/js/app.js"></script>
</body>
</html>
Step 3: Use Flash Messages with Redirect
In this step we will learn how to give message when you redirect one by one:
1. Redirect with success message
We can simple redirect route or redirect url or redirect back with success flash message, we can use in controller like this way:
public function create(Request $request)
{
$this->validate($request,[
'title' => 'required',
'details' => 'required'
]);
$items = Item::create($request->all());
return back()->with('success','Item created successfully!');
}
You can get layout of success flash message:
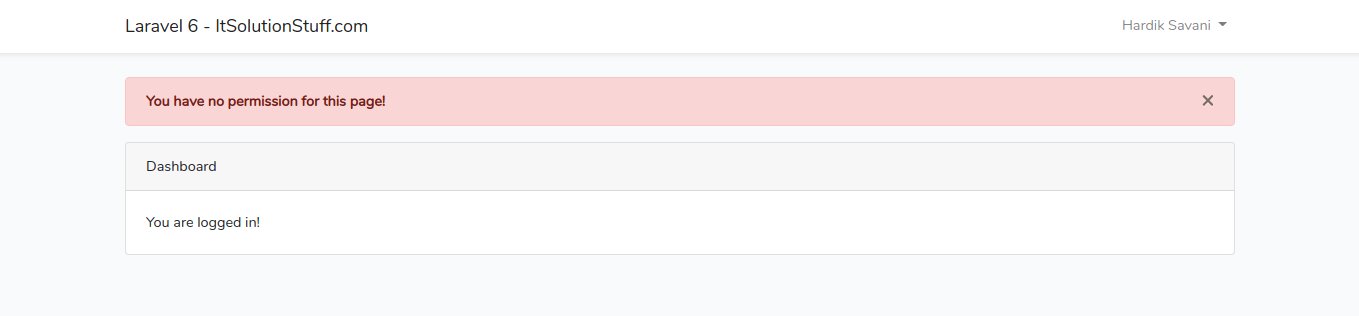
2. Redirect with error message
We can simple redirect route or redirect url or redirect back with error flash message, we can use in controller like this way:
public function create(Request $request)
{
return redirect()->route('home')
->with('error','You have no permission for this page!');
}
You can get layout of error flash message:
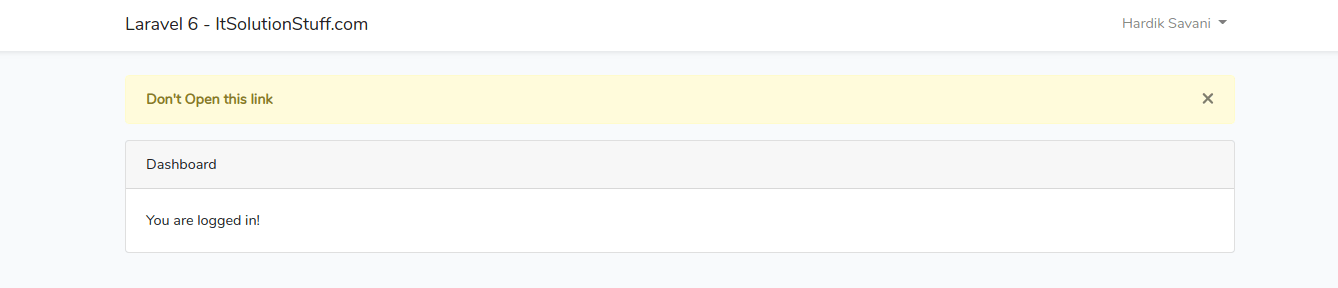
3. Redirect with warning message
We can simple redirect route or redirect url or redirect back with warning flash message, we can use in controller like this way:
public function create(Request $request)
{
return redirect()->route('home')
->with('warning',"Don't Open this link");
}
You can get layout of warning flash message:
4. Redirect with info message
We can simple redirect route or redirect url or redirect back with info flash message, we can use in controller like this way:
public function create(Request $request)
{
$this->validate($request,[
'title' => 'required',
'details' => 'required'
]);
$items = Item::create($request->all());
return back()->with('info','You added new items, follow next step!');
}
You can get layout of info flash message:

5. Validation Error
If you use laravel 5 validation then you will redirect back with errors automatically, At that time it will also generate error flash message.
public function create(Request $request)
{
$this->validate($request,[
'title' => 'required',
'details' => 'required'
]);
.....
}
You can get layout of error flash message:

This way you can simple implement flash message in your laravel 8 application.
I hope it can help you….
Hi Guys,
In this tutorial,I will learn you how to use flash message in laravel 8.you can easy nad simply use flash message in laravel 8.
This tutorial is designed to give you Laravel 8 Flash Message example, mutually we will learn to how to integrate and use flash message in laravel 8. We would shed light on flash message example in laravel after login. Possibly, this is required in almost every application, be it built with laravel or any other language or framework.
Flash messages are required in laravel 8 application because that way we can give alter with what progress complete, error, warning etc. In this tutorial, I added several ways to give a flash message like redirect with success message, redirect with an error message, redirect with a warning message and redirect with info message. In this example, we use a bootstrap flash alert layout that way it becomes good layout.
So, you have to just follow the basic three step to integrate flash message in your laravel 8 application. So let’s follow below step:
Step 1: Create Global File For Flash Message
In first step we will create new blade file message.blade.php. In this file we will write code of bootstrap alert and check which messages come.
There are following alert will added:
1)success
2)error
3)warning
4)info
5)validation error
So, let’s create message.blade.php file and put bellow code on that file.
resources/views/message.blade.php
@if ($message = Session::get('success'))
<div class="alert alert-success alert-block">
<button type="button" class="close" data-dismiss="alert">×</button>
<strong>{{ $message }}</strong>
</div>
@endif
@if ($message = Session::get('error'))
<div class="alert alert-danger alert-block">
<button type="button" class="close" data-dismiss="alert">×</button>
<strong>{{ $message }}</strong>
</div>
@endif
@if ($message = Session::get('warning'))
<div class="alert alert-warning alert-block">
<button type="button" class="close" data-dismiss="alert">×</button>
<strong>{{ $message }}</strong>
</div>
@endif
@if ($message = Session::get('info'))
<div class="alert alert-info alert-block">
<button type="button" class="close" data-dismiss="alert">×</button>
<strong>{{ $message }}</strong>
</div>
@endif
@if ($errors->any())
<div class="alert alert-danger">
<button type="button" class="close" data-dismiss="alert">×</button>
Please check the form below for errors
</div>
@endif
Step 2: Use Flash Message in Theme
Now we are going to call all the conjugated code from the message file in the main layout. Ultimately, create a new file and folder, path as follows layouts/app.blade.php, and incorporate the following code.
@include('message')
You can also see i added flash file on my theme, so you can add that way. Let’s see bellow example:
resources/views/layouts/app.blade.php
<!DOCTYPE html>
<html lang="en">
<head>
    <meta charset="utf-8">
    <meta http-equiv="X-UA-Compatible" content="IE=edge">
    <meta name="viewport" content="width=device-width, initial-scale=1">
    <!-- Styles -->
    <link href="/css/app.css" rel="stylesheet">
</head>
<body>
    <div id="app">
        @include('message')
        @yield('content')
    </div>
    <!-- Scripts -->
    <script src="/js/app.js"></script>
</body>
</html>
Step 3: Use Flash Messages with Redirect
In this step we will learn how to give message when you redirect one by one:
1. Redirect with success message
We can simple redirect route or redirect url or redirect back with success flash message, we can use in controller like this way:
public function create(Request $request)
{
	$this->validate($request,[
        'title' => 'required',
        'details' => 'required'
        ]);
	$items = Item::create($request->all());
	return back()->with('success','Item created successfully!');
}
To display an success message in your blade views, so you can add the below code in your blade file:
@if(Session::has('success'))
    <div class="alert alert-success">
        {{Session::get('success')}}
    </div>
@endif
You can get layout of success flash message:

2. Redirect with error message
We can simple redirect route or redirect url or redirect back with error flash message, we can use in controller like this way:
public function create(Request $request)
{
    return redirect()->route('home')
        ->with('error','You have no permission for this page!');
}
To display an success message in your blade views, so you can add the below code in your blade file:
@if(Session::has('error'))
    <div class="alert alert-danger">
        {{Session::get('error')}}
    </div>
@endif
You can get layout of success flash message:

3. Redirect with warning message
We can simple redirect route or redirect url or redirect back with warning flash message, we can use in controller like this way:
public function create(Request $request)
{
    return redirect()->route('home')
            ->with('warning',"Don't Open this link");
}
To display an success message in your blade views, so you can add the below code in your blade file:
@if(Session::has('warning'))
    <div class="alert alert-warning">
        {{Session::get('warning')}}
    </div>
@endif
You can get layout of success flash message:

4. Redirect with info message
We can simple redirect route or redirect url or redirect back with info flash message, we can use in controller like this way:
public function create(Request $request)
{
    $this->validate($request,[
        'title' => 'required',
        'details' => 'required'
        ]);
    $items = Item::create($request->all());
    return back()->with('info','You added new items, follow next step!');
}
To display an success message in your blade views, so you can add the below code in your blade file:
@if(Session::has('info'))
    <div class="alert alert-info">
        {{Session::get('info')}}
    </div>
@endif
You can get layout of success flash message:

5. Validation Error
If you use laravel 5 validation then you will redirect back with errors automatically, At that time it will also generate error flash message.
public function create(Request $request)
{
    $this->validate($request,[
        'title' => 'required',
        'details' => 'required'
        ]);
    .....
}
You can get layout of success flash message:

I hope it can help you….
✌️ Like this article? Follow me on Twitter and Facebook. You can also subscribe to RSS Feed.
Версия
![]()
![]()
Validation
- Introduction
-
Validation Quickstart
- Defining The Routes
- Creating The Controller
- Writing The Validation Logic
- Displaying The Validation Errors
- Repopulating Forms
- A Note On Optional Fields
-
Form Request Validation
- Creating Form Requests
- Authorizing Form Requests
- Customizing The Error Messages
- Preparing Input For Validation
-
Manually Creating Validators
- Automatic Redirection
- Named Error Bags
- Customizing The Error Messages
- After Validation Hook
- Working With Validated Input
-
Working With Error Messages
- Specifying Custom Messages In Language Files
- Specifying Attributes In Language Files
- Specifying Values In Language Files
- Available Validation Rules
- Conditionally Adding Rules
-
Validating Arrays
- Validating Nested Array Input
- Validating Passwords
-
Custom Validation Rules
- Using Rule Objects
- Using Closures
- Implicit Rules
Introduction
Laravel provides several different approaches to validate your application’s incoming data. It is most common to use the validate method available on all incoming HTTP requests. However, we will discuss other approaches to validation as well.
Laravel includes a wide variety of convenient validation rules that you may apply to data, even providing the ability to validate if values are unique in a given database table. We’ll cover each of these validation rules in detail so that you are familiar with all of Laravel’s validation features.
Validation Quickstart
To learn about Laravel’s powerful validation features, let’s look at a complete example of validating a form and displaying the error messages back to the user. By reading this high-level overview, you’ll be able to gain a good general understanding of how to validate incoming request data using Laravel:
Defining The Routes
First, let’s assume we have the following routes defined in our routes/web.php file:
use AppHttpControllersPostController;
Route::get('/post/create', [PostController::class, 'create']);
Route::post('/post', [PostController::class, 'store']);
The GET route will display a form for the user to create a new blog post, while the POST route will store the new blog post in the database.
Creating The Controller
Next, let’s take a look at a simple controller that handles incoming requests to these routes. We’ll leave the store method empty for now:
<?php
namespace AppHttpControllers;
use AppHttpControllersController;
use IlluminateHttpRequest;
class PostController extends Controller
{
/**
* Show the form to create a new blog post.
*
* @return IlluminateViewView
*/
public function create()
{
return view('post.create');
}
/**
* Store a new blog post.
*
* @param IlluminateHttpRequest $request
* @return IlluminateHttpResponse
*/
public function store(Request $request)
{
// Validate and store the blog post...
}
}
Writing The Validation Logic
Now we are ready to fill in our store method with the logic to validate the new blog post. To do this, we will use the validate method provided by the IlluminateHttpRequest object. If the validation rules pass, your code will keep executing normally; however, if validation fails, an IlluminateValidationValidationException exception will be thrown and the proper error response will automatically be sent back to the user.
If validation fails during a traditional HTTP request, a redirect response to the previous URL will be generated. If the incoming request is an XHR request, a JSON response containing the validation error messages will be returned.
To get a better understanding of the validate method, let’s jump back into the store method:
/**
* Store a new blog post.
*
* @param IlluminateHttpRequest $request
* @return IlluminateHttpResponse
*/
public function store(Request $request)
{
$validated = $request->validate([
'title' => 'required|unique:posts|max:255',
'body' => 'required',
]);
// The blog post is valid...
}
As you can see, the validation rules are passed into the validate method. Don’t worry — all available validation rules are documented. Again, if the validation fails, the proper response will automatically be generated. If the validation passes, our controller will continue executing normally.
Alternatively, validation rules may be specified as arrays of rules instead of a single | delimited string:
$validatedData = $request->validate([
'title' => ['required', 'unique:posts', 'max:255'],
'body' => ['required'],
]);
In addition, you may use the validateWithBag method to validate a request and store any error messages within a named error bag:
$validatedData = $request->validateWithBag('post', [
'title' => ['required', 'unique:posts', 'max:255'],
'body' => ['required'],
]);
Stopping On First Validation Failure
Sometimes you may wish to stop running validation rules on an attribute after the first validation failure. To do so, assign the bail rule to the attribute:
$request->validate([
'title' => 'bail|required|unique:posts|max:255',
'body' => 'required',
]);
In this example, if the unique rule on the title attribute fails, the max rule will not be checked. Rules will be validated in the order they are assigned.
A Note On Nested Attributes
If the incoming HTTP request contains «nested» field data, you may specify these fields in your validation rules using «dot» syntax:
$request->validate([
'title' => 'required|unique:posts|max:255',
'author.name' => 'required',
'author.description' => 'required',
]);
On the other hand, if your field name contains a literal period, you can explicitly prevent this from being interpreted as «dot» syntax by escaping the period with a backslash:
$request->validate([
'title' => 'required|unique:posts|max:255',
'v1.0' => 'required',
]);
Displaying The Validation Errors
So, what if the incoming request fields do not pass the given validation rules? As mentioned previously, Laravel will automatically redirect the user back to their previous location. In addition, all of the validation errors and request input will automatically be flashed to the session.
An $errors variable is shared with all of your application’s views by the IlluminateViewMiddlewareShareErrorsFromSession middleware, which is provided by the web middleware group. When this middleware is applied an $errors variable will always be available in your views, allowing you to conveniently assume the $errors variable is always defined and can be safely used. The $errors variable will be an instance of IlluminateSupportMessageBag. For more information on working with this object, check out its documentation.
So, in our example, the user will be redirected to our controller’s create method when validation fails, allowing us to display the error messages in the view:
<!-- /resources/views/post/create.blade.php -->
<h1>Create Post</h1>
@if ($errors->any())
<div class="alert alert-danger">
<ul>
@foreach ($errors->all() as $error)
<li>{{ $error }}</li>
@endforeach
</ul>
</div>
@endif
<!-- Create Post Form -->
Customizing The Error Messages
Laravel’s built-in validation rules each has an error message that is located in your application’s lang/en/validation.php file. Within this file, you will find a translation entry for each validation rule. You are free to change or modify these messages based on the needs of your application.
In addition, you may copy this file to another translation language directory to translate the messages for your application’s language. To learn more about Laravel localization, check out the complete localization documentation.
XHR Requests & Validation
In this example, we used a traditional form to send data to the application. However, many applications receive XHR requests from a JavaScript powered frontend. When using the validate method during an XHR request, Laravel will not generate a redirect response. Instead, Laravel generates a JSON response containing all of the validation errors. This JSON response will be sent with a 422 HTTP status code.
The @error Directive
You may use the @error Blade directive to quickly determine if validation error messages exist for a given attribute. Within an @error directive, you may echo the $message variable to display the error message:
<!-- /resources/views/post/create.blade.php -->
<label for="title">Post Title</label>
<input id="title"
type="text"
name="title"
class="@error('title') is-invalid @enderror">
@error('title')
<div class="alert alert-danger">{{ $message }}</div>
@enderror
If you are using named error bags, you may pass the name of the error bag as the second argument to the @error directive:
<input ... class="@error('title', 'post') is-invalid @enderror">
Repopulating Forms
When Laravel generates a redirect response due to a validation error, the framework will automatically flash all of the request’s input to the session. This is done so that you may conveniently access the input during the next request and repopulate the form that the user attempted to submit.
To retrieve flashed input from the previous request, invoke the old method on an instance of IlluminateHttpRequest. The old method will pull the previously flashed input data from the session:
$title = $request->old('title');
Laravel also provides a global old helper. If you are displaying old input within a Blade template, it is more convenient to use the old helper to repopulate the form. If no old input exists for the given field, null will be returned:
<input type="text" name="title" value="{{ old('title') }}">
A Note On Optional Fields
By default, Laravel includes the TrimStrings and ConvertEmptyStringsToNull middleware in your application’s global middleware stack. These middleware are listed in the stack by the AppHttpKernel class. Because of this, you will often need to mark your «optional» request fields as nullable if you do not want the validator to consider null values as invalid. For example:
$request->validate([
'title' => 'required|unique:posts|max:255',
'body' => 'required',
'publish_at' => 'nullable|date',
]);
In this example, we are specifying that the publish_at field may be either null or a valid date representation. If the nullable modifier is not added to the rule definition, the validator would consider null an invalid date.
Form Request Validation
Creating Form Requests
For more complex validation scenarios, you may wish to create a «form request». Form requests are custom request classes that encapsulate their own validation and authorization logic. To create a form request class, you may use the make:request Artisan CLI command:
php artisan make:request StorePostRequest
The generated form request class will be placed in the app/Http/Requests directory. If this directory does not exist, it will be created when you run the make:request command. Each form request generated by Laravel has two methods: authorize and rules.
As you might have guessed, the authorize method is responsible for determining if the currently authenticated user can perform the action represented by the request, while the rules method returns the validation rules that should apply to the request’s data:
/**
* Get the validation rules that apply to the request.
*
* @return array
*/
public function rules()
{
return [
'title' => 'required|unique:posts|max:255',
'body' => 'required',
];
}
{tip} You may type-hint any dependencies you require within the
rulesmethod’s signature. They will automatically be resolved via the Laravel service container.
So, how are the validation rules evaluated? All you need to do is type-hint the request on your controller method. The incoming form request is validated before the controller method is called, meaning you do not need to clutter your controller with any validation logic:
/**
* Store a new blog post.
*
* @param AppHttpRequestsStorePostRequest $request
* @return IlluminateHttpResponse
*/
public function store(StorePostRequest $request)
{
// The incoming request is valid...
// Retrieve the validated input data...
$validated = $request->validated();
// Retrieve a portion of the validated input data...
$validated = $request->safe()->only(['name', 'email']);
$validated = $request->safe()->except(['name', 'email']);
}
If validation fails, a redirect response will be generated to send the user back to their previous location. The errors will also be flashed to the session so they are available for display. If the request was an XHR request, an HTTP response with a 422 status code will be returned to the user including a JSON representation of the validation errors.
Adding After Hooks To Form Requests
If you would like to add an «after» validation hook to a form request, you may use the withValidator method. This method receives the fully constructed validator, allowing you to call any of its methods before the validation rules are actually evaluated:
/**
* Configure the validator instance.
*
* @param IlluminateValidationValidator $validator
* @return void
*/
public function withValidator($validator)
{
$validator->after(function ($validator) {
if ($this->somethingElseIsInvalid()) {
$validator->errors()->add('field', 'Something is wrong with this field!');
}
});
}
Stopping On First Validation Failure Attribute
By adding a stopOnFirstFailure property to your request class, you may inform the validator that it should stop validating all attributes once a single validation failure has occurred:
/**
* Indicates if the validator should stop on the first rule failure.
*
* @var bool
*/
protected $stopOnFirstFailure = true;
Customizing The Redirect Location
As previously discussed, a redirect response will be generated to send the user back to their previous location when form request validation fails. However, you are free to customize this behavior. To do so, define a $redirect property on your form request:
/**
* The URI that users should be redirected to if validation fails.
*
* @var string
*/
protected $redirect = '/dashboard';
Or, if you would like to redirect users to a named route, you may define a $redirectRoute property instead:
/**
* The route that users should be redirected to if validation fails.
*
* @var string
*/
protected $redirectRoute = 'dashboard';
Authorizing Form Requests
The form request class also contains an authorize method. Within this method, you may determine if the authenticated user actually has the authority to update a given resource. For example, you may determine if a user actually owns a blog comment they are attempting to update. Most likely, you will interact with your authorization gates and policies within this method:
use AppModelsComment;
/**
* Determine if the user is authorized to make this request.
*
* @return bool
*/
public function authorize()
{
$comment = Comment::find($this->route('comment'));
return $comment && $this->user()->can('update', $comment);
}
Since all form requests extend the base Laravel request class, we may use the user method to access the currently authenticated user. Also, note the call to the route method in the example above. This method grants you access to the URI parameters defined on the route being called, such as the {comment} parameter in the example below:
Route::post('/comment/{comment}');
Therefore, if your application is taking advantage of route model binding, your code may be made even more succinct by accessing the resolved model as a property of the request:
return $this->user()->can('update', $this->comment);
If the authorize method returns false, an HTTP response with a 403 status code will automatically be returned and your controller method will not execute.
If you plan to handle authorization logic for the request in another part of your application, you may simply return true from the authorize method:
/**
* Determine if the user is authorized to make this request.
*
* @return bool
*/
public function authorize()
{
return true;
}
{tip} You may type-hint any dependencies you need within the
authorizemethod’s signature. They will automatically be resolved via the Laravel service container.
Customizing The Error Messages
You may customize the error messages used by the form request by overriding the messages method. This method should return an array of attribute / rule pairs and their corresponding error messages:
/**
* Get the error messages for the defined validation rules.
*
* @return array
*/
public function messages()
{
return [
'title.required' => 'A title is required',
'body.required' => 'A message is required',
];
}
Customizing The Validation Attributes
Many of Laravel’s built-in validation rule error messages contain an :attribute placeholder. If you would like the :attribute placeholder of your validation message to be replaced with a custom attribute name, you may specify the custom names by overriding the attributes method. This method should return an array of attribute / name pairs:
/**
* Get custom attributes for validator errors.
*
* @return array
*/
public function attributes()
{
return [
'email' => 'email address',
];
}
Preparing Input For Validation
If you need to prepare or sanitize any data from the request before you apply your validation rules, you may use the prepareForValidation method:
use IlluminateSupportStr;
/**
* Prepare the data for validation.
*
* @return void
*/
protected function prepareForValidation()
{
$this->merge([
'slug' => Str::slug($this->slug),
]);
}
Manually Creating Validators
If you do not want to use the validate method on the request, you may create a validator instance manually using the Validator facade. The make method on the facade generates a new validator instance:
<?php
namespace AppHttpControllers;
use AppHttpControllersController;
use IlluminateHttpRequest;
use IlluminateSupportFacadesValidator;
class PostController extends Controller
{
/**
* Store a new blog post.
*
* @param Request $request
* @return Response
*/
public function store(Request $request)
{
$validator = Validator::make($request->all(), [
'title' => 'required|unique:posts|max:255',
'body' => 'required',
]);
if ($validator->fails()) {
return redirect('post/create')
->withErrors($validator)
->withInput();
}
// Retrieve the validated input...
$validated = $validator->validated();
// Retrieve a portion of the validated input...
$validated = $validator->safe()->only(['name', 'email']);
$validated = $validator->safe()->except(['name', 'email']);
// Store the blog post...
}
}
The first argument passed to the make method is the data under validation. The second argument is an array of the validation rules that should be applied to the data.
After determining whether the request validation failed, you may use the withErrors method to flash the error messages to the session. When using this method, the $errors variable will automatically be shared with your views after redirection, allowing you to easily display them back to the user. The withErrors method accepts a validator, a MessageBag, or a PHP array.
Stopping On First Validation Failure
The stopOnFirstFailure method will inform the validator that it should stop validating all attributes once a single validation failure has occurred:
if ($validator->stopOnFirstFailure()->fails()) {
// ...
}
Automatic Redirection
If you would like to create a validator instance manually but still take advantage of the automatic redirection offered by the HTTP request’s validate method, you may call the validate method on an existing validator instance. If validation fails, the user will automatically be redirected or, in the case of an XHR request, a JSON response will be returned:
Validator::make($request->all(), [
'title' => 'required|unique:posts|max:255',
'body' => 'required',
])->validate();
You may use the validateWithBag method to store the error messages in a named error bag if validation fails:
Validator::make($request->all(), [
'title' => 'required|unique:posts|max:255',
'body' => 'required',
])->validateWithBag('post');
Named Error Bags
If you have multiple forms on a single page, you may wish to name the MessageBag containing the validation errors, allowing you to retrieve the error messages for a specific form. To achieve this, pass a name as the second argument to withErrors:
return redirect('register')->withErrors($validator, 'login');
You may then access the named MessageBag instance from the $errors variable:
{{ $errors->login->first('email') }}
Customizing The Error Messages
If needed, you may provide custom error messages that a validator instance should use instead of the default error messages provided by Laravel. There are several ways to specify custom messages. First, you may pass the custom messages as the third argument to the Validator::make method:
$validator = Validator::make($input, $rules, $messages = [
'required' => 'The :attribute field is required.',
]);
In this example, the :attribute placeholder will be replaced by the actual name of the field under validation. You may also utilize other placeholders in validation messages. For example:
$messages = [
'same' => 'The :attribute and :other must match.',
'size' => 'The :attribute must be exactly :size.',
'between' => 'The :attribute value :input is not between :min - :max.',
'in' => 'The :attribute must be one of the following types: :values',
];
Specifying A Custom Message For A Given Attribute
Sometimes you may wish to specify a custom error message only for a specific attribute. You may do so using «dot» notation. Specify the attribute’s name first, followed by the rule:
$messages = [
'email.required' => 'We need to know your email address!',
];
Specifying Custom Attribute Values
Many of Laravel’s built-in error messages include an :attribute placeholder that is replaced with the name of the field or attribute under validation. To customize the values used to replace these placeholders for specific fields, you may pass an array of custom attributes as the fourth argument to the Validator::make method:
$validator = Validator::make($input, $rules, $messages, [
'email' => 'email address',
]);
After Validation Hook
You may also attach callbacks to be run after validation is completed. This allows you to easily perform further validation and even add more error messages to the message collection. To get started, call the after method on a validator instance:
$validator = Validator::make(...);
$validator->after(function ($validator) {
if ($this->somethingElseIsInvalid()) {
$validator->errors()->add(
'field', 'Something is wrong with this field!'
);
}
});
if ($validator->fails()) {
//
}
Working With Validated Input
After validating incoming request data using a form request or a manually created validator instance, you may wish to retrieve the incoming request data that actually underwent validation. This can be accomplished in several ways. First, you may call the validated method on a form request or validator instance. This method returns an array of the data that was validated:
$validated = $request->validated();
$validated = $validator->validated();
Alternatively, you may call the safe method on a form request or validator instance. This method returns an instance of IlluminateSupportValidatedInput. This object exposes only, except, and all methods to retrieve a subset of the validated data or the entire array of validated data:
$validated = $request->safe()->only(['name', 'email']);
$validated = $request->safe()->except(['name', 'email']);
$validated = $request->safe()->all();
In addition, the IlluminateSupportValidatedInput instance may be iterated over and accessed like an array:
// Validated data may be iterated...
foreach ($request->safe() as $key => $value) {
//
}
// Validated data may be accessed as an array...
$validated = $request->safe();
$email = $validated['email'];
If you would like to add additional fields to the validated data, you may call the merge method:
$validated = $request->safe()->merge(['name' => 'Taylor Otwell']);
If you would like to retrieve the validated data as a collection instance, you may call the collect method:
$collection = $request->safe()->collect();
Working With Error Messages
After calling the errors method on a Validator instance, you will receive an IlluminateSupportMessageBag instance, which has a variety of convenient methods for working with error messages. The $errors variable that is automatically made available to all views is also an instance of the MessageBag class.
Retrieving The First Error Message For A Field
To retrieve the first error message for a given field, use the first method:
$errors = $validator->errors();
echo $errors->first('email');
Retrieving All Error Messages For A Field
If you need to retrieve an array of all the messages for a given field, use the get method:
foreach ($errors->get('email') as $message) {
//
}
If you are validating an array form field, you may retrieve all of the messages for each of the array elements using the * character:
foreach ($errors->get('attachments.*') as $message) {
//
}
Retrieving All Error Messages For All Fields
To retrieve an array of all messages for all fields, use the all method:
foreach ($errors->all() as $message) {
//
}
Determining If Messages Exist For A Field
The has method may be used to determine if any error messages exist for a given field:
if ($errors->has('email')) {
//
}
Specifying Custom Messages In Language Files
Laravel’s built-in validation rules each has an error message that is located in your application’s lang/en/validation.php file. Within this file, you will find a translation entry for each validation rule. You are free to change or modify these messages based on the needs of your application.
In addition, you may copy this file to another translation language directory to translate the messages for your application’s language. To learn more about Laravel localization, check out the complete localization documentation.
Custom Messages For Specific Attributes
You may customize the error messages used for specified attribute and rule combinations within your application’s validation language files. To do so, add your message customizations to the custom array of your application’s lang/xx/validation.php language file:
'custom' => [
'email' => [
'required' => 'We need to know your email address!',
'max' => 'Your email address is too long!'
],
],
Specifying Attributes In Language Files
Many of Laravel’s built-in error messages include an :attribute placeholder that is replaced with the name of the field or attribute under validation. If you would like the :attribute portion of your validation message to be replaced with a custom value, you may specify the custom attribute name in the attributes array of your lang/xx/validation.php language file:
'attributes' => [
'email' => 'email address',
],
Specifying Values In Language Files
Some of Laravel’s built-in validation rule error messages contain a :value placeholder that is replaced with the current value of the request attribute. However, you may occasionally need the :value portion of your validation message to be replaced with a custom representation of the value. For example, consider the following rule that specifies that a credit card number is required if the payment_type has a value of cc:
Validator::make($request->all(), [
'credit_card_number' => 'required_if:payment_type,cc'
]);
If this validation rule fails, it will produce the following error message:
The credit card number field is required when payment type is cc.
Instead of displaying cc as the payment type value, you may specify a more user-friendly value representation in your lang/xx/validation.php language file by defining a values array:
'values' => [
'payment_type' => [
'cc' => 'credit card'
],
],
After defining this value, the validation rule will produce the following error message:
The credit card number field is required when payment type is credit card.
Available Validation Rules
Below is a list of all available validation rules and their function:
accepted
The field under validation must be "yes", "on", 1, or true. This is useful for validating «Terms of Service» acceptance or similar fields.
accepted_if:anotherfield,value,…
The field under validation must be "yes", "on", 1, or true if another field under validation is equal to a specified value. This is useful for validating «Terms of Service» acceptance or similar fields.
active_url
The field under validation must have a valid A or AAAA record according to the dns_get_record PHP function. The hostname of the provided URL is extracted using the parse_url PHP function before being passed to dns_get_record.
after:date
The field under validation must be a value after a given date. The dates will be passed into the strtotime PHP function in order to be converted to a valid DateTime instance:
'start_date' => 'required|date|after:tomorrow'
Instead of passing a date string to be evaluated by strtotime, you may specify another field to compare against the date:
'finish_date' => 'required|date|after:start_date'
after_or_equal:date
The field under validation must be a value after or equal to the given date. For more information, see the after rule.
alpha
The field under validation must be entirely alphabetic characters.
alpha_dash
The field under validation may have alpha-numeric characters, as well as dashes and underscores.
alpha_num
The field under validation must be entirely alpha-numeric characters.
array
The field under validation must be a PHP array.
When additional values are provided to the array rule, each key in the input array must be present within the list of values provided to the rule. In the following example, the admin key in the input array is invalid since it is not contained in the list of values provided to the array rule:
use IlluminateSupportFacadesValidator;
$input = [
'user' => [
'name' => 'Taylor Otwell',
'username' => 'taylorotwell',
'admin' => true,
],
];
Validator::make($input, [
'user' => 'array:username,locale',
]);
In general, you should always specify the array keys that are allowed to be present within your array.
bail
Stop running validation rules for the field after the first validation failure.
While the bail rule will only stop validating a specific field when it encounters a validation failure, the stopOnFirstFailure method will inform the validator that it should stop validating all attributes once a single validation failure has occurred:
if ($validator->stopOnFirstFailure()->fails()) {
// ...
}
before:date
The field under validation must be a value preceding the given date. The dates will be passed into the PHP strtotime function in order to be converted into a valid DateTime instance. In addition, like the after rule, the name of another field under validation may be supplied as the value of date.
before_or_equal:date
The field under validation must be a value preceding or equal to the given date. The dates will be passed into the PHP strtotime function in order to be converted into a valid DateTime instance. In addition, like the after rule, the name of another field under validation may be supplied as the value of date.
between:min,max
The field under validation must have a size between the given min and max. Strings, numerics, arrays, and files are evaluated in the same fashion as the size rule.
boolean
The field under validation must be able to be cast as a boolean. Accepted input are true, false, 1, 0, "1", and "0".
confirmed
The field under validation must have a matching field of {field}_confirmation. For example, if the field under validation is password, a matching password_confirmation field must be present in the input.
current_password
The field under validation must match the authenticated user’s password. You may specify an authentication guard using the rule’s first parameter:
'password' => 'current_password:api'
date
The field under validation must be a valid, non-relative date according to the strtotime PHP function.
date_equals:date
The field under validation must be equal to the given date. The dates will be passed into the PHP strtotime function in order to be converted into a valid DateTime instance.
date_format:format
The field under validation must match the given format. You should use either date or date_format when validating a field, not both. This validation rule supports all formats supported by PHP’s DateTime class.
declined
The field under validation must be "no", "off", 0, or false.
declined_if:anotherfield,value,…
The field under validation must be "no", "off", 0, or false if another field under validation is equal to a specified value.
different:field
The field under validation must have a different value than field.
digits:value
The field under validation must be numeric and must have an exact length of value.
digits_between:min,max
The field under validation must be numeric and must have a length between the given min and max.
dimensions
The file under validation must be an image meeting the dimension constraints as specified by the rule’s parameters:
'avatar' => 'dimensions:min_width=100,min_height=200'
Available constraints are: min_width, max_width, min_height, max_height, width, height, ratio.
A ratio constraint should be represented as width divided by height. This can be specified either by a fraction like 3/2 or a float like 1.5:
'avatar' => 'dimensions:ratio=3/2'
Since this rule requires several arguments, you may use the Rule::dimensions method to fluently construct the rule:
use IlluminateSupportFacadesValidator;
use IlluminateValidationRule;
Validator::make($data, [
'avatar' => [
'required',
Rule::dimensions()->maxWidth(1000)->maxHeight(500)->ratio(3 / 2),
],
]);
distinct
When validating arrays, the field under validation must not have any duplicate values:
'foo.*.id' => 'distinct'
Distinct uses loose variable comparisons by default. To use strict comparisons, you may add the strict parameter to your validation rule definition:
'foo.*.id' => 'distinct:strict'
You may add ignore_case to the validation rule’s arguments to make the rule ignore capitalization differences:
'foo.*.id' => 'distinct:ignore_case'
The field under validation must be formatted as an email address. This validation rule utilizes the egulias/email-validator package for validating the email address. By default, the RFCValidation validator is applied, but you can apply other validation styles as well:
'email' => 'email:rfc,dns'
The example above will apply the RFCValidation and DNSCheckValidation validations. Here’s a full list of validation styles you can apply:
-
rfc:RFCValidation -
strict:NoRFCWarningsValidation -
dns:DNSCheckValidation -
spoof:SpoofCheckValidation -
filter:FilterEmailValidation
The filter validator, which uses PHP’s filter_var function, ships with Laravel and was Laravel’s default email validation behavior prior to Laravel version 5.8.
{note} The
dnsandspoofvalidators require the PHPintlextension.
ends_with:foo,bar,…
The field under validation must end with one of the given values.
enum
The Enum rule is a class based rule that validates whether the field under validation contains a valid enum value. The Enum rule accepts the name of the enum as its only constructor argument:
use AppEnumsServerStatus;
use IlluminateValidationRulesEnum;
$request->validate([
'status' => [new Enum(ServerStatus::class)],
]);
{note} Enums are only available on PHP 8.1+.
exclude
The field under validation will be excluded from the request data returned by the validate and validated methods.
exclude_if:anotherfield,value
The field under validation will be excluded from the request data returned by the validate and validated methods if the anotherfield field is equal to value.
exclude_unless:anotherfield,value
The field under validation will be excluded from the request data returned by the validate and validated methods unless anotherfield‘s field is equal to value. If value is null (exclude_unless:name,null), the field under validation will be excluded unless the comparison field is null or the comparison field is missing from the request data.
exclude_without:anotherfield
The field under validation will be excluded from the request data returned by the validate and validated methods if the anotherfield field is not present.
exists:table,column
The field under validation must exist in a given database table.
Basic Usage Of Exists Rule
'state' => 'exists:states'
If the column option is not specified, the field name will be used. So, in this case, the rule will validate that the states database table contains a record with a state column value matching the request’s state attribute value.
Specifying A Custom Column Name
You may explicitly specify the database column name that should be used by the validation rule by placing it after the database table name:
'state' => 'exists:states,abbreviation'
Occasionally, you may need to specify a specific database connection to be used for the exists query. You can accomplish this by prepending the connection name to the table name:
'email' => 'exists:connection.staff,email'
Instead of specifying the table name directly, you may specify the Eloquent model which should be used to determine the table name:
'user_id' => 'exists:AppModelsUser,id'
If you would like to customize the query executed by the validation rule, you may use the Rule class to fluently define the rule. In this example, we’ll also specify the validation rules as an array instead of using the | character to delimit them:
use IlluminateSupportFacadesValidator;
use IlluminateValidationRule;
Validator::make($data, [
'email' => [
'required',
Rule::exists('staff')->where(function ($query) {
return $query->where('account_id', 1);
}),
],
]);
file
The field under validation must be a successfully uploaded file.
filled
The field under validation must not be empty when it is present.
gt:field
The field under validation must be greater than the given field. The two fields must be of the same type. Strings, numerics, arrays, and files are evaluated using the same conventions as the size rule.
gte:field
The field under validation must be greater than or equal to the given field. The two fields must be of the same type. Strings, numerics, arrays, and files are evaluated using the same conventions as the size rule.
image
The file under validation must be an image (jpg, jpeg, png, bmp, gif, svg, or webp).
in:foo,bar,…
The field under validation must be included in the given list of values. Since this rule often requires you to implode an array, the Rule::in method may be used to fluently construct the rule:
use IlluminateSupportFacadesValidator;
use IlluminateValidationRule;
Validator::make($data, [
'zones' => [
'required',
Rule::in(['first-zone', 'second-zone']),
],
]);
When the in rule is combined with the array rule, each value in the input array must be present within the list of values provided to the in rule. In the following example, the LAS airport code in the input array is invalid since it is not contained in the list of airports provided to the in rule:
use IlluminateSupportFacadesValidator;
use IlluminateValidationRule;
$input = [
'airports' => ['NYC', 'LAS'],
];
Validator::make($input, [
'airports' => [
'required',
'array',
Rule::in(['NYC', 'LIT']),
],
]);
in_array:anotherfield.*
The field under validation must exist in anotherfield‘s values.
integer
The field under validation must be an integer.
{note} This validation rule does not verify that the input is of the «integer» variable type, only that the input is of a type accepted by PHP’s
FILTER_VALIDATE_INTrule. If you need to validate the input as being a number please use this rule in combination with thenumericvalidation rule.
ip
The field under validation must be an IP address.
ipv4
The field under validation must be an IPv4 address.
ipv6
The field under validation must be an IPv6 address.
mac_address
The field under validation must be a MAC address.
json
The field under validation must be a valid JSON string.
lt:field
The field under validation must be less than the given field. The two fields must be of the same type. Strings, numerics, arrays, and files are evaluated using the same conventions as the size rule.
lte:field
The field under validation must be less than or equal to the given field. The two fields must be of the same type. Strings, numerics, arrays, and files are evaluated using the same conventions as the size rule.
max:value
The field under validation must be less than or equal to a maximum value. Strings, numerics, arrays, and files are evaluated in the same fashion as the size rule.
mimetypes:text/plain,…
The file under validation must match one of the given MIME types:
'video' => 'mimetypes:video/avi,video/mpeg,video/quicktime'
To determine the MIME type of the uploaded file, the file’s contents will be read and the framework will attempt to guess the MIME type, which may be different from the client’s provided MIME type.
mimes:foo,bar,…
The file under validation must have a MIME type corresponding to one of the listed extensions.
Basic Usage Of MIME Rule
'photo' => 'mimes:jpg,bmp,png'
Even though you only need to specify the extensions, this rule actually validates the MIME type of the file by reading the file’s contents and guessing its MIME type. A full listing of MIME types and their corresponding extensions may be found at the following location:
https://svn.apache.org/repos/asf/httpd/httpd/trunk/docs/conf/mime.types
min:value
The field under validation must have a minimum value. Strings, numerics, arrays, and files are evaluated in the same fashion as the size rule.
multiple_of:value
The field under validation must be a multiple of value.
{note} The
bcmathPHP extension is required in order to use themultiple_ofrule.
not_in:foo,bar,…
The field under validation must not be included in the given list of values. The Rule::notIn method may be used to fluently construct the rule:
use IlluminateValidationRule;
Validator::make($data, [
'toppings' => [
'required',
Rule::notIn(['sprinkles', 'cherries']),
],
]);
not_regex:pattern
The field under validation must not match the given regular expression.
Internally, this rule uses the PHP preg_match function. The pattern specified should obey the same formatting required by preg_match and thus also include valid delimiters. For example: 'email' => 'not_regex:/^.+$/i'.
{note} When using the
regex/not_regexpatterns, it may be necessary to specify your validation rules using an array instead of using|delimiters, especially if the regular expression contains a|character.
nullable
The field under validation may be null.
numeric
The field under validation must be numeric.
password
The field under validation must match the authenticated user’s password.
{note} This rule was renamed to
current_passwordwith the intention of removing it in Laravel 9. Please use the Current Password rule instead.
present
The field under validation must be present in the input data but can be empty.
prohibited
The field under validation must be empty or not present.
prohibited_if:anotherfield,value,…
The field under validation must be empty or not present if the anotherfield field is equal to any value.
prohibited_unless:anotherfield,value,…
The field under validation must be empty or not present unless the anotherfield field is equal to any value.
prohibits:anotherfield,…
If the field under validation is present, no fields in anotherfield can be present, even if empty.
regex:pattern
The field under validation must match the given regular expression.
Internally, this rule uses the PHP preg_match function. The pattern specified should obey the same formatting required by preg_match and thus also include valid delimiters. For example: 'email' => 'regex:/^.+@.+$/i'.
{note} When using the
regex/not_regexpatterns, it may be necessary to specify rules in an array instead of using|delimiters, especially if the regular expression contains a|character.
required
The field under validation must be present in the input data and not empty. A field is considered «empty» if one of the following conditions are true:
- The value is
null. - The value is an empty string.
- The value is an empty array or empty
Countableobject. - The value is an uploaded file with no path.
required_if:anotherfield,value,…
The field under validation must be present and not empty if the anotherfield field is equal to any value.
If you would like to construct a more complex condition for the required_if rule, you may use the Rule::requiredIf method. This method accepts a boolean or a closure. When passed a closure, the closure should return true or false to indicate if the field under validation is required:
use IlluminateSupportFacadesValidator;
use IlluminateValidationRule;
Validator::make($request->all(), [
'role_id' => Rule::requiredIf($request->user()->is_admin),
]);
Validator::make($request->all(), [
'role_id' => Rule::requiredIf(function () use ($request) {
return $request->user()->is_admin;
}),
]);
required_unless:anotherfield,value,…
The field under validation must be present and not empty unless the anotherfield field is equal to any value. This also means anotherfield must be present in the request data unless value is null. If value is null (required_unless:name,null), the field under validation will be required unless the comparison field is null or the comparison field is missing from the request data.
required_with:foo,bar,…
The field under validation must be present and not empty only if any of the other specified fields are present and not empty.
required_with_all:foo,bar,…
The field under validation must be present and not empty only if all of the other specified fields are present and not empty.
required_without:foo,bar,…
The field under validation must be present and not empty only when any of the other specified fields are empty or not present.
required_without_all:foo,bar,…
The field under validation must be present and not empty only when all of the other specified fields are empty or not present.
required_array_keys:foo,bar,…
The field under validation must be an array and must contain at least the specified keys.
same:field
The given field must match the field under validation.
size:value
The field under validation must have a size matching the given value. For string data, value corresponds to the number of characters. For numeric data, value corresponds to a given integer value (the attribute must also have the numeric or integer rule). For an array, size corresponds to the count of the array. For files, size corresponds to the file size in kilobytes. Let’s look at some examples:
// Validate that a string is exactly 12 characters long...
'title' => 'size:12';
// Validate that a provided integer equals 10...
'seats' => 'integer|size:10';
// Validate that an array has exactly 5 elements...
'tags' => 'array|size:5';
// Validate that an uploaded file is exactly 512 kilobytes...
'image' => 'file|size:512';
starts_with:foo,bar,…
The field under validation must start with one of the given values.
string
The field under validation must be a string. If you would like to allow the field to also be null, you should assign the nullable rule to the field.
timezone
The field under validation must be a valid timezone identifier according to the timezone_identifiers_list PHP function.
unique:table,column
The field under validation must not exist within the given database table.
Specifying A Custom Table / Column Name:
Instead of specifying the table name directly, you may specify the Eloquent model which should be used to determine the table name:
'email' => 'unique:AppModelsUser,email_address'
The column option may be used to specify the field’s corresponding database column. If the column option is not specified, the name of the field under validation will be used.
'email' => 'unique:users,email_address'
Specifying A Custom Database Connection
Occasionally, you may need to set a custom connection for database queries made by the Validator. To accomplish this, you may prepend the connection name to the table name:
'email' => 'unique:connection.users,email_address'
Forcing A Unique Rule To Ignore A Given ID:
Sometimes, you may wish to ignore a given ID during unique validation. For example, consider an «update profile» screen that includes the user’s name, email address, and location. You will probably want to verify that the email address is unique. However, if the user only changes the name field and not the email field, you do not want a validation error to be thrown because the user is already the owner of the email address in question.
To instruct the validator to ignore the user’s ID, we’ll use the Rule class to fluently define the rule. In this example, we’ll also specify the validation rules as an array instead of using the | character to delimit the rules:
use IlluminateSupportFacadesValidator;
use IlluminateValidationRule;
Validator::make($data, [
'email' => [
'required',
Rule::unique('users')->ignore($user->id),
],
]);
{note} You should never pass any user controlled request input into the
ignoremethod. Instead, you should only pass a system generated unique ID such as an auto-incrementing ID or UUID from an Eloquent model instance. Otherwise, your application will be vulnerable to an SQL injection attack.
Instead of passing the model key’s value to the ignore method, you may also pass the entire model instance. Laravel will automatically extract the key from the model:
Rule::unique('users')->ignore($user)
If your table uses a primary key column name other than id, you may specify the name of the column when calling the ignore method:
Rule::unique('users')->ignore($user->id, 'user_id')
By default, the unique rule will check the uniqueness of the column matching the name of the attribute being validated. However, you may pass a different column name as the second argument to the unique method:
Rule::unique('users', 'email_address')->ignore($user->id),
Adding Additional Where Clauses:
You may specify additional query conditions by customizing the query using the where method. For example, let’s add a query condition that scopes the query to only search records that have an account_id column value of 1:
'email' => Rule::unique('users')->where(function ($query) {
return $query->where('account_id', 1);
})
url
The field under validation must be a valid URL.
uuid
The field under validation must be a valid RFC 4122 (version 1, 3, 4, or 5) universally unique identifier (UUID).
Conditionally Adding Rules
Skipping Validation When Fields Have Certain Values
You may occasionally wish to not validate a given field if another field has a given value. You may accomplish this using the exclude_if validation rule. In this example, the appointment_date and doctor_name fields will not be validated if the has_appointment field has a value of false:
use IlluminateSupportFacadesValidator;
$validator = Validator::make($data, [
'has_appointment' => 'required|boolean',
'appointment_date' => 'exclude_if:has_appointment,false|required|date',
'doctor_name' => 'exclude_if:has_appointment,false|required|string',
]);
Alternatively, you may use the exclude_unless rule to not validate a given field unless another field has a given value:
$validator = Validator::make($data, [
'has_appointment' => 'required|boolean',
'appointment_date' => 'exclude_unless:has_appointment,true|required|date',
'doctor_name' => 'exclude_unless:has_appointment,true|required|string',
]);
Validating When Present
In some situations, you may wish to run validation checks against a field only if that field is present in the data being validated. To quickly accomplish this, add the sometimes rule to your rule list:
$v = Validator::make($data, [
'email' => 'sometimes|required|email',
]);
In the example above, the email field will only be validated if it is present in the $data array.
{tip} If you are attempting to validate a field that should always be present but may be empty, check out this note on optional fields.
Complex Conditional Validation
Sometimes you may wish to add validation rules based on more complex conditional logic. For example, you may wish to require a given field only if another field has a greater value than 100. Or, you may need two fields to have a given value only when another field is present. Adding these validation rules doesn’t have to be a pain. First, create a Validator instance with your static rules that never change:
use IlluminateSupportFacadesValidator;
$validator = Validator::make($request->all(), [
'email' => 'required|email',
'games' => 'required|numeric',
]);
Let’s assume our web application is for game collectors. If a game collector registers with our application and they own more than 100 games, we want them to explain why they own so many games. For example, perhaps they run a game resale shop, or maybe they just enjoy collecting games. To conditionally add this requirement, we can use the sometimes method on the Validator instance.
$validator->sometimes('reason', 'required|max:500', function ($input) {
return $input->games >= 100;
});
The first argument passed to the sometimes method is the name of the field we are conditionally validating. The second argument is a list of the rules we want to add. If the closure passed as the third argument returns true, the rules will be added. This method makes it a breeze to build complex conditional validations. You may even add conditional validations for several fields at once:
$validator->sometimes(['reason', 'cost'], 'required', function ($input) {
return $input->games >= 100;
});
{tip} The
$inputparameter passed to your closure will be an instance ofIlluminateSupportFluentand may be used to access your input and files under validation.
Complex Conditional Array Validation
Sometimes you may want to validate a field based on another field in the same nested array whose index you do not know. In these situations, you may allow your closure to receive a second argument which will be the current individual item in the array being validated:
$input = [
'channels' => [
[
'type' => 'email',
'address' => 'abigail@example.com',
],
[
'type' => 'url',
'address' => 'https://example.com',
],
],
];
$validator->sometimes('channels.*.address', 'email', function ($input, $item) {
return $item->type === 'email';
});
$validator->sometimes('channels.*.address', 'url', function ($input, $item) {
return $item->type !== 'email';
});
Like the $input parameter passed to the closure, the $item parameter is an instance of IlluminateSupportFluent when the attribute data is an array; otherwise, it is a string.
Validating Arrays
As discussed in the array validation rule documentation, the array rule accepts a list of allowed array keys. If any additional keys are present within the array, validation will fail:
use IlluminateSupportFacadesValidator;
$input = [
'user' => [
'name' => 'Taylor Otwell',
'username' => 'taylorotwell',
'admin' => true,
],
];
Validator::make($input, [
'user' => 'array:username,locale',
]);
In general, you should always specify the array keys that are allowed to be present within your array. Otherwise, the validator’s validate and validated methods will return all of the validated data, including the array and all of its keys, even if those keys were not validated by other nested array validation rules.
Validating Nested Array Input
Validating nested array based form input fields doesn’t have to be a pain. You may use «dot notation» to validate attributes within an array. For example, if the incoming HTTP request contains a photos[profile] field, you may validate it like so:
use IlluminateSupportFacadesValidator;
$validator = Validator::make($request->all(), [
'photos.profile' => 'required|image',
]);
You may also validate each element of an array. For example, to validate that each email in a given array input field is unique, you may do the following:
$validator = Validator::make($request->all(), [
'person.*.email' => 'email|unique:users',
'person.*.first_name' => 'required_with:person.*.last_name',
]);
Likewise, you may use the * character when specifying custom validation messages in your language files, making it a breeze to use a single validation message for array based fields:
'custom' => [
'person.*.email' => [
'unique' => 'Each person must have a unique email address',
]
],
Accessing Nested Array Data
Sometimes you may need to access the value for a given nested array element when assigning validation rules to the attribute. You may accomplish this using the Rule::foreEach method. The forEach method accepts a closure that will be invoked for each iteration of the array attribute under validation and will receive the attribute’s value and explicit, fully-expanded attribute name. The closure should return an array of rules to assign to the array element:
use AppRulesHasPermission;
use IlluminateSupportFacadesValidator;
use IlluminateValidationRule;
$validator = Validator::make($request->all(), [
'companies.*.id' => Rule::forEach(function ($value, $attribute) {
return [
Rule::exists(Company::class, 'id'),
new HasPermission('manage-company', $value),
];
}),
]);
Validating Passwords
To ensure that passwords have an adequate level of complexity, you may use Laravel’s Password rule object:
use IlluminateSupportFacadesValidator;
use IlluminateValidationRulesPassword;
$validator = Validator::make($request->all(), [
'password' => ['required', 'confirmed', Password::min(8)],
]);
The Password rule object allows you to easily customize the password complexity requirements for your application, such as specifying that passwords require at least one letter, number, symbol, or characters with mixed casing:
// Require at least 8 characters...
Password::min(8)
// Require at least one letter...
Password::min(8)->letters()
// Require at least one uppercase and one lowercase letter...
Password::min(8)->mixedCase()
// Require at least one number...
Password::min(8)->numbers()
// Require at least one symbol...
Password::min(8)->symbols()
In addition, you may ensure that a password has not been compromised in a public password data breach leak using the uncompromised method:
Password::min(8)->uncompromised()
Internally, the Password rule object uses the k-Anonymity model to determine if a password has been leaked via the haveibeenpwned.com service without sacrificing the user’s privacy or security.
By default, if a password appears at least once in a data leak, it will be considered compromised. You can customize this threshold using the first argument of the uncompromised method:
// Ensure the password appears less than 3 times in the same data leak...
Password::min(8)->uncompromised(3);
Of course, you may chain all the methods in the examples above:
Password::min(8)
->letters()
->mixedCase()
->numbers()
->symbols()
->uncompromised()
Defining Default Password Rules
You may find it convenient to specify the default validation rules for passwords in a single location of your application. You can easily accomplish this using the Password::defaults method, which accepts a closure. The closure given to the defaults method should return the default configuration of the Password rule. Typically, the defaults rule should be called within the boot method of one of your application’s service providers:
use IlluminateValidationRulesPassword;
/**
* Bootstrap any application services.
*
* @return void
*/
public function boot()
{
Password::defaults(function () {
$rule = Password::min(8);
return $this->app->isProduction()
? $rule->mixedCase()->uncompromised()
: $rule;
});
}
Then, when you would like to apply the default rules to a particular password undergoing validation, you may invoke the defaults method with no arguments:
'password' => ['required', Password::defaults()],
Occasionally, you may want to attach additional validation rules to your default password validation rules. You may use the rules method to accomplish this:
use AppRulesZxcvbnRule;
Password::defaults(function () {
$rule = Password::min(8)->rules([new ZxcvbnRule]);
// ...
});
Custom Validation Rules
Using Rule Objects
Laravel provides a variety of helpful validation rules; however, you may wish to specify some of your own. One method of registering custom validation rules is using rule objects. To generate a new rule object, you may use the make:rule Artisan command. Let’s use this command to generate a rule that verifies a string is uppercase. Laravel will place the new rule in the app/Rules directory. If this directory does not exist, Laravel will create it when you execute the Artisan command to create your rule:
php artisan make:rule Uppercase
Once the rule has been created, we are ready to define its behavior. A rule object contains two methods: passes and message. The passes method receives the attribute value and name, and should return true or false depending on whether the attribute value is valid or not. The message method should return the validation error message that should be used when validation fails:
<?php
namespace AppRules;
use IlluminateContractsValidationRule;
class Uppercase implements Rule
{
/**
* Determine if the validation rule passes.
*
* @param string $attribute
* @param mixed $value
* @return bool
*/
public function passes($attribute, $value)
{
return strtoupper($value) === $value;
}
/**
* Get the validation error message.
*
* @return string
*/
public function message()
{
return 'The :attribute must be uppercase.';
}
}
You may call the trans helper from your message method if you would like to return an error message from your translation files:
/**
* Get the validation error message.
*
* @return string
*/
public function message()
{
return trans('validation.uppercase');
}
Once the rule has been defined, you may attach it to a validator by passing an instance of the rule object with your other validation rules:
use AppRulesUppercase;
$request->validate([
'name' => ['required', 'string', new Uppercase],
]);
Accessing Additional Data
If your custom validation rule class needs to access all of the other data undergoing validation, your rule class may implement the IlluminateContractsValidationDataAwareRule interface. This interface requires your class to define a setData method. This method will automatically be invoked by Laravel (before validation proceeds) with all of the data under validation:
<?php
namespace AppRules;
use IlluminateContractsValidationRule;
use IlluminateContractsValidationDataAwareRule;
class Uppercase implements Rule, DataAwareRule
{
/**
* All of the data under validation.
*
* @var array
*/
protected $data = [];
// ...
/**
* Set the data under validation.
*
* @param array $data
* @return $this
*/
public function setData($data)
{
$this->data = $data;
return $this;
}
}
Or, if your validation rule requires access to the validator instance performing the validation, you may implement the ValidatorAwareRule interface:
<?php
namespace AppRules;
use IlluminateContractsValidationRule;
use IlluminateContractsValidationValidatorAwareRule;
class Uppercase implements Rule, ValidatorAwareRule
{
/**
* The validator instance.
*
* @var IlluminateValidationValidator
*/
protected $validator;
// ...
/**
* Set the current validator.
*
* @param IlluminateValidationValidator $validator
* @return $this
*/
public function setValidator($validator)
{
$this->validator = $validator;
return $this;
}
}
Using Closures
If you only need the functionality of a custom rule once throughout your application, you may use a closure instead of a rule object. The closure receives the attribute’s name, the attribute’s value, and a $fail callback that should be called if validation fails:
use IlluminateSupportFacadesValidator;
$validator = Validator::make($request->all(), [
'title' => [
'required',
'max:255',
function ($attribute, $value, $fail) {
if ($value === 'foo') {
$fail('The '.$attribute.' is invalid.');
}
},
],
]);
Implicit Rules
By default, when an attribute being validated is not present or contains an empty string, normal validation rules, including custom rules, are not run. For example, the unique rule will not be run against an empty string:
use IlluminateSupportFacadesValidator;
$rules = ['name' => 'unique:users,name'];
$input = ['name' => ''];
Validator::make($input, $rules)->passes(); // true
For a custom rule to run even when an attribute is empty, the rule must imply that the attribute is required. To create an «implicit» rule, implement the IlluminateContractsValidationImplicitRule interface. This interface serves as a «marker interface» for the validator; therefore, it does not contain any additional methods you need to implement beyond the methods required by the typical Rule interface.
To generate a new implicit rule object, you may use the make:rule Artisan command with the --implicit option :
php artisan make:rule Uppercase --implicit
{note} An «implicit» rule only implies that the attribute is required. Whether it actually invalidates a missing or empty attribute is up to you.