Laravel 8 sends error exceptions mail. this tutorial shows you how you can send error exceptions on developer mail. And you will learn to send error exceptions on developer mail or as you want any other mail.
If you have deployed your larval application on a live server. Your live laravel app is running fine. If there were no issues with the laravel application. Sometimes, major error exceptions came for your laravel app. The app will be down and the user will leave your application
In Laravel, all exceptions are handled by the AppExceptionsHandler class. This class contains two methods: report and render.
Send Error Exception Mail In Laravel 8 Apps
In some cases, what if you were immediately informed via e-mail (or any other service) about the bug and you fix it ASAP. In Laravel, this can be done easily. We will learn how to send error exceptions mail step by step in this post.
We are going to show you how you can send error exception mail in your laravel app. Just follow the few steps and it has finished.
- Create Mail Class
- Create an Email View
- Send Error Exception Mail
Create Mail Class
First of all, create a mail class using the below command:
php artisan make:mail ExceptionMail
This will create a class ExceptionMail in the app/Maildirectory.
<?php

namespace AppMail;

use IlluminateBusQueueable;
use IlluminateMailMailable;
use IlluminateQueueSerializesModels;
use IlluminateContractsQueueShouldQueue;

class ExceptionMail extends Mailable
{
    use Queueable, SerializesModels;

    /**
     * The body of the message.
     *
     * @var string
     */
    public $content;

    /**
     * Create a new message instance.
     *
     * @return void
     */
    public function __construct($content)
    {
        $this->content = $content;
    }

    /**
     * Build the message.
     *
     * @return $this
     */
    public function build()
    {
        return $this->view('emails.exception_email')
                    ->with('content', $this->content);
    }
}
Create Email View
Now, we will create a new view file inside the emails folder that file name email_exception.blade.php. and the below-given code in add your email_exception.blade.php file:
Send Error Exception Mail
Go to AppExceptionsHandler file and update the below code into your file.
<?php

namespace AppExceptions;

use Mail;
use SymfonyComponentDebugExceptionFlattenException;
use SymfonyComponentDebugExceptionHandler as SymfonyExceptionHandler;
use AppMailExceptionOccured;

use Throwable;
use IlluminateFoundationExceptionsHandler as ExceptionHandler;

class Handler extends ExceptionHandler
{
    /**
     * A list of the exception types that are not reported.
     *
     * @var array
     */
    protected $dontReport = [
        //
    ];

    /**
     * A list of the inputs that are never flashed for validation exceptions.
     *
     * @var array
     */
    protected $dontFlash = [
        'password',
        'password_confirmation',
    ];

    /**
     * Report or log an exception.
     *
     * @param  Exception  $exception
     * @return void
     */
    public function report(Throwable $exception)
    {
       if ($this->shouldReport($exception)) {
            $this->sendEmail($exception); // sends an email
        }
        parent::report($exception);
    }

    /**
     * Render an exception into an HTTP response.
     *
     * @param  IlluminateHttpRequest  $request
     * @param  Exception  $exception
     * @return IlluminateHttpResponse
     */
    public function render($request, Exception $exception)
    {
        return parent::render($request, $exception);
    }

    public function sendEmail(Throwable $exception)
    {
        try {
            $e = FlattenException::create($exception);

            $handler = new SymfonyExceptionHandler();

            $html = $handler->getHtml($e);

            Mail::to('[email protected]')->send(new ExceptionMail($html));
        } catch (Exception $ex) {
            dd($ex);
        }
    }
}
In case, error exception is thrown by your application. You will receive an email with full information about the errors.
Conclusion
In this tutorial, you have learned step by step how to send error exceptions mail on laravel application.
If you were immediately informed via e-mail (or any other service) about the bug and you fix it ASAP. In Laravel, this can be done easily. We have learned how to send error exceptions mail step by step in this post.
Thanks to reading this how to send error mail in laravel.
Recommended Laravel Posts

My name is Devendra Dode. I am a full-stack developer, entrepreneur, and owner of Tutsmake.com. I like writing tutorials and tips that can help other developers. I share tutorials of PHP, Python, Javascript, JQuery, Laravel, Livewire, Codeigniter, Node JS, Express JS, Vue JS, Angular JS, React Js, MySQL, MongoDB, REST APIs, Windows, Xampp, Linux, Ubuntu, Amazon AWS, Composer, SEO, WordPress, SSL and Bootstrap from a starting stage. As well as demo example.
View all posts by Admin
February 1, 2023
Category : Laravel
I am going to show you example of laravel send email on exception. step by step explain laravel send exception mail. if you have question about how to send mail on exception in laravel then I will give simple example with solution. you can see laravel send email on error.
You can use this example with laravel 6, laravel 7, laravel 8 and laravel 9 version.
Sometimes we upload code on production and when you have any error on production then we don’t know it. Even laravel log on laravel.log file but as a developer, we don’t check every day on the log file. so you need something that will inform you when error or exception generate on your application. I will give you the perfect solution for this. When any error or exception generate in your laravel project then it will inform you via email. Yes, We will send an email on Error Exceptions in laravel.
It’s totally free. So just follow the below step and add send mail on an error in laravel app.
Step 1: Install Laravel
This step is not required; however, if you have not created the laravel app, then you may go ahead and execute the below command:
composer create-project laravel/laravel example-app
Step 2: Make Configuration
In first step, you have to add send mail configuration with mail driver, mail host, mail port, mail username, mail password so laravel 9 will use those sender configuration for sending email. So you can simply add as like following.
.env
MAIL_MAILER=smtp
MAIL_HOST=smtp.gmail.com
MAIL_PORT=465
MAIL_USERNAME=mygoogle@gmail.com
MAIL_PASSWORD=rrnnucvnqlbsl
MAIL_ENCRYPTION=tls
MAIL_FROM_ADDRESS=mygoogle@gmail.com
MAIL_FROM_NAME="${APP_NAME}"
Step 3: Create Mail Class
In this step we will create mail class ExceptionOccured for email send on error exception. So let’s run bellow command.
php artisan make:mail ExceptionOccured
now, let’s update code on ExceptionOccured.php file as bellow:
app/Mail/ExceptionOccured.php
<?php
namespace AppMail;
use IlluminateBusQueueable;
use IlluminateContractsQueueShouldQueue;
use IlluminateMailMailable;
use IlluminateQueueSerializesModels;
class ExceptionOccured extends Mailable
{
use Queueable, SerializesModels;
public $content;
/**
* Create a new message instance.
*
* @return void
*/
public function __construct($content)
{
$this->content = $content;
}
/**
* Build the message.
*
* @return $this
*/
public function build()
{
return $this->view('emails.exception')
->with('content', $this->content);
}
}
Step 4: Create Blade View
In this step, we will create blade view file for email. In this file we will write all exception details. now we just write some dummy text. create bellow files on «emails» folder.
resources/views/emails/exception.blade.php
<!DOCTYPE html>
<html>
<head>
<meta charset="UTF-8" />
<meta name="robots" content="noindex,nofollow" />
<style> body { background-color: #F9F9F9; color: #222; font: 14px/1.4 Helvetica, Arial, sans-serif; margin: 0; padding-bottom: 45px; }
a { cursor: pointer; text-decoration: none; }
a:hover { text-decoration: underline; }
abbr[title] { border-bottom: none; cursor: help; text-decoration: none; }
code, pre { font: 13px/1.5 Consolas, Monaco, Menlo, "Ubuntu Mono", "Liberation Mono", monospace; }
table, tr, th, td { background: #FFF; border-collapse: collapse; vertical-align: top; }
table { background: #FFF; border: 1px solid #E0E0E0; box-shadow: 0px 0px 1px rgba(128, 128, 128, .2); margin: 1em 0; width: 100%; }
table th, table td { border: solid #E0E0E0; border-width: 1px 0; padding: 8px 10px; }
table th { background-color: #E0E0E0; font-weight: bold; text-align: left; }
.hidden-xs-down { display: none; }
.block { display: block; }
.break-long-words { -ms-word-break: break-all; word-break: break-all; word-break: break-word; -webkit-hyphens: auto; -moz-hyphens: auto; hyphens: auto; }
.text-muted { color: #999; }
.container { max-width: 1024px; margin: 0 auto; padding: 0 15px; }
.container::after { content: ""; display: table; clear: both; }
.exception-summary { background: #B0413E; border-bottom: 2px solid rgba(0, 0, 0, 0.1); border-top: 1px solid rgba(0, 0, 0, .3); flex: 0 0 auto; margin-bottom: 30px; }
.exception-message-wrapper { display: flex; align-items: center; min-height: 70px; }
.exception-message { flex-grow: 1; padding: 30px 0; }
.exception-message, .exception-message a { color: #FFF; font-size: 21px; font-weight: 400; margin: 0; }
.exception-message.long { font-size: 18px; }
.exception-message a { border-bottom: 1px solid rgba(255, 255, 255, 0.5); font-size: inherit; text-decoration: none; }
.exception-message a:hover { border-bottom-color: #ffffff; }
.exception-illustration { flex-basis: 111px; flex-shrink: 0; height: 66px; margin-left: 15px; opacity: .7; }
.trace + .trace { margin-top: 30px; }
.trace-head .trace-class { color: #222; font-size: 18px; font-weight: bold; line-height: 1.3; margin: 0; position: relative; }
.trace-message { font-size: 14px; font-weight: normal; margin: .5em 0 0; }
.trace-file-path, .trace-file-path a { color: #222; margin-top: 3px; font-size: 13px; }
.trace-class { color: #B0413E; }
.trace-type { padding: 0 2px; }
.trace-method { color: #B0413E; font-weight: bold; }
.trace-arguments { color: #777; font-weight: normal; padding-left: 2px; }
@media (min-width: 575px) {
.hidden-xs-down { display: initial; }
}</style>
</head>
<body>
<div class="exception-summary">
<div class="container">
<div class="exception-message-wrapper">
<h1 class="break-long-words exception-message">{{ $content['message'] ?? '' }}</h1>
<div class="exception-illustration hidden-xs-down"></div>
</div>
</div>
</div>
<div class="container">
<div class="trace trace-as-html">
<table class="trace-details">
<thead class="trace-head"><tr><th>
<h3 class="trace-class">
<span class="text-muted">(1/1)</span>
<span class="exception_title"><span title="ErrorException">ErrorException</span></span>
</h3>
<p class="break-long-words trace-message">{{ $content['message'] ?? '' }}</p>
<p class="">URL: {{ $content['url'] ?? '' }}</p>
<p class="">IP: {{ $content['ip'] ?? '' }}</p>
</th></tr></thead>
<tbody>
<tr>
<td>
<span class="block trace-file-path">in <span title="{{ $content['file'] ?? '' }}"><strong>{{ $content['file'] ?? '' }}</strong> line {{ $content['line'] ?? '' }}</span></span>
</td>
</tr>
@foreach(($content['trace'] ?? []) as $value)
<tr>
<td>
at <span class="trace-class"><span title="{{ $value['class'] ?? '' }}">{{ basename($value['class'] ?? '') }}</span></span><span class="trace-type">-></span><span class="trace-method">{{ $value['function'] ?? '' }}</span>(<span class="trace-arguments"></span>)<span class="block trace-file-path">in <span title=""><strong>{{ $value['file'] ?? '' }}</strong> line {{ $value['line'] ?? '' }}</span></span>
</td>
</tr>
@endforeach
</tbody>
</table>
</div>
</div>
</body>
</html>
Step 5: Send Mail on Exception
Here, every error exception handle on Exceptions/Handler.php file in laravel. in this file we will write code for send email with error message, file, line, trace, url and ip address details. you can get more details and send in email.
You can also store this information on database from here. so let’s copy below code and paste on Handler.php file. You need to change recipient email address.
app/Exceptions/Handler.php
<?php
namespace AppExceptions;
use IlluminateFoundationExceptionsHandler as ExceptionHandler;
use Throwable;
use Log;
use Mail;
use AppMailExceptionOccured;
class Handler extends ExceptionHandler
{
/**
* A list of the exception types that are not reported.
*
* @var array>
*/
protected $dontReport = [
];
/**
* A list of the inputs that are never flashed for validation exceptions.
*
* @var array
*/
protected $dontFlash = [
'current_password',
'password',
'password_confirmation',
];
/**
* Register the exception handling callbacks for the application.
*
* @return void
*/
public function register()
{
$this->reportable(function (Throwable $e) {
$this->sendEmail($e);
});
}
/**
* Write code on Method
*
* @return response()
*/
public function sendEmail(Throwable $exception)
{
try {
$content['message'] = $exception->getMessage();
$content['file'] = $exception->getFile();
$content['line'] = $exception->getLine();
$content['trace'] = $exception->getTrace();
$content['url'] = request()->url();
$content['body'] = request()->all();
$content['ip'] = request()->ip();
Mail::to('your_email@gmail.com')->send(new ExceptionOccured($content));
} catch (Throwable $exception) {
Log::error($exception);
}
}
}
Step 6: Create Routes
In this step, we will add one route that generate exception and you will receive one email notification. We are creating this is a testing route. so let’s add it.
routes/web.php
<?php
use IlluminateSupportFacadesRoute;
/*
|--------------------------------------------------------------------------
| Web Routes
|--------------------------------------------------------------------------
|
| Here is where you can register web routes for your application. These
| routes are loaded by the RouteServiceProvider within a group which
| contains the "web" middleware group. Now create something great!
|
*/
Route::get('/get-error', function () {
$find = AppModelsUser::find(100000)->id;
return view('welcome');
});
Run Laravel App:
All the required steps have been done, now you have to type the given below command and hit enter to run the Laravel app:
php artisan serve
Now, Go to your web browser, type the given URL and view the app output:
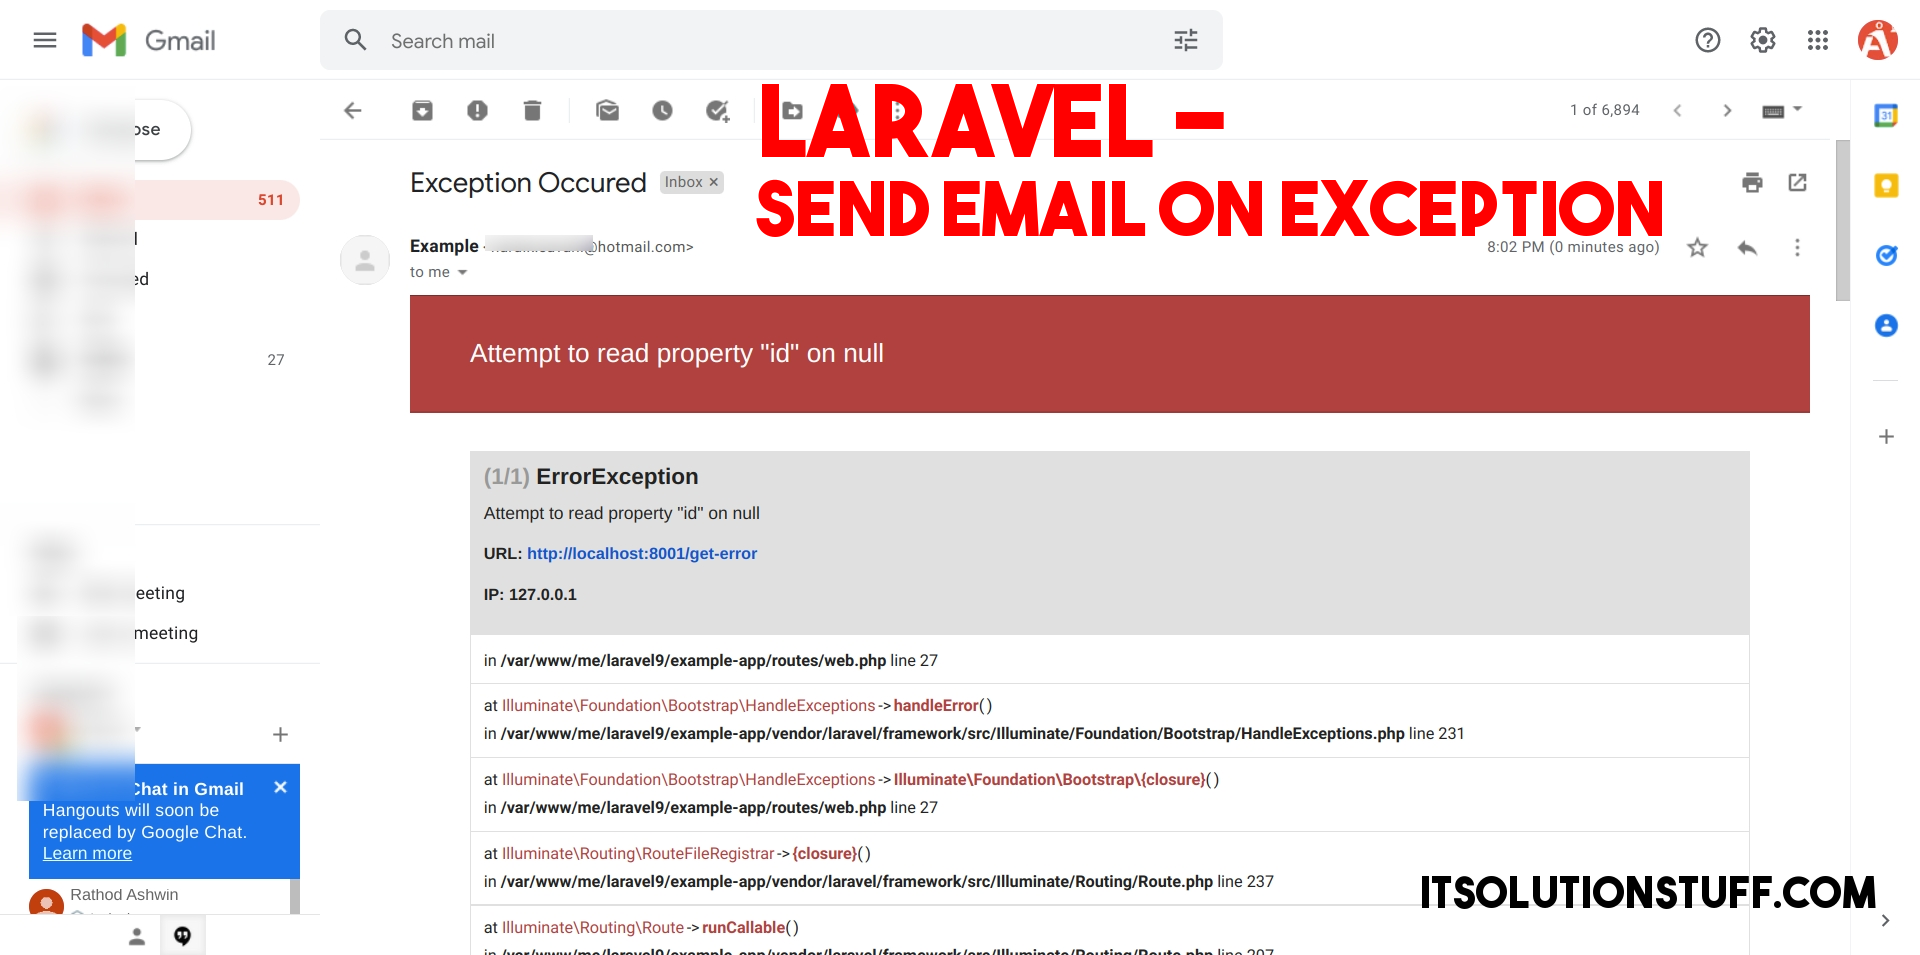
http://localhost:8000/get-error
Output: You Email Look Like This
I hope it can help you…
You’ve created a new Laravel app for your client and deployed it on the production server. Everything was working fine till a customer has a problem with the app because of some buggy code. He immediately leaves the app, and the same thing happens with multiple customers before you know about the bug. You fix the bug, and then everything is on track.
But what if you were notified immediately through e-mail (or another service) about the bug and you fix it ASAP. In Laravel, this can be done easily and in this post, we’re going to learn how.
In Laravel, all exceptions are handled by the AppExceptionsHandler class. This class contains two methods: report and render. We’re only interested in report method; it is used to log exceptions or send them to an external service like Bugsnag or Sentry. By default, the report method simply passes the exception to the base class where the exception is logged. However, we can use it to send an email to developers about the exception.
/**
* Report or log an exception.
*
* This is a great spot to send exceptions to Emails.
*
* @param Exception $exception
* @return void
*/
public function report(Exception $exception)
{
if ($this->shouldReport($exception)) {
$this->sendEmail($exception); // sends an email
}
return parent::report($exception);
}
/**
* Sends an email to the developer about the exception.
*
* @param Exception $exception
* @return void
*/
public function sendEmail(Exception $exception)
{
// sending email
}
Here we are using shouldReport method to ignore exceptions which are listed in the $dontReport property of the exception handler.
Each type of email sent by the application is represented as a “mailable” class in Laravel. So, we need to create our mailable class using the make:mail command:
$ php artisan make:mail ExceptionOccured
This will create a class ExceptionOccured in the app/Mail directory.
Merely sending the mail will not solve the problem. We need the full stack trace of the exception. And for that, we can use the Symfony’s Debug component.
public function sendEmail(Exception $exception)
{
try {
$e = FlattenException::create($exception);
$handler = new SymfonyExceptionHandler();
$html = $handler->getHtml($e);
Mail::to('developer@gmail.com')->send(new ExceptionOccured($html));
} catch (Exception $ex) {
dd($ex);
}
}
Make sure you add the following code at the top of the file:
use Mail;
use SymfonyComponentDebugExceptionFlattenException;
use SymfonyComponentDebugExceptionHandler as SymfonyExceptionHandler;
use AppMailExceptionOccured;
Note—We have used the try block to avoid the infinite loop if the mail command fails.
Then, in your ExceptionOccured mailer class:
<?php
namespace AppMail;
use IlluminateBusQueueable;
use IlluminateMailMailable;
use IlluminateQueueSerializesModels;
use IlluminateContractsQueueShouldQueue;
class ExceptionOccured extends Mailable
{
use Queueable, SerializesModels;
/**
* The body of the message.
*
* @var string
*/
public $content;
/**
* Create a new message instance.
*
* @return void
*/
public function __construct($content)
{
$this->content = $content;
}
/**
* Build the message.
*
* @return $this
*/
public function build()
{
return $this->view('emails.exception')
->with('content', $this->content);
}
}
Add the following code in your emails.exception view file:
{!! $content !!}
Now, whenever an exception is thrown in your application, you will receive an email with full stack trace. Cool!
I have created a Laravel package named squareboat/sneaker to do all this cumbersome work for you so you can concentrate on solving the bug.
Some of the features of the sneaker are:
– On/off emailing using .env file.
– Customizing the email body.
– Ignoring the exception generated by bots.
and more to come.
If you want the complete source code for this, I’m more than happy to share it and you can find the source code on Github
It’s very tedious for a developer to check error logs every day and make sure that everything is running fine. But you can reduce this daily overhead by creating simple developer notifications to Admin Mail or Slack for example.
1. Handle Exceptions in Laravel Handler
There is default Handler for all these exceptions at appExceptionsHandler.php in Laravel 8. We handled the situation in reportable callback.
<?php

namespace AppExceptions;

use AppJobsJobDevNotification;
use IlluminateFoundationExceptionsHandler as ExceptionHandler;
use Throwable;

class Handler extends ExceptionHandler
{
    .
    .
    .
    /**
     * Register the exception handling callbacks for the application.
     *
     * @return void
     */
    public function register()
    {
        $this->reportable(function (Throwable $e) {
            // Create Notification Data
            $exception = [
                "name" => get_class($e),
                "message" => $e->getMessage(),
                "file" => $e->getFile(),
                "line" => $e->getLine(),
            ];

            // Create a Job for Notification which will run after 5 seconds.
            $job = (new JobDevNotification($exception))->delay(5);

            // Dispatch Job and continue
            dispatch($job);
        });
    }
}
2. Create Mail for Alert
Create the Mail appMailErrorAlert.php in Laravel using below command. Refer Mail documentation on https://laravel.com/docs/8.x/mail
php artisan make:mail ErrorAlert<?php
namespace AppMail;
use IlluminateBusQueueable;
use IlluminateContractsQueueShouldQueue;
use IlluminateMailMailable;
use IlluminateQueueSerializesModels;
class ErrorAlert extends Mailable
{
use Queueable, SerializesModels;
public $exception;
/**
* Create a new message instance.
*
* @return void
*/
public function __construct($exception)
{
$this->exception = $exception;
}
/**
* Build the message.
*
* @return $this
*/
public function build()
{
return $this->from('system@example.com', 'System')->subject("Error Alert on Server")
->view('emails.error_alert');
}
}You will also need a resourcesviewsemailserror_alert.blade.php to format a mail. Here you can directly use $exception variable as it is set public in ErrorAlert.php.
Hello Admin,<br><br>

There is a <b>{{ $exception['name'] }}</b> on Laravel Server.<br><br>

<b>Error</b>: {{ $exception['message'] }}<br><br>

<b>File</b>: {{ $exception['file'].":".$exception['line'] }}<br><br>

<b>Time</b> {{ date("Y-m-d H:i:s") }}<br><br>

Please do the needful.
3. Create Database Queue to process Jobs in background
Now to run the Jobs in background we need to setup a database queue drivers. So we will update .env as below. Refer Queue documentation on https://laravel.com/docs/8.x/queues.
QUEUE_CONNECTION=databaseCreate the Queue Table in Database with following commands
$ php artisan queue:table
Migration created successfully!

$ php artisan migrate
Migrating: 2021_08_26_180839_create_jobs_table
Migrated:  2021_08_26_180839_create_jobs_table (52.85ms)
4. Create Job for Alert
Let’s create a simple Job appJobsJobDevNotification.php. Creating Job will make sure that your ongoing operations will not be affected.
<?php

namespace AppJobs;

use AppMailErrorAlert;
use IlluminateBusQueueable;
use IlluminateContractsQueueShouldQueue;
use IlluminateFoundationBusDispatchable;
use IlluminateQueueInteractsWithQueue;
use IlluminateQueueSerializesModels;
use IlluminateSupportFacadesMail;

/**
 * Developer Notification Job
 */
class JobDevNotification implements ShouldQueue
{
    use Dispatchable, InteractsWithQueue, Queueable, SerializesModels;

    public $exception = [];

    /**
     * Create a new job instance.
     *
     * @param array $exception
     * @return void
     */
    public function __construct($exception)
    {
        $this->exception = $exception;
    }

    /**
     * Execute the job.
     *
     * @return void
     */
    public function handle() {
        // Send Mail
        Mail::to("admin@example.com")->send(new ErrorAlert($this->exception));
    }
}
5. Start Queue, Setup SMTP & Done
php artisan queue:listenNow update you .env file for SMTP Gateway Details and you are good to go!

Find code for this article on https://github.com/gdbhosale/Laravel-Exception-Alerts
Remember to set up your application for emailing by ensuring proper configuration of config/mail.php
Also check to make sure ENV variables are properly set.
This example is a guide and is minimal. Explore, modify and style the view as you wish. Tweak the code to meet your needs. For example, set the recepient in your .env file
Send Error report email
Exceptions in Laravel are handled by AppExceptionsHandler.php
This file contains two functions by default.
Report & Render. We will only be using the first
public function report(Exception $e)
The report method is used to log exceptions or send them to an external service like BugSnag. By default, the report method simply passes the exception to the base class where the exception is logged. However, you are free to log exceptions however you wish.
Essentially this function just forwards the error and does nothing. Therefore, we can insert business logic to perform operations based on the error. For this example we will be sending an email containing the error information.
public function report(Exception $e)
{
    if ($e instanceof Exception) {
        // Fetch the error information we would like to
        // send to the view for emailing
        $error['file']    = $e->getFile();
        $error['code']    = $e->getCode();
        $error['line']    = $e->getLine();
        $error['message'] = $e->getMessage();
        $error['trace']   = $e->getTrace();

        // Only send email reports on production server
        if(ENV('APP_ENV') == "production"){
            #1. Queue email for sending on "exceptions_emails" queue
            #2. Use the emails.exception_notif view shown below
            #3. Pass the error array to the view as variable $e
            Mail::queueOn('exception_emails', 'emails.exception_notif', ["e" => $error], function ($m) {
                $m->subject("Laravel Error");
                $m->from(ENV("MAIL_FROM"), ENV("MAIL_NAME"));
                $m->to("[email protected]", "Webmaster");
            });

        }
    }

    // Pass the error on to continue processing
    return parent::report($e);
}
The view for the email («emails.exception_notif») is below
<?php
$action = (Route::getCurrentRoute()) ? Route::getCurrentRoute()->getActionName() : "n/a";
$path = (Route::getCurrentRoute()) ? Route::getCurrentRoute()->getPath() : "n/a";
$user = (Auth::check()) ? Auth::user()->name : 'no login';
?>

There was an error in your Laravel App<br />

<hr />
<table border="1" width="100%">
    <tr><th >User:</th><td>{{ $user }}</td></tr>
    <tr><th >Message:</th><td>{{ $e['message'] }}</td></tr>
    <tr><th >Action:</th><td>{{ $action }}</td></tr>
    <tr><th >URI:</th><td>{{ $path }}</td></tr>
    <tr><th >Line:</th><td>{{ $e['line'] }}</td></tr>
    <tr><th >Code:</th><td>{{ $e['code'] }}</td></tr>
</table>
Catching application wide ModelNotFoundException
appExceptionsHandler.php
public function render($request, Exception $exception)
{
    if ($exception instanceof ModelNotFoundException) {
        abort(404);
    }

    return parent::render($request, $exception);
}
You can catch / handle any exception that is thrown in Laravel.
Version
![]()
![]()
-
Introduction
- Configuration
- Driver Prerequisites
- Failover Configuration
- Generating Mailables
-
Writing Mailables
- Configuring The Sender
- Configuring The View
- View Data
- Attachments
- Inline Attachments
- Attachable Objects
- Headers
- Tags & Metadata
- Customizing The Symfony Message
-
Markdown Mailables
- Generating Markdown Mailables
- Writing Markdown Messages
- Customizing The Components
-
Sending Mail
- Queueing Mail
-
Rendering Mailables
- Previewing Mailables In The Browser
- Localizing Mailables
- Testing Mailables
- Mail & Local Development
- Events
-
Custom Transports
- Additional Symfony Transports
Introduction
Sending email doesn’t have to be complicated. Laravel provides a clean, simple email API powered by the popular Symfony Mailer component. Laravel and Symfony Mailer provide drivers for sending email via SMTP, Mailgun, Postmark, Amazon SES, and sendmail, allowing you to quickly get started sending mail through a local or cloud based service of your choice.
Configuration
Laravel’s email services may be configured via your application’s config/mail.php configuration file. Each mailer configured within this file may have its own unique configuration and even its own unique «transport», allowing your application to use different email services to send certain email messages. For example, your application might use Postmark to send transactional emails while using Amazon SES to send bulk emails.
Within your mail configuration file, you will find a mailers configuration array. This array contains a sample configuration entry for each of the major mail drivers / transports supported by Laravel, while the default configuration value determines which mailer will be used by default when your application needs to send an email message.
Driver / Transport Prerequisites
The API based drivers such as Mailgun and Postmark are often simpler and faster than sending mail via SMTP servers. Whenever possible, we recommend that you use one of these drivers.
Mailgun Driver
To use the Mailgun driver, install Symfony’s Mailgun Mailer transport via Composer:
composer require symfony/mailgun-mailer symfony/http-client
Next, set the default option in your application’s config/mail.php configuration file to mailgun. After configuring your application’s default mailer, verify that your config/services.php configuration file contains the following options:
'mailgun' => [
'domain' => env('MAILGUN_DOMAIN'),
'secret' => env('MAILGUN_SECRET'),
],
If you are not using the United States Mailgun region, you may define your region’s endpoint in the services configuration file:
'mailgun' => [
'domain' => env('MAILGUN_DOMAIN'),
'secret' => env('MAILGUN_SECRET'),
'endpoint' => env('MAILGUN_ENDPOINT', 'api.eu.mailgun.net'),
],
Postmark Driver
To use the Postmark driver, install Symfony’s Postmark Mailer transport via Composer:
composer require symfony/postmark-mailer symfony/http-client
Next, set the default option in your application’s config/mail.php configuration file to postmark. After configuring your application’s default mailer, verify that your config/services.php configuration file contains the following options:
'postmark' => [
'token' => env('POSTMARK_TOKEN'),
],
If you would like to specify the Postmark message stream that should be used by a given mailer, you may add the message_stream_id configuration option to the mailer’s configuration array. This configuration array can be found in your application’s config/mail.php configuration file:
'postmark' => [
'transport' => 'postmark',
'message_stream_id' => env('POSTMARK_MESSAGE_STREAM_ID'),
],
This way you are also able to set up multiple Postmark mailers with different message streams.
SES Driver
To use the Amazon SES driver you must first install the Amazon AWS SDK for PHP. You may install this library via the Composer package manager:
composer require aws/aws-sdk-php
Next, set the default option in your config/mail.php configuration file to ses and verify that your config/services.php configuration file contains the following options:
'ses' => [
'key' => env('AWS_ACCESS_KEY_ID'),
'secret' => env('AWS_SECRET_ACCESS_KEY'),
'region' => env('AWS_DEFAULT_REGION', 'us-east-1'),
],
To utilize AWS temporary credentials via a session token, you may add a token key to your application’s SES configuration:
'ses' => [
'key' => env('AWS_ACCESS_KEY_ID'),
'secret' => env('AWS_SECRET_ACCESS_KEY'),
'region' => env('AWS_DEFAULT_REGION', 'us-east-1'),
'token' => env('AWS_SESSION_TOKEN'),
],
If you would like to define additional options that Laravel should pass to the AWS SDK’s SendEmail method when sending an email, you may define an options array within your ses configuration:
'ses' => [
'key' => env('AWS_ACCESS_KEY_ID'),
'secret' => env('AWS_SECRET_ACCESS_KEY'),
'region' => env('AWS_DEFAULT_REGION', 'us-east-1'),
'options' => [
'ConfigurationSetName' => 'MyConfigurationSet',
'EmailTags' => [
['Name' => 'foo', 'Value' => 'bar'],
],
],
],
Failover Configuration
Sometimes, an external service you have configured to send your application’s mail may be down. In these cases, it can be useful to define one or more backup mail delivery configurations that will be used in case your primary delivery driver is down.
To accomplish this, you should define a mailer within your application’s mail configuration file that uses the failover transport. The configuration array for your application’s failover mailer should contain an array of mailers that reference the order in which mail drivers should be chosen for delivery:
'mailers' => [
'failover' => [
'transport' => 'failover',
'mailers' => [
'postmark',
'mailgun',
'sendmail',
],
],
// ...
],
Once your failover mailer has been defined, you should set this mailer as the default mailer used by your application by specifying its name as the value of the default configuration key within your application’s mail configuration file:
'default' => env('MAIL_MAILER', 'failover'),
Generating Mailables
When building Laravel applications, each type of email sent by your application is represented as a «mailable» class. These classes are stored in the app/Mail directory. Don’t worry if you don’t see this directory in your application, since it will be generated for you when you create your first mailable class using the make:mail Artisan command:
php artisan make:mail OrderShipped
Writing Mailables
Once you have generated a mailable class, open it up so we can explore its contents. Mailable class configuration is done in several methods, including the envelope, content, and attachments methods.
The envelope method returns an IlluminateMailMailablesEnvelope object that defines the subject and, sometimes, the recipients of the message. The content method returns an IlluminateMailMailablesContent object that defines the Blade template that will be used to generate the message content.
Configuring The Sender
Using The Envelope
First, let’s explore configuring the sender of the email. Or, in other words, who the email is going to be «from». There are two ways to configure the sender. First, you may specify the «from» address on your message’s envelope:
use IlluminateMailMailablesAddress;
use IlluminateMailMailablesEnvelope;
/**
* Get the message envelope.
*
* @return IlluminateMailMailablesEnvelope
*/
public function envelope()
{
return new Envelope(
from: new Address('[email protected]', 'Jeffrey Way'),
subject: 'Order Shipped',
);
}
If you would like, you may also specify a replyTo address:
return new Envelope(
from: new Address('[email protected]', 'Jeffrey Way'),
replyTo: [
new Address('[email protected]', 'Taylor Otwell'),
],
subject: 'Order Shipped',
);
Using A Global from Address
However, if your application uses the same «from» address for all of its emails, it can become cumbersome to call the from method in each mailable class you generate. Instead, you may specify a global «from» address in your config/mail.php configuration file. This address will be used if no other «from» address is specified within the mailable class:
'from' => ['address' => '[email protected]', 'name' => 'App Name'],
In addition, you may define a global «reply_to» address within your config/mail.php configuration file:
'reply_to' => ['address' => '[email protected]', 'name' => 'App Name'],
Configuring The View
Within a mailable class’ content method, you may define the view, or which template should be used when rendering the email’s contents. Since each email typically uses a Blade template to render its contents, you have the full power and convenience of the Blade templating engine when building your email’s HTML:
/**
* Get the message content definition.
*
* @return IlluminateMailMailablesContent
*/
public function content()
{
return new Content(
view: 'emails.orders.shipped',
);
}
Note
You may wish to create aresources/views/emailsdirectory to house all of your email templates; however, you are free to place them wherever you wish within yourresources/viewsdirectory.
Plain Text Emails
If you would like to define a plain-text version of your email, you may specify the plain-text template when creating the message’s Content definition. Like the view parameter, the text parameter should be a template name which will be used to render the contents of the email. You are free to define both an HTML and plain-text version of your message:
/**
* Get the message content definition.
*
* @return IlluminateMailMailablesContent
*/
public function content()
{
return new Content(
view: 'emails.orders.shipped',
text: 'emails.orders.shipped-text'
);
}
For clarity, the html parameter may be used as an alias of the view parameter:
return new Content(
html: 'emails.orders.shipped',
text: 'emails.orders.shipped-text'
);
View Data
Via Public Properties
Typically, you will want to pass some data to your view that you can utilize when rendering the email’s HTML. There are two ways you may make data available to your view. First, any public property defined on your mailable class will automatically be made available to the view. So, for example, you may pass data into your mailable class’ constructor and set that data to public properties defined on the class:
<?php
namespace AppMail;
use AppModelsOrder;
use IlluminateBusQueueable;
use IlluminateMailMailable;
use IlluminateMailMailablesContent;
use IlluminateQueueSerializesModels;
class OrderShipped extends Mailable
{
use Queueable, SerializesModels;
/**
* The order instance.
*
* @var AppModelsOrder
*/
public $order;
/**
* Create a new message instance.
*
* @param AppModelsOrder $order
* @return void
*/
public function __construct(Order $order)
{
$this->order = $order;
}
/**
* Get the message content definition.
*
* @return IlluminateMailMailablesContent
*/
public function content()
{
return new Content(
view: 'emails.orders.shipped',
);
}
}
Once the data has been set to a public property, it will automatically be available in your view, so you may access it like you would access any other data in your Blade templates:
<div>
Price: {{ $order->price }}
</div>
Via The with Parameter:
If you would like to customize the format of your email’s data before it is sent to the template, you may manually pass your data to the view via the Content definition’s with parameter. Typically, you will still pass data via the mailable class’ constructor; however, you should set this data to protected or private properties so the data is not automatically made available to the template:
<?php
namespace AppMail;
use AppModelsOrder;
use IlluminateBusQueueable;
use IlluminateMailMailable;
use IlluminateMailMailablesContent;
use IlluminateQueueSerializesModels;
class OrderShipped extends Mailable
{
use Queueable, SerializesModels;
/**
* The order instance.
*
* @var AppModelsOrder
*/
protected $order;
/**
* Create a new message instance.
*
* @param AppModelsOrder $order
* @return void
*/
public function __construct(Order $order)
{
$this->order = $order;
}
/**
* Get the message content definition.
*
* @return IlluminateMailMailablesContent
*/
public function content()
{
return new Content(
view: 'emails.orders.shipped',
with: [
'orderName' => $this->order->name,
'orderPrice' => $this->order->price,
],
);
}
}
Once the data has been passed to the with method, it will automatically be available in your view, so you may access it like you would access any other data in your Blade templates:
<div>
Price: {{ $orderPrice }}
</div>
Attachments
To add attachments to an email, you will add attachments to the array returned by the message’s attachments method. First, you may add an attachment by providing a file path to the fromPath method provided by the Attachment class:
use IlluminateMailMailablesAttachment;
/**
* Get the attachments for the message.
*
* @return IlluminateMailMailablesAttachment[]
*/
public function attachments()
{
return [
Attachment::fromPath('/path/to/file'),
];
}
When attaching files to a message, you may also specify the display name and / or MIME type for the attachment using the as and withMime methods:
/**
* Get the attachments for the message.
*
* @return IlluminateMailMailablesAttachment[]
*/
public function attachments()
{
return [
Attachment::fromPath('/path/to/file')
->as('name.pdf')
->withMime('application/pdf'),
];
}
Attaching Files From Disk
If you have stored a file on one of your filesystem disks, you may attach it to the email using the fromStorage attachment method:
/**
* Get the attachments for the message.
*
* @return IlluminateMailMailablesAttachment[]
*/
public function attachments()
{
return [
Attachment::fromStorage('/path/to/file'),
];
}
Of course, you may also specify the attachment’s name and MIME type:
/**
* Get the attachments for the message.
*
* @return IlluminateMailMailablesAttachment[]
*/
public function attachments()
{
return [
Attachment::fromStorage('/path/to/file')
->as('name.pdf')
->withMime('application/pdf'),
];
}
The fromStorageDisk method may be used if you need to specify a storage disk other than your default disk:
/**
* Get the attachments for the message.
*
* @return IlluminateMailMailablesAttachment[]
*/
public function attachments()
{
return [
Attachment::fromStorageDisk('s3', '/path/to/file')
->as('name.pdf')
->withMime('application/pdf'),
];
}
Raw Data Attachments
The fromData attachment method may be used to attach a raw string of bytes as an attachment. For example, you might use this method if you have generated a PDF in memory and want to attach it to the email without writing it to disk. The fromData method accepts a closure which resolves the raw data bytes as well as the name that the attachment should be assigned:
/**
* Get the attachments for the message.
*
* @return IlluminateMailMailablesAttachment[]
*/
public function attachments()
{
return [
Attachment::fromData(fn () => $this->pdf, 'Report.pdf')
->withMime('application/pdf'),
];
}
Inline Attachments
Embedding inline images into your emails is typically cumbersome; however, Laravel provides a convenient way to attach images to your emails. To embed an inline image, use the embed method on the $message variable within your email template. Laravel automatically makes the $message variable available to all of your email templates, so you don’t need to worry about passing it in manually:
<body>
Here is an image:
<img src="{{ $message->embed($pathToImage) }}">
</body>
Warning
The$messagevariable is not available in plain-text message templates since plain-text messages do not utilize inline attachments.
Embedding Raw Data Attachments
If you already have a raw image data string you wish to embed into an email template, you may call the embedData method on the $message variable. When calling the embedData method, you will need to provide a filename that should be assigned to the embedded image:
<body>
Here is an image from raw data:
<img src="{{ $message->embedData($data, 'example-image.jpg') }}">
</body>
Attachable Objects
While attaching files to messages via simple string paths is often sufficient, in many cases the attachable entities within your application are represented by classes. For example, if your application is attaching a photo to a message, your application may also have a Photo model that represents that photo. When that is the case, wouldn’t it be convenient to simply pass the Photo model to the attach method? Attachable objects allow you to do just that.
To get started, implement the IlluminateContractsMailAttachable interface on the object that will be attachable to messages. This interface dictates that your class defines a toMailAttachment method that returns an IlluminateMailAttachment instance:
<?php
namespace AppModels;
use IlluminateContractsMailAttachable;
use IlluminateDatabaseEloquentModel;
use IlluminateMailAttachment;
class Photo extends Model implements Attachable
{
/**
* Get the attachable representation of the model.
*
* @return IlluminateMailAttachment
*/
public function toMailAttachment()
{
return Attachment::fromPath('/path/to/file');
}
}
Once you have defined your attachable object, you may return an instance of that object from the attachments method when building an email message:
/**
* Get the attachments for the message.
*
* @return array
*/
public function attachments()
{
return [$this->photo];
}
Of course, attachment data may be stored on a remote file storage service such as Amazon S3. So, Laravel also allows you to generate attachment instances from data that is stored on one of your application’s filesystem disks:
// Create an attachment from a file on your default disk...
return Attachment::fromStorage($this->path);
// Create an attachment from a file on a specific disk...
return Attachment::fromStorageDisk('backblaze', $this->path);
In addition, you may create attachment instances via data that you have in memory. To accomplish this, provide a closure to the fromData method. The closure should return the raw data that represents the attachment:
return Attachment::fromData(fn () => $this->content, 'Photo Name');
Laravel also provides additional methods that you may use to customize your attachments. For example, you may use the as and withMime methods to customize the file’s name and MIME type:
return Attachment::fromPath('/path/to/file')
->as('Photo Name')
->withMime('image/jpeg');
Headers
Sometimes you may need to attach additional headers to the outgoing message. For instance, you may need to set a custom Message-Id or other arbitrary text headers.
To accomplish this, define a headers method on your mailable. The headers method should return an IlluminateMailMailablesHeaders instance. This class accepts messageId, references, and text parameters. Of course, you may provide only the parameters you need for your particular message:
use IlluminateMailMailablesHeaders;
/**
* Get the message headers.
*
* @return IlluminateMailMailablesHeaders
*/
public function headers()
{
return new Headers(
messageId: '[email protected]',
references: ['[email protected]'],
text: [
'X-Custom-Header' => 'Custom Value',
],
);
}
Tags & Metadata
Some third-party email providers such as Mailgun and Postmark support message «tags» and «metadata», which may be used to group and track emails sent by your application. You may add tags and metadata to an email message via your Envelope definition:
use IlluminateMailMailablesEnvelope;
/**
* Get the message envelope.
*
* @return IlluminateMailMailablesEnvelope
*/
public function envelope()
{
return new Envelope(
subject: 'Order Shipped',
tags: ['shipment'],
metadata: [
'order_id' => $this->order->id,
],
);
}
If your application is using the Mailgun driver, you may consult Mailgun’s documentation for more information on tags and metadata. Likewise, the Postmark documentation may also be consulted for more information on their support for tags and metadata.
If your application is using Amazon SES to send emails, you should use the metadata method to attach SES «tags» to the message.
Customizing The Symfony Message
Laravel’s mail capabilities are powered by Symfony Mailer. Laravel allows you to register custom callbacks that will be invoked with the Symfony Message instance before sending the message. This gives you an opportunity to deeply customize the message before it is sent. To accomplish this, define a using parameter on your Envelope definition:
use IlluminateMailMailablesEnvelope;
use SymfonyComponentMimeEmail;
/**
* Get the message envelope.
*
* @return IlluminateMailMailablesEnvelope
*/
public function envelope()
{
return new Envelope(
subject: 'Order Shipped',
using: [
function (Email $message) {
// ...
},
]
);
}
Markdown Mailables
Markdown mailable messages allow you to take advantage of the pre-built templates and components of mail notifications in your mailables. Since the messages are written in Markdown, Laravel is able to render beautiful, responsive HTML templates for the messages while also automatically generating a plain-text counterpart.
Generating Markdown Mailables
To generate a mailable with a corresponding Markdown template, you may use the --markdown option of the make:mail Artisan command:
php artisan make:mail OrderShipped --markdown=emails.orders.shipped
Then, when configuring the mailable Content definition within its content method, use the markdown parameter instead of the view parameter:
use IlluminateMailMailablesContent;
/**
* Get the message content definition.
*
* @return IlluminateMailMailablesContent
*/
public function content()
{
return new Content(
markdown: 'emails.orders.shipped',
with: [
'url' => $this->orderUrl,
],
);
}
Writing Markdown Messages
Markdown mailables use a combination of Blade components and Markdown syntax which allow you to easily construct mail messages while leveraging Laravel’s pre-built email UI components:
<x-mail::message>
# Order Shipped
Your order has been shipped!
<x-mail::button :url="$url">
View Order
</x-mail::button>
Thanks,<br>
{{ config('app.name') }}
</x-mail::message>
Note
Do not use excess indentation when writing Markdown emails. Per Markdown standards, Markdown parsers will render indented content as code blocks.
Button Component
The button component renders a centered button link. The component accepts two arguments, a url and an optional color. Supported colors are primary, success, and error. You may add as many button components to a message as you wish:
<x-mail::button :url="$url" color="success">
View Order
</x-mail::button>
Panel Component
The panel component renders the given block of text in a panel that has a slightly different background color than the rest of the message. This allows you to draw attention to a given block of text:
<x-mail::panel>
This is the panel content.
</x-mail::panel>
Table Component
The table component allows you to transform a Markdown table into an HTML table. The component accepts the Markdown table as its content. Table column alignment is supported using the default Markdown table alignment syntax:
<x-mail::table>
| Laravel | Table | Example |
| ------------- |:-------------:| --------:|
| Col 2 is | Centered | $10 |
| Col 3 is | Right-Aligned | $20 |
</x-mail::table>
Customizing The Components
You may export all of the Markdown mail components to your own application for customization. To export the components, use the vendor:publish Artisan command to publish the laravel-mail asset tag:
php artisan vendor:publish --tag=laravel-mail
This command will publish the Markdown mail components to the resources/views/vendor/mail directory. The mail directory will contain an html and a text directory, each containing their respective representations of every available component. You are free to customize these components however you like.
Customizing The CSS
After exporting the components, the resources/views/vendor/mail/html/themes directory will contain a default.css file. You may customize the CSS in this file and your styles will automatically be converted to inline CSS styles within the HTML representations of your Markdown mail messages.
If you would like to build an entirely new theme for Laravel’s Markdown components, you may place a CSS file within the html/themes directory. After naming and saving your CSS file, update the theme option of your application’s config/mail.php configuration file to match the name of your new theme.
To customize the theme for an individual mailable, you may set the $theme property of the mailable class to the name of the theme that should be used when sending that mailable.
Sending Mail
To send a message, use the to method on the Mail facade. The to method accepts an email address, a user instance, or a collection of users. If you pass an object or collection of objects, the mailer will automatically use their email and name properties when determining the email’s recipients, so make sure these attributes are available on your objects. Once you have specified your recipients, you may pass an instance of your mailable class to the send method:
<?php
namespace AppHttpControllers;
use AppHttpControllersController;
use AppMailOrderShipped;
use AppModelsOrder;
use IlluminateHttpRequest;
use IlluminateSupportFacadesMail;
class OrderShipmentController extends Controller
{
/**
* Ship the given order.
*
* @param IlluminateHttpRequest $request
* @return IlluminateHttpResponse
*/
public function store(Request $request)
{
$order = Order::findOrFail($request->order_id);
// Ship the order...
Mail::to($request->user())->send(new OrderShipped($order));
}
}
You are not limited to just specifying the «to» recipients when sending a message. You are free to set «to», «cc», and «bcc» recipients by chaining their respective methods together:
Mail::to($request->user())
->cc($moreUsers)
->bcc($evenMoreUsers)
->send(new OrderShipped($order));
Looping Over Recipients
Occasionally, you may need to send a mailable to a list of recipients by iterating over an array of recipients / email addresses. However, since the to method appends email addresses to the mailable’s list of recipients, each iteration through the loop will send another email to every previous recipient. Therefore, you should always re-create the mailable instance for each recipient:
foreach (['[email protected]', '[email protected]'] as $recipient) {
Mail::to($recipient)->send(new OrderShipped($order));
}
Sending Mail Via A Specific Mailer
By default, Laravel will send email using the mailer configured as the default mailer in your application’s mail configuration file. However, you may use the mailer method to send a message using a specific mailer configuration:
Mail::mailer('postmark')
->to($request->user())
->send(new OrderShipped($order));
Queueing Mail
Queueing A Mail Message
Since sending email messages can negatively impact the response time of your application, many developers choose to queue email messages for background sending. Laravel makes this easy using its built-in unified queue API. To queue a mail message, use the queue method on the Mail facade after specifying the message’s recipients:
Mail::to($request->user())
->cc($moreUsers)
->bcc($evenMoreUsers)
->queue(new OrderShipped($order));
This method will automatically take care of pushing a job onto the queue so the message is sent in the background. You will need to configure your queues before using this feature.
Delayed Message Queueing
If you wish to delay the delivery of a queued email message, you may use the later method. As its first argument, the later method accepts a DateTime instance indicating when the message should be sent:
Mail::to($request->user())
->cc($moreUsers)
->bcc($evenMoreUsers)
->later(now()->addMinutes(10), new OrderShipped($order));
Pushing To Specific Queues
Since all mailable classes generated using the make:mail command make use of the IlluminateBusQueueable trait, you may call the onQueue and onConnection methods on any mailable class instance, allowing you to specify the connection and queue name for the message:
$message = (new OrderShipped($order))
->onConnection('sqs')
->onQueue('emails');
Mail::to($request->user())
->cc($moreUsers)
->bcc($evenMoreUsers)
->queue($message);
Queueing By Default
If you have mailable classes that you want to always be queued, you may implement the ShouldQueue contract on the class. Now, even if you call the send method when mailing, the mailable will still be queued since it implements the contract:
use IlluminateContractsQueueShouldQueue;
class OrderShipped extends Mailable implements ShouldQueue
{
//
}
Queued Mailables & Database Transactions
When queued mailables are dispatched within database transactions, they may be processed by the queue before the database transaction has committed. When this happens, any updates you have made to models or database records during the database transaction may not yet be reflected in the database. In addition, any models or database records created within the transaction may not exist in the database. If your mailable depends on these models, unexpected errors can occur when the job that sends the queued mailable is processed.
If your queue connection’s after_commit configuration option is set to false, you may still indicate that a particular queued mailable should be dispatched after all open database transactions have been committed by calling the afterCommit method when sending the mail message:
Mail::to($request->user())->send(
(new OrderShipped($order))->afterCommit()
);
Alternatively, you may call the afterCommit method from your mailable’s constructor:
<?php
namespace AppMail;
use IlluminateBusQueueable;
use IlluminateContractsQueueShouldQueue;
use IlluminateMailMailable;
use IlluminateQueueSerializesModels;
class OrderShipped extends Mailable implements ShouldQueue
{
use Queueable, SerializesModels;
/**
* Create a new message instance.
*
* @return void
*/
public function __construct()
{
$this->afterCommit();
}
}
Note
To learn more about working around these issues, please review the documentation regarding queued jobs and database transactions.
Rendering Mailables
Sometimes you may wish to capture the HTML content of a mailable without sending it. To accomplish this, you may call the render method of the mailable. This method will return the evaluated HTML content of the mailable as a string:
use AppMailInvoicePaid;
use AppModelsInvoice;
$invoice = Invoice::find(1);
return (new InvoicePaid($invoice))->render();
Previewing Mailables In The Browser
When designing a mailable’s template, it is convenient to quickly preview the rendered mailable in your browser like a typical Blade template. For this reason, Laravel allows you to return any mailable directly from a route closure or controller. When a mailable is returned, it will be rendered and displayed in the browser, allowing you to quickly preview its design without needing to send it to an actual email address:
Route::get('/mailable', function () {
$invoice = AppModelsInvoice::find(1);
return new AppMailInvoicePaid($invoice);
});
Warning
Inline attachments will not be rendered when a mailable is previewed in your browser. To preview these mailables, you should send them to an email testing application such as Mailpit or HELO.
Localizing Mailables
Laravel allows you to send mailables in a locale other than the request’s current locale, and will even remember this locale if the mail is queued.
To accomplish this, the Mail facade offers a locale method to set the desired language. The application will change into this locale when the mailable’s template is being evaluated and then revert back to the previous locale when evaluation is complete:
Mail::to($request->user())->locale('es')->send(
new OrderShipped($order)
);
User Preferred Locales
Sometimes, applications store each user’s preferred locale. By implementing the HasLocalePreference contract on one or more of your models, you may instruct Laravel to use this stored locale when sending mail:
use IlluminateContractsTranslationHasLocalePreference;
class User extends Model implements HasLocalePreference
{
/**
* Get the user's preferred locale.
*
* @return string
*/
public function preferredLocale()
{
return $this->locale;
}
}
Once you have implemented the interface, Laravel will automatically use the preferred locale when sending mailables and notifications to the model. Therefore, there is no need to call the locale method when using this interface:
Mail::to($request->user())->send(new OrderShipped($order));
Testing Mailables
Laravel provides a variety of methods for inspecting your mailable’s structure. In addition, Laravel provides several convenient methods for testing that your mailable contains the content that you expect. These methods are: assertSeeInHtml, assertDontSeeInHtml, assertSeeInOrderInHtml, assertSeeInText, assertDontSeeInText, assertSeeInOrderInText, assertHasAttachment, assertHasAttachedData, assertHasAttachmentFromStorage, and assertHasAttachmentFromStorageDisk.
As you might expect, the «HTML» assertions assert that the HTML version of your mailable contains a given string, while the «text» assertions assert that the plain-text version of your mailable contains a given string:
use AppMailInvoicePaid;
use AppModelsUser;
public function test_mailable_content()
{
$user = User::factory()->create();
$mailable = new InvoicePaid($user);
$mailable->assertFrom('[email protected]');
$mailable->assertTo('[email protected]');
$mailable->assertHasCc('[email protected]');
$mailable->assertHasBcc('[email protected]');
$mailable->assertHasReplyTo('[email protected]');
$mailable->assertHasSubject('Invoice Paid');
$mailable->assertHasTag('example-tag');
$mailable->assertHasMetadata('key', 'value');
$mailable->assertSeeInHtml($user->email);
$mailable->assertSeeInHtml('Invoice Paid');
$mailable->assertSeeInOrderInHtml(['Invoice Paid', 'Thanks']);
$mailable->assertSeeInText($user->email);
$mailable->assertSeeInOrderInText(['Invoice Paid', 'Thanks']);
$mailable->assertHasAttachment('/path/to/file');
$mailable->assertHasAttachment(Attachment::fromPath('/path/to/file'));
$mailable->assertHasAttachedData($pdfData, 'name.pdf', ['mime' => 'application/pdf']);
$mailable->assertHasAttachmentFromStorage('/path/to/file', 'name.pdf', ['mime' => 'application/pdf']);
$mailable->assertHasAttachmentFromStorageDisk('s3', '/path/to/file', 'name.pdf', ['mime' => 'application/pdf']);
}
Testing Mailable Sending
We suggest testing the content of your mailables separately from your tests that assert that a given mailable was «sent» to a specific user. To learn how to test that mailables were sent, check out our documentation on the Mail fake.
Mail & Local Development
When developing an application that sends email, you probably don’t want to actually send emails to live email addresses. Laravel provides several ways to «disable» the actual sending of emails during local development.
Log Driver
Instead of sending your emails, the log mail driver will write all email messages to your log files for inspection. Typically, this driver would only be used during local development. For more information on configuring your application per environment, check out the configuration documentation.
HELO / Mailtrap / Mailpit
Alternatively, you may use a service like HELO or Mailtrap and the smtp driver to send your email messages to a «dummy» mailbox where you may view them in a true email client. This approach has the benefit of allowing you to actually inspect the final emails in Mailtrap’s message viewer.
If you are using Laravel Sail, you may preview your messages using Mailpit. When Sail is running, you may access the Mailpit interface at: http://localhost:8025.
Using A Global to Address
Finally, you may specify a global «to» address by invoking the alwaysTo method offered by the Mail facade. Typically, this method should be called from the boot method of one of your application’s service providers:
use IlluminateSupportFacadesMail;
/**
* Bootstrap any application services.
*
* @return void
*/
public function boot()
{
if ($this->app->environment('local')) {
Mail::alwaysTo('[email protected]');
}
}
Events
Laravel fires two events during the process of sending mail messages. The MessageSending event is fired prior to a message being sent, while the MessageSent event is fired after a message has been sent. Remember, these events are fired when the mail is being sent, not when it is queued. You may register event listeners for this event in your AppProvidersEventServiceProvider service provider:
use AppListenersLogSendingMessage;
use AppListenersLogSentMessage;
use IlluminateMailEventsMessageSending;
use IlluminateMailEventsMessageSent;
/**
* The event listener mappings for the application.
*
* @var array
*/
protected $listen = [
MessageSending::class => [
LogSendingMessage::class,
],
MessageSent::class => [
LogSentMessage::class,
],
];
Custom Transports
Laravel includes a variety of mail transports; however, you may wish to write your own transports to deliver email via other services that Laravel does not support out of the box. To get started, define a class that extends the SymfonyComponentMailerTransportAbstractTransport class. Then, implement the doSend and __toString() methods on your transport:
use MailchimpTransactionalApiClient;
use SymfonyComponentMailerSentMessage;
use SymfonyComponentMailerTransportAbstractTransport;
use SymfonyComponentMimeMessageConverter;
class MailchimpTransport extends AbstractTransport
{
/**
* The Mailchimp API client.
*
* @var MailchimpTransactionalApiClient
*/
protected $client;
/**
* Create a new Mailchimp transport instance.
*
* @param MailchimpTransactionalApiClient $client
* @return void
*/
public function __construct(ApiClient $client)
{
parent::__construct();
$this->client = $client;
}
/**
* {@inheritDoc}
*/
protected function doSend(SentMessage $message): void
{
$email = MessageConverter::toEmail($message->getOriginalMessage());
$this->client->messages->send(['message' => [
'from_email' => $email->getFrom(),
'to' => collect($email->getTo())->map(function ($email) {
return ['email' => $email->getAddress(), 'type' => 'to'];
})->all(),
'subject' => $email->getSubject(),
'text' => $email->getTextBody(),
]]);
}
/**
* Get the string representation of the transport.
*
* @return string
*/
public function __toString(): string
{
return 'mailchimp';
}
}
Once you’ve defined your custom transport, you may register it via the extend method provided by the Mail facade. Typically, this should be done within the boot method of your application’s AppServiceProvider service provider. A $config argument will be passed to the closure provided to the extend method. This argument will contain the configuration array defined for the mailer in the application’s config/mail.php configuration file:
use AppMailMailchimpTransport;
use IlluminateSupportFacadesMail;
/**
* Bootstrap any application services.
*
* @return void
*/
public function boot()
{
Mail::extend('mailchimp', function (array $config = []) {
return new MailchimpTransport(/* ... */);
});
}
Once your custom transport has been defined and registered, you may create a mailer definition within your application’s config/mail.php configuration file that utilizes the new transport:
'mailchimp' => [
'transport' => 'mailchimp',
// ...
],
Additional Symfony Transports
Laravel includes support for some existing Symfony maintained mail transports like Mailgun and Postmark. However, you may wish to extend Laravel with support for additional Symfony maintained transports. You can do so by requiring the necessary Symfony mailer via Composer and registering the transport with Laravel. For example, you may install and register the «Sendinblue» Symfony mailer:
composer require symfony/sendinblue-mailer symfony/http-client
Once the Sendinblue mailer package has been installed, you may add an entry for your Sendinblue API credentials to your application’s services configuration file:
'sendinblue' => [
'key' => 'your-api-key',
],
Next, you may use the Mail facade’s extend method to register the transport with Laravel. Typically, this should be done within the boot method of a service provider:
use IlluminateSupportFacadesMail;
use SymfonyComponentMailerBridgeSendinblueTransportSendinblueTransportFactory;
use SymfonyComponentMailerTransportDsn;
/**
* Bootstrap any application services.
*
* @return void
*/
public function boot()
{
Mail::extend('sendinblue', function () {
return (new SendinblueTransportFactory)->create(
new Dsn(
'sendinblue+api',
'default',
config('services.sendinblue.key')
)
);
});
}
Once your transport has been registered, you may create a mailer definition within your application’s config/mail.php configuration file that utilizes the new transport:
'sendinblue' => [
'transport' => 'sendinblue',
// ...
],