Version
![]()
![]()
Error Handling
- Introduction
- Configuration
-
The Exception Handler
- Reporting Exceptions
- Exception Log Levels
- Ignoring Exceptions By Type
- Rendering Exceptions
- Reportable & Renderable Exceptions
-
HTTP Exceptions
- Custom HTTP Error Pages
Introduction
When you start a new Laravel project, error and exception handling is already configured for you. The AppExceptionsHandler class is where all exceptions thrown by your application are logged and then rendered to the user. We’ll dive deeper into this class throughout this documentation.
Configuration
The debug option in your config/app.php configuration file determines how much information about an error is actually displayed to the user. By default, this option is set to respect the value of the APP_DEBUG environment variable, which is stored in your .env file.
During local development, you should set the APP_DEBUG environment variable to true. In your production environment, this value should always be false. If the value is set to true in production, you risk exposing sensitive configuration values to your application’s end users.
The Exception Handler
Reporting Exceptions
All exceptions are handled by the AppExceptionsHandler class. This class contains a register method where you may register custom exception reporting and rendering callbacks. We’ll examine each of these concepts in detail. Exception reporting is used to log exceptions or send them to an external service like Flare, Bugsnag or Sentry. By default, exceptions will be logged based on your logging configuration. However, you are free to log exceptions however you wish.
For example, if you need to report different types of exceptions in different ways, you may use the reportable method to register a closure that should be executed when an exception of a given type needs to be reported. Laravel will deduce what type of exception the closure reports by examining the type-hint of the closure:
use AppExceptionsInvalidOrderException;
/**
* Register the exception handling callbacks for the application.
*
* @return void
*/
public function register()
{
$this->reportable(function (InvalidOrderException $e) {
//
});
}
When you register a custom exception reporting callback using the reportable method, Laravel will still log the exception using the default logging configuration for the application. If you wish to stop the propagation of the exception to the default logging stack, you may use the stop method when defining your reporting callback or return false from the callback:
$this->reportable(function (InvalidOrderException $e) {
//
})->stop();
$this->reportable(function (InvalidOrderException $e) {
return false;
});
Note
To customize the exception reporting for a given exception, you may also utilize reportable exceptions.
Global Log Context
If available, Laravel automatically adds the current user’s ID to every exception’s log message as contextual data. You may define your own global contextual data by overriding the context method of your application’s AppExceptionsHandler class. This information will be included in every exception’s log message written by your application:
/**
* Get the default context variables for logging.
*
* @return array
*/
protected function context()
{
return array_merge(parent::context(), [
'foo' => 'bar',
]);
}
Exception Log Context
While adding context to every log message can be useful, sometimes a particular exception may have unique context that you would like to include in your logs. By defining a context method on one of your application’s custom exceptions, you may specify any data relevant to that exception that should be added to the exception’s log entry:
<?php
namespace AppExceptions;
use Exception;
class InvalidOrderException extends Exception
{
// ...
/**
* Get the exception's context information.
*
* @return array
*/
public function context()
{
return ['order_id' => $this->orderId];
}
}
The report Helper
Sometimes you may need to report an exception but continue handling the current request. The report helper function allows you to quickly report an exception via the exception handler without rendering an error page to the user:
public function isValid($value)
{
try {
// Validate the value...
} catch (Throwable $e) {
report($e);
return false;
}
}
Exception Log Levels
When messages are written to your application’s logs, the messages are written at a specified log level, which indicates the severity or importance of the message being logged.
As noted above, even when you register a custom exception reporting callback using the reportable method, Laravel will still log the exception using the default logging configuration for the application; however, since the log level can sometimes influence the channels on which a message is logged, you may wish to configure the log level that certain exceptions are logged at.
To accomplish this, you may define an array of exception types and their associated log levels within the $levels property of your application’s exception handler:
use PDOException;
use PsrLogLogLevel;
/**
* A list of exception types with their corresponding custom log levels.
*
* @var array<class-string<Throwable>, PsrLogLogLevel::*>
*/
protected $levels = [
PDOException::class => LogLevel::CRITICAL,
];
Ignoring Exceptions By Type
When building your application, there will be some types of exceptions you simply want to ignore and never report. Your application’s exception handler contains a $dontReport property which is initialized to an empty array. Any classes that you add to this property will never be reported; however, they may still have custom rendering logic:
use AppExceptionsInvalidOrderException;
/**
* A list of the exception types that are not reported.
*
* @var array<int, class-string<Throwable>>
*/
protected $dontReport = [
InvalidOrderException::class,
];
Note
Behind the scenes, Laravel already ignores some types of errors for you, such as exceptions resulting from 404 HTTP «not found» errors or 419 HTTP responses generated by invalid CSRF tokens.
Rendering Exceptions
By default, the Laravel exception handler will convert exceptions into an HTTP response for you. However, you are free to register a custom rendering closure for exceptions of a given type. You may accomplish this via the renderable method of your exception handler.
The closure passed to the renderable method should return an instance of IlluminateHttpResponse, which may be generated via the response helper. Laravel will deduce what type of exception the closure renders by examining the type-hint of the closure:
use AppExceptionsInvalidOrderException;
/**
* Register the exception handling callbacks for the application.
*
* @return void
*/
public function register()
{
$this->renderable(function (InvalidOrderException $e, $request) {
return response()->view('errors.invalid-order', [], 500);
});
}
You may also use the renderable method to override the rendering behavior for built-in Laravel or Symfony exceptions such as NotFoundHttpException. If the closure given to the renderable method does not return a value, Laravel’s default exception rendering will be utilized:
use SymfonyComponentHttpKernelExceptionNotFoundHttpException;
/**
* Register the exception handling callbacks for the application.
*
* @return void
*/
public function register()
{
$this->renderable(function (NotFoundHttpException $e, $request) {
if ($request->is('api/*')) {
return response()->json([
'message' => 'Record not found.'
], 404);
}
});
}
Reportable & Renderable Exceptions
Instead of type-checking exceptions in the exception handler’s register method, you may define report and render methods directly on your custom exceptions. When these methods exist, they will be automatically called by the framework:
<?php
namespace AppExceptions;
use Exception;
class InvalidOrderException extends Exception
{
/**
* Report the exception.
*
* @return bool|null
*/
public function report()
{
//
}
/**
* Render the exception into an HTTP response.
*
* @param IlluminateHttpRequest $request
* @return IlluminateHttpResponse
*/
public function render($request)
{
return response(/* ... */);
}
}
If your exception extends an exception that is already renderable, such as a built-in Laravel or Symfony exception, you may return false from the exception’s render method to render the exception’s default HTTP response:
/**
* Render the exception into an HTTP response.
*
* @param IlluminateHttpRequest $request
* @return IlluminateHttpResponse
*/
public function render($request)
{
// Determine if the exception needs custom rendering...
return false;
}
If your exception contains custom reporting logic that is only necessary when certain conditions are met, you may need to instruct Laravel to sometimes report the exception using the default exception handling configuration. To accomplish this, you may return false from the exception’s report method:
/**
* Report the exception.
*
* @return bool|null
*/
public function report()
{
// Determine if the exception needs custom reporting...
return false;
}
Note
You may type-hint any required dependencies of thereportmethod and they will automatically be injected into the method by Laravel’s service container.
HTTP Exceptions
Some exceptions describe HTTP error codes from the server. For example, this may be a «page not found» error (404), an «unauthorized error» (401) or even a developer generated 500 error. In order to generate such a response from anywhere in your application, you may use the abort helper:
abort(404);
Custom HTTP Error Pages
Laravel makes it easy to display custom error pages for various HTTP status codes. For example, if you wish to customize the error page for 404 HTTP status codes, create a resources/views/errors/404.blade.php view template. This view will be rendered on all 404 errors generated by your application. The views within this directory should be named to match the HTTP status code they correspond to. The SymfonyComponentHttpKernelExceptionHttpException instance raised by the abort function will be passed to the view as an $exception variable:
<h2>{{ $exception->getMessage() }}</h2>
You may publish Laravel’s default error page templates using the vendor:publish Artisan command. Once the templates have been published, you may customize them to your liking:
php artisan vendor:publish --tag=laravel-errors
Fallback HTTP Error Pages
You may also define a «fallback» error page for a given series of HTTP status codes. This page will be rendered if there is not a corresponding page for the specific HTTP status code that occurred. To accomplish this, define a 4xx.blade.php template and a 5xx.blade.php template in your application’s resources/views/errors directory.
Version
![]()
![]()
Validation
- Introduction
-
Validation Quickstart
- Defining The Routes
- Creating The Controller
- Writing The Validation Logic
- Displaying The Validation Errors
- Repopulating Forms
- A Note On Optional Fields
- Validation Error Response Format
-
Form Request Validation
- Creating Form Requests
- Authorizing Form Requests
- Customizing The Error Messages
- Preparing Input For Validation
-
Manually Creating Validators
- Automatic Redirection
- Named Error Bags
- Customizing The Error Messages
- After Validation Hook
- Working With Validated Input
-
Working With Error Messages
- Specifying Custom Messages In Language Files
- Specifying Attributes In Language Files
- Specifying Values In Language Files
- Available Validation Rules
- Conditionally Adding Rules
-
Validating Arrays
- Validating Nested Array Input
- Error Message Indexes & Positions
- Validating Files
- Validating Passwords
-
Custom Validation Rules
- Using Rule Objects
- Using Closures
- Implicit Rules
Introduction
Laravel provides several different approaches to validate your application’s incoming data. It is most common to use the validate method available on all incoming HTTP requests. However, we will discuss other approaches to validation as well.
Laravel includes a wide variety of convenient validation rules that you may apply to data, even providing the ability to validate if values are unique in a given database table. We’ll cover each of these validation rules in detail so that you are familiar with all of Laravel’s validation features.
Validation Quickstart
To learn about Laravel’s powerful validation features, let’s look at a complete example of validating a form and displaying the error messages back to the user. By reading this high-level overview, you’ll be able to gain a good general understanding of how to validate incoming request data using Laravel:
Defining The Routes
First, let’s assume we have the following routes defined in our routes/web.php file:
use AppHttpControllersPostController;
Route::get('/post/create', [PostController::class, 'create']);
Route::post('/post', [PostController::class, 'store']);
The GET route will display a form for the user to create a new blog post, while the POST route will store the new blog post in the database.
Creating The Controller
Next, let’s take a look at a simple controller that handles incoming requests to these routes. We’ll leave the store method empty for now:
<?php
namespace AppHttpControllers;
use AppHttpControllersController;
use IlluminateHttpRequest;
class PostController extends Controller
{
/**
* Show the form to create a new blog post.
*
* @return IlluminateViewView
*/
public function create()
{
return view('post.create');
}
/**
* Store a new blog post.
*
* @param IlluminateHttpRequest $request
* @return IlluminateHttpResponse
*/
public function store(Request $request)
{
// Validate and store the blog post...
}
}
Writing The Validation Logic
Now we are ready to fill in our store method with the logic to validate the new blog post. To do this, we will use the validate method provided by the IlluminateHttpRequest object. If the validation rules pass, your code will keep executing normally; however, if validation fails, an IlluminateValidationValidationException exception will be thrown and the proper error response will automatically be sent back to the user.
If validation fails during a traditional HTTP request, a redirect response to the previous URL will be generated. If the incoming request is an XHR request, a JSON response containing the validation error messages will be returned.
To get a better understanding of the validate method, let’s jump back into the store method:
/**
* Store a new blog post.
*
* @param IlluminateHttpRequest $request
* @return IlluminateHttpResponse
*/
public function store(Request $request)
{
$validated = $request->validate([
'title' => 'required|unique:posts|max:255',
'body' => 'required',
]);
// The blog post is valid...
}
As you can see, the validation rules are passed into the validate method. Don’t worry — all available validation rules are documented. Again, if the validation fails, the proper response will automatically be generated. If the validation passes, our controller will continue executing normally.
Alternatively, validation rules may be specified as arrays of rules instead of a single | delimited string:
$validatedData = $request->validate([
'title' => ['required', 'unique:posts', 'max:255'],
'body' => ['required'],
]);
In addition, you may use the validateWithBag method to validate a request and store any error messages within a named error bag:
$validatedData = $request->validateWithBag('post', [
'title' => ['required', 'unique:posts', 'max:255'],
'body' => ['required'],
]);
Stopping On First Validation Failure
Sometimes you may wish to stop running validation rules on an attribute after the first validation failure. To do so, assign the bail rule to the attribute:
$request->validate([
'title' => 'bail|required|unique:posts|max:255',
'body' => 'required',
]);
In this example, if the unique rule on the title attribute fails, the max rule will not be checked. Rules will be validated in the order they are assigned.
A Note On Nested Attributes
If the incoming HTTP request contains «nested» field data, you may specify these fields in your validation rules using «dot» syntax:
$request->validate([
'title' => 'required|unique:posts|max:255',
'author.name' => 'required',
'author.description' => 'required',
]);
On the other hand, if your field name contains a literal period, you can explicitly prevent this from being interpreted as «dot» syntax by escaping the period with a backslash:
$request->validate([
'title' => 'required|unique:posts|max:255',
'v1.0' => 'required',
]);
Displaying The Validation Errors
So, what if the incoming request fields do not pass the given validation rules? As mentioned previously, Laravel will automatically redirect the user back to their previous location. In addition, all of the validation errors and request input will automatically be flashed to the session.
An $errors variable is shared with all of your application’s views by the IlluminateViewMiddlewareShareErrorsFromSession middleware, which is provided by the web middleware group. When this middleware is applied an $errors variable will always be available in your views, allowing you to conveniently assume the $errors variable is always defined and can be safely used. The $errors variable will be an instance of IlluminateSupportMessageBag. For more information on working with this object, check out its documentation.
So, in our example, the user will be redirected to our controller’s create method when validation fails, allowing us to display the error messages in the view:
<!-- /resources/views/post/create.blade.php -->
<h1>Create Post</h1>
@if ($errors->any())
<div class="alert alert-danger">
<ul>
@foreach ($errors->all() as $error)
<li>{{ $error }}</li>
@endforeach
</ul>
</div>
@endif
<!-- Create Post Form -->
Customizing The Error Messages
Laravel’s built-in validation rules each have an error message that is located in your application’s lang/en/validation.php file. Within this file, you will find a translation entry for each validation rule. You are free to change or modify these messages based on the needs of your application.
In addition, you may copy this file to another translation language directory to translate the messages for your application’s language. To learn more about Laravel localization, check out the complete localization documentation.
XHR Requests & Validation
In this example, we used a traditional form to send data to the application. However, many applications receive XHR requests from a JavaScript powered frontend. When using the validate method during an XHR request, Laravel will not generate a redirect response. Instead, Laravel generates a JSON response containing all of the validation errors. This JSON response will be sent with a 422 HTTP status code.
The @error Directive
You may use the @error Blade directive to quickly determine if validation error messages exist for a given attribute. Within an @error directive, you may echo the $message variable to display the error message:
<!-- /resources/views/post/create.blade.php -->
<label for="title">Post Title</label>
<input id="title"
type="text"
name="title"
class="@error('title') is-invalid @enderror">
@error('title')
<div class="alert alert-danger">{{ $message }}</div>
@enderror
If you are using named error bags, you may pass the name of the error bag as the second argument to the @error directive:
<input ... class="@error('title', 'post') is-invalid @enderror">
Repopulating Forms
When Laravel generates a redirect response due to a validation error, the framework will automatically flash all of the request’s input to the session. This is done so that you may conveniently access the input during the next request and repopulate the form that the user attempted to submit.
To retrieve flashed input from the previous request, invoke the old method on an instance of IlluminateHttpRequest. The old method will pull the previously flashed input data from the session:
$title = $request->old('title');
Laravel also provides a global old helper. If you are displaying old input within a Blade template, it is more convenient to use the old helper to repopulate the form. If no old input exists for the given field, null will be returned:
<input type="text" name="title" value="{{ old('title') }}">
A Note On Optional Fields
By default, Laravel includes the TrimStrings and ConvertEmptyStringsToNull middleware in your application’s global middleware stack. These middleware are listed in the stack by the AppHttpKernel class. Because of this, you will often need to mark your «optional» request fields as nullable if you do not want the validator to consider null values as invalid. For example:
$request->validate([
'title' => 'required|unique:posts|max:255',
'body' => 'required',
'publish_at' => 'nullable|date',
]);
In this example, we are specifying that the publish_at field may be either null or a valid date representation. If the nullable modifier is not added to the rule definition, the validator would consider null an invalid date.
Validation Error Response Format
When your application throws a IlluminateValidationValidationException exception and the incoming HTTP request is expecting a JSON response, Laravel will automatically format the error messages for you and return a 422 Unprocessable Entity HTTP response.
Below, you can review an example of the JSON response format for validation errors. Note that nested error keys are flattened into «dot» notation format:
{
"message": "The team name must be a string. (and 4 more errors)",
"errors": {
"team_name": [
"The team name must be a string.",
"The team name must be at least 1 characters."
],
"authorization.role": [
"The selected authorization.role is invalid."
],
"users.0.email": [
"The users.0.email field is required."
],
"users.2.email": [
"The users.2.email must be a valid email address."
]
}
}
Form Request Validation
Creating Form Requests
For more complex validation scenarios, you may wish to create a «form request». Form requests are custom request classes that encapsulate their own validation and authorization logic. To create a form request class, you may use the make:request Artisan CLI command:
php artisan make:request StorePostRequest
The generated form request class will be placed in the app/Http/Requests directory. If this directory does not exist, it will be created when you run the make:request command. Each form request generated by Laravel has two methods: authorize and rules.
As you might have guessed, the authorize method is responsible for determining if the currently authenticated user can perform the action represented by the request, while the rules method returns the validation rules that should apply to the request’s data:
/**
* Get the validation rules that apply to the request.
*
* @return array
*/
public function rules()
{
return [
'title' => 'required|unique:posts|max:255',
'body' => 'required',
];
}
Note
You may type-hint any dependencies you require within therulesmethod’s signature. They will automatically be resolved via the Laravel service container.
So, how are the validation rules evaluated? All you need to do is type-hint the request on your controller method. The incoming form request is validated before the controller method is called, meaning you do not need to clutter your controller with any validation logic:
/**
* Store a new blog post.
*
* @param AppHttpRequestsStorePostRequest $request
* @return IlluminateHttpResponse
*/
public function store(StorePostRequest $request)
{
// The incoming request is valid...
// Retrieve the validated input data...
$validated = $request->validated();
// Retrieve a portion of the validated input data...
$validated = $request->safe()->only(['name', 'email']);
$validated = $request->safe()->except(['name', 'email']);
}
If validation fails, a redirect response will be generated to send the user back to their previous location. The errors will also be flashed to the session so they are available for display. If the request was an XHR request, an HTTP response with a 422 status code will be returned to the user including a JSON representation of the validation errors.
Adding After Hooks To Form Requests
If you would like to add an «after» validation hook to a form request, you may use the withValidator method. This method receives the fully constructed validator, allowing you to call any of its methods before the validation rules are actually evaluated:
/**
* Configure the validator instance.
*
* @param IlluminateValidationValidator $validator
* @return void
*/
public function withValidator($validator)
{
$validator->after(function ($validator) {
if ($this->somethingElseIsInvalid()) {
$validator->errors()->add('field', 'Something is wrong with this field!');
}
});
}
Stopping On First Validation Failure Attribute
By adding a stopOnFirstFailure property to your request class, you may inform the validator that it should stop validating all attributes once a single validation failure has occurred:
/**
* Indicates if the validator should stop on the first rule failure.
*
* @var bool
*/
protected $stopOnFirstFailure = true;
Customizing The Redirect Location
As previously discussed, a redirect response will be generated to send the user back to their previous location when form request validation fails. However, you are free to customize this behavior. To do so, define a $redirect property on your form request:
/**
* The URI that users should be redirected to if validation fails.
*
* @var string
*/
protected $redirect = '/dashboard';
Or, if you would like to redirect users to a named route, you may define a $redirectRoute property instead:
/**
* The route that users should be redirected to if validation fails.
*
* @var string
*/
protected $redirectRoute = 'dashboard';
Authorizing Form Requests
The form request class also contains an authorize method. Within this method, you may determine if the authenticated user actually has the authority to update a given resource. For example, you may determine if a user actually owns a blog comment they are attempting to update. Most likely, you will interact with your authorization gates and policies within this method:
use AppModelsComment;
/**
* Determine if the user is authorized to make this request.
*
* @return bool
*/
public function authorize()
{
$comment = Comment::find($this->route('comment'));
return $comment && $this->user()->can('update', $comment);
}
Since all form requests extend the base Laravel request class, we may use the user method to access the currently authenticated user. Also, note the call to the route method in the example above. This method grants you access to the URI parameters defined on the route being called, such as the {comment} parameter in the example below:
Route::post('/comment/{comment}');
Therefore, if your application is taking advantage of route model binding, your code may be made even more succinct by accessing the resolved model as a property of the request:
return $this->user()->can('update', $this->comment);
If the authorize method returns false, an HTTP response with a 403 status code will automatically be returned and your controller method will not execute.
If you plan to handle authorization logic for the request in another part of your application, you may simply return true from the authorize method:
/**
* Determine if the user is authorized to make this request.
*
* @return bool
*/
public function authorize()
{
return true;
}
Note
You may type-hint any dependencies you need within theauthorizemethod’s signature. They will automatically be resolved via the Laravel service container.
Customizing The Error Messages
You may customize the error messages used by the form request by overriding the messages method. This method should return an array of attribute / rule pairs and their corresponding error messages:
/**
* Get the error messages for the defined validation rules.
*
* @return array
*/
public function messages()
{
return [
'title.required' => 'A title is required',
'body.required' => 'A message is required',
];
}
Customizing The Validation Attributes
Many of Laravel’s built-in validation rule error messages contain an :attribute placeholder. If you would like the :attribute placeholder of your validation message to be replaced with a custom attribute name, you may specify the custom names by overriding the attributes method. This method should return an array of attribute / name pairs:
/**
* Get custom attributes for validator errors.
*
* @return array
*/
public function attributes()
{
return [
'email' => 'email address',
];
}
Preparing Input For Validation
If you need to prepare or sanitize any data from the request before you apply your validation rules, you may use the prepareForValidation method:
use IlluminateSupportStr;
/**
* Prepare the data for validation.
*
* @return void
*/
protected function prepareForValidation()
{
$this->merge([
'slug' => Str::slug($this->slug),
]);
}
Likewise, if you need to normalize any request data after validation is complete, you may use the passedValidation method:
use IlluminateSupportStr;
/**
* Handle a passed validation attempt.
*
* @return void
*/
protected function passedValidation()
{
$this->replace(['name' => 'Taylor']);
}
Manually Creating Validators
If you do not want to use the validate method on the request, you may create a validator instance manually using the Validator facade. The make method on the facade generates a new validator instance:
<?php
namespace AppHttpControllers;
use AppHttpControllersController;
use IlluminateHttpRequest;
use IlluminateSupportFacadesValidator;
class PostController extends Controller
{
/**
* Store a new blog post.
*
* @param Request $request
* @return Response
*/
public function store(Request $request)
{
$validator = Validator::make($request->all(), [
'title' => 'required|unique:posts|max:255',
'body' => 'required',
]);
if ($validator->fails()) {
return redirect('post/create')
->withErrors($validator)
->withInput();
}
// Retrieve the validated input...
$validated = $validator->validated();
// Retrieve a portion of the validated input...
$validated = $validator->safe()->only(['name', 'email']);
$validated = $validator->safe()->except(['name', 'email']);
// Store the blog post...
}
}
The first argument passed to the make method is the data under validation. The second argument is an array of the validation rules that should be applied to the data.
After determining whether the request validation failed, you may use the withErrors method to flash the error messages to the session. When using this method, the $errors variable will automatically be shared with your views after redirection, allowing you to easily display them back to the user. The withErrors method accepts a validator, a MessageBag, or a PHP array.
Stopping On First Validation Failure
The stopOnFirstFailure method will inform the validator that it should stop validating all attributes once a single validation failure has occurred:
if ($validator->stopOnFirstFailure()->fails()) {
// ...
}
Automatic Redirection
If you would like to create a validator instance manually but still take advantage of the automatic redirection offered by the HTTP request’s validate method, you may call the validate method on an existing validator instance. If validation fails, the user will automatically be redirected or, in the case of an XHR request, a JSON response will be returned:
Validator::make($request->all(), [
'title' => 'required|unique:posts|max:255',
'body' => 'required',
])->validate();
You may use the validateWithBag method to store the error messages in a named error bag if validation fails:
Validator::make($request->all(), [
'title' => 'required|unique:posts|max:255',
'body' => 'required',
])->validateWithBag('post');
Named Error Bags
If you have multiple forms on a single page, you may wish to name the MessageBag containing the validation errors, allowing you to retrieve the error messages for a specific form. To achieve this, pass a name as the second argument to withErrors:
return redirect('register')->withErrors($validator, 'login');
You may then access the named MessageBag instance from the $errors variable:
{{ $errors->login->first('email') }}
Customizing The Error Messages
If needed, you may provide custom error messages that a validator instance should use instead of the default error messages provided by Laravel. There are several ways to specify custom messages. First, you may pass the custom messages as the third argument to the Validator::make method:
$validator = Validator::make($input, $rules, $messages = [
'required' => 'The :attribute field is required.',
]);
In this example, the :attribute placeholder will be replaced by the actual name of the field under validation. You may also utilize other placeholders in validation messages. For example:
$messages = [
'same' => 'The :attribute and :other must match.',
'size' => 'The :attribute must be exactly :size.',
'between' => 'The :attribute value :input is not between :min - :max.',
'in' => 'The :attribute must be one of the following types: :values',
];
Specifying A Custom Message For A Given Attribute
Sometimes you may wish to specify a custom error message only for a specific attribute. You may do so using «dot» notation. Specify the attribute’s name first, followed by the rule:
$messages = [
'email.required' => 'We need to know your email address!',
];
Specifying Custom Attribute Values
Many of Laravel’s built-in error messages include an :attribute placeholder that is replaced with the name of the field or attribute under validation. To customize the values used to replace these placeholders for specific fields, you may pass an array of custom attributes as the fourth argument to the Validator::make method:
$validator = Validator::make($input, $rules, $messages, [
'email' => 'email address',
]);
After Validation Hook
You may also attach callbacks to be run after validation is completed. This allows you to easily perform further validation and even add more error messages to the message collection. To get started, call the after method on a validator instance:
$validator = Validator::make(/* ... */);
$validator->after(function ($validator) {
if ($this->somethingElseIsInvalid()) {
$validator->errors()->add(
'field', 'Something is wrong with this field!'
);
}
});
if ($validator->fails()) {
//
}
Working With Validated Input
After validating incoming request data using a form request or a manually created validator instance, you may wish to retrieve the incoming request data that actually underwent validation. This can be accomplished in several ways. First, you may call the validated method on a form request or validator instance. This method returns an array of the data that was validated:
$validated = $request->validated();
$validated = $validator->validated();
Alternatively, you may call the safe method on a form request or validator instance. This method returns an instance of IlluminateSupportValidatedInput. This object exposes only, except, and all methods to retrieve a subset of the validated data or the entire array of validated data:
$validated = $request->safe()->only(['name', 'email']);
$validated = $request->safe()->except(['name', 'email']);
$validated = $request->safe()->all();
In addition, the IlluminateSupportValidatedInput instance may be iterated over and accessed like an array:
// Validated data may be iterated...
foreach ($request->safe() as $key => $value) {
//
}
// Validated data may be accessed as an array...
$validated = $request->safe();
$email = $validated['email'];
If you would like to add additional fields to the validated data, you may call the merge method:
$validated = $request->safe()->merge(['name' => 'Taylor Otwell']);
If you would like to retrieve the validated data as a collection instance, you may call the collect method:
$collection = $request->safe()->collect();
Working With Error Messages
After calling the errors method on a Validator instance, you will receive an IlluminateSupportMessageBag instance, which has a variety of convenient methods for working with error messages. The $errors variable that is automatically made available to all views is also an instance of the MessageBag class.
Retrieving The First Error Message For A Field
To retrieve the first error message for a given field, use the first method:
$errors = $validator->errors();
echo $errors->first('email');
Retrieving All Error Messages For A Field
If you need to retrieve an array of all the messages for a given field, use the get method:
foreach ($errors->get('email') as $message) {
//
}
If you are validating an array form field, you may retrieve all of the messages for each of the array elements using the * character:
foreach ($errors->get('attachments.*') as $message) {
//
}
Retrieving All Error Messages For All Fields
To retrieve an array of all messages for all fields, use the all method:
foreach ($errors->all() as $message) {
//
}
Determining If Messages Exist For A Field
The has method may be used to determine if any error messages exist for a given field:
if ($errors->has('email')) {
//
}
Specifying Custom Messages In Language Files
Laravel’s built-in validation rules each have an error message that is located in your application’s lang/en/validation.php file. Within this file, you will find a translation entry for each validation rule. You are free to change or modify these messages based on the needs of your application.
In addition, you may copy this file to another translation language directory to translate the messages for your application’s language. To learn more about Laravel localization, check out the complete localization documentation.
Custom Messages For Specific Attributes
You may customize the error messages used for specified attribute and rule combinations within your application’s validation language files. To do so, add your message customizations to the custom array of your application’s lang/xx/validation.php language file:
'custom' => [
'email' => [
'required' => 'We need to know your email address!',
'max' => 'Your email address is too long!'
],
],
Specifying Attributes In Language Files
Many of Laravel’s built-in error messages include an :attribute placeholder that is replaced with the name of the field or attribute under validation. If you would like the :attribute portion of your validation message to be replaced with a custom value, you may specify the custom attribute name in the attributes array of your lang/xx/validation.php language file:
'attributes' => [
'email' => 'email address',
],
Specifying Values In Language Files
Some of Laravel’s built-in validation rule error messages contain a :value placeholder that is replaced with the current value of the request attribute. However, you may occasionally need the :value portion of your validation message to be replaced with a custom representation of the value. For example, consider the following rule that specifies that a credit card number is required if the payment_type has a value of cc:
Validator::make($request->all(), [
'credit_card_number' => 'required_if:payment_type,cc'
]);
If this validation rule fails, it will produce the following error message:
The credit card number field is required when payment type is cc.
Instead of displaying cc as the payment type value, you may specify a more user-friendly value representation in your lang/xx/validation.php language file by defining a values array:
'values' => [
'payment_type' => [
'cc' => 'credit card'
],
],
After defining this value, the validation rule will produce the following error message:
The credit card number field is required when payment type is credit card.
Available Validation Rules
Below is a list of all available validation rules and their function:
accepted
The field under validation must be "yes", "on", 1, or true. This is useful for validating «Terms of Service» acceptance or similar fields.
accepted_if:anotherfield,value,…
The field under validation must be "yes", "on", 1, or true if another field under validation is equal to a specified value. This is useful for validating «Terms of Service» acceptance or similar fields.
active_url
The field under validation must have a valid A or AAAA record according to the dns_get_record PHP function. The hostname of the provided URL is extracted using the parse_url PHP function before being passed to dns_get_record.
after:date
The field under validation must be a value after a given date. The dates will be passed into the strtotime PHP function in order to be converted to a valid DateTime instance:
'start_date' => 'required|date|after:tomorrow'
Instead of passing a date string to be evaluated by strtotime, you may specify another field to compare against the date:
'finish_date' => 'required|date|after:start_date'
after_or_equal:date
The field under validation must be a value after or equal to the given date. For more information, see the after rule.
alpha
The field under validation must be entirely Unicode alphabetic characters contained in p{L} and p{M}.
To restrict this validation rule to characters in the ASCII range (a-z and A-Z), you may provide the ascii option to the validation rule:
'username' => 'alpha:ascii',
alpha_dash
The field under validation must be entirely Unicode alpha-numeric characters contained in p{L}, p{M}, p{N}, as well as ASCII dashes (-) and ASCII underscores (_).
To restrict this validation rule to characters in the ASCII range (a-z and A-Z), you may provide the ascii option to the validation rule:
'username' => 'alpha_dash:ascii',
alpha_num
The field under validation must be entirely Unicode alpha-numeric characters contained in p{L}, p{M}, and p{N}.
To restrict this validation rule to characters in the ASCII range (a-z and A-Z), you may provide the ascii option to the validation rule:
'username' => 'alpha_num:ascii',
array
The field under validation must be a PHP array.
When additional values are provided to the array rule, each key in the input array must be present within the list of values provided to the rule. In the following example, the admin key in the input array is invalid since it is not contained in the list of values provided to the array rule:
use IlluminateSupportFacadesValidator;
$input = [
'user' => [
'name' => 'Taylor Otwell',
'username' => 'taylorotwell',
'admin' => true,
],
];
Validator::make($input, [
'user' => 'array:name,username',
]);
In general, you should always specify the array keys that are allowed to be present within your array.
ascii
The field under validation must be entirely 7-bit ASCII characters.
bail
Stop running validation rules for the field after the first validation failure.
While the bail rule will only stop validating a specific field when it encounters a validation failure, the stopOnFirstFailure method will inform the validator that it should stop validating all attributes once a single validation failure has occurred:
if ($validator->stopOnFirstFailure()->fails()) {
// ...
}
before:date
The field under validation must be a value preceding the given date. The dates will be passed into the PHP strtotime function in order to be converted into a valid DateTime instance. In addition, like the after rule, the name of another field under validation may be supplied as the value of date.
before_or_equal:date
The field under validation must be a value preceding or equal to the given date. The dates will be passed into the PHP strtotime function in order to be converted into a valid DateTime instance. In addition, like the after rule, the name of another field under validation may be supplied as the value of date.
between:min,max
The field under validation must have a size between the given min and max (inclusive). Strings, numerics, arrays, and files are evaluated in the same fashion as the size rule.
boolean
The field under validation must be able to be cast as a boolean. Accepted input are true, false, 1, 0, "1", and "0".
confirmed
The field under validation must have a matching field of {field}_confirmation. For example, if the field under validation is password, a matching password_confirmation field must be present in the input.
current_password
The field under validation must match the authenticated user’s password. You may specify an authentication guard using the rule’s first parameter:
'password' => 'current_password:api'
date
The field under validation must be a valid, non-relative date according to the strtotime PHP function.
date_equals:date
The field under validation must be equal to the given date. The dates will be passed into the PHP strtotime function in order to be converted into a valid DateTime instance.
date_format:format,…
The field under validation must match one of the given formats. You should use either date or date_format when validating a field, not both. This validation rule supports all formats supported by PHP’s DateTime class.
decimal:min,max
The field under validation must be numeric and must contain the specified number of decimal places:
// Must have exactly two decimal places (9.99)...
'price' => 'decimal:2'
// Must have between 2 and 4 decimal places...
'price' => 'decimal:2,4'
declined
The field under validation must be "no", "off", 0, or false.
declined_if:anotherfield,value,…
The field under validation must be "no", "off", 0, or false if another field under validation is equal to a specified value.
different:field
The field under validation must have a different value than field.
digits:value
The integer under validation must have an exact length of value.
digits_between:min,max
The integer validation must have a length between the given min and max.
dimensions
The file under validation must be an image meeting the dimension constraints as specified by the rule’s parameters:
'avatar' => 'dimensions:min_width=100,min_height=200'
Available constraints are: min_width, max_width, min_height, max_height, width, height, ratio.
A ratio constraint should be represented as width divided by height. This can be specified either by a fraction like 3/2 or a float like 1.5:
'avatar' => 'dimensions:ratio=3/2'
Since this rule requires several arguments, you may use the Rule::dimensions method to fluently construct the rule:
use IlluminateSupportFacadesValidator;
use IlluminateValidationRule;
Validator::make($data, [
'avatar' => [
'required',
Rule::dimensions()->maxWidth(1000)->maxHeight(500)->ratio(3 / 2),
],
]);
distinct
When validating arrays, the field under validation must not have any duplicate values:
'foo.*.id' => 'distinct'
Distinct uses loose variable comparisons by default. To use strict comparisons, you may add the strict parameter to your validation rule definition:
'foo.*.id' => 'distinct:strict'
You may add ignore_case to the validation rule’s arguments to make the rule ignore capitalization differences:
'foo.*.id' => 'distinct:ignore_case'
doesnt_start_with:foo,bar,…
The field under validation must not start with one of the given values.
doesnt_end_with:foo,bar,…
The field under validation must not end with one of the given values.
The field under validation must be formatted as an email address. This validation rule utilizes the egulias/email-validator package for validating the email address. By default, the RFCValidation validator is applied, but you can apply other validation styles as well:
'email' => 'email:rfc,dns'
The example above will apply the RFCValidation and DNSCheckValidation validations. Here’s a full list of validation styles you can apply:
-
rfc:RFCValidation -
strict:NoRFCWarningsValidation -
dns:DNSCheckValidation -
spoof:SpoofCheckValidation -
filter:FilterEmailValidation -
filter_unicode:FilterEmailValidation::unicode()
The filter validator, which uses PHP’s filter_var function, ships with Laravel and was Laravel’s default email validation behavior prior to Laravel version 5.8.
Warning
Thednsandspoofvalidators require the PHPintlextension.
ends_with:foo,bar,…
The field under validation must end with one of the given values.
enum
The Enum rule is a class based rule that validates whether the field under validation contains a valid enum value. The Enum rule accepts the name of the enum as its only constructor argument:
use AppEnumsServerStatus;
use IlluminateValidationRulesEnum;
$request->validate([
'status' => [new Enum(ServerStatus::class)],
]);
Warning
Enums are only available on PHP 8.1+.
exclude
The field under validation will be excluded from the request data returned by the validate and validated methods.
exclude_if:anotherfield,value
The field under validation will be excluded from the request data returned by the validate and validated methods if the anotherfield field is equal to value.
If complex conditional exclusion logic is required, you may utilize the Rule::excludeIf method. This method accepts a boolean or a closure. When given a closure, the closure should return true or false to indicate if the field under validation should be excluded:
use IlluminateSupportFacadesValidator;
use IlluminateValidationRule;
Validator::make($request->all(), [
'role_id' => Rule::excludeIf($request->user()->is_admin),
]);
Validator::make($request->all(), [
'role_id' => Rule::excludeIf(fn () => $request->user()->is_admin),
]);
exclude_unless:anotherfield,value
The field under validation will be excluded from the request data returned by the validate and validated methods unless anotherfield‘s field is equal to value. If value is null (exclude_unless:name,null), the field under validation will be excluded unless the comparison field is null or the comparison field is missing from the request data.
exclude_with:anotherfield
The field under validation will be excluded from the request data returned by the validate and validated methods if the anotherfield field is present.
exclude_without:anotherfield
The field under validation will be excluded from the request data returned by the validate and validated methods if the anotherfield field is not present.
exists:table,column
The field under validation must exist in a given database table.
Basic Usage Of Exists Rule
'state' => 'exists:states'
If the column option is not specified, the field name will be used. So, in this case, the rule will validate that the states database table contains a record with a state column value matching the request’s state attribute value.
Specifying A Custom Column Name
You may explicitly specify the database column name that should be used by the validation rule by placing it after the database table name:
'state' => 'exists:states,abbreviation'
Occasionally, you may need to specify a specific database connection to be used for the exists query. You can accomplish this by prepending the connection name to the table name:
'email' => 'exists:connection.staff,email'
Instead of specifying the table name directly, you may specify the Eloquent model which should be used to determine the table name:
'user_id' => 'exists:AppModelsUser,id'
If you would like to customize the query executed by the validation rule, you may use the Rule class to fluently define the rule. In this example, we’ll also specify the validation rules as an array instead of using the | character to delimit them:
use IlluminateSupportFacadesValidator;
use IlluminateValidationRule;
Validator::make($data, [
'email' => [
'required',
Rule::exists('staff')->where(function ($query) {
return $query->where('account_id', 1);
}),
],
]);
You may explicitly specify the database column name that should be used by the exists rule generated by the Rule::exists method by providing the column name as the second argument to the exists method:
'state' => Rule::exists('states', 'abbreviation'),
file
The field under validation must be a successfully uploaded file.
filled
The field under validation must not be empty when it is present.
gt:field
The field under validation must be greater than the given field. The two fields must be of the same type. Strings, numerics, arrays, and files are evaluated using the same conventions as the size rule.
gte:field
The field under validation must be greater than or equal to the given field. The two fields must be of the same type. Strings, numerics, arrays, and files are evaluated using the same conventions as the size rule.
image
The file under validation must be an image (jpg, jpeg, png, bmp, gif, svg, or webp).
in:foo,bar,…
The field under validation must be included in the given list of values. Since this rule often requires you to implode an array, the Rule::in method may be used to fluently construct the rule:
use IlluminateSupportFacadesValidator;
use IlluminateValidationRule;
Validator::make($data, [
'zones' => [
'required',
Rule::in(['first-zone', 'second-zone']),
],
]);
When the in rule is combined with the array rule, each value in the input array must be present within the list of values provided to the in rule. In the following example, the LAS airport code in the input array is invalid since it is not contained in the list of airports provided to the in rule:
use IlluminateSupportFacadesValidator;
use IlluminateValidationRule;
$input = [
'airports' => ['NYC', 'LAS'],
];
Validator::make($input, [
'airports' => [
'required',
'array',
],
'airports.*' => Rule::in(['NYC', 'LIT']),
]);
in_array:anotherfield.*
The field under validation must exist in anotherfield‘s values.
integer
The field under validation must be an integer.
Warning
This validation rule does not verify that the input is of the «integer» variable type, only that the input is of a type accepted by PHP’sFILTER_VALIDATE_INTrule. If you need to validate the input as being a number please use this rule in combination with thenumericvalidation rule.
ip
The field under validation must be an IP address.
ipv4
The field under validation must be an IPv4 address.
ipv6
The field under validation must be an IPv6 address.
json
The field under validation must be a valid JSON string.
lt:field
The field under validation must be less than the given field. The two fields must be of the same type. Strings, numerics, arrays, and files are evaluated using the same conventions as the size rule.
lte:field
The field under validation must be less than or equal to the given field. The two fields must be of the same type. Strings, numerics, arrays, and files are evaluated using the same conventions as the size rule.
lowercase
The field under validation must be lowercase.
mac_address
The field under validation must be a MAC address.
max:value
The field under validation must be less than or equal to a maximum value. Strings, numerics, arrays, and files are evaluated in the same fashion as the size rule.
max_digits:value
The integer under validation must have a maximum length of value.
mimetypes:text/plain,…
The file under validation must match one of the given MIME types:
'video' => 'mimetypes:video/avi,video/mpeg,video/quicktime'
To determine the MIME type of the uploaded file, the file’s contents will be read and the framework will attempt to guess the MIME type, which may be different from the client’s provided MIME type.
mimes:foo,bar,…
The file under validation must have a MIME type corresponding to one of the listed extensions.
Basic Usage Of MIME Rule
'photo' => 'mimes:jpg,bmp,png'
Even though you only need to specify the extensions, this rule actually validates the MIME type of the file by reading the file’s contents and guessing its MIME type. A full listing of MIME types and their corresponding extensions may be found at the following location:
https://svn.apache.org/repos/asf/httpd/httpd/trunk/docs/conf/mime.types
min:value
The field under validation must have a minimum value. Strings, numerics, arrays, and files are evaluated in the same fashion as the size rule.
min_digits:value
The integer under validation must have a minimum length of value.
multiple_of:value
The field under validation must be a multiple of value.
missing
The field under validation must not be present in the input data.
missing_if:anotherfield,value,…
The field under validation must not be present if the anotherfield field is equal to any value.
missing_unless:anotherfield,value
The field under validation must not be present unless the anotherfield field is equal to any value.
missing_with:foo,bar,…
The field under validation must not be present only if any of the other specified fields are present.
missing_with_all:foo,bar,…
The field under validation must not be present only if all of the other specified fields are present.
not_in:foo,bar,…
The field under validation must not be included in the given list of values. The Rule::notIn method may be used to fluently construct the rule:
use IlluminateValidationRule;
Validator::make($data, [
'toppings' => [
'required',
Rule::notIn(['sprinkles', 'cherries']),
],
]);
not_regex:pattern
The field under validation must not match the given regular expression.
Internally, this rule uses the PHP preg_match function. The pattern specified should obey the same formatting required by preg_match and thus also include valid delimiters. For example: 'email' => 'not_regex:/^.+$/i'.
Warning
When using theregex/not_regexpatterns, it may be necessary to specify your validation rules using an array instead of using|delimiters, especially if the regular expression contains a|character.
nullable
The field under validation may be null.
numeric
The field under validation must be numeric.
password
The field under validation must match the authenticated user’s password.
Warning
This rule was renamed tocurrent_passwordwith the intention of removing it in Laravel 9. Please use the Current Password rule instead.
present
The field under validation must exist in the input data.
prohibited
The field under validation must be missing or empty. A field is «empty» if it meets one of the following criteria:
- The value is
null. - The value is an empty string.
- The value is an empty array or empty
Countableobject. - The value is an uploaded file with an empty path.
prohibited_if:anotherfield,value,…
The field under validation must be missing or empty if the anotherfield field is equal to any value. A field is «empty» if it meets one of the following criteria:
- The value is
null. - The value is an empty string.
- The value is an empty array or empty
Countableobject. - The value is an uploaded file with an empty path.
If complex conditional prohibition logic is required, you may utilize the Rule::prohibitedIf method. This method accepts a boolean or a closure. When given a closure, the closure should return true or false to indicate if the field under validation should be prohibited:
use IlluminateSupportFacadesValidator;
use IlluminateValidationRule;
Validator::make($request->all(), [
'role_id' => Rule::prohibitedIf($request->user()->is_admin),
]);
Validator::make($request->all(), [
'role_id' => Rule::prohibitedIf(fn () => $request->user()->is_admin),
]);
prohibited_unless:anotherfield,value,…
The field under validation must be missing or empty unless the anotherfield field is equal to any value. A field is «empty» if it meets one of the following criteria:
- The value is
null. - The value is an empty string.
- The value is an empty array or empty
Countableobject. - The value is an uploaded file with an empty path.
prohibits:anotherfield,…
If the field under validation is not missing or empty, all fields in anotherfield must be missing or empty. A field is «empty» if it meets one of the following criteria:
- The value is
null. - The value is an empty string.
- The value is an empty array or empty
Countableobject. - The value is an uploaded file with an empty path.
regex:pattern
The field under validation must match the given regular expression.
Internally, this rule uses the PHP preg_match function. The pattern specified should obey the same formatting required by preg_match and thus also include valid delimiters. For example: 'email' => 'regex:/^[email protected]+$/i'.
Warning
When using theregex/not_regexpatterns, it may be necessary to specify rules in an array instead of using|delimiters, especially if the regular expression contains a|character.
required
The field under validation must be present in the input data and not empty. A field is «empty» if it meets one of the following criteria:
- The value is
null. - The value is an empty string.
- The value is an empty array or empty
Countableobject. - The value is an uploaded file with no path.
required_if:anotherfield,value,…
The field under validation must be present and not empty if the anotherfield field is equal to any value.
If you would like to construct a more complex condition for the required_if rule, you may use the Rule::requiredIf method. This method accepts a boolean or a closure. When passed a closure, the closure should return true or false to indicate if the field under validation is required:
use IlluminateSupportFacadesValidator;
use IlluminateValidationRule;
Validator::make($request->all(), [
'role_id' => Rule::requiredIf($request->user()->is_admin),
]);
Validator::make($request->all(), [
'role_id' => Rule::requiredIf(fn () => $request->user()->is_admin),
]);
required_unless:anotherfield,value,…
The field under validation must be present and not empty unless the anotherfield field is equal to any value. This also means anotherfield must be present in the request data unless value is null. If value is null (required_unless:name,null), the field under validation will be required unless the comparison field is null or the comparison field is missing from the request data.
required_with:foo,bar,…
The field under validation must be present and not empty only if any of the other specified fields are present and not empty.
required_with_all:foo,bar,…
The field under validation must be present and not empty only if all of the other specified fields are present and not empty.
required_without:foo,bar,…
The field under validation must be present and not empty only when any of the other specified fields are empty or not present.
required_without_all:foo,bar,…
The field under validation must be present and not empty only when all of the other specified fields are empty or not present.
required_array_keys:foo,bar,…
The field under validation must be an array and must contain at least the specified keys.
same:field
The given field must match the field under validation.
size:value
The field under validation must have a size matching the given value. For string data, value corresponds to the number of characters. For numeric data, value corresponds to a given integer value (the attribute must also have the numeric or integer rule). For an array, size corresponds to the count of the array. For files, size corresponds to the file size in kilobytes. Let’s look at some examples:
// Validate that a string is exactly 12 characters long...
'title' => 'size:12';
// Validate that a provided integer equals 10...
'seats' => 'integer|size:10';
// Validate that an array has exactly 5 elements...
'tags' => 'array|size:5';
// Validate that an uploaded file is exactly 512 kilobytes...
'image' => 'file|size:512';
starts_with:foo,bar,…
The field under validation must start with one of the given values.
string
The field under validation must be a string. If you would like to allow the field to also be null, you should assign the nullable rule to the field.
timezone
The field under validation must be a valid timezone identifier according to the timezone_identifiers_list PHP function.
unique:table,column
The field under validation must not exist within the given database table.
Specifying A Custom Table / Column Name:
Instead of specifying the table name directly, you may specify the Eloquent model which should be used to determine the table name:
'email' => 'unique:AppModelsUser,email_address'
The column option may be used to specify the field’s corresponding database column. If the column option is not specified, the name of the field under validation will be used.
'email' => 'unique:users,email_address'
Specifying A Custom Database Connection
Occasionally, you may need to set a custom connection for database queries made by the Validator. To accomplish this, you may prepend the connection name to the table name:
'email' => 'unique:connection.users,email_address'
Forcing A Unique Rule To Ignore A Given ID:
Sometimes, you may wish to ignore a given ID during unique validation. For example, consider an «update profile» screen that includes the user’s name, email address, and location. You will probably want to verify that the email address is unique. However, if the user only changes the name field and not the email field, you do not want a validation error to be thrown because the user is already the owner of the email address in question.
To instruct the validator to ignore the user’s ID, we’ll use the Rule class to fluently define the rule. In this example, we’ll also specify the validation rules as an array instead of using the | character to delimit the rules:
use IlluminateSupportFacadesValidator;
use IlluminateValidationRule;
Validator::make($data, [
'email' => [
'required',
Rule::unique('users')->ignore($user->id),
],
]);
Warning
You should never pass any user controlled request input into theignoremethod. Instead, you should only pass a system generated unique ID such as an auto-incrementing ID or UUID from an Eloquent model instance. Otherwise, your application will be vulnerable to an SQL injection attack.
Instead of passing the model key’s value to the ignore method, you may also pass the entire model instance. Laravel will automatically extract the key from the model:
Rule::unique('users')->ignore($user)
If your table uses a primary key column name other than id, you may specify the name of the column when calling the ignore method:
Rule::unique('users')->ignore($user->id, 'user_id')
By default, the unique rule will check the uniqueness of the column matching the name of the attribute being validated. However, you may pass a different column name as the second argument to the unique method:
Rule::unique('users', 'email_address')->ignore($user->id),
Adding Additional Where Clauses:
You may specify additional query conditions by customizing the query using the where method. For example, let’s add a query condition that scopes the query to only search records that have an account_id column value of 1:
'email' => Rule::unique('users')->where(fn ($query) => $query->where('account_id', 1))
uppercase
The field under validation must be uppercase.
url
The field under validation must be a valid URL.
ulid
The field under validation must be a valid Universally Unique Lexicographically Sortable Identifier (ULID).
uuid
The field under validation must be a valid RFC 4122 (version 1, 3, 4, or 5) universally unique identifier (UUID).
Conditionally Adding Rules
Skipping Validation When Fields Have Certain Values
You may occasionally wish to not validate a given field if another field has a given value. You may accomplish this using the exclude_if validation rule. In this example, the appointment_date and doctor_name fields will not be validated if the has_appointment field has a value of false:
use IlluminateSupportFacadesValidator;
$validator = Validator::make($data, [
'has_appointment' => 'required|boolean',
'appointment_date' => 'exclude_if:has_appointment,false|required|date',
'doctor_name' => 'exclude_if:has_appointment,false|required|string',
]);
Alternatively, you may use the exclude_unless rule to not validate a given field unless another field has a given value:
$validator = Validator::make($data, [
'has_appointment' => 'required|boolean',
'appointment_date' => 'exclude_unless:has_appointment,true|required|date',
'doctor_name' => 'exclude_unless:has_appointment,true|required|string',
]);
Validating When Present
In some situations, you may wish to run validation checks against a field only if that field is present in the data being validated. To quickly accomplish this, add the sometimes rule to your rule list:
$v = Validator::make($data, [
'email' => 'sometimes|required|email',
]);
In the example above, the email field will only be validated if it is present in the $data array.
Note
If you are attempting to validate a field that should always be present but may be empty, check out this note on optional fields.
Complex Conditional Validation
Sometimes you may wish to add validation rules based on more complex conditional logic. For example, you may wish to require a given field only if another field has a greater value than 100. Or, you may need two fields to have a given value only when another field is present. Adding these validation rules doesn’t have to be a pain. First, create a Validator instance with your static rules that never change:
use IlluminateSupportFacadesValidator;
$validator = Validator::make($request->all(), [
'email' => 'required|email',
'games' => 'required|numeric',
]);
Let’s assume our web application is for game collectors. If a game collector registers with our application and they own more than 100 games, we want them to explain why they own so many games. For example, perhaps they run a game resale shop, or maybe they just enjoy collecting games. To conditionally add this requirement, we can use the sometimes method on the Validator instance.
$validator->sometimes('reason', 'required|max:500', function ($input) {
return $input->games >= 100;
});
The first argument passed to the sometimes method is the name of the field we are conditionally validating. The second argument is a list of the rules we want to add. If the closure passed as the third argument returns true, the rules will be added. This method makes it a breeze to build complex conditional validations. You may even add conditional validations for several fields at once:
$validator->sometimes(['reason', 'cost'], 'required', function ($input) {
return $input->games >= 100;
});
Note
The$inputparameter passed to your closure will be an instance ofIlluminateSupportFluentand may be used to access your input and files under validation.
Complex Conditional Array Validation
Sometimes you may want to validate a field based on another field in the same nested array whose index you do not know. In these situations, you may allow your closure to receive a second argument which will be the current individual item in the array being validated:
$input = [
'channels' => [
[
'type' => 'email',
'address' => '[email protected]',
],
[
'type' => 'url',
'address' => 'https://example.com',
],
],
];
$validator->sometimes('channels.*.address', 'email', function ($input, $item) {
return $item->type === 'email';
});
$validator->sometimes('channels.*.address', 'url', function ($input, $item) {
return $item->type !== 'email';
});
Like the $input parameter passed to the closure, the $item parameter is an instance of IlluminateSupportFluent when the attribute data is an array; otherwise, it is a string.
Validating Arrays
As discussed in the array validation rule documentation, the array rule accepts a list of allowed array keys. If any additional keys are present within the array, validation will fail:
use IlluminateSupportFacadesValidator;
$input = [
'user' => [
'name' => 'Taylor Otwell',
'username' => 'taylorotwell',
'admin' => true,
],
];
Validator::make($input, [
'user' => 'array:username,locale',
]);
In general, you should always specify the array keys that are allowed to be present within your array. Otherwise, the validator’s validate and validated methods will return all of the validated data, including the array and all of its keys, even if those keys were not validated by other nested array validation rules.
Validating Nested Array Input
Validating nested array based form input fields doesn’t have to be a pain. You may use «dot notation» to validate attributes within an array. For example, if the incoming HTTP request contains a photos[profile] field, you may validate it like so:
use IlluminateSupportFacadesValidator;
$validator = Validator::make($request->all(), [
'photos.profile' => 'required|image',
]);
You may also validate each element of an array. For example, to validate that each email in a given array input field is unique, you may do the following:
$validator = Validator::make($request->all(), [
'person.*.email' => 'email|unique:users',
'person.*.first_name' => 'required_with:person.*.last_name',
]);
Likewise, you may use the * character when specifying custom validation messages in your language files, making it a breeze to use a single validation message for array based fields:
'custom' => [
'person.*.email' => [
'unique' => 'Each person must have a unique email address',
]
],
Accessing Nested Array Data
Sometimes you may need to access the value for a given nested array element when assigning validation rules to the attribute. You may accomplish this using the Rule::forEach method. The forEach method accepts a closure that will be invoked for each iteration of the array attribute under validation and will receive the attribute’s value and explicit, fully-expanded attribute name. The closure should return an array of rules to assign to the array element:
use AppRulesHasPermission;
use IlluminateSupportFacadesValidator;
use IlluminateValidationRule;
$validator = Validator::make($request->all(), [
'companies.*.id' => Rule::forEach(function ($value, $attribute) {
return [
Rule::exists(Company::class, 'id'),
new HasPermission('manage-company', $value),
];
}),
]);
Error Message Indexes & Positions
When validating arrays, you may want to reference the index or position of a particular item that failed validation within the error message displayed by your application. To accomplish this, you may include the :index (starts from 0) and :position (starts from 1) placeholders within your custom validation message:
use IlluminateSupportFacadesValidator;
$input = [
'photos' => [
[
'name' => 'BeachVacation.jpg',
'description' => 'A photo of my beach vacation!',
],
[
'name' => 'GrandCanyon.jpg',
'description' => '',
],
],
];
Validator::validate($input, [
'photos.*.description' => 'required',
], [
'photos.*.description.required' => 'Please describe photo #:position.',
]);
Given the example above, validation will fail and the user will be presented with the following error of «Please describe photo #2.»
Validating Files
Laravel provides a variety of validation rules that may be used to validate uploaded files, such as mimes, image, min, and max. While you are free to specify these rules individually when validating files, Laravel also offers a fluent file validation rule builder that you may find convenient:
use IlluminateSupportFacadesValidator;
use IlluminateValidationRulesFile;
Validator::validate($input, [
'attachment' => [
'required',
File::types(['mp3', 'wav'])
->min(1024)
->max(12 * 1024),
],
]);
If your application accepts images uploaded by your users, you may use the File rule’s image constructor method to indicate that the uploaded file should be an image. In addition, the dimensions rule may be used to limit the dimensions of the image:
use IlluminateSupportFacadesValidator;
use IlluminateValidationRulesFile;
Validator::validate($input, [
'photo' => [
'required',
File::image()
->min(1024)
->max(12 * 1024)
->dimensions(Rule::dimensions()->maxWidth(1000)->maxHeight(500)),
],
]);
Note
More information regarding validating image dimensions may be found in the dimension rule documentation.
File Types
Even though you only need to specify the extensions when invoking the types method, this method actually validates the MIME type of the file by reading the file’s contents and guessing its MIME type. A full listing of MIME types and their corresponding extensions may be found at the following location:
https://svn.apache.org/repos/asf/httpd/httpd/trunk/docs/conf/mime.types
Validating Passwords
To ensure that passwords have an adequate level of complexity, you may use Laravel’s Password rule object:
use IlluminateSupportFacadesValidator;
use IlluminateValidationRulesPassword;
$validator = Validator::make($request->all(), [
'password' => ['required', 'confirmed', Password::min(8)],
]);
The Password rule object allows you to easily customize the password complexity requirements for your application, such as specifying that passwords require at least one letter, number, symbol, or characters with mixed casing:
// Require at least 8 characters...
Password::min(8)
// Require at least one letter...
Password::min(8)->letters()
// Require at least one uppercase and one lowercase letter...
Password::min(8)->mixedCase()
// Require at least one number...
Password::min(8)->numbers()
// Require at least one symbol...
Password::min(8)->symbols()
In addition, you may ensure that a password has not been compromised in a public password data breach leak using the uncompromised method:
Password::min(8)->uncompromised()
Internally, the Password rule object uses the k-Anonymity model to determine if a password has been leaked via the haveibeenpwned.com service without sacrificing the user’s privacy or security.
By default, if a password appears at least once in a data leak, it will be considered compromised. You can customize this threshold using the first argument of the uncompromised method:
// Ensure the password appears less than 3 times in the same data leak...
Password::min(8)->uncompromised(3);
Of course, you may chain all the methods in the examples above:
Password::min(8)
->letters()
->mixedCase()
->numbers()
->symbols()
->uncompromised()
Defining Default Password Rules
You may find it convenient to specify the default validation rules for passwords in a single location of your application. You can easily accomplish this using the Password::defaults method, which accepts a closure. The closure given to the defaults method should return the default configuration of the Password rule. Typically, the defaults rule should be called within the boot method of one of your application’s service providers:
use IlluminateValidationRulesPassword;
/**
* Bootstrap any application services.
*
* @return void
*/
public function boot()
{
Password::defaults(function () {
$rule = Password::min(8);
return $this->app->isProduction()
? $rule->mixedCase()->uncompromised()
: $rule;
});
}
Then, when you would like to apply the default rules to a particular password undergoing validation, you may invoke the defaults method with no arguments:
'password' => ['required', Password::defaults()],
Occasionally, you may want to attach additional validation rules to your default password validation rules. You may use the rules method to accomplish this:
use AppRulesZxcvbnRule;
Password::defaults(function () {
$rule = Password::min(8)->rules([new ZxcvbnRule]);
// ...
});
Custom Validation Rules
Using Rule Objects
Laravel provides a variety of helpful validation rules; however, you may wish to specify some of your own. One method of registering custom validation rules is using rule objects. To generate a new rule object, you may use the make:rule Artisan command. Let’s use this command to generate a rule that verifies a string is uppercase. Laravel will place the new rule in the app/Rules directory. If this directory does not exist, Laravel will create it when you execute the Artisan command to create your rule:
php artisan make:rule Uppercase --invokable
Once the rule has been created, we are ready to define its behavior. A rule object contains a single method: __invoke. This method receives the attribute name, its value, and a callback that should be invoked on failure with the validation error message:
<?php
namespace AppRules;
use IlluminateContractsValidationInvokableRule;
class Uppercase implements InvokableRule
{
/**
* Run the validation rule.
*
* @param string $attribute
* @param mixed $value
* @param Closure $fail
* @return void
*/
public function __invoke($attribute, $value, $fail)
{
if (strtoupper($value) !== $value) {
$fail('The :attribute must be uppercase.');
}
}
}
Once the rule has been defined, you may attach it to a validator by passing an instance of the rule object with your other validation rules:
use AppRulesUppercase;
$request->validate([
'name' => ['required', 'string', new Uppercase],
]);
Translating Validation Messages
Instead of providing a literal error message to the $fail closure, you may also provide a translation string key and instruct Laravel to translate the error message:
if (strtoupper($value) !== $value) {
$fail('validation.uppercase')->translate();
}
If necessary, you may provide placeholder replacements and the preferred language as the first and second arguments to the translate method:
$fail('validation.location')->translate([
'value' => $this->value,
], 'fr')
Accessing Additional Data
If your custom validation rule class needs to access all of the other data undergoing validation, your rule class may implement the IlluminateContractsValidationDataAwareRule interface. This interface requires your class to define a setData method. This method will automatically be invoked by Laravel (before validation proceeds) with all of the data under validation:
<?php
namespace AppRules;
use IlluminateContractsValidationDataAwareRule;
use IlluminateContractsValidationInvokableRule;
class Uppercase implements DataAwareRule, InvokableRule
{
/**
* All of the data under validation.
*
* @var array
*/
protected $data = [];
// ...
/**
* Set the data under validation.
*
* @param array $data
* @return $this
*/
public function setData($data)
{
$this->data = $data;
return $this;
}
}
Or, if your validation rule requires access to the validator instance performing the validation, you may implement the ValidatorAwareRule interface:
<?php
namespace AppRules;
use IlluminateContractsValidationInvokableRule;
use IlluminateContractsValidationValidatorAwareRule;
class Uppercase implements InvokableRule, ValidatorAwareRule
{
/**
* The validator instance.
*
* @var IlluminateValidationValidator
*/
protected $validator;
// ...
/**
* Set the current validator.
*
* @param IlluminateValidationValidator $validator
* @return $this
*/
public function setValidator($validator)
{
$this->validator = $validator;
return $this;
}
}
Using Closures
If you only need the functionality of a custom rule once throughout your application, you may use a closure instead of a rule object. The closure receives the attribute’s name, the attribute’s value, and a $fail callback that should be called if validation fails:
use IlluminateSupportFacadesValidator;
$validator = Validator::make($request->all(), [
'title' => [
'required',
'max:255',
function ($attribute, $value, $fail) {
if ($value === 'foo') {
$fail('The '.$attribute.' is invalid.');
}
},
],
]);
Implicit Rules
By default, when an attribute being validated is not present or contains an empty string, normal validation rules, including custom rules, are not run. For example, the unique rule will not be run against an empty string:
use IlluminateSupportFacadesValidator;
$rules = ['name' => 'unique:users,name'];
$input = ['name' => ''];
Validator::make($input, $rules)->passes(); // true
For a custom rule to run even when an attribute is empty, the rule must imply that the attribute is required. To quickly generate a new implicit rule object, you may use the make:rule Artisan command with the --implicit option:
php artisan make:rule Uppercase --invokable --implicit
Warning
An «implicit» rule only implies that the attribute is required. Whether it actually invalidates a missing or empty attribute is up to you.
For Laravel 8
go to your appExceptionsHandler.php and override invalidJson method like this:
// Add this line at the top of the class
use IlluminateValidationValidationException;


/**
 * Convert a validation exception into a JSON response.
 *
 * @param  IlluminateHttpRequest  $request
 * @param  IlluminateValidationValidationException  $exception
 * @return IlluminateHttpJsonResponse
 */
protected function invalidJson($request, ValidationException $exception)
{
    // You can return json response with your custom form
    return response()->json([
        'success' => false,
        'data' => [
            'code' => $exception->status,
            'message' => $exception->getMessage(),
            'errors' => $exception->errors()
        ]
    ], $exception->status);
}
Response Sample:
{
  "success": false,
  "data": {
    "code": 422,
    "message": "The given data was invalid.",
    "errors": {
      "password": [
        "The password field is required."
      ]
    }
  }
}
The original method was:
/**
 * Convert a validation exception into a JSON response.
 *
 * @param  IlluminateHttpRequest  $request
 * @param  IlluminateValidationValidationException  $exception
 * @return IlluminateHttpJsonResponse
 */
protected function invalidJson($request, ValidationException $exception)
{
    return response()->json([
        'message' => $exception->getMessage(),
        'errors' => $exception->errors(),
    ], $exception->status);
}
Response Sample:
{
  "message": "The given data was invalid.",
  "errors": {
    "password": [
      "The password field is required."
    ]
  }
}
Note that unauthenticated response is in separate method, so you can override it as well
/**
 * Convert an authentication exception into a response.
 *
 * @param  IlluminateHttpRequest  $request
 * @param  IlluminateAuthAuthenticationException  $exception
 * @return SymfonyComponentHttpFoundationResponse
 */
protected function unauthenticated($request, AuthenticationException $exception)
{
    return $request->expectsJson()
        // Here you can change the form of the json response
        ? response()->json(['message' => $exception->getMessage()], 401) // <-
        : redirect()->guest($exception->redirectTo() ?? route('login'));
}
- Introduction
- Configuration
-
The Exception Handler
- Reporting Exceptions
- Exception Log Levels
- Ignoring Exceptions By Type
- Rendering Exceptions
- Reportable & Renderable Exceptions
-
HTTP Exceptions
- Custom HTTP Error Pages
Introduction
When you start a new Laravel project, error and exception handling is already configured for you. The AppExceptionsHandler class is where all exceptions thrown by your application are logged and then rendered to the user. We’ll dive deeper into this class throughout this documentation.
Configuration
The debug option in your config/app.php configuration file determines how much information about an error is actually displayed to the user. By default, this option is set to respect the value of the APP_DEBUG environment variable, which is stored in your .env file.
During local development, you should set the APP_DEBUG environment variable to true. In your production environment, this value should always be false. If the value is set to true in production, you risk exposing sensitive configuration values to your application’s end users.
The Exception Handler
Reporting Exceptions
All exceptions are handled by the AppExceptionsHandler class. This class contains a register method where you may register custom exception reporting and rendering callbacks. We’ll examine each of these concepts in detail. Exception reporting is used to log exceptions or send them to an external service like Flare, Bugsnag or Sentry. By default, exceptions will be logged based on your logging configuration. However, you are free to log exceptions however you wish.
For example, if you need to report different types of exceptions in different ways, you may use the reportable method to register a closure that should be executed when an exception of a given type needs to be reported. Laravel will deduce what type of exception the closure reports by examining the type-hint of the closure:
use AppExceptionsInvalidOrderException;

/**
 * Register the exception handling callbacks for the application.
 *
 * @return void
 */
public function register()
{
    $this->reportable(function (InvalidOrderException $e) {
        //
    });
}
When you register a custom exception reporting callback using the reportable method, Laravel will still log the exception using the default logging configuration for the application. If you wish to stop the propagation of the exception to the default logging stack, you may use the stop method when defining your reporting callback or return false from the callback:
$this->reportable(function (InvalidOrderException $e) {
    //
})->stop();

$this->reportable(function (InvalidOrderException $e) {
    return false;
});
Note
To customize the exception reporting for a given exception, you may also utilize reportable exceptions.
Global Log Context
If available, Laravel automatically adds the current user’s ID to every exception’s log message as contextual data. You may define your own global contextual data by overriding the context method of your application’s AppExceptionsHandler class. This information will be included in every exception’s log message written by your application:
/**
 * Get the default context variables for logging.
 *
 * @return array
 */
protected function context()
{
    return array_merge(parent::context(), [
        'foo' => 'bar',
    ]);
}
Exception Log Context
While adding context to every log message can be useful, sometimes a particular exception may have unique context that you would like to include in your logs. By defining a context method on one of your application’s custom exceptions, you may specify any data relevant to that exception that should be added to the exception’s log entry:
<?php

namespace AppExceptions;

use Exception;

class InvalidOrderException extends Exception
{
    // ...

    /**
     * Get the exception's context information.
     *
     * @return array
     */
    public function context()
    {
        return ['order_id' => $this->orderId];
    }
}
The report Helper
Sometimes you may need to report an exception but continue handling the current request. The report helper function allows you to quickly report an exception via the exception handler without rendering an error page to the user:
public function isValid($value)
{
    try {
        // Validate the value...
    } catch (Throwable $e) {
        report($e);

        return false;
    }
}
Exception Log Levels
When messages are written to your application’s logs, the messages are written at a specified log level, which indicates the severity or importance of the message being logged.
As noted above, even when you register a custom exception reporting callback using the reportable method, Laravel will still log the exception using the default logging configuration for the application; however, since the log level can sometimes influence the channels on which a message is logged, you may wish to configure the log level that certain exceptions are logged at.
To accomplish this, you may define an array of exception types and their associated log levels within the $levels property of your application’s exception handler:
use PDOException;
use PsrLogLogLevel;

/**
 * A list of exception types with their corresponding custom log levels.
 *
 * @var array<class-string<Throwable>, PsrLogLogLevel::*>
 */
protected $levels = [
    PDOException::class => LogLevel::CRITICAL,
];
Ignoring Exceptions By Type
When building your application, there will be some types of exceptions you simply want to ignore and never report. Your application’s exception handler contains a $dontReport property which is initialized to an empty array. Any classes that you add to this property will never be reported; however, they may still have custom rendering logic:
use AppExceptionsInvalidOrderException;

/**
 * A list of the exception types that are not reported.
 *
 * @var array<int, class-string<Throwable>>
 */
protected $dontReport = [
    InvalidOrderException::class,
];
Note
Behind the scenes, Laravel already ignores some types of errors for you, such as exceptions resulting from 404 HTTP «not found» errors or 419 HTTP responses generated by invalid CSRF tokens.
Rendering Exceptions
By default, the Laravel exception handler will convert exceptions into an HTTP response for you. However, you are free to register a custom rendering closure for exceptions of a given type. You may accomplish this via the renderable method of your exception handler.
The closure passed to the renderable method should return an instance of IlluminateHttpResponse, which may be generated via the response helper. Laravel will deduce what type of exception the closure renders by examining the type-hint of the closure:
use AppExceptionsInvalidOrderException;

/**
 * Register the exception handling callbacks for the application.
 *
 * @return void
 */
public function register()
{
    $this->renderable(function (InvalidOrderException $e, $request) {
        return response()->view('errors.invalid-order', [], 500);
    });
}
You may also use the renderable method to override the rendering behavior for built-in Laravel or Symfony exceptions such as NotFoundHttpException. If the closure given to the renderable method does not return a value, Laravel’s default exception rendering will be utilized:
use SymfonyComponentHttpKernelExceptionNotFoundHttpException;

/**
 * Register the exception handling callbacks for the application.
 *
 * @return void
 */
public function register()
{
    $this->renderable(function (NotFoundHttpException $e, $request) {
        if ($request->is('api/*')) {
            return response()->json([
                'message' => 'Record not found.'
            ], 404);
        }
    });
}
Reportable & Renderable Exceptions
Instead of type-checking exceptions in the exception handler’s register method, you may define report and render methods directly on your custom exceptions. When these methods exist, they will be automatically called by the framework:
<?php

namespace AppExceptions;

use Exception;

class InvalidOrderException extends Exception
{
    /**
     * Report the exception.
     *
     * @return bool|null
     */
    public function report()
    {
        //
    }

    /**
     * Render the exception into an HTTP response.
     *
     * @param  IlluminateHttpRequest  $request
     * @return IlluminateHttpResponse
     */
    public function render($request)
    {
        return response(/* ... */);
    }
}
If your exception extends an exception that is already renderable, such as a built-in Laravel or Symfony exception, you may return false from the exception’s render method to render the exception’s default HTTP response:
/**
 * Render the exception into an HTTP response.
 *
 * @param  IlluminateHttpRequest  $request
 * @return IlluminateHttpResponse
 */
public function render($request)
{
    // Determine if the exception needs custom rendering...

    return false;
}
If your exception contains custom reporting logic that is only necessary when certain conditions are met, you may need to instruct Laravel to sometimes report the exception using the default exception handling configuration. To accomplish this, you may return false from the exception’s report method:
/**
 * Report the exception.
 *
 * @return bool|null
 */
public function report()
{
    // Determine if the exception needs custom reporting...

    return false;
}
Note
You may type-hint any required dependencies of thereportmethod and they will automatically be injected into the method by Laravel’s service container.
HTTP Exceptions
Some exceptions describe HTTP error codes from the server. For example, this may be a «page not found» error (404), an «unauthorized error» (401) or even a developer generated 500 error. In order to generate such a response from anywhere in your application, you may use the abort helper:
abort(404);
Custom HTTP Error Pages
Laravel makes it easy to display custom error pages for various HTTP status codes. For example, if you wish to customize the error page for 404 HTTP status codes, create a resources/views/errors/404.blade.php view template. This view will be rendered on all 404 errors generated by your application. The views within this directory should be named to match the HTTP status code they correspond to. The SymfonyComponentHttpKernelExceptionHttpException instance raised by the abort function will be passed to the view as an $exception variable:
<h2>{{ $exception->getMessage() }}</h2>
You may publish Laravel’s default error page templates using the vendor:publish Artisan command. Once the templates have been published, you may customize them to your liking:
php artisan vendor:publish --tag=laravel-errors
Fallback HTTP Error Pages
You may also define a «fallback» error page for a given series of HTTP status codes. This page will be rendered if there is not a corresponding page for the specific HTTP status code that occurred. To accomplish this, define a 4xx.blade.php template and a 5xx.blade.php template in your application’s resources/views/errors directory.
After working with Laravel for a while and learning about its way of handling exception, I found myself creating my own exceptions, either to simplify some if/else statements or to terminate function calls or even features.
These custom exceptions come in handy, especially when combined with the throw_if and throw_unless functions, which provides a cleaner way of throwing conditional exceptions.
Content
- Understanding custom exception
-
Structuring custom exceptions
- Making exceptions simple and extensible
- Standardizing errors
- Creating the JsonEncodeException
Understanding custom exceptions
Laravel can handle custom exceptions automatically when the exception is created in a certain way. First, the exception has to extend the Exception class and then, in case you want to render something to the end user, you have to override the render() function.
If you need to create an exception that will extend a class that isn’t an Exception, Laravel won’t be able to automatically handle the exception and as a result, you will have to use a try/catch block.
Check the following code example to better understand how a custom exception can be defined.
<?php

namespace AppExceptions;

use Exception;
use IlluminateHttpResponse;

abstract class MyCustomException extends Exception
{

    public function render(Request $request): Response
    {
        $status = 400;
        $error = "Something is wrong";
        $help = "Contact the sales team to verify";

        return response(["error" => $error, "help" => $help], $status);
    }
}
Enter fullscreen mode
Exit fullscreen mode
The result, from the exception above, would render a response with HTTP status 400 and a JSON in the following format:
{
    "error": "Something is wrong",
    "help": "Contact the sales team to verify"
}
Enter fullscreen mode
Exit fullscreen mode
To test this example, and validate the rendered JSON, you can use plain PHP to throw the exception just like this throw new MyCustomException();
Structuring custom exceptions
Even though the creation of custom exceptions is pretty straightforward, It’s possible to design a more robust architecture around exceptions. The design that will be presented in this post has two premises.
1) Making exceptions simple and extensible.
2) Standardize the way error responses are shown.
For them to be simpler and more extensible, we need to define a structure from where every custom exception can derive from.
As for standardizing them, it’s required to define how the error will be shown to the end user, and it is important to display your errors in a single structured manner. Otherwise, front-end applications, or other APIs integrating with yours, won’t be able to trust your error responses and this kind of applications are just horrible to work with.
Making exceptions simple and extensible
So, how can we implement custom exceptions in a way that we can enforce that every exception will comply with the appropriate status code, error, message and other properties in a standard way with a basis that can be reusable? For that, we can define an abstraction that all custom exceptions will implement, as the code down below shows.
<?php

namespace AppExceptions;

use Exception;
use IlluminateHttpRequest;
use IlluminateHttpResponse;

abstract class ApplicationException extends Exception
{
    abstract public function status(): int;

    abstract public function help(): string;

    abstract public function error(): string;

    public function render(Request $request): Response
    {
        $error = new Error($this->help(), $this->error());
        return response($error->toArray(), $this->status());
    }
}
Enter fullscreen mode
Exit fullscreen mode
Here, an abstract class gets defined to enforce that every exception will implement a status(), help() and error() functions.
At the render() function, that we are overriding from the Exception class, we are using the result of the implementation of our help and error methods to create an error object.
The error object is responsible for standardizing the errors in the application, it doesn’t matter whether the error was from an exception or a business rule validation, if it is an error it will be encapsulated into the error object.
Standardizing errors
To standardize errors, we will create the already mentioned and previously used error object. This object has two main characteristics.
1) Define the data properties that will be shown when rendering the error.
2) Be able to be automatically transformed into JSON by Laravel.
<?php

namespace AppExceptions;

use JsonSerializable;
use IlluminateContractsSupportJsonable;
use IlluminateContractsSupportArrayable;

class Error implements Arrayable, Jsonable, JsonSerializable
{
    public function __construct(private string $help = '', private string $error = '')
    {
    }

    public function toArray(): array
    {
        return [
            'error' => $this->error,
            'help' => $this->help,
        ];
    }

    public function jsonSerialize(): array
    {
        return $this->toArray();
    }

    public function toJson($options = 0.0)
    {
        $jsonEncoded = json_encode($this->jsonSerialize(), $options);
        throw_unless($jsonEncoded, JsonEncodeException::class);
        return $jsonEncoded;
    }
}
Enter fullscreen mode
Exit fullscreen mode
Notice that the class declaration implements three interfaces, these interfaces are responsible for making the class capable of being converted into an array or a JSON.
Following the class declaration we have the constructor where property promotion is getting used to keep the code cleaner, as parameters we have $help which shows a possible solution to the error getting shown, and $error where the error that happened gets specified.
Next we have the toArray() function where the error object gets returned as an array.
Then we have the jsonSerialize() function, where the error object also returns as an array. Here we are applying DRY and just calling the toArray() inside the jsonSerialize() function, since they return the same result, there is no reason for us to repeat ourselves.
Finally, we have the toJson() function, where our object gets converted into a JSON string. Notice that we start by calling the json_encode(), to this function we are passing as parameter the result from jsonSerializer() previously implemented and the $options from the function itself.
As a result, we should have the $jsonEncoded variable a JSON string matching the information present in our error object, however in cases where json_encode() can’t transform the array passed as parameter into JSON it will return a boolean false.
For that reason, in the next line we’re using the throw_unless() helper to throw an exception in case $jsonEncoded is evaluated to false, and otherwise we return the JSON string in the subsequent line.
Now we just need to define the JsonEncodeException that we conditionally throw in the toJson() function.
Creating the JsonEncodeException
Considering that this exception is a custom exception written specially to handle the JSON conversion of our error object, it makes perfect sense to use our ApplicationException from the previous session.
<?php

namespace AppExceptions;

use IlluminateHttpResponse;

class JsonEncodeException extends ApplicationException
{
    public function status(): int
    {
        return Response::HTTP_BAD_REQUEST;
    }

    public function help(): string
    {
        return trans('exception.json_not_encoded.help');
    }

    public function error(): string
    {
        return trans('exception.json_not_encoded.error');
    }
}
Enter fullscreen mode
Exit fullscreen mode
Notice that once we extend the ApplicationException class, we have the obligation to implement the status, help, and error functions. Inside these functions, we implemented the return of the values that make sense to the context of this exception.
In this specific example, we are return the HTTP status 400, and we are getting translated texts from Laravel’s translating scheme.
Keeping all your messages and texts in Laravel’s translating structure is always a good decision. Having to translate an app, after a lot of written code, is often more difficult and requires much more refactoring than starting the app with this pattern.
Now our custom exception structure and encapsulation of errors is done.
Happy coding!
Tutorial last revisioned on August 10, 2022 with Laravel 9
API-based projects are more and more popular, and they are pretty easy to create in Laravel. But one topic is less talked about — it’s error handling for various exceptions. API consumers often complain that they get «Server error» but no valuable messages. So, how to handle API errors gracefully? How to return them in «readable» form?
Main Goal: Status Code + Readable Message
For APIs, correct errors are even more important than for web-only browser projects. As people, we can understand the error from browser message and then decide what to do, but for APIs — they are usually consumed by other software and not by people, so returned result should be «readable by machines». And that means HTTP status codes.
Every request to the API returns some status code, for successful requests it’s usually 200, or 2xx with XX as other number.
If you return an error response, it should not contain 2xx code, here are most popular ones for errors:
| Status Code | Meaning |
| 404 | Not Found (page or other resource doesn’t exist) |
| 401 | Not authorized (not logged in) |
| 403 | Logged in but access to requested area is forbidden |
| 400 | Bad request (something wrong with URL or parameters) |
| 422 | Unprocessable Entity (validation failed) |
| 500 | General server error |
Notice that if we don’t specify the status code for return, Laravel will do it automatically for us, and that may be incorrect. So it is advisable to specify codes whenever possible.
In addition to that, we need to take care of human-readable messages. So typical good response should contain HTTP error code and JSON result with something like this:
{
    "error": "Resource not found"
}
Ideally, it should contain even more details, to help API consumer to deal with the error. Here’s an example of how Facebook API returns error:
{
  "error": {
    "message": "Error validating access token: Session has expired on Wednesday, 14-Feb-18 18:00:00 PST. The current time is Thursday, 15-Feb-18 13:46:35 PST.",
    "type": "OAuthException",
    "code": 190,
    "error_subcode": 463,
    "fbtrace_id": "H2il2t5bn4e"
  }
}
Usually, «error» contents is what is shown back to the browser or mobile app. So that’s what will be read by humans, therefore we need to take care of that to be clear, and with as many details as needed.
Now, let’s get to real tips how to make API errors better.
Tip 1. Switch APP_DEBUG=false Even Locally
There’s one important setting in .env file of Laravel — it’s APP_DEBUG which can be false or true.
If you turn it on as true, then all your errors will be shown with all the details, including names of the classes, DB tables etc.

It is a huge security issue, so in production environment it’s strictly advised to set this to false.
But I would advise to turn it off for API projects even locally, here’s why.
By turning off actual errors, you will be forced to think like API consumer who would receive just «Server error» and no more information. In other words, you will be forced to think how to handle errors and provide useful messages from the API.
Tip 2. Unhandled Routes — Fallback Method
First situation — what if someone calls API route that doesn’t exist, it can be really possible if someone even made a typo in URL. By default, you get this response from API:
Request URL: http://q1.test/api/v1/offices
Request Method: GET
Status Code: 404 Not Found
{
    "message": ""
}
And it is OK-ish message, at least 404 code is passed correctly. But you can do a better job and explain the error with some message.
To do that, you can specify Route::fallback() method at the end of routes/api.php, handling all the routes that weren’t matched.
Route::fallback(function(){
    return response()->json([
        'message' => 'Page Not Found. If error persists, contact info@website.com'], 404);
});
The result will be the same 404 response, but now with error message that give some more information about what to do with this error.
Tip 3. Override 404 ModelNotFoundException
One of the most often exceptions is that some model object is not found, usually thrown by Model::findOrFail($id). If we leave it at that, here’s the typical message your API will show:
{
    "message": "No query results for model [AppOffice] 2",
    "exception": "SymfonyComponentHttpKernelExceptionNotFoundHttpException",
    ...
}
It is correct, but not a very pretty message to show to the end user, right? Therefore my advice is to override the handling for that particular exception.
We can do that in app/Exceptions/Handler.php (remember that file, we will come back to it multiple times later), in render() method:
// Don't forget this in the beginning of file
use IlluminateDatabaseEloquentModelNotFoundException;

// ...

public function render($request, Exception $exception)
{
    if ($exception instanceof ModelNotFoundException) {
        return response()->json([
            'error' => 'Entry for '.str_replace('App', '', $exception->getModel()).' not found'], 404);
    }

    return parent::render($request, $exception);
}
We can catch any number of exceptions in this method. In this case, we’re returning the same 404 code but with a more readable message like this:
{
    "error": "Entry for Office not found"
}Notice: have you noticed an interesting method $exception->getModel()? There’s a lot of very useful information we can get from the $exception object, here’s a screenshot from PhpStorm auto-complete:
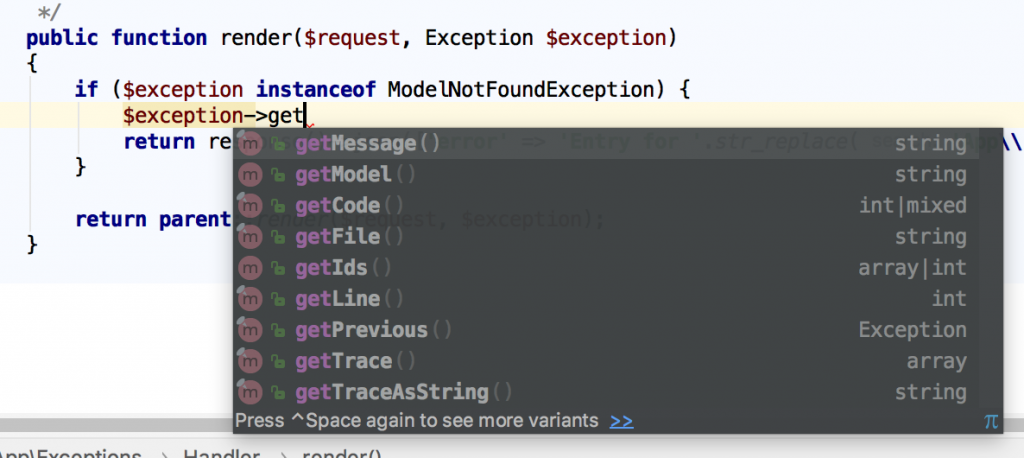
Tip 4. Catch As Much As Possible in Validation
In typical projects, developers don’t overthink validation rules, stick mostly with simple ones like «required», «date», «email» etc. But for APIs it’s actually the most typical cause of errors — that consumer posts invalid data, and then stuff breaks.
If we don’t put extra effort in catching bad data, then API will pass the back-end validation and throw just simple «Server error» without any details (which actually would mean DB query error).
Let’s look at this example — we have a store() method in Controller:
public function store(StoreOfficesRequest $request)
{
    $office = Office::create($request->all());

    return (new OfficeResource($office))
        ->response()
        ->setStatusCode(201);
}
Our FormRequest file app/Http/Requests/StoreOfficesRequest.php contains two rules:
public function rules()
{
    return [
        'city_id' => 'required|integer|exists:cities,id',
        'address' => 'required'
    ];
}
If we miss both of those parameters and pass empty values there, API will return a pretty readable error with 422 status code (this code is produced by default by Laravel validation failure):
{
    "message": "The given data was invalid.",
    "errors": {
        "city_id": ["The city id must be an integer.", "The city id field is required."],
        "address": ["The address field is required."]
    }
}
As you can see, it lists all fields errors, also mentioning all errors for each field, not just the first that was caught.
Now, if we don’t specify those validation rules and allow validation to pass, here’s the API return:
{
    "message": "Server Error"
}
That’s it. Server error. No other useful information about what went wrong, what field is missing or incorrect. So API consumer will get lost and won’t know what to do.
So I will repeat my point here — please, try to catch as many possible situations as possible within validation rules. Check for field existence, its type, min-max values, duplication etc.
Tip 5. Generally Avoid Empty 500 Server Error with Try-Catch
Continuing on the example above, just empty errors are the worst thing when using API. But harsh reality is that anything can go wrong, especially in big projects, so we can’t fix or predict random bugs.
On the other hand, we can catch them! With try-catch PHP block, obviously.
Imagine this Controller code:
public function store(StoreOfficesRequest $request)
{
    $admin = User::find($request->email);
    $office = Office::create($request->all() + ['admin_id' => $admin->id]);
    (new UserService())->assignAdminToOffice($office);

    return (new OfficeResource($office))
        ->response()
        ->setStatusCode(201);
}
It’s a fictional example, but pretty realistic. Searching for a user with email, then creating a record, then doing something with that record. And on any step, something wrong may happen. Email may be empty, admin may be not found (or wrong admin found), service method may throw any other error or exception etc.
There are many way to handle it and to use try-catch, but one of the most popular is to just have one big try-catch, with catching various exceptions:
try {
    $admin = User::find($request->email);
    $office = Office::create($request->all() + ['admin_id' => $admin->id]);
    (new UserService())->assignAdminToOffice($office);
} catch (ModelNotFoundException $ex) { // User not found
    abort(422, 'Invalid email: administrator not found');
} catch (Exception $ex) { // Anything that went wrong
    abort(500, 'Could not create office or assign it to administrator');
}
As you can see, we can call abort() at any time, and add an error message we want. If we do that in every controller (or majority of them), then our API will return same 500 as «Server error», but with much more actionable error messages.
Tip 6. Handle 3rd Party API Errors by Catching Their Exceptions
These days, web-project use a lot of external APIs, and they may also fail. If their API is good, then they will provide a proper exception and error mechanism (ironically, that’s kinda the point of this whole article), so let’s use it in our applications.
As an example, let’s try to make a Guzzle curl request to some URL and catch the exception.
Code is simple:
$client = new GuzzleHttpClient();
$response = $client->request('GET', 'https://api.github.com/repos/guzzle/guzzle123456');
// ... Do something with that response
As you may have noticed, the Github URL is invalid and this repository doesn’t exist. And if we leave the code as it is, our API will throw.. guess what.. Yup, «500 Server error» with no other details. But we can catch the exception and provide more details to the consumer:
// at the top
use GuzzleHttpExceptionRequestException;

// ...

try {
    $client = new GuzzleHttpClient();
    $response = $client->request('GET', 'https://api.github.com/repos/guzzle/guzzle123456');
} catch (RequestException $ex) {
    abort(404, 'Github Repository not found');
}
Tip 6.1. Create Your Own Exceptions
We can even go one step further, and create our own exception, related specifically to some 3rd party API errors.
php artisan make:exception GithubAPIExceptionThen, our newly generated file app/Exceptions/GithubAPIException.php will look like this:
namespace AppExceptions;

use Exception;

class GithubAPIException extends Exception
{

    public function render()
    {
        // ...
    }

}
We can even leave it empty, but still throw it as exception. Even the exception name may help API user to avoid the errors in the future. So we do this:
try {
    $client = new GuzzleHttpClient();
    $response = $client->request('GET', 'https://api.github.com/repos/guzzle/guzzle123456');
} catch (RequestException $ex) {
    throw new GithubAPIException('Github API failed in Offices Controller');
}
Not only that — we can move that error handling into app/Exceptions/Handler.php file (remember above?), like this:
public function render($request, Exception $exception)
{
    if ($exception instanceof ModelNotFoundException) {
        return response()->json(['error' => 'Entry for '.str_replace('App', '', $exception->getModel()).' not found'], 404);
    } else if ($exception instanceof GithubAPIException) {
        return response()->json(['error' => $exception->getMessage()], 500);
    } else if ($exception instanceof RequestException) {
        return response()->json(['error' => 'External API call failed.'], 500);
    }

    return parent::render($request, $exception);
}
Final Notes
So, here were my tips to handle API errors, but they are not strict rules. People work with errors in quite different ways, so you may find other suggestions or opinions, feel free to comment below and let’s discuss.
Finally, I want to encourage you to do two things, in addition to error handling:
- Provide detailed API documentation for your users, use packages like API Generator for it;
- While returning API errors, handle them in the background with some 3rd party service like Bugsnag / Sentry / Rollbar. They are not free, but they save massive amount of time while debugging. Our team uses Bugsnag, here’s a video example.
Hello guys, today I’m going to show you how to display validation error custom messages. I’ll share three methods to change the error messages. Let’s start:
Table of Contents
- Set Error Messages in Controller
- Adding Error Messages in Language File
- Creating Custom Request
Step 1 : Set Error Messages in Controller
We can easily change custom error messages in the controller. This is a quick solution. Have a look at this method:
BookController.php
<?php

namespace AppHttpControllers;

use AppBook;
use IlluminateHttpRequest;
use Validator;

class BookController extends Controller
{
    public function store(Request $request)
    {
        // validator
        $validator = Validator::make($request->all(), [
            'name' => 'required',
            'author' => 'required',
        ], [
            'name.required' => 'Please enter book name',
            'author.required' => 'Please enter book author',
        ]);

        // check validation
        if ($validator->fails()) {
            $response = [
                'success' => false,
                'message' => $validator->messages()
            ];
            return response()->json($response, 404);
        }

        // try to store the book
        try {
            $input = $request->all();
            Book::create($input);

            $success = true;
            $message = "Stored successful";
        } catch (IlluminateDatabaseQueryException $ex) {
            $success = false;
            $data = null;
            $message = $ex->getMessage();
        }

        // make response
        $response = [
            'success' => $success,
            'message' => $message
        ];

        // return response
        return response()->json($response, 200);
    }
}
Step 2 : Adding Error Messages in Language File
This is the last method. If we set custom error messages here, these will work in the whole project.
Open resources/lang/en/validation.php file and add custom errors with messages in the “custom” array. Here’s an example:
validation.php
'custom' => [
    'name' => [
        'required' => 'Please enter book name',
    ],
    'author' => [
        'required' => 'Please enter book author',
    ],
],
and the BookController looks like:
BookController.php
<?php

namespace AppHttpControllers;

use IlluminateHttpRequest;
use AppBook;
use Validator;

class BookController extends Controller
{
    public function store(Request $request)
    {
        // validator
        $validator = Validator::make($request->all(), [
            'name' => 'required',
            'author' => 'required',
        ]);

        // check validation
        if ($validator->fails()) {
            $response = [
                'success' => false,
                'message' => $validator->messages()
            ];
            return response()->json($response, 404);
        }

        // try to store the book
        try {
            $input = $request->all();
            Book::create($input);

            $success = true;
            $message = "Book successfully stored";
        } catch (IlluminateDatabaseQueryException $ex) {
            $success = false;
            $message = $ex->getMessage();
        }

        // make response
        $response = [
            'success' => $success,
            'message' => $message
        ];

        // return response
        return response()->json($response, 200);
    }
}
Step 3 : Creating Custom Request
By creating a custom request we can do this. To do this, we have to create a request. Let’s create a request by using this artisan command:
php artisan make:request BookFormRequestOpen the BookFormRequest from appHttpRequests and paste this code:
BookFormRequest.php
<?php

namespace AppHttpRequests;

use IlluminateFoundationHttpFormRequest;

class BookFormRequest extends FormRequest
{
    /**
     * Determine if the user is authorized to make this request.
     *
     * @return bool
     */
    public function authorize()
    {
        return true;
    }

    /**
     * Get the validation rules that apply to the request.
     *
     * @return array
     */
    public function rules()
    {
        return [
            'name' => 'required',
            'author' => 'required',
        ];
    }

    /**
     * Get the error messages for the defined validation rules.
     *
     * @return array
     */
    public function messages()
    {
        return [
            'name.required' => 'Please enter book name',
            'author.required' => 'Please enter book author',
        ];
    }
}
Let’s use this BookFormRequest request in our BookController.
BookController.php
<?php

namespace AppHttpControllers;

use IlluminateHttpRequest;
use AppHttpRequestsBookFormRequest;
use AppBook;

class BookController extends Controller
{
    public function store(BookFormRequest $request)
    {
        // try to store the book
        try {
            $input = $request->all();
            Book::create($input);

            $success = true;
            $message = "Book successfully stored";
        } catch (IlluminateDatabaseQueryException $ex) {
            $success = false;
            $message = $ex->getMessage();
        }

        // make response
        $response = [
            'success' => $success,
            'message' => $message
        ];

        // return response
        return response()->json($response, 200);
    }
}
Note: To get the response from the custom request, we have to set header Accept: application/json.
The tutorial is over. You can choose any method. Thank you.
Validation error messages customization in laravel
Step 1. Create form request using CLI
php artisan make:request StorePostRequest
Step 2. Add validation rules to rules() method and custom messages in messages() method in created file
// appHttpRequestsStorePostRequest.php
public function authorize()
{
    return true;
}
public function rules()
{
    return [
        'title' => 'required|unique:posts|max:255',
        'body' => 'required',
    ];
}

public function messages(){
    return [
        'title.required' => 'Post title is required',
        'body.required' => 'Post Body is required',
    ];
}
Step 3. Make changes in your controller file
// appHttpControllers<YourController>.php
use AppHttpRequestsStorePostRequest;

public function store(StorePostRequest $request)
{
    $validated = $request->validated();
    dd($validated);
}
//Step 4. Display validation errors in view file
@if($errors->any())
<div class="alert alert-danger" role="alert">
    <ul class="list-unstyled">
        @foreach($errors->all() as $error)
        <li> {{ $error }} </li>
        @endforeach
    </ul>
</div>
@endif
You can customize or change the validation error messages used by the form request by changing the array of attribute / rule pairs (‘title.required’) with the custom error message in messages() method Like for required title attribute you can use ‘title.required’ => ‘Post title is required’.
Custom validation error messages using validate() or Validator::make() method
Method 1. Custom validation error message using Validator facade.
//Before class definition.
use IlluminateSupportFacadesValidator;
// Inside controller’s method
$validator = Validator::make($request->all(),  [
    'title' => 'required',
    'body' => 'required',
],
[
    'required' => 'The :attribute field can not be blank.',
    'body.required' => 'Custom validation message for body attribute on required.',
]);

if($validator->fails()){
    return  redirect()->back()->withErrors($validator)->withInput();
}
Method 2. Custom validation error message using validate() method.
// inside controller’s method — appHttpControllers<YourController>.php
$this->validate($request, [
    'title' => 'required',
    'body' => 'required',
],
[
    'required' => 'The :attribute field can not be blank.',
    'body.required' => 'Custom validation message for body attribute on required.',
]);
We can easily add custom validation error messages by passing a third argument to the validate() or Validator::make() method containing an array of our custom validation error messages. Basically, these methods accept four parameters, form request data, validation rules, custom error messages, and custom attributes.
How to customize and change validation error message ?
We can easily add custom validation error messages by passing a third argument to the validate() or Validator::make() method containing an array of our custom validation error messages. Basically, these methods accept four parameters, form request data, validation rules, custom error messages, and custom attributes.
How to show only error message in Laravel Validator?
You can get all the validation errors message with $errors = $validator->errors(); and return to view using return redirect()->back()->withErrors($errors); in controller class and display in Laravel blade.
How to use custom place-holder replacements for error messages?
When creating a custom validation rule, you may sometimes need to define custom place-holder replacements for error messages. You may do so by creating a custom Validator as described above, and adding a replaceXXX function to the validator.
How to set custom Error messages in Laravel?
You can use below three method to set custom error message in Laravel
- Using Language File
- Directly in Controller Code
- Using Custom Request
How to return custom error message from controller method?
In most cases, you will probably specify your custom messages in a language file instead of passing them directly to the Validator. To do so, add your messages to custom array in the resources/lang/xx/validation.php language file.
How do I create a custom message in Laravel validation?
$messages = array(
'required' => 'The :attribute field is required. ',
);
$validator = Validator::make($input, $rules, $messages);
What is the method used for specifying custom message for validation errors in form request?
What is the method used for specifying custom message for validation errors in form request? After checking if the request failed to pass validation, you may use the withErrors method to flash the error messages to the session.
How to customize built-in form validation error messages
we can customize the error messages by passing a second array as an argument, containing keys formed using the name of the parameter, dot, and then the name of the validation rule — the value will be the error message we want to display.
Which method is used to check validation error in laravel?
After checking if the request failed to pass validation, you may use the withErrors method to flash the error messages to the session. When using this method, the $errors variable will automatically be shared with your views after redirection, allowing you to easily display them back to the user.
In this laravel 7 custom validation error messages example tutorial, you will learn how to add custom validation message error in laravel web applications.
Sometimes, you need to change the default validation message and want to use custom validation error messages with laravel forms instead of dafault validation error message in laravel.
So, this tutorial will help you step by step on how to use custom validation error messages on laravel forms.
Just follow the below steps and learn how to use laravel custom validation error messages on laravel forms:
- Step 1: Install Laravel Application
- Step 2: Setup Database Credentials
- Step 3: Run Migration Command
- Step 4: Create Route
- Step 5: Generate Controller By Command
- Step 6: Create the blade view
- Step 7: Run Development Server
Step 1: Install Laravel Application
First of all, Open your command prompt and run the following command:
composer create-project --prefer-dist laravel/laravel Blog
This command will install fresh new laravel setup in provided location. After that, open your laravel web application in any text editor and Go to your application .env file and set up database credentials and move next step.
Step 2: Setup Database Credentials
In this step, Add database credentials in the .env file:
DB_CONNECTION=mysql
DB_HOST=127.0.0.1
DB_PORT=3306
DB_DATABASE=here your database name here
DB_USERNAME=here database username here
DB_PASSWORD=here database password here
Step 3: Run Migration Command
Next, Open your command prompt and run the following command for migration:
php artisan migrate
This command will create some tables into your database.
Step 4: Create Routes
In this step, Open your routes/web.php and update the following routes into your routes/web.php file:
routes/web.php
Step 5: Generate Controller By Command
In this step, open your command prompt and run the following command to generate custom error message controller:
php artisan make:controller CustomErrorController
After that, Go to app/Http/Controllers/CustomErrorController.php and update the following code into your controller file:
app/Http/Controllers/CustomErrorController.php
namespace AppHttpControllers;

use IlluminateHttpRequest;
use AppUser;

class CustomErrorController extends Controller
{
    public function create()
    {
        return view('form');
    }

    public function store(Request $request)
    {
        $request->validate(
            [
                'name' => 'required',
                'password' => 'required|min:5',
                'email' => 'required|email|unique:users'
            ],
            [
                'name.required' => 'Name is required',
                'password.required' => 'Password is required'
            ]
          );

        $input = $request->all();
        $input['password'] = bcrypt($input['password']);
        $user = User::create($input);

        return back()->with('success', 'User created successfully.');
    }
}
Step 6: Create Blade View
In this step, Go to resources/views folder and create one blade view file name from.blade.php and update the following code into your file:
resources/views/form.blade.php
<!DOCTYPE html>
<html>
<head>
    <title>Laravel Custom Validation Error Message Example Tutorial -Tutsmake.com</title>
    <meta charset="utf-8">
    <meta http-equiv="X-UA-Compatible" content="IE=edge">
    <meta name="viewport" content="width=device-width, initial-scale=1">
    <link href="//netdna.bootstrapcdn.com/bootstrap/3.2.0/css/bootstrap.min.css" rel="stylesheet">
</head>
<body>
    <div class="container">

        <h1>Laravel Custom Validation Error Message Example</h1>

        @if(Session::has('success'))
        <div class="alert alert-success">
            {{ Session::get('success') }}
            @php
                Session::forget('success');
            @endphp
        </div>
        @endif

        <form method="POST" action="{{ route('store') }}">

            @csrf

            <div class="form-group">
                <label>Name:</label>
                <input type="text" name="name" class="form-control" placeholder="Name">
                @if ($errors->has('name'))
                    <span class="text-danger">{{ $errors->first('name') }}</span>
                @endif
            </div>

            <div class="form-group">
                <label>Password:</label>
                <input type="password" name="password" class="form-control" placeholder="Password">
                @if ($errors->has('password'))
                    <span class="text-danger">{{ $errors->first('password') }}</span>
                @endif
            </div>

            <div class="form-group">
                <strong>Email:</strong>
                <input type="text" name="email" class="form-control" placeholder="Email">
                @if ($errors->has('email'))
                    <span class="text-danger">{{ $errors->first('email') }}</span>
                @endif
            </div>

            <div class="form-group">
                <button class="btn btn-success btn-submit">Submit</button>
            </div>
        </form>
    </div>
</body>
</html>
Step 7: Run Development Server
In this step, we will use the PHP artisan serve command. It will start your server locally
php artisan serveIf you want to run the project diffrent port so use this below command
php artisan serve --port=8080
Now we are ready to run our example so run bellow command to quick run.
http://localhost:8000/form