I am getting this error while opening /etc/profile file using nano.
Error reading lock file /etc/.profile.swp: Not enough data read
How can I fix this?
![]()
Zanna♦
68.2k55 gold badges210 silver badges320 bronze badges
asked Jul 25, 2017 at 9:12
![]()
5
Try to remove the hidden file .[yourfilename].swp, which is stored in the same folder as the file that you are trying to open.
In your case try the shell command rm /etc/.profile.swp.
This issue also occurs with nano 2.7.4, and must be something to do with how nano handles a corrupted swapfile.
Hope this helped
![]()
storm
4,8836 gold badges33 silver badges48 bronze badges
answered Sep 21, 2017 at 8:50
![]()
sunwalkersunwalker
5513 silver badges2 bronze badges
1
The problem is linked to a bug in an older version of nano as seen here.
As per the report, the affected version was nano-2.4.2. You should run nano --version to ascertain your current version and update accordingly.
A more detailed report of the actual issue can be found here.
answered Jul 25, 2017 at 9:47
![]()
2
Was happening for me because I was out of disk space, I cleared up some space, deleted the swap file and it worked.
answered Dec 8, 2017 at 20:04
![]()
AnthonyAnthony
1211 silver badge3 bronze badges
This happened for me because of a log file that wasn’t rotating, it took the entire disk space, I solved it by truncating this log file, then removing the .swp file.
answered Aug 25, 2019 at 6:47
![]()
AyuMuAyuMu
111 bronze badge
0
For me this was because of running docker container logs.
Worked fine after deleting them.
Logs location: /var/lib/docker/containers/
rm -rf /var/lib/docker/containers/*
Note: this will delete all the log generated till today, you may choose to deleted not required and also take backup to avoid logs data loss.
answered May 23, 2022 at 8:44
![]()
Please try this one (run this on the current folder):
find . -name "*.swp" -delete
Keep in mind that as @pbhj commented:
[…] this will find all files below the current root, ending in .swp, and delete them. Which should work to remove temporary nano files, but might have unintended consequences.
![]()
answered Sep 6, 2022 at 20:38
![]()
2
Before you get into this article, you may find here are the most frequent solved problems here it is.
This article covers a detailed step by step solution and there are significant reasons this content serves your purpose. Success
I’m happy to share the piece of tip here that worked for me and saved my time a lot.
Let’s begin now,
Introduction
Before begin, a bit to describe my development work here is the project developed in PHP Laravel Framework with LAMP (Linux Apache, MySQL and Php). The completed Php project is deployed in AWS Server instance in where Linux Ubuntu 18.4 OS installed.
Over a period of time, php project captures error logs increased size and occupied disk space in server instance.
- Software Involved
- Linux — Ubuntu 18.4
- Linux Command Terminal
- PHP — Laravel Framework
- MySQL
As you may have encountered these terms like error writing lock file no space left on device, swp: Not enough data read, .swp file. There could be lot of reasons why we encounter «Not enough space left«.
Similarly here are the most frequent search terms as you and me searched a lot to get here.
Error reading lock file /etc/.profile.swp Not enough data read
Error reading lock file /etc/.default.swp Not enough data read
Error reading lock file /etc/.rc.local.swp Not enough data read
As said above .swp file may be the one causing the error. In your case .swp could be profile or default or local.
Problem Description
This is what happened in my case,
I logged into server instance where my php project is deployed which is Ubuntu 18.4, and opened command Terminal (Ctrl + Alt + T). I navigated to project folder.
When exactly this error thrown?
There was a random common error in php project, if you are php background I’m sure you know it .env file and its purposes.
.env file stores all the configurations databases, SSL certificates credentials etc of the project.
As said in above box, I actually did not configure correctly, setting to APP_DEBUG=true in .env file is fine for development.
APP_DEBUG = true
Whereas when you deploy your project in server it is highly not recommended to set as true. It should be set to false as below
APP_DEBUG = false
Why setting to false is important?
Its because when you set APP_Debug = true in .env file means when you encounter error in application the exception thrown in browser along with whole .env file expose everything as plain text.
Imagine anyone sees the error can also read your database user name and password.
Apart from above suggested let’s get into the main problem description,
In the project folder .env file resides in root folder, now I try to open it (to change APP_DEBUG=false) in command line editor in terminal with this command $ sudo nano .env
$ sudo nano .env
After executing the command error show as «Error reading lock file ./..env.swp not enough data read«. This is because any file you open with any editor .swp file gets created. And in here, log file size huge and space on device is insufficient to open the file in editor.
If you have searched google many sites suggested different approach that did not help as much, that’s the only reason I’m providing helping hand, explore more here
Get Set Solution helps everyone with details steps with google search.

So how I get rid of not enough data read on device? Let’s move to solution section.
Solution
The simple solution is provided in image below.
These are the 4 steps to do
- 1. Navigate to your Project folder
- 2. Find if you have hidden .swp files in folder
- 3. Delete the .swp files
- 4. Ensure you have deleted or not
STEP 1 : Navigate to your Project Folder
I have placed my project folder in /home/ubuntu/projects/generator.
/home is home directory
/ubuntu is user account
/projects is the folder name
/generator is the actual php application
STEP : 2 Find if you have hidden .swp files
As circled 1 in image, execute this command find . -name «*.swp»
$ find . -name «*.swp»
the result will be as below as circled 2 list of .swp files available in my project

STEP 3 : Delete the .swp files
As circled 3 in image, execute the command find . -name «*.swp» -delete
$ find . -name «*.swp» -delete
After executing command, you find all the .swp files are deleted
STEP 4: Ensure you have deleted .swp files are not
Just execute the same command find . -name «*.swp» this takes to next line that indicates you have deleted .swp files successfully
If you have missed all 4 steps, you can refer to below image described.

So what’s next move?
Now you can proceed to open .env file using this command, that’s all done.
$ sudo nano .env
-
#3
@bbgeek17 Thank you for the reply. There is plenty of storage space on all drives, but you bring up a good point… There was an episode previously where syslog file overfilled the boot SSD with errors from an USB device. I deleted the syslog file, removed the device and all was forgotten. I wonder if the fstab.swp was created during this time and is a remnant of that issue? Based on your google search article, it sounds like the correct action is to rm the fstab.swp file. I will give it another 24hrs for other replies before I dare to delete an important system file and then report back to you.
I also attempted to edit etc/fstab with vi and received the following error thus supporting idea of fstab.swp file conflicting with fstab:
Code:
E325: ATTENTION
Found a swap file by the name "/etc/.fstab.swp"
          owned by: root   dated: Mon Jul 12 21:34:36 2021
         [cannot be read]
While opening file "/etc/fstab"
             dated: Wed Jun  2 20:04:31 2021

(1) Another program may be editing the same file.  If this is the case,
    be careful not to end up with two different instances of the same
    file when making changes.  Quit, or continue with caution.
(2) An edit session for this file crashed.
    If this is the case, use ":recover" or "vim -r /etc/fstab"
    to recover the changes (see ":help recovery").
    If you did this already, delete the swap file "/etc/.fstab.swp"
    to avoid this message.
"/etc/fstab" 5 lines, 207 characters
In the end, I think your articles recommendation to delete .fstab.swp is the most logical. Maybe a mv command versus rm to start. Incidentally, I did a DuckDuckGo search and that article did not appear. Maybe I should start using Google again.
Thanks for your feedback!
Last edited: Sep 30, 2021
Ошибка при открытии /etc/profile: Ошибка чтения файла блокировки /etc/.profile.swp: Недостаточно чтения данных
Я получаю эту ошибку при открытии /etc/profile файл с использованием нано.
Как я могу это исправить?
6 ответов
Попробуйте удалить скрытый файл .[yourfilename].swp , который хранится в той же папке, что и файл, который вы пытаетесь открыть.
В вашем случае попробуйте команду оболочки rm /etc/.profile.swp ,
Эта проблема также возникает в nano 2.7.4 и должна быть связана с тем, как nano обрабатывает поврежденный файл подкачки.
Надеюсь, это помогло
Проблема связана с ошибкой в старой версии nano как видно здесь.
Согласно отчету, уязвимая версия была nano-2.4.2 , Ты должен бежать nano —version чтобы узнать вашу текущую версию и обновить соответственно.
Более подробный отчет о фактической проблеме можно найти здесь.
Это происходило для меня, потому что у меня не было места на диске, я очистил немного места, удалил файл подкачки, и это сработало.
Это произошло для меня из-за файла журнала, который не вращался, он занял все дисковое пространство, я решил это, обрезав этот файл журнала, а затем удалив файл.swp.
Примерьте вот это
Для меня это было из-за запуска журналов контейнера докеров. Работал нормально после их удаления. Расположение журналов: /var/lib/docker/containers/ rm -rf /var/lib/docker/containers/*
Примечание: это приведет к удалению всего журнала, созданного до сегодняшнего дня, вы можете выбрать удаление без необходимости, а также сделать резервную копию, чтобы избежать потери данных журналов.
Источник
Ошибка при выполнении apt: Unable to acquire the dpkg lock /var/lib/dpkg/lock
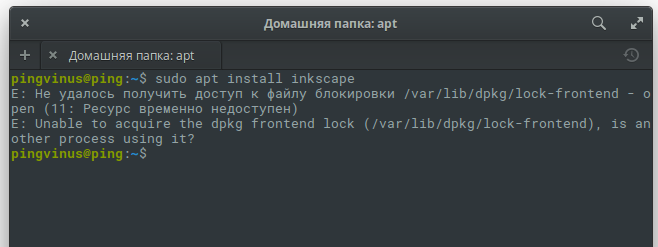
Описание проблемы. Ошибка
При выполнении в Ubuntu команды вида:
в терминале появляется ошибка:
Ошибка может появляться не только при выполнении apt install, но и при любых других действиях с apt или apt-get.
Сообщение об ошибке может немного отличаться в зависимости от различных условий. Например, могут появляться следующие ошибки:
Как исправить
Данные ошибки появляются, когда программа apt-get (apt) не может получить доступ к файлу блокировки /var/lib/dpkg/lock* . Данный файл используется, чтобы запретить одновременное выполнение операций, связанных с управлением пакетами в системе, так как при одновременном изменении данных о пакетах будет нарушена целостность «пакетной базы».
Обычно существует две основные причины появления, описанных выше ошибок:
- В данный момент уже выполняется экземпляр программы apt-get (apt).
- Предыдущий вызов apt-get (apt) завершился некорректно.
Способ первый
Сначала нужно проверить, что уже не запущен другой экземпляр программы apt-get (apt). Выполним следующую команду, чтобы проверить есть ли apt в списке запущенных процессов:
Вывод команды может быть следующим:
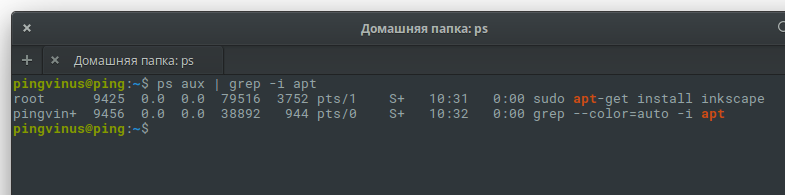
В первой строке мы видим, что уже есть работающий экземпляр программы apt-get, который имеет PID (идентификатор) 9425. Вторая строка относится к нашей команде grep, которую мы запустили с аргументом apt, поэтому она вывела саму себя. Итак, нас интересует только первая строка.
Если вы уверены, что не запускали программу apt-get сами, или она не запущена в фоновом режиме, например, выполняется автоматическое обновление системы, то нужно принудительно завершить ее выполнение. Для этого воспользуемся командой kill −9 . Команде нужно указать числовой идентификатор процесса. В нашем случае это 9425. Выполняем команду:
После выполнения данной команды, процесс с идентификатором 9425 завершится.
Можно воспользоваться еще одним простым способом — это завершить все экземпляры программ apt и apt-get сразу. Для этого можно выполнить команду:
Способ второй
Если первый способ вам не помог, то рассмотрим еще один способ решения проблемы. Обычно он используется, когда нет работающих экземпляров программ apt или apt-get, а значит предыдущее их выполнение завершилось аварийно, и файлы блокировки остались закрытыми.
Нам нужно удалить все файлы блокировки. Для этого выполняем команды:
Если при выполнении каких-нибудь из этих команд появится сообщение: rm: невозможно удалить ’/var/../lock’: Нет такого файла или каталога , это нормально, не обращайте на него внимания.
После этого нужно выполнить переконфигурацию (донастройку) пакетов:
Заключение
Мы рассмотрели два способа решения ошибок, связанных с доступом к файлу блокировки dpkg. Как правило, эти способы помогают. Если у вас остались какие-либо вопросы, оставляйте их в комментариях.
Источник
How to Fix ‘E: Could not get lock /var/lib/dpkg/lock’ Error in Ubuntu Linux
Recently I was trying to install an application using the apt command on Ubuntu when I encountered the following error:
E: Could not get lock /var/lib/dpkg/lock – open (11: Resource temporarily unavailable)
E: Unable to lock the administration directory (/var/lib/dpkg/), is another process using it?
In fact, there is a similar error you may see:
E: Could not get lock /var/lib/apt/lists/lock – open (11: Resource temporarily unavailable)
E: Unable to lock directory /var/lib/apt/lists/
E: Could not get lock /var/lib/dpkg/lock – open (11: Resource temporarily unavailable)
E: Unable to lock the administration directory (/var/lib/dpkg/), is another process using it?
In some cases, you might see it while using the Software Center:
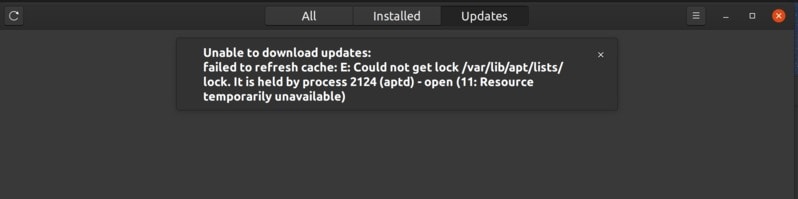 Could Not Get Lock Error in Ubuntu Software Center
These errors are very similar to another common Ubuntu error, Unable to lock directory /var/cache/apt/archives/, and the interesting thing is that the fixes are similar as well.
Fixing “Unable to lock the administration directory (/var/lib/dpkg/)” error
You see this error because some other program is trying to update Ubuntu. When a command or application is updating the system or installing a new software, it locks the dpkg file (Debian package manager).
This locking is done so that two processes don’t change the content at the same time as it may lead to unwarranted situation and a possible broken system.
Let’s see what steps can you take to fix this issue of ‘unable to lock administration directory’.
Method 0:
The first thing you should do is to check if some other program could be running system update or installing a program.
If you are using command line, check if an application like Software Center, Software Updater, Synaptic package manager, Gdebi is running any update/installation. If that’s the case, please wait for the program to finish the running process.
If there is no such application running, please check all the open terminal windows and see if you are running an update or installing a program. If yes, wait for it to finish.
If none of the above is happening, check which other process is running the apt command (package manager for handling software). Use this command:
For me, it showed this output:

If you see that apt is being used by a program like apt.systemd.daily update, you are in luck, my dear reader.
This is a daemon that runs in the background and check for system updates automatically when you start your system.
In Ubuntu 18.04 and higher versions, it may even try to download and install the important security updates on its own. At least this is what I see in the default settings in Software & Updates tool on the Ubuntu desktop.
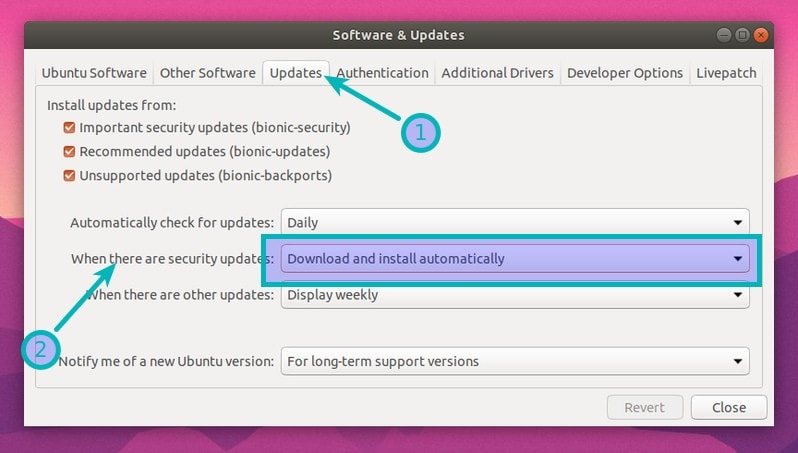 Ubuntu may install security updates in background
If you are on Ubuntu server, you may check whether you have unattended upgrades enabled by checking the content of the file /etc/apt/apt.conf.d/20auto-upgrades.
So if you see apt.systemd.daily is using the apt process, all you have to do is to wait for a few minutes. When the automatic update finishes, you should be able to install your software as usual.
As a permanent solution, you may disable the check for automatic update and unattended upgrades altogether however I won’t advise that for security reasons.
Now, that was the simple scenario and it could be handled easily. But that might not always be the case. If some other program is using apt, you need to handle it differently.
Method 1:
Use the Linux command line to find and kill the running process. To do that, use the command below:
This will show you the id of the process running apt or apt-get. In the example below, the process id is 7343. You can ignore the last line containing ‘grep –color=auto’.

You can use the process id to terminate it by sending the SIGTERM signal. Replace the
with the number you got in the output of previous command.
Check if the process was killed by running the ‘ps aux | grep -i apt’ command. If it is still running, force kill it with SIGKILL signal:
Another easier way would be to use the killall command. This will kill all the instances of a running program:
Method 2
The above method would fix the problem for you in most cases. But my case was a bit different. I was updating my system and accidentally closed the terminal. For that reason, there were no processes running apt, but it still showed me the error.
In this case, the root cause is the lock file. As mentioned earlier, the lock files are used to prevent two or more processes from using the same data. When apt or apt-get commands are run, they create lock files in a few places. If the previous apt command was not terminated properly, the lock files are not deleted and hence they prevent any new instances of apt-get or apt commands.
To fix the problem, all you need to do is to remove the lock files. But before you do that, it would be a good idea to stop any process that is using the lock files.
Use the lsof command to get the process ID of the process holding the lock files. Check the error and see what lock files it is complaining about and get the id of the processes holding these lock files.
Run these commands one by one.
It’s possible that the commands don’t return anything, or return just one number. If they do return at least one number, use the number(s) and kill the processes like this (replace the
with the numbers you got from the above commands):
You can now safely remove the lock files using the commands below:
After that, reconfigure the packages:
Now if you run the sudo apt update command, everything should be fine.
Troubleshooting 1: “Unable to acquire the dpkg frontend lock”
If you see an error like this:
You should find out which process is holding the lock-frontend using the lsof command as discussed in previous sections:
This is what it showed for me:
If you see ‘unattende‘ COMMAND column, this means unattended security upgrades are running. You should wait for the process to finish. Basically, this is what I discussed in method 0 but you probably skipped that.
If the COMMAND is something else, you may kill the process and then remove the lock file. You can see the process id under the PID column. Use this PID to kill the process. After that, remove the lock file and run the update command to see if it’s been fixed.
What’s that lsof: warning can’t stat() fuse.gvfsd-fuse file system?
Note: If you see “lsof: warning can’t stat() fuse.gvfsd-fuse file system /run/user/1000/gvfs
Output information may be incomplete” lines after running the earlier mentioned lsof command, don’t panic.
That’s not an error. It’s just that lsof tries to look into mounted file systems as well and the warning is about those mounted systems.
The files are locked by the processes on your main filesystem so if it shows some warning and no output, this only means that there is no process using those lock files.
Troubleshooting 2: “dpkg: error: dpkg frontend is locked by another process”
If you see the error “dpkg frontend is locked by another process” while running the steps in method 2, you need to one additional step.
First, find out the id of the process that is holding the lock file.
The above command will give you the details of the processes using the lock files. Use the process ID to kill this program:
Now you can remove the lock and reconfigure dpkg:
Did it work for you? Which method fixed it for you?

I hope this small tip helped you fix the “Could not get lock /var/lib/dpkg/lock” error. If yes, please let me know which method worked for you in the comments.
If you are still facing issues, let me know. I’ll try to help you out.
Any other suggestions are also welcome in the comments.
Источник
How to Fix Could not get lock /var/lib/dpkg/lock Error on Ubuntu
Home » SysAdmin » How to Fix Could not get lock /var/lib/dpkg/lock Error on Ubuntu
In Ubuntu, you may sometimes encounter an error when attempting to run an apt command:
Could not get lock /var/lib/dpkg/lock – open (11: Resource temporarily unavailable)
E: Unable to lock the administration directory (/var/lib/dpkg/), is another process using it?
This message lets you know that dpkg, the Debian Package Manager service, is unavailable.
Use the options in this guide to resolve the Ubuntu «Could not get lock…» error.

- Access to a terminal window / command line
- A user account with sudo or root privileges
5 Options to Fix «Could not get lock» Ubuntu Error
By default, the update service launches when Ubuntu starts. The automatic updater uses dpkg to check and install updates.
The dpkg service locks itself so that two processes don’t update the content simultaneously. The service is locked to avoid potential corruptions in the system. However, it also means that the user cannot, for example, run a simple apt command.
1: Wait it Out or Reboot
Give the system up to 10 minutes after you see the error, then try your software installation again.
If you’re certain that nothing is being installed, you can reboot the machine and try again.
To adjust the settings for automatic updates:
1. Click Activites > Search.
2. Type Updates.
3. Click the icon for Software & Updates.
4. Use the check boxes and drop-down menus to select your preferred update schedule.
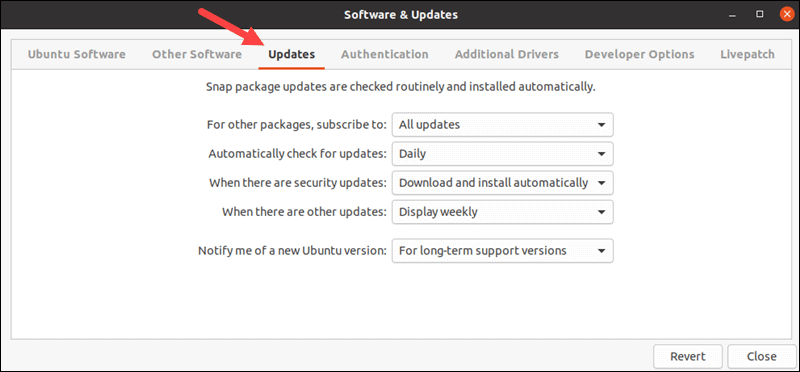
Note: We recommend keeping automatic updates turned on. Optionally, you can set them to be less frequent or to notify you instead of automatic downloading.
2: Examine the Running Processes
1. If you already tried waiting and rebooting the system, and you still get the error, use the following command to see which installation services are running:
2. If there are any applications using apt, they will appear on the list. Look for an entry similar to:
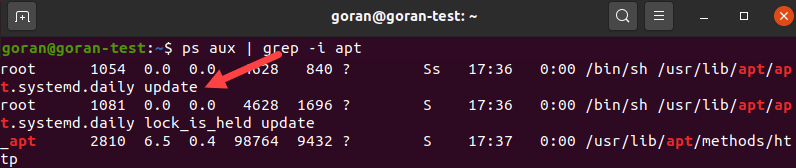
3. The daily update message means your system is running normal updates. You have to wait for this process to finish, but no other action is required.
You may have another apt process that’s running:
The most important columns are the second column, which lists the PID (process ID), and the last column that displays the service that’s using apt.
4. Alternately, you may have a dpkg service that’s still running. To find it, use the following command:
The dpkg output will look similar to the apt output.
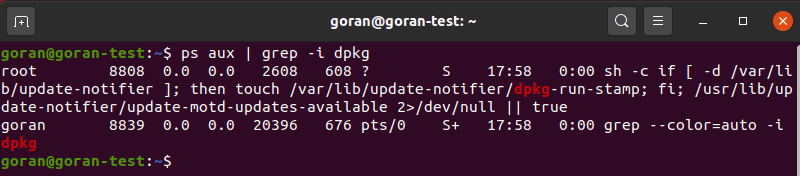
3: Address the Stuck Apt Service
1. If you have a mystery apt or dpkg service running, terminate it and see if that resolves your error. Use the following command:
2. Replace 8808 with the actual process ID (PID) from Step 2. It should complete and return to a new command prompt line. If it doesn’t, force the process to stop by adding the -9 option:
This should have resolved the issue.
4: Delete Lock Files
The error message in Ubuntu may appear similar to the following:
These are lock files, which are created to prevent two instances of apt or dpkg from using the same files at the same time. This can happen if an installation is interrupted or did not complete. Remove the lock files at your own risk.
To delete the lock files, use the rm command:
Removing these files should fix the error.
5: Reconfigure dpkg
1. Run the —configure command if you just deleted the lock files. Also, this command will help if you receive the following error:
“dpkg was interrupted, you must manually run ‘sudo dpkg –configure -a’ to correct the problem.”
2. Enter the command as displayed above:
Output returns a new line and the command should resolve the issue.
Fix Could not get lock /var/lib/dpkg/lock-frontend Error
The steps for fixing this error follow the similar pattern in the methods we described above. The full error is:
1. Do not remove the lock files immediately. Before doing so, locate and kill all processes that may be using the files.
Note: Check out our guide to learn more about lsof command in Linux.
2. The output returns a result similar to:
3. If you see unattended under the command column, your system is installing a security update. Wait for the process to complete.
4. Otherwise, note all process IDs and kill them with the force option:
5. Once you do that, you can try removing the lock-frontend files.
This should fix the error.
6. The last thing you can try after deleting the lock files is reconfiguring dpkg as we showed in the fifth section.
To test if these steps fixed the error, run the update command:
When the process completes successfully, that shows you fixed the “E: Could not get lock /var/lib/dpkg/lock” error.
Note: The error we tackled has multiple different forms, but the methods for fixing it are similar. Some of the variations of the “Could not get lock…” error are:
E: Could not get lock /var/lib/apt/lists/lock – open (11: Resource temporarily unavailable)
E: Unable to lock directory /var/lib/apt/lists/
and
E: Could not get lock /var/lib/dpkg/lock – open (11: Resource temporarily unavailable)
E: Unable to lock the administration directory (/var/lib/dpkg/), is another process using it?
This article explains five options to fix the “E: Could not get lock /var/lib/dpkg/lock” error on Ubuntu.
One of the options above will resolve the issue and chances are that the error will resolve itself upon rebooting the system.
Another common Ubuntu error message «Sub-process /usr/bin/dpkg returned an error code (1)» could indicate a problem with the package installer.
Источник