
Часовой пояс в Linux обычно настраивается во время установки системы. Иногда пользователю может потребоваться его изменить. Способ изменения часового пояса (его еще называют временной зоной) может зависеть от конкретного дистрибутива. Рассмотрим некоторые из способов изменения часового пояса.
Оглавление
- Посмотреть текущий часовой пояс
- Команда date
- Команда timedatectl
- ls -lh /etc/localtime
- Получить список доступных часовых поясов
- Утилита tzselect
- Утилита timedatectl
- Изменить часовой пояс
- Изменяем часовой пояс утилитой timedatectl
- Изменяем часовой пояс настройкой /etc/localtime
- Изменить часовой пояс только для одной программы или текущей сессии
- Изменить часовой пояс через графические утилиты
- Заключение
Посмотреть текущий часовой пояс
Посмотреть текущий часовой пояс можно разными способами.
Команда date
Команда date выводит текущую дату, время и часовой пояс:
$ date
Вт мар 12 19:01:33 MSK 2019
В выводе команды мы можем видеть, что текущая временная зона соответствует Москве — MSK.
Команда timedatectl
Утилита timedatectl применяется для настройки и получения информации о текущем системном времени. Она доступна в системах, использующих systemd.
Если выполнить команду timedatectl без параметров, то будет выведена информация о системных часах, а также часовой пояс (в поле Time zone).
$ timedatectl
Local time: Вт 2019-03-12 20:18:08 MSK
Universal time: Вт 2019-03-12 17:18:08 UTC
RTC time: Вт 2019-03-12 17:18:09
Time zone: Europe/Moscow (MSK, +0300)
System clock synchronized: yes
NTP service: active
RTC in local TZ: no
ls -lh /etc/localtime
Файл /etc/localtime это символическая ссылка, которая указывает на текущий часовой пояс, используемый в системе.
Для просмотра можно воспользоваться командной:
$ ls -lh /etc/localtime
lrwxrwxrwx 1 root root 35 мар 12 20:09 /etc/localtime -> ../usr/share/zoneinfo/Europe/Moscow
Получить список доступных часовых поясов
Утилита tzselect
Перед тем, как устанавливать часовой пояс, нужно понять, какое значение можно установить. Для этого можно воспользоваться утилитой tzselect.
После запуска утилита tzselect отображает список географических областей. Вы должны ввести номер области и нажать Enter. Затем появится список стран. Аналогично, нужно ввести номер страны. Появится список городов. Вводим номер города. В результате вы сможете увидеть название вашей временной зоны.
tzselect
Please identify a location so that time zone rules can be set correctly.
Please select a continent, ocean, "coord", or "TZ".
1) Africa
2) Americas
3) Antarctica
4) Asia
5) Atlantic Ocean
6) Australia
7) Europe
8) Indian Ocean
9) Pacific Ocean
10) coord - I want to use geographical coordinates.
11) TZ - I want to specify the time zone using the Posix TZ format.
#? 7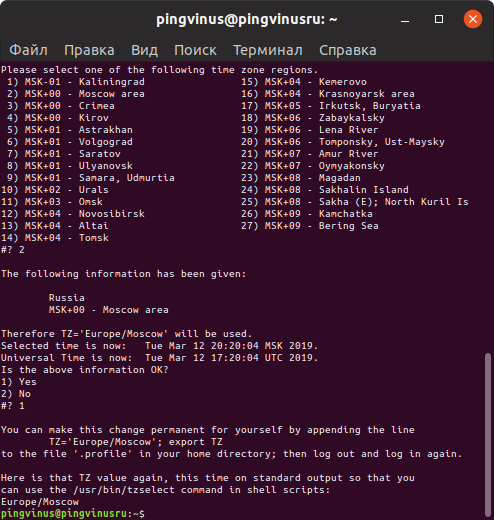
Утилита timedatectl
Утилита timedatectl поддерживает опцию list-timezones. Выполнив следующую команду можно просмотреть список всех доступных временных зон:
timedatectl list-timezonesМожно воспользоваться grep и ограничить область поиска. Например, выведем список временных зон только для Европы:
timedatectl list-timezones | grep Europe | lessИзменить часовой пояс
Изменяем часовой пояс утилитой timedatectl
Напомним, что утилита timedatectl доступна только для систем, использующих systemd. Если у вас нет утилиты timedatectl, то используйте способ описанный в следующем параграфе.
Для установки часового пояса с помощью утилиты timedatectl нужно выполнить команду:
timedatectl set-timezone Europe/MoscowВо время ввода часового пояса можно нажимать дважды клавишу Tab, чтобы получить список часовых поясов.
Изменяем часовой пояс настройкой /etc/localtime
Данный способ наиболее универсальный и работает в большинстве дистрибутивов Linux.
Необходимо создать символическую ссылку /etc/localtime, чтобы она указывала на файл нужной временной зоны. Файлы временных зон хранятся в каталоге /usr/share/zoneinfo/. Каждая зона имеет путь /usr/share/zoneinfo/Название/Зоны. Например, для Москвы это /usr/share/zoneinfo/Europe/Moscow.
Итак создадим ссылку на нужный файл временной зоны:
sudo unlink /etc/localtime
sudo ln -s /usr/share/zoneinfo/Europe/Moscow /etc/localtime
Чтобы проверить, что временная зона установлена верно, можно выполнить команду date:
dateИзменить часовой пояс только для одной программы или текущей сессии
Чтобы установить часовой пояс для отдельной программы можно задать его через переменную окружения TZ:
TZ=America/Chicago программаНапример:
$ TZ=America/Chicago date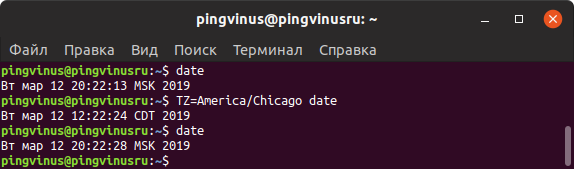
Чтобы установить часовой пояс только для текущей сессии в терминале, используется команда:
export TZ=America/DenverИзменить часовой пояс через графические утилиты
Выше мы описали способ изменения часового пояса, используя средства и утилиты командной строки. В большинстве дистрибутивах обычно есть графическая программа настройки, через которую можно с легкостью изменить часовой пояс.
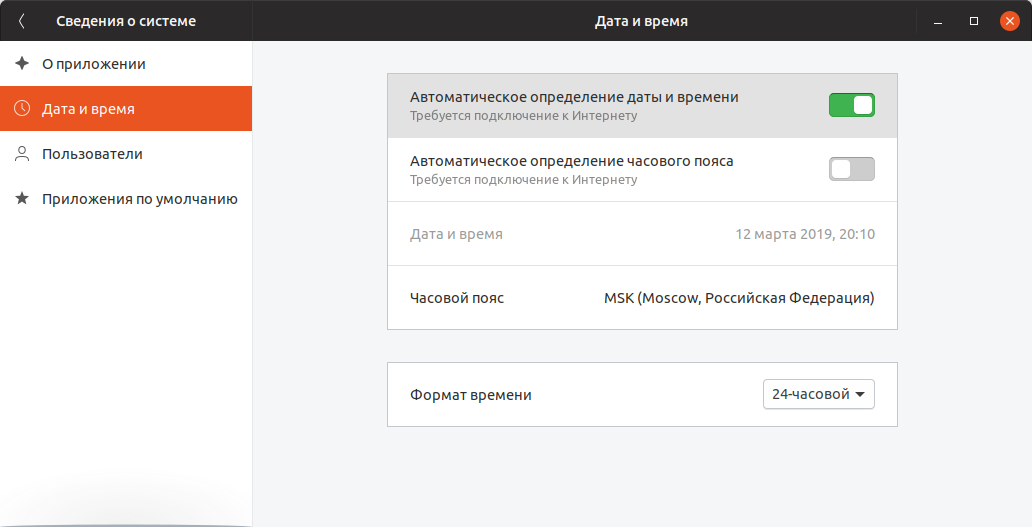
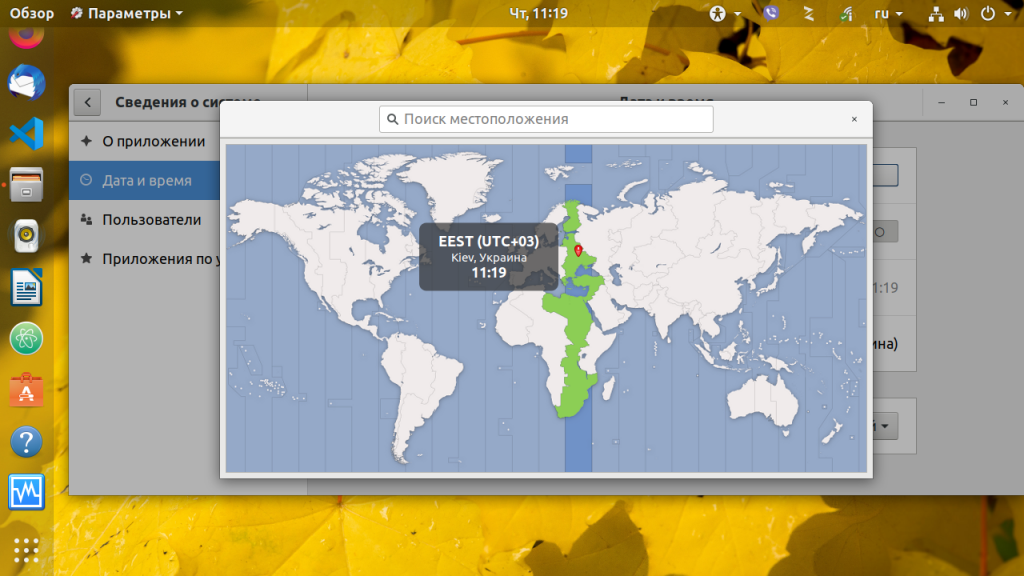
Если вы работаете в Gnome, откройте Параметры системы.
Перейдите на вкладку Сведения о системе, далее вкладка Дата и время (в зависимости от версии Gnome названия пунктов могут немного отличаться). Нажмите на надпись Часовой пояс.
Откроется карта с возможностью интерактивного выбора часового пояса. Выберите мышкой нужный регион на карте.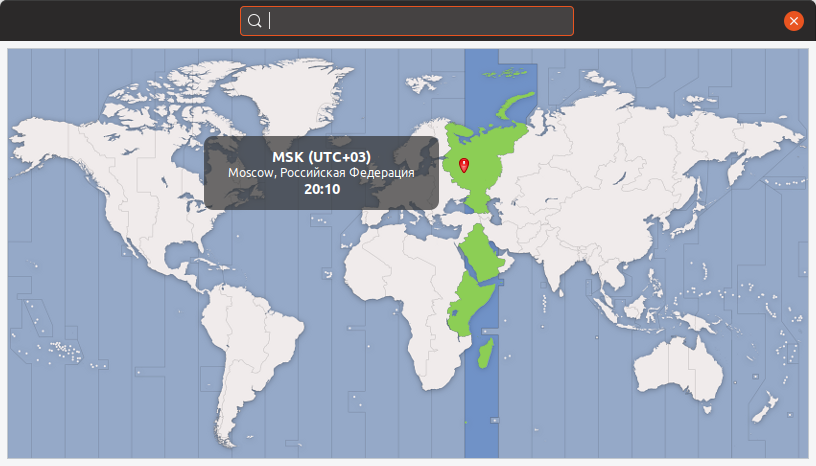
Заключение
Мы рассмотрели как изменить часовой пояс в Linux, как определить текущий часовой пояс и просмотреть список доступных временных зон. Большинству пользователей подойдет способ с использованием графической программы для изменения Параметров системы.
![]()
Download Article
A quick and easy guide to changing time zones in any Linux distribution
![]()
Download Article
This wikiHow teaches you how to change the time zone on a Linux computer. You can change the timezone on every Linux distribution by using the command line, or you can use the selection menu in the command line for different Linux distributions. If you’re using Mint, Ubuntu, or any other distribution with a simple user interface and settings menu, you can also change the time zone settings from there.
-

1
Open Terminal. Select the Terminal program from your Linux programs, or press Ctrl+Alt+T on your keyboard.
-
2
Check your current time zone. Type date into Terminal and press ↵ Enter. The terminal will display the date in
Weekday Month Day Time TimeZone Yearformat.- For example, you might see something like
Wed Mar 7 07:38:23 EDT 2017wherein «EDT» refers to the current time zone (Eastern Daylight Time).
Advertisement
- For example, you might see something like
-
3
Check available time zones. Type in cd /usr/share/zoneinfo and press ↵ Enter, then type in tzselect and press ↵ Enter to display a list of locations.
- The /usr/share/zoneinfo directory may vary depending on your Linux distribution.
-
4
Select a continent or ocean. Type in a selection number that pertains to your general location, then press ↵ Enter.
-
5
Select a country. Type in a selection number from the on-screen list and press ↵ Enter.
-
6
Select a time zone. Type in a selection number to select the preferred time zone region and press ↵ Enter.
- If your city is not listed in the time zone list, pick a different city from your same time zone.
-
7
Confirm the local time. In the following prompt, confirm that the local time is correct by typing 1 and then pressing ↵ Enter.
- If the time isn’t correct, type in 2 and press ↵ Enter, then select a new continent and repeat the process.
-
8
Verify that your time zone has been set. Run the date command again and check that the time zone corresponds to the one you just changed to. If you see you new time zone listed, you have successfully changed your computer’s time zone.
-
9
Set your clock to stay synced with internet time servers if you like. Most modern distributions have NTP already installed. If your Linux distribution does not, you will need to install the NTP server package. Use the following commands to install it, depending on your Linux distribution:
- Ubuntu/Mint/Debian: sudo apt install ntpdate
-
CentOS: sudo yum install ntpdate
sudo /sbin/chkconfig ntpd on -
Fedora/RedHat: sudo yum install ntpdate
sudo chkconfig ntpd on - Enter ntpdate server link && hwclock –w after the installation command, making sure to enter the link to the website in place of server link.


Advertisement
-
1
Open Terminal. Select the Terminal program from your Linux programs, or press Ctrl+Alt+T on your keyboard.
-
2
Enter the time zone menu command. Depending on your Linux distribution, this command will vary:
- Ubuntu and Mint — sudo dpkg-reconfigure tzdata followed by the admin/user password.
- Redhat — redhat-config-date
- CentOS and Fedora — system-config-date
- ‘FreeBSD and Slackware — tzselect
-
3
Select your geographic area. Use the arrow keys to select the geographic area the country is found in, then press ↵ Enter.
-
4
Select your city/region. Select the city or region corresponding to your time zone, then press ↵ Enter. This will change the time zone on your system.[1]


Advertisement
-
1
Click the «System Menu» icon. It’s a combined group of Power, Volume and Networking icons in the upper-right corner of the screen. A drop-down menu will appear.[2]
-
2
Click the «Settings» icon. This gear-shaped icon is in the upper-left corner of the drop-down menu. Doing so opens the Ubuntu Settings.
-
3
Click Date & Time. You’ll find this tab on the left side of the window.
-
4
Turn off Automatic Time Zone. Click the blue «Automatic Time Zone» switch in the middle of the page to do so.
- If the «Automatic Time Zone» switch is grey, skip this step.
-
5
Click Time Zone. It’s near the bottom of the window. Doing so opens the Time Zone menu.
-
6
Select a time zone. Click your approximate location on the world map to do so. You should see the time change to match the selected area’s time zone.
-
7
Close the window. This will save your settings and update your time zone accordingly.


Advertisement
-
1
Open the Menu. Click Menu in the bottom-left corner of the screen.
-
2
Click the System Settings icon. It’s made of two grey cogs. You’ll find it on the left side of the Menu window.
-
3
Click Date & Time. It’s in the «Preferences» group of options.
-
4
Select a time zone. Click a vertical slice of the map to pick that time zone. You should see the clock on the right side of the page immediately change to reflect the selected time zone’s time.
-
5
Enter your user password when prompted. If you have logged in as an Administrator, you may not need to enter password. In case you have logged in as a Standard user, type in the Administrator password. Super user privileges are required to make any changes to time zone settings.
-
6
Click Authenticate. It’s at the bottom of the prompt. Doing so unlocks the Date & Time menu.


Advertisement
Ask a Question
200 characters left
Include your email address to get a message when this question is answered.
Submit
Advertisement
Video
-
On some versions of RedHat Linux, Slackware, Gentoo, SuSE, Debian, Ubuntu, and anything else that is «normal», the command to display and change the time is «date», not «clock».
-
On mobile phones and other small devices that run Linux, the time zone is stored differently. It is written in /etc/TZ. Edit this file manually or use echo (for instance, echo GMT0BST > /etc/TZ to set the the timezone of the United Kingdom).
Thanks for submitting a tip for review!
Advertisement
-
Some applications (such as PHP) have separate timezone settings from the system timezone.
-
On some systems, there is a system utility provided that will prompt for the correct timezone and make the proper changes to the system configuration. For example, Debian provides the «tzsetup» or «tzconfig» utility.
Advertisement
About This Article
Thanks to all authors for creating a page that has been read 1,623,397 times.
Is this article up to date?
![]()
Download Article
A quick and easy guide to changing time zones in any Linux distribution
![]()
Download Article
This wikiHow teaches you how to change the time zone on a Linux computer. You can change the timezone on every Linux distribution by using the command line, or you can use the selection menu in the command line for different Linux distributions. If you’re using Mint, Ubuntu, or any other distribution with a simple user interface and settings menu, you can also change the time zone settings from there.
-
1
Open Terminal. Select the Terminal program from your Linux programs, or press Ctrl+Alt+T on your keyboard.
-
2
Check your current time zone. Type date into Terminal and press ↵ Enter. The terminal will display the date in
Weekday Month Day Time TimeZone Yearformat.- For example, you might see something like
Wed Mar 7 07:38:23 EDT 2017wherein «EDT» refers to the current time zone (Eastern Daylight Time).
Advertisement
- For example, you might see something like
-
3
Check available time zones. Type in cd /usr/share/zoneinfo and press ↵ Enter, then type in tzselect and press ↵ Enter to display a list of locations.
- The /usr/share/zoneinfo directory may vary depending on your Linux distribution.
-
4
Select a continent or ocean. Type in a selection number that pertains to your general location, then press ↵ Enter.
-
5
Select a country. Type in a selection number from the on-screen list and press ↵ Enter.
-
6
Select a time zone. Type in a selection number to select the preferred time zone region and press ↵ Enter.
- If your city is not listed in the time zone list, pick a different city from your same time zone.
-
7
Confirm the local time. In the following prompt, confirm that the local time is correct by typing 1 and then pressing ↵ Enter.
- If the time isn’t correct, type in 2 and press ↵ Enter, then select a new continent and repeat the process.
-
8
Verify that your time zone has been set. Run the date command again and check that the time zone corresponds to the one you just changed to. If you see you new time zone listed, you have successfully changed your computer’s time zone.
-
9
Set your clock to stay synced with internet time servers if you like. Most modern distributions have NTP already installed. If your Linux distribution does not, you will need to install the NTP server package. Use the following commands to install it, depending on your Linux distribution:
- Ubuntu/Mint/Debian: sudo apt install ntpdate
-
CentOS: sudo yum install ntpdate
sudo /sbin/chkconfig ntpd on -
Fedora/RedHat: sudo yum install ntpdate
sudo chkconfig ntpd on - Enter ntpdate server link && hwclock –w after the installation command, making sure to enter the link to the website in place of server link.
Advertisement
-
1
Open Terminal. Select the Terminal program from your Linux programs, or press Ctrl+Alt+T on your keyboard.
-
2
Enter the time zone menu command. Depending on your Linux distribution, this command will vary:
- Ubuntu and Mint — sudo dpkg-reconfigure tzdata followed by the admin/user password.
- Redhat — redhat-config-date
- CentOS and Fedora — system-config-date
- ‘FreeBSD and Slackware — tzselect
-
3
Select your geographic area. Use the arrow keys to select the geographic area the country is found in, then press ↵ Enter.
-
4
Select your city/region. Select the city or region corresponding to your time zone, then press ↵ Enter. This will change the time zone on your system.[1]
Advertisement
-
1
Click the «System Menu» icon. It’s a combined group of Power, Volume and Networking icons in the upper-right corner of the screen. A drop-down menu will appear.[2]
-
2
Click the «Settings» icon. This gear-shaped icon is in the upper-left corner of the drop-down menu. Doing so opens the Ubuntu Settings.
-
3
Click Date & Time. You’ll find this tab on the left side of the window.
-
4
Turn off Automatic Time Zone. Click the blue «Automatic Time Zone» switch in the middle of the page to do so.
- If the «Automatic Time Zone» switch is grey, skip this step.
-
5
Click Time Zone. It’s near the bottom of the window. Doing so opens the Time Zone menu.
-
6
Select a time zone. Click your approximate location on the world map to do so. You should see the time change to match the selected area’s time zone.
-
7
Close the window. This will save your settings and update your time zone accordingly.
Advertisement
-
1
Open the Menu. Click Menu in the bottom-left corner of the screen.
-
2
Click the System Settings icon. It’s made of two grey cogs. You’ll find it on the left side of the Menu window.
-
3
Click Date & Time. It’s in the «Preferences» group of options.
-
4
Select a time zone. Click a vertical slice of the map to pick that time zone. You should see the clock on the right side of the page immediately change to reflect the selected time zone’s time.
-
5
Enter your user password when prompted. If you have logged in as an Administrator, you may not need to enter password. In case you have logged in as a Standard user, type in the Administrator password. Super user privileges are required to make any changes to time zone settings.
-
6
Click Authenticate. It’s at the bottom of the prompt. Doing so unlocks the Date & Time menu.
Advertisement
Ask a Question
200 characters left
Include your email address to get a message when this question is answered.
Submit
Advertisement
Video
-
On some versions of RedHat Linux, Slackware, Gentoo, SuSE, Debian, Ubuntu, and anything else that is «normal», the command to display and change the time is «date», not «clock».
-
On mobile phones and other small devices that run Linux, the time zone is stored differently. It is written in /etc/TZ. Edit this file manually or use echo (for instance, echo GMT0BST > /etc/TZ to set the the timezone of the United Kingdom).
Thanks for submitting a tip for review!
Advertisement
-
Some applications (such as PHP) have separate timezone settings from the system timezone.
-
On some systems, there is a system utility provided that will prompt for the correct timezone and make the proper changes to the system configuration. For example, Debian provides the «tzsetup» or «tzconfig» utility.
Advertisement
About This Article
Thanks to all authors for creating a page that has been read 1,623,397 times.
Is this article up to date?
Часовой пояс — это географический регион с одинаковым стандартным временем. Обычно часовой пояс устанавливается во время установки операционной системы, но его можно легко изменить позже.
Использование правильного часового пояса необходимо для многих задач и процессов, связанных с системами. Например, демон cron использует часовой пояс системы для выполнения заданий cron. Часовой пояс также используется для временных меток журналов.
Проверка текущего часового пояса
timedatectl утилита командной строки, которая позволяет вам просматривать и изменять системное время и дату. Он доступен во всех современных системах Linux на основе systemd.
Чтобы просмотреть текущий часовой пояс, вызовите timedatectl команду без каких-либо параметров или аргументов:
timedatectl Local time: Tue 2019-12-03 16:30:44 UTC
Universal time: Tue 2019-12-03 16:30:44 UTC
RTC time: Tue 2019-12-03 16:30:44
Time zone: Etc/UTC (UTC, +0000)
System clock synchronized: no
systemd-timesyncd.service active: yes
RTC in local TZ: no
Вывод выше показывает, что часовой пояс системы установлен в UTC.
Часовой пояс системы настраивается путем символической ссылки /etc/localtime файла на двоичный идентификатор часового пояса в /usr/share/zoneinfo каталоге.
Другой способ проверить часовой пояс — просмотреть путь, на который указывает символическая ссылка, с помощью ls команды:
ls -l /etc/localtimelrwxrwxrwx 1 root root 27 Dec 3 16:29 /etc/localtime -> /usr/share/zoneinfo/Etc/UTC
Изменение часового пояса в Linux
Перед сменой часового пояса вам необходимо узнать полное название часового пояса, которое вы хотите использовать. Соглашение о присвоении имен часовым поясам обычно использует формат «Регион / Город».
Чтобы просмотреть все доступные часовые пояса, используйте timedatectl команду или перечислите файлы в /usr/share/zoneinfo каталоге:
timedatectl list-timezones...
America/Montserrat
America/Nassau
America/New_York
America/Nipigon
America/Nome
America/Noronha
...
Как только вы определите, какой часовой пояс соответствует вашему местоположению, выполните следующую команду от имени пользователя root или sudo :
sudo timedatectl set-timezone <your_time_zone>
Например, чтобы изменить часовой пояс системы, America/New_York введите:
sudo timedatectl set-timezone America/New_York
Чтобы проверить изменение, timedatectl снова вызовите команду:
timedatectl Local time: Tue 2019-12-03 13:55:09 EST
Universal time: Tue 2019-12-03 18:55:09 UTC
RTC time: Tue 2019-12-03 18:02:16
Time zone: America/New_York (EST, -0500)
System clock synchronized: no
systemd-timesyncd.service active: yes
RTC in local TZ: no
Миссия выполнена! Вы успешно изменили часовой пояс вашей системы.
Изменение часового пояса путем создания символической ссылки
Если вы используете более старый дистрибутив Linux, а timedatectl утилита отсутствует в вашей системе, вы можете изменить часовой пояс, вставив ссылку /etc/localtime на часовой пояс в /usr/share/zoneinfo каталоге.
Удалить текущую символическую ссылку или файл:
sudo rm -rf /etc/localtimeОпределите часовой пояс, который вы хотите настроить, и создайте символическую ссылку :
sudo ln -s /usr/share/zoneinfo/America/New_York /etc/localtime
Проверьте это, перечислив /etc/localtime файл или вызвав date команду:
dateВыходные данные включают часовой пояс, в этом примере это «EST».
Tue Dec 3 14:10:54 EST 2019
Вывод
Чтобы изменить часовой пояс в системах Linux, используйте sudo timedatectl set-timezone команду, за которой следует длинное имя часового пояса, которое вы хотите установить.
![]()
Загрузить PDF
![]()
Загрузить PDF
Из этой статьи вы узнаете, как изменить часовой пояс на компьютере Linux. Часовой пояс можно изменить на любом дистрибутиве Linux с помощью командной строки или меню выбора разных дистрибутивов Linux в командной строке. Если вы используете Mint, Ubuntu или другой дистрибутив с простым пользовательским интерфейсом и меню настроек, измените часовой пояс оттуда.
-
1
Запустите «Терминал». Выберите программу «Терминал» из списка программ Linux или нажмите Ctrl+Alt+T на клавиатуре.
-
2
Определите текущий часовой пояс. Введите date в «Терминал» и нажмите ↵ Enter. «Терминал» отобразит дату в формате:
День_недели Месяц Число Время Часовой_пояс Год.- Пример:
Wed (среда) Mar (март) 7 07:38:23 FET 2017, где «FET» обозначает текущий часовой пояс (Дальневосточноевропейское время).
- Пример:
-
3
Отобразите доступные часовые пояса. Введите cd /usr/share/zoneinfo и нажмите ↵ Enter, после чего введите tzselect и нажмите ↵ Enter, чтобы отобразить список мест.
- Путь /usr/share/zoneinfo может быть другим в зависимости от дистрибутива Linux.
-
4
Выберите континент или океан. Введите номер места в соответствии со своим местоположением и нажмите ↵ Enter.
-
5
Выберите страну. Введите на экране номер страны из списка и нажмите ↵ Enter.
-
6
Выберите часовой пояс. Введите номер предпочитаемого часового пояса и нажмите ↵ Enter.
- Если вашего города нет в списке, выберите другой город из того же часового пояса.
-
7
Подтвердите местное время. Подтвердите правильность местного времени, введя 1, а затем нажмите ↵ Enter.
- Если время указано неверно, введите 2 и нажмите ↵ Enter, а затем выберите другой континент и повторите весь процесс снова.
-
8
Убедитесь, что вы поменяли часовой пояс. Еще раз введите команду date и убедитесь, что на экране показан правильный часовой пояс. Если это так, то вы успешно изменили часовой пояс.
-
9
Настройте часы, чтобы они синхронизировались с сервером точного времени в интернете. Большинство современных дистрибутивов Linux содержат предварительно установленный пакет NTP. Если в вашем дистрибутиве его нет, установите пакет NTP отдельно. Используйте одну из следующих команд, чтобы установить NTP:
- Ubuntu/Mint/Debian: sudo apt install ntp
-
CentOS: sudo yum install ntp
sudo /sbin/chkconfig ntpd on -
Fedora/RedHat: sudo yum install ntp
sudo chkconfig ntpd on - Введите ntpdate ссылка на сервер && hwclock –w после команды установки, указав ссылку на сайт сервера.
Реклама


-
1
Запустите «Терминал». Выберите программу «Терминал» из списка программ Linux или нажмите Ctrl+Alt+T на клавиатуре.
-
2
Введите команду, чтобы открыть меню «Часовой пояс». Эта команда может отличаться в зависимости от дистрибутива Linux:
- Ubuntu и Mint — sudo dpkg-reconfigure tzdata с указанием пароля администратора/пользователя.
- Redhat — redhat-config-date
- CentOS и Fedora — system-config-date
- ‘FreeBSD и Slackware — tzselect
-
3
Выберите регион. Стрелками на клавиатуре выберите регион, в котором проживаете, и нажмите ↵ Enter.
-
4
Выберите свой город/страну. Выберите город или страну в соответствующем часовом поясе и нажмите ↵ Enter, чтобы изменить часовой пояс на компьютере.
[1]
Реклама


-
1
Щелкните по иконке «Системное меню»
, чтобы отобразить выпадающее меню. Это треугольник, направленный вниз, в правом верхнем углу экрана.[2]
-
2
Щелкните по иконке «Настройки» (гаечный ключ и отвертка) в левом нижнем углу меню. Откроется Центр управления Ubuntu.
-
3
Прокрутите вниз и нажмите на Подробности. Это раздел в нижней части боковой панели, расположенной в левой части окна.
- Убедитесь, чтобы мышь при этом находилась над левой боковой панелью.
-
4
Откройте вкладку Дата и время в левой части окна.
-
5
Отключите автоматическое определение часового пояса. Для этого нажмите на синий переключатель «Автоматически определять часовой пояс».
- Если этот параметр уже отключен, пропустите этот шаг.
-
6
Нажмите на Часовой пояс в нижней части окна, чтобы открыть меню выбора часового пояса.
-
7
Выберите часовой пояс. Выберите свое приблизительное местоположение на карте мира. Время на компьютере должно измениться в соответствии с часовым поясом в выбранном регионе.
-
8
Закройте окно, чтобы сохранить изменения и обновить часовой пояс на компьютере.
Реклама


-
1
Откройте Меню. Нажмите на «Меню» в левом нижнем углу экрана.
-
2
Нажмите на иконку «Параметры системы» (две серых шестеренки) в левой части окна Меню.
-
3
Выберите раздел Дата и время в группе «Параметры».
-
4
Нажмите на кнопку Разблокировать в правой части окна.
-
5
Введите пароль пользователя. Введите пароль для входа в систему.
-
6
Нажмите на Подтвердить в нижней части запроса, чтобы разблокировать меню «Дата и время».
-
7
Выберите часовой пояс. Щелкните по вертикальному срезу карты для выбора часового пояса. Время в правой части страницы сразу же изменится в соответствии с выбранным часовым поясом.
-
8
Нажмите на Заблокировать в правой части окна, чтобы сохранить часовой пояс и заблокировать меню «Дата и время».
Реклама


Советы
- В некоторых версиях RedHat Linux, Slackware, Gentoo, SuSE, Debian, Ubuntu и других стандартных дистрибутивах командой для отображения и изменения времени является «date», а не «clock».
- На мобильных телефонах и других портативных устройствах, работающих под управлением Linux, часовой пояс хранится в другом месте. Он содержится в файле /etc/TZ в формате, который описан, например, в [1]. Отредактируйте этот файл вручную или воспользуйтесь командой echo (например, echo GMT3FET > /etc/TZ, чтобы установить часовой пояс Москвы).
Реклама
Предупреждения
- Настройки часового пояса в некоторых приложениях (например, PHP) отличаются от системных настроек часового пояса.
- В некоторых системах есть утилита, которая запрашивает правильный часовой пояс и вносит соответствующие изменения в конфигурацию системы. В Debian, к примеру, для этого есть утилиты tzsetup и tzconfig.
Реклама
Об этой статье
Эту страницу просматривали 62 283 раза.
Была ли эта статья полезной?
Часовой пояс — это географический регион с одинаковым стандартным временем. Обычно часовой пояс задается во время установки операционной системы, но его можно легко изменить позже.
Использование правильного часового пояса необходимо для многих системных задач и процессов. Например, демон cron использует часовой пояс системы для выполнения заданий cron. Часовой пояс также используется для отметок времени журналов.
В этом руководстве описаны действия, необходимые для установки или изменения часового пояса в Linux.
Проверка текущего часового пояса
timedatectl — это timedatectl программа командной строки, которая позволяет просматривать и изменять системное время и дату. Он доступен во всех современных системах Linux на базе systemd.
Чтобы просмотреть текущий часовой пояс, вызовите команду timedatectl без каких-либо параметров или аргументов:
timedatectl Local time: Tue 2019-12-03 16:30:44 UTC
Universal time: Tue 2019-12-03 16:30:44 UTC
RTC time: Tue 2019-12-03 16:30:44
Time zone: Etc/UTC (UTC, +0000)
System clock synchronized: no
systemd-timesyncd.service active: yes
RTC in local TZ: no
Приведенный выше вывод показывает, что часовой пояс системы установлен на UTC.
Системный часовой пояс настраивается путем символьной привязки файла /etc/localtime к идентификатору двоичного часового пояса в каталоге /usr/share/zoneinfo .
Другой способ проверить часовой пояс — просмотреть путь, на который указывает символическая ссылка, с помощью команды ls :
ls -l /etc/localtimelrwxrwxrwx 1 root root 27 Dec 3 16:29 /etc/localtime -> /usr/share/zoneinfo/Etc/UTC
Изменение часового пояса в Linux
Перед изменением часового пояса вам нужно узнать длинное название часового пояса, который вы хотите использовать. В соглашении об именах часовых поясов обычно используется формат «Регион / Город».
Чтобы просмотреть все доступные часовые пояса, используйте команду timedatectl или перечислите файлы в каталоге /usr/share/zoneinfo :
timedatectl list-timezones...
America/Montserrat
America/Nassau
America/New_York
America/Nipigon
America/Nome
America/Noronha
...
Как только вы определите, какой часовой пояс соответствует вашему местоположению, выполните следующую команду от имени пользователя root или sudo :
sudo timedatectl set-timezone <your_time_zone>Например, чтобы изменить часовой пояс системы на America/New_York , введите:
sudo timedatectl set-timezone America/New_YorkЧтобы проверить изменение, снова вызовите команду timedatectl :
timedatectl Local time: Tue 2019-12-03 13:55:09 EST
Universal time: Tue 2019-12-03 18:55:09 UTC
RTC time: Tue 2019-12-03 18:02:16
Time zone: America/New_York (EST, -0500)
System clock synchronized: no
systemd-timesyncd.service active: yes
RTC in local TZ: no
Миссия выполнена! Вы успешно изменили часовой пояс вашей системы.
Изменение часового пояса путем создания символической ссылки
Если вы используете более старый дистрибутив Linux и утилита timedatectl отсутствует в вашей системе, вы можете изменить часовой пояс, установив символическую ссылку /etc/localtime на часовой пояс в каталоге /usr/share/zoneinfo .
Удалить текущую символическую ссылку или файл:
sudo rm -rf /etc/localtimeОпределите часовой пояс, который вы хотите настроить, и создайте символическую ссылку :
sudo ln -s /usr/share/zoneinfo/America/New_York /etc/localtimeПроверьте это, перечислив файл /etc/localtime или вызвав команду date :
dateВыходные данные включают часовой пояс, в данном примере это «EST».
Tue Dec 3 14:10:54 EST 2019
Выводы
Чтобы изменить часовой пояс в системах Linux, используйте команду sudo timedatectl set-timezone за которой следует длинное имя часового пояса, который вы хотите установить.
Не стесняйтесь оставлять комментарии, если у вас есть вопросы.
В статье мы разберёмся с тем, как настроить время в Linux. Посмотрим текущее время, укажем часовой пояс и настроим синхронизацию времени.
Чтобы посмотреть текущее время на вашем сервере linux воспользуйтесь командой date:
alex@ubu:~$ date
Ср 13 июл 2022 13:40:27 UTC
В выводе мы видим не только дату и время, но также и часовой пояс. Сейчас вместо часового пояса используется UTC.
Также можно использовать другую команду – timedatectl:
alex@s-ubu:~$ timedatectl
               Local time: Ср 2022-07-20 07:56:41 UTC
           Universal time: Ср 2022-07-20 07:56:41 UTC
                 RTC time: Ср 2022-07-20 07:56:41
                Time zone: UTC (UTC, +0000)
System clock synchronized: yes
              NTP service: active
          RTC in local TZ: no
Без опций она покажет текущее время, часовой пояс, а также другую информацию связанную с синхронизацией времени. Например в примере выше видно что время успешно синхронизуется (System clock synchronized: yes) и синхронизация настроена (NTP service: active).
С помощью этой же утилиты (timedatectl) мы будем настраивать часовой пояс и следить за синхронизацией времени, об этом чуть ниже.
Настройка часового пояса
Вообще часовой пояс в системе определяется файлом /etc/localtime, который является символьной ссылкой (про ссылки я уже писал):
alex@ubu:~$ ls -l /etc/localtime
lrwxrwxrwx 1 root root 27 апр 21 01:01 /etc/localtime -> /usr/share/zoneinfo/Etc/UTC
Можно вручную отредактировать эту ссылку и указать нужный часовой пояс:
alex@ubu:~$ sudo ln -sf /usr/share/zoneinfo/Europe/Moscow /etc/localtime
Или воспользоваться утилитой timedatectl:
alex@ubu:~$ sudo timedatectl set-timezone Europe/Moscow
Если вас не устраивает выбранный мною часовой пояс, то можете посмотреть список поддерживаемых часовых поясов так:
alex@ubu:~$ timedatectl list-timezones
Проверим время и часовой пояс:
alex@ubu:~$ timedatectl
               Local time: Ср 2022-07-13 16:50:39 MSK
           Universal time: Ср 2022-07-13 13:50:39 UTC
                 RTC time: Ср 2022-07-13 13:50:39
                Time zone: Europe/Moscow (MSK, +0300)
System clock synchronized: yes
              NTP service: active
          RTC in local TZ: no
Как видим, часовой пояс уже изменился на Europe/Moscow (MSK, +0300).
Синхронизация времени
В настоящее время очень важно чтобы часы на ваших серверах были синхронизированы. Очень много систем полагаются на время, например:
- если часы на сервере kerberos и клиенте расходятся более чем на 5 минут, то клиенты не смогут пройти проверку подлинности на сервере;
- в различных финансовых системах транзакции должны выполняться в надлежащем порядке, поэтому серверы выполняющую эту работу должны быть строго синхронизированы по времени;
- правильное время также нужно для выполнения автоматизированный задач;
- системные журналы также полагаются на время.
Получение списка NTP серверов по DHCP
Если ваш сервер получает сетевые настройки по dhcp, то он может получить список NTP серверов (серверов времени для синхронизации). Это настраивается в файле /etc/dhcp/dhclient.conf. В строке request мы определяем что хотим получать от сервера dhcp. И здесь может быть указан параметр ntp-servers:
alex@ubu:~$ cat /etc/dhcp/dhclient.conf
# часть текста пропустил
request subnet-mask, broadcast-address, time-offset, routers,
        domain-name, domain-name-servers, domain-search, host-name,
        dhcp6.name-servers, dhcp6.domain-search, dhcp6.fqdn, dhcp6.sntp-servers,
        netbios-name-servers, netbios-scope, interface-mtu,
        rfc3442-classless-static-routes, ntp-servers;
# часть текста пропустил
Само собой, вы получите список ntp-серверов, только в том случае если ваш dhcp сервер их распространяет.
Служба синхронизации времени
В системах работающих на systemd работает специальная служба синхронизации времени systemd-timesyncd.service. Можем посмотреть её статус:
alex@ubu:~$ systemctl status systemd-timesyncd.service
● systemd-timesyncd.service - Network Time Synchronization
     Loaded: loaded (/lib/systemd/system/systemd-timesyncd.service; enabled; vendor preset: enabled)
     Active: active (running) since Wed 2022-07-13 17:08:06 MSK; 23s ago
       Docs: man:systemd-timesyncd.service(8)
   Main PID: 399 (systemd-timesyn)
     Status: "Initial synchronization to time server 192.168.0.16:123 (192.168.0.16)."
      Tasks: 2 (limit: 2241)
     Memory: 1.3M
        CPU: 63ms
     CGroup: /system.slice/systemd-timesyncd.service
             └─399 /lib/systemd/systemd-timesyncd
Видим что синхронизация идет с сервером по адресу 192.168.0.16. У меня этот адрес прилетел по dhcp.
Обратите внимание, что служба эта стартует по запросу и останавливается после синхронизации времени!
Давайте выключим получение ntp серверов по dhcp:
alex@ubu:~$ sudo nano /etc/dhcp/dhclient.conf
# в этой строке удалите опцию ntp-servers
request subnet-mask, broadcast-address, time-offset, routers,
        domain-name, domain-name-servers, domain-search, host-name,
        dhcp6.name-servers, dhcp6.domain-search, dhcp6.fqdn, dhcp6.sntp-servers,
        netbios-name-servers, netbios-scope, interface-mtu,
        rfc3442-classless-static-routes;
Вы можете использовать следующий пул серверов времени для синхронизации – https://www.pool.ntp.org/zone/ru. Укажем первый сервер из этого пула в конфиге /etc/systemd/timesyncd.conf:
alex@ubu:~$ sudo nano /etc/systemd/timesyncd.conf
[Time]
NTP=0.ru.pool.ntp.org
FallbackNTP=ntp.ubuntu.com
RootDistanceMaxSec=5
PollIntervalMinSec=32
PollIntervalMaxSec=2048
В конфиге используются следующие опции:
- NTP – укажите 1 или несколько ntp серверов. Если хотите указать несколько серверов, разделяйте их пробелами;
- FallbackNTP – укажите 1 или несколько резервных ntp серверов;
- RootDistanceMaxSec – максимальное время в секундах, за которое пакет от сервера эталонного времени должен доходить до сервера к которому мы подлкючены;
- PollIntervalMinSec и PollIntervalMaxSec – минимальный и максимальный интервалы синхронизаций времени. Вначале используется минимальный интервал, а затем он увеличивается если система видит что локальное время со временем ntp-сервера не расходится.
После правки перезапустите службу синхронизаций времени:
alex@ubu:~$ sudo systemctl restart systemd-timesyncd.service
Дополнительно можно посмотреть информацию по синхронизации времени с помощью следующей команды:
alex@ubu:~$ timedatectl timesync-status
       Server: 91.209.94.10 (0.ru.pool.ntp.org)
Poll interval: 34min 8s (min: 32s; max 34min 8s)
         Leap: normal
      Version: 4
      Stratum: 2
    Reference: 3EE70662
    Precision: 1us (-25)
Root distance: 4.012ms (max: 5s)
       Offset: -5.502ms
        Delay: 11.084ms
       Jitter: 2.886ms
 Packet count: 7
    Frequency: +15,118ppm
Здесь мы видим адрес ntp-сервера, а также какой интервал синхронизации (34min 8s) использовался последний раз.
То-есть служба синхронизации времени systemd-timesyncd.service будет запускаться и останавливаться сейчас примерно раз в 34 минуты. Поэтому если увидите, что служба в состоянии loaded и inactive, не пугайтесь. По логам видно что она периодически запускается:
alex@ubu:~$ systemctl status systemd-timedated
○ systemd-timedated.service - Time & Date Service
     Loaded: loaded (/lib/systemd/system/systemd-timedated.service; static)
     Active: inactive (dead)
       Docs: man:systemd-timedated.service(8)
             man:localtime(5)
             man:org.freedesktop.timedate1(5)

июл 19 15:54:24 s-ubu systemd[1]: systemd-timedated.service: Deactivated successfully.
июл 19 15:55:41 s-ubu systemd[1]: Starting Time & Date Service...
июл 19 15:55:41 s-ubu systemd[1]: Started Time & Date Service.
июл 19 15:56:35 s-ubu systemd[1]: systemd-timedated.service: Deactivated successfully.
июл 19 16:05:45 s-ubu systemd[1]: Starting Time & Date Service...
июл 19 16:05:45 s-ubu systemd[1]: Started Time & Date Service.
июл 19 16:06:15 s-ubu systemd[1]: systemd-timedated.service: Deactivated successfully.
июл 19 16:28:42 s-ubu systemd[1]: Starting Time & Date Service...
июл 19 16:28:42 s-ubu systemd[1]: Started Time & Date Service.
июл 19 16:30:17 s-ubu systemd[1]: systemd-timedated.service: Deactivated successfully.
Из вывода:
- Deactivated successfully – служба останавливается;
- Starting Time & Date Service… – служба стартует;
- Started Time & Date Service – служба стартовала;
- и так по кругу.
Ещё один способ задать часовой пояс
С помощью команды dpkg-reconfigure tzdata также можно задать часовой пояс:
alex@ubu:~$ sudo dpkg-reconfigure tzdata
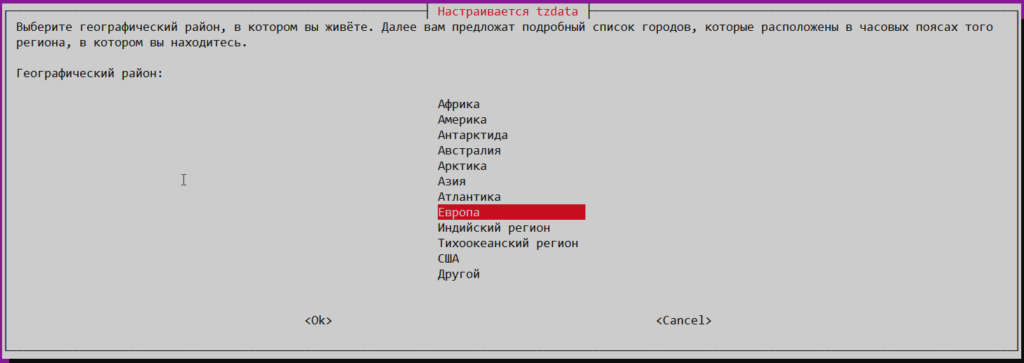
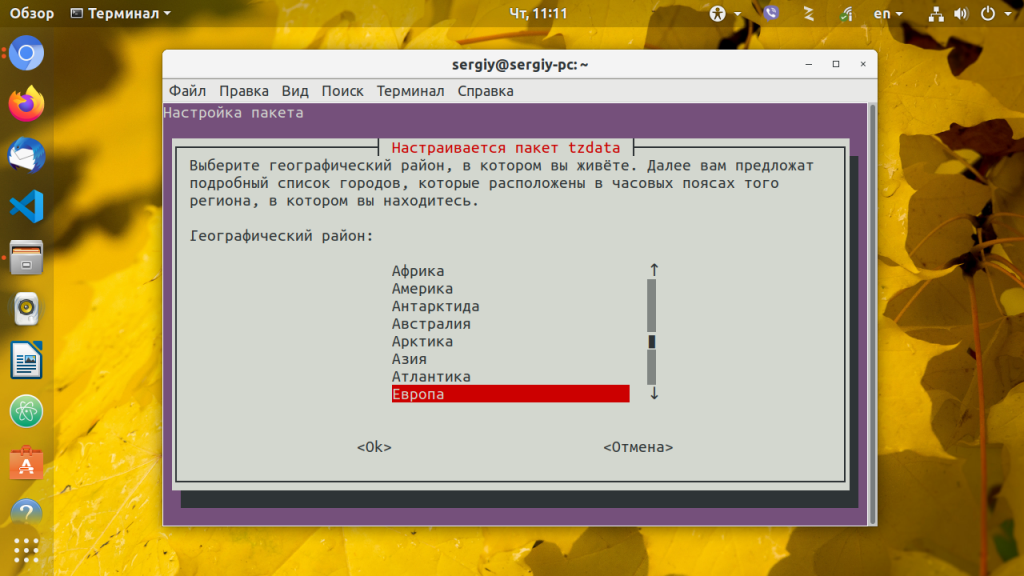
После выполнения вы можете использовать псевдографический интерфейс для настройки часового пояса. Вначале выберите географический район:
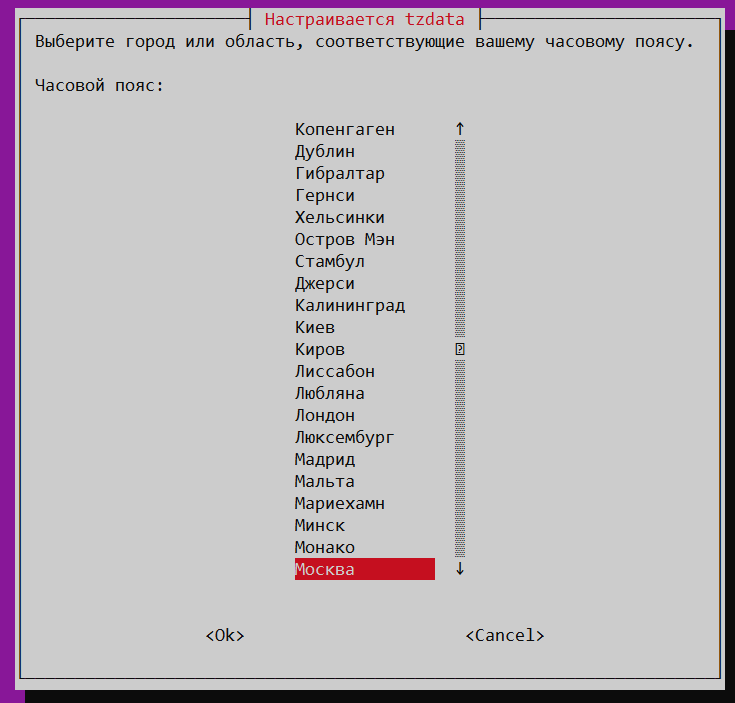
Затем город:
Итог
Теперь вы знаете как настроить время на сервере Debian или Ubuntu. Мы научились устанавливать часовой пояс и настраивать синхронизации времени с ntp серверами.
Узнали про следующие команды:
- date – покажет текущую дату, время и часовой пояс;
- timedatectl – покажет тоже самое что и date + синхронизуется ли время;
- timedatectl list-timezones – покажет список поддерживаемых часовых поясов;
- timedatectl set-timezone Europe/Moscow – установить часовой пояс Europe/Moscow;
- timedatectl timesync-status – покажет с какими ntp-серверами синхронизуется время и как часто;
- dpkg-reconfigure tzdata – установить часовой пояс.
Познакомились с файлами:
- /etc/localtime – является символической ссылкой и содержит информацию о текущем часовом поясе;
- /etc/dhcp/dhclient.conf – настройки dhcp-клиента, который умеет запрашивать ntp-сервера для синхронизации времени;
- /etc/systemd/timesyncd.conf – настройки службы синхронизации времени.
Узнали про службу синхронизации времени:
- systemd-timedated.service – стартует по запросу, а после синхронизации времени отключается до следующей синхронизации.
Сводка

Имя статьи
Дата, время и часовой пояс в Linux
Описание
В статье мы разберёмся с тем, как настроить время в Linux. Посмотрим текущее время, укажем часовой пояс и настроим синхронизацию времени
Мы очень часто пользуемся временем в Linux, начиная от простой задачи узнать сколько сейчас времени, до более сложной — посмотреть логи или узнать когда произошло то или иное событие в системе. Все завязано на времени, поэтому очень важно, чтобы часы шли правильно.
Наша планета разделена на часовые пояса, это было сделано с одной простой целью, чтобы время в любой точке планеты соответствовало солнечному времени. Время между этими зонами отличается на час и всего таких поясов — 24, за эталон взято время по нулевому, Гринвичскому меридиану.
Поэтому в определенный момент время в разных участках планеты будет отличаться на час. В этой небольшой статье мы рассмотрим как изменить часовой пояс Linux, чтобы операционная система правильно работала со временем и могла правильно его синхронизировать через интернет.
Операционная система Linux хранит и обрабатывает системное время в специальном Unix формате — количество секунд прошедших с полуночи первого января 1970 года. Эта дата считается началом эпохи Unix. И используется не ваше локальное время, а время по гринвичскому меридиану.
Для преобразования времени по Гринвичу в региональное время используется часовой пояс. Это преобразование выполняется для каждого пользователя. Это необходимо, чтобы каждый пользователь мог настроить для себя правильное по его временной зоне время. Такое поведение просто необходимо на серверах, когда на одной машине могут работать люди из разных частей мира.
По умолчанию в системе может быть установлен неправильный часовой пояс, это приведет к путанице в логах событий, да и другим трудностям. Но все это легко исправить. Дальше мы рассмотрим несколько способов изменить часовой пояс Linux.
Настройка часового пояса в linux
1. Ссылка /etc/localtime
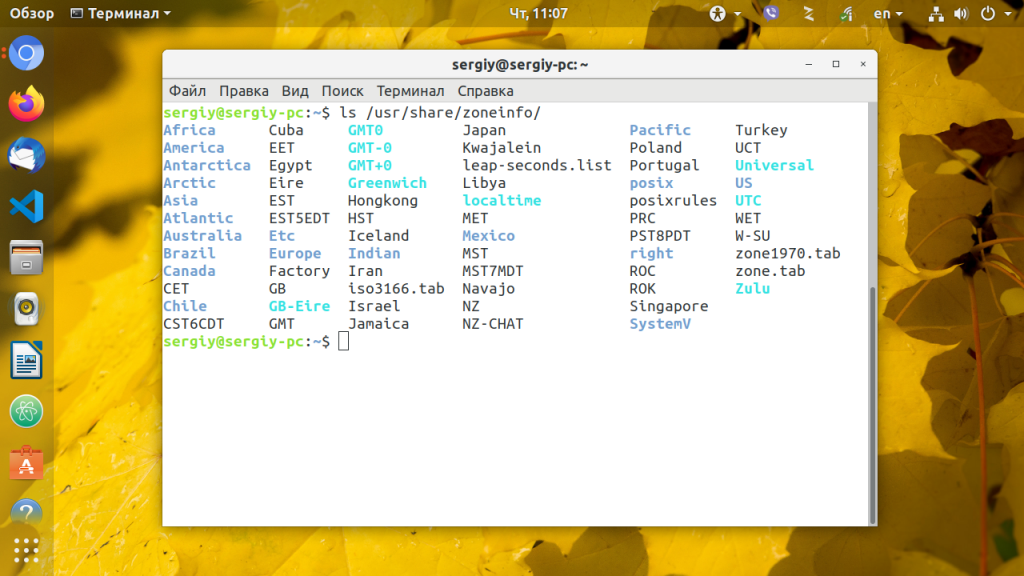
Наиболее популярный и поддерживаемый в большинстве дистрибутивов способ установки часового пояса для всех пользователей — с помощью символической ссылки /etc/localtime на файл нужного часового пояса. Список доступных часовых поясов можно посмотреть командой:
ls /usr/share/zoneinfo/
Сначала создайте резервную копию текущего часового пояса:
cp /etc/localtime /etc/localtime.bak
Для создания символической ссылки используйте команду ln -sf. Файл зоны нужно выбрать из доступных в системе. Например, мой часовой пояс — Украина, Киев, для установки будет использоваться следующая команда:
ln -sf /usr/share/zoneinfo/Europe/Kiev /etc/locatime
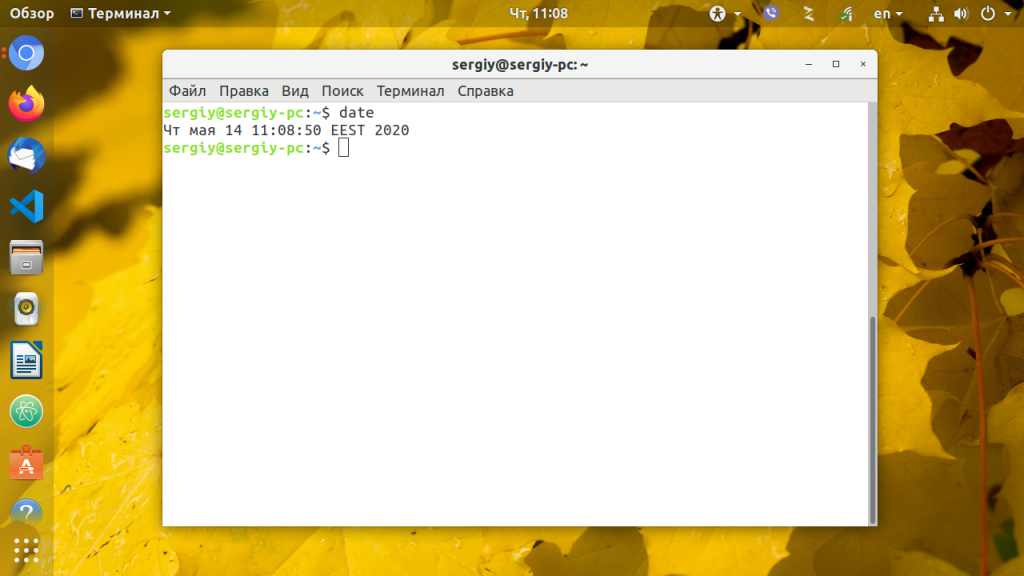
Теперь можете проверить текущее системное время с помощью утилиты date:
date
Если у вас установлена утилита rdate можно синхронизировать время с сетью:
sudo rdate -s time-a.nist.gov
Осталось только синхронизировать ваши аппаратные часы с новыми настройками, для этого выполните команду:
/sbin/hwclock --systohc
Если нужно изменить часовой пояс только для определенной программы или скрипта, просто измените для нее переменную окружения TZ, например:
export TZ=Europe/Kiev
Эта настройка сохраняется только для текущего сеанса командной оболочки. Чтобы сменить часовой пояс linux для определенного пользователя тоже нужно использовать переменную среды TZ. Только ее нужно добавить в файл ~/.environment. Этот файл читается по умолчанию при входе в систему, а значит переменная будет доступна всем программам:
vi ~/.environment
export TZ=Europe/Kiev
Готово, теперь вы знаете как выполняется настройка часового пояса linux для определенного пользователя.
2. Настройка с помощью tzdata
Если вы не хотите использовать описанный выше способ, можно воспользоваться специальными утилитами. Вот только в разных дистрибутивах используются свои утилиты. Рассмотрим варианты для самых популярных дистрибутивов.
В Red Hat Linux:
redhat-config-date
В CentOS и Fedora:
system-config-date
В Slackware или FreeBSD:
tzselect
В Ubuntu:
dpkg-reconfigure tzdata
В большинстве случаев вы увидите подобное диалоговое окно:
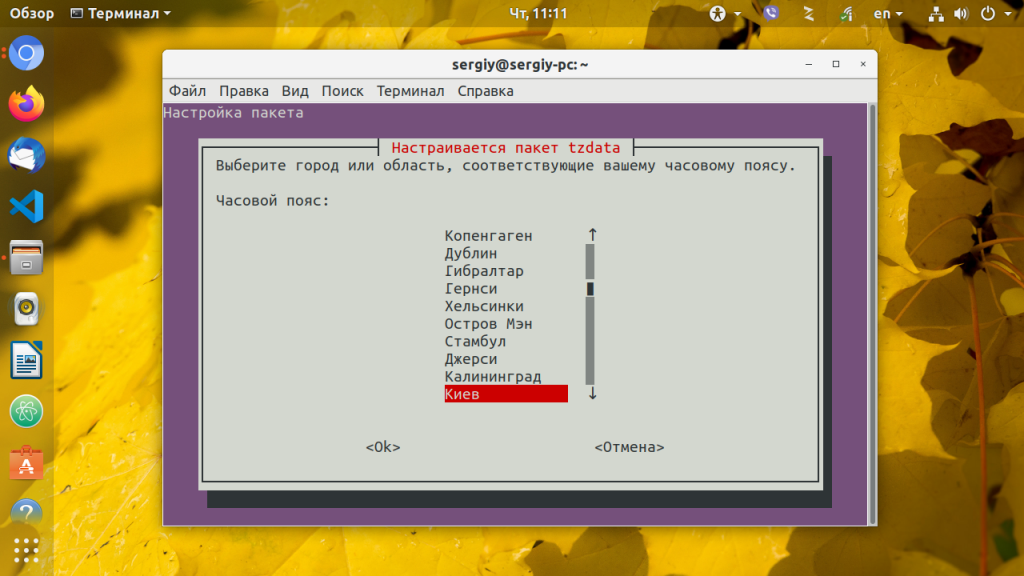
Здесь просто нужно выбрать нужный часовой пояс и нажать кнопку Enter. После этого для окончательного применения настроек нужно будет перезагрузить систему.
3. Настройка с помощью systemd
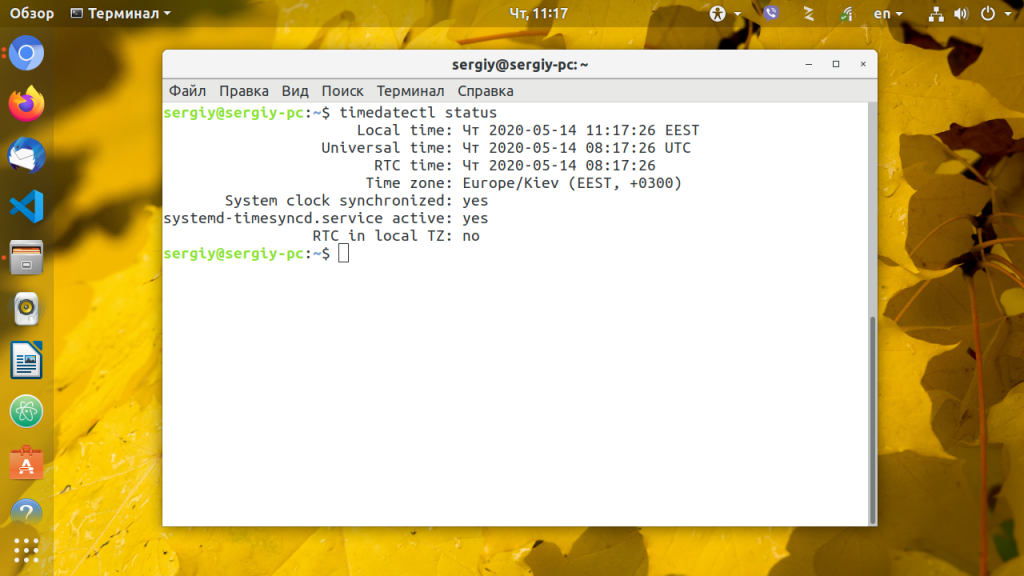
В systemd есть своя утилита для настройки даты и часового пояса. Чтобы узнать текущее состояние выполните:
timedatectl status
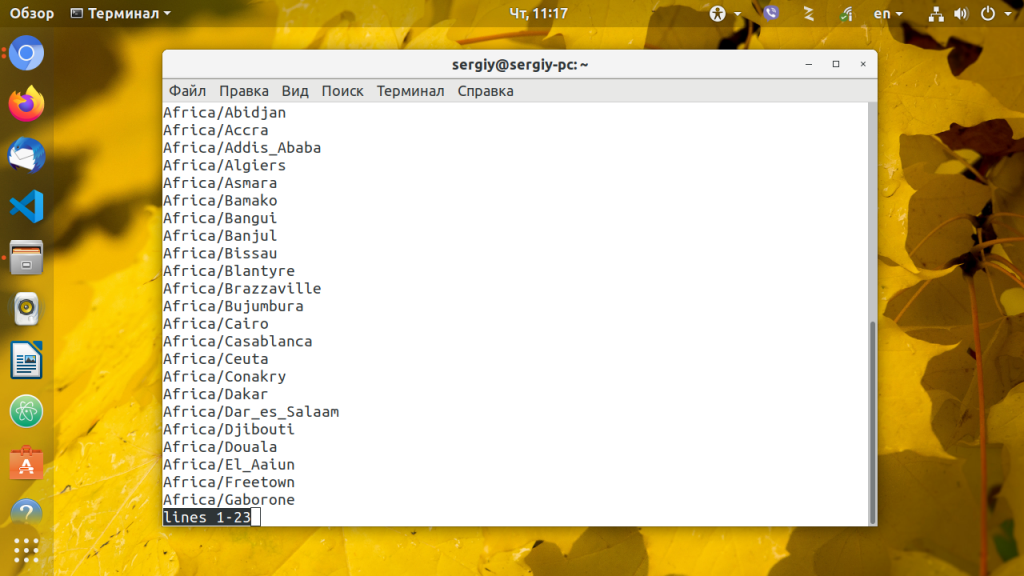
Для просмотра всех доступных временных зон выполните такую команду:
timedatectl list-timezones
А для установки нужного часового пояса используйте команду set-timezone, например, тот же Europe/Kiev:
sudo timedatectl set-timezone Europe/Kiev
4. Настройка часового пояса в GUI
В дистрибутиве Ubuntu и других, использующих Gnome, настройка часового пояса Linux может быть выполнена прямо в параметрах системы. Для этого выберите пункт Сведения о системе, затем Дата и время, выберите свое местоположение на карте, или наберите название для поиска в поле ввода:
В KDE аналогично можно установить часовой пояс в настройках системы. Запустите утилиту настроек, откройте пункт Локализация, перейдите в раздел Дата и время, а затем откройте вкладку Часовой пояс:
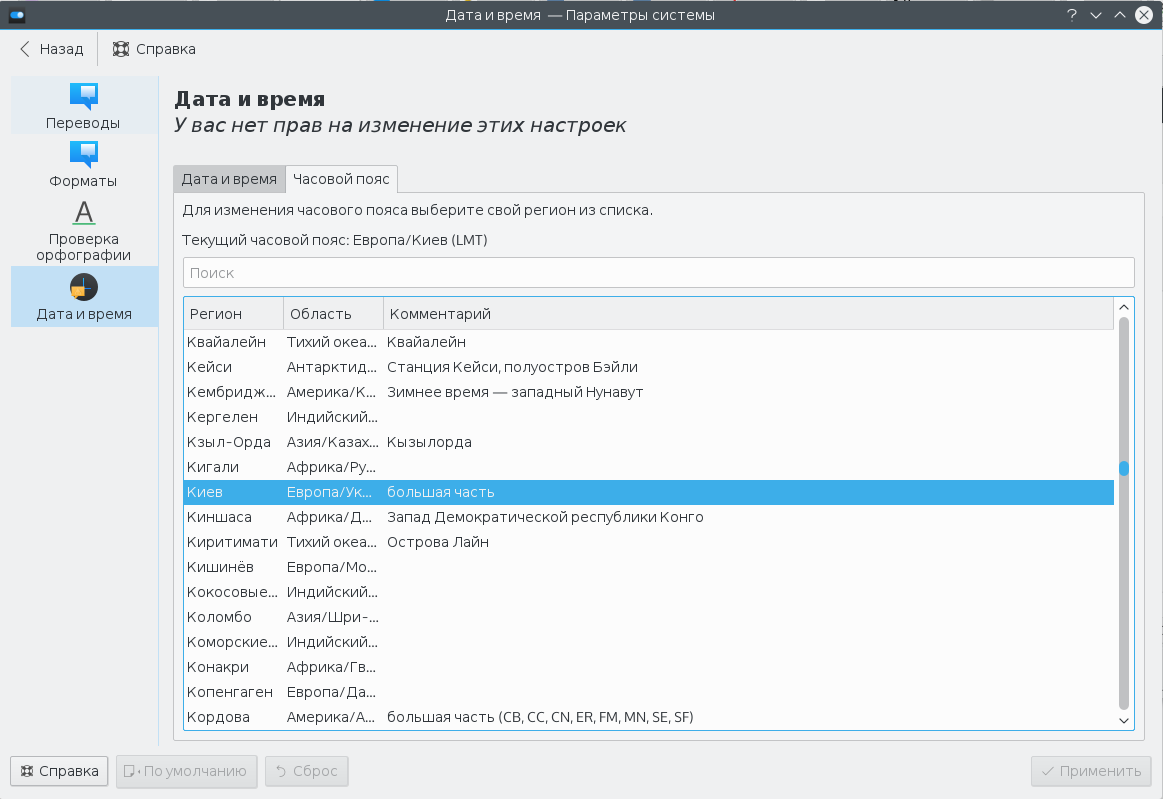
Остается выбрать часовой пояс в списке и нажать кнопку Применить. Здесь уже изменения должны проявиться моментально.
Выводы
Теперь вы знаете как выполняется установка часового пояса в linux и сможете настроить не только свой домашний компьютер но и сервер с множеством пользователей, которым нужен отдельный часовой пояс для правильного местного времени. Если у вас остались вопросы, спрашивайте в комментариях!
На завершение видео, в котором подробно рассказано, что такое часовые пояса и зачем они нужны:

Статья распространяется под лицензией Creative Commons ShareAlike 4.0 при копировании материала ссылка на источник обязательна .
|
|
Needs Updating |

Contents
-
Ubuntu Time Management
-
Changing the Time Zone
- Using the GUI
- Using the Command Line (terminal)
- Using the Command Line (unattended)
-
Time Synchronization using NTP
- Using the GUI
- Command Line ntpd
-
Changing NTP Time Servers
- Using the GUI
- ntpd
- Command Line ntpdate
- ntpdate
-
Multiple Boot Systems Time Conflicts
-
Make Windows use UTC
- Reversing the change
-
Make Linux use ‘Local’ time
- Pre-Ubuntu 15.04 systems (e.g. Ubuntu 14.04 LTS):
- Ubuntu 15.04 systems and above (e.g. Ubuntu 16.04 LTS):
-
Make Windows use UTC
-
Troubleshooting
- Is NTP installed?
-
Which configuration file is it using?
- How do I configure NTP to use DHCP
- Is NTP running?
- Which servers are you using?
- Can these servers be resolved?
- Can these servers be reached?
- What’s NTP up to?
- Why does NTP keep resetting/failing?
-
Changing the Time Zone
Ubuntu Time Management
This page gives useful information about the way that Ubuntu manages time by changing the timezone, setting up synchronization using Network Time Protocol (NTP), and adjusting servers.
Changing the Time Zone
This section shows you how to accomplish this task using either the Graphical User Interface (GUI) or by using the command line (terminal).
Using the GUI
Perhaps the most user friendly way to change the time zone of your Ubuntu system is to use the Graphical User Interface (GUI).
-
Click on the System menu on the top panel, go into the Administration sub-menu, and click on Time and Date.
- Click on the currently selected time zone to bring up the selection map.
-
- Click in the general area of your location on the time zone map, the map will zoom in.
-
-
Select the closest city then choose Close
-


Using the Command Line (terminal)
Using the command line, you can use sudo dpkg-reconfigure tzdata.
-
Open a terminal window by going to Applications>Accessories>Terminal
-
sudo dpkg-reconfigure tzdata
- Follow the directions in the terminal.
-
The timezone info is saved in /etc/timezone — which can be edited or used below
Using the Command Line (unattended)
- Find out the long description for the timezone you want to configure.
-
Save this name to /etc/timezone
-
run sudo dpkg-reconfigure —frontend noninteractive tzdata:
$ echo "Australia/Adelaide" | sudo tee /etc/timezone
Australia/Adelaide
$ sudo dpkg-reconfigure --frontend noninteractive tzdata

Current default time zone: 'Australia/Adelaide'
Local time is now:      Sat May  8 21:19:24 CST 2010.
Universal Time is now:  Sat May  8 11:49:24 UTC 2010.
This can be scripted if required.
Time Synchronization using NTP
This page describes methods for automatically keeping your computer’s time accurate. This is extremely useful for servers, and is also recommended for desktop machines.
Network Time Protocol (NTP) is a UDP/IP protocol for synchronizing time over a network connection. Basically a client requests the current time from a server, and then uses the servers response to set its own clock.
Beyond this simple description, there is a lot of complexity. There are multiple tiers of NTP servers, with the tier one NTP servers connected to atomic clocks (often via GPS), and tier two and three servers spreading the load of actually handling requests across the internet. The client software is a lot more complex than you might think as it has to factor communication delays, and adjust the time in a way that does not affect the other processes that run on the system. Luckily all that complexity is hidden from the user.
Using the GUI
This is how to enable NTP time synchronization using the GUI (Graphical User Interface).
-
Click on the System menu on the top panel, go into the Administration sub-menu, and click on Date and Time.
-
Select the configuration option Keep synchronized with Internet servers
-
- You may get a dialog box informing you that NTP support has to be installed.
-
-
After selecting Install NTP Support it will download the needed files.
-
-
You are now finished and you can click Close or you can customize the NTP servers (default is ntp.ubuntu.com) that your computer uses to synchronize with by choosing Select Servers.
-


Command Line ntpd
ntpdate is a bit of a blunt instrument as it can only adjust the time once a day in one big correction. The ntp daemon ntpd is far more subtle as it calculates the drift of your system clock and continuously adjusts it in small increments. Using ntpd there are no large corrections that could lead to inconsistent logs for instance. The cost is a little processing power and memory, but for a modern system this is negligible.
To setup ntpd in versions of Ubuntu 7.04 and higher
sudo apt-get install ntp
To set up ntpd pre Ubuntu 7.04:
sudo apt-get install ntp-simple
Changing NTP Time Servers
In both cases above, your system will use Ubuntu’s NTP server at ntp.ubuntu.com by default. This is OK, but you might want to use several servers to increase accuracy and resilience, and you may want to use time servers that are geographically closer to you.
Using the GUI
-
Click on the System menu on the top panel, go into the Administration sub-menu, and click on Date and Time.
- You may have to enter your password to continue.
-
-
Select Configure Servers
-
- Enable the box next to your choice of server(s) or add your own.
-


ntpd
-
Change the contents of /etc/ntp.conf to include additional server lines:
server ntp.ubuntu.com
server pool.ntp.org
Command Line ntpdate
ntpdate is no longer installed by default on Ubuntu. The file /etc/cron.daily/ntpdate also does not exist anymore
ntpdate, if installed, will run it once at boot time to set up your time according to Ubuntu’s NTP server. However, a system’s clock is likely to drift considerably between reboots if the time between reboots is long. In that case it makes sense to correct the time occasionally. The easiest way to do this is to get cron to run it every day. With your favorite editor, create (needs sudo) a file /etc/cron.daily/ntpdate containing:
 #!/bin/sh
 ntpdate ntp.ubuntu.com
Make sure that you make this new file executable:
sudo chmod 755 /etc/cron.daily/ntpdate
ntpdate
-
Change the contents of /etc/cron.daily/ntpdate to add the pooled ntp servers:
ntpdate ntp.ubuntu.com pool.ntp.org
You may notice pool.ntp.org in the examples above. This is a really good idea which uses round-robin DNS to return an NTP server from a pool, spreading the load between several different servers. Even better, they have pools for different regions — I am in New Zealand, so I use nz.pool.ntp.org instead of pool.ntp.org. Look at http://www.pool.ntp.org/ for more details.
You can also Google for NTP servers in your region, and add these to your configuration. To test that a server works, just type sudo ntpdate ntp.server.name and see what happens.
Multiple Boot Systems Time Conflicts
Operating systems store and retrieve the time in the hardware clock located on your motherboard so that it can keep track of the time even when the system does not have power. Most operating systems (Linux/Unix/Mac) store the time on the hardware clock as UTC by default, though some systems (notably Microsoft Windows) store the time on the hardware clock as the ‘local’ time. This causes problems in a dual boot system if both systems view the hardware clock differently.
The advantage of having the hardware clock as UTC is that you don’t need to change the hardware clock when moving between timezones or when Daylight Savings Time (DST) begins or ends as UTC does not have DST or timezone offsets.
Changing Linux to use local time is easier and more reliable than changing Windows to use UTC, so dual-boot Linux/Windows systems tend to use local time.
Since Intrepid (8.10), UTC=yes is default.
Make Windows use UTC
Note: This method was not initially supported on Windows Vista and Server 2008, but came back with Vista SP2, Windows 7, Server 2008 R2 and Windows 8/8.1.
To make MS Windows calculate the time from the hardware clock as UTC.
-
Create a file named WindowsTimeFixUTC.reg with the following contents and then double click on it to merge the contents with the registry:
Windows Registry Editor Version 5.00

[HKEY_LOCAL_MACHINESYSTEMCurrentControlSetControlTimeZoneInformation]
     "RealTimeIsUniversal"=dword:00000001
Note: Windows Time service will still write local time to the RTC regardless of the registry setting above on shutdown, so it is handy to disable Windows Time service with this command (if time sync is still required while in Windows use any third-party time sync solution):
sc config w32time start= disabled
Reversing the change
You can create a file with the following contents and then double-click it to merge in the original changes, as above:
Windows Registry Editor Version 5.00

[HKEY_LOCAL_MACHINESYSTEMCurrentControlSetControlTimeZoneInformation]
     "RealTimeIsUniversal"=-
If Windows Time service was disabled, enable it again with the command:
sc config w32time start= demand
Make Linux use ‘Local’ time
To tell your Ubuntu system that the hardware clock is set to ‘local’ time:
Pre-Ubuntu 15.04 systems (e.g. Ubuntu 14.04 LTS):
- edit /etc/default/rcS
- add or change the following section
# Set UTC=yes if your hardware clock is set to UTC (GMT)
UTC=no
Ubuntu 15.04 systems and above (e.g. Ubuntu 16.04 LTS):
- open a terminal and execute the following command
timedatectl set-local-rtc 1
Troubleshooting
Is NTP installed?
Run dpkg-query —list ntp* and look for ntp-simple (pre 7.04) or ntp. The ntpdate and ntp-doc packages may also be useful.
Which configuration file is it using?
By default NTP uses /etc/ntp.conf. If /etc/ntp.conf.dhcp exists then the NTP daemon assumes you’re using DHCP to redefine the NTP settings and it uses that file instead.
How do I configure NTP to use DHCP
Your DHCP server must be configured to supply NTP servers (man dhcpd.conf may be helpful).
Your client must be configured to use the supplied NTP servers. To do this, add ntp-servers to the request (or even require) line in /etc/dhcp3/dhclient.conf. You may wish to use the default and prepend features as well to provide default/additional NTP servers. Please see man dhclient.conf and man dhcp-options for details.
Is NTP running?
NTP most commonly ‘fails’ if it cannot resolve the servers in its configuration file at startup (this can happen if DNS isn’t available during boot). Also, if NTP is unable to keep the local clock reasonably accurate it gives up and terminates (see below).
Try sudo /etc/init.d/ntp status to check if NTP is running, and sudo /etc/init.d/ntp restart to restart it if necessary.
I have various systems on unreliable networks so I use a simple script to bounce NTP if needed:
$ cat /etc/cron.hourly/BOUNCE-NTP
#!/bin/sh

/usr/bin/ntpq -np | /bin/grep '^*' > /dev/null || ( /usr/bin/ntpq -np ; /etc/init.d/ntp restart )
Which servers are you using?
Run grep ^server /etc/ntp.conf or grep ^server /etc/ntp.conf.dhcp to figure out which servers you’re trying to use
If your network or ISP have an NTP server they should be listed here. Failing that, try ntp.ubuntu.com and/or the NTP pool servers (http://www.pool.ntp.org/). 3 or 4 servers is plenty, and don’t use a server without permission (see http://en.wikipedia.org/wiki/NTP_vandalism).
Can these servers be resolved?
If host $servername fails then you may have DNS issues that need to be fixed ($servername is the name of a server listed in your configuration file, see above).
Can these servers be reached?
If ntptrace $servername fails then you may have routing/firewall issues that need to be fixed ($servername is the name of a server listed in your configuration file, see above). NTP uses UDP port 123, make sure these packets can are properly NAT-ed through your gateway if necessary.
What’s NTP up to?
ntpq —numeric —peers
—numeric removes the DNS lookups. You can leave it off, but don’t be surprised if the resolved names don’t match names in the ntp.conf file.
Ideally you want a * and a few +’s in the fist column and a reach of 377 (see http://www.ntp.org/ntpfaq/NTP-s-trouble.htm#Q-MON-REACH)
delay is in milliseconds. It should be < 1 for local network servers, < 10 for ISP servers over DSL and ideally < 100 for wireless. offset is in milliseconds and is the current best guess of the time difference between your system and the server. The smaller the better! jitter is an estimate the the local clock frequency error. The smaller the better. If it’s consistently high then your system may be drifting (see below)
Why does NTP keep resetting/failing?
NTP attempts to fix your local clock to keep accurate time. If your local clock drifts too fast (usually HW problems or IRQ lockups or somesuch) then NTP either keeps resetting your clock or gives up and terminates. Fix the drift problem and NTP will behave.