Время прочтения
6 мин
Просмотры 391K
Невозможно представить себе пользователя и администратора сервера, или даже рабочей станции на основе Linux, который никогда не читал лог файлы. Операционная система и работающие приложения постоянно создают различные типы сообщений, которые регистрируются в различных файлах журналов. Умение определить нужный файл журнала и что искать в нем поможет существенно сэкономить время и быстрее устранить ошибку.

Журналирование является основным источником информации о работе системы и ее ошибках. В этом кратком руководстве рассмотрим основные аспекты журналирования операционной системы, структуру каталогов, программы для чтения и обзора логов.
Основные лог файлы
Все файлы журналов, можно отнести к одной из следующих категорий:
- приложения;
- события;
- службы;
- системный.
Большинство же лог файлов содержится в директории /var/log.
- /var/log/syslog или /var/log/messages содержит глобальный системный журнал, в котором пишутся сообщения с момента запуска системы, от ядра Linux, различных служб, обнаруженных устройствах, сетевых интерфейсов и много другого.
- /var/log/auth.log или /var/log/secure — информация об авторизации пользователей, включая удачные и неудачные попытки входа в систему, а также задействованные механизмы аутентификации.
- /var/log/dmesg — драйвера устройств. Одноименной командой можно просмотреть вывод содержимого файла. Размер журнала ограничен, когда файл достигнет своего предела, старые сообщения будут перезаписаны более новыми. Задав ключ
--level=можно отфильтровать вывод по критерию значимости.
Поддерживаемые уровни журналирования (приоритеты):
   emerg - система неиспользуемая
   alert - действие должно быть произведено немедленно
    crit - условия критичности
     err - условия ошибок
    warn - условия предупреждений
  notice - обычные, но значимые условия
    info - информационный
   debug - отладочные сообщения

(5:520)$ dmesg -l err
[1131424.604352] usb 1-1.1: 2:1: cannot get freq at ep 0x1
[1131424.666013] usb 1-1.1: 1:1: cannot get freq at ep 0x81
[1131424.749378] usb 1-1.1: 1:1: cannot get freq at ep 0x81- /var/log/alternatives.log — Вывод программы
update-alternatives, в котором находятся символические ссылки на команды или библиотеки по умолчанию. - /var/log/anaconda.log — Записи, зарегистрированные во время установки системы.
- /var/log/audit — Записи, созданные службой аудита
auditd. - /var/log/boot.log — Информация, которая пишется при загрузке операционной системы.
- /var/log/cron — Отчет службы
crondоб исполняемых командах и сообщения от самих команд. - /var/log/cups — Все, что связано с печатью и принтерами.
- /var/log/faillog — Неудачные попытки входа в систему. Очень полезно при проверке угроз в системе безопасности, хакерских атаках, попыток взлома методом перебора. Прочитать содержимое можно с помощью команды
faillog. - var/log/kern.log — Журнал содержит сообщения от ядра и предупреждения, которые могут быть полезны при устранении ошибок пользовательских модулей встроенных в ядро.
- /var/log/maillog/ или /var/log/mail.log — Журнал почтового сервера, используемого на ОС.
- /var/log/pm-powersave.log — Сообщения службы экономии заряда батареи.
- /var/log/samba/ — Логи файлового сервера
Samba, который используется для доступа к общим папкам Windows и предоставления доступа пользователям Windows к общим папкам Linux. - /var/log/spooler — Для представителей старой школы, содержит сообщения USENET. Чаще всего бывает пустым и заброшенным.
- /var/log/Xorg.0.log — Логи X сервера. Чаще всего бесполезны, но если в них есть строки начинающиеся с EE, то следует обратить на них внимание.
Для каждого дистрибутива будет отдельный журнал менеджера пакетов.
- /var/log/yum.log — Для программ установленных с помощью
Yumв RedHat Linux. - /var/log/emerge.log — Для
ebuild-ов установленных изPortageс помощьюemergeв Gentoo Linux. - /var/log/dpkg.log — Для программ установленных с помощью
dpkgв Debian Linux и всем семействе родственных дистрибутивах.
И немного бинарных журналов учета пользовательских сессий.
- /var/log/lastlog — Последняя сессия пользователей. Прочитать можно командой
last. - /var/log/tallylog — Аудит неудачных попыток входа в систему. Вывод на экран с помощью утилиты
pam_tally2. - /var/log/btmp — Еже один журнал записи неудачных попыток входа в систему. Просто так, на всякий случай, если вы еще не догадались где следует искать следы активности взломщиков.
- /var/log/utmp — Список входов пользователей в систему на данный момент.
- /var/log/wtmp — Еще один журнал записи входа пользователей в систему. Вывод на экран командой
utmpdump.
(5:535)$ sudo utmpdump /var/log/wtmp
[5] [02187] [l0  ] [        ] [4.0.5-gentoo     ] [0.0.0.0     ] [Вт авг 11 16:50:07 2015]
[1] [00000] [~~  ] [shutdown] [4.0.5-gentoo     ] [0.0.0.0     ] [Вт авг 11 16:50:08 2015]
[2] [00000] [~~  ] [reboot  ] [3.18.12-gentoo   ] [0.0.0.0     ] [Вт авг 11 16:50:57 2015]
[8] [00368] [rc  ] [        ] [3.18.12-gentoo   ] [0.0.0.0     ] [Вт авг 11 16:50:57 2015]
[1] [20019] [~~  ] [runlevel] [3.18.12-gentoo   ] [0.0.0.0     ] [Вт авг 11 16:50:57 2015]
И другие журналы
Так как операционная система, даже такая замечательная как Linux, сама по себе никакой ощутимой пользы не несет в себе, то скорее всего на сервере или рабочей станции будет крутится база данных, веб сервер, разнообразные приложения. Каждое приложения или служба может иметь свой собственный файл или каталог журналов событий и ошибок. Всех их естественно невозможно перечислить, лишь некоторые.
- /var/log/mysql/ — Лог базы данных MySQL.
- /var/log/httpd/ или /var/log/apache2/ — Лог веб сервера Apache, журнал доступа находится в
access_log, а ошибки — вerror_log. - /var/log/lighthttpd/ — Лог веб сервера lighttpd.
В домашнем каталоге пользователя могут находится журналы графических приложений, DE.
- ~/.xsession-errors — Вывод
stderrграфических приложений X11.
Initializing  "kcm_input" :  "kcminit_mouse"
Initializing  "kcm_access" :  "kcminit_access"
Initializing  "kcm_kgamma" :  "kcminit_kgamma"
QXcbConnection: XCB error: 3 (BadWindow), sequence: 181, resource id: 10486050, major code: 20 (GetProperty), minor code: 0
kf5.kcoreaddons.kaboutdata: Could not initialize the equivalent properties of Q*Application: no instance (yet) existing.
QXcbConnection: XCB error: 3 (BadWindow), sequence: 181, resource id: 10486050, major code: 20 (GetProperty), minor code: 0
Qt: Session management error: networkIdsList argument is NULL- ~/.xfce4-session.verbose-log — Сообщения рабочего стола XFCE4.
Чем просматривать — lnav
Почти все знают об утилите less и команде tail -f. Также для этих целей сгодится редактор vim и файловый менеджер Midnight Commander. У всех есть свои недостатки: less неважно обрабатывает журналы с длинными строками, принимая их за бинарники. Midnight Commander годится только для беглого просмотра, когда нет необходимости искать по сложному шаблону и переходить помногу взад и вперед между совпадениями. Редактор vim понимает и подсвечивает синтаксис множества форматов, но если журнал часто обновляется, то появляются отвлекающие внимания сообщения об изменениях в файле. Впрочем это легко можно обойти с помощью <:view /path/to/file>.
Недавно я обнаружил еще одну годную и многообещающую, но слегка еще сыроватую, утилиту — lnav, в расшифровке Log File Navigator.

Установка пакета как обычно одной командой.
$ aptitude install lnav #Debian/Ubuntu/LinuxMint
$ yum install lnav #RedHat/CentOS
$ dnf install lnav #Fedora
$ emerge -av lnav #Gentoo, нужно добавить в файл package.accept_keywords
$ yaourt -S lnav #Arch
Навигатор журналов lnav понимает ряд форматов файлов.
- Access_log веб сервера.
- CUPS page_log
- Syslog
- glog
- dpkg.log
- strace
- Произвольные записи с временными отметками
- gzip, bzip
- Журнал VMWare ESXi/vCenter
Что в данном случае означает понимание форматов файлов? Фокус в том, что lnav больше чем утилита для просмотра текстовых файлов. Программа умеет кое что еще. Можно открывать несколько файлов сразу и переключаться между ними.
(5:471)$ sudo lnav /var/log/pm-powersave.log /var/log/pm-suspend.logПрограмма умеет напрямую открывать архивный файл.
(5:471)$ lnav -r /var/log/Xorg.0.log.old.gzПоказывает гистограмму информативных сообщений, предупреждений и ошибок, если нажать клавишу <i>. Это с моего syslog-а.
Mon May 02 20:25:00        123 normal         3 errors         0 warnings         0 marks
Mon May 02 22:40:00          2 normal         0 errors         0 warnings         0 marks
Mon May 02 23:25:00         10 normal         0 errors         0 warnings         0 marks
Tue May 03 07:25:00         96 normal         3 errors         0 warnings         0 marks
Tue May 03 23:50:00         10 normal         0 errors         0 warnings         0 marks
Wed May 04 07:40:00         96 normal         3 errors         0 warnings         0 marks
Wed May 04 08:30:00          2 normal         0 errors         0 warnings         0 marks
Wed May 04 10:40:00         10 normal         0 errors         0 warnings         0 marks
Wed May 04 11:50:00        126 normal         2 errors         1 warnings         0 marks
Кроме этого поддерживается подсветка синтаксиса, дополнение по табу и разные полезности в статусной строке. К недостаткам можно отнести нестабильность поведения и зависания. Надеюсь lnav будет активно развиваться, очень полезная программа на мой взгляд.
Использованные материалы
- lnav — An Advanced Log File viewer for Linux
- What Are Linux Logs? How to View Them, Most Important Directories, and More
- Как посмотреть логи в Linux
Системные администраторы, да и обычные пользователи Linux, часто должны смотреть лог файлы для устранения неполадок. На самом деле, это первое, что должен сделать любой сисадмин при возникновении любой ошибки в системе.
Сама операционная система Linux и работающие приложения генерируют различные типы сообщений, которые регистрируются в различных файлах журналов. В Linux используются специальное программное обеспечение, файлы и директории для хранения лог файлов. Знание в каких файлах находятся логи каких программ поможет вам сэкономить время и быстрее решить проблему. В этой статье мы рассмотрим основные части системы логирования в Linux, файлы логов, а также утилиты, с помощью которых можно посмотреть логи Linux.
Расположение логов по умолчанию
Большинство файлов логов Linux находятся в папке /var/log/ вы можете список файлов логов для вашей системы с помощью команды ls:
ls -l /var/log/
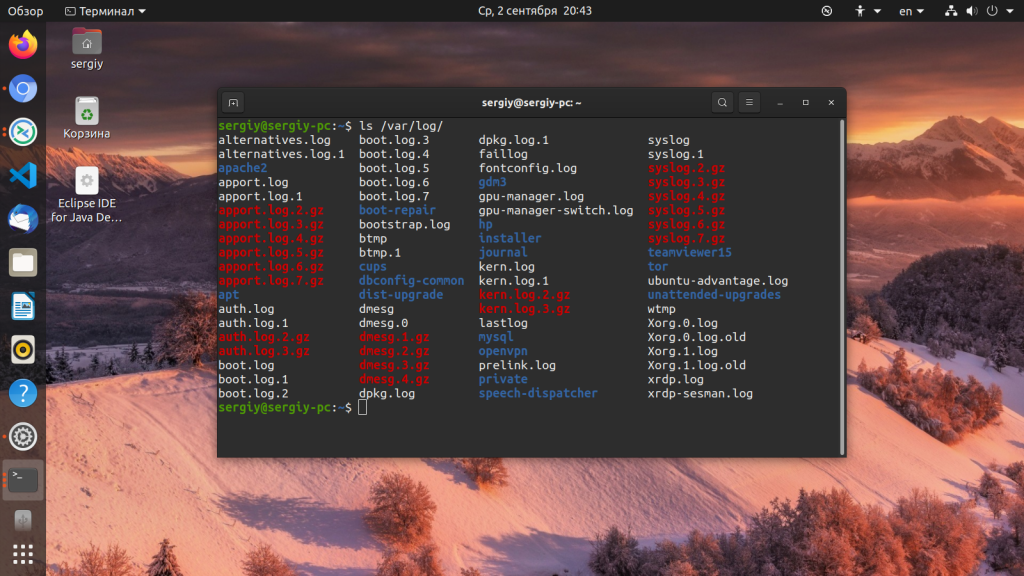
Ниже мы рассмотрим 20 различных файлов логов Linux, размещенных в каталоге /var/log/. Некоторые из этих логов встречаются только в определенных дистрибутивах, например, dpkg.log встречается только в системах, основанных на Debian.
- /var/log/messages — содержит глобальные системные логи Linux, в том числе те, которые регистрируются при запуске системы. В этот лог записываются несколько типов сообщений: это почта, cron, различные сервисы, ядро, аутентификация и другие.
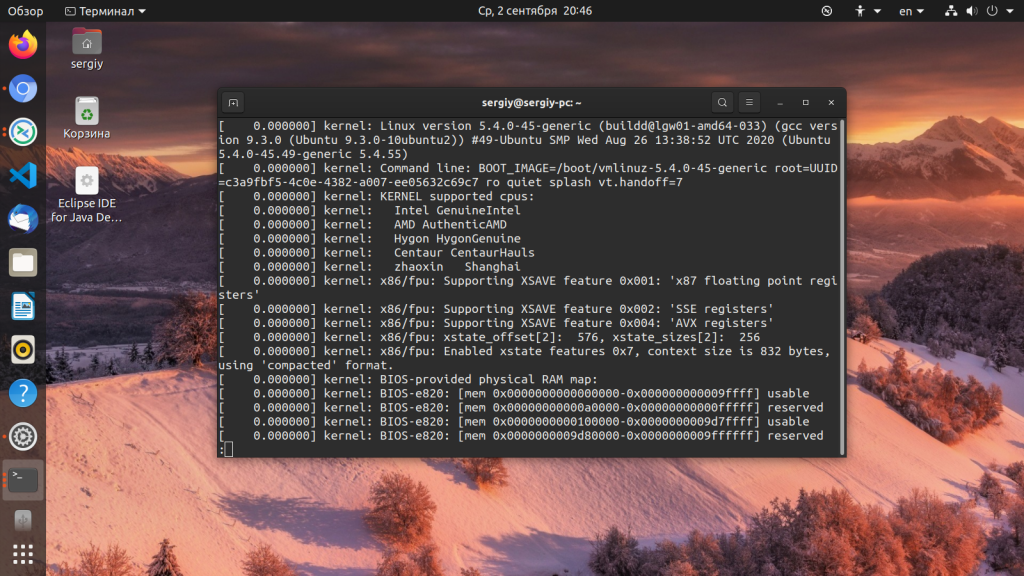
- /var/log/dmesg — содержит сообщения, полученные от ядра. Регистрирует много сообщений еще на этапе загрузки, в них отображается информация об аппаратных устройствах, которые инициализируются в процессе загрузки. Можно сказать это еще один лог системы Linux. Количество сообщений в логе ограничено, и когда файл будет переполнен, с каждым новым сообщением старые будут перезаписаны. Вы также можете посмотреть сообщения из этого лога с помощью команды dmseg.
- /var/log/auth.log — содержит информацию об авторизации пользователей в системе, включая пользовательские логины и механизмы аутентификации, которые были использованы.
- /var/log/boot.log — Содержит информацию, которая регистрируется при загрузке системы.
- /var/log/daemon.log — Включает сообщения от различных фоновых демонов
- /var/log/kern.log — Тоже содержит сообщения от ядра, полезны при устранении ошибок пользовательских модулей, встроенных в ядро.
- /var/log/lastlog — Отображает информацию о последней сессии всех пользователей. Это нетекстовый файл, для его просмотра необходимо использовать команду lastlog.
- /var/log/maillog /var/log/mail.log — журналы сервера электронной почты, запущенного в системе.
- /var/log/user.log — Информация из всех журналов на уровне пользователей.
- /var/log/Xorg.x.log — Лог сообщений Х сервера.
- /var/log/alternatives.log — Информация о работе программы update-alternatives. Это символические ссылки на команды или библиотеки по умолчанию.
- /var/log/btmp — лог файл Linux содержит информацию о неудачных попытках входа. Для просмотра файла удобно использовать команду last -f /var/log/btmp
- /var/log/cups — Все сообщения, связанные с печатью и принтерами.
- /var/log/anaconda.log — все сообщения, зарегистрированные при установке сохраняются в этом файле
- /var/log/yum.log — регистрирует всю информацию об установке пакетов с помощью Yum.
- /var/log/cron — Всякий раз когда демон Cron запускает выполнения программы, он записывает отчет и сообщения самой программы в этом файле.
- /var/log/secure — содержит информацию, относящуюся к аутентификации и авторизации. Например, SSHd регистрирует здесь все, в том числе неудачные попытки входа в систему.
- /var/log/wtmp или /var/log/utmp — системные логи Linux, содержат журнал входов пользователей в систему. С помощью команды wtmp вы можете узнать кто и когда вошел в систему.
- /var/log/faillog — лог системы linux, содержит неудачные попытки входа в систему. Используйте команду faillog, чтобы отобразить содержимое этого файла.
- /var/log/mysqld.log — файлы логов Linux от сервера баз данных MySQL.
- /var/log/httpd/ или /var/log/apache2 — лог файлы linux11 веб-сервера Apache. Логи доступа находятся в файле access_log, а ошибок в error_log
- /var/log/lighttpd/ — логи linux веб-сервера lighttpd
- /var/log/conman/ — файлы логов клиента ConMan,
- /var/log/mail/ — в этом каталоге содержатся дополнительные логи почтового сервера
- /var/log/prelink/ — Программа Prelink связывает библиотеки и исполняемые файлы, чтобы ускорить процесс их загрузки. /var/log/prelink/prelink.log содержит информацию о .so файлах, которые были изменены программой.
- /var/log/audit/— Содержит информацию, созданную демоном аудита auditd.
- /var/log/setroubleshoot/ — SE Linux использует демон setroubleshootd (SE Trouble Shoot Daemon) для уведомления о проблемах с безопасностью. В этом журнале находятся сообщения этой программы.
- /var/log/samba/ — содержит информацию и журналы файлового сервера Samba, который используется для подключения к общим папкам Windows.
- /var/log/sa/ — Содержит .cap файлы, собранные пакетом Sysstat.
- /var/log/sssd/ — Используется системным демоном безопасности, который управляет удаленным доступом к каталогам и механизмами аутентификации.
Чтобы посмотреть логи на Linux удобно использовать несколько утилит командной строки Linux. Это может быть любой текстовый редактор, или специальная утилита. Скорее всего, вам понадобятся права суперпользователя для того чтобы посмотреть логи в Linux. Вот команды, которые чаще всего используются для этих целей:
- less;
- more;
- cat;
- head;
- grep;
- tail;
- zcat;
- zgrep;
- zmore;
- vi;
- nano.
Я не буду останавливаться подробно на каждой из этих команд, поскольку большинство из них уже подробно рассмотрены на нашем сайте. Но приведу несколько примеров. Просмотр логов Linux выполняется очень просто:
Смотрим лог /var/log/dmesg, с возможностью прокрутки:
less /var/log/dmesg
Просмотр логов Linux, в реальном времени:
tail -f /var/log/dmesg
Открываем лог файл dmesg:
cat /var/log/dmesg
Первые строки dmesg:
head /var/log/dmesg
Выводим только ошибки из /var/log/messages:
grep -i error /var/log/dmesg

Кроме того, посмотреть логи на linux можно и с помощью графических утилит. Программа Журналы может быть использована для удобного просмотра и отслеживания системных журналов на ноутбуке или персональном компьютере с Linux.

Вы можете установить программу в любой системе с установленным X сервером. Также для просмотра логов может использоваться любой графический тестовый редактор.
Кроме того, у каждого сервиса есть свой лог файл, который можно посмотреть с помощью утилиты journalctl.
Выводы
В каталоге /var/log вы можете найти всю необходимую информацию о работе Linux. Из сегодняшней статьи вы достаточно узнали, чтобы знать где искать, и что искать. Теперь просмотр логов в Linux не вызовет у вас проблем. Если остались вопросы, задавайте в комментариях!

Статья распространяется под лицензией Creative Commons ShareAlike 4.0 при копировании материала ссылка на источник обязательна .
Об авторе
![]()
Основатель и администратор сайта losst.ru, увлекаюсь открытым программным обеспечением и операционной системой Linux. В качестве основной ОС сейчас использую Ubuntu. Кроме Linux, интересуюсь всем, что связано с информационными технологиями и современной наукой.
This tutorial explains the basic administration of a Linux server through system
logs. A system log is a file that contains information about the events that
happened on the system during runtime.
In this article, you will learn the following Linux logging basics:
- Where the Linux log files are stored, how are they formatted, and how to read them.
- How to read the most important logs (such as
syslog). - How to configure the Ubuntu
syslogdaemon. - What Linux log rotation is all about and how to use the logrotate utility.
Prerequisites
Before proceeding with the rest of this tutorial, ensure that you have a basic
knowledge of working with the Linux command line. While many of the concepts
discussed in this article are general applicable to all Linux distributions,
we’ll be demonstrating them in Ubuntu only so ensure to set up an Ubuntu 20.04
server that includes a non-root user with sudo access.
🔭 Want to centralize and monitor your Linux logs?
Head over to Logtail and start ingesting your logs in 5 minutes.
Step 1 — Finding Linux system logs
All Ubuntu system logs are stored in the /var/log directory. Change into this
directory in the terminal using the command below:
You can view the contents of this directory by issuing the following command:
You should see a similar output to the following:
Output
alternatives.log  auth.log       btmp            cloud-init-output.log  dmesg    dpkg.log  journal/  landscape/  private/  ubuntu-advantage-license-check.log  ubuntu-advantage-timer.log  unattended-upgrades/
apt/              bootstrap.log  cloud-init.log  dist-upgrade/          dmesg.0  faillog   kern.log  lastlog     syslog    ubuntu-advantage.log                ufw.log                     wtmp
Let’s look at a few of the essential system log files that may be present in the
/var/log directory and what they contain:
/var/log/syslog: stores general information about any global activity in the
system./var/log/auth.log: keeps track of all security-related actions (login,
logout, or root user activity)./var/log/kern.log: stores information about events originating from the
Linux kernel./var/log/boot.log: stores system startup messages./var/log/dmesg: contains messages related to device drivers./var/log/faillog: keeps track of failed logins, which comes in handy when
investigating attempted security breaches.
The /var/log directory is also used to store various application logs. For
example, if your distribution is bundled with Apache or MySQL, or installed
later, their log files will also be found here.
Step 2 — Viewing Linux log file contents
Log files contain a large amount of information that are useful for monitoring
or analyzing activities performed by the system or a specific application.
Therefore, a Linux server administrator must learn the art of reading and
understanding the various messages present in log files to effectively diagnose
or troubleshoot an issue.
Before we can read log files, we ought to know how they are formatted. Let’s
review two basic approaches to log file formatting and storage: plain text and
binary files.
Plaintext log files
These logs are plain text files with a standardized content format. Ubuntu uses
a log template called
RSYSLOG_TraditionalFileFormat.
This log format consists of four main fields with a space delimiter:
- The timestamp indicates the time when a log entry was created in the
formatMMM dd HH:mm:ss(e.g.Sep 28 19:00:00). Notice that this format
does not include a year. - Hostname is the host or system that originally create the message.
- Application is the application that created the message.
- Message contains the actual details of an event.
Let’s go ahead and review some log files in the plaintext format. Run the
command below to print the contents of the /var/log/syslog file with the
tail utility:
sudo tail /var/log/syslog
This outputs the last 10 lines of the file:
Output
Mar 23 12:38:09 peter dbus-daemon[1757]: [session uid=1000 pid=1757] Activating via systemd: service name='org.freedesktop.Tracker1' unit='tracker-store.service' requested by ':1.1' (uid=1000 pid=1754 comm="/usr/libexec/tracker-miner-fs " label="unconfined")
Mar 23 12:38:09 peter systemd[1743]: Starting Tracker metadata database store and lookup manager...
Mar 23 12:38:09 peter dbus-daemon[1757]: [session uid=1000 pid=1757] Successfully activated service 'org.freedesktop.Tracker1'
Mar 23 12:38:09 peter systemd[1743]: Started Tracker metadata database store and lookup manager.
Mar 23 12:38:40 peter tracker-store[359847]: OK
Mar 23 12:38:40 peter systemd[1743]: tracker-store.service: Succeeded.
Mar 23 12:39:01 peter CRON[359873]: (root) CMD (  [ -x /usr/lib/php/sessionclean ] && if [ ! -d /run/systemd/system ]; then /usr/lib/php/sessionclean; fi)
Mar 23 12:39:23 peter systemd[1]: Starting Clean php session files...
Mar 23 12:39:23 peter systemd[1]: phpsessionclean.service: Succeeded.
Mar 23 12:39:23 peter systemd[1]: Finished Clean php session files.
You’ll notice that that each record in this file is formatted in the manner
described earlier. For example, the last record has its timestamp as Mar 23
12:39:23, hostname as peter, application as systemd[1] and message as
Finished Clean php session files.
If you want to view the entire log file, you can use the cat utility or any
text editor such as nano or vim.
Binary log files
While plaintext is the dominant storage format for log files, you will also
encounter binary log files that cannot be read with a normal text editor. The
/var/log directory contains multiple binary files that are related to the user
authorization:
/var/log/utmp: tracks users that are currently logged into the system./var/log/wtmp: tracks previously logged in users. It contains a past data
fromutmp./var/log/btmp: tracks failed login attempts.
For these binary logs, special command-line tools are used to display the
relevant information in human-readable form. For example, to review the contents
of the /var/log/utmp file, run the who utility with -H option (this option
causes column labels to be printed in the output table):
You’ll see the program’s output appear on the screen:
Output
NAME   LINE         TIME             COMMENT
george pts/0        2021-03-21 15:29 (2001:67c:1220:80c:b1:a84e:69ee:f530)
willie pts/1        2021-03-21 07:20 (adsl-dyn22.78-98-29.t-com.sk)
bonnie pts/2        2021-03-21 10:31 (2001:67c:1220:80c:b1:a84e:69ee:f530)
peter  pts/6        2021-03-21 14:37 (100.64.97.50)
...
The output above describes all the currently logged in users, the time of login
and their host machine’s IP address.
You can also review the contents of the /var/log/wtmp binary file through the
last command as shown below:
You’ll see the program’s output appear on the screen:
Output
peter    :1           Sat Mar 13 08:06   still logged in
reboot   system boot  Sat Mar 13 08:06   still running
peter    :1           Fri Mar 12 07:42 - down  (1+00:22)
reboot   system boot  Fri Mar 12 07:42 - 08:05 (1+00:23)
peter    :1           Sun Mar  7 11:20 - down  (4+20:21)
reboot   system boot  Sun Mar  7 11:20 - 07:41 (4+20:21)
peter    :1           Fri Mar  5 08:02 - crash (2+03:17)
reboot   system boot  Fri Mar  5 08:01 - 07:41 (6+23:39)
peter    :0           Tue Mar  2 08:38 - crash (2+23:23)
reboot   system boot  Tue Mar  2 08:38 - 07:41 (9+23:03)
peter    :1           Thu Feb 25 11:44 - down  (4+20:53)
reboot   system boot  Thu Feb 25 11:44 - 08:37 (4+20:53)

wtmp begins Thu Feb 25 11:43:23 2021
The output shows a table where the first column refers to the user name (the
pseudo-user reboot is recorded each time when the system is rebooted). The third
field refers to the login timestamp, and the last column shows the session
duration.
To review the /var/log/btmp file (containing failed login attempts), execute
the lastb command with sudo privileges:
You’ll see the program’s output appear on the screen:
Output
falcon   tty3                  Thu Feb 12 07:10 - 07:10  (00:00)
ruby     tty1                  Thu Feb 12 07:09 - 07:09  (00:00)
sergio   tty1                  Thu Feb 12 07:09 - 07:09  (00:00)

btmp begins Thu Feb 25 11:43:32 2021
The output shows users that failed to login with the corresponding timestamp.
Step 3 — Examining the syslog deamon configuration
All system logs are created and maintained by a background process called a
daemon. The traditional Linux daemon for logging is syslogd. However, Ubuntu
20.04 uses a daemon called rsyslogd which is a superset of syslogd. It uses
a special configuration file (/etc/rsyslog.conf) that specifies the logging
rules.
Go ahead and print the contents of the /etc/rsyslog.conf file with the cat
command:
This command prints the entire content of this configuration file, but we’re
only going to show a truncated output here:
Output
[label /etc/rsyslog.conf]
. . .

###########################
#### GLOBAL DIRECTIVES ####
###########################

#
# Use traditional timestamp format.
# To enable high precision timestamps, comment out the following line.
#
$ActionFileDefaultTemplate RSYSLOG_TraditionalFileFormat

# Filter duplicated messages
$RepeatedMsgReduction on

#
# Set the default permissions for all log files.
#
$FileOwner syslog
$FileGroup adm
$FileCreateMode 0640
$DirCreateMode 0755
$Umask 0022
$PrivDropToUser syslog
$PrivDropToGroup syslog

#
# Where to place spool and state files
#
$WorkDirectory /var/spool/rsyslog

#
# Include all config files in /etc/rsyslog.d/
#
$IncludeConfig /etc/rsyslog.d/*.conf
This file contains a lot of information, but we’ll focus on two configuration
details. Firstly, a variable called $ActionFileDefaultTemplate defines the
syslog record format as described in Step 2. You can change the value of this
variable if the default log format is unsuitable for you. Secondly, the last
line in the file defines a variable called $IncludeConfig that specifies the
directory for additional configuration files.
In Ubuntu, all additional Rsyslog rules are placed in the
/etc/rsyslog.d/50-default.conf file by default. Go ahead and examine the
contents of this file with the head utility (the -n 15 option specifies that
only the first 15 lines should be printed):
head -n 15 /etc/rsyslog.conf/50-default.conf
You’ll see the program’s output appear on the screen:
Output
#  Default rules for rsyslog.
#
#           For more information see rsyslog.conf(5) and /etc/rsyslog.conf

#
# First some standard log files.  Log by facility.
#
auth,authpriv.*         /var/log/auth.log
*.*;auth,authpriv.none      -/var/log/syslog
#cron.*             /var/log/cron.log
#daemon.*           -/var/log/daemon.log
kern.*              -/var/log/kern.log
#lpr.*              -/var/log/lpr.log
mail.*              -/var/log/mail.log
#user.*             -/var/log/user.log
The output contains rsyslogd configuration rules. Each non-empty line (or line
that does not start with the # character) defines a rule. The rule definition
starts with a selector followed by one or more spaces and an action field:
- The selector specifies the facility with a corresponding priority. For
example, the*selector refers to all facilities or priorities. - The action field of a selector usually references a log file.
Step 4 — Rotating log files in Linux
The size of log file must be controlled because they always grow over time. Each
system has limited resources and logs that are too large can lead to performance
and memory problems, not to mention the loss of storage space. Linux
distributions typically solve this problem through the concept of log rotation
which continuously repeats the following actions:
- Instead of continuously writing to log file as it grows larger, the file name
is changed to one with a version suffix, and creates a brand new file is
created for new log entries. This means a log file has multiple backups which
are optionally compressed. - When the backup files reaches a specified number, the system deletes the
oldest ones.
Let’s view an example of rotating log files in Linux. Execute the ls command
with following options:
ls -l -h -t /var/log/syslog*
The -l option outputs a listing that includes various metadata about a file,
the -h option prints the file size in human-readable form, and the -t option
sorts the listing by modification time (newest first). The /var/log/syslog*
argument specifies that only files in the /var/log directory with the syslog
prefix should be included in the output.
You’ll see the program’s output appear on the screen:
Output
-rw-r----- 1 syslog adm  47K mar 30 09:49 /var/log/syslog
-rw-r----- 1 syslog adm 3,5G mar 30 07:45 /var/log/syslog.1.gz
-rw-r----- 1 syslog adm 1,6M mar 29 10:06 /var/log/syslog.2.gz
-rw-r----- 1 syslog adm  29K mar 28 07:49 /var/log/syslog.3.gz
-rw-r----- 1 syslog adm  54K mar 27 08:08 /var/log/syslog.4.gz
-rw-r----- 1 syslog adm 6,4M mar 26 07:35 /var/log/syslog.5.gz
-rw-r----- 1 syslog adm  31K mar 25 08:01 /var/log/syslog.6.gz
This output describes all the versions of the syslog file. Typically, it is
the biggest log file on the system because, as explained earlier, it records
almost every event that occurs in the system. The older versions are labelled
with a version suffix (e.g. syslog.6.gz is the oldest syslog backup).
Notice that the backup files are all compressed with the standard GNU zip
compression algorithm. (as evidenced by the .gz extension). This helps with
space savings since log files can grow to the size of gigabytes (in our example
the biggest file is 3.5 GB). You’ll also notice that these files cover a time
interval of only six days.
Step 5 — Configuring the logrotate daemon
Log rotation is maintained by a system daemon called logrotate. Similar to the
rsyslogd utility, this daemon uses a special configuration file called
logrotate.conf in the /etc directory.
Go ahead and display the contents of the logrotate config file with cat
utility:
This command prints the entire contents of the configuration file to the screen:
Output
# see "man logrotate" for details
# rotate log files weekly
weekly

# use the adm group by default, since this is the owning group
# of /var/log/syslog.
su root adm

# keep 4 weeks worth of backlogs
rotate 4

# create new (empty) log files after rotating old ones
create

# use date as a suffix of the rotated file
#dateext

# uncomment this if you want your log files compressed
#compress

# packages drop log rotation information into this directory
include /etc/logrotate.d

# system-specific logs may be also be configured here.
The output describes the global configuration for logrotate. In our example,
the log files are rotated weekly, the system keeps four rotation backups, and
compression is turned off. However, this is the most general configuration for
any log. We can also set up a more specific configuration for a particular log
file. In Ubuntu, the configuration for specific logs are placed in the
/etc/logrotate.d directory by default (you’ll notice the presence of this
directory in /etc/logrotate.conf).
Let’s view the contents of the /etc/logrotate.d directory by executing the
ls command:
The output below describes all the utilities that have a specific log rotation
config:
Output
alternatives  bootlog      dpkg               ubuntu-advantage-tools
apache2       btmp         ppp                ufw
apport        certbot      rsyslog            unattended-upgrades
apt           cups-daemon  speech-dispatcher  wtmp
You’ll notice that the rsyslog daemon has its own log rotation configuration
file. Go ahead and display the first 15 lines of the rsyslog file with the
head utility:
head -n 15 /etc/logrotate.d/rsyslog
You’ll see the following output on the screen:
Output
/var/log/syslog
{
    rotate 7
    daily
    missingok
    notifempty
    delaycompress
    compress
    postrotate
        /usr/lib/rsyslog/rsyslog-rotate
    endscript
}

/var/log/mail.info
/var/log/mail.warn
This output shows that the syslog file is rotated daily, and that seven
compressed backups are kept before older ones are deleted.
You can force logrotate to rotate a log file immediately by executing
following the command:
sudo logrotate -fv /etc/logrotate.conf
The -f option forces immediate rotation and the -v option turns on verbose
mode (it will display messages during rotation). The execution of this command
shows the following output (truncated to save space):
Output
reading config file /etc/logrotate.conf
including /etc/logrotate.d
reading config file alternatives
reading config file apache2
reading config file apport
reading config file apt
reading config file bootlog
reading config file btmp
reading config file certbot
reading config file cups-daemon
reading config file dpkg
reading config file ppp
reading config file rsyslog
reading config file speech-dispatcher
reading config file ubuntu-advantage-tools
reading config file ufw
reading config file unattended-upgrades
reading config file wtmp
. . .
The beginning of the output shows that the logrotate daemon reads all its
configuration files first before proceeding. The entire output is very long
because it prints every single detail of the rotation process.
Conclusion
In this tutorial, you’ve learnt the basics of system logs in Linux and how to
read and understand them. We discussed where the logs are typically placed and
the different log formats you will likely encounter. We also covered the
rsyslogd utility, which is responsible for maintaining log files in Ubuntu
before discussing log rotation and how to use the logrotate utility to keep
log files small and manageable. To learn more about all the utilities described
in this article, explore the
Rsyslog server article and the
Logrotate article in
the Logging guides.
Thanks for reading!
Centralize all your logs into one place.
Analyze, correlate and filter logs with SQL.
Create actionable
dashboards.
Share and comment with built-in collaboration.
Got an article suggestion?
Let us know
![]()
![]()
![]()
Next article
How to Use Logrotate to Manage Log Files in Linux
Learn how to use the Logrotate utility in Linux-based systems to set up automatic compression and deletion of older log records
→
![]()
This work is licensed under a Creative Commons Attribution-NonCommercial-ShareAlike 4.0 International License.
Если вы столкнулись с проблемами в работе сервера, первое, что нужно сделать — посмотреть логи Linux. В системный журнал записываются диагностические сообщения, поступающие от различных компонентов операционной системы, таких как ядро или службы, поэтому с большой долей вероятности причина сбоев будет найдена.
Каждое сообщение генерируется в результате возникновения какого-либо события в операционной системе. Событием может быть остановка службы, авторизации пользователя в системе или неполадки в работе приложения. События имеют определенный приоритет, в зависимости от степени критичности. В Linux различают следующие типы событий:
- emerg — авария, наивысший приоритет;
- alert — тревога;
- crit — критическое событие;
- err — ошибка;
- warn — внимание;
- notice — уведомление;
- info — информационное сообщение;
- debug — отладочная информация;
На сегодняшний день в Linux основными службами сбора логов являются rsyslog и systemd-journald, они работают независимо друг от друга и входят в состав большинства современных дистрибутивов.
rsyslog
Журналы службы находятся в директории “/var/log/” в виде обычных текстовых файлов. В зависимости от типа события, сообщения записываются в разные файлы. Например файл “/var/log/auth.log” содержит информацию о входе пользователей в систему, а в файл “/var/log/kern.log” записываются сообщения ядра. В разных дистрибутивах названия файлов могут отличаться, поэтому для точного понимания куда именно происходит запись сообщений рассмотрим файл конфигурации “/etc/rsyslog.d/50-default.conf”.

Правила описывают место хранения логов в зависимости от типа сообщения. В левой части строки указан тип сообщения в формате “[Источник].[Приоритет]”, а в правой части имя файла журнала. При записи типа сообщения можно применять символ “*”, обозначающий любое значение или параметр “none”, обозначающий исключение из списка. Рассмотрим более подробно первые два правила.
“auth,authpriv.* /var/log/auth.log”

“*.*;auth,authpriv.none -/var/log/syslog”
Первое правило означает, что все сообщения принятые от механизма авторизации будут записаны в файл “/var/log/auth.log”. В этом файле будут зарегистрированы все попытки входа пользователей в систему, как удачные так и не удачные. Второе правило говорит о том, что все сообщения, кроме тех, которые связаны с авторизацией будут записаны в файл “/var/log/syslog”. Именно к этим файлам приходится обращаться наиболее часто. Следующие правила определяют место хранения журналов ядра “kern.*” и почтовой службы “mail.*”
Журналы логов можно открыть любой утилитой для просмотра текста, например less, cat, tail. Откроем файл “/var/log/auth.log”
less /var/log/auth.log

Каждая строка файла является отдельным сообщением, поступившим от приложения или службы. Все сообщения, независимо от источника имеют единый формат и состоят из пяти частей. Рассмотрим их на примере выделенного сообщения на скриншоте.
- Дата и время регистрации сообщения — “Feb 12 06:18:33”
- Имя компьютера, с которого пришло сообщение — “vds”
- Имя программы или службы, к которой относится сообщение — “sshd”
- Идентификатор процесса, отправившего сообщение — [653]
- Текст сообщения — “Accepted password for mihail from 188.19.42.165 port 2849 ssh2”
Это был пример успешного подключения по ssh.
А так выглядит неудачная попытка:

В этом файле также фиксируется выполнение команд с повышенными правами.

Откроем файл /var/log/syslog

На скриншоте выделено сообщение о выключении сетевого интерфейса.
Для поиска нужной информации в больших текстовых файлах можно использовать утилиту grep. Найдем все сообщения от службы pptpd в файле “/var/log/syslog”
grep 'pptpd' /var/log/syslog

Во время диагностики можно использовать утилиту tail, которая выводит последние строки в файле. Команда “tail -f /var/log/syslog” позволит наблюдать запись логов в реальном времени.
Служба rsyslog является очень гибкой, высокопроизводительной и может использоваться для сбора логов как на локальных системах, так и на уровне предприятия. Полную документацию можно найти на официальном сайте https://www.rsyslog.com/
Запись логов происходит непрерывно и размер файлов постоянно растет. Механизм ротации обеспечивает автоматическое архивирование старых журналов и создание новых. В зависимости от правил, обработка журналов может выполняться ежедневно, еженедельно, ежемесячно или при достижении файлом определенного размера. По мере создания новых архивов, старые могут быть просто удалены или предварительно отправлены по электронной почте. Ротация выполняется утилитой logrotate. Основная конфигурация находится в файле “/etc/logrotate.conf”, также обрабатывается содержимое файлов в директории “/etc/logrotate.d/”
Новые правила можно записывать в основной файл конфигурации, но более правильным будет создание отдельного файла в директории “/etc/logrotate.d/” По умолчанию в директории уже содержится несколько файлов.

Рассмотрим файл “/etc/logrotate.d/rsyslog”, который содержит правила ротации для журналов службы rsyslog.

В начале правила указывается путь к файлу журнала, затем в фигурных скобках перечисляются директивы.
- rotate 7 — необходимо постоянно хранить 7 файлов
- daily — ежедневно будет создаваться новый файл
- compress — старые файлы необходимо архивировать.

На скриншоте видно, что в каталоге “/var/log/” находится основной журнал “syslog” и семь архивов, что соответствует правилам ротации.
Более подробное описание по настройке утилиты logrotate можно найти в мануале, выполнив команду “man logrotate”
journald
Служба сбора логов systemd-journald является частью системы инициализации systemd. Файлы журнал хранятся в директории “/var/log/journal/” в специальном формате и могут быть открыты с помощью утилиты journalctl. Формат записей такой же как у службы rsyslog.
Команда journalctl без параметров выводит на экран все записи, но учитывая, что объем журнала может достигать нескольких гигабайт, такой способ просмотра не подходит для практического применения. Рассмотрим некоторые опции утилиты.
- вывод записей с момента последней загрузки
journalctl -b - вывод записей за определенный период времени
journalctl -S "2020-02-17 12:00" -U "2020-02-17 12:10" - вывод записей, принятых от определенной службы
journalctl -u pptpd - вывод сообщений ядра
journalctl -k - вывод сообщений с определенным приоритетом, в данном случае будут выведены ошибки и более высокие приоритеты(crit, alert, emerg).
journalctl -p err - вывод сообщений в реальном времени
journalctl -f
Для более гибкого поиска опции можно совмещать. Выведем все ошибки службы pptpd
journalctl -u pptpd -p err

Если в качестве аргумента указать путь к исполняемому файлу, утилита выведет все сообщения, отправленные этим файлом. Выведем сообщения, отправленные файлом “/usr/bin/sudo” начиная с 04:15 18-го февраля 2020 года. Фактически будут выведены все команды, выполненные с повышенными правами.
journalctl -S "2020-02-18 04:15" /usr/bin/sudo

Для того, чтобы узнать сколько места на диске занимают файлы журнала, выполним команду
journalctl --disk-usage
Для ограничения объема журнала размером 1Gb выполним команду
journalctl --vacuum-size=1G
Открытие бинарных файлов
В заключении рассмотрим несколько специальных файлов в директории “/var/log/”, в которых регистрируются попытки входа пользователей в систему. Это бинарные файлы, которые могут быть открыты только специальными утилитами.
/var/log/wtmp — содержит информацию об успешном входе пользователей в систему, для открытия используется утилита last

/var/log/btmp — в файле регистрируются все неудачные попытки входа в систему, открывается командой lastb с повышенными правами. Параметр -n определяет количество выводимых строк начиная с конца файла.

/var/log/lastlog — содержит время последнего входа для каждой учетной записи, может быть открыт одноименной утилитой lastlog

|
|
Needs Expansion |

Contents
- Introduction
- Target Audience
-
System Logs
- Authorization Log
- Daemon Log
- Debug Log
- Kernel Log
- Kernel Ring Buffer
- System Log
-
Application Logs
- Apache HTTP Server Logs
- CUPS Print System Logs
- Rootkit Hunter Log
- Samba SMB Server Logs
- X11 Server Log
-
Non-Human-Readable Logs
- Login Failures Log
- Last Logins Log
- Login Records Log
-
System Logging Daemon (syslogd)
- Configuration of syslogd
- Echoing Messages to syslogd With Logger
- Log Rotation
-
Essential Commands
- Getting Started
- Editing Files
- Viewing Files
- Viewing the Beginning of Files
- Viewing the End of Files
- Watching a Changing File
- Searching Files
-
Resources
- Local System Resources
- WWW Resources
Introduction
One of the things which makes GNU/Linux a great operating system is that virtually anything and everything happening on and to the system may be logged in some manner. This information is invaluable for using the system in an informed manner, and should be one of the first resources you use to trouble-shoot system and application issues. The logs can tell you almost anything you need to know, as long as you have an idea where to look first.
Your Ubuntu system provides vital information using various system log files. These log files are typically plain ASCII text in a standard log file format, and most of them sit in the traditional system log subdirectory /var/log. Many are generated by the system log daemon, syslogd on behalf of the system and certain applications, while some applications generate their own logs by writing directly to files in /var/log.
This guide talks about how to read and use several of these system log files, how to use and configure the system logging daemon, syslogd, and how log rotation works. See the Resources section for additional information.
Target Audience
This guide will be simple enough to use if you have any experience using the console and editing text files using a text editor. See the end of this document for some essential commands that may help you find your way around these files if you’re relatively new to the command line.
System Logs
System logs deal primarily with the functioning of the Ubuntu system, not necessarily with additional applications added by users. Examples include authorization mechanisms, system daemons, system messages, and the all-encompassing system log itself, syslog.
The Authorization Log tracks usage of authorization systems, the mechanisms for authorizing users which prompt for user passwords, such as the Pluggable Authentication Module (PAM) system, the sudo command, remote logins to sshd and so on. The Authorization Log file may be accessed at /var/log/auth.log. This log is useful for learning about user logins and usage of the sudo command.
Use grep to cut down on the volume. For example, to see only information in the Authorization Log pertaining to sshd logins, use this:
grep sshd /var/log/auth.log | less
Daemon Log
A daemon is a program that runs in the background, generally without human intervention, performing some operation important to the proper running of your system. The daemon log at /var/log/daemon.log and contains information about running system and application daemons such as the Gnome Display Manager daemon gdm, the Bluetooth HCI daemon hcid, or the MySQL database daemon mysqld. This can help you trouble-shoot problems with a particular daemon.
Again, use grep to find specific information, plugging in the name of the daemon you’re interested in.
Debug Log
The debug log at /var/log/debug and provides detailed debug messages from the Ubuntu system and applications which log to syslogd at the DEBUG level.
Kernel Log
The kernel log at /var/log/kern.log provides a detailed log of messages from the Ubuntu Linux kernel. These messages may prove useful for trouble-shooting a new or custom-built kernel, for example.
Kernel Ring Buffer
The kernel ring buffer is not really a log file per se, but rather an area in the running kernel you can query for kernel bootup messages via the dmesg utility. To see the messages, use this:
dmesg | less
Or to search for lines that mention the Plug & Play system, for example, use grep like this:
dmesg | grep pnp | less
By default, the system initialization script /etc/init.d/bootmisc.sh sends all bootup messages to the file /var/log/dmesg as well. You can view and search this file the usual way.
System Log
The system log typically contains the greatest deal of information by default about your Ubuntu system. It is located at /var/log/syslog, and may contain information other logs do not. Consult the System Log when you can’t locate the desired log information in another log. It also contains everything that used to be in /var/log/messages.
Application Logs
Many applications also create logs in /var/log. If you list the contents of your /var/log subdirectory, you will see familiar names, such as /var/log/apache2 representing the logs for the Apache 2 web server, or /var/log/samba, which contains the logs for the Samba server. This section of the guide introduces some specific examples of application logs, and information contained within them.
Apache HTTP Server Logs
The default installation for Apache2 on Ubuntu creates a log subdirectory: /var/log/apache2. Within this subdirectory are two log files with two distinct purposes:
-
/var/log/apache2/access.log — records of every page served and every file loaded by the web server.
-
/var/log/apache2/error.log — records of all error conditions reported by the HTTP server
By default, every time Apache accesses a file or page, the access logs record the IP address, time and date, browser identification string, HTTP result code and the text of the actual query, which will generally be a GET for a page view. Look at the Apache documentation for a complete rundown; quite a lot can be gleaned from this file, and indeed many statistical packages exist that perform analyses of these logs.
Also, every time any error occurs, Apache adds a line to the error log. If you run PHP with error and warning messages disabled, this can be your only way to identify bugs.
CUPS Print System Logs
The Common Unix Printing System (CUPS) uses the default log file /var/log/cups/error_log to store informational and error messages. If you need to solve a printing issue in Ubuntu, this log may be a good place to start.
Rootkit Hunter Log
The Rootkit Hunter utility (rkhunter) checks your Ubuntu system for backdoors, sniffers and rootkits, which are all signs of compromise of your system. The log rkhunter uses is located at /var/log/rkhunter.log.
Samba SMB Server Logs
The Server Message Block Protocol (SMB) server, Samba is popularly used for sharing files between your Ubuntu computer and other computers which support the SMB protocol. Samba keeps three distinct types of logs in the subdirectory /var/log/samba:
-
log.nmbd — messages related to Samba’s NETBIOS over IP functionality (the network stuff)
-
log.smbd — messages related to Samba’s SMB/CIFS functionality (the file and print sharing stuff)
-
log.[IP_ADDRESS] — messages related to requests for services from the IP address contained in the log file name, for example, log.192.168.1.1.
X11 Server Log
The default X11 Windowing Server in use with Ubuntu is the Xorg X11 server, and assuming your computer has only one display defined, it stores log messages in the file /var/log/Xorg.0.log. This log is helpful for diagnosing issues with your X11 environment.
Non-Human-Readable Logs
Some log files found in the /var/log subdirectory are designed to be readable by applications, not necessarily by humans. Some examples of such log files which appear in /var/log follow.
Login Failures Log
The login failures log located at /var/log/faillog is actually designed to be parsed and displayed by the faillog command. For example, to print recent login failures, use this:
faillog
Last Logins Log
The last logins log at /var/log/lastlog should not typically be parsed and examined by humans, but rather should be used in conjunction with the lastlog command. For example to see a listing of logins with the lastlog command, displayed one page per screen with the less command, use the following command:
lastlog | less
Login Records Log
The file /var/log/wtmp contains login records, but unlike /var/log/lastlog above, /var/log/wtmp is not used to show a list of recent logins, but is instead used by other utilities such as the who command to present a listed of currently logged in users. This command will show the users currently logged in to your machine:
who
System Logging Daemon (syslogd)
The system logging daemon syslogd, also known as sysklogd, awaits logging messages from numerous sources and routes the messages to the appropriate file or network destination. Messages logged to syslogd usually contain common elements like system hostnames and time-stamps in addition to the specific log information.
Configuration of syslogd
The syslogd daemon’s configuration file is /etc/syslog.conf. Each entry in this file consists of two fields, the selector and the action. The selector field specifies a facility to be logged, such as for example the auth facility which deals with authorization, and a priority level to log such information at, such as info, or warning. The action field consists of a target for the log information, such as a standard log file (i.e. /var/log/syslog), or the hostname of a remote computer to send the log information to.
Echoing Messages to syslogd With Logger
A neat utility exists in the logger tool, which allows one to place messages into the System Log (i.e. /var/log/syslog) arbitrarily. For example, assume your user name is buddha, and you would like to enter a message into the syslog about a particularly delicious pizza you’re eating, you could use a command such as the following at a terminal prompt:
logger This Pizza from Vinnys Gourmet Rocks
and you would end up with a line in the /var/log/syslog file like this:
Jan 12 23:34:45 localhost buddha: This Pizza from Vinnys Gourmet Rocks
You can even specify a tag the messages come from, and redirect the output standard error too.
#
# sample logger error jive
#
logmsg="/usr/bin/logger -s -t MyScript "

# announce what this script is, even to the log
$logmsg "Directory Checker FooScript Jive 1.0"

# test for the existence of Fred's home dir on this machine
if [ -d /home/fred ]; then
   $logmsg "I. Fred's Home Directory Found"
else
   $logmsg "E. Fred's Home Directory was NOT Found. Boo Hoo."
   exit 1
fi
Executing this script as chkdir.sh on the machine butters where Fred does not have a home directory, /home/fred, gives the following results:
bumpy@butters:~$./chkdir.sh
MyScript: Directory Checker FooScript Jive 1.0
MyScript: E. Fred's Home Directory was NOT Found. Boo Hoo.
bumpy@butters:~$tail -n 2 /var/log/syslog
Jan 12 23:23:11 localhost MyScript: Directory Checker FooScript Jive 1.0
Jan 12 23:23:11 localhost MyScript: E. Fred's Home Directory was NOT Found. Boo Hoo.
So, as you can see, we received the messages both via standard error, at the terminal prompt, and they also appear in our syslog.
Log Rotation
When viewing directory listings in /var/log or any of its subdirectories, you may encounter log files with names such as daemon.log.0, daemon.log.1.gz, and so on. What are these log files? They are ‘rotated’ log files. That is, they have automatically been renamed after a predefined time-frame, and a new original log started. After even more time the log files are compressed with the gzip utility as in the case of the example daemon.log.1.gz. The purpose of log rotation is to archive and compress old logs so that they consume less disk space, but are still available for inspection as needed. What handles this functionality? Why, the logrotate command of course! Typically, logrotate is called from the system-wide cron script /etc/cron.daily/logrotate, and further defined by the configuration file /etc/logrotate.conf. Individual configuration files can be added into /etc/logrotate.d (where the apache2 and mysql configurations are stored for example).
This guide will not cover the myriad of ways logrotate may be configured to handle the automatic rotation of any log file on your Ubuntu system. For more detail, check the Resources section of this guide.
 NOTE: You may also rotate system log files via the cron.daily script /etc/cron.daily/sysklogd instead of using logrotate. Actually, the utility savelog may produce unexpected results on log rotation which configuring logrotate seems to have no effect on. In those cases, you should check the cron.daily sysklogd script in /etc/cron.daily/sysklogd and read the savelog manual page to see if savelog is not in fact doing the rotation in a way that is not what you are specifying with logrotate.
Essential Commands
If you’re new to the console and the Linux command line, these commands will get you up and running to the point where you can work with log files at a basic level.
Getting Started
To change to the log directory, where most of these files sit, use the cd command. This saves having to type out a full path name for every subsequent command:
cd /var/log
Editing Files
You can view and edit files in GEdit or Kate, the simple text editors that come with Ubuntu and Kubuntu respectively, but these can be overkill when all you want to do is look at a file or make simple changes. The easiest editor to use from the console is nano, which is less powerful but also less complicated than vim or emacs. The command to edit a particular logfile /var/log/example.log using nano is:
nano example.log
Press Ctrl+X to exit. It will ask if you want to save your changes when you exit, but unless you run it with the sudo command the files won’t be writable. In general, you won’t want to save your changes to log files, of course.
Viewing Files
To simply look at a file, an editor is overkill. Use the less command, which pages through a file one screen at a time:
less example.log
You don’t need sudo to look at a file. Press h for help, or q to quit. The cursor keys and page up/down keys will work as expected, and the slash key («/») will do a case-sensitive search; the n key repeats the last search.
Viewing the Beginning of Files
To see the first ten lines of a file, use the head command:
head example.log
To see some other number of lines from the beginning of the file, add the -n switch, thus:
head -n 20 example.log
Viewing the End of Files
To see the final ten lines of a file, the analogous command is tail:
tail example.log
Again, the -n switch gives you control over how many lines it displays:
tail -n 20 example.log
Watching a Changing File
Also, the -f («follow») switch puts tail into a loop, constantly waiting for new additions to the file it’s displaying. This is useful for monitoring files that are being updated in real time:
tail -f example.log
Press Ctrl+C to quit the loop.
Searching Files
Because log files can be large and unwieldy, it helps to be able to focus. The grep command helps you strip out only the content you care about. To find all the lines in a file containing the word «system», for example, use this:
grep "system" example.log
To find all the lines containing «system» at the beginning of the line, use this:
grep "^system" example.log
Note the caret symbol, a regular expression that matches only the start of a line. This is less useful for standard log files, which always start with a date and time, but it can be handy otherwise. Not all files have a standard format.
Any time the result of a grep is still too long, you can pipe it through less:
grep "system" example.log | less
Resources
Additional information on system and application logs and syslogd is available via the following resources:
Local System Resources
|
man dmesg |
System manual page for the dmesg kernel ring buffer utility |
|
man faillog |
System manual page for the faillog command (and also the faillog configuration file via man 5 faillog) |
|
man grep |
System manual page for the grep pattern searching utility |
|
man head |
System manual page for the head utility |
|
man klogd |
System manual page for the kernel log daemon (klogd) |
|
man last |
System manual for the last command which shows last logged in users |
|
man less |
System manual page for the less paging utility |
|
man logger |
System manual page for the logger command-line interface to syslog utility |
|
man logrotate |
System manual page for the the logrotate utility |
|
man savelog |
System manual page for the savelog log file saving utility |
|
man syslogd |
System manual page for the system log daemon (syslogd) |
|
man syslog.conf |
System manual page for the syslogd configuration file |
|
man tail |
System manual page for the tail utility |
WWW Resources
Checking Your System Logs with awk
Syslog — Watching Your Logs
http://www.ibm.com/developerworks/linux/library/l-roadmap5/-Linux Logging
Sawing Linux Logs With Simple Tools
CategorySystem
👨🏫️ Что такое логи?
Логи (журнал сервера, англ. server log) – это записываемые
фрагменты данных, описывающие то, что в конкретный момент времени делает сервер, ядро, службы и приложения. Вот пример лога SSH из /var/log/auth.log:
May 5 08:57:27 ubuntu-bionic sshd[5544]: pam_unix(sshd:session): session opened for user vagrant by (uid=0)
Обратите внимание, что непосредственно
перед сообщением лог содержит несколько полей: метка времени, имя хоста, инициатор
события и идентификатор процесса.
Логи в Linux поступают
из разных источников. Ниже перечислены основные.
Подсистема systemd. Большинство дистрибутивов Linux для управления службами имеют в своём составе systemd. Подсистема инициализации и управления ловит
выходные данные служб и записывает их в журнал. Для работы с логами systemd используется система журналирования journalctl (шпаргалка по работе с journalctl):
        $ journalctl
...
May 05 08:57:27 ubuntu-bionic sshd[5544]: pam_unix(sshd:session): session opened for user vagrant by (uid=0)
...
Сообщения процессов по стандарту syslog. При отсутствии systemd такие процессы, как SSH, могут записывать данные в UNIX-сокет
в формате syslog. Демон syslog, например, rsyslog, выбирает сообщение, анализирует и по умолчанию
записывает его в /var/log.
Ядро Linux пишет собственные логи в особый буфер. Подсистемы systemd или syslog могут считывать
журналы из этого буфера, а затем записывать их в свои журналы или файлы – обычно /var/log/kern.log. Чтобы посмотреть логи ядра, воспользуйтесь dmesg:
        $ dmesg -T
...
[Tue May 5 08:41:31 2020] EXT4-fs (sda1): mounted filesystem with ordered data mode. Opts: (null)
...
Audit logs. Особый случай сообщений ядра, предназначенных для аудита событий, таких как
доступ к файлам. Обычно для прослушивания таких журналов
безопасности, существует специальная служба, например, auditd, записывающая свои сообщения в /var/log/audit/audit.log.
Журнал приложений.
Несистемные приложения имеют тенденцию записывать данные в /var/log:
- Apache (httpd) обычно пишет в
/var/log/httpdили/var/log/apache2. Журналы HTTP-доступа находятся в файле/var/log/httpd/access.log. - Логи MySQL обычно находятся в
/var/log/mysql.logили/var/log/mysqld.log. - Старые версии Linux могут записывать свои логи загрузки с помощью bootlogd в
/var/log/bootили/var/log/boot.log. В современных ОС об этом заботится systemd: вы можете просматривать связанные с загрузкой журналы с помощьюjournalctl -b. Дистрибутивы без systemd снабжены syslog-демоном, считывающим данные из буфера ядра. Таким образом, вы можете найти свои boot/reboot-журналы в/var/log/messagesили/var/log/syslog.
🔍 Если коротко: где искать логи?
Как правило, вы найдете
журналы пингвиньего сервера в каталоге /var/log и подкаталогах. Это место, где
syslog-демонам даны полные права на запись. Также это то место, которое у большинства
приложений (например, Apache) указано по умолчанию, как место хранения логов.
Для systemd
расположение по умолчанию – /var/log/journal, но просматривать файлы
логов напрямую не получится – они хранятся в двоичном формате. Как же быть?
📰 Как анализировать журналы
Если ваш дистрибутив
Linux использует Systemd (как и большинство современных дистрибутивов), то все
ваши системные журналы находятся в специальной области journal. Просмотреть их можно
с помощью journalctl (наиболее важные команды
journalctl).
Если ваш дистрибутив использует syslog, для их просмотра используются стандартные инструменты: cat, less
или grep:
        # grep "error" /var/log/syslog | tail
Mar 31 09:48:02 ubuntu-bionic rsyslogd: unexpected GnuTLS error -53 - this could be caused by a broken connection. GnuTLS reports: Error in the push function. [v8.2002.0 try https://www.rsyslog.com/e/2078 ]
...
Если для управления журналами вы используете auditd, всё найдётся в файле /var/log/audit.log. В поиске и анализе поможет ausearch.
Заметим, что хорошим тоном
является хранение всех логов централизованно, в одном месте. Особенно если у
вас несколько серверов. Обсудим эту задачу подробнее.

Системные журналы могут
находиться в двух местах: в systemd или в обычных текстовых файлах, записанных
демоном syslog. В некоторых дистрибутивах, например, Ubuntu, есть и то, и
другое: journald настроен на пересылку в syslog. Это осуществляется путем
установки ForwardToSyslog=Yes в конфиге journald.conf.
Централизация журналов с помощью Journald
Если в ваш дистрибутив включён systemd, для централизации журналов мы рекомендуем использовать
journal-upload.
Централизация журналов с помощью syslog
Существует несколько случаев,
в которых подойдет централизация с применением syslog:
- Если в ваш дистрибутив не включён journald. Это означает, что системные журналы направляются непосредственно в syslog-демон.
- Когда необходимо собирать и анализировать журналы приложений. Например, в случае с журналами для Apache через rsyslog и Elasticsearch.
- Если вы хотите перенаправить записи –
ForwardToSyslog=Yes. Для этого в качестве транспорта следует использовать syslog-протокол. Однако подход приведет к потере некоторых структурированных данных journald т. к. он пересылает только поляsyslog-specific. - Когда вы настроили syslog-демон для чтения из журналов (как это делает journalctl). Такой подход не приводит к потере структурированных данных, но более чувствителен к ошибкам (например, в случае повреждения журнала) и увеличивает накладные расходы.
Во всех перечисленных ситуациях информация будут проходить через демон syslog, а оттуда их можно
отправить в любое место и использовать на своё усмотрение.
Большинство
дистрибутивов Linux поставляются с rsyslog. Чтобы пересылать
данные на другой сервер через TCP, добавьте следующую строку в
/etc/rsyslog.conf:
*.* @@logsene-syslog-receiver.example.com
Эта строка будет заворачивать
данные на сервер example.com. Вы можете заменить logsene-syslog-receiver.[…..]
именем своего syslog-хоста.
Некоторые демоны могут
выводить данные в Elasticsearch через HTTP/HTTPS. Одним из них является наш rsyslog.
Например, если вы юзаете rsyslog на Ubuntu, сначала установите модуль
Elasticsearch:
sudo apt-get install rsyslog-elasticsearch
Затем в
конфигурационном файле вам потребуется поправить два элемента: шаблон JSON для Elasticsearch:
        template(name="LogseneFormat" type="list" option.json="on") {
 constant(value="{")
 constant(value=""@timestamp":"")
 property(name="timereported" dateFormat="rfc3339")
 constant(value="","message":"")
 property(name="msg")
 constant(value="","host":"")
 property(name="hostname")
 constant(value="","severity":"")
 property(name="syslogseverity-text")
 constant(value="","facility":"")
 property(name="syslogfacility-text")
 constant(value="","syslog-tag":"")
 property(name="syslogtag")
 constant(value="","source":"")
 property(name="programname")
 constant(value=""}")
}
и action, который пересылает данные в Elasticsearch, используя указанный выше шаблон:
        module(load="omelasticsearch")
action(type="omelasticsearch"
 template="LogseneFormat" # шаблон,объявленный ранее
 searchIndex="LOGSENE_APP_TOKEN_GOES_HERE"
 server="logsene-receiver.example.com"
 serverport="443"
 usehttps="on"
 bulkmode="on"
 queue.dequeuebatchsize="100" # сколько сообщений отправлять за раз
 action.resumeretrycount="-1") # буфер сообщений
В приведенном примере показано, как отправлять сообщения в API Elasticsearch на example.com. Настройте action на ваш локальный Elasticsearch:
searchIndex– будет вашим алиасом;server– имя хоста (ноды) Elasticsearch;serverportможет быть 9200 или кастомным, главное, чтобы на нем слушал Elasticsearch;usehttps= "off"– отправление данных по http.
Независимо от того,
используете ли вы syslog-протокол или что-то еще, лучше перенаправлять данные непосредственно из демона, чем искать проблемы в отдельных файлах из /var/log.
Это не значит, что
файлы в /var/log бесполезны. Они пригодятся в следующих случаях:
- приложения пишут туда свои логи, например, HTTP, FTP, MySQL и т. д.,
- требуется обработать системные журналы, например, с помощью grep.
❗Важные файлы журналов для мониторинга
Здесь мы рассмотрим
ключевые файлы логов, какую информацию они хранят, как настраивается rsyslog для записи и как посмотреть информацию с помощью journalctl.
Журнал /var/log/syslog или /var/log/messages
Это «всеохватывающий» системный лог:
        # logger "this is a test"
# tail -1 /var/log/syslog
May 7 15:33:11 ubuntu-bionic test-user: this is a test
Вы найдёте здесь все
сообщения: ошибки, информационные сообщения и все другие серьёзности. Исключением является stop action.
Если в /var/log/syslog
или /var/log/messages пусто, скорее всего, journald не перенаправляет данные в
syslog. Все те же данные можно просмотреть, вызвав journalctl
без параметров.
        # journalctl --no-pager | grep "this is a test"
May 07 15:33:11 ubuntu-bionic test-user[7526]: this is a test
Журналы /var/log/kern.log или /var/log/dmesg
Сюда по умолчанию
отправляются сообщения ядра:
Apr 17 16:47:28 ubuntu-bionic kernel: [ 0.004000] console [tty1] enabled
И снова, если у вас нет
syslog (или файл пустой/отсутствует) – используйте journalctl:
kern.* /var/log/kern.log
Журналы /var/log/auth.log или /var/log/secure
Здесь вы найдете
сообщения об аутентификации, генерируемые такими службами, как sshd:
May 7 15:03:09 ubuntu-bionic sshd[1202]: pam_unix(sshd:session): session closed for user vagrant
Вот ещё один фильтр по значениям auth и authpriv:
auth,authpriv.* /var/log/auth.log
Вы можете использовать
такие фильтры в journalctl, используя числовые
уровни объектов:
        # journalctl SYSLOG_FACILITY=4 SYSLOG_FACILITY=10
...
May 7 15:03:09 ubuntu-bionic sshd[1202]: pam_unix(sshd:session): session closed for user vagrant
...
Журнал /var/log/cron.log
Сюда отправляются ваши
cron-сообщения (jobs-ы, выполняемые регулярно):
May 06 08:19:01 localhost.localdomain anacron[1142]: Job `cron.daily' started
Пример фильтра:
cron.* /var/log/cron
С journalctl можно
сделать так:
# journalctl SYSLOG_FACILITY=9
Журнал /var/log/mail.log или /var/log/maillog
Практически все демоны
(такие как Postfix, cron и т. д.) обычно пишут свои логи в syslog. Затем rsyslog
раскладывает эти логи по файлам:
mail.* /var/log/mail.log
С помощью journald просматривать
журналы можно так:
# journalctl SYSLOG_FACILITY=2
📄 Подведём итоги
- Расположение и формат системных журналов Linux зависят от того, как настроен дистрибутив.
- Большинство дистрибутивов имеют systemd, и все логи «живут» там. Чтобы что-то просмотреть и найти, используйте journalctl.
- Некоторые дистрибутивы передают системные журналы в syslog, либо напрямую, либо через journal. В этом случае у вас, скорее всего, есть логи, записанные в отдельные файлы в
/var/log. - Если вы управляете несколькими серверами, вам потребуется централизовать журналирование с помощью специального ПО или использовать собственный ELK-стек.
Логгирование
событий невероятно важная и серьёзная штука в любой сфере администрирования и
ОС. Рекомендуем отнестись ответственно к данной теме – она будет полезна
при дебагинге, разработке и просто в управлении инфраструктурой.
ЧТЕНИЕ И НАСТРОЙКА ЛОГОВ LINUX В UBUNTU И CENTOS
Администраторам Linux часто нужно заглядывать в лог-файл для устранения неполадок. По сути, это действие первой необходимости для любого админа.
Система Linux и ее приложения могут создавать разные типы сообщений, которые записываются в различные журналы. Linux использует набор конфигурационных файлов, каталогов, программ, команд и демонов для создания, хранения и повторного использования таких сообщений. Поэтому зная, где система хранит свои журналы и как воспользоваться определенными командами, можно сэкономить драгоценное время во время устранения неполадок.
Данное руководство рассматривает различные части механизма журналирования Linux.
Примечание: Команды данного руководства были протестированы на простых установках CentOS 6.4, Ubuntu 12 и Debian 7.
Стандартные логи
По умолчанию журналы в Linux хранятся в /var/log.
Для просмотра списка журналов, находящихся в данном каталоге, используйте команду ls -l /var/log.
В системе CentOS это выглядит так:
[root@TestLinux ~]# ls -l /var/log
total 1472
-rw-------. 1 root root   4524 Nov 15 16:04 anaconda.ifcfg.log
-rw-------. 1 root root  59041 Nov 15 16:04 anaconda.log
-rw-------. 1 root root  42763 Nov 15 16:04 anaconda.program.log
-rw-------. 1 root root 299910 Nov 15 16:04 anaconda.storage.log
-rw-------. 1 root root  40669 Nov 15 16:04 anaconda.syslog
-rw-------. 1 root root  57061 Nov 15 16:04 anaconda.xlog
-rw-------. 1 root root   1829 Nov 15 16:04 anaconda.yum.log
drwxr-x---. 2 root root   4096 Nov 15 16:11 audit
-rw-r--r--  1 root root   2252 Dec  9 10:27 boot.log
-rw-------  1 root utmp    384 Dec  9 10:31 btmp
-rw-------. 1 root utmp   1920 Nov 28 09:28 btmp-20131202
drwxr-xr-x  2 root root   4096 Nov 29 15:47 ConsoleKit
-rw-------  1 root root   2288 Dec  9 11:01 cron
-rw-------. 1 root root   8809 Dec  2 17:09 cron-20131202
-rw-r--r--  1 root root  21510 Dec  9 10:27 dmesg
-rw-r--r--  1 root root  21351 Dec  6 16:37 dmesg.old
-rw-r--r--. 1 root root 165665 Nov 15 16:04 dracut.log
-rw-r--r--. 1 root root 146876 Dec  9 10:44 lastlog
-rw-------  1 root root    950 Dec  9 10:27 maillog
-rw-------. 1 root root   4609 Dec  2 17:00 maillog-20131202
-rw-------  1 root root 123174 Dec  9 10:27 messages
-rw-------. 1 root root 458481 Dec  2 17:00 messages-20131202
-rw-------  1 root root   2644 Dec  9 10:44 secure
-rw-------. 1 root root  15984 Dec  2 17:00 secure-20131202
-rw-------  1 root root      0 Dec  2 17:09 spooler
-rw-------. 1 root root      0 Nov 15 16:02 spooler-20131202
-rw-------. 1 root root      0 Nov 15 16:02 tallylog
-rw-rw-r--. 1 root utmp  89856 Dec  9 10:44 wtmp
-rw-------  1 root root   3778 Dec  6 16:48 yum.log
Просмотр логов
В каталоге /var/log находится несколько общих журналов:
- wtmp
- utmp
- dmesg
- messages
- maillog или mail.log
- spooler
- auth.log или secure
Файлы wtmp и utmp отслеживают пользователей, вошедших и покинувших систему. Содержимое данных журналов нельзя читать с помощью простой команды «cat», для этого есть специальные команды, с которыми теперь нужно ознакомиться.
Чтобы узнать, кто в текущий момент находится на сервере Linux, нужно использовать команду «who». Она извлекает информацию из /var/run/utmp (в CentOS и Debian) или из /run/utmp (в Ubuntu).
Это пример ее работы в CentOS:
[root@TestLinux ~]# who
root     tty1         2013-12-09 10:44
root      pts/0        2013-12-09 10:29 (10.0.2.2)
sysadmin pts/1        2013-12-09 10:31 (10.0.2.2)
joeblog  pts/2        2013-12-09 10:39 (10.0.2.2)
Команда «sysadmin» выводит историю входа пользователей:
[root@TestLinux ~]# last | grep sysadmin
sysadmin pts/1        10.0.2.2         Mon Dec  9 10:31   still logged in
sysadmin pts/0        10.0.2.2         Fri Nov 29 15:42 - crash  (00:01)
sysadmin pts/0        10.0.2.2         Thu Nov 28 17:06 - 17:13  (00:06)
sysadmin pts/0        10.0.2.2         Thu Nov 28 16:17 - 17:05  (00:48)
sysadmin pts/0        10.0.2.2         Thu Nov 28 09:29 - crash  (06:04)
sysadmin pts/0        10.0.2.2         Wed Nov 27 16:37 - down   (00:29)
sysadmin tty1                          Wed Nov 27 14:05 - down   (00:36)
sysadmin tty1                          Wed Nov 27 13:49 - 14:04  (00:15)
В данном примере нужно было получить историю входа пользователя sysadmin. Как можно видеть, было пару случаев, когда он приводил к сбою системы.
Чтобы узнать время последней перезагрузки системы, используйте следующую команду:
[root@TestLinux ~]# last reboot
Результат имеет примерно такой вид:
reboot   system boot  2.6.32-358.el6.x Mon Dec  9 10:27 - 10:47  (00:19)
reboot   system boot  2.6.32-358.el6.x Fri Dec  6 16:37 - 10:47 (2+18:10)
reboot   system boot  2.6.32-358.el6.x Fri Dec  6 16:28 - 16:36  (00:08)    reboot   system boot  2.6.32-358.el6.x Fri Dec  6 11:06 - 16:36  (05:29)
reboot   system boot  2.6.32-358.el6.x Mon Dec  2 17:00 - 16:36 (3+23:36)
reboot   system boot  2.6.32-358.el6.x Fri Nov 29 16:01 - 16:36 (7+00:34)
reboot   system boot  2.6.32-358.el6.x Fri Nov 29 15:43 - 16:36 (7+00:53)
...
...
wtmp begins Fri Nov 15 16:11:54 2013
Чтобы узнать время последнего входа в систему, используйте lastlog:
[root@TestLinux ~]# lastlog
Результат на CentOS выглядит примерно так:
Username        Port        From            Latest
root            tty1                        Mon Dec  9 10:44:30 +1100 2013
bin                                        **Never logged in**
daemon                                     **Never logged in**
adm                                        **Never logged in**
lp                                         **Never logged in**
sync                                       **Never logged in**
shutdown                                   **Never logged in**
halt                                       **Never logged in**
mail                                       **Never logged in**
uucp                                       **Never logged in**
operator                                   **Never logged in**
games                                      **Never logged in**
gopher                                     **Never logged in**
ftp                                        **Never logged in**
nobody                                     **Never logged in**
vcsa                                       **Never logged in**
saslauth                                   **Never logged in**
postfix                                    **Never logged in**
sshd                                       **Never logged in**
sysadmin         pts/1    10.0.2.2         Mon Dec  9 10:31:50 +1100 2013
dbus                                       **Never logged in**
joeblog          pts/2    10.0.2.2         Mon Dec  9 10:39:24 +1100 2013
Для просмотра содержимого текстовых журналов можно использовать команды «cat», «head» или «tail».
В приведенном ниже примере просматриваются последние 10 строк журнала /var/log/messages на Debian:
debian@debian:~$ sudo tail /var/log/messages
Вывод:
Dec 16 01:21:08 debian kernel: [    9.584074] Bluetooth: BNEP (Ethernet Emulation) ver 1.3
Dec 16 01:21:08 debian kernel: [    9.584074] Bluetooth: BNEP filters: protocol multicast
Dec 16 01:21:08 debian kernel: [    9.648220] Bridge firewalling registered
Dec 16 01:21:08 debian kernel: [    9.696728] Bluetooth: SCO (Voice Link) ver 0.6
Dec 16 01:21:08 debian kernel: [    9.696728] Bluetooth: SCO socket layer initialized
Dec 16 01:21:08 debian kernel: [    9.832215] lp: driver loaded but no devices found
Dec 16 01:21:08 debian kernel: [    9.868897] ppdev: user-space parallel port driver
Dec 16 01:21:11 debian kernel: [   12.748833] [drm] Initialized drm 1.1.0 20060810
Dec 16 01:21:11 debian kernel: [   12.754412] pci 0000:00:02.0: PCI INT A -> Link[LNKB] -> GSI 11 (level, low) -> IRQ 11
Dec 16 01:21:11 debian kernel: [   12.754412] [drm] Initialized vboxvideo 1.0.0 20090303 for 0000:00:02.0 on minor 0
Демон rsyslog
Центром механизма журналирования является демон rsyslog. Данный сервис отвечает за прослушивание зарегистрированных сообщений различных частей системы Linux и маршрутизацию сообщения к соответствующему журналу в каталоге /var/log. Он также может передавать зарегистрированные сообщения другому серверу Linux.
Конфигурационный файл rsyslog
Демон rsyslog получает конфигурации из файла «rsyslog.conf», который находится в каталоге /etc.
В основном, файл rsyslog.conf говорит демону, где хранить сообщения. Данная информация имеет вид серии строк, состоящих из двух частей.
Этот файл можно найти в rsyslog.d/50-default.conf в Ubuntu.
Под двумя частями строк подразумеваются селектор и действие (selector и action). Они разделяются пробельным символом.
Селектор указывает на источник и важность сообщения, а действие говорит, что нужно сделать с данным сообщением.
Сам селектор также разделен на 2 части символом точки (.). Часть перед символом точки называется объектом (источник сообщения), а часть за символом называется приоритетом (степень важности сообщения).
Комбинация объекта-приоритета и действия говорит rsyslog, что делать, если сообщение соответствует указанным параметрам.
Вот отрывок из файла rsyslog.conf на CentOS:
# rsyslog v5 configuration file
...
...
# Include all config files in /etc/rsyslog.d/
IncludeConfig /etc/rsyslog.d/*.conf
#### RULES ####
# Log all kernel messages to the console.
# Logging much else clutters up the screen.
#kern.*  /dev/console
# Log anything (except mail) of level info or higher.
# Don't log private authentication messages!
*.info;mail.none;authpriv.none;cron.none                /var/log/messages
# The authpriv file has restricted access.
authpriv.*                                              /var/log/secure
# Log all the mail messages in one place.
mail.*                                                  -/var/log/maillog
# Log cron stuff
cron.*                                                  /var/log/cron
# Everybody gets emergency messages
*.emerg                                                 *
# Save news errors of level crit and higher in a special file.
uucp,news.crit                                          /var/log/spooler
# Save boot messages also to boot.log
local7.*                                                /var/log/boot.log
...
...
Чтобы понять, что все это значит, нужно рассмотреть типы объектов, которые распознает Linux:
- auth or authpriv: Сообщения, поступающие от сервисов авторизации и безопасности;
- kern: сообщения ядра Linux;
- mail: сообщения подсистемы почты;
- cron: сообщения демона Cron;
- daemon: сообщения от демонов;
- news: сообщения подсистемы новостей сети;
- lpr: сообщения, связанные с печатью;
- user: сообщения пользовательских программ;
- local0 до local7:Зарезервировано для локального использования.
Ниже приведен список приоритетов по возрастанию:
- Debug: Отладочная информация от программ;
- info: простое информационное сообщение – никакого вмешательства не требуется;
- notice: состояние, которое может потребовать внимания;
- warn: Предупреждение;
- err: ошибка;
- crit: критическое состояние;
- alert: состояние, требующее немедленного вмешательства;
- emerg: аварийное состояние.
Изучите следующую строку из файла:
cron.* /var/log/cron
Она говорит rsyslog сохранять все сообщения, приходящие от демона cron, в файле /var/log/cron. Звездочка (*) поле точки значит, что зарегистрированы будут сообщения всех приоритетов. Аналогичным образом, если объект был определен звездочкой, это объединяет все источники.
Объекты и приоритеты могут быть связаны в несколькими способами.
Вид по умолчанию, когда после точки указан только один приоритет, значит, что будут охвачены все сообщения с таким или высшим уровнем приоритета. Таким образом, данное указание регистрирует все сообщения, приходящие от почтовой подсистемы с приоритетом «warn» и выше в специальном файле в /var/log:
mail.warn /var/log/mail.warn
Такие параметры будут регистрировать все сообщения с таким же или высшим, чем warn, приоритетом и пропускать все остальное. То есть, сообщения с приоритетом err, crit, alert и emerg также будут внесены в файл.
Знак равности (=) после точки указывает регистрировать только сообщения с указанным приоритетом. То есть, если нужно регистрировать только сообщения от почтовой подсистемы с приоритетом info, указание будет таким:
mail.=info /var/log/mail.info
Опять же, если нужно регистрировать все сообщения почтовой подсистемы, кроме сообщений с приоритетом info, строка будет выглядеть так:
mail.!info /var/log/mail.info
или так:
mail.!=info /var/log/mail.info
В первом случае файл mail.info содержал бы все сообщения с приоритетом ниже info. Во втором случае он содержал бы все сообщения с приоритетом выше info.
Несколько объектов в одной строке нужно разделить запятой.
Несколько селекторов в одной строке также разделяются запятой.
Отмеченное звездочкой действие объединяет всех пользователей.
К примеру, об этом говорит запись в файле rsyslog.conf на CentOS:
# Everybody gets emergency messages *.emerg *
По возможности проверьте, что говорит rsyslog.conf на других системах Linux. Вот отрывок из Debian:
#  /etc/rsyslog.conf    Configuration file for rsyslog.
#
#           For more information see
#           /usr/share/doc/rsyslog-doc/html/rsyslog_conf.html
...
...
auth,authpriv.*         /var/log/auth.log
*.*;auth,authpriv.none      -/var/log/syslog
#cron.*             /var/log/cron.log
daemon.*            -/var/log/daemon.log
kern.*              -/var/log/kern.log
lpr.*               -/var/log/lpr.log
mail.*              -/var/log/mail.log
user.*              -/var/log/user.log
#
# Logging for the mail system.  Split it up so that
# it is easy to write scripts to parse these files.
#
mail.info           -/var/log/mail.info
mail.warn           -/var/log/mail.warn
mail.err            /var/log/mail.err
#
# Logging for INN news system.
#
news.crit           /var/log/news/news.crit
news.err            /var/log/news/news.err
news.notice         -/var/log/news/news.notice
Как можно видеть, Debian сохраняет сообщения безопасности/авторизации всех уровней в /var/log/auth.log, в то время как CentOS делает это в /var/log/secure.
Конфигурации для rsyslog могут исходить также от других пользовательских файлов. Эти файлы пользовательских конфигураций, как правило, расположены в разных каталогах в /etc/rsyslog.d. Файл rsyslog.conf включает эти каталоги, используя директиву «$IncludeConfig».
Так это выглядит в Ubuntu:
#  Default logging rules can be found in /etc/rsyslog.d/50-default.conf
....
....
$IncludeConfig /etc/rsyslog.d/*.conf
Содержимое каталога /etc/rsyslog.d выглядит так:
-rw-r--r-- 1 root root  311 Mar 17  2012 20-ufw.conf
-rw-r--r-- 1 root root  252 Apr 11  2012 21-cloudinit.conf
-rw-r--r-- 1 root root 1655 Mar 30  2012 50-default.conf
Теперь сохранять сообщение в журнал необязательно; сообщение можно переслать консоли пользователя. В таком случае, поле действия будет содержать имя пользователя. Если сообщение нужно отправить нескольким пользователям, их имена нужно разделить запятыми. Если же сообщение нужно распространить между всеми пользователями, в поле действия вносится символ *.
Будучи частью сетевой операционной системы, демон rsyslog может не только хранить зарегистрированные сообщения локально, но и передавать их на другие серверы Linux, а также действовать как репозиторий для других систем. Демон прослушивает сообщения через UDP-порт 514. В приведенном ниже примере он пересылает критические сообщения ядра на сервер под названием «texas»:
kern.crit @texas
Создание и тестирование сообщений
Теперь попробуйте сами создать сообщение.
Для этого нужно будет сделать следующее:
- Задать спецификацию в файле /etc/rsyslog.conf;
- Перезапустить демон rsyslog;
- Проверить конфигурацию с помощью утилиты «logger».
В следующем примере внесены две строки в файл rsyslog.conf на CentOS. Как видите, обе они исходят от объекта local4 и имеют разные приоритеты.
[root@TestLinux ~]# vi /etc/rsyslog.conf
....
....
# New lines added for testing log message generation
local4.crit                                             /var/log/local4crit.log
local4.=info                                            /var/log/local4info.log`

Затем нужно перезапустить сервис, чтобы обновить данные файла:

`[root@TestLinux ~]# /etc/init.d/rsyslog restart
Shutting down system logger:                               [  OK  ]
Starting system logger:                                    [  OK  ]
[root@TestLinux ~]#`

Теперь нужно вызвать приложение logger, чтобы создать сообщение:

`[root@TestLinux ~]# logger -p local4.info " This is a info message from local 4"`

Каталог /var/log показывает два новых сообщения:

`...
...
-rw-------  1 root root      0 Dec  9 11:21 local4crit.log
-rw-------  1 root root     72 Dec  9 11:22 local4info.log
Размер local4info.log не равен нулю, а это значит, что сообщение было записано:
[root@TestLinux ~]# cat /var/log/local4info.log
Dec  9 11:22:32 TestLinux root:  This is a info message from local 4
Ротация лог-файлов
Со временем журналы становятся больше, поскольку в них появляется новая информация. Это создает потенциальную проблему производительности. Кроме того, управление файлами становится затруднительным.
Linux использует понятие «ротации» журналов вместо их очистки или удаления. При ротации создается новый каталог, а старый переименуется и при необходимости сжимается. Таким образом, журналы имеют несколько старых версий. Эти файлы будут возвращаться в течение определенного периода времени в виде так называемых backlog-ов. Как только будет получено определенное количество backlog-ов, новая ротация удалит самый старый журнал.
Ротация выполняется при помощи утилиты «logrotate».
Конфигурационный файл logrotate
Как и rsyslog, logrotate зависит от конфигурационного файла по имени logrotate.conf, который находится в /etc.
Вот что находится в данном файле на Debian:
debian@debian:~$ cat /etc/logrotate.conf
# see "man logrotate" for details
# rotate log files weekly
weekly
# keep 4 weeks worth of backlogs
rotate 4
# create new (empty) log files after rotating old ones
create
# uncomment this if you want your log files compressed
#compress
# packages drop log rotation information into this directory
include /etc/logrotate.d
# no packages own wtmp, or btmp -- we'll rotate them here
/var/log/wtmp {
missingok
monthly
create 0664 root utmp
rotate 1
}
/var/log/btmp {
missingok
monthly
create 0660 root utmp
rotate 1
}
# system-specific logs may be configured here
По умолчанию журналы ротируются еженедельно, оставляя 4 backlog-а. При запуске программы создается новый пустой журнал, а старые при необходимости будут сжаты.
Файлы wtmp и btmp являются исключениями. wtmp отслеживает вход в систему, а btmp содержит информацию о неудавшихся попытках входа. Эти журнальные файлы ротируются каждый месяц, и ошибки не возвращаются, если можно найти один из предыдущих файлов wtmp или btmp.
Пользовательские конфигурации ротации журналов содержатся в каталоге «etc/logrotate.d». также они включены в logrotate.conf с помощью директивы include. К примеру, Debian показывает такое содержание данного каталога:
debian@debian:~$ ls -l /etc/logrotate.d
total 44
-rw-r--r-- 1 root root 173 Apr 15  2011 apt
-rw-r--r-- 1 root root  79 Aug 12  2011 aptitude
-rw-r--r-- 1 root root 135 Feb 24  2010 consolekit
-rw-r--r-- 1 root root 248 Nov 28  2011 cups
-rw-r--r-- 1 root root 232 Sep 19  2012 dpkg
-rw-r--r-- 1 root root 146 May 12  2011 exim4-base
-rw-r--r-- 1 root root 126 May 12  2011 exim4-paniclog
-rw-r--r-- 1 root root 157 Nov 16  2010 pm-utils
-rw-r--r-- 1 root root  94 Aug  8  2010 ppp
-rw-r--r-- 1 root root 515 Nov 30  2010 rsyslog
-rw-r--r-- 1 root root 114 Nov 26  2008 unattended-upgrades
Содержание rsyslog показывает, как вернуть логи в исходное состояние:
debian@debian:~$ cat /etc/logrotate.d/rsyslog
/var/log/syslog
{
rotate 7
daily
missingok
notifempty
delaycompress
compress
postrotate
invoke-rc.d rsyslog reload > /dev/null
endscript
}
/var/log/mail.info
/var/log/mail.warn
/var/log/mail.err
/var/log/mail.log
/var/log/daemon.log
/var/log/kern.log
/var/log/auth.log
/var/log/user.log
/var/log/lpr.log
/var/log/cron.log
/var/log/debug
/var/log/messages
{
rotate 4
weekly
missingok
notifempty
compress
delaycompress
sharedscripts
postrotate
invoke-rc.d rsyslog reload > /dev/null
endscript
}
Как видите, файл «syslog» будет повторно инициализирован каждый день. Другие журнальные файлы ротируются каждую неделю.
Также стоит упомянуть директив postrotate. Она указывает действие, которое происходит после того, как ротация журналов завершена.
Тестирование ротации
Logrotate можно запустить вручную для ротации одного или нескольких файлов. Чтобы это сделать, нужно просто указать соответствующий конфигурационный файл как аргумент.
Чтобы продемонстрировать, как это работает, ниже приведен неполный список журнальных файлов в каталоге /var/log на CentOS:
[root@TestLinux ~]# ls -l /var/log
total 800
...
-rw-------  1 root root    359 Dec 17 18:25 maillog
-rw-------. 1 root root   1830 Dec 16 16:35 maillog-20131216
-rw-------  1 root root  30554 Dec 17 18:25 messages
-rw-------. 1 root root 180429 Dec 16 16:35 messages-20131216
-rw-------  1 root root    591 Dec 17 18:28 secure
-rw-------. 1 root root   4187 Dec 16 16:41 secure-20131216
...
...
Неполное содержимое файла logrotate.conf выглядит так:
[root@TestLinux ~]# cat /etc/logrotate.conf
# see "man logrotate" for details
# rotate log files weekly
weekly
# keep 4 weeks worth of backlogs
rotate 4
# create new (empty) log files after rotating old ones
create
...
...
Затем запустите команду logrotate:
[root@TestLinux ~]# logrotate -fv /etc/logrotate.conf
Сообщения прокручиваются при создании новых файлов, обнаружении ошибок и т.д. Затем попробуйте проверить новые журнальные файлы почты, безопасности и сообщений:
[root@TestLinux ~]# ls -l /var/log/mail*
-rw-------  1 root root    0 Dec 17 18:34 /var/log/maillog
-rw-------. 1 root root 1830 Dec 16 16:35 /var/log/maillog-20131216
-rw-------  1 root root  359 Dec 17 18:25 /var/log/maillog-20131217
[root@TestLinux ~]# ls -l /var/log/messages*
-rw-------  1 root root    148 Dec 17 18:34 /var/log/messages
-rw-------. 1 root root 180429 Dec 16 16:35 /var/log/messages-20131216
-rw-------  1 root root  30554 Dec 17 18:25 /var/log/messages-20131217
[root@TestLinux ~]# ls -l /var/log/secure*
-rw-------  1 root root    0 Dec 17 18:34 /var/log/secure
-rw-------. 1 root root 4187 Dec 16 16:41 /var/log/secure-20131216
-rw-------  1 root root  591 Dec 17 18:28 /var/log/secure-20131217
[root@TestLinux ~]#
Как можно видеть, все три новых журнала были созданы. Почтовый журнал и журнал безопасности все еще пусты, но новый журнал сообщений уже содержит некоторые данные.
CentOS
логи
Ubuntu
logger
rsyslog
Системным администраторам часто требуется просмотреть логи в операционной среде Linux. Это первое, что необходимо сделать, если возникла неисправность, и стоит задача ее устранить. Операционная система Linux и работающие приложения генерируют различные типы сообщений, которые регистрируются в различных файлах журналов. В Linux используются специальное программное обеспечение, файлы и директории для хранения лог файлов. Если вы знаете, какие программы в каких логах генерирует информацию, а главное, где эти логи находятся, вы сможете быстро решать любые возникшие проблемы с минимальной потерей времени. Дальше рассмотрим основные части системы логирования в Linux, файлы логов, а также утилиты, с помощью которых можно посмотреть логи Linux.
Расположение логов в Linux
Все основные логи Linux находятся в папке /var/log/ вы можете список файлов логов для вашей системы с помощью команды ls:
$ ls -l /var/log/
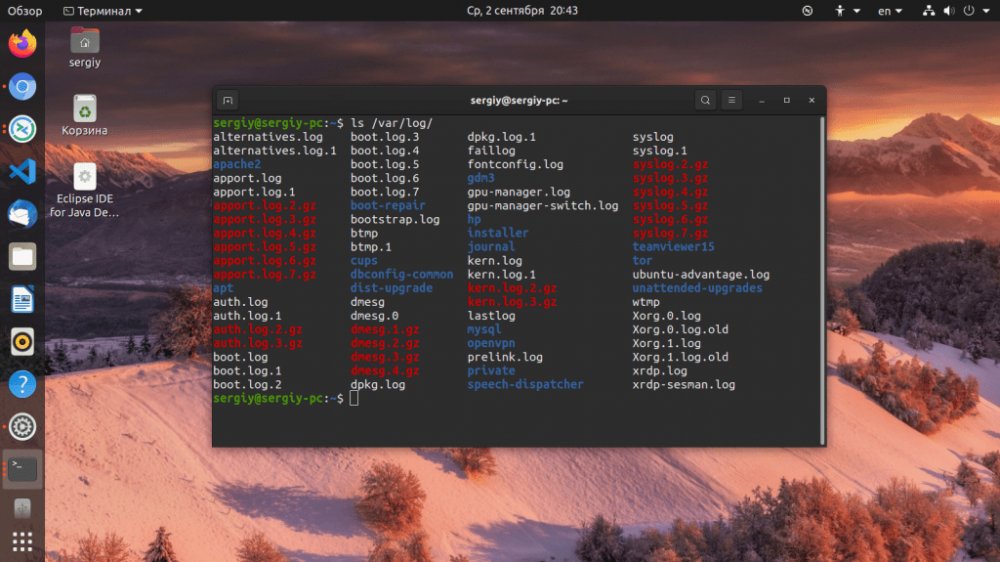
Дальше рассмотрим 20 различных файлов логов Linux, размещенных в каталоге /var/log/. Некоторых из этих логов встречаются только в определенных дистрибутивах, например, dpkg.log встречается только в системах, основанных на Debian:
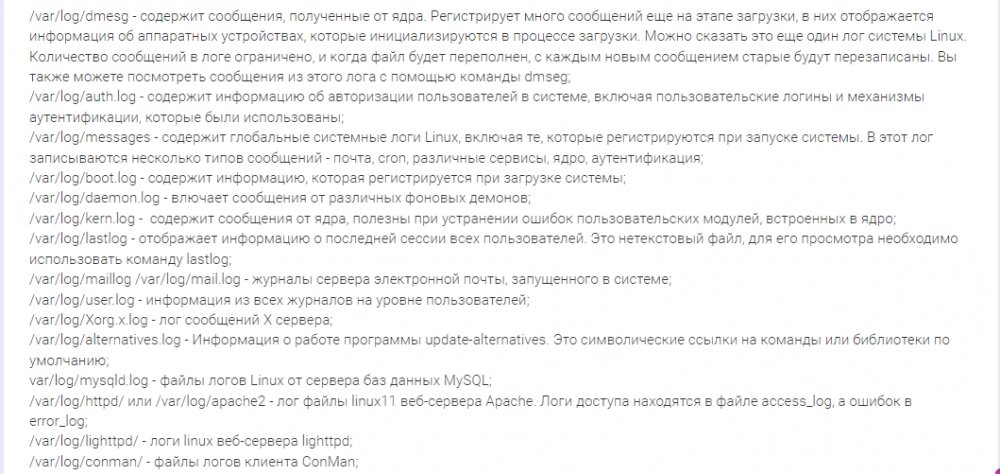
Дальше рассмотрим, как просмотреть эти логи в операционной системе.
Просмотр логов в Linux
Для просмотра логов в операционной среде Linux удобно пользоваться несколькими утилитами командой строки. Для этого, как правило, используют любой текстовый редактор, или специальную утилиту. Скорее всего, нужно будет получить права суперпользователя для того чтобы посмотреть логи в Linux. Список чаще всего используемых для этой цели команд:
- cat;
- head;
- grep;
- tail;
- zcat;
- zgrep;
- zmore;
- vi;
- nano.
Чтобы просмотреть лог /var/log/dmesg с возможностью прокрутки достаточно выполнить:
$ less /var/log/dmesg
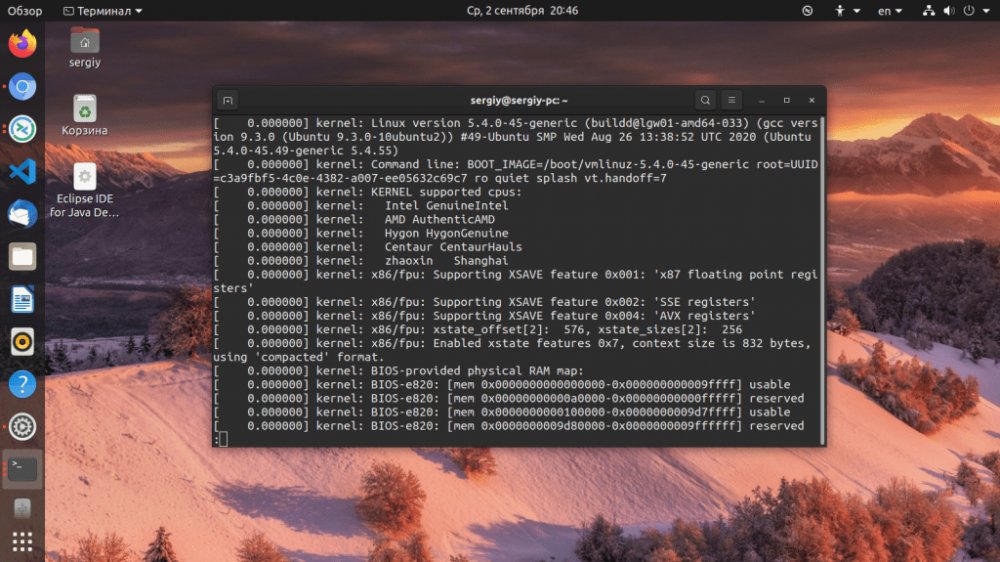
Смотрим логи в реальном времени:
$ tail -f /var/log/dmesg
Открываем файл лога dmesg:
$ cat /var/log/dmesg
Просматриваем первые строки:
$ head /var/log/dmesg
Дальше выводим ошибки из /var/log/messages:
$ grep -i error /var/log/dmesg
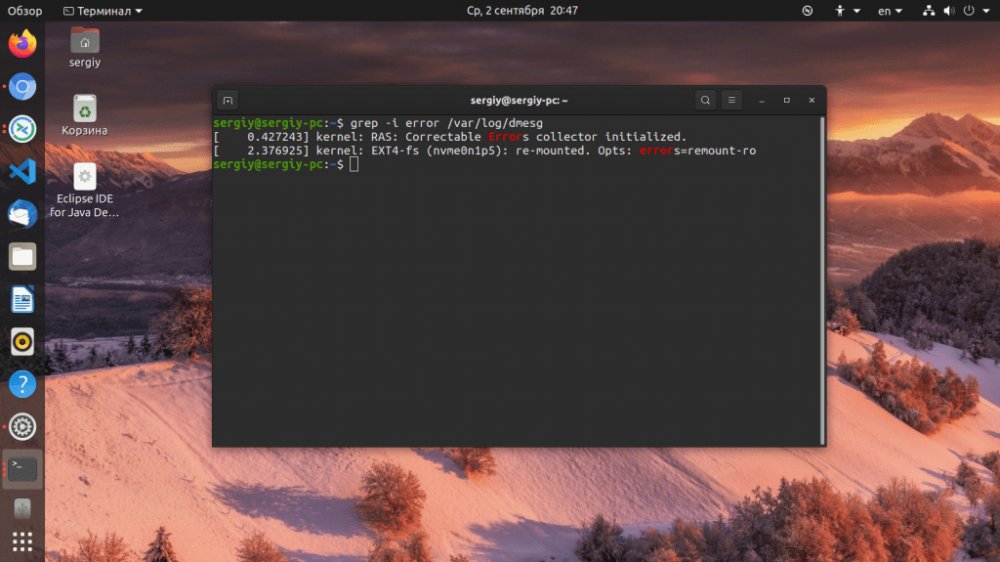
Смотреть логи в Linux можно и с помощью графических утилит. Программа Журналы может быть использована для удобного просмотра и отслеживания системных журналов на ноутбуке или персональном компьютере с Linux.
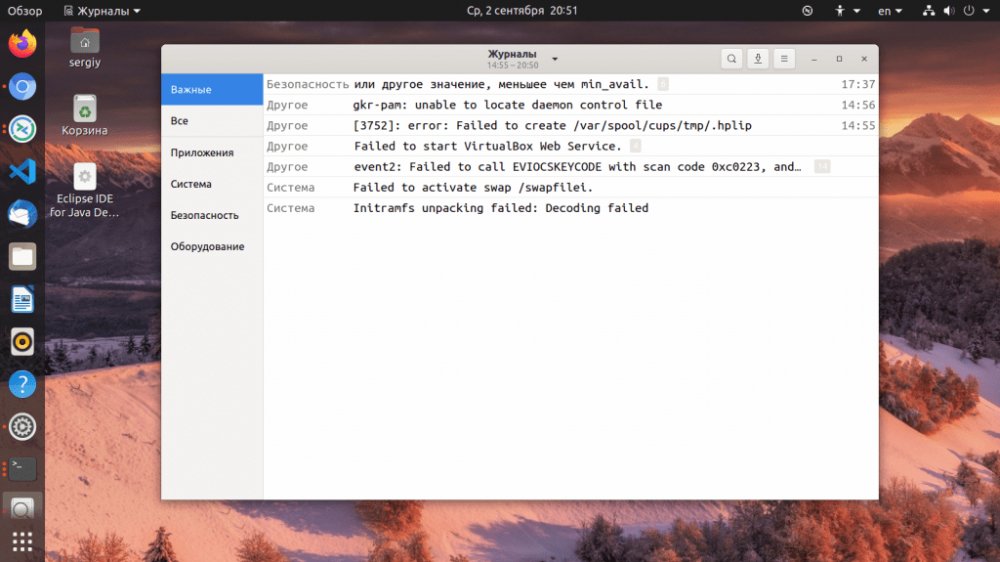
Можно установить программу в любой системе с установленным X сервером. Также для просмотра логов может использоваться любой графический тестовый редактор.
What are Linux Log Files?
All Linux systems create and store information log files for boot processes, applications, and other events. These files can be a helpful resource for troubleshooting system issues.
Most Linux log files are stored in a plain ASCII text file and are in the /var/log directory and subdirectory. Logs are generated by the Linux system daemon log, syslogd or rsyslogd.
This tutorial will walk you through how to find and read Linux log files, and configure the system logging daemon.

Prerequisites
- Access to Linux
- A user account with root user privileges
1. First, open the Linux terminal as a root user. This will enable root privileges.
2. Use the following command to see the log files:
cd /var/log3. To view the logs, type the following command:
lsThe command displays all Linux log files, such as kern.log and boot.log. These files contain the necessary information for the proper function of the operating system.
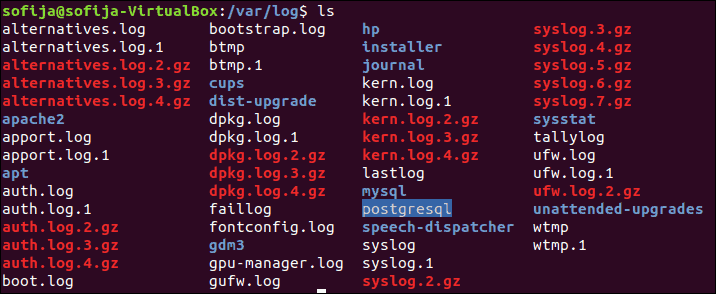
Log files are accessed using root privileges. By definition, root is the default account that has access to all Linux files.
Use the following example line command to access the respective file:
sudo less [log name here].logThis command displays a timeline of all information related to that operation.
Note that log files are stored in plain text so they can be viewed by using the following standard commands:
zcat – Displays all the contents of logfile.gz
zmore – See the file in pages, without decompressing the files
zgrep – Search inside a compressed file
grep – Find all occurrences of a search term in a file or filter a log file
tail – Output the last few lines of files
head– View the very beginning of text files
Note: Check out our comprehensive guide on grep to learn how to use it with examples.
Important Linux System Logs
Logs can tell a lot about the operations of a system. A good understanding of each type of file will help how to distinguish the respective logs.
Most directories can be grouped into one of four categories:
- System Logs
- Event Logs
- Application Logs
- Service Logs
Many of these logs can be located in the var/log subdirectory.
System Logs
Systems log files are needed for Linux to work. On its own, it contains the most significant amount of information about system functionality. The most common log files are:
/var/log/boot.log: System Boot log (the boot log stores all information related to booting operations)/var/log/auth.log: Auth logs (the authentication log stores all authentication logs, including successful and failed attempts)/var/log/httpd/: Apache access and error logs/var/log/mysqld.log: MySQL database server log file/var/log/debug: Debug logs (the debug log stores detailed messages related to debugging and is useful for troubleshooting specific system operations)/var/log/daemon.log: Daemon logs (the daemon log contains information about events related to running the Linux operation)/var/log/maillog: Mail server logs (the mail log stores information related to mail servers and archiving emails)/var/log/kern.log: Kernel logs (the kernel log stores information from the Ubuntu Linux kernel)/var/log/yum.log: Yum command logs
System Logging Daemon
A daemon log is a program that runs in the background and is essential for system operations. These logs have their own category of logs and are seen as the heart of the logging operations for any system.
The path for the system login daemon’s configuration is /etc/syslog.conf.
Each file consists of a selector and an action entry field. The syslogd daemon can forward log messages as well. This can be useful for debugging purposes.
Application Logs
Application logs store information relevant to any application that is executed. This can include error messages, signs of system compromise, and browser identification string.
Log files that fall into this category include CUPS Print System logs, Rootkit Hunter log, Apache HTTP server logs, Samba SMB server logs, and X11 server log.
Non-Human-Readable Logs
Not all logs are designed in a human-readable format. Some are designed only to be read by system applications. Such files are often related to login information. They include login failure logs, last logins logs, and login records.
There are tools and software for reading Linux log files. They are not necessary for reading files as most can be read directly from the Linux terminal.
Supplemental GUIs for Viewing Linux Log Files
System Log Viewer is a GUI that can be used to monitor system logs.
The interface provides several functions for managing logs, including a log statistics display. It is a user-friendly log monitoring GUI.
Useful features include:
- A live view of logs
- Number of lines in the log
- Log size
- Most recent log dates
- Modifications made to logs
- Filters
- Keyboard Shortcuts
Alternatively, use Xlogmaster which can monitor a considerable number of log files. It features three different modes:
- Run mode: Starts a specified program and obtains stdout
- Cat mode: Cats files within specified intervals
- Tail mode: Checks log files within regular intervals
Xlogmaster is useful for increasing security. It translates all data for highlighting, hiding lines, and displays this information for taking user requested action.
How to Configure Log Files on Ubuntu and CentOS
This section explains different mechanisms for configuring log files. Let’s start with a CentOS example.
To view users currently logged onto a Linux server, enter the who command as a root user:
who
This also lists the login history of users. To view the login history of the system administrator, enter the following command:
last reboot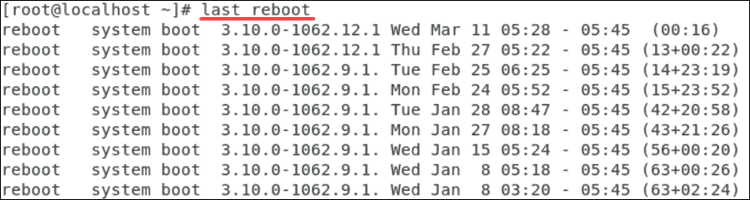
To view information of the last login, enter:
lastlog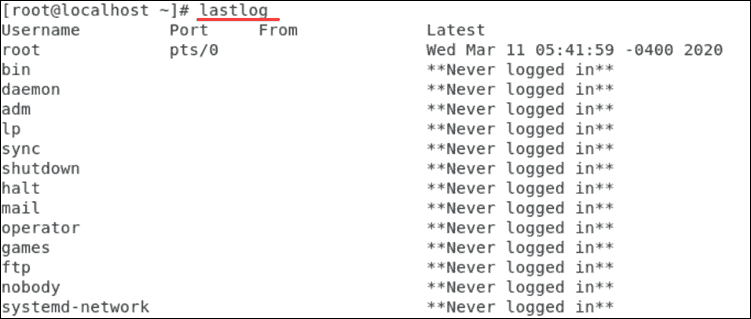
Execute Log Rotation
Log files that have zeroes appended at the end are rotated files. That means log file names have automatically been changed within the system.
The purpose of log rotation is to compress outdated logs that are taking up space. Log rotation can be done using the logrotate command. This command rotates, compresses, and mails system logs.
logrotate handles systems that create significant amounts of log files. The command is used by the cron scheduler and reads the logrotate configuration file /etc/logrotate.conf. It’s also used to read files in the logrotate configuration directory.
To include additional functionality to logrotate, start by entering the following command:
var/log/log name here].log {
Missingok
Notifempty
Compress
Size 20k
Daily
Create 0600 root root
}
It compresses and resizes the desired log file.
The commands perform the actions as follows:
missingok – Tells logrotate not to output an error if a log file is missing
notifempty – Does not rotate the log file if it is empty. It reduces the size of the log file with gzip
size – Ensures that the log file does not exceed the specified dimension and rotates it otherwise
daily – Rotates the log files on a daily schedule. This can also be done on a weekly or monthly schedule
create – Instantiates a log file where the owner and group are a root user
Conclusion
A thorough understanding of how to view and read Linux logs is necessary for troubleshooting a Linux system.
Using the proper commands and tools can simplify this process.