The ‘loadlibrary failed with error 126’ is an error that dates back to the earlier Windows versions (Vista and onwards) but is still reported. The issue is reported when launching an application/game or installing it.

Many programs showed this error. Following are a few examples of such applications, games, utilities:
- Rhinoceros 3D
- Adobe Suite (Photoshop, Illustrator, etc.)
- TrackIRv5
- UltimateDefrag
- Radar ScreenSaver
- Logitech Gaming Keyboard and Headset
- Minecraft
- BluetStacks
- Steam or Steam Games (like Stardew)
- Virtual Box
- PowerAttendantLite
- Blender
- Civilization VI
- ANSYS
- Microsoft Remote Desktop
- MATLAB
Many factors can cause the ‘loadlibrary failed with error 126’ but the following can be regarded as the main culprits:
- Missing Admin Privileges: If the application (like NetBeans) cannot access protected system files or directories due to the absence of admin privileges, it may result in a loadlibrary error.
- Corrupt or Outdated Graphics Driver: If the system’s graphics driver is corrupt or outdated, then its incompatibility with the problematic application may lead to the error 126.
- Dual Graphics Cards: If the system has two graphics cards i.e., a switchable graphics system with one built-in graphics card and the other dedicated, then it can cause the loadlibrary issue if the application modules try to use both cards at the same time.
- Corrupt System Files: If the essential system files are corrupt, then an application may fail to access an essential directory or file, resulting in the loadlibrary failed with error 126.
Launch the Problematic Application as an Administrator
You may encounter the loadlibrary failed with error 126 when the problematic application does not have the privileges to access a protected system resource. In this case, launching the problematic application as an administrator may solve the problem.
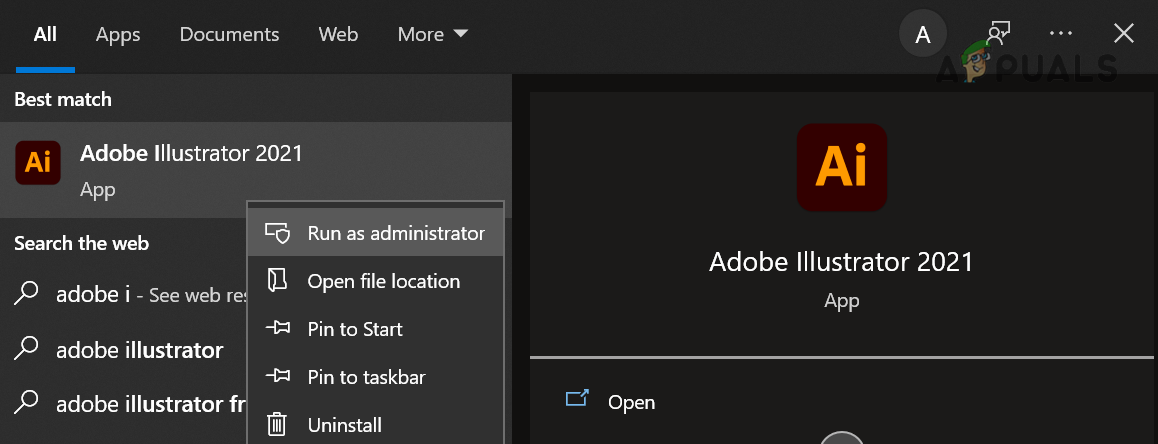
- Right-click on the shortcut icon of the problematic application (or in the search results of the start menu) like Adobe Illustrator.

Run Illustrator as Administrator - Now select Run as Administrator and check if the application launches fines.
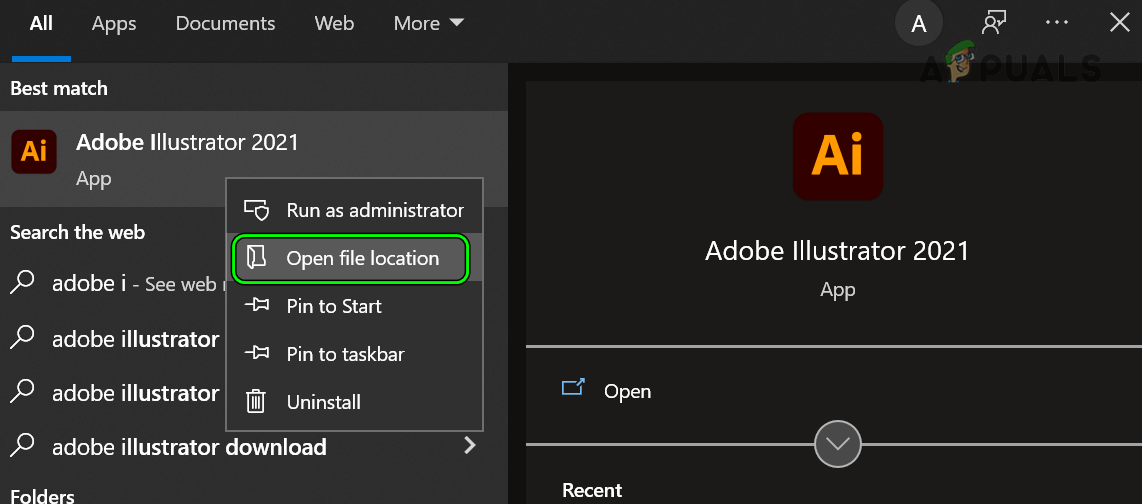
- If so, close the application and again launch it normally (not as administrator) and check if it is working fine.
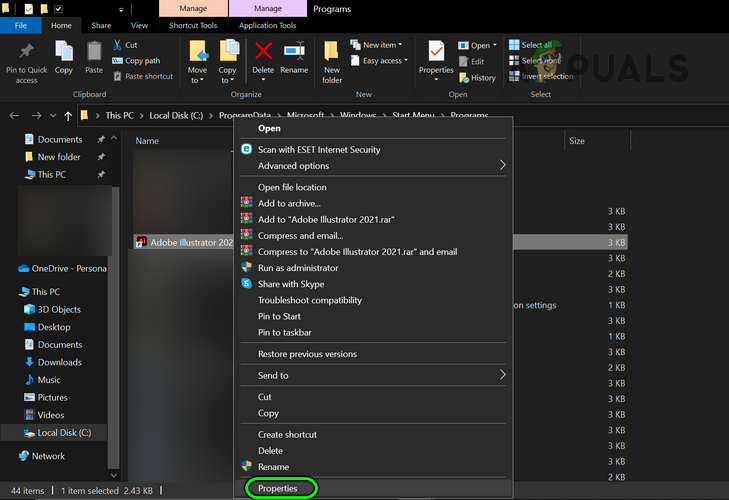
- If not, then right-click on the shortcut of the problematic application (like Adobe Photoshop) and select Properties. In case, the start menu search is used, select Open File Location, right-click on Illustrator, and select Properties.

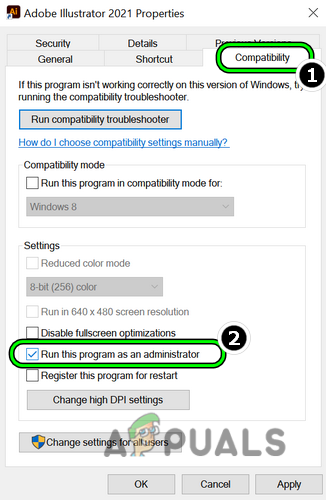
Open File Location of Adobe Illustrator - Now head to the Compatibility tab and checkmark Run This Program as an Administrator.

Open Properties of Adobe Illustrator - Then apply the changes made and launch the application through the shortcut to check if it is clear of the loadlibrary failed error 126.

Check Run This Program as Administrator for Adobe Illustrator
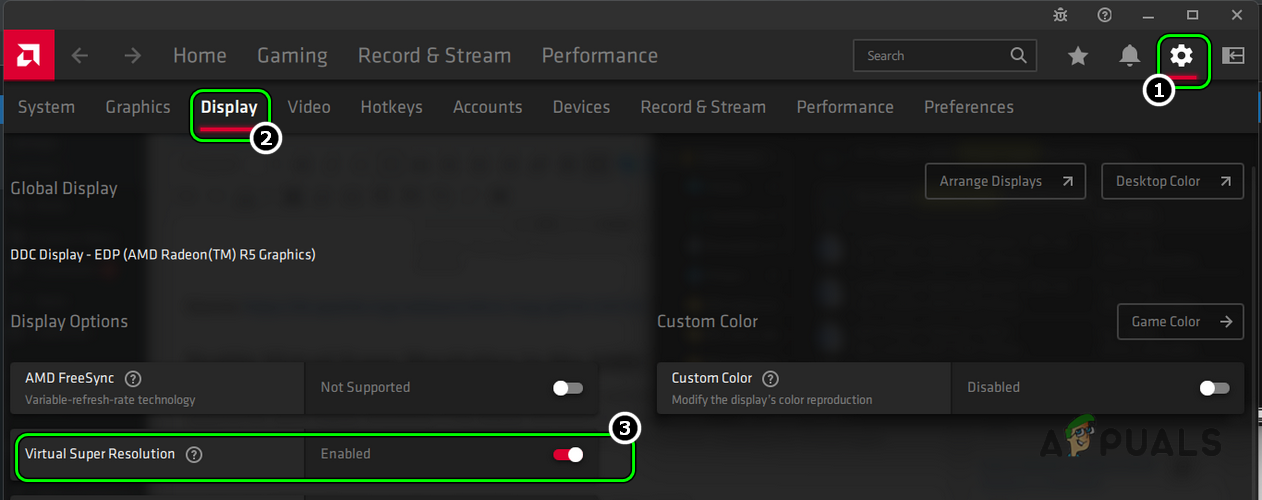
Enable Virtual Super Resolution in the AMD Settings
VSR (or Virtual Super Resolution) is an AMD feature that lets an application or game render at higher resolutions (beyond the native display resolution). If the display resolution in use is not compatible with the game (like Civilization VI), then that may cause the loadlibrary error at hand. In this context, enabling the Virtual Super Resolution in the AMD Settings may solve the problem.
- Open the AMD Software and click on Settings (near the top right corner).
- Now head to the Display tab and under Display Options, enable Virtual Super Resolution.

Enable Virtual Super Resolution in AMD Settings - Then launch the problematic game (like Civilization VI) or application and check if the loadlibrary issue is resolved.
Copy the DLL File to the System32 Directory
You may encounter the issue under discussion if an essential DLL file is missing from the System32 directory and copying the same may solve the problem.
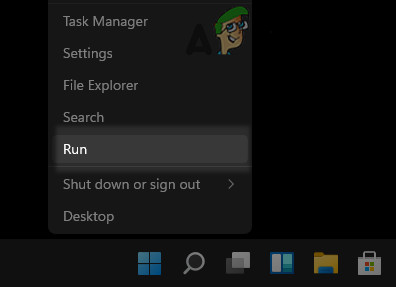
- Right-click Windows and open Run.

Open the Run Command Box from the Quick Access Menu - Now navigate to the following:
C:WindowsSystem32DriverStoreFileRepositoryu0352938.inf_amd64_e098709f94aef08dB352876
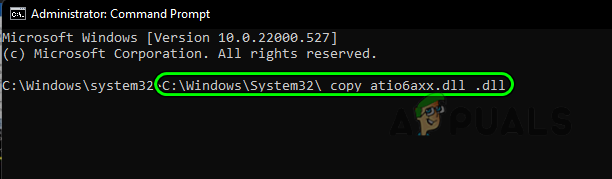
- Then copy the atio6axx.dll file and paste it into the following directory:
C:windowssystem32
- Now restart the system and upon restart, launch the problematic application (like ArcMap) to check if it is working fine.
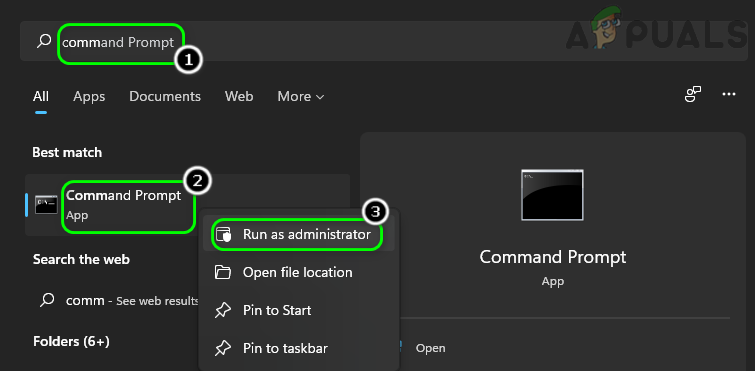
- If not, click Windows, search, right-click Command Prompt, and select Run as Administrator.

Open Command Prompt as Administrator - Then execute the following (copy/paste the command, otherwise, make sure the spacing is right):
C:WindowsSystem32 copy atio6axx.dll .dll

Copy atio6axx.dll File - Now restart the system and upon restart, check if the loadlibrary error is cleared.
Change the Main Monitor or Disconnect the External Display
In a multi-display environment, you may encounter the loadlibrary failed error if the main monitor is not the internal display (in case of a laptop) or if the external display is not connected to a dedicated graphics card port but to an on-board graphics card port (in a dual graphics cards setup) as this may cause incompatible resource hogging by the cards. In such a case, changing the main monitor of the system or disconnecting the external display may fix error 126.
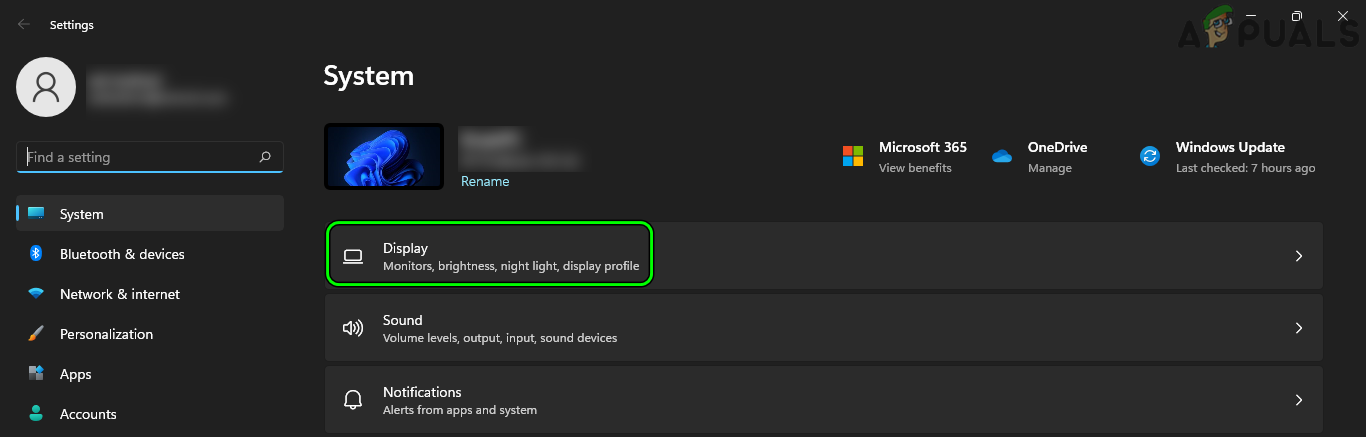
- Right-click Windows and open Settings.

Open Windows Settings - Now, in the System tab, open Display and expand Multiple Displays.

Open Display in the System Tab of the Windows Settings - Then select the Internal Display (you may use the Identify button to find out which display belongs to what) and checkmark Make This My Main Display.

Set the Laptop’s Internal Display as the Main Display - Now launch the application in question (like Adobe Photoshop) and check if it is operating fine.
- If not, check if connecting the external display to another port (or swapping monitors’ ports) solves the problem.
- If that did not work, disconnect the external monitor from the system and restart the system.
- Upon restart, launch the problematic application and check if it is working fine. If so, then you may connect back the external monitor.

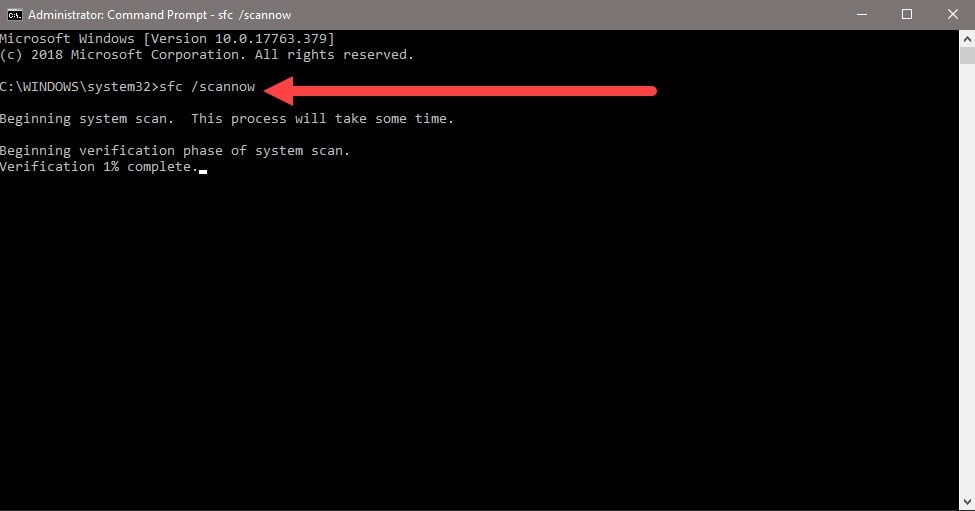
Perform an SFC Scan of the System
The loadlibrary may fail with error 126 if the essential system files are corrupt which may not let an application access an essential system directory or resource. In this case, you may fix the issue by performing an SFC scan of the system.
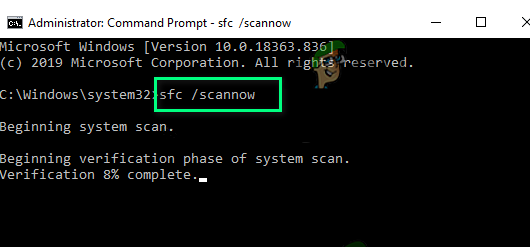
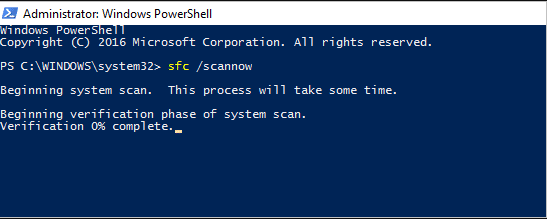
- Perform an SFC scan of the system and wait till the scan is complete. Make sure to launch the Command Prompt as an administrator. Moreover, this scan may take some time to complete, so try it in your spare time (or overnight).

Perform an SFC Scan - Once the SFC scan is completed, check if the loadlibrary problem is solved.
Perform a Clean Boot of the System
The loadlibrary error might occur if a process/service on the system is interfering with the problematic application’s execution. In such a case, ending the conflicting processes in the Task Manager or performing a clean boot of the system may clear the error 126.
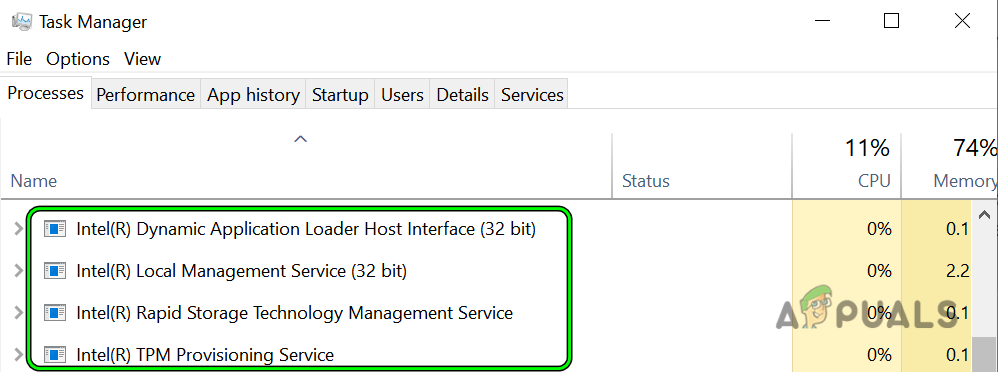
End Conflicting Tasks in the Task Manager
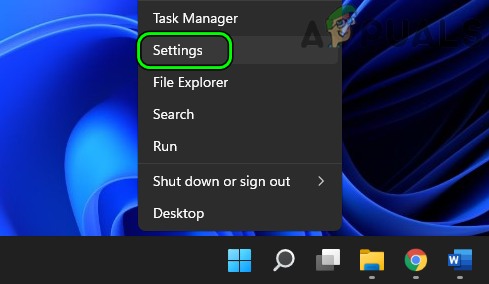
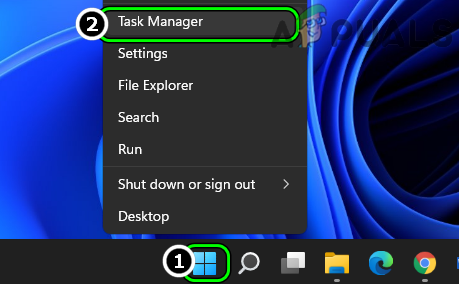
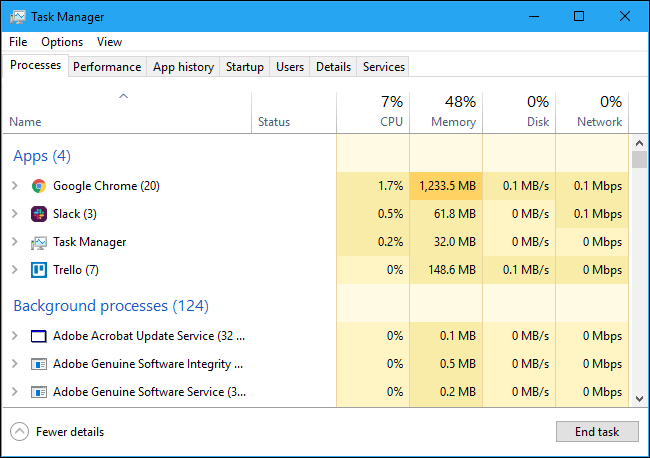
- Right-click Windows and open Task Manager.

Open the Task Manager of the System Through the Quick Access Menu - Now end all the processes related to Intel and then check if the issue is resolved.

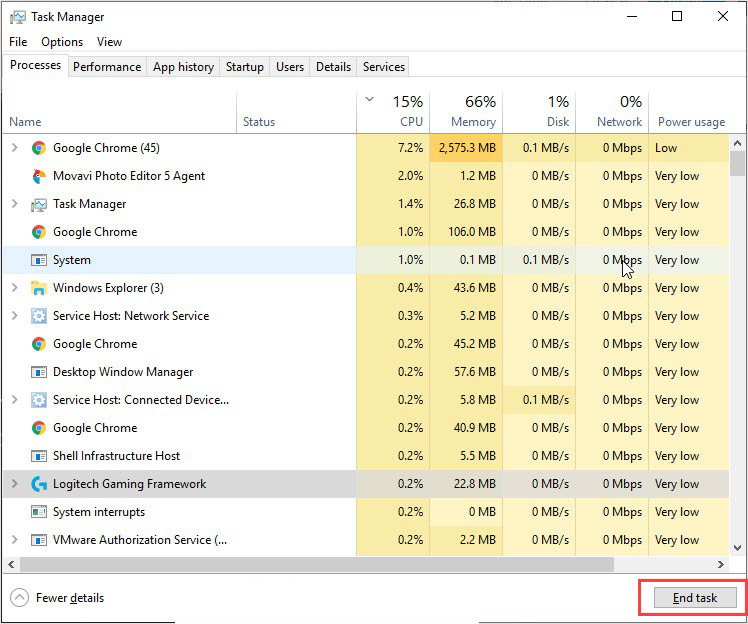
End Intel Related Processes in the Task Manager - If not, then check if ending all the non-essential processes or processes related to the problematic application (like Adobe processes if the issue is occurring with an Adobe application like Photoshop) solves the problem.
Perform a Clean Boot of the System
- Perform a clean boot of the system (make sure to disable Radeon Software in the Startup tab of the Task Manager) and check if the loadlibrary issue is cleared. If so, then you may enable back the processes one by one till the problematic one is found. Once found, either keep it disabled or uninstall it.
- If the issue persists, check if booting the system into the Safe Mode solves the problem.
Uninstall AMD Software
There are many applications (found by clean booting the system) reported to cause the loadlibrary issue but in many instances, users reported that the AMD Software triggered the error. Here, uninstalling the AMD Software may solve the problem.
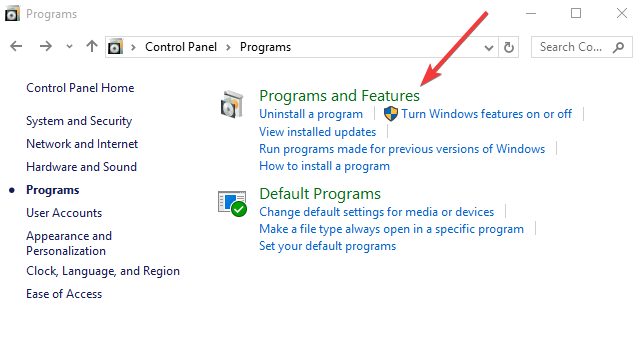
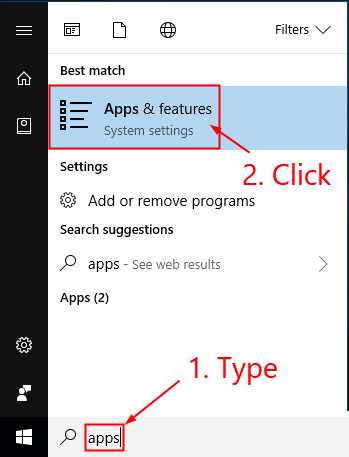
- Right-click Windows and open Apps & Features.

Open Apps & Features - Now, in front of AMD Software, click on three vertical ellipses and select Uninstall.

Uninstall AMD Software - Then confirm to uninstall AMD Software and follow the prompts on the screen to uninstall it.
- Once uninstalled, restart the system, and upon restart, check if the loadlibrary problem is solved.


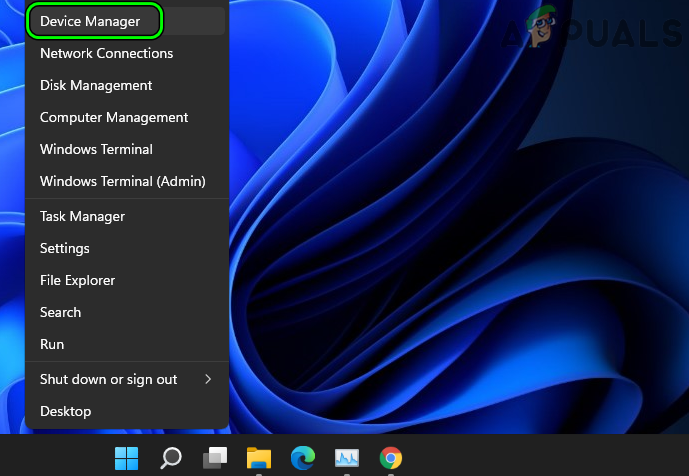
Disable the System’s Built-in Graphics Card
You may encounter loadlibrary error 126 if the system has two graphics cards (i.e., one built-in and the other dedicated) and the modules of the applications involved tried to use different cards simultaneously.
For example, if the issue occurs when an RDP session is used to launch Blender and the loadlibrary error is shown, then the issue might have occurred as the RDP session tried to use a built-in graphics card, whereas, Blender was trying to use the dedicated graphics card. In this scenario, disabling the built-in graphics card (after all, dedicated graphics is more powerful and useful) will force the usage of a single card and thus may fix the LoadLibrary error.
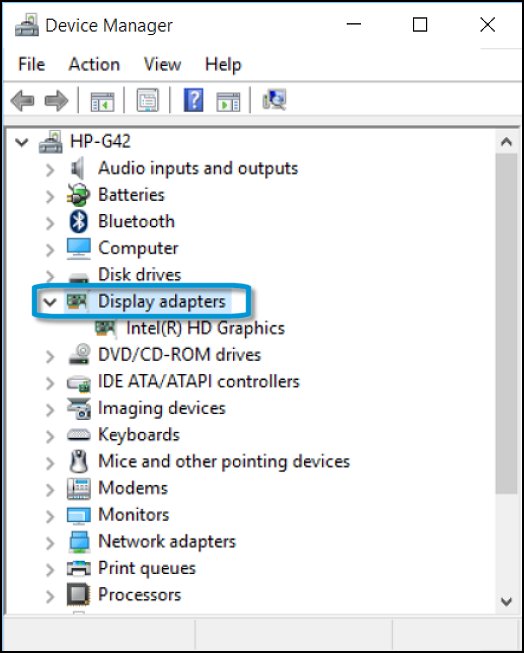
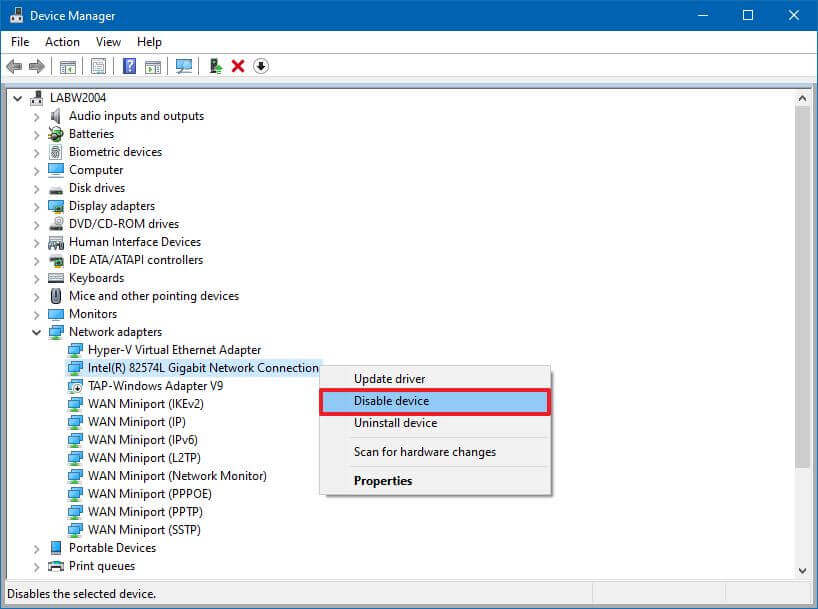
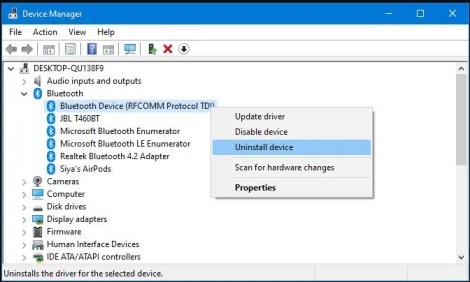
- Right-click Windows and open Device Manager.

Open Device Manager Through the Quick Access Menu - Now expand Display Adapters and right-click on the built-in graphics device (like an Intel one).

Disable Intel Graphics Card in the Device Manager - Then select Disable Device and afterward, confirm to disable the graphics device.
- Now launch the problematic application or pair of applications (like RDP and Blender) and check if the loadlibrary failed error is cleared. Keep in mind, you can enable the built-in graphics device afterward.
- If that did not work, check if disabling and enabling the dedicated graphics card (like an AMD card) solves the problem.

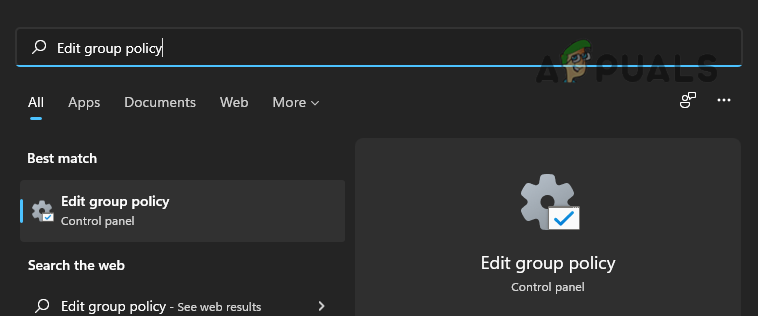
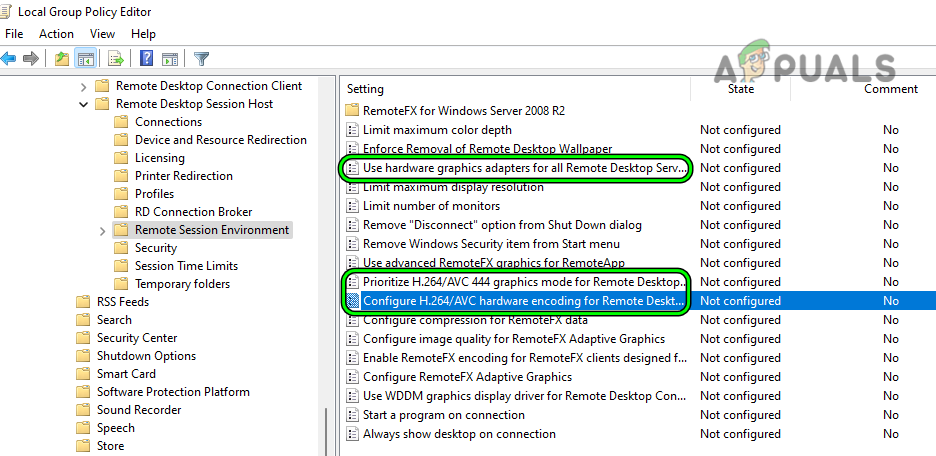
Edit the System’s Group Policy for Remote Connections
If the issue is occurring when a remote connection is used to access the system, then the improper usage of graphics properties of the host may trigger the issue at hand. Here, editing the system’s Group Policy about the remote connection to force the proper usage of the graphics properties may solve the problem.
- Click Windows, search, and open Edit Group Policy.

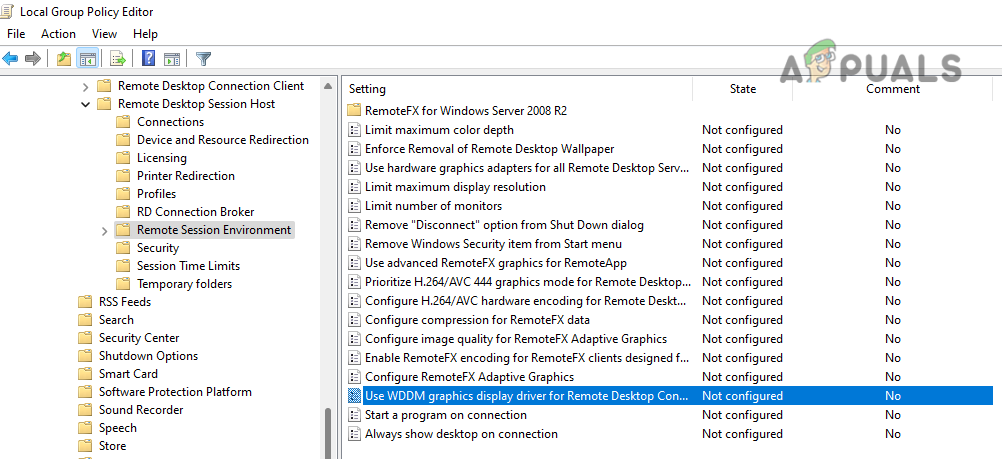
Open Edit Group Policy - Now navigate to the following path:
Computer Configuration>> Administrative Templates>> Windows Components>> Remote Desktop Services>> Remote Desktop Session Host>> Remote Session Environment
- Then disable the option of Use WDDM Graphics Display Driver for Remote Desktop Connections and close the editor.

Disable Use WDDM Graphics Display Driver for Remote Desktop Connections in the Group Policy Editor - Now restart the system and upon restart, check if the loadlibrary error 126 is cleared.
- If not, open the Group Policy Editor and make sure the following are set as Enabled:
Use Hardware Graphics Adapters for All Remote Desktop Services

Prioritize H.265/AVC444 Graphics Mode for Remote Desktop Connections

Configure H.264/AVC Hardware Encoding for Remote Desktop Connections

Enable Relevant Graphics Settings in the Group Policy Editor - Then close the Group Policy Editor and restart your system.
- Upon restart, check if the loadlibrary issue is resolved.
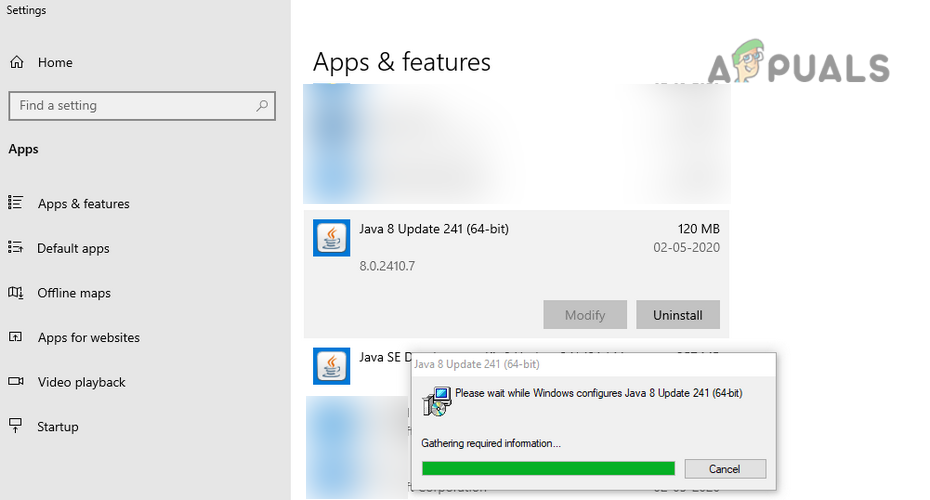
Uninstall A Java Version
If an application (like Minecraft) requires JAVA but the system has two Java versions installed (like a 32-bit and other, 64-bit), then that may break the operation of the application and cause loadlibrary failed with error 126. In this case, uninstalling a Java version may solve the problem.
- Right-click Windows and open Apps & Features.
- Now check if there is more than one Java version installed.
- If so, uninstall the 64-bit version and afterward, restart the system.

Uninstall Java 64-bit Version - Upon restart, check if the system is cleared of the libraryload error.
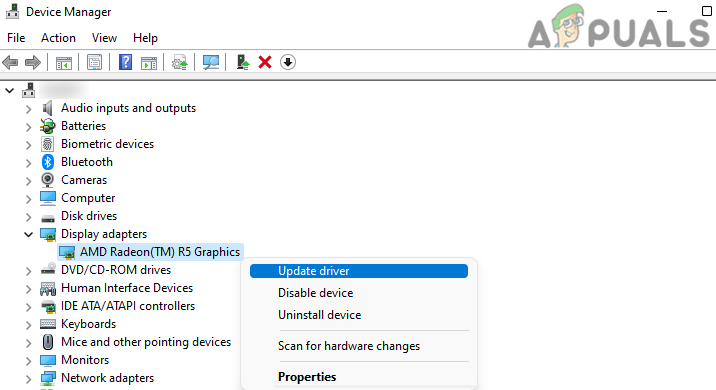
Update or Reinstall the Graphics Driver
You may encounter loadlibrary failed with error 126 if the system’s graphics driver is outdated or corrupt as it can lead to the incompatibility between the other OS modules (like the application showing the error) and the driver. In this scenario, updating the graphics driver to the latest build or reinstalling it may solve the problem.
Update the Graphics Driver Through the Device Manager
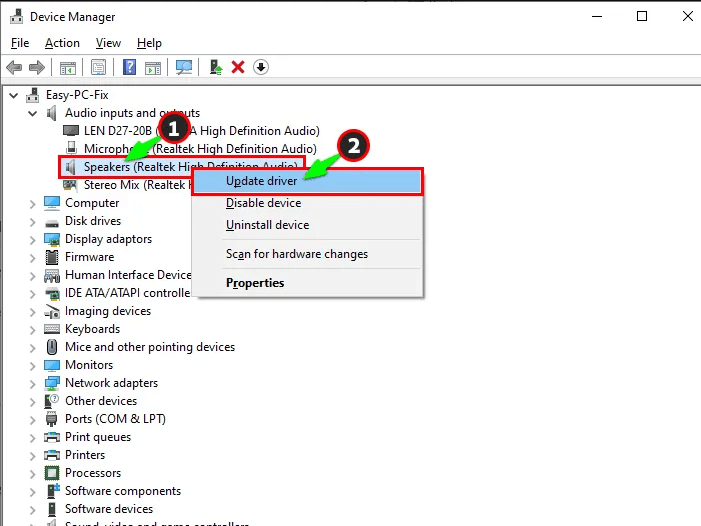
- Right-click Windows and open Device Manager.
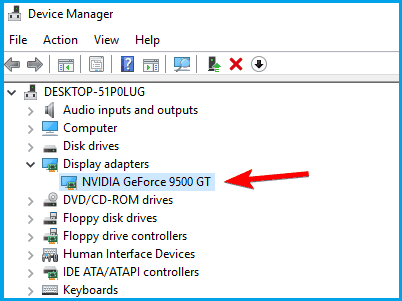
- Now expand the Display Adapters tab and right-click on the problematic graphics card.
- Then select Update Driver and click on Search Automatically for Drivers.

Update Driver of the Graphics Device in the Device Manager - If an updated driver is available, install it and then restart the system.

Search Automatically for Drivers of the Graphics Device - Upon restart, check if the system is clear of the loadlibrary error.
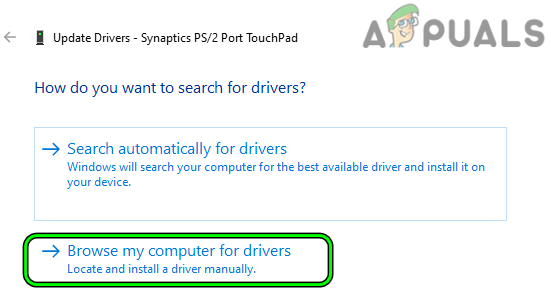
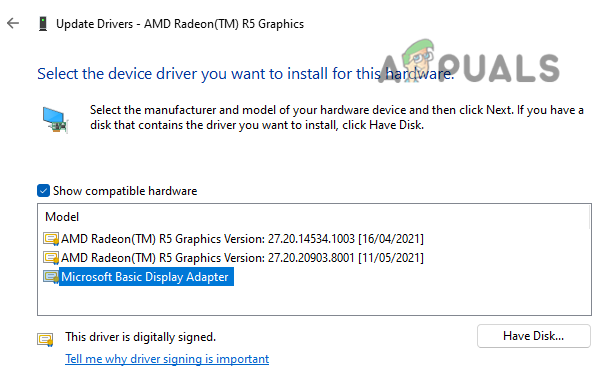
- If not, right-click on the graphics driver in the Display Adapter tab of the Device Manager and select Update Driver.
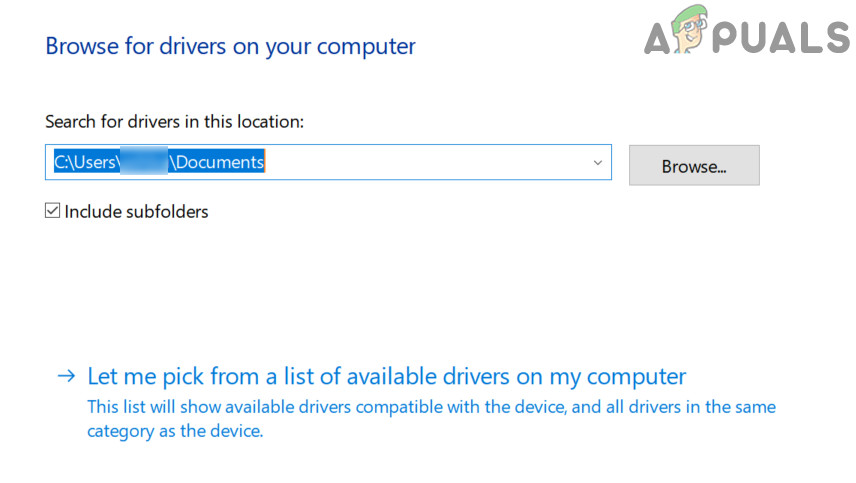
- Now choose to Browse My Computer for Drivers and click on Let Me Pick from a List of Available Drivers on My Computer.

Select Browse My Computer for Drivers When Updating the Touchpad Driver - Then select Microsoft Basic Display Adapter and click on Next.

Let Me Pick from a List of Available Drivers on My Computer - Once the driver is installed, restart your system and upon restart, check if the loadlibrary error 126 is cleared.

Select Microsoft Basic Display Adapter for the Graphics Card

Update the Graphics Driver Through the OEM Website
- Launch a web browser and visit the graphics card OEM website (like AMD).
- Now download the latest graphics driver as per your graphics card and then launch the downloaded driver as an administrator.
- Then follow the prompts on the screen to complete the installation and once done, restart your system.
- Upon restart, check if the loadlibrary issue is resolved.
- If not, navigate to the support page of the OEM’s website (like AMD Support) and download the OEM utility that auto-detects and install updates for the graphics driver (like AMD Auto-Detect and Install Updates for Radeon Graphics and Ryzen Chipset Drivers for Windows).

Download AMD Auto-Detect Utility - Then install that utility as an administrator and afterward, restart your system.
- Upon restart, check if the system is clear of the error 126.

Reinstall the Graphics Driver
- If the above did not work, download the latest graphics driver from the OEM website.
- Then right-click on the graphics card in the Display Adapters tab of the Device Manager and select Uninstall Device.

Uninstall the Graphics Driver in the Device Manager - Now checkmark Attempt to Remove the Drivers for This Device (Windows 10 user might see the option as Delete the Driver Software of This Device) and then click on Uninstall.

Select Attempt to Remove the Driver for This Device and Click on Uninstall for the Graphics Device - Once the driver is uninstalled, restart your system and upon restart, check if the system is clear of the loadlibrary problem.
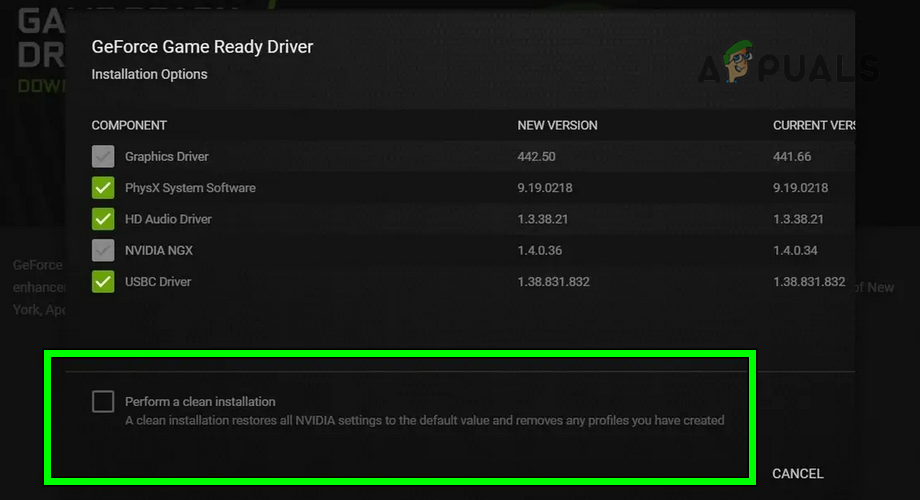
- If not, install the latest graphics driver (not the application like AMD Graphics Software, just install the driver) as an administrator (downloaded earlier) and make sure to select Perform a Clean Install.

Perform a Clean Installation of AMD Drivers - Afterward, restart your system and upon restart, check if the loadlibary failed error is cleared.
- If that did not work, boot the system into the safe mode and uninstall the graphics driver (as discussed earlier).
- Now boot the system into the normal mode and install the latest graphics driver as administrator (downloaded earlier).
- Once done, restart your PC and upon restart, check if the system is clear of the loadlibrary error.
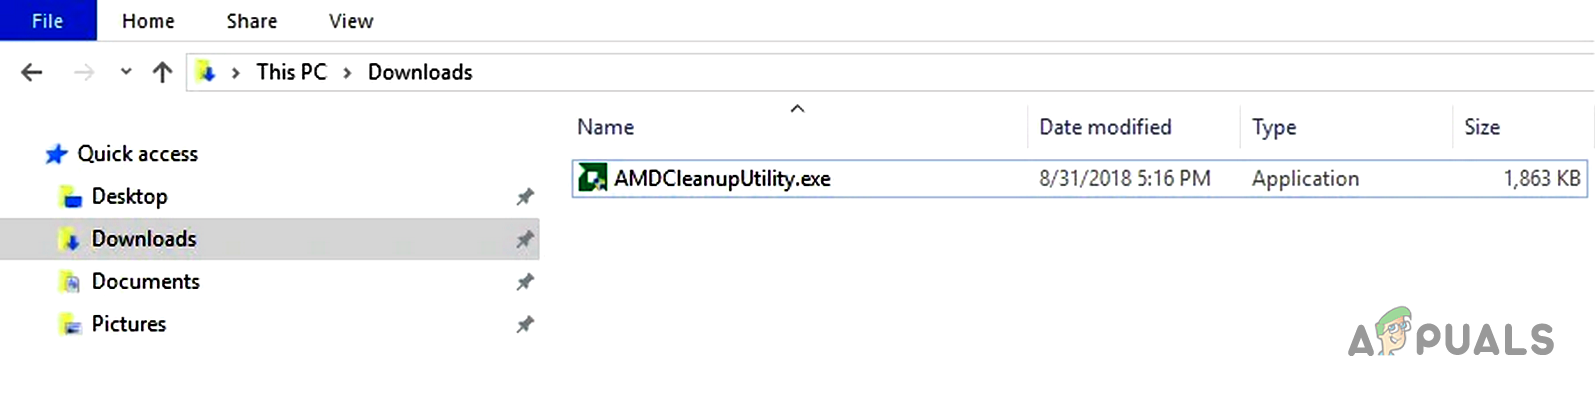
- If the issue persists, check if uninstalling the driver with the OEM utility (like AMD Cleanup Utility) and then reinstall the latest graphics driver as administrator solves the problem.

Launch the AMD Clean Up Utility - If the issue is still there, check if using an older graphics driver (you may download the one from the OEM’s website) solves the problem.


Reinstall the Drivers of the Dual Graphics Cards
In case, the system is using dual graphics cards (like a built-in Intel card and a dedicated AMD card), then reinstalling both the drivers may solve the problem.
- Firstly, make sure to download the latest graphics drivers from the related OEM websites (like Intel and AMD).
- Now, uninstall both the graphics drivers from the system’s Device Manager (as discussed earlier) and right-click on Windows.

Uninstall Intel and AMD Drivers in the Device Manager - Now select Apps & Features and uninstall all applications related to both graphics cards.
- Then install the driver of the built-in graphics card (like an Intel driver) and restart your system.
- Upon restart, install the driver of the dedicated graphics card (like an AMD driver), and afterward, check if the loadlibrary failed issue is resolved.

Perform an In-Place Upgrade of the System’s Windows
If none of the above worked for you, then the issue could be the result of the corrupt installation of Windows (that is beyond repair). In this case, performing an in-place upgrade of the system’s Windows may solve the problem. For elucidation, we will discuss the process for a Windows 11 PC.
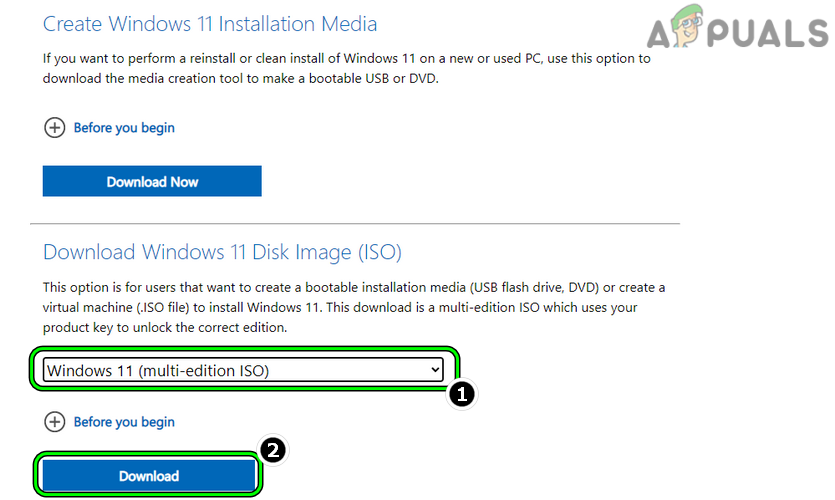
- Launch a web browser and steer to the Windows 11 download page of Microsoft.
- Now, in the section of Download Windows 11 Disk Image (ISO), select Windows 11 in the dropdown and click on Download.

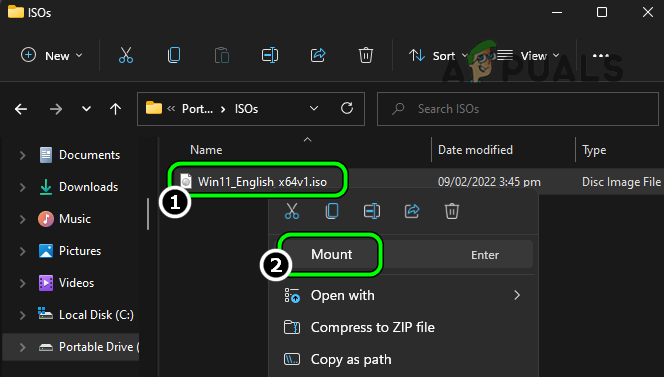
Download the Windows 11 ISO File - Then wait till the download is complete and afterward, right-click on the downloaded ISO.
- Now select Mount and then open the mounted drive through the File Explorer.

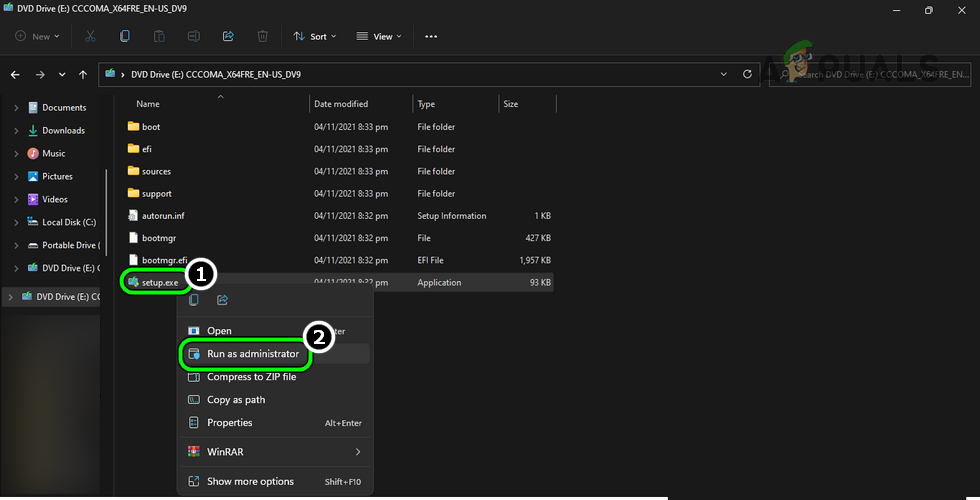
Mount Windows 11 ISO - Then right-click on the Setup file and select Run as Administrator.

Open Windows 11 Setup as Administrator - Now follow the prompts on the screen to complete the process but make sure to select Keep Files, Apps, and Settings.
- Once the in-place upgrade is complete, restart the system and upon restart, hopefully, the system will be cleared of the loadlibrary issue.
Many Windows users have complained about finding an error message showing “Loadlibrary Failed with error 126” while launching any game or installing any application.
The problem usually comes with ATI Graphics Card, and when it conflicts with the inbuilt graphics card of your device.
The error is commonly seen with games and gaming platforms like Minecraft, Steam platform games, Stardew Valley and many others.
Not only this, the applications like Adobe Suite Photoshop, Microsoft Remote Desktop, BluetStacks, etc. This is quite problematic as every time you run any game or application, the error popup on the screen: loadlibrary failed with error 126 the specified module could not be found, and even after pressing OK, the error still appears.
To fix various PC related errors, we recommend Advanced System Repair tool:
This software is your one stop solution to fix Windows errors, protect you from malware, clean junks and optimize your PC for maximum performance in 3 easy steps:
- Download Advanced System Repair tool rated Excellent on Trustpilot.
- Click Install & Scan Now to install & scan issues causing the PC problems.
- Next, click on Click Here to Fix All Issues Now to fix, clean, protect and optimize your PC effectively.
In this article, follow the underlying fixes confirmed by other affected users to solve the error, but first, let us see the causes in detail.
So, without any delay, let’s start..!
What is LoadLibrary?
LoadLibrary is an essential Windows operating system process and requires working properly. It is utilized for loading a library module in the process address space and return grip, which is utilized in a GetProcAddress for getting the DLL function address. LoadLibrary is also utilized for loading the executable module.
The error loadlibrary failed with error 126 Windows usually relates when,
- A graphics card mounted externally conflicts with the performance of the inbuilt graphics card. This causes discrepancy and eventually leads to a runtime error while updating the loadlibrary.
- Virus interference in the Windows Visual Library causes problematic glitches
- The system files corruption can also cause the error when the application might fail to access the essential directory or the file.
How to Fix Loadlibrary Failed with Error 126?
#1: Disabling the Graphics Card
One of the main reasons for the error: loadlibrary failed with error 126: the specified module could not be found a lot to do with a conflicting graphics card (Inbuilt versus external).
The external GPU would take the plunge in rendering as it is installed for better performance. Therefore, it is recommended to disable the inbuilt GPU and allow the external to perform at its peak potential. The steps to disable GPU are as follows,
- Click Start Menu
- Type Device Manager
- Find the inbuilt graphics driver under Display Adapter
- Right-click on the same and choose Disable Driver
- The Driver would be disabled and now restart the system
- Check if the problem is gone
#2: Updating ATI Graphics Card
The easiest way of updating a Graphics Card is by using the Device Manager. There are three ways to do it, including,
- By Downloading Automatically from ATI Site:
- Visit the official site of ATI Graphics Card
- Visit the page and click on Automatically Detect and Install Your Driver
- Click on Download Now option
- Open the File Location and click on the .exe file to run the new Driver and update
- Restart the System
- By Downloading Manually from ATI Site:
- Visit the official Site of the Graphics Card
- Check the page and find Manually Select Your Driver options
- Choose the GPU Series, Name, and the OS versions
- And click on Show Result to see the results
- Download the driver and Install
- Restart the Device to enforce changes
- By Searching from Device Manager:
- Click on Windows
- Search DEVICE MANAGER
- Find the Graphics card on the Display Adapter Tab
- Right-click on the Graphics Card driver and find the options including Update Driver
-
- Click on Search Automatically for Drivers to allow finding suitable drivers on the internet
- Click on the results if you receive an update and install it
- Restart the System to see if the system doesn’t show the errors any further
- Alternatively, if you have a driver already in your device hard driver, in the step where you request Search for drivers, choose the option Browse My computer for Drivers.
- Perform the task and see if the problem is gone.
Alternatively, you can update the driver using the automatic Driver Updater tool. This is just by scanning once detected and updating entire system drivers.
Get Driver Updater tool, to update graphic drivers automatically
#3: Uninstalling GPU Drivers
Drivers are subjected to malfunction in some cases and this requires uninstallation as a whole. This works in removing the error code fully and a fresh driver can be used. Remember to reinstall these drivers by the steps mentioned in the updating part and the process is the same.
- Launch Device Manager by pressing Windows + I key
- Under Display Adapter Tab, choose the Graphics Card Driver (AMD or NVIDIA)
- Right-click on the driver to check the Uninstall Device option
- Exit and Restart the Device
#4: Reinstalling Runtime Libraries
Windows devices run with MS Visual C++ packages, which form the Runtime libraries. In some cases, these are not installed properly and lead to the error message showing loadlibrary failed with error 126 the specified module could not be found. Here is the fix for this,
- Click on Start and type Programs and Features
- Check on Microsoft Visual C++ Redistributable Package
- Tap on Uninstall on the top of the list
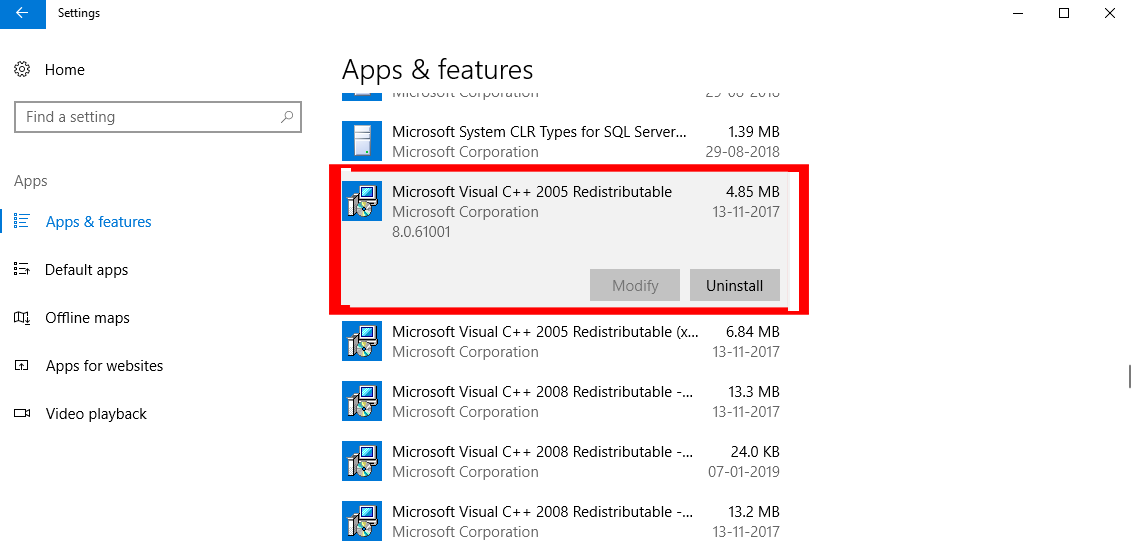
- Restart your system
- Visit Microsoft Official site and download the latest redistributable package available for free
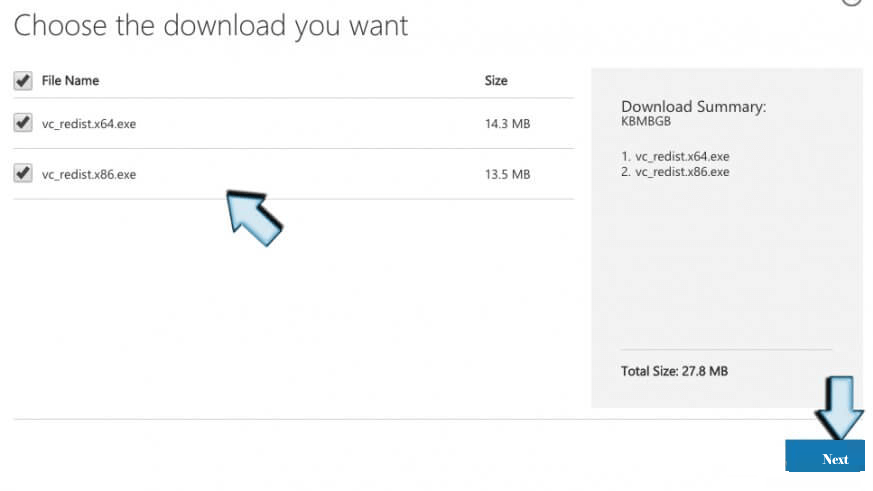
- Click on the Installation .exe file found in the package and follow the rules to see the function move seamlessly
- Restart the device once again to see the error gone and the Runtime Libraries properly updated
#5: Updating Antivirus
The least likely reason can relate to the Antivirus program interfering with the performance of the GPU driver. In this case, it is recommended to update the Antivirus frequently and if you are using Windows Defender, make sure to update them as well.
Alternatively, you can also disable the security program installed on your system and see if the error is resolved.
#6: Using SFC Scan
When essential system files are corrupted, this does not allow an application requesting access to the Sys directory. This requires performing an SFC scan of the System. The steps include,
- Click on Start > type CMD
- Make sure to launch the command prompt as admin
- Type SFC/SCANNOW
- This would perform the step of SFC scan and takes almost 15 minutes to finish
- Restart the Device
#7: Ending Inconsistent Tasks
Sometimes, it might not end because a related process is running side by side. In this case, end-all Non-essential Processes to stop all other services related to the inbuilt GPU.
- Open Start Menu
- And open Task Manager
- Find all the processes related to the inbuilt GPU inside the Processes tab
- Right-click on the application and click on End Task
#8: Removing JAVA Version
There are several apps, which require JAVA to function (including Minecraft). These are responsible for breaking the operation of the application and triggering loadlibrary failed with error 126 the specified module could not be found error. The steps to perform oversees the following,
- Click Start
- Type Apps & Features
- Check if there is more than one Java version installed
- Uninstall the 64-bit variant
- Restart the Device
#9: Disconnecting External Display
Multi-display settings also contribute to the reason for showcasing the error more often. This accounts for when an external GPU is not correctly connected to the inbuilt GPU and triggers inconsistencies. To fix this, these are the steps,
- Right-click on Windows
- Open Settings, then inside the System option, find the Display tab
- Choose the Internal Display and tick on Make This My Main Display
- Launch the problematic app
- See if the problem after swapping ports exist
- If the process fails, remove the external monitor
- Restart the system to check if the application is no longer showing the message. If yes, then feel free to connect the external monitor.
#10: Reinstalling both the Drivers
This scenario calls for reinstalling inbuilt and external GPU drivers to settle the score over error: loadlibrary failed with error 126: the specified module could not be found. We assume you downloaded these drivers beforehand freshly before performing the task.
Follow the steps mentioned #2 and #3 to perform safe uninstallation and reinstallation. The point to note here is while reinstallation, make sure to install the drivers of the inbuilt GPU first and then proceed with the external ones.
Best Solution to Fix “Loadlibrary Failed with Error 126” Error
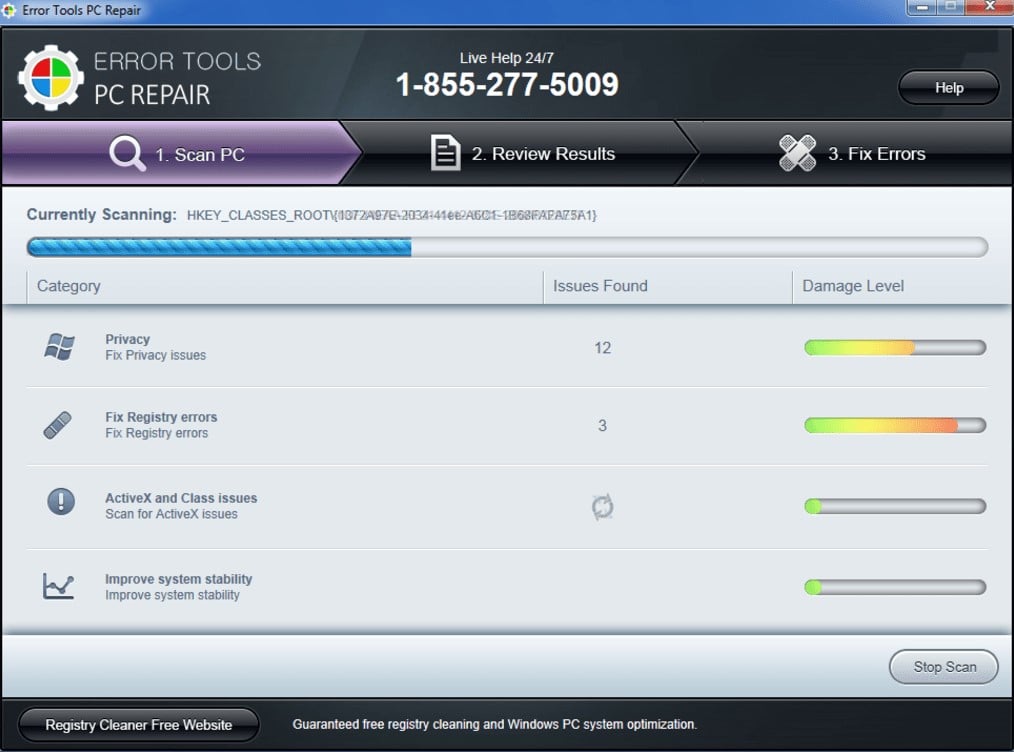
If none of the above-given solutions works for you to fix the error 126 then here it is suggested to run the PC Repair Tool.
This advanced, multifunctional tool detects and fixes Windows PC-related errors just by scanning. It is a highly advanced and trusted tool, that repairs corrupted Windows system files, DLL errors, and BSOD errors, prevents your PC from file loss, removes virus or malware infection, and much more.
So, free to run this automatic utility and make your Windows PC error-free.
Get PC Repair Tool, to fix loadlibrary failed with error 126 Error
Final Thoughts
Loadlibarary failed error 126 is a consequence of conflicting graphics cards while operating an application.
Using these tips, you can solve a rather irritating problem without breaking a sweat.
It is estimated that one of our solutions managed to fix the error. I hope the article works for you.
If there is anything that I missed out on, or you have any queries or suggestions, then you can write to us on our Facebook Page. Also, don’t forget to shoot the like button.
Good Luck..!

Hardeep has always been a Windows lover ever since she got her hands on her first Windows XP PC. She has always been enthusiastic about technological stuff, especially Artificial Intelligence (AI) computing. Before joining PC Error Fix, she worked as a freelancer and worked on numerous technical projects.
The Loadlibrary failed with error 126, 87, 1114 or 1455 has been with Windows since years, and there are reports that people are still facing the problem even in the latest Windows 11. The error message occurs upon launching an application on Windows PC. the accompanying messages may be:
The specified modue could not be found
A dynamic link library (dll) initialization routine failed

There’s a long list of applications affected by this error message. But the most popular among them are:
- Adobe Suite
- BlueStacks
- Minecraft
- Microsoft Remote Desktop
- Virtual Box
- Steam
- Logitech peripherals
- Civilization VI
It’s easy to troubleshoot this problem. Continue with the guide to solve the issue on your system.
What is LoadLibrary?
Says Microsoft – LoadLibrary can be used to load a library module into the address space of the process and return a handle that can be used in GetProcAddress to get the address of a DLL function. LoadLibrary can also be used to load other executable modules. In short – it is a critical OS process that is need to work properly.
What causes the Loadlibrary failed with error on Windows PC
There can be multiple reasons behind the Loadlibrary failed with error 126, 87, 1114 or 1455 in Windows 11/10. But among all, the major reasons triggering the problem are mentioned below.
- If you haven’t provided the problematic applications with administrative rights, you will most likely face the mentioned problem.
- Not having the latest graphics driver update can be another major reason behind the problem. Additionally, a corrupted driver can also trigger the issue.
- If your system features two graphics cards, the problematic application will try to use both of them simultaneously, which will directly cause different problems, including the one in question.
- If the Windows file has been corrupted, you will face the Loadlibrary failed with error on your Windows PC.
Now that you have a piece of prior knowledge about different reasons causing the problem let’s check out how to eliminate them.
Below is a list of all the effective solutions you can try to fix Loadlibrary failed with error 126, 87, 1114 or 1455 on Windows PC.
- Restart the application and PC
- Run the application in administrator mode
- Copy the DLL file to the System32 folder
- Close unnecessary background running applications
- Run the SFC scan
- Download the latest Graphics Driver update
Now, let’s take a look at all these solutions in detail.
1] Restart the application and PC
To begin with, restart the problem at the application all over again. But make sure none of the associated services is running in the background. You can check it by opening the Task Manager and closing all the services associated with the problematic application. Once done, check if the problem is solved or not.
If you are still facing the problem, you can go with restarting the system. As it turns out, the error message can appear due to a temporary glitch. And the best thing you can do to eliminate such glitches is restart your system. Do it, and see if there’s any difference.
2] Run the application in administrator mode
As mentioned, the major reason behind the problem can be the lack of administrative privileges. Most of the applications that throw the mentioned error needs administrative rights to perform normally. But if this isn’t the case, i.e., you haven’t provided the rights, you will face different issues, including the one you’re currently facing. So, grant administrative rights to the application and check if the problem is solved.
- Open the Start Menu by pressing the Windows key.
- In the space provided, type the name of the problematic application and press Enter.
- From the result, right-click on the application and choose Open file location.
- Right-click on the application exe file in the following window and choose the Properties option.
- Click on the Compatibility tab.
- Select Run this program as an administrator.
- Click on Apply > OK.
Now, restart your system, and launch the application. Check if you’re still facing the problem. If yes, try the next solution.
3] Copy the DLL file to the System32 folder
You will face the mentioned problem if the important DLL files are missing from the System32 folder. To solve the problem, you will have to copy-paste the DLL file to the required folder. Here are the steps you need to follow.
Open the Run dialogue box by pressing Windows + R shortcut key.
Copy-paste the below-mentioned location and press the enter key.
C:WindowsSystem32DriverStoreFileRepositoryu0352938.inf_amd64_e098709f94aef08dB352876
In the folder, copy the atio6axx.dll file and paste it in the following location.
C:Windowssystem32
Once done, restart your system and launch the application. Check if the problem continues.
See: Fix vulkan-1.dll not found or missing error
Sometimes, a large number of unnecessary background running applications can also be the primary reason behind the problem. In this case, the best thing to do is close all the background running applications using the Task Manager. Click the Ctrl + Shift + Esc shortcut key to open Task Manager > Right-click on unnecessary applications > End Task.
Now, check if the problem persists. If yes, continue with the guide.
5] Run the SFC scan
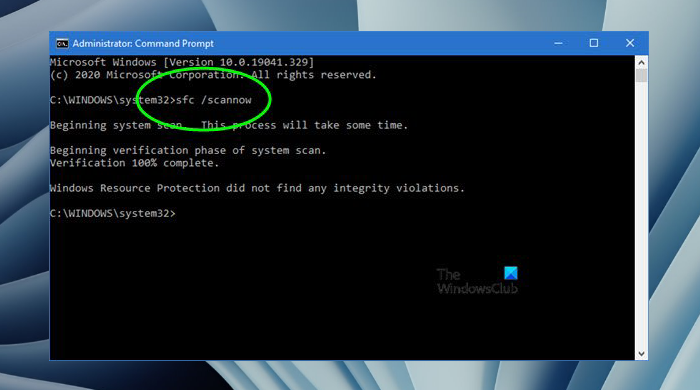
You can run the SFC scan on your Windows PC to fix the Loadlibrary failed with error 126. The SFC scan helps to scan and restore corrupt Windows system files. You can run the SFC scan by following the below steps.
- Open Command Prompt in administrator mode.
- Type the following command and press enter.
sfc /scannow
Wait until the command is executed. Once done, check for the problem.
See: Fix Wireless Display Install Failed Error
6] Download the latest Graphics Driver update
The mentioned error can be caused due to updated or corrupted graphics driver. In either case, the best thing you can do is download the latest graphics driver update. Here are the steps you need to follow to get the work done.
- Check Optional Updates to update the driver.
- Go to the manufacturer’s website and download your driver.
- Update your driver from the Device Manager.
Install the downloaded driver on your system, followed by a simple restart.
Read: Access is Denied error while installing software
How do you fix error code 126 on Minecraft?
It’s very easy to troubleshoot the error code 126 on Minecraft. You can try either of these steps to solve the problem: Run Minecraft in administrator mode, perform Clean Boot, Run SFC scan, and download the latest graphics driver update. If nothing works, you can reinstall the game to solve the problem.
What is Loadlibrary failed with Error 87?
The Loadlibrary failed with Error 87 hawkers due to machine graphics card configuration. In laymen’s terms, the problem indicates that you need to download the latest graphics driver update. It’s very easy to troubleshoot Loadlibrary failed with Error 87.
Read Next: Event ID 307 and 304 with error code 0x801c001d.
Adobe Photoshop Version: 22.0.1 20201106.r.73 2020/11/06: 70b4743b574 x64
Number of Launches: 2
Operating System: Windows 10 64-bit
Version: 10 or greater 10.0.19041.546
System architecture: Intel CPU Family:6, Model:14, Stepping:9 with MMX, SSE Integer, SSE FP, SSE2, SSE3, SSE4.1, SSE4.2, AVX, AVX2, HyperThreading
Physical processor count: 4
Logical processor count: 8
Processor speed: 3600 MHz
Built-in memory: 24476 MB
Free memory: 15684 MB
Memory available to Photoshop: 22406 MB
Memory used by Photoshop: 70 %
ACP.local Status:
— SDK Version: 1.34.1.4
— Core Sync Status: Reachable and compatible
— Core Sync Running: 4.3.61.1
— Min Core Sync Required: 4.3.28.24
ACPL Cache Config:
— Time to Live: 5184000 seconds
— Max Size: 20480 MB
— Purge Percentage: 50%
— Threshold Percentage: 85%
— Purge Interval: 60 seconds
Native GPU: Enabled.
Manta Canvas: Enabled.
Alias Layers: Disabled.
Modifier Palette: Enabled.
Highbeam: Enabled.
Image tile size: 1024K
Image cache levels: 4
Font Preview: Medium
TextComposer: Latin
The GPU Sniffer crashed on 11/26/2020 at 9:20:04 AM
Display: 1
Display Bounds: top=0, left=0, bottom=2160, right=3840
OpenGL Drawing: Disabled.
OpenGL Allow Old GPUs: Not Detected.
License Type: Subscription
Serial number: 96040971690560074296
GUIDBucket:Composite Core (enable_composite_core): onComposite Core GPU (comp_core_gpu): offComposite Core UI (comp_core_ui): offDocument Graph (enable_doc_graph): off
Application folder: C:Program FilesAdobeAdobe Photoshop 2021
Temporary file path: C:UserstinaAppDataLocalTemp
Photoshop scratch has async I/O enabled
Scratch volume(s):
Startup, 223.7G, 35.8G free
Required Plugins folder: C:Program FilesAdobeAdobe Photoshop 2021RequiredPlug-ins
Primary Plugins folder: C:Program FilesAdobeAdobe Photoshop 2021Plug-ins
Installed components:
A3DLIBS.dll A3DLIB Dynamic Link Library 9.2.0.112
ACE.dll ACE 2020/10/28-12:40:22 113.624934 113.624934
AdbePM.dll PatchMatch 2020/09/29:17:00:06 1.624362 1.624362
AdobeLinguistic.dll Adobe Linguisitc Library developer.633ca06620e3b28a3ccee5d61e3e97bd84fe66b3
AdobeOwl.dll Adobe Owl 5.5.0
AdobePDFL.dll PDFL 2020/08/08-01:12:48 79.395135 79.395135
AdobePDFSettings.dll Adobe PDFSettings 1.07
AdobePIP.dll Adobe Product Improvement Program 8.1.0.68.49183
AdobeSVGAGM.dll AdobeSVGAGM 79.623146 79.623146
AdobeXMP.dll Adobe XMP Core 2020/07/10-22:06:53 79.164488 79.164488
AdobeXMPFiles.dll Adobe XMP Files 2020/07/10-22:06:53 79.164488 79.164488
AdobeXMPScript.dll Adobe XMP Script 2020/07/10-22:06:53 79.164488 79.164488
adobe_caps.dll Adobe CAPS 10,0,0,6
AGM.dll AGM 2020/10/28-12:40:22 113.624934 113.624934
AID.dll AID DLL 1.0.0.12
AIDE.dll AIDE 2020/08/10-16:30:32 79.623154 79.623154
ARE.dll ARE 2020/10/28-12:40:22 113.624934 113.624934
AXE8SharedExpat.dll AXE8SharedExpat 2020/08/01-01:08:32 79.622927 79.622927
AXEDOMCore.dll AXEDOMCore 2020/08/01-01:08:32 79.622927 79.622927
Bib.dll BIB 2020/10/28-12:40:22 113.624934 113.624934
BIBUtils.dll BIBUtils 2020/10/28-12:40:22 113.624934 113.624934
boost_date_time.dll photoshopdva 12.1.0
boost_filesystem.dll photoshopdva 12.1.0
boost_system.dll photoshopdva 12.1.0
boost_threads.dll photoshopdva 12.1.0
CoolType.dll CoolType 2020/10/28-12:40:22 113.624934 113.624934
CRClient.dll Adobe Crash Reporter Client DLL 3.0.2.0
DirectML.dll DirectML Redistributable Library 1.0.200514-0504.1.redist-dml-2.1.0.dcd3712
dnssd.dll Bonjour 3,0,0,2
dvaaccelerate.dll photoshopdva 12.1.0
dvaappsupport.dll photoshopdva 12.1.0
dvaaudiodevice.dll photoshopdva 12.1.0
dvacore.dll photoshopdva 12.1.0
dvacrashhandler.dll Adobe Audition CC 2017 10.0.0
dvamarshal.dll photoshopdva 12.1.0
dvamediatypes.dll photoshopdva 12.1.0
dvametadata.dll photoshopdva 12.1.0
dvametadataapi.dll photoshopdva 12.1.0
dvametadataui.dll photoshopdva 12.1.0
dvaplayer.dll photoshopdva 12.1.0
dvascripting.dll photoshopdva 12.1.0
dvatransport.dll photoshopdva 12.1.0
dvaui.dll photoshopdva 12.1.0
dvaunittesting.dll photoshopdva 12.1.0
dynamic-torqnative.dll Unified Extensibility Platform uxp-4.1.2.214
dynamiclink.dll photoshopdva 12.1.0
ExtendScript.dll ExtendScript 2019/07/29-10:07:31 82.2 82.2
icucnv66.dll International Components for Unicode Build dev.1a8973dfe99250a665e321702b3d76963c65bdfe
icudt66.dll International Components for Unicode Build dev.1a8973dfe99250a665e321702b3d76963c65bdfe
icuuc66.dll International Components for Unicode Build dev.1a8973dfe99250a665e321702b3d76963c65bdfe
igestep30.dll IGES Reader 9.3.0.113
ippcc.dll ippCC. Intel(R) Integrated Performance Primitives. Color Conversion. 2020.0.1 (r0x35c5ec66)
ippcck0.dll ippCC. Intel(R) Integrated Performance Primitives. Color Conversion. 2020.0.1 (r0x35c5ec66)
ippccl9.dll ippCC. Intel(R) Integrated Performance Primitives. Color Conversion. 2020.0.1 (r0x35c5ec66)
ippccy8.dll ippCC. Intel(R) Integrated Performance Primitives. Color Conversion. 2020.0.1 (r0x35c5ec66)
ippcore.dll core. Intel(R) Integrated Performance Primitives. Core Library. 2020.0.1 (r0x35c5ec66)
ippcv.dll ippCV. Intel(R) Integrated Performance Primitives. Computer Vision. 2020.0.1 (r0x35c5ec66)
ippcvk0.dll ippCV. Intel(R) Integrated Performance Primitives. Computer Vision. 2020.0.1 (r0x35c5ec66)
ippcvl9.dll ippCV. Intel(R) Integrated Performance Primitives. Computer Vision. 2020.0.1 (r0x35c5ec66)
ippcvy8.dll ippCV. Intel(R) Integrated Performance Primitives. Computer Vision. 2020.0.1 (r0x35c5ec66)
ippi.dll ippIP. Intel(R) Integrated Performance Primitives. Image Processing. 2020.0.1 (r0x35c5ec66)
ippik0.dll ippIP. Intel(R) Integrated Performance Primitives. Image Processing. 2020.0.1 (r0x35c5ec66)
ippil9.dll ippIP. Intel(R) Integrated Performance Primitives. Image Processing. 2020.0.1 (r0x35c5ec66)
ippiy8.dll ippIP. Intel(R) Integrated Performance Primitives. Image Processing. 2020.0.1 (r0x35c5ec66)
ipps.dll ippSP. Intel(R) Integrated Performance Primitives. Signal Processing. 2020.0.1 (r0x35c5ec66)
ippsk0.dll ippSP. Intel(R) Integrated Performance Primitives. Signal Processing. 2020.0.1 (r0x35c5ec66)
ippsl9.dll ippSP. Intel(R) Integrated Performance Primitives. Signal Processing. 2020.0.1 (r0x35c5ec66)
ippsy8.dll ippSP. Intel(R) Integrated Performance Primitives. Signal Processing. 2020.0.1 (r0x35c5ec66)
ippvm.dll ippVM. Intel(R) Integrated Performance Primitives. Vector Math. 2020.0.1 (r0x35c5ec66)
ippvmk0.dll ippVM. Intel(R) Integrated Performance Primitives. Vector Math. 2020.0.1 (r0x35c5ec66)
ippvml9.dll ippVM. Intel(R) Integrated Performance Primitives. Vector Math. 2020.0.1 (r0x35c5ec66)
ippvmy8.dll ippVM. Intel(R) Integrated Performance Primitives. Vector Math. 2020.0.1 (r0x35c5ec66)
JP2KLib.dll JP2KLib 2020/06/29-16:59:49 79.275695 79.275695
libifcoremd.dll Intel(r) Visual Fortran Compiler 10.0 (Update A)
libiomp5md.dll Intel(R) OpenMP* Runtime Library 5.0
libmmd.dll Intel(R) C/C++/Fortran Compiler Mainline
LogSession.dll LogSession 8.1.0.68.49183
mediacoreif.dll photoshopdva 12.1.0
Microsoft.AI.MachineLearning.dll Microsoft® Windows® Operating System 1.3.20200515.1.eb5da13
MPS.dll MPS 2020/08/10-16:30:32 79.623129 79.623129
onnxruntime.dll Microsoft® Windows® Operating System 1.3.20200515.1.eb5da13
opencv_world440.dll OpenCV library 4.4.0
Photoshop.dll Adobe Photoshop 2021 22.0
Plugin.dll Adobe Photoshop 2021 22.0
PlugPlugExternalObject.dll Adobe(R) CEP PlugPlugExternalObject Standard Dll (64 bit) 10.0.0
PlugPlugOwl.dll Adobe(R) CSXS PlugPlugOwl Standard Dll (64 bit) 10.0.0.80
PSCloud.dll 1.0.0.1
PSViews.dll Adobe Photoshop 2021 22.0
ScCore.dll ScCore 2019/07/29-10:07:31 82.2 82.2
SVGRE.dll SVGRE 79.623146 79.623146
svml_dispmd.dll Intel(R) C/C++/Fortran Compiler Mainline
tbb.dll Intel(R) Threading Building Blocks for Windows 2020, 2, 2020, 0311
tbbmalloc.dll Intel(R) Threading Building Blocks for Windows 2020, 2, 2020, 0311
TfFontMgr.dll FontMgr 9.3.0.113
TfKernel.dll Kernel 9.3.0.113
TFKGEOM.dll Kernel Geom 9.3.0.113
TFUGEOM.dll Adobe, UGeom© 9.3.0.113
VulcanControl.dll Vulcan Application Control Library 6.5.0.000
VulcanMessage5.dll Vulcan Message Library 6.5.0.000
WinRTSupport.dll Adobe Photoshop Windows RT Support 21.0.0.0
WRServices.dll WRServices Build 16.0.0.4539038 16.0.0.4539038
wu3d.dll U3D Writer 9.3.0.113
Unified Extensibility Platform uxp-4.1.2.214
Required plugins:
Accented Edges 22.0 — from the file “Filter Gallery.8bf”
Adaptive Wide Angle 22.0 — from the file “Adaptive Wide Angle.8bf”
Angled Strokes 22.0 — from the file “Filter Gallery.8bf”
Average 22.0 (20201106.r.73 2020/11/06: 70b4743b574) — from the file “Average.8bf”
Bas Relief 22.0 — from the file “Filter Gallery.8bf”
BMP 22.0 — from the file “Standard MultiPlugin.8bf”
Camera Raw 13.0.2 — from the file “Camera Raw.8bi”
Camera Raw Filter 13.0.2 — from the file “Camera Raw.8bi”
Chalk && Charcoal 22.0 — from the file “Filter Gallery.8bf”
Charcoal 22.0 — from the file “Filter Gallery.8bf”
Chrome 22.0 — from the file “Filter Gallery.8bf”
Cineon 22.0 (20201106.r.73 2020/11/06: 70b4743b574) — from the file “Cineon.8bi”
Clouds 22.0 (20201106.r.73 2020/11/06: 70b4743b574) — from the file “Clouds.8bf”
Color Halftone 22.0 — from the file “Standard MultiPlugin.8bf”
Colored Pencil 22.0 — from the file “Filter Gallery.8bf”
Conté Crayon 22.0 — from the file “Filter Gallery.8bf”
Craquelure 22.0 — from the file “Filter Gallery.8bf”
Crop and Straighten Photos 22.0 (20201106.r.73 2020/11/06: 70b4743b574) — from the file “CropPhotosAuto.8li”
Crop and Straighten Photos Filter 22.0 — from the file “Standard MultiPlugin.8bf”
Crosshatch 22.0 — from the file “Filter Gallery.8bf”
Crystallize 22.0 — from the file “Standard MultiPlugin.8bf”
Cutout 22.0 — from the file “Filter Gallery.8bf”
Dark Strokes 22.0 — from the file “Filter Gallery.8bf”
De-Interlace 22.0 — from the file “Standard MultiPlugin.8bf”
Dicom 22.0 — from the file “Dicom.8bi”
Difference Clouds 22.0 (20201106.r.73 2020/11/06: 70b4743b574) — from the file “Clouds.8bf”
Diffuse Glow 22.0 — from the file “Filter Gallery.8bf”
Displace 22.0 — from the file “Standard MultiPlugin.8bf”
Dry Brush 22.0 — from the file “Filter Gallery.8bf”
Eazel Acquire 22.0 (20201106.r.73 2020/11/06: 70b4743b574) — from the file “EazelAcquire.8ba”
Entropy 22.0 (20201106.r.73 2020/11/06: 70b4743b574) — from the file “statistics.8ba”
Export Color Lookup Tables 22.0 (20201106.r.73 2020/11/06: 70b4743b574) — from the file “Export3DLUT.8be”
Extrude 22.0 — from the file “Standard MultiPlugin.8bf”
FastCore Routines 22.0 (20201106.r.73 2020/11/06: 70b4743b574) — from the file “FastCore.8bx”
Fibers 22.0 — from the file “Standard MultiPlugin.8bf”
Film Grain 22.0 — from the file “Filter Gallery.8bf”
Filter Gallery 22.0 — from the file “Filter Gallery.8bf”
Fresco 22.0 — from the file “Filter Gallery.8bf”
Glass 22.0 — from the file “Filter Gallery.8bf”
Glowing Edges 22.0 — from the file “Filter Gallery.8bf”
Grain 22.0 — from the file “Filter Gallery.8bf”
Graphic Pen 22.0 — from the file “Filter Gallery.8bf”
Halftone Pattern 22.0 — from the file “Filter Gallery.8bf”
Halide Bottlenecks 22.0 (20201106.r.73 2020/11/06: 70b4743b574) — from the file “HalideBottlenecks.8bx”
HDRMergeUI 22.0 — from the file “HDRMergeUI.8bf”
HSB/HSL 22.0 — from the file “Standard MultiPlugin.8bf”
IFF Format 22.0 — from the file “Standard MultiPlugin.8bf”
IGES 22.0 (20201106.r.73 2020/11/06: 70b4743b574) — from the file “U3D.8bi”
Ink Outlines 22.0 — from the file “Filter Gallery.8bf”
JPEG 2000 22.0 — from the file “JPEG2000.8bi”
Kurtosis 22.0 (20201106.r.73 2020/11/06: 70b4743b574) — from the file “statistics.8ba”
Lens Blur 22.0 — from the file “Lens Blur.8bf”
Lens Correction 22.0 — from the file “Lens Correction.8bf”
Lens Flare 22.0 — from the file “Standard MultiPlugin.8bf”
Liquify 22.0 — from the file “Liquify.8bf”
Matlab Operation 22.0 (20201106.r.73 2020/11/06: 70b4743b574) — from the file “ChannelPort.8bf”
Maximum 22.0 (20201106.r.73 2020/11/06: 70b4743b574) — from the file “statistics.8ba”
Mean 22.0 (20201106.r.73 2020/11/06: 70b4743b574) — from the file “statistics.8ba”
Measurement Core 22.0 (20201106.r.73 2020/11/06: 70b4743b574) — from the file “MeasurementCore.8me”
Median 22.0 (20201106.r.73 2020/11/06: 70b4743b574) — from the file “statistics.8ba”
Mezzotint 22.0 — from the file “Standard MultiPlugin.8bf”
Minimum 22.0 (20201106.r.73 2020/11/06: 70b4743b574) — from the file “statistics.8ba”
MMXCore Routines 22.0 (20201106.r.73 2020/11/06: 70b4743b574) — from the file “MMXCore.8bx”
Mosaic Tiles 22.0 — from the file “Filter Gallery.8bf”
Multiprocessor Support 22.0 (20201106.r.73 2020/11/06: 70b4743b574) — from the file “MultiProcessor Support.8bx”
Neon Glow 22.0 — from the file “Filter Gallery.8bf”
Note Paper 22.0 — from the file “Filter Gallery.8bf”
NTSC Colors 22.0 (20201106.r.73 2020/11/06: 70b4743b574) — from the file “NTSC Colors.8bf”
Ocean Ripple 22.0 — from the file “Filter Gallery.8bf”
OpenEXR 22.0 — from the file “Standard MultiPlugin.8bf”
Paint Daubs 22.0 — from the file “Filter Gallery.8bf”
Palette Knife 22.0 — from the file “Filter Gallery.8bf”
Patchwork 22.0 — from the file “Filter Gallery.8bf”
Paths to Illustrator 22.0 — from the file “Standard MultiPlugin.8bf”
PCX 22.0 (20201106.r.73 2020/11/06: 70b4743b574) — from the file “PCX.8bi”
Photocopy 22.0 — from the file “Filter Gallery.8bf”
Picture Package Filter 22.0 (20201106.r.73 2020/11/06: 70b4743b574) — from the file “ChannelPort.8bf”
Pinch 22.0 — from the file “Standard MultiPlugin.8bf”
Pixar 22.0 (20201106.r.73 2020/11/06: 70b4743b574) — from the file “Pixar.8bi”
Plaster 22.0 — from the file “Filter Gallery.8bf”
Plastic Wrap 22.0 — from the file “Filter Gallery.8bf”
Pointillize 22.0 — from the file “Standard MultiPlugin.8bf”
Polar Coordinates 22.0 — from the file “Standard MultiPlugin.8bf”
Portable Bit Map 22.0 (20201106.r.73 2020/11/06: 70b4743b574) — from the file “PBM.8bi”
Poster Edges 22.0 — from the file “Filter Gallery.8bf”
PRC 22.0 (20201106.r.73 2020/11/06: 70b4743b574) — from the file “U3D.8bi”
Radial Blur 22.0 — from the file “Standard MultiPlugin.8bf”
Radiance 22.0 (20201106.r.73 2020/11/06: 70b4743b574) — from the file “Radiance.8bi”
Range 22.0 (20201106.r.73 2020/11/06: 70b4743b574) — from the file “statistics.8ba”
Render Color Lookup Grid 22.0 (20201106.r.73 2020/11/06: 70b4743b574) — from the file “Export3DLUT.8be”
Reticulation 22.0 — from the file “Filter Gallery.8bf”
Ripple 22.0 — from the file “Standard MultiPlugin.8bf”
Rough Pastels 22.0 — from the file “Filter Gallery.8bf”
Save for Web 22.0 — from the file “Save for Web.8be”
ScriptingSupport 22.0 — from the file “ScriptingSupport.8li”
Shake Reduction 22.0 — from the file “Shake Reduction.8bf”
Shear 22.0 — from the file “Standard MultiPlugin.8bf”
Skewness 22.0 (20201106.r.73 2020/11/06: 70b4743b574) — from the file “statistics.8ba”
Smart Blur 22.0 — from the file “Standard MultiPlugin.8bf”
Smudge Stick 22.0 — from the file “Filter Gallery.8bf”
Solarize 22.0 (20201106.r.73 2020/11/06: 70b4743b574) — from the file “Solarize.8bf”
Spaces 22.0 — from the file “Spaces.8li”
Spatter 22.0 — from the file “Filter Gallery.8bf”
Spherize 22.0 — from the file “Standard MultiPlugin.8bf”
Sponge 22.0 — from the file “Filter Gallery.8bf”
Sprayed Strokes 22.0 — from the file “Filter Gallery.8bf”
Stained Glass 22.0 — from the file “Filter Gallery.8bf”
Stamp 22.0 — from the file “Filter Gallery.8bf”
Standard Deviation 22.0 (20201106.r.73 2020/11/06: 70b4743b574) — from the file “statistics.8ba”
Sumi-e 22.0 — from the file “Filter Gallery.8bf”
Summation 22.0 (20201106.r.73 2020/11/06: 70b4743b574) — from the file “statistics.8ba”
Targa 22.0 — from the file “Standard MultiPlugin.8bf”
Texturizer 22.0 — from the file “Filter Gallery.8bf”
Tiles 22.0 — from the file “Standard MultiPlugin.8bf”
Torn Edges 22.0 — from the file “Filter Gallery.8bf”
Twirl 22.0 — from the file “Standard MultiPlugin.8bf”
U3D 22.0 (20201106.r.73 2020/11/06: 70b4743b574) — from the file “U3D.8bi”
Underpainting 22.0 — from the file “Filter Gallery.8bf”
Vanishing Point 22.0 — from the file “VanishingPoint.8bf”
Variance 22.0 (20201106.r.73 2020/11/06: 70b4743b574) — from the file “statistics.8ba”
Water Paper 22.0 — from the file “Filter Gallery.8bf”
Watercolor 22.0 — from the file “Filter Gallery.8bf”
Wave 22.0 — from the file “Standard MultiPlugin.8bf”
WIA Support 22.0 (20201106.r.73 2020/11/06: 70b4743b574) — from the file “WIASupport.8li”
Wind 22.0 — from the file “Standard MultiPlugin.8bf”
Wireless Bitmap 22.0 (20201106.r.73 2020/11/06: 70b4743b574) — from the file “WBMP.8bi”
ZigZag 22.0 — from the file “Standard MultiPlugin.8bf”
Optional and third party plugins: NONE
Duplicate and Disabled plugins: NONE
Plugins that failed to load: NONE
Unified Extensibility Platform — Extensions:
com.adobe.ccx.start (L) 3.8.0.28 — from the file «C:Program FilesCommon FilesAdobe/UXP/Extensionscom.adobe.ccx.start-3.8.0»
CDO: 1.76.10
CmdN: 1.5.18
CDP: 1.100.16
com.adobe.unifiedpanel (L) 1.1.0.24 — from the file «C:Program FilesAdobeAdobe Photoshop 2021RequiredUXP/com.adobe.unifiedpanel»
com.adobe.ccx.timeline (L) 2.6.27.0 — from the file «C:Program FilesAdobeAdobe Photoshop 2021RequiredUXP/com.adobe.ccx.timeline»
com.adobe.nfp.gallery (P) 1.2.109.0 — from the file «C:Program FilesAdobeAdobe Photoshop 2021RequiredUXP/com.adobe.nfp.gallery»
com.adobe.photoshop.exportAs (P) 5.1.2.0 — from the file «C:Program FilesAdobeAdobe Photoshop 2021RequiredUXP/com.adobe.photoshop.exportAs»
com.adobe.photoshop.personalization (L) 1.0.0.0 — from the file «C:Program FilesAdobeAdobe Photoshop 2021RequiredUXP/com.adobe.photoshop.personalization»
com.adobe.pluginspanel (P) 1.0.50.0 — from the file «C:Program FilesAdobeAdobe Photoshop 2021RequiredUXP/com.adobe.pluginspanel»
Extensions:
Libraries 1.0.0 — from the file “C:Program FilesCommon FilesAdobeCEPextensionsCC_LIBRARIES_PANEL_EXTENSION_3_9_288index.html”
New Document 3.4.0 — from the file “C:Program Files (x86)Common FilesAdobeCEPextensionscom.adobe.ccx.fnft-3.4.0fnft.html?v=3.4.0.16”
com.adobe.inapp.typekit.purchase 1.0.0 — from the file “C:Program FilesCommon FilesAdobeCEPextensionsCC_LIBRARIES_PANEL_EXTENSION_3_9_288purchaseTypekit.html”
Home 2.15.0 — from the file “C:Program Files (x86)Common FilesAdobeCEPextensionscom.adobe.ccx.start-2.15.0index.html?v=2.15.0.7”
com.adobe.capture.extension 1.0.0 — from the file “C:Program FilesCommon FilesAdobeCEPextensionsCC_LIBRARIES_PANEL_EXTENSION_3_9_288extensionscapturecapture.html”
com.adobe.stock.panel.licensing-embedded 1.0.0 — from the file “C:Program FilesCommon FilesAdobeCEPextensionsCC_LIBRARIES_PANEL_EXTENSION_3_9_288extensionsstock-panel-licensingindex.html”
Adobe Color Themes 6.1.0 — from the file “C:Program FilesAdobeAdobe Photoshop 2021RequiredCEPextensionscom.adobe.KulerPanel.htmlindex.html”
Export As 4.8.13 — from the file “C:Program FilesAdobeAdobe Photoshop 2021RequiredCEPextensionscom.adobe.photoshop.cremaindex.html”
Export As 4.8.13 — from the file “C:Program FilesAdobeAdobe Photoshop 2021RequiredCEPextensionscom.adobe.photoshop.cremaindex.html”
Installed TWAIN devices: NONE
Ошибки с кодами 126, реже 127, ссылаются на то, что «Не найден указанный модуль». Таким образом легко сделать вывод – в Windows 7, 8, 10 недостает какого-то файла. Это действительно часто означает отсутствие DLL-библиотеки, но не всегда. Дело может быть и в других неприятных неполадках с реестром или системой защиты и т. п. Вполне может быть, что все дело и в самой программе, которая этот сбой провоцирует. Мы поможем исправить ошибку (Error 126) своими силами, ничего особо сложного в этом нет. Однако, предупреждаем, что неправильные действия в реестре или при взаимодействии с драйверами могут вызвать негативные последствия для работы операционной системы.
Содержание
- Причины ошибки 126
- Как исправить ошибку 126?
- Способ 1: автоматическое исправление проблем с DLL-файлами
- Способ 2: временно отключаем антивирус
- Способ 3: обновляем Microsoft NET Framework
- Способ 4: переустанавливаем DirectX
- Способ 5: сканируем системные файлы Windows
- Способ 6: восстанавливаем системные реестр
- Способ 7: делаем откат Windows
Причины ошибки 126
Если отображается ошибка 126 «Не найден модуль» – можем сделать вывод о наличии одной из перечисленных ниже проблем:
- отсутствует, не зарегистрирован или поврежден DLL-файл;
- неправильная настройка или нарушение целостности системных файлов;
- некорректная установка программы или она была чем-то прервана;
- повреждение Windows вирусами;
- сбой в системном реестре;
- проблема в драйверах, настройке оборудования или его несовместимости с версией операционной системы.
Как исправить ошибку 126?
Мы разработали серию решений проблемы, одно из них обязано помочь, так как исправляет каждую из перечисленных проблем. Логично, что после устранения неполадки, все должно заработать правильно.
Способ 1: автоматическое исправление проблем с DLL-файлами
Есть специальная утилита, которая автоматически сканирует системные библиотеки и сравнивает их с эталоном. Если она обнаружит, что какого-то файла или нескольких, недостает, она сама их загрузит. Также происходит анализ битых, поврежденных и модифицированных файлов. Это очень удобно и быстро в сравнении с ручным способом и, что немаловажно, еще и более безопасно. На личном опыте, программа работает стабильно и не устанавливает файлы, зараженные вирусами. Однако любые манипуляции с DLL-библиотеками сложно назвать полностью безопасными.
Инструкция по устранению ошибки 126:
- Загружаем программу Restoro PC Repair Tool. Лучше это делать с официального сайта.
- Устанавливаем и запускаем софт. Нажимаем на кнопку «Начать сканирование» (Start Scan).
- После процедуры анализа системы кликаем по клавише «Восстановить все» (Repair All).
Важное достоинство программы – она оптимизирует компьютер, увеличивая его производительность (если в системе есть какие-то проблемы с DLL). Ее можно оставить в качестве настольного софта, так как утилита решает большой спектр проблем.
Способ 2: временно отключаем антивирус
Есть большая вероятность, что ошибка 126 спровоцирована антивирусной защитой системы. Если в момент установки программы антивирус посчитал один из компонентов угрозой и заблокировал его, он будет отсутствовать, а система писать «Не найден указанный модуль». В целом желательно отключать защиту в момент установки программ, которым доверяем.
Инструкция:
- Выключаем антивирус (встроенный Защитник Windows и/или сторонний).
- Полностью удаляем программу через «Программы и компоненты» (пункт находится в Панели управления).
- Начинаем установку утилиты снова, проверив, что сейчас антивирус не работает.
- Проверяем результат.
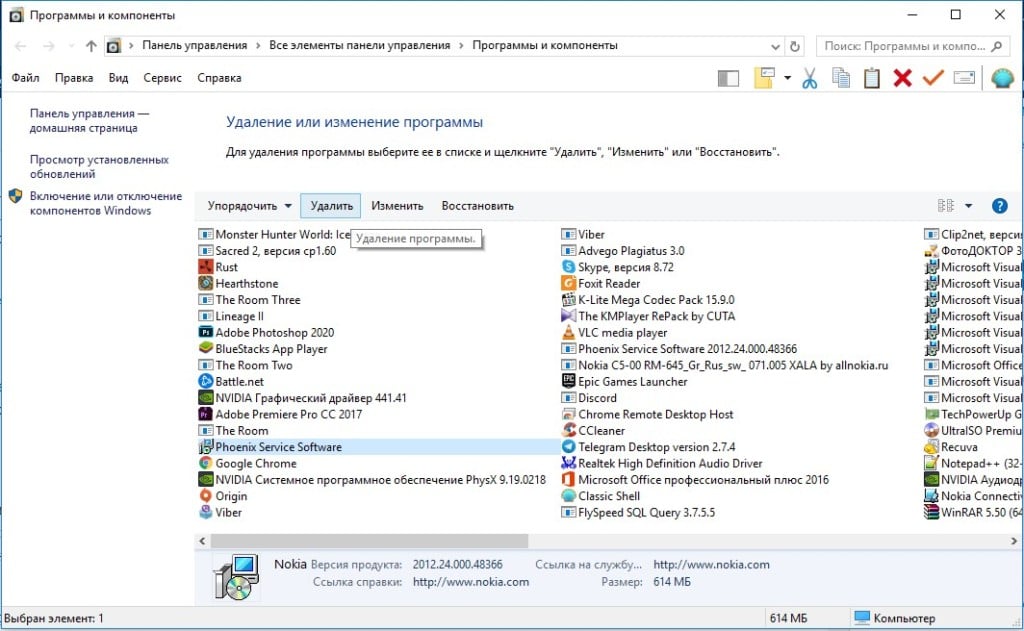
Если сейчас программа заработала нормально, рекомендуем открыть антивирус и добавить в список его исключений данный софт. В противном случае со временем ошибка может вернуться, ведь антивирусная защита снова может заблокировать или удалить файл.
Важно! Для максимального результата лучше сделать полное удаление программы. Для этого можем воспользоваться iObit Uninstaller. Софт анализирует систему и ищет остатки файлов приложения, удаляя и их.
Способ 3: обновляем Microsoft NET Framework
Устаревание платформы Microsoft NET Framework нередко приводит к ошибкам с кодом 126 и 127. Благо, это просто решается, достаточно обновить среду. Если дело было в этом, все должно заработать. Скачать актуальную версию NET Framework можем с официального сайта Microsoft.
Способ 4: переустанавливаем DirectX
Очень много DLL-файлов напрямую связаны с DirectX, поэтому есть высокая вероятность, что сообщение «Не найден указанный модуль» относится к данному программному компоненту. Его легко переустановить, так как DirectX тоже распространяет Microsoft совершенно бесплатно и для любых версий, конфигураций операционной системы. С установкой проблем быть не должно, за исключением одного момента – желательно, перед началом инсталляции софта удалить старую версию DirectX.
Способ 5: сканируем системные файлы Windows
Во всех актуальных версиях Windows есть встроенный инструмент анализа системных файлов. Он часто помогает при различных проблемах с DLL-файлами.
Как запустить системные файлы:
- В поиск Windows вводим cmd и запускаем «Командную строку».
- Вводим команду sfc /scannow.
- Ждем завершения сканирования системы. Все ошибки должны быть исправлены автоматически, если такая возможность есть.
Способ 6: восстанавливаем системные реестр
Ошибка 126 и 127 может быть следствием скопления мусора в реестре или повреждения значений в нем. Одна проблема – вручную все перелистать и исправить просто нереально. Для этого лучше использовать специальные программы, например, Total System Care. В утилите есть все необходимое для анализа системного реестра, его оптимизации и исправления существующих проблем. Еще можем порекомендовать CCleaner. Обе программы справятся со своими задачами.
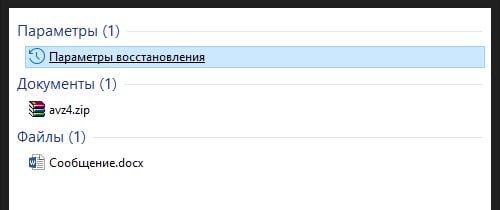
Способ 7: делаем откат Windows
Если никакие ручные способы исправления не помогают, что бывает редко, приходится обратиться к последнему методу и откатить Windows к последнему рабочему состоянию. Иногда файлы DLL могут пропадать из-за удаления программы, и вы можете столкнуться с ошибкой 126. Чтобы устранить ее, воспользуйтесь точками восстановления. Найти «Параметры восстановления» можем через поиск в Windows.
Теперь ошибка с кодом 126 больше не должна беспокоить пользователя как в Windows 7, так и 8, 10. Одна из процедур практически 100% должна исправить проблему. При этом мы не рекомендуем вручную менять DLL-файл, если удалось обнаружить в каком именно проблема. Все из-за чрезмерно высокого шанса загрузить вирус.