-

challism
- Moderator
- Posts: 4138
- Joined: 17 Jan 2015
- Location: Fanboy Shill
I installed loopMIDI but when I try to create a MIDI channel, it gives me this error saying «perhaps the teVirtual MIdi driver isn’t installed.» I’ve tried uninstalling/reinstalling and repairing loopMIDI but nothing seems to be working. It’s been a few years since I last used it, but I’ve never encountered this error before with loopMIDI. Any ideas how to fix this?
I’m running Windows 7 and loopMIDI v1.0.16.27 (seems to be the most current version on Tobias’ website)
~
- Capture.JPG (52.31 KiB) Viewed 1213 times
-
jam-s
- Posts: 2507
- Joined: 17 Apr 2015
- Location: Aachen, Germany
- Contact:
19 Apr 2021
Have you tried to reboot your windows?
-
challism
- Moderator
- Posts: 4138
- Joined: 17 Jan 2015
- Location: Fanboy Shill
19 Apr 2021
Yes, I tried that too. Sorry forgot to mention that. Didn’t work.
-

rgdaniel
- Posts: 572
- Joined: 07 Sep 2017
- Location: Canada

19 Apr 2021
If you search for files named teVirtualMIDI on your system, do you find lots? I get a dozen or so files, .dll .sys .cat, 32 bit, 64 bit, and unspecified, a dozen or so altogether, in various places including system32 folder.
-
rmtcvolte
- Posts: 172
- Joined: 15 Nov 2018
20 Apr 2021
To check if it is installed allready: open a terminal (cmd.exe) and type in «driverquery | more» to get a list of all installed drivers.
Download and install rtpMidi from Erichsen, the driver is included there too (if the the installer for the driver included in loopMidi is broken). Have to search for the installer of an older version, not sure I will find, but in case you like to try this…
-
challism
- Moderator
- Posts: 4138
- Joined: 17 Jan 2015
- Location: Fanboy Shill
21 Apr 2021
Thanks for chiming in with some ideas.
I copied an older version of loopMIDI that runs on my other computer without any issues; installed it on this computer and I am still getting the same error. So there must be something going on with this computer, not with loopMIDI. Oh well. I’ll just use my other computer; I don’t think I’m going to solve this, nor do I think it’s worth the effort.
-
Who is online
Users browsing this forum: MuttReason and 0 guests
Содержание
- 3 простых шага по исправлению ошибок TEVIRTUALMIDI32.DLL
- Подробности файле с именем tevirtualmidi32.dll
- Очистите мусорные файлы, чтобы исправить tevirtualmidi32.dll, которое перестало работать из-за ошибки.
- Очистите реестр, чтобы исправить tevirtualmidi32.dll, которое перестало работать из-за ошибки
- Как удалить заблокированный файл
- Настройка Windows для исправления критических ошибок tevirtualmidi32.dll:
- Как другие пользователи поступают с этим файлом?
- Как вы поступите с файлом tevirtualmidi32.dll?
- Некоторые сообщения об ошибках, которые вы можете получить в связи с tevirtualmidi32.dll файлом
- TEVIRTUALMIDI32.DLL
- 3 простых шага по исправлению ошибок TEVIRTUALMIDI64.DLL
- Подробности файле с именем tevirtualmidi64.dll
- Очистите мусорные файлы, чтобы исправить tevirtualmidi64.dll, которое перестало работать из-за ошибки.
- Очистите реестр, чтобы исправить tevirtualmidi64.dll, которое перестало работать из-за ошибки
- Как удалить заблокированный файл
- Настройка Windows для исправления критических ошибок tevirtualmidi64.dll:
- Как другие пользователи поступают с этим файлом?
- Как вы поступите с файлом tevirtualmidi64.dll?
- Некоторые сообщения об ошибках, которые вы можете получить в связи с tevirtualmidi64.dll файлом
- TEVIRTUALMIDI64.DLL
- Как исправить диспетчер устройств Ошибка 21 Код 21
- Код ошибки исправления 21
- Код 21 — Что это?
- Решения
- Причины ошибок
- Дополнительная информация и ручной ремонт
- Способ 1 — подождите несколько секунд, а затем нажмите F5
- MСпособ 2 — Перезагрузите компьютер
- Способ 3 — установить DriverFIX
- Расширенный ремонт системы Pro
- Поделиться этой статьей:
- Вас также может заинтересовать
- Плохое размещение маршрутизатора
- Рыбные танки
- Книжные полки
- Зеркала
- Вещи, которые влияют на сигналы в домах
- Любые металлические украшения.
- Кухонная техника и бытовая техника
- Домашние тренажерные залы
- Вещи, блокирующие ваш Wi-Fi, которые вы не можете легко контролировать
- Стены
- Полы и потолок
- Системы отопления
- Что такое Desk365?
- О потенциально нежелательных приложениях
- Как именно выглядят нежелательные программы?
- Советы о том, как предотвратить щенков
- Что делать, если вы не можете загрузить Safebytes Anti-Malware?
- Переключитесь на альтернативный веб-браузер
- Установите и запустите антивирус с вашей флешки
- Давайте поговорим о SafeBytes Anti-Malware!
- Технические детали и удаление вручную (для опытных пользователей)
- Вариант 1. Попробуйте запустить средство устранения неполадок питания.
- Вариант 2 — Восстановить настройки схемы электропитания по умолчанию вручную
- Вариант 3. Попробуйте удалить или переустановить драйвер аккумулятора.
- Вариант 1. Убедитесь, что службы Защитника Windows запущены.
- Вариант 2. Попробуйте изменить некоторые записи в реестре Windows.
- Вариант 1. Убедитесь, что вы не находитесь в режиме планшета.
- Вариант 2. Переведите компьютер в состояние чистой загрузки.
- Вариант 3. Попробуйте переустановить программу.
- Вариант 4 — попробуйте запустить проверку системных файлов
- Вариант 5 — Запустите инструмент DISM
- Вариант 1. Попробуйте удалить содержимое папки «Автоматические назначения».
- Вариант 2. Попытайтесь восстановить поисковый индекс.
- Вариант 3. Попробуйте оптимизировать папку для общих элементов.
- Вариант 4. Попробуйте выполнить восстановление системы.
- Вариант 1. Отключить группировку файлов только в одной папке.
- Вариант 2 — отключить группировку файлов во всех папках
- Ошибка библиотеки Microsoft Visual C ++
- Решения
- Причины ошибок
- Дополнительная информация и ручной ремонт
- Вариант 1. Попробуйте запустить DISM Tool.
- Вариант 2. Попробуйте запустить средство проверки системных файлов или сканирование SFC.
- Вариант 3. Попробуйте запустить средство устранения неполадок Центра обновления Windows.
- Вариант 4. Выполните восстановление системы
- Вариант 5 — сбросить папки SoftwareDistribution и Catroot2
3 простых шага по исправлению ошибок TEVIRTUALMIDI32.DLL
Подробности файле с именем tevirtualmidi32.dll
Очистите мусорные файлы, чтобы исправить tevirtualmidi32.dll, которое перестало работать из-за ошибки.
- Запустите приложение Asmwsoft Pc Optimizer.
- Потом из главного окна выберите пункт «Clean Junk Files».
- Когда появится новое окно, нажмите на кнопку «start» и дождитесь окончания поиска.
- потом нажмите на кнопку «Select All».
- нажмите на кнопку «start cleaning».
Очистите реестр, чтобы исправить tevirtualmidi32.dll, которое перестало работать из-за ошибки
Как удалить заблокированный файл
- В главном окне Asmwsoft Pc Optimizer выберите инструмент «Force deleter»
- Потом в «force deleter» нажмите «Выбрать файл», перейдите к файлу tevirtualmidi32.dll и потом нажмите на «открыть».
- Теперь нажмите на кнопку «unlock and delete», и когда появится подтверждающее сообщение, нажмите «да». Вот и все.
Настройка Windows для исправления критических ошибок tevirtualmidi32.dll:
- Нажмите правой кнопкой мыши на «Мой компьютер» на рабочем столе и выберите пункт «Свойства».
- В меню слева выберите » Advanced system settings».
- В разделе «Быстродействие» нажмите на кнопку «Параметры».
- Нажмите на вкладку «data Execution prevention».
- Выберите опцию » Turn on DEP for all programs and services . » .
- Нажмите на кнопку «add» и выберите файл tevirtualmidi32.dll, а затем нажмите на кнопку «open».
- Нажмите на кнопку «ok» и перезагрузите свой компьютер.
Как другие пользователи поступают с этим файлом?
Всего голосов ( 202 ), 133 говорят, что не будут удалять, а 69 говорят, что удалят его с компьютера.
Как вы поступите с файлом tevirtualmidi32.dll?
Некоторые сообщения об ошибках, которые вы можете получить в связи с tevirtualmidi32.dll файлом
- (tevirtualmidi32.dll) столкнулся с проблемой и должен быть закрыт. Просим прощения за неудобство.
- tevirtualmidi32.dll. Эта программа не отвечает.
- (tevirtualmidi32.dll) — Ошибка приложения: the instruction at 0xXXXXXX referenced memory error, the memory could not be read. Нажмитие OK, чтобы завершить программу.
- (tevirtualmidi32.dll) не является ошибкой действительного windows-приложения.
- (tevirtualmidi32.dll) отсутствует или не обнаружен.
TEVIRTUALMIDI32.DLL
Проверьте процессы, запущенные на вашем ПК, используя базу данных онлайн-безопасности. Можно использовать любой тип сканирования для проверки вашего ПК на вирусы, трояны, шпионские и другие вредоносные программы.
Источник
3 простых шага по исправлению ошибок TEVIRTUALMIDI64.DLL
Подробности файле с именем tevirtualmidi64.dll
Очистите мусорные файлы, чтобы исправить tevirtualmidi64.dll, которое перестало работать из-за ошибки.
- Запустите приложение Asmwsoft Pc Optimizer.
- Потом из главного окна выберите пункт «Clean Junk Files».
- Когда появится новое окно, нажмите на кнопку «start» и дождитесь окончания поиска.
- потом нажмите на кнопку «Select All».
- нажмите на кнопку «start cleaning».
Очистите реестр, чтобы исправить tevirtualmidi64.dll, которое перестало работать из-за ошибки
Как удалить заблокированный файл
- В главном окне Asmwsoft Pc Optimizer выберите инструмент «Force deleter»
- Потом в «force deleter» нажмите «Выбрать файл», перейдите к файлу tevirtualmidi64.dll и потом нажмите на «открыть».
- Теперь нажмите на кнопку «unlock and delete», и когда появится подтверждающее сообщение, нажмите «да». Вот и все.
Настройка Windows для исправления критических ошибок tevirtualmidi64.dll:
- Нажмите правой кнопкой мыши на «Мой компьютер» на рабочем столе и выберите пункт «Свойства».
- В меню слева выберите » Advanced system settings».
- В разделе «Быстродействие» нажмите на кнопку «Параметры».
- Нажмите на вкладку «data Execution prevention».
- Выберите опцию » Turn on DEP for all programs and services . » .
- Нажмите на кнопку «add» и выберите файл tevirtualmidi64.dll, а затем нажмите на кнопку «open».
- Нажмите на кнопку «ok» и перезагрузите свой компьютер.
Как другие пользователи поступают с этим файлом?
Всего голосов ( 202 ), 133 говорят, что не будут удалять, а 69 говорят, что удалят его с компьютера.
Как вы поступите с файлом tevirtualmidi64.dll?
Некоторые сообщения об ошибках, которые вы можете получить в связи с tevirtualmidi64.dll файлом
- (tevirtualmidi64.dll) столкнулся с проблемой и должен быть закрыт. Просим прощения за неудобство.
- tevirtualmidi64.dll. Эта программа не отвечает.
- (tevirtualmidi64.dll) — Ошибка приложения: the instruction at 0xXXXXXX referenced memory error, the memory could not be read. Нажмитие OK, чтобы завершить программу.
- (tevirtualmidi64.dll) не является ошибкой действительного windows-приложения.
- (tevirtualmidi64.dll) отсутствует или не обнаружен.
TEVIRTUALMIDI64.DLL
Проверьте процессы, запущенные на вашем ПК, используя базу данных онлайн-безопасности. Можно использовать любой тип сканирования для проверки вашего ПК на вирусы, трояны, шпионские и другие вредоносные программы.
Источник
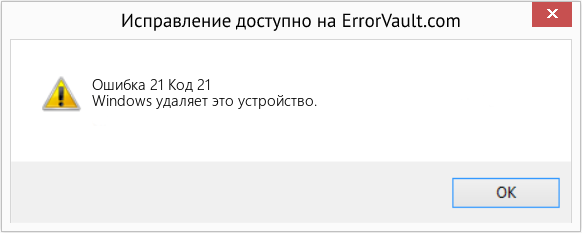
Как исправить диспетчер устройств Ошибка 21 Код 21
В этой статье представлена ошибка Ошибка 21, также известная как Код 21 и ее описание Windows удаляет это устройство.
Информация об ошибке
Имя ошибки: Код 21
Номер ошибки: Ошибка 21
Применимо к: Windows 10, 8, 7, Vista, XP
Описание: Windows удаляет это устройство.
Это средство исправления может устранить такие распространенные компьютерные ошибки, как BSODs, замораживание системы и сбои. Он может заменить отсутствующие файлы операционной системы и библиотеки DLL, удалить вредоносное ПО и устранить вызванные им повреждения, а также оптимизировать ваш компьютер для максимальной производительности.
О диспетчере устройств
Каждое устройство, которое вы подключаете к компьютеру, имеет совместимый драйвер, помогающий запускать процессы, использующие этот компонент. Список всех устройств в компьютере можно найти в свойствах аппаратного устройства в диспетчере устройств. Если с этими компонентами что-то не так, в списке появятся индикаторы. Эти индикаторы дадут вам представление о том, является ли это проблемой драйвера, конфликтом с системным ресурсом или другими устройствами. Вы можете увидеть в списке восклицательный знак, вопросительный знак или стрелку вниз.
Ошибки диспетчера устройств сопровождаются сообщениями об ошибках, которые описывают ситуацию с аппаратным обеспечением компьютера. Известные как коды ошибок оборудования, они точно указывают, в какой части компьютера возникла проблема. Когда вы сталкиваетесь с кодами ошибок диспетчера устройств, вы можете устранить проблему, внеся изменения в раздел диспетчера устройств.
Окно диспетчера устройств и его содержимое одинаково во всех версиях Windows. Чтобы просмотреть состояние компонентов в диспетчере устройств, можно просто найти в поиске термин «Диспетчер устройств» или запустить процесс «devmgmt.msc».
Определения (Бета)
Здесь мы приводим некоторые определения слов, содержащихся в вашей ошибке, в попытке помочь вам понять вашу проблему. Эта работа продолжается, поэтому иногда мы можем неправильно определить слово, так что не стесняйтесь пропустить этот раздел!
- Устройство — электронные устройства: компьютеры, смартфоны, планшеты, электронное оборудование и платформы.
- Windows — ОБЩАЯ ПОДДЕРЖКА WINDOWS ВЫКЛЮЧЕНА -ТОПИЧЕСКИЙ
Симптомы Ошибка 21 — Код 21
Как уже говорилось ранее, при возникновении проблем с устройством вы увидите индикаторы в окне диспетчера устройств. На проблемном устройстве может быть красный знак X, восклицательный знак, знак вопроса или стрелка вниз, в зависимости от того, с каким случаем вы столкнулись.
Восклицательный знак означает, что компьютер обнаруживает устройство, но не распознает его, а если вы видите вопросительный знак с восклицательным знаком, то возможны конфликты между двумя устройствами, подключенными к компьютеру. Красный знак X означает, что ваша операционная система не может найти устройство, возможно, оно было отключено или его необходимо заново подключить или заново обнаружить на компьютере. Стрелка вниз означает, что устройство временно отключено.
Помимо индикаторов значков в диспетчере устройств, вы также можете получить ошибки, которые расскажут вам о симптомах, проявляющихся на вашем компьютере.
(Только для примера)
Причины возникновения Код 21 — Ошибка 21
Независимо от того, какую именно ошибку диспетчера устройств вы получаете, эти ошибки обычно вызваны следующим:
- Недавние изменения в системе, например, установка новой программы или оборудования
- Изменения в реестре, вызванные другими способами устранения ошибок
- Обновления, которые компьютер установил автоматически
- Вирусная инфекция, направленная на настройки диспетчера устройств
- Недостаточно памяти
- Неисправность аппаратного обеспечения вследствие обычного износа устройства
Методы ремонта
Не нужно бояться получить ошибку диспетчера устройств. Ошибки диспетчера устройств — это инструменты, которые помогают нам правильно определить, какой компонент или программное обеспечение необходимо устранить.
Если метод ремонта вам подошел, пожалуйста, нажмите кнопку upvote слева от ответа, это позволит другим пользователям узнать, какой метод ремонта на данный момент работает лучше всего.
Источник
Код ошибки исправления 21
Код 21 — Что это?
Код 21 является Код ошибки диспетчера устройств это появляется, когда вы пытаетесь использовать аппаратное устройство, подключенное к вашему компьютеру, и Windows запрещает вам использовать его.
Это связано с тем, что Windows испытывает проблемы с загрузкой драйвера устройства. Это сообщение об ошибке отображается в следующем формате:
Решения
Причины ошибок
 Причины ошибок
Код ошибки 21 означает, что Windows находится в процессе удаления устройства, и устройство не было полностью удалено. Это происходит, когда вы устанавливаете устройство для удаления, а затем выбираете то же устройство для запуска в вашей системе.
По вашим инструкциям Windows начинает удалять это устройство, и когда вы, с другой стороны, пытаетесь использовать / получить доступ к тому же устройству, которое вы выбрали для удаления, запускается Код 21.
Дополнительная информация и ручной ремонт
Если на вашем ПК появляется ошибка с кодом 21, рекомендуется немедленно ее устранить.
Хотя эта ошибка не повредит вашу систему, но значительно снизит производительность вашего ПК, чего вы определенно не хотите, особенно если вы работаете на своем компьютере ежедневно и используете его для выполнения важных дел, требующих срочного выполнения.
Чтобы исправить и устранить, попробуйте методы, приведенные ниже:
Способ 1 — подождите несколько секунд, а затем нажмите F5
Это один из лучших и простых способов решить проблему с кодом 15 в вашей системе. Подождите несколько секунд, а затем нажмите клавишу F5. Это обновит Диспетчер устройств вид и ошибка скорее всего уйдут.
MСпособ 2 — Перезагрузите компьютер
Иногда коды ошибок могут появляться из-за временных сбоев. Чтобы устранить такие ошибки, достаточно перезагрузить компьютер. Завершите работу Windows, а затем перезагрузите систему.
Скорее всего, это разрешит код 21. Однако, если ошибка все еще сохраняется, это означает, что основная проблема для кода 21 глубже, чем вы думаете. Попробуйте метод 3, чтобы решить эту проблему.
Способ 3 — установить DriverFIX
Как упоминалось ранее, код ошибки 21 может возникнуть, если вы выбрали устройство для удаления, а затем пытаетесь использовать его повторно.
Чтобы решить эту проблему, вам, возможно, придется снова установить устройство и драйвер для этого переустановленного устройства. Чтобы без проблем переустановить драйвер, просто скачайте DriverFIX.
Это интеллектуальная, удобная и интуитивно понятная программа, предназначенная для решения проблем с драйверами. В программу встроена интеллектуальная технология идентификации устройств, которая:
- Автоматически обнаруживает все соответствующие системные драйверы
- Соответствует им с последними доступными версиями
- А затем регулярно обновляет драйверы в соответствии с их совместимыми версиями.
Кроме того, он обеспечивает точную установку и гарантирует, что ваша система работает с оптимальной скоростью.
Другие функции, которыми может похвастаться эта программа, — это полное резервное копирование и восстановление, безопасное управление через USB и извлечение.
Если ничего не работает, вы можете попробовать функцию полного резервного копирования и восстановления и восстановить ваш компьютер в прежнее состояние, когда он работал должным образом до возникновения ошибки.
ДрайверFIX создает резервную копию всех ваших файлов, а хеджирование данных защищает вас от таких бедствий, как потеря данных. Восстанавливает систему на то время, когда она работала исправно.
Открыть скачать драйверFIX в вашей системе и устраните код ошибки 21 сегодня.
Расширенный ремонт системы Pro
Поделиться этой статьей:
Вас также может заинтересовать
Удивительно большое количество вещей, присутствующих в вашем доме, может и действительно мешает вашему сигналу Wi-Fi, делая его слабым, поэтому устройства сбрасывают его, имеют проблемы с подключением или работают медленно.
Здравствуйте и добро пожаловать в нашу последнюю статью, в которой мы рассмотрим все, что присутствует во многих домах, но очень плохо влияет на ваш сигнал WI-Fi.
Плохое размещение маршрутизатора
Наличие маршрутизатора в плохом положении может иметь очень большое влияние на мощность сигнала WI-Fi и его доступность. Обычно мы не уделяем большого внимания тому, где мы размещаем наш маршрутизатор, но снова и снова было доказано, что близость к определенным объектам действительно оказывает большое влияние на мощность и производительность беспроводного сигнала.
Итак, что это за объекты и плохие позиции, где мы могли бы разместить маршрутизатор и эффективно убить его возможности Wi-Fi?
Рыбные танки
Вода блокирует все радиоволны, включая сигналы Wi-Fi и сами волны, поэтому наличие роутера рядом с аквариумом или любым большим источником воды — плохая идея. Вы всегда должны смотреть на воду как на что-то плохое для вашего Wi-Fi и отодвигать роутер от нее как можно дальше.
Книжные полки
Бумага — еще одна история и пример демпфирующего эффекта радиоволн. Знаете ли вы, что в тихих комнатах и студиях звукозаписи используются различные узоры бумаги, чтобы устранить отражение звука от поверхностей? Ну, помимо поглощения звуковых волн, бумага также поглощает сигналы Wi-Fi, и если у вас есть большая книжная полка с множеством книг, сложенных одна рядом с другой, у вас просто отличная стена поглощения сигнала.
Зеркала
Проблема с зеркалами заключается в их покрытии, которое наносится на стекло, чтобы превратить его в зеркало, это покрытие является металлическим и, как таковое, поглощает сигналы в больших количествах. Если у вас есть старое или качественное зеркало с серебряным покрытием, дела обстоят еще хуже, так как серебро поглотит даже больше волн, чем современные дешевые.
Да, телевизор тоже в этом списке и по той же причине, что и зеркало, хотя у телевизора нет металлического покрытия, у него есть кое-что еще хуже: большое металлическое покрытие на задней панели. Металлическое покрытие обеспечивает структурную целостность телевизора и обеспечивает его защиту от электромагнитных волн, а также предотвращает волны Wi-Fi. Не размещайте маршрутизатор за телевизором.
Вещи, которые влияют на сигналы в домах
Любые металлические украшения.
Теперь, когда мы покрыли зеркала и телевизор из-за того, что они из металла, мы должны взглянуть на сам металл. Любой металлический предмет, который у вас может быть, например, корзины, фигурки, статуи, рамки и т. д., будет эффективно блокировать ваш сигнал.
Кухонная техника и бытовая техника
Кухонная техника, такая как холодильники, микроволновые печи, духовки, плиты и т. д., а также бытовая техника и коммунальные услуги, такие как посудомоечные машины, стиральные машины, сушилки и т. д., представляют собой большие металлические предметы, заключенные в металлическую клетку, которая блокирует дальнейшее распространение сигналов, и не секрет, что по этой причине на большинстве кухонь Wi-Fi слабее.
Домашние тренажерные залы
Это логичный вывод из всего, что было объяснено до сих пор, если у вас дома есть тренажерный зал или небольшой тренажерный зал, он, вероятно, заполнен металлическими весами и зеркалами внутри, все это будет мешать и блокировать сигналы.
Вещи, блокирующие ваш Wi-Fi, которые вы не можете легко контролировать
Стены
Толстые стены будут гасить сигналы, толстые стены из кирпича будут глушить еще больше, а бетонные стены убьют его практически полностью. Любая металлическая арматура внутри стен также ослабит и заглушит сигналы.
Полы и потолок
Это несколько важно, если у вас есть пол под или под комнатой, где находится ваш маршрутизатор, но по той же причине, что стены блокируют ваш сигнальный пол и потолок, тем более, что большую часть времени они сделаны из какой-нибудь более прочный материал, например, бетон с металлическим забором внутри.
Системы отопления
Если у вас есть система отопления, состоящая из металлических радиаторов с водой внутри, то с точки зрения мощности сигнала Wi-Fi у вас есть аквариум, но в металлическом корпусе, и поэтому мощность сигнала сильно снизится.
Что такое Desk365?
Desk 365 — это программа, разработанная компанией 337 Technology Limited, которая многими антивирусами классифицируется как потенциально нежелательное приложение. Хотя технически это не вредоносное ПО, для многих пользователей оно нежелательно, поскольку часто распространяется в виде пакета с другими загрузками. Это позволяет быстро получить доступ к вашим ярлыкам и приложениям. После установки эта программа вставит себя в системный реестр, добавив строки запуска, чтобы позволить ей автоматически запускаться при каждом перезапуске вашей системы. Программное обеспечение добавляет запланированную задачу Windows, чтобы позволить ей снова открываться, даже когда она закрыта. Приложения также получают доступ к Интернету и добавляют правила брандмауэра в вашу систему, которые позволяют ей получать доступ ко всему без ограничений.
Основной исполняемый файл для этого приложения — Dock365.exe. Можно удалить этот файл, предотвращая запуск приложения, но его службы мониторинга и элементы реестра остаются скрытыми внутри вашего компьютера.
Программное обеспечение отправляет информацию о просмотре обратно на свои рекламные серверы, отображая настраиваемые объявления и спонсируемые продукты вместо обычных результатов поиска. А само приложение закрепляется в меню «Пуск» и не может быть удалено.
О потенциально нежелательных приложениях
Как именно выглядят нежелательные программы?
Советы о том, как предотвратить щенков
Что делать, если вы не можете загрузить Safebytes Anti-Malware?
Переключитесь на альтернативный веб-браузер
Установите и запустите антивирус с вашей флешки
Давайте поговорим о SafeBytes Anti-Malware!
Технические детали и удаление вручную (для опытных пользователей)
Вариант 1. Попробуйте запустить средство устранения неполадок питания.
Вариант 2 — Восстановить настройки схемы электропитания по умолчанию вручную
- Снова откройте «Настройки Windows» и выберите «Система».
- Затем прокрутите вниз, пока не увидите параметр «Питание и сон».
- После этого нажмите «Дополнительные параметры питания», расположенные на правой панели, чтобы открыть параметры питания.
- Теперь нажмите на ссылку «Изменить настройки плана» и выберите «Восстановить настройки по умолчанию для этого плана».
Вариант 3. Попробуйте удалить или переустановить драйвер аккумулятора.
Вариант 1. Убедитесь, что службы Защитника Windows запущены.
Вариант 2. Попробуйте изменить некоторые записи в реестре Windows.
Вариант 1. Убедитесь, что вы не находитесь в режиме планшета.
Вариант 2. Переведите компьютер в состояние чистой загрузки.
Вариант 3. Попробуйте переустановить программу.
Вариант 4 — попробуйте запустить проверку системных файлов
Вариант 5 — Запустите инструмент DISM
Вариант 1. Попробуйте удалить содержимое папки «Автоматические назначения».
- Нажмите клавиши Win + R на клавиатуре, чтобы открыть утилиту «Выполнить».
- Затем введите «% AppData% MicrosoftWindowsRecentAutomaticDestination» и нажмите Enter, чтобы открыть это местоположение.
- Оттуда выберите все файлы и нажмите комбинацию клавиш Shift + Delete.
- После этого вы получите приглашение, которое спросит вас, хотите ли вы удалить все файлы навсегда, просто нажмите «Да». Это удалит весь кэш быстрого доступа.
- Теперь проверьте, можете ли вы теперь открыть папку или папку без сообщения «Работа над ней…».
Вариант 2. Попытайтесь восстановить поисковый индекс.
- Сначала откройте параметры индексирования с помощью панели поиска.
- Затем нажмите на соответствующий список, например, папку «Пользователи».
- После этого нажмите кнопку «Дополнительно». Откроется миниатюрное окно и оттуда перейдите на вкладку «Параметры индекса».
- Затем нажмите «Восстановить» в разделе «Устранение неполадок».
- Теперь нажмите кнопку ОК после завершения восстановления. Это должно перестроить поисковый индекс для всех файлов и, таким образом, исправить зафиксированный в сообщении «Работа над ним…» проводник.
Вариант 3. Попробуйте оптимизировать папку для общих элементов.
Вариант 4. Попробуйте выполнить восстановление системы.
Вариант 1. Отключить группировку файлов только в одной папке.
Вариант 2 — отключить группировку файлов во всех папках
Ошибка библиотеки Microsoft Visual C ++
Решения
Причины ошибок
 Причины ошибок
Дополнительная информация и ручной ремонт
Были проблемы с установкой некоторых обновлений, но мы попробуем позже. Если вы продолжаете видеть это и хотите искать информацию в Интернете или обратиться в службу поддержки, это может помочь: 2018-03 Накопительное обновление для Windows 10 версии 1709 для систем на базе x64 (KB4088776) — ошибка 0X800F0900 »
Вариант 1. Попробуйте запустить DISM Tool.
DISM.exe / Online / Cleanup-Image / RestoreHealth / Источник: C: RepairSourceWindows / LimitAccess
Вариант 2. Попробуйте запустить средство проверки системных файлов или сканирование SFC.
Вариант 3. Попробуйте запустить средство устранения неполадок Центра обновления Windows.
Вариант 4. Выполните восстановление системы
Вариант 5 — сбросить папки SoftwareDistribution и Catroot2
net stop wuauserv net start cryptSvc чистые стартовые биты net start msiserver
- После ввода этих команд он остановит службу обновления Windows, фоновую интеллектуальную службу передачи (BITS), криптографию и установщик MSI.
- Затем перейдите в папку C: / Windows / SoftwareDistribution и избавьтесь от всех папок и файлов, нажав клавиши Ctrl + A, чтобы выбрать их все, а затем нажмите «Удалить». Обратите внимание: если файлы уже используются, вы не сможете их удалить.
После сброса папки SoftwareDistribution вам необходимо сбросить папку Catroot2, чтобы перезапустить только что остановленные службы. Для этого выполните следующие действия:
- Введите каждую из следующих команд.
net start wuauserv net start cryptSvc чистые стартовые биты net start msiserver
Источник
- Home
- Loopmidi error code 21
Most Popular Sites That List Loopmidi Error Code 21
Below are 46 working coupons for Loopmidi Error Code 21 from reliable websites that we have updated for users to get maximum savings. Take action now for maximum saving as these discount codes will not valid forever. You can always come back for Loopmidi Error Code 21 because we update all the latest coupons and special deals weekly.
View more
«FAILED to create virtual MIDI port!» / Bug Reports …
Dec 17, 2016 · Re: «FAILED to create virtual MIDI port!» friendo: This so
unds troublesome. The loopMIDI driver powers imitone’s Virtual MIDI, and that driver is developed by Tobias Erichsen—I can’t fix it. Collect any information you can when the driver crashes, and I can send it his way (though I wouldn’t expect a swift response).
View more
1 year ago
329 used Verified
loopMIDI not working with new installation | Cakewalk Forums
Jun 30, 2014 · loopMIDI not working with new installation Current configu
ration: Been using windows 8 64 since the beginning for this audio computer. Sonar 8.5.3, SX2, loopMIDI, loopBe,… working fine Upgraded to 8.1, and then 8.1.1, and all other updates. ALL STILL OK. Had an issue with windows a couple of months ago.
View more
1 year ago
310 used Verified
LoopMidi Issues | Forum
Aug 28, 2014 · Re: LoopMidi Issues. Select the channel you want the notes
to go to, not the MIDI out, before you press play. Otherwise the notes will just go back into the MIDI out and trigger more notes. The input Port number in the Wrapping settings of a plugin wont record to its piano roll anyway. Turn off Auto select linked modules in General settings so …
View more
1 year ago
390 used Verified
Review Reason Codes and Statements | CMS
Aug 10, 2020 · The current review reason codes and statements can be foun
d below: List of Review Reason Codes and Statements. Please email [email protected] for suggesting a topic to be considered as our next set of standardized review result codes and statements. Page Last Modified: 08/10/2020 12:19 PM.
View more
1 year ago
329 used Verified
[SOLVED] Error 21 Code Problem Issue (100% Working …
 Update your Windows Drivers on your PC – Go to the start menu. Search
or go to the … Â Reset TCP/IP (Transmission Control Protocol/Internet Protocol) on your PC – Â Go to the … Â Clear your Internet Browsing Cookies and Caches on your PC – Go to your Browser. Click … Â By assigning DNS Address manually on your Windows PC – Go to the start menu & click … Â Flush the DNS on your Windows PC – Go to the start menu. Search & go to the CMD … Â Change the Internet LAN (Local Area Network) Settings – Check your proxy settings or … Â Reinstall the Network Adapter on your Windows PC – Go to the start menu. Search or go … See full list on techinpost.com
View more
1 year ago
681 used Verified
Setup loopMIDI – Silence and Sound
loopMIDI is required on Windows to create a virtual loopback MIDI port that
Shove will send data to. Your DAW will be configured to listen on this virtual port so Shove can communicate with it. There are alternatives to loopMIDI but it’s freeware and really simple to …
View more
1 year ago
283 used Verified
loopmidi · GitHub Topics · GitHub
Apr 26, 2020 · GitHub is where people build software. More than 50 millio
n people use GitHub to discover, fork, and contribute to over 100 million projects.
View more
1 year ago
170 used Verified
2 Easy steps to remove loopmidi.exe file (works fast)
First Tip How to Stop loopmidi.exe process. Run Asmwsoft Pc Optimizer applic
ation.; Then from main window select «Process Manager» item. wait for few seconds, then after the process list appears scroll down to find loopmidi.exe file you want to delete or stop.; click the loopmidi.exe process file then click the right mouse button then from the list select «Add to the block list».
View more
1 year ago
375 used Verified
loopMIDI | Tobias Erichsen
loopMIDI. Virtual loopback MIDI cable for Windows 7 up to Windows 10, 32 and
64 bit. This software can be used to create virtual loopback MIDI-ports to interconnect applications on Windows that want to open hardware-MIDI-ports for communication. The ports created are unique for each user and only exist while the loopMIDI-application is running.
View more
1 year ago
366 used Verified
A1CNow Troubleshooting
A1CNow PTS Diagnostics, Inc. 3070 POLA4 381933070019 In stock. A1CNow Selfch
eck monitor with 4 test strips provides a fast and easy way of obtaining accurate HbA1c results in the home to help you better manage (or avoid) diabetes. Results in 5 minutes. Manufacturer does not sell test strips separately from monitor. Our Price:$68.35/box.
View more
1 year ago
362 used Verified
How to Repair Error Code 21 | Windows Error Support
Code 21 is a Device Manager error code that appears when you try to use a ha
rdware device attached to your computer and the Windows prohibits you from using it. This is due to the Windows experiences problems loading the device driver. This error message is displayed in the following format: “Windows is removing this device.
View more
1 year ago
323 used Verified
Solved: CHS 435HDC error code Er:21 — Verizon Fios Community
Jan 09, 2013 · Hey — 48 hours after the problem started, I found a fix. U
nplugged ir receivers and rebooted. All set now. plug ir I back in when done.
View more
1 year ago
139 used Verified
Customer Support for Banktivity — IGG Software
Looking for help? We pride ourselves on providing first-class technical supp
ort and customer services. Find support articles, FAQ’s & Live Chat support here.
View more
1 year ago
157 used Verified
Error Codes > Konica-Minolta > bizhub 920 pro > page 2
Code: SC18-20 Description: The locking of the paper lift motor /2 (M20) is d
etected. When M20 is ON, an error detection signal of the M20 is detected. Causes: Paper …
View more
1 year ago
160 used
How to fix Gameloop HTTP Download Error | Error Code 21 …
hi guys aaj ke video m hm bat krne wale hain ke gameloop jo ke ek emulator h
ain jo ke tencent n bnaya hain specially pubg ko P.C m play krne ke leye bnaya ha…
View more
1 year ago
147 used
virtualMIDI | Tobias Erichsen
Since that time it is also possible for individuals to get their own code-si
gning certificate to be able to run their drivers on the 64bit versions of Vista and Windows 7. The driver is currently part of the rtpMIDI-driver network-MIDI driver and the loopMIDI virtual loopback MIDI cable. But it can be used for other tasks as well.
View more
1 year ago
349 used
LoopBe1 — A Free Virtual MIDI Driver — Nerds.de
A Free Virtual MIDI Driver. LoopBe1 is an internal MIDI device for transferr
ing MIDI data between computer programs. Basically LoopBe1 is an «invisible cable» to connect a MIDI outport of an application to any other application´s MIDI inport. All MIDI data sent to the program´s output is channeled to the receiving applications in realtime.
View more
1 year ago
342 used
Solved: Error code 21 — Adobe Support Community — 7098512
Apr 21, 2015 · I finally gave up trouble shooting, Uninstalled the CC app
and then reinstalled it. After reinstalling the CC app the Lightroom app then installed and is now working.
View more
1 year ago
173 used
Top 15 loopMIDI Alternative and Similar Softwares | May …
Top 15 loopMIDI Alternative and Similar Softwares | May 2021. The ports crea
ted are unique for each user and only exist while the loopMIDI-application is running. So if you log-off, the created ports cease to exist. When you close the configuration, the application will not terminate, but rather be minimized to the traybar. When you right-click …
View more
1 year ago
337 used
LG AC Error Codes and Troubleshooting
May 01, 2019 · Fault Code 21: This fault is caused by an over current in
the inverters DC power circuit. If the DC part of the circuit exceeds 14 Amps fault code 21 will be displayed. Fault Code 22: This fault is caused by a Compressor over-current see code 21. Please see section on Inverter testing at the end
View more
1 year ago
323 used
Troubleshooting & Errors | SLING TV Help
Oct 06, 2020 · Troubleshooting & Errors
1 year ago
48 used
LG Split System Air Conditioner Error Codes …
Jun 06, 2017 · My LG mini-split AC system blinks code 21. Pressing the bu
ttons on the remote doesn’t do anything. After turning off the breaker for a minute and turning back on, it runs for 10-15 minutes, but not nearly as cold as it used to be, then shuts off and blinks 21 again. Any ideas? The model is LG lsn307hv3.
View more
1 year ago
323 used
20% off Loopy Cases • 5 Coupons & Promo Codes • May 2021 …
Our members save money by using these loopycases.com discount codes at the c
heckout. Today’s top Loopy Cases offer is 20% Off ; Our best Loopy Cases coupon code will save you 20%; Shoppers have saved an average of $6.64 with our Loopy Cases promo codes; The last time we posted a Loopy Cases discount code was on May 18 2021; Shop Loopy Cases …
View more
1 year ago
328 used
HOW to fix error code 2/20/21/31 in GAMELOOP | GAMELOOP ke …
hey guys mera naam hai ruchir or swagat hai apka mere iss youtube channel le
tusgo science mae . to yaar aaj ki iss video mae mai baat karunga ke kaise aap fi…
View more
1 year ago
144 used
Wireless | T-Mobile Support
Visit T-Mobile Support for help with phones & internet devices, plans & serv
ices, billing, and more!
View more
1 year ago
119 used
Support | Minitab
Product Support. Get started with any of Minitab’s products or learn more ab
out statistical and process improvement concepts. Whether you are new to Minitab products or are an experienced user, explore this area to find the help you need.
View more
1 year ago
267 used
Get Troubleshooting Help | SLING TV Help
If you’re experiencing a technical issue while watching Sling TV, check out
some common troubleshooting steps which should get you back up streaming in no time. common troubleshooting tech help steps ts help technical assistance technical help relaunch app restart device reinstall app update app clear cache check speed
View more
1 year ago
326 used
Roblox
Roblox is ushering in the next generation of entertainment. Imagine, create,
and play together with millions of people across an infinite variety of immersive, user-generated 3D worlds.
View more
1 year ago
225 used
Download loop be internal midi free (Windows)
Download loop be internal midi free. Multimedia tools downloads — LoopBe1 —
Internal MIDI Port by nerds.de GbR and many more programs are available for instant and free download.
View more
1 year ago
179 used
Groceries, Pharmacy, Electronics, Home, Style | Meijer
Discover Meijer’s amazing finds at low prices. Store pickup & delivery optio
ns available for top brands in foods, fashion, electronics, and 40+ departments.
View more
1 year ago
148 used
Can anyone explain exactly how to do MIDI outputs using …
Apr 30, 2020 · Here’s my setup. I suggest you start from scratch and don’
t have any othyer Loopmidi connections to begin with. Create two loopmidi channels, named Metagrid One and Metagrid Two. With Metaserver running, right click on setup and assign Metagrid One to the first slot (Metasystem Midi) and Metagrid Two to the second slot (Cubase)
View more
1 year ago
334 used
Top 10 Digit Discount Code PS4 2021 (May Updated)
May 01, 2021 · Top 10 Digit Discount Code PS4 (May 2021) H9JDFD57MN – 2
5% off for PS4 at PS Store. ctik – For 10% off XGamer glyn bro ur sloppy. shah – use code to improve your creative skills by 75%. Grandma – use code for 20% off when you checkout. D9NGJ7NF3L – 10% off total purchase on US PSN. Equate – Use Code for 10% off any purchase!
View more
1 year ago
353 used
Rejection Codes for 2020, 2021 Tax Returns. Instructions.
Oct 25, 2020 · Rejection Codes For IRS, State Returns If your e-filed a 2
019 or 2020 Tax Return was rejected by the IRS and/or the state tax agency — eFile.com (or any online tax site) does not reject tax returns — please don’t panic over this rejection.
View more
1 year ago
246 used
loopsmidi — Sample Packs | Royalty-Free R&B Samples, Hip …
Sale price$30.00Regular price$40.00Unit price / per. Tax included. Default T
itle. Default Title — $30.00 USD. Quantity. Add to Cart. Full details →.
View more
1 year ago
136 used
UTK Far Infrared Heating Pad – Natural Heat. Amazing Healing.
UTK Far Infrared Heating Pad for Back Pain, 126 Natural Jade Stone Heat Pad
– Medium [21″x31″],6 Level Temp Settings, Auto-shut and Memory Function Rated …
View more
1 year ago
146 used
Paramount + Help Center
Welcome to the Paramount+ Help Center How can we help? Search Articles. Gett
ing Started
View more
1 year ago
110 used
loopMIDI — Baixar (grátis) a versão para Windows
Aug 07, 2010 · LoopMIDI 1.0.16.27 pode ser baixado do nosso site de graç
a. LoopMIDI foi originalmente criado por Tobias Erichsen. O tamanho do arquivo do último pacote de instalação disponível para download é de 7.8 MB. Esse software para PC trabalha bem com as versões 32-bit do Windows XP/Vista/7/8/10.
View more
1 year ago
310 used
Find Savings and Deals at Lowe’s Home Improvement
Whirlpool, Maytag, KitchenAid, Amana, GE, LG, Samsung, Frigidaire, & Electro
lux brands limited to a maximum 10% discount, unless otherwise shown. Some items available via special order only. Offer applies to select items only. See Lowes.com or associate for more details and qualifying items. Valid 05/20/21 — 06/9/21.
View more
1 year ago
315 used
Amazon.com: Firestone WR17602581 Air Command F3 Wireless …
This item: Firestone 2581 Wireless Assembly Kit $439.19. In Stock. Ships fro
m and sold by Amazon.com. FREE Shipping. Details. Firestone 2588 Air Compressor $58.55. Only 4 left in stock — order soon. Ships from and sold by Team Allied Distribution. Malida Pipe Tube Hose Cutter Scissors1/4″ 3/8″ 1/2″ PVC Nylon PU for Water filters Reverse Osmosis …
View more
1 year ago
336 used
Windows 10 KB4565351 and KB4566782 are causing …
Aug 16, 2020 · Windows 10 KB4565351 and KB4566782 are causing installatio
n issues for some users. Microsoft brings the Patch Tuesday updates for all its supported versions of Windows 10 with the purpose of improving the overall operating system. While Patch Tuesday updates are important for everyone running Windows 10 because it includes fixes for critical …
View more
1 year ago
361 used
Electrolux Wash Mach. Code E21- won’t drain water. Believe …
Electrolux Wash Mach. Code E21- won’t drain water. Believe hose may be plugg
ed. MOD-EIFLS60LT0 SER-4C30904889. Manual? Or advice…so I can operate?
View more
1 year ago
132 used
NBA 2K21 Locker Codes List — LockerCodes.io
May 07, 2021 · Possessed, Double Take, Finals, Pantheon, or All-Star Pant
heon Pack. 4/21/21. 4/14/21. 2K21-MAVS-GRIZZ-LK3E5. Luca Doncic Jersey in MyCareer and Amethyst Series 2 Luca Doncic card.
View more
1 year ago
201 used
SAMSUNG_CSC_CODE_LIST — Google Sheets
Conditional f ormatting. A l ternating colors. C lear formatting Ctrl+. Sor
t sheet by column A, A → Z. Sort sheet by column A, Z → A. So r t range by column A, A → Z. Sor t range by column A, Z → A. S ort range. Create a f ilter.
View more
1 year ago
247 used
PGA Tour 2K21 HB-RS [1702] error code workaround: Get …
Aug 21, 2020 · Stevivor is an independent video games outlet that has ser
viced Australia, New Zealand and the world since 2009. We’ve been featured on Google News since 2014, and Apple News, OpenCritic and Metacritic since 2016. We were added to The Game Awards’ jury in 2017 and the Game Critics Awards E3 panel in 2018.
View more
1 year ago
317 used
Please Rate Here
From 2 user
💵 Average Discount: 5.6$
🛍 Amount Of Coupons: 46
🏆 Highest Discount: 25% off
Filter Search
Coupon Type
Other Good Coupons
Loopmidi Error Code 21 — FAQ
Where do I find loopmidi in FL Studio?
Open FL Studio, go to Options → MIDI Setting. Find the loopMIDI you created both in “Input” and “Output” sections.
What is MIDI driver loopbe1?
A Free Virtual MIDI Driver LoopBe1 is an internal MIDI device for transferring MIDI data between computer programs. Basically LoopBe1 is an «invisible cable» to connect a MIDI outport of an application to any other application´s MIDI inport. All MIDI data sent to the program´s output is channeled to the receiving applications in realtime.
How do I activate loop MIDI?
When you right-click on the traybar-icon of loopMIDI, you get an options-menu to either deactivate the application, configure the ports or to activate autostart each time you log on to the computer. This software uses the virtualMIDI driver to actually create the ports.
Where can I find the loopycases coupon code?
Paste the code in the ‘Promo Code’ or ‘Coupon Code’ box on the LoopyCases® checkout page . View your savings and complete the checkout process. How can I contact LoopyCases®?
Top Stores
Tips Not To Miss Any Coupons 24/7
1. Email subscription
To receive coupons and discounts notification, sign up for email list of the retailer.
2. Social media
Check out Facebook, Twitter, Instagram page for upcoming sales and coupon promotions.
3. Coupon sites
You have free access to different coupon sites like isCoupon to search for active discounts.
1. Money saving
The tool filters out the lowest price and the highest discounts available, making purchase decisions easier
than ever.
2. Customized search
Type in search bar whatever product you look for and the tool will show you the best deals
3. Time saving
Not much time wasted for the results. You are just a few clicks away from accurate options for your saving.
-
Don’t Miss Another Deals!
Subscribe to get notification about new coupon!
Latest Blog Posts
How to use loopmidi error code 21
Using coupons can save you hundreds of dollars each month on basic necessities, like household items, food & drinks, entertainment or fashion,…There are a lot of ways to find coupons, but where to find the best coupons. First, you can visit the official retailer website to look for whether they have a promotion program or not. Or you can search on social networks such as Facebook, Instagram, Twitter, YouTube,…If there is any promotion, they often update on there. Or another fast way is to visit our site- isCoupon. On our site, you can find a ton of great coupons from different fields.
What else we have
You won’t find as many coupons on some other sites as isCoupon. Our site offers thousands of coupons from well- known retailers around the world. It’s worth checking out for some of the unique deals and exclusive offers on our site. It is simple to use and often has coupons you can’t find anywhere else. It contains coupons for a variety of items, including grocery, household items, entertainment, food & drink, pet supplies, diapers to shampoo, …Our site is fairly easy to use, too. Simply search by categories, specific brands or store name you are looking for, the massive list of coupons will appear. Then click the box to show the deal or code. Besides, this is a great option for you to refer to some helpful online shopping tips and tricks.
Amazon Coupon Searcher
There are a few ways to get your hands on the best coupons on Amazon. And Amazon Coupon Searcher is considered as the greatest tool that helps you to cut back on costs without cutting down the product quality on Amazon. We have developed this tool to meet all of your demands about discounts and savings. All you have to do is selecting a department or entering your desired item name, Amazon Coupon Searcher will do the rest. Trying this cool tool to get the best price now.
3 простых шага по исправлению ошибок LOOPMIDI.EXE
Подробности файле с именем loopmidi.exe
Очистите мусорные файлы, чтобы исправить loopmidi.exe, которое перестало работать из-за ошибки.
- Запустите приложение Asmwsoft Pc Optimizer.
- Потом из главного окна выберите пункт «Clean Junk Files».
- Когда появится новое окно, нажмите на кнопку «start» и дождитесь окончания поиска.
- потом нажмите на кнопку «Select All».
- нажмите на кнопку «start cleaning».
Очистите реестр, чтобы исправить loopmidi.exe, которое перестало работать из-за ошибки
Как удалить заблокированный файл
- В главном окне Asmwsoft Pc Optimizer выберите инструмент «Force deleter»
- Потом в «force deleter» нажмите «Выбрать файл», перейдите к файлу loopmidi.exe и потом нажмите на «открыть».
- Теперь нажмите на кнопку «unlock and delete», и когда появится подтверждающее сообщение, нажмите «да». Вот и все.
Настройка Windows для исправления критических ошибок loopmidi.exe:
- Нажмите правой кнопкой мыши на «Мой компьютер» на рабочем столе и выберите пункт «Свойства».
- В меню слева выберите » Advanced system settings».
- В разделе «Быстродействие» нажмите на кнопку «Параметры».
- Нажмите на вкладку «data Execution prevention».
- Выберите опцию » Turn on DEP for all programs and services . » .
- Нажмите на кнопку «add» и выберите файл loopmidi.exe, а затем нажмите на кнопку «open».
- Нажмите на кнопку «ok» и перезагрузите свой компьютер.
Как другие пользователи поступают с этим файлом?
Всего голосов ( 203 ), 134 говорят, что не будут удалять, а 69 говорят, что удалят его с компьютера.
Как вы поступите с файлом loopmidi.exe?
Некоторые сообщения об ошибках, которые вы можете получить в связи с loopmidi.exe файлом
- (loopmidi.exe) столкнулся с проблемой и должен быть закрыт. Просим прощения за неудобство.
- (loopmidi.exe) перестал работать.
- loopmidi.exe. Эта программа не отвечает.
- (loopmidi.exe) — Ошибка приложения: the instruction at 0xXXXXXX referenced memory error, the memory could not be read. Нажмитие OK, чтобы завершить программу.
- (loopmidi.exe) не является ошибкой действительного windows-приложения.
- (loopmidi.exe) отсутствует или не обнаружен.
LOOPMIDI.EXE
Проверьте процессы, запущенные на вашем ПК, используя базу данных онлайн-безопасности. Можно использовать любой тип сканирования для проверки вашего ПК на вирусы, трояны, шпионские и другие вредоносные программы.
Источник
Patching Error Code 21
Code 21 — What is it?
Code 21 is a Device Manager error code that appears when you try to use a hardware device attached to your computer and the Windows prohibits you from using it.
This is due to the Windows experiences problems loading the device driver. This error message is displayed in the following format:
Solution
Error Causes
Error code 21 means that Windows is in the device removal process and the device has not been completely removed. It occurs when you set a device to be removed and then select the same device to run on your system.
Upon your instructions, Windows start to remove that device and when you on the other hand try to use/access the same device that you selected for removal, it kicks up Code 21.
Further Information and Manual Repair
If you are experiencing error code 21 on your PC, it is advisable to resolve it immediately.
Though this error will not damage your system, but will significantly lower the performance of your PC which is definitely something you don’t want especially if you work on your computer daily and use it to perform important time-sensitive errands.
To repair and resolve, try the methods given below:
Method 1 — Wait for a Few Seconds and Then Press F5
This is one of the best and easiest ways to resolve code 15 on your system. Wait for a few seconds, and then press the F5 key. This will update the Device Manager view and the error will most probably go away.
Method 2 — Restart Your PC
Sometimes error codes may pop up due to temporary glitches. To resolve such errors, a simple reboot of your PC is enough. Shut down Windows and then restart your system.
This is most likely to resolve Code 21. However, if the error still persists then this means the underlying problem for code 21 is deeper than you think. Try method 3 to resolve.
Method 3 — Install DriverFIX
As mentioned earlier, the error code 21 may occur if you have selected a device to remove and then you try to reuse it.
To resolve, you may have to install the device again and the driver for that the reinstalled device. To reinstall the driver without any hassle, simply download DriverFIX.
It is a smart, user-friendly, and intuitive software program designed to resolve driver problems. The program is embedded with intelligent device identification technology which:
- Automatically detects all the appropriate system drivers
- Matches them with the latest available versions
- And then updates drivers according to their compatible versions on a regular basis
Furthermore, it enables accurate installation and ensures that your system is running at its optimal speed.
Other features that this program boasts are full backup and restoration, safe USB management, and ejection.
If nothing works, you can try the full backup and restoration feature and restore your PC to its previous state when it was functioning properly before the error occurred.
DriverFIX creates a backup of all your files and data hedging keeps you from disasters like data loss. It restores the system to the time when it was working properly.
Click here to download DriverFIX on your system and resolve error code 21 today.
Advanced System Repair Pro
Share this article:
You might also like
Option 1 – Disable GWXUX in the Task Scheduler
Option 2 – Uninstall the KB3035583 Windows Update
- To uninstall the KB3035583 Windows Update, you need to go to Control Panel, and for you to do that, type “control panel” in the Cortana Search box.
- After that, click on Control Panel from the related search results given.
- Once Control Panel is pulled up, search for “View Installed Updates” in the search field from the top right part of the window.
- Next, click on a link labeled, “View Installed Updates” under the Programs and Features menu.
- After clicking the link, you will see the list of all the installed updates in your computer from the Windows Updates.
- Now look for an update named “KB3035583” and select it.
- You should notice the Uninstall button located at the top portion of the sub-menu ribbon as you can see on the snippet below. Click on that button to uninstall the KB3035583 Windows Update.
- After uninstalling the update, make sure to restart your computer to apply the changes made.
Option 3 – Try using the System File Checker
Option 1 – Try to clear browser cache
- Open your Google Chrome browser.
- After that, tap the Ctrl + H keys. Doing so will open a new panel that allows you to delete the browsing history and other data in your browser.
- Now select every checkbox that you see and click on the Clear data button.
- Then restart your Chrome browser and check if you can now complete the download again.
Option 2 – Try to delete the cache files for Google Chrome
Option 3 – Try allowing Google Chrome to keep local data
Option 4 – Try to enable the setting that offers to save password
Option 5 – Try to create a new profile for Chrome
Option 6 – Reset Chrome
Option 7 – Try to clean reinstall Chrome
Solution
Error Causes
Further Information and Manual Repair
1. Run Few Programs at a Time
2. Increase the Virtual Memory Size
3. Install More RAM
4. Download and Run Restoro, Registry Cleaner on your System
YourTemplateFinder is a browser extension developed by Mindspark for Google Chrome. This extension allows users to browse and download various templates that can be used for all kinds of occasions.
When installed, it changes your default search engine and home page to MyWay.com. During your browsing sessions, YourTemplateFinder will monitor user activity, recording website visits, user information, product purchases, etc. This data is later used to target better ads to users.
While browsing the internet with this extension active you will see additional ads displayed throughout your browsing sessions. Sponsored content such as links, banners, and pop-up ads will appear on websites sometimes even covering the website content.
This extension has been marked for removal by several anti-virus applications and has been classified as a Browser Hijacker due to its aggressive behavior and ad injections. It is flagged for optional removal.
Источник
Loopmidi Error Code 21
Most Popular Sites That List Loopmidi Error Code 21
Below are 46 working coupons for Loopmidi Error Code 21 from reliable websites that we have updated for users to get maximum savings. Take action now for maximum saving as these discount codes will not valid forever. You can always come bac k for Loopmidi Error Code 21 because we update all the latest coupons and special deals weekly. View more
«FAILED to create virtual MIDI port!» / Bug Reports .
Dec 17, 2016 · Re: «FAILED to create virtual MIDI port!» friendo: This so
unds troublesome. The loopMIDI driver powers imitone’s Virtual MIDI, and that driver is developed by Tobias Erichsen—I can’t fix it. Collect any information you can when the driver crashes, and I can send it his way (though I wouldn’t expect a swift response).
loopMIDI not working with new installation | Cakewalk Forums
Jun 30, 2014 · loopMIDI not working with new installation Current configu
ration: Been using windows 8 64 since the beginning for this audio computer. Sonar 8.5.3, SX2, loopMIDI, loopBe. working fine Upgraded to 8.1, and then 8.1.1, and all other updates. ALL STILL OK. Had an issue with windows a couple of months ago.
LoopMidi Issues | Forum
Aug 28, 2014 · Re: LoopMidi Issues. Select the channel you want the notes
to go to, not the MIDI out, before you press play. Otherwise the notes will just go back into the MIDI out and trigger more notes. The input Port number in the Wrapping settings of a plugin wont record to its piano roll anyway. Turn off Auto select linked modules in General settings so .
Review Reason Codes and Statements | CMS
Aug 10, 2020 · The current review reason codes and statements can be foun
d below: List of Review Reason Codes and Statements. Please email [email protected] for suggesting a topic to be considered as our next set of standardized review result codes and statements. Page Last Modified: 08/10/2020 12:19 PM.
[SOLVED] Error 21 Code Problem Issue (100% Working .
 Update your Windows Drivers on your PC – Go to the start menu. Search
or go to the … Â Reset TCP/IP (Transmission Control Protocol/Internet Protocol) on your PC – Â Go to the … Â Clear your Internet Browsing Cookies and Caches on your PC – Go to your Browser. Click … Â By assigning DNS Address manually on your Windows PC – Go to the start menu & click … Â Flush the DNS on your Windows PC – Go to the start menu. Search & go to the CMD … Â Change the Internet LAN (Local Area Network) Settings – Check your proxy settings or … Â Reinstall the Network Adapter on your Windows PC – Go to the start menu. Search or go … See full list on techinpost.com
Setup loopMIDI – Silence and Sound
loopMIDI is required on Windows to create a virtual loopback MIDI port that
Shove will send data to. Your DAW will be configured to listen on this virtual port so Shove can communicate with it. There are alternatives to loopMIDI but it’s freeware and really simple to …
loopmidi · GitHub Topics · GitHub
Apr 26, 2020 · GitHub is where people build software. More than 50 millio
n people use GitHub to discover, fork, and contribute to over 100 million projects.
2 Easy steps to remove loopmidi.exe file (works fast)
First Tip How to Stop loopmidi.exe process. Run Asmwsoft Pc Optimizer applic
ation.; Then from main window select «Process Manager» item. wait for few seconds, then after the process list appears scroll down to find loopmidi.exe file you want to delete or stop.; click the loopmidi.exe process file then click the right mouse button then from the list select «Add to the block list».
loopMIDI | Tobias Erichsen
loopMIDI. Virtual loopback MIDI cable for Windows 7 up to Windows 10, 32 and
64 bit. This software can be used to create virtual loopback MIDI-ports to interconnect applications on Windows that want to open hardware-MIDI-ports for communication. The ports created are unique for each user and only exist while the loopMIDI-application is running.
A1CNow Troubleshooting
A1CNow PTS Diagnostics, Inc. 3070 POLA4 381933070019 In stock. A1CNow Selfch
eck monitor with 4 test strips provides a fast and easy way of obtaining accurate HbA1c results in the home to help you better manage (or avoid) diabetes. Results in 5 minutes. Manufacturer does not sell test strips separately from monitor. Our Price:$68.35/box.
How to Repair Error Code 21 | Windows Error Support
Code 21 is a Device Manager error code that appears when you try to use a ha
rdware device attached to your computer and the Windows prohibits you from using it. This is due to the Windows experiences problems loading the device driver. This error message is displayed in the following format: “Windows is removing this device.
Solved: CHS 435HDC error code Er:21 — Verizon Fios Community
Jan 09, 2013 · Hey — 48 hours after the problem started, I found a fix. U
nplugged ir receivers and rebooted. All set now. plug ir I back in when done.
Customer Support for Banktivity — IGG Software
Looking for help? We pride ourselves on providing first-class technical supp
ort and customer services. Find support articles, FAQ’s & Live Chat support here.
Error Codes > Konica-Minolta > bizhub 920 pro > page 2
Code: SC18-20 Description: The locking of the paper lift motor /2 (M20) is d
etected. When M20 is ON, an error detection signal of the M20 is detected. Causes: Paper .
How to fix Gameloop HTTP Download Error | Error Code 21 .
hi guys aaj ke video m hm bat krne wale hain ke gameloop jo ke ek emulator h
ain jo ke tencent n bnaya hain specially pubg ko P.C m play krne ke leye bnaya ha.
virtualMIDI | Tobias Erichsen
Since that time it is also possible for individuals to get their own code-si
gning certificate to be able to run their drivers on the 64bit versions of Vista and Windows 7. The driver is currently part of the rtpMIDI-driver network-MIDI driver and the loopMIDI virtual loopback MIDI cable. But it can be used for other tasks as well.
LoopBe1 — A Free Virtual MIDI Driver — Nerds.de
A Free Virtual MIDI Driver. LoopBe1 is an internal MIDI device for transferr
ing MIDI data between computer programs. Basically LoopBe1 is an «invisible cable» to connect a MIDI outport of an application to any other application´s MIDI inport. All MIDI data sent to the program´s output is channeled to the receiving applications in realtime.
Solved: Error code 21 — Adobe Support Community — 7098512
Apr 21, 2015 · I finally gave up trouble shooting, Uninstalled the CC app
and then reinstalled it. After reinstalling the CC app the Lightroom app then installed and is now working.
Top 15 loopMIDI Alternative and Similar Softwares | May .
Top 15 loopMIDI Alternative and Similar Softwares | May 2021. The ports crea
ted are unique for each user and only exist while the loopMIDI-application is running. So if you log-off, the created ports cease to exist. When you close the configuration, the application will not terminate, but rather be minimized to the traybar. When you right-click .
LG AC Error Codes and Troubleshooting
May 01, 2019 · Fault Code 21: This fault is caused by an over current in
the inverters DC power circuit. If the DC part of the circuit exceeds 14 Amps fault code 21 will be displayed. Fault Code 22: This fault is caused by a Compressor over-current see code 21. Please see section on Inverter testing at the end
Troubleshooting & Errors | SLING TV Help
Oct 06, 2020 · Troubleshooting & Errors
LG Split System Air Conditioner Error Codes .
Jun 06, 2017 · My LG mini-split AC system blinks code 21. Pressing the bu
ttons on the remote doesn’t do anything. After turning off the breaker for a minute and turning back on, it runs for 10-15 minutes, but not nearly as cold as it used to be, then shuts off and blinks 21 again. Any ideas? The model is LG lsn307hv3.
20% off Loopy Cases • 5 Coupons & Promo Codes • May 2021 .
Our members save money by using these loopycases.com discount codes at the c
heckout. Today’s top Loopy Cases offer is 20% Off ; Our best Loopy Cases coupon code will save you 20%; Shoppers have saved an average of $6.64 with our Loopy Cases promo codes; The last time we posted a Loopy Cases discount code was on May 18 2021; Shop Loopy Cases .
HOW to fix error code 2/20/21/31 in GAMELOOP | GAMELOOP ke .
hey guys mera naam hai ruchir or swagat hai apka mere iss youtube channel le
tusgo science mae . to yaar aaj ki iss video mae mai baat karunga ke kaise aap fi.
Wireless | T-Mobile Support
Visit T-Mobile Support for help with phones & internet devices, plans & serv
ices, billing, and more!
Support | Minitab
Product Support. Get started with any of Minitab’s products or learn more ab
out statistical and process improvement concepts. Whether you are new to Minitab products or are an experienced user, explore this area to find the help you need.
Get Troubleshooting Help | SLING TV Help
If you’re experiencing a technical issue while watching Sling TV, check out
some common troubleshooting steps which should get you back up streaming in no time. common troubleshooting tech help steps ts help technical assistance technical help relaunch app restart device reinstall app update app clear cache check speed
Roblox
Roblox is ushering in the next generation of entertainment. Imagine, create,
and play together with millions of people across an infinite variety of immersive, user-generated 3D worlds.
Download loop be internal midi free (Windows)
Download loop be internal midi free. Multimedia tools downloads — LoopBe1 —
Internal MIDI Port by nerds.de GbR and many more programs are available for instant and free download.
Groceries, Pharmacy, Electronics, Home, Style | Meijer
Discover Meijer’s amazing finds at low prices. Store pickup & delivery optio
ns available for top brands in foods, fashion, electronics, and 40+ departments.
Can anyone explain exactly how to do MIDI outputs using .
Apr 30, 2020 · Here’s my setup. I suggest you start from scratch and don’
t have any othyer Loopmidi connections to begin with. Create two loopmidi channels, named Metagrid One and Metagrid Two. With Metaserver running, right click on setup and assign Metagrid One to the first slot (Metasystem Midi) and Metagrid Two to the second slot (Cubase)
Top 10 Digit Discount Code PS4 2021 (May Updated)
May 01, 2021 · Top 10 Digit Discount Code PS4 (May 2021) H9JDFD57MN – 2
5% off for PS4 at PS Store. ctik – For 10% off XGamer glyn bro ur sloppy. shah – use code to improve your creative skills by 75%. Grandma – use code for 20% off when you checkout. D9NGJ7NF3L – 10% off total purchase on US PSN. Equate – Use Code for 10% off any purchase!
Rejection Codes for 2020, 2021 Tax Returns. Instructions.
Oct 25, 2020 · Rejection Codes For IRS, State Returns If your e-filed a 2
019 or 2020 Tax Return was rejected by the IRS and/or the state tax agency — eFile.com (or any online tax site) does not reject tax returns — please don’t panic over this rejection.
loopsmidi — Sample Packs | Royalty-Free R&B Samples, Hip .
Sale price$30.00Regular price$40.00Unit price / per. Tax included. Default T
itle. Default Title — $30.00 USD. Quantity. Add to Cart. Full details →.
UTK Far Infrared Heating Pad – Natural Heat. Amazing Healing.
UTK Far Infrared Heating Pad for Back Pain, 126 Natural Jade Stone Heat Pad
– Medium [21″x31″],6 Level Temp Settings, Auto-shut and Memory Function Rated …
Paramount + Help Center
Welcome to the Paramount+ Help Center How can we help? Search Articles. Gett
loopMIDI — Baixar (grátis) a versão para Windows
Aug 07, 2010 · LoopMIDI 1.0.16.27 pode ser baixado do nosso site de graç
a. LoopMIDI foi originalmente criado por Tobias Erichsen. O tamanho do arquivo do último pacote de instalação disponível para download é de 7.8 MB. Esse software para PC trabalha bem com as versões 32-bit do Windows XP/Vista/7/8/10.
Find Savings and Deals at Lowe’s Home Improvement
Whirlpool, Maytag, KitchenAid, Amana, GE, LG, Samsung, Frigidaire, & Electro
lux brands limited to a maximum 10% discount, unless otherwise shown. Some items available via special order only. Offer applies to select items only. See Lowes.com or associate for more details and qualifying items. Valid 05/20/21 — 06/9/21.
Amazon.com: Firestone WR17602581 Air Command F3 Wireless .
This item: Firestone 2581 Wireless Assembly Kit $439.19. In Stock. Ships fro
m and sold by Amazon.com. FREE Shipping. Details. Firestone 2588 Air Compressor $58.55. Only 4 left in stock — order soon. Ships from and sold by Team Allied Distribution. Malida Pipe Tube Hose Cutter Scissors1/4″ 3/8″ 1/2″ PVC Nylon PU for Water filters Reverse Osmosis .
Windows 10 KB4565351 and KB4566782 are causing .
Aug 16, 2020 · Windows 10 KB4565351 and KB4566782 are causing installatio
n issues for some users. Microsoft brings the Patch Tuesday updates for all its supported versions of Windows 10 with the purpose of improving the overall operating system. While Patch Tuesday updates are important for everyone running Windows 10 because it includes fixes for critical .
Electrolux Wash Mach. Code E21- won’t drain water. Believe .
Electrolux Wash Mach. Code E21- won’t drain water. Believe hose may be plugg
ed. MOD-EIFLS60LT0 SER-4C30904889. Manual? Or advice. so I can operate?
NBA 2K21 Locker Codes List — LockerCodes.io
May 07, 2021 · Possessed, Double Take, Finals, Pantheon, or All-Star Pant
heon Pack. 4/21/21. 4/14/21. 2K21-MAVS-GRIZZ-LK3E5. Luca Doncic Jersey in MyCareer and Amethyst Series 2 Luca Doncic card.
SAMSUNG_CSC_CODE_LIST — Google Sheets
Conditional f ormatting. A l ternating colors. C lear formatting Ctrl+. Sor
t sheet by column A, A → Z. Sort sheet by column A, Z → A. So r t range by column A, A → Z. Sor t range by column A, Z → A. S ort range. Create a f ilter.
PGA Tour 2K21 HB-RS [1702] error code workaround: Get .
Aug 21, 2020 · Stevivor is an independent video games outlet that has ser
viced Australia, New Zealand and the world since 2009. We’ve been featured on Google News since 2014, and Apple News, OpenCritic and Metacritic since 2016. We were added to The Game Awards’ jury in 2017 and the Game Critics Awards E3 panel in 2018.
Please Rate Here
💵 Average Discount: 5.6$
🛍 Amount Of Coupons: 46
🏆 Highest Discount: 25% off
Filter Search
Coupon Type
Other Good Coupons
Loopmidi Error Code 21 — FAQ
Where do I find loopmidi in FL Studio?
Open FL Studio, go to Options → MIDI Setting. Find the loopMIDI you created both in “Input” and “Output” sections.
What is MIDI driver loopbe1?
A Free Virtual MIDI Driver LoopBe1 is an internal MIDI device for transferring MIDI data between computer programs. Basically LoopBe1 is an «invisible cable» to connect a MIDI outport of an application to any other application´s MIDI inport. All MIDI data sent to the program´s output is channeled to the receiving applications in realtime.
How do I activate loop MIDI?
When you right-click on the traybar-icon of loopMIDI, you get an options-menu to either deactivate the application, configure the ports or to activate autostart each time you log on to the computer. This software uses the virtualMIDI driver to actually create the ports.
Where can I find the loopycases coupon code?
Paste the code in the ‘Promo Code’ or ‘Coupon Code’ box on the LoopyCases® checkout page . View your savings and complete the checkout process. How can I contact LoopyCases®?
Top Stores
Tips Not To Miss Any Coupons 24/7
1. Email subscription
To receive coupons and discounts notification, sign up for email list of the retailer.
Check out Facebook, Twitter, Instagram page for upcoming sales and coupon promotions.
You have free access to different coupon sites like isCoupon to search for active discounts.
Full advantages of Amazon Discount Hunter.
 Full advantages of Amazon Discount Hunter.
The tool filters out the lowest price and the highest discounts available, making purchase decisions easier than ever.
2. Customized search
Type in search bar whatever product you look for and the tool will show you the best deals
Not much time wasted for the results. You are just a few clicks away from accurate options for your saving.
Popular Searched
Recently Searched

Don’t Miss Another Deals!
Subscribe to get notification about new coupon!
Latest Blog Posts

5 Tips for Christmas Shopping this Year
As the Christmas season approaches, it is time to start thinking about what you would like to get for that special someone in your life.

Can Chromecast go on any TV?
Even if your TV is not android, this little gadget can turn your normal screen into a smart TV. Chromecast is the creation of Google Inc.

Nike Increased Discount to 20% for Healthcare Workers
Doctors, nurses, and other medical healthcare workers receive different discounts and offers from different brands.

Difference between Shopping Vouchers and Coupons
The difference between a discount shopping voucher and a coupon is that the former will no longer have the same value.

How to Wear Long Coats for Men?
The long coat can make you look more elegant and classic but you need to wear it correctly. Here is how to wear it.

Earphones vs Earbuds vs Headphones- What’s the Difference
For music lovers, every music gadget has a different value and application. The same goes for the use of earbuds, earphones, and headphones.
How to use loopmidi error code 21
Using coupons can save you hundreds of dollars each month on basic necessities, like household items, food & drinks, entertainment or fashion. There are a lot of ways to find coupons, but where to find the best coupons. First, you can visit the official retailer website to look for whether they have a promotion program or not. Or you can search on social networks such as Facebook, Instagram, Twitter, YouTube. If there is any promotion, they often update on there. Or another fast way is to visit our site- isCoupon. On our site, you can find a ton of great coupons from different fields.
What else we have
You won’t find as many coupons on some other sites as isCoupon. Our site offers thousands of coupons from well- known retailers around the world. It’s worth checking out for some of the unique deals and exclusive offers on our site. It is simple to use and often has coupons you can’t find anywhere else. It contains coupons for a variety of items, including grocery, household items, entertainment, food & drink, pet supplies, diapers to shampoo, . Our site is fairly easy to use, too. Simply search by categories, specific brands or store name you are looking for, the massive list of coupons will appear. Then click the box to show the deal or code. Besides, this is a great option for you to refer to some helpful online shopping tips and tricks.
Amazon Coupon Searcher
There are a few ways to get your hands on the best coupons on Amazon. And Amazon Coupon Searcher is considered as the greatest tool that helps you to cut back on costs without cutting down the product quality on Amazon. We have developed this tool to meet all of your demands about discounts and savings. All you have to do is selecting a department or entering your desired item name, Amazon Coupon Searcher will do the rest. Trying this cool tool to get the best price now.
Источник
Code 21 — What is it?
Code 21 is a Device Manager error code that appears when you try to use a hardware device attached to your computer and the Windows prohibits you from using it.
This is due to the Windows experiences problems loading the device driver. This error message is displayed in the following format:
“Windows is removing this device. (Code 21)”
Solution
 Error Causes
Error code 21 means that Windows is in the device removal process and the device has not been completely removed. It occurs when you set a device to be removed and then select the same device to run on your system.
Upon your instructions, Windows start to remove that device and when you on the other hand try to use/access the same device that you selected for removal, it kicks up Code 21.
Further Information and Manual Repair
If you are experiencing error code 21 on your PC, it is advisable to resolve it immediately.
Though this error will not damage your system, but will significantly lower the performance of your PC which is definitely something you don’t want especially if you work on your computer daily and use it to perform important time-sensitive errands.
To repair and resolve, try the methods given below:
Method 1 — Wait for a Few Seconds and Then Press F5
This is one of the best and easiest ways to resolve code 15 on your system. Wait for a few seconds, and then press the F5 key. This will update the Device Manager view and the error will most probably go away.
Method 2 — Restart Your PC
Sometimes error codes may pop up due to temporary glitches. To resolve such errors, a simple reboot of your PC is enough. Shut down Windows and then restart your system.
This is most likely to resolve Code 21. However, if the error still persists then this means the underlying problem for code 21 is deeper than you think. Try method 3 to resolve.
Method 3 — Install DriverFIX
As mentioned earlier, the error code 21 may occur if you have selected a device to remove and then you try to reuse it.
To resolve, you may have to install the device again and the driver for that the reinstalled device. To reinstall the driver without any hassle, simply download DriverFIX.
It is a smart, user-friendly, and intuitive software program designed to resolve driver problems. The program is embedded with intelligent device identification technology which:
- Automatically detects all the appropriate system drivers
- Matches them with the latest available versions
- And then updates drivers according to their compatible versions on a regular basis
Furthermore, it enables accurate installation and ensures that your system is running at its optimal speed.
Other features that this program boasts are full backup and restoration, safe USB management, and ejection.
If nothing works, you can try the full backup and restoration feature and restore your PC to its previous state when it was functioning properly before the error occurred.
DriverFIX creates a backup of all your files and data hedging keeps you from disasters like data loss. It restores the system to the time when it was working properly.
Click here to download DriverFIX on your system and resolve error code 21 today.
Advanced System Repair Pro
One-click automated PC repair solution
![]()
With Advanced System Repair Pro you can easily
DOWNLOAD
Advanced System Repair Pro is compatible with all versions of Microsoft Windows including Windows 11
Share this article:
You might also like
0x800ccc92 — What is it?
The 0x800ccc92 is a Microsoft Outlook error. The error restricts your ability to send and receive emails on your Outlook email address successfully. This error is very similar to 0x800cc90 and 0x800ccc91 Outlook error codes.
The 0x800ccc92 error message is often displayed as:
‘Receiving reported error (0x800ccc92): Your email server rejected your login.’
This error is quite common and is faced by many Microsoft Outlook users. It is advisable to fix this error immediately because besides restricting you from sending and receiving emails via Outlook, due to this error the data on your Outlook also becomes inaccessible and unreadable, and sometimes Outlook also begins to freeze unexpectedly.
Error Causes
Some of the most common causes of the error code 0x800ccc92 are:
- PST files get corrupt
- Incorrect Outlook configuration settings
- PST file crosses its fixed file size limit
- Failure of POP3 and Protocol STMP in database server connection
- Improper synchronization between Outlook and the server
- Usage of invalid password or username
- Virus Infection
Further Information and Manual Repair
Any of the above causes may result in the 0x800ccc92 error message display. If you encounter this Outlook error, you don’t need to panic and call the network personnel in your office to fix and repair the error. In fact, it is very easy to fix and you can repair it by yourself:
Here are some of the best and easy ways to resolve this error in the shortest time:
- If the error message 0x0800ccc92 is displayed as POP3: Invalid Password, then in this case it is advisable to cross-check your Outlook account ID and password. Sometimes this error message may pop up if you insert an incorrect password or ID. Therefore the best way to resolve it to check where you went wrong and then re-enter your ID and Password correctly.
If the error is not related to POP3 (Post Office Protocol) then you can try some other alternative to resolve this issue.
- Another alternative is to install the latest available Server Service Pack for Exchange. This solution works best if compatibility is the issue.
- However, when nothing works, then it is advisable to download PST repair tool. The PST repair software is designed to scan, detect, repair, and resolve Outlook errors like 0x800ccc92. The PST repair software is built with special algorithms that help repair PST corrupt files in seconds. This tool works on all Windows Operating Systems including Windows 8, Windows 7, Windows Vista, Windows XP, Windows 2003, and Windows 2008.
- All you need to do is, download and install this software on your system.
- Once you download it, run it on your PC to detect errors.
- Press scan to get started
- The scanning may take about a couple of minutes to complete.
- Once it is complete, click on the repair tab to fix the errors.
- Now restart your Outlook again and now try sending emails. This solution is likely to work if the above-mentioned solutions don’t.
Read More
Keeping your system updated is a must and Windows updates are definitely a great way to do that. These updates are essential since they provide important security and various fixes for bugs in your Windows 10 computer. However, there are plenty of instances when you encounter issues with Windows Updates and one of them is when the Windows Updates turn off automatically at random times.
Some users reported that they saw a notification about Windows Updates being turned off. Note that the issue is not with the update itself since many users turned on the Windows Update and the system was properly updated. The issue is that the Windows Updates turned off all by itself.
There could be several reasons why the Windows Updates turned off by themselves. It could be due to the antivirus program installed on your computer. Antivirus programs are known to cause issues with other programs, Windows updates components included. This can occur due to false positives as well as odd compatibility issues. Aside from antivirus programs, the Windows Update service itself could also be the root cause of the problem. There could be a corrupted file in the Windows Update folder or it could be that the Windows Update service wasn’t started properly. Any of these issues can be resolved by following the troubleshooting options given below. Make sure to follow each one of them carefully for better results.
Option 1 – Try to disable your antivirus program
Disabling the antivirus program or any security software installed in your computer is always a good idea you can try when the Windows Update process does not go smoothly. So before you try updating your computer again, make sure to disable the antivirus or security program and once the Windows Update is done, don’t forget to enable the antivirus program back again.
Option 2 – Try to make some changes in the Registry
- Tap the Wins key once and type in “command prompt” in the field.
- From the search results, right-click on Command Prompt and select the “Run as administrator” option to run it with admin privileges.
- Next, type the following command and tap Enter:
reg add «HKEY_LOCAL_MACHINESOFTWAREMicrosoftWindowsCurrentVersionWindowsUpdateAuto Update» /v AUOptions /t REG_DWORD /d 0 /f
- After that, type the following command and hit Enter again:
sc config wuauserv start= auto
The command you entered will set the Windows Update to auto so you should be good to go.
Option 3 – Try to reset the Windows Update components
If by any chance that the second option didn’t work, resetting the Windows Update components could also help you resolve the problem. How? Refer to the following steps:
- Open Command Prompt with admin privileges.
- After that, type each one of the following commands and hit Enter after you key in one after the other.
- net stop wuauserv
- net stop cryptsvc
- net stop bits
- net stop msiserver
Note: The commands you entered will stop the Windows Update components such as Windows Update service, Cryptographic services, BITS, and MSI Installer.
- After disabling WU components, you need to rename both the SoftwareDistribution and Catroot2 folders. To do that, type each one of the following commands below, and don’t forget to hit Enter after you type one command after the other.
- ren C:WindowsSoftwareDistribution SoftwareDistribution.old
- ren C:WindowsSystem32catroot2 Catroot2.old
- Next, restart the services you’ve stopped by entering another series of commands. Don’t forget to hit Enter after you key in one command after the other.
- net start wuauserv
- net start cryptsvc
- net start bits
- net start msiserver
- Close Command Prompt and reboot your PC.
Option 4 – Run the Windows Update Troubleshooter
Running the built-in Windows Update troubleshooter is one of the things you can first check out as it is known to automatically resolve any Windows Update errors. To run it, go to Settings and then select Troubleshoot from the options. From there, click on Windows Update and then click the “Run the troubleshooter” button. After that, follow the next on-screen instructions and you should be good to go.
Read More
Today most users have an SSD drive, times have changed and SSD has become your typical computer equipment.
A lot of time has passed from the first SSD hard drives up to today and technology has evolved and improved but still, there are some cool tricks and tips to speed up and extend the lifespan of your SSD hard drive.
That being said let us dive right into what I would like to call the essentials of having an SSD hard drive.
-
Keep your SSD firmware up to date.
This one really is a no-brainer, keeping your firmware updated at all times will ensure longer life and SSD stability. The trick here is that each SSD manufacturer has its own ways of updating firmware so this is not something universal, you will have to go to the official website of your SSD manufacturer and get firmware updates and instructions from them directly.
-
Enable ACHI.
Advanced controller host interface or short ACHI is a feature that will ensure that your Windows will support all of the features that come with running SSD on your computer. It controls the TRIM feature which is crucial in helping Windows itself in its garbage collection on your hard drive. In order to enable ACHI, you will have to do it from your BIOS and it would be very good if the feature is enabled before Windows itself is installed so it can take full advantage of it.
-
Enable TRIM.
TRIM feature is vital in extending your SSD lifespan and it should be enabled by default in Windows but you can never be too cautious and double-check and enable if needed. To make sure it is enabled, open your command prompt and type in: fsutil behavior set disabledeletenotify 0
-
Make sure your system restore is enabled.
In the first SSD days, system restore was really a feature that you wanted to be disabled in order to prevent and extend the life span of your SSD drive, but we came a long way from there and today there is no reason to keep this feature turned off since it can be helping many ways with both your system and SSD.
-
Disable Indexing in Windows.
A large portion of the speed of your SSD drive is used for indexing files in Windows. Of course, the indexing feature is great if you store everything on your SSD drive but if by any chance you have another drive for your backup, pictures, music, etc. it would be highly beneficial for you to turn it off on your SSD. To turn indexing off click on your start menu, click on the computer. Right-click on your SSD and then click on properties. De-select box that says: Allow files to have contents indexed in addition to file properties and click OK. Once you do this the operating system will apply this to all the files and folders on the drive. If you see a dialog telling you that it couldn’t remove a file from the index, click Ignore All.
-
Keep Windows defrag ON.
This also was the option in early SSD days which was better to be OFF, but as said before since technology has been making progress and Windows has been improved and made aware of SSD drives, defrag has evolved as well, and now it is more of optimization tool then defragmenter which was once.
-
Disable Prefetch and Superfetch.
Windows is placing information in both physical and virtual memory for applications that you are not currently using but they are used often in order to speed their response time. If you are running low on space or having struggles with virtual memory it would be best to turn them both off. Go to registry manager and find: HKEY_LOCAL_MACHINESYSTEMCurrentControlSetControlSession ManagerMemory ManagementPrefetchParameters, there you have 2 values: EnablePrefetcher and EnableSuperfetch, set both values to 0.
-
Disable Search and Superfetch services.
Disabling Superfetch in the registry is not all work, Press WINDOWS + R to bring run dialog, type in it services.msc, Find both Search and Superfetch and disable them.
-
Configure Write Caching.
Write caching can be enabled and disabled in the device manager by expanding disk drives, right-clicking on SSD, then click properties, select the policies tab. In the tab, there is the option to Enable write caching on the device. Now trick in this is that you will need to try and benchmark your SSD with both options turned ON and OFF since different manufacturers have different performances with this option being ON or OFF.
-
Disable CleanPageFileAtShutdown and LargeSystemCache.
Page file and a large cache of page files are not something that we longer need, since SSD writes with great speed in its flash memory both of these options can be disabled and you will both speed up shut down the process of your system and save some SSD life since page files will not be written. Find both options in the registry under the key: ComputerHKEY_LOCAL_MACHINESYSTEMCurrentControlSetControlSession ManagerMemory Management set both to 0
-
Set high performance in Power options.
This option in power management will prevent your SSD from constantly shutting down and bringing it up increasing speed without sacrificing its life span.
These are tips and tricks for having great and longer life as well as speed for your SSD drive. We hope that you have found them useful and that you will come again to check new articles published daily for easier IT life.
Read More
What is Error Code 31?
Device Manager Error Code 31 pops up when Windows prevents the driver for a particular hardware device from loading. The error code 31 is almost always presented in the following format:
“This device is not working properly because Windows cannot load the drivers required for this device.” Code 31
This error can occur with any hardware device; however, in most cases, it occurs with Ethernet cards. The good news is that it belongs in the easy-to-resolve category. So repairing it should not be difficult.
Solution
Error Causes
Error code 31 is related to driver problems, and the most common causes include:
- Outdated drivers
- Missing drivers
- Mis-configured drivers
- Corrupt drivers
Further Information and Manual Repair
To resolve error code 31 on your system, try the methods given below. We have listed down some of the most effective and easy-to-perform DIY methods for fixing Device Manager code 31 on your PC.
Method 1 — Rollback the Driver to its Previous State
This simply means to return the driver back to its previous state — to the version last installed. Try this method to resolve error code 31. This is probably the easiest way to return your PC to its previous working state.
However, by doing so, you will not be able to update your drivers and run new driver versions on your system. In other words, this is a temporary method to fix this issue.
You may still want to try other methods given below to ensure you have the latest drivers installed on your system.
You can roll back the driver to its previous version by accessing the Driver Rollback feature located in the driver settings within the Device Manager. Or another way to perform a rollback is to use the Windows System Restore Utility.
It is a recovery tool built-in the new Windows versions. To access it, simply go to the start menu and type System Restore Utility in the search menu.
Access it and pick a point in the past, also referred to as the restore point, to return your PC to its previous state before the error code 31 occurred.
However, to resolve the problem permanently, try method 2.
Method 2 — Update the Driver
Error code 31, as discussed above, may occur due to outdated, misconfigured, or corrupted drivers. Whatever the reason may be, to ensure the proper functioning of your hardware device, it is important to update the drivers on your system frequently.
To start driver updates, first, it is important to find out and identify problematic drivers. You need to identify the drivers that are corrupt, misconfigured, and outdated. For this, go to the Device Manager and then look for devices with yellow exclamation marks.
The yellow exclamation marks next to the devices show that these device drivers are problematic. Once you’ve identified the problematic drivers, simply update them by finding the latest and compatible versions on the manufacturer’s website.
This process is time-consuming and can be frustrating at times, especially when doing it for the first time.
Also, once you’ve updated the drivers, you need to update them from time to time to ensure they don’t get outdated, or else you will have to encounter Device Manager error codes again.
Method 3 — Download DriverFIX to Update Drivers Automatically
To avoid the hassle and stress involved in updating drivers manually, it is advisable to download and install DriverFIX.
DriverFIX is a smart, innovative, and feature-filled software embedded with an intelligent algorithm that quickly detects problematic drivers, matches them with the latest and compatible versions, and updates them immediately and automatically in just a few seconds and a couple of clicks.
It’s as simple as it can be. Furthermore, with this software installed on your PC, you don’t have to stress and worry about when your drivers need to be updated again.
DriverFIX ensures all drivers are continuously and regularly updated before they become outdated.
Click here to download DriverFIX to repair Device Manager error code 31 and update drivers automatically and regularly.
Read More
If you are currently facing the “A required device isn’t connected or cannot be accessed” error with codes 0xc0000185, 0xc0000225, 0xc0000001, 0xc00000f, and 0xc000000e on your Windows 10 computer, worry not for this post will help you resolve this problem. All these error codes point out the same thing – your computer needs to be repaired. Some of these error codes are related to the “winload.efi” file which means that you are using the UEFI system. This file also loads up important drivers in order to start the Windows Kernel. And if you got a remark from any of these error codes indicating that there is a hardware failure or that the driver configuration is incorrect, then you must physically check if the wires are connected properly.
This kind of error occurs mostly when your computer wasn’t able to locate the system files that are needed to boot up your computer. Thus, the only way to fix this problem is to correct the boot record. It is recommended that you utilize the “/RebuildBCD” option in order to rebuild the BCD files. To do so, follow these steps:
- You can start by booting into the installation environment for Windows 10 from an installation media.
- After that, click on Repair your computer and on the blue screen, select Troubleshoot and then select the Advanced options menu.
- From there, select Command Prompt and once you open it, enter each one of the commands given below by sequence.
- bootrec /FixMbr
- bootrec /FixBoot
- bootrec /ScanOS
- bootrec /RebuildBcd
- Once you’re done executing the commands given above, type “exit” to close the Command Prompt window and then restart your computer and see if it fixed error code 0xc000014c.
On the other hand, if rebuilding the BCD using the /RebuildBCD option didn’t help, you can try a crude way to rebuild the boot record from scratch. You can do that by following the given steps below which will export and delete/backup the BCD available in the system.
- Go to the Advanced Recovery Mode.
- From there, go to Command Prompt and execute the commands given below and make sure to enter them one after the other.
- bcdedit /export C:BCD_Backup
- c:
- cd boot
- attrib bcd -s -h –r
- ren c:bootbcd bcd.old
- bootrec /RebuildBcd
If it still didn’t help, then troubleshoot the problem further with the help of the following instructions.
Option 1 – Disable the Secure Boot in the BIOS
Disabling the Secure Boot in the BIOS settings is definitely recommended to resolve the error. To disable Secure Boot, here’s what you have to do:
- First, boot your computer into Windows 10.
- Next, go to Settings > Windows Update. From there, check if there is anything that you have to download and install if you see any available updates. Usually, OEMs send and update the list of trusted hardware, drivers, and operating systems for your computer.
- After that, go to the BIOS of your computer.
- Then go to Settings > Update & Security > Advanced Startup options. If you click on Restart Now, it will restart your computer and give you all the advanced options.
- Next, select Troubleshoot > Advanced Options. As you can see, this screen offers you further options including System restore, Startup repair, Go back to the previous version, Command Prompt, System Image Recovery, and UEFI Firmware Settings.
- Select the UEFI Firmware Settings which will take you to the BIOS.
- From there, go to the Security > Boot > Authentication tab where you should see Secure Boot. Note that every OEM has its own way of implementing the options so it varies.
- Next, set Secure Boot to Disabled and set Legacy Support to On or Enabled.
- Save the changes made and exit. Afterward, your computer will reboot.
Option 2 – Run System File Checker
You could also run a System File Checker or SFC scan. All you have to do is select Command Prompt from the Advanced Options. Once you’ve opened Command Prompt, type the “sfc /scannow” command and tap Enter to execute it.
Option 3 – Disable the Early Launch Anti-Malware Protection
- You need to restart your computer in the Start Menu first while holding down the Shift key on your keyboard.
- After that, it will restart your computer to Startup Settings.
- Now ensure that the 8th option is labeled as “Disable early launch anti-malware protection.
- Then tap the F8 key since the aforementioned option above is listed at number 8. This should launch and load Windows on your PC with the Early Anti-malware protection disabled for that session only when you try to carry out the same task and then check if the error related to the Winload.efi file is now fixed.
Option 4 – Try to run Automatic Startup Repair
In this option, you need to boot your computer into the Advanced Startup Options and from there, run the Automatic Startup Repair and then wait until the process is completed.
Option 5 – Try to reset the BIOS or the UEFI Settings
If updating the BIOS didn’t help in fixing the error, you can try to reset the BIOS instead.
- Start your computer and tap the F10 key during the booting process to enter the BIOS. If it does not work, you can try tapping the F1 or F2 key as well as the Del key.
- Once you’re already in the BIOS, tap the F9 key to get the prompt to RestoreLoad default configuration now for the BIOS.
- Next, click on Yes and then follow the next on-screen instructions that appear to set the BIOS back to its default settings.
- Once you’re done restoring the default settings of the BIOS, restart your computer and then check if it now boots properly.
Option 6 – Try to physically check the hardware
You should also check the physical status of the hardware in your computer. You can clean the dust off the hardware components like the Network Card of the computer. You might want to use a small blower or you could also use a soft cloth and run the components gently. Make sure that you don’t damage any parts with moisture or cause harm to any circuits while you carry out this task.
Read More
Sqlite3.dll Error — What is it?
Sqlite3.dll error is a typical example of DLL errors. This error message occurs when the system fails to access Sqlite3.dLL (Dynamic Link Library) files shared by certain programs to run on the PC. The error is displayed in the following format:
«Cannot find the file sqlite3.dll (or one of its components)»
Followed by:
«Error starting program.. A required .DLL file sqlite3.dll was not found.»
Solution
Error Causes
The sqlite3.dll error message may pop up on your computer screen due to the following reasons:
- Missing sqlite3.dll files
- DLL files affected due to viruses and malware on your system
- Registry overloaded with invalid entries
- Disk fragmentation
Whether the cause for the sqlite3.dll error code on your PC is malware invasion or registry issues, it is recommended to resolve it immediately before the damage sets in.
Such errors can expose your PC to serious threats like privacy errors, data breaches, identity thefts, cybercrime, system failure, crashes, and valuable data loss.
Further Information and Manual Repair
When it comes to fixing sqlite3.dll error code, you don’t always need to hire a professional and spend hundreds of dollars on the repair. Here are some simple and do it yourself solutions that you can try and resolve the error on your system for free.
1. Check inside recycle bin and restore the deleted file
If this error popped on your computer screen after installing a certain program, then you need to check your recycle bin.
This is because DLL files are shared by multiple programs, it might be possible that the program you just deleted also used the sqlite3.dll file to run on your system. And so when you uninstalled the program, the sqlite3.dll file also got removed.
To resolve this, check your recycle bin for the file. If you find it, restore it. Once the files is restored, try running the application that was generating the sqlite3.dll error message. If the error still persists, then this means the cause of the sqlite3.dll error is deeper. It could be due to malware or the registry.
2. Remove Malware
To remove malware, run an antivirus. This will help scan for such malicious software on your system affecting DLL files and remove them. However, the drawback is that it may slow down the speed of your PC significantly. And when running it, you may have to stop all other activities on your system.
3. Repair and Restore the Registry
If the cause of the sqlite3.dll error is the registry corrupted with invalid entries and disk fragmentation, then you need to repair and restore the registry. The best way to do this is to download Restoro.
Restoro is a powerful and highly functional registry cleaner.
It scans your entire PC and detects all registry issues in seconds. It wipes out all the unnecessary and obsolete files including the junk files, invalid registry entries, bad registry keys, temporary internet files, cookies, and browser history.
It clears up hard disk space and frees it of clutter. Furthermore, this registry cleaner also repairs the damaged DLL files and restores the registry.
Restoro is not only a registry cleaner but is also a system optimizer. This means you can also run it to scan and remove malware on your PC and system instability issues. It boosts your PC’s speed and performance.
It runs smoothly on all Windows versions. It is safe, efficient and user-friendly. The layout is neat and the interface is easy to use and intuitive. In just a few clicks you can resolve the sqlite3.dll error and resume using your desired programs.
Click here to download Total System Care on your PC to resolve sqlite3.dll error pop-ups.
Read More
Error Code 0x803f7001 – What is it?
Error code 0x803f7001 occurs when there is a failure to update your Windows operating system to Windows 10. Usually, a message box pops up with the following statement, “Windows is not activated as your previous version of Windows on this device was not activated prior to upgrade to Windows 10.” When this occurs, common symptoms of the error code will manifest themselves:
- Inability to upgrade your Windows operating system to Windows 10
- Message box with error code 0x803f7001
Solution
Error Causes
The cause for error code 0x803f7001 varies. Usually, it occurs for two reasons: 1) when during the process of upgrading to Windows 10, no valid Windows license or product key is found for your device or 2) when a user performs a clean installation of Windows 10. During a clean installation, a new license is usually required to allow you to activate your copy of Windows.
Further Information and Manual Repair
There are two main options available to fix error code 0x803f7001. Usually, the use of a valid product key can help users rectify error code 0x803f7001. You may also try an automated tool to access the best solutions.
Method One: Use a Valid Product Key
A product key is a code containing 25 characters that enable users to activate Windows. You will need to enter the product key in the exact order it appears in order to install your Windows operating system. All users will be able to access this code in an email or on a card within the Windows DVD package they receive upon purchasing a version of the Windows operating system.
To solve error code 0x803f7001, complete the following steps.
- Step one: Click the Start button then select Settings
- Step two: Select Update and Security then Activation
- Step three: Click the Change product key
- Step four: Type in your valid product key. (To do this ensure the 25 characters are accounted for and in the correct order.)
If the issue causing error code 0x803f7001 relates to your product key, then the instructions within method one will rectify the issue. You will be able to install and activate Windows 10. However, if while attempting to update your Windows operating system, the error occurs once more, you will need to follow the instructions in the manual repair below.
You may also consider contacting a Windows repair technician if you are uncertain of your ability to perform the tasks required to fix error code 0x803f7001. This IT professional will be able to use his or her technical knowledge to perform complex manual repair tasks if the need arises.
Method Two: Install an Automated Tool
Automated tools help PC users eliminate common issues such as Windows error codes. To address or rectify error codes like error code 0x8007007b download a powerful automated tool on your machine. This tool enables users to access quick solutions. It also scans for and corrects issues that may result in error codes or poor PC performance.
Read More
If you suddenly see a system icon or an application icon that has a blue and yellow shield or icon overlay at the corner, this indicates that the application has to run with admin privileges and each time you run these kinds of applications, a UAC or User Account Control prompt will appear to confirm if you really want to run the application. Although this kind of behavior is for security reasons, it can get quite annoying especially if you use the application on a daily basis. To make it convenient for you, this post will walk you through how you can remove the blue and yellow shield icon from an application on your Windows 10 computer.
The User Account Control or UAC setting is the one that ensures no program can run with administrative privileges unless it is allowed by the user. This stops any program that could be potentially harmful to the computer from making any changes which are why keeping this setting to its default state is for the best and making any changes in its setting is not recommended unless it is really needed.
So if you really have to remove the icon overlay in an application, there are several ways you can do that. You can try reinstalling the program and set Compatibility or change the UAC level. For more information, refer to every option given below.
Option 1 – Try to reinstall the application and set Compatibility
As you know, the application icons where you can see the shields are shortcuts mostly and they signify that the User Account Control will appear each time you launch the app. Thus, if you have an app that you use regularly and you’re certain that the app can be trusted, you can try to reinstall the app and set its compatibility by following these steps:
- You need to uninstall the app first and then install its latest version. You must not run or open the app after you reinstall it, not until you’ve completed the steps.
- Next, you have to right-click on the shortcut icon of the app, and from the menu, select Properties.
- Afterward, go to the Compatibility tab and look for the checkbox labeled “Run this program as an administrator” and uncheck it.
- Now click on the Apply and OK buttons to save the changes made. This should remove the shield icon from the app.
Option 2 – Try changing the UAC level
- Tap the Win + Q to open the search bar and type UAC to see the User Account Control setting.
- From the UAC setting, lower the UAC level by selecting the settings that say, “Notify only when apps try to make changes to my computer”.
- After selecting that option, you shouldn’t be getting any warning now when you run the app with the shield icon. But keep in mind that this is not a temporary setting which can be risky especially if the app can’t be trusted.
Read More
The network driver error is a not serious Windows issue. It happens from time to time and luckily it can be solved with a little effort and in a short time period. Today in this article we will explore the most common solutions for driver malfunction for Network adapter inside Windows 10. If you have this particular problem, go from step 1 to the last step since all steps are meant to go from simplest to the most complex.
All of that being said let us fix your Network driver issue.
-
Check to see if the cable is plugged in and not malfunctioned
The first common issue of the network now working can be cable malfunction or bad contact in your network adapter or in HUB/SWITCH. There are various tools to check the quality and working order of cable but you could also make sure that it is not a cable issue by trying connection with the correct working cable. If the network is restored with another cable then change the malfunctioning cable and your issue is resolved if the problem persists move to the next step.
-
Check if Windows troubleshooter will resolve the issue
Righ-click on the network icon in the taskbar and choose to troubleshoot problems. Windows built-in tools could resolve issues and fix them for you. If by any chance Windows is not able to find or resolve issues move to the next step.
-
Check if the Device Manager is reporting an error and update the driver
If the hardware is functioning properly then the issue might be in Windows not detecting device or driver malfunction. In any case, the Device Manager will be the one who will report this problem. In order to check to see if the driver is properly working press ⊞ WINDOWS + X to open the hidden start menu.

Once it opens, click on Device Manager to open it,
If you have a driver device error inside Windows, you should see it immediately when entering the Device Manager, it will have a yellow exclamation mark beside it. Right-click on it and choose update driver. -
Reinstall driver
If driver update failed or you already have the latest drivers, reinstalling them could fix the issue since drivers might have corrupted during installation of some update or application. Follow steps from point 3 to get to the driver in Device Manager, then right-click on it but instead of update choose to uninstall. Reboot Windows once the driver is uninstalled and Windows will install a new one automatically. If you do not want to update drivers automatically, do not restart your system, instead install the latest driver for your device, then reboot. Since this is a network error, you will have to get drivers on another computer and transfer them via USB to malfunctioning one.
-
Check Windows update
Check to see if the latest Windows update is installed, update your Windows if needed
-
Fix driver issue with DRIVERFIX
If everything else fails, get DRIVERFIX, a premium solution for your PC issues, and fix driver errors.

Read More
Blizzard is one of the most beloved game company which brought some of the most and greatest titles in PC gaming. Blizzard has released its own launcher in which you can launch games, sadly sometimes launcher does not want to work and fails to connect.
If this happens to you be sure to:
-
Reset your network devices to make sure your router hasn’t become flooded with data.
Power cycling your modem and router allows them to reset and re-establish a connection to your ISP. Follow these steps to completely power cycle the devices in your network connection:Note: If your modem has a battery backup, you will need to take the battery out or use the reset button on the modem.
- Shut down all computers connected to the modem/router.
- Power down and unplug the modem and the router if you’re using one.
- Allow to sit for 60 seconds unplugged.
- Plug in and turn on the modem and router, and allow them to completely boot up until the front panel connection lights on the modem show a steady connection.
- Start the computer and allow it to completely boot up.
-
If you’re using a wireless connection, optimize your internet connection to rule out a connection issue.
If you’re experiencing issues with your low-speed or wireless internet connection, follow the steps below to troubleshoot the problem.
-
Try plugging your computer directly into your modem.
- Shut down other programs that access the internet, such as other games or download programs.
- Satellite, mobile phone, and WiMax internet connections are not stable connections and may cause further connection issues when playing Blizzard games. If possible, consider switching to a more stable connection.
-
-
Update your drivers and operating system to resolve any compatibility issues.
Out-of-date drivers and operating systems can cause a variety of issues and are one of the first things to check when a game is having problems. The instructions below will help you check and update your drivers.
- Even new computers can have out-of-date drivers and operating systems because updates are released routinely.
- Some games and programs might run fine on a system with old drivers, but outdated drivers can still create technical issues with specific games or programs.
- Check our supported video cards articles to make sure your hardware is compatible:
- World of Warcraft
- Hearthstone
- StarCraft II
- Diablo III
- Heroes of the Storm
- Overwatch
Refer to the steps below to update drivers and software for your operating system.
-
Release and renew your IP and flush your DNS to resolve any network conflicts.
- While on the desktop, press Windows Key and type CMD.
- Right-click Command Prompt and select Run as administrator.
- Type ipconfig /release in the command prompt.
- Wait a few seconds for a reply that the IP address has been released.
- Type ipconfig /renew in the command prompt.
- Wait a few seconds for a reply that the IP address has been re-established.
- Type ipconfig /flushdns in the command prompt.
- Close the command prompt and attempt to make a connection.
-
Close all other applications to resolve software conflicts and free up resources.
Before trying the steps below, close unnecessary programs and restart your computer.
Identify Problematic Startup Items
- Press Ctrl+Shift+Esc to open the Task Manager.
- Click More Details.
- Select the Startup tab.
- Right-click on each item and select Disable.
- Restart the computer.
If this resolves the issue, enable the startup application one at a time to determine which one is causing the problem. You will need to restart between each application you enable.
Note: To re-enable startup applications, follow steps 1-4 and select Enable.
-
Delete the Battle.net Tools folder to automatically rebuild outdated or corrupt files.
- Close Blizzard processes.
- Press Ctrl + Shift + Esc to bring up the Task Manager.
- Click the Processes tab.
- Select all Agent, Blizzard Battle.net desktop app, and game processes, and click End Process.
- Navigate to the folder containing the Battle.net directory:
- Press Windows Key + R to open the Run dialogue.
- Type C:ProgramData into the Open field and press Enter.
- Delete the Battle.net folder.
- Run Battle.net and update the game to see if the issue persists.
If the error persists after you try these steps, another program may be causing the problem. Restart your computer and delete the Battle.net folder one more time.
Note: The above steps may cause the Blizzard Battle.net desktop app to forget game install locations. If your games can’t be found, you will see Install on the Blizzard Battle.net desktop app game tab instead of Play. To find your installation, click Locate this game or run the game launcher.
- Close Blizzard processes.
Read More
![]()
Copyright © 2022, ErrorTools. All Rights Reserved
Trademarks: Microsoft Windows logos are registered trademarks of Microsoft. Disclaimer: ErrorTools.com is not affiliated with Microsoft, nor claim direct affiliation.
The information on this page is provided for information purposes only.
![]()
Repair your PC with one click
Please be aware that our software needs to be installed on a PC system with Windows on it, Open this website on a desktop PC and download the software for easy and quick elimination of your issues.
| Номер ошибки: | Ошибка 21 | |
| Название ошибки: | Code 21 | |
| Описание ошибки: | Устройство будет удалено из Windows. | |
| Разработчик: | Microsoft Corporation | |
| Программное обеспечение: | Windows Operating System | |
| Относится к: | Windows XP, Vista, 7, 8, 10, 11 |
Windows 10 проблемы с Code 21 чаще всего связаны с повреждением или отсутствием файла 21. Как правило, любую проблему, связанную с файлом Windows 10, можно решить посредством замены файла на новую копию. В качестве дополнительного шага по устранению неполадок мы настоятельно рекомендуем обновить все устаревшие драйверы устройства, которые могут способствовать возникновению подобных сообщений об ошибках Code 21.
Классические проблемы Code 21
Проблемы Code 21 обычно связаны с ошибкой синего экрана смерти, также известной как ошибка «BSOD» или «Stop»:
- «Ошибка Code 21 привела к завершении работы Windows, чтобы предотвратить повреждение компьютера. «
- «: (Windows столкнулась с проблемой с Code 21 и нуждается в перезапуске. «
- «0x0000000A: IRQL_NOT_LESS_РАВНО — Code 21»
- 0x0000001E ОСТАНОВКА: КМОДЕ_ИСКЛЮЧЕНИЕ_НЕТ_ОБРАБАТЫВАЕТСЯ — Code 21
- 0×00000050 ОСТАНОВКА: СТРАНИЦА_FAULT_IN_NONPAGED_AREA — Code 21
Во многих случаях ошибки Code 21, вызывающие синий экран смерти, возникают после установки аппаратного или программного обеспечения, связанной с 21s. Обычно ошибки синего экрана, связанные с Code 21, возникают при загрузке драйвера устройства, связанного с Microsoft Corporation, во время установки 21 или связанной программы или во время запуска или завершения работы Windows. Отслеживание того, когда и где возникает ошибка STOP, является важной информацией при устранении проблемы. Notating при возникновении ошибок Code 21 STOP имеет первостепенное значение для поиска причины проблем, связанных с 21s, и сообщая о них за помощью.
Истоки проблем Code 21
Ошибки синего экрана смерти, связанные с Code 21, вызваны связанными с этим проблемами программного обеспечения, оборудования, микропрограммы или драйвера устройства. Связанное с Microsoft Corporation оборудование или сам 21 может привести к этим проблемам.
В частности, проблемы Code 21, вызванные:
- Плохо настроенные, устаревшие или поврежденные драйверы устройств (Code 21).
- Недопустимый Code 21 или поврежденный раздел реестра, связанный с 21s.
- Заражение вредоносными программами повреждено файл Code 21 или связанные с ним файлы 21.
- Конфликт оборудования после установки оборудования NewMicrosoft Corporation или оборудования, связанного с Code 21.
- Поврежденные или удаленные системные файлы после установки программного обеспечения или драйверов, связанных с 21.
- BSOD Code 21, созданный поврежденным жестким диском.
- Ошибка Code 21 STOP, созданная в результате повреждения оперативной памяти.
Продукт Solvusoft
Загрузка
WinThruster 2022 — Проверьте свой компьютер на наличие ошибок.
Совместима с Windows 2000, XP, Vista, 7, 8, 10 и 11
Установить необязательные продукты — WinThruster (Solvusoft) | Лицензия | Политика защиты личных сведений | Условия | Удаление
Эмулятор Геймлуп отличается предельно простой установкой, что очень удобно для пользователя. В большинстве случаев он даже не требует установки, а сразу же готов к запуску мобильных игр. Но иногда программа отказывается работать корректно, это встречается даже на мощных ПК. Особенно неприятно, когда не запускается GameLoop сразу же после установки или через некоторое время, хотя до этого было все в порядке. В данной статье мы разберем основные причины возникновения проблемы и действенные способы решения.
Решение проблемы
Как правило, пользователи сталкиваются с тем, что эмулятор попросту не открывается, вылетает или в какой-то момент зависает. Подобные ошибки могут быть вызваны разными причинами. А вот самые популярные из них:
В первом случае поможет временная приостановка защиты, во втором – ручное изменение параметров, в третьем – активация режима совместимости, а в четвертом – полная переустановка программы. Давайте разберемся с каждым более детально. Действуйте по порядку, чтобы наверняка устранить проблему.
Способ №1: Временное отключение антивируса
Антивирусная защита может найти угрозу даже в безвредных программах на компьютере, заблокировав их работу или ограничив доступ в Интернет. Именно такая ситуация может произойти с эмулятором GameLoop. Чтобы это проверить, попробуйте на некоторое время приостановить защиту вашего антивируса.
Проще всего это сделать через его значок в трее Windows (нижний правый угол). Щелкните по нему правой клавишей мыши и в контекстном меню выберите соответствующей пункт.

В случае с Kaspersky Internet Security он выглядит так:

А вот вариант с Avast:
В других антивирусах процедура отключения защиты будет примерно такой же.
Способ №2: Смена настроек эмулятора

Если Геймлуп начинает запускаться, но в определенный момент зависает или вылетает, то вы все равно можете зайти в его настройки. Делается это из основного меню. Кликните по отмеченным пунктам, чтобы попасть на нужную страницу:
Теперь пройдите в раздел «Движок». По умолчанию в блоке «Визуализация» выбран режим «Интеллектуальный». Попробуйте его заменить на один из четырех оставшихся пунктов, например, OpenGL. Если это не поможет, то попробуйте выбрать что-то еще. Далее, убедитесь, что активны опции «Кэш визуализации», «Глобальное кэширование визуализации» и «Rendering Optimization». Включите их вручную, если это требуется.
Остальные значения выставьте так:

Для применения параметров нажмите на кнопку «Сохранить».В конце обязательно перезапустите компьютер и попробуйте открыть эмулятор.
Способ №3: Включение режима совместимости
Пользователи Windows 8, 8.1 и 10 нередко сталкиваются с проблемами GameLoop из-за системного сбоя, который получится устранить с помощью режима совместимости. Включить его выйдет следующим образом:
Способ №4: Полная переустановка Геймлуп
Если ни один из предыдущих вариантов не дал нужного результата, то дело может быть в повреждении файлов программы или в использовании устаревшей версии. Лучшее решение – полная переустановка. Всю процедуру можно разделить на два этапа:
Но если просто удалить GameLoop с компьютера, то в системе останутся отдельные файлы, которые иногда мешают при повторной инсталляции. Поэтому их тоже следует стереть. Мы разбирали это действие в отдельной статье.
Инструкция по загрузке:
Итоги
Эмулятор GameLoop отлично оптимизирован даже для слабых компьютеров и ноутбуков, но все равно иногда работает с ошибками. Особенно неприятно, когда он попросту отказывается запускаться. Сходу причину такой проблемы не определить, поэтому мы рекомендуем по очереди перебрать все способы, предложенные в статье. Но начинать стоит с банальной перезагрузки ПК.
Fix All Gameloop Errors Codes | Installation | Lag Issues

PUBG is the most popular Multiplayer Online Battle Royale game. PUBG Stands for PlayerUnknown’s Battlegrounds which means unknown players fight in a battle royal mode. The players may either fight as a solo member or in a small group with the winner being the last man alive. The success of the game led to the development of many other similar battle royale games one popularly being Fortnite BR. The game is free to download from Google Play Store for Android.
Gaming Buddy Gameloop by Tencent for Windows who are also the developers of PUBG created the emulator specifically catered towards the game. The Gaming Buddy is able to handle the PUBG mobile and is well optimised to run even on low-end Windows PC. Though there is a PC version of PUBG, it is paid therefore an emulator is a very good option to play the game for free.
Today in this post I will talk about all the possible solutions to fix errors, crashes, lags and loading issues on the Tencent Gaming Buddy for Windows 7/8/10.
Content at Glance
Troubleshooting Gameloop Errors and Problems
Here are the best fixes for Gameloop TGB errors, loading & installing issues, crashes and more.
1. Fix Lag or FPS Drop Issues on PUBG
The Gameloopuses available resources on the PC to run. As different systems have different hardware and software specs a particular setting may not be helpful for the smooth and clutter-free running of TGB on the PC. Here are the best settings for Lag-Free gameplay. I am giving the best optimisation settings for Windows 10 but you make changes accordingly to your system based on specifications.
Here are the best settings to Fix Lag or freeze Issues on Tencent gaming buddy.
1. Right Click on TBG icon and click on Open File Location.
2. Now look for the File named ‘App Market’, right-click and open Properties.
3. Here click on compatibility tab.

4. Now Under Compatibility Mode select any other lower windows version and right check on the ‘Run this program in this mode’.
If you face any issues click Run Compatibility Troubleshooter and select recommended settings.
5. Also, make sure to select Run the ‘Program as Administrator‘ and hit Apply.
6. If your system is running on Windows 7 download and Install DirectX from Google Search. Win 8/10 have them pre-installed.
7. Close all the Tabs and open TBG, open settings in the TBG.
8. Here Click on Engine, select OpenGL if you have a good GPU and OpenGL+ if a strong graphics processor. And select DirectX for good CPU and DirectX+ if a very strong CPU.
9. Right, check all the boxes available but you have a dedicated GPU card like Nvidia and AMD you can select Priotorise Dedicated GPU. If not then uncheck that box.
10. Keep Anti-aliasing Close, set memory less than your device RAM and keep the resolution low or high based on system hardware specs.

11. Now Click on the Game Tab, set resolution HD or SD and display quality as smoothly. Hit Save Button and enjoy the game clutter and lag-free on your PC system.
2. Loading Stuck on 98% Error
This is the second most common issue which users are facing while trying to launch the App and the Apps stocks on loading. I have come up with some of the best possible solutions for the same.
Tweak Windows Defender Settings
First, uninstall the Gaming Buddy by going to the Programs under the Control panel. Now, search for Windows Defender. Here click on Windows Defender Security Center and click on Virus and Threat Protection. Now open Configurations for protection against viruses and threats and Deactivate all the options available.
Uninstall the Antivirus App
An antivirus App may cause trouble with the loading of codes necessary for the launching of Gaming Buddy. So, it is better to uninstall the App. You can also try to relax the scanning ability of the Anti-Virus by changing the settings of the AV App to protect peripheral data of the system.
Change App Engine
The DirectX and OpenGL have different working conditions, one needs a good CPU while other a good graphics processing unit respectively. So, I recommend you to change the engine and try relaunching the emulator, in most cases the issue is solved if it is due to engine incompatibility.
Delete Temp Folder
You can find the location of the Temp folder in the diagnosis option of the TGB. At the bottom of the diagnosis box, you will see the path. Open the Temp Folder and Delete the temporary file/s. Relaunch the TGB to check if the issue is solved.
3. Fix Voice Chat | Mic Not Working | Audio Issues
This is not an error faced by few but more than 10% gamers in PUBG universe. I have found a simple fix for the same.
Go to Sound Settings on your Windows. Look for App volume and device preferences under Other sound options. Make sure your TG Buddy is open in the background. If so, you will see TBG under the running Apps. Here you will see Input and Output options as Default. Just Change both to the USB device.

Now right click on Sound Icon → Open Sound → go to Advanced options each time for Playback and Recording. Here untick all the options under Exclusive Mode.

If you are not able to get output through speakers just make sure drivers installed. After you turn on PUBG mobile minimise it and go to your setting >> sound settings >> increase media volume.
4. TGB Error Code Fix
Error Code 2,3, 5
1. Uninstall the emulator
2. Go to C:/ drive and delete the f0lder which is saved as Tencent in program files. If it shows that some files are in use just add the folder to archive and then delete it
3. Install the emulator again

Error Code 31 | Download Failed, Please Retry
Method 2
1. Remove all Temp files: Window Key+ R and type TEMP and Hit ENTER and Delete all temp files and also Type %TEMP% and delete all files.
2. Go to Control Panel → User Account → Change your account name → Change name
3. Go to Change your account type → If you are an admin then change it to standard or standard to admin
4. Re-Login and again re-install TGB.
100% CPU Usage
If your CPU still 100% usage, please do these steps:
5. Failed to Start the Emulator, Failed to Start the Engine (Error Fix)
Download Process Hacker

Manual Fix
6. Fix Update Your Graphics Driver
If you see an error message saying Update Graphics Driver or Failed to initialize rendering engine. The following solution can help fix the issue.
7. Keys Not Working Problem Fix
You can reset the keys on your TBG to fix the issue
8. High Ping Issue
Change the Network

Ping does not depend on internet speeds but it depends on server response for the request sent from the mobile. An internet with low speeds but having fast response time will have low ping while an internet with high speed but having a low server response will have high Ping. So try to just change your network, switch data card, connect to a different Hotspot or Change your ISP and see if the network response is high and ping is low for smoother gameplay.
2. Change Location
A network consists of a number of intricate factors which can cause the ping to fluctuate. The location of your mobile or router is also one such factor which can cause high ping. So just try to change your location while playing the game. Look for places less crowded with objects, try playing closer to the router, change router location and play the game if possible at higher elevations in your house.
5. Change DNS Servers

Changing DNS Servers is not a very effective means to reduce the ping directly but can help to speed up the amount of time it takes to resolve a domain nameservers. Thus changing the DNS can at times help to reduce ping indirectly. Most of the devices have built-in DNS option in the setting also there are a number of apps on the Play Store which help in changing the DNS, you can try the popular DNS Changer App or Net Optimizer. this will do the trick. You can test the best DNS available based on your location and network to fix lag and reduce latency (ping time) on online games for the better gaming experience.
PUBG Not Working on Tencent Buddy
If the PUBG Mobile is unable to load or causing the problem with the installation you can try a different emulator like Bluestacks, Nox Player. The emulator is capable of handling heavy games and download PUBG mobile from Play Store directly onto the emulator.
How to Install and Use PUBG On Nox Player?
1. Download and install Nox Player from the Official Site. The process will take a few clicks.
2. Once successfully installed you will see the Play Store App on the main screen of the Nox Player.
3. Open the Google Store and log in with your Google ID and Password.
4. Search for the PUBG game and install it on the emulator.
5. Open the game and enjoy it on PC for free. Done!
PUBG Account Ban
There is no way to fix PUBG Ban apart from waiting till the Ban uplifts or using any other login Account. Short-term bans for 1 day, 3 days, 5 days, etc. are for inappropriate behaviour, teamkilling, teaming, etc. Any cheating, inappropriate programs, bug abuse, etc. can result in a permanent ban.
Conclusion: I hope with the solutions above you can solve all the issues and errors faced on TGB for PUBG Mobile. I hope the post was helpful. Do comment below for any assistance or if needed.
If you’ve any thoughts on Fix All Gameloop Errors Codes | Installation | Lag Issues, then feel free to drop in below comment box. Also, please subscribe to our DigitBin YouTube channel for videos tutorials. Cheers!
Не удалось запустить эмулятор. Работа эмулятора была завершена неправильно – как исправить
Сегодня расскажем об ошибке при запуске эмулятора “Не удалось запустить эмулятор. Работа эмулятора была завершена неправильно. Перезапустите эмулятор и попробуйте еще раз позже”. Предупреждения появляются в Tencent Gaming Buddy, Gameloop, Bluestaks, Nox App Player и других. В статье рассмотрим причины сбоя, а ниже дадим рекомендации как устранить проблему самостоятельно. Скриншот с ошибкой Tencent Gaming Buddy ниже.

Не удалось запустить эмулятор. Работа эмулятора была завершена неправильно
Причины сбоя запуска
Причин сбоя запуска несколько: во-первых, это зависит от самой игры, которую вы запускаете, если это PUBG MOBILE – разработчики стали блокировать игроков с эмуляторами. Поскольку играть против людей со смартфонов или планшетов гораздо легче, управляя клавиатурой и мышкой.
Исправляем ошибку запуска
Для начала давайте убедимся, что у нас нормально работает Multiwindow. Тут схема простая – запускаем Tencent Gaming Buddy, а после сообщения об ошибке следуем инструкции:
Этот способ помогает в 90% случаев. Если не запустилось или снова выскочило сообщение о завершении работы, будем искать копии папки TxGameAssistant.
Находим дубликаты Tencent Gaming Buddy
Для поиска дубликатов эмулятора или его папок, загружаем и устанавливаем CCleaner с официального сайта или отсюда. Запускаем CCleaner и следуем инструкции:

Ищем дубликаты в CCleaner

Ищем проблемы в реестре системы
При запуске лаунчера Tencent в свойствах ярлыка задайте максимальные права. Или запускайте кликом правой кнопкой мыши и выбирайте “Запустить от имени Администратора”.
Заключение
Эти советы помогают в большинстве случаев, исключения составляют только если игроков с эмуляторами блокируют на самом сервере игры. Напишите в комментариях какой их способов помог вам исправить проблему “Не удалось запустить эмулятор. Работа эмулятора была завершена неправильно”. Если информация оказалась полезной – поставьте лайк и поделитесь статьей в соцсетях.

Евгений Загорский
IT специалист. Автор информационных статей на тему Андроид смартфонов и IOS смартфонов. Эксперт в области решения проблем с компьютерами и программами: установка, настройка, обзоры, советы по безопасности ваших устройств. В свободное время занимается дизайном и разработкой сайтов.
Источники:
https://game-loop. ru/faq/gameloop-not-launching
https://www. digitbin. com/fix-tencent-gaming-buddy-error/
https://itpen. ru/ne-udalos-zapustit-emulyator-rabota-emulyatora-byla-zavershena-nepravilno-kak-ispravit/
В этой статье представлена ошибка с номером Ошибка 21, известная как Код ошибки Windows 21, описанная как Ошибка 21: Возникла ошибка в приложении Windows. Приложение будет закрыто. Приносим свои извинения за неудобства.
О программе Runtime Ошибка 21
Время выполнения Ошибка 21 происходит, когда Windows дает сбой или падает во время запуска, отсюда и название. Это не обязательно означает, что код был каким-то образом поврежден, просто он не сработал во время выполнения. Такая ошибка появляется на экране в виде раздражающего уведомления, если ее не устранить. Вот симптомы, причины и способы устранения проблемы.
Определения (Бета)
Здесь мы приводим некоторые определения слов, содержащихся в вашей ошибке, в попытке помочь вам понять вашу проблему. Эта работа продолжается, поэтому иногда мы можем неправильно определить слово, так что не стесняйтесь пропустить этот раздел!
- Код ошибки . Код ошибки — это значение, возвращаемое для предоставления контекста, почему произошла ошибка.
- Windows — ОБЩАЯ ПОДДЕРЖКА WINDOWS ВНЕШНЯЯ ТЕМА
Симптомы Ошибка 21 — Код ошибки Windows 21
Ошибки времени выполнения происходят без предупреждения. Сообщение об ошибке может появиться на экране при любом запуске %программы%. Фактически, сообщение об ошибке или другое диалоговое окно может появляться снова и снова, если не принять меры на ранней стадии.
Возможны случаи удаления файлов или появления новых файлов. Хотя этот симптом в основном связан с заражением вирусом, его можно отнести к симптомам ошибки времени выполнения, поскольку заражение вирусом является одной из причин ошибки времени выполнения. Пользователь также может столкнуться с внезапным падением скорости интернет-соединения, но, опять же, это не всегда так.
 Repair Tool")
(Только для примера)
Причины Код ошибки Windows 21 — Ошибка 21
При разработке программного обеспечения программисты составляют код, предвидя возникновение ошибок. Однако идеальных проектов не бывает, поскольку ошибки можно ожидать даже при самом лучшем дизайне программы. Глюки могут произойти во время выполнения программы, если определенная ошибка не была обнаружена и устранена во время проектирования и тестирования.
Ошибки во время выполнения обычно вызваны несовместимостью программ, запущенных в одно и то же время. Они также могут возникать из-за проблем с памятью, плохого графического драйвера или заражения вирусом. Каким бы ни был случай, проблему необходимо решить немедленно, чтобы избежать дальнейших проблем. Ниже приведены способы устранения ошибки.
Методы исправления
Ошибки времени выполнения могут быть раздражающими и постоянными, но это не совсем безнадежно, существует возможность ремонта. Вот способы сделать это.
Если метод ремонта вам подошел, пожалуйста, нажмите кнопку upvote слева от ответа, это позволит другим пользователям узнать, какой метод ремонта на данный момент работает лучше всего.
Обратите внимание: ни ErrorVault.com, ни его авторы не несут ответственности за результаты действий, предпринятых при использовании любого из методов ремонта, перечисленных на этой странице — вы выполняете эти шаги на свой страх и риск.
Метод 1 — Закройте конфликтующие программы
Когда вы получаете ошибку во время выполнения, имейте в виду, что это происходит из-за программ, которые конфликтуют друг с другом. Первое, что вы можете сделать, чтобы решить проблему, — это остановить эти конфликтующие программы.
- Откройте диспетчер задач, одновременно нажав Ctrl-Alt-Del. Это позволит вам увидеть список запущенных в данный момент программ.
- Перейдите на вкладку «Процессы» и остановите программы одну за другой, выделив каждую программу и нажав кнопку «Завершить процесс».
- Вам нужно будет следить за тем, будет ли сообщение об ошибке появляться каждый раз при остановке процесса.
- Как только вы определите, какая программа вызывает ошибку, вы можете перейти к следующему этапу устранения неполадок, переустановив приложение.
Метод 2 — Обновите / переустановите конфликтующие программы
Использование панели управления
- В Windows 7 нажмите кнопку «Пуск», затем нажмите «Панель управления», затем «Удалить программу».
- В Windows 8 нажмите кнопку «Пуск», затем прокрутите вниз и нажмите «Дополнительные настройки», затем нажмите «Панель управления»> «Удалить программу».
- Для Windows 10 просто введите «Панель управления» в поле поиска и щелкните результат, затем нажмите «Удалить программу».
- В разделе «Программы и компоненты» щелкните проблемную программу и нажмите «Обновить» или «Удалить».
- Если вы выбрали обновление, вам просто нужно будет следовать подсказке, чтобы завершить процесс, однако, если вы выбрали «Удалить», вы будете следовать подсказке, чтобы удалить, а затем повторно загрузить или использовать установочный диск приложения для переустановки. программа.
Использование других методов
- В Windows 7 список всех установленных программ можно найти, нажав кнопку «Пуск» и наведя указатель мыши на список, отображаемый на вкладке. Вы можете увидеть в этом списке утилиту для удаления программы. Вы можете продолжить и удалить с помощью утилит, доступных на этой вкладке.
- В Windows 10 вы можете нажать «Пуск», затем «Настройка», а затем — «Приложения».
- Прокрутите вниз, чтобы увидеть список приложений и функций, установленных на вашем компьютере.
- Щелкните программу, которая вызывает ошибку времени выполнения, затем вы можете удалить ее или щелкнуть Дополнительные параметры, чтобы сбросить приложение.
Метод 3 — Обновите программу защиты от вирусов или загрузите и установите последнюю версию Центра обновления Windows.
Заражение вирусом, вызывающее ошибку выполнения на вашем компьютере, необходимо немедленно предотвратить, поместить в карантин или удалить. Убедитесь, что вы обновили свою антивирусную программу и выполнили тщательное сканирование компьютера или запустите Центр обновления Windows, чтобы получить последние определения вирусов и исправить их.
Метод 4 — Переустановите библиотеки времени выполнения
Вы можете получить сообщение об ошибке из-за обновления, такого как пакет MS Visual C ++, который может быть установлен неправильно или полностью. Что вы можете сделать, так это удалить текущий пакет и установить новую копию.
- Удалите пакет, выбрав «Программы и компоненты», найдите и выделите распространяемый пакет Microsoft Visual C ++.
- Нажмите «Удалить» в верхней части списка и, когда это будет сделано, перезагрузите компьютер.
- Загрузите последний распространяемый пакет от Microsoft и установите его.
Метод 5 — Запустить очистку диска
Вы также можете столкнуться с ошибкой выполнения из-за очень нехватки свободного места на вашем компьютере.
- Вам следует подумать о резервном копировании файлов и освобождении места на жестком диске.
- Вы также можете очистить кеш и перезагрузить компьютер.
- Вы также можете запустить очистку диска, открыть окно проводника и щелкнуть правой кнопкой мыши по основному каталогу (обычно это C
- Щелкните «Свойства», а затем — «Очистка диска».

Метод 6 — Переустановите графический драйвер
Если ошибка связана с плохим графическим драйвером, вы можете сделать следующее:
- Откройте диспетчер устройств и найдите драйвер видеокарты.
- Щелкните правой кнопкой мыши драйвер видеокарты, затем нажмите «Удалить», затем перезагрузите компьютер.
Метод 7 — Ошибка выполнения, связанная с IE
Если полученная ошибка связана с Internet Explorer, вы можете сделать следующее:
- Сбросьте настройки браузера.
- В Windows 7 вы можете нажать «Пуск», перейти в «Панель управления» и нажать «Свойства обозревателя» слева. Затем вы можете перейти на вкладку «Дополнительно» и нажать кнопку «Сброс».
- Для Windows 8 и 10 вы можете нажать «Поиск» и ввести «Свойства обозревателя», затем перейти на вкладку «Дополнительно» и нажать «Сброс».
- Отключить отладку скриптов и уведомления об ошибках.
- В том же окне «Свойства обозревателя» можно перейти на вкладку «Дополнительно» и найти пункт «Отключить отладку сценария».
- Установите флажок в переключателе.
- Одновременно снимите флажок «Отображать уведомление о каждой ошибке сценария», затем нажмите «Применить» и «ОК», затем перезагрузите компьютер.
Если эти быстрые исправления не работают, вы всегда можете сделать резервную копию файлов и запустить восстановление на вашем компьютере. Однако вы можете сделать это позже, когда перечисленные здесь решения не сработают.
Другие языки:
How to fix Error 21 (Windows Error Code 21) — Error 21: Windows has encountered a problem and needs to close. We are sorry for the inconvenience.
Wie beheben Fehler 21 (Windows-Fehlercode 21) — Fehler 21: Windows hat ein Problem festgestellt und muss geschlossen werden. Wir entschuldigen uns für die Unannehmlichkeiten.
Come fissare Errore 21 (Codice di errore di Windows 21) — Errore 21: Windows ha riscontrato un problema e deve essere chiuso. Ci scusiamo per l’inconveniente.
Hoe maak je Fout 21 (Windows-foutcode 21) — Fout 21: Windows heeft een probleem ondervonden en moet worden afgesloten. Excuses voor het ongemak.
Comment réparer Erreur 21 (Code d’erreur Windows 21) — Erreur 21 : Windows a rencontré un problème et doit se fermer. Nous sommes désolés du dérangement.
어떻게 고치는 지 오류 21 (Windows 오류 코드 21) — 오류 21: Windows에 문제가 발생해 닫아야 합니다. 불편을 끼쳐드려 죄송합니다.
Como corrigir o Erro 21 (Código de erro 21 do Windows) — Erro 21: O Windows encontrou um problema e precisa fechar. Lamentamos o inconveniente.
Hur man åtgärdar Fel 21 (Windows felkod 21) — Fel 21: Windows har stött på ett problem och måste avslutas. Vi är ledsna för besväret.
Jak naprawić Błąd 21 (Kod błędu systemu Windows 21) — Błąd 21: system Windows napotkał problem i musi zostać zamknięty. Przepraszamy za niedogodności.
Cómo arreglar Error 21 (Código de error de Windows 21) — Error 21: Windows ha detectado un problema y debe cerrarse. Lamentamos las molestias.
![]() Об авторе: Фил Харт является участником сообщества Microsoft с 2010 года. С текущим количеством баллов более 100 000 он внес более 3000 ответов на форумах Microsoft Support и создал почти 200 новых справочных статей в Technet Wiki.
Об авторе: Фил Харт является участником сообщества Microsoft с 2010 года. С текущим количеством баллов более 100 000 он внес более 3000 ответов на форумах Microsoft Support и создал почти 200 новых справочных статей в Technet Wiki.
Следуйте за нами: ![]()
![]()
![]()
Последнее обновление:
27/04/22 04:36 : Пользователь Android проголосовал за то, что метод восстановления 1 работает для него.

Этот инструмент восстановления может устранить такие распространенные проблемы компьютера, как синие экраны, сбои и замораживание, отсутствующие DLL-файлы, а также устранить повреждения от вредоносных программ/вирусов и многое другое путем замены поврежденных и отсутствующих системных файлов.
ШАГ 1:
Нажмите здесь, чтобы скачать и установите средство восстановления Windows.
ШАГ 2:
Нажмите на Start Scan и позвольте ему проанализировать ваше устройство.
ШАГ 3:
Нажмите на Repair All, чтобы устранить все обнаруженные проблемы.
СКАЧАТЬ СЕЙЧАС
Совместимость
![]()
Требования
1 Ghz CPU, 512 MB RAM, 40 GB HDD
Эта загрузка предлагает неограниченное бесплатное сканирование ПК с Windows. Полное восстановление системы начинается от $19,95.
ID статьи: ACX012777RU
Применяется к: Windows 10, Windows 8.1, Windows 7, Windows Vista, Windows XP, Windows 2000
Return to “FL Studio Users Forum (Looptalk)”
Jump to:
Forum rules
Please read them here.
New Topic
Post Reply
9 posts
• Page 1 of 1
[You can only see part of this thread as you are not logged in to the forums]
-
sirchris
- Sat Jul 06, 2019 9:23 pm
-
-
- Quote
-
x
loopmidi not working in latest RC version
Hi I have followed the instructions to use loopmidi to capture arpeggios and so forth and it does not appear to be working now. Has anyone else noticed this? If you have it working can you please confirm the steps you used?
Top
-
HeathW
- Sat Jul 06, 2019 9:55 pm
-
-
- Quote
-
x
Re: loopmidi not working in latest RC version
start loopmidi before fl studio, configure the …
Top
-
sirchris
- Sun Jul 07, 2019 1:55 am
-
-
- Quote
-
x
Re: loopmidi not working in latest RC version
Thanks I was following this video before I post…
Top
-
HeathW
- Sun Jul 07, 2019 8:55 am
-
-
- Quote
-
x
Re: loopmidi not working in latest RC version
post a screenshot of your midi settings — insur…
Top
-
sirchris
- Sun Jul 07, 2019 11:06 am
-
-
- Quote
-
x
Re: loopmidi not working in latest RC version
loopmidi is not muted
Top
-
HeathW
- Sun Jul 07, 2019 12:26 pm
-
-
- Quote
-
x
Re: loopmidi not working in latest RC version
did you open loopmidi and see if the ‘port’ was…
Top
-
sirchris
- Sun Jul 07, 2019 12:32 pm
-
-
- Quote
-
x
Re: loopmidi not working in latest RC version
Yes i am doing everything correctly and have ta…
Top
-
sirchris
- Sun Jul 07, 2019 12:46 pm
-
-
- Quote
-
x
Re: loopmidi not working in latest RC version
yes its not muted. can you please send me a scr…
Top
-
sirchris
- Mon Jul 08, 2019 12:45 pm
-
-
- Quote
-
x
Re: loopmidi not working in latest RC version
I guess its working but it doesnt work for all …
Top
Display posts from previous:
Sort by
New Topic
Post Reply
9 posts
• Page 1 of 1
Return to “FL Studio Users Forum (Looptalk)”
Jump to: