![]() |
|
Обновлено 24 июня 2019 6
Многие пользователи при использовании внешних мониторов с Mac или во время расширения рабочего стола на экран iPad сталкиваются с проблемами в настройке разрешения экрана.
? Спасибо re:Store за полезную информацию. ?
Система предлагает несколько стандартных вариантов, которые могут не подходить для внешнего монитора.
Есть два способа гибко менять разрешение экрана.
1. При помощи стандартных средств системы
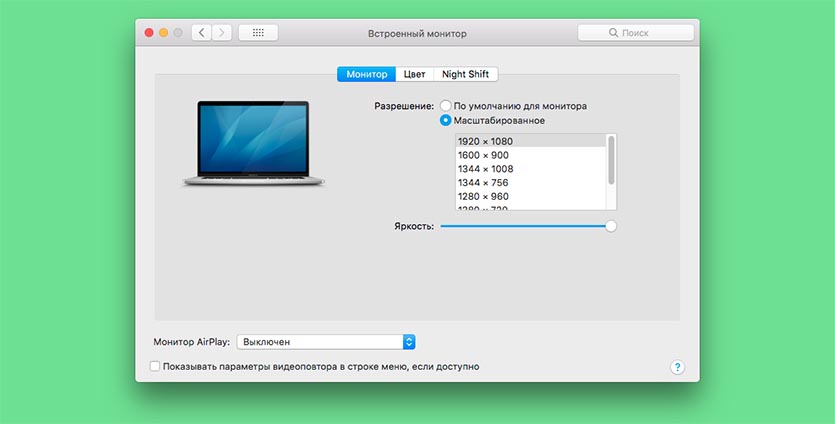
Просто зажимаем клавишу Option и открываем Системные настройки – Монитор.
В разделе Масштабирование увидите большое количество вариантов разрешения экрана.
2. При помощи сторонних приложений
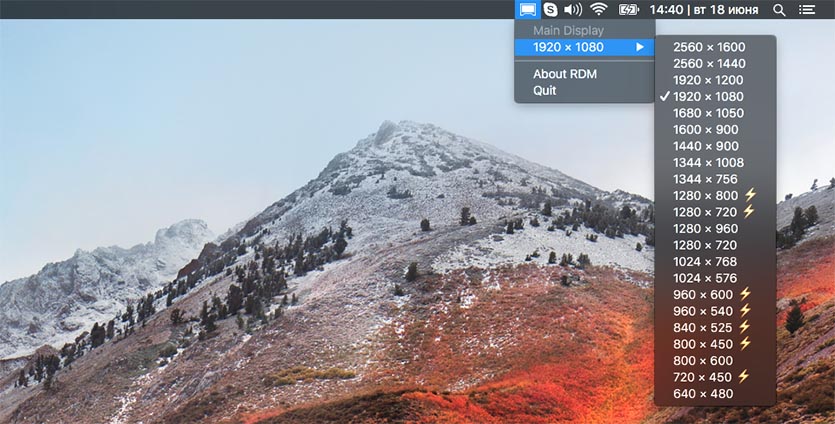
Можно воспользоваться бесплатной утилитой RDM Retina Display Menu.
После ее установки в строке меню появится специальный пункт для быстрой смены разрешения экрана.

 (17 голосов, общий рейтинг: 4.35 из 5)
🤓 Хочешь больше? Подпишись на наш Telegram.
![]()
iPhones.ru
Скрытое меню в macOS, о котором знают не все.
- Apple,
- macOS,
- restore,
- Маки,
- фишки
![]()
Артём Суровцев
@artyomsurovtsev
Люблю технологии и все, что с ними связано. Верю, что величайшие открытия человечества еще впереди!
 Изменение разрешения на Mac столь же простая задача, как и в других ОС и в этой инструкции подробно о том, как поменять разрешение экрана Mac OS встроенными средствами системы, а при необходимости и с помощью сторонних утилит.
Во всех случаях старайтесь использовать физическое разрешение экрана монитора, в противном случае изображение будет отображаться с искажениями, что особенно заметно при работе с текстом: следствием установки разрешения, отличного от фактического разрешения монитора будут расплывчатые шрифты. См. также: Как включить темную тему оформления Mac OS.
Изменение разрешения экрана Mac с помощью системных настроек
Для того, чтобы поменять разрешение в Mac OS выполните следующие простые шаги:
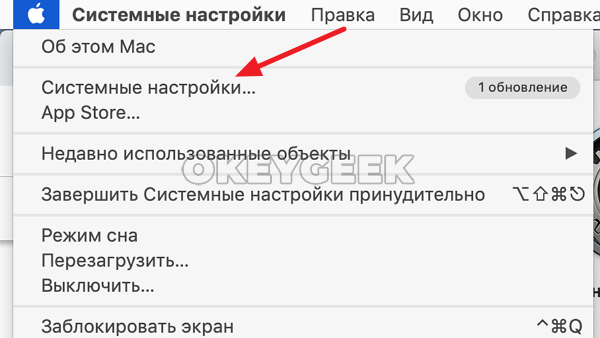
- Зайдите в системные настройки. Для этого нажмите по значку с логотипом Apple слева вверху и выберите соответствующий пункт меню.
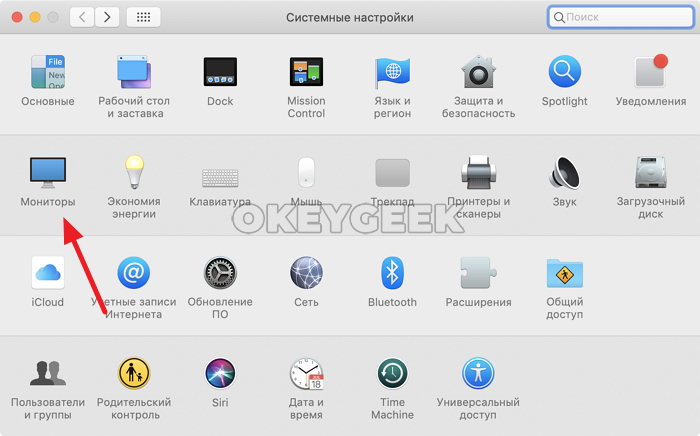
- Откройте раздел «Мониторы».

- По умолчанию для мониторов обычно выставлено рекомендуемое разрешение «По умолчанию». При необходимости выбрать другое разрешение выберите пункт «Масштабированное».

- Выберите одно из доступных для этого монитора разрешений.


Обычно, описываемых шагов вполне достаточно для установки нужного разрешения, но не всегда.
Проблемы с выбором разрешения могут возникать, например, при использовании переходников и конвертеров, когда ваш MacBook, Mac Mini или другой компьютер Apple не может определить, что за монитор к нему подключен и какими характеристиками он обладает. Однако установка требуемого вам разрешения остается возможной.
Другие способы изменения разрешения монитора Mac OS
Если необходимое разрешение не отображается в списке доступных, можно использовать сторонние утилиты для настройки экрана, например, бесплатную программу DisableMonitor, доступную на странице https://github.com/Eun/DisableMonitor
После установки и запуска DisableMonitor (может потребоваться дать разрешение в параметрах безопасности в системных настройках), в строке меню появится значок монитора, позволяющий выбрать нужное разрешение для одного или нескольких экранов.
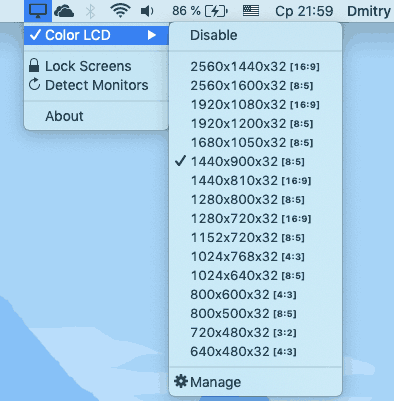
Если открыть раздел «Manage» в программе, можно выбрать, какие разрешения следует отображать для быстрого переключения, а какие убрать из списка.
Если необходимого решения не нашлось в этой простой инструкции, задавайте вопрос в комментариях, я постараюсь помочь.
![]()
Download Article
![]()
Download Article
If you want to change the display resolution on your MacBook or Mac desktop computer, you can easily do so in the Displays settings. In this article, we’ll explain how to change the resolution of your built-in display or an external display, as well as how to run apps in low-resolution mode and troubleshoot common problems.
Things You Should Know
- Change your screen resolution by opening System Preferences and selecting Displays.
- You can also change the screen resolution of an external monitor in the Display Settings menu.
- If you choose a resolution option that isn’t supported and your screen goes black, you can usually reset by pressing Esc.
-

1
Open the
Apple Menu. Your Mac’s resolution should already be optimized for its built-in display, but you can change the resolution using the preset options in the Displays menu. Start by clicking the
Apple Menu in the top left corner of your screen.[1]
- If you can’t see the Apple Menu because of your current resolution settings, press ⌘ + Space on your keyboard to launch Spotlight, then type in system preferences. Click the System Preferences icon when it comes up in the search results.
-
2
Select System Preferences. Click System Preferences… near the top of the Apple Menu. This will open a new window.[2]
Advertisement
-
3
Click Displays. Select Displays from the System Preferences window. The icon looks like a blue computer monitor.[3]
-
4
Toggle on the Scaled radio button. By default, the resolution should be set to Default for Display. Next to the Resolution heading, click the radio button next to Scaled to view other resolution options.[4]
-
5
Select your preferred scale option. Once you select Scaled, you’ll see a series of thumbnails showing different resolution options. Choose the one that fits your needs best.[5]
- For example, select Larger Text (1024 x 640) to display text, apps, icons, and other objects on your screen at a larger scale.
- If you’d rather have more space on your screen, choose an option like More Space (1680 x 1050) to make text, windows, icons, and other objects on your screen look smaller.
-
6
Click OK to confirm your selection. Depending on the resolution you select, a dialog box may pop up asking you if you’re sure you want to change your display resolution. Click OK to confirm your choice or Cancel to exit the dialog box without making any changes.
- This dialog only pops up if you choose a scale that is likely to hide parts of your screen, such as the Larger Text scale option. Otherwise, the changes are automatically applied when you click on the resolution you want.


Advertisement
-
1
Connect your external display. If you’re using an external display, such as a monitor or a TV, you can adjust the resolution using the System Preferences menu on your Mac. Start by connecting the display to your computer. Depending on what type of Mac you are using, you can do this by:[6]
- Plugging the display into your HDMI or Thunderbolt port.
- Plugging the display into your Mac using an adapter that supports DisplayPort Alt Mode, Thunderbolt 3, or Thunderbolt 4.
- Connecting to the display wirelessly using AirPlay.
-
2
Click on the
Apple Menu. Once your external display is connected, open the
Apple Menu in the top left corner of your screen.[7]
-
3
Open System Preferences. Select System Preferences… from the menu. A System Preferences window will pop up.[8]
-
4
Select Displays. In the System Preferences menu, click the Displays button. It looks like a blue computer monitor.[9]
-
5
Click Display Settings. Once you add a new display, you will see this additional option in the Displays menu. Click the Display Settings… button to change your resolution and make other adjustments.[10]
-
6
Choose your display from the sidebar. In the Display Settings dialog box, click the display you want to adjust in the menu on the left side of the window.[11]
-
7
Select the resolution you want from the Scaled pop-up menu. Depending on what kind of device you are using as an external monitor, you may see an option to adjust the resolution. The resolution should be automatically optimized for the device selected in the Optimize for dropdown menu.[12]
To change the resolution:- Click the radio button next to Scaled.
- Click on the scaled resolution you want from the thumbnails that appear below the Scaled option.
- Depending on the option you select, the resolution may change immediately, or a dialog box may pop up asking you to confirm your selection.
-
8
Click Done to confirm your selection. When you’ve chosen the resolution you want, click Done to close the Display Settings dialog box.[13]


Advertisement
-
1
Quit the app you’d like to view in low-resolution mode. Some apps may not display properly at your Mac’s default resolution. In Mac OS 11 (Big Sur) and earlier Mac operating systems, it is possible to run apps in low resolution mode, which may improve how they look on your screen. If you’re already running the app, quit it so you can relaunch it in low-resolution mode.[14]
- As of September 2022, low-resolution mode is not available in Mac OS 12 (Monterey).
-
2
Open the Applications folder. Once you’ve quit the app, launch a
Finder window and click on Applications in the side menu.[15]
-
3
Click the app once to select it. Locate the app you want to run in low-resolution mode in the Applications folder. Select the app by clicking it once, but don’t launch it.[16]
-
4
Open the File menu. With the app still selected, click the File menu at the top of the screen.[17]
-
5
Select Get Info. In the File menu, click on Get Info. This will launch a dialog box with information about the app.[18]
- You can also open the Get Info dialog box by pressing ⌘ Command+I with the app selected.
-
6
Check the box next to Open in Low Resolution. In the Get Info window, look for an option to Open in Low Resolution. Click the box next to this option to turn it on.[19]
- Depending on which operating system you’re running, you might not see this option. Some apps are also automatically set to run in low-resolution mode.
-
7
Close the Get Info window. Once you’ve made your selection, click the red Close button in the top left corner of the Get Info window to close the dialog.[20]
-
8
Re-launch the app. After you close the Get Info window, double-click the app to open it again. It should now run in low-resolution mode.[21]


Advertisement
-
1
Wait 15 seconds if your screen goes black after changing the resolution. If you selected a resolution that isn’t supported, you might see a black screen after changing the resolution. If this happens, wait 15 seconds to see if your screen resets automatically.[22]
-
2
Press Esc if the resolution doesn’t reset. If waiting doesn’t work, touch the Esc key. This should revert your screen’s resolution back to your previous selection.[23]
-
3
Restart your Mac in Safe Mode if you still can’t reset your display. In some cases, you may need to reset the resolution in Safe Mode.[24]
To do this:[25]
- Open the
menu and select Shut Down.
- Wait 10 seconds after your computer finishes shutting down.
- If your Mac is Intel-based, restart your computer and quickly press and hold the ⇧ Shift key. Let go of the ⇧ Shift key as soon as you see the Login window.
- If you have a Mac with Apple silicon, press and hold the Power button until you see the Startup Options window. Then, press ⇧ Shift, select Continue in Safe Mode, and let go of ⇧ Shift.
- Open the
-
4
Open the
Apple Menu once your Mac starts. After your Mac starts up in Safe Mode, click the
Apple Menu in the top left corner of your screen.[26]
-
5
Select System Preferences. Click System Preferences in the menu to launch the System Preferences window.[27]
-
6
Click Displays. In System Preferences, click on the Displays icon. It looks like a blue computer monitor.[28]
-
7
Select Display Settings. In the Displays window, click Display Settings or Display, depending on your OS.[29]
-
8
Choose Default for Display. Next to the Resolution header, click the radio button next to Default for Display. This should reset your computer back to its default screen resolution.[30]
-
9
Restart your Mac. Once you’ve reset your resolution, restart your Mac as you normally would.[31]


Advertisement
Add New Question
-
Question
How do I reset my screen resolution on a Mac?

Josef Storzi
Apple & Mobile Phone Repair Specialist
Josef Storzi is an Apple and Mobile Phone Repair Specialist and the Owner of Imobile LA, a mobile phone repair company based in Los Angeles, California. Josef specializes in repairing screens, charging ports, batteries, water damage, speakers, and microphones on all mobile phone brands including Apple, Samsung, LG, Nokia, and Sony. He also specializes in tablet, laptop, and computer repairs as well as the pros and cons of recent mobile software updates.
Apple & Mobile Phone Repair Specialist
Expert Answer
Support wikiHow by
unlocking this expert answer.Open your System Preferences. You can find this by either searching «preferences» in Spotlight search, or you can open «Finder,» navigate to «Applications,» then choose System Preferences.» Once that’s open, click on «Displays.» There, you’ll see an option for «Resolution.» Change that from the default to «Scaled.» Once you click on «Scaled,» the resolutions available for your display will appear. You may select any resolution you desire.
-
Question
How do I change it to my own resolution that these methods do not support?
You cannot change your screen’s resolution to custom values. This is because these apps aforementioned do not support it; you have to look for a third-party app that supports this function.

Ask a Question
200 characters left
Include your email address to get a message when this question is answered.
Submit
Advertisement
About This Article
Thanks to all authors for creating a page that has been read 229,432 times.
Is this article up to date?
![]()
Download Article
![]()
Download Article
If you want to change the display resolution on your MacBook or Mac desktop computer, you can easily do so in the Displays settings. In this article, we’ll explain how to change the resolution of your built-in display or an external display, as well as how to run apps in low-resolution mode and troubleshoot common problems.
Things You Should Know
- Change your screen resolution by opening System Preferences and selecting Displays.
- You can also change the screen resolution of an external monitor in the Display Settings menu.
- If you choose a resolution option that isn’t supported and your screen goes black, you can usually reset by pressing Esc.
-
1
Open the
Apple Menu. Your Mac’s resolution should already be optimized for its built-in display, but you can change the resolution using the preset options in the Displays menu. Start by clicking the
Apple Menu in the top left corner of your screen.[1]
- If you can’t see the Apple Menu because of your current resolution settings, press ⌘ + Space on your keyboard to launch Spotlight, then type in system preferences. Click the System Preferences icon when it comes up in the search results.
-
2
Select System Preferences. Click System Preferences… near the top of the Apple Menu. This will open a new window.[2]
Advertisement
-
3
Click Displays. Select Displays from the System Preferences window. The icon looks like a blue computer monitor.[3]
-
4
Toggle on the Scaled radio button. By default, the resolution should be set to Default for Display. Next to the Resolution heading, click the radio button next to Scaled to view other resolution options.[4]
-
5
Select your preferred scale option. Once you select Scaled, you’ll see a series of thumbnails showing different resolution options. Choose the one that fits your needs best.[5]
- For example, select Larger Text (1024 x 640) to display text, apps, icons, and other objects on your screen at a larger scale.
- If you’d rather have more space on your screen, choose an option like More Space (1680 x 1050) to make text, windows, icons, and other objects on your screen look smaller.
-
6
Click OK to confirm your selection. Depending on the resolution you select, a dialog box may pop up asking you if you’re sure you want to change your display resolution. Click OK to confirm your choice or Cancel to exit the dialog box without making any changes.
- This dialog only pops up if you choose a scale that is likely to hide parts of your screen, such as the Larger Text scale option. Otherwise, the changes are automatically applied when you click on the resolution you want.
Advertisement
-
1
Connect your external display. If you’re using an external display, such as a monitor or a TV, you can adjust the resolution using the System Preferences menu on your Mac. Start by connecting the display to your computer. Depending on what type of Mac you are using, you can do this by:[6]
- Plugging the display into your HDMI or Thunderbolt port.
- Plugging the display into your Mac using an adapter that supports DisplayPort Alt Mode, Thunderbolt 3, or Thunderbolt 4.
- Connecting to the display wirelessly using AirPlay.
-
2
Click on the
Apple Menu. Once your external display is connected, open the
Apple Menu in the top left corner of your screen.[7]
-
3
Open System Preferences. Select System Preferences… from the menu. A System Preferences window will pop up.[8]
-
4
Select Displays. In the System Preferences menu, click the Displays button. It looks like a blue computer monitor.[9]
-
5
Click Display Settings. Once you add a new display, you will see this additional option in the Displays menu. Click the Display Settings… button to change your resolution and make other adjustments.[10]
-
6
Choose your display from the sidebar. In the Display Settings dialog box, click the display you want to adjust in the menu on the left side of the window.[11]
-
7
Select the resolution you want from the Scaled pop-up menu. Depending on what kind of device you are using as an external monitor, you may see an option to adjust the resolution. The resolution should be automatically optimized for the device selected in the Optimize for dropdown menu.[12]
To change the resolution:- Click the radio button next to Scaled.
- Click on the scaled resolution you want from the thumbnails that appear below the Scaled option.
- Depending on the option you select, the resolution may change immediately, or a dialog box may pop up asking you to confirm your selection.
-
8
Click Done to confirm your selection. When you’ve chosen the resolution you want, click Done to close the Display Settings dialog box.[13]
Advertisement
-
1
Quit the app you’d like to view in low-resolution mode. Some apps may not display properly at your Mac’s default resolution. In Mac OS 11 (Big Sur) and earlier Mac operating systems, it is possible to run apps in low resolution mode, which may improve how they look on your screen. If you’re already running the app, quit it so you can relaunch it in low-resolution mode.[14]
- As of September 2022, low-resolution mode is not available in Mac OS 12 (Monterey).
-
2
Open the Applications folder. Once you’ve quit the app, launch a
Finder window and click on Applications in the side menu.[15]
-
3
Click the app once to select it. Locate the app you want to run in low-resolution mode in the Applications folder. Select the app by clicking it once, but don’t launch it.[16]
-
4
Open the File menu. With the app still selected, click the File menu at the top of the screen.[17]
-
5
Select Get Info. In the File menu, click on Get Info. This will launch a dialog box with information about the app.[18]
- You can also open the Get Info dialog box by pressing ⌘ Command+I with the app selected.
-
6
Check the box next to Open in Low Resolution. In the Get Info window, look for an option to Open in Low Resolution. Click the box next to this option to turn it on.[19]
- Depending on which operating system you’re running, you might not see this option. Some apps are also automatically set to run in low-resolution mode.
-
7
Close the Get Info window. Once you’ve made your selection, click the red Close button in the top left corner of the Get Info window to close the dialog.[20]
-
8
Re-launch the app. After you close the Get Info window, double-click the app to open it again. It should now run in low-resolution mode.[21]
Advertisement
-
1
Wait 15 seconds if your screen goes black after changing the resolution. If you selected a resolution that isn’t supported, you might see a black screen after changing the resolution. If this happens, wait 15 seconds to see if your screen resets automatically.[22]
-
2
Press Esc if the resolution doesn’t reset. If waiting doesn’t work, touch the Esc key. This should revert your screen’s resolution back to your previous selection.[23]
-
3
Restart your Mac in Safe Mode if you still can’t reset your display. In some cases, you may need to reset the resolution in Safe Mode.[24]
To do this:[25]
- Open the
menu and select Shut Down.
- Wait 10 seconds after your computer finishes shutting down.
- If your Mac is Intel-based, restart your computer and quickly press and hold the ⇧ Shift key. Let go of the ⇧ Shift key as soon as you see the Login window.
- If you have a Mac with Apple silicon, press and hold the Power button until you see the Startup Options window. Then, press ⇧ Shift, select Continue in Safe Mode, and let go of ⇧ Shift.
- Open the
-
4
Open the
Apple Menu once your Mac starts. After your Mac starts up in Safe Mode, click the
Apple Menu in the top left corner of your screen.[26]
-
5
Select System Preferences. Click System Preferences in the menu to launch the System Preferences window.[27]
-
6
Click Displays. In System Preferences, click on the Displays icon. It looks like a blue computer monitor.[28]
-
7
Select Display Settings. In the Displays window, click Display Settings or Display, depending on your OS.[29]
-
8
Choose Default for Display. Next to the Resolution header, click the radio button next to Default for Display. This should reset your computer back to its default screen resolution.[30]
-
9
Restart your Mac. Once you’ve reset your resolution, restart your Mac as you normally would.[31]
Advertisement
Add New Question
-
Question
How do I reset my screen resolution on a Mac?
Josef Storzi
Apple & Mobile Phone Repair Specialist
Josef Storzi is an Apple and Mobile Phone Repair Specialist and the Owner of Imobile LA, a mobile phone repair company based in Los Angeles, California. Josef specializes in repairing screens, charging ports, batteries, water damage, speakers, and microphones on all mobile phone brands including Apple, Samsung, LG, Nokia, and Sony. He also specializes in tablet, laptop, and computer repairs as well as the pros and cons of recent mobile software updates.
Apple & Mobile Phone Repair Specialist
Expert Answer
Support wikiHow by
unlocking this expert answer.Open your System Preferences. You can find this by either searching «preferences» in Spotlight search, or you can open «Finder,» navigate to «Applications,» then choose System Preferences.» Once that’s open, click on «Displays.» There, you’ll see an option for «Resolution.» Change that from the default to «Scaled.» Once you click on «Scaled,» the resolutions available for your display will appear. You may select any resolution you desire.
-
Question
How do I change it to my own resolution that these methods do not support?
You cannot change your screen’s resolution to custom values. This is because these apps aforementioned do not support it; you have to look for a third-party app that supports this function.
Ask a Question
200 characters left
Include your email address to get a message when this question is answered.
Submit
Advertisement
About This Article
Thanks to all authors for creating a page that has been read 229,432 times.
Is this article up to date?
 Большая часть компьютеров под управлением MacOS — это ноутбуки серии MacBook. Современные модели таких ноутбуков оснащаются матрицей с высоким разрешением, которое достигает 2880×1800. Далеко не всем пользователям удобно работать с таким разрешением, при котором мелкие элементы могут быть практически незаметны. В рамках данной статьи рассмотрим, как изменить разрешение на MacBook или любом другом устройстве под управлением MacOS.
Оглавление:
1. Как изменить разрешение на MacBook в настройках
2. Как изменить разрешение на MacBook утилитами
Как изменить разрешение на MacBook в настройках
Первый способ — классический, он предполагает использование стандартных настроек компьютера для смены разрешения. Данный способ удобно использовать, если вам менять разрешение требуется не сильно часто, и при этом не нужно использовать “нетипичное” для используемой матрицы разрешение.
Чтобы поменять разрешение экрана MacBook, зайдите в настройки. Для этого в верхнем левом углу нажмите на значок яблока и выберите пункт “Системные настройки”.
Далее перейдите в раздел “Мониторы”, где настраиваются параметры дисплея.
В MacOS используется “Масштабированное” разрешение. В зависимости от потребностей, можно выбрать различные варианты масштабированного разрешения — в диапазоне от более крупного текста до большого количества свободного места.

Как можно видеть, сама операционная система не позволяет выбрать конкретное разрешение экрана, как это привычно для пользователей Windows. То есть, нельзя указать желаемое соотношение числа пикселей по горизонтали и по вертикали. Для этого можно использовать способ, который рассмотрен ниже.
Как изменить разрешение на MacBook утилитами
Рассмотрим вариант с использованием специализированных утилит, которые позволяют более детально настраивать разрешение экрана, что может быть полезно в ряде случаев.
В конкретном случае рассмотрим утилиту Resolutionator. Она дает возможность не только выбрать желаемое разрешение для всех мониторов, которые подключены к компьютеру под управлением Mac OS, но и позволяет делать это максимально быстро и удобно. После установки утилиты, доступ к ней осуществляется в один клик из верхней административной панели.
Скачайте утилиту с официального сайта разработчиков — https://manytricks.com/resolutionator/.
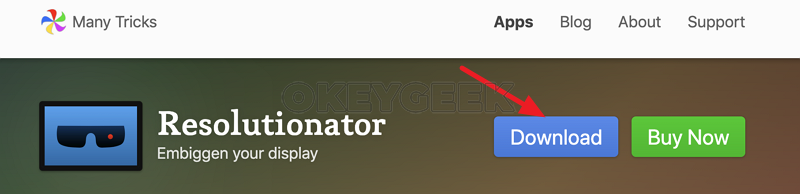
Установите ее на компьютер. При первом запуске потребуется подтвердить желание запустить программу, поскольку она загружена из интернета, и встроенная система безопасности Mac OS считает ее потенциально опасной.
После установки и запуска приложения, в верхней административной панели появится значок приложения. Нажав на него, можно видеть список разрешений, которые подходят для использования на матрице монитора (или экрана MacBook).
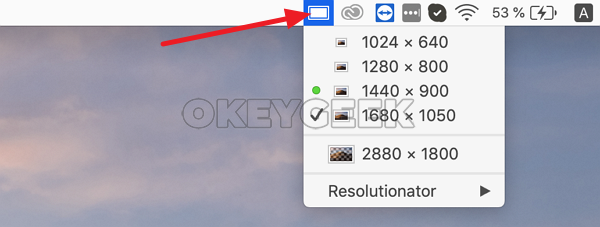
Можно выбрать необходимое разрешение, после чего оно сразу изменится.
![]()
![]()
![]()
![]()
![]() (11 голос., средний: 4,64 из 5)
(11 голос., средний: 4,64 из 5)
![]() Загрузка…
Загрузка…