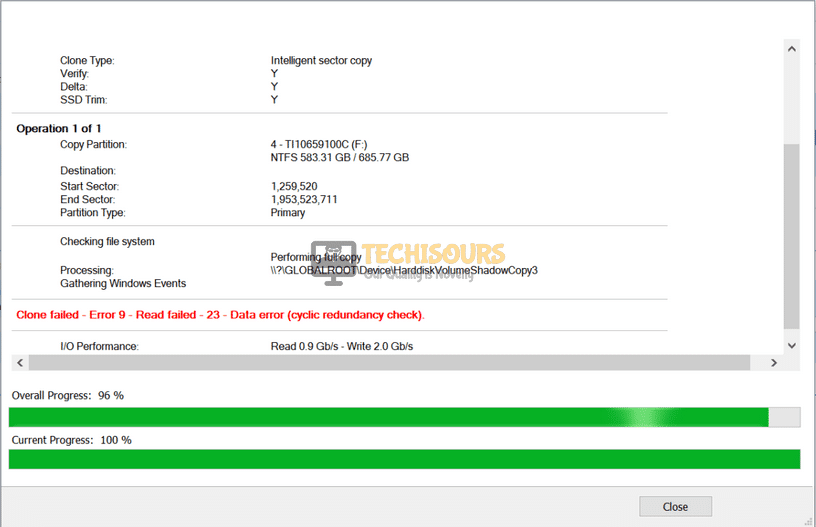
Macrium Reflect is a backup tool for Microsoft Windows. Many users have encountered an error while cloning their HDD to an SSD or a new HDD. This error states “Clone failed – Error 9” and it prevents you to clone your drive. The “macrium reflect error 9″ can be solved easily by going through the solutions explained in this article.
What causes the error 9 in Macrium Reflect?
There are different reasons that cause the macrium reflect error 9 in different situations. Some of the most common reasons are listed below:
- Improper cable connection might cause this issue.
- Bad Sectors in the storage device can cause this error.
- Your antivirus software might be blocking some of the features.
- This error might occur if the disk has a file system error.
Pre tips:
The error 9 might be encountered by anyone anytime. In most of the cases, the physical connection between both of the drives is loose, that is why you see this error. So if this error pops up on your screen, make sure you have connected the drive properly. If it doesn’t help, try to replace the connecting cable because the cable might get damaged easily if it is used excessively.
What to do if you get the “Macrium Reflect Error 9” on backup?
Solution 1: Disable or Uninstall Third-party Antivirus Softwares
If the error 9 appears, the reason might be that antivirus is blocking some features of the system. Third-party antiviruses are good to some extent but sometimes they create a problem by blocking some features of the system. So to resolve this error, turn-off your third party antiviruses and reboot the system to check if this problem is resolved.
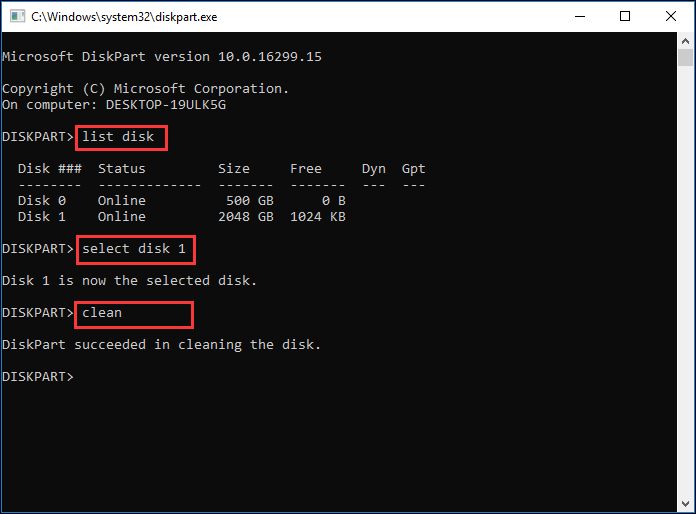
Solution 2: Clean the Target Disk to Resolve macrium reflect error 9
If you still encounter the macrium reflect error 9, run a disk cleanup of the destination disk. Follow the steps below to carry this task out.
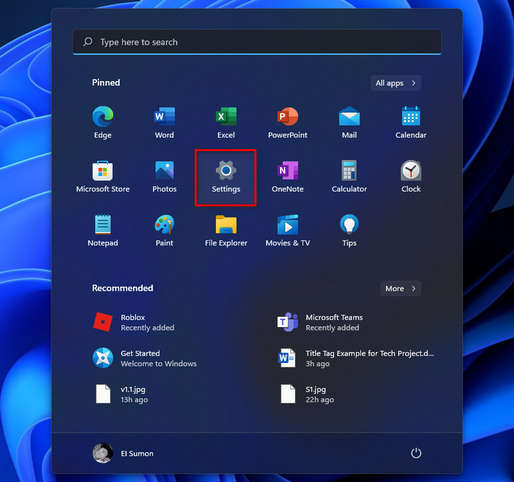
- Click the search button in the taskbar. Type and open Diskpart.

Diskpart - Write the following commands one by one and hit enter to execute them. (Note that X represents the Number of your Target drive)
-
list disk
select disk X
clean

Disk cleanup - Restart your computer and check if the issue is resolved.


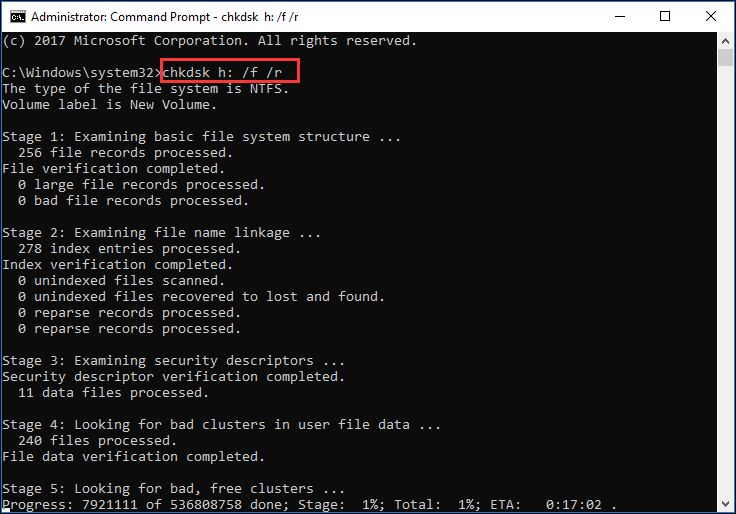
Solution 3: Run CHKDSK Utility for terminating macrium reflect error 9
Running the CHKDSK utility has been reported as the most efficient solution to error 9. Follow the steps given below to perform this task.
- Click the search button in the taskbar and type Command Prompt.
- Right-click on it and click Run as administrator.

Clicking on “Run as Administrator” - Enter the following command and hit enter to execute it. (Note that X represents the letter of your source drive)
-
chkdsk X: /f /r

Running chkdsk - Restart your PC and see if the error occurs again.


Solution 4: Create Image instead of Cloning
If you still can’t get rid of the error 9, try to make a disk image with Macrium Reflect. Follow the steps below to create this image and check if the error is resolved.
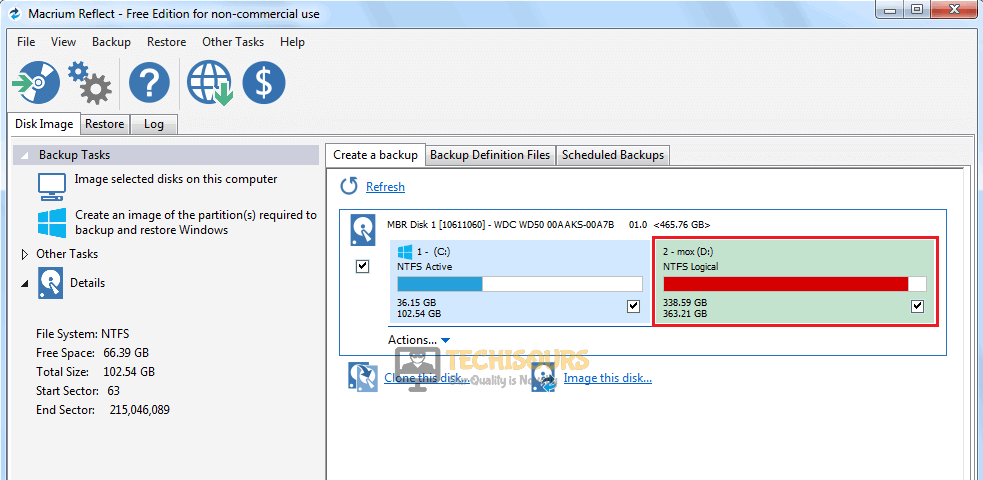
- Open Macrium and wait while it populates all the drives connected.
- Now select the drive which you want to image.

Select disk - Near the bottom bar, click Image this disk.

Image this disk - Now click the browse button and select aa location to create this image.
- Select OK, then select Next and then select None when it asks to choose a template.
- Now press Finish.

Finishing up


Solution 5: Ignore Bad Sectors
If macrium reflect error 9 appears on the screen while you are creating the image, try to ignore the bad sectors to resolve this issue. Follow the steps given below:
- Open Macrium.
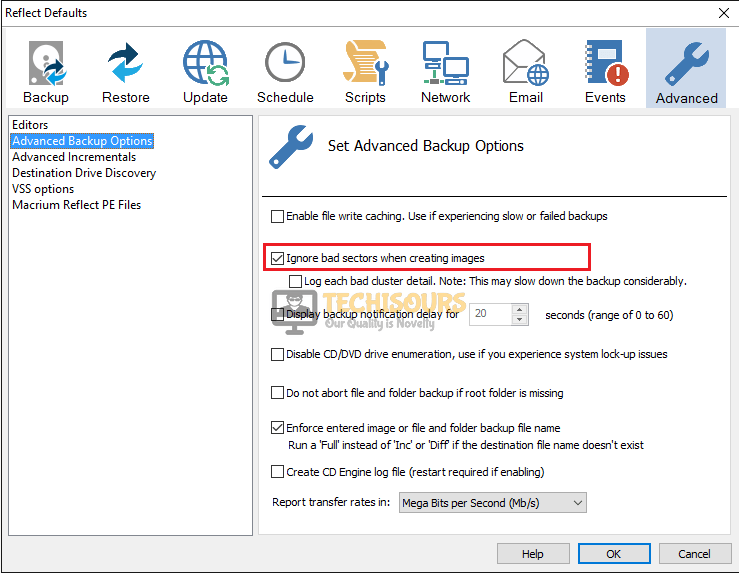
- At the top of the screen, click on Advanced.

Advanced - Now on the left pane, click on Advanced Backup Options.

Advanced Backup Options - Now check the box parallel to Ignore bad sectors when creating images.
Ignore bad sectors when creating images - Now press OK.

Solution 6: Use EaseUS
If none of the solutions explained above works, try to use another third-party software to carry your task out.
- Download EaseUS from your favorite browser.
- Install the tool by following the on-screen instructions and launch it.

Launch the tool - Select the partition that you want to clone.
Select the partition - Now select the destination disk to save your clone.
- Click Proceed.
Proceed


If you need further assistance, contact here.
Содержание
- SOLVED – Macrium Reflect Error 9 on backup
- How to fix Macrium Reflect Error 9 during backup
- Fix 1 – Check your connections
- Fix 2 – Disable third-party antivirus software
- Fix 3 – Clean the Target Disk
- Fix 4 – Run CHKDSK Utility
- Fix 5 – Create Image instead of Cloning
- Fix 6 – Ignore Bad Sectors
- How to Fix Macrium Reflect Error 9 during Backup?
- What causes the error 9 in Macrium Reflect?
- Pre tips:
- What to do if you get the “Macrium Reflect Error 9” on backup?
- Solution 1: Disable or Uninstall Third-party Antivirus Softwares
- Solution 2: Clean the Target Disk to Resolve macrium reflect error 9
- Solution 3: Run CHKDSK Utility for terminating macrium reflect error 9
- Solution 4: Create Image instead of Cloning
- Solution 5: Ignore Bad Sectors
- Solution 6: Use EaseUS
- Как исправить ошибку «Ошибка клонирования Macrium»
- Содержание
- Что вызывает ошибку «Macrium Reflect Clone failed»?
- Как исправить ошибку «Отражение клона Macrium не удалось»?
- Проверьте диск на наличие плохих секторов
- Очистить целевой диск
- Попробуйте отключить антивирус
- Создать образ вместо клонирования
- Игнорировать плохие сектора
- Проверьте подключение привода
- Попробуйте сторонние альтернативы
- Подключитесь к ближайшей сети Wi-Fi на телефоне BlackBerry Pearl 3G
- Далее
- Подключение к сети Wi-Fi на телефоне Nokia N900
- Далее
- Подключение к сети Wi-Fi с помощью параметра «Кнопка» на BlackBerry Bold 9650
SOLVED – Macrium Reflect Error 9 on backup

Macrium Reflect is image based backup utility for Microsoft Windows. The tool is easy to use and offers a solid performance; however, recently many users encountered an error while trying to clone their drive. The error reads “Clone failed – Error 9” and it prevents you from cloning your drive.
The error 9 in Macrium Reflect can appear for a number of reasons. These include improper cable connection, conflict with your antivirus software, file system error, etc. In this post, we look at different methods to solve this issue. So let’s get started!
How to fix Macrium Reflect Error 9 during backup
Are you receiving the error 9 in Macrium Reflect? Don’t worry. Here are some effective ways to get rid of this issue in no time.
Fix 1 – Check your connections
If you encounter the error 9, the first thing to do is check the physical connection between both the drives. In most cases, the drive is not connected properly causing the problem. Also, try to replace the connecting cable because the cable might be damaged easily if used excessively.
Fix 2 – Disable third-party antivirus software
Antivirus software aims to protect your computer from malware and cyber threats, but sometimes, it can block some features of the system. This can lead to error 9 in Macrium Reflect. To fix this error, you should turn off your third-party antivirus and reboot the system to see if it helps.
Fix 3 – Clean the Target Disk
If the error continues to occur, you can run a disk cleanup of the destination disk to fix the issue. Here is how to proceed:
1) Type “diskpart” in the Windows search bar and click to open it.
2) Click Yes if you’re prompted for permission.
3) Input the following commands one by one and hit Enter on each:
Note: The X in the above commands represents the number of your Target drive.
4) When the process is finishes, restart your computer and check if the issue has been resolved.
Fix 4 – Run CHKDSK Utility
Running the CHKDSK utility has fixed the macrium reflect error 9 for many users. Follow the steps below to carry this task out:
1) Type “cmd” in the Windows search bar, then right-click on the Command Prompt result and select Run as administrator.
2) Click Yes if you’re prompted for permission.
3) In the Command Prompt window, input the following command and hit Enter to execute it:
Note: The X in the above commands represents the number of your Target drive.
4) Restart your computer and check to see if you still encounter the error.
Fix 5 – Create Image instead of Cloning
You can try making a disk image with Macrium Reflect to avoid the error 9. Here’s how to do it:
1) Open Macrium and wait for it to populate all the drives connected.
2) Select the drive you want to create an image of.
3) Click Image this disk…
4) Select a location to create this image, then click OK > Next.
5) Select None when it asks to choose a template.
6) Finally, hit the Finish button.
Fix 6 – Ignore Bad Sectors
If you receive the error 9 while creating the image, try to ignore the bad sectors to fix this issue.
1) Open Macrium and click on Advanced in the top menu.
2) On the left pane, click on Advanced Backup Options.
3) Check the box for Ignore bad sectors when creating images.
4) Click OK to save the changes.
We hope this post helped you fix the error 9 in Macrium Reflect. If not, you can tell us your concern in the comments below, and we’ll do what we can to help.
Источник
How to Fix Macrium Reflect Error 9 during Backup?
Macrium Reflect is a backup tool for Microsoft Windows. Many users have encountered an error while cloning their HDD to an SSD or a new HDD. This error states “Clone failed – Error 9” and it prevents you to clone your drive. The “macrium reflect error 9″ can be solved easily by going through the solutions explained in this article.
Error Message
What causes the error 9 in Macrium Reflect?
There are different reasons that cause the macrium reflect error 9 in different situations. Some of the most common reasons are listed below:
- Improper cable connection might cause this issue.
- Bad Sectors in the storage device can cause this error.
- Your antivirus software might be blocking some of the features.
- This error might occur if the disk has a file system error.
Pre tips:
The error 9 might be encountered by anyone anytime. In most of the cases, the physical connection between both of the drives is loose, that is why you see this error. So if this error pops up on your screen, make sure you have connected the drive properly. If it doesn’t help, try to replace the connecting cable because the cable might get damaged easily if it is used excessively.
What to do if you get the “Macrium Reflect Error 9” on backup?
Solution 1: Disable or Uninstall Third-party Antivirus Softwares
If the error 9 appears, the reason might be that antivirus is blocking some features of the system. Third-party antiviruses are good to some extent but sometimes they create a problem by blocking some features of the system. So to resolve this error, turn-off your third party antiviruses and reboot the system to check if this problem is resolved.
Solution 2: Clean the Target Disk to Resolve macrium reflect error 9
If you still encounter the macrium reflect error 9, run a disk cleanup of the destination disk. Follow the steps below to carry this task out.
- Click the search button in the taskbar. Type and open Diskpart.
 Diskpart
 - Write the following commands one by one and hit enter to execute them. (Note that X represents the Number of your Target drive)
- Disk cleanup
- Restart your computer and check if the issue is resolved.
Solution 3: Run CHKDSK Utility for terminating macrium reflect error 9
Running the CHKDSK utility has been reported as the most efficient solution to error 9. Follow the steps given below to perform this task.
- Click the search button in the taskbar and type Command Prompt.
- Right-click on it and click Run as administrator.Clicking on “Run as Administrator”
- Enter the following command and hit enter to execute it. (Note that X represents the letter of your source drive)
- Running chkdsk
- Restart your PC and see if the error occurs again.
Solution 4: Create Image instead of Cloning
If you still can’t get rid of the error 9, try to make a disk image with Macrium Reflect. Follow the steps below to create this image and check if the error is resolved.
- Open Macrium and wait while it populates all the drives connected.
- Now select the drive which you want to image. Select disk
- Near the bottom bar, click Image this disk.Image this disk
- Now click the browse button and select aa location to create this image.
- Select OK, then select Next and then select None when it asks to choose a template.
- Now press Finish.Finishing up
Solution 5: Ignore Bad Sectors
If macrium reflect error 9 appears on the screen while you are creating the image, try to ignore the bad sectors to resolve this issue. Follow the steps given below:
- Open Macrium.
- At the top of the screen, click on Advanced. Advanced
- Now on the left pane, click on Advanced Backup Options.Advanced Backup Options
- Now check the box parallel to Ignore bad sectors when creating images. Ignore bad sectors when creating images
- Now press OK.
Solution 6: Use EaseUS
If none of the solutions explained above works, try to use another third-party software to carry your task out.
- Download EaseUS from your favorite browser.
- Install the tool by following the on-screen instructions and launch it. Launch the tool
- Select the partition that you want to clone. Select the partition
- Now select the destination disk to save your clone.
- Click Proceed.Proceed
If you need further assistance, contact here.
Источник
Как исправить ошибку «Ошибка клонирования Macrium»
Содержание
Macrium Reflect — это программа для создания образов дисков и резервного копирования для Microsoft Windows, которая создает резервные копии и образы с помощью службы Microsoft Volume Shadow Copy Service. Он выполняет резервное копирование и репликацию (клонирование) целых разделов на другой накопитель одним нажатием кнопки.
Сообщение об ошибке «Не удалось отразить клон Macrium”- очень распространенная ошибка, которая возникает, в частности, при клонировании жесткого диска на твердотельный накопитель. Причины этого сообщения об ошибке очень разнообразны и варьируются от проблем с антивирусом до поврежденных секторов на диске.
Что вызывает ошибку «Macrium Reflect Clone failed»?
Как упоминалось ранее, это сообщение об ошибке может появиться по разным причинам. Некоторые из них перечислены ниже:
- В связь между приводом и компьютером не правильно. Плохой соединительный кабель может нарушить процесс клонирования устройства хранения.
- На запоминающем устройстве есть плохие сектора. Программное обеспечение обычно возвращает сообщение об ошибке, когда обнаруживает поврежденные сектора во время клонирования.
- В антивирус программное обеспечение не позволяет Macrium клонировать диск. Это очень распространенная практика, когда антивирусное программное обеспечение блокирует любую попытку доступа к диску в течение продолжительных периодов времени.
Как исправить ошибку «Отражение клона Macrium не удалось»?
Пользователи, столкнувшиеся с этой проблемой, сообщают, что они получают различные сообщения об ошибках, такие как «доступ запрещен» или «невозможно сопоставить раздел». Это сообщение об ошибке обычно также сопровождается цифрами ошибки, такими как «ошибка 9», «ошибка 0» и т. Д. В редких случаях, если разрешения установлены неправильно, может появиться сообщение «чтение не выполнено 13, разрешение отклонено 32» или « write failed 22 invalid argument ‘вместе с исходной строкой ошибки.
Перечисленные ниже решения направлены на все эти проблемы. Убедитесь, что у вас есть активное подключение к Интернету и вы вошли в систему как администратор.
Проверьте диск на наличие плохих секторов
Плохой сектор — это сектор на запоминающем устройстве, который недоступен для любого программного обеспечения из-за необратимого повреждения. Плохие секторы постоянно присутствуют на устройстве хранения. Чтобы противостоять этому, операционная система помечает эти сектора, чтобы они могли пропустить их при обычных операциях. Если у вас есть поврежденные сектора, вы должны запустить утилиту «chkdsk», чтобы убедиться, что они не нарушают процесс клонирования.
- Нажмите Windows + S, введите «командная строка»В диалоговом окне щелкните приложение правой кнопкой мыши и выберите«Запустить от имени администратора”.
- В командной строке с повышенными привилегиями выполните следующую команду:
- Если вам будет предложено проверить после перезагрузки, нажмите «y» и перезагрузите компьютер. После перезапуска chkdsk уже будет запланирован операционной системой, и будет выполнено сканирование. Наберитесь терпения и позвольте процессу.
- После того, как утилита просканировала и удалила поврежденные сектора из обычного доступа, попробуйте снова клонировать устройство хранения.
Очистить целевой диск
Если на целевом диске повреждена файловая система, Macrium не сможет клонировать ее. Поврежденные файловые системы тоже не редкость и обычно возникают из-за логических ошибок. Мы можем использовать утилиту diskpart, чтобы очистить структуру целевого диска и посмотреть, решит ли это проблему.
- Нажмите Windows + R, введите «командная строка»В диалоговом окне щелкните приложение правой кнопкой мыши и выберите«Запустить от имени администратора”.
- В командной строке выполните следующие команды одну за другой по порядку.
diskpart list disk select disk [номер целевого диска] очистить все
- После восстановления файловой структуры перезагрузите компьютер, убедитесь, что оба диска подключены правильно, и попробуйте клонировать снова.
Попробуйте отключить антивирус
Как упоминалось ранее, антивирусное программное обеспечение блокирует доступ к любой программе, которую они считают подозрительной в заражении компьютерной системы. Если процесс клонирования заблокирован антивирусом, вы можете получить сообщение об ошибке «Доступ запрещен» вместе с кодом ошибки.
Чтобы противостоять этой ситуации, вы можете отключи свой антивирус ПО полностью, а затем повторите попытку клонирования. Если на вашем рабочем столе установлено несколько антивирусных программ, сделайте то же самое для всех. Как только вы будете абсолютно уверены, что никакой антивирус не контролирует ваш компьютер, попробуйте снова запустить процесс клонирования.
Создать образ вместо клонирования
Если у вас возникли проблемы с клонированием нашего жесткого диска, вы можете попробовать создать его образ. Между этими двумя процессами есть небольшие различия. Клонирование диска — это процедура копирования всего содержимого одного диска на другой, которая включает в себя всю информацию, необходимую для загрузки операционной системы с диска. Он создает индивидуальную копию жесткого диска, и эти жесткие диски могут быть заменены друг на друга также после процесса клонирования.
Создание образа диска — это процесс создания резервной копии содержимого жесткого диска. Образ диска — это тип файлов хранилища, который содержит все данные и информацию, необходимую для загрузки операционной системы. Однако образ диска должен быть применяется для того, чтобы жесткий диск работал.
Здесь мы опишем процедуру создания образа вашего диска вместо клонирования.
- Откройте Macrium и дайте ему заполнить все подключенные диски. затем выберите диск который ты хочешь образ и нажмите Изображение этого диска присутствует внизу.
- Теперь щелкните кнопка просмотра и выберите расположение где вы хотите создать изображение. Нажмите хорошо когда вы выбрали место.
- Выбрать далее. Теперь вы можете выбрать шаблон для своей резервной копии. Если вы не знаете, что это, нажмите Никто.
- Нажмите финиш и начнется создание вашего образа. Терпеливо дождитесь завершения процесса.
Игнорировать плохие сектора
Если вы получаете такое же сообщение об ошибке при создании образа, вы можете попробовать игнорировать поврежденные секторы при создании образа. Обычно, следуя решению 1, все сбойные секторы удаляются из логической памяти. Но если есть какие-то проблемы, которые все еще вызывают проблемы, это может решить проблему.
- открыто Макриум и нажмите на Продвинутый из верхней части экрана.
- Сейчас чек коробка Игнорировать плохие сектора при создании образов.
- Нажмите хорошо для сохранения изменений и выхода. Теперь попробуйте снова создать изображение.
Проверьте подключение привода
Прежде чем вы начнете использовать сторонние альтернативы, вам следует проверить правильность физического соединения между обоими вашими дисками. Если вы подключаете SSD через порт USB, попробуйте подключить его к материнской плате и повторите попытку клонирования.
Измените соединение SATA для жесткого диска и, если возможно, попробуйте заменить кабель. Кабели можно легко повредить, и из-за них процесс клонирования может быть нарушен. Как только вы убедитесь, что обе, целевой и целевой диски подключены правильно, продолжайте процесс клонирования.
Попробуйте сторонние альтернативы
Если все вышеперечисленные методы не работают для вас, вы можете рассмотреть возможность использования другого альтернативного программного обеспечения. Согласно нашему исследованию, было множество случаев, когда Macrium выдавал ошибку, в то время как другое программное обеспечение, такое как AOMEI отлично справился со своей работой.
Для информации пользователя мы рекомендуем программное обеспечение AOMEI. Вы можете скачать программный модуль с официального сайта и попробовать клонировать с него свой диск.
Примечание: Appuals не имеет отношения к какому-либо программному обеспечению. Все рекомендованное программное обеспечение предназначено исключительно для информации читателя.
Подключитесь к ближайшей сети Wi-Fi на телефоне BlackBerry Pearl 3G
Узнайте, как находить и подключаться к беспроводным сетям (Wi-Fi) на вашем BlackBerry Pearl 3G. Этот клип покажет вам, как это делается. Являетесь ли вы счастливым владельцем смартфона BlackBerry или .
Далее
Подключение к сети Wi-Fi на телефоне Nokia N900
Подключение смартфона Nokia N900 к беспроводной точке доступа или домашней сети Wi-Fi — всего в нескольких шагах! Посмотрите это видео технической поддержки от Nokia, которое точно скажет вам, где най.
Далее
Подключение к сети Wi-Fi с помощью параметра «Кнопка» на BlackBerry Bold 9650
Узнайте, как использовать инструмент «Кнопки» на телефоне BlackBerry Bold 9650 для подключения к беспроводной сети. Этот клип покажет вам, как это делается. Являетесь ли вы счастливым владел.
Источник

Macrium Reflect is image based backup utility for Microsoft Windows. The tool is easy to use and offers a solid performance; however, recently many users encountered an error while trying to clone their drive. The error reads “Clone failed – Error 9” and it prevents you from cloning your drive.
The error 9 in Macrium Reflect can appear for a number of reasons. These include improper cable connection, conflict with your antivirus software, file system error, etc. In this post, we look at different methods to solve this issue. So let’s get started!
How to fix Macrium Reflect Error 9 during backup
Are you receiving the error 9 in Macrium Reflect? Don’t worry. Here are some effective ways to get rid of this issue in no time.
- Check your connection
- Disable third-party antivirus software
- Clean the Target Disk
- Run CHKDSK Utility
- Ignore Bad Sectors
- Create Image instead of Cloning
Fix 1 – Check your connections
If you encounter the error 9, the first thing to do is check the physical connection between both the drives. In most cases, the drive is not connected properly causing the problem. Also, try to replace the connecting cable because the cable might be damaged easily if used excessively.
Fix 2 – Disable third-party antivirus software
Antivirus software aims to protect your computer from malware and cyber threats, but sometimes, it can block some features of the system. This can lead to error 9 in Macrium Reflect. To fix this error, you should turn off your third-party antivirus and reboot the system to see if it helps.
Fix 3 – Clean the Target Disk
If the error continues to occur, you can run a disk cleanup of the destination disk to fix the issue. Here is how to proceed:
1) Type “diskpart” in the Windows search bar and click to open it.
2) Click Yes if you’re prompted for permission.
3) Input the following commands one by one and hit Enter on each:
list disk
select disk X
clean
Note: The X in the above commands represents the number of your Target drive.

4) When the process is finishes, restart your computer and check if the issue has been resolved.
Fix 4 – Run CHKDSK Utility
Running the CHKDSK utility has fixed the macrium reflect error 9 for many users. Follow the steps below to carry this task out:
1) Type “cmd” in the Windows search bar, then right-click on the Command Prompt result and select Run as administrator.
2) Click Yes if you’re prompted for permission.
3) In the Command Prompt window, input the following command and hit Enter to execute it:
chkdsk X: /f /r
Note: The X in the above commands represents the number of your Target drive.

4) Restart your computer and check to see if you still encounter the error.
Fix 5 – Create Image instead of Cloning
You can try making a disk image with Macrium Reflect to avoid the error 9. Here’s how to do it:
1) Open Macrium and wait for it to populate all the drives connected.
2) Select the drive you want to create an image of.
3) Click Image this disk…
4) Select a location to create this image, then click OK > Next.
5) Select None when it asks to choose a template.
6) Finally, hit the Finish button.
Fix 6 – Ignore Bad Sectors
If you receive the error 9 while creating the image, try to ignore the bad sectors to fix this issue.
1) Open Macrium and click on Advanced in the top menu.
2) On the left pane, click on Advanced Backup Options.
3) Check the box for Ignore bad sectors when creating images.
4) Click OK to save the changes.
We hope this post helped you fix the error 9 in Macrium Reflect. If not, you can tell us your concern in the comments below, and we’ll do what we can to help.
READ NEXT
- [2020 FIX] GeForce Experience Error Code 0x0001
- Fixed: Digital TV Tuner Device Registration Application Issue
Macrium Reflect is a very useful disk cloning and imaging tool. However, some users claim that they encounter Macrium Reflect clone failed issue when cloning disk. How to fix it? Don’t be panic. This article will show you how to fix Macrium Reflect clone failed issue with top 5 fixes.
You may come across Macrium Reflect clone failed error message when cloning your HDD to an SSD or a new HDD. When it happens, what should you do? The first step is to learn the reasons that give rise to Macrium Reflect clone failed. After learning the reasons, you can follow the solutions in this article to fix the error efficiently.
What Is Macrium Reflect
Some users don’t know what Macrium Reflect is. Actually it is a backup tool for Microsoft Windows developed by Paramount Software UK Ltd in 2006. It creates disk images and file backup archives with the use of Microsoft Volume Shadow Copy Service.
Macrium Reflect can clone one disk onto another, backup whole partitions or individual files and folders, which is a very convenient disk cloning utility. However, some users report that they encounter Macrium Reflect clone failed error when they clone hard drive with the backup software Macrium Reflect.
How to fix Macrium Reflect clone failed issue? Do you know the reasons that lead to Macrium Reflect clone failed? Here I summarize some reasons for Macrium Reflect clone failed error. You may have a look.
Reasons for Macrium Reflect Clone Failed Issue
Macrium Reflect clone failed problem could occur from time to time. There are many reasons that could lead to Macrium Reflect clone failed issue. Here are some typical reasons for your reference.
1. The cable connection is not proper:
If the cable between your device and computer is not connected properly, you may fail in cloning disk with the disk cloning software Macrium Reflect. So, make sure the proper cable connection between the drive and the computer.
2. The storage device has bad sectors:
You may encounter Macrium Reflect clone failed error when there are bad sectors on the source disk.
3. Antivirus software is enabled:
The antivirus software blocks the process to clone system files due to security reasons, leading to Macrium Reflect clone failed issue.
4. The disk has file system error:
When the destination or target disk has corrupted file system, you may receive Macrium Reflect clone failed error message.
Solution 1. Run CHKDSK Utility
Sometimes the Macrium Reflect clone failed issue is caused by bad sectors on hard disk. You can run CHKDSK Windows 10 to check and fix hard drive errors and bad sectors that may cause Macrium Reflect clone failed issue.
Well, how to run CHKDSK Windows 10 to scan and fix hard drive errors? If you don’t know, you can follow the steps as below to run CHKDSK utility in Windows 10 now.
Step 1. Launch the Command Prompt
- Input Command Prompt in the Windows 10 Cortana search box.
- Click the best match and right-click it to Run as administrator.
Step 2. Run CHKDSK
- Input chkdsk *: /f /r (* represents the letter of your source drive) and press Enter.
- This command will scan the source disk and repair all the errors, bad sectors or corruption it finds.
- When the process is done, you can input exit and hit Enter to close the command prompt window.
After that, you can run the software to clone your disk and see if the Macrium Reflect clone failed issue has been solved. If you still encounter Macrium Reflect clone failed error message, you have no choice but to the rest solutions.
Solution 2. Clean the target disk
If the target or destination disk has corrupted file system, it may also lead to Macrium Reflect free clone failed issue. In this way, you can clean the destination disk before cloning.
Step 1. Run Diskpart Windows 10
You can launch Diskpart via the following two ways.
- Right-click Windows 10 Start menu and choose Run. Then type diskpart in the pop-up Run window.
- Input diskpart in the Windows search box and clickthe best match
Step 2. Use Diskpart to Clean Disk
- Input list disk to show all the disks connected to your computer and hit Enter.
- Input select disk * (* represents disk number of your target disk) to select the destination hard drive. And then hit Enter.
- Input clean and hit Enter to remove all the data on the target disk.
After the disk is cleaned, you can restart your computer and clone disk with Macrium Reflect. Make sure that both the drives are connected properly and try cloning again.
Solution 3. Disable Antivirus Software
The Macrium Reflect clone failed issue may be caused by antivirus software. If the antivirus software on your computer is enabled, it will prevent access to any program they find likely to infect a computer system. This could be the reasons for Macrium Reflect clone failed error message.
In this case, you can disable the antivirus software installed on your computer temporarily and then clone your drive again. After you successfully clone hard drive with Macrium Reflect, you can enable the antivirus software to protect computer from virus attack.
If you still encounter Macrium Reflect clone failed issue, try the next method.
Solution 4. Make an Image Instead of Cloning
If you meet the Macrium Reflect failed to clone issue when cloning, you can make a disk image with Macrium Reflect.
A disk image is a type of storage files. It is a backup copy of the contents of a hard drive and it contains all the data and the necessary information to boot into the operating system.
You can backup hard drive to an external hard drive and then restore the image to your new hard drive or SSD. In this way, the system and other data will all be copied to the new disk as well. When you come across Macrium Reflect clone failed, you can make a disk image instead of cloning.
Solution 5. Try Macrium Reflect Alternative Backup Software
MiniTool Partition Wizard
If the above solutions cannot help you fix Macrium Reflect clone failed issue, you can try using other disk clone software to copy disk. MiniTool Partition Wizard is the best Macrium Reflect free alternative software.
MiniTool Partition Wizard is an all-in-one partition manager & disk cloning utility, which can help you perform many partition and disk management operations like resize partition, extend partition, convert FAT to NTFS, convert MBR to GPT, migrate OS to SSD/HD, copy disk, check file system and so on.
You can try using the drive cloning software when you encounter Macrium Reflect clone failed error during the cloning process. If you have never used the software and don’t know how to get and utilize the software, don’t worry. The following contents will show you how to copy disk with MiniTool Partition Wizard.
Before you start, connect a hard disk, for example, SSD or an external hard drive, to your computer.
Step 1. The first thing is to get the Macrium Reflect free alternative MiniTool Partition Wizard Free Edition by clicking the following button. Install the drive cloning and backup software on your computer. Then launch it to get the main interface.
Free Download
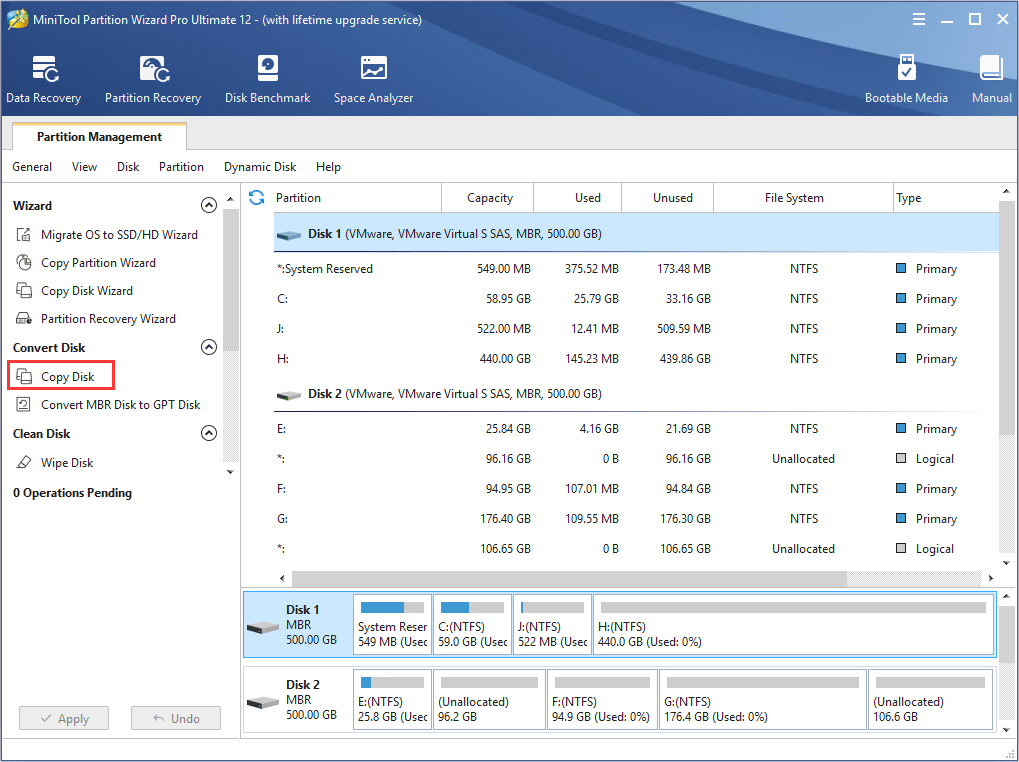
Step 2. On the main interface, select the disk you need to copy and choose Copy Disk from the left action panel. To clone system disk, MiniTool Partition Wizard Pro Ultimate is recommended.
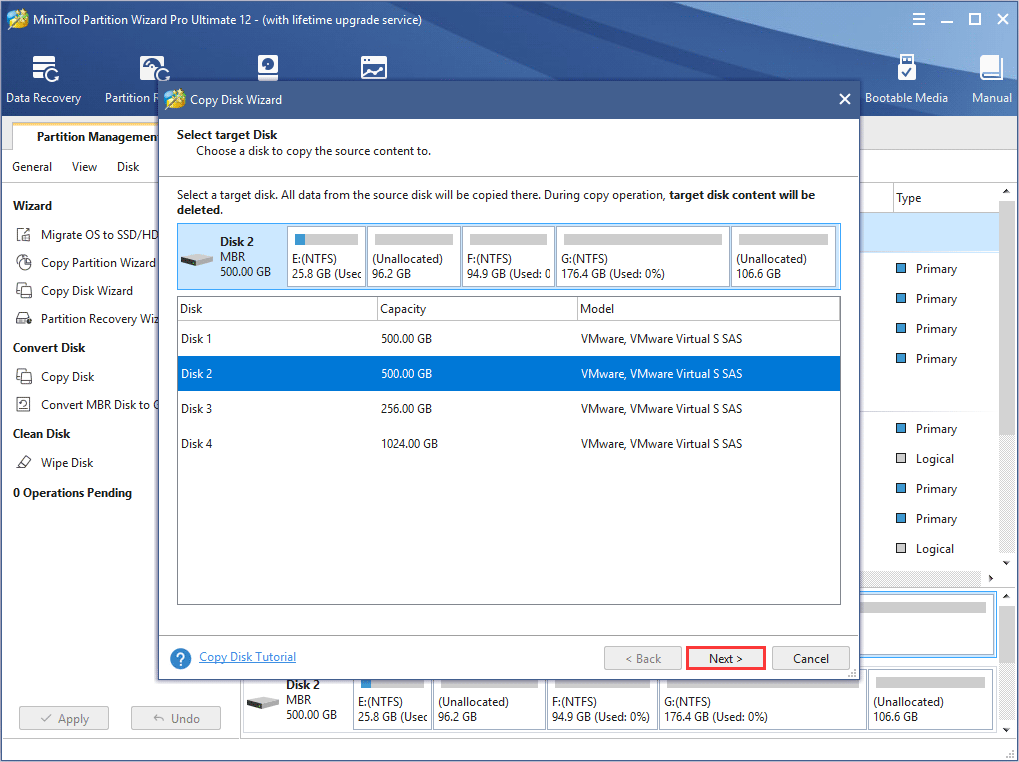
Step 3. Select a target disk from the disk list and click Next. When you click Next, it will remind you that all the data on the disk will be destroyed. Make sure there is no important file on the destination disk. Then click Yes to continue.
Step 4. You may change the copy options by yourself. Fit partition to entire disk means the selected disk will be copied to target disk with the whole disk filled proportionally. Copy partitions without resize means the selected disk will be copied with their original sizes.
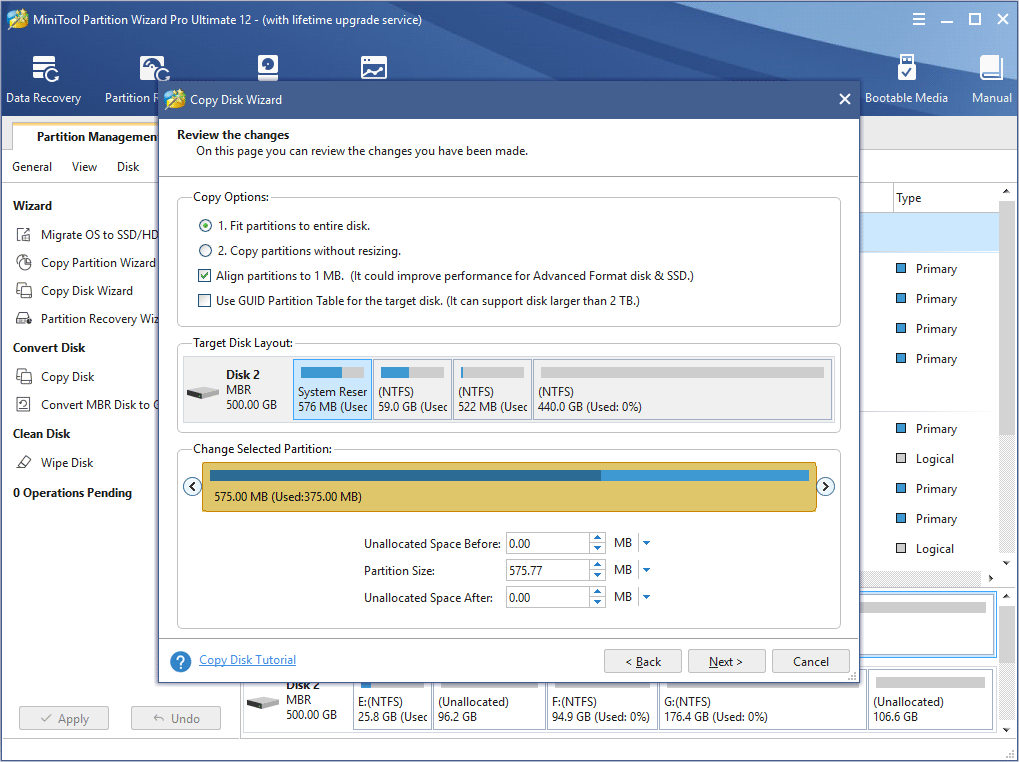
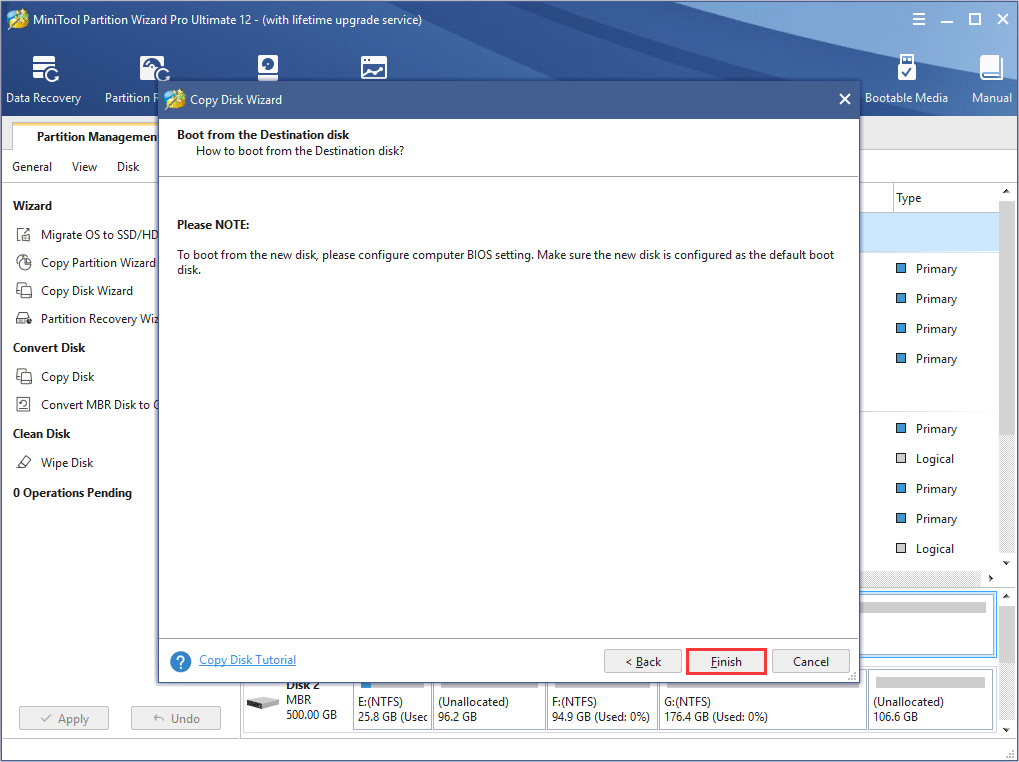
Step 5. Then MiniTool Partition Wizard Free Edition will tell you how to boot from the new disk. Read the note and click Finish to go on.
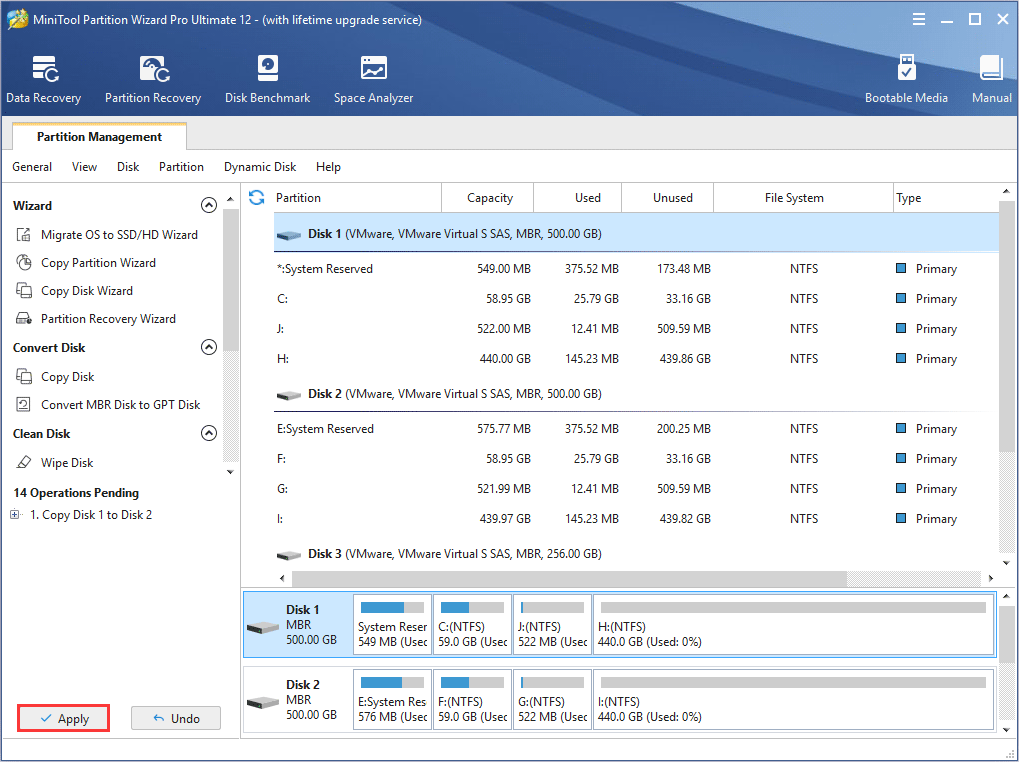
Step 6. Then click Apply to allow the pending operations and click Yes to allow changes.
This is how to copy disk with the Macrium Reflect free alterative MiniTool Partition Wizard. If you just want to copy a partition, you can choose Copy Partition function to copy a specific partition by yourself.
Actually, apart from this drive cloning utility, you can choose the professional backup software MiniTool ShadowMaker, which has the same magic like MiniTool Partition Wizard.
With the Macrium Reflect free alternative MiniTool Partition Wizard Free Edition, I successfully cloned hard drive without a hassle. This disk cloning software is worth trying if Macrium Reflect clone failed.Click to Tweet
MiniTool ShadowMaker
MiniTool ShadowMaker is a professional backup tool. It can help you backup files and folders, disks and partitions in just a few clicks. With this backup software, you are able to clone system disk or data disk on your computer without a hassle. When you encounter Macrium Reflect clone failed issue, you can try using MiniTool ShadowMaker to clone disk.
Here are detailed steps to clone disk with MiniTool ShadowMaker.
Step 1. Download MiniTool ShadowMaker by clicking the following button. Install it on your computer.
Free Download
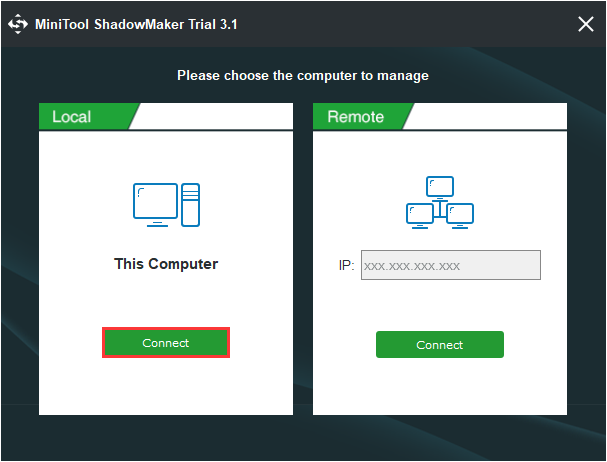
Step 2. Launch the Macrium Reflect free alternative MiniTool ShadowMaker. Click Keep Trial and choose Connect in This Computer to continue.
Step 3. When you get the main interface, go to the Tools page directly and choose Clone Disk to clone your disk.
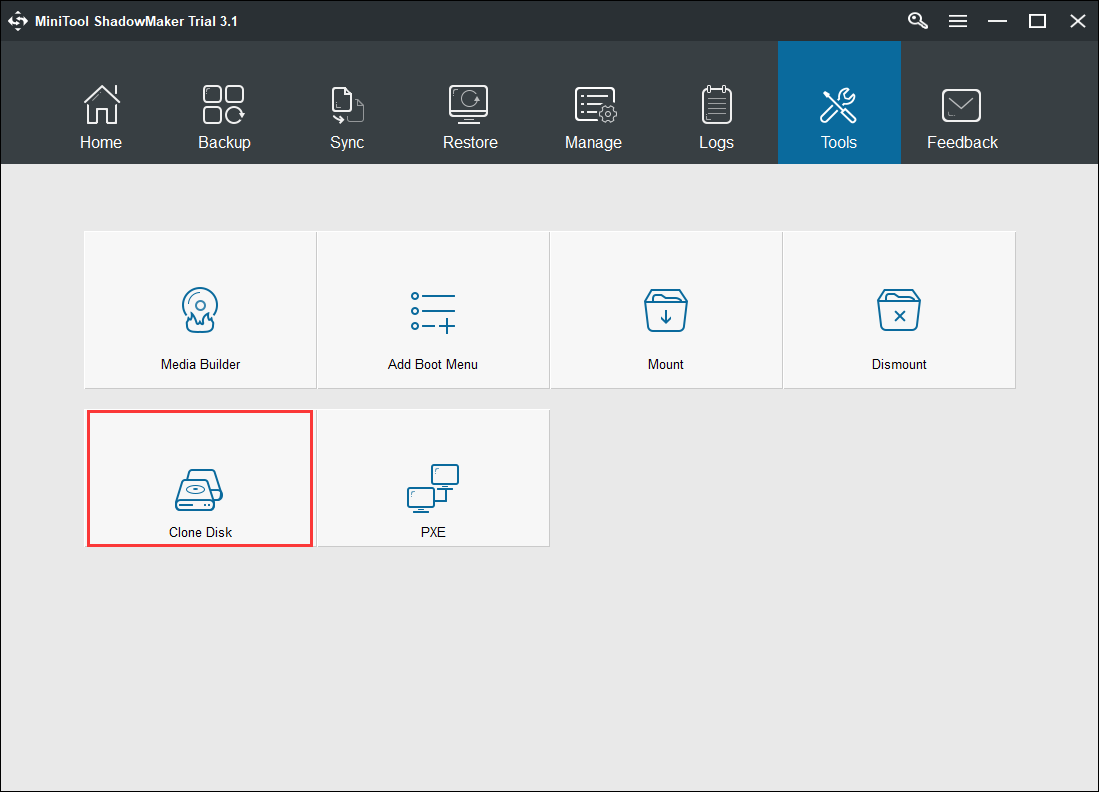
Step 4. On this page, click The Source Disk and The Target Disk modules respectively to choose the hard drive you want to backup and choose the destination disk to save the copy.
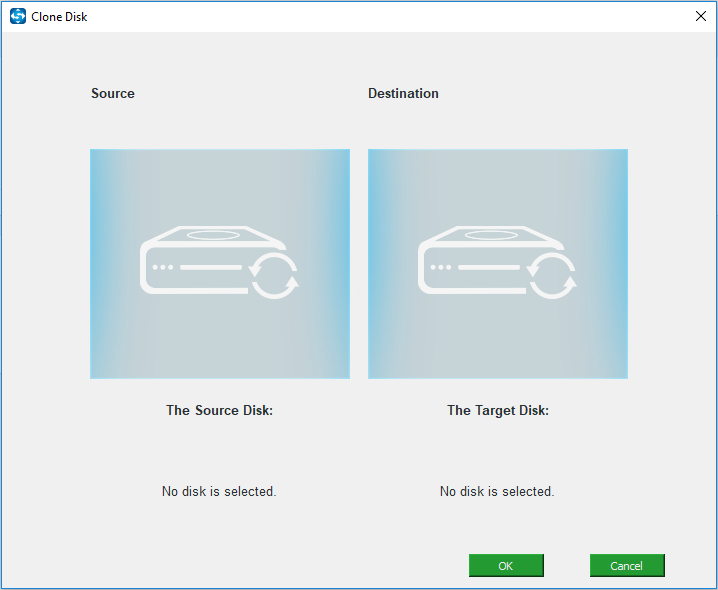
Step 5. After selecting the source disk and target disk, you can click OK to continue. When you click OK, a pop-up window will remind you that data on target disk will be destroyed. So, backup important files on target disk in advance.

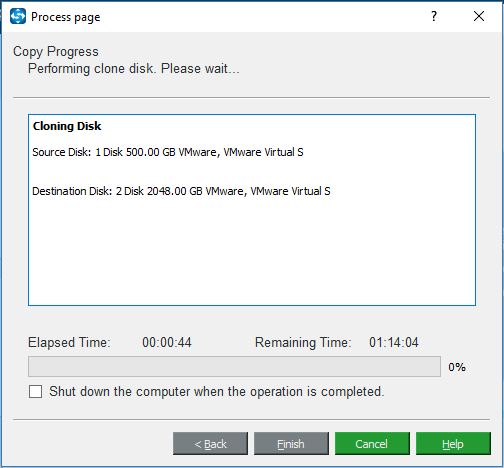
Step 6. Then the Macrium Reflect free alternative software will start cloning your source disk to target disk. The time for disk cloning depends on how many files you have stored on the source disk. Please wait patiently.
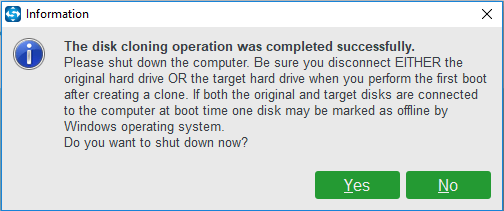
Step 7. When disk clone is finished, you will receive a message which tells you that the source disk and the target disk have the same signature and one disk will be marked as offline if both of them are connected to your computer.
Remove either of them when the disk clone process is finished. However, if you need to boot your computer from the target disk, you should go to the BIOS settings to change the boot order.
Now you have learned how to clone disk with the two Macrium Reflect free alternatives. If you encounter Macrium Reflect clone failed error or other Macrium Reflect errors like Macrium Reflect error 0 or Macrium Reflect error 9, you can try using the MiniTool Partition Wizard Free Edition and MiniTool ShadowMaker to clone disk and make backups.
Free Download
Free Download
Wrapping things Up
After reading this article, you should know how to resolve the Macrium Reflect clone failed error with the above 5 solutions. Even if you cannot fix Macrium Reflect clone failed error, you can try using the two awesome Macrium Reflect free alternatives.
If you have any question about how to fix Macrium Reflect clone failed issue or you have any other good drive cloning and backup software to recommend, you can leave a message on the following comment zone and we will respond as soon as possible. If you need any help when using MiniTool software, you can contact us via [email protected].
Macrium Reflect is a very useful disk cloning and imaging tool. However, some users claim that they encounter Macrium Reflect clone failed issue when cloning disk. How to fix it? Don’t be panic. This article will show you how to fix Macrium Reflect clone failed issue with top 5 fixes.
You may come across Macrium Reflect clone failed error message when cloning your HDD to an SSD or a new HDD. When it happens, what should you do? The first step is to learn the reasons that give rise to Macrium Reflect clone failed. After learning the reasons, you can follow the solutions in this article to fix the error efficiently.
What Is Macrium Reflect
Some users don’t know what Macrium Reflect is. Actually it is a backup tool for Microsoft Windows developed by Paramount Software UK Ltd in 2006. It creates disk images and file backup archives with the use of Microsoft Volume Shadow Copy Service.
Macrium Reflect can clone one disk onto another, backup whole partitions or individual files and folders, which is a very convenient disk cloning utility. However, some users report that they encounter Macrium Reflect clone failed error when they clone hard drive with the backup software Macrium Reflect.
How to fix Macrium Reflect clone failed issue? Do you know the reasons that lead to Macrium Reflect clone failed? Here I summarize some reasons for Macrium Reflect clone failed error. You may have a look.
Reasons for Macrium Reflect Clone Failed Issue
Macrium Reflect clone failed problem could occur from time to time. There are many reasons that could lead to Macrium Reflect clone failed issue. Here are some typical reasons for your reference.
1. The cable connection is not proper:
If the cable between your device and computer is not connected properly, you may fail in cloning disk with the disk cloning software Macrium Reflect. So, make sure the proper cable connection between the drive and the computer.
2. The storage device has bad sectors:
You may encounter Macrium Reflect clone failed error when there are bad sectors on the source disk.
3. Antivirus software is enabled:
The antivirus software blocks the process to clone system files due to security reasons, leading to Macrium Reflect clone failed issue.
4. The disk has file system error:
When the destination or target disk has corrupted file system, you may receive Macrium Reflect clone failed error message.
Solution 1. Run CHKDSK Utility
Sometimes the Macrium Reflect clone failed issue is caused by bad sectors on hard disk. You can run CHKDSK Windows 10 to check and fix hard drive errors and bad sectors that may cause Macrium Reflect clone failed issue.
Well, how to run CHKDSK Windows 10 to scan and fix hard drive errors? If you don’t know, you can follow the steps as below to run CHKDSK utility in Windows 10 now.
Step 1. Launch the Command Prompt
- Input Command Prompt in the Windows 10 Cortana search box.
- Click the best match and right-click it to Run as administrator.
Step 2. Run CHKDSK
- Input chkdsk *: /f /r (* represents the letter of your source drive) and press Enter.
- This command will scan the source disk and repair all the errors, bad sectors or corruption it finds.
- When the process is done, you can input exit and hit Enter to close the command prompt window.
After that, you can run the software to clone your disk and see if the Macrium Reflect clone failed issue has been solved. If you still encounter Macrium Reflect clone failed error message, you have no choice but to the rest solutions.
Solution 2. Clean the target disk
If the target or destination disk has corrupted file system, it may also lead to Macrium Reflect free clone failed issue. In this way, you can clean the destination disk before cloning.
Step 1. Run Diskpart Windows 10
You can launch Diskpart via the following two ways.
- Right-click Windows 10 Start menu and choose Run. Then type diskpart in the pop-up Run window.
- Input diskpart in the Windows search box and clickthe best match
Step 2. Use Diskpart to Clean Disk
- Input list disk to show all the disks connected to your computer and hit Enter.
- Input select disk * (* represents disk number of your target disk) to select the destination hard drive. And then hit Enter.
- Input clean and hit Enter to remove all the data on the target disk.
After the disk is cleaned, you can restart your computer and clone disk with Macrium Reflect. Make sure that both the drives are connected properly and try cloning again.
Solution 3. Disable Antivirus Software
The Macrium Reflect clone failed issue may be caused by antivirus software. If the antivirus software on your computer is enabled, it will prevent access to any program they find likely to infect a computer system. This could be the reasons for Macrium Reflect clone failed error message.
In this case, you can disable the antivirus software installed on your computer temporarily and then clone your drive again. After you successfully clone hard drive with Macrium Reflect, you can enable the antivirus software to protect computer from virus attack.
If you still encounter Macrium Reflect clone failed issue, try the next method.
Solution 4. Make an Image Instead of Cloning
If you meet the Macrium Reflect failed to clone issue when cloning, you can make a disk image with Macrium Reflect.
A disk image is a type of storage files. It is a backup copy of the contents of a hard drive and it contains all the data and the necessary information to boot into the operating system.
You can backup hard drive to an external hard drive and then restore the image to your new hard drive or SSD. In this way, the system and other data will all be copied to the new disk as well. When you come across Macrium Reflect clone failed, you can make a disk image instead of cloning.
Solution 5. Try Macrium Reflect Alternative Backup Software
MiniTool Partition Wizard
If the above solutions cannot help you fix Macrium Reflect clone failed issue, you can try using other disk clone software to copy disk. MiniTool Partition Wizard is the best Macrium Reflect free alternative software.
MiniTool Partition Wizard is an all-in-one partition manager & disk cloning utility, which can help you perform many partition and disk management operations like resize partition, extend partition, convert FAT to NTFS, convert MBR to GPT, migrate OS to SSD/HD, copy disk, check file system and so on.
You can try using the drive cloning software when you encounter Macrium Reflect clone failed error during the cloning process. If you have never used the software and don’t know how to get and utilize the software, don’t worry. The following contents will show you how to copy disk with MiniTool Partition Wizard.
Before you start, connect a hard disk, for example, SSD or an external hard drive, to your computer.
Step 1. The first thing is to get the Macrium Reflect free alternative MiniTool Partition Wizard Free Edition by clicking the following button. Install the drive cloning and backup software on your computer. Then launch it to get the main interface.
Free Download
Step 2. On the main interface, select the disk you need to copy and choose Copy Disk from the left action panel. To clone system disk, MiniTool Partition Wizard Pro Ultimate is recommended.
Step 3. Select a target disk from the disk list and click Next. When you click Next, it will remind you that all the data on the disk will be destroyed. Make sure there is no important file on the destination disk. Then click Yes to continue.
Step 4. You may change the copy options by yourself. Fit partition to entire disk means the selected disk will be copied to target disk with the whole disk filled proportionally. Copy partitions without resize means the selected disk will be copied with their original sizes.
Step 5. Then MiniTool Partition Wizard Free Edition will tell you how to boot from the new disk. Read the note and click Finish to go on.
Step 6. Then click Apply to allow the pending operations and click Yes to allow changes.
This is how to copy disk with the Macrium Reflect free alterative MiniTool Partition Wizard. If you just want to copy a partition, you can choose Copy Partition function to copy a specific partition by yourself.
Actually, apart from this drive cloning utility, you can choose the professional backup software MiniTool ShadowMaker, which has the same magic like MiniTool Partition Wizard.
With the Macrium Reflect free alternative MiniTool Partition Wizard Free Edition, I successfully cloned hard drive without a hassle. This disk cloning software is worth trying if Macrium Reflect clone failed.Click to Tweet
MiniTool ShadowMaker
MiniTool ShadowMaker is a professional backup tool. It can help you backup files and folders, disks and partitions in just a few clicks. With this backup software, you are able to clone system disk or data disk on your computer without a hassle. When you encounter Macrium Reflect clone failed issue, you can try using MiniTool ShadowMaker to clone disk.
Here are detailed steps to clone disk with MiniTool ShadowMaker.
Step 1. Download MiniTool ShadowMaker by clicking the following button. Install it on your computer.
Free Download
Step 2. Launch the Macrium Reflect free alternative MiniTool ShadowMaker. Click Keep Trial and choose Connect in This Computer to continue.
Step 3. When you get the main interface, go to the Tools page directly and choose Clone Disk to clone your disk.
Step 4. On this page, click The Source Disk and The Target Disk modules respectively to choose the hard drive you want to backup and choose the destination disk to save the copy.
Step 5. After selecting the source disk and target disk, you can click OK to continue. When you click OK, a pop-up window will remind you that data on target disk will be destroyed. So, backup important files on target disk in advance.
Step 6. Then the Macrium Reflect free alternative software will start cloning your source disk to target disk. The time for disk cloning depends on how many files you have stored on the source disk. Please wait patiently.
Step 7. When disk clone is finished, you will receive a message which tells you that the source disk and the target disk have the same signature and one disk will be marked as offline if both of them are connected to your computer.
Remove either of them when the disk clone process is finished. However, if you need to boot your computer from the target disk, you should go to the BIOS settings to change the boot order.
Now you have learned how to clone disk with the two Macrium Reflect free alternatives. If you encounter Macrium Reflect clone failed error or other Macrium Reflect errors like Macrium Reflect error 0 or Macrium Reflect error 9, you can try using the MiniTool Partition Wizard Free Edition and MiniTool ShadowMaker to clone disk and make backups.
Free Download
Free Download
Wrapping things Up
After reading this article, you should know how to resolve the Macrium Reflect clone failed error with the above 5 solutions. Even if you cannot fix Macrium Reflect clone failed error, you can try using the two awesome Macrium Reflect free alternatives.
If you have any question about how to fix Macrium Reflect clone failed issue or you have any other good drive cloning and backup software to recommend, you can leave a message on the following comment zone and we will respond as soon as possible. If you need any help when using MiniTool software, you can contact us via [email protected].
Clone failed error 9 is an application error message displayed by the Macrium Reflect software when an error or fault occurs during the cloning of a disk. Reflect is a disk backup, cloning, and imaging software available for individual users to download and use for free. Disk cloning is the process of ultimately creating an exact one-to-one copy of the disk. This could be seen as the RAID 1 configuration in which an exact mirror copy of the disk is saved as Redundant Data. Macrium Reflect is an excellent tool for disk management and can easily clone disks, but sometimes problems like clone failed error 9 can come up.
Contents
- 1 Macrium Reflect
- 2 Reason for Clone failed error 9
- 3 Solutions for clone failed error 9
- 3.1 Running an SFC scan
- 3.2 Disable Antivirus software
- 3.3 Run Disk Cleanup
- 3.4 Disk cleanup diskpart
- 3.5 Run a chkdsk scan
- 3.6 Avoid Bad sectors
- 4 FAQs on Clone Failed Error 9
- 4.1 What is the complete form of RAID?
- 4.2 Differentiate between disk cloning and backup?
- 4.3 What do you mean by disk imaging?
- 5 Conclusion
- 6 Trending Now
Macrium Reflect
Reflect is a free-to-download disk management tool used by many users throughout the world for backing up, cloning, or imaging disks. The software is free to use for individual home users, and it is licensable for business and server enterprise purposes. The program can face some issues during the cloning process, such as the corruption of data, file system issues, etc., leading to clone failed error 9.
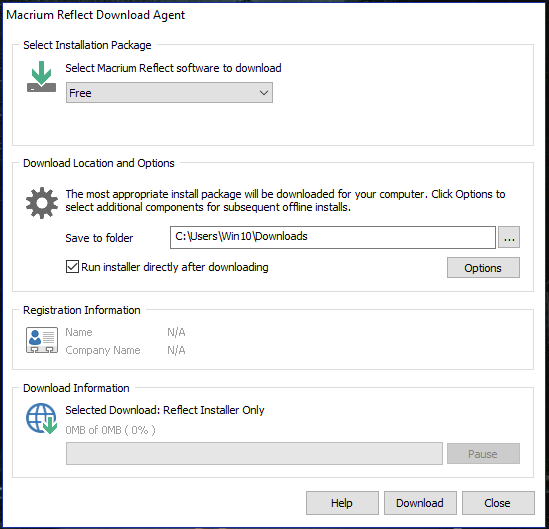
Download the Macruim Reflect Free from its official website https://www.macrium.com/reflectfree?mo#. Head to the download page and Tick the purpose of your download, enter your email to signup, and begin the download. You could also download the Macrium Reflect home edition for 30 days free trial, which provides some advance and rich features.
Reason for Clone failed error 9
Errors can show up for many potential reasons. Each error message represents a different cause for the error. In the case of clone failed error, the primary reason is the failure of the CRC (Cyclic Redundancy Check) checksum of the data stored in the disk in the form of files. CRC is an algorithm used to test the integrity of the data or file. If the CRC test fails, that means the data is corrupted or altered somehow.
There could be many reasons for the failure of the CRC test of a file or any data. The most probable explanation is the presence of malware on the system that is slowly corrupting the disk’s file system. Other causes are also possible such as the harmful physical condition of the disk, etc. In such scenarios, users are more likely to experience messages like clone failed error 9.

Solutions for clone failed error 9
There are quite a few ways that a user can try to rectify clone failed error 9. The following are the most reliable solutions that the users can employ.
Running an SFC scan
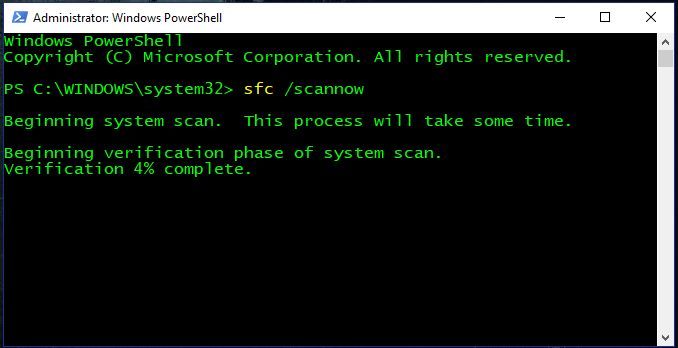
System File Check(SFC) is a system utility program that can deal with most of the problems caused by corrupt files. It scans the system’s corrupt files and restores them automatically. Follow the given steps to run an SFC scan. It requires administrator privileges to execute.
- Right click on the start menu.
- click on Windows PowerShell (Admin).
- Type sfc /scannow in the shell and hit enter.
Depending on your system and the number of issues found, the process would take time to complete.
Disable Antivirus software
Antivirus softwares continuously scans the system in the background to prevent it from threats and vulnerabilities. If Macrium reflect or Antivirus software are accessing the same portion of the disk simultaneously, chances are there might be some conflict regarding the access of the portion of the disk, which ultimately can lead to a clone failed error 9. Or sometimes, The antivirus won’t allow the cloning program to interact with the disk’s file system due to security concerns.
Therefore it is recommended that the users disable the Antivirus software while the Cloning process is being carried out, especially if the user is continuously receiving failure error 9. Different antivirus has different procedures to disable their default background operation temporarily. Disable your antivirus accordingly.
Run Disk Cleanup
Running the disk cleanup utility can help the user get rid of the clone failed error 9 as the utility program cleans the disk appropriately and removes any corrupt temporary files. Follow the given steps to run the disk cleanup utility on your target disk (the disk you are trying to clone).
- Open start menu.
- Type disk cleanup in the search bar.
- Open the Disk Cleanup program.
- Select the drive you want to clean.
- Let the process finish.
- Clean the temporary files as suggested.
- Click on OK.

Disk cleanup diskpart
Disk cleanup can also be performed using the Windows Diskpart utility. Follow the given steps to clean the disk using the command-line diskpart utility.
- Press Windows key + R.
- Enter cmd in the search box and hit enter.
- In the shell type diskpart and hit enter.
- Diskpart utilty would open in a different window.
- Type list disk in the shell to list the attatched disk.
- type select disk X ( your disk number).
- type clean and hit enter.

Run a chkdsk scan
Chkdsk is short for Check disk. It is a command-line utility used to check, recover, and repair disks from any sort of damage. Administrator privileges are required to run this utility. Follow the given steps to eradicate clone failed error 9 using chkdsk.
- Right Click on the start menu.
- Open Windows PowerShell (Admin).
- Enter ‘chkdsk /f /r‘ in the shell and hit enter.
- Reboot your system when finished.
/f stands for a fix. It fixes the issues found during the scanning. /r stands for restore. It tries to restore the data.
Avoid Bad sectors
Another way to avoid the clone failed error 9 is to ignore the bad sectors of the disk that are causing the problem. This could be done within the reflect application settings themselves. Follow the given procedures to ignore bad sectors.
- Open the Macrium relflect application.
- Go to Advanced option in the upper menu.
- On the left side, Open Advanced Backup Options.
- Tick the checkbox that says Ignore bad sectors when creating images.
- Click OK.

FAQs on Clone Failed Error 9
What is the complete form of RAID?
It stands for Redundant Array of Independent Disks. It is a data storage technology scheme.
Differentiate between disk cloning and backup?
Backing up data means copying the data to another disk to restore it if the original data is lost. Cloning is when you have to change the disk itself but copy the exact data and file system in the new disk. For example, upgrading from an HDD to SSD, you don’t want to change the data, but you could change the drive after cloning.
What do you mean by disk imaging?
It means cloning the entire disk into another disk but in archived and compressed form.
Conclusion
Macrium Reflect is a disk data management software used by users worldwide. Due to some data corruption and other reasons, users could face errors like clone failed error 9 during the cloning process of a disk. In this article, we provide you with many easy ways to employ yourself to get rid of this error.
Trending Now
-
Resolve Error Code E4301 Using These 4 Exciting Methods
●October 20, 2022
-
15 Incredible Ways to Fix Paramount Plus Keeps Pausing Error
by Amal Santosh●October 20, 2022
-
5 Strategies to Fix Adobe Short Media Token Validation Error Invalid Signature
by Amal Santosh●October 11, 2022
-
Fix the Apple TV 4K Turns off by Itself with 7 Wonderful Ways
by Amal Santosh●October 11, 2022


На чтение 6 мин. Просмотров 5.1k. Опубликовано 28.04.2021
Macrium Reflect – это программа для создания образов дисков и резервного копирования для Microsoft Windows, которая создает резервные копии и образы с помощью службы Microsoft Volume Shadow Copy Service. Он выполняет резервное копирование и репликацию (клонирование) целых разделов на другой диск хранения одним нажатием кнопки.

Сообщение об ошибке « Macrium Reflect clone failed » – очень распространенная ошибка, которая возникает, в частности, при клонировании жесткого диска на твердотельный накопитель. Причины этого сообщения об ошибке очень разнообразны и варьируются от проблем с антивирусом до поврежденных секторов на диске.
Содержание
- Что вызывает ошибку «Ошибка клонирования Macrium»?
- Как исправить ошибку Macrium. ?
- Проверить диск на наличие плохих секторов
- Очистить целевой диск
- Попробуйте отключить антивирус
- Создайте образ вместо клонирования
- Игнорировать плохие сектора
- Проверьте подключение диска
- Попробуйте стороннее устройство Альтернативы
Что вызывает ошибку «Ошибка клонирования Macrium»?
Как упоминалось ранее, это сообщение об ошибке может появиться по разным причинам. Некоторые из них перечислены ниже:
- соединение между диском и компьютером неправильно. Плохой соединительный кабель может нарушить процесс клонирования устройства хранения.
- На устройстве хранения есть поврежденные сектора . Программное обеспечение обычно выдает сообщение об ошибке при обнаружении поврежденных секторов во время клонирования.
- антивирус не позволяет Macrium клонировать диск. Это очень распространенная практика, когда антивирусное программное обеспечение блокирует любую попытку доступа к диску в течение длительного периода времени.
Как исправить ошибку Macrium. ?
Пользователи, столкнувшиеся с этой проблемой, сообщают, что они получают различные сообщения об ошибках, такие как «доступ запрещен» или «невозможно сопоставить раздел». Это сообщение об ошибке обычно также сопровождается цифрами ошибки, такими как «ошибка 9», «ошибка 0» и т. Д. В редких случаях, если разрешения установлены неправильно, может появиться сообщение «ошибка чтения 13 отказано в разрешении 32» или « write failed 22 invalid argument ‘вместе с исходной строкой ошибки.
Решения, перечисленные ниже, направлены на все эти проблемы. Убедитесь, что у вас есть активное подключение к Интернету и вы вошли в систему как администратор.
Проверить диск на наличие плохих секторов
Плохой сектор – это сектор на устройстве хранения, который недоступен для любого программного обеспечения из-за необратимого повреждения. Плохие сектора постоянно присутствуют на устройстве хранения. Чтобы противостоять этому, операционная система помечает эти сектора, чтобы они могли пропустить их при обычных операциях. Если у вас есть поврежденные сектора, вам следует запустить утилиту chkdsk, чтобы убедиться, что они не нарушают процесс клонирования.
- Нажмите Windows + S, введите « командная строка »в диалоговом окне, щелкните приложение правой кнопкой мыши и выберите« Запуск от имени администратора ».
- После входа с повышенными привилегиями в командной строке выполните следующую команду:
chkdsk/r

- Если вам будет предложено проверить после перезагрузки, нажмите ‘y’ и перезагрузите компьютер.. После перезапуска chkdsk уже будет запланирован операционной системой, и будет выполнено сканирование. Наберитесь терпения и позвольте процессу.
- После того, как утилита просканирует и удалит поврежденные сектора из обычного доступа, попробуйте снова клонировать устройство хранения.
Очистить целевой диск
Если на целевом диске повреждена файловая система, Macrium не сможет клонировать его. Поврежденные файловые системы тоже не редкость и обычно возникают из-за логических ошибок. Мы можем использовать утилиту diskpart, чтобы очистить структуру целевого диска и посмотреть, решит ли это проблему.
- Нажмите Windows + R, введите « командная строка »в диалоговом окне, щелкните приложение правой кнопкой мыши и выберите« Запуск от имени администратора ».
- В командной строке выполните следующие команды по порядку.
diskpartlist diskselect disk [номер диска целевого диска] очистить все

- Перезагрузите компьютер после восстановления файловой структуры, убедитесь, что оба диска подключены правильно, и попробуйте клонировать снова.
Попробуйте отключить антивирус
Как упоминалось ранее, антивирусное программное обеспечение блокирует доступ к любой программе, которую они находят с подозрением на заражение компьютерной системы. Если процесс клонирования заблокирован антивирусом, вы можете получить сообщение об ошибке «Доступ запрещен» вместе с кодом ошибки.
Чтобы противостоять этой ситуации, вы можете отключить антивирус полностью, а затем повторите попытку клонирования. Если на вашем рабочем столе установлено несколько антивирусных программ, сделайте то же самое для всех. Если вы абсолютно уверены, что никакой антивирус не контролирует ваш компьютер, попробуйте снова запустить процесс клонирования.
Создайте образ вместо клонирования
Если у вас возникли проблемы с клонированием нашего жесткого диска, вы можете попробовать создать его образ. Между этими двумя процессами есть небольшие различия. Клонирование диска – это процедура копирования всего содержимого одного диска на другой, которое включает всю информацию, необходимую для загрузки операционной системы с диска. Он создает индивидуальную копию жесткого диска, и эти жесткие диски могут быть заменены друг на друга после процесса клонирования.
Создание образа диска – это процесс создания резервной копии содержимого жесткого диска. Образ диска – это тип файлов хранилища, который содержит все данные и информацию, необходимую для загрузки операционной системы. Однако для работы жесткого диска необходимо применить образ диска.
Здесь мы опишем процедуру создания образа вашего диска вместо клонирования .
- Откройте Macrium и дайте ему заполнить все подключенные диски.. Затем выберите диск , для которого вы хотите создать изображение , и нажмите Изображение этого диска внизу.

- Теперь нажмите кнопку обзора и выберите место , где вы хотите создать изображение. После выбора местоположения нажмите OK .

- Выбрать далее. Теперь вы можете выбрать шаблон для своей резервной копии. Если вы не знаете, что это, нажмите

- Нажмите Готово , и начнется создание изображения. Терпеливо дождитесь завершения процесса.
Игнорировать плохие сектора
Если вы получаете такое же сообщение об ошибке, когда Создавая образ, вы можете попробовать игнорировать битые секторы при создании образа. Обычно, следуя решению 1, все сбойные секторы удаляются из логического хранилища. Но если есть какие-то проблемные, которые все еще вызывают проблемы, это может решить проблему.
- Откройте Macrium и нажмите Advanced в верхней части экрана.
- Теперь установите флажок Игнорировать плохие секторы при создании изображений .

- Нажмите OK , чтобы сохранить изменения и выйти. Теперь попробуйте снова создать образ.
Проверьте подключение диска
Перед тем, как начать использовать сторонние альтернативы , вы должны проверить правильность физического соединения между обоими вашими дисками. Если вы подключаете твердотельный накопитель через порт USB, попробуйте подключить его к материнской плате и повторите попытку клонирования.

Измените соединение SATA для жесткого диска и, если возможно, попробуйте заменить кабель. Кабели можно легко повредить, и из-за них процесс клонирования может быть нарушен. Убедившись, что оба , целевой и целевой диски подключены правильно, переходите к процессу клонирования.
Попробуйте стороннее устройство Альтернативы
Если все вышеперечисленные методы не работают для вас, вы можете рассмотреть возможность использования другого альтернативного программного обеспечения. Согласно нашему опросу, было множество случаев, когда Macrium выдавал ошибку, тогда как другое программное обеспечение, такое как AOMEI , справлялось с этой задачей отлично.

Для информации пользователя мы рекомендуем программное обеспечение AOMEI . Вы можете скачать программный модуль с официального сайта и попробовать клонировать с него свой диск..
Примечание. Appuals не имеет отношения к какому-либо программному обеспечению. Все рекомендованное программное обеспечение предназначено исключительно для информации читателя.
You are trying to clone or backup a drive using the Macruim Reflect tool, but you encountered an error Clone Failed – Error 9 that prevents you from cloning your drive.
Sounds familiar, right?
There is no need to worry about it if you are in such a situation.
As a tech expert and enthusiast, I researched and tested solutions to solve Macruim Reflect errors during cloning or backup. Here, you will learn some of the best practical solutions to solve your Macruim Reflect clone failed error 9.
Are you looking for the right and effective solution to your problem?
Sit tight, keep reading and precisely follow the instructions to solve your problem within a few minutes.
Let’s get started.
Follow our guide on how to Fix the Teredo Error on Xbox
Reasons for Macrium Reflect Error 9 Issue
The Macrium Reflect clone error 9 occurs during the cloning or backup because of the improper cable connection setup, damage or faulty cable connection, conflicting third-party antivirus software, corrupted disk file system, or bad storage sectors. To solve the problem, fix these issues.
The Macrium Reflect clone failed error issue 9 might happen at any time. A variety of factors might cause the failure of a Macrium Reflect.
This section will discuss some of the common potential reasons preventing cloning or backup your drive.
Here are some common reasons for the Macrium Reflect error 9:
Connectivity Issue
One of the most typical causes of the Macrium Reflects clone failed error on your Windows system is a problem with connectivity.
During the drive cloning or backup process, faulty or damaged connectivity issues also cause the clone failed error. To resolve your problem, you must first check and correct your connection.
Read more on how to Fix Square Enix Error code i2501 FFXIV
Corrupted Disk Files System
The corrupted disk files system is one of the most prevalent causes of your Windows system’s Macrium Reflects clone failed error. If the disk files get corrupted, your drive may become incompatible.
To fix the Macrium Reflects clone failed error on your Windows PC, you’ll need to repair or format your disk or drive.
Conflict Antivirus Applications
Another possible cause of the Macrium Reflects clone failed error on your Windows PC is a third-party antivirus program.
When antivirus software conflicts with Macrium Reflects tool, it might cause the Macrium Reflects drive clone failed error. Disabling or uninstalling the antivirus application can fix the error issue.
Storage Bad Sectors
If you have bad sectors on your drive, you could get a Macrium Reflect clone failed error on your Windows computer.
To solve the Macrium Reflects drive clone failed error on your Windows PC, ignore the bad sectors of the disk that are causing the problem when cloning the drive.
Check our latest post on how to Fix Minecraft Not Update Error
Macrium Reflect is a backup tool for Windows users that helps to clone and backup drives easily and quickly from one disk to another.
But, some Macrium Reflect users reported that they got the clone failed error message while trying to clone or backup a drive.
Are you annoyed and frustrated about your terrible situation and looking for the best solutions?
Don’t worry. This section will describe the most effective and proven solutions to the Macrium Reflect clone failed error.
To solve the error issue, keep reading and follow the instructions step by step.
Also read, how to Fix Friends Network Unreachable Error on Steam
Here are the steps to fix Macrium Reflect error 9:
1. Run CHKDSK Tool
CHKDSK tool is a helpful feature to scan and solve the drive or disk error issue on Windows system computers.
Using the CHKDSK program, you can check and repair the drive issues that create the Macrium Reflect clone failed error during the drive cloning or backup.
Here are the steps to run the CHKDSK tool:
Check our exclusive tutorial on How to fix blue screen on Windows 11
2. Clean your Drive
Cleaning your error source disk may help you solve your specific error problem on your Windows computer.
So, to solve your Macrium Reflect clone failed error 9, you can try to run a disk cleanup on your targeted disk.
Here are the steps to clean your disk:
Check out our separate post to change power mode on Windows 11
3. Uninstall Third-party Antivirus Application
Antivirus application is another cause of Macrium Reflect clone failed error during the drive cloning or backup.
Using a third-party antivirus application on your system might conflict with the different system programs, creating various error issues. For the same reason, when your antivirus application conflict with the Macrium Reflect tool, it can generate an error issue.
So, to solve the problem, you need to disable or uninstall the third-party antivirus software to solve the issue.
Here are the steps to uninstall the antivirus application:
- Open the Start menu and click on the Settings icon under the pinned apps to open Windows Settings. Or,

- Press the Windows Key + I on your keyboard to open the Windows Settings App.

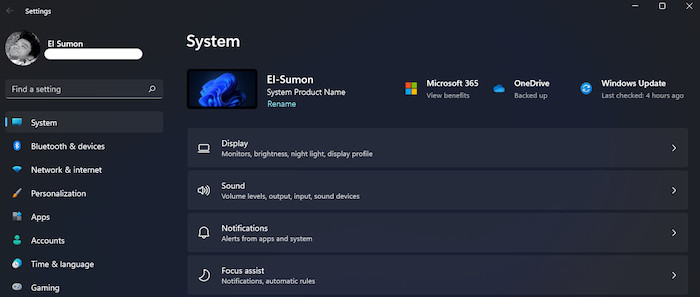
- Select the Apps tab on the left side settings menu panel.
- Select the Apps & features right side screen.

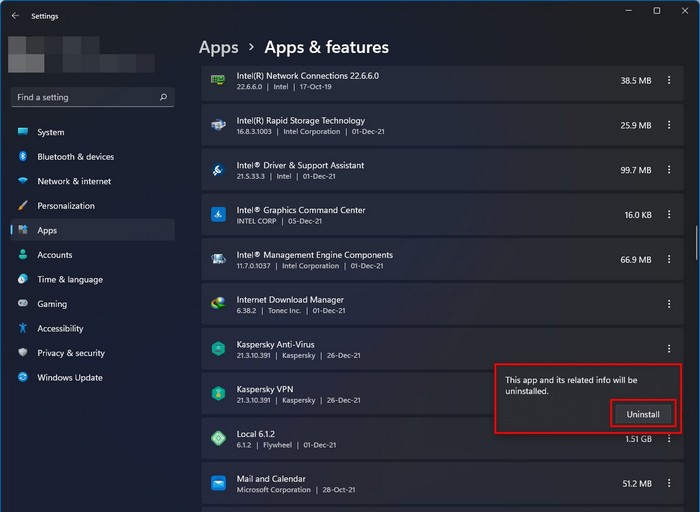
- Scroll down and find your installed antivirus application.
- Click on the three-dot menu and select the Uninstall button.
- Click on the Uninstall button to confirm to uninstall the app.

- Wait some time to complete the process.
- Retry to clone or backup your drive to see whether your problem is solved or not. If not, follow the next solution.

Follow our guide to Fix update error 8024402F on Windows 11
4. Create Image Instead of Cloning
If the previous solution does not solve your problem, try using Macrium Reflect to create a disk image. Many users can resolve the Macrium Reflect error issue by using this method.
Here are the steps to create an image instead of cloning:
- Open your Macrium Reflect
- Select the drive or disk that you want to create an image.
- Click Image this disk link at the bottom of the window.
- Click the browse
- Select a location to start the image you want.
- Click on the OK
- Select Next to go forward.
- Choose None as a template.
- Click on the Finish button to end the image-creating process.
5. Ignore the Bad Sectors
You can ignore the bad sectors when creating the images to solve your Macrium Reflect clone failed error 9. To do this, you need to enable the options on the Macrium Reflect application.
Here are the steps to enable the ignore the bad sectors option:
- Open your Macrium Reflect
- Click on the Advanced option at the top of the menu bar.
- Click on the Advanced Backup Options on the left-side pane.
- Check the Ignore the bad sectors when creating the images box to enable the option.
- Click on the OK button to apply the changes.
Check out the easiest way to Fix Netflix Error Code NW-1-19
Final Thoughts
The Macrium Reflect clone failed error issue might happen at any time. After analyzing the problem, I discovered some possible reasons for the Macrium Reflect clone error.
Here I discuss the possible reasons for the Macrium Reflect clone failed error issue. I also demonstrate the best proven and practical methods to fix your Macrium Reflect clone failed error issue on your Windows computer.
You can successfully solve your problem quickly by applying these proven and tested methods. If you find a solution, please let me know which strategy worked for you.
I hope this article is beneficial for you. If you’re interested in learning more about similar topics, you can also browse other posts.
|
Message |
|
|
Matt92 |
Matt92 posted 26 December 2021 4:33 PM HOT |
|
New Member
Group: Forum Members |
I keep getting «Backup aborted! Unable to read from disk — Error Code 23 — Data error (cyclic redundancy check)» whenever I perform a clone. I’ve done a CHKDSK /R /F three times on my «C:» drive and it finds no errors. Please don’t tell me my disk has bad sectors and is permanently damaged and close the topic there.
Here is some partition information about my C drive.
I have tried running a clone via the rescue media (so Windows does not even boot and it uses the Linux based Macrium rescue system) and even that fails leading me to believe there is something else going on with the Reflect software. I used to use Reflect on my Windows 7 machine and it would work fine each and every time (so long as I didn’t use the system and I just let the backup run). Anyway, some information about my current machine is I am running Windows 10 (with the latest update as of 27 December 2021). I’m using UEFI as the BIOS and a «Samsung 980 EVO Plus NVMe M.2 SSD 2TB» drive. I am starting to believe there is some sort of bug in the Reflect code which fails on the «Samsung 980 EVO Plus» series due to the internal controller doing something regarding the nature of the SSD. If you need more information, just let me know as Reflect is the best backup software I’ve ever used and I’d like to keep using it and support your company. I’d really like to get this resolved no matter what it takes. Thanks.
Edited |
|
|
|
|
JK |
JK posted 26 December 2021 5:58 PM |
|
Macrium Hero
Group: Forum Members |
Matt, welcome to the other side. I left ATI almost one year ago; there are other users on this forum with more expertise than me who will be able to sort out your problem. In the meantime, maybe you can clarify a few things. You talk about doing «cloning» (and you have posted in the cloning forum), but you also say that your plan is to use incremental backups (which is not possible with cloning, as far as I know). So perhaps you can clarify what you are trying to achieve. In addition, you have mentioned the error message encountered, but it would be helpful if you post a copy of the log file from one of the failed cloning jobs. If you are using a paid copy of Reflect, your license code will be shown at the bottom of your log files — please delete this info before posting the log.
|
|
|
|
|
Matt92 |
Matt92 posted 26 December 2021 6:05 PM |
|
New Member
Group: Forum Members |
Basically I’m happy with either method of the backup, but preferably I’d like to do incremental backups.
Edited |
|
|
|
|
JK |
JK posted 26 December 2021 6:29 PM |
|
Macrium Hero
Group: Forum Members |
It would be better if you edit to redact anything confidential, and then post it here. It would be forum users other than me who would know better what to look for in the logs (unless it is something obvious). Since your goal is to do incremental backups, I would recommend that you start by attempting a full image backup of all contents of your first Samsung 970 disk, and then post the redacted log. By the way, the partition layout on your system disk looks odd for a UEFI boot system — the MSR is missing and the Recovery partition is in the wrong location. But since this is a presumably a bootable system, it may not be a big deal. Something to keep in mind, though, in case it is playing some role in the problem.
|
|
|
|
|
Matt92 |
Matt92 posted 26 December 2021 11:00 PM |
|
New Member
Group: Forum Members |
Sure, I will do a full image backup of all contents of my primary «Samsung 980» disk and then post the redacted log. I am just running a backup with «Acronis TrueImage» currently, so when it’s done I’ll attempt the full image Reflect backup and share the log.
Edited |
|
|
|
|
jphughan |
jphughan posted 27 December 2021 1:28 PM |
|
Macrium Evangelist
Group: Forum Members |
Just as a data point, I have a Samsung 970 Evo Plus and have no issues running Reflect for daily image backups. Are you sure the error you’re seeing occurs when backing up the C partition and not one of the hidden partitions? You may be running CHKDSK /R against the wrong partition. The log might help determine that. Copy/pasting the text of the log, removing your license key from the end and any other data you wish, would be helpful.
Edited |
|
|
|
|
Seekforever |
Seekforever posted 27 December 2021 3:33 PM |
|
Guru
Group: Forum Members |
«The drive is only 3.5 months old.» |
|
|
|
|
dbminter |
dbminter posted 27 December 2021 9:14 PM |
|
Macrium Evangelist
Group: Forum Members |
I’ve had optical disc drives die within 2 months after purchase and I’ve had one that lasted 2.5 years, where optical disc drives generally last about 7 months before needing replacing. So, there’s no real rhyme or reason to why electronics die early or last well beyond their expected life span. |
|
|
|
|
Matt92 |
Matt92 posted 28 December 2021 2:47 AM |
|
New Member
Group: Forum Members |
Log is attached.
Attachments
|
|
|
|
|
JK |
JK posted 28 December 2021 3:32 AM |
|
Macrium Hero
Group: Forum Members |
This Macrium blog posts allows for the possibility that a disk may have bad sectors that are not fixed by chkdsk /r, and therefore can only be imaged if the option to ignore bad sectors is enabled:
Alternatively, if you create the image from the Reflect Rescue Environment, then the option to ignore bad sectors is always enabled. Thus, I would suggest repeating the imaging attempt with the above option enabled. If the Error 23 problem was in fact caused by bad sectors on the C: drive, then this will show up in the log. If the log does not show bad clusters, then the problem lies elsewhere. @jphughan may have other suggestions (and I would defer to his advice, if it differs from my ownb).
|
|
|


Microsoft provides its users with a ton of helpful utilities and background services that can essentially make your experience with the operating system far better and enhance performance. One such utility is known as the Macrium Reflect backup utility that is meant specifically for images and image-based backups.
The reason why this is such an impressive tool is partly since it has been designed to be user-friendly and it can help provide a streamlined performance to your computer overall. That being said, it is still prone to several errors and in today’s article, we will be discussing all the Macrium Reflect Error 9.

What is the Macrium Reflect Error 9?
The error 9 has become a common issue to arise in a lot of computers and seems to spring up especially when users attempt to clone their drive. The notification for error 9 reads, “Clone failed – Error 9.” This is troubling because it hinders your cloning process and doesn’t let you clone your drive.
In many cases, the error 9 in Macrium Reflect can pop up due to several reasons. These reasons can include quite a few common issues. In today’s article we will list out all possible explanations for the cause of the Macrium Reflect Error 9 and then we will also tell you how to solve it!
What can cause the Macrium Reflect Error 9?
- If you have an antivirus on your device, this might be causing a hindrance to this utility’s features.
- If you are dealing with a faulty cable connection that might also be a cause.
- If your storage device has Bad Sectors, you can get this error.
- Finally, the error 9 might also be caused if your disk has a file system error.
Now that we are aware of why it happens, let’s figure out how to stop it!
How to solve the Macrium Reflect Error 9?
- Uninstall Third-party Antivirus Software
One of the most common reasons why you might be seeing the error 9 appear is because your installed antivirus might be blocking its features and thus causing this utility to not function properly. To fix this error, all you have to do is simply disable or uninstall your anti-virus. You can then reboot the system and the problem should be fixed.

- Clean your Disk to fix Macrium reflect error 9
If you tried disabling your anti-virus and it didn’t help, then we recommend that you clean your disc to fix the Macrium error 9. You can run a disk cleanup of the target disk using the following steps below:
- Type and open Diskpart from Search.

- Your next step will be to type in the following commands. Make sure you enter them one after the other to properly execute them!
list disk
select disk X (X represents your target drive’s number)
clean

- Restart your computer and in most cases, the issue should be resolved.

- Run CHKDSK Utility
If the last step didn’t quite work out for you, you might want to consider running the CHKDSK utility feature. This will provide a fix for the reflect issue 9 in many cases.
Here are the steps that you will need to follow:
- The first step is to get the command prompt up by typing cmd in the search bar. You will then choose the option that reads, Run as administrator.

- Your next step is to click on Yes but this is only if it asks for permission.
- Next up, you may click on the Command Prompt window, and add in the following command:
chkdsk X: /f /r

Once you have typed it in, click enter and then restart your computer.
- Opt for an Image instead of Cloning
If it is not allowing you to clone, then you can instead opt to create a disk image using Macrium Reflect and this will resolve the issue in most cases. Here are the steps you need to follow:
- First, you will launch the Macrium utility and then let it get a hang of all the different connected drives.
- You can then choose whatever drive that you wish to create an image of.

- Your next step will be to choose the option for Click Image on this disk.

- You can then choose the location to create this image and then click OK and then choose Next.

- Press the option for None as it will request an option for a template.

- Your last step will be to press the Finish button and you are done!

- Make sure your connections are functional
If the error 9 is popping up for you, then we recommend that you also make sure that your drives are connected properly. This refers to checking that the cables between drives are attached properly and therefore not the cause of this error. If you feel like your connecting cable might be too old or simply damaged from excessive use, then you might opt for a replacement.

- Ignore Bad Sectors
This step is certainly one of those methods that you will get to do as you are creating an image. If you attempt to do this and the issue comes on the screen, you can simply choose to ignore the bad sectors and in most cases, you will fix the issue.
Here are the steps you need to follow:
- Launch the Macrium tool.
- You will see an option for Advanced, select it and it should get you to Advanced Backup Options.

- There will be an option to Ignore bad sectors when creating images here. You can check the box next to it.

- Finally, click on ok and you’re done!

- Use a third-party app like EaseUS
If you have exhausted the list on how to solve Macrium error and still don’t have a solution, then we would suggest that you try to make use of a 3rd party software to help you fix it! A good option is EaseUS software and here’s what you need to do:
- Your first step will be to download the EaseUS app using any browser.

- It will then give you’re a step-by-step guide and you can install it using these instructions.
- Launch the app and then you can choose which partition you wish to clone
 .
.- After this make sure to choose to save your clone in a destination disk of your choice.
- Finally, you must choose the option to Proceed and that’s all!
 .
.
Today’s article seeks to provide complete details and knowledge on the Macrium Reflect Error and this is quite a common issue that arises in Windows! However, as today’s article has shown it is not too difficult to get rid of and if you follow these steps completely then you will not have any problems!
With that, we end this guide and informative article in the hopes that we have imparted all there is to tell our readers regarding this topic!