Sometimes a customer or you can be redirected to a fatal error page. It is located at www.domain.com/report/?id=##### When this page appears, it means that there is some failure in the system.
This can be fraught with consequences because as you know none of the errors can disappear by themselves and it can pull the entire site down. We suggest considering a way for solving this issue.
Standardly, only a definite customer who is redirected to its page can see the error. Also, the design of this page is a bit uncommitted. In many cases, the developers of the substandard themes simply forget about this paragraph in the template. To avoid it, it is recommended to use the correct themes for Magento ®.
Fatal Error Structure
Any files related to this error are located on the hosting path. The directory is Magento/report/
.htaccess
config.xml – This is the template configuration file.
index.php – the error page configuration, the code of its calling and message are done here.
skin – this is the folder where you will find data on your error page.
The information output
All the settings should be done in the configuration file. The output is defined by the section called <action>.
The screen functions
In order to display the information on the screen, you need to set up the function <action> in print.
Sending information by e-mail
In order to output, the information not only on the screen but make it received by an administrator by email you need to set up the value of the section <action> in an email. In the section called <email_address>, you need to indicate the address of your email which will be used for the site work control.
If you enable this function, a customer who sees the error will be able to address an administrator by email using feedback options.
Programming
There is also an ability to output the error page in PHP without the template design. In order to configure this system, you need to go to the hosting files in the root directory Magento/index.php. Then please change the line 60 to the following:
#Mage::setIsDeveloperMode(false); — a standard line.
Mage::setIsDeveloperMode(true); — the line with which the standard line should be replaced.
Please note:
After you finish the work, don’t forget to change this line to the initial value.
Localization and redesign
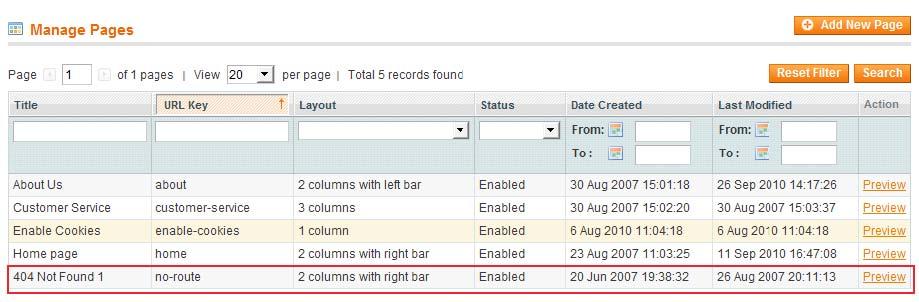
In order to find the page which is responsible for the 404 error displaying in Magento ® you need to go to System – CMS – Pages. Here are all the stores displayed in this section. You need to find accordingly 404 Not Found. If this page does not exist, you need to create it. While creating the page you must be sure that the URL Key is created as no-route. Then you should click on it and choose the tab in the left side of the Content screen. If it is difficult to do it yourself, GoMage experts can do it for you.
Please look at the screenshot called Pages Configuration.
We see the following page.
Please look at the screenshot called edit 404.

Here you can correct the page design as you want. If it is necessary, go to the HTML code editor. It will be great to locate on this page not only the explanation how a customer has been redirected, but also a working link to the main page or a customer’s account.
Overcoming Fatal Errors in Magento ®
When trouble arises with your eCommerce store solution it may be frustrating but it is not the end of the road. Handled correctly by following concepts like those listed above can empower your ability to overcome undesirable road bumps with your Magento store.
What hurdles have you found yourself dealing with when it came to having a smooth running operation with your eCommerce site?
Share your experiences, the good — the bad and the unusual in the comments below. Be sure to tell us how they were ultimately solved and what you might do differently when finding yourself dealing with the same or similar issues in the future.

Thank you!
We will contact you shortly

You may encounter one of the common errors when running the PHP website source code. And in this article, I will guide you to fix PHP Fatal Error: Allowed Memory Size.
Cases of this error in Magento 2 are also common. For example: Install Theme, Install Extension,…
When encountering this error, an error message will appear:
PHP Fatal error:  Allowed memory size of 134217728 bytes exhausted (tried to allocate 4096 bytes) in C:xampphtdocsmagento232vendoroyejorgeless.phplibLessTreeDimension.php on line 21
Fatal error: Allowed memory size of 134217728 bytes exhausted (tried to allocate 4096 bytes) in C:xampphtdocsmagento232vendoroyejorgeless.phplibLessTreeDimension.php on line 21
Reason
The cause of this error is because the PHP process is executing using larger RAM resources that we have specified in the php.ini file through “memory_limit”.

This is the configuration table of “memory_limit”.
| PHP: Fatal Error: Allowed Memory Size of 8388608 Bytes Exhausted | 8 MB |
| PHP: Fatal Error: Allowed Memory Size of 16777216 Bytes Exhausted | 16 MB |
| PHP: Fatal Error: Allowed Memory Size of 33554432 Bytes Exhausted | 32 MB |
| PHP: Fatal Error: Allowed Memory Size of 67108864 Bytes Exhausted | 64 MB |
| PHP: Fatal Error: Allowed Memory Size of 134217728 Bytes Exhausted | 128 MB |
| PHP: Fatal Error: Allowed Memory Size of 268435456 Bytes Exhausted | 256 MB |
| PHP: Fatal Error: Allowed Memory Size of 536870912 Bytes Exhausted | 512 MB |
| PHP: Fatal Error: Allowed Memory Size of 1073741824 Bytes Exhausted | 1 GB |
You can collate to raise the appropriate value.
- First, You locate the directory of the
php.inidirectory. This will usually beetc/php.ini.
- Next, You find the line “memory_limt =”
- Finally, You adjust the value accordingly and save it.

Good luck!
It comes to the end of the article.
You can view the article How To Install Magento 2.3 In Windows Using XAMPP.
Follow us for more helpful article!
We hope this is a useful blog for you.
Thank you for reading!
As of July 1, 2020, there are no longer any quality fixes or security patches provided for Magento 1.
While you can technically still use Magento 1 software, without this support, you’ll be putting all the information stored on your site at risk. Magento 1 users who want to protect customer data, as well as take advantage of all the other benefits, will need to migrate to Magento 2. However, there may be some bumps along the way.
Here’s how to fix the most common Magento 2 installation issues.
#cta-visual-fe#<cta-title>Fast and Flexible CMS for Magento<cta-title>Gain full control over your site without sacrificing page speed with Shogun Frontend.Learn more
5 Common Issues When Migrating to Magento 2 — and How to Fix Them
These tips will help your migration go as smoothly as possible.
1. Installation Progress Gets Stuck
Issue: Once in the Magento Setup Wizard, installation can get stuck around the 70% mark — and no error message will display.

Solution: To fix this problem, you may just need to adjust the PHP setting for max_execution_time.
- Use a phpinfo.php file to locate php.ini.
- Open the php.ini file in a text editor (note: you’ll need to be a user with root privileges to do this).
- Go to the max_execution_time setting and change the value to 18000.
- Save your changes and close the text editor.
- Restart Apache.
If you’re using nginx, you’ll also need to add a timeout setting to the location ~ ^/setup/index.php section of your nginx host configuration file:
location ~ ^/setup/index.php {
…………………
fastcgi_read_timeout 600s;
fastcgi_connect_timeout 600s;
}
Then, restart nginx.
And if you’re using Varnish, you’ll need to add a timeout limit value to the backend section of your default.vcl file:
backend default {
…………………
.first_byte_timeout = 600s;
}
Then, restart Varnish.
2. Reflection Exception Error
Issue: During installation, you may run into an error message that looks like this:
[ERROR] exception ‘ReflectionException’ with message ‘Class MagentoFrameworkStoreManagerInterface does not exist’ in /<path>/lib/internal/Magento/Framework/Code/Reader/ClassReader.php
Solution: To fix this problem, the directories and files under Magento’s var subdirectory will need to be cleared, and then you’ll need to install Magento again. Enter the following commands (again, you’ll need to have root privileges for your Magento file system to do so):
$ cd <the name of your Magento install directory>/var
$ rm -rf var/cache/* di/* generation/* page_cache/*
If you still get the Reflection Exception error and you’re using Redis, use this command to clear your Redis cache and try again:
$ redis-cli FLUSHALL
3. Fatal PDO Error
Issue: Here’s another error message you might receive:
PHP Fatal error: Class ‘PDO’ not found in /var/www/html/magento2/setup/module/Magento/Setup/src/Module/Setup/ConnectionFactory.php on line 44
Solution: The cause of this error, most likely, is that you haven’t installed one or more of the following PHP extensions, which are all required:
- ext-bcmath
- ext-ctype
- ext-curl
- ext-dom
- ext-gd
- ext-hash
- ext-iconv
- ext-intl
- ext-mbstring
- ext-openssl
- ext-pdo_mysql
- ext-simplexml
- ext-soap
- ext-xsl
- ext-zip
- lib-libxml
Install any of the required extensions that are missing and try again.
4. Composer Version Error
Issue: There is a known bug with versions of Composer that are dated between November 21 to November 26, 2015 — they will produce the following error during installation:
[ErrorException]
file_get_contents(app/etc/NonComposerComponentRegistration.php): failed to open stream: No such file or directory
Solution: Fixing this error involves downgrading Composer to a version released before November 21, 2015, or upgrading to a version released after November 26, 2015, and then downloading Magento again.
Use this command to confirm which version of Composer you’re using (the date of your Composer release will be listed at the end of the response):
composer -v
If your version is within the affected dates, you can use the following command to downgrade your version of Composer:
composer self-update 1.0.0-alpha11
Or you could use this command to upgrade to the latest version of Composer:
composer self-update
Then, delete your Magento 2 directory and sub-directories and download Magento again (and if you downgraded rather than upgraded Composer, after downloading Magento again you should take this chance to upgrade to the latest version of Composer).
5. Errors Installing Optional Sample Data
Issue:Installing optional sample data allows you to learn how to use Magento before you commit to starting the process of actually creating your store. But there are also a number of errors associated with installing optional sample data, such as:
Permissions Error
The following error is caused by your file system permissions settings (from Magento Help Center):
Module ‘Magento_CatalogRuleSampleData’:
[ERROR] exception ‘MagentoFrameworkExceptionLocalizedException’ with message ‘Can’t create directory /var/www/html/magento2/generated/code/Magento/CatalogRule/Model/.’ in /var/www/html/magento2/lib/internal/Magento/Framework/Code/Generator.php:103
(more)`
Next exception ‘ReflectionException’ with message ‘Class MagentoCatalogRuleModelRuleFactory does not exist’ in /var/www/html/magento2/lib/internal/Magento/Framework/Code/Reader/ClassReader.php:29
(more)
Solution: To fix it, go back and set up your access permissions as a user with root privileges.
Production Mode Error
If you try to install optional sample data in production mode with Composer, you’ll get the following error (from Firebear Studio):
PHP Fatal error: Uncaught TypeError: Argument 1 passed to SymfonyComponentConsoleInputArrayInput::__construct() must be of the type array, object given, called in /<path>/vendor/magento/framework/ObjectManager/Factory/AbstractFactory.php on line 97 and defined in /<path>/vendor/symfony/console/Symfony/Component/Console/Input/ArrayInput.php:37
Solution: To avoid this error, you’ll need to instead install the optional sample data in developer mode. Log in as the Magento file system owner and enter these commands:
cd <magento_root>
bin/magento deploy:mode:set developer
rm -rf generated/code/* generated/metadata/*
bin/magento sampledata:deploy
SELinux Error
The following error is caused by SELinux:
PHP Fatal error: Call to undefined method MagentoCatalogModelResourceProductInterceptor::getWriteConnection() in /var/www/magento2/app/code/Magento/SampleData/Module/Catalog/Setup/Product/Gallery.php on line 144
Solution: To resolve the error, you must disable SELinux. Check out this guide from TecMint for detailed instructions on disabling SELinux.
Develop Branch Error
Finally, this is yet another error you may run into when installing optional sample data:
[MagentoSetupSampleDataException] Error during sample data installation: Class MagentoSalesModelServiceOrderFactory does not exist
Solution: This is a known issue with the Magento 2 develop branch. You can fix this by switching to the master branch with the following command:
cd <magento_root>
git checkout master
git pull origin master
#cta-visual-fe#<cta-title>Fast and Flexible CMS for Magento<cta-title>Gain full control over your site without sacrificing page speed with Shogun Frontend.Learn more
After Installation
Once you successfully install Magento 2 and address any issues, you should explore the Magento extensions library next.

Here, you’ll find apps that can help you attract more visitors to your store and enhance your user experience. For example, Omnisend will improve your email marketing efforts, and with Searchanise Smart Search Autocomplete you can use artificial intelligence to steer your visitors toward making more purchases.
You can refer to our guide on the best Magento apps of 2020 for more information on how to improve your store with extensions.
Очень частов во время установки Magento 2 (используя php bin/magento setup:install) появляется ошибка: «PHP Fatal error: Allowed memory size of NNN bytes exhausted». Эта ошибка значит, что вашему скрипту на хостинге или локальном компьютере не хватает памяти для корректной работы.

Полный текст ошибки и php stack trace:
$ php bin/magento setup:install --admin-firstname name
 --admin-lastname lastname --admin-email=email@email.com
PHP Fatal error: Allowed memory size of 134217728 bytes exhausted (tried to allocate 5 bytes)
 in magento2/vendor/magento/zendframework1/library/Zend/Db/Statement/Pdo.php
on line 228
PHP Stack trace:
PHP   1. {main}() magento2/bin/magento:0
PHP   2. SymfonyComponentConsoleApplication->run() magento2/bin/magento:25
PHP   3. MagentoFrameworkConsoleCli->doRun() magento2/vendor/symfony/console/Symfony/Component/Console/Application.php:126
PHP   4. SymfonyComponentConsoleApplication->doRun() magento2/vendor/magento/framework/Console/Cli.php:49
PHP   5. SymfonyComponentConsoleApplication->doRunCommand() magento2/vendor/symfony/console/Symfony/Component/Console/Application.php:195
PHP   6. SymfonyComponentConsoleCommandCommand->run() magento2/vendor/symfony/console/Symfony/Component/Console/Application.php:874
PHP   7. MagentoSetupConsoleCommandInstallCommand->execute() magento2/vendor/symfony/console/Symfony/Component/Console/Command/Command.php:257
PHP   8. MagentoSetupModelInstaller->install() magento2/setup/src/Magento/Setup/Console/Command/InstallCommand.php:125
PHP   9. call_user_func_array:{magento2/setup/src/Magento/Setup/Model/Installer.php:331}() magento2/setup/src/Magento/Setup/Model/Installer.php:331
PHP  10. MagentoSetupModelInstaller->installDataFixtures() magento2/setup/src/Magento/Setup/Model/Installer.php:331
PHP  11. MagentoSetupModelInstaller->handleDBSchemaData() magento2/setup/src/Magento/Setup/Model/Installer.php:746
PHP  12. MagentoConfigurableSampleDataSetupInstallData->install() magento2/setup/src/Magento/Setup/Model/Installer.php:798
PHP  13. MagentoFrameworkSetupSampleDataExecutor->exec() magento2/vendor/magento/module-configurable-sample-data/Setup/InstallData.php:33
PHP  14. MagentoFrameworkAppState->emulateAreaCode() magento2/vendor/magento/framework/Setup/SampleData/Executor.php:50
PHP  15. call_user_func_array:{magento2/vendor/magento/framework/App/State.php:171}() magento2/vendor/magento/framework/App/State.php:171
PHP  16. MagentoConfigurableSampleDataSetupInstaller->install() magento2/vendor/magento/framework/App/State.php:171
PHP  17. MagentoConfigurableSampleDataModelProduct->install() magento2/vendor/magento/module-configurable-sample-data/Setup/Installer.php:57
PHP  18. MagentoImportExportModelImportInterceptor->importSource() magento2/vendor/magento/module-configurable-sample-data/Model/Product.php:96
PHP  19. MagentoImportExportModelImportInterceptor->___callPlugins() magento2/var/generation/Magento/ImportExport/Model/Import/Interceptor.php:104
PHP  20. call_user_func_array:{magento2/vendor/magento/framework/Interception/Interceptor.php:144}() magento2/vendor/magento/framework/Interception/Interceptor.php:144
PHP  21. MagentoImportExportModelImport->importSource() magento2/vendor/magento/framework/Interception/Interceptor.php:144
PHP  22. MagentoImportExportModelImport->processImport() magento2/vendor/magento/module-import-export/Model/Import.php:413
PHP  23. MagentoImportExportModelImportEntityAbstractEntity->importData() magento2/vendor/magento/module-import-export/Model/Import.php:448
PHP  24. MagentoCatalogImportExportModelImportProduct->_importData() magento2/vendor/magento/module-import-export/Model/Import/Entity/AbstractEntity.php:578
PHP  25. MagentoCatalogImportExportModelImportProduct->_saveProductsData() magento2/vendor/magento/module-catalog-import-export/Model/Import/Product.php:844
PHP  26. MagentoCatalogImportExportModelImportProduct->_saveProducts() magento2/vendor/magento/module-catalog-import-export/Model/Import/Product.php:876
PHP  27. MagentoCatalogImportExportModelImportProduct->_saveProductAttributes() magento2/vendor/magento/module-catalog-import-export/Model/Import/Product.php:1613
PHP  28. MagentoFrameworkDBAdapterPdoMysql->insertOnDuplicate() magento2/vendor/magento/module-catalog-import-export/Model/Import/Product.php:1160
PHP  29. MagentoFrameworkDBAdapterPdoMysql->query() magento2/vendor/magento/framework/DB/Adapter/Pdo/Mysql.php:1842
PHP  30. MagentoFrameworkDBAdapterPdoMysql->_query() magento2/vendor/magento/framework/DB/Adapter/Pdo/Mysql.php:499
PHP  31. Zend_Db_Adapter_Pdo_Abstract->query() magento2/vendor/magento/framework/DB/Adapter/Pdo/Mysql.php:444
PHP  32. Zend_Db_Adapter_Abstract->query() magento2/vendor/magento/zendframework1/library/Zend/Db/Adapter/Pdo/Abstract.php:238
PHP  33. Zend_Db_Statement->execute() magento2/vendor/magento/zendframework1/library/Zend/Db/Adapter/Abstract.php:480
PHP  34. MagentoFrameworkDBStatementPdoMysql->_execute() magento2/vendor/magento/zendframework1/library/Zend/Db/Statement.php:303
PHP  35. Zend_Db_Statement_Pdo->_execute() magento2/vendor/magento/framework/DB/Statement/Pdo/Mysql.php:95
PHP  36. PDOStatement->execute() magento2/vendor/magento/zendframework1/library/Zend/Db/Statement/Pdo.php:228
[свернуть]
По умолчанию Magento 2 устанавливает лимит использования памяти в 256мб в magento2/pub/.htaccess:
############################################
## adjust memory limit

    php_value memory_limit 256M
    php_value max_execution_time 18000
Поэтому лучше всего иметь 256мб в настройках PHP.
Решение:
1) Изменить php.ini для увеличения параметра memory_limit на глобальном уровне
Для нахождения php.ini можено использовать команду «php —ini» из консоли
...
; How many GET/POST/COOKIE input variables may be accepted
; max_input_vars = 1000

; Maximum amount of memory a script may consume (128MB)
; http://php.net/memory-limit
memory_limit = 256M
...
2) Также можно изменить данный параметр локально только для magento2 скрипта:
Добавить ini_set(«memory_limit»,»256M») в «magento2/bin/magento» файл
#!/usr/bin/env php
<?php
/**
 * Copyright © 2015 Magento. All rights reserved.
 * See COPYING.txt for license details.
 */
ini_set('memory_limit', '256M');
use MagentoFrameworkAppInterface;
if (PHP_SAPI !== 'cli') {
    echo 'bin/magento must be run as a CLI application';
    exit(1);
}
3) Также можно изменить memory_limit только для этого вызова php
php -dmemory_limit=1G bin/magento setup:install
Как проверить текущее значение memory_limit:
1) Выполнить комманду:
php -r "echo ini_get('memory_limit').PHP_EOL;"
2) Или выполнить следующую команду:
php -i | grep memory
Это выведет, что-то такое:
$ php -i | grep memory
memory_limit => 128M => 128M
Collecting memory statistics => Yes
3) Создать php файла phpinfo.php и добавить следующий код:
<?php phpinfo(); ?>
Текст данной статьи на английском Magento 2 installation: PHP Fatal error Allowed memory size exhausted