Magisk был нашим выбором, когда дело доходит до управления и администрирования super su. Никакие другие приложения не так хороши, как Magisk, не говоря уже о простом процессе установки. Однако из-за новых обновлений Android и возрастающей сложности процесса рутирования многие пользователи сталкиваются с ошибкой установки Magisk Process Error, когда они пытаются использовать приложение. С Magisk проблема возникает из-за того, что носитель не найден, или из-за других проблем, связанных с медиа.
Magisk — это приложение для управления Super SU с открытым исходным кодом, которое любят миллионы пользователей по всему миру. За последние несколько месяцев приложение претерпело множество изменений, таких как удаление многих несовместимых функций, таких как Magiskide, или удаление репозиториев Magisk. Но поскольку это разработка с открытым исходным кодом, многие разработчики активно работают над проектом, чтобы сделать его лучше с каждым днем.
Содержание страницы
-
Как исправить ошибку процесса Magisk Ошибка установки
- Повторно загрузить ZIP-файл
- Проверить ZIP-формат
- Проверьте права доступа к хранилищу приложений
- Проверьте права доступа к файлам
- Чтение журнала ошибок
- Заключение
Как исправить ошибку процесса Magisk Ошибка установки
Ошибка процесса обычно означает, что проблема возникла где-то во время процесса перепрошивки. Либо загруженный файл поврежден, либо просто несовместим с Magisk. Или возможно, что вы не предоставили доступ к хранилищу приложению файлового менеджера. Хотя точную причину можно найти с помощью журнала ошибок, но приведенные ниже методы помогут устранить проблему и без него.
Повторно загрузить ZIP-файл
Наиболее распространенной причиной ошибки Magisk Process Error Installation Failed являются несовместимые или поврежденные файлы. Всякий раз, когда вы загружаете файл с медленным интернетом, есть небольшие шансы, что загрузка будет повреждена. Поэтому обязательно проверьте загруженный файл на его контрольную сумму или попробуйте загрузить файл из официального источника.
Проверить ZIP-формат
Magisk совместим только со сжатыми файлами формата ZIP или IMG. Любой другой формат файла приведет к ошибкам установки. Иногда прошиваемый zip-архив, который вы загружаете из Интернета, имеет формат 7z или RAR. Вы должны извлечь эти файлы, чтобы получить совместимые с Magisk форматы ZIP или IMG.
Проверьте права доступа к хранилищу приложений
Во многих случаях вполне возможно, что ZIP-файл является правильным и действительным, но приложение файлового менеджера, которое вы используете в Magisk, не имеет разрешений на хранение. Таким образом, в конечном итоге Magisk запустит процесс установки, но не сможет найти файл и, следовательно, ошибку установки!
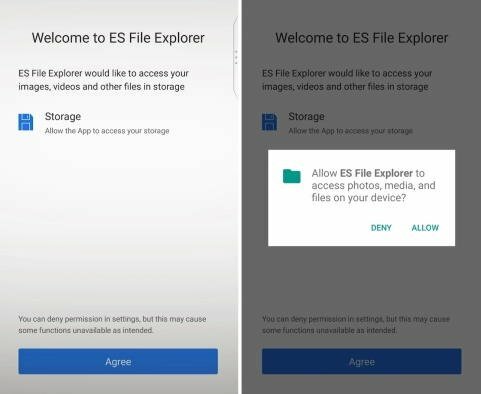
Поэтому, чтобы исправить это, вы должны убедиться, что у приложения есть соответствующее разрешение на хранение. Предполагая, что вы будете использовать EX File Explorer в качестве приложения для управления файлами, вот шаги для предоставления разрешений на хранение.
Откройте ES File Manager или загрузите его из Playstore.
Объявления
Он попросит вас предоставить разрешение на хранение, предоставить все разрешения. После этого запустите процесс установки Magisk и выберите проводник ES, когда он запросит доступ к прошиваемому zip-файлу, теперь он не будет показывать никаких ошибок.
Проверьте права доступа к файлам
Убедитесь, что файл, который вы прошиваете, имеет права на чтение, запись и выполнение. Важно иметь эти разрешения, так как без них вы не сможете получить доступ к файлу и, следовательно, Magisk не сможет прошить его на вашем телефоне.
Вы можете легко проверить или изменить права доступа к файлам с помощью проводника ES.
Объявления
Найдите местоположение файла и выберите изменение разрешения в параметрах файла.
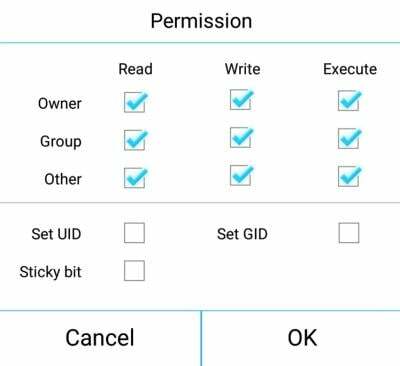
Здесь убедитесь, что все галочки отмечены под чтением, записью и исполняемыми файлами.
Чтение журнала ошибок
Вышеуказанные методы, безусловно, помогут устранить все возможные ошибки, но есть много причин, по которым вы сталкиваетесь с ошибкой установки. Чтобы получить четкую картину, важно проверить журнал ошибок от Magisk.
java.io. FileNotFoundException: /storage/emulated/0/boot.img: открыть не удалось: EACCES (отказано в доступе).
Как вы видите в приведенном выше журнале ошибок, мы можем легко определить, что проблема связана с отказом в разрешениях, поэтому мы можем продолжить и предоставить соответствующее разрешение приложению. Точно так же могут быть разные проблемы, которые вы сможете определить только из журнала ошибок.
Заключение
Итак, это были шаги по исправлению ошибки установки Magisk Process. Надеюсь, вы сможете решить проблему со своей стороны. Также рекомендуем вам обновить магиск менеджер до последней версии. Если у вас есть какие-либо вопросы относительно вышеупомянутых шагов, сообщите нам об этом в комментариях.

What is Magisk?
Magisk is one of the best alternatives to Supersu, developed by ‘topjohnwu’ (an XDA developer). The actual purpose of Magisk is to grant or deny root permission whenever required. The new Magisk app is much better than Supersu. There are certain apps (like banking apps, pokemon go) which cannot be installed on a rooted device. Magisk helps you to install and run all of these applications without any problem.
Magisk has Universal Systemless Interface. It means that you can easily create your own mod app with the help of magisk. Magisk is mostly the same as the Xposed framework which means that you can install various modules and tweaks to your Android device.
Magisk install error 1 is a well-known problem which every android user faces while flashing the zip file. You need to follow the below 3 method one by one (If one does not work for you.).
This types of Error mostly appears when you are flashing an incomplete zip file. You must have to download the full zip file and then flash again. Your problem will be solved.
How to fix Magisk error 1 using TWRP recovery method
- First of all, You need to put your boot.img file on your Micro Sd card.
- And then reboot your device in Recovery mode.
- And then tap “Install.”
- And now you need to tap on “Install image” (Located at the bottom right corner).
- Now you have to select your boot.img
- And then select the “Boot partition” and then now swipe to confirm the flash.
- That’s it.
How to fix Magisk Error 1 using Flashify method
- First of all, You need to download and install “Flashify” from the play store. click here
- Now, open the app and then grant root permission.
- And then select “boot image” from the main page.
- And now locate your Boot image and then confirm the flash.
- That’s it.
Thanks. I hope that the above step by step guide has helped you to fix the magisk install error 1 in TWRP recovery. If did not work or your have any other solution then do a comment in the below comment box and help the android community.
Magisk Install Error 1 Error 7 In TWRP Recovery
Magisk Install Error 1 Error 7 In TWRP Recovery Unable to Root your Phone Having errors in Magisk A lot of Android users have run into this issue at some point or another, including myself. Don’t worry I Have a Fix For That You went to flash the latest Magisk.zip and TWRP reports error 1. its very frustrating issue that must be solved well I have found a solution for that I would like to install Magisk, but error 1 pops up. I do not have a SuperSU application on my phone. What to do now Don’t worry Follow this Fix
1. Flash STOCK BOOT.IMG
- Locate a Stock BOOT.img file for your device/rom. This can usually be found in ROM zip file or your TWRP backups.i Am Using Aosp Exteded Rom Download Here
- Copy and flash your BOOT.img with either fastboot / TWRP / App.
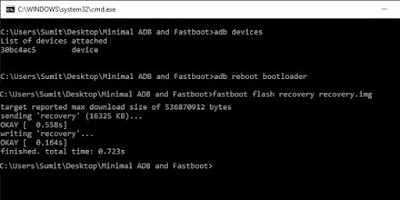
Fastboot method:
- Boot your phone into bootloader mode with adb command “adb reboot bootloader”
- Issue the fastboot command “fastboot flash boot boot.img”
- Reboot back into android “fastboot reboot”
TWRP:
- Place your BOOT.img on your sd card
- Reboot into TWRP recovery
- Tap “Install”
- In the bottom right corner tap “Install Image”
- Select your BOOT.img
- Select the Boot Partition, then swipe to confirm Flash
App (Flashify):
- Download Flashify
- Install and open the app
- Grant Root permissions
- Select “Boot Image” from the main page
- Find and select your Boot.img
- Confirm the Flash
Watch this Video To Fix Errors in magisk
didn’t work? try this
Flash the UnSU.zip and magiskuninstaller.zip
Sometimes Magisk simply will not flash because SuperSu and or an old version of Magisk is already installed.
unSuZip:-Download
or
Manually delete Magisk files from /data
- Connect your phone to your PC and open an ADB SHELL. You will need root to do this as well as the following steps. If your device isn’t rooted yet then simply reboot into your custom recovery of choice to do the following commands.
- Change directories to /data
- Use the command “rm” to remove ALL Magisk related files in the root of /data. EXAMPLE: “rm -r magisk” “rm magisk.img” “rm magisk_debug.log”
- reboot your phone for good measure then try installing Magisk again

Nesh
Hi My Name is Nesh
I have passion in cinematography, And I use it to create engaging youtube videos for My youtube channel Game of Roms.
I make Phone Reviews, Tips & Tricks and Android Rom Videos.
In this guide, we will show you the steps to fix the Magisk Process error Installation Failed. Magisk has for long been the go-to choice when it comes to gaining administrative access to your device. While it has undergone a slew of changes in recent times, such as the removal of MagiskHide, Magisk Modules repository, and the likes, but other developers have come forward and more than made up for it.
And since it is open-source, we are bound to see more enhancements in the near future. As far as its usage instructions are concerned, the generic steps are to patch the stock boot.img via Magisk and then flash it via Fastboot OR directly flash the Magisk APK (after renaming it to ZIP) via TWRP. However, in reality, things are a tad bit different. Apart from flashing the patched boot, sometime, you might need to disable verity by flashing vbmeta.
Likewise, in some instances, flashing the vendor_boot.img file also becomes a necessity. If you don’t do so, then a soft-bricked or bootloop device is on the cards. Fortunately, when it comes to Magisk Process error Installation Failed, there isn’t any concern involved as such as the issue could easily be fixed in just a few clicks. And in this guide, we will show you how to do just that. Follow along.
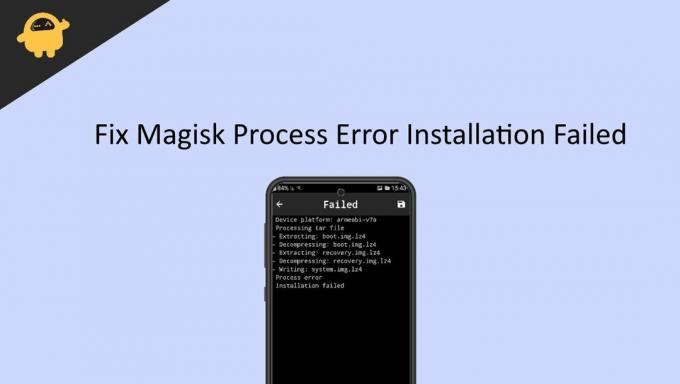
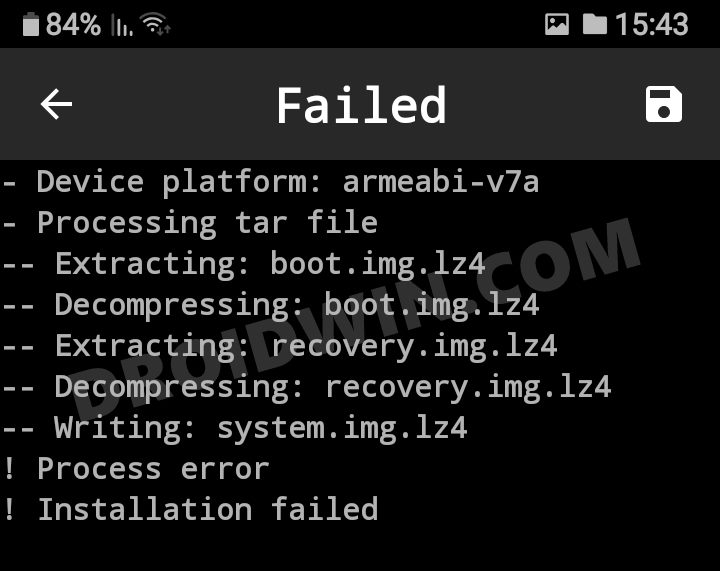
So recently I was patching the stock boot.img and got treated with this error message:
- Device platform: arm64-v8a
- Installing 92546e8a (23016)
! Process error
! Installation failed
Upon checking the error log, it was stated that:
java.io.FileNotFoundException: /storage/emulated/0/boot.img: open failed: EACCES (Permission denied).
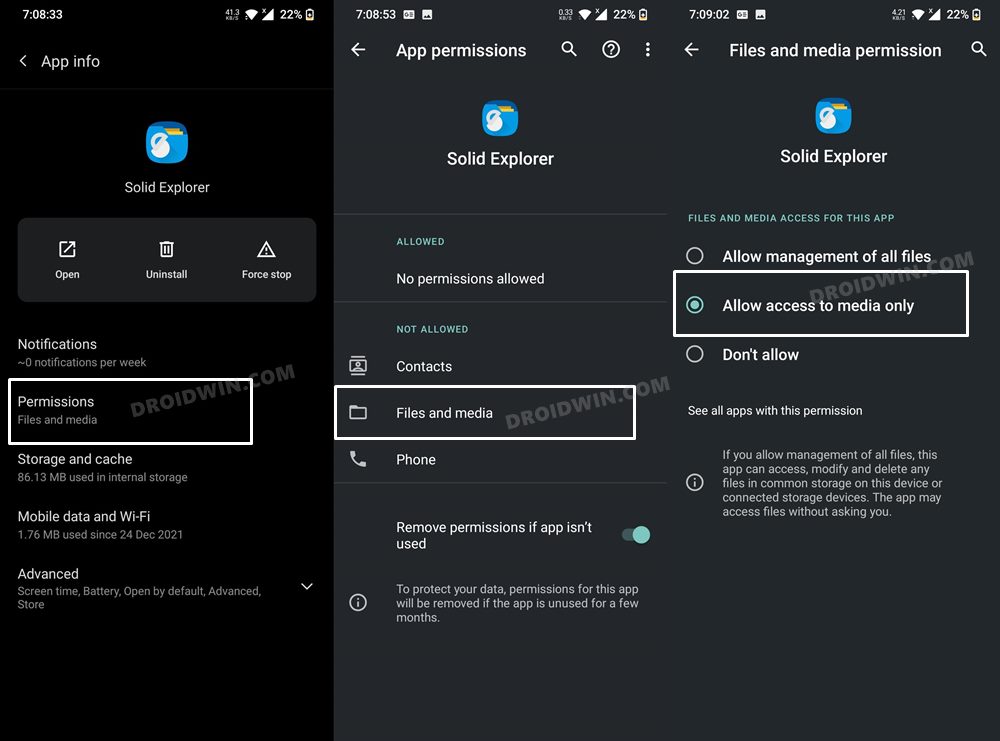
So this helped us debug the error quite easily. The reason for this issue is the fact the File Explorer app that you had used to select the stock boot.img file (within the Magisk app) didn’t have access to the device storage. So either grant it the said access or use the default file picker that might already be having that access. As far as the former is concerned, here’s how it could be done:
- To begin with, head over to the Settings menu on your device.
- Then go to Apps > See All Apps and select the desired file manager app.

- After that, go to its Permission section and allow its access to Files and Media.
- That’s it. This should resolve the underlying Magisk error.
So these were the steps to fix the Magisk Process error Installation Failed. If you have any queries concerning the aforementioned steps, do let us know in the comments. We will get back to you with a solution at the earliest.
- How to Fix Magisk Bootloop using TWRP Recovery [2 Methods]
- Fix Magisk Safetynet API Error: Detailed Guide
- Fix Magisk Module Bootloop without TWRP Recovery
- How to Fix Root is not Properly Installed | Missing Magisk Root
About Chief Editor

Sadique Hassan
administrator
A technical geek by birth, he always has a keen interest in the Android platform right since the birth of the HTC Dream. The open-source environment always seems to intrigue him with the plethora of options available at his fingertips. “MBA by profession, blogger by choice!”
This post is a help to Fix Magisk Install Error 1 problem in TWRP.

Okay, so you might be either switching from Super Su to Magisk, or this might be the first time you’re rooting your phone, but one this is for sure: You are Rooting your phone.
Let’s get into this, What is Magisk?
Magisk is an alternative to Chainfire’s SuperSU, a better alternative to be precise. With Magisk you can hide your rooting. This is helpful specially when you want to use Banking Apps Like: Google Pay,PayTM, PayPal or even some games like PokemonGo which detect your device is rooted and thus does’nt work normally or doesn’t work at all. For this Problem, Magisk is for your rescue. It systemless-ly masks your device so that these Apps cannot detect the Root.
Magisk is created by Topjohnwu, who created Magisk Manager and kept is open Source unlike SuperSU. Thus, Magisk is more likely to be improved by any developer who wish to contribute.
Let’s move on to Rooting your device:
Rooting your device is simple and easy, though it has some risk of bricking your phone. I recommend only developers to root their phone.
I won’t be going into the same process depicted by other sites and only to flash and result in Error1.
I’ve gone through many process like:
- Using a different ROM.
- Formatting your phone completely.
- Extracting your ROM’s .zip file and Flashing it.
- Extracting .img boot file, pasting it someplace in internal Memory.
All the above are crap, just time wasting and data wasting.
Let’s to the Step by Step Procedure:
NOTE: I’m a Redmi 4A developer and tester, so this might not possibly work for other phone model. but I’ve tester for Redmi 5A and Note 4 as well.
- Full charge your Phone. This is a necessary step a few don’t bother considering it and have faced a lot of issues.
- Take a complete Backup of your Phone.
- Go back to Stock ROM(The ROM that came pre-installed on your phone). If you are first time rooting, just ignore this step.[Not a Mandatory step. works on most custom ROM as well. I’ve tried AEX, LineageOS15.1, RR6.0]
- I’ve never seen Magisk didn’t work on any ROM, so don’t worry, I got you. Note: All these ROM had Oreo.
- Make sure you’ve unlocked your bootloader. Now download TWRP but here’s the thing. Download TWRP recovery with vendor. Download link: REDMI_4A_TWRP- Rolex
Redmi_5A_TWRP- Riva - Now install this Recovery using Fastboot, using PC, I recommend Minimal ADB & Fastboot.

- That was it. Now flash Magisk and Reboot to system.
- You will an App Magisk Manager installed on your device.

- That’s it. you’re done. Now to hide Rooting, this manager will help to install a file and select the apps from which you wish to hide the Rooting. Enjoy!!

Further to install any Custom ROM. Flash the zip file, your Magisk would still be installed. and phone would still be rooted.😎
Further information by the developers:

For further queries, comment down. Hope to help you all. 👍