![]()
Download Article
![]()
Download Article
Zooming isn’t a native feature in Minecraft. However, the OptiFine mod for Minecraft: Java Edition adds improved graphics and the ability to zoom. Minecraft: Java Edition is available on PC, Mac, and Linux computers. You cannot install mods on Minecraft: Windows 10 Edition or Minecraft for smartphones or game consoles. However, you can lower the field-of-view (FOV) in the Settings menu, which makes objects appear a little closer. This wikiHow teaches you how to zoom using the OptiFine mod and how to lower the FOV in the Settings menu.
-

1
Go to https://optifine.net/downloads in a web browser. This is the website to download the OptiFine mod. OptiFine is an improved graphics mod that adds the ability to zoom in Minecraft, among other things. It also includes improved graphics, high definition textures, dynamic lighting, realistic water, and more.
- In order to install OptiFine or any other mods, you need Minecraft: Java Edition for PC, Mac, or Linux. You cannot install mods on Minecraft: Windows 10 Edition or Minecraft for mobile devices or game consoles.
- Minecraft: Windows 10 Edition is different from Minecraft: Java Edition. You cannot install Optifine on Minecraft: Windows 10 Edition. You can find out which version you are playing by launching the game and checking to see if it says «Java Edition» or «Windows 10 Edition» below «Minecraft» on the title screen.
-
2
Click (Mirror). It’s to the right of the latest version of the OptiFine mod. This takes you to a direct download for the OptiFine mod.
- If you click the button that says Download, you will be taken to an adware website that may contain malicious software.[1]
Advertisement
- If you click the button that says Download, you will be taken to an adware website that may contain malicious software.[1]
-
3
Click Download. It’s below the latest version of OptiFine. This downloads a «.jar» file for the latest version of OptiFine to your Downloads folder.
- This file may be flagged as potentially harmful by your web browser or Antivirus program. If asked if you want to keep the file, click Keep or a similar option to confirm you want to download this file.
- OptiFine may cause your game to run slower if your PC has a slower graphics card or processor.
-
4
Double-click the OptiFine «.jar» file. The OptiFine «.jar» file you just downloaded can be found in your Downloads folder. Double-click the file to begin the installation process.
- If the file doesn’t open, or it doesn’t have an icon that resembles a coffee cup, you need to install the latest version of Java.
-
5
Click Install. This installs the OptiFine mod for Minecraft.
- You must run the latest version of Minecraft in the Minecraft launcher at least once before you can install the OptiFine mod.
-
6
Click Ok. Once the mod is installed, you will see a pop-up alert informing you the mod was successfully installed. Click Ok to close the window.
-
7
Open the Minecraft Launcher. The Minecraft Launcher has an icon that resembles a grass block. Click the icon in your Windows Start menu or Applications folder to open the Minecraft launcher.
-
8
Select the OptiFine mod. Use the drop-down menu to the left of the green «Play» button to select «OptiFine».
- If you don’t see OptiFine in the drop-down menu next to the «Play» button, click Installations at the top of the launcher. Then click New in the upper-left corner. Type a name for the installation (i.e. «OptiFine»). Then use the «Version» menu to select the version with «OptiFine» in the title.
-
9
Click Play. It’s the green button in the bottom-center of the launcher. This launches a new game of Minecraft with the OptiFine mod enabled.
-
10
Click Singleplayer, Multiplayer, or Realms. Local single-player games can be found under the «Singleplayer» option. Game servers can be found under «Multiplayer.» Games that are part of your Minecraft Realms subscription can be found under «Realms».
-
11
Select a game and click Play Selected World or Join Server. This either loads your Minecraft game or connects you to a multiplayer server.
- Alternatively, you can click Create New World to start a new game.
- Servers with lots of players and lots of detail may be especially slow with OptiFine.
-
12
Press and hold C. When the OptiFine mod is enabled, you can zoom by pressing and holding the «C» key.


Advertisement
-
1
Open the Minecraft Launcher. The Minecraft Launcher has an icon that resembles a grass block. Click the icon in your Windows Start menu or Applications folder to open the Minecraft launcher. The Minecraft launcher can be used to launch Minecraft:
- Using a lower field of view reduces the number of objects on-screen and zooms in on the objects in your center view. This won’t zoom in by a lot, but it will make objects appear significantly closer.
- Minecraft: Windows 10 Edition is different from Minecraft: Java Edition. You can find out which version you are playing by launching the game and checking to see if it says «Java Edition» or «Windows 10 Edition» below «Minecraft» on the title screen.
-
2
Click Play. It’s the green button in the bottom-center of the launcher. This launches Minecraft.
-
3
Click Singleplayer, Multiplayer, or Realms. Local single-player games can be found under the «Singleplayer» option. Game servers can be found under «Multiplayer.» Games that are part of your Minecraft Realms subscription can be found under «Realms».
-
4
Select a game and click Play Selected World or Join Server. This either loads your Minecraft game or connects you to a multiplayer server.
- Alternatively, you can click Create New World to start a new game.
-
5
Press Esc. This opens the Game Menu.
-
6
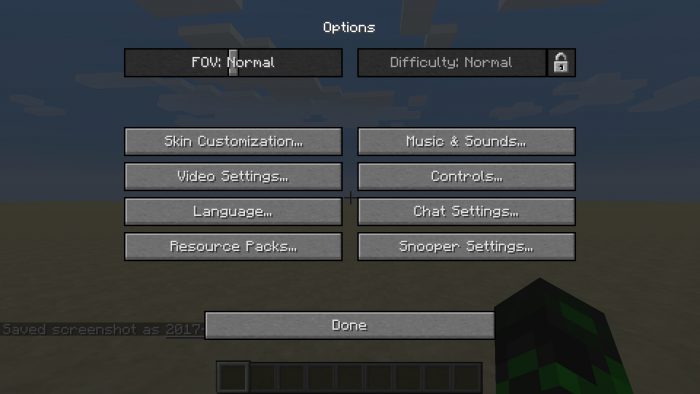
Click Options…. It’s the fourth button on the left in the Game Menu.
-
7
Drag slider bar in the «FOV» box to the left. The «FOV» bar is at the top of the Options menu and to the left. Drag the FOV bar to the left to lower your field of view. This will make objects appear significantly closer.[2]


Advertisement
-
1
Open Minecraft. This method works on Minecraft for smartphones and tablets, game consoles, and Minecraft: Windows 10 Edition.
- Using a lower field of view reduces the number of objects on-screen and zooms in on the objects in your center view. This won’t zoom in by a lot, but it will make objects appear significantly closer.
- Minecraft: Windows 10 Edition is different from Minecraft: Java Edition. You can find out which version you are playing by launching the game and checking to see if it says «Java Edition» or «Windows 10 Edition» below «Minecraft» on the title screen.
-
2
Click or tap Play. It’s the first button at the top of the title page. This displays saved games for you to play.
-
3
Select or create a new game. Click a game to load it. Single-player games are under the «Worlds» tab. Click Create New to start a new game. You can join a friend’s game under the «Friends» tab, or join a multiplayer game under the «Servers» tab.
-
4
Open the game menu. To open the Game Menu, tap the icon that resembles a pause button with two vertical lines at the top on smartphones and tablets. On game consoles, press the «Options», «Menu (☰)», or «+» button to open the game menu. On Windows 10 Edition, press the «Esc» button.
-
5
Select Settings. It’s the second option in the game menu. This displays the Settings menu where you can adjust your game preferences.
-
6
Select Video. It’s towards the bottom of the Settings menu in the left panel. It’s the second option under «General.»
-
7
Lower the slider bar below «FOV.» It’s in the panel to the right about halfway down the menu. This lowers the field of view. Using a lower field of view will make objects appear significantly closer.


Advertisement
Add New Question
-
Question
Does this work on the regular Minecraft servers?

Yes, most. Some servers ban it.
-
Question
Do I need Forge to use OptiFine?
No you can download OptiFine with or without Forge.
-
Question
In servers like Jartex network it doesn’t allow me to zoom, I downloaded everything. What should I do?
Raai0100
Community Answer
Maybe they don’t allow you to zoom as it is banned. You should check with the owner of the server.
See more answers
Ask a Question
200 characters left
Include your email address to get a message when this question is answered.
Submit
Advertisement
-
You can see far away objects and mobs using the Spyglass in all versions of Minecraft.
Thanks for submitting a tip for review!
Advertisement
Video
References
About This Article
Article SummaryX
1. Download the OptiFine mod from https://optifine.net/downloads.
2. Open the OptiFine «.jar» file in your Downloads folder and click Install.
3. Open the Minecraft launcher.
4. Use the menu to the left of the «Play» button to select «OptiFine».
5. Click Play.
6. Load a game in Minecraft.
7. Press and hold «C» to zoom.
Did this summary help you?
Thanks to all authors for creating a page that has been read 210,142 times.
Did this article help you?
![]()
Download Article
![]()
Download Article
Zooming isn’t a native feature in Minecraft. However, the OptiFine mod for Minecraft: Java Edition adds improved graphics and the ability to zoom. Minecraft: Java Edition is available on PC, Mac, and Linux computers. You cannot install mods on Minecraft: Windows 10 Edition or Minecraft for smartphones or game consoles. However, you can lower the field-of-view (FOV) in the Settings menu, which makes objects appear a little closer. This wikiHow teaches you how to zoom using the OptiFine mod and how to lower the FOV in the Settings menu.
-
1
Go to https://optifine.net/downloads in a web browser. This is the website to download the OptiFine mod. OptiFine is an improved graphics mod that adds the ability to zoom in Minecraft, among other things. It also includes improved graphics, high definition textures, dynamic lighting, realistic water, and more.
- In order to install OptiFine or any other mods, you need Minecraft: Java Edition for PC, Mac, or Linux. You cannot install mods on Minecraft: Windows 10 Edition or Minecraft for mobile devices or game consoles.
- Minecraft: Windows 10 Edition is different from Minecraft: Java Edition. You cannot install Optifine on Minecraft: Windows 10 Edition. You can find out which version you are playing by launching the game and checking to see if it says «Java Edition» or «Windows 10 Edition» below «Minecraft» on the title screen.
-
2
Click (Mirror). It’s to the right of the latest version of the OptiFine mod. This takes you to a direct download for the OptiFine mod.
- If you click the button that says Download, you will be taken to an adware website that may contain malicious software.[1]
Advertisement
- If you click the button that says Download, you will be taken to an adware website that may contain malicious software.[1]
-
3
Click Download. It’s below the latest version of OptiFine. This downloads a «.jar» file for the latest version of OptiFine to your Downloads folder.
- This file may be flagged as potentially harmful by your web browser or Antivirus program. If asked if you want to keep the file, click Keep or a similar option to confirm you want to download this file.
- OptiFine may cause your game to run slower if your PC has a slower graphics card or processor.
-
4
Double-click the OptiFine «.jar» file. The OptiFine «.jar» file you just downloaded can be found in your Downloads folder. Double-click the file to begin the installation process.
- If the file doesn’t open, or it doesn’t have an icon that resembles a coffee cup, you need to install the latest version of Java.
-
5
Click Install. This installs the OptiFine mod for Minecraft.
- You must run the latest version of Minecraft in the Minecraft launcher at least once before you can install the OptiFine mod.
-
6
Click Ok. Once the mod is installed, you will see a pop-up alert informing you the mod was successfully installed. Click Ok to close the window.
-
7
Open the Minecraft Launcher. The Minecraft Launcher has an icon that resembles a grass block. Click the icon in your Windows Start menu or Applications folder to open the Minecraft launcher.
-
8
Select the OptiFine mod. Use the drop-down menu to the left of the green «Play» button to select «OptiFine».
- If you don’t see OptiFine in the drop-down menu next to the «Play» button, click Installations at the top of the launcher. Then click New in the upper-left corner. Type a name for the installation (i.e. «OptiFine»). Then use the «Version» menu to select the version with «OptiFine» in the title.
-
9
Click Play. It’s the green button in the bottom-center of the launcher. This launches a new game of Minecraft with the OptiFine mod enabled.
-
10
Click Singleplayer, Multiplayer, or Realms. Local single-player games can be found under the «Singleplayer» option. Game servers can be found under «Multiplayer.» Games that are part of your Minecraft Realms subscription can be found under «Realms».
-
11
Select a game and click Play Selected World or Join Server. This either loads your Minecraft game or connects you to a multiplayer server.
- Alternatively, you can click Create New World to start a new game.
- Servers with lots of players and lots of detail may be especially slow with OptiFine.
-
12
Press and hold C. When the OptiFine mod is enabled, you can zoom by pressing and holding the «C» key.
Advertisement
-
1
Open the Minecraft Launcher. The Minecraft Launcher has an icon that resembles a grass block. Click the icon in your Windows Start menu or Applications folder to open the Minecraft launcher. The Minecraft launcher can be used to launch Minecraft:
- Using a lower field of view reduces the number of objects on-screen and zooms in on the objects in your center view. This won’t zoom in by a lot, but it will make objects appear significantly closer.
- Minecraft: Windows 10 Edition is different from Minecraft: Java Edition. You can find out which version you are playing by launching the game and checking to see if it says «Java Edition» or «Windows 10 Edition» below «Minecraft» on the title screen.
-
2
Click Play. It’s the green button in the bottom-center of the launcher. This launches Minecraft.
-
3
Click Singleplayer, Multiplayer, or Realms. Local single-player games can be found under the «Singleplayer» option. Game servers can be found under «Multiplayer.» Games that are part of your Minecraft Realms subscription can be found under «Realms».
-
4
Select a game and click Play Selected World or Join Server. This either loads your Minecraft game or connects you to a multiplayer server.
- Alternatively, you can click Create New World to start a new game.
-
5
Press Esc. This opens the Game Menu.
-
6
Click Options…. It’s the fourth button on the left in the Game Menu.
-
7
Drag slider bar in the «FOV» box to the left. The «FOV» bar is at the top of the Options menu and to the left. Drag the FOV bar to the left to lower your field of view. This will make objects appear significantly closer.[2]
Advertisement
-
1
Open Minecraft. This method works on Minecraft for smartphones and tablets, game consoles, and Minecraft: Windows 10 Edition.
- Using a lower field of view reduces the number of objects on-screen and zooms in on the objects in your center view. This won’t zoom in by a lot, but it will make objects appear significantly closer.
- Minecraft: Windows 10 Edition is different from Minecraft: Java Edition. You can find out which version you are playing by launching the game and checking to see if it says «Java Edition» or «Windows 10 Edition» below «Minecraft» on the title screen.
-
2
Click or tap Play. It’s the first button at the top of the title page. This displays saved games for you to play.
-
3
Select or create a new game. Click a game to load it. Single-player games are under the «Worlds» tab. Click Create New to start a new game. You can join a friend’s game under the «Friends» tab, or join a multiplayer game under the «Servers» tab.
-
4
Open the game menu. To open the Game Menu, tap the icon that resembles a pause button with two vertical lines at the top on smartphones and tablets. On game consoles, press the «Options», «Menu (☰)», or «+» button to open the game menu. On Windows 10 Edition, press the «Esc» button.
-
5
Select Settings. It’s the second option in the game menu. This displays the Settings menu where you can adjust your game preferences.
-
6
Select Video. It’s towards the bottom of the Settings menu in the left panel. It’s the second option under «General.»
-
7
Lower the slider bar below «FOV.» It’s in the panel to the right about halfway down the menu. This lowers the field of view. Using a lower field of view will make objects appear significantly closer.
Advertisement
Add New Question
-
Question
Does this work on the regular Minecraft servers?
Yes, most. Some servers ban it.
-
Question
Do I need Forge to use OptiFine?
No you can download OptiFine with or without Forge.
-
Question
In servers like Jartex network it doesn’t allow me to zoom, I downloaded everything. What should I do?
Raai0100
Community Answer
Maybe they don’t allow you to zoom as it is banned. You should check with the owner of the server.
See more answers
Ask a Question
200 characters left
Include your email address to get a message when this question is answered.
Submit
Advertisement
-
You can see far away objects and mobs using the Spyglass in all versions of Minecraft.
Thanks for submitting a tip for review!
Advertisement
Video
References
About This Article
Article SummaryX
1. Download the OptiFine mod from https://optifine.net/downloads.
2. Open the OptiFine «.jar» file in your Downloads folder and click Install.
3. Open the Minecraft launcher.
4. Use the menu to the left of the «Play» button to select «OptiFine».
5. Click Play.
6. Load a game in Minecraft.
7. Press and hold «C» to zoom.
Did this summary help you?
Thanks to all authors for creating a page that has been read 210,142 times.
Did this article help you?
Обновлено: 10.02.2023
Как настроить разрешение экрана в майнкрафт
Итак, чтобы сменить разрешение экрана в игре майнкрафт, вам нужно выполнить следующую инструкцию:
3. После всех выполненных действий в игре откроется раздел, где вы и сможете настроить разрешение экрана в майнкрафт.
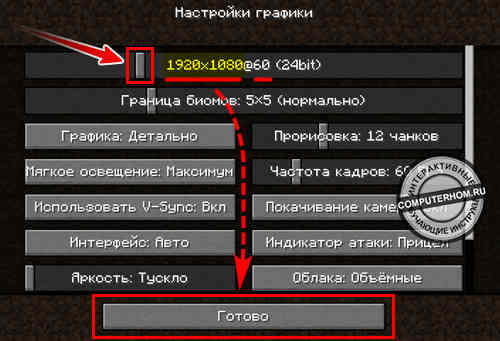
В самом верхнем меню будет отображен ползунок по смене разрешения экрана:
- Если отвести ползунок в левую часть, то разрешение экрана будет увеличиваться.
- Если отвести ползунок в правую часть, то разрешение экрана будет уменьшаться.

Можно ли поменять разрешение экрана в игре minecraft с помощью программ. Потому-что мой экран недостаточно длинный, не могли бы вы мне помочь решить эту проблему?
нажми клавишу f11 там насколько я помню автоматически игра разворачивается под твоё разрешение экрана
Помогите в майнкравте версии 1.13.2 не меняется раширение я меняю на 1366×768 но нивига не присходит остоётся всё тагже
Если же пользователь планирует редактировать разрешение экрана в Minecraft, то для этого нужно сделать пару простых и понятных действий.
p, blockquote 1,0,1,0,0 —>
В целом, инструкция выглядит следующим образом:
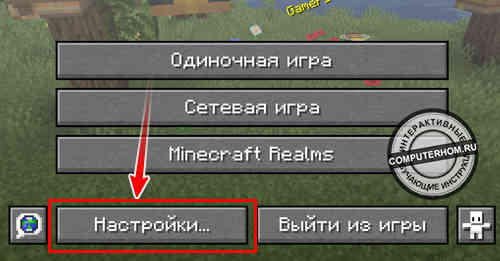
- Необходимо запустить на своем компьютере игру Minecraft и обратиться к клавише с настройками в правом верхнем углу.
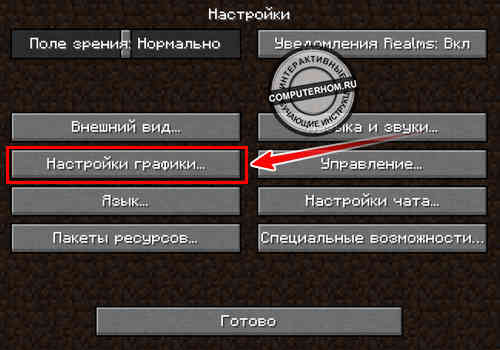
- Найти там настройку графики.
- Увидеть в самом внизу разрешение экрана.
Чтобы уменьшить разрешение, нужно двигать ползунок в левую сторону. Для увеличения, в свою очередь, его нужно двигать в правую сторону.
p, blockquote 3,1,0,0,0 —>
После того, как пользователь установил желаемые для себя параметры, нужно нажать на клавишу готово.
p, blockquote 4,0,0,0,0 —>
Теперь результат был сохранен, а у игрока было установлено новое разрешение, которое он может использовать для игры.
p, blockquote 5,0,0,1,0 —>
Сейчас же стоит поговорить об этом процессе, но в больших подробностях. Что же предстоит выполнить:
- Сначала понадобится запустить на своем компьютере Minecraft, а затем перейти в настройки. Она указана в левом углу.
- Перейти в настройки графики. Появляется огромное окно, где нужно выбрать наиболее подходящее для себя разрешение. Если менять состояние ползунка в левую сторону, разрешение уменьшается и наоборот.
- Важно отметить, что в этом разделе еще можно настраивать так называемую частоту обновления кадров. Чем выше это значение, тем лучше, ведь тогда пользователь сможет наблюдать максимально плавную и красивую картинку, особенно при сравнении с тем, что у него было раньше. Важно: подобная возможность должна быть установлена на мониторе.
При этом настраивать разрешение, например, на экране своего смартфона уже невозможно. Подобная процедура закрыта самим разработчиком и это обусловлено исключительно тем, что там оптимальные настройки устанавливаются в самостоятельном режиме. То есть, пользователь никак не может регулировать эти параметры и может использовать только готовый вариант.
Ваш браузер устарел, и поэтому некоторые важные функции этого сайта могут не работать. Пожалуйста, обновитесь то более современного браузера. 
1.12.2 fullscreen с разрешением меньше экранного

mbrNikolas
Итак имеется:
Игра:
RULAUNCHER
1.12.2 c Forge 1.12.2-14.23.5.2847, Optifine 1.12.2_HD_U_F4
видео:
intel hd graphics 620
никак не могу установить разрешение игры ниже разрешения экрана при этом должен быть «Полноэкранный режим: вкл». Он конечно остается «вкл» и разрешение то, что я установил, но на весь экран игра не растягивается.
разрешение экрана 1920х1080
При попытке запустить игру в разрешении 1280×720 во весь экран получается вот такое(ссылка на gdrive со скрином):
окно игры в этом случае не имеет свойств обычного окна винды и не растягивается руками. его размер соответствует размеру окна в 1280х720 на 1920х1080 экране.
если установить системное разрешение экрана 1280х720 получится точно такой же скрин.

Caman86
ТруЪ Олдфаги-с
Звание: V.I.P на хуторе
mbrNikolas
Caman86,
F11 это переключение между «Полноэкранный режим: вкл/выкл». 2 раза нажать — попадаем в состояние установленное в игре до нажатий, то есть ничего не меняется. Но я проверил на всякий и в разных ситуациях(изначально вкл, изначально выкл). Не помогло.
Caman86
ТруЪ Олдфаги-с
Звание: V.I.P на хуторе
mbrNikolas,
А зачем тебе вообще переключать на меньшее разрешение экрана?
Да и вообще нормально работать вся графика стала с версии 1.14.
mbrNikolas
Caman86,
ну раз уж ты спросил.
1. со сглаживанием не вижу большой разницы между меньшим и большим разрешением, и так всё квадратное, а прирост производительности более чем в 2 раза.
2. с моей слабенькой интегрированной картой при 15+ чанках уже местами проседает ниже 40, фпс
3. кулер в ноуте чтобы совсем не крутился. и тишина абсолютная и акк меньше ест.
Caman86
ТруЪ Олдфаги-с
Звание: V.I.P на хуторе
mbrNikolas,
1. Сглаживание ест много видео-процессоров, из-за чего появиться чуть большая нагрузка, чем с высоким разрешением.
2. Рассказываю секрет: если у тебя есть дискретная видеокарта, то её можно указать в настройках драйвера как ГПУ для майна. И да, это даст меньший прирост, потому что майну-то и рисовать нечего. А больше 12-14 чанков ставить не имеет смысла: радиус деспавна мобов всегда одинаков.
Да и я не знаю какой у тебя процессор: с версий
1.9 майнкрафт стал зависеть именно от процессора, а не от ОЗУ.
3. При работе от аккумулятора ноутбук переходит в режим энергосбережения, из-за чего урезаются:
Работа кулеров (ноутбук переходит в пассивное охлаждение, из-за чего могут быть перегревы), виртуальные ядра процессора, ограничивается максимальная нагрузка на ядро
до 60-70 %, также и с видеоядром (не важно встройка ли, или нет). Вдобавок аккумулятор быстро расходует свой ресурс, то есть будет в дальнейшем держать всё меньше заряда, а переход от активного охлаждения к пассивному способствует ускорению к проблемам с процессором.
Статистика форума
Сейчас онлайн: 2
Администраторы | Главные редакторы | Модератор | Дедушки | Журналисты | HENTAI BOY | Goldфаги | Журналисты-олдфаги | ТруЪ Олдфаги-с | ТруЪ Плагинщик | Олдфаги | true Художник | Модератор бездны | Картоделы | XXXL ПХЛ | Просто хорошие люди | Посетители | Новички

Новичок

Проблема с разрешением
Вопрос не совсем по игре, скорее технического плана..
У меня широкоэкранный монитор, 16:9, и стоит разрешение рабочего стола 1280х720. Я запускаю ваш ланчер, все нормально, потом запускается Майнкрафт, в окне, и тут разрешение у меня меняется на 1280×960, и я получаю растянутое изображение, и две черные полосы, сверху и снизу.. И в таком виде оно остается, даже если я выхожу из игры. При этом в настройках разрешения экрана, пишет что у меня стоит 1280х720, и если поменять режим на другой, а потом снова на 1280х720, это не помогает. Монитор по прежнему вместо 1280х720 выдает 1280х960.. Спасает только перезагрузка.
Пробовал в настройках Майнкрафта включать опцию «полный экран» и устанавливать его разрешение вручную — не помогает, поскольку игра сначало запускается в окне и гробит разрешение, а потом уже переключается на полный экран. Полноэкранный режим отображает прочие разрешения корректно, но после выхода, все равно требуется перезагрузка.
Вопрос: в чем причина и лечится ли программно? Может быть можно как-то настроить разрешение окна в игре?
Видео инструкция — как изменить разрешение экрана в майнкрафт
Читайте также:
- Fallout 4 как поменять музыку в главном меню
- Tales of zestiria дополнения как установить
- Days gone автоприцеливание как включить
- Enhanced graphics pack age of empires 2 как установить
- Тестовая ветка project zomboid как включить